

Page 1
GAS CONVERSION KIT
Installation Instructions - Grill
KIT # AGCK-NG / AGCK-LP
KIT # AECK-NG / AECK-LP
This conversion kit shall be installed by a qualified service agency in accordance with the manufacturer’s instructions and all applicable codes and requirements of the authority having jurisdiction.
If the information in these instructions is not followed exactly, a fire, explosion or production
of carbon monoxide may result causing property damage, personal injury or loss of life. The
qualified service agency is responsible for the proper installation of this kit. The installation is not
proper and complete until the operation of the converted appliance is checked as specified in the
manufacturer’s instructions supplied with this kit.
IMPORTANT - READ ALL INSTRUCTIONS BEFORE YOU BEGIN
THE INSTRUCTIONS HEREIN SHOULD BE PERFORMED BY A QUALIFIED SERVICE TECHNICIAN.
THE GRILL MUST BE COMPLETELY COOL AND THE PREVIOUS GAS SOURCE MUST BE SHUT OFF
OR REMOVED BEFORE ATTEMPTING GAS CONVERSION. SHUT OFF OR REMOVE GAS SUPPLY TO
THE APPLIANCE PRIOR TO DISCONNECTING THE ELECTRICAL POWER.
Some parts inside your grill have sharp edges. Care must be taken when handling the various components
to avoid personal injury. Wear gloves when handling.
KIT CONTENTS:
Orifices (hood type for main burners)
Orifice (spud type for rotisserie)
Regulator (see pg. 5)
Instructions
Label
TOOLS REQUIRED:
Work gloves
Safety glasses
Phillips and flat-blade screwdriver
Pipe wrench or large slip-joint pliers
Thread sealant
1/2” deep socket wrench with short extension
Assorted combination wrenches (5/16, 1/2, 5/8, 3/4, 7/8 inch)
EN
EN
DANGER
If you smell gas:
1. Shut off gas to the appliance.
2. Extinguish any open flame.
3. Open lid.
4. If odor continues, keep away from the
appliance and immediately call your gas
supplier or your fire department.
IF THE INFORMATION IN THIS MANUAL IS NOT FOLLOWED
EXACTLY, A FIRE OR EXPLOSION MAY RESULT CAUSING
PROPERTY DAMAGE, PERSONAL INJURY, OR DEATH.
Flammable Gas - disconnect all propane or natural gas supplies to this
unit before servicing.
Electrical Parts & Components – disconnect all power supplies and
batteries before servicing.
1. Do not store or use gasoline or other
flammable liquids or vapors in the
vicinity of this or any other appliance.
2. An LP cylinder not connected for use
shall not be stored in the vicinity of this
or any other appliance.
DANGER
READ THIS MANUAL CAREFULLY AND COMPLETELY BEFORE USING YOUR GRILL
TO REDUCE THE RISK OF FIRE, BURN HAZARD, OR OTHER INJURY. KEEP THIS
MANUAL FOR FUTURE REFERENCE.
©2019 Hestan Commercial Corporation
1
Page 2
EN
CHANGING ORIFICES
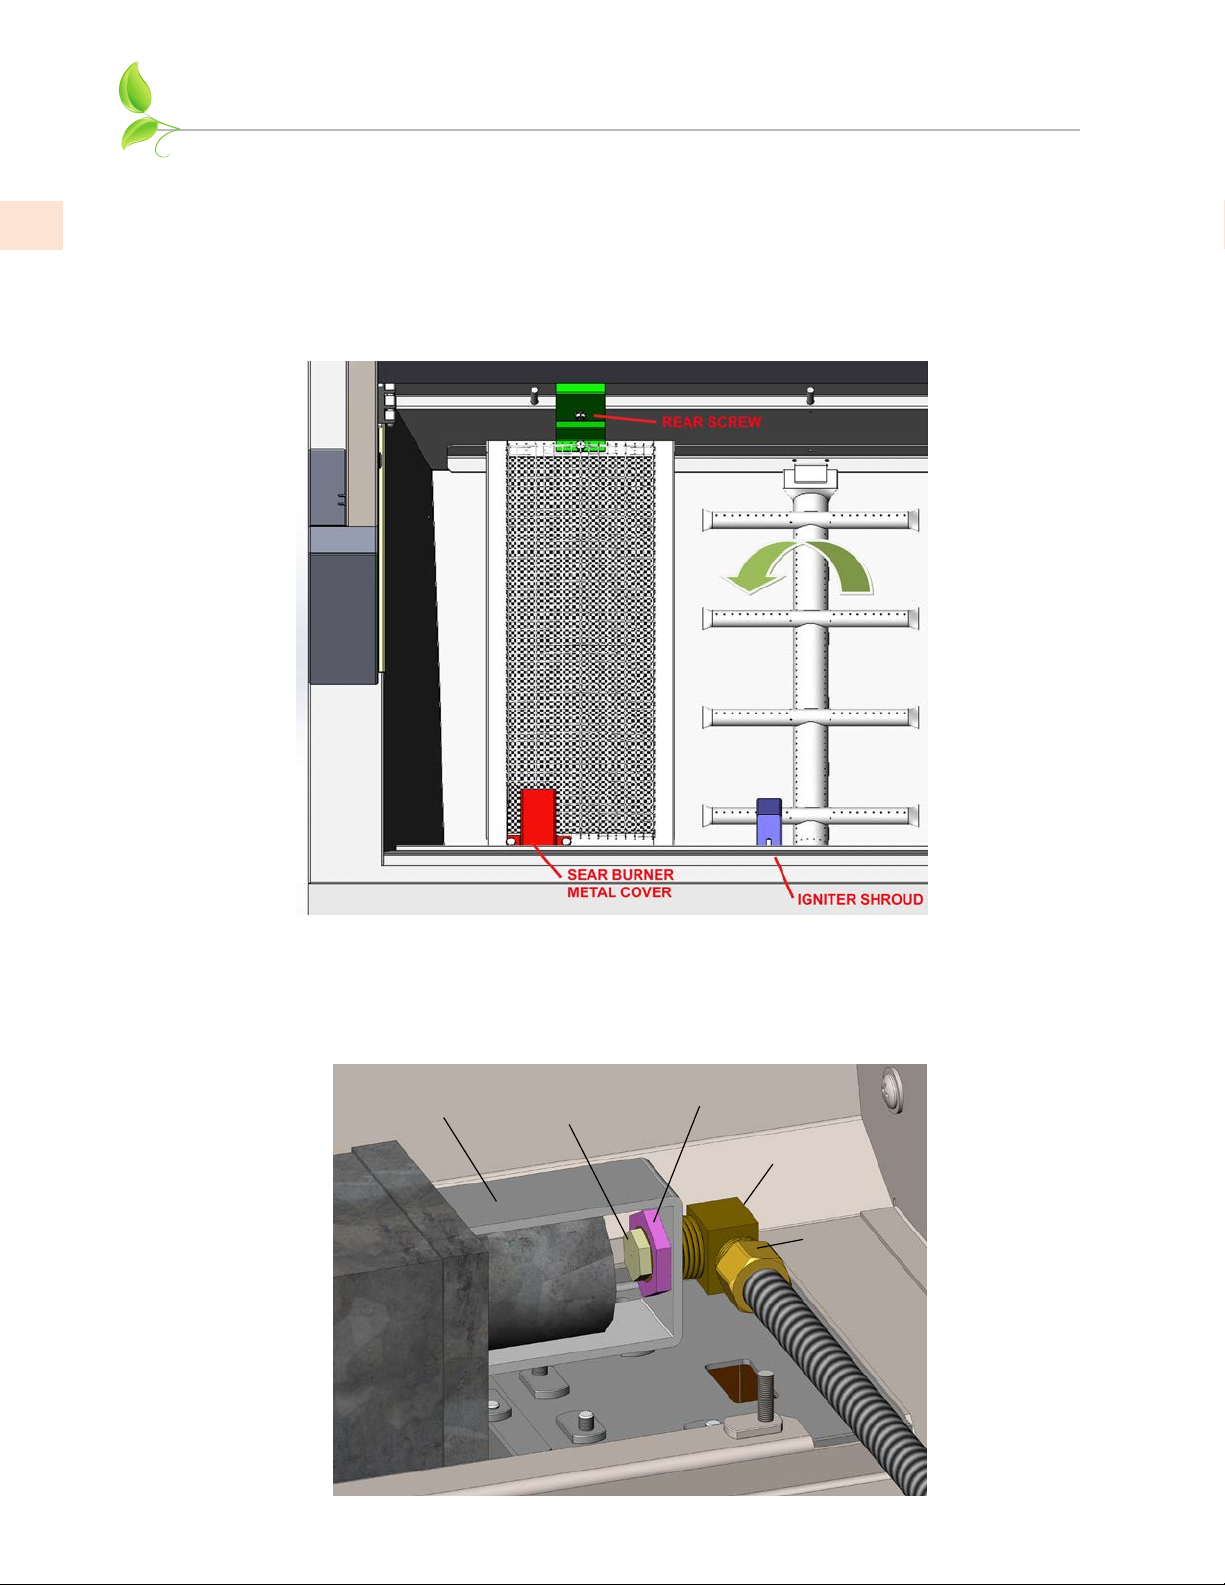
1. Open your grill and remove the grates, radiant trays, and burners from the firebox area. Open flame
burners (Trellis burners in Hestan Grills, and U-Burners in Aspire Grills) are removed by lifting up
the rear of the burner, and carefully twisting to clear the igniter shroud. Sear burners have a small
metal cover over the igniter which must be removed first. There is also a screw at the rear firebox
wall which must be removed. The sear burner can then be carefully removed using the same twisting
action to avoid breaking the ceramic igniter. Remove the rear cover of the grill. If your grill is
mounted on a cart, remove the rear access panel of the cart as well. Also remove the control knobs
and drip pan.
2. Beginning with the Infrared Rotisserie Burner in the upper canopy area of the grill, access the spud
orifice shown in the image below. Disconnect the flex hose first. Then use a wrench to hold the
brass elbow steady, while using another wrench to remove the lock-nut. You may now remove the
elbow out of the burner bracket. Try not to disturb the flex hose connection by unduly bending it
too much. Be careful not to damage the wires and copper thermocouple tube nearby.
2
©2019 Hestan Commercial Corporation
BURNER
BRACKET
SPUD
ORIFICE
LOCK-NUT
ELBOW
FLEX
HOSE
Page 3
CHANGING ORIFICES
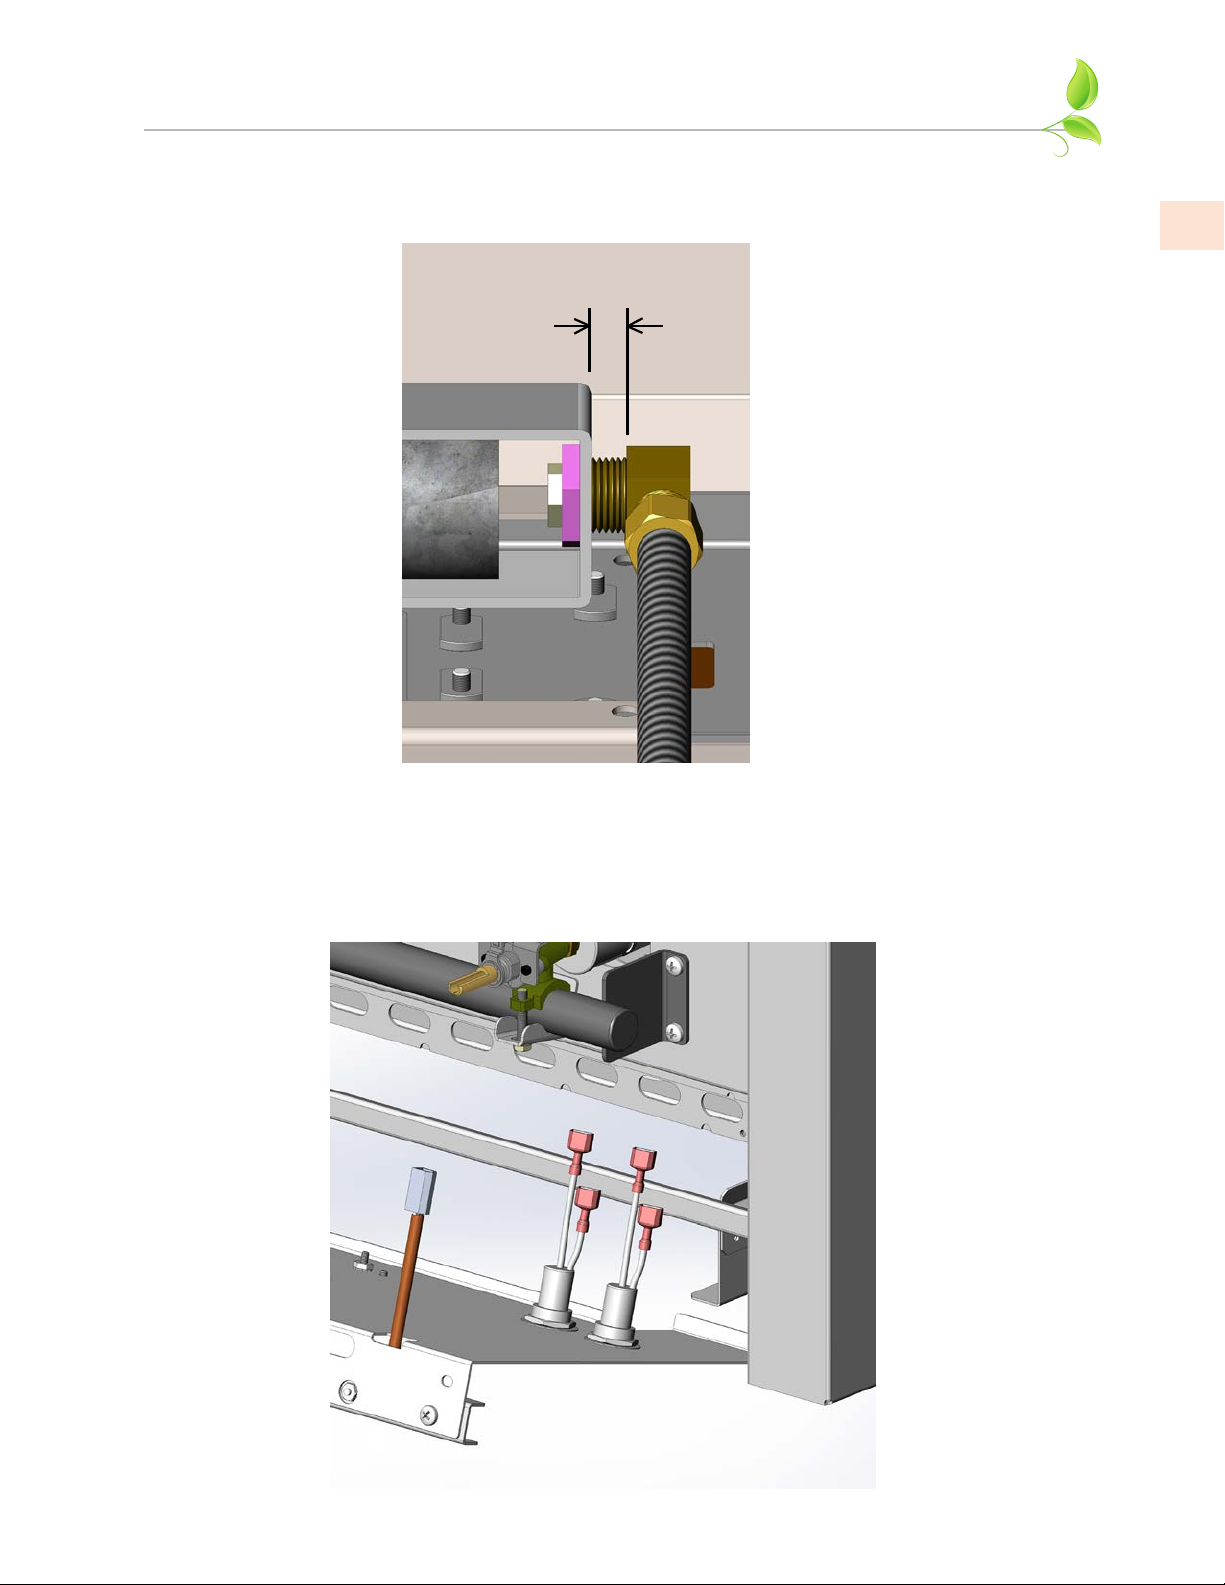
3. When replacing the elbow and orifice assembly back into the burner bracket, it is important to
maintain the original spacing shown below for proper burner performance. The orifice size is
stamped on the orifice.
.25” (6.3 mm)
(continued)
EN
4. Remove the screws securing the control panel to the front of the grill. Carefully tilt down the
control panel being careful not to damage the wires to the switches and LED light bar. Pull off the
connectors to the 2 switches and the LED light bar at this time. Remove the control panel from the
grill and set aside.
©2019 Hestan Commercial Corporation
3
Page 4
EN
CHANGING ORIFICES
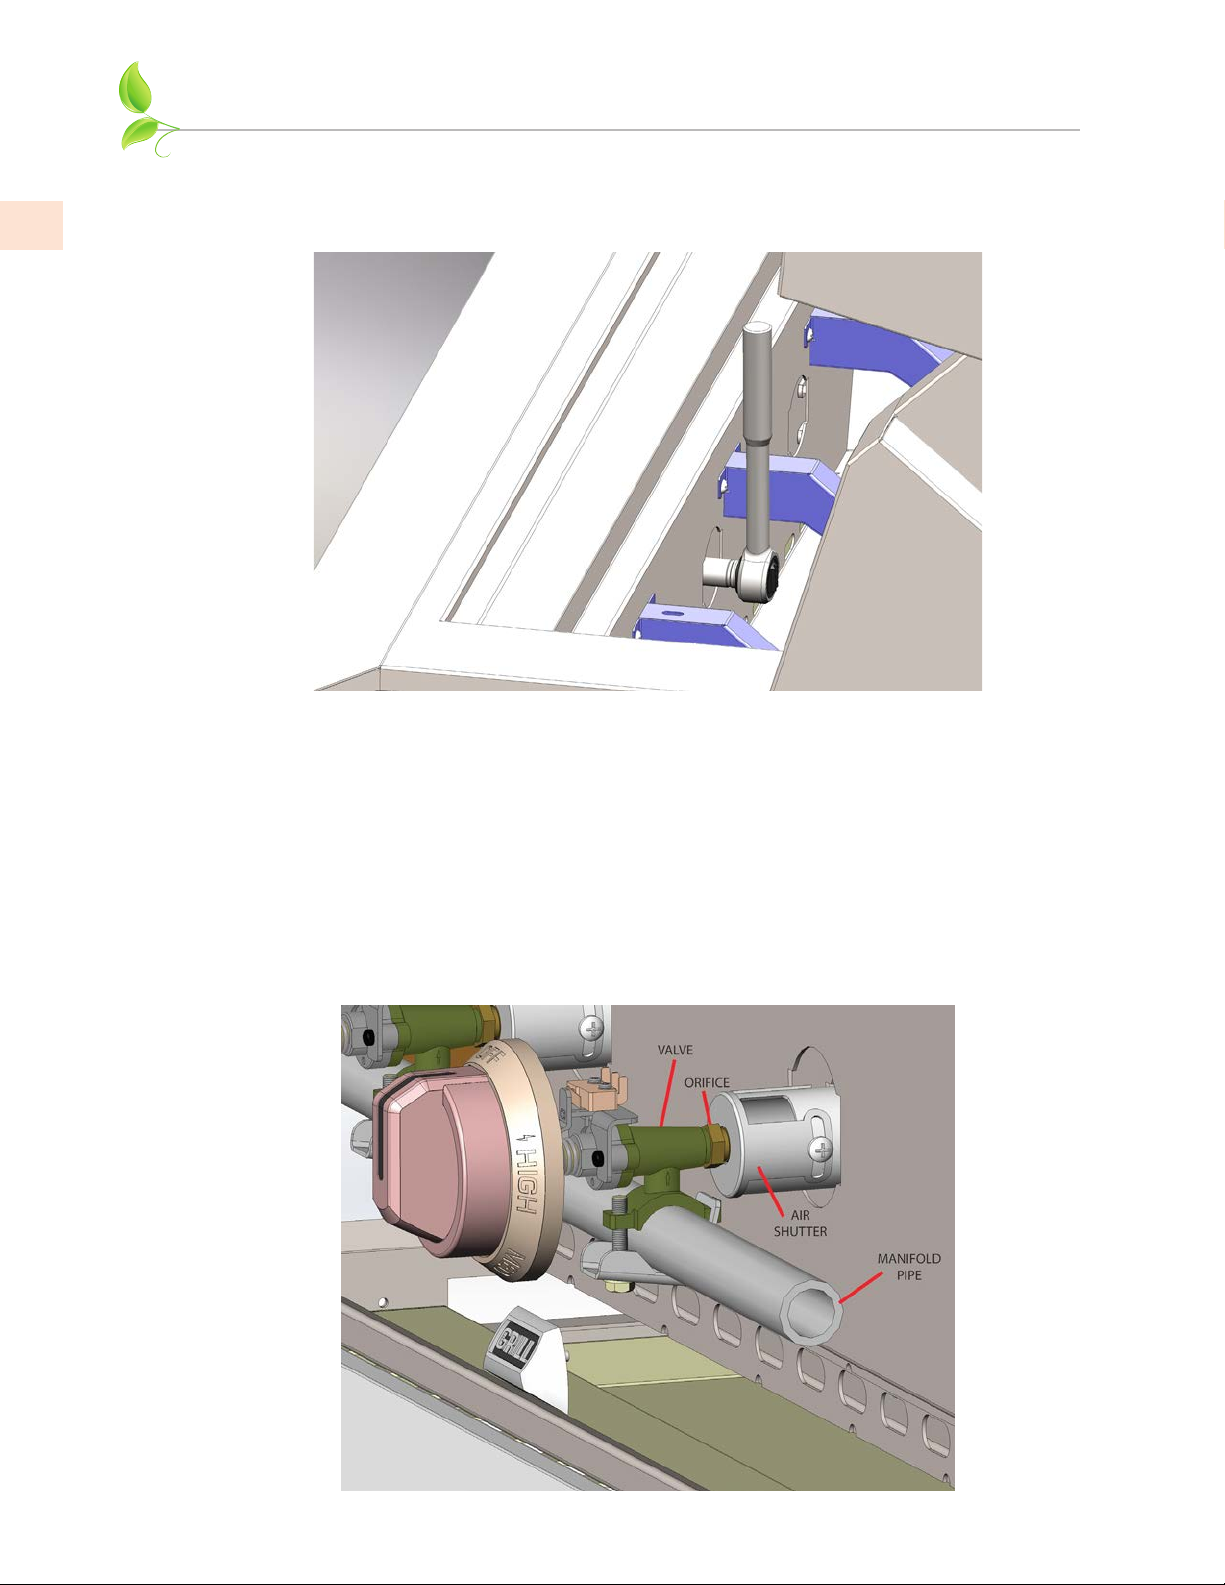
5. Before removing the main burner orifices, take a visual note as to how far the orifice is installed onto
the valve body. The orifices are removed with a 1/2” deep socket wrench. Use even pressure to
break loose the old orifice and remove from the valve.
(continued)
6. If your grill is equipped with both open-flame and Sear Burners, verify you have the correct orifice
for each kind of burner. The orifice size is stamped on the body of the orifice. Consult the chart at
the end of this manual for what size is used on each burner type. This is also a good time to clean
and inspect the burners for clogged ports, debris, spider webs, etc.
Install the orifices slowly to avoid cross-threading and damaging the threads. The orifice will become
noticeably harder to turn as you proceed. Make frequent visual checks of the orifice as it goes
onto the valve. As shown below, the orifice is nearly bottomed-out on the valve body. You want to
tighten all the orifices equally so they are all seated the same distance. Use a burner to check the
orifice is properly seated. As shown, the burner should fully seat with the orifice protruding into
the air shutter as far as possible. The burner should rest flat on the burner hanger at the back of the
firebox.
4
©2019 Hestan Commercial Corporation
Page 5
CHANGING REGULATORS
GAS SUPPLY
The local gas authority or supplier should be consulted at the installation planning stage in order to
establish the availability of an adequate supply of gas (NG or LP). If it is a new installation, have the
gas authorities or supplier check the meter size and piping to assure that the unit is supplied with the
necessary amount of gas supply and pressure to operate the unit(s).
Gas connections should be made by a qualified plumber, or your professional outdoor appliance service
technician.
All fixed (non-mobile) appliances must be fitted with an accessible upstream gas shutoff valve as a means
of isolating the appliance for emergency shut off and for servicing.
Make certain new piping and connections have been made in a clean manner and have been purged so
that piping compound, chips, etc. will not clog regulators, valves, orifices, or burners. Use pipe joint
compound / thread sealant approved for natural and LP gases.
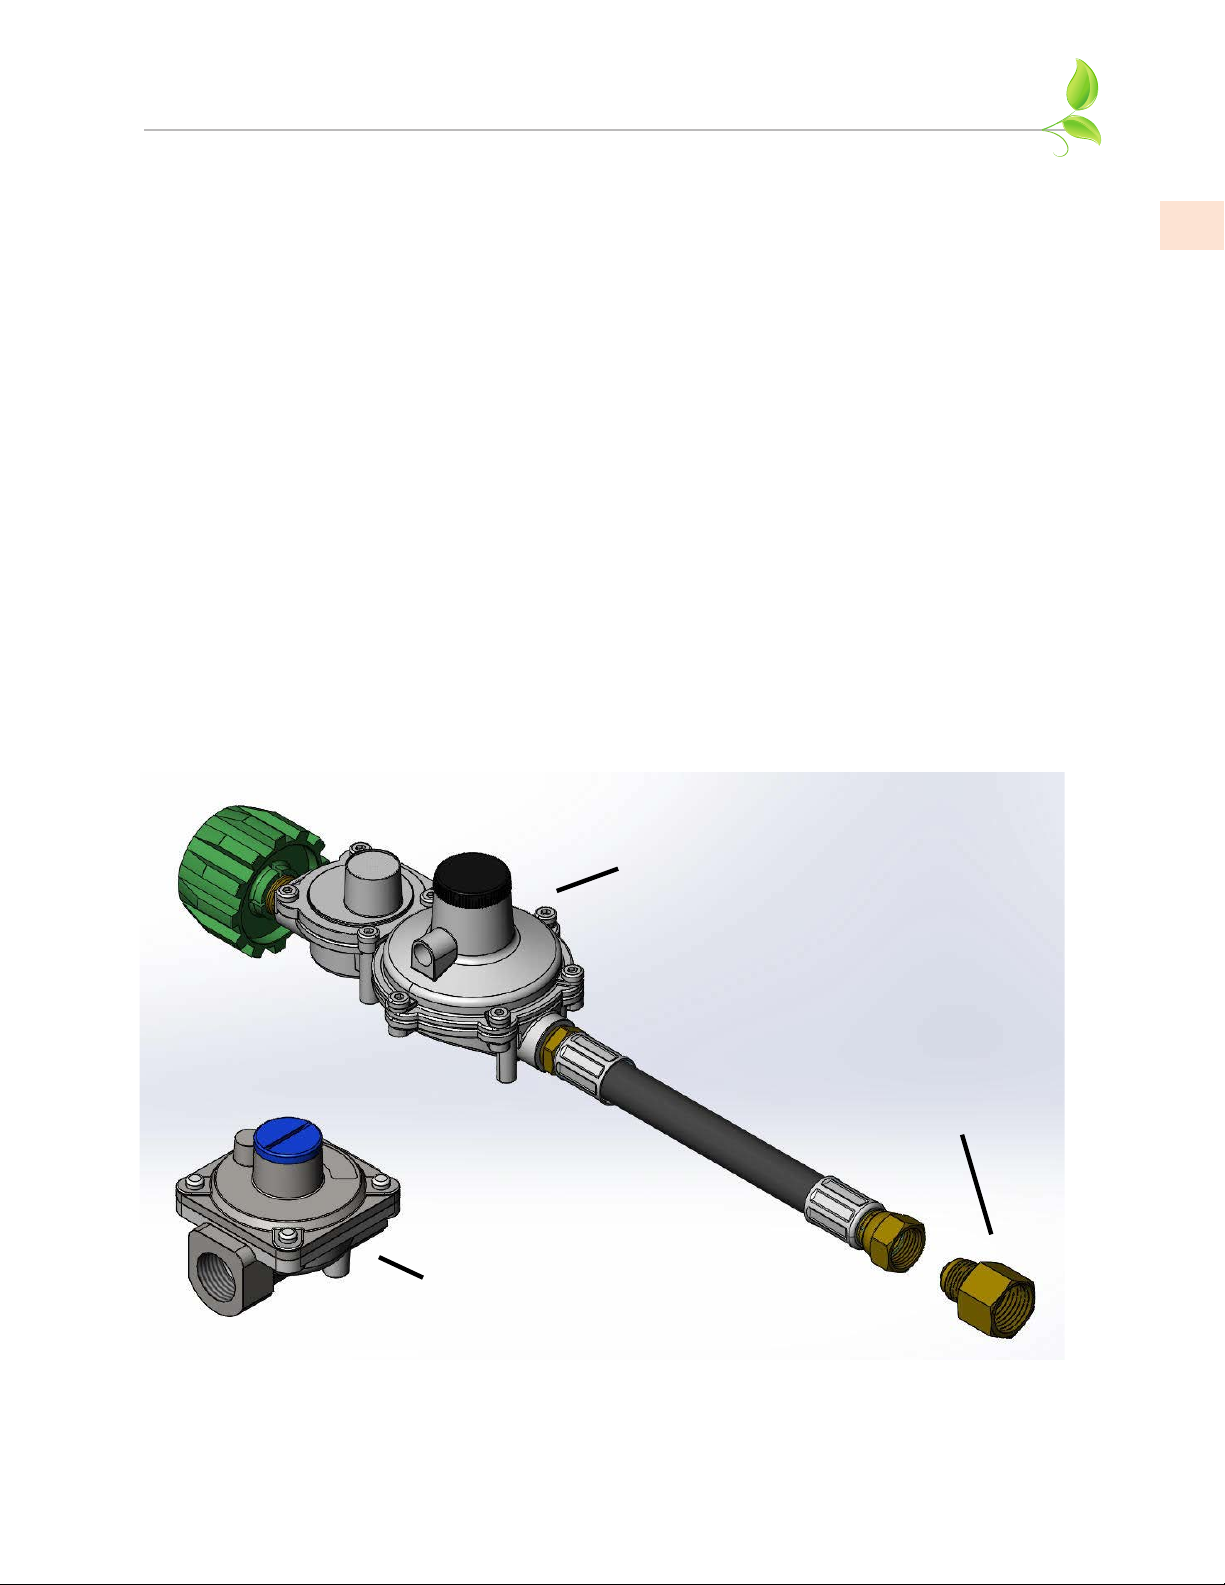
REGULATOR TYPES
Shown below are the two types of regulators used on Hestan outdoor appliances. Your conversion kit
(AGCK-NG or AGCK-LP) comes with the appropriate regulator for the fuel type you are converting to.
Remove your existing regulator by using a pipe wrench and other tools as required. Consult the GAS
CONNECTIONS section of your Hestan outdoor appliance for full instructions on installing the new
regulator, and providing accessible upstream gas shutoff valve (NG only). Use thread sealant on all
connections.
EN
NAT GAS
REGULATOR
(P/N 006239)
2-STAGE LP
REGULATOR /
HOSE ASSEMBL Y
(P/N 014309)
ADAPTER, 3/8 FLARE
X 1/2 NPT FEMALE
(P/N 008053)
©2019 Hestan Commercial Corporation
5
Page 6
EN
TESTING & ADJUSTMENT
LEAK TESTING
GENERAL
A complete gas tightness check must be performed of all gas-carrying components due to possible
movement during installation, or excessive pressure unknowingly being applied to parts of the unit.
BEFORE TESTING
• Do not smoke while leak testing.
• Never leak test with an open flame.
• Make a soap solution of one part liquid detergent and one part water for leak testing purposes.
• Apply the solution to the gas fittings by using a spray bottle or a brush.
• For LP units, always check with a full LP cylinder.
TO TEST
• Make sure all control valves are in the “OFF” position.
• Apply the soap solution described above to all fittings.
• Turn the gas supply on.
• Check all connections from the supply line, or LP cylinder up to and including the manifold pipe
assembly.
• Soap bubbles will appear where a leak is present. If a leak is present, immediately turn off gas supply,
tighten any leaking fittings, turn the gas supply back on, and recheck.
• If you cannot stop a gas leak, turn off the gas supply and call the dealer where you purchased your
grill.
• Do not use the grill until all connections have been checked and do not leak.
IMPORTANT NOTE - ALWAYS CHECK FOR LEAKS AFTER EVERY LP CYLINDER CHANGE.
BURNER / VALVE ADJUSTMENTS
Consult the GAS CONNECTIONS section of your Hestan outdoor appliance for full instructions on
burner adjustments, flame appearance, air shutter adjustment, and valve adjustments. This step is very
important to ensure successful burner performance after conversion to the new fuel type, or changing
orifices for high altitude locations.
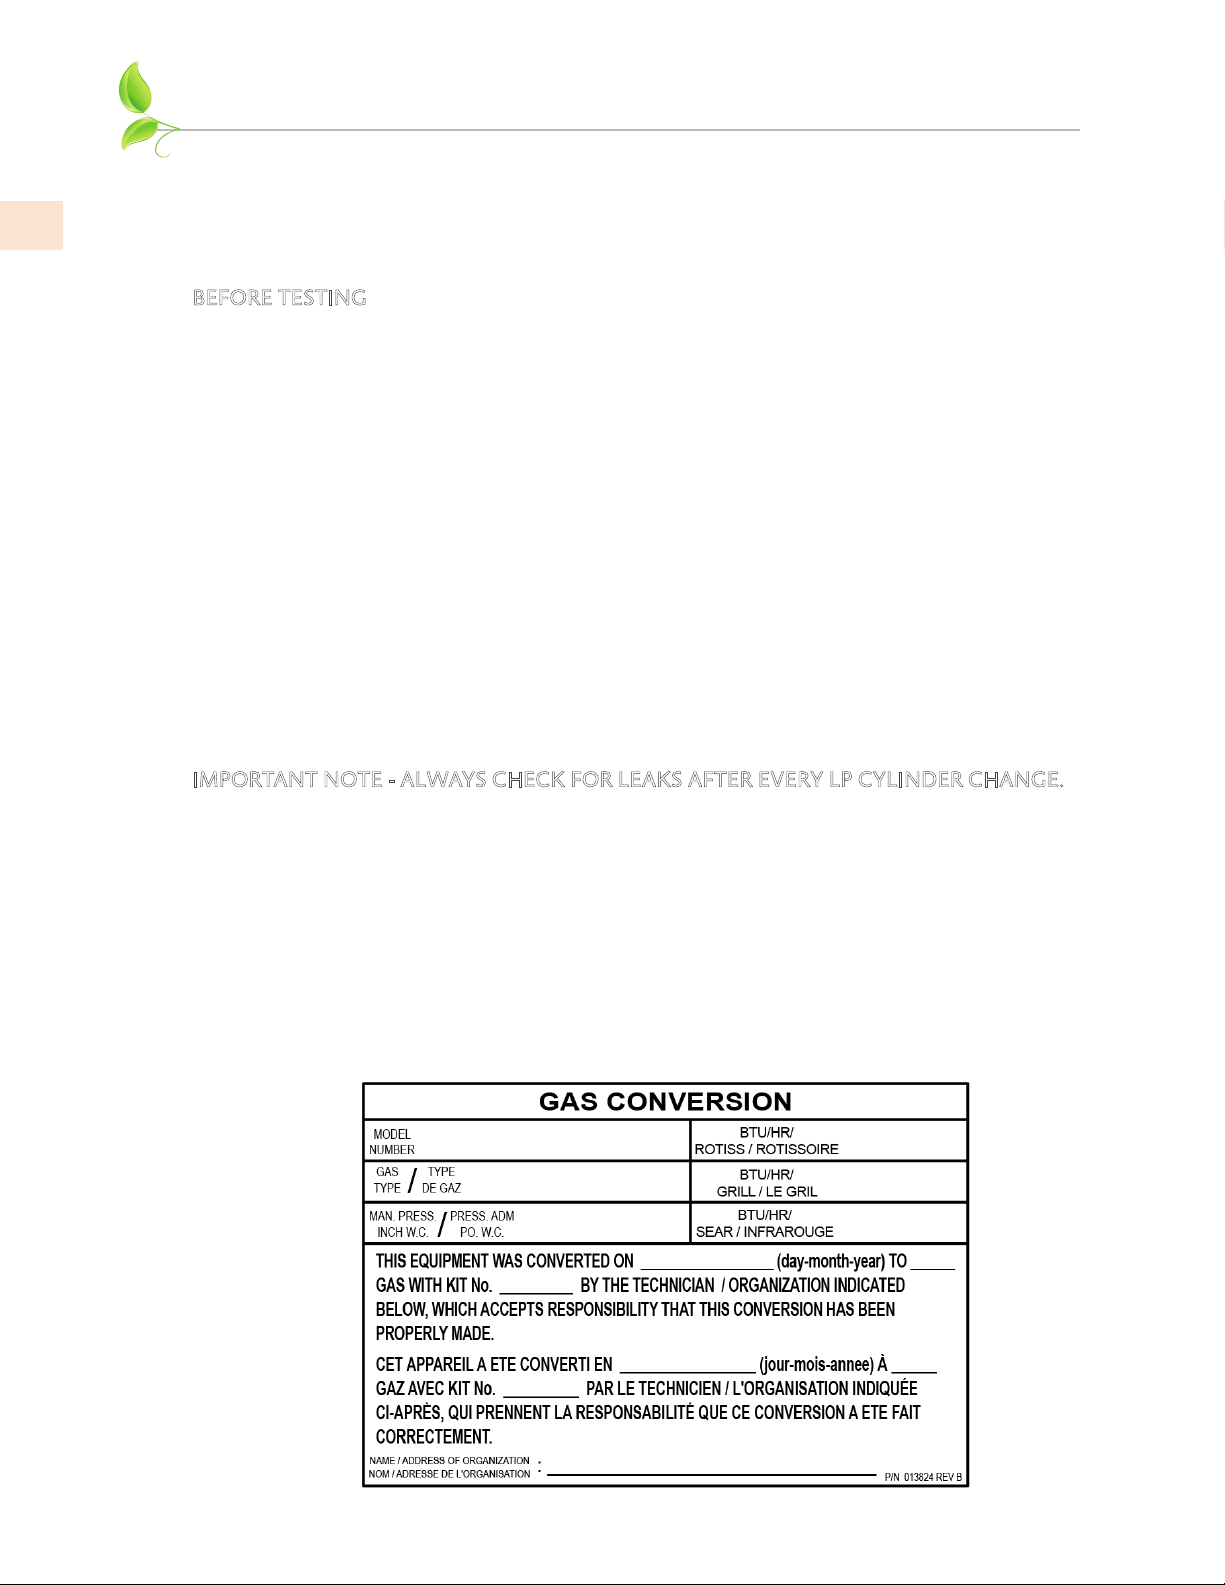
LABEL
After conversion, the label below must be attached to the grill next to the existing rating label located
under the drip pan. The qualified service technician will fill in the Gas Type, Manifold Pressure, and BTU
Rates for each burner type (per the chart on previous page). The technician should sign and date the
label.
6
©2019 Hestan Commercial Corporation
Page 7

NG IS 7" SUPPLY --> 4" AT MANIFOLD
Hestan Outdoor Orifice Chart
LP IS 11" SUPPLY --> 10" AT MANIFOLD
Equipment Burner Type
Trellis Burner NG 25,000
Sear Burner NG 25,000
30" Outdoor Grill
36" Outdoor Grill
42" Outdoor Grill
Rotiss NG 12,000
Trellis Burner LP 25,000
Sear Burner LP 22,000
Rotiss LP 11,000
Trellis Burner NG 25,000
Sear Burner NG 25,000
Rotiss NG 14,000
Trellis Burner LP 25,000
Sear Burner LP 22,000
Rotiss LP 13,000
Trellis Burner NG 25,000
Sear Burner NG 25,000
Rotiss NG 18,000
Trellis Burner LP 25,000
Sear Burner LP 22,000
Rotiss LP 18,000
Gas
Type
Rate Per
Burner
(Btu/hr)
Orifice P/N
000293-042
000293-042
002865-051
000293-053
000293-054
002865-060
000293-042
000293-042
002865-050
000293-053
000293-054
002865-057
000293-042
000293-042
002865-045
000293-053
000293-054
002865-056
ORIFICE SIZE
-NG -LP
42
42
51
-
-
-
42
42
50
-
-
-
42
42
45
-
-
-
-
-
-
53 3/8
54 N/A
60 N/A
-
-
-
53 3/8
54 N/A
57 N/A
-
-
-
53 3/8
54 N/A
56 N/A
Air
Shutter
Opening
(inch)
5/16
N/A
N/A
5/16
N/A
N/A
5/16
N/A
N/A
EN
Aspire Outdoor Orifice Chart
NG IS 7" SUPPLY --> 4" AT MANIFOLD
LP IS 11" SUPPLY --> 10" AT MANIFOLD
Equipment
30" Aspire Grill
36" Aspire Grill
42" Aspire Grill
Burner
Type
U-Burner NG 23,000
Sear Burner NG 23,000
Rotiss NG 12,000
U-Burner LP 23,000
Sear Burner LP 23,000
Rotiss LP 11,000
U-Burner NG 23,000
Sear Burner NG 23,000
Rotiss NG 14,000
U-Burner LP 23,000
Sear Burner LP 23,000
Rotiss LP 13,000
U-Burner NG 23,000
Sear Burner NG 23,000
Rotiss NG 18,000
U-Burner LP 23,000
Sear Burner LP 23,000
Rotiss LP 18,000
Gas
Type
Rate Per
Burner
(Btu/hr)
Orifice P/N
000293-043
000293-043
002865-051
000293-054
000293-054
002865-060
000293-043
000293-043
002865-050
000293-054
000293-054
002865-057
000293-043
000293-043
002865-045
000293-054
000293-054
002865-056
ORIFICE SIZE
-NG -LP
43
43
51
-
-
-
43
43
50
-
-
-
43
43
45
-
-
-
-
-
-
54 3/8
54 N/A
60 N/A
-
-
-
54 3/8
54 N/A
57 N/A
-
-
-
54 3/8
54 N/A
56 N/A
Air
Shutter
Opening
(inch)
1/4
N/A
N/A
1/4
N/A
N/A
1/4
N/A
N/A
©2019 Hestan Commercial Corporation
7
Page 8

RETAIN THIS MANUAL FOR FUTURE REFERENCE
Hestan Commercial Corporation
3375 E. La Palma Ave.
Anaheim, CA 92806
(888) 905-7463
©2019 Hestan Commercial Corporation P/N 008979 REV E
 Loading...