

Page 1
HES, Inc.
Phoenix, AZ
1.800.626.7590
www.hesinnovations.com
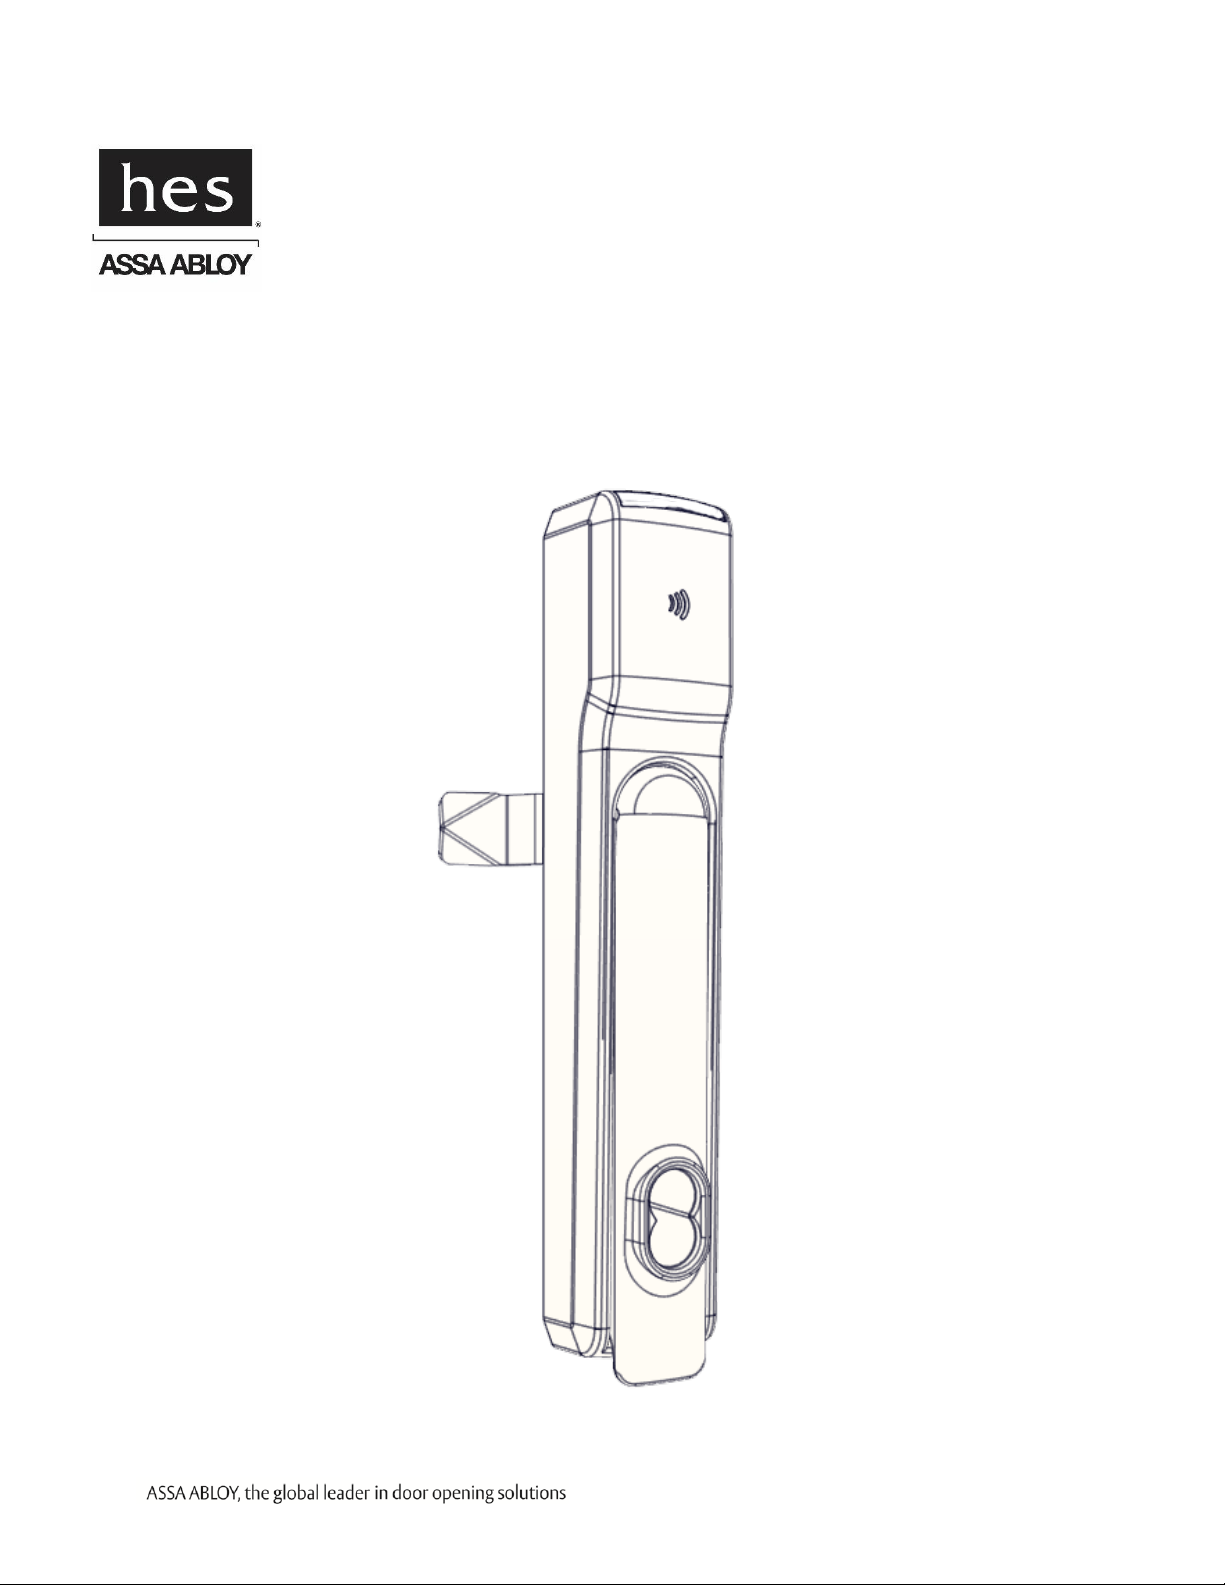
KS200-640 Server Cabinet Lock Series
Installation Instructions
3085006.002 Rev. 3 1
Page 2
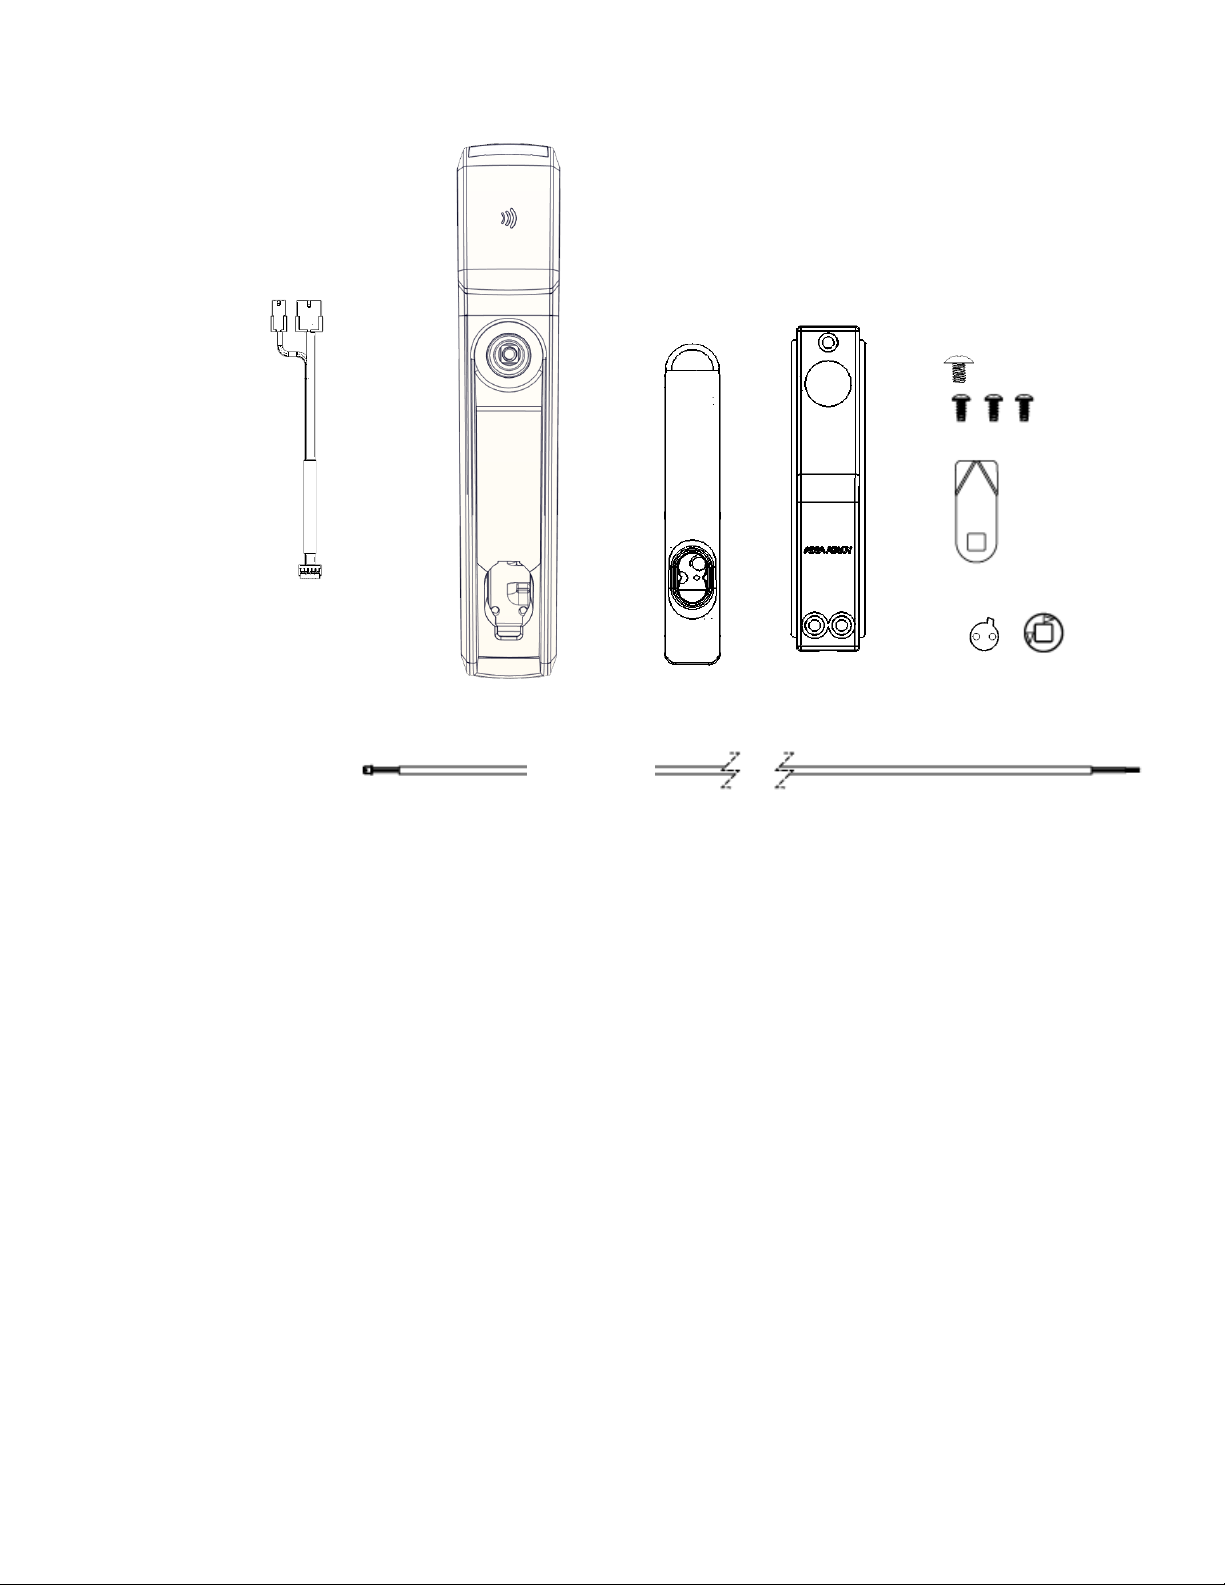
Package Contents
Recommended Tools
Approved RFID Credential
Phillips P2 driver
WT-2 Wiegand Test Box
Optional Additional Tools:
SFIC Core for key override or
SFIC Blank Plastic Core
Normally Open DPS Switches
System Side Interface Cable
Specifications
Voltage: 12–24 VDC ±10% (Power Supply not provided)
KS200-640 (Reader) Current Consumption:
12 VDC: 37 mA peak for Red and Green LED only
470 mA peak for Red and Green LED and Motor Drive
24 VDC: 18 mA peak for Red and Green LED only
245 mA peak for Red and Green LED and Motor Drive
Operating Temperature: -10C to 50C
Holding Force: 250 lbs
Handling
Selector
Lock
Handle
Mounting Plate
Mounting Screws
Cam
DPS Cable
SFIC
Cam
Lock Side
Interface Cable
3085006.002 Rev. 3 2
Page 3

Connector Pin Wiring:
Molex 8-Pin Connector Pin
Wire Color
Description
1
Black
12 VDC Reader (–)
2
White
Wiegand Data (1)
3
N/A
N/A
4
N/A
N/A
5
Red
12 VDC Reader (+)
6
Green
Wiegand Data (0)
7
Blue
Red LED
8
Yellow
Green LED
Molex 4-Pin Connector Pin
1
Violet
12/24 VDC / Lock (COM, –)
2
Pink
Tamper / DPS (NC, +)
3
Gray
12/24 VDC / Lock (COM, +)
4
Tan
Tamper / DPS (COMM, –)
LED Function: LED states are controlled and defined by the User’s EAC. Enabling the red and green
LEDs on the KS200 occurs via an active low (ground) signal.
Output Type: SIAAC-01-1996 Wiegand Output Compliant.
FCC Part 15 Compliant, Industry Canada Compliant, European Commission Compliant
BHMA: A156.3, A156.36, A156.25 Compliant
NOTE: Contact HID Global Technical Support at (866) 607-7339 for additional configuration cards to
enable the credential capabilities of “iCLASS Elite” and “NFC over HCE.”
Credentials Supported: 125 kHz Proximity or 13.56 MHz iCLASS, iCLASS Elite, iCLASS SEOS, iCLASS
SE, ISO 15693 ICLASS, ISO 14443A Mifare, Mifare Plus, Desfire SE, Desfire EV1, and NFC over HCE.
System Overview
The KS200 is a radio-frequency identification (RFID) lock for server cabinet installation applications.
The lock is capable of reading RFID credentials and providing that data to an electronic access control
(EAC) system via Wiegand data signaling. The EAC determines whether user access should be granted
or denied. When the EAC provides an active-high unlock signal to the lock in the access granted case,
the KS200-640 drives a motor to complete the unlock/lock cycle. EAC indication of user access/denial is
provided to the user by way of LED control inputs on the lock. Additional lock monitoring features (e.g.,
door position, tamper) are monitored within the lock and status provided to the EAC.
3085006.002 Rev. 3 3
Page 4
Installation
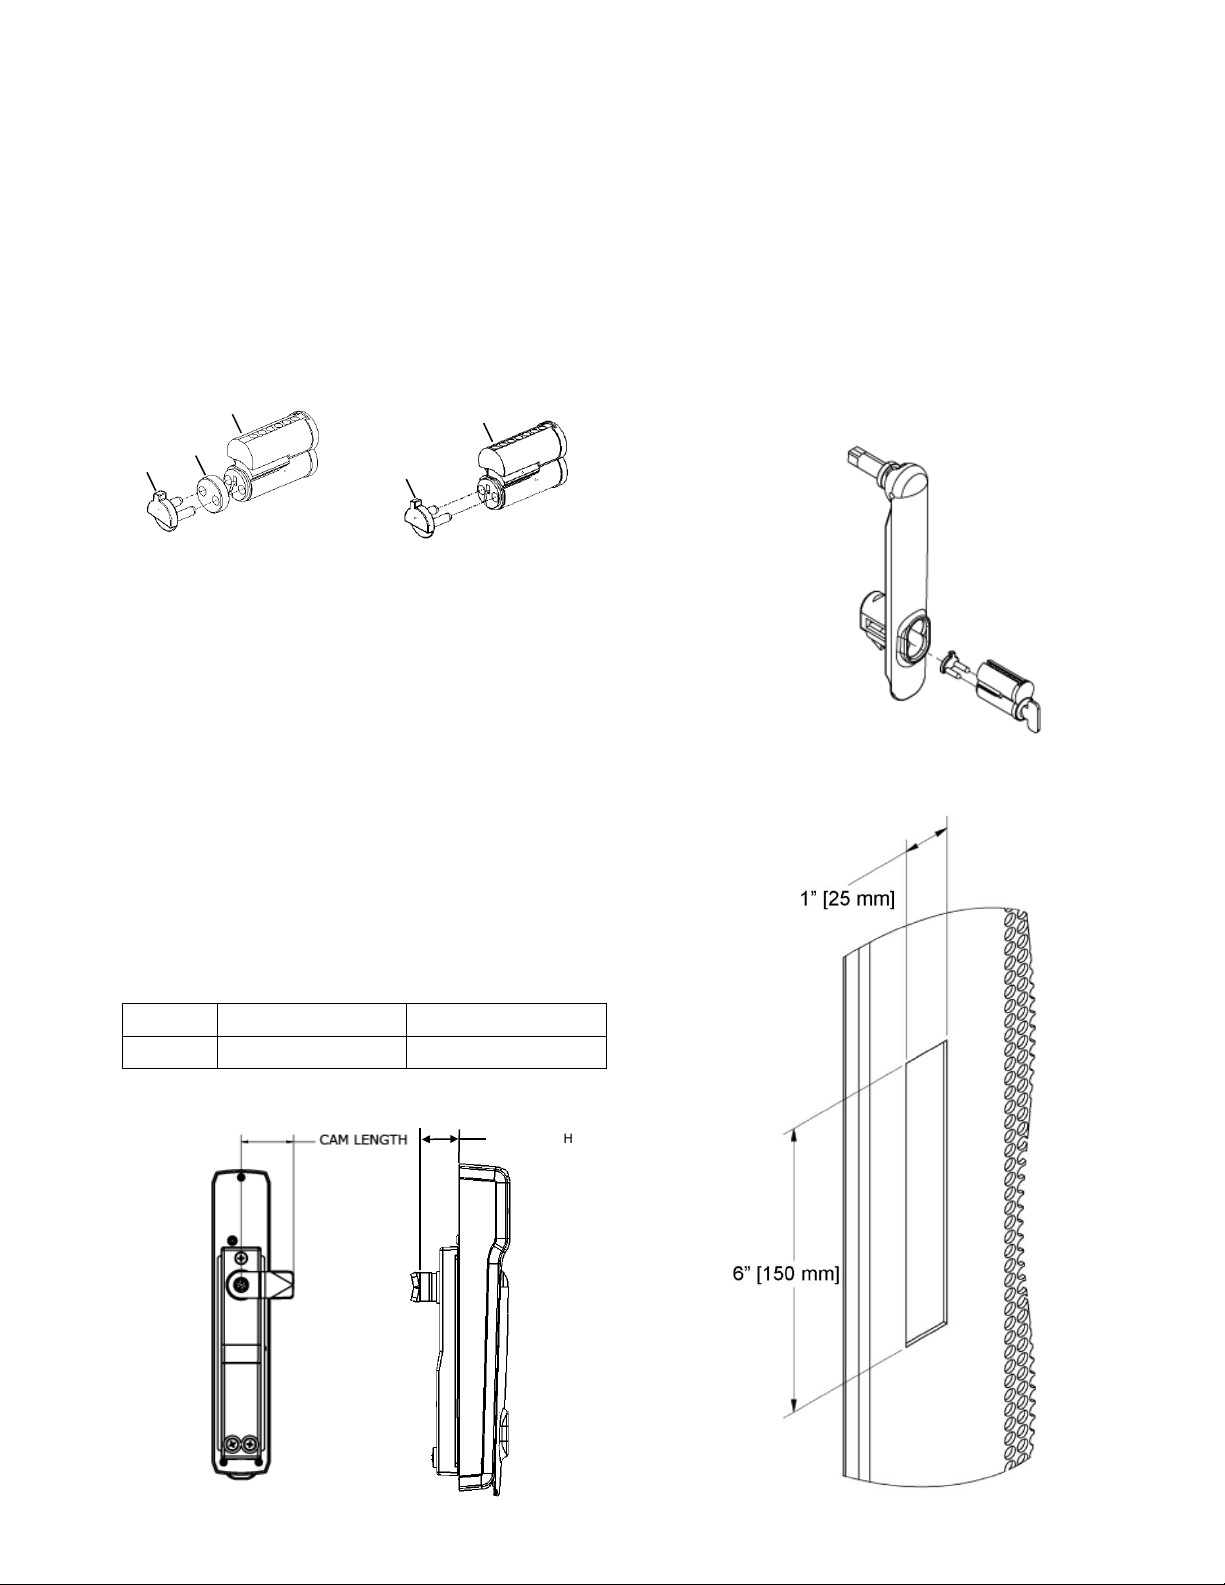
1. Installing an SFIC Core
NOTE 1: A key override (SFIC) provides a backup entry method in the rare case the KS200 or EAC
is inactive (Recommended).
NOTE 2: The included SFIC cam has been tested with Medeco and Sargent 6- or 7-pin SFIC cores.
2. Preparing the Cabinet
1. LOCATE the 1” [25 mm] x 6” [150 mm] lock cutout on
the door (some doors may require modification).
2. ENSURE power is available at the rack.
3. RE-USE the existing cam, if possible.
NOTE: One cam is supplied.
CAM
CAM LENGTH
CAM DEPTH
CAM 1
1-1/2” [38 mm]
15/16” [24 mm]
SFIC
Core
Cam
SFIC
Core
7-pin
6-pin
1. Insert Cam into SFIC
Use the included Spacer
with 6-pin SFICs.
2. INSERT SFIC
into lock
CAM DEPTH
Cam
6-pin
Spacer
3085006.002 Rev. 3 4
Page 5

3. Installing the Lock
1. SLIDE lock into cutout.
NOTE: (Optional) The DPS signal is closed when the handle is
resting in its locked position. The DPS circuit can be
extended to include normally open DPS switches
arranged in a series to monitor additional doors and
panels.
DPS Extension Cable
DPS
Needed
Switch #1
(SPST-NO):
2. PERFORM the following to
extend the DPS Circuit.
a. REMOVE the DPS jumper.
b. CONNECT the included
DPS extension cable.
c. CONNECT additional
normally-open DPS
switches as shown to
monitor additional panels.
3. CONNECT the female, 10-position
Hirose™ connector on the lock side
interface cable to the KS200.
4. ENSURE the lock side interface
cable will properly protrude from
the bottom of the KS200
prior to attaching the rear bracket.
ENSURE the wiring is not
obstructing the mounting holes prior
to securing the rear bracket.
Provided
Switches
(SPST-
NO): As
3085006.002 Rev. 3 5
Page 6

4. Installing the Handing Selector
CAUTION! Inserting/snapping the handle all the way in will lock the lever
2. POSITION the arrows to
point toward the door
edge.
1. INSERT handing
selector into lock.
6. ENSURE that the lock is fully
secured and flush to the mounting
surface in order to depress
tamper switch on back of device
for correct operation.
NOTE: If the tamper switch is
not fully depressed, the
lock opens the
Tamper/DPS+/- contact.
5. ATTACH rear bracket with screws.
7. IF the tamper switch is not fully
closed,
THEN REMOVE the tamper
contact,
AND ENSURE the lock is closed.
3. INSERT and SECURE
cam with screw.
Door edge
3085006.002 Rev. 3 6
Page 7

5. Attaching the Wiring
New 4-/8-Pin Molex
Integrated Wiegand: K/KS200 Cabinet Locks, ElectroLynx Wire Color/Function Assignments
Connector
8-Pin Molex Connector
4-Pin Molex Connector
Pin/Wire
Color
1
Black
2
White
3
N/A 4 N/A 5 Red 6 Green
7
Blue
8
Yellow
1
Violet 2 Pink 3 Gray 4 Tan
Function
12 VDC
Reader
Wiegand
Data
N/A
N/A
12 VDC
Reader
Wiegand
Data
LED
12/24
VDC/
Lock
Tamper/
DPS
12/24
VDC/
Lock
Tamper/
DPS
Setting
NEG
Data 1
N/A
N/A
POS
Data 0
RED
Green
COM, -
NC, +
COM, +
COM, -
Legacy 10-Pin Molex to 4-/8-Pin Molex
Integrated Wiegand: K/KS200 Cabinet Locks, ElectroLynx Wire Color/Function Assignments
Connector
8-Pin Molex Connector
4-Pin Molex Connector
Pin/Wire
Color
1
Black
2
White
3
N/A 4 N/A 5 Red 6 Green
7
Orange
8
Brown
1
Gray
2
Yellow
3
Violet 4 Blue
Function
12 VDC
Reader
Wiegand
Data
N/A
N/A
12 VDC
Reader
Wiegand
Data
LED
12/24
VDC/
Lock
Tamper/
DPS
12/24
VDC/
Lock
Tamper/
DPS
Setting
NEG
Data 1
N/A
N/A
POS
Data 0
RED
Green
COM, -
NC, +
COM, +
COM, -
1. CONNECT the Lock Side Interface Cable to the lock.
2. CONNECT the Lock Side Interface Cable to the optional System Side Interface Cable (see
Connector and Cable Diagram).
3. RUN the System Side Interface Cable, as required (see Server Cabinet Wiring Example).
4. ATTACH the included 4-Pin and 8-Pin Molex Female Connectors to the bare wire side of the
System Side Interface Cable.
NOTE: It is recommended that 10-conductor, 24 AWG, cable be used.
5. ENSURE the following power cabling guidelines are followed:
Wire AWG
Supply Voltage
Allowed Cable Length (ft.)*
20 AWG
12
419
24
3217
22 AWG
12
264
24
2023
24 AWG
12
166
24
1272
* Round trip loss. V = 2 x I x R x xft xft = V / (2 x I x R)
3085006.002 Rev. 3 7
Page 8

Connector and Cable Diagram
3085006.002 Rev. 3 8
Page 9

Server Cabinet Wiring Example
3085006.002 Rev. 3 9
Page 10

6. Testing the Lock with the Access Control System
1. TEST the lock with a known good
credential to confirm it will open as
desired when installed.
a. PRESENT a credential known to the EAC.
b. LIFT lever and TURN to open the cabinet.
3085006.002 Rev. 3 10
Page 11

This page intentionally left blank
3085006.002 Rev. 3 11
Page 12

FCC Statement
For Technical Support, please call 1-800-626-7590
For information on other HES cabinet lock solutions,
visit hesinnovations.com
This device complies with part 15 of the FCC Rules. Operation is subject to the following two conditions:
(1) This device may not cause harmful interference, and
(2) this device must accept any interference received, including interference that may cause undesired operation.
IC Statement
This device complies with Industry Canada license-exempt RSS standards(s). Operation is subject to the following
two conditions:
(1) this device may not cause interference, and
(2) this device must accept any interference, including interference that may cause undesired operation.
CE Statement
HES hereby declares that these proximity readers are in compliance with the essential requirements and other
relevant provisions of Directive 1999/5/EC (http://ec.europa.eu/enterprise/sectors/rtte/files/guide2009-04-
20_en.pdf).
Conformité aux normes FCC
Cet appareil est confrome à la Partie 15 des règlements de la FCC. Son fonctionnement est souimes aux deux
conditions suivantes:
(1) cet appareil ne peut causer d’interférences, et
(2) cet appareil doit accepter toute interference, y compris des interférences qui peuvent provoquer un
fonctionnement indésirable du périphérique.
Conformité aux normes IC
Cet appareil est confrome avec Industrie Canada exempt de license RSS standard(s).
Son fonctionnement est souimes aux deux conditions suivantes:
(3) cet appareil ne peut causer d’interférences, et
(4) cet appareil doit accepter toute interference, y compris des interférences qui peuvent provoquer un
fonctionnement indésirable du périphérique.
Conformité aux normes CE
HES déclare par la présente que ces lecteurs à proximité sont conformes aux exigences essentielles et aux autres
stipulations pertinentes de la Directive 1999/5/CE (http://ec.europa.eu/enterprise/sectors/rtte/files/guide2009-0420_en.pdf).
3085006.002 Rev. 3 12
 Loading...