

Herz ETKF 1 8250 02 Datasheet
HERZ ETKF
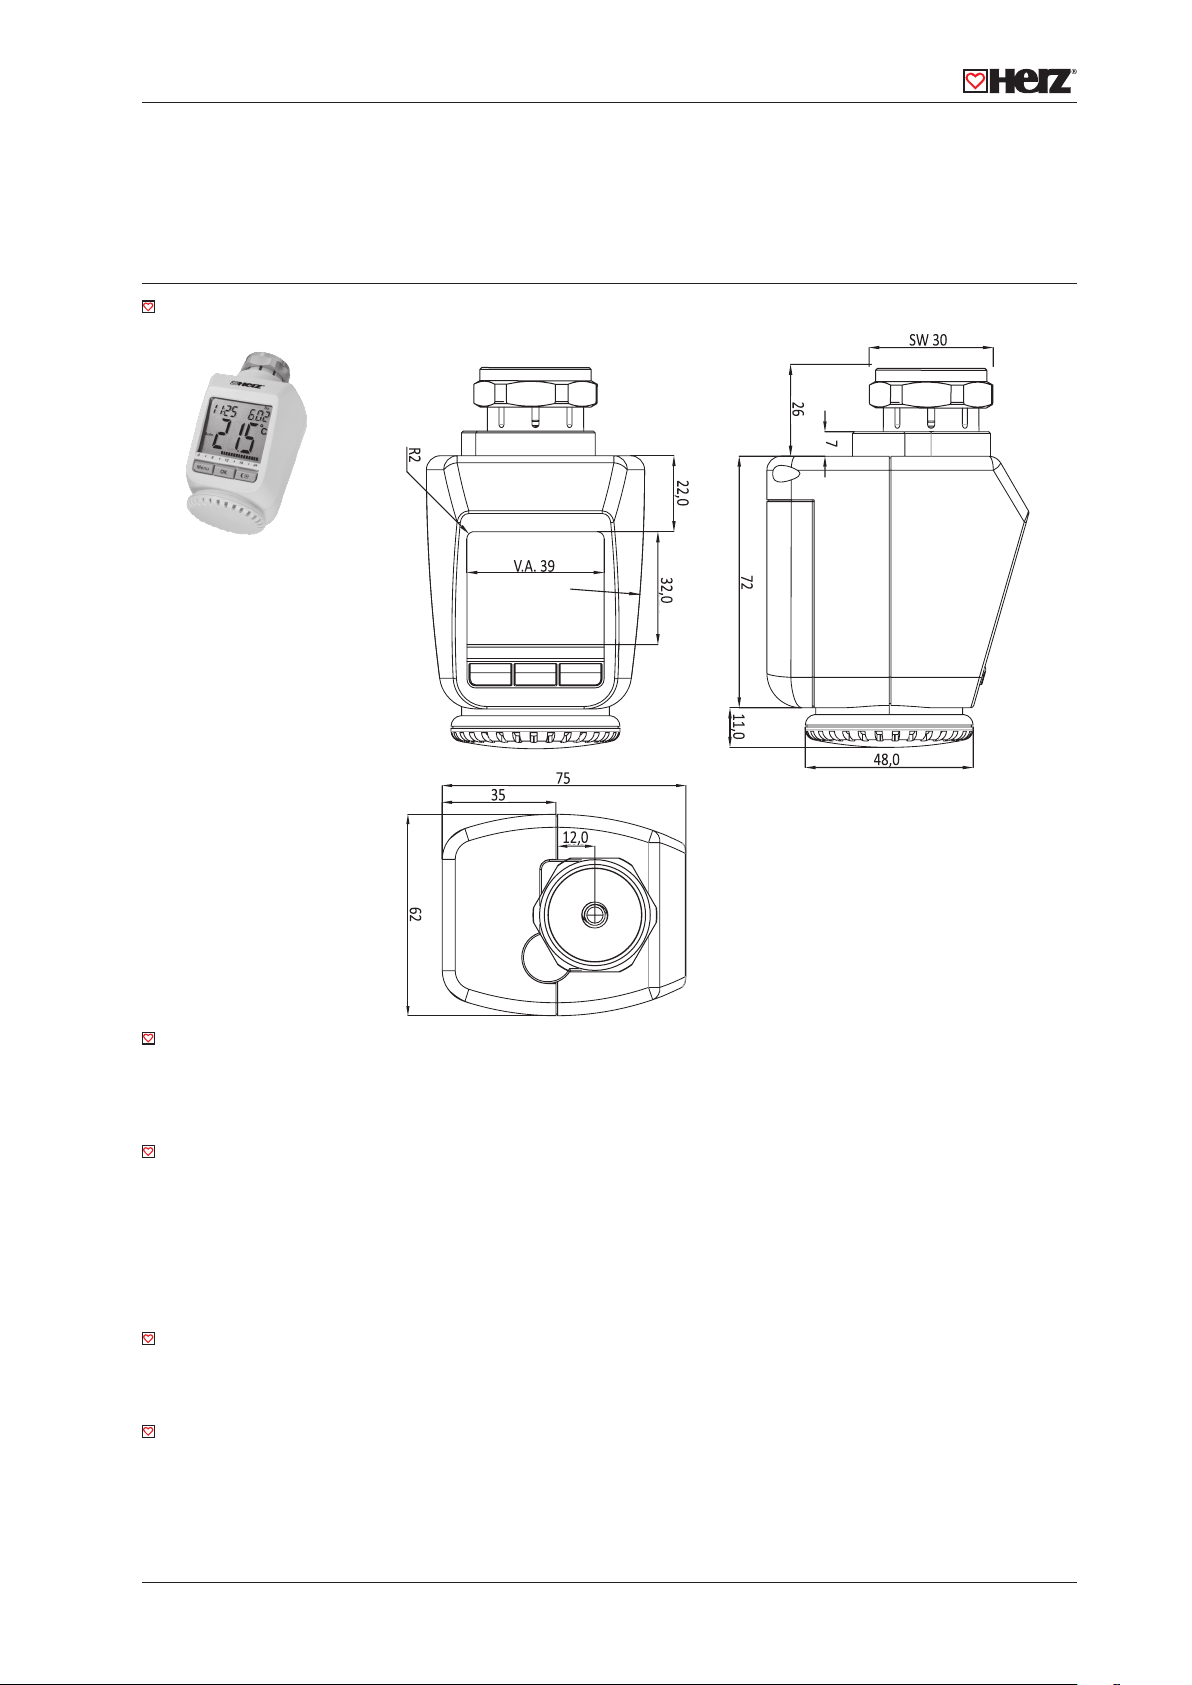
Energy Saving Thermostatic Head 1 8250 02
Size in mm
ETKF
Energy Saving Thermostatic Head
Data sheet 8250, Issue 1011
Version
1 8250 01 Energy Saving Thermostatic Head
The actuator with built in programmable temperature, time control and wireless receiver.
Thread connection M 28 x 1,5
Technical data Setting range: 5 °C bis 30 °C
Differential: 0,5 K
Batteries: 2 x 1,5 V AA, LR6, Battery life approx. 2 years
Receiver frequency: 868,3 MHz
max. surrent consumption: 100 mA
Ambient temperature: +5 °C bis +55 °C
max. surface temperature: +90 °C (of radiator)
linear stroke: 4,2 mm
Application
The actuator can be installed on all HERZ-TRVs with M28x1,5.
Function
This energy saving controller for radiators can be used to control room temperature an the basis of time. The actuator moves
a valve, thereby allowing the amount of heat flowing to the heating appliance to be controlled.
The controller is compatoble with the most HERZ TRVs. The large illuminated display ensures user-friendly operation. A wireless receiver allows the device to receive commands from taught-in system components.
Page 1
HERZ ETKF
Installation
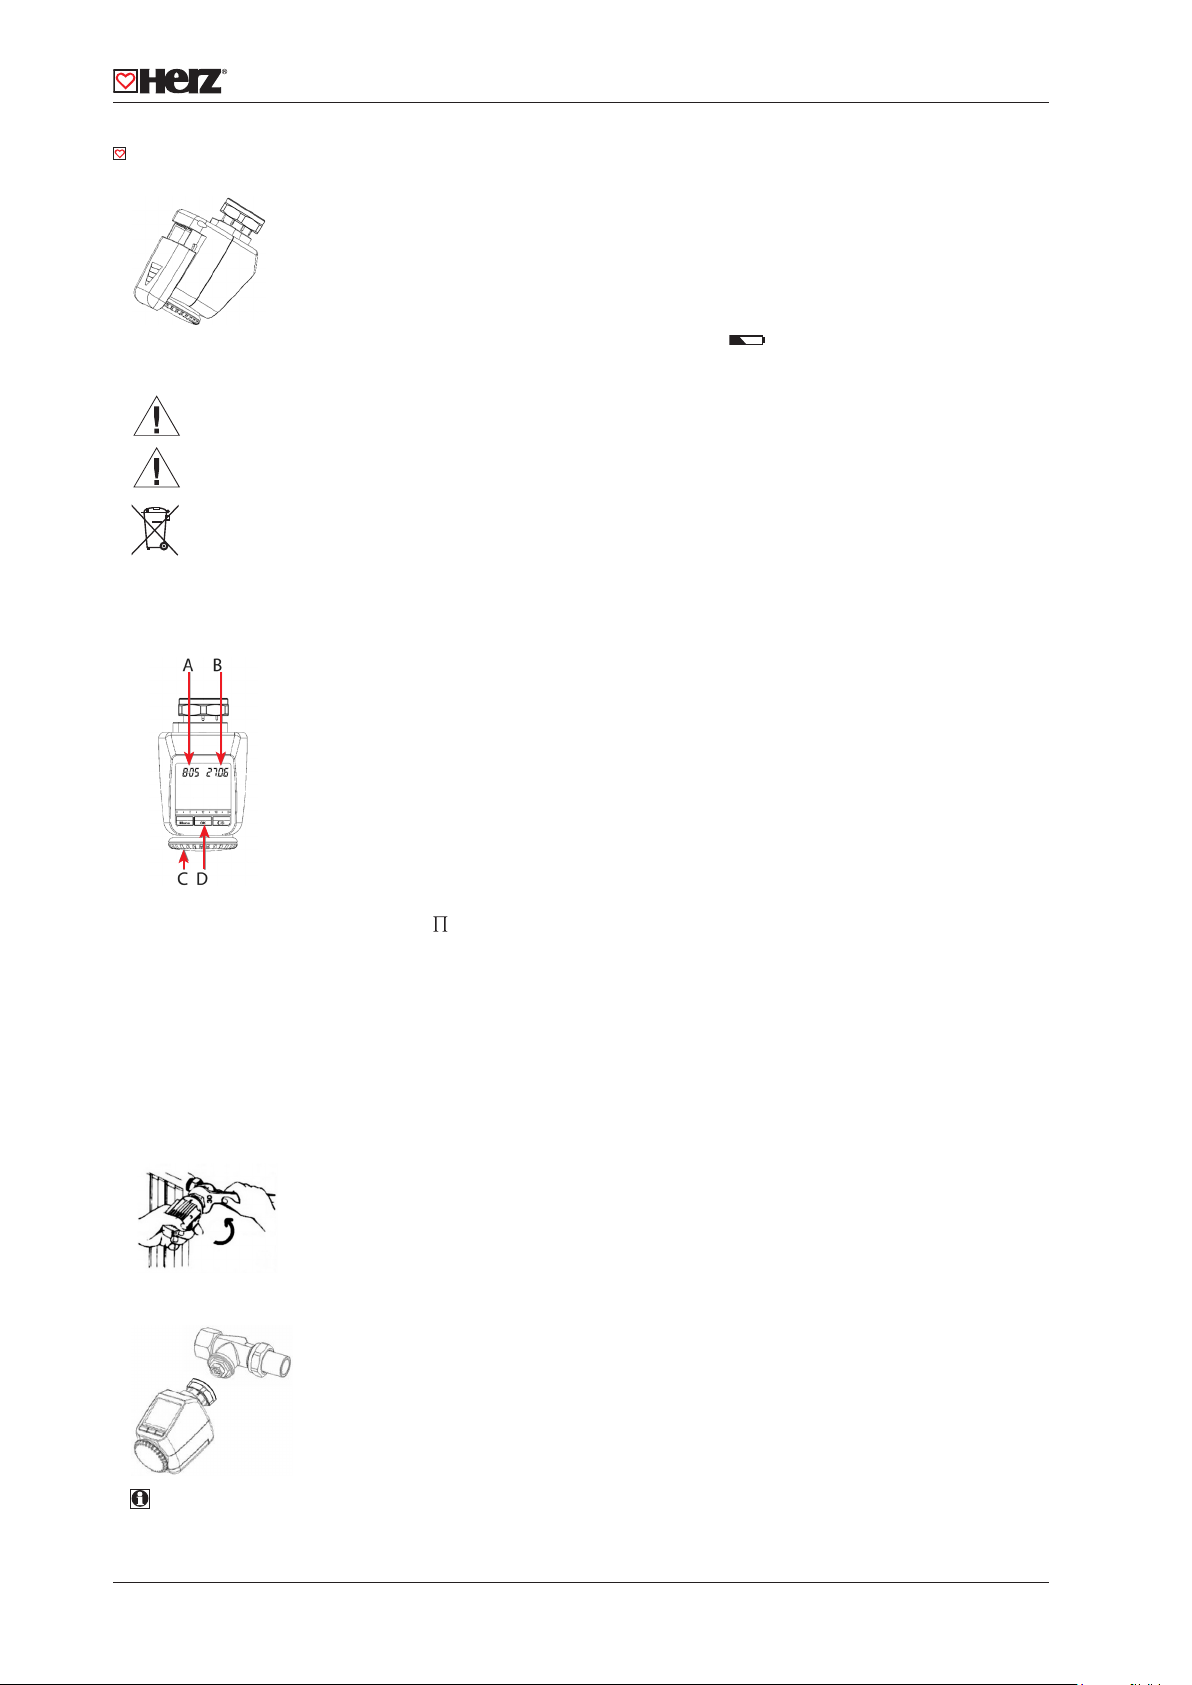
Step 1: Inserting (replacing) the batteries
• Remove the battery compartment cover
• Insert 2 new LR6 batteries (Mignon/AA) into the battery compartment, ensuring they are the
right way round
• Reattach the battery compartment cover and click into place
New alkaline batteries have a life of approximately two years. A battery symbol ( ) will indicate when the batteries need
to be replaced. after removing the old batteries, please wait approximately 1 minute before inserting the new ones. This
device does not suport operation with rechargeable batteries.
Nevver recharge standard batteries. Doing so will present a risk of explosion.
Do not throw the batteries into a fire.
Do not short-circuit batteries.
Used batteries should not be disposed of with regular domestic waste. Instead, they should be taken to your
local battery diposal point.
Step 2: Settingthe date and time of day
The firmware version number will be displayed briefly once you have inserted/ replaced the batteries and then you will be
automatically prompted to set the date and time of day.
• Use the setting wheel (C) to set the year (B)
• Confirm with OK (D)
• Use the setting wheel (C) to set the month (B)
• Confirm with OK (D)
• Use the setting wheel (C) to set the day (B)
• Confirm with OK (D)
• Use the setting wheel (C) to set the hour (B)
• Confirm with OK (D)
• Use the setting wheel (C) to set the minute (B)
• Confirm with OK (D)
The motor will start moving back the control pin while the entries are still being made.
• If “InS” is displayed with a rotating „ “ symbol, this indicates that the motor is still moving back. Once the device is
ready for the actuator to be installed on the valve, just “InS” will appear on the display.
• The weekly program and other settings can be customised prior to installation. To do this, press the menu button when
“InS” is shown on the display.
• Once programming is complete, “InS” will reappear on the display and installation (Step 3) can commence.
Step 3: Installing the energy-saving controller
The actuator can be installed on all HERZ TRVs. There is no need to drain away water or fiddle around with the heating system
before doing this.
First, you need to remove the old thermostat dial:
• Turn the thermostat dial anticlockwise as far as it will go.
• Release the thermal ring of the thermostat.
• Remove the thermostat from the valve.
The energy-saving controller can only be installed if “InS” is showing on the display. Following installation, the actuator will
perform an adjustment run so that it can adapt to the valve. During this process, “AdA” will be displayed.
• Place the actuator on the valve.
• Tighten the union nut.
• “InS” will appear on the display, press the OK button.
• The actuator will perform an adjustment run (“AdA” will appear on the display, operation not possible).
• After that, the actuator will be ready for operation (Auto mode).
If the adjustment run was initiated prior to installation, or if an error message will be displayed (F1, F2, F3); press OK to
move the motor back to the “InS” position.
Page 2
HERZ ETKF
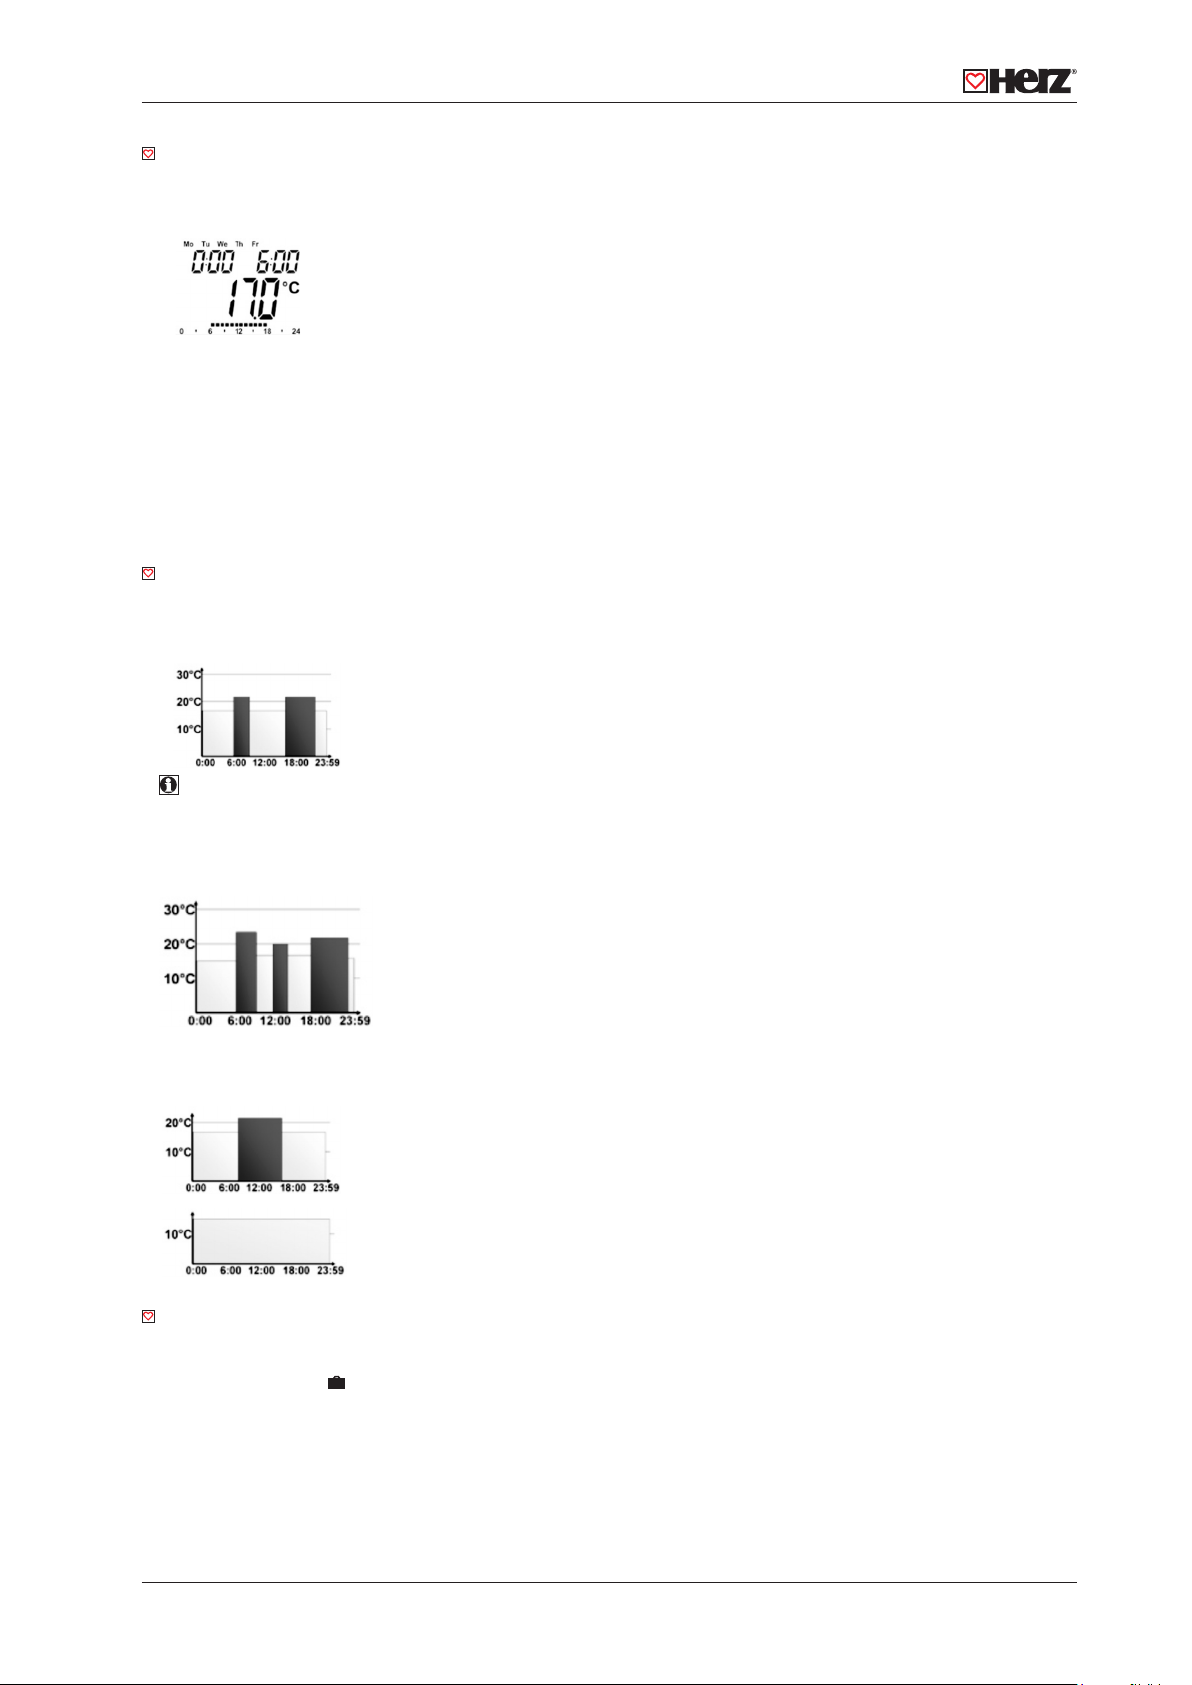
Setting the weekly program
The weekly program allows you to set up to 3 separate heating periods (7 switching times) for each day of the week. Programming is performed in relation to the selected days, for which temperatures must be stored for a period from 00:00 to
23:59.
• Press and hold down the menu button for more than 3 seconds.
• “Pro” will appear on the display.
• Confirm with OK.
• “dAy” will appear on the display. The setting wheel can be used to select an individual day of the
week, all working days, the weekend or the entire week (example shows working days selected).
• Confirm with OK.
• Use the setting wheel to set the first time segment (example shows 0:00 to 6:00).
• Then, select the required temperature for the selected time segment (example shows 17.0°C).
• Confirm with OK.
• Keep repeating this process until you have finished storing temperatures for the period from
0:00 to 23:59.
In Auto mode, the temperature can be modified at any time via the setting wheel. The modified temperature will then be
retained until the next program changeover.
Weekly program: Examples
The energy-saving controller allows you to store up to 3 heating periods (7 switching times) with individual temperature
settings for each day of the week. The factory setting consists of two heating phases (from 6:00 until 9:00 and from 17:00 until
23:00 respectively) for every single day of the week:
from 00:00 to 06:00 17.0 °C
from 06:00 to 09:00 21.0 °C
from 09:00 to 17:00 17.0 °C
from 17:00 to 23:00 21.0 °C
from 23:00 to 23:59 17.0 °C
To represent the switching periods, the display shows bars for every other switching interval. In this example, no bars are
shown for the interval from 0:00 to 6:00. Bars are only shown on the display for the intervals from 6:00 to 9:00 and from 17:00
to 23:00.
If a room also needs to be heated at around noon, the corresponding program might look like this:
Monday bis Sunday
from 00:00 to 06:00 16.0 °C
from 06:00 to 09:00 22.0 °C
from 09:00 to 12:00 17.0 °C
from 12:00 to 14:00 20.0 °C
from 14:00 to 17:30 17.0 °C
from 17:30 to 23:30 21.0 °C
from 23:30 to 23:59 16.0 °C
If you have a home office and only want it to be heated during the day on working days, you can program the following
times:
Monday bis Sunday
from 00:00 to 08:30 17.0 °C
from 08:30 to 17:00 21.0 °C
from 17:00 to 23:59 17.0 °C
Saturday bis Sunday
from 00:00 to 23:59 15.0 °C
Operating modes
To switch between the 3 operating modes described below, press the menu button briefly (these operating modes can only
be selected following installation/Step 3):
• Holiday function ( ): Set a temperature that is to be maintained until a fixed point in time.
• Manu: Manual operation – The temperature is set manually using the setting wheel.
• Auto: Weekly program – The temperature is controlled automatically in accordance with the stored weekly program..
Page 3
HERZ ETKF
Configuration menu
The configuration menu can be used to modify settings. To access this menu, press and hold down the menu button (for
more than 3 seconds).
• Pro: For setting the weekly program (see Section “1 Setting the weekly program”)
• dAt: For modifying the time of day and date
• POS: For querying the actuator’s current position
• dSt: Automatic switchover at the start or end of daylight saving time can be deactivated.
• AEr: For setting the “window open” temperature and time so that the temperature is automatically reduced in the event
of ventilation
• tOF: For setting the offset temperature
• rES: For restoring the factory settings
• UnL: For teaching out all taught-• in wireless components
Use the setting wheel to select menu items and the OK button to confirm your choice. Press the menu button again to return
to the previous level. After 65 seconds without anything happening, the menu will close automatically.
Display content during normal operation
During normal operation, the following are displayed: day of the week, time of day, date, operating mode,
temperature setting and switching periods. The bars indicating the weekly program’s switching periods
are shown for every other time interval. For an example, please refer to “2. Weekly program: Examples”.
Teaching in wireless components
The actuator supports the teaching in of up to 4 system components (e.g. remote control and window contact), plus 1 wall
thermostat.
• Press and hold down the OK button for more than 3 seconds.
• The remaining teach-in time will be displayed (30 seconds).
• The device being taught-in now needs to send a wireless signal (e.g. press button on remote control).
• The display will then switch to the normal view.
Once this has been done, the actuator will respond to wireless commands from taught-in devices. Whenever the actuator
receives a signal from a window contact or remote control, the display will light up briefly.
Teaching out wireless components
Components that have been taught in on the actuator can be taught out again using the “UnL” (Unlearn) function. All wireless components are taught out at once with this function.
• Press and hold down the menu button for more than 3 seconds.
• Use the setting wheel to select the “UnL” menu item.
• Confirm with OK.
• “ACC” will appear on the display; press OK to confirm.
Setting the holiday function
If you want a fixed temperature to be maintained for a set period of time while you are on holiday or during a party, you can
make use of the Holiday function.
• Press and release the menu button repeatedly until the suitcase symbol ( ) appears on the display.
• Use the setting wheel to set the end of the time period during which the temperature is to be maintained.
• Press the OK button to confirm.
• Then use the setting wheel to set the date.
• Press the OK button to confirm.
• Use the setting wheel to set the temperature; press OK to confirm. The display will flash to confirm your settings.
The set temperature will remain in force until the specified time. After that, the actuator will adopt Auto mode. Wireless
commands from the window contact and remotecontrol will continue to be executed.
Comfort and set-back temperatures
The comfort/set-back temperature button ( ) provides an easy and convenient way of switching between these two
temperatures. The factory settings are 21.0°C and 17.0°C respectively. To adapt them, proceed as follows:
• Press and hold down the comfort/set-back temperature button ( ) for more than 3 seconds.
• The sun symbol ( ) will appear on the display along with the current comfort temperature.
• Use the setting wheel to modify the temperature; press OK to confirm.
• The moon symbol ( ) will appear together with the setback temperature.
• Use the setting wheel to modify the temperature; press OK to confirm.
The temperature can even be modified in Auto mode at any time by using this button. The new setting will be retained until
the program’s next switching time.
Child-proof lock/Operating inhibit
Operation can be inhibited.
• To activate/deactivate the operating inhibit, briefly press the Menu and ( ) buttons at the same time.
• Once the function is active, “LOC” will appear on the display.
• To deactivate the function, press both buttons again.
Page 4
 Loading...