

Page 1
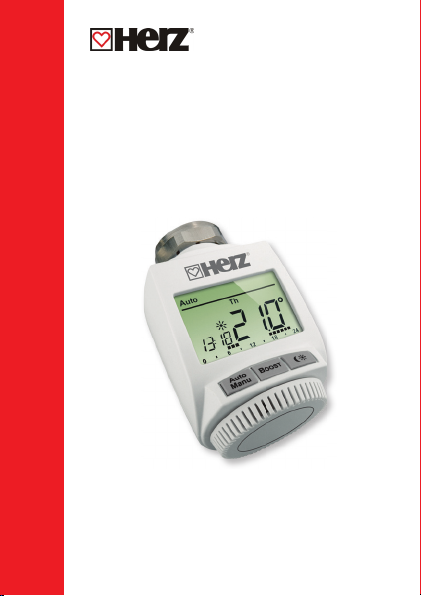
Radiator Thermostat ETKF
Operating manual
+
Page 2

Scope of delivery
Scope of delivery
Quan-
Item
tity
1x ETKF+ Radiator Thermostat 1 8251 01
2x LR6/mignon/AA battery
1x Brief instruction in German/English
2
Page 3

Table of contents
Table of contents
1 Information about this manual ................................. 4
2 Safety instructions .................................................... 4
3 Function .................................................................... 5
4 Device overview ......................................................... 7
5 Start-up ..................................................................... 8
6 Teaching-in ............................................................. 19
7 Operating modes (Auto/manu/holiday) .................. 22
8 Comfort and reduction temperature ...................... 23
9 Setting the holiday function .................................... 24
10 Configuration menu ................................................ 25
11 Child safeguard/operating lock .............................. 37
12 Activate heating pause (battery saving).................. 40
13 Restore factory settings .......................................... 41
14 LED flashing sequences and
transmission behaviour .......................................... 42
15 Maintenance and cleaning ...................................... 43
16 Information about radio operation ......................... 43
17 Technical specifications .......................................... 44
1st English edition 06/2016
All rights reserved. Translation of the original version in German.
3
Documentation © 2016 HERZ, Austria
Version 1.1
Page 4
Information about this manual
1 information about thiS manual
Read this manual carefully before starting to use the device.
Keep the manual so you can refer to it at a later date if you
need to. If you hand over the device to other persons for use,
please hand over the operating manual as well.
Symbols used:
Attention!
This indicates a hazard.
Note.
This section contains important additional information.
2 SafetY inStructionS
The device is not a toy; do not allow children to play
with it. Do not leave packaging material lying around,
as it can be dangerous in the hands of a child.
Do not open the device: it does not contain any components that need to be serviced by the user. In the
event of an error, please return the device to the service department.
The device may only be operated indoors and must
be protected from the effects of damp and dust, as
well as solar or heat radiation.
4
Page 5
Function
Using the device for any purpose other than that described in this operating manual does not fall within
the scope of intended use and shall invalidate any
warranty or liability. This also applies to any conversion or modification work. The device is intended for
private use only.
3 function
The ETKF+ Radiator Thermostat is responsible for regulating the radiators within the HERZ system. During ventilation, the ETKF+ Radiator Thermostat automatically reduces
the temperature in a room in order to save on energy costs.
Communication between the HERZ components is bidirectional. This ensures that the information sent reaches the
recipient.
The configuration of the ETKF+ Radiator Thermostat is made
according to the system variant used. You have the possibility
to choose between the following two variants:
HERZ Room solution
In the room solution, the settings of all connected devices in your room can comfortably be made via the
Wall Thermostat+. Up to 8 ETKF+ Radiator Thermostats and 8 Window Sensors+ can be connected and
controlled via the Wall Thermostat+.
5
Page 6

Function
HERZ Radiator solution
With the HERZ Radiator solution you can easily start
using the HERZ system. The ambient temperature
within a room can be flexibly controlled and regulated
with up to 2 ETKF+ Radiator Thermostats and 3 Window Sensors+. Configuration is performed directly on
the ETKF+ Radiator Thermostat.
With a Wall Thermostat+ the solution can be extended
to a room solution.
6
.
Page 7
Device overview
4 device overview
A
B
C
FDE
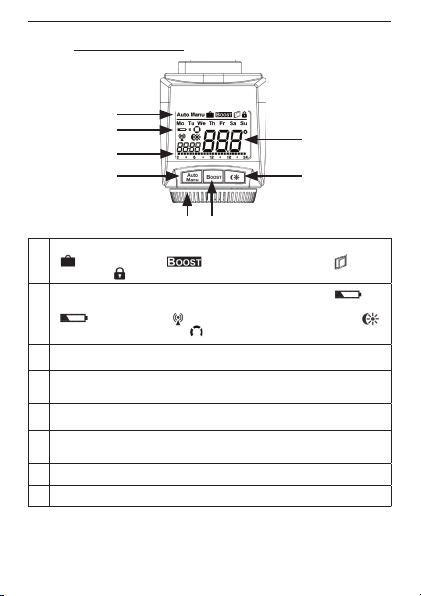
A Automatic mode (Auto), manual mode (Manu), holiday mode
( ), Boost function ( ), open-window function (
ating lock ( )
Weekday, replace batteries of the Radiator Thermostat+ ( ), re-
B
place batteries of a taught-in device (e.g. window sensor)
( ), radio activity ( ), comfort/reduction temperature ( ),
time/date, activity symbol ( )
C Bar chart of programmed heating phases of current day
D Auto/Manu button: Switch between automatic and manual mode,
exit the holiday mode
E Handwheel for temperature settings, select and set menu items
F Boost button: Activate the boost function, confirm, start teach-
in procedure
G Switch between reduction and comfort temperature
H Display of setpoint temperature
7
H
G
), oper-
Page 8
Start-up
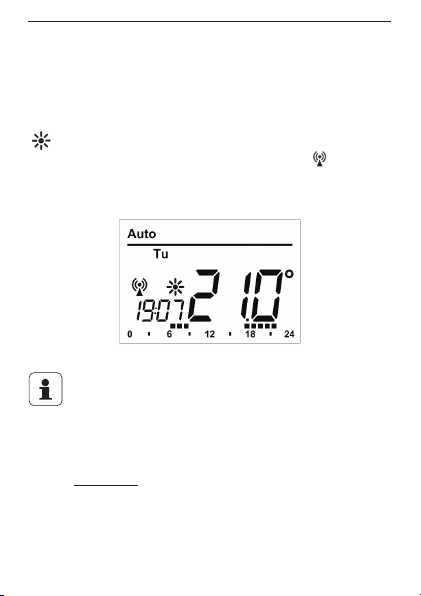
4.1 diSplaY content in normal mode
Operating mode, week day, setpoint temperature, time, radio signal and switching time periods are displayed in normal mode. In the example, the ETKF+ Radiator Thermostat
is in automatic mode (Auto) and the comfort temperature
( ) of 21.0°C is set. The weekday Tuesday (Tu) and the time
(19:07 h) are displayed. The antenna symbol ( ) indicates
that the connection to the taught-in components has been
established. The heating phases are displayed as bar charts.
The bars for the heating phases in the week program
will only be displayed if the saved temperature is
higher than the reduction temperature. Please see
section 10.1 for examples.
5 Start-up
5.1 inSerting (replacing) batterieS
To insert the batteries into the ETKF+ Radiator Thermostat,
please proceed as follows:
8
Page 9
Start-up
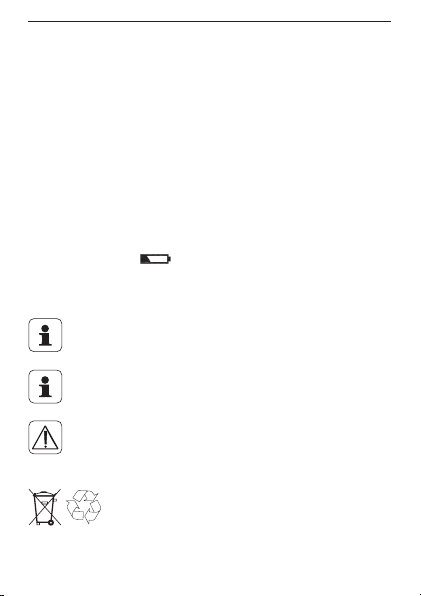
• Remove the battery compartment cover by pushing it
forwards.
• Insert 2 LR06/mignon/AA batteries in the battery compartment, making sure they are the right way round.
• Reattach the battery compartment cover and latch it into
place.
After inserting batteries, the radiator thermostat has to be
mounted on the radiator (see sec. „5.3 Installation on the
radiator“ on page 10). The ETKF+ Radiator Thermostat
starts an adapting run afterwards (see sec. „5.4 Adapting
run“ on page 12).
A battery symbol (
) indicates that the batteries need to
be replaced. After removing the batteries, you should wait
approx. 1 minute before inserting the new ones.
The service life of new alkaline batteries is approximately two years.
This device does not support operation with rechargeable batteries.
Never recharge standard batteries. Doing so will present a risk of explosion. Do not throw the batteries
into a fire! Do not short-circuit batteries.
Used batteries should not be disposed of with
regular domestic waste! Instead, take them to
your local battery disposal point.
9
Page 10

Start-up
5.2 Set date and time
If batteries are inserted or replaced, the date and time is
automatically requested after a brief display of the firmware version number:
• Set the year, month, day, hour and minute with the hand-
wheel and confirm with the Boost button. The motor
moves the control pin backwards during the setting of
date and time.
• If "InS" and the rotating activity symbol " " are displayed,
the motor still reverses. When only "InS" is shown in the display, the radiator thermostat can be installed on the valve.
The ETKF+ Radiator Thermostat+ can be configured already
before installation. Press the auto/menu button for this,
while „INS“ is shown in the display (see sec. „10 Configuration menu“ on page 19). After the programming has been
completed, „InS“ is shown again in the display and installation can take place.
5.3 inStallation on the radiator
The ETKF+ Radiator Thermostat is easy to install and can
be done without draining heating water or intervening in the
heating system. No special tools are required, nor does the
heating have to be switched off.
10
Page 11

Start-up
The union nut attached to the radiator thermostat can be
used universally and without accessories for all HERZ thermostatic valves with a thread size of M28 x 1.5mm. For adaptors to use HERZ ETKF+ with other manufacturers see HERZ
product rnge or the homepage www.herz.eu.
5.3.1 Removing the old dial
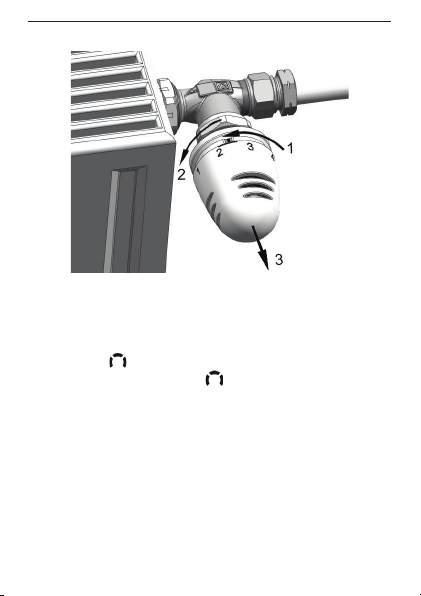
Rotate the thermostat dial to the maximum value (1) (anti-clockwise). The thermostat dial then no longer presses
against the valve spindle, making it easier to remove.
There are different ways of fixing the position of the thermostat dial:
• Union nut: Unscrew the union nut in an anticlockwise di-
rection (2). The thermostat head can then be removed (3).*
• Snap-on fastenings: Thermostat dials that have been at-
tached using this method can be easily released by giving
the lock/union nut a slight turn in the anticlockwise direction (2). The thermostat head can then be removed (3).*
• Compression fitting: The thermostat dial is held in place
by a mounting ring which is held together with a screw.
Loosen this screw and remove the thermostat head from
the valve (3).*
• Threaded connection with set screw: Loosen the set screw
and remove the thermostat head (3).
*
* Adapter to ETKF+ has to be ordered separately.
11
Page 12
Start-up
5.4 adapting run
Once the batteries have been inserted and date and time have
been set, the motor reverses;
tivity symbol ( ) are displayed.
without the activity symbol ( ), the radiator thermostat+
can be mounted. This is followed by an adapting run ("AdA")
to adapt the thermostat to the valve.
• Attach the radiator thermostat to the valve (see sec. „5.3
Installation on the radiator“ on page 10).
• Tighten the union nut.
• Press the Boost button when "InS" is displayed.
12
meanwhile, "InS" and the ac-
As soon as "InS" is displayed
Page 13
Teaching-in
Now the radiator thermostat performs an adapting run. "AdA"
and the activity symbol ( ) are displayed; during this time,
operation is not possible.
If the adapter run has been initiated prior to mounting or if
an error message (F1, F2, F3) is displayed, press the Boost
button; the motor reverses to the "InS" position.
Teach-in mode can be activated even whilst "InS" is
still displayed.
6 teaching-in
In order to be able to use the ETKF+ Radiator Thermostat
in your installation, you must teach it in first. The teach-in
procedure depends on the system variant used. Choose your
system variant (House, Room or Radiator solution) and follow the instructions below.
HERZ Room solution
In the HERZ Room solution all settings and programmings (e.g. week programs) can be made directly via
the Wall Thermostat+. To teaching-in the device to
the Wall Thermostat+, proceed as follows:
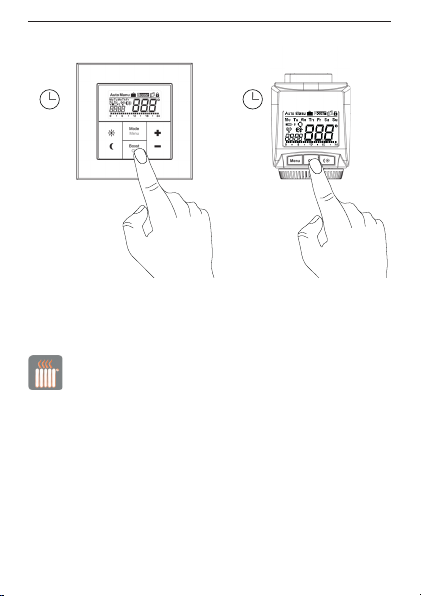
• Press and hold down the OK button of the Wall Thermo-
stat+ for at least 3 seconds to activate teach-in mode
• Activate the teach-in mode of your ETKF+ Radiator Ther-
mostat. Press and hold down the Boost button for at least
3 seconds. The display shows the remaining teach-in time
in seconds. The teach-in time is 30 seconds.
13
(1)
.
Page 14
Teaching-in
1.
2.
> 3 s
> 3 s
After teaching-in has been successful, the display returns
back to normal display.
HERZ Radiator solution
In the HERZ Room solution all settings and programmings (e.g. week programs) can be made directly via
the ETKF+ Radiator Thermostat.
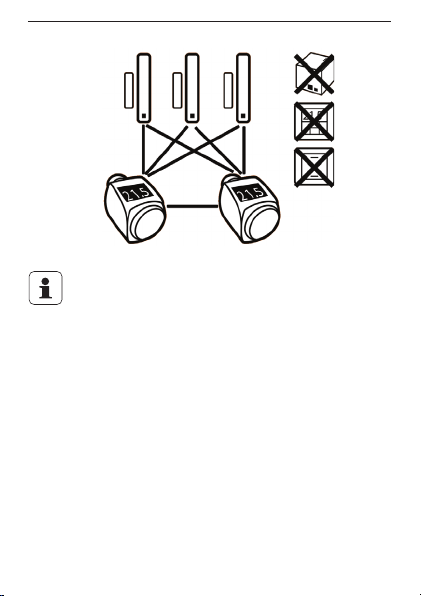
All devices have to be taught-in to each other, i.e. is all ETKF+
Radiator Thermostats and all Window Sensors+ have to be
taught-in to each other (max. 7 connections).
14
Page 15
Teaching-in
If you have already taught-in and configured a ETKF+
Radiator Thermostat and want to add another ETKF+
Radiator Thermostat you first have to activate teachin mode of the device you have already configured.
The configuration data will then be transmitted automatically to the new device.
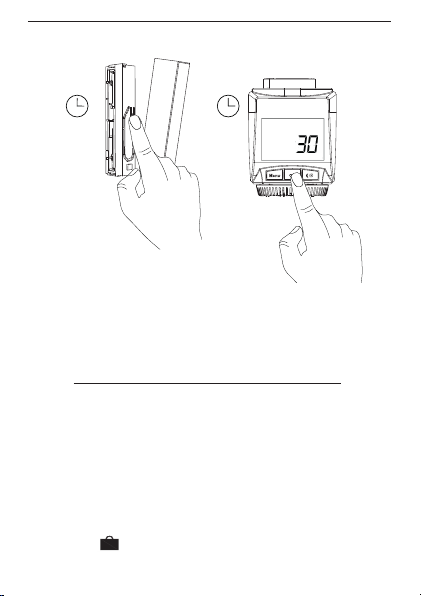
• Put the Window Sensor+ into teach-in mode according to
the corresponding operating manual.
• Activate the teach-in mode of your ETKF+ Radiator Ther-
mostat. Press and hold down the Boost button for at least
3 seconds. The display shows the remaining teach-in time
in seconds. The teach-in time is 30 seconds.
15
Page 16
Operating modes (Auto/manu/holiday)
1.
2.
> 3 s
> 3 s
• After teaching-in has been successful, the display returns
back to normal display.
7 operating modeS (auto/manu/holidaY)
To switch between operating modes, press and immediately
release the Auto/Manu button (the operating modes only become available for selection once installation is complete).
• Auto: Week program - automatic temperature regulation
in accordance with the time profile saved (heat/reduce).
• Manu: Manual operation - the manually set temperature
using the handwheel is maintained permanently.
• Holiday (
16
): In holiday mode, the set temperature is
Page 17
Comfort and reduction temperature
maintained up to an end time, at which point the device
switches to auto mode automatically.
If the operating mode is changed on one device in a
room, this change is applied to all taught-in ETKF+
Radiator Thermostats assigned to that room.
8 comfort and reduction temperature
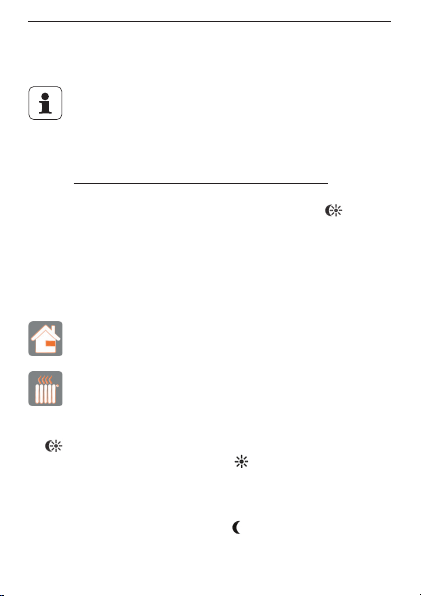
The comfort and reduction temperature button ( ) makes
switching between comfort and reduction temperature
simple and user friendly. The factory setting for the comfort temperature is 21.0 °C and the reduction temperature
17.0 °C. The comfort and reduction temperature can be
changed individually.
In the HERZ Room solution you can configure the settings for the ETKF+ Radiator Thermostat via the Wall
Thermostat+.
If you use the
Radiator solution, proceed as follows:
• Press and hold the comfort/reduction temperate button
( ) for at least 3 seconds.
• The display shows the symbol ( ) and the comfort tem-
perature as defined.
• Change the temperature with the handwheel and confirm
with the Boost button.
• The display shows the symbol ( ) and the reduction tem-
perature as defined.
17
ETKF+ Radiator Thermostat in the HERZ
Page 18
Setting the holiday function
• Change the temperature with the handwheel and confirm
with the Boost button.
Even in auto mode, the temperature can be changed at any
time using the button. It will then remain the same until the
next point at which the week programme changes.
9 Setting the holidaY function
If you want to maintain a fixed temperature for a certain period, e.g. during your holidays or a party, the holiday function can be used.
In the HERZ Room solution you can configure the settings for the ETKF+ Radiator Thermostat via the Wall
Thermostat+.
If you use the ETKF+ Radiator Thermostat in the HERZ
Radiator solution, proceed as follows:
• Briefly press the Auto/Manu button repeated-
ly, until the suitcase symbol ( ) appears in the display.
• Set the time via the handwheel up to which the temperature
is to be maintained and then confirm with the Boost button.
• Set the weekday via the handwheel up to which the tem-
perature is to be maintained and then confirm with the
Boost button.
• Set the temperature with the handwheel and confirm with
the Boost button. The display will flash to confirm.
The set temperature will remain until the set end time. Af-
18
Page 19
Configuration menu
terwards the radiator thermostat will switch back to Auto
mode. Radio control commands like those from a Window
Sensor+ or the routine descaling run will still be performed.
10 configuration menu
As soon as the ETKF+ Radiator Thermostat has been
taught-in to a Wall Thermostat+, all settings have to
be made via the Wall Thermostat+. Opening the menu
of the ETKF+ Radiator Thermostat is no longer possible.
HERZ Radiator solution
Settings of the ETKF+ Radiator Thermostat can be
changed in the configuration menu of the device. The
menu can be accessed by pressing the Auto/Mode
button for more than 3 seconds. Menu items can
be selected with the handwheel and confirmed with
the Boost button. By pressing the Auto/Menu button
again, you can return to the previous level. If there
is no further activation of the device for more than 1
minute, the menu closes automatically. The following
settings can be made:
19
Page 20

Configuration menu
Sec-
Display Function
tion
14.1 Pro: Set week program
14.2 dAT: Change time and date
14.3 bOS: Set valve opening and length of “Boost”
14.4 AEr: Set open-window temperature and time
function
for the automatic temperature reduction
during ventilation
14.5 dEC: Set valve protection function
14.6 t-d: Changing display of date and time
14.7 dSt: (De-)Activate automatic switching between summer and winter time
14.8 tOF: Set temperature offset
14.9 UnL: Teach-out wireless components
14.10
rES: Restoring the factory settings
10.1 Setting the week program (pro)
In the week program, for each weekday up to 6 heating phases (13 change settings) can be set separately. The programming is carried out for the days chosen, whereby temperature settings have to be set for the entire period between
20
Page 21
Configuration menu
00:00 and 23:59.
In the HERZ Room solution you can configure the settings for the ETKF+ Radiator Thermostat via the Wall
Thermostat+.
If you use the ETKF+ Radiator Thermostat in the HERZ
Radiator solution, proceed as follows:
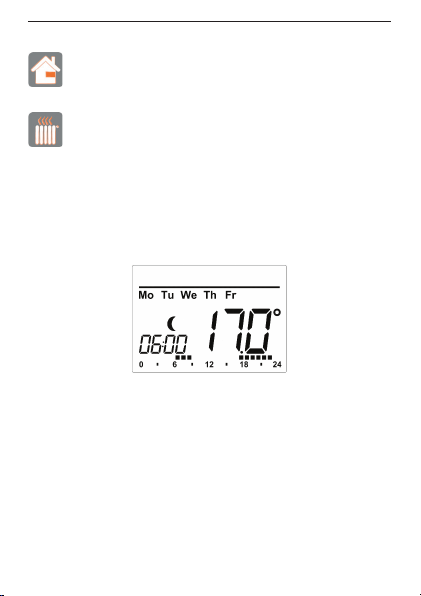
• Press the Auto/Manu button longer than 3 seconds. The
display will show “Pro”. Confirm with the Boost button.
• “dAy” appears on the display. With the handwheel you
can be selected an individual weekday, all working days,
the weekend or the whole week (example working days).
• Confirm with the Boost button.
• Now set the end time of the first time period (example:
6:00 h for the period 0:00 – 6:00 h).
• Confirm with the Boost button.
• With the handwheel select the chosen temperature for the
previously chosen time period (example: 17.0°C).
• Confirm with the Boost button.
• Repeat this procedure until temperatures are stored for
the entire period between 0:00 and 23:59 h.
21
Page 22
Configuration menu
In auto mode, the temperature can be changed at any time
using the handwheel our the comfort/reduction temperature
button (
). The modified temperature will then remain the
same until the next point at which the program changes.
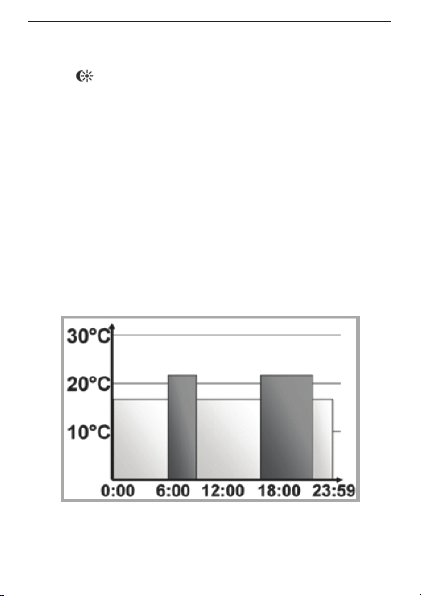
Week program: Example
For each day of the week up to 6 heating phases (13 change
settings) with individual temperature settings can be saved
with the ETKF+ Radiator Thermostat. The factory settings
are as follows:
from 00:00 to 06:00 17.0 °C
from 06:00 to 09:00 21.0 °C
from 09:00 to 17:00 17.0 °C
from 17:00 to 23:00 21.0 °C
from 23:00 to 23:59 17.0 °C
The display will show bars for those heating phases where
the set temperature for the period is higher than the saved
22
Page 23
Configuration menu
reduction temperature. With this example no bars for the
interval 0:00 to 6:00 are displayed. The bars only appear in
the display for the intervals 6:00 to 9:00 and 17:00 to 23:00.
10.2 changing date and time (dat)
In the configuration menu, date and time can be adjusted.
In the HERZ Room solution you can configure the settings for the ETKF+ Radiator Thermostat via the Wall
Thermostat+.
If you use the ETKF+ Radiator Thermostat in the HERZ
Radiator solution, proceed as follows:
• Press the Auto/Manu button longer than 3 seconds.
• Select the menu item „dAT“ with the handwheel.
• Confirm with the Boost button.
• Set the year, month, day, hour and minute with the handwheel and confirm with the Boost button.
10.3 booSt function (boS)
With the boost function, cool rooms can be heated within
short at the touch of a button. When the function is activated,
the heating valve opens immediately for 5 minutes at 80 %
(factory setting). There will be a pleasant room temperature
right away because of the radiated heat. By the end of the 5
minute Boost phase, the radiator thermostat automatically
changes back to the prior operating mode.
23
Page 24
Configuration menu
Activate boost function:
• Press the Boost button to activate the boost function.
• The remaining time for the function is counted down in
seconds ("300" to "000"). Whilst the function is active,
is displayed.
• The activity symbol ( ) is displayed as long as the adjusting pin opens/closes the valve.
• Once the set time has elapsed, the ETKF+ Radiator Thermostat switches back to the mode that was active previously
(Auto/Manu), with the temperature that was set previously.
• The function can be deactivated prematurely at any time
by pressing the Boost button again.
Adjust duration of boost function and valve opening.
In the HERZ Room solution you can configure the settings for the ETKF+ Radiator Thermostat via the Wall
Thermostat+.
If you use the ETKF+ Radiator Thermostat in the HERZ
Radiator solution, proceed as follows:
• Press the Auto/Manu button longer than 3 seconds.
• Select the menu item "bOS" with the handwheel.
• Confirm with the Boost button.
• Set the duration of the boost function (in minutes) with the
handwheel and confirm with the Boost button.
• Set the valve opening (in percentage) with the handwheel
and confirm with the Boost button.
24
Page 25
Configuration menu
The radiant heat will not have an immediate effect
if the radiator is covered or concealed (e.g. by a
sofa).
If the duration of the boost function is set so that
the display exceeds 999 seconds, the display value
switches from seconds to minutes.
10.4 open-window function (aer)
During ventilation, the ETKF+ Radiator Thermostat automatically reduces the temperature in a room in order to save on
energy costs. Whilst this function is active, the open-window
symbol ( ) appears on the display.
Without Window Sensor+:
The ETKF+ Radiator Thermostat is able to automatically detect a sharp fall in temperature caused by ventilation (temperature fall detection). The temperature is then reduced to
12 °C for 15 minutes (default factory setting) or to an individually configured value.
With Window Sensor+:
When a Window Sensor+ is used, the opening and closing of
a window is detected at the precise time it occurs. Whilst the
window is open the temperature of all radiator thermostats
installed in the room is reduced for 15 minutes to 12°C (default factory setting) or to an individually configured value.
When the Window Sensor+ detects the closing of the window, all ETKF+ Radiator Thermostats installed in the room
25
Page 26
Configuration menu
are immediately reset to their original mode.
Adjust reduced temperature and duration:
A reduced temperature of 12° C and a duration of 15 minutes
is set as default. Both values can be configured individually:
In the HERZ Room solution you can configure the settings for the ETKF+ Radiator Thermostat via the Wall
Thermostat+.
If you use the ETKF+ Radiator Thermostat in the HERZ
Radiator solution, proceed as follows:
• Press the Auto/Manu button longer than 3 seconds.
• Select the menu item "AEr" with the handwheel.
• Confirm with the Boost button.
• Set the reduction temperature with the handwheel and
confirm with the Boost button.
• Set the duration for the reduction temperature with the
handwheel and confirm with the Boost button.
Temperature fall detection without a Window Sensor+
can also be deactivated (by setting the duration to 0
minutes).
When a Window Sensor+ is taught-in, the ETKF+ Radiator Thermostat does not react to a temperature
fall.
26
Page 27
Configuration menu
10.5 Setting routine deScaling (dec)
The ETKF+ Radiator Thermostat can protect against valve
calcification automatically. Therefore, an automatic routine
descaling is performed once a week. During this brief period,
when the valve opens and closes once, operation is not possible. The time for performing this function can individually
be configured (it is factory set to run at 12:00 on Saturdays).
In the HERZ Room solution you can configure the settings for the ETKF+ Radiator Thermostat via the Wall
Thermostat+.
If you use the ETKF+ Radiator Thermostat in the HERZ
Radiator solution, proceed as follows:
• Press the Auto/Manu button longer than 3 seconds.
• Select the menu item "dEC" with the handwheel.
• Confirm your setting using the Boost button.
• Use the handwheel to select the weekday and confirm this
with the Boost button.
• Use the handwheel to select the time and confirm this
with the Boost button.
“CAL” is displayed during descaling.
10.6 Switching time/date diSplaY (t-d)
The factory setting will show the time on the display. In the
menu the display can be switched to the date.
27
Page 28
Configuration menu
In the HERZ Room solution you can configure the settings for the ETKF+ Radiator Thermostat via the Wall
Thermostat+.
If you use the ETKF+ Radiator Thermostat in the HERZ
Radiator solution, proceed as follows:
• Press the Auto/Manu button longer than 3 seconds.
• Select the menu item "t-d" with the handwheel.
• Confirm with the Boost button.
• Now set the format you want to show on the display by
turning the handwheel. Date and time will switch when
turning the wheel.
• Confirm with the Boost button.
10.7 Switching between Summer and winter time (dSt)
You can activate/deactivate automatic switch-over for summer/winter time for the ETKF+ Radiator Thermostat.
In the HERZ Room solution you can configure the settings for the ETKF+ Radiator Thermostat via the Wall
Thermostat+.
If you use the ETKF+ Radiator Thermostat in the HERZ
Radiator solution, proceed as follows:
• Press the Auto/Manu button longer than 3 seconds.
• Select the menu item „dSt“ with the handwheel.
• Confirm your setting using the Boost button.
• Set the option „On“ to activate automatic switching or set
28
Page 29
Configuration menu
the option „OFF“ to deactivate automatic switching with
the handwheel.
• Confirm with the Boost button.
10.8 Setting offSet temperature (tof)
As the temperature is measured on the radiator, the temperature distribution can vary throughout a room. To adjust
this, a temperature offset of ±3.5 °C can be set. If a nominal
temperature of e.g. 20 °C is set but the room presents with
only 18 °C,an offset of -2.0 °C needs to be set.
If you use the ETKF+ Radiator Thermostat in connection with a Wall Thermostat+, the temperature will
be measured at the Wall Thermostat+.
In the HERZ Room solution you can configure the settings for the ETKF+ Radiator Thermostat via the Wall
Thermostat+.
If you use the ETKF+ Radiator Thermostat in the HERZ
Radiator solution, proceed as follows:
• Press the Auto/Manu button longer than 3 seconds.
• Select the menu item „tOF“ with the handwheel and confirm with the Boost button.
• Turn the handwheel and set the desired offset temperature (max. ±3.5°C).
• Confirm with the Boost button.
29
Page 30
Configuration menu
10.9 teach-out wireleSS componentS (unl)
Devices that are taught-in to the ETKF+ Radiator Thermostat can be taught-out with the function "Unlearn" (UnL). All
taught-in devices are deleted simultaneously.
In the HERZ Room solution you can configure the settings for the ETKF+ Radiator Thermostat via the Wall
Thermostat+.
If you use the ETKF+ Radiator Thermostat in the HERZ
Radiator solution, proceed as follows:
• Press the Auto/Manu button longer than 3 seconds.
• Select the menu item „UnL“ with the handwheel and confirm with the Boost button.
• „ACC“ appears in the display. Confirm with the Boost button to delete all taught-in devices.
10.10 reStoring the factorY SettingS (reS)
The factory settings of the ETKF+ Radiator Thermostat can
be restored manually. This means that all the manually performed settings are lost.
In the HERZ Room solution you can configure the settings for the ETKF+ Radiator Thermostat via the Wall
Thermostat+.
If you use the ETKF+ Radiator Thermostat in the HERZ
Radiator solution, proceed as follows:
30
Page 31
Child safeguard/operating lock
• Press the Auto/Manu button longer than 3 seconds.
• Select the menu item „rES“ with the handwheel and confirm with the Boost button.
• „ACC“ appears in the display. Confirm with the Boost button to reset the device.
If you have taught-in several ETKF+ Radiator Thermostats or Window Sensors+, all devices have to be
reset.
11 child Safeguard/operating lock
Basic child safeguard/operating lock
Operation of the device can be locked to avoid settings being changed unintended (e.g. through involuntary touch).
• To activate/deactivate the basic operating lock, press and
immediately release the Auto/Manu and ( ) buttons simultaneously.
• Once activated, the operating lock symbol ( ) is shown on
the display for 10 s.. Afterwards, the symbol will be displayed permanently. Operation of the device is now locked.
• To deactivate the operating lock, press both buttons once
again.
Advanced child safeguard/operating lock function (Loc)
The advanced operating lock provides enhanced security
for the operation of the ETKF+ Radiator Thermostat
the entry of a four-digit code. When the advanced operating
lock is activated on the ETKF
31
+
Radiator Thermostat
with
, the de-
Page 32
Child safeguard/operating lock
vice switches to auto mode automatically and operation is
reduced to adjusting the temperature using the handwheel
and/or the comfort (
) and reduction temperature buttons
( ). The adjustable temperature range is also restricted. The
minimum and maximum temperature upper limits are between 5.0 °C and 24.0 °C.
The advanced operating lock is deactivated in the initial state.
Activating the operating lock:
• Press the Auto/Manu button longer than 3 seconds. Se-
lect the menu item „Loc“ with the handwheel and confirm
with the Boost button.
• Next, enter the default four-digit code 1357. Use the hand-
wheel to select each digit one after the other. Once you
have selected the correct digits, press the Boost button to
confirm. The cursor moves to the next digit automatically.
• After you have selected the correct code, "ON" or "OFF" is
displayed. Select the required state using the handwheel.
"On" means that the advanced operating lock is activated.
"OFF" deactivates the operating lock. Select "ON" and press
the Boost button to confirm your selection.
• The advanced operating lock is now activated and the
- symbol is displayed.
• If you enter an incorrect code, the display switches back
to normal immediately.
Deactivating the operating lock:
• If the - symbol is displayed, the advanced operating
lock is activated.
• Press the Auto/Manu button longer than 3 seconds to de-
activate the lock.
32
Page 33
Child safeguard/operating lock
• Enter the default four-digit code. Use the handwheel to
select each digit one after the other. Press the Boost button to confirm the correct digits.
• After you have selected the correct code, "ON" or "OFF"
is displayed. Select "OFF" with the handwheel and press
the Boost button to confirm.
• The display returns to normal. The
-symbol is off and
the advanced operating lock is deactivated.
• If you enter an incorrect code, the display switches back
to normal immediately. The advanced operating lock continues to be activated.
If you have taught-in several radiator thermostats the
operating lock has to be activated and deactivated
manually on each device.
Changing the code:
• Press the Auto/Manu button longer than 3 seconds. Se-
lect the menu item „Loc“ with the handwheel and confirm
with the Boost button.
• Enter the code stored in the memory as described above.
"ON" or "OFF" is displayed.
• Press the Auto/Manu button again.
• Use the handwheel to change each of the four digits in
the code one after the other. Confirm your selection with
the Boost button. The new code and "ON" or "OFF" are
now displayed.
• Once you have selected all four digits, press the Boost but-
ton. Your code has now changed and the display reverts
to the normal view.
33
Page 34
Activate heating pause (battery saving)
If you forget the code, the full functional scope of the
ETKF+ Radiator Thermostat can only be restored by
performing a factory reset (see sec. „13 Restore factory settings“ on page 35). The code can only be
changed on the device itself.
12 activate heating pauSe (batterY Saving)
Battery life can be prolonged by switching the heating off in
summer. To achieve this, the valve is opened fully. The calcification protection continues to run.
In the HERZ Room solution you can configure the settings for the ETKF+ Radiator Thermostat via the Wall
Thermostat+.
If you use the ETKF+ Radiator Thermostat in the HERZ
Radiator solution, proceed as follows:
• Press the Auto/Manu button until Manu appears in the
display.
• In manual mode (Manu), turn the handwheel clockwise
until "On" is displayed.
• To save changes and leave manual mode, press the Auto/
Manu button again.
12.1 activating f roSt protectio n operation (radiator
Switched off)
If the room does not need to be heated, the valve can be
34
Page 35
Restore factory settings
closed. The valve is only opened if there is a risk of frost.
The calcification protection continues to run.
In the HERZ Room solution you can configure the settings for the ETKF+ Radiator Thermostat via the Wall
Thermostat+.
If you use the ETKF+ Radiator Thermostat in the HERZ
Radiator solution, proceed as follows:
• Press the Auto/Manu button until Manu appears in the
display.
• In manual mode (Manu), turn the handwheel anticlockwise
until "OFF" is displayed.
• To save changes and leave manual mode, press the Auto/
Manu button again.
13 reStore factorY SettingS
The factory settings of the ETKF+ Radiator Thermostat can
be restored manually. Restoring the factory settings deletes
all settings and information about taught-in devices.
• Remove the batteries from the battery compartment.
• Wait 60 seconds.
• Press and hold down the three buttons (Auto/Manu, Boost,
( ) while inserting the batteries.
• Once the factory settings have been restored successfully,
"rES" is displayed.
35
Page 36
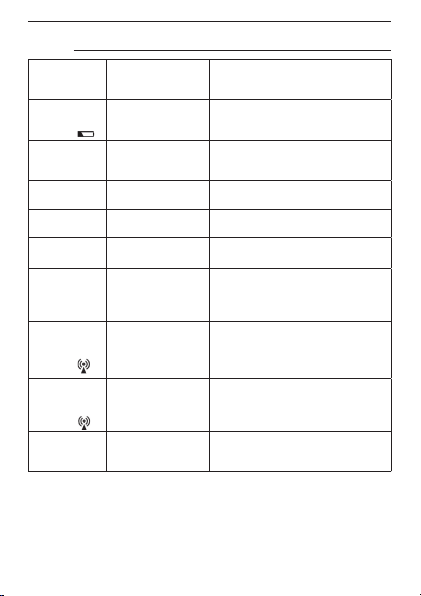
LED flashing sequences and transmission behaviour
14 led flaShing SequenceS and tranSmiSSion behaviour
Error code
on the
display
Empty
battery
symbol (
F1 Valve drive slug-
F2 Actuating range
F3 Adjustment
F5 Temperature
F6 Battery voltage
Slowly
flashing
antenna
symbol (
Quickly
flashing
antenna
symbol (
CAL Routine descaling
36
Problem Solution
Battery voltage
too low
)
gish
too wide
range too small
sensor defective
too low, valve
moved to error
position
Connection to
taught-in HERZ
components lost
)
Duty cycle limit
reached
)
is active
Replace batteries
Check the installation; check
whether the pin on the heating
valve is stuck
Check the fastening of the radiator thermostat
Check the heating valve; check
whether the valve pin is jammed
Device defective - please contact
your specialist dealer.
Replace the batteries of the
radiator thermostat
Check the power supply and
the batteries of taught-in HERZ
components.
The device can resume radio
communication after a waiting
time of approx. one hour
Automatic function (see sec.
„10.5 Setting routine descaling
(dEC)“ on page 27)
Page 37
Maintenance and cleaning
15 maintenance and cleaning
The product does not require any maintenance. Enlist the
help of an expert to carry out any repairs. Clean the product
using a soft, lint-free cloth that is clean and dry. You may
dampen the cloth a little with lukewarm water in order to
remove more stubborn marks. Do not use any detergents
containing solvents, as they could corrode the plastic housing and label.
16 information about radio operation
Radio transmission is performed on a non-exclusive transmission path, which means that there is a possibility of interference occurring. Interference can also be caused by
switching operations, electrical motors or defective electrical devices.
The range of transmission within buildings can differ
greatly from that available in the open air. Besides the
transmitting power and the reception characteristics
of the receiver, environmental factors such as humidity in the vicinity have an important role to play, as do
on-site structural/screening conditions.
HERZ Armaturen GmbH hereby declares that this device
complies with the essential requirements and other relevant
regulations of Directive 1999/5/EC. You can find the full declaration of conformity at www.herz.eu.
37
Page 38

Technical specifications
17 technical SpecificationS
Device short description: BC-RT-TRX-CyG-4
Supply voltage: 2x 1.5 V LR6/mignon/AA
Current consumption: 100 mA (max.)
Battery life: 2 years (typ.)
Display: LCD
Radio frequency: 868.3 MHz
Typ. open area RF range: > 100 m
Receiver category: SRD category 2
Duty cycle: < 1 % per h
Method of operation: Type 1
Degree of protection: IP20
Ambient temperature: 0 to 50 °C
Dimensions (W x H x D): 60 x 65 x 100 mm
Weight: 170 g (not incl. batteries)
Connection: M30 x 1.5 mm
Linear travel: 4.2 mm
Spring force: 80 N (typ.)
Subject to technical changes.
HERZ Room solution:
• max. 1 Wall Thermostat+
• max. 8 ETKF+ Radiator Thermostats
• max. 8 Window Sensors
HERZ Radiator solution
• max. 2 ETKF+ Radiator Thermostat
• max. 3 Window Sensors
38
+
+
Page 39
Technical specifications
Do not dispose of the device with regular
domestic waste.
Electronic equipment must be disposed of at local
collection points for waste electronic equipment in
compliance with the Waste Electrical and Electronic
Equipment Directive.
The CE sign is a free trading sign addressed exclusively to the authorities and does not include any
warranty of any properties.
For technical support, please contact your specialist dealer.
39
Page 40
HERZ Armaturen GmbH
Richard-Strauss-Str. 22, A-1230 Vienna
Phone: +43 (0)1 616 26 31-0
Fax: +43 (0)1 616 26 31-227
E-Mail: [email protected]
40
 Loading...