

Page 1
EUR USB RPT RDM LOUD EQ
USA
FM1
106.50
HMR 10
OWNER’S MANUAL
Digital media receiver
Rev. 0.3
hertzaudiovideo.com
Page 2

1 INDEX
2. PRECAUTIONS ....................................................................................................................................3
3. PACKAGING CONTENTS ..................................................................................................................... 5
4. DIMENSIONS ......................................................................................................................................5
5. INSTALLATION ....................................................................................................................................6
5.1 Installation Cautions .................................................................................................................6
6. MOUNTING .........................................................................................................................................7
7. CONNECTIONS ....................................................................................................................................8
8. CONTROLS ..........................................................................................................................................9
8.1 Operational Panel .....................................................................................................................9
8.2 Name of Buttons and their Functions ....................................................................................9
9. OPERATIONS ....................................................................................................................................10
9.1 Basic Operation .......................................................................................................................10
9.2 FM (RDS) Operation ................................................................................................................11
9.3 USB Mode Operation ..............................................................................................................12
9.4 AUX In Mode Operation ..........................................................................................................13
9.5 Bluetooth Operation ...............................................................................................................13
10. TROUBLESHOOTING ........................................................................................................................14
10.1 General .....................................................................................................................................14
10.2 USB ...........................................................................................................................................14
10.3 Bluetooth .................................................................................................................................14
11. TECHNICAL SPECIFICATIONS .......................................................................................................... 15
2
Page 3

2 PRECAUTIONS
WARNING: for your safety, while boating,
keep the volume to a level at which
external sounds can be heard.
1. This unit uses precision parts and components for
its operation. In the event of any operating issues,
never open the case or disassemble the unit
Contact your Hertz dealer or service center.
2. FCC STATEMENT
2.1
This device complies with Part 15 of the FCC Rules.
Operation is subject to the following two conditions:
(1)
This device may not cause harmful interference.
(2)
This device must accept any interference received,
including interference that may cause undesired
operation.
2.2
Changes or modifications not expressly approved
by the party responsible for compliance could void
the user’s authority to operate the equipment.
FCC ID: 2ASUD-HMR10
NOTE: This equipment has been tested and found
to comply with the limits for a Class B digital device,
pursuant to Part 15 of the FCC Rules. These limits are
designed to provide reasonable protection against
harmful interference in a residential installation. This
equipment generates, uses and can radiate radio
frequency energy and, if not installed and used in
accordance with the instructions, may cause harmful
interference to radio communications. However,
there is no guarantee that interference will not occur
in a particular installation. If this equipment does
cause harmful interference to radio or television
reception, which can be determined by turning the
equipment off and on, the user is encouraged to try
to correct the interference by one or more of the
following measures:
- Reorient or relocate the receiving antenna.
- Increase the separation between the equipment
and receiver.
- Connect the equipment into an outlet on a circuit
different from that to which the receiver is connected.
- Consult the dealer or an experienced radio/TV
technician for help.
FCC Radiation Exposure Statement.
This equipment complied with FCC radiation exposure
limits set forth for an uncontrolled environment. This
equipment should be installed and operated with
minimum distance 20 cm between the unit & your body.
3. The Bluetooth word mark and logos are registered
trademarks owned by the Bluetooth SIG, Inc. and any
use of such marks by Elettromedia srl is under license.
Other trademarks and trade names belong to their
respective owners.
.
Owner’s Manual
4. IC warning
This device complies with Industry Canada’s
license-exempt RSS standard(s).
Operation is subject to the following two conditions:
(1) This device may not cause interference
(2) This device must accept any interference, including
interference that may cause undesired operation
of the device.
This Class B digital apparatus complies with Canadian
ICES-0003.
Le présent appareil est conforme aux CNR d’Industrie
Canada applicables aux appareils radio exempts de
licence.
L’exploitation est autorisée aux deux conditions
suivantes:
(1) l’appareil ne doit pas produire de brouillage
(2)
l’utilisateur de l’appareil doit accepter tout brouillage
radioélectrique subi, même si le brouillage est
susceptible d’en compromettre le fonctionnement.
This equipment complies with IC radiation exposure
limits set forth for an uncontrolled environment.
The antenna should be installed and operated with
minimum distance of 20 cm between the radiator and
your body.
This transmitter must not be co-located or operating
in conjunction with any other antenna or transmitter.
Cet appareil est conforme aux limites d’exposition aux
rayonnements de la IC pour un environnement non
contrôlé. L’antenne doit être installé de façon à garder
une distance minimale de 20 centimètres entre la source
de rayonnements et votre corps.
L’émetteur ne doit pas être colocalisé ni fonctionner
conjointement avec à autre antenne ou autre émetteur.
WARNING: changes or modifications to this unit not
expressly approved by the party responsible for
compliance could void the user’s authority to
operate the equipment.
IC ID: 24882-HMR10
Cleaning the Body
- Use a soft, dry cloth and gently wipe off any dirt or dust.
- For persistent dirt, apply some neutral detergent
diluted in water on a soft cloth, wipe off the dirt
gently, then wipe again with a dry cloth.
- Do not use benzene, thinner, boat cleaner, etc., as
these substances may damage the body or
cause the paint to peel. Also, leaving rubber or
plastic products in contact with the body for long
periods of time may cause stains.
3
Page 4

USB Port
- The USB memory sticks must be recognized as
“USB” to work properly. Some models may not
operate correctly. In the event data is lost or
damaged under any condition, Elettromedia srl
shall not be liable for any damage. When using
the USB memory stick, we recommend that you
backup your data (music) to a personal computer
before using.
- Data (music) files may be damaged when USB
memory sticks are removed while the device
is reading data, or by Static electricity and/or an
electrical surge.
- Connect/disconnect the USB memory stick when
it is not accessed.
- Disconnect the USB memory device when not in use.
CAUTIONS ON HANDLING
Protect from high temperatures. Exposure to direct sunlight for an extended period of time can produce very
high temperature in your vessel. Cool down the interior before starting playback.
4
Page 5
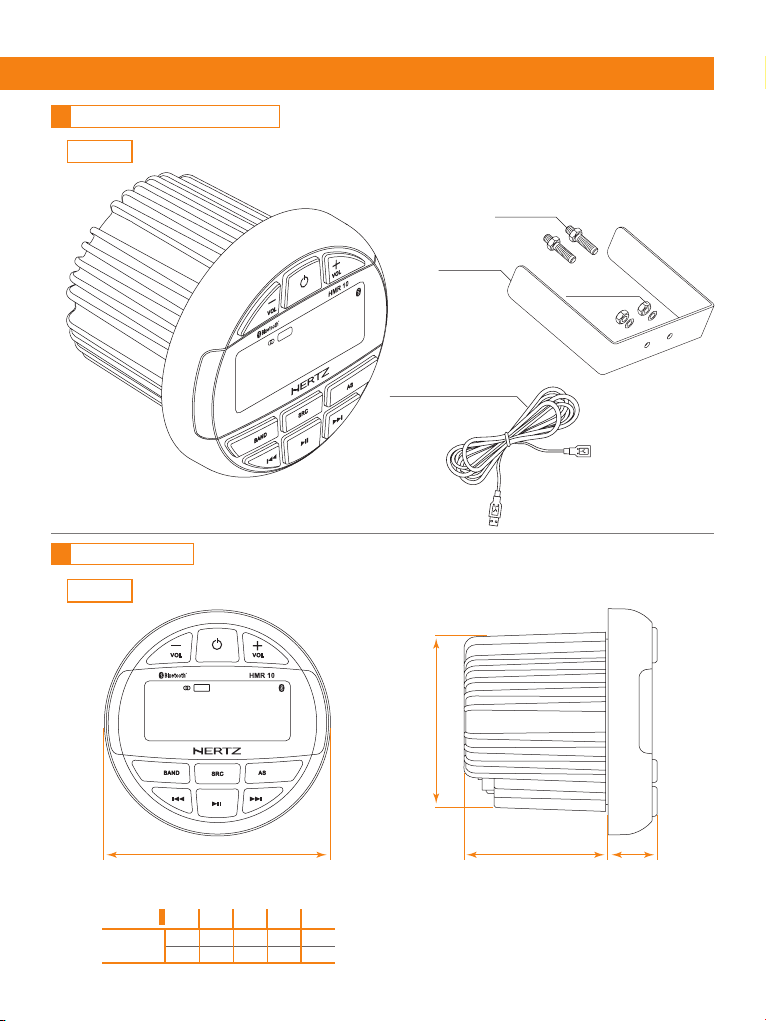
3 PACKAGING CONTENTS
HMR 10
Owner’s Manual
x2 Screws
4 DIMENSIONS
HMR 10
USA EUR USB RPT RDM LOUD EQ
106.50
USA EUR USB RPT RDM LOUD EQ
106.50
FM1
FM1
U-bracket
USB extension cable
100 cm / 39.37 in.
B
x2 Nuts
and washers
HMR 10
A C
A B C D
113 89,5 72 24,5 mm
4.45 3.52 2.83 0.96 in.
D
5
Page 6
5 INSTALLATION
5.1 Before Starting
1. This set is exclusively for use in vessels with a negative ground 12 V power supply.
2. Read these instructions carefully.
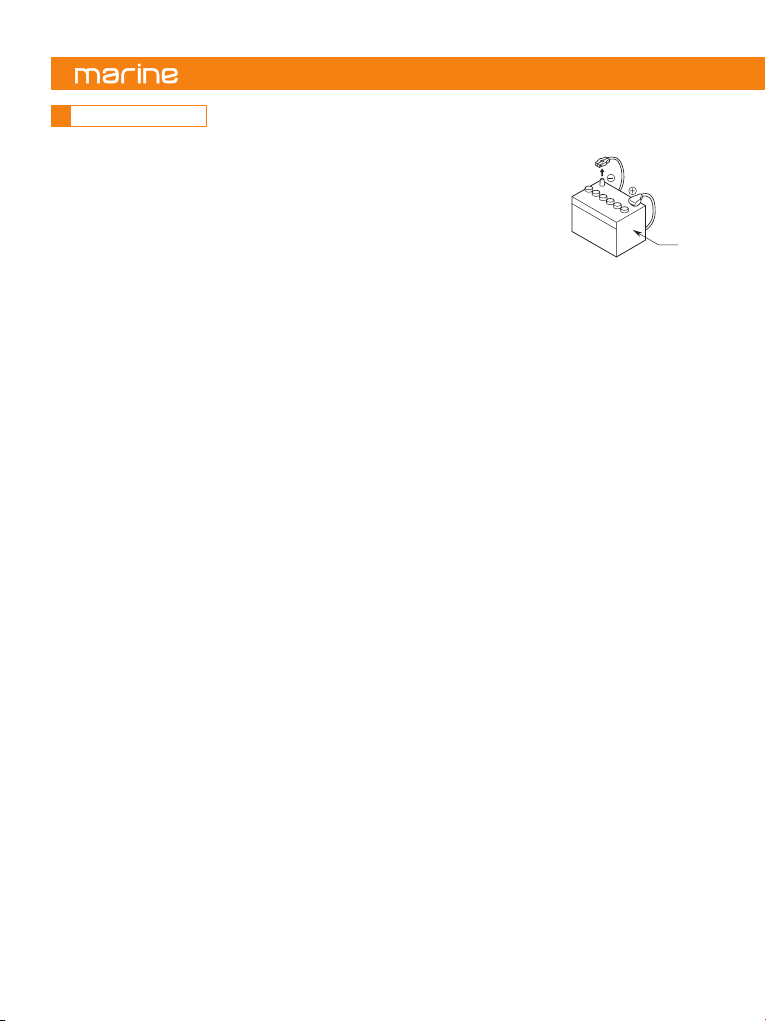
3. Make sure the battery “-” terminal is disconnected before starting. This is to prevent
short circuits during installation. (Figure 1)
5.2 Installation Cautions
1. In order to avoid any interference, do not install the tuner module or control unit in the proximity of the
engine compartment.
2. The use of unauthorized parts can cause permanent damage to the unit.
3. Always check your wire connections to ensure proper installation before turning on the unit.
4. Consult with your nearest dealer for proper installation or if other accessories are needed to complete the
installation.
5. Seek assistance if modifications or drilling holes to your vessel is needed.
6. Do not install the unit where it will be subjected to excessive moisture, dust, dirt, foreign particles or vibration.
Areas of high temperature from the engine, direct sunlight, or heat sources should also be avoided.
7. Do not install the unit in a location where it will interfere with the vessel operation, or it will injure the
passengers if there is a sudden or emergency stop.
Battery
Figure 1
6
Page 7
USA EUR USB RPT RDM LOUD EQ
FM1
106.50
USAEUR USB RPT RDM LOUDEQ
FM1
106.50
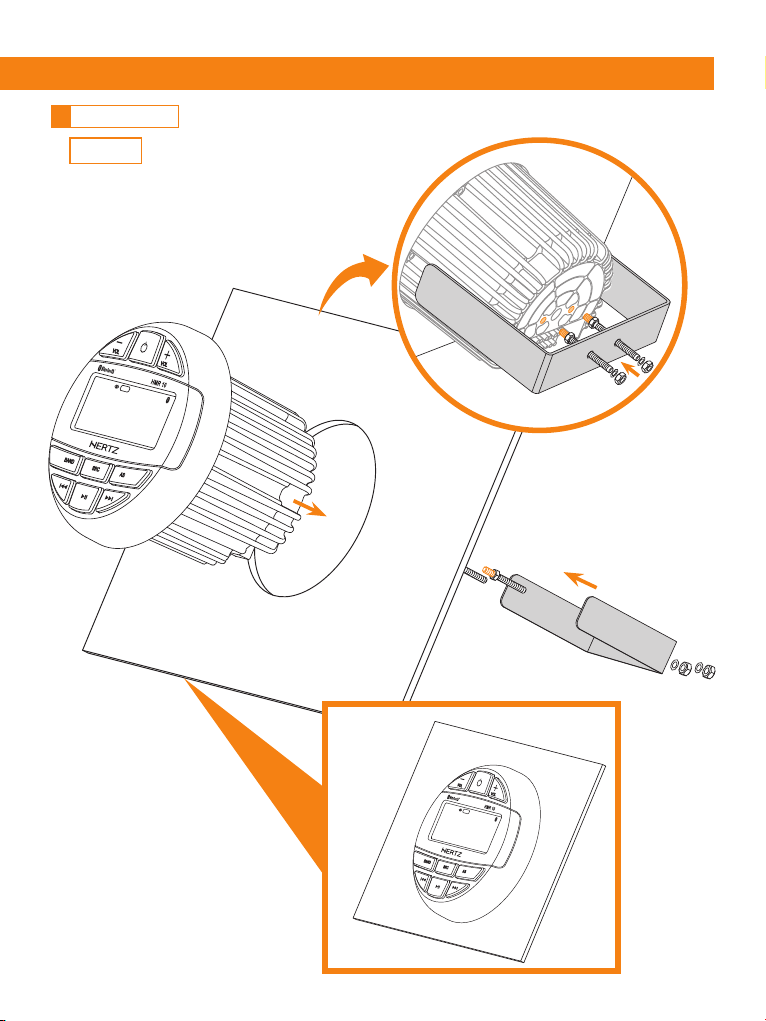
6 MOUNTING
HMR 10
Owner’s Manual
7
Page 8
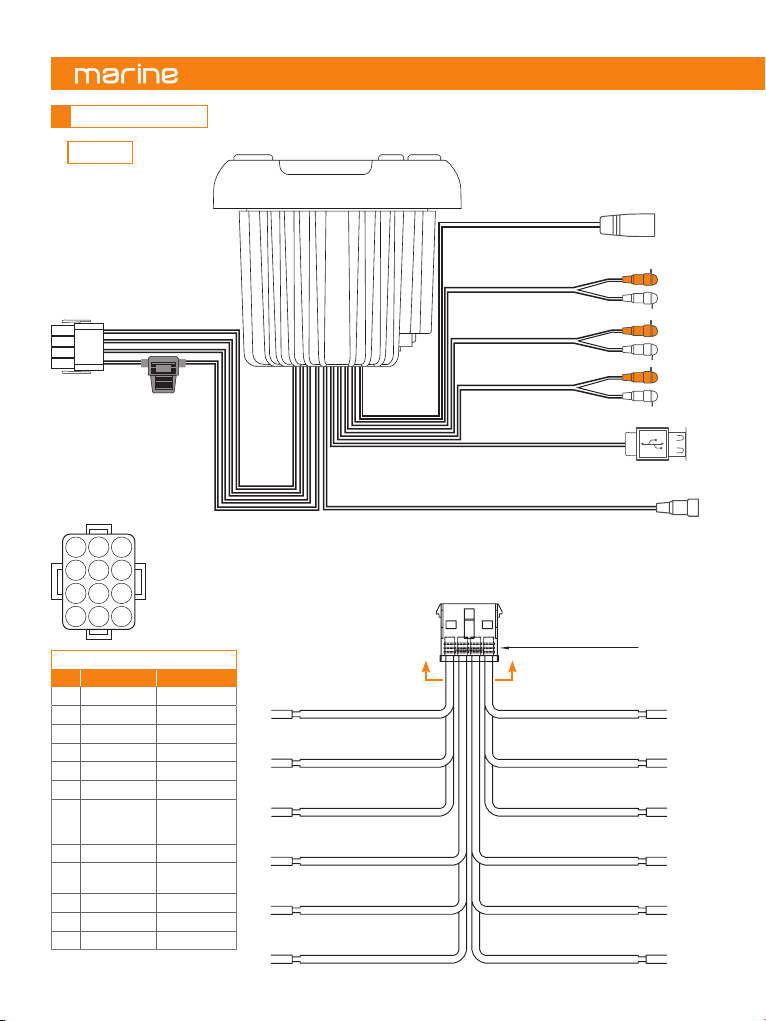
7 CONNECTIONS
HMR 10
FUSE
(10A)
BLACK
RADIO ANTENNA
WHITE Aux In
BROWN Front Out
BLACK Rear Out
BLACK
Rch Red
Lch White
Rch Red
Lch White
Rch Red
Lch White
USB
A-A
321
654
987
121110
12 pin Harness pin out
No. Wire color Description
Yellow Battery (+12V)
1
White/black Front left -
2
White Front left +
3
Red ACC (+12V)
4
Grey/black Front right -
5
Grey Front right +
6
Blue
7
Green/black Rear left -
8
Green Rear left +
9
Black GND
10
Violet/black Rear right -
11
Violet Rear right +
12
Note: cable out view
8
Antenna/
Remote out
(+12V)
12 PIN HARNESS
A A
YELLOW BATTERY (+12V)
BLACK
Wired Remote Control INPUT
Water Seal (Blue)
WHITE FRONT LEFT +BLACK GROUND
WHITE/BLACK FRONT LEFT -
BLUE ANTENNA/REM OUT (+12V)GREEN REAR LEFT +
VIOLET REAR RIGHT +GREEN/BLACK REAR LEFT -
VIOLET/BLACK REAR RIGHT -GRAY FRONT RIGHT +
RED ACC (+12V)GRAY/BLACK FRONT RIGHT -
Page 9
8 CONTROLS
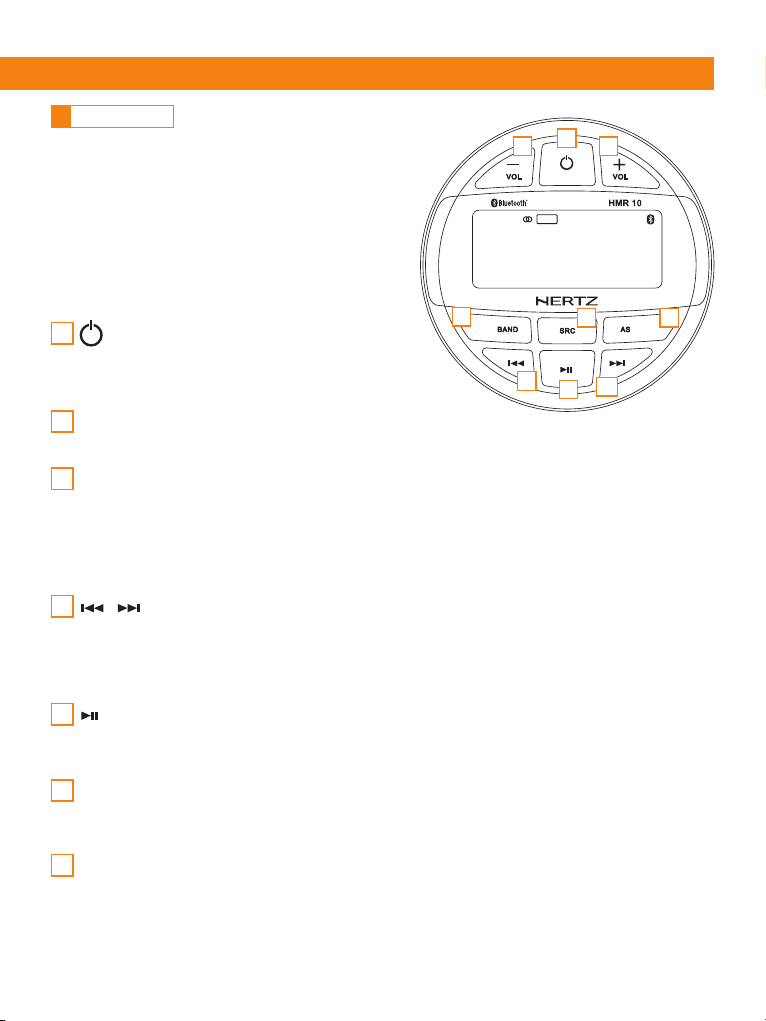
8.1 Operational Panel
USA EUR USB RPT RDM LOUD EQ
106.50
8.2 Name of Buttons and their Functions
1
Button
- Mute ON / OFF (short press)
- Power On (short press)
- Power OFF (long press)
2
VOL +/- Button
- Adjust volume level
3
AS Button
- AM/FM mode: entering manual tuning (short press) the display shows “MANUAL”.
The System will revert to “AUTO” mode after a few seconds if no button is pressed
- FM mode: auto storing of the first 18 strongest stations (FM1, FM2, FM3). (Long press).
- AM mode: auto storing of the first 12 strongest stations (AM1, AM2). (Long press).
- USB mode: a long press enter USB music file browsing (please see “9.3 USB mode operation”)
/ Button
4
- AM/FM mode: previous/next preset station (short press).
- AM/FM mode: SEEK the next/previous strongest station (long press).
- USB/BT mode: previous/next track (short press).
- USB/BT mode: fast forward / rewind (press and hold).
6
4
Owner’s Manual
1
22
FM1
7 3
4
5
5
Button
- AM/FM mode: SAVE a preset station (long press). (please see “9.2 Radio operation”).
- USB/BT mode: PLAY or PAUSE playback (short press).
BAND Button
6
- AM/FM mode: change band.
- USB mode: change display info (Title, Artist, Album name, Track number and Playback time) (short press).
7
SRC Button
- Toggle the audio source (short press).
- Enter into system MENU (long press).
- Then short press “SRC” to move to the next option.
- Use the “VOL +/-” button to change the option value.
9
Page 10
9 OPERATIONS
9.1 Basic Operation
WARNING: when the unit is turned on, starting and stopping the engine with its volume raised
to the maximum level may cause hearing damage. Make sure you adjust the volume in advance
Power On/Off
Note:
- Start the engine before using this unit.
- Be careful about using this unit for a long time without running the engine. If you drain the vessel battery,
you may not be able to start the engine and this can reduce the service life of the battery.
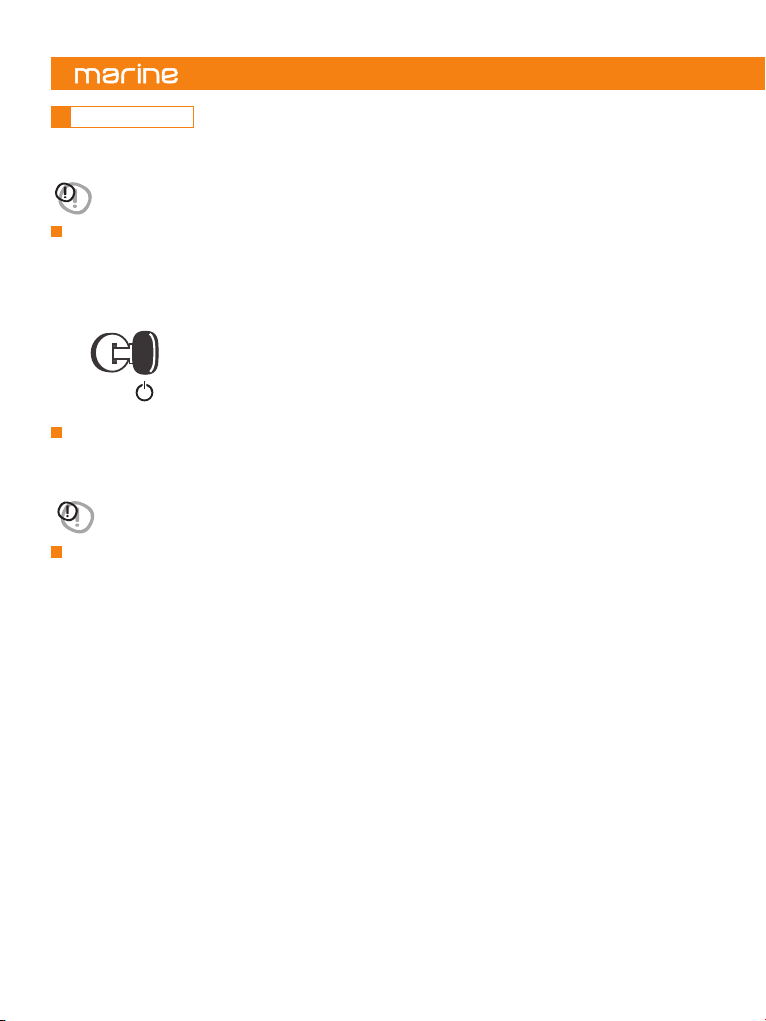
1. Start the engine.
Engine ON position
2. Press the button to turn on the power in standby mode. Press and hold to turn off the power.
3. Press the SRC button to toggle source among Tuner, USB, BT Music, Aux In.
Adjusting the volume
Press VOL + / VOL- button to increase or decrease the volume.
The adjustable range of volume is 0 to 40.
WARNING: while boating, keep the volume at a level at which external sounds can still be heard.
Please be aware of the volume levels in residential, family areas and local volume level ordinances.
System menu
- Press and hold SRC to enter system menu.
- Press SRC to move to the next option.
- Use the VOL +/- button to change the option value / setting.
1 Bass:
Press VOL + or VOL - to adjust the desired Bass level range from -7 to +7.
2 Treble:
Press VOL + or VOL - to adjust the desired Treble level range from -7 to +7.
3 Balance:
Press VOL + or VOL - to adjust the Balance between the right and left speakers from R10
(full right) to L10 (full left).
4 Fader:
Press VOL + or VOL - to adjust the Fader between the front and rear speakers from R10
(full rear) to F10 (full front).
5 Beep:
Press VOL + or VOL - to select beep on/off.
6 EQ (Preset Equalizer Setting): Press VOL + or VOL - to change EQ:
Hertz EQ -> Classic -> Pop.
7 LOUD:
Press VOL + or VOL - to select ON/OFF.
8 Area:
Press VOL + or VOL - to select between USA, Europe.
9 P-VOL:
Press VOL + or VOL - to select the desired volume level upon turn on.
10
Page 11
Owner’s Manual
9.2 Radio Operation
Select Tuner as Playing Source
Press SRC button to select the Tuner mode.
Global Tuner
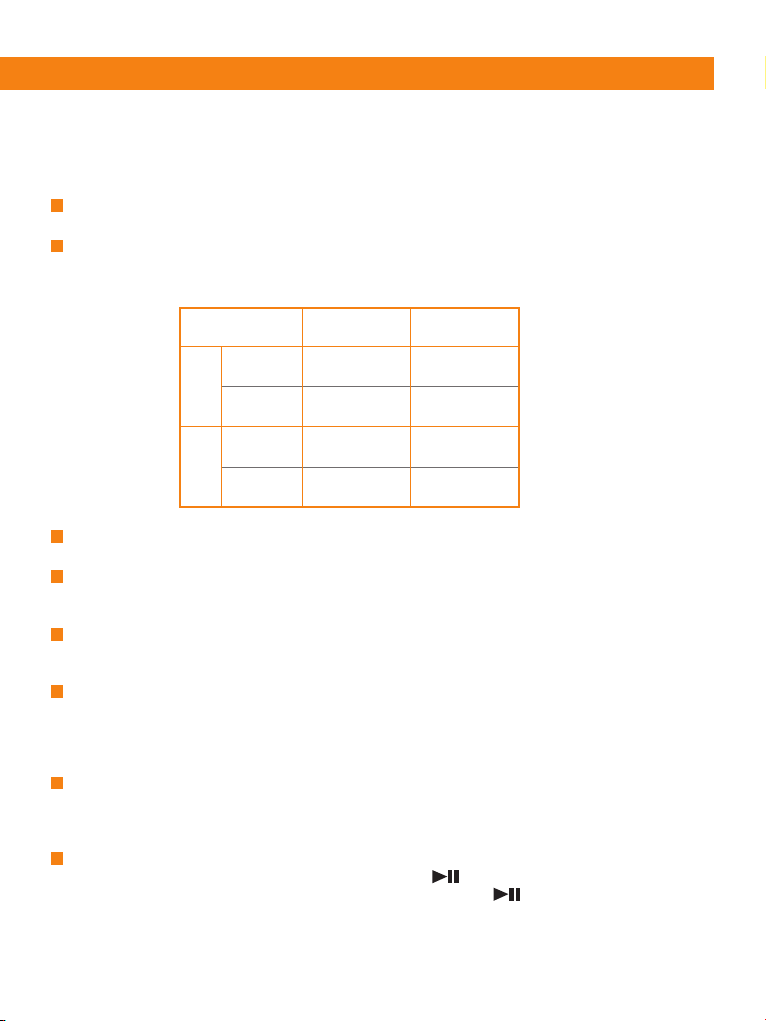
This unit is initially set to USA frequency intervals of 10KHz for AM and 100KHz for FM.
When using it outside the USA, the frequency reception range can be switched to the intervals below.
AM
FM
Frequency
spacing
Frequency
range
Frequency
spacing
Frequency
range
USA
Standard
10KHz 9KHz
530 - 1710KHz 522 - 1620KHz
100KHz 50KHz
87.5 -
107.9MHz
Europe
Standard
87.5 - 108MHz
Select the Radio Band
Press BAND button to select one radio band from FM1, FM2, FM3, AM1, AM2.
Preset station selection
- short press SEEK - to move to the previous preset.
- short press SEEK + to move to the next preset.
SEEK Tuning
- long press SEEK - to SEEK the previous strongest station.
- long press SEEK + to SEEK the next strongest station.
Manual Tuning
short press AS button to enter manual tuning.
- the display shows MANUAL (the system reverts to AUTO mode after a few seconds if no button is pressed).
- press SEEK - or SEEK + to manual tune the desired frequency (the system reverts to AUTO mode after a
few seconds if no button is pressed).
Auto Store
Only stations with sufficient signal strength will be detected and stored in the memory.
Press and hold the AS button to automatically find the first 18 strongest stations and store them into presets.
The new stations replace any stations already stored in the band.
Save a preset
Tune the desired station / frequency and then press and hold button, the preset number starts to blink.
Use the SEEK buttons to select desired preset number then long press button to save it.
11
Page 12
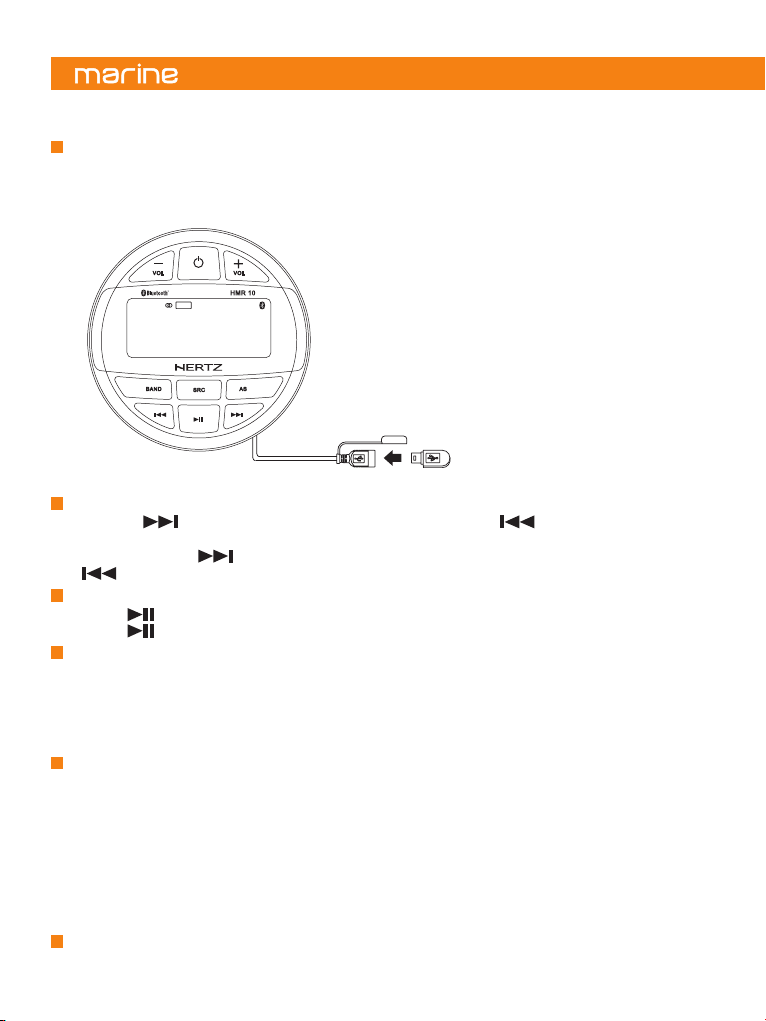
9.3 USB Mode Operation
Connect
1. Insert a USB device into the USB pigtail.
2. To remove the USB device, you should select another source or turn off the power, in order to avoid damaging
the USB device. Then take off the USB device.
USA EUR USB RPT RDM LOUD EQ
FM1
106.50
Select a Track
1. Press the button to move on to the next track/song. Press the button to go back to the
previous track/song.
2. Press and hold the button to fast forward through the track/song. Press and hold the
button to rewind through the track/song.
Play / Pause
Press the button to pause the track/song that is currently playing.
Press the button to resume playing the track/song that has been paused.
Repeat Feature
This function allows you to Repeat All tracks/songs, repeat the currently
playing track/song or turn the Repeat feature OFF.
1. Press AS button once, it will display “REPEAT ONE”. The “RPT” logo lights up.
2. Press AS twice, it will display “RANDOM”. The “RDM” logo lights up.
3.Press AS button three times, it will display “REPEAT ALL”. The “RPT” logo turns off.
Browsing
- Long press “AS” button to enter USB file browsing, playback stops, then use “SEEK” buttons to find the
desired folder (folders are distinguished by the symbol “>” before the name) or track.
- Press “AS” button to enter the folder or to play the selected song.
- Press “BAND” button to exit the current folder.
- The system will revert to “Playback” mode after a few seconds if no button is pressed.
- The upper bar will display the current browsing level. Example:
• “_-------“ means that you are browsing the USB ROOT.
• “-_------“ means that you entered into a folder.
• “--_-----“ means that you entered into a folder contained into another folder.
Track Info
Short press BAND button to change the displayed info.
12
Page 13
Owner’s Manual
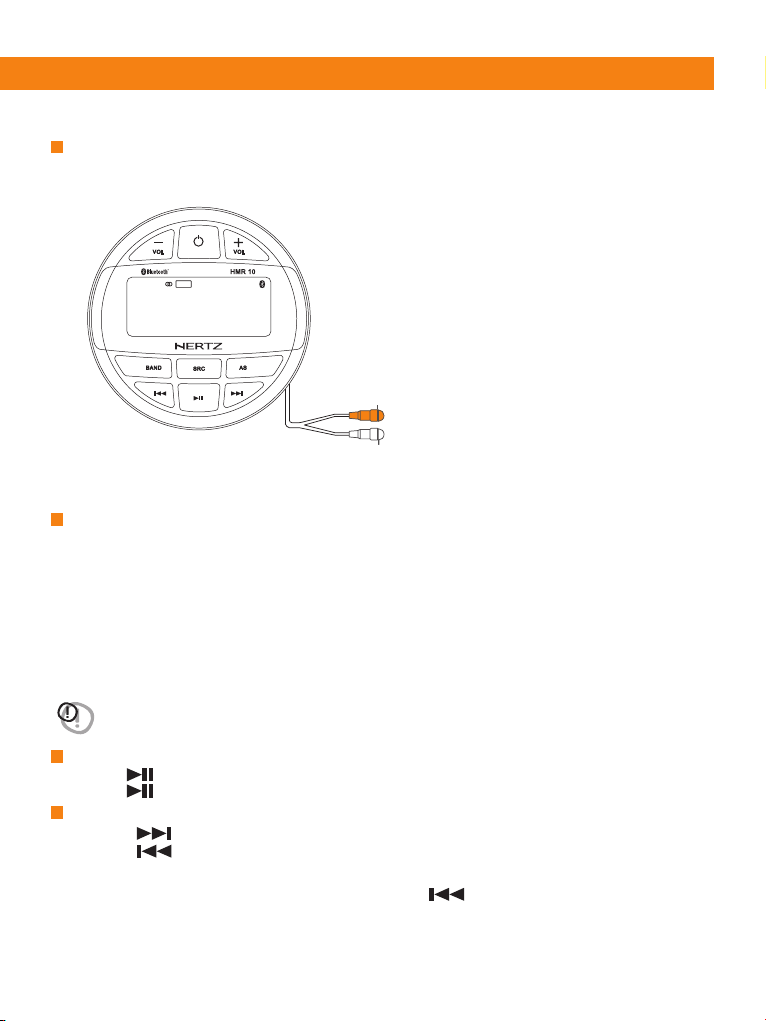
9.4 AUX In Mode Operation
The AUX In RCA inputs in this system are provided to allow playback of sounds and music from external devices
connected to this unit. Press the SRC button to select “AUX In”.
USA EUR USB RPT RDM LOUD EQ
FM1
106.50
Rch Red
Lch White
9.5 Bluetooth Operation
Pair the Bluetooth Device
1. From your Bluetooth enabled device, turn Bluetooth ON and search for Bluetooth device.
2. When a list of available Bluetooth devices appears on your Bluetooth device select HMR 10
3. “CONN. OK” will appear on the display.
4. The unit will automatically enter the BT Music source and you can now start streaming audio from your Bluetooth
enabled device.
Note:
When the device is connected long pressing the AS button the device will be disconnected. Short press AS
button to reconnect the same device (it may take up to 20 seconds).
WARNING: please avoid operating your connected mobile phone while audio streaming as this may
cause noise or stuttering on the song playback. Audio streaming may or may not resume after
telephone interruption as this depends on the mobile phone used.
Play / Pause
Press the button to pause the track/song that is currently playing.
Press the button to resume playing the track/song that has been paused.
Select a Track
1. Press the button to move on to the next track/song.
2. Press the button to go back to the previous track/song.
Note:
Playing order will depend on Bluetooth audio player. When the button is pressed some A2DP devices
will restart the current track depending on the duration of the playback. Some Bluetooth audio players may
not allow play / pause synchronization with this unit. Please make sure both the device and the main unit are
in the same play / pause status in BT Music mode.
13
Page 14
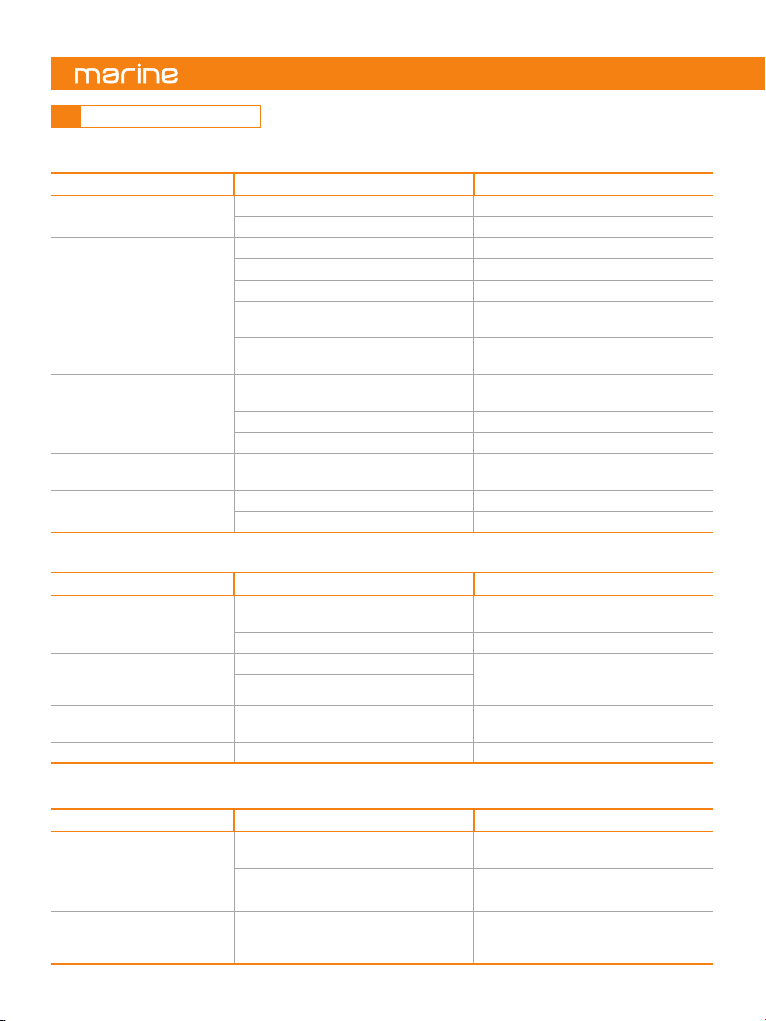
10 TROUBLESHOOTING
10.1 General
Problem Cause Remedy
Unit cannot power on.
No/low audio output.
Poor sound quality or
distortion.
Unit resets itself when engine
is off.
Auto seek function can not find
any stations.
Unit fuse blown. Replace with new fuse of correct value.
Vessel battery fuse blown. Replace with new fuse of correct value.
Incorrect audio output connection. Check wiring and correct.
Volume set too low. Increase volume level.
Speakers damaged. Replace speakers.
Heavily biased volume balance.
Speaker wiring is in contact with metal
part of vessel.
Speaker power rating does not match
unit.
Wrong connections. Check wiring and correct.
Speaker is shorted. Check wiring and correct.
Incorrect connection between ACC and
Battery.
The antenna cable is not connected. Insert the antenna cable securely.
The signals are too weak. Select a station manually.
Adjust the channel balance to center
position.
Insulate all speaker wiring connections.
Replace speakers.
Check wiring and correct.
10.2 USB
Problem Cause Remedy
USB device cannot be inserted.
USB device is not recognized.
No sound heard with the
display showing “No File”.
Sound skips or is noisy. MP3/WMA files are not encoded properly. Use properly encoded MP3/WMA files.
The USB device has been inserted incorrectly.
The USB connector is broken. Replace with a new USB device.
The USB device is damaged.
Connectors are loose.
No MP3/WMA file is stored in the USB device.
Reverse the connection direction of the
USB device and try again.
Disconnect the USB device and reconnect.
If the device is still not recognized, try
replacing it with a different USB device.
Store these files properly in the USB device.
10.3 Bluetooth
Problem Cause Remedy
Cannot pair the Bluetooth
enabled device with the audio
system.
Audio quality is poor after
connection with a Bluetooth
enabled device.
14
The device does not support the profiles
required for the system.
The Bluetooth function of the device is
not enabled.
The Bluetooth reception is poor.
The external BT device is not compatible.
Refer to the user manual of the device for
how to enable the function.
Move the device closer to the audio
system or remove any obstacle between
the device and the system.
Page 15
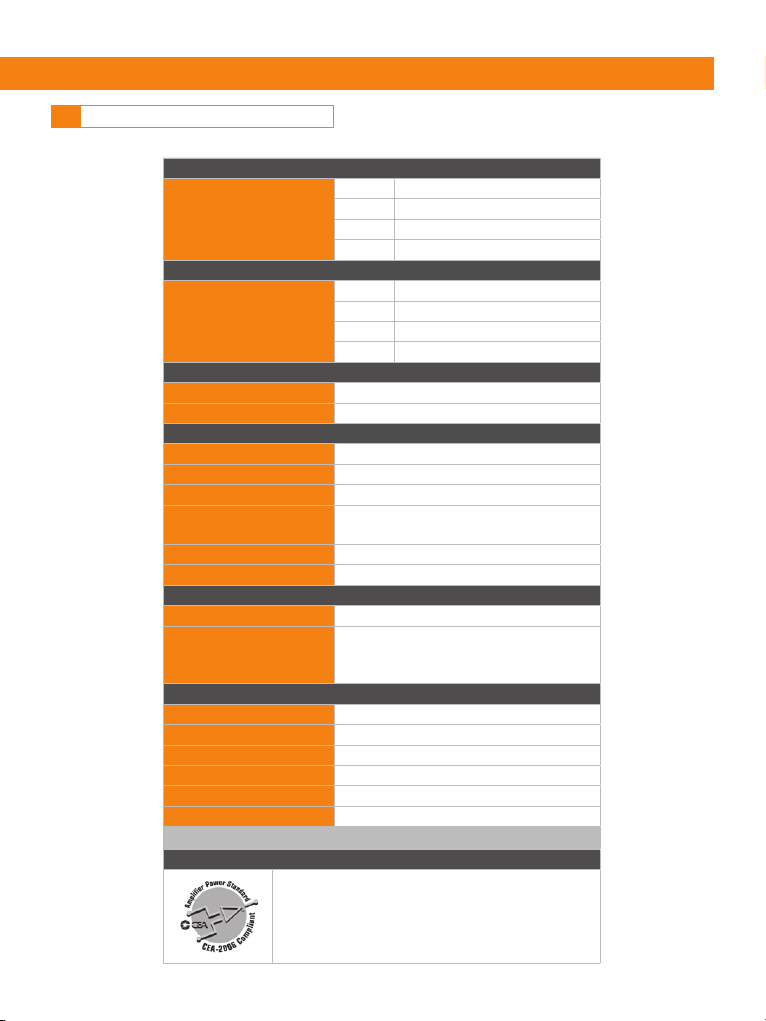
11 TECHNICAL SPECIFICATIONS
FM TUNER
Frequency Range
AM TUNER
Frequency Range
AUDIO
Maximum Power Output 50 W x 4 (@ 4 Ohm)
Max Output Level @ 0.1 % THD 4 x 4 V RMS (Front - Rear)
USB
USB 2.0 Full Speed
USB Port 1 A
USB Voltage 5.0 V
Maximum MP3/WMA Songs
USB Flash Drive Max Capacity 32 Gb
Compatible Format FAT/FAT32
BLUETOOTH
Specification Bluetooth Version 2.1 + EDR
Supported Profiles
GENERAL
Power Supply Voltage 12 V DC (10,5 to 16 V allowable)
Grounding System Negative Ground
Speaker impedance 4-8 ohms per channel
IP Protection IP66
Over Voltage Alarm
Over Temperature Protection
NOTE: Specifications and design are subject to change without notice for further improvement.
CEA SPECIFICATIONS
Owner’s Manual
USA 87.9 - 107.9 MHz
Europe 87.5 - 108.0 MHz
Asia 87.5 - 108.0 MHz
Australia 87.5 - 108.0 MHz
USA 530 - 1710 KHz
Europe 531 - 1602 KHz
Asia 531 - 1629 KHz
Australia 531 - 1629 KHz
Max Folder 6000
Max File 60000
• A2DP (Advanced Audio Distribution Profile)
• AVRCP 1.5 (Audio/Video Remote control profile)
• SSP (Simple Secure Pairing)
Output power @ 4Ω, ⩽1% THD+N, 14.4 V: 22 W x 4 RMS
15
Page 16

PART OF ELETTROMEDIA
Strada Regina Km 3,500 - Marignano
62018 Potenza Picena (MC) Italy
T +39 0733 870 870 - F +39 0733 870 880
www.elettromedia.it
FML001_REV.E
All specifications subject to change without notice
 Loading...