

HERO 330SEL, 330SES Operating And Maintenance Instructions Manual
AIRLESS SPRAY EQUIPMENT
1997 VERSION
BEGINNING AT
SERIAL NUMBER
330SES - 760381
330SEL - 780651
SAFETY, OPERATING AND
MAINTENANCE INSTRUCTIONS
Do Not attempt to operate this machine until you have read and understand
ALL safety precautions and operating instructions.
Equipment and chemicals when used improperly can be dangerous
H.E.R.O. INDUSTRIES LTD. 330SES / 330SEL MANUAL - “B” VERSION
AND PARTS LIST
35

H.E.R.O. WARRANTY
H.E.R.O. INDUSTRIES , guarantees this airless pump to be free of defects in
materials and workmanship to the original owner, for a period of one full year
from the date of purchase.
The warranty entitles the owner to parts replacement at no charge. The parts
replacement warranty is valid for any necessary replacement, whither caused
by material or workmanship defect or simple wear. The hydrapulse membrane
(part# 4-04-22-4500) is warranted for LIFE. Installation costs for the
hydrapulse membrane is provided for the first 12 months only. H.E.R.O.
Industries offers no warranty on the intake ball, outgo ball, drive belt, hoses,
gun or accessories, plastic, rubber, other soft goods or motor used in or
supplied with the H.E.R.O. sprayer.
Motor, accessories, etc., which are supplied by other manufacturers and are
attached to or supplied with the H.E.R.O. airless pump, are warranted only to
the extent that these parts are warranted by their respective manufacturers.
Warranty claims must be made directly to such manufacturers or their local
authorized service depots.
The warranty is only applicable to the original purchaser and the equipment
has been properly used, operated and maintained in accordance with all
instructions, precautions and warnings contained in this manual. For the
purpose of this warranty, damage resulting from accident, abuse, improper
cleaning or operation, fire, flood, or Act of God, is not covered.
H.E.R.O.’s liability is limited to replacing parts found to be defective or worn
and does not include; transportation costs, damage or other expenses of any
kind incurred in connection with the purchase and use of this sprayer.
Repairs claimed under warranty must be performed at an authorized H.E.R.O.
Service Center, using only genuine H.E.R.O. parts. Parts necessary under
warranty claim will be supplied by your local H.E.R.O. Service Center.
DO NOT return worn parts to factory without authorization.
To qualify for the warranty, the warranty card (attached to this page) supplied
with this H.E.R.O. airless pump, must be completed with equipment serial
number and signed by the purchaser, and postmarked within ten (10) days of
purchase.
H.E.R.O. INDUSTRIES LTD. 330SES / 330SEL MANUAL - “B” VERSION
1

TABLE OF CONTENTS
For greatest user satisfaction, please familiarize
yourself with all maintenance and operational instructions
Important Safety Precautions ..............................................................................................3-4
Introduction ...........................................................................................................................5
Operating Instructions ............................................................................................................5
Setting Up To Spray ..............................................................................................................6
Flushing The Unit ..................................................................................................................7
Special Notes .........................................................................................................................8
Airless Spray Painting Suggestions ...................................................................................9-11
Trouble Shooting ............................................................................................................12-20
Hydrapulse Membrane Replacement ....................................................................................21
Intake Seat Replacement ......................................................................................................22
Piston Repairs .................................................................................................................23-24
Outgo Valve ........................................................................................................................25
Prime Valve Repairs ............................................................................................................26
Pressure Control Valve Repairs ............................................................................................27
Accessories .........................................................................................................................28
Parts List And Descriptions .............................................................................................29-32
Hardware and Motor Parts ...................................................................................................32
Exploded Unit Diagram ..................................................................................................33-34
IMPORTANT
NOTE: AS WITH ALL MECHANICAL EQUIPMENT, PROPER OPERATING AND
MAINTENANCE PROCEDURES ARE REQUIRED TO KEEP YOUR H.E.R.O. AIRLESS PUMP
PERFORMING TO YOUR SATISFACTION. THE FOLLOWING SAFETY, OPERATING AND
MAINTENANCE INSTRUCTIONS ARE IMPORTANT.
Read and understand this manual completely, especially with regard to all safety precautions. Read and
follow instructions on all warning labels on your equipment. Keep the warning labels clean and readable at
all times. Order new labels from your local distributor or from H.E.R.O. Industries if needed.
The manufacturer shall not be responsible for any loss, damages, or injury of any kind or nature whatsoever
resulting from the use the equipment other than in strict compliance with the instructions, cautions and
warnings contained in this operating and instruction manual and as displayed on the face of the equipment.
This system is capable of producing 2400 psi. ( spray pressure ). To avoid rupture and injury DO NOT
operate this pump with components rated less than 3000 psi. working pressure (including but not limited to
spray guns, hose and connections).
Before servicing, cleaning or removing of any part, shut off power and relieve pressure.
H.E.R.O. INDUSTRIES LTD. 330SES / 330SEL MANUAL - “B” VERSION
2

IMPORTANT SAFETY PRECAUTIONS
WARNING
Material issuing from the spray tip is at high pressure. If fingers, or any part of the bo dy are placed near
the tip of the spray gun, it is possible that the spray could break the skin and inject some of the spray
material. If injury does occur, seek immediate attention of a medical doctor. Be prepared to inform the
doctor what fluid was injected, if the injury is of an injection nature. Equipment and chemicals when
used improperly can be dangerous!
ý NEVER place any part of the body in front of the spray tip or aim the gun toward any part of the
body.
ý NEVER point the gun toward any individual.
ý NEVER treat any injury as a simple cut. If injury does occur, seek immediate medical attention. Be
prepared to inform the doctor what fluid was injected.
ý NEVER allow another person to use the sprayer unless he is thoroughly instructed on its operation
and has read all safety precautions in this manual and all safety warning labels attached to unit.
ý NEVER use around children.
ý NEVER attempt to perform any maintenance or service on any part of the unit spray system without
first;
1. Shutting off the unit.
2. Disconnecting the power cord from the outlet.
3. Relieving all pressure in the pump by triggering the gun.
4. Locking gun trigger in "LOCKED" position, with gun locked closed.
ý NEVER operate the sprayer without the tip guard complete and in place.
ý NEVER spray any material in the vicinity of open flame, pilot lights, electrical outlets or any other
source of ignition.
ý NEVER spray volatile materials with flash points lower than 140 F (60 C).
ý NEVER attempt to stop any leakage in the paint line or at any fitting with your hand or any part of
your body. Immediately shut off the unit should leakage occur.
ý NEVER wash an electric motor, nor operate it in the rain or in wet or damp areas, to protect yourself
from electric shock.
ý NEVER allow paint hose to become kinked, or to vibrate against rough or sharp surfaces.
ý NEVER operate the unit at pressures higher than the pressure rating of the lowest rated component
in the system, or at pressure higher than factory preset.
ý NEVER spray in an enclosed area. The spraying area must be well ventilated to safely remove
chemical vapors.
ý NEVER operate the unit with worn or damaged accessories, or with accessories other than those
supplied by H.E.R.O. Industries, unless the accessories have been first specifically approved in
writing by H.E.R.O. Industries.
ý NEVER allow the unit to be serviced or repaired anywhere other than an authorized H.E.R.O.
Service Center, or with other than genuine H.E.R.O. parts or components.
ý NEVER leave unit unattended without first shutting off, triggering the gun to relieve all pump
pressure, and setting the trigger lock on gun in "LOCKED" position, with gun locked closed.
H.E.R.O. INDUSTRIES LTD. 330SES / 330SEL MANUAL - “B” VERSION
3

ALWAYS
þ ALWAYS follow H.E.R.O. recommendations for operation and safety completely.
þ ALWAYS ensure that switch is in off position before plugging in the electric motor.
þ ALWAYS set trigger lock on gun in "LOCKED" position when not in use, with gun locked close.
þ ALWAYS check connections and fittings for tightness before operating the unit.
þ ALWAYS locate the unit in a well ventilated area a minimum of 25 feet from the spray area.
þ ALWAYS ground the unit, the paint containers, and the object being sprayed to eliminate static
discharge. Ensure that all these objects remain grounded throughout the entire spraying operation.
þ ALWAYS use approved 3 prong grounded extension cord and approved grounded outlets of the
voltage and frequency specified on the motor. The outlet must be at least 25 feet from the spraying
area.
þ ALWAYS use approved 3 prong grounded extension cord not less than # 12/3 gauge up to 50 feet,
and not less than # 10/3 gauge up to 100 feet. DO NOT exceed 100 feet of extension cord.
þ ALWAYS use accessories and components approved for at least 3000 psi (working pressure) in the
spraying system.
þ ALWAYS use accessories and components supplied by H.E.R.O. Industries, or specifically
approved in writing by H.E.R.O. Industries on with the unit
þ ALWAYS examine accessories for wear or damage before operating the unit
þ ALWAYS use lowest possible pressure when flushing and cleaning the unit, and hold the gun firmly
against a metal container to reduce static discharge possibility.
þ ALWAYS wear a face filter mask when operating the unit.
þ ALWAYS ;
1. Turn off the motor
2. Disconnect the power cord from the outlet.
3. Relieve all pressure in the pump by triggering the gun.
4. Lock gun trigger in "LOCKED" position, with gun locked closed before attempting to perform any
maintenance or service on any part of the unit spray system.
þ ALWAYS wear safety glasses when operating the unit.
þ ALWAYS ensure fire extinguishing equipment is readily available and properly maintained in the spray
area.
þ ALWAYS observe good housekeeping and keep the spray area free from obstructions.
þ ALWAYS be aware that certain chemicals may react with aluminum, carbide, or other components in
the pump system. Read the manufacturer's label on all materials to be sprayed, and follow the
manufacturer's recommendations. If in doubt, consult your material sup plier to be sure.
H.E.R.O. INDUSTRIES LTD. 330SES / 330SEL MANUAL - “B” VERSION
4
H.E.R.O. AIRLESS SPRAY PAINTING
Welcome to the world of H.E.R.O. airless paint spraying. We are sure you will enjoy owning and operating
your new H.E.R.O. model 330SES or 330SEL. With H.E.R.O. airless spray equipment you will avoid the
inconvenience and mess of over spray. You are spraying paint, not air, and the paint is driven to the painting
surface in a clean, fan shaped spray which penetrates all cracks and corners. To attain these results, you must
adjust the pressure as low as possible. We recommend that you become familiar with your H.E.R.O. unit.
Discuss with your dealer the useful accessory items he has to offer - various types of tips, extension poles for
hard to reach areas, extra hose, etc. Use of accessory items is often the difference between a good job and an
excellent one!
OPERATING INSTRUCTIONS
WARNING
Do not attempt to operate this machine until you have read and understood all safety precautions and
operating instructions. Equipment and chemicals when used improperly can be dangerous.
Your H.E.R.O. airless sprayer has been fully factory tested prior to shipment.
BEFORE STARTING YOUR H.E.R.O. PUMP....
CHECK to ensure that the shipping seal has been removed from under the cap on the hydraulic tank.
Hydraulic tank should be at least 3/4 full of H.E.R.O. LVO hydraulic fluid.
CHECK all fittings and connections in the pump system, hose, and gun to ensure that they are tight.
CHECK to ensure that there is a spray tip in the gun, and that the tip is the correct size for the coating you
are to spray. ( There are various tips available, for each type of coating or configuration. See " Airless Spray
Tip " on page 11 , for proper tip selection.
CHECK to ens ure that you have H.E.R.O. strainer bags, H.E.R.O. Wonder Wash, appropriate thinner for
the paint, a waste container, and any other accessories you may require for the job.
CHECK to ensure that you have adequate extension cord size and length if the machine cannot be situated
immediately next to an electric outlet. Distances up to 50 feet require #12/3 wire grounded cord, up to 100
feet require #10/3 wire grounded cord. DO NOT exceed 100 feet of extension cord. If distance is greater,
obtain and install ext ra length of H.E.R.O. airless spray hose.
READ THIS MANUAL THOROUGHLY.
H.E.R.O. INDUSTRIES LTD. 330SES / 330SEL MANUAL - “B” VERSION
5
SETTING UP TO SPRAY
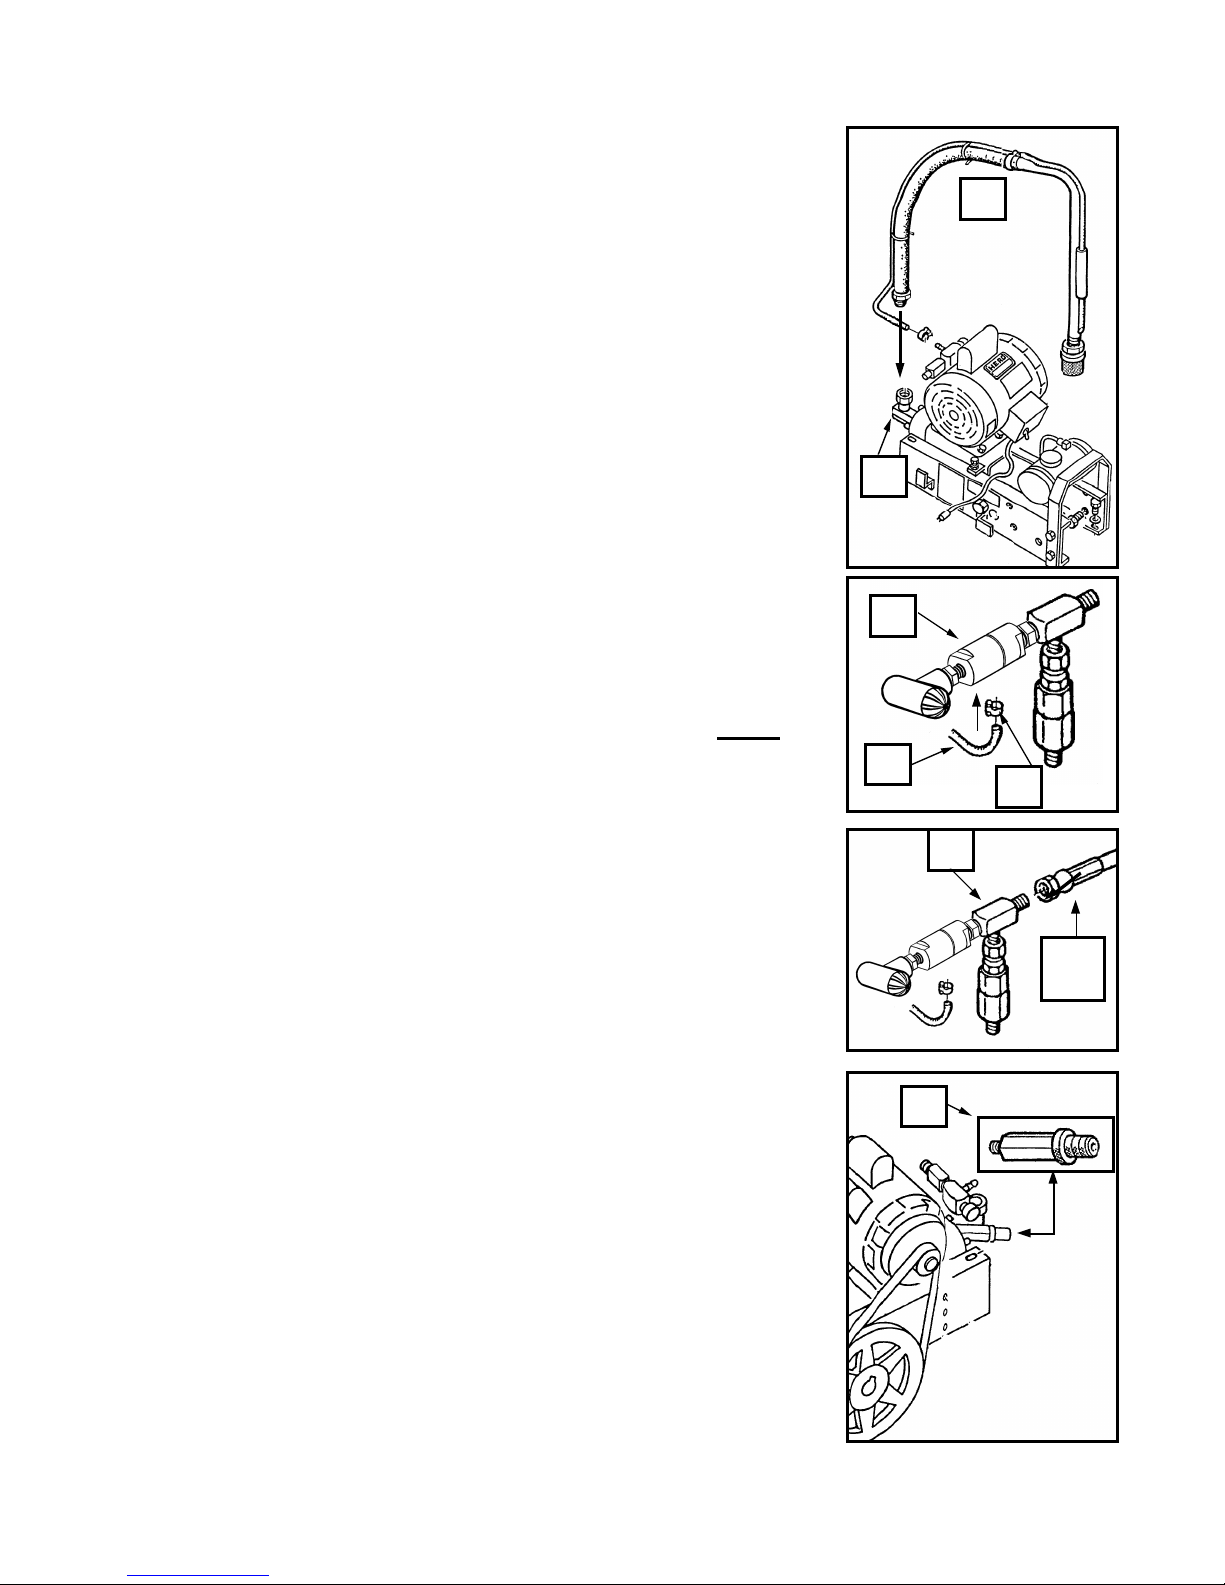
1 Remove unit from shipping carton.
2 Attach intake siphon assembly (ref# 7) to intake elbow (ref# 8). Use
caution to avoid over tightening which may result in cracked or broken
fittings.
3 Attach prime hose (ref# 50) to prime valve (ref# 49). Secure with clamp
(ref# 51).
4 Attach paint hose to outgo tee (ref# 35).
5 Attach gun to paint hose. NOTE; Spray tip and tip guard should be
attached to gun prior to attaching to hose.
6 Place intake siphon assembly into a clean 5 gallon pail.
7 Install strainer bag (accessory item 5GAL SB) in pail and secure with large
rubber band ( accessory item 106). NOTE; Strainer bag must remain 4
inches from the bottom of pail
8 Trigger gun to release any pressure in the unit. Use extreme caution to
ensure that the gun is not directed towards anyone or any object which may
be damaged. NOTE; Unit may contain storage solution.
9 To remove storage solution, add one gallon of thinner, compatible with the
type of paint to be used, to the siphon pail.
10 Turn pressure control knob (ref# 71) counter clockwise to lowest pressure
setting.
11 Be sure motor switch is in "OFF" position. Plug unit into 115V, 15 amp.,
grounded circuit. NOTE; If using an extension cord, you MUST use a
#12/3 wire grounded cord, up to 50 feet or #10/3 wire grounde d cord, up
to 100 feet. DO NOT EXCEED 100 FEET OF EXTENSION CORD . If
distance is greater, purchase and install additional lengths of airless spray
hose.
12 Turn motor switch "on".
13 Turn prime valve knob (ref# 45) counter clockwise until fully open. Allow
thinner to circulate back into the siphon pail for a few minutes. Then turn
the prime valve knob clockwise to close the valve ( close tightly ), and
direct the flow to the paint hose and gun. Leave the pressure setting low.
14 Trigger gun into waste container.
15 Pour paint through strainer bag into siphon pail.
16 Repeat steps 13 and 14, until paint flows freely. NOTE; Never turn prime
valve back to "prime" position when the unit is under pressure .
17 Spray a test pattern. Begin by spraying a test pattern onto old newspaper or
other scrap material.
18 Increase the pressure, slowly at first, by turning the pressure contro l knob
clockwise. Continue increasing the pressure until the spray pattern is
uniformed from top to bottom, with no heavy areas. Secure pressure
control setting, by turning the silver lock ring (ref# 72) counter clockwise
until snugly against the face of the pressure control knob. If heavy areas are
still visible at maximum pressure setting, thin the paint with the correct
thinner, according to the paint manufacturer's recommendations.
7
8
49
50
51
35
Paint
Hose
70
H.E.R.O. INDUSTRIES LTD. 330SES / 330SEL MANUAL - “B” VERSION
6
FLUSHING THE UNIT AT SHUTDOWN
OR COLOR CHANGE
If shutting down for a short period of time, it is sufficient to trigger the gun
to relieve pressure. Then set the safety lock o n gun to "locked" position with
the gun locked closed and immerse the gun in a container of the correct
thinner for the paint yo u are spraying.
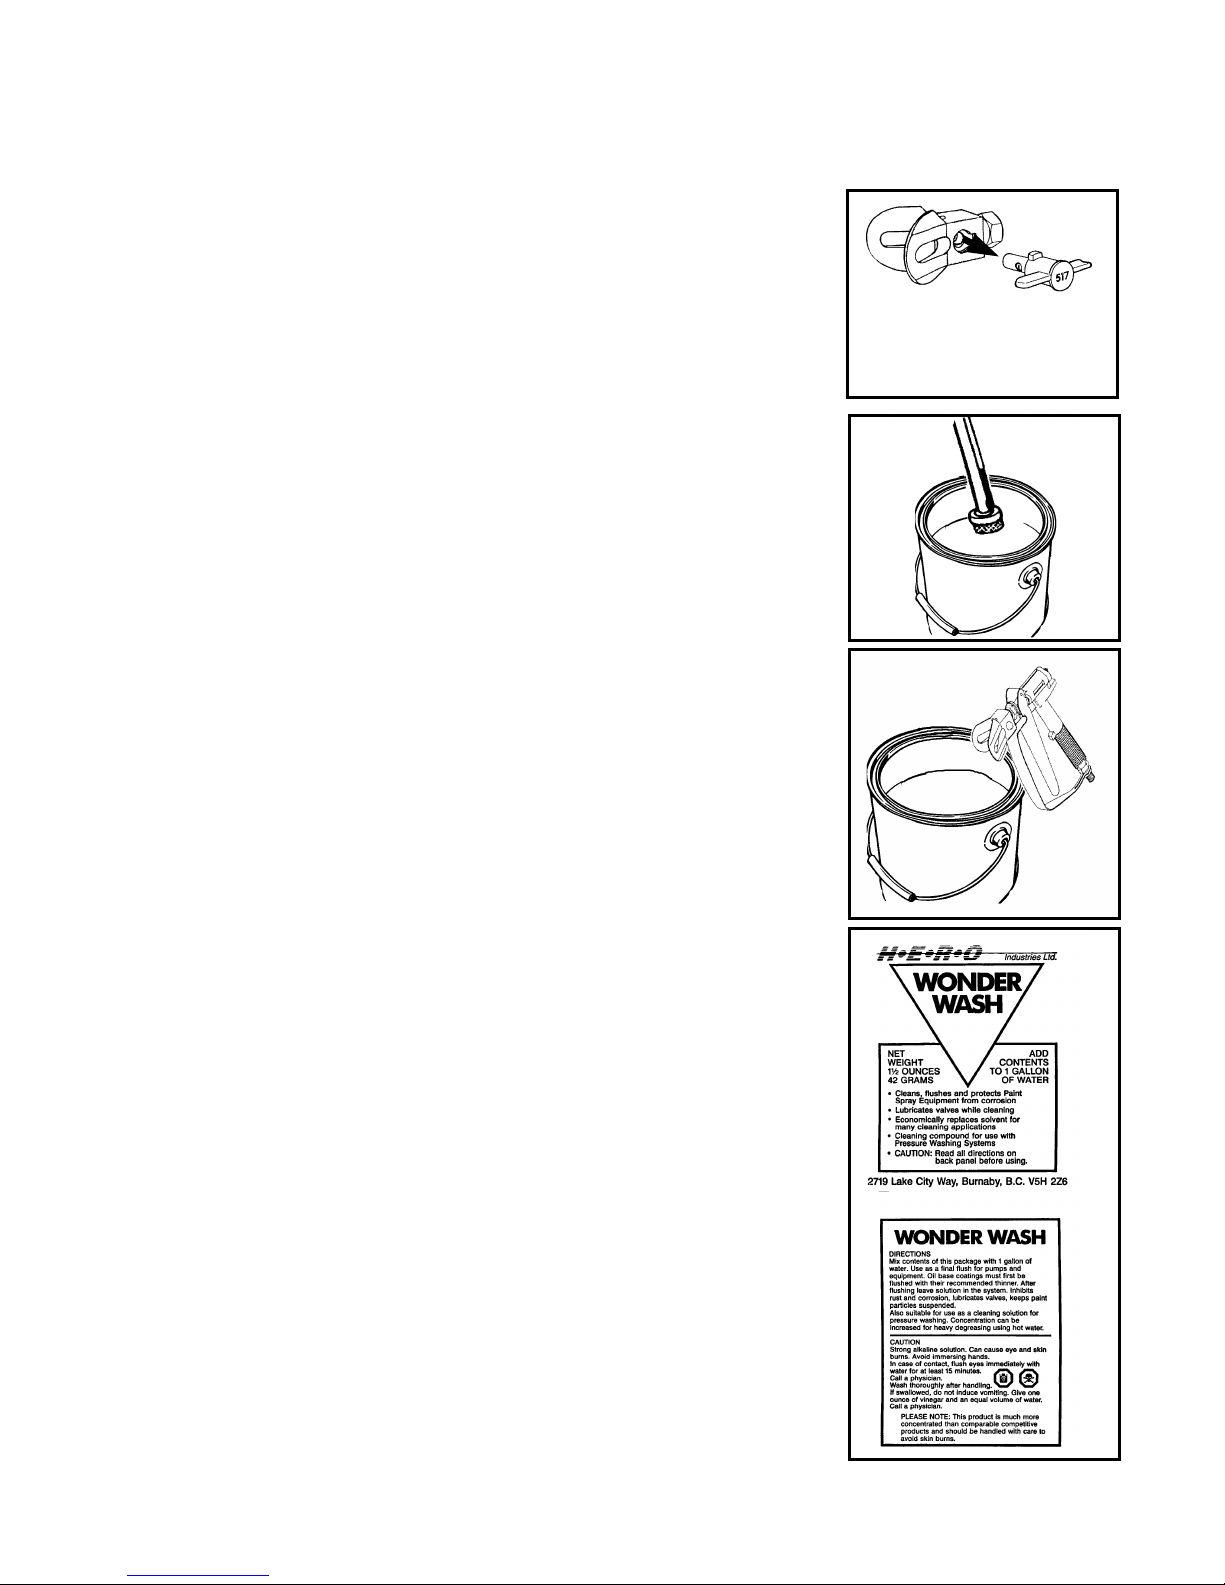
1. Remove spray tip from gun.
2. Turn pressure control knob counter clockwise to low pressure setting.
Only use sufficient pressure to allow material to move through the
sprayer. DO NOT operate at or near full pressure.
3. Remove siphon assembly from paint container.
4. Trigger gun, back into paint container, until unit runs dry.
NOTE: Pump and spray hose will continue to contain paint. This paint
may be recovered by placing prime hose into paint container and draining
the remainder while re-priming with cleaning fluid. See step 5* and 6*.
5. Place siphon assembly in container of correct thinner, for the spray
product being used, and prime the pump as shown in step 13, of
"Spraying". *See special notes from step 4. Allow thinner to circulate
back into the container for a few minutes to flush the prime valve.
6. Close prime valve.
7. Trigger gun into paint container until thinner comes through. *See special
notes from step 4. Re-direct flow into waste container and continue
spraying until thinner runs clear. Heavily soiled thinners may have to be
changed to complete cleaning job.
8. Lift siphon assembly and allow pump to run dry.
9. Repeat procedure using a gallon of H.E.R.O. Equipment Wonder Wash
solution. If not using Wonder Wash, unit must not be stored with water.
Only store with a non corrosive material ( Paint thinner, solvent ).
10. Switch unit "off" and trigger gun to relieve remaining pressure.
11. Remove and rinse gun handle filter in correct thinner.
SPECIAL STORAGE INSTRUCTIONS
In areas where the sprayer is NOT used 12 months of the year, special
preparations must be used for winter or off season storage. Because solvents
evaporate quickly, they should not be used for long term storage. A petroleum
based solution ( solvent and oil ) should be used as an extended storage
material. DO NOT allow storage solution to freeze in the sprayer.
H.E.R.O. Equipment Wonder Wash, available from your H.E.R.O.
distributor, will provide the added cleaning benefits of solvent at a much
lower cost. Suitable as a short term ( 1- 2 days ) storage solution only
CAUTION
Remove tip from base when flushing
and cleaning airless pumping system
H.E.R.O. INDUSTRIES LTD. 330SES / 330SEL MANUAL - “B” VERSION
7

SPECIAL NOTES AND INSTRUCTIONS
8 paint hose.
NEVER LEAVE THE UNIT UNDER PRESSURE WHEN NOT SPRAYING (MOTOR TURNED
OFF). RELIEVE PRESSURE BY TRIGGERING GUN. NEVER STORE THE UNIT WITH PAINT
OR WATER IN THE PUMP SYSTEM, EVEN OVERNIGHT.
ý NEVER attempt to start the motor when the unit is under pressure. Relieve pressure and follow
instructions in "Setting up to spray"
ý NEVER attempt to run the motor on longer or lighter extension cord than specified.
ý Avoid operating the unit while tilted. Keeping it level assures greater operating efficiency.
þ If motor's thermal overload switch has opened, unplug unit and allow it to cool.
ý DO NOT attempt to resume spraying before determining and correcting the cause of overheating.
þ Always follow flushing and cleaning instructions exactly.
þ In hot weather, locate unit in shade.
þ Regularly check the level of H.E.R.O. LVO hydraulic fluid in the hydraulic tank. It should be kept near
full, top up as needed with only genuine H.E.R.O. LVO hydraulic fluid.
þ Crankshaft eccentric bearing should be greased at regular intervals consistent with hours of use. Use
MO-2 grease (ie. common auto grease) approximately every 10 hours of operation.
þ If you wish to power your H.E.R.O. airless sprayer with a generator, it must be a minimum of a 4500
watt generator, in good operating condition.
NOTE; An electric tool must be powered by a generator which has an output wattage of at least three
times the maximum draw of the motor under full load.
þ A minimum 50’ and a maximum of 300’ of airless spray hose may be used.
NOTE: 50’ x 3/8” paint hose ( part # 117 ) should be used for every 50’ x 1/4” paint hose
( part # 114 ) over 100’.
100’ total length of paint hose = 2 of 50’ x 1/4” paint hose.
150’ total length of paint hose = 2 of 50’ x 1/4” paint hose and 1 of 50’ x 3/8 paint hose.
200’ total length of paint hose = 2 of 50’ x 1/4” paint hose and 2 of 50’ x 3/8 paint hose.
250’ total length of paint hose = 3 of 50’ x 1/4” paint hose and 2 of 50’ x 3/
300’ total length of paint hose = 3 of 50’ x 1/4” paint hose and 3 of 50’ x 3/8 paint hose.
þ Product viscosity, altitude ( feet above sea level ) and vertical reach can effect pump performance and
special accessories may be required. Product viscosity may have to be further reduced at higher
elevations. Special “ High Altitude” siphon assemblies ( part # 4-210 -HA ) are available for use in
areas at or above 5000 feet above sea level. This kit may also prove beneficial if spraying thicker
viscosity materials. The larger diameter 3/8” paint hose should also be used.
þ Check drive belt ( part# 66/100 ) tension frequently. The belt will stretch with use, and should be
adjusted after 20 hours of operation and again after 50 hours. Periodic checks after 50 hours should be
made. Failure of the drive belt is not covered by the equipment warranty, so proper maintenance of the
belt is important.
þ Regularly check fittings, bolts, nuts and connections for damage. Tighten, adjust or replace as required.
þ Check crankshaft alignment often. An out of alignment crankshaft will cause the damage to the
eccentric bearing.
H.E.R.O. INDUSTRIES LTD. 330SES / 330SEL MANUAL - “B” VERSION
8

AIRLESS SPRAY PAINTING
SUGGESTIONS AND TECHNIQUE
A good airless spray application is the result of many factors. Surface preparation, which includes cleaning
and degreasing, priming, material compatibility, quality finish product and correct applicatio n technique, are
all important to the finished results.
The key to all good applications is a good spray gun technique. The finished results are what the client will
look at and base his opinion on. Your skill and abilities are as important as good equip ment and good paint.
Proper application techniques can easily be learned by using the following simple guidelines. If you are not
familiar with the basic spray techniques we recommend that you study this portion of the manual and
practice the techniques shown. Practice your technique on scrap cardboard or old newspaper until you feel
confident.
FOR EXCELLENT RESULTS, READ AND PRACTICE THESE TECHNIQUES
1. Always strain all paint through a H.E.R.O. strainer bag.
The most common reason for airless sprayers to malfunction is foreign matter jamming the valves or
plugging the tip. Always strain the paint before putting through the pump.
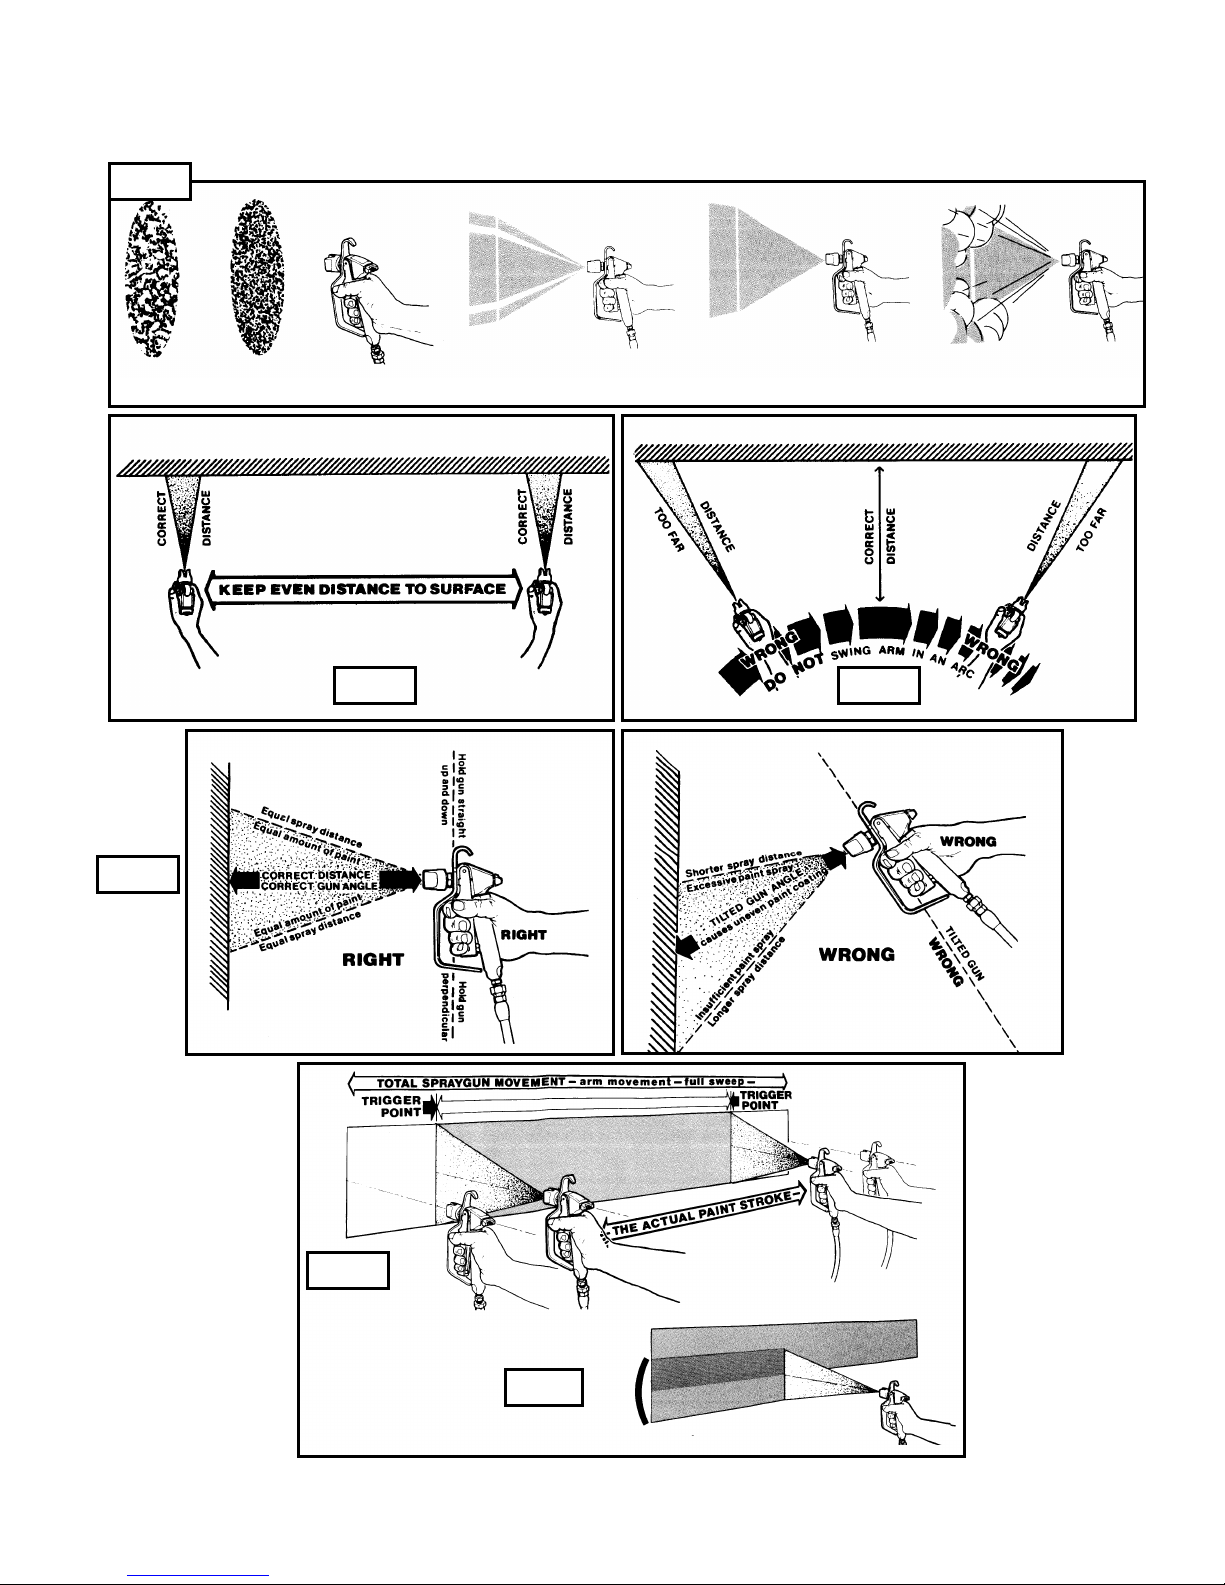
2. Always spray at the lowest pressure setting which will provide a uniform spray fan. (fig. 1, page 10)
Adjust pressure control knob so that paint is completely atomized . Insufficient pressure will result in
"tailing". Too much pressure will result in excess fog and over spray, excess tip wear, and increased
sprayer wear and tear. See setting up to spray, page 5.
3. Alway s spray at right angles to the surface being sprayed. (fig. 2, page 10)
Angling or arcing the nozzle toward the surface will cause uneven coverage and excessive
overspray.
4. Always hold spray gun 12-15 inches from spray surface. (fig. 3, page 10)
Too close and the fan width will be reduced and material will be applied too heavily (runs).
Too far from the surface and you will have excessive overspray and light coverage (transparent).
5. Always move the gun parallel to the surface being sprayed, at a consistent speed.
This avoids uneven coverage (thick or thin areas).
6. Always start the spray stroke before triggering the gun and release the trigger before completing the
stroke. (fig. 4, page 10)
This avoids heavy build up of paint at either end of the spray stroke.
7. Always lap your spray pattern by one half. (fig. 5, page 10)
This assures full coverage of the surface being painted.
H.E.R.O. INDUSTRIES LTD. 330SES / 330SEL MANUAL - “B” VERSION
9
AIRLESS SPRAY PAINTING
SUGGESTIONS AND TECHNIQUE
FIG. 1
Poor Good Tailing Good Pattern Fog, Overspray
FIG. 3
FIG. 2 FIG. 2
FIG. 4
H.E.R.O. INDUSTRIES LTD. 330SES / 330SEL MANUAL - “B” VERSION
FIG. 5
10
 Loading...