

Page 1
Herni
USER MANUAL
version: 01-2019
Page 2
Herni
TABLE OF CONTENTS
I. General information Seite
1.1 Introduction 2
1.2 Purpose and indication 2
1.3 Relevant information 3
1.4 Declaration of conformity 3
1.5 Warranty 3
1.6 Service and repair 3
1.7 Practical instructions 3
1.8 Installation in the car 4
1.9 Adjusting the head rest 4
1.10 Using the 3-point-harness 5
II. Safety instructions
2.1 Safety instructions 7
III. Handling and functions of the basic seat
3.1 Adjusting the internal 5-point-belt 8
3.2 Using the separate adjusters 8
3.3 Adusting the height of the back rest 9
3.4 Adjusting the angle of the back 9
IV. Using the optional accessories
4.1 ISOFIX-adapter 10
4.2 Clamp bow 11
4.3 Security tray 12
4.4 Lateral supports 12
4.5 Abduction block 13
4.6 Angular adjustment 13
4.7 Foot rest / foot roll 14
4.8 Swivel 14
4.9 Protection mat 15
4.10 Belts to connect the chest straps 15
V. Guarantee 16
VI. Labeling 16
VII. Maintenance & product care
7.1 Pull off the cover 17
VIII. Technical characteristics 18
• Page 1 •
Page 3
Herni
I. General information
1.1 Introduction
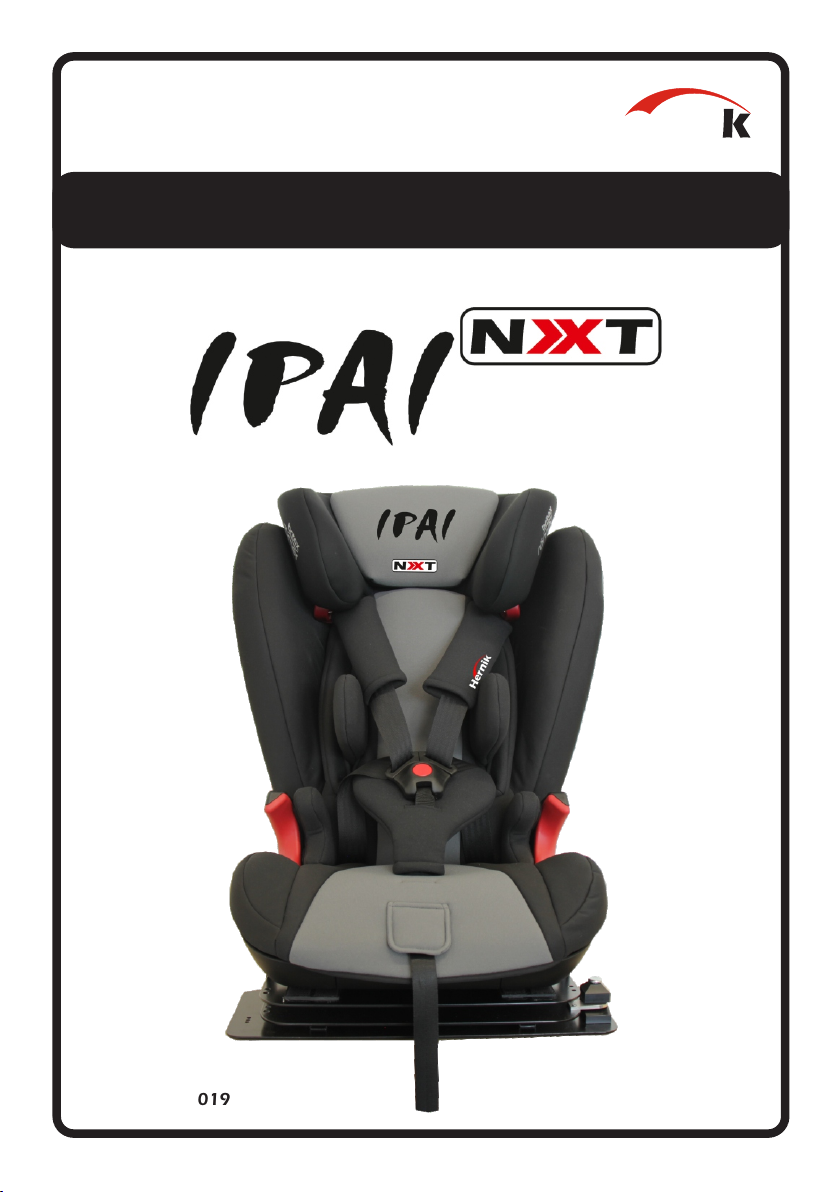
You have chosen the car seat "IPAI-NXT" and get hereby a high quality product
from our house. We would like to thank you for your trust in us.
To make sure you find joy with this product and to ensure it helps you to make
everyday life easier, we present you this manual. It shows you the correct and
simple usage and the necessary care and maintenance. To avoid damage due to
operator error and to ensure best use, please read the following instructions
carefully. If you have any questions or problems, please contact your dealer.
We wish you a trouble-free use and hope that our products meet your
expectations.
We reserve the right to make technical changes to the version described in this
manual.
Before installing in your car and using it for the first time, please read and follow
the installation instructions on pages 4 - 6. Please ensure that the instructions for
use remain with the product and are therefore available to everyone who use the
seat.
Yours
HERNIK GmbH
1.2 Purpose and indication
The IPAI-NXT was developed for the transport of children with special needs in
cars. Children with poor head or trunk control (eg infantile cerebral palsy, muscular
dystrophy, hypotension) can be supported in their posture by means of
individually positioned thorax pads and special upholstery which ensures a safe
transportation.
Important optional accessories can be used to address specific needs such as: the
seat angle or the installation of a stable abduction wedge or a footstool. More in
chapter IV.
• Page 2 •
Page 4
Herni
I. General information
1.3 Relevant information
The IPAI-NXT car seat for disabled children consists of two modules:
1. A standard child car seat from Römer-Britax (please refer to the manufacturer's
manual for use).
2. Adaptation module with accessories, which offers the possibility to equip the car
seat according to individual needs. Please observe the instructions for use from
HERNIK GmbH.
1.4 Declaration of conformity
HERNIK GmbH declares in sole responsibility that car seat "IPAI-NXT" complies with
the Essential Requirements (Appendix 1 of Directive 93/42 EEC). The product is
marked with the CE mark according to the above mentioned directive.
1.5 Warranty
A warranty can only be accepted if the product is used under the specified
conditions and for the intended purposes. The manufacturer is not liable for
damage caused by components and spare parts which were not approved by the
manufacturer.
1.6 Service and repair
Service and repairs on the IPAI-NXT may only be carried out by specialized dealers.
If you have any problems, contact your local dealer. For repairs, you will only
receive original spare parts.
1.7 Practical instructions
The car seat will be delivered fully assembled. Upon delivery, the dealer will instruct
the user how to use the device by using the manual. The specialist dealer should
install together with the user the car seat in the car and if available adjust the Isofix
strap or the clamp.
When installing the car seat, it is best to hold it with one hand in the center of the
front and the other at the top. In order to achieve an optimal sitting position, it is
necessary to adjust the car seat individually to the circumstances of the child. This
should always be done by the dealer.
• Page 3 •
Page 5
I. General information
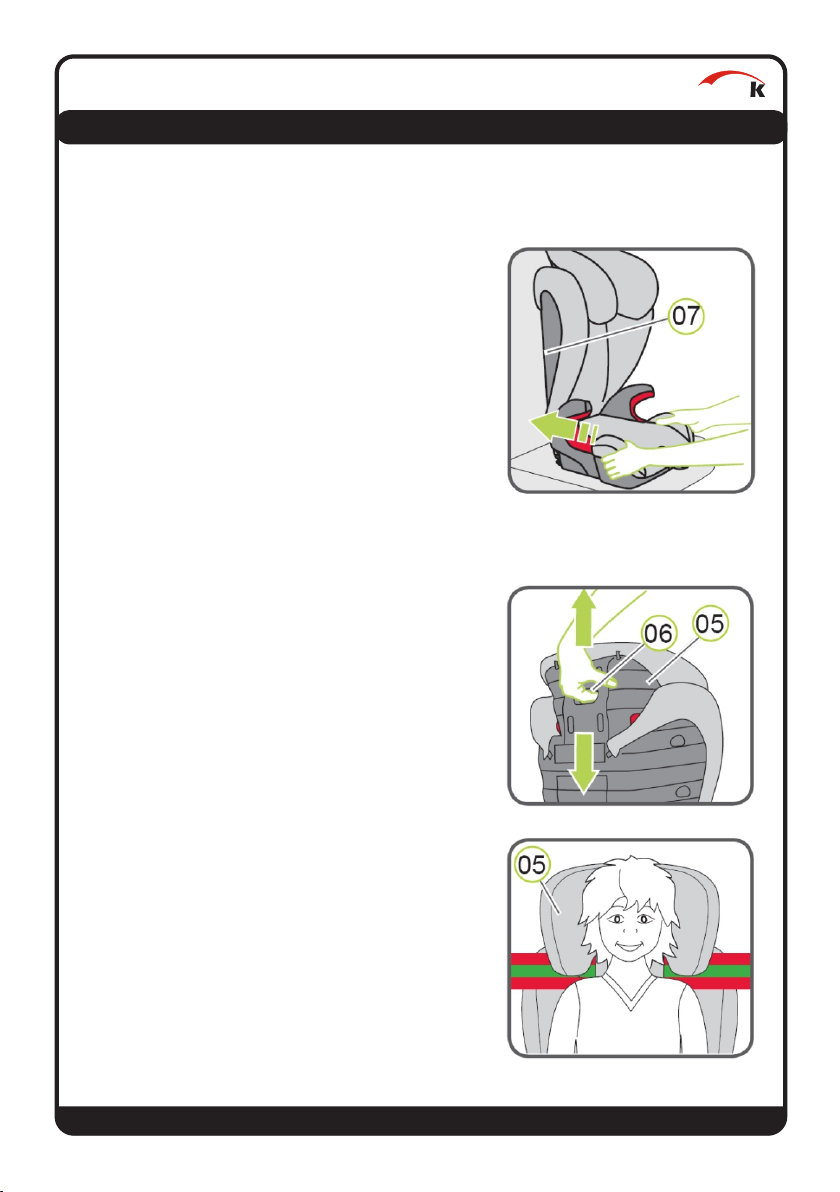
1.8 Installation in the car
Place the child seat on the vehicle seat. Make
sure that the backrest (07) lies flat against the
backrest of the vehicle seat.
Tip! If the headrest of the vehicle seat disturbs,
remove it.
1.9 Adjusting the head rest
1. A correctly adjusted headrest (05) ensures
the optimal course of the car's diagonal belt
(3-point belt) and offers your child maximum
protection. The headrest (05) must be
adjusted so that there is still room for two
fingers between the shoulders of your child
and the headrest (05). This allows you to
adjust the height of the headrest to your
child's height:
Herni
2. Grasp the adjustment handle (06) on the
back of the headrest (05) and pull it up. Now
the headrest is unlocked.
3. Now you can push the unlocked headrest
(05) to the needed height. As soon as you
release the adjustment handle (06), the
headrest (05) locks.
4. Place the child safety seat on the vehicle
seat.
5. Have your child sit in the child car seat and
check the height. Repeat this process until
the headrest (05) is at the correct height.
• Page 4 •
Page 6
Herni
I. General information
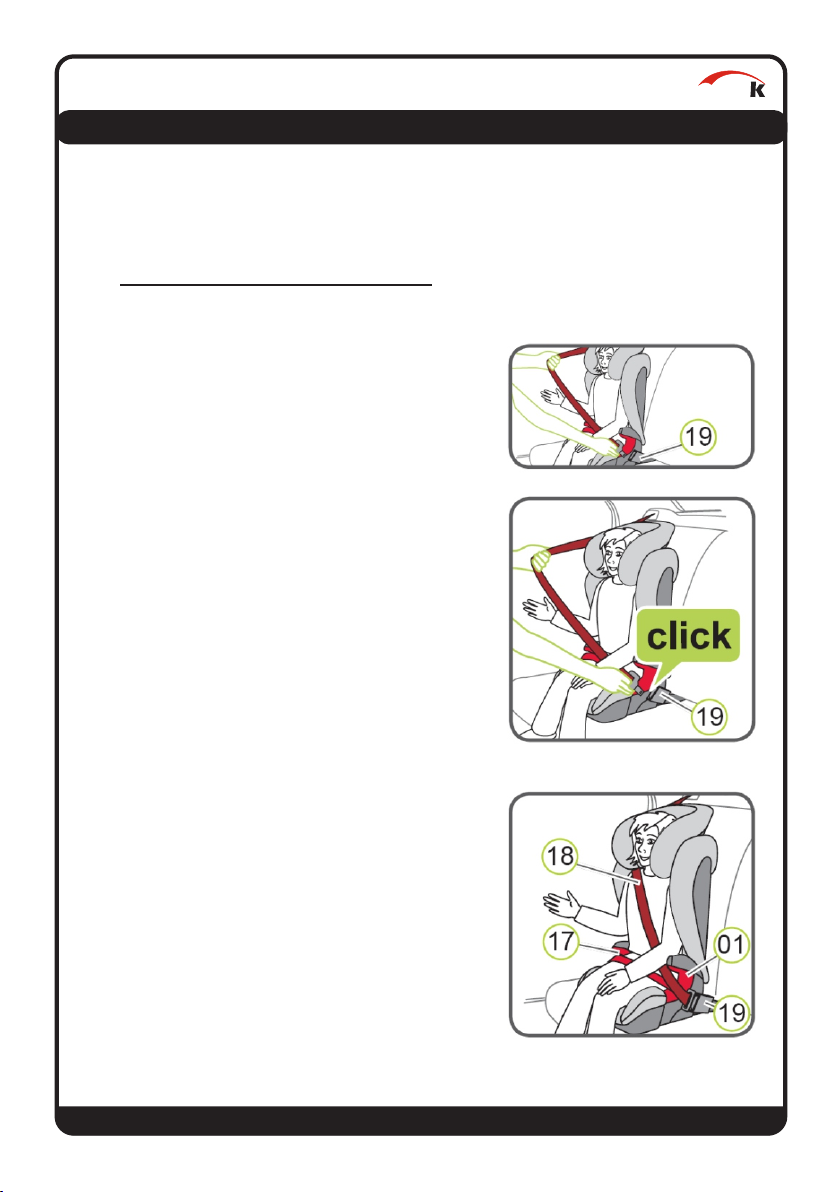
1.10 Using the 3-point-harness (Gr. III)
To be able to absorb the enormous forces during an accident, the IPAI-NXT must
be secured with the vehicle's three-point belt according to ECE 44, R14 and R16.
An ISOFIX connection alone is not enough.
1. Put your child in the child seat - ideally by
turning the seat by 90 ° (option: swivel adapter).
2. Pull out the vehicle belt and guide it (in front of
your child) to the seat belt buckle (19).
DANGER! Make sure that the vehicle belt is not
twisted, otherwise the full protective effect of the
restraint system is not given anymore.
3. Lock the latch in the car buckle (19) with a CLICK.
4. Place the Diagonal Belt (18) and Lap Belt (17)
on the side of the Car Seat Belt Buckle (19) in the
light red belt guide (01) of the Seat Cushion.
DANGER! The Car Seat Belt Buckle (19) must not
be between the light red belt guide (01) and the
arm rest.
5. Place the lap belt (17) on the other side of the
seat cushion in the light red belt guide (01).
DANGER! The lap belt (17) must run as low as
possible on both sides over the hips of your child.
• Page 5 •
Page 7
I. General information
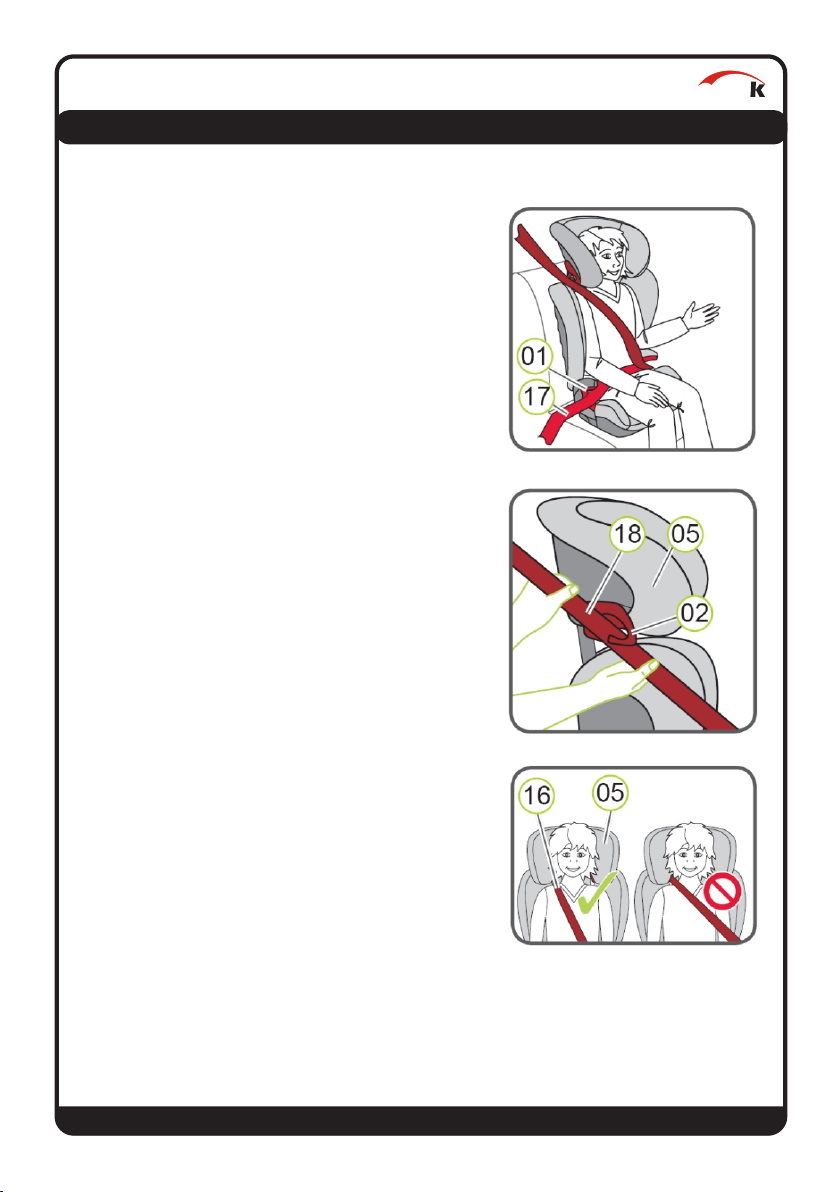
6. Insert the diagonal belt (18) into the dark red
belt holder (02) of the headrest (05) until it is
completely and untwisted in the belt holder
(02).
Tip! If the backrest (07) hides the belt holder
(02), you can adjust the headrest (14)
upwards. After you inserted the diagonal
strap (18) you can set the headrest (05) back
to the correct height.
7. Make sure that the diagonal strap (18) runs
over your child's collarbone and does not
touch the throat.
Tip! You can adjust the height of the headrest
(05) also while the seat is in the car.
Before every drive, check that ...
►►the child safety seat is securely fastened;
►►the lap belt (17) runs on both sides of the
seat cushion in the light red belt guides
(01),
►►the diagonal belt (18) on the side of the
buckle (19) also runs in the light red belt
guide (01) of the seat cushion,
►►the diagonal strap (18) runs through the
dark red belt holder (02) of the headrest,
►►the diagonal belt (18) runs diagonally to
the back,
►►the straps are tight and not twisted,
►►The car's buckle (19) is not in the light red
belt guide (01) of the seat cushion.
Herni
• Page 6 •
Page 8
Herni
II. Safety instructions
· Before use, the components must be checked for perfect function and
condition.
· The instructions for use must always be carried on the child car seat.
· The safety of your child is only guaranteed if the seat is installed correctly and
if the child is fixed exactly.
· The straps must be laid tight and without twisting.
· The 3-point safety belt is to be guided through the provided belt guides and
is supposed to surround the seat tightly.
Please check:
A) whether the seat belt is securely placed in the belt guide
B) whether the belt buckles are locked correctly
C) that no textiles are impacted
· Make sure that no solid objects like pins, belt buckles, etc. are placed between
child and seat belt. This could lead to injuries in the event of accidents.
· Explain to your child how important it is to be well-secured and that the
course of the straps do not change. It shouldn't pull on the straps nor
open the belt buckles.
· Do not make any changes to the car seat, otherwise you risk your child's
safety.
· The car seat must not be damaged by moving parts in the car or through
doors.
· Never leave your child alone in the child car seat.
· Inform your passengers how your child can be taken out of the seat after an
accident.
· After an accident, the entire child car seat has to be renewed.
• Page 7 •
Page 9
III. Handling and functions of the basic seat
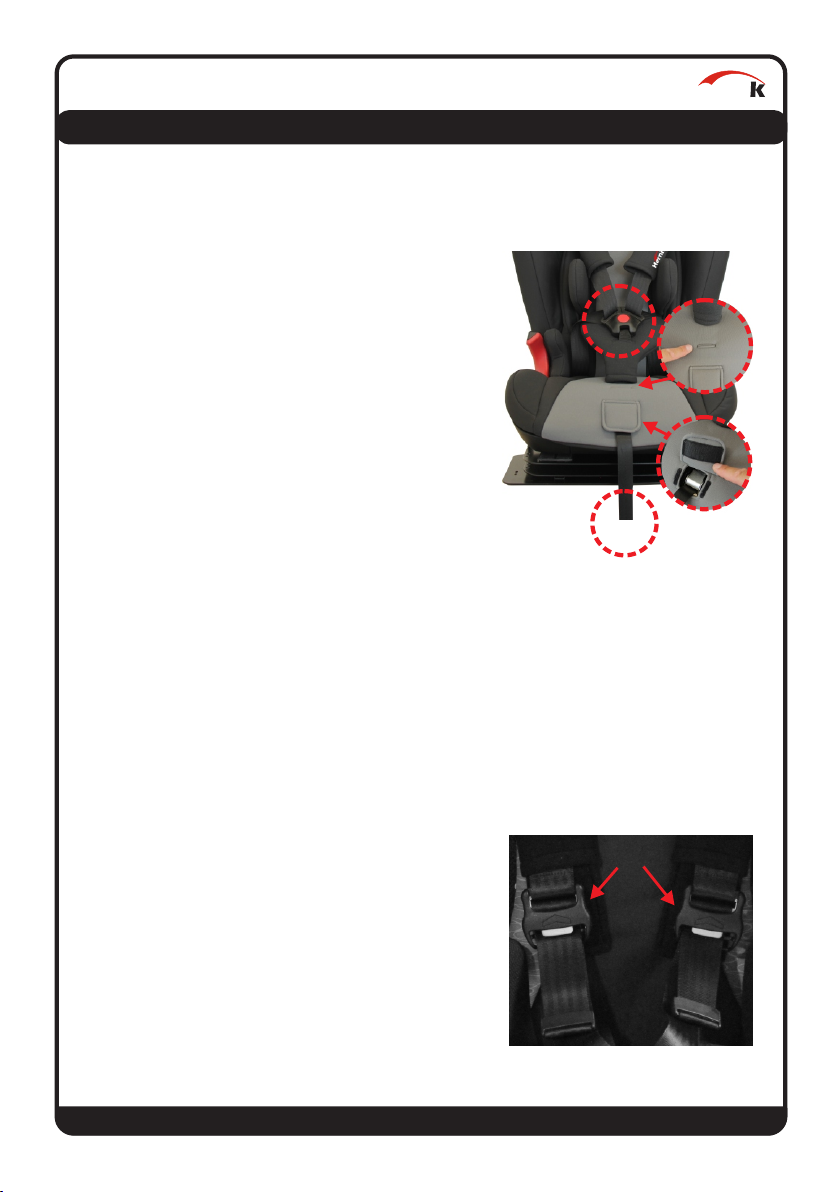
3.1 Adjusting the internal 5-point-belt
First select one of the two available positions for
the belt buckle ! For this purpose, the seat
cover must be loosened on one side to get to
the location underneath. Then put your child in
the car seat and make sure that it sits with the
hip at the back.
Now put the straps over the child's shoulders.
If the strap length is insufficient, lift the cover
and press gently on the metal rocker, so that the
straps in the shoulder area can be adjusted. Be
careful not to pinch the belt by pressing too
hard!
Then insert the two metal tongues into the belt
buckle until they click into place with a click.
Then tighten the strap system by pulling on the
narrow strap , which is located between the
legs of your child, until a stable position is found.
Herni
3.2 Using the separate adjusters
Optionally, it is possible to tighten the belt by
means of two separate belt adjusters. Instead of
pressing on the metal rocker , press the gray
button on the belt adjuster to loosen the belt
system.
Then pull on the strap end to adjust the straps
individually.
• Page 8 •
Page 10
III. Handling and functions of the basic seat
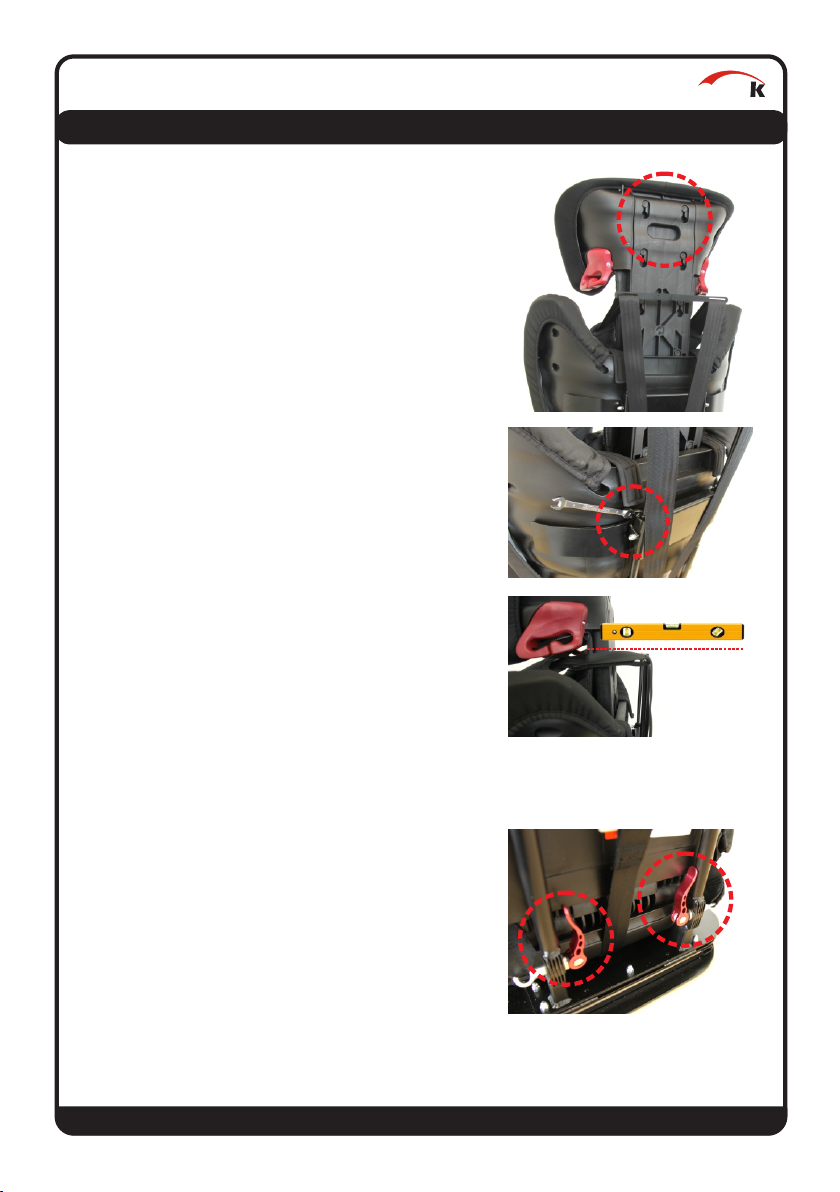
3.3 Adusting the height of the back rest
Press the release latch in the handle to move
the headrest up or down. Make sure that the
child's head never looks over the headrest!
Adjust the belt crossbeam of the 5-point belt so
that the belt runs horizontally - see ! Open the
screw connections on both sides. If the height
is adjusted correctly you can tighten the screws
again.
Herni
3.4 Adjusting the angle of the back
It is possible to adjust the back angle stepless and
lock it in any position. This ensures that the car
seat is stable in any position. Open the two quick
releases and move the back to the desired
position. Then close the quick release levers to fix
the angle.
• Page 9 •
Page 11
IV. Using the optional accessories
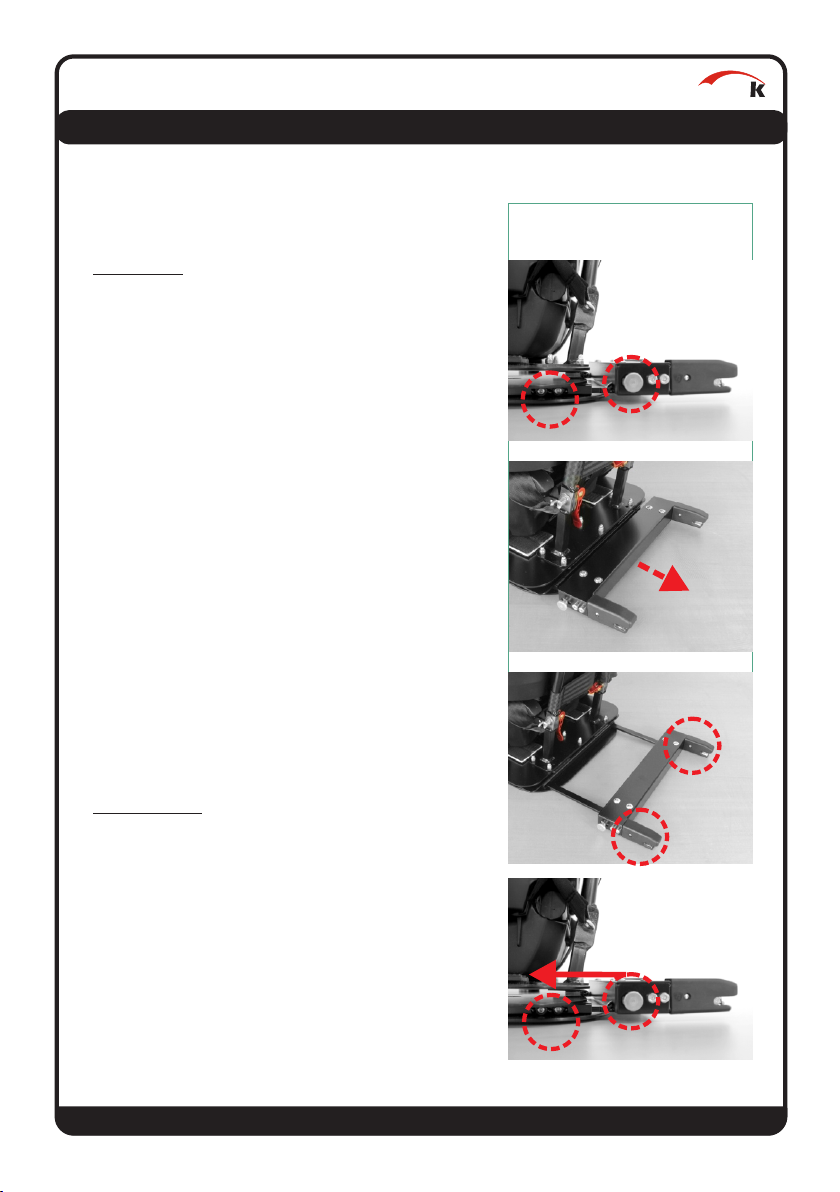
4.1 ISOFIX-adapter
Installation:
1. Let the installation of the seat and its adjustment
been demonstrated to you by the technician.
2. Open the setscrews on the left and right and
pull the bracket out to the rear.
3. Adjust the back rest of the car's seat to the
required angle, taking advantage of the space
created to the car's back pad. Slide the ISOFIX
adapter on both sides backwards in the direction of
the backrest until you hear the locking of the two
ISOFIX tongues in the vehicle's ISOFIX mounting
(two clicks).
4. Push the car seat towards the backrest of the
vehicle until both touch and are slightly under
tension. This prevents vibrations while driving.
5. Close the two setscrews left and right. In
addition, the two ISOFIX tongues must be
protected against unattempt opening, which is
why both screws must be tightened.
6. Ensure that both ISOFIX tongues are engaged by
a double-sided pulling test.
Herni
Removal Note:
1. Open the two screws .
2. Move them forwards in the direction of the car
seat, releasing the grid connection of the system. It
may be necessary to compensate for the pressure
of the seats padding so that the connection can be
solved.
3. The car seat can now be removed from the
vehicle.
• Page 10 •
Page 12
IV. Using the optional accessories
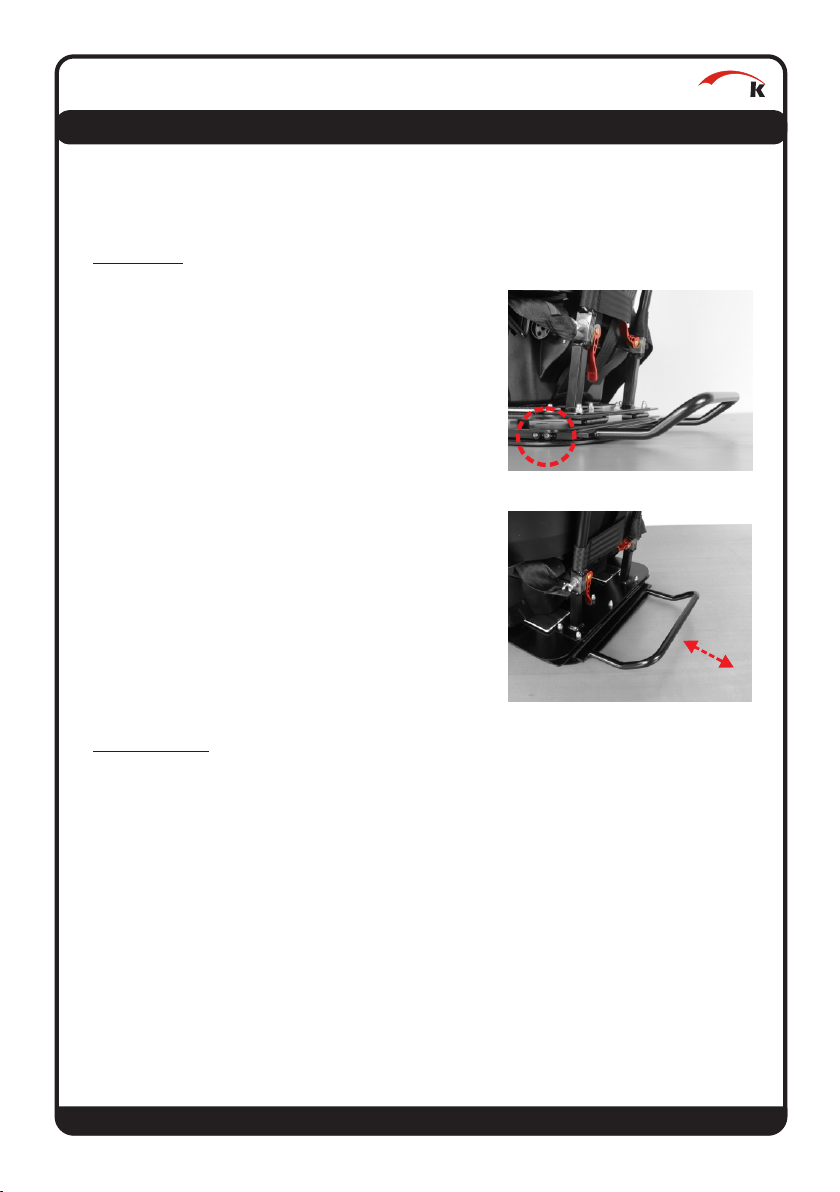
4.2 Clamp bow
Installation:
1. Let the installation of the seat and adjustment
of it be shown to you during the delivery.
2. Open the setscrews on the left and right
and pull the bracket to the rear.
3. Adjust the back rest of the car's seat to the
required angle, taking advantage of the space
created to the car's back pad. Now push the
clamp on both sides backwards in the direction of the backrest, until it sinks into the gap
of the car seat and seat upholstery and
remains firm.
4. Push the car seat against the backrest of the
vehicle until it rests flat.
5. Now close the two setscrews left and right.
6. Whether the offset of the bow must be
directed upwards or downwards depends on
the construction of the respective passenger
car seats.
Herni
Removal Note:
1. Pull the car seat including the clamp out of
the gap of the car seat.
• Page 11 •
Page 13
IV. Using the optional accessories
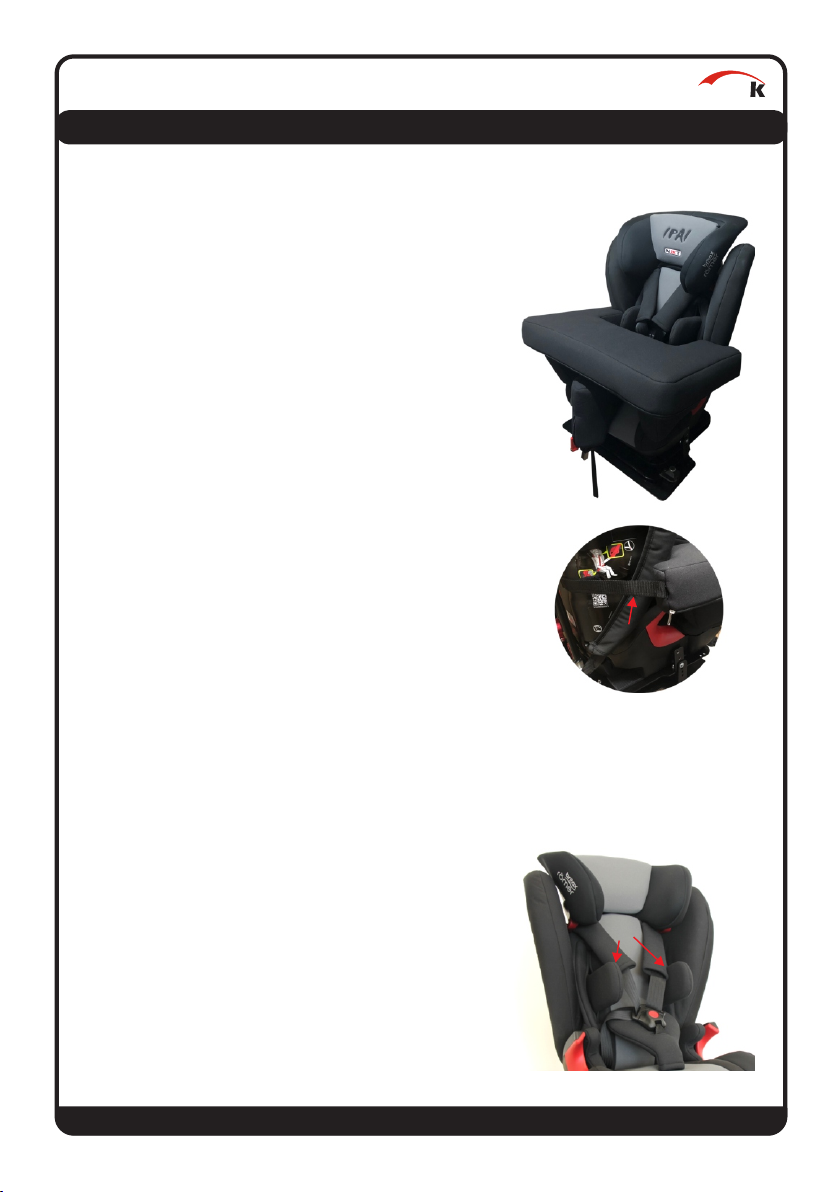
4.3 Security tray
Installation:
1. Let the installation of the seat and adjustment of it be
shown to you during the delivery.
2. Put the support and safety pad on the car seat
after sitting your child into it and strapping it on.
3. Secure the padding using the supplied Velcro straps
, which are fastened to the back of the car seat.
4. Your child's arms should rest on the table, which
leads to an upright seating position. This supports the
upper body.
5. Make sure to avoid the risk of toys, which may be on
the upholstery. Do not use hard, solid or even sharpedged objects!
4.4 Lateral supports
1. HERNIK GmbH is not allowed to injure (drill, screw)
the body of the IPAI-NXT. Nevertheless it was very
important to us to offer lateral supports for children
with weak trunk muscles, so we decided for a fixation
solution, which uses Velcro for sufficient stability and
also provides flexibility.
Herni
2. In order to change the position of the pads, it must
first be carefully released by gently turning the Velcro
connection. Afterwards, the pad can be arranged freely.
IMPORTANT: For a stable fit, the pad should be pressed
with high pressure while turning back and forth on the
back of the IPAI-NXT. This creates a firmer hold of the
Velcro elements!
• Page 12•
Page 14
IV. Using the optional accessories
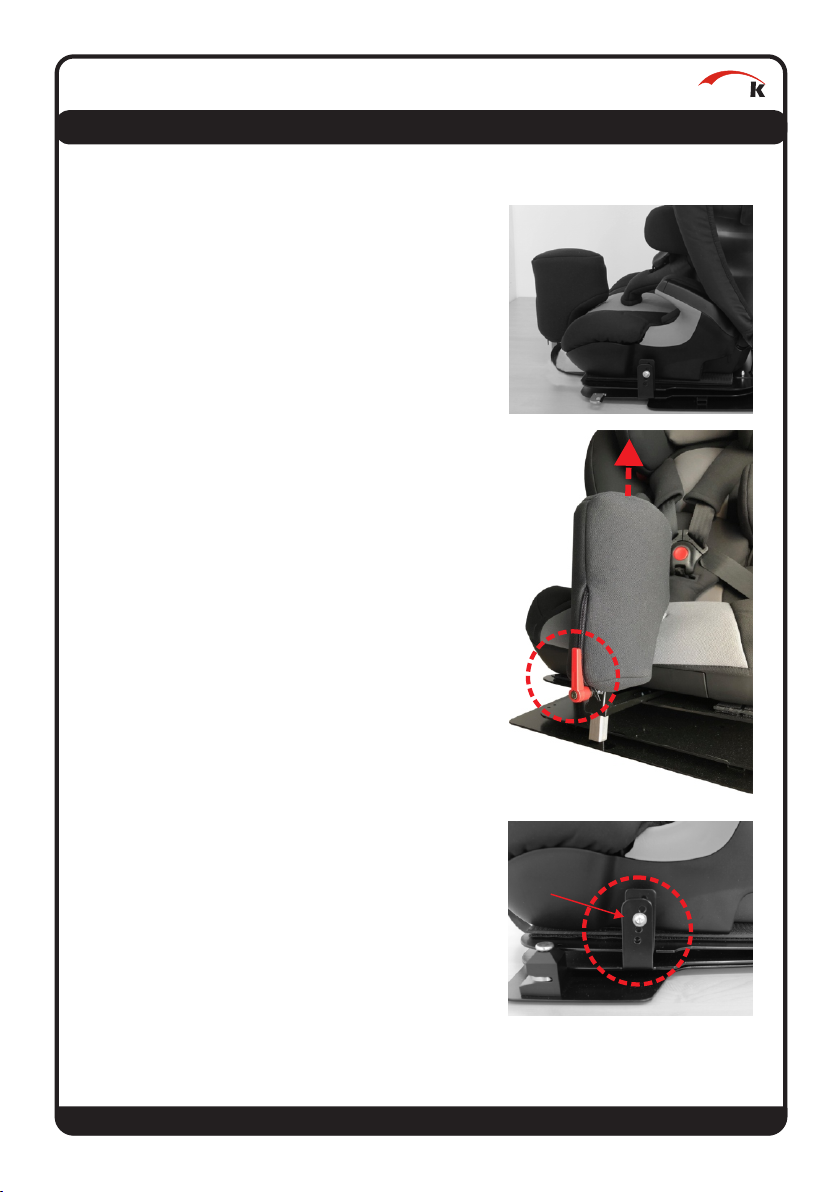
4.5 Abduction block
1. The abduction wedge helps your child to
reach a predetermined distance between the
knees. In order to loosen or tightening the 5point belt, the wedge must be removed.
Open the clamp and remove the wedge
upwards.
2. The wedge should be against the seat
upholstery as shown in the picture. The depth
of the wedge can be adjusted. For this
purpose, both hexagon screws must be
opened and offset under the seat.
3. The wedge should always be used while
driving (if chosen as an option), otherwise
your child could be injured by the mounting.
4. The lever can be changed in its position by
gently pulling it forward without moving the
screw connection. Make sure it is up and not
out of the way, otherwise your child's calves
may come into contact with it.
Herni
4.6 Angular adjustment
1. If the seat angle provided by the vehicle seat
is insufficient, the seat angle of the car seat
can be increased by the (extended) child seat
angle adjustment . For this purpose, the
screw left and right has to be opened and
another hole to be selected. Then tighten the
screws back.
2. For safety reasons, here is no quick release
possible!
• Page 13 •
Page 15
IV. Using the optional accessories
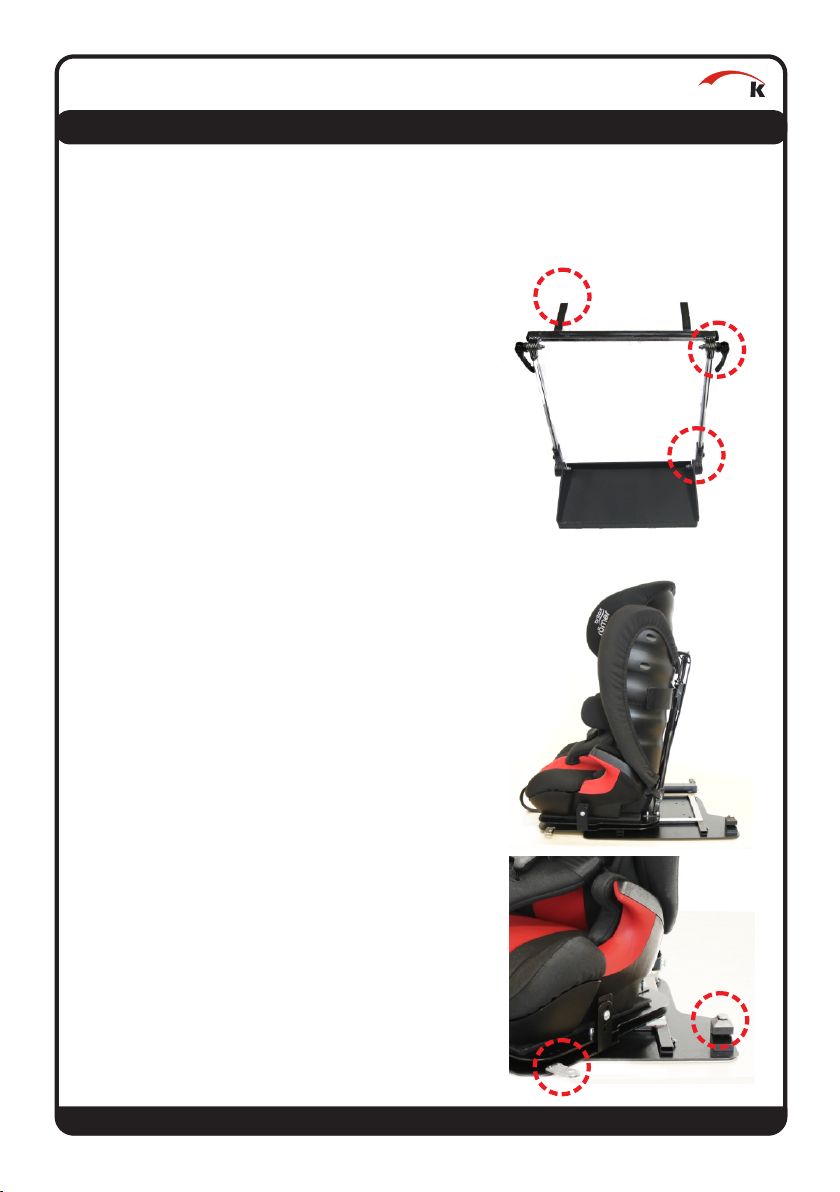
4.7 Foot rest / foot roll
Herni
1. The tabs are fixed below the car seat by
means of set screws on the base mount, so
that the depth can be adjusted.
2. The angle of the handrails can be varied by
opening the quick release lever . Care
should be taken to ensure that the levers are
in a position that does not cause harm!
3. To adjust the height of the footrest, the
screws on the left and right must be
opened. Now the height can be stepless
selected. Then please tighten the screws
again.
4.8 Swivel
1. To simplify the daily transfer to the vehicle, we
recommend our swivel adapter, which let the
car seat turn outwards by 90 °. For technical
reasons, only ONE direction of rotation is
possible. For a later change in the other
direction, the car seat must be rebuilt in our
house. The use of the ISOFIX adapters or the
clamp are recommended!
2. To turn the chair, the handle must be pulled
up and the chair moved at the same time. The
optional footrest stops to avoid collisions with
the front passenger seat and the B-pillar.
Pay attention when rotating your child's legs!
3. After the transfer, simply turn the IPAI-NXT back
to the starting position and pay attention to the
"click" sound, in which the tongue snaps back
into the catch.
• Page 14 •
Page 16
IV. Using the optional accessories
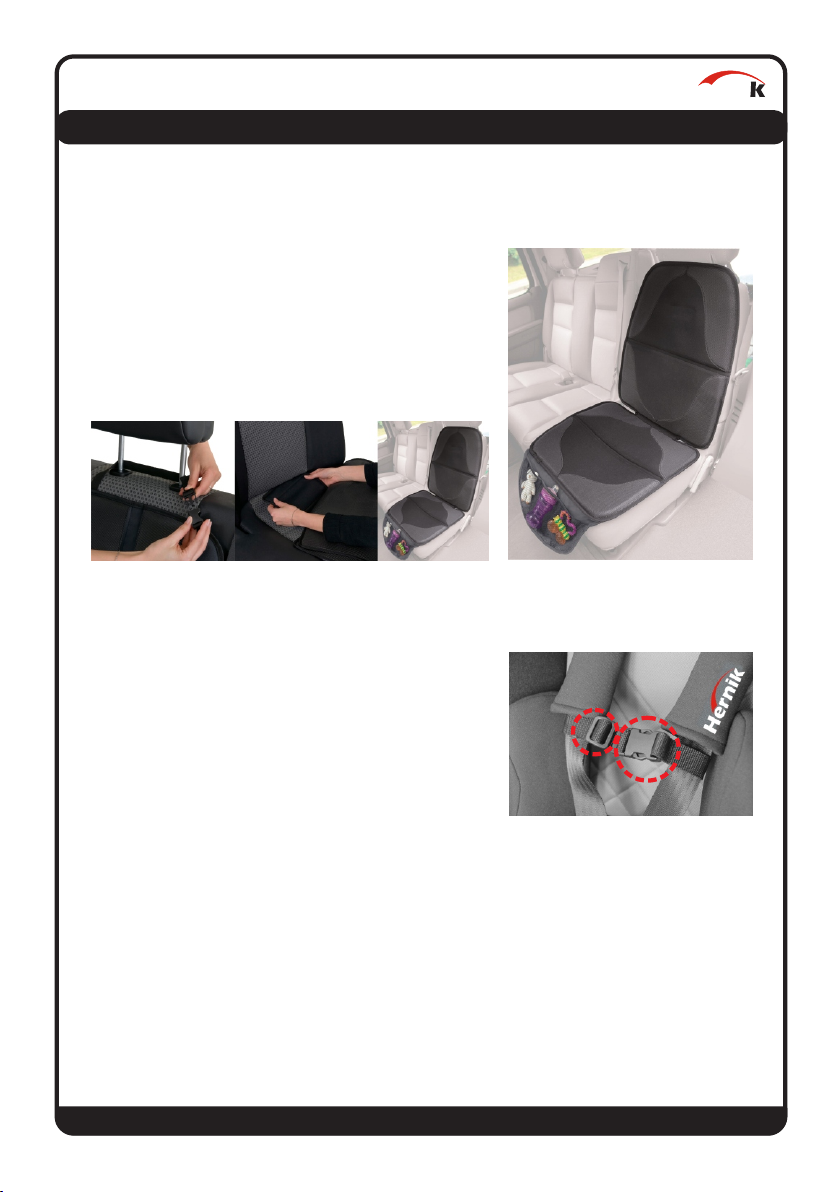
4.9 Protection mat
1. Position the mat on the car seat without
blocking the ISOFIX connectors.
2. Place the IPAI-NXT in the center of the
protective mat and secure it as described in
chapter 3.1.
4.10 Belts to connect the chest straps
1. Set the belt at the height of your child's chest.
Keep a sufficient distance to the neck! To
prevent the belt from slipping, the insides are
equipped with velcro. To solve this, loosen it
with your fingers.
2. Now adjust the width of the belt by threading
the belt out of the slider and then tighten the
belt buckle . Now secure the loose end of the
strap by means of the slider to prevent
unwanted loosening of the strap.
Herni
• Page 15 •
Page 17
Herni
V. Guarantee
Hernik products are designed and manufactured in accordance with strict quality
standards. If, in exceptional circumstances, you have cause for complaint, Hernik
GmbH guarantee in accordance with the terms and conditions of delivery:
• 24 months warranty on all solid parts, from date of delivery.
• 12 months warranty on all moving parts, from date of delivery.
For parts that were not manufactured by Hernik GMBH, please refer to the
warranty policy of the respective manufacturer (Römer-Britax Kindersicherheit
GmbH). Claims under this guarantee are subject to the device being properly
installed and used in accordance with the instructions provided.
Warranty is void where modifications or improper repairs, without prior
consultation with the manufacturers are carried out. Warranty is void where a
device is improperly fitted.
Further claims, for whatever legal reason, in particular, claims for direct or indirect
damages are excluded.
VI. Labeling
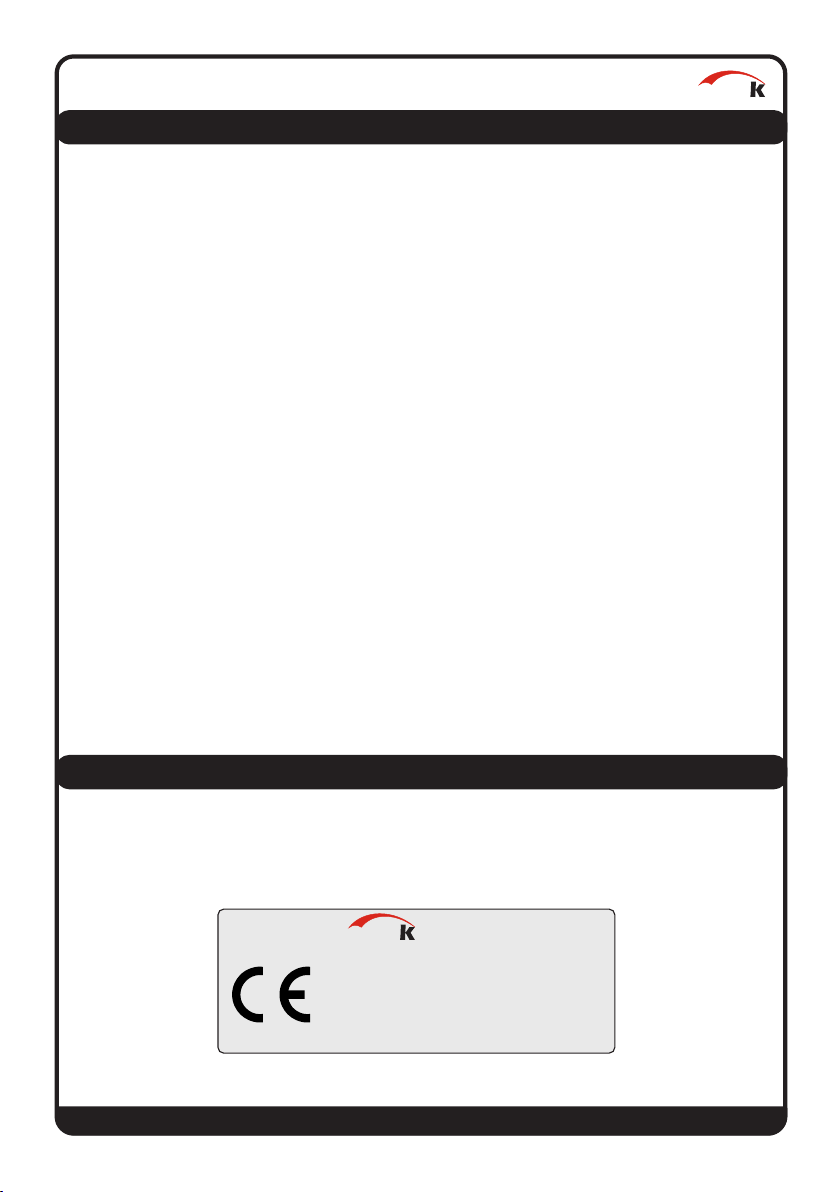
On the back you‘ll find the following labeling:
Partenhauserweg 14 • 81369 München • Germany
Herni
Rückhalteeinrichtung f. spez. Anforderungen „S“
Serien-Nr.: IPAI-2019-9999
Lesen Sie bitte vor Gebrauch die Bedienungsanleitung!
GmbH
IPAI-NXT (36 kg)
• Page 16 •
Page 18
VII. Maintenance & product care
7.1 Pull off the cover
Please ensure that you only use original BRITAXRÖMER or HERNIK replacement seat covers, as
the seat cover is an integral part of the child
safety seat and fulfills important functions to
ensure the perfect functioning of the seat.
Replacement seat covers are available from your
Dealer.
The cover can be removed and washed with a
mild detergent in the fine washing program of
the washing machine (30 ° C). Please refer to the
instructions on the washing label of the cover.
The plastic parts can be cleaned with soap and
water. Do not use harsh cleaning material (such
as solvents).
DANGER! The child safety seat must not be
used without the seat cover.
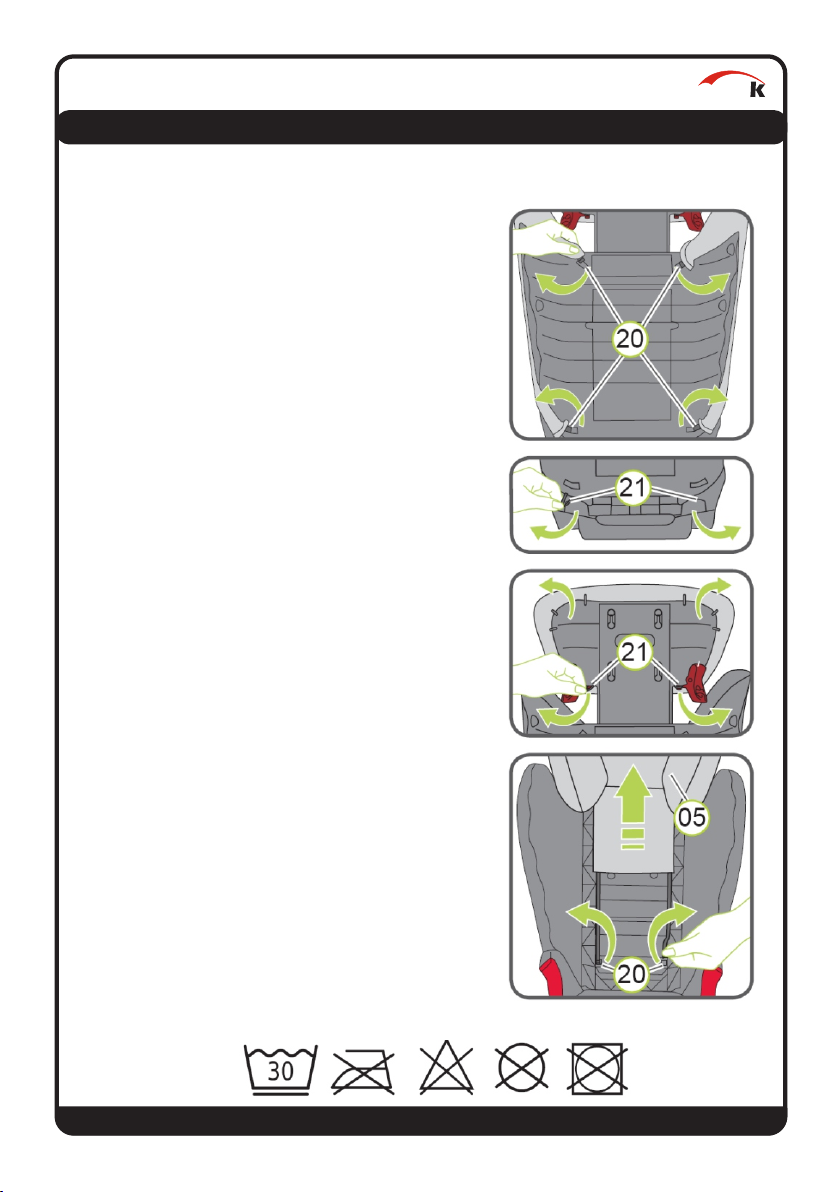
1. Move the headrest of the car seat to its
uppermost position.
2. Unhook the hooks (20) on the back of the
backrest (07).
3. Pull off the upper part of the cover.
4. Suspend the reference loops (21) at the
bottom at the back of the backrest (07).
5. Remove the cover from the seat cushion (03).
Do the same with the headrest cover.
6. Disconnect the reference loops (21) at the
back of the headrest (05)
7. Suspend the hooks (20) on the front of the
backrest (07)
8. Pull off the cover of the headrest (05).
►►The cover can now be washed.
Herni
• Page 17 •
Page 19
Herni
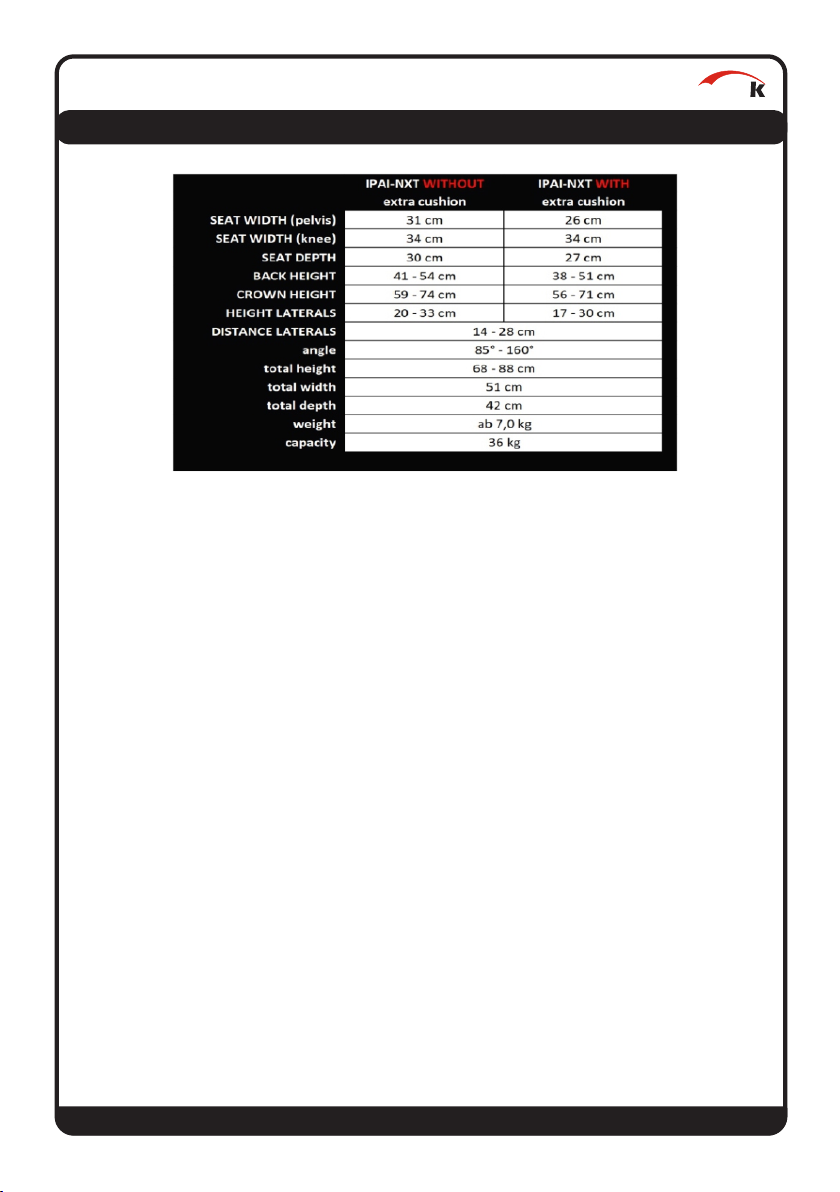
VIII. Technical characteristics
Standard equipment:
• 5-point harness with padded buckle pad (height adjustable!)
and belt protectors
• Headrest height adjustable
• comfortable back and headrest padding with removable cover (modelable
foam!)
• three-part basic cover removable and washable at 30 ° C
• aluminum / steel construction, incl. back angle adjustment and stable base plate;
back angle stepless adjustable and lockable
• Page 18 •
Page 20

Herni
HERNIK GmbH
Bodenseestrasse 25
83059 Kolbermoor • Germany
+49 8031-2068044 • +49 8031-2069215
[email protected] • www.hernik.de
• Seite 13 •
 Loading...