

Hermle Z 207 A Operating Manual
© Hermle Labortechnik GmbH Z207A_V1.17_eng
Operating Manual for
Small Centrifuge
Z 207 A


CONTENTS
© Hermle Labortechnik GmbH Z207A_V1.17_eng I
1. PRODUCT DESCRIPTION ..................................................................................................1
1.1 Safety Instructions ............................................................................................................................................ 1
1.2 Indended Purpose ............................................................................................................................................. 1
1.3 Brief Description ................................................................................................................................................ 1
1.4 Delivery Package ............................................................................................................................................... 1
1.5 Operating and Display Elements ...................................................................................................................... 2
1.5.1 LCD-Display .................................................................................................................................................... 2
1.6 Signs- and Indication of the Centrifuge ........................................................................................................... 3
1.6.1 General ............................................................................................................................................................ 3
1.6.2 Product Nameplate (Example) ........................................................................................................................ 3
1.6.3 Warning and Information Signs ....................................................................................................................... 4
1.6.4 Danger, Precautions and Warranty ................................................................................................................. 5
1.6.5 Following Rules Must Strictly be Adhered To: ................................................................................................. 5
1.6.6 Warranty .......................................................................................................................................................... 6
1.7 Installation of the Centrifuge ............................................................................................................................ 6
1.7.1 Unpacking the Centrifuge ................................................................................................................................ 6
1.7.2 Space Requirements ....................................................................................................................................... 6
1.7.3 Installation ....................................................................................................................................................... 6
1.8 Basic Adjustment .............................................................................................................................................. 7
1.8.1 Adjustment of the Rotor Type .......................................................................................................................... 7
1.8.2 Access to the Mode: “Standard settings“ ......................................................................................................... 7
1.8.3 Signal Turn On / Off ........................................................................................................................................ 8
1.8.4 Keyboard Sound Turn On / Off ........................................................................................................................ 8
1.8.5 Sleep Mode On / Off ........................................................................................................................................ 9
1.8.6 Retrieving Operation Data ............................................................................................................................... 9
2. OPERATING ...................................................................................................................... 10
2.1 Mounting and Loading the Rotor ................................................................................................................... 10
2.1.1 Installation of Rotors ...................................................................................................................................... 10
2.1.2 Loading the Angle Rotor ................................................................................................................................ 11
2.1.3 Loading and Overloading of Rotors ............................................................................................................... 11
2.1.4 Removing the Rotor ...................................................................................................................................... 11
2.2 Power Switch ................................................................................................................................................... 12
2.3 Lid ..................................................................................................................................................................... 12
2.3.1 Lid Release ................................................................................................................................................... 12
2.3.2 Lid Lock ......................................................................................................................................................... 13
2.4 Pre-Selection .................................................................................................................................................... 13
2.4.1 Pre-Selection of Speed and RCF-Value ........................................................................................................ 13
2.4.2 Pre-Selection of Running Time ...................................................................................................................... 14
2.4.3 Pre-Selection of Brake Intensity and Acceleration......................................................................................... 14
2.5 Radius Correction ............................................................................................................................................ 15
2.6 Program ............................................................................................................................................................ 16
2.6.1 Storage of Programs ..................................................................................................................................... 16
2.6.2 Recall of Stored Programs ............................................................................................................................ 17

CONTENTS
II Z207A_V1.17_eng © Hermle Labortechnik GmbH
2.6.3 Leaving Program Mode ................................................................................................................................. 17
2.7 Starting and Stopping the Centrifuge ............................................................................................................ 17
2.7.1 Starting the Centrifuge................................................................................................................................... 17
2.7.2 The “STOP” KEY ........................................................................................................................................... 18
2.8 Imbalance Detection ........................................................................................................................................ 18
3. MAINTENANCE ................................................................................................................. 20
3.1 Maintenance and Cleaning.............................................................................................................................. 20
3.1.1 General .......................................................................................................................................................... 20
3.1.2 Cleaning and Disinfection of the Unit ............................................................................................................ 21
3.1.3 Cleaning and Disinfection of the Rotor .......................................................................................................... 21
3.1.4 Disinfection of PP-Rotors .............................................................................................................................. 21
3.1.5 Glass Breakage ............................................................................................................................................. 22
3.2 Lifetime of Rotors and Accessories ............................................................................................................... 22
4. TROUBLE SHOOTING ...................................................................................................... 23
4.1 Error Message: Problem / Solution ................................................................................................................ 23
4.2 Survey of Possible Error Messages and Solutions ...................................................................................... 23
4.2.1 Lid Release during Power Failure (Emergency Lid Release) ........................................................................ 23
4.2.2 Description of the Error Message System ..................................................................................................... 24
5. RECEIPT OF CENTRIFUGES TO REPAIR ....................................................................... 25
6. TRANSPORT, STORAGE AND DISPOSAL ...................................................................... 26
6.1 Transport .......................................................................................................................................................... 26
6.2 Storage ............................................................................................................................................................. 26
6.3 Disposal ............................................................................................................................................................ 26
7. APPENDIX ........................................................................................................................... I
EG – Conformity Declaration ................................................................................................................................... II
Table 1: Technical Data ......................................................................................................................................... III
Table 2: Error Messages ......................................................................................................................................... IV
Table 3: Radius Correction ..................................................................................................................................... IV
Table 4: Symbols- / Abbreviations........................................................................................................................... IV
Redemption Form: Decontamination Certificate ...................................................................................................... V

PRODUCT DESCRIPTION
© Hermle Labortechnik GmbH Z207A_V1.17_eng 1
1. PRODUCT DESCRIPTION
1.1 Safety Instructions
This symbol indicates safety instructions and points of potential dangerous situations. Before using
the centrifuge for the first time, please read the operating manual.
Failure to follow these instructions can result in personal injury and/or property damage .
Intended use includes: the observation of all instructions, in the instruction manual, and
administering inspection and maintenance.
1.2 Indended Purpose
This Hermle centrifuge was designed only for the separation of materials or mixtures with different
densities, specifically for the preparation and processing of samples, from the human body, in
context of an in-vitro-diagnostic use, to allow the use of in-vitro-diagnostic in accordance to its'
intended purpose. The designated device and its' accessories listed, in the technical documentation,
are in compliance with Directive 98/79/EC for In-Vitro-Diagnostic Medical Devices.
Hermle Centrifuges are intended exclusively for indoor use and for the use of qualified personnel.
Only Hermle original rotors and accessories should be used. Any other use or intended use is strictly
prohibited. For any resulting damage, the company, Hermle Labortechnik, is not liable.
1.3 Brief Description
The unit type Z 207 A is a non refrigerated universal centrifuge, which can be used with 100 – 230V
country-specific power cords.
The centrifuge can only be used with one angle rotor.
All parameters are accessible via buttons and selected with the control field. All pre-selected and
current values will be shown permanently on the LCD-display.
The centrifuge is powered by a maintenance-free induction motor.
Detailed technical data are in Table 1: "Technical Data", (see APPENDIX P.III).
1.4 Delivery Package
• 1 Centrifuge Z 207 A
• 1 Rotor 221.57 V01
• 1 Instruction Manual Z 207 A
• 1 Power Cord
PRODUCT DESCRIPTION
2 Z207A_V1.17_eng © Hermle Labortechnik GmbH
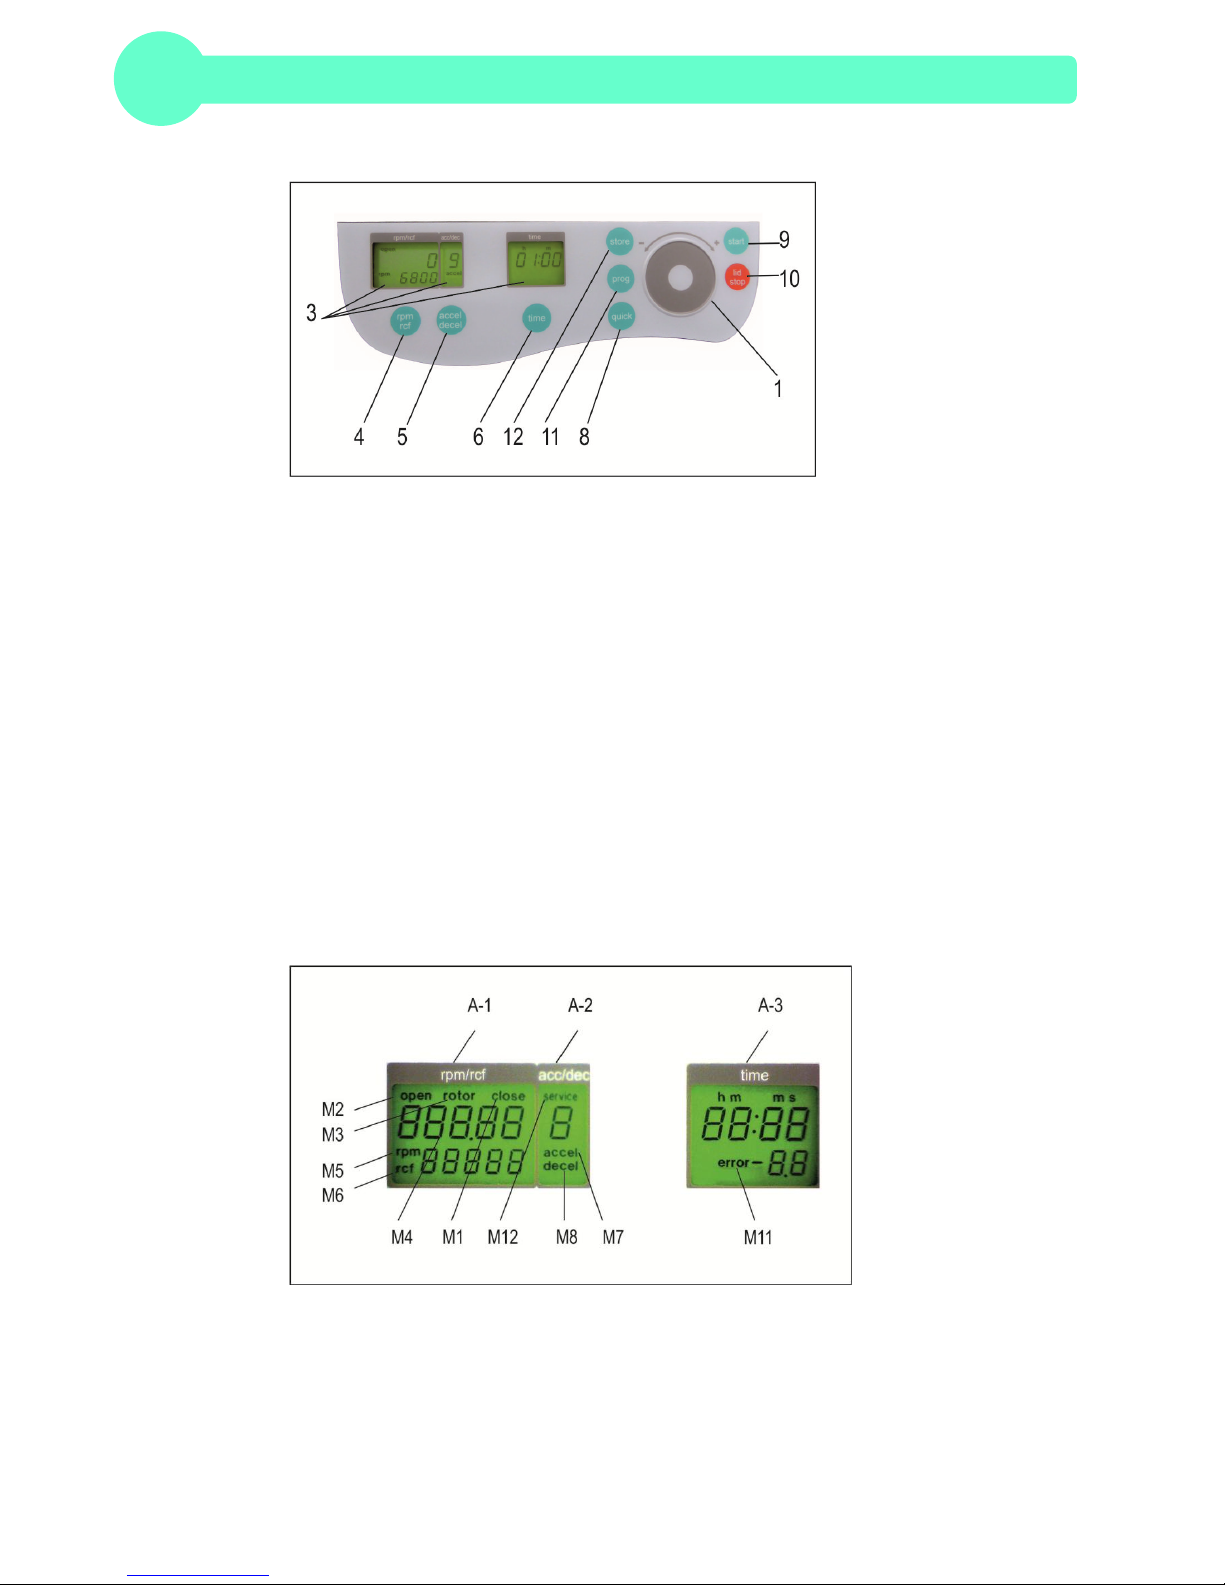
1.5 Operating and Display Elements
1 control field Run Parameters
3 LCD Control Panel Display
4 rpm/rcf Speed/ g-force
5 accel/decel Acceleration / Deceleration Intensity
6 time Centrifugation Time
8 quick Short Running
9 start Start Centrifugation
10 lid/stop Lid Release / Stop Centrifugation
11 prog Retrieving Stored Programs
12 store Program Store
1.5.1 LCD-Display
The following picture shows the individual elements of the LCD-Display.
Display Fields:
A-1 Display Field – "rpm/rcf"
A-2 Display Field – "acc/dec"
A-3 Display Field– "time"

PRODUCT DESCRIPTION
© Hermle Labortechnik GmbH Z207A_V1.17_eng 3
Messages/Logo of the Display Field:
M1 "close" M6 "rcf"
M2 "open" M7 "accel"
M3 "rotor" M8 "decel"
M4 Rotor-No. M11 "error"
M5 "rpm" M12 "service
1.6 Signs- and Indication of the Centrifuge
1.6.1 General
Direction of Rotation – clockwise rotation for the rotor drive
1.6.2 Product Nameplate (Example)
Company Address: Hermle Labortechnik GmbH, Siemensstr. 25, D-78564 Wehingen
TYPE: Type Designation of the Product
REF: Article Number of the Product
SN: Serial Number of the Product
Date of Manufacture
Manufacturer
Instructions for Disposal (see Chapter 6, page 26)
MAX. SPEED: max. Allowed Speed of the Unit
PRODUCT DESCRIPTION
4 Z207A_V1.17_eng © Hermle Labortechnik GmbH
KIN. EN.: max. Kinet Energy with Corresponding Rotor
U/I/f: Allowable Voltage / Max. Current / Frequency
P: Electrical Input Power
Operating Manual
Labeling identifies that all Standards and Guidelines are applied
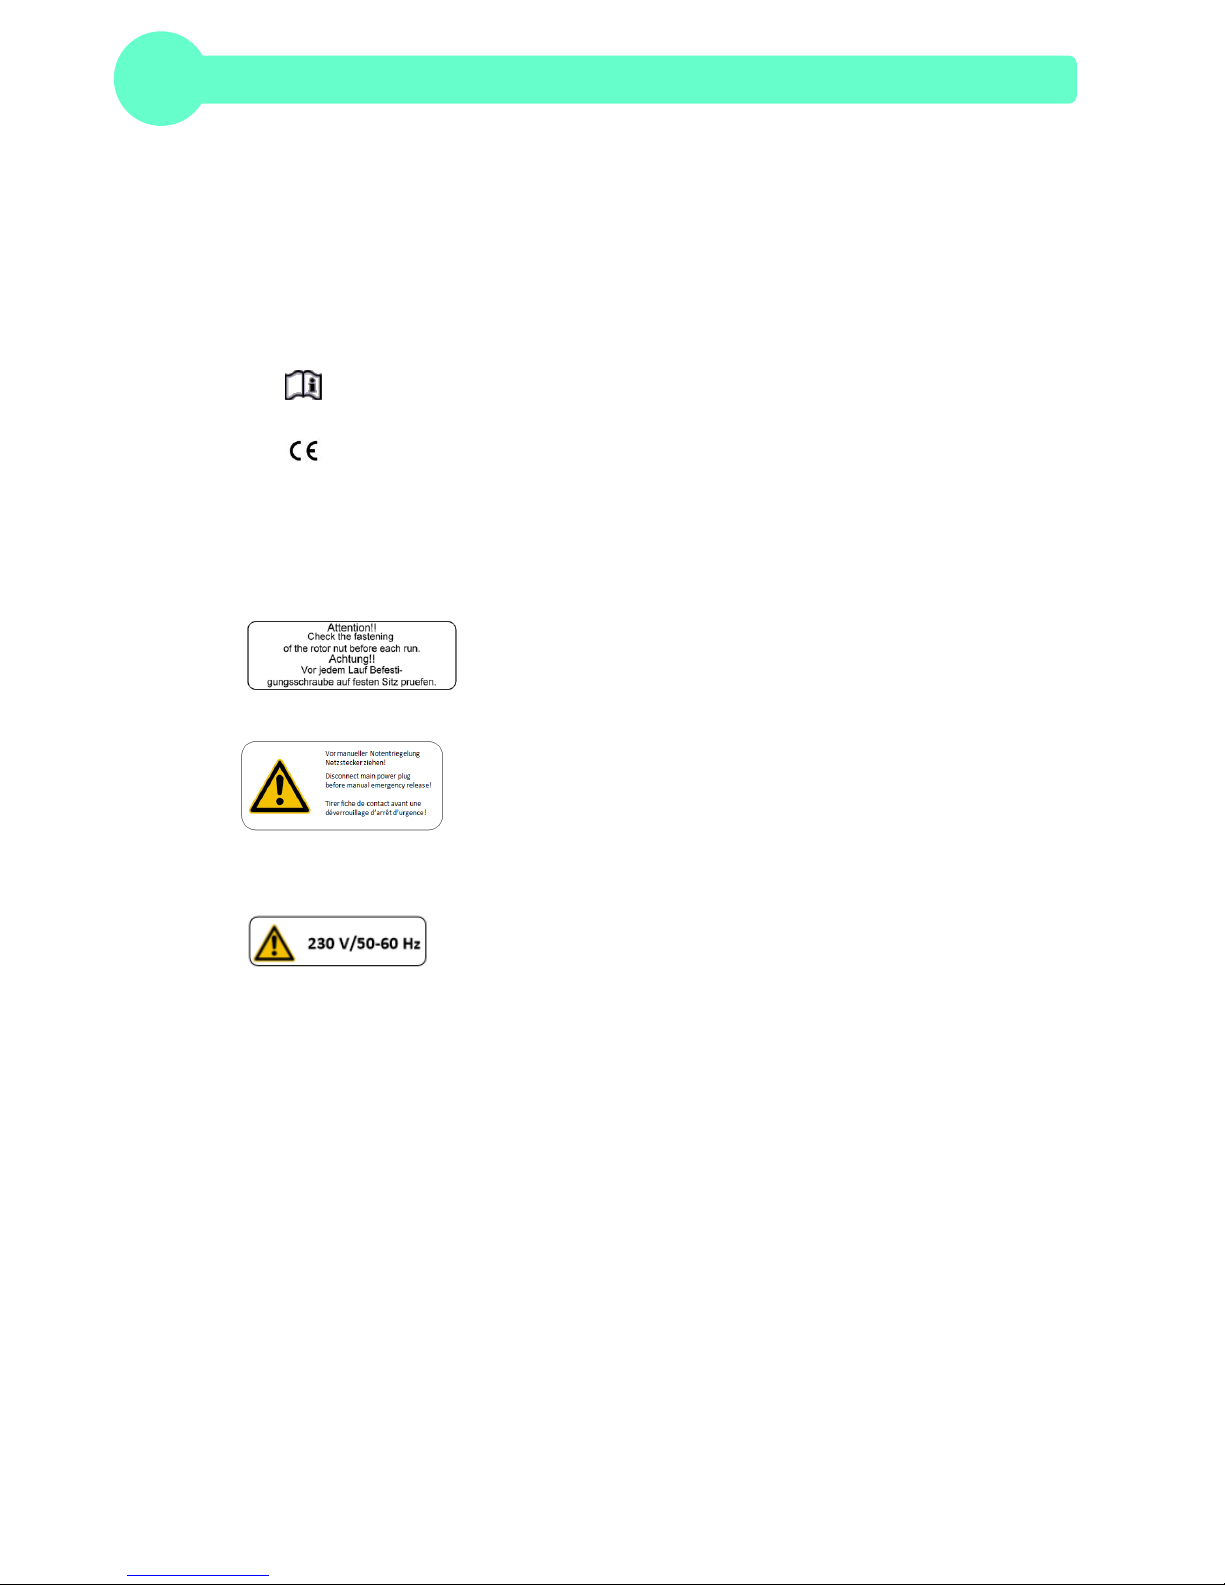
1.6.3 Warning and Information Signs
Attention! Check the fastening of the rotor nut before each run.
Take off mains plug before opening the housing or the emergency
release.
Power Input

PRODUCT DESCRIPTION
© Hermle Labortechnik GmbH Z207A_V1.17_eng 5
1.6.4 Danger, Precautions and Warranty
This device may only be operated by a trained professional. Carefully, read the
operating manual and be familiar with the functions of the device.
To protect people and the environment, the following precautions must be taken:
• During centrifugation, the presence of people and the arrangement of hazardous materials is
strictly prohibited, within 30 cm/12 in around the centrifuge, according to the regulations of
EN 61010-2-020.
• The HERMLE Z 207 A is non "explosion-proof" and must not be operated in explosion-
endangered areas or locations. Centrifugation of flammable, explosive, radioactive, or such
substances, which chemically react with high energy, is strictly prohibited. If used in such
environment, this is at the users own expense.
• Never spin toxic or pathogenic material without adequate safety precautions, i.e.
centrifugation of tubes with or without defective hermetic sealing, is strictly prohibited. The
user is obliged to perform appropriate disinfection procedures, in case dangerous substances
have contaminated the centrifuge and/or its' accessories. When centrifuging infectious
substances, always pay attention to the General Laboratory Precautions. If necessary,
contact your safety officer!
• It is prohibited to run the centrifuge, with rotors not manufactured for this unit.
• Under no circumstances open the lid of the centrifuge, while the rotor is still running or
rotating with a speed of > 2m/s.
1.6.5 Following Rules Must Strictly be Adhered To:
• Do not operate the centrifuge if not installed correctly.
• Do not operate the centrifuge when dismounted (e.g. without housing).
• Do not run the centrifuge, if mechanical or electrical assembly groups have been tampered
with, by unauthorized personnel.
• Do not use accessories such as rotors and adapters, that are not approved by HERMLE
Labortechnik GmbH, except commercially available centrifuge tubes, made of glass or
plastic.
• Do not spin extremely corrosive substances, as they may cause material damages and impair
mechanical resistance.
• Do not operate the centrifuge with rotors or adapters, which show any signs of corrosion or
mechanical damage.
The manufacturer is responsible for safety and reliability, of the centrifuge, only if:
• The unit is operated in accordance to this instruction manual.
• Modifications, repairs or other adjustments are performed by HERMLE-authorized personnel
and the electrical installation of the related location corresponds to the IEC-regulations.

PRODUCT DESCRIPTION
6 Z207A_V1.17_eng © Hermle Labortechnik GmbH
1.6.6 Warranty
The centrifuge has been subjected to thorough testing and quality control. In the unlikely case of any
manufacturing faults occurring, the centrifuge and rotors are covered by warranty, for a period of two
years, from date of delivery. This warranty becomes invalid in any case of mishandling, damage
and/or negligence and further in any case of usage of inappropriate spare parts and / or accessories
or unauthorized modification of the unit.
Technical modification rights are reserved, by the manufacturer, in regards to
technical improvement!
1.7 Installation of the Centrifuge
1.7.1 Unpacking the Centrifuge
Model Z 207 A is supplied in a carton.
Remove the strap retainer, open the carton and remove the centrifuge. The instruction manual must
be kept with the centrifuge at all times!
1.7.2 Space Requirements
The centrifuge should be installed on an even, vibration free and solid surface, if possible on a
laboratory cabinet / table or some other solid vibration free surface.
During centrifugation, the centrifuge must be placed in a way, that there is a minimum space of
30 cm / 12 in on each side of the unit, according to EN 61010-2-020 standards.
Do not place the centrifuge next to a window or a heater where it could be disposed to excessive
heat, as the performance of the unit is based on an ambient temperature of 23°C/73.4°F.
1.7.3 Installation
Follow these steps:
• Check whether the power supply corresponds with the one specified on the manufacturer's
rating label, mounted on the rear panel.
• The line voltage circuit breaker is max. 10 A (Type K), slowly release for commonly used
instruments.
• In case of emergency, there must be an emergency switch off installed outside of the room, in
order to disconnect the power supply from the unit.
• Connect the centrifuge with the mains.
• (The socket for the power cord must be easy to reach, respectively easy to disconnect).
• Switch on, by using the mains power switch (2.2).
• Open the lid, by using the button LID.
• Remove the transport securing device of the motor
PRODUCT DESCRIPTION
© Hermle Labortechnik GmbH Z207A_V1.17_eng 7
1.8 Basic Adjustment
1.8.1 Adjustment of the Rotor Type
For centrifuge Z 207 A, only one rotor (221.57 V01) is acceptable. Due to this, rotor adjustments
cannot be conducted.
1.8.2 Access to the Mode: “Standard settings“
While starting this model, the following basic settings can be performed:
- Signal Turn On / Off
- Keybord Sound On / Off
- Sleep Mode On / Off
The following operating data can be retrieved in this menu:
- Number of Starts
- Operating Hours of Centrifuge
- Operating Hours of Motor
- Software Version
- Error List
- Function of the Imbalance Switch
- Operation of Keyboard
- Hardware Version
- Intermediate Circuit Voltage in Volt
- Display Tests
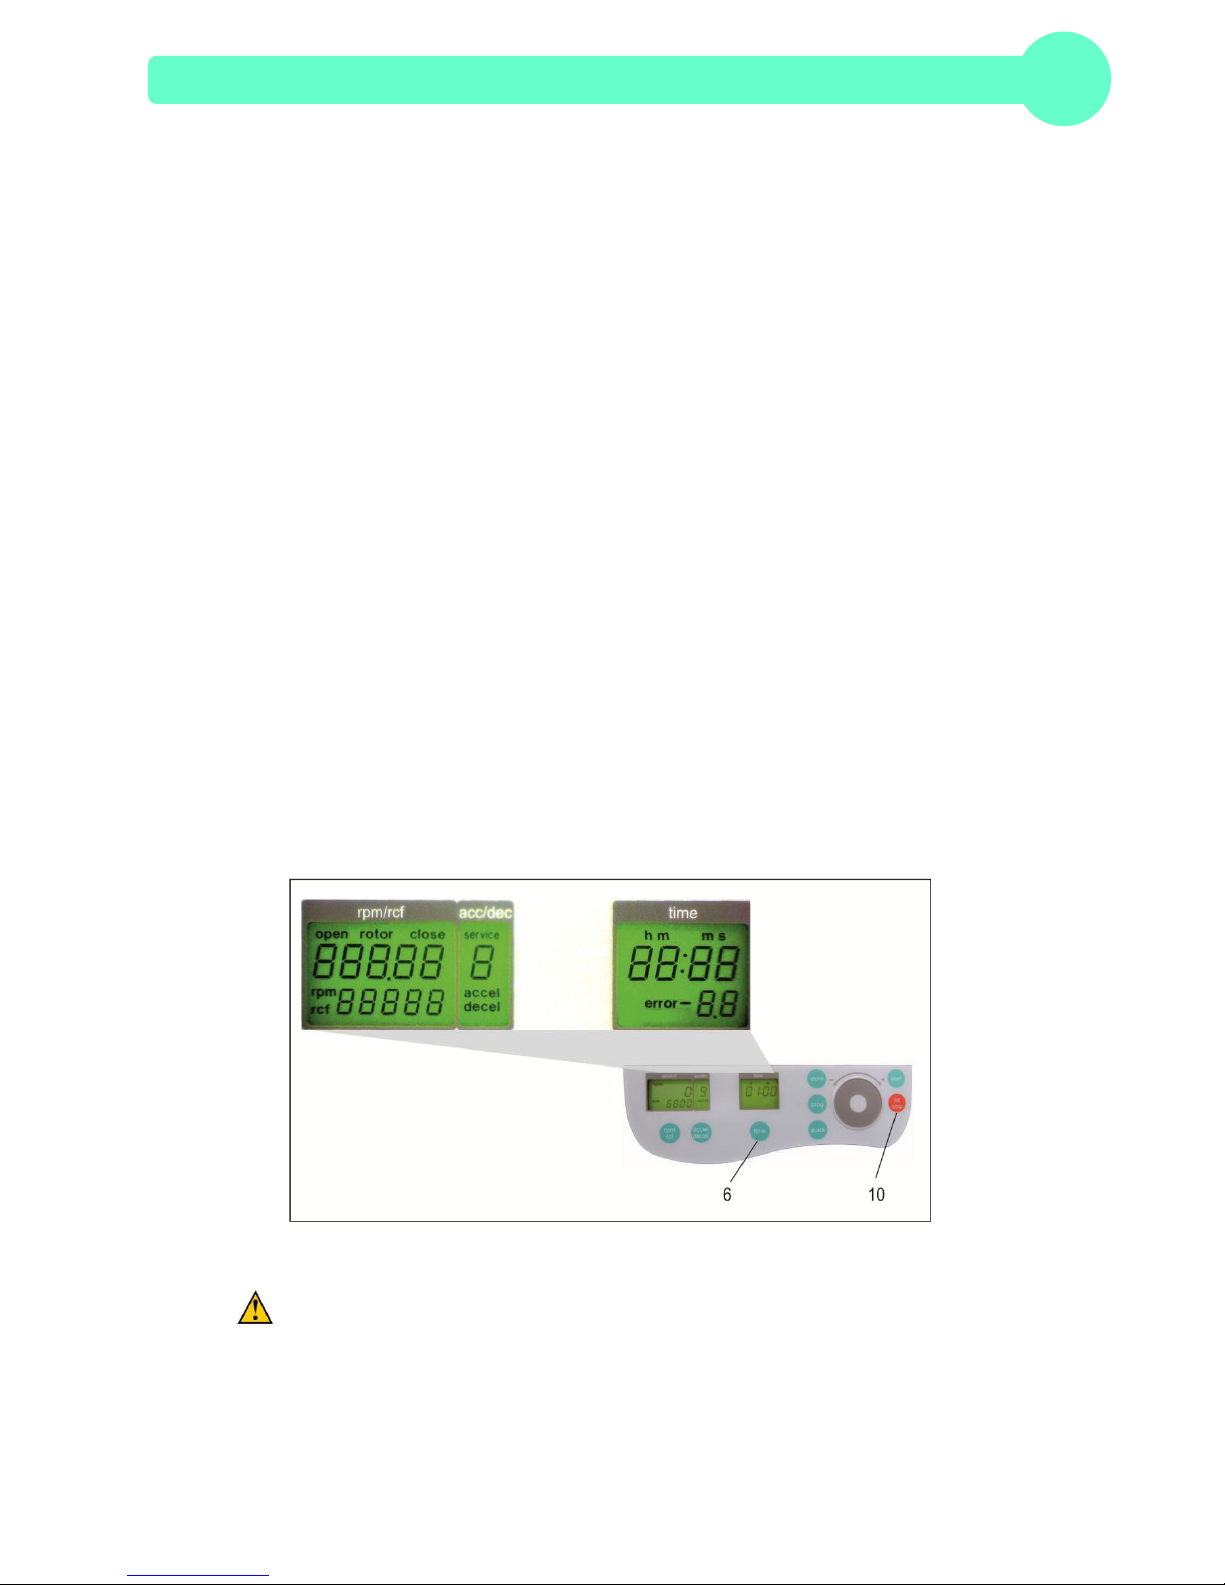
Open the centrifuge lid and shut off the main switch. Now switch on again the main switch.For
approximately 3 seconds “Z 207 A“ will be shown in the display. Press during this time the keys
“time“ (6) and “lid“ (10) simultaneously. As a result, a display test is administered for approx. 3
seconds. All possible indications will appear at the same time (see Figure 1).
Figure 1
ATTENTION:
- The normal program mode can be changed back again by switching off the centrifuge,
for a short period!
- All changed settings must be confirmed by the key, “start” (9). A confirmation screen
will appear with the word, “store”, in the display “rpm/rcf” (A-1) - Only then the preselections are valid!
PRODUCT DESCRIPTION
8 Z207A_V1.17_eng © Hermle Labortechnik GmbH
1.8.3 Signal Turn On / Off
Proceed as illustrated, under point 1.8.2, to enter this program mode, press the key; "accel/decel"
(5). In the display, "accel/decel" (A-2) flashes the word, "service". Select the letter, "L" with the
control field (1). As a result, appearing in the display "rpm/rcf" (4), are the words, "On Sound". By
pressing the key, "rpm/rcf" (4), the word "On" flashes, and the sound can be switched off with the
control field (1), (see Figure 2).
After the settings have been stored by user, the normal program mode can be changed back again
by switching off the centrifuge, for a short period.
Figure 2
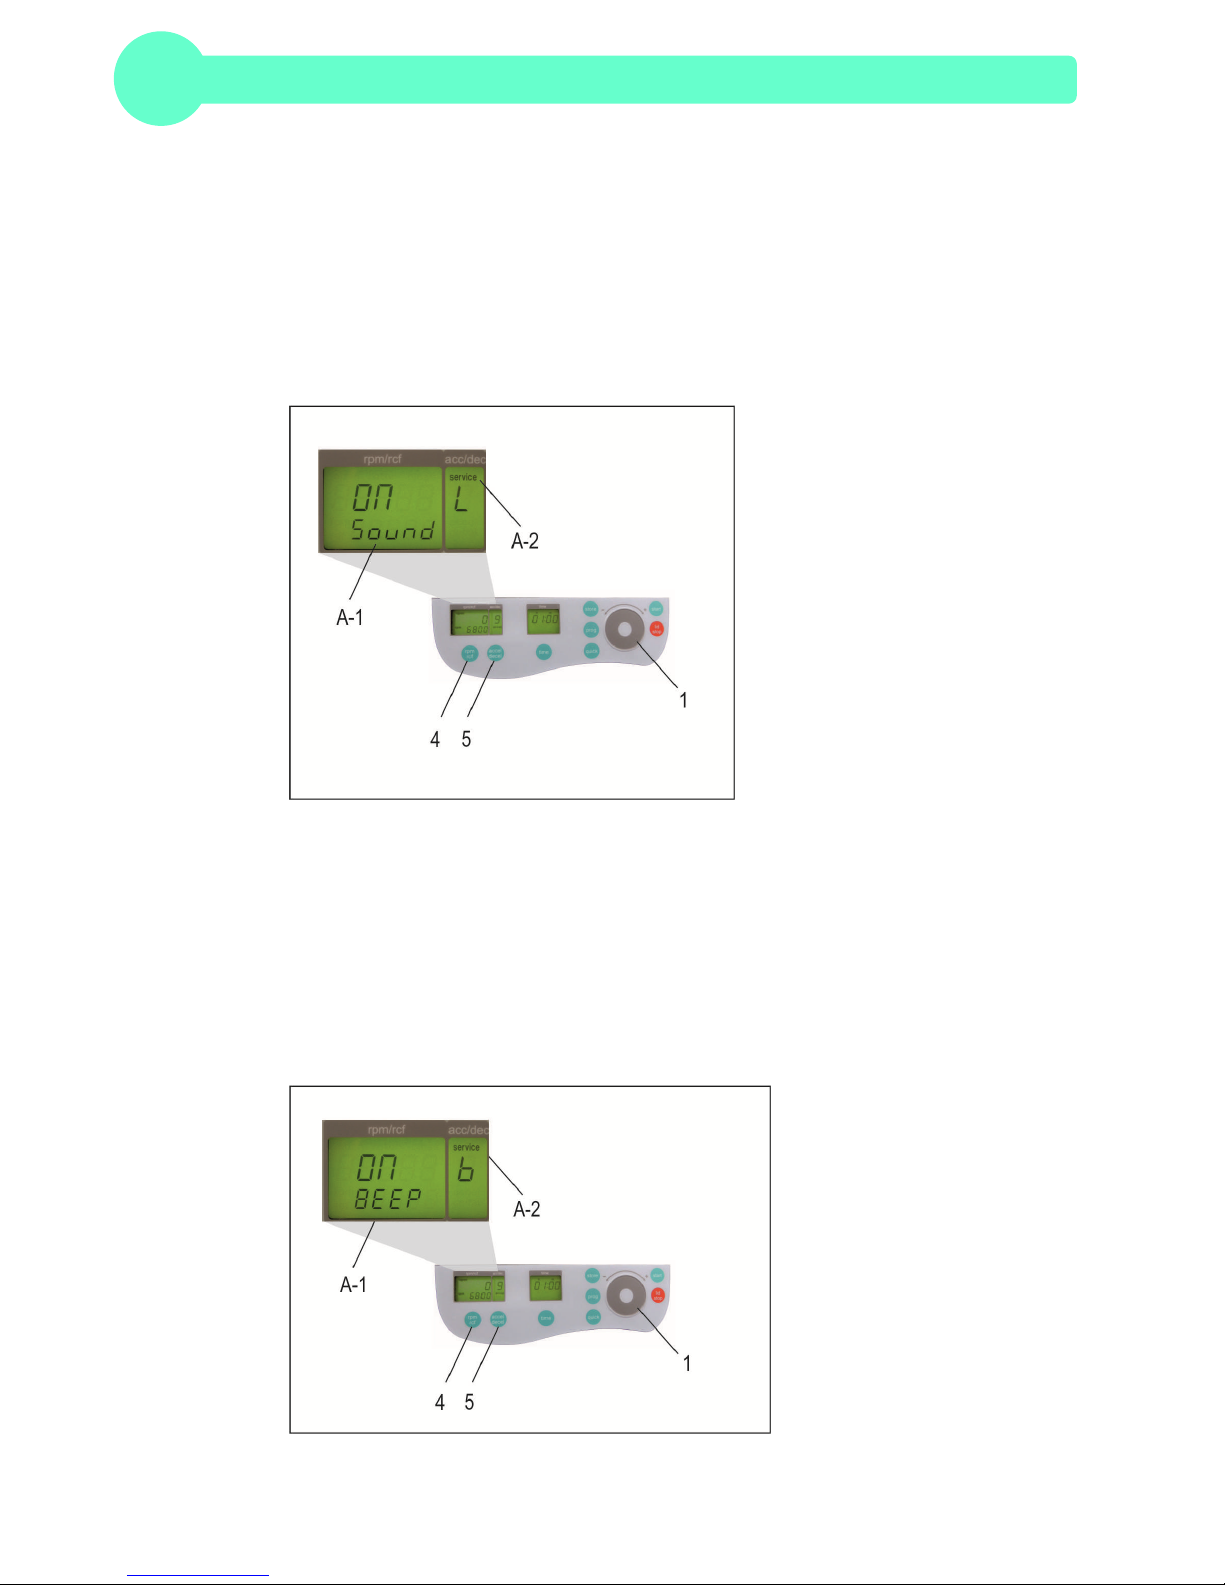
1.8.4 Keyboard Sound Turn On / Off
Proceed as illustrated, under point 1.8.2, to enter this program mode, press the key, "accel/decel"
(5). In the display, "accel/decel" (A-2) flashes the word, "service". Select the letter "b" with the control
field (1). As a result, appearing in the display, "rpm/rcf" (A-1), the word "ON/BEEP". After pressing
the key, "rpm/rcf" (4), turn the keyboard sound (On) or (Off), with the rotorary field (1), (see Figure
3).
After the settings have been stored by user, the normal program mode can be changed back again
by switching off the centrifuge, for a short period.
Figure 3
 Loading...