

Hermle Sieva-3 Instruction Manual
Instruction Manual
for
Filtration Centrifuge
Sieva-3

CONTENT
Sieva-3_V1.18_eng © Hermle Labortechnik GmbH

CONTENT
© Hermle Labortechnik GmbH Sieva-3_V1.18_eng
1. GENERAL INFORMATION ..................................................................................................1
1.1 Danger, precautions and warranty ....................................................................................................................... 1
1.2 Description ........................................................................................................................................................... 2
1.3 Delivery Package ................................................................................................................................................. 2
1.4 Warranty .............................................................................................................................................................. 2
1.5 Operating and Display Elements ......................................................................................................................... 3
1.5.1 LED light .......................................................................................................................................................... 3
1.5.2 LCD-Display .................................................................................................................................................... 4
1.6 Signs and Indications of the Centrifuge ............................................................................................................... 4
1.6.1 General ............................................................................................................................................................ 4
1.6.2 Product Nameplate (Example) ........................................................................................................................ 5
1.6.3 Warning and Information Signs ....................................................................................................................... 6
2. INSTALLATION ...................................................................................................................7
2.1 Unpackaging ........................................................................................................................................................ 7
2.2 Space Requirements ........................................................................................................................................... 7
2.3 Installation ............................................................................................................................................................ 7
2.4 Installation of the rotor ......................................................................................................................................... 8
2.4.1 Mounting of the centrifugal basket ................................................................................................................... 8
2.4.2 Überladung von Rotoren ................................................................................................................................. 8
2.4.3 Removing of the rotor ...................................................................................................................................... 8
2.4.4 Functional principle of the baskets .................................................................................................................. 9
3. BASIC ADJUSTMENTS .................................................................................................... 10
3.1 Adjustment of the Rotor Type ............................................................................................................................ 10
3.2 Access to the Mode: “Standard settings“ ........................................................................................................... 10
3.3 Acoustic Signal Turn On / Off ........................................................................................................................... 11
3.4 Volume Pre-Selection of Sound Signal .............................................................................................................. 11
3.5 Song Selection – End of Run ............................................................................................................................. 12
3.6 Keyboard Sound Turn On / Off .......................................................................................................................... 12
3.7 Sleep Mode Setting ........................................................................................................................................... 13
3.8 Retrieving Operation Data ................................................................................................................................. 13
4. OPERATION ...................................................................................................................... 14
4.1 Power Switch ..................................................................................................................................................... 14
4.2 Centrifuge Lid .................................................................................................................................................... 14
4.2.1 Lid Release ................................................................................................................................................... 14
4.2.2 Lid Lock ......................................................................................................................................................... 15
4.3 Pre-Selection ..................................................................................................................................................... 15
4.3.1 Pre-Selection of Speed and RCF-Value ........................................................................................................ 15
4.3.2 Pre-Selection of Running Time ...................................................................................................................... 16
4.3.3 Pre-Selection of Brake Intensity and Acceleration......................................................................................... 16
4.4 Program ............................................................................................................................................................. 17

CONTENT
Sieva-3_V1.18_eng © Hermle Labortechnik GmbH
4.4.1 Storage of Programs ..................................................................................................................................... 17
4.4.2 Recall of Stored Programs ............................................................................................................................ 18
4.4.3 Leaving Program Mode ................................................................................................................................. 19
4.5 Starting and Stopping the Centrifuge ................................................................................................................. 19
4.5.1 Starting the Centrifuge................................................................................................................................... 19
4.5.2 Stopping the Centrifuge ................................................................................................................................. 19
4.6 Imbalance Detection .......................................................................................................................................... 20
4.7 Volume Flow ...................................................................................................................................................... 20
4.8 External Temperature Control............................................................................................................................ 20
5. MAINTENANCE ................................................................................................................. 21
5.1 Maintenace and Cleaning .................................................................................................................................. 21
Cleaning and Disinfecting of the Unit ......................................................................................................................... 22
Cleaning and Disinfection of the Rotor ....................................................................................................................... 22
Disinfection of Aluminum Rotors ................................................................................................................................ 22
Disinfektion of PP-Rotors ........................................................................................................................................... 23
Glass Breakage .......................................................................................................................................................... 23
Lifetime of Rotors, Round and Rectangular Buckets, Accessories ................................................................................. 23
6. TROUBLE SHOOTING ...................................................................................................... 24
6.1 Error Messages: Problem / Solution .................................................................................................................. 24
6.2 Survey of Possible Error Messages and Solutions ............................................................................................ 24
6.2.1 Lid Release during Power Failure (Emergency Lid Release) ........................................................................ 24
6.2.2 Description of the Error Message System ..................................................................................................... 25
6.2.3 Procedure while error 14 ............................................................................................................................... 25
7. TRANSPORT, STORAGE AND DISPOSAL ...................................................................... 26
Transport ........................................................................................................................................................................ 26
Storage 26
Disposal .......................................................................................................................................................................... 26
8. APPENDIX ........................................................................................................................... I
EC – Conformity Declaration .................................................................................................................................... II
Tabelle 1: Technical Data ...................................................................................................................................... III
Table 2: Max. Speed and RCF-Values for Permissible Rotors ............................................................................... IV
Table 3: Permissble Net Weight .............................................................................................................................. IV
Table 4: Error Messages .......................................................................................................................................... V
Table 5: Abbreviations ............................................................................................................................................. V
Redemption Form / Decontamination Certificate ..................................................................................................... 1

GENERAL INFORMATION
© Hermle Labortechnik GmbH Sieva-3_V1.18_eng 1
1. GENERAL INFORMATION
1.1 Danger, precautions and warranty
Before putting the centrifuge into operation, please read this instruction manual
carefully.
This device may only be operated by trained specialist stuff. They must have carefully read
the operating manual and be familiar with the function of the device.
To protect people and environment the following precautions should be observed:
• During centrifugation, the presence of people and the setting up of hazardous materials is
prohibited within 30 cm around the centrifuge according to the regulations of
EN 61010-2-020.
• The HERMLE SIEVA 3 is non explosion-proof and must therefore not be operated in
explosion-endangered areas or locations. Centrifugation of flammable, explosive, radioactive,
or such substances, which chemically react with high energy, is strictly prohibited. The final
decision on the risks associated with the use of such substances is the responsibility of the
user of the centrifuge.
• Never spin toxic or pathogenic material without adequate safety precautions, i.e.
centrifugation of buckets / tubes without or with defective hermetic sealings is strictly
prohibited. The user is obliged to perform appropriate disinfection procedures in case
dangerous substances have contaminated the centrifuge and or its accessories. When
centrifuging infectious substances, always pay attention to the General Laboratory
Precautions. If necessary, contact your safety officer!
• It is prohibited to run the centrifuge with rotors other than listed for this unit.
• Under no circumstances open the lid of the centrifuge while the rotor is still running or rotating
with a speed of > 2m/s
The following rules must be strictly adhered to:
• Do not operate the centrifuge in case it is not installed correctly.
• Do not operate the centrifuge when dismounted (e.g. without housing).
• Do not run the centrifuge when mechanical or electrical assembly groups have been
tampered with unauthorized persons.
• Do not use accessories such as rotors and buckets, which are not exclusively approved by
HERMLE Labortechnik GmbH, except commercially available centrifuge tubes made of glass
or plastic.
• Do not spin extremely corrosive substances, as they may cause material damages and impair
mechanical resistance.
• Do not operate the centrifuge with rotors or buckets, which show any signs of corrosion or
mechanical damage.
The manufacturer is responsible for safety and reliability of the centrifuge, only if:
• The unit is operated in accordance with this instruction manual.
• Modifications, repairs or other adjustments are performed by HERMLE-authorized personnel
and the electrical installation of the related location corresponds to the IEC-regulations.

GENERAL INFORMATION
2 Sieva-3_V1.18_eng © Hermle Labortechnik GmbH
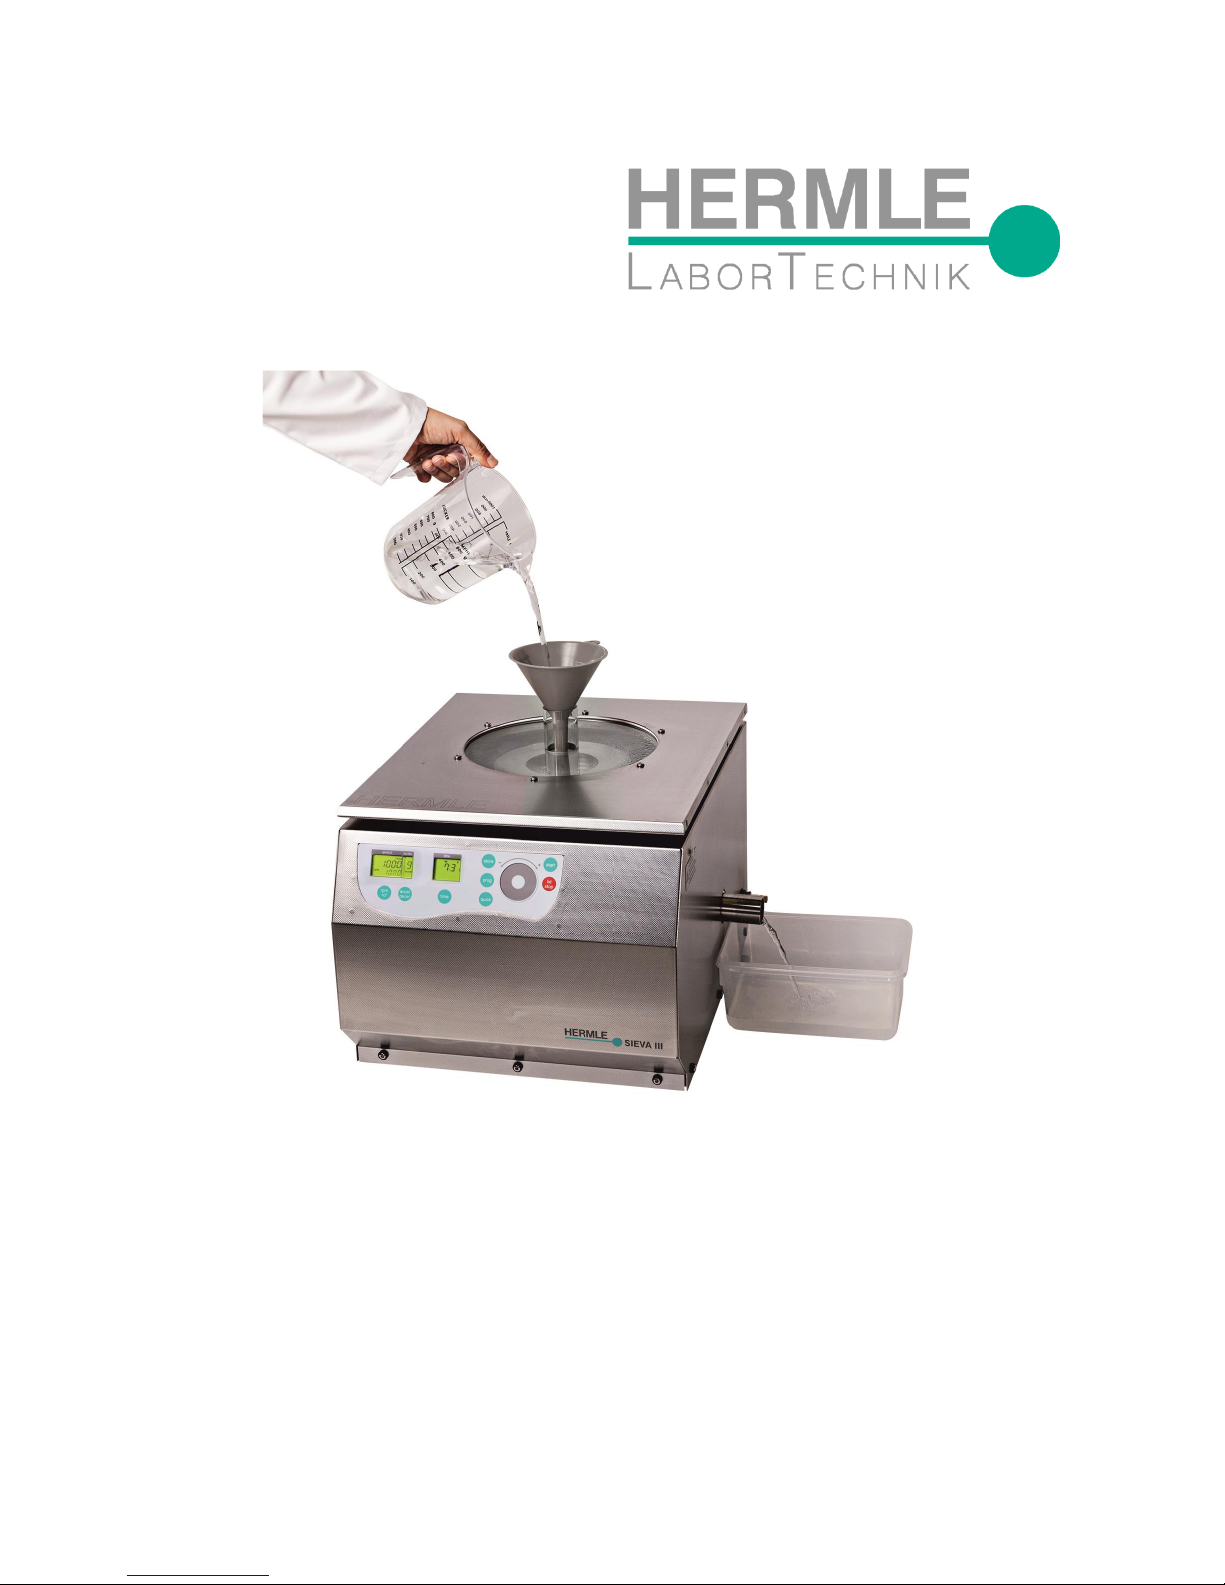
1.2 Description
The Sieva-3 is a filtration centrifuge with microprocessor control. All parameters are accessible via
buttons and selected with the control field. All pre-selected and current values will be shown
permanently on the LCD-display.
The set parameters remain stored after the centrifugation.
The lid is locked and unlocked by an electromagnetic lid lock.
The centrifuge is powered by a maintenance-free and silent induction motor.
1.3 Delivery Package
1 Centrifuge Sieva -3
1 Instruction Manual Sieva-3
1 Hex key
1 Allen key
1 Power cord
Rotor(s) / Accessories will be packaged either inside the centrifuge or separately.
1.4 Warranty
The centrifuge has been subjected to thorough testing and quality controls. In the unlikely case of
any manufacturing faults occurring, the centrifuge and rotors are covered by warranty for a period of
two years from date of delivery. This warranty becomes invalid in case of mishandling, damage and
negligence and further in case of usage of inappropriate spare parts and / or accessories or
unauthorized modification of the unit.
Technical modification rights are reserved by the manufacturer in respect to
technical improvement!
GENERAL INFORMATION
© Hermle Labortechnik GmbH Sieva-3_V1.18_eng 3
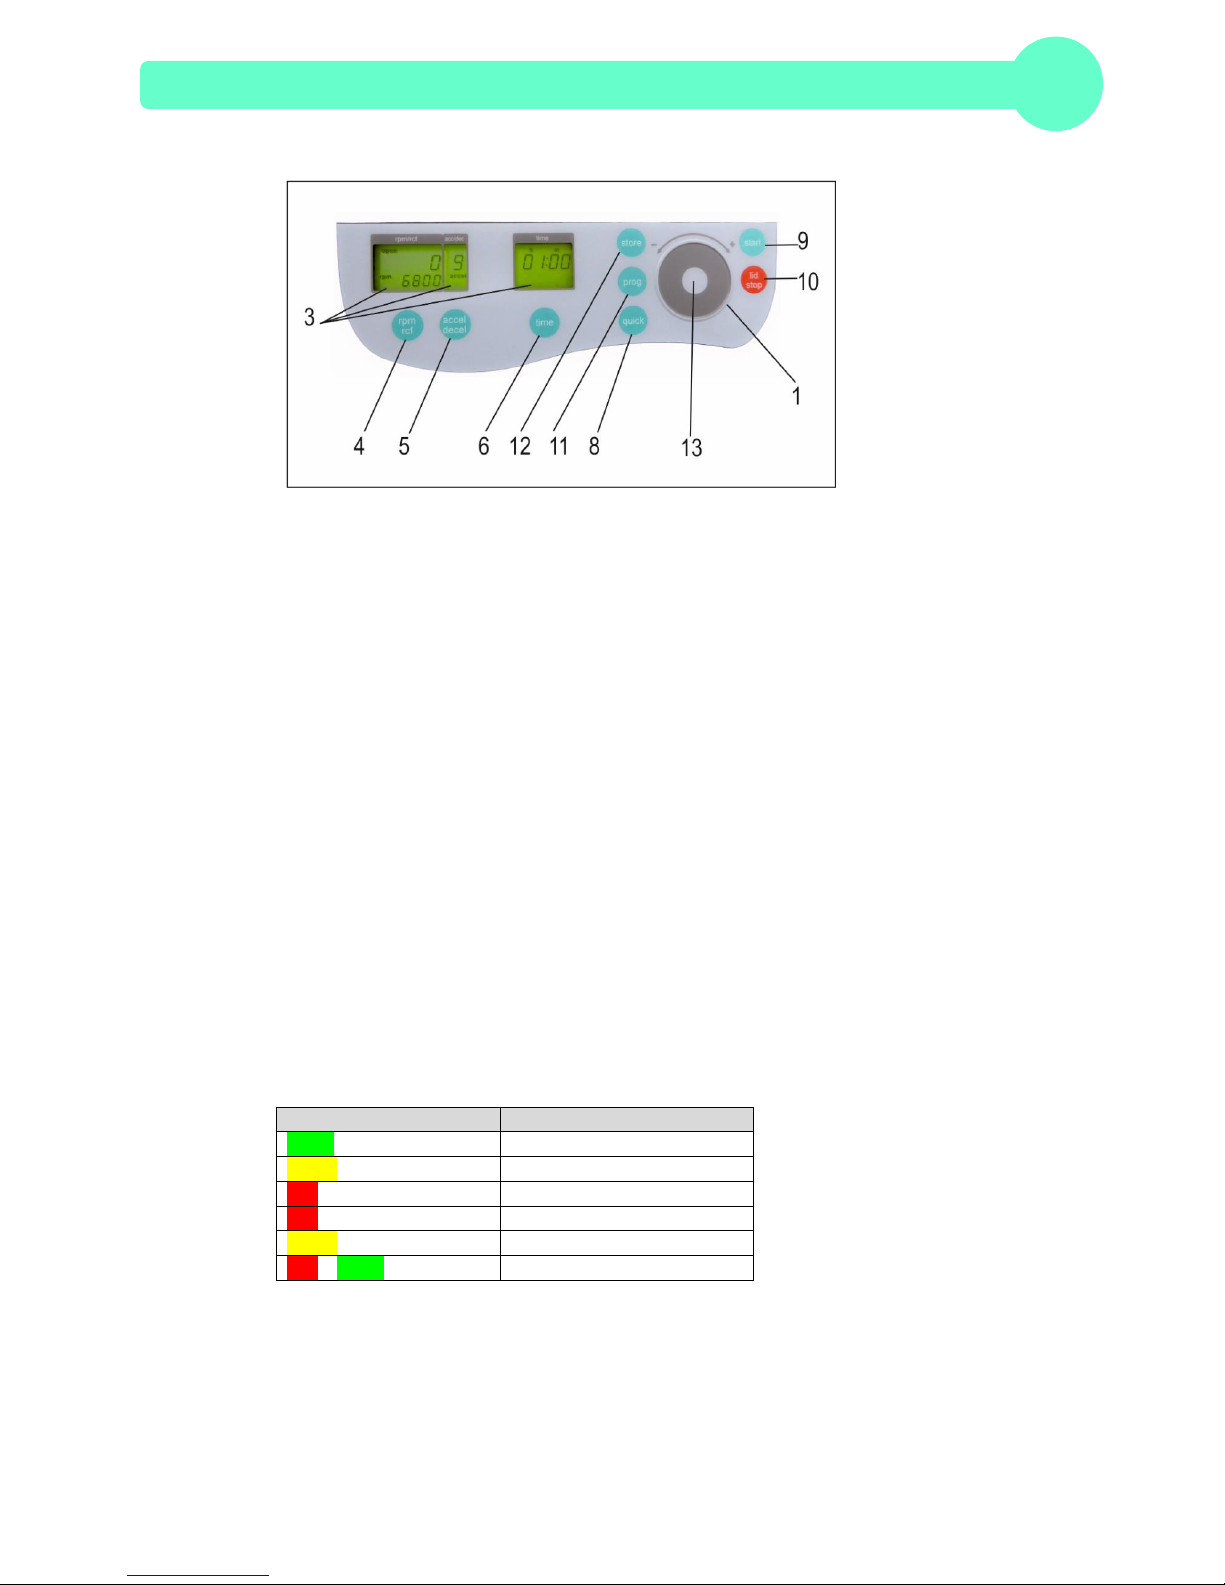
1.5 Operating and Display Elements
1 control field Run Parameters
3 LCD Control Panel Display
4 rpm/rcf Speed / g-force
5 accel/decel Acceleration / Deceleration
6 time Centrifugation time
8 quick Short Running
9 start Start Centrifugation
10 lid/stop Lid Release / Stop Centrifuge
11 prog Retrieving Stored Programs
12 store Program Store
13 LED light Shows the status of the centrifuge
1.5.1 LED light
The LED light indicates the current operation state of the centrifuge. The following table shows all
operating states.
Color of LED light
Operating state
Green
Run complete, lid is closed
Yellow
Lid opened, no sleep mode
Red flashing fast
Error message
Red flashing slow
Centrifuge runs
Yellow flashing slow
Sleep mode
Red – Green flashing slow
Standard settings menu
GENERAL INFORMATION
4 Sieva-3_V1.18_eng © Hermle Labortechnik GmbH
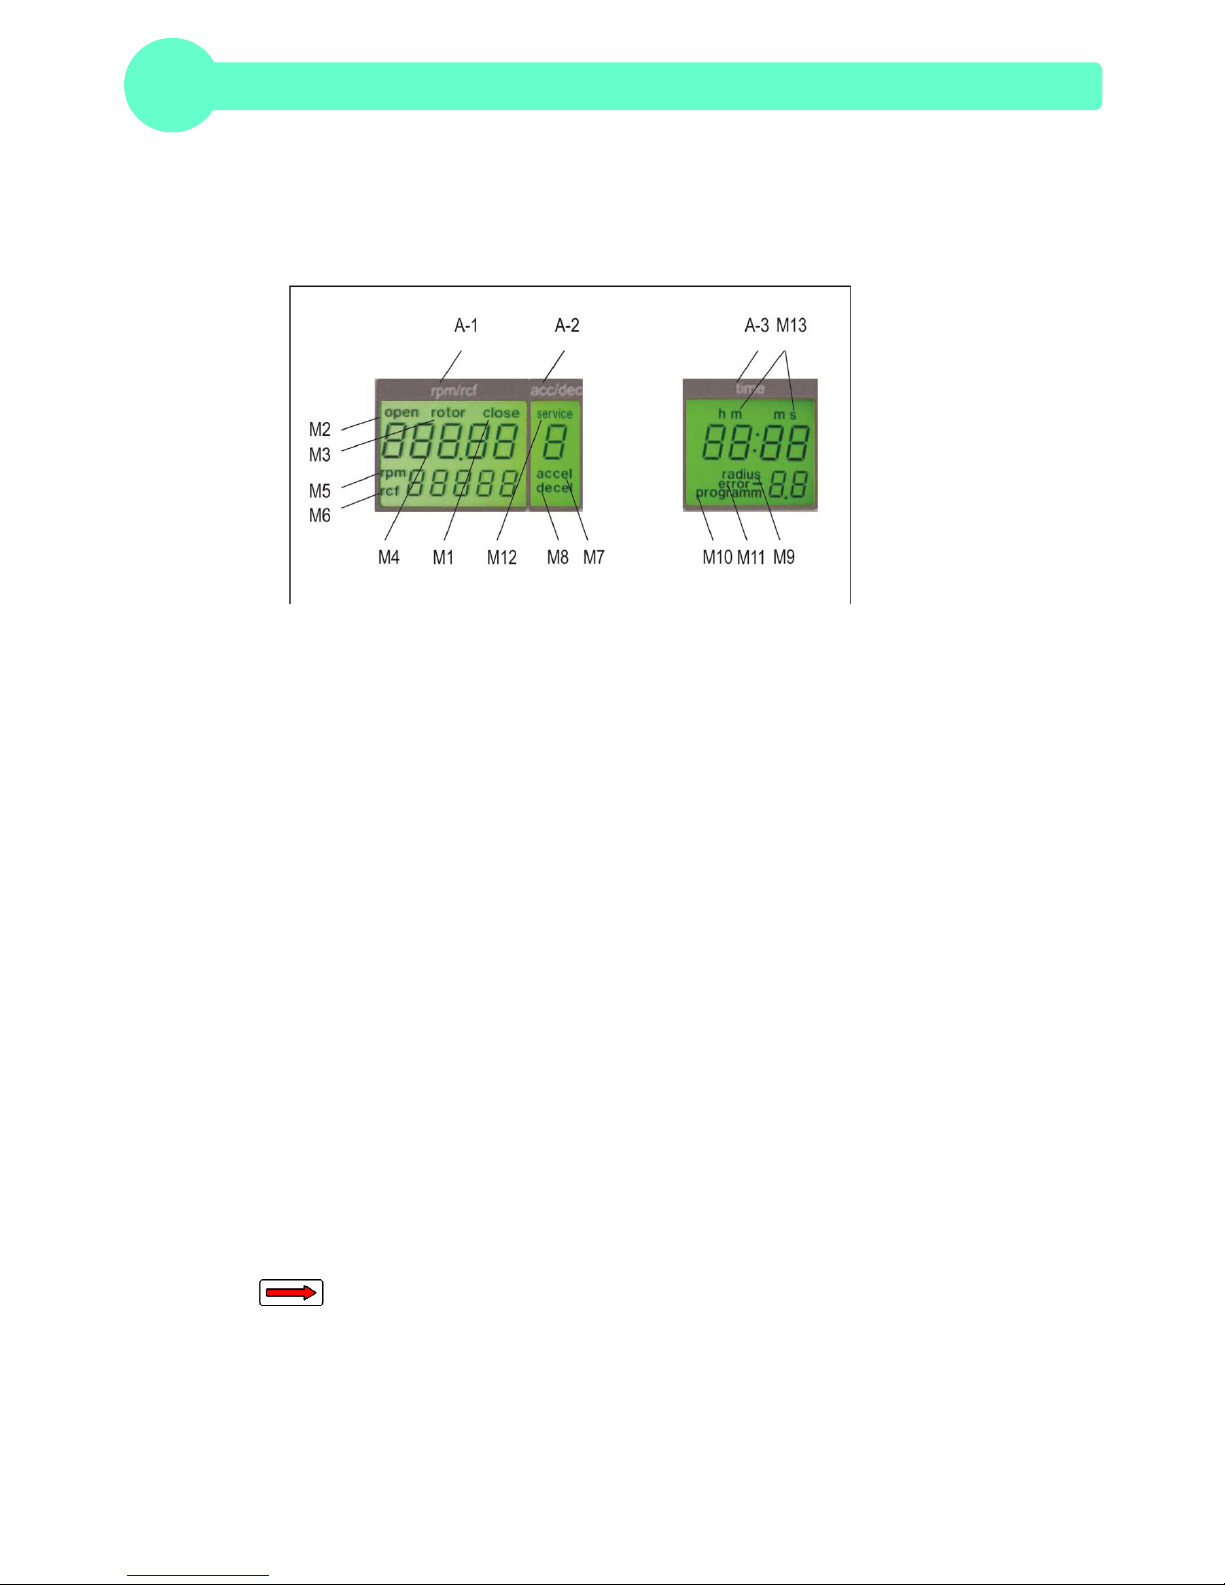
1.5.2 LCD-Display
The following picture shows the individual elements of the LCD-display.
Display Fields:
A-1 Display Field – "rpm/rcf"
A-2 Display Field – "acc/dec"
A-3 Display Field – "time"
Messages/Lettering of the Display Fields:
M1 "close" M8 "decel"
M2 "open" M9 "radius"
M3 "rotor" M10 "program"
M4 Rotor-No. M11 "error"
M5 "rpm" M12 "service"
M6 "rcf" M13 h m s
M7 "accel"
1.6 Signs and Indications of the Centrifuge
1.6.1 General
Direction of Rotation – clockwise rotation for the rotor drive
GENERAL INFORMATION
© Hermle Labortechnik GmbH Sieva-3_V1.18_eng 5
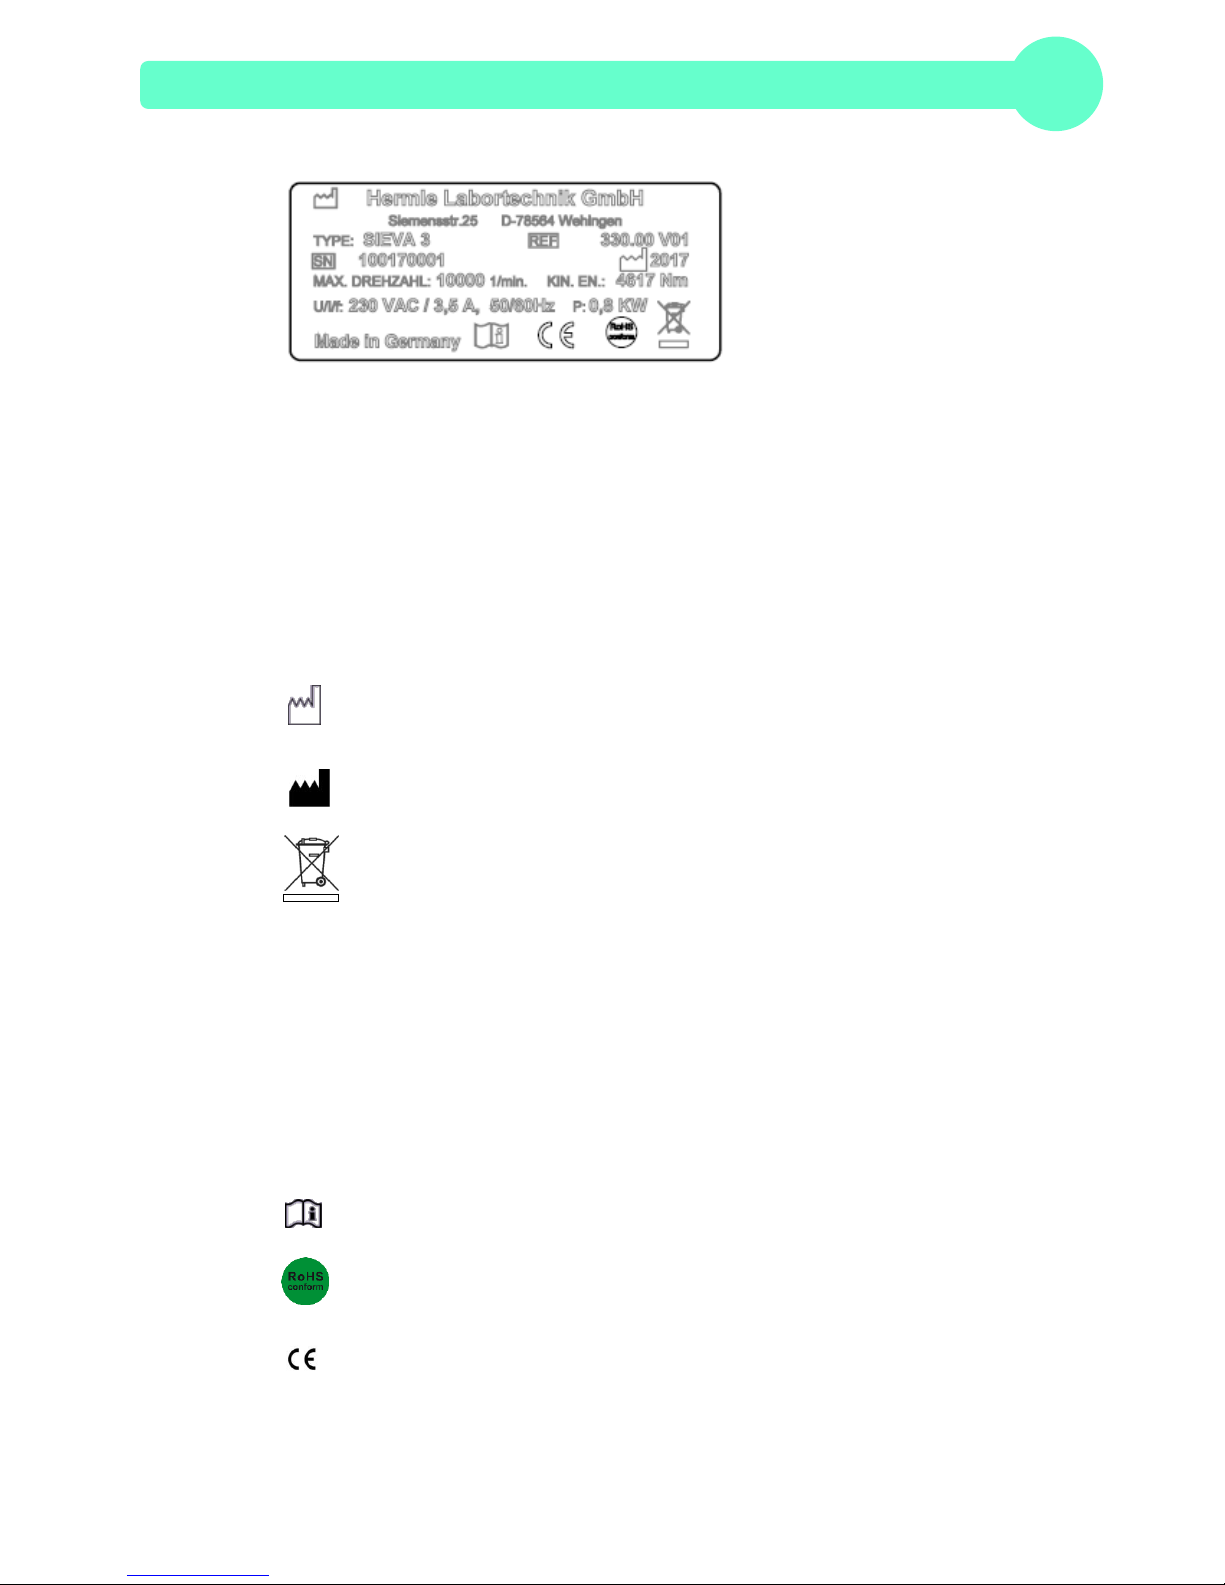
1.6.2 Product Nameplate (Example)
Company Adress: Hermle Labortechnik GmbH, Siemensstr. 25, D-78564 Wehingen
TYPE: Type Designation of the Product
REF: Order No. of the Product
SN: Serial Number of the Product
Date of Manufacture
Manufacturer
Instructions for Disposal, (see chapter 7, S. 26)
MAX. Drehzahl: Max. Allowed Speed of the Unit
KIN. EN.: Max. Kinetic Energy with Corresponding Rotor
U/I/f: Allowable Voltage / Max. Current / Frequency
P: Electrical Input Power
Operating Manual
RoHS-Compliance label (see chapter 7, S. 26)
Labeling identifies that all Standards and Guidelines are applied
GENERAL INFORMATION
6 Sieva-3_V1.18_eng © Hermle Labortechnik GmbH
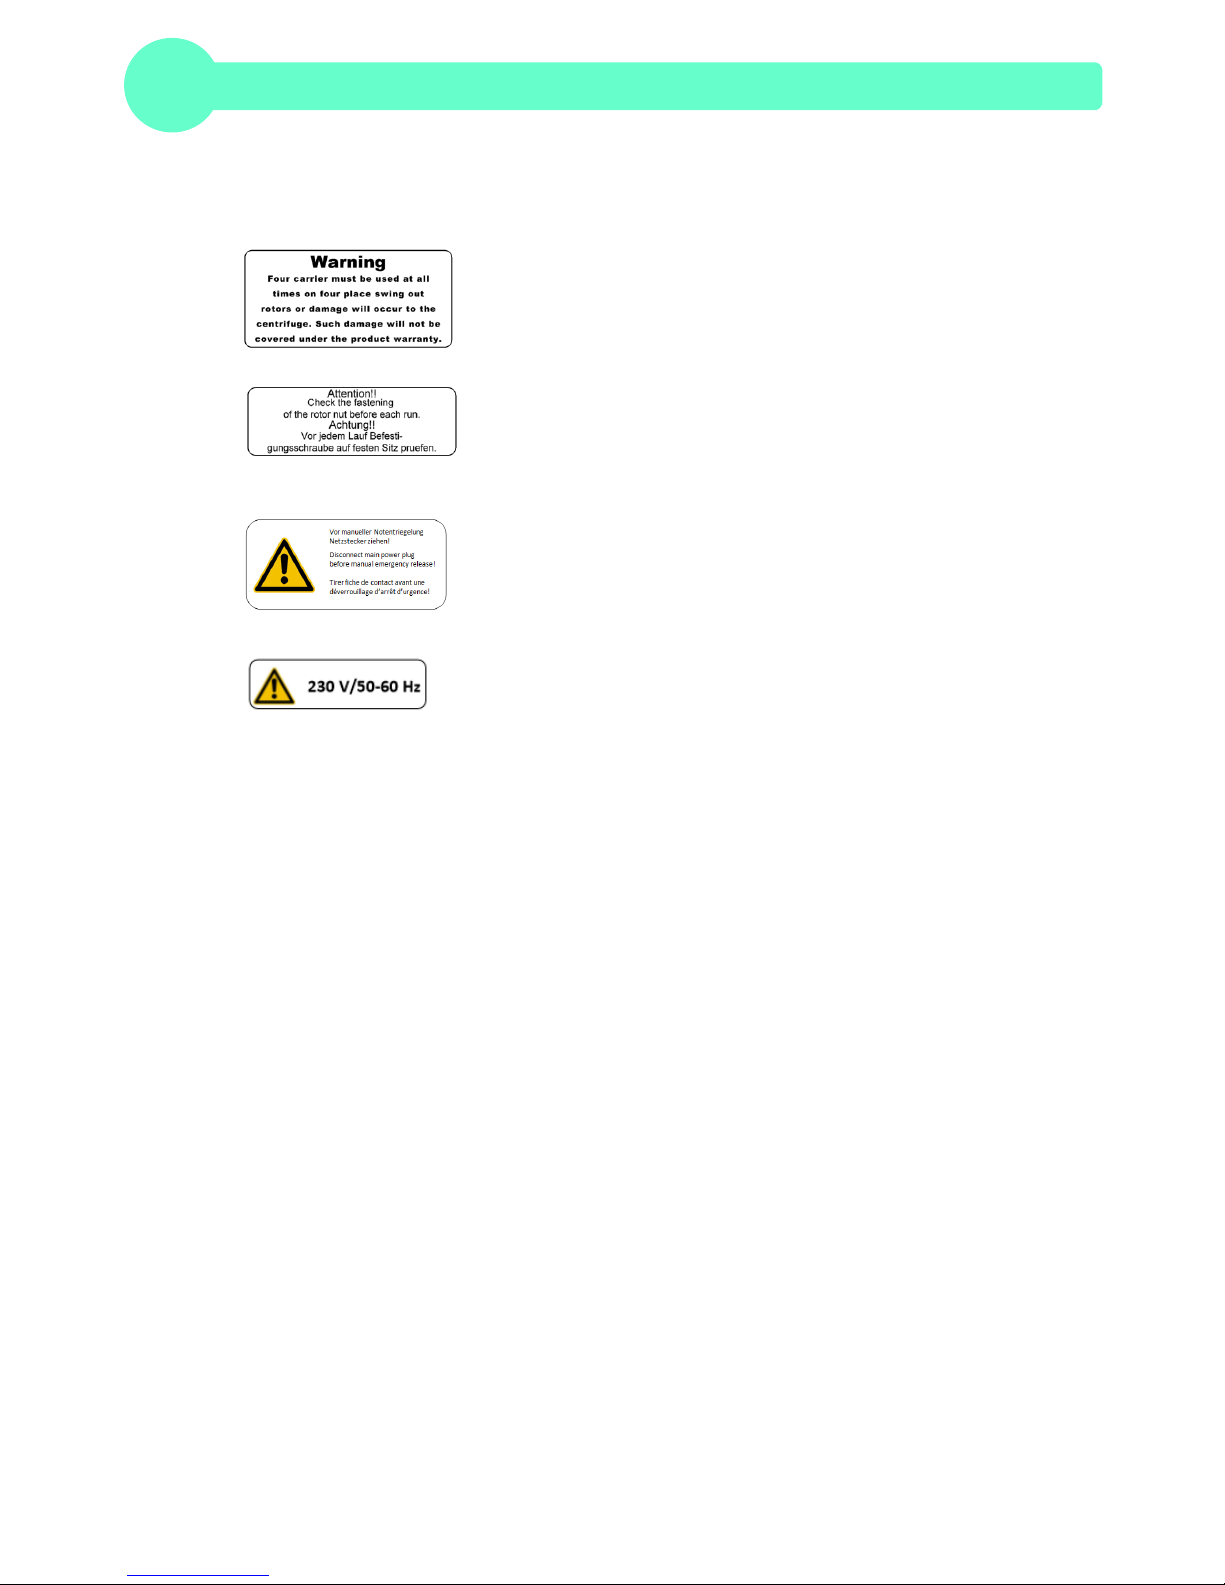
1.6.3 Warning and Information Signs
Four carrier must be used at all times on four place swing out rotors or
damage will occur to the centrifuge. Such damage will not be covered
under the product warranty.
Attention! Check the fastening of the rotor nut before each run!
Take off mains plug before opening the housing or the emergency
release
Power Input

INSTALLATION
© Hermle Labortechnik GmbH Sieva-3_V1.18_eng 7
2. INSTALLATION
2.1 Unpackaging
Model Sieva-3 is supplied in a carton on a palett. Remove the strap retainer and lift the carton. Now
the centrifuge is standing free on the pallet. Lift the centrifuge on both sides with an appropriate
number of helpers and place it on the laboratory table (see Figure 1 ).
Attention! Do not lift the centrifuge from under the lid or by the front panel!
Figure 1
The instruction manual must be kept with the centrifuge, at all times!
2.2 Space Requirements
The centrifuge should be installed on an even, solid surface, if possible on a laboratory cabinet /
table or some other solid vibration free surface.
During centrifugation, the centrifuge must be placed in a way, that there is a minimum space of
30 cm/11.81in on each side of the unit, according to EN 61010-2-020 standards.
Do not place the centrifuge next to a window or a heater where it could be disposed to excessive
heat, as the performance of the unit is based on an ambient temperature of 23°C/73.4°F.
2.3 Installation
Follow these steps:
- Check whether the power supply corresponds with the one specified on the manufacturer's
rating label, mounted on the rear pane.
- The power connection for the centrifuge requires a separate one-site protection, with 16 A
(Type K).
- In case of emergency, there must be an emergency switch off installed outside of the room,
in order to disconnect the power supply from the unit.
- Connect the centrifuge, with the mains.
(The socket for the power cord must be easy to reach, respectively easy to disconnect).
- Switch on, by using the mains power switch (I).
- Open the lid, by using the button LID.
- Remove the transport securing device of the motor.
INSTALLATION
8 Sieva-3_V1.18_eng © Hermle Labortechnik GmbH
2.4 Installation of the rotor
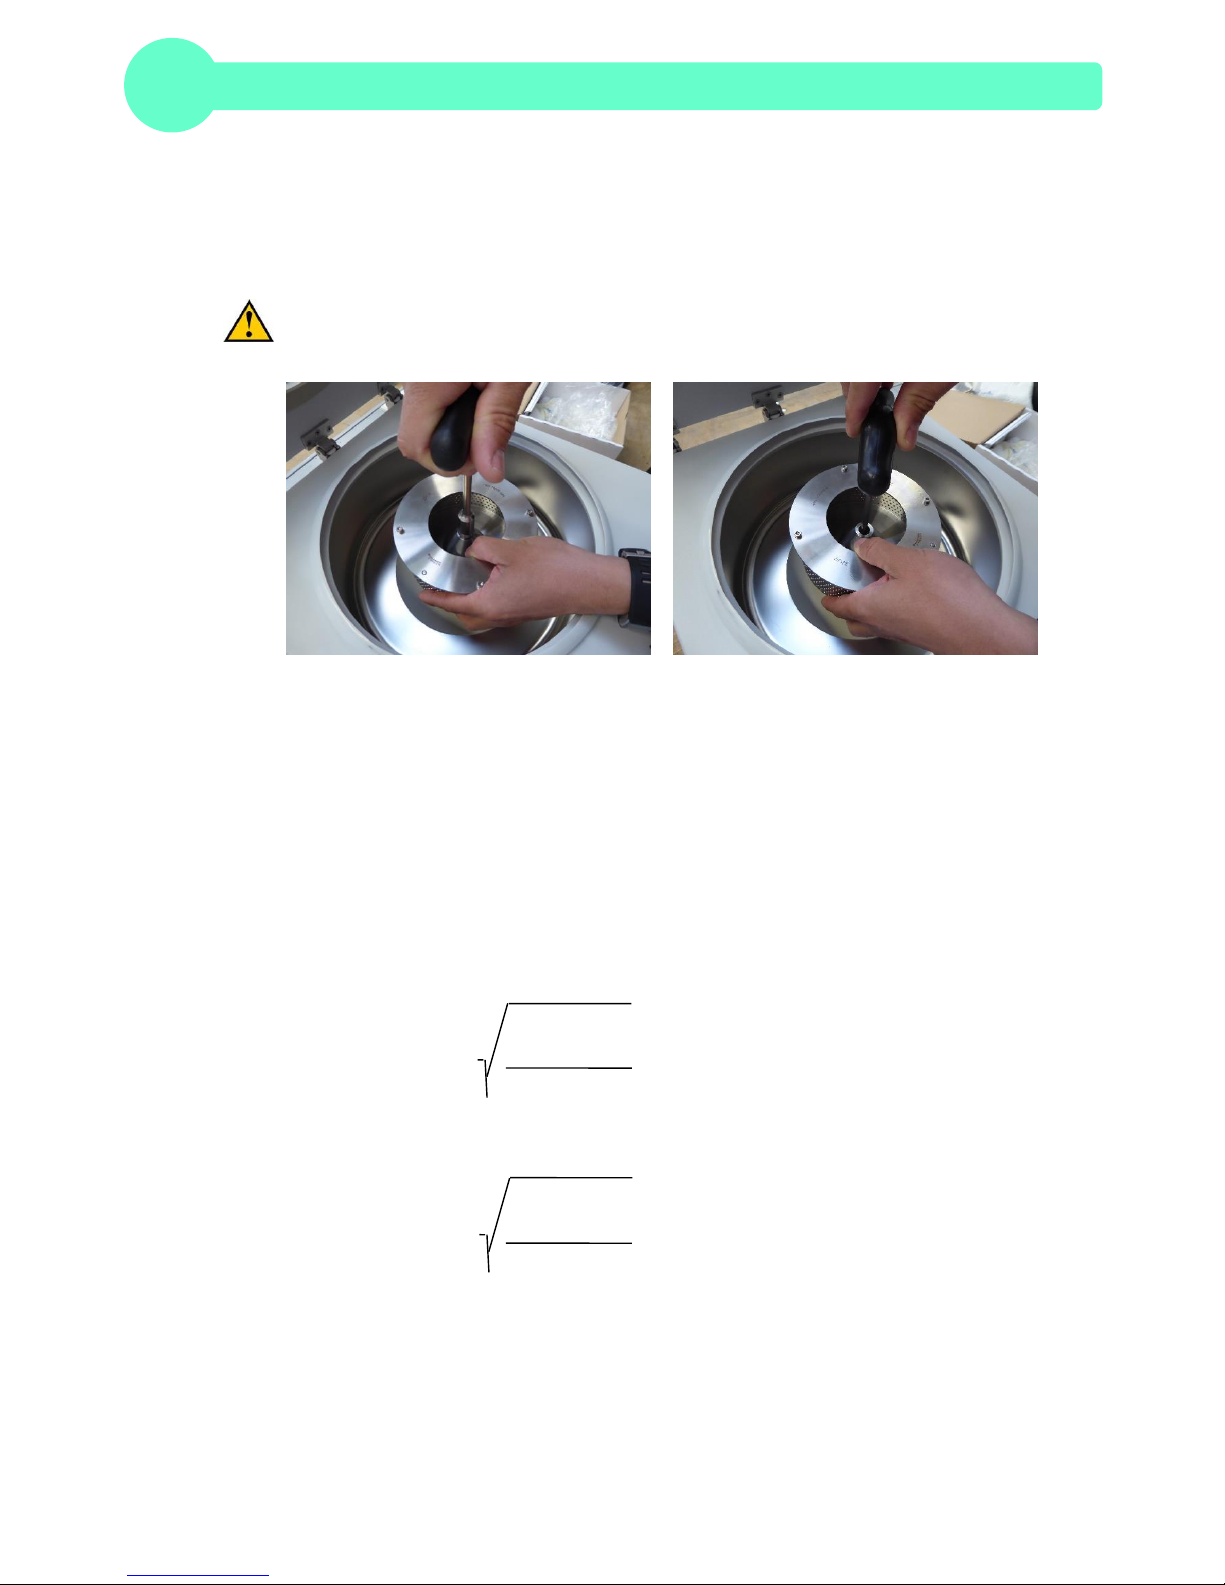
2.4.1 Mounting of the centrifugal basket
Place the basket onto the shaft mounting. Make sure that the driving pins on the shaft mounting and
the borings on the bottom of the basket are in the correct position. Hold the basket with one hand
and secure the fixing nut with the help of the hex key by turning it clockwise (see Figure 2).
To ensure safe operation, the motor mounting must be regularly checked for tightness and secured,
if necessary. Therefore remove the fixing nut from the basket. Hold the basket with one hand and
tighten the motor mounting with the help of allen key by turning it clockwise (see Figure 3).
Figure 2 Figure 3
2.4.2 Überladung von Rotoren
The maximum load permitted for the rotor is determined by the manufacturer, as well as the
maximum speed allowed for this rotor (see label on rotor), must not be exceeded.
The liquid the rotors are loaded with, should have a max. homogeneous density of 1.2 g/ml or less
when the rotor is running at maximum speed
In order to spin liquids with a higher density, the speed has to be reduced, according to the following
formula:
1,2
Reduced speed n
red
= x max. speed (n
max
) of the rotor
higher density
Example:
1,2
n
red
= x 4.000 = 3.360 rpm
1,7
2.4.3 Removing of the rotor
Hold the basket with one hand and untighten the fixing nut of the basket by turning the hex key
counter clockwise. Lift the rotor from the motor mounting.
 Loading...