

Page 1
A complimentary Copy From
Mr & Mrs Vintage Typewriters.
For More Visit www.mrmrsvintagetypewriters.com
Page 2
Useful
tips
1.Toobtain
the
best
possible
results
from
your
machine.
read
these
instructions
carefully.
2.Ifyou
need
further
advice
contact
your
nearest
official
HERMES
agent.
3.
Makeita
habit
each
nighttoput
your
typewriter
in
its
case.
4.
When
erasing,
move
the
carriage
completely
to
the
left
or
right.
This
will
prevent
rubber
dust
clogging
the
type
bars.
5.
Make
sure
that
the
typeofyour
HERMESisalways
ciean,
foraneat
letterisa
pleasure
to
read.
6.Weshould
particularly
warn
you
against
tampering
with
the
machine
yourself,
as
any
such
interference
would
render
inva|id
the
benefits
of
your
guarantee.
Machine
Number
Each
machine
hasanumber
stamped
near
the
left-hand
ribbon
spool,
under
the
front
protection
plate.Tosave
time,a|ways
quote
this
number
in
any
relevant
correspond-
ence
with
your
HERMES
agent.
Before
reading
these
instructions,
unfold
the
back
cover
asinthe
following
diagram.
N.
B.—The
numbers
quoted
in
the
text
refertothe
specifi-
cationatthe
endofthis
booklet.
If
the
machine
is
delivered
with
the
factory
packing,
see
the
instructions
given
on
the
back
cover
page.
A complimentary Copy From Mr & Mrs Vintage Typewriters. For More Visit www.mrmrsvintagetypewriters.com
Page 3
Index
Page
Page
Useful
tips
cover
page
Ribbon
Changing
the
ribbon
coiour
6
Stencils
6
Preparing
the
machine
for
use
Choosing
the
rihboh
and
spoois
6
Reversmg
the
direction
of
the
ribbon
..a)
automatic
6
Opening
the
carrying
case2b)
manual
6
Closing
the
carrying
case2.I'
"""
Freeing
and
locking
(centering)
the
carriage
2
Changing
the
ribbon.
7
Paper
insertion
2
The
tabulator
4*
.
Automatic
tabulator
8
General
typlng
rulesa)Setting
tab
stops
8
’.
b)
Clearing
individual
stops
8
AdJUStlng
the
paper3c)
Clearing
all
stops
8
Paper
supports
3
Transparent
card
holders
3
Endofpage...'...3Maintenance
Movable
paper
Side
gUIde
3
Capital
letters
4
Cleaning
the
type
9
Space
bar.--__4
Cleaning
the
platen
9
Buttons
for
movmg
the
carriage
4
Cleaning
the
cardholders,
space
bar
and
painted
parts
9
Back
spacer4Cleaning
the
machine
9
Line
spacer4Oiling
Q
Platen
release
for:
a)
writing
between
two
lines
5
b)
writing
on
lined
paper5Specification
Drawing
pencil
lines
quickly
5
Intermediate
table
*
5
Diagram
inside
back
cover
Margins
5
Margin
(endofline)
and
jammed
typebar
release
...
6
Individual
touch
regulator
*
6
*Onthe
HERMES
3000
only.
Page 4
Preparing
the
machine
for
use
Opening
the
carrying
case
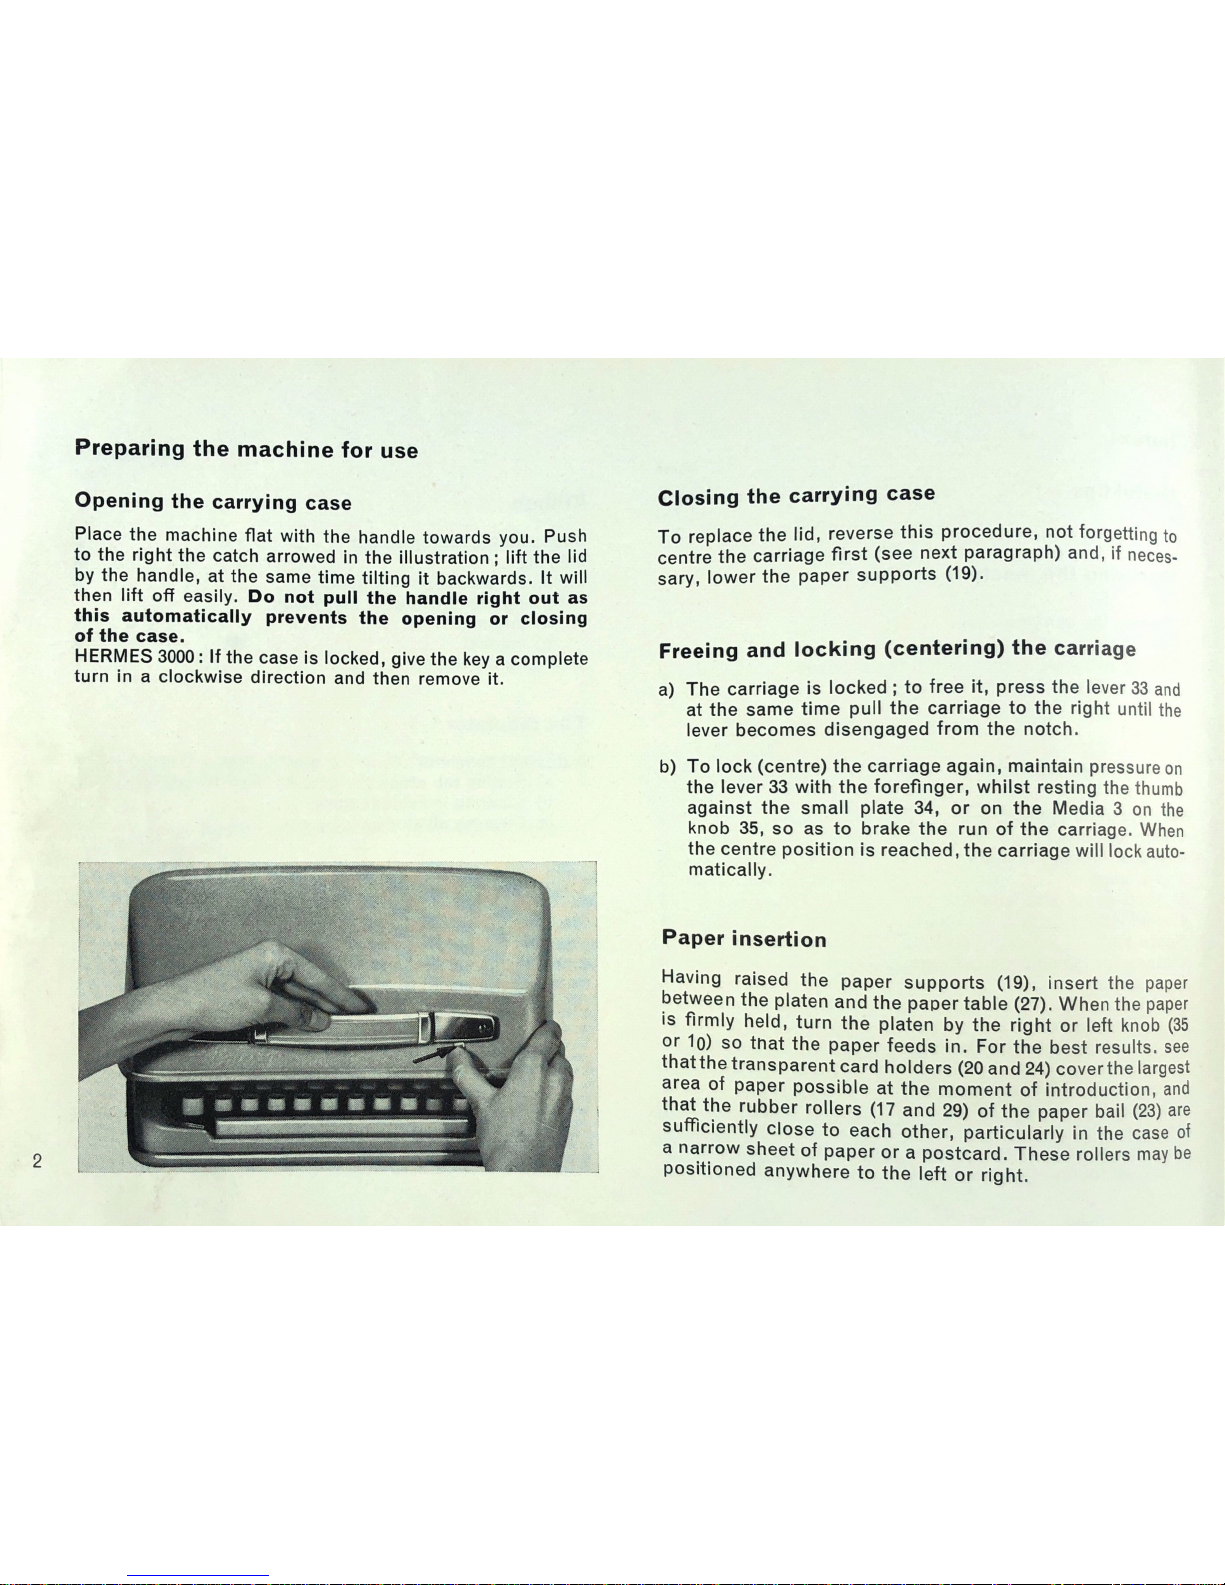
Place
the
machine
flat
with
the
handle
towards
you.
Push
to
the
right
the
catch
arrowed
in
the
illustration;
lift
the
lid
by
the
handle.
at
the
same
time
tilting
it
backwards.
It
will
then
lift
off
easily.
Do
not
pull
the
handle
right
out
as
this
automatically
prevents
the
opening
or
closing
of
the
case.
HERMES
3000:Ifthe
caseislocked,
give
the
keyacomplete
turn
inaclockwise
direction
and
then
remove
it.
m_l
W
4.4".“
.m.la...m«
M
11"IUIII’Im.“
..
..
.
.
w
“R,
_.
.ykyvhm-th
,me..m..
Closing
the
carrying
case
To
replace
the
lid.
reverse
this
procedure.
not
forgetting
to
centre
the
carriage
first
(see
next
paragraph)
and,ifneces-
sary,
lower
the
paper
supports
Freeing
and
locking
(centering)
the
carriage
a)
The
carriage
is
locked
;tofree
it.
press
the
lever33and
at
the
same
time
pull
the
carriage
to
the
right
until
the
lever
becomes
disengaged
from
the
notch.
b)Tolock
(centre)
the
carriage
again,
maintain
pressure
on
the
lever
33
with
the
forefinger,
whilst
resting
the
thumb
against
the
small
plate
34,
or
on
the
Media
3onthe
knob
35.
so
as
to
brake
the
run
of
the
carriage.
When
the
centre
position
is
reached.
the
carriage
will
lock
auto-
matically.
Paper
insertion
Having
raised
the
paper
supports
insert
the
paper
between
the
platen
and
the
paper
table
When
the
paper
is
firmly
held,
turn
the
platen
by
the
right
or
left
knob
(35
or
10)
so
that
the
paper
feeds
in.
For
the
best
results.
see
that
the
transparent
card
holders
(20
and
24)
coverthe
largest
areaofpaper
possibleatthe
momentofintroduction.
and
that
the
rubber
rollers
(17
and
29)ofthe
paper
bail
(23)
are
sufficiently
close
to
each
other,
particularly
in
the
case
of
a
narrow
sheet
of
paper
orapostcard.These
rollers
may
be
posrtloned
anywhere
to
the
leftorright.
A complimentary Copy From
Mr & Mrs Vintage Typewriters.
For More Visit www.mrmrsvintagetypewriters.com
Page 5
General
typing
rules
Adjusting
the
paper
If
the
paperiscrooked,
pull
forward
the
paper
release
lever
(30)
thus
freeing
the
paper
from
all
pressure
and
then
adjust
itsothatitis
parallel
with
the
paper
bail
Return
the
lever30to
its
original
position.
Paper
supports
This
feature
(19)
prevents
the
paper
from
coming
into
contact
with
the
backofthe
machineorfrom
touching
the
table.Itis
particularly
useful
when
typing
stencils.
It
also
enables
onetosee
clearly
the
written
text.Tobring
the
paper
supports
into
position,
one
has
merelytoraise
one
of
the
two
arms
resting
against
the
back
protection
plate
Transparent
card
holders
(guide
lines)
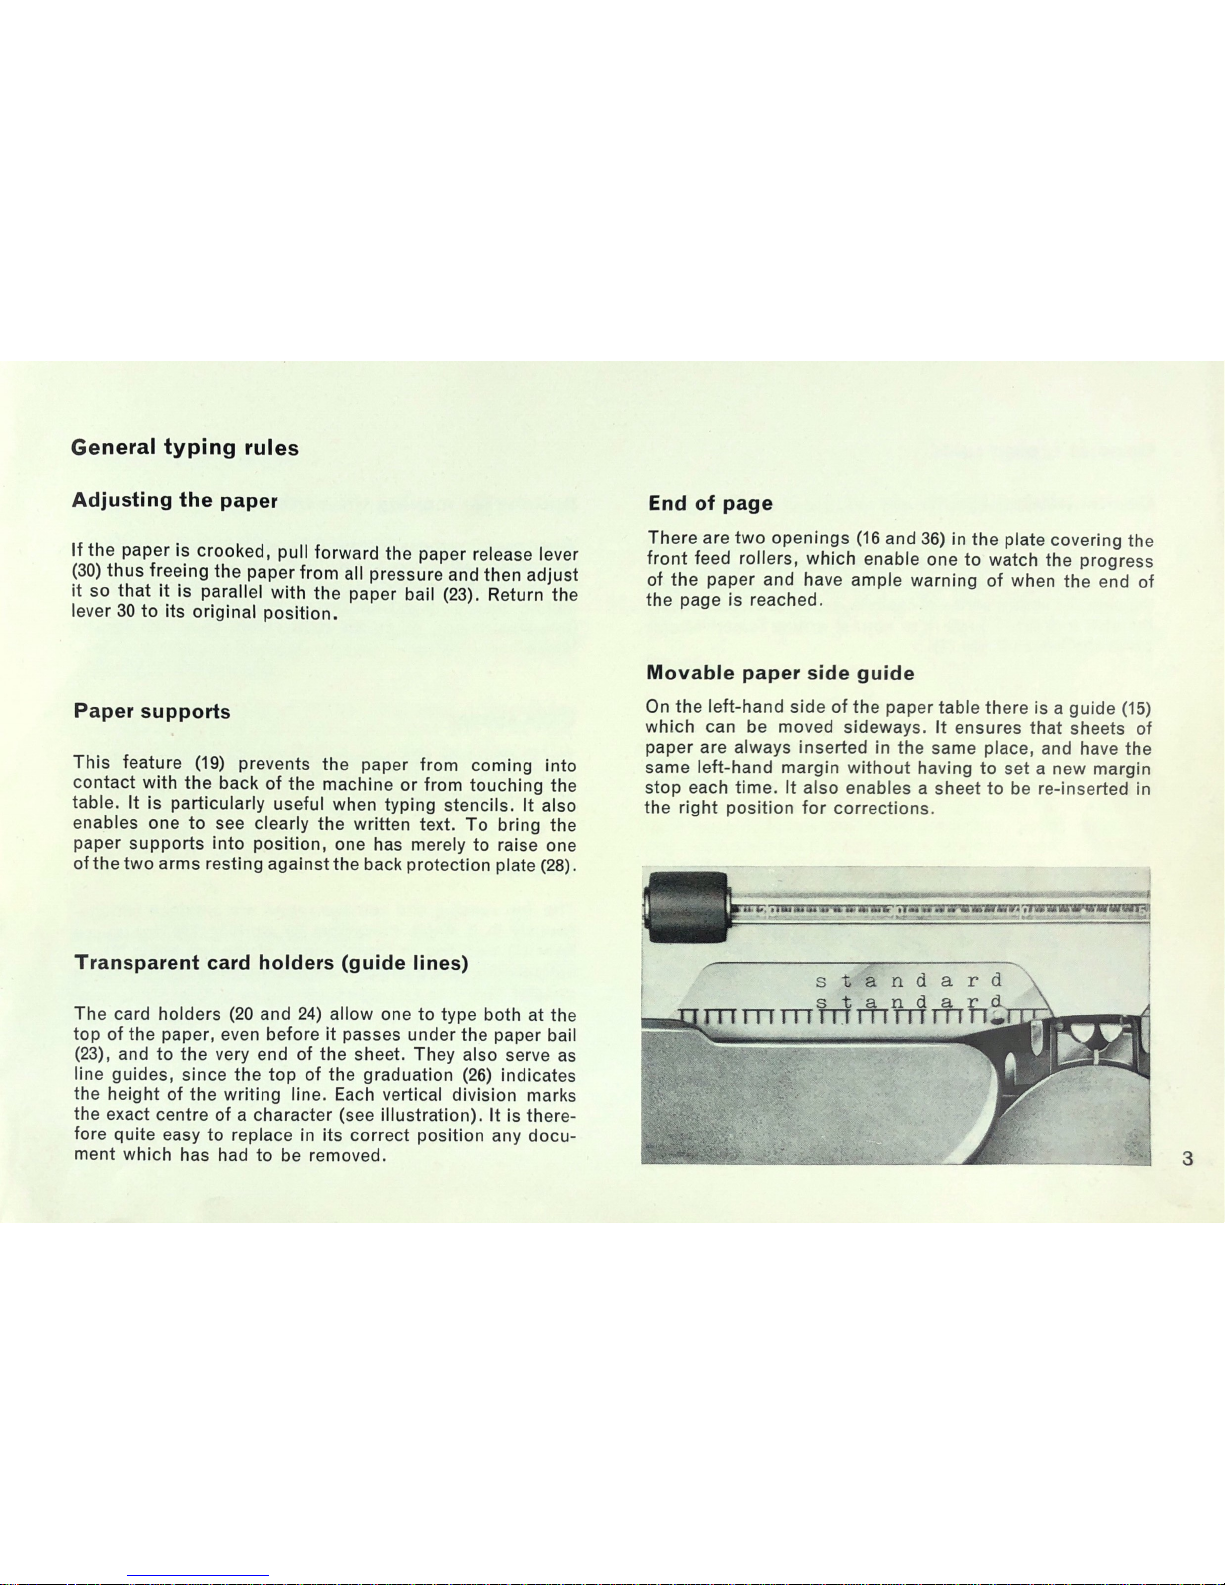
The
card
holders
(20
and
24)
allow
onetotype
bothatthe
topofthe
paper,
even
beforeitpasses
under
the
paper
bail
andtothe
very
endofthe
sheet.
They
also
serve
as
line
guides,
since
the
topofthe
graduation
(26)
indicates
the
heightofthe
writing
line.
Each
vertical
division
marks
the
exact
centreofa
character
(see
illustration).
Itisthere-
fore
quite
easytoreplace
in
its
correct
position
any
docu-
ment
which
has
had
to
be
removed.
End
of
page
There
are
two
openings
(16
and
36)inthe
plate
covering
the
front
feed
rollers,
which
enable
onetowatch
the
progress
of
the
paper
and
have
ample
warning
of
when
the
end
of
the
pageisreached.
Movable
paper
side
guide
On
the
left—hand
sideofthe
paper
table
thereisa
guide
(15)
which
canbemoved
sideways.
it
ensures
that
sheets
of
paper
are
always
inserted
in
the
same
place.
and
have
the
same
left-hand
margin
without
havingtosetanew
margin
stop
each
time.italso
enables
a
sheettobe
re-inserted
in
the
right
position
for
corrections.
i
Page 6
General
typing
rules
Capital
letters
To
write
capital
letters
or
those
signs
in
the
upper
case.
press
one
of
the
keys1or45which
are
found
on
each
side
of
the
keyboard;
pressure
must
be
maintained
whilst
typing
the
sign.
To
writeaseries
of
capitals,
press
down
completely
the
shift
lock
To
return
to
normal
writing
(small
letters)
press
the
left
shift
key
Space
bar
The
space
bar
(46)isused
to
move
the
carriage
from
right
to
left,
for
separating
two
words
or
leaving
blank
spaces.
Buttons
for
moving
the
carriage
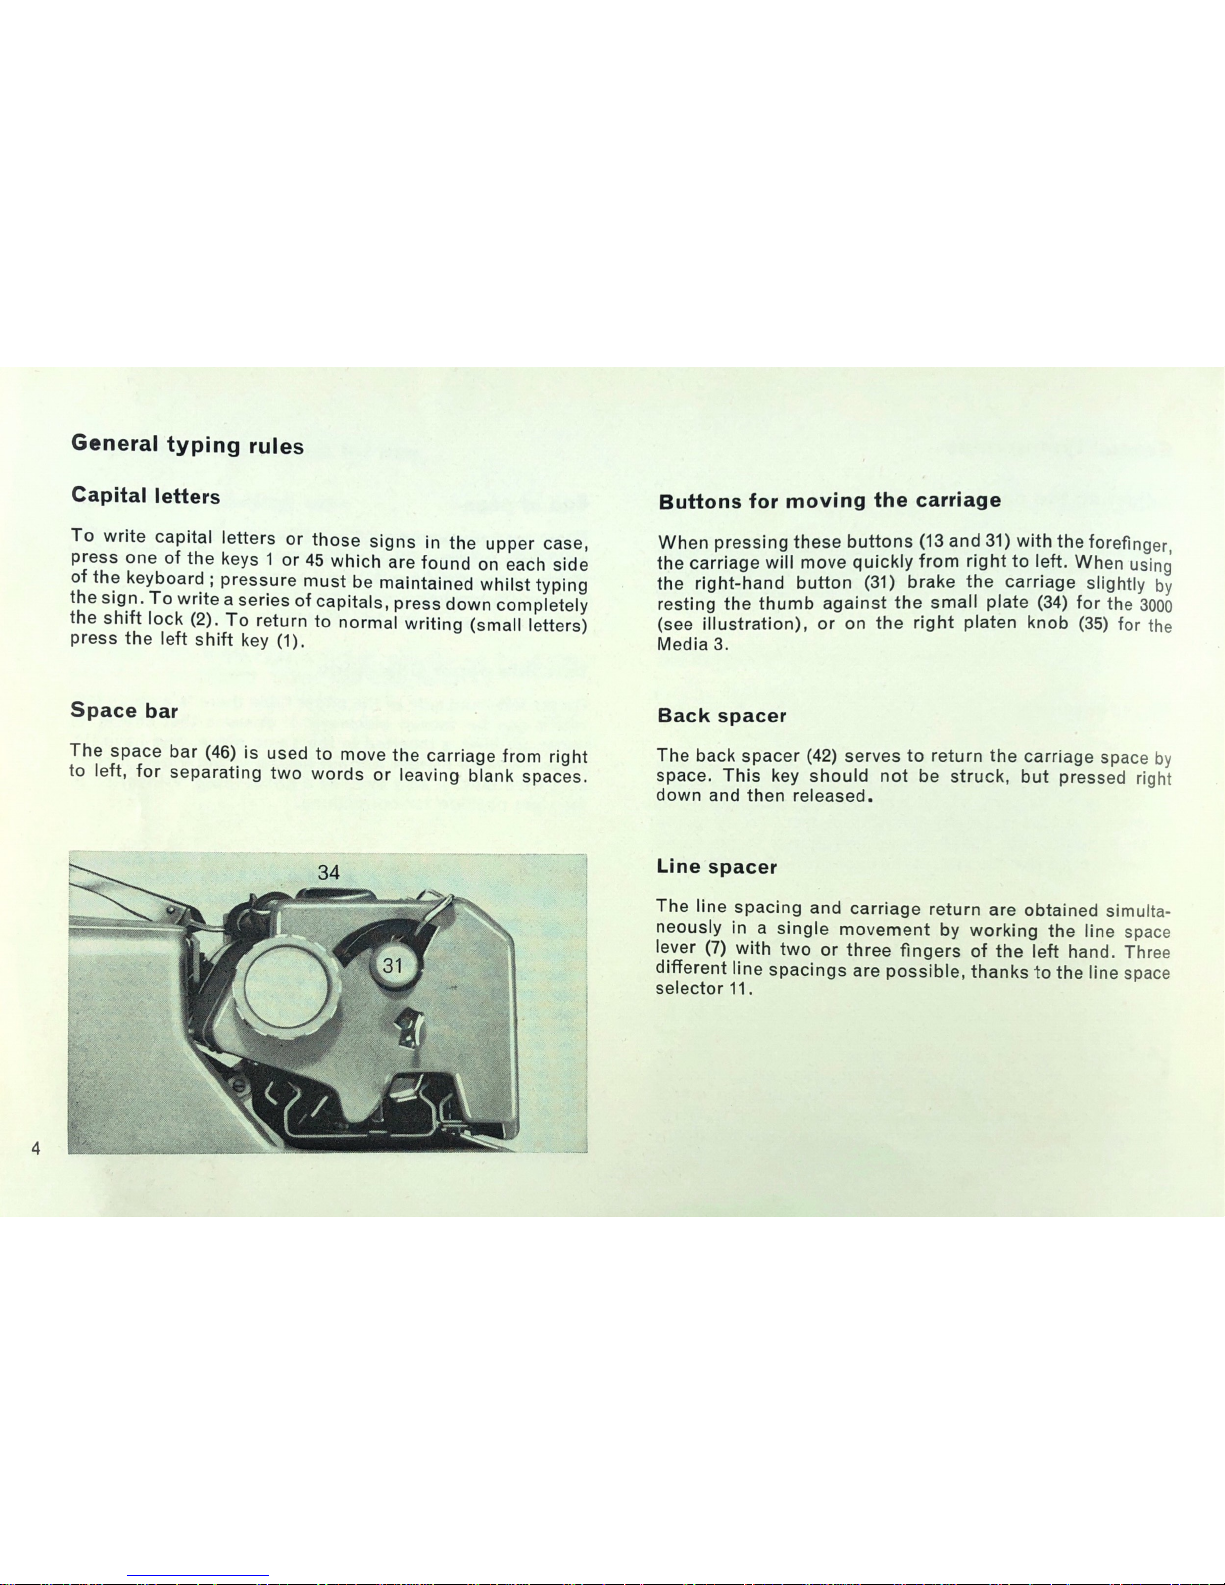
When
pressing
these
buttons
(13
and
31)
with
the
forefinger,
the
carriage
will
move
quickly
from
righttoleft.
When
using
the
right-hand
button
(31)
brake
the
carnage
slightly
by
resting
the
thumb
against
the
small
plate
(34)
for
the
3000
(see
illustration).
or
on
the
right
platen
knob
(35)
for
the
Media
3.
Back
spacer
The
back
spacer
(42)
serves
to
return
the
carriage
space
by
space.
This
key
should
not
be
struck,
but
pressed
right
down
and
then
released.
Line
spacer
The
line
spacing
and
carriage
return
are
obtained
simulta-
neously
inasingle
movement
by
working
the
line
space
lever
(7)
with
two
or
three
fingers
of
the
left
hand. Three
different
line
spacings
are
possible,
thanks
to
the
line
space
selector11.
A complimentary Copy From Mr & Mrs Vintage Typewriters. For More Visit www.mrmrsvintagetypewriters.com
Page 7
General
typing
rules
Platen
release
for:
a)
writing
between
two
lines.
When
the
selector
11
is
opposite
the
white
dot,
the
platen
is
free,
but the
previous
line
spacing
will
be
re-engaged
as
soon
as
the
selector
11isreturned
to
its
original
position.
This
device
is
particularly
useful
when
you
wish
to
return
to
the
original
spacing
after
makinganaddition
or
correc-
tion
between
the
lines.
b)
writing
on
lined
paper.
On
the
other
hand,itis
possible,
by
pulling
out
the
left-hand
platen
knob
(10)tofree
the
platen
completely
so
that
it
will
not
re-engage
the
original
spacing.
This
procedure
maybeused
when
typing
on
lined
paperorforms,
for
which
noneofthe
three
line
spacings
are
suitable
or,
for
example.
when
re-insertingapage
already
begun.
Push
in
the
knob
10
to
re-engage
the
platen
and
the
line
spacing.
Drawing
pencil
lines
quickly
To
draw
vertical
or
horizontal
lines
quickly,
insert
the
sharp
pointofa
pencilinone
of
the
holes
(21)ofa
card
holder,
and
either
move
the
carriage
sideways,
or
turn
the
platen.
Intermediate
table
(on
the
HERMES
3000
only)
This
feature
(14)
is
extremely
useful
when
correcting
the
various
copiesoradding
hand-written
notes
without
having
to
remove
the
paper
from
the
machine.
Margins
The
stops—the
positions
(18
and
25)ofwhich
are
clearly
visible
in
the
paper
bail
(23)
on
the
“3000"
——
are
used
to
fix
the
left
and
right-hand
margins
of
the
text.Toset
the
left-hand
margin,
move
the
carriage
to
where
the
first
typed
signisto
appear,
and
pull
forward
the
lever
12.
The
margin
is
automatically
setinthe
required
position.
For
the
right-
hand
margin,
follow
the
same
procedure,
using
lever
32,
after
having
moved
the
carriage
to
where
the
endofthe
line
is
required.
To
move
the
left-hand
margin
further
to
the
left,
pull
forward
lever12whilst
moving
the
carriage
into
the
new
position.
Then
release
the
lever
12.Tomove
the
right-hand
margin
more
to
the
right,
pull
forward
the
lever
32
with
the
middle
finger,
whilst
at
the
same
time
pressing
with
the
index
finger
on
button
31tomove
the
carriage.
Let
the
carriage
slide
to
where
the
new
marginisrequired,
braking
the
movement
slightly
by
resting
the
thumbonthe
small
plate34or
for
the
Mediaonthe
platen
knob
35.
N.
B.—When
the
carriage
is
blocked,
the
left-hand
margin
is
locked.
Page 8
General
typing
rules
Margin
(endofline)
and
jammed
type
bar
release
key
The
type
bars
lock
automatically
about
seven
spaces
after
the
warning
bell.
To
write
past
the
margin,
press
the
margin
release
key
(43)
(on
the
Media,
4).Itis
then
possible
to
type
as
farasthe
endofthe
platen.
This
key
also
enables
one
to
type
beyond
the
left-hand
margin
without
altering
the
margin
stop.
Pressure
must
be
maintained
on
the key
when
typing
over
the
stop.
The
same
key
hasasecond
use.Whentwotype
bars
become
jammed,press
on
this
keytorelease
and
return
themtotheir
proper
places.
Individual
touch
regulator
(on
the
HERMES
3000
only)
By
meansofthe
lever5itispossible
to
adjust
the
touch
to
your
own
taste.
When
the
leverisright
down,
the
touch
is
soft
and
becomes
progressively
harderasthe
leverisraised.
The
ribbon
Changing
the
ribbon
colour
The
selector
lever40and
the
colour
indicator
on
the
right
of
the
front
protection
plate
show
the
ribbon
colour
in
use.
The
blue
corresponds
to
the
upper
portion
of
the
ribbon,
the
yellow
to
the
centre
position,
and
the
red
to
the
lower
portion.
When
the
selector
40
pointstothe
white,
the
ribbon
is
neutralized
(for
stencils).
For
Script
type
machines,
the
use
ofatwo-colour
ribbon
is
not
recommended.
Stencils
To
type
a
stencil,
the
following
procedure
is
necessary.
Neutralize
the
ribbon,
raise
the
paper
supports
(19)
and
clean
the
type
thoroughly.lnsertthe
stencil
and
take
care
to
type
very
regularly.
Choosing
the
ribbon
and
spools
To
function
smoothly
on
the
Hermes
3000orMedia.aribbon
mustbewoundona
spool
having
the
same
fittings
as
the
HermesorDIN
spools,
and
measuring
13mmin
width.
Reversing
the
ribbon
direction
a)
Automatically.
When
the
ribbon
has
wound
itself
completely
onto
one
spool,itwill
automatically
reverse
and
wind
back
onto
the
other.
b)Byhand.
It,
for
some
reason
or
other,
you
wish
to
change
the
directionofthe
ribbon
yourself,
push
either
torwards
or
backwards
oneofthe
ribbon
guides
(9or37).
A complimentary Copy From
Mr & Mrs Vintage Typewriters.
For More Visit www.mrmrsvintagetypewriters.com
Page 9
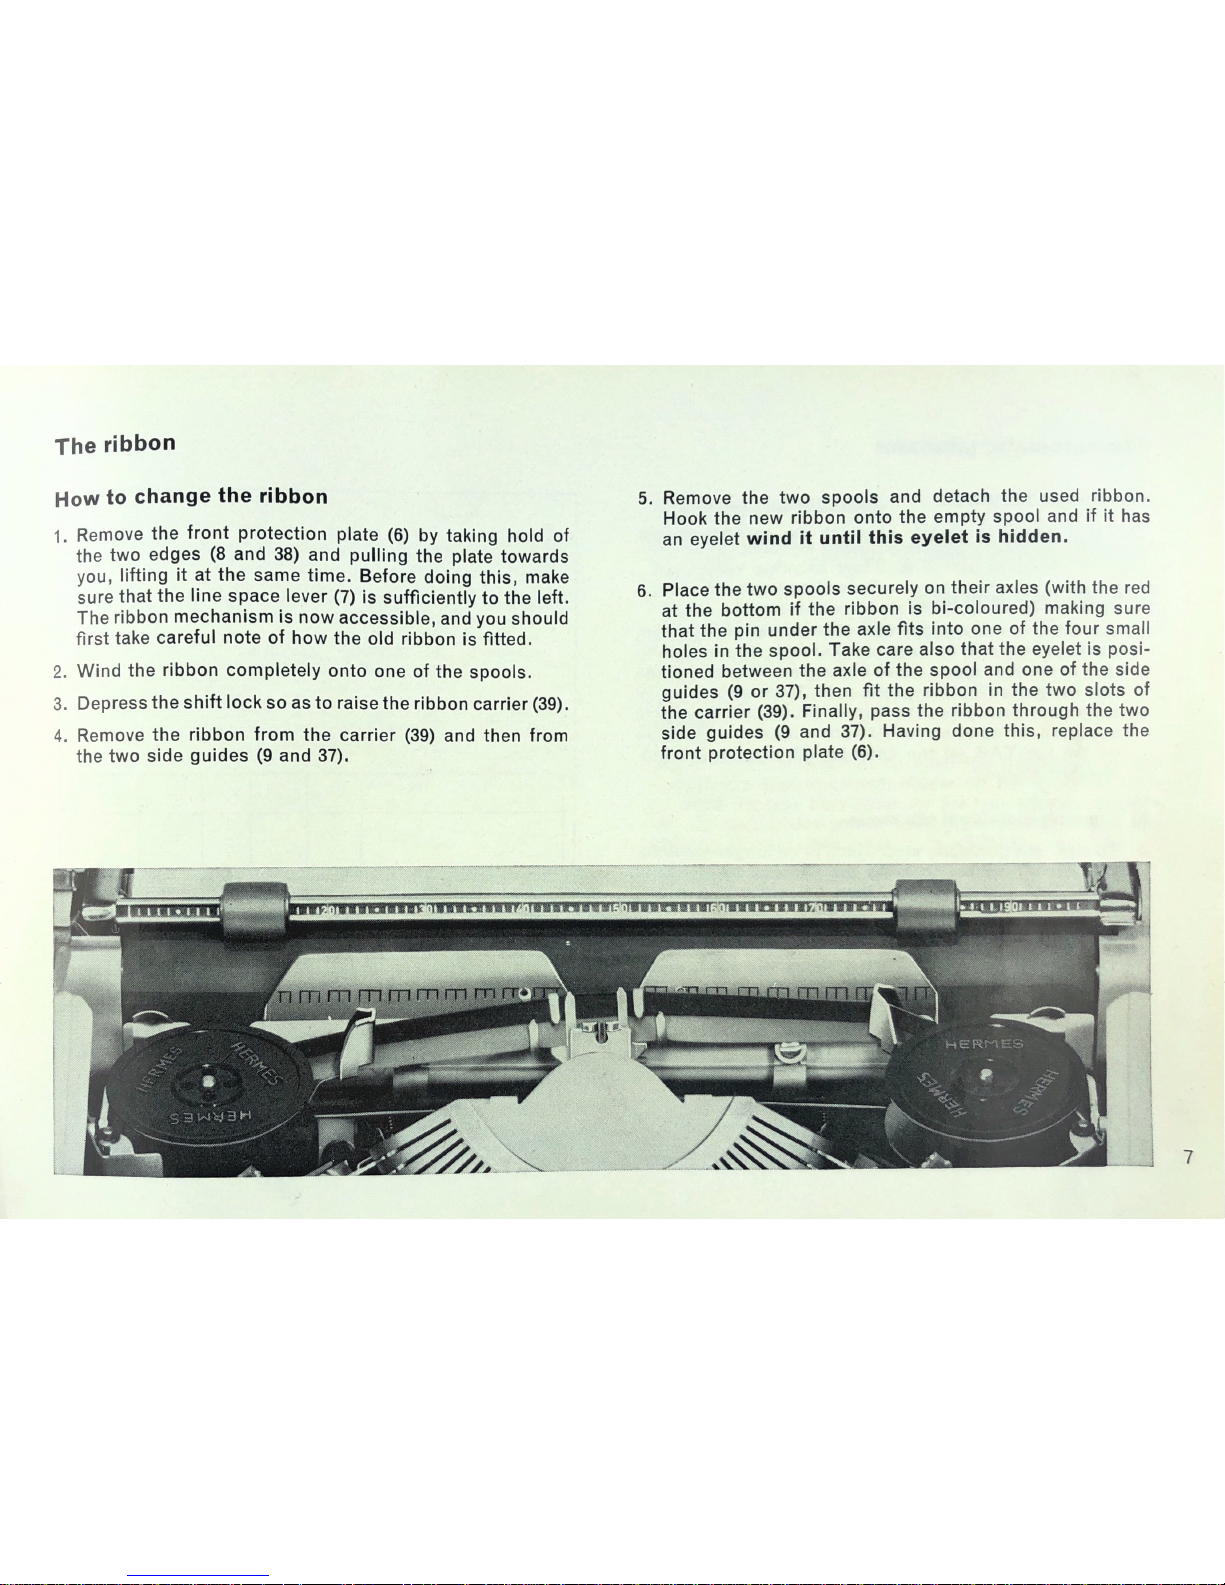
The
ribbon
How
to
change
the
ribbon
1.
Remove
the
front
protection
plate
(6)
by
taking
hold
of
the
two
edges
(8
and
38)
and
pulling
the
plate
towards
you,
liftingitat
the
same
time.
Before
doing
this,
make
sure
that
the
line
space
lever
(7)issufficiently
to
the
left.
The
ribbon
mechanism
is
now
accessible,
and
you
should
first
take
careful
noteofhow
the
old
ribbonisfitted.
2.
Wind
the
ribbon
completely
onto
oneofthe
spools.
3.
Depress
the
shift
locksoastoraisethe
ribbon
carrier
4.
Remove
the
ribbon
from
the
carrier
(39)
and
then
from
the
two
side
guides(9and
37).
5.
Remove
the
two
spools
and
detach
the
used
ribbon.
Hook
the
new
ribbon
onto
the
empty
spool
andifit
has
an
eyelet
windituntil
this
eyeletishidden.
6.
Place
the
two
spools
securely
on
their
axles
(with
the
red
at
the
bottomitthe
ribbonisbi-coloured)
making
sure
that
the
pin
under
the
axle
fits
into
one
of
the
four
small
holesinthe
spoo|.Take
care
also
that
the
eyeletisposi-
tioned
between
the
axleofthe
spool
and
oneofthe
side
guides
(9or37),
then
fit
the
ribbon
in
the
two
slots
of
the
carrier
Finally,
pass
the
ribbon
through
the
two
side
guides(9and
37).
Having
done
this,
replace
the
front
protection
plate
Page 10
The
automatic
tabulator
Automatic
tabulator
This
isadevice
by
means
of
which
the
carriage
moves
automatically
from
column
to
column.
a)
Setting
tabulator
stops
b)
The
scale
on
the
paper
bail
(23)
corresponds
to
the
tabulator
stops.
It,
for
example,
you
want
the
carriage
to
stopatthe
30th
space,
moveitalong
until
the
slotofthe
type
bar
guide
(22)isopposite
point30on
the
paper
bail
scale,
and
then
press
the key
—l—
Repeat
the
same
operation
for
other
stops.
At
each
successive
pressure
on
the
key
TAB
(4)
the
carriage
will
stop
in
the
pre-
selected
position.
Clearing
individual
tab
stops
To
clear
any
particular
stop
which
isnolonger
required,
press
the
TAB
keytobring
the
carriage
to
the
point
where
the
stop
is
set,
and
then
press
the
key
—
Clearing
all
tab
stops
To
clear
all
the
stops
at
once,
press
the
key
---
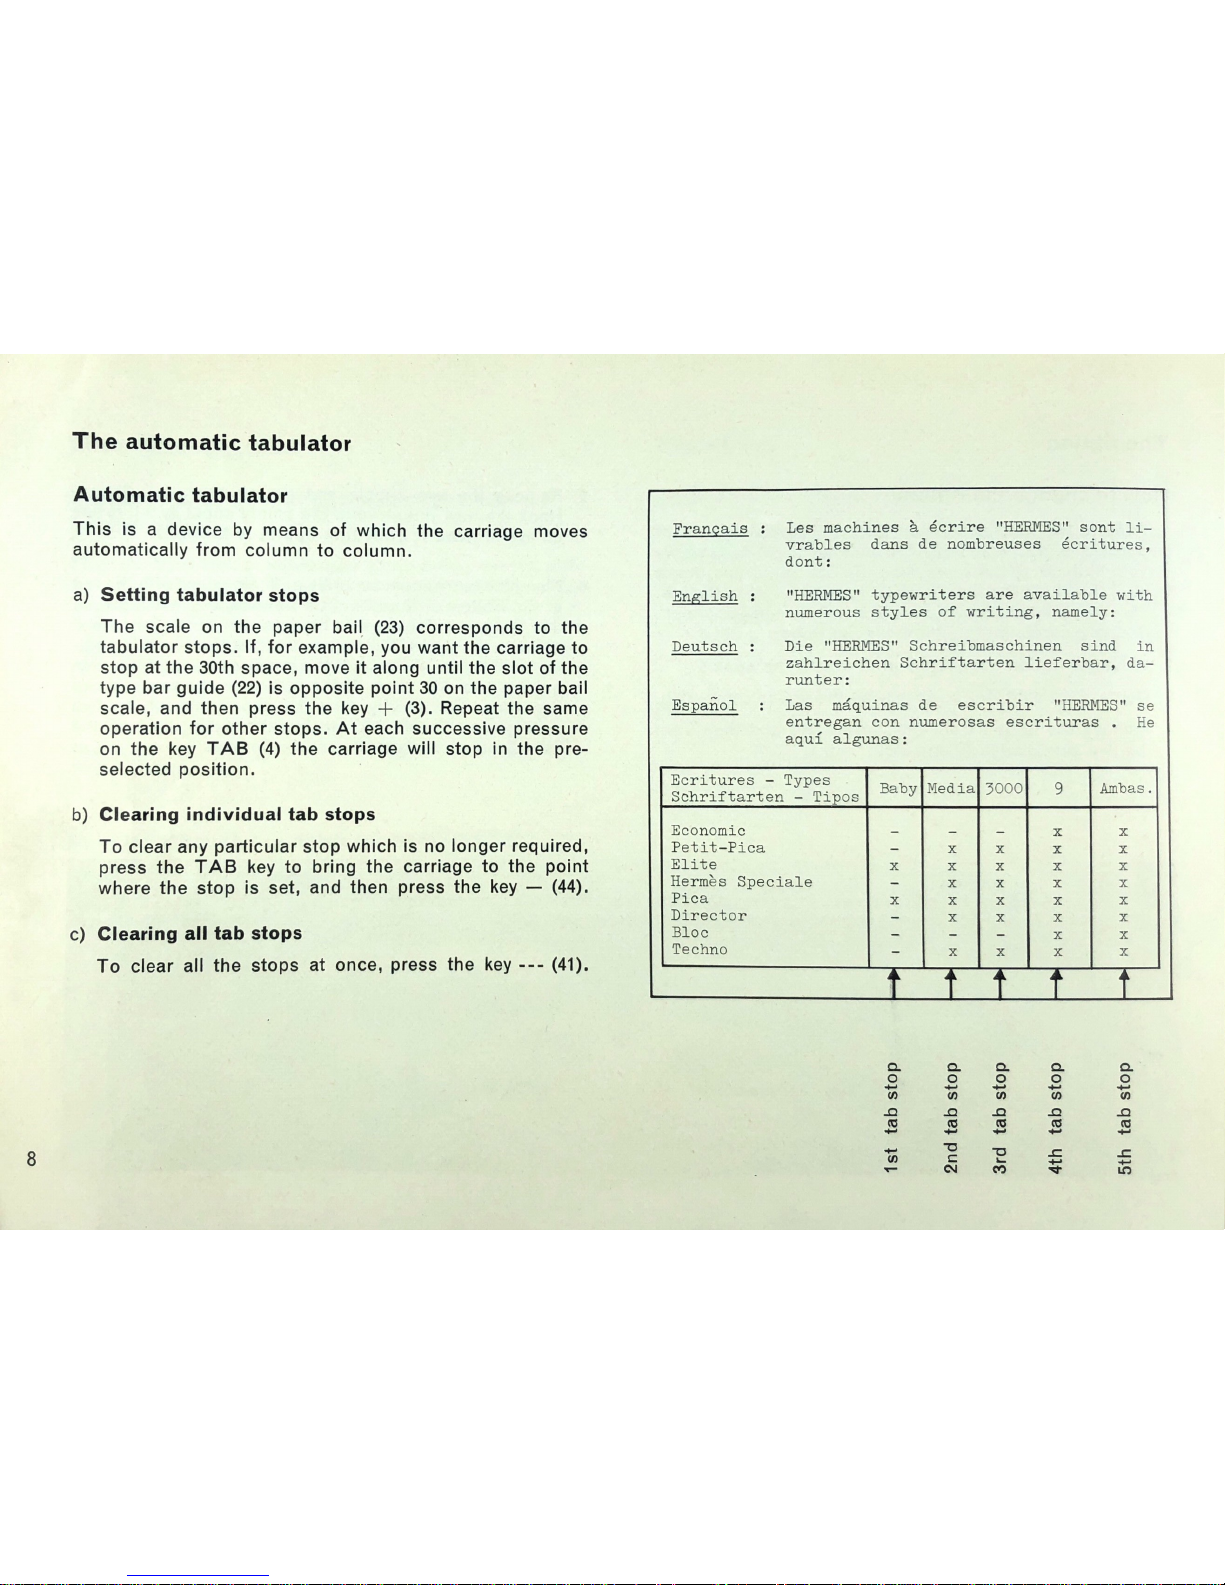
Les
machines
a
écrire
"HERMES"
sont
li—
vrables
densdenombreuses
écritures,
dont:
"HERMES"
typewriters
are
available
with
numerous
stylesofwriting,
namely:
Die
"HERMES"
Schreibmaschinen
sind
in
zahlreichen
Schriftarten
lieferbar,
da—
runter:
Las
méquinas
de
escribir
"HERMES"
se
entregan
con
numerosas
escrituras
.
He
aqui
algunas:
Ecritures
—
Types
Schriftarten
—
Tipos
5000
“-
Economic
Petit—Pica
Elite
Hermes
Speciale
Pica
Director
Bloc
Techno
NINNNNNI
NININNNNI
><><><>4><><><>4
NNNNNK‘NN
1st
tab
stop
2nd
tab
stop
3rd
tab
stop
4th
tab
stop
5th
tab
stop
Page 11
Maintenance
Cleaning
the
characters
To
maintain
a
clear
impression,
clean
the
type face
regularly
—
brushing
from back
to
front
—
with
the
brush
provided.
If
certain
type
faces
are
clogged
with
hard
ink,
this
can
be
removed
by
tapping
them
withabrush
moistened
with
petrol.
Cleaning
the
platen
The
rubber
platen
should
only
be
cleaned
with
alcohol
taking
care
to
protect
the
card
holders.
Never
use
petrol,
benzine
or
any
other
liquid
which
may
be
harmful
to
the
rubber.
Cleaning
the
card
holders,
space
bar
and
painted
parts
Important:
Avoid
the
card
holders
coming
into
contact
with
petrol,
alcohol
or
any
diluting
agentasthis
would
affect
their
transparency.
Clean
them
with
a
cloth
moistened
in
soapy
water.
Likewise
the
space
bar,
the
carriage
sides
and
platen
knobs
should
never
be
cleaned
with
organic
solvents
(petrol,
paraffin,turpentine,trichlorethylene,
alcohol,
acetone
etc.)
but
with
soapy
water.
On
the
other
hand,
a
cloth
slightly
moistened
with
alcohol
may
be
used
to
clean
the
metal
parts.
Cleaning
the
machine
Clean
the
machine
regularly
withoutdismantlingit.Remove
the
rubber
particles
and
dust
by
means
of
the
soft
brush
whichisalso
provided.
The
parts
which
mustbecleaned
in
this
way
are
perfectly
accessible,
and
the
utmost
care
shouldbetaken
nottobreak
the
springs
or
damage
other
parts.
Oiling
The
machine
should
not
be
oiled
too
frequently,
as
this
encourages
dust
to
collect.
Never
oil
the
segment
slots
in
which
the
type
bars
move,
or
the
type
bars
themselves.
We
strongly
advise
you
to
have
the
machine
cleaned
and
checked
at
least
once
a
year
byaHERMES
agent.
Page 12
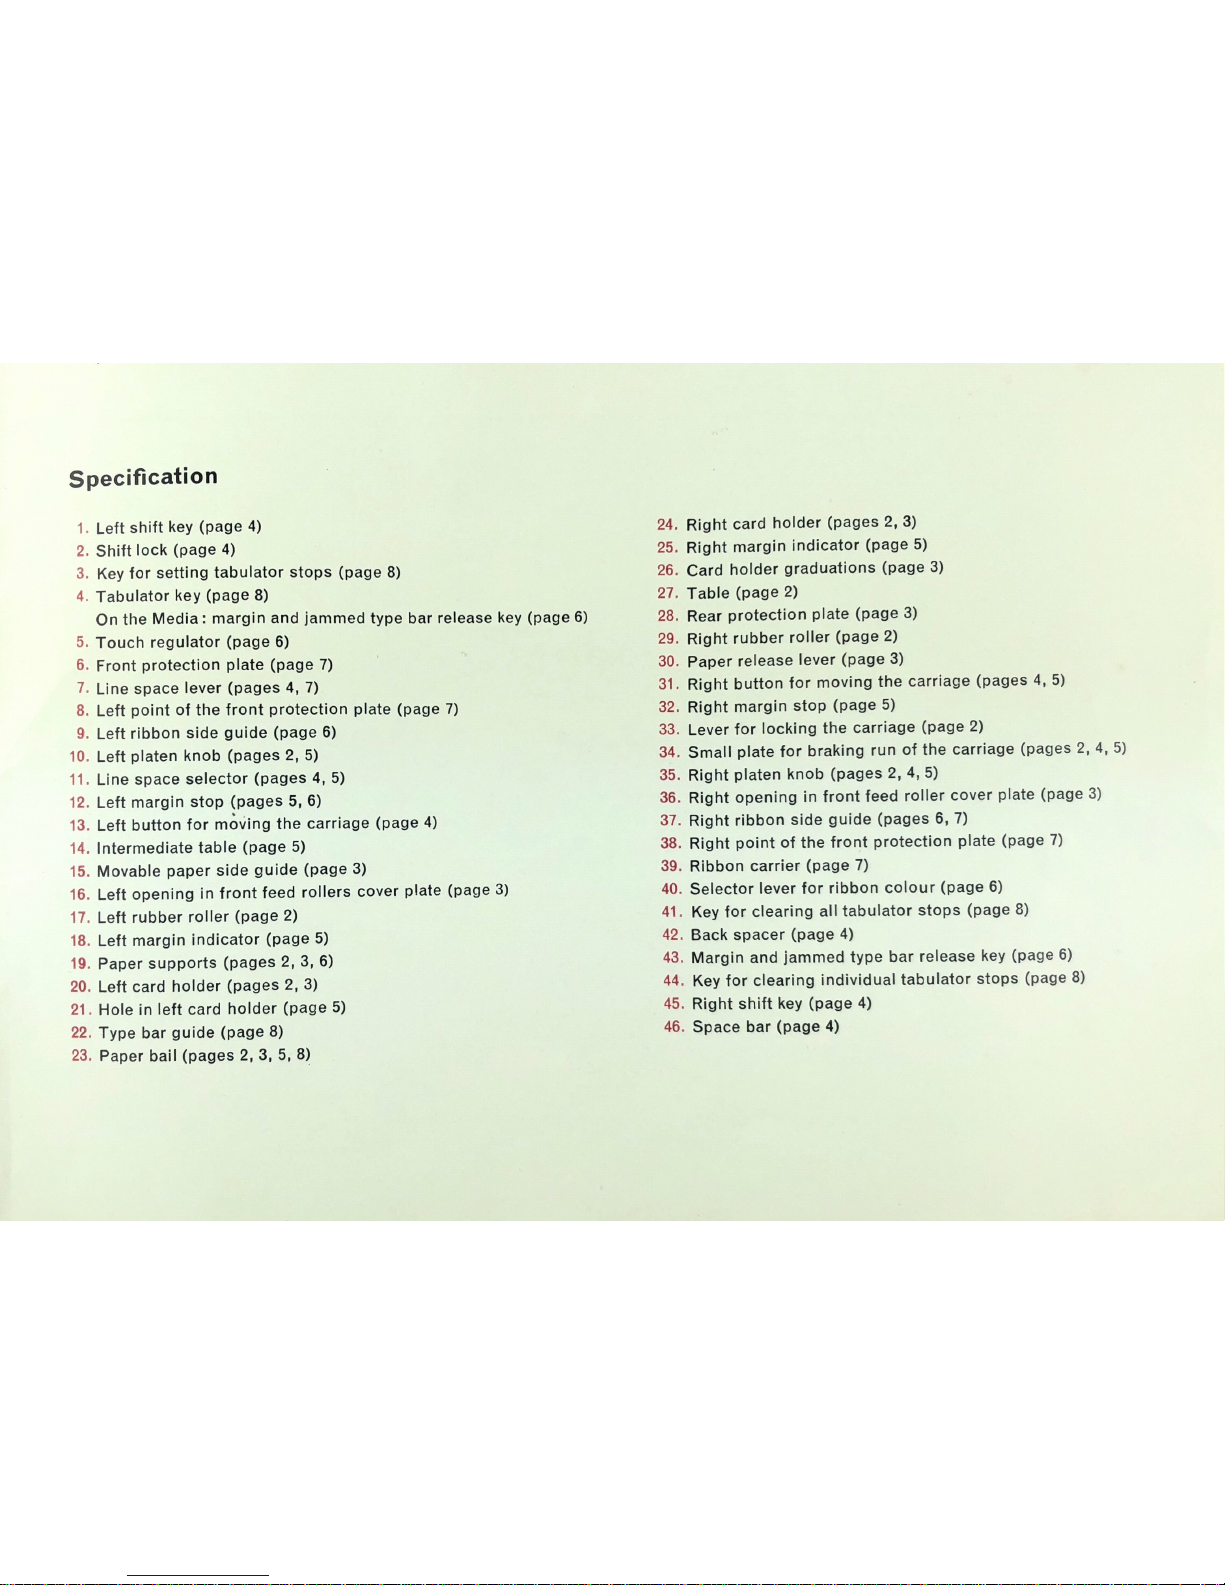
Specification
21.
22.
23
.
Left
shift
key
(page
4)
Shift
lock
(page
4)
.
Key
for
setting
tabulator
stops
(page
8)
.
Tabulator
key
(page
8)
On
the
Media:
margin
and
jammed
type
bar
release
key
(page
6)
-
Touch
regulator
(page
6)
-
Front
protection
plate
(page
7)
.
Line
space
lever
(pages4,7)
.
Left
pointofthe
front
protection
plate
(page
7)
.
Left
ribbon
side
guide
(page
6)
.
Left
platen
knob
(pages2.5)
.
Line
space
selector
(pages4.5)
.
Left
margin
stop
(pages5,6)
'-,Left
button
for
moving
the
carriage
(page
4)
.
Intermediate
table
(page
5)
.
Movable
paper
side
guide
(page
3)
.
Left
openinginfront
feed
rollers
cover
plate
(page
3)
.
Left
rubber
roller
(page
2)
.
Left
margin
indicator
(page
5)
.
Paper
supports
(pages
2,3,6)
.
Left
card
holder
(pages
2.3)
Holeinleft
card
holder
(page
5)
Type
bar
guide
(page
8)
.
Paper
bail
(pages2,3,5.8)
24.
25.
26.
27.
28.
29.
SO.
31.
32.
33.
34.
35.
36.
37.
38.
39.
40.
41.
42.
43.
44.
45.
46.
Right
card
holder
(pages2,3)
Right
margin
indicator
(page
5)
Card
holder
graduations
(page
3)
Table
(page
2)
Rear
protection
plate
(page
3)
Right
rubber
roller
(page
2)
Paper
release
lever
(page
3)
Right
button
for
moving
the
carriage
(pages4,5)
Right
margin
stop
(page
5)
Lever
for
locking
the
carriage
(page
2)
Small
plate
for
braking
runofthe
carriage
(pages
2,
4, 5)
Right
platen
knob
(pages2,4,5)
Right
opening
in
front
feed
roller
cover
plate
(page
3)
Right
ribbon
side
guide
(pages6,7)
Right
pointofthe
front
protection
plate
(page
7)
Ribbon
carrier
(page
7)
Selector
lever
for
ribbon
colour
(page
6)
Key
for
clearing
all
tabulator
stops
(page
8)
Back
spacer
(page
4)
Margin
and
jammed
type
bar
release
key
(page
6)
Key
for
clearing
individual
tabulator
stops
(page
8)
Right
shift
key
(page
4)
Space
bar
(page
4)
Page 13
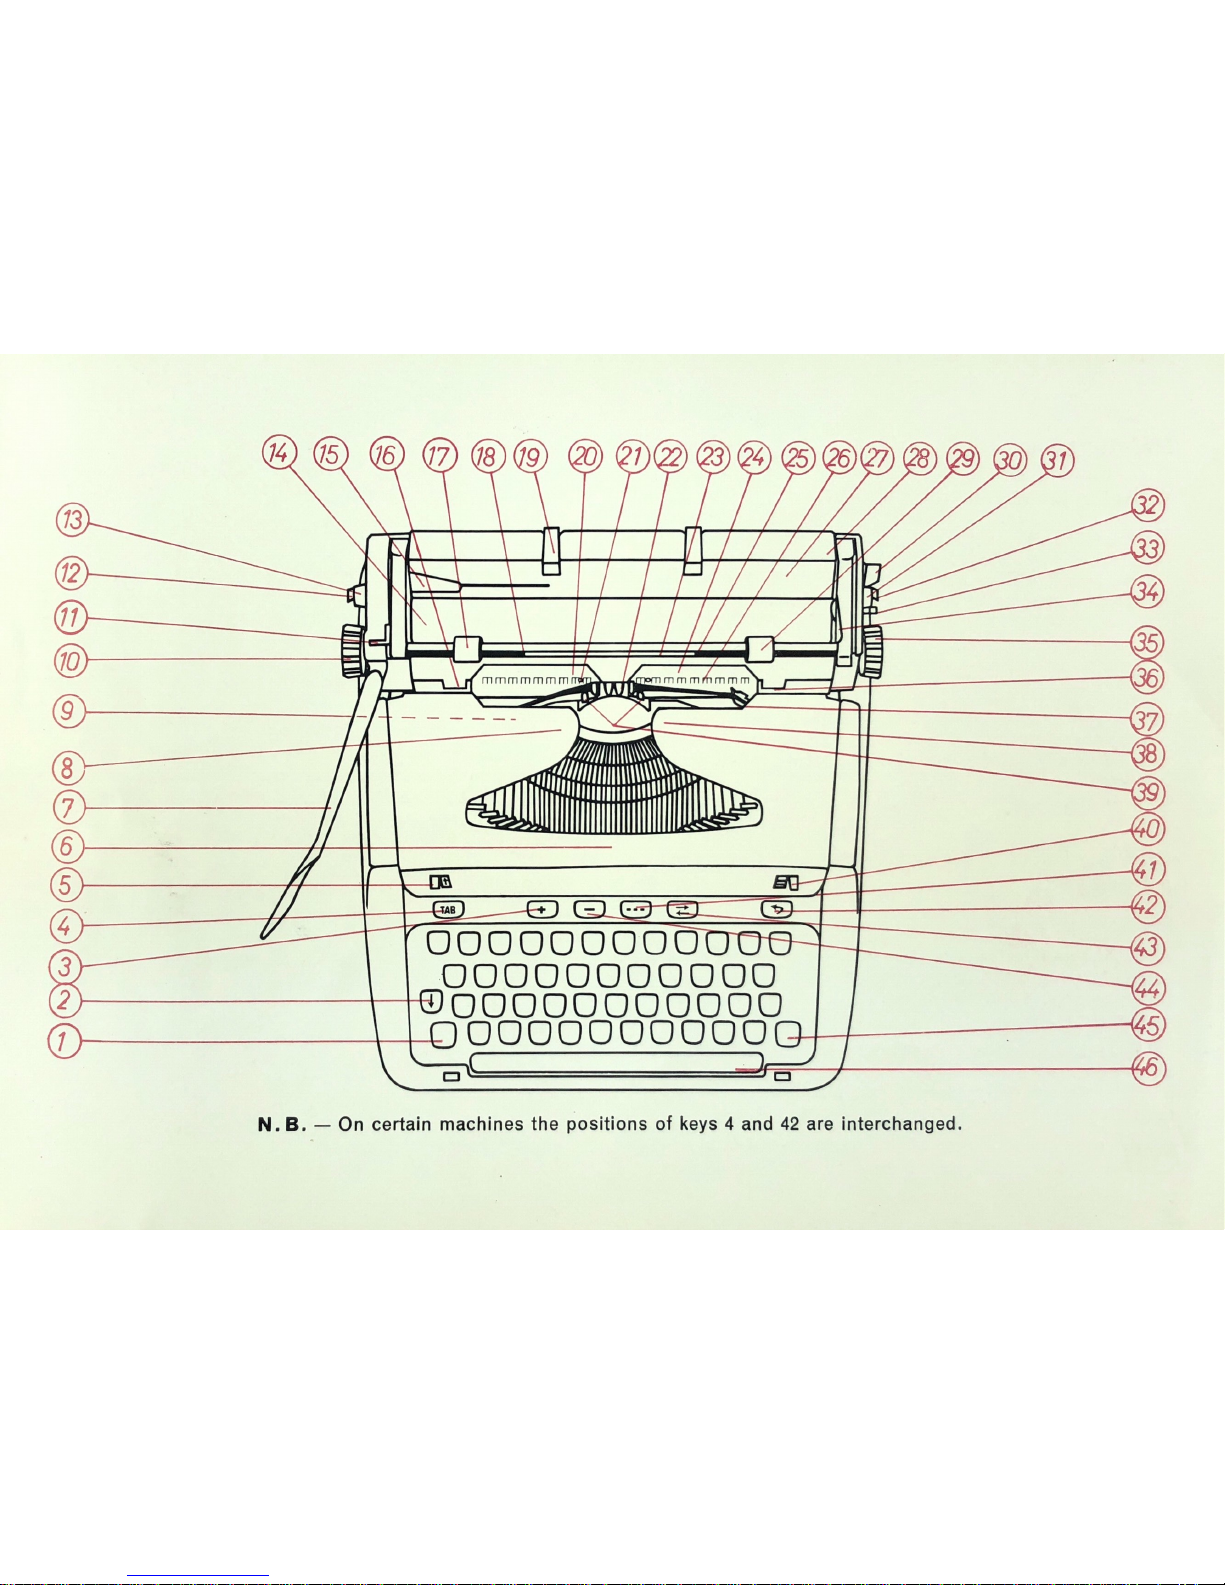
@tE
@
®®®
m
‘2
p
igl-Igll-IEIIIIA’Q’
3
.4
Itasallullumg
@
.
'
II
’
_-
”C3
.EJIIII
044
—III
l
(QC?
(3%
L
‘
~\)
s;\
R;xf
b
(.5
2
(>2
.
4.4;)
~
.0
N.
B.
—
On
certain
machines
the
positions
of
keys4and
42
are
interchanged.
A complimentary Copy From Mr & Mrs Vintage Typewriters. For More Visit www.mrmrsvintagetypewriters.com
 Loading...