

Heritage 023601 Instructions For Use And Care Manual
INSTRUCTIONS FOR USE AND CARE P.2
INSTRUCTIONS POUR L’USAGE ET L’ENTRETIEN
P.1 1
ELECTRIC AIR FRYER
FRITEUSE ÉLECTRIQUE À AIR
F
TEMPS
TIME
F
TEMPS
TIME
F
TEMPS
TIME
F
TEMPS
TIME
F
TEMPS
TIME
F
TEMPS
TIME
F
TEMPS
TIME
2
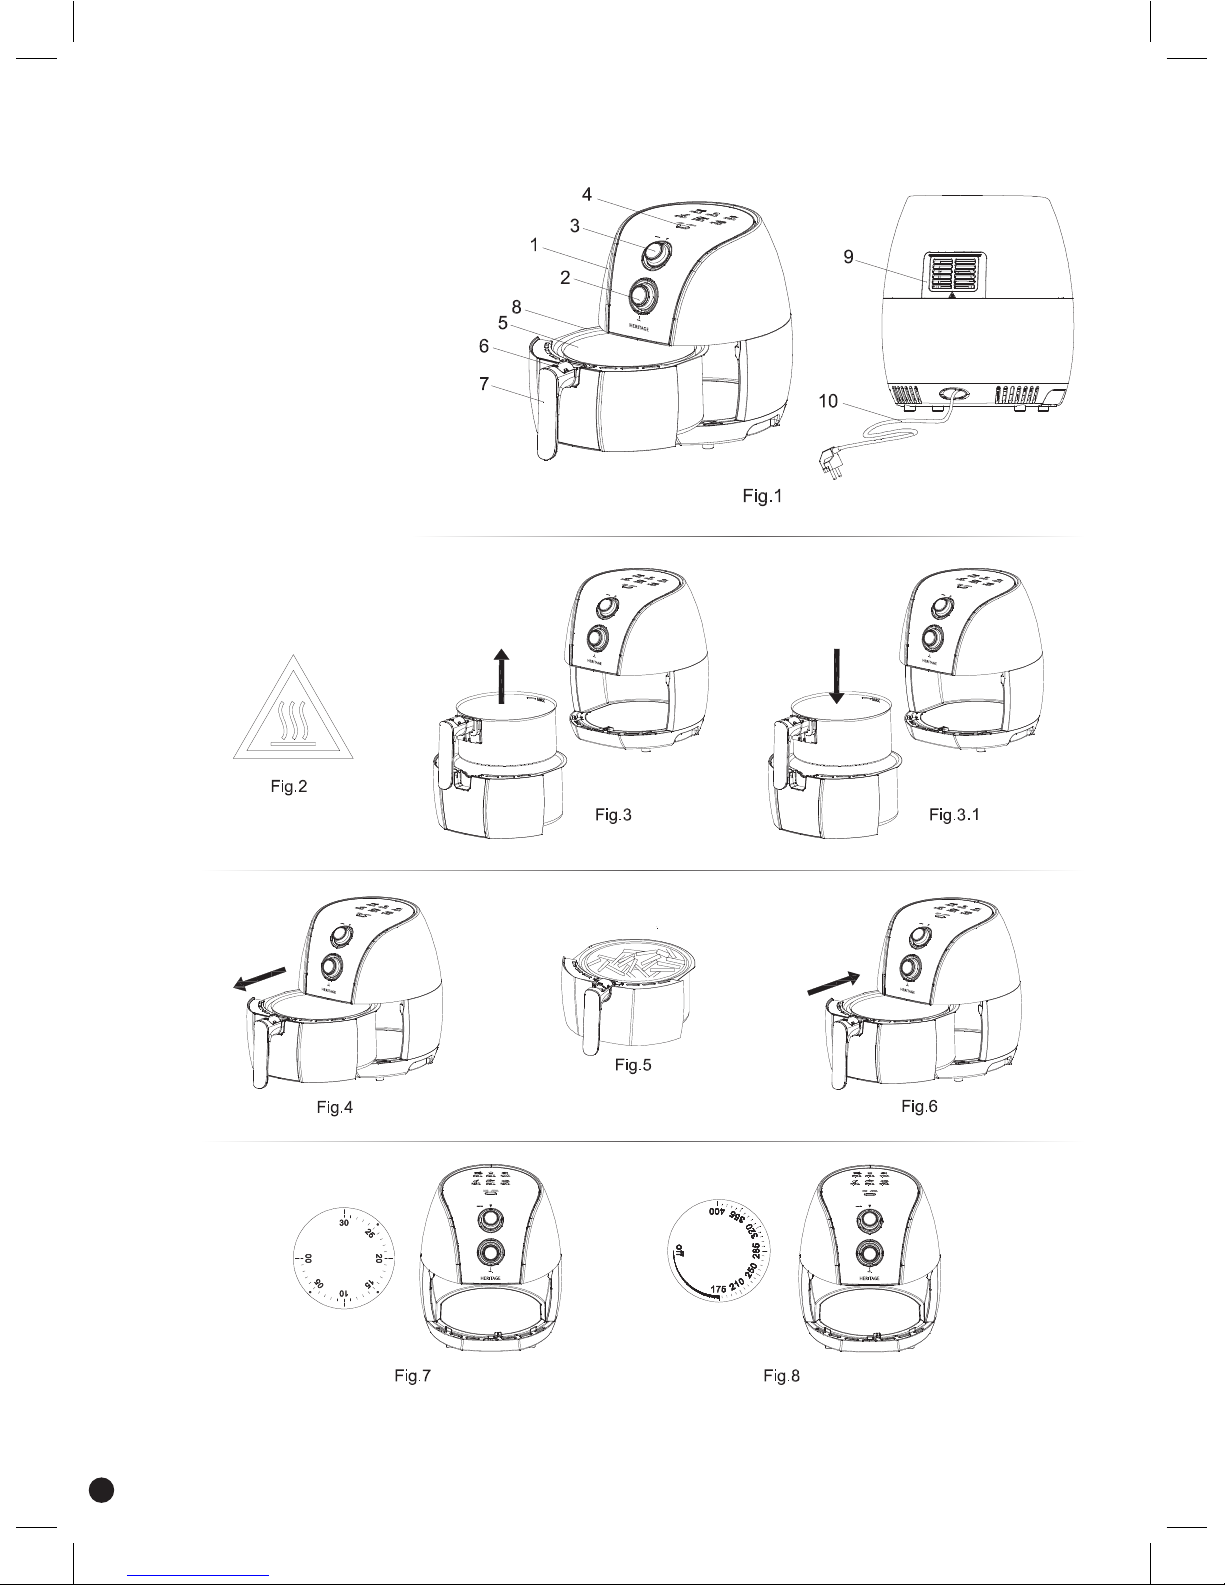
General description
1. Main housing
2. Temperature control knob
3. Timer knob
4. Power/Working indicator light
5. Basket
6. Basket release button
7. Basket handle
8. Pan
9. Air outlet
10. Cord

3
OPERATING AND SAFETY INSTRUCTIONS
Item no. Voltage (V) Wattage (W) Frequency (Hz)
023601 120 1500 60
IMPORTANT SAFEGUARDS
READ THE BELOW INSTRUCTIONS BEFORE USE
WARNING: To reduce the risk of fire, electrical shock, serious personal injury and/or property
damage:
1. To protect against electric shock, do not immerse power cord, plug or product in water or
any other liquid.
2. Do not touch hot surfaces. Use protective oven mitts or gloves to avoid burns or serious
personal injury. Always use the basket handle and the bottom cool touch handles located
on each side of the unit.
3. Keep the product out of the reach of children and pets. This product is not intended for
use by children. Close adult supervision is necessary when any appliance is used near
children.
4. Unplug from electrical outlet before cleaning or when not in use. Allow the unit to cool
down completely before assembling, disassembling or relocating.
5. Do not operate the product if it has a damaged power cord or plug, or after the appliance
malfunctions or has been damaged in any manner. Do not attempt to examine or repair
this product yourself. Please call the customer service number provided in this user
manual.
6. Do not leave the product unattended while it is in use. DO NOT move the appliance while
in use.
7. Do not touch the food basket or the inside of the pan or fryer during a cooking cycle as
they are extremely hot and may cause severe burns. Always use the basket handle.
8. The food basket and pan are designed for use within this appliance only. They must never
be used on a stovetop, range top, hot gas or electric burner or in a heated oven. They
may warp and result in injuries as a result.
9. Always make sure the food basket and pan are dry prior to use. If they are returned to
the appliance when wet, they may damage or cause the product to malfunction.
10. Do not plug or unplug the product into/from the electrical outlet with a wet hand.
11. Use the product in a well-ventilated area. Keep the product away from kitchen cabinets,
curtains, clothing, dishtowels, or other flammable materials.
12. Do not use attachments not recommended or sold by the product manufacturer. The use of
accessory attachments not recommended by the appliance manufacturer may cause injuries.

4
13. This product is intended for indoor, non-commercial use. Do not use outdoors or for
anything other than its intended use. This appliance is intended for countertop use only.
14. Do not let the cord hang over the edge of a table or counter or touch hot surfaces, as
you may trip and fall or cause the hot contents of the appliance to spill and possibly
cause burns or injuries.
15. Do not place the product on or near a hot gas or electric burner, or in heated oven as it
may cause this appliance to melt.
16. Always place the product on a flat, stable surface – it is not recommended to use the
appliance on temperature sensitive surfaces.
17. To disconnect, turn the temperature control knob to “OFF”, then remove plug from wall
outlet. Connect the power plug to an easily accessible outlet so the appliance can be
unplugged immediately in the event of an emergency.
18. Do not use the appliance with a programmer or timing device that switches it on
automatically. The use of such devices is dangerous and can cause a fire risk.
19. If this appliance begins to malfunction during operation, unplug the cord from the outlet
immediately. Do not attempt to repair or use a malfunctioning appliance.
20. Extreme caution must be used when moving an appliance containing hot oil or other hot
liquids.
SAVE THESE INSTRUCTIONS FOR
FUTURE REFERENCE
POLARIZED PLUG: This appliance is equipped with a polarized plug (one blade is wider than
the other). As a safety feature to reduce the risk of electrical shock, this plug is intended to fit
in a polarized outlet only one way. If the plug does not fit fully in the outlet, reverse the plug.
If it still does not fit, contact a qualified electrician. Do not attempt to defeat this feature or
modify the plug in any way. If the plug fits loosely into the AC outlet or if the AC outlet feels
warm, do not use that outlet.
SPECIAL INSTRUCTIONS: A short power supply cord is provided to reduce the risk of
becoming entangled in or tripping over a longer cord.
AN EXTENSION CORD MAY BE USED IF CARE IS EXERCISED IN THEIR USE:
• Minimize the risk of overheating by using the shortest UL or ETL listed cord possible.
• The marked electrical rating must be at least as great as that of the product.
• Never use a single extension cord to operate more than one appliance.
• Arrange the longer cord so that it will not drape over a countertop or tabletop where it can
be tripped over, snagged, or pulled on unintentionally (especially by children).
• DO NOT alter the plug. DO NOT attempt to defeat the safety purpose of the polarized plug.

5
BEFORE INITIAL USE
1. Remove all packaging materials.
2. Remove any stickers or labels from the appliance.
3. Thoroughly clean the basket and pan in warm soapy water using a non-abrasive sponge.
Note: You can also clean these parts in the dishwasher.
4. Wipe inside and outside of the appliance with a damp cloth.
NOTE: This is an oil-free fryer that works on hot air, do not fill the pan with oil or frying fat.
PREPARING FOR USE
1. Place the appliance on a stable, horizontal and even surface.
Do not place the item on temperature sensitive surfaces.
2. Place the basket in the pan (P.2 fig.3.1).
3. Pull the cord from the storage compartment located on the bottom of the appliance and
plug the unit in a corresponding wall outlet (P.2 fig.1).
4. Do not fill the pan with oil or any other liquid.
5. Do not put anything on top of the appliance or the airflow will be disrupted and hinder the
air frying result.
TO USE
This appliance can prepare a large range of ingredients. See the cooking guide in this booklet
for food tips and ideas.
Air frying
1. Connect the plug into wall outlet.
2. Carefully pull the pan out of the air fryer. (P.2 fig.4)
3. Put the ingredients in the basket. (P.2 fig.5)
4. Slide the pan back into the air fryer. (P.2 fig 6)
Carefully align the pan with the guides on the body of the fryer.
Never use the pan without the basket in it.
Caution: Do not touch the pan right after use as it will be very hot. Only hold the pan by
the basket handle.
5. Determine the required preparation time for the ingredient (see Cooking Chart for
reference).
6. To switch on the appliance, turn the temperature control knob (P.2 fig.8) to the desired
temperature. Then, turn the timer knob to the desired preparation time (P.2 fig. 7) (see
Cooking Chart for reference).* The POWER indicator light will turn on meaning the unit is
turned on. The WORKING indicator light will also turn on meaning the unit is preheating.
Note: Add 3 minutes to the preparation time when the appliance is cold for preheating.
You can also let the appliance preheat without any ingredients inside. To do this, turn the
timer knob to 3 minutes. Turn the temperature control knob to the desired temperature

6
and wait until the WORKING indicator light goes out (approx. 3 minutes). Then, pull out
the pan, fill the basket with food and turn the timer knob to the desired preparation time.
The timer will start counting down the set preparation time.
Note: During the air frying process, the WORKING indicator light will turn on and
o from time to time. This indicates that the heating element is maintaining the set
temperature.
Note: Excess oil from the ingredients may drip on the bottom of the pan. Make sure the
unit is completely cooled o after the air frying process before cleaning the pan.
7. To ensure even cooking, some foods require “shaking” during the cooking process. To do
this, simply pull out the pan, place it on a heat-resistant surface, slide the button guard
forward and press the basket-release button to eject the basket (P.2 fig.3), gently shake
the contents as needed, insert the basket pack in the pan until you hear a locking click
and fasten the pan in the unit to continue cooking. For heavier or fragile foods, use nylon
or silicone heat-resistant tongs or other utensils to safely mix the food.
Tip: If you set the timer to half the preparation time, you will hear the timer bell when
you have to shake the ingredients. However, this means you will have to set the timer
again to the remaining preparation time after shaking.
8. When you hear the timer bell, the set preparation time has elapsed and heating will stop.
Pull the pan out of the appliance and place it on a heat-resistant surface.
Note: You can also switch o the appliance manually. To do this, turn the time control
knob to 0 and the temperature control knob to “OFF”.
9. Check if the ingredients are ready. If the ingredients are not ready yet, simply slide the
pan back into the appliance and set the timer to a few extra minutes.
10. To remove the ingredients (e.g. fries), pull the pan out of the air fryer, place it a heatresistant surface and press the basket release button to lift the basket out of the pan.
Do not turn the basket upside down with the pan still attached to it, as any excess oil
that has collected on the bottom of the pan will leak onto the ingredients and/or on your
work space. Depending on the type of ingredients in the fryer, steam may escape from
the pan.
11. Empty the basket into a bowl or onto a plate.
Tip: To remove large or fragile ingredients, lift the ingredients out of the basket using a
pair of non-abrasive heat-resistant tongs.
12. When a batch of ingredients is ready, the air fryer remains preheated and ready for a
second cycle.
 Loading...