

Page 1

- 21 -
Indústrias Hergóm, S.A.,
.. may not be held liable for any damages
caused by alterations in its products that have not been authorised in
writing, or for faulty installation work.
Furthermore, it reserves the right to alter its products without prior
warning.
Indústrias Hergóm, S.A.,
. a company registered in Soto de la
Marina, Cantabria – Spain, offers a TWO YEAR warranty on all its
products.
The geographical coverage of the said warranty only includes the countries
in which
Indústrias Hergóm, S.A.,
. a subsidiary company or an
official importer distribute its products and where Community Directive
1999/44/CE is in force.
The warranty starts on the purchase date of the product as indicated on the
warranty document and only covers any damage or breakages due to
manufacturing defects.
WELCOME to the Hergóm range.
We would like to thank you for choosing our cast iron hearth,
which represents, in technique and style, a significant
improvement on classical coal and wood hearths.
We are sure that your new hearth will prove fully satisfactory,
which is the most outstanding feature of our equipment.
Owning a Hergóm TC-1, H-01 or H-02 cast iron hearth
displays an exceptional sense of quality.
Please read this manual in full. Its purpose is to familiarise
users with their hearths by explaining extremely useful
installation, operational and maintenance instructions. Keep
this manual at hand for future reference whenever necessary.
If, after reading this manual, you should require any extra
clarification, please consult your regular dealer or call the
factory directly.
IMPORTANT WARNING: If the hearth is not installed
correctly, it will not provide the excellent service for which it
has been designed. Please read these instructions in full and
trust the work to a specialist.
Page 2
- 22 -
1.- INTRODUCTION
Several versions of the Cast Iron Hearth are available:
1. HEARTH H-01 which is completely built-in. Users may decorate the
front piece as they prefer, using wood, stone, marble…
It is served in pieces packed in a cardboard box with a wooden
frame, duly protected, to facilitate handling and transport. The simple
assembly instructions can be found in the ASSEMBLY section of this
manual.
2. HEARTH H-02 features an elegantly designed cast iron front piece
to decorate the visible part of the hearth.
It is supplied totally assembled from the factory, assembled, and
sealed with refractory putty.
3. HEARTH HEATER features the same ornamental front piece as the
H-02 and provides a maximum power of 25 Kw.
It is supplied totally assembled from the factory, assembled, and
sealed with refractory putty.
4. HEARTH TC-1 (Turbo Convector), with the H-02 ornamental front
piece. It is supplied totally assembled from the factory, assembled,
and sealed with refractory putty.
No unauthorised alteration may be introduced to the hearths. They have
been designed, tested and certified as delivered from the factory.
Industrias Hergóm may not he held liable for the malfunction, breakage
or damage caused by devices that have been altered by a user or installer.
2.- FEATURES
2.1 CONSTRUCTION
Totally manufactured in cast
iron using assembled pieces
that are screwed together (H01 & H-02).
The TC-1 model displays the
same features as the H-02,
but also includes a sheet
metal lining treated against
rust as part of the hot air
chamber.
Page 3

- 23 -
The HEATER HEARTHS include a steel sheet pipe for A-37 “RC” quality
boilers
2.2 OPTIONAL ACCESSORIES FOR H-01
The following accessories may be adapted to this model:
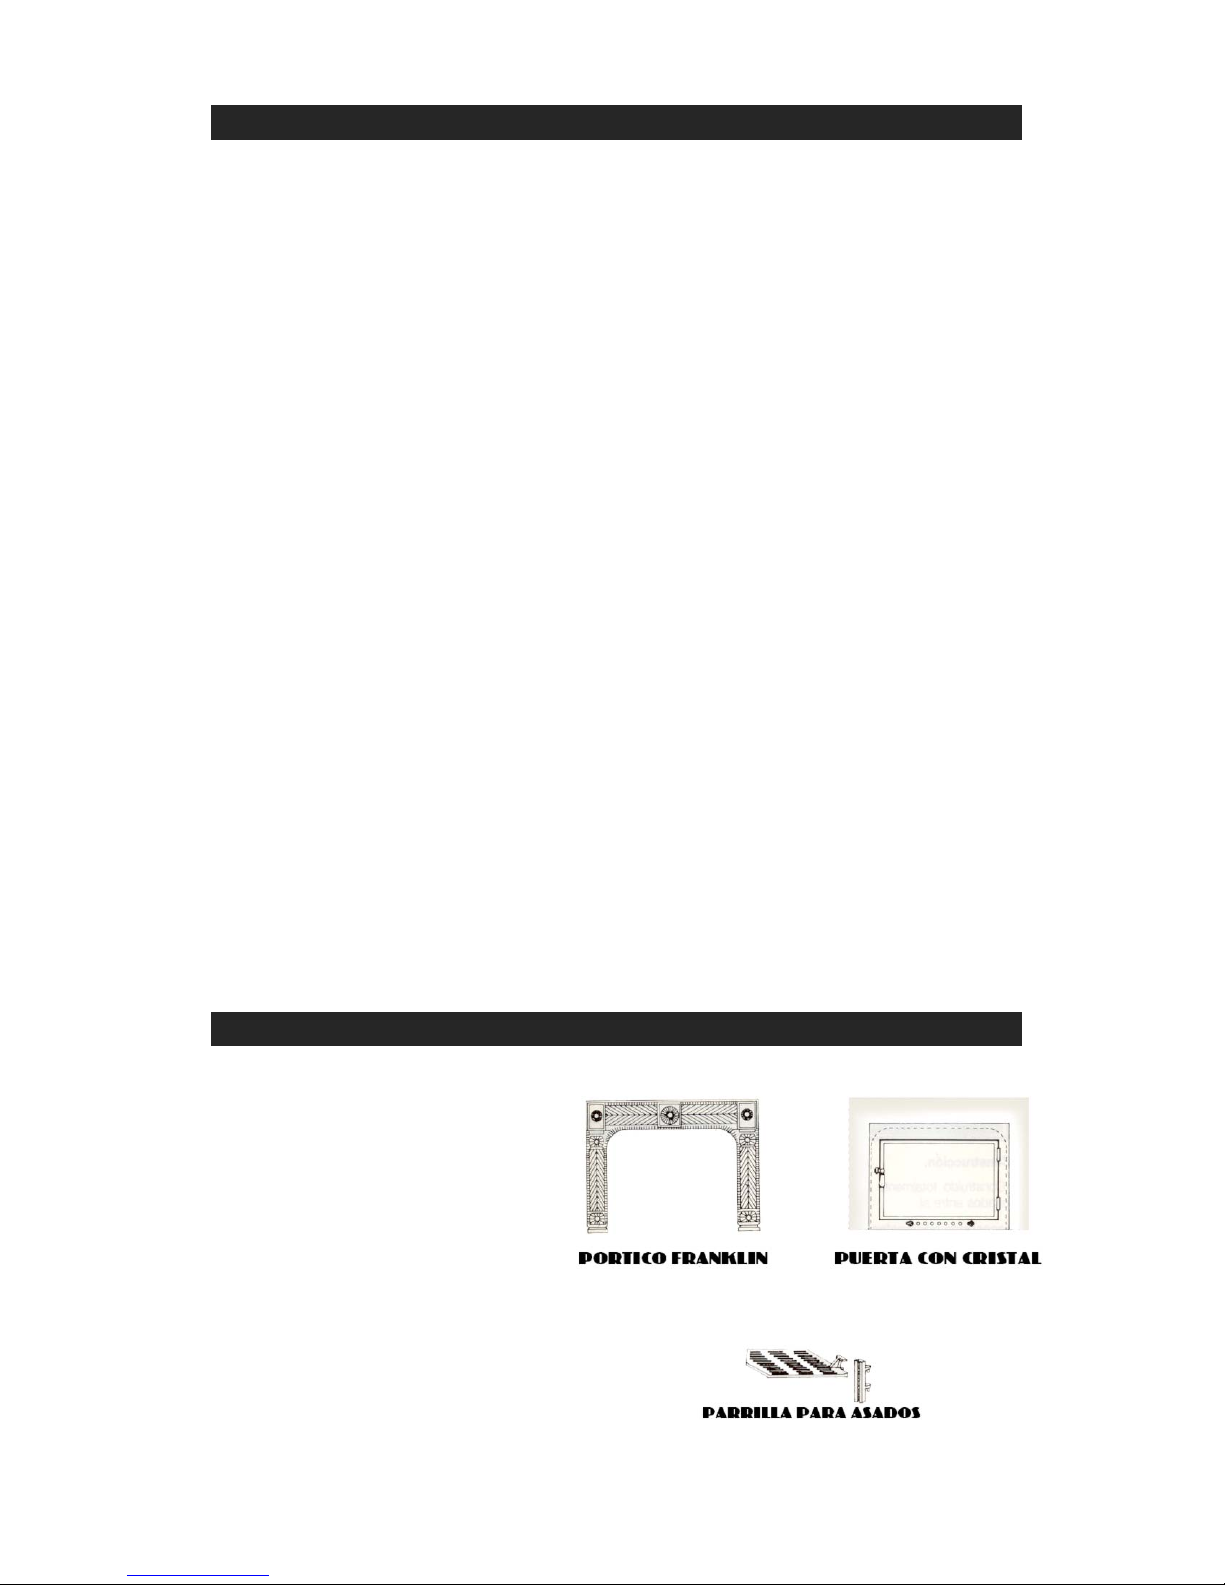
x CAST IRON FRANKLIN-77 FRONT PIECE, to decorate the front of the
hearth. It is supplied painted in black or with a vitreous porcelain
enamel finish.
x THERMAL GLASS DOOR. Laminated steel with a large heat-resistant
glass piece for a full view of the fire. It is supplied with a special heatproof handle.
WARNING: Install the glass door before placing the cast iron front
piece.
x GRILL. Revolving grill, adjustable in height. Easy to install on its
anchor points on the side of the hearth (may also be adapted to H-02
and TC-1 models).
3.- ASSEMBLY
3.1 INSTALLING HEARTH H-01
1. Place the H-02 base on the floor.
2. Attach the back of H-06 over the back door of the base and fix using
the tabs by means of the two M-6x25 screws with washer and nut.
3. Fit the right hand side panel, H-04, in the groove on the base and in
the back panel. Attach it to the back tab using an M-6x25 screw with
washer and nut.
4. Perform the same operation with the left-hand side panel, H-05.
5. Fit the top back piece, H-07, (fit into the grooves) on the back and the
sides. Fix in place using the four M-6x35 screws with washers and
nuts.
6. Fit the frame around the sides of the hearth. Fix the top and bottom
in place by means of M-6x25 screws with washers and nuts.
7. Fit the right-hand side of the chimney, H-09, on the right-hand side of
the hearth and fix in place using an M-6x25 screw with washer and
nut.
8. Do the same with the left-hand side of the chimney (19), H-08.
9. Fit the bottom of the chimney, H-10, in the back top groove of the
hearth and fix it to the top tabs on the sides of the chimney using the
M-6x35 screws with washers and nuts.
Page 4

- 24 -
10. Fit the front of the chimney, H-11, to the sides of the chimney. Fix it
to the lower tabs using two M-6x35 screws with washers and nuts.
11. Fit the H-01 baseboard to the front of the base. The vertical tab will
limit with the lower part of the frame. Fix to the frame using the
vertical tab by means of two M-6x25 screws with washers and nuts.
12. Fit the hood by fixing the internal tabs or side, front and back edges
that form the chimney. Fix to the sides of the chimney using two M6x30 screws with washers and nuts.
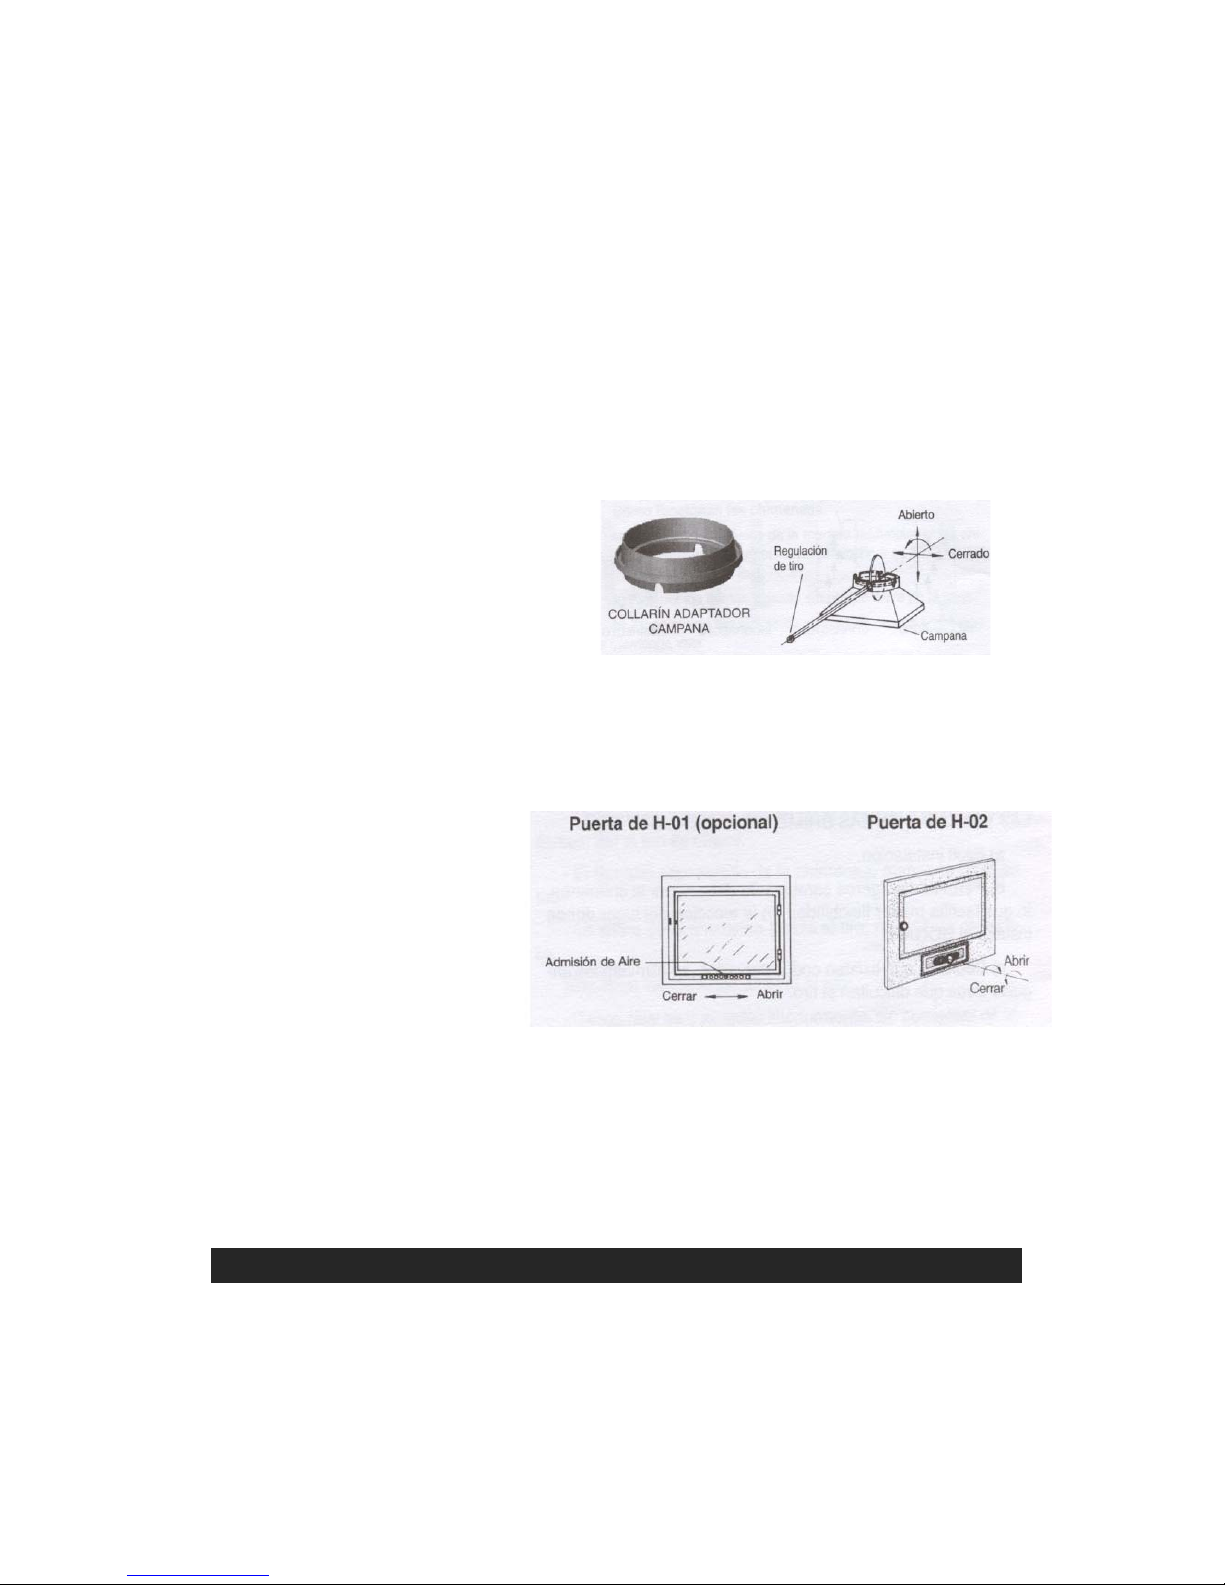
13. Fit the draw regulation valve, L-020, in the position you find most
suitable, on the front or on the side. You will have to open the gaps
for the tube in the collar ring.
14. Fit the grill in the base.
15. Fit the protection over the mouth of the hearth. The sides of the
protection cover must fit into the tabs located on the sides.
16. Introduce the ash pan through the front of the baseboard, H-01.
Important!! When assembling, seal all joints between parts with refractory
putty.
Do not tighten the screws until the last piece has been placed (the hood).
Do not place all the weight of the chimney on the device.
3.2 INSTALLING THE FRANKLIN STYLE FRONT PIECE
(accessory)
1. Fit the Franklin type columns to the frame by placing them on the
baseboard. Fix them to the frame by means of the two enamelled
round head screws, l/4x45mm, with a washer and nut. DO NOT
TIGHTEN AT PRESENT.
2. Fit the FRANKLIN front piece on the top of the frame and rest it on
the top ends of the columns. Fix the frame using the three brass
screws, nuts and washers.
Tighten the columns.
3.3INSTALLING THE THERMAL GLASS DOOR (accessory)
Instructions are provided with the glass door. It requires drilling the sides
of the hearth matching the sides of the door and is only advisable for
hearths that have been installed with an air chamber.
In the case of built-in hearths, the door can be attached by simply gluing it
to the frame using refractory putty.
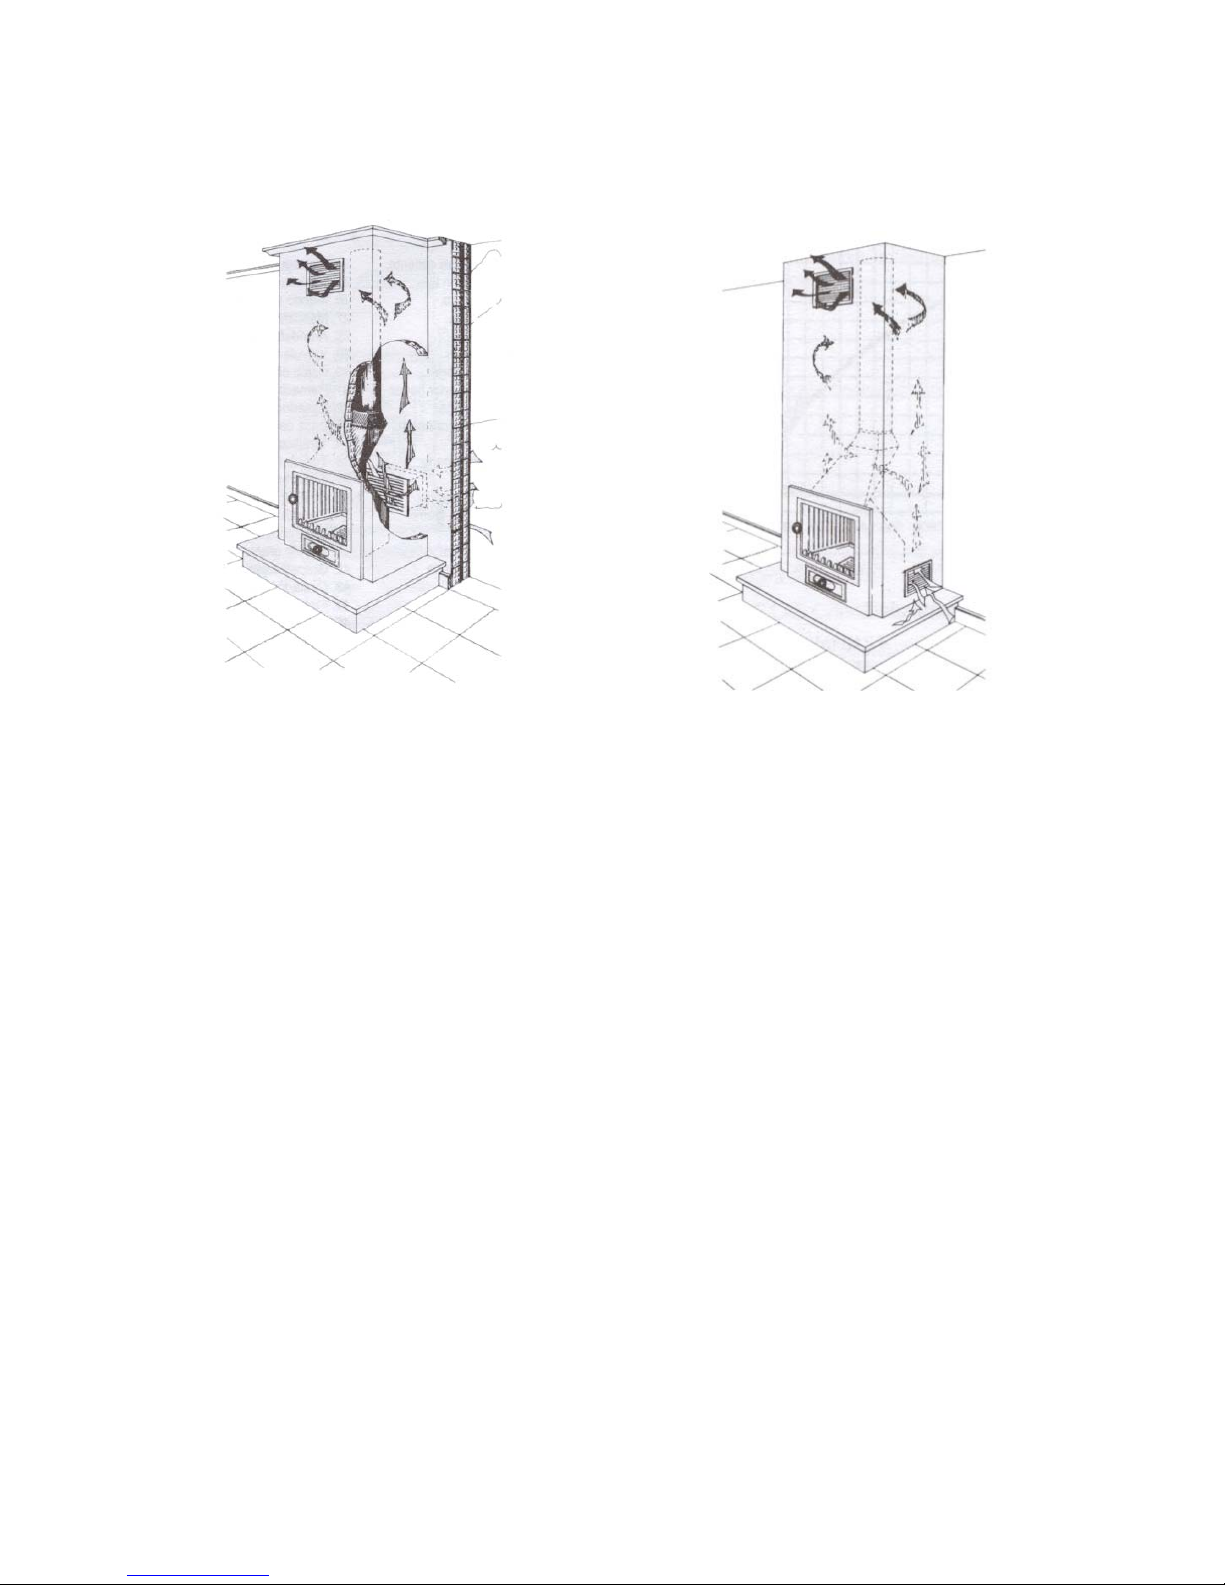
3.4DIAGRAM OF THE LINING
VERSION “A”: CONVECTION with external air intake (clean air).
VERSION “B”: CONVECTION with local air intake (recirculation of the
same air)
Page 5
- 25 -
Important!! The hood ventilation grilles must be located in such a way
that they cannot be blocked.
The air that comes out of the top ventilation grilles may reach high
temperatures, therefore, do not use materials that are incapable of
resisting high temperatures in the grille area. The grilles must be metal
(never use wooden or plastic grilles).
Do not place objects near the top ventilation grilles; the hot air may
damage them.
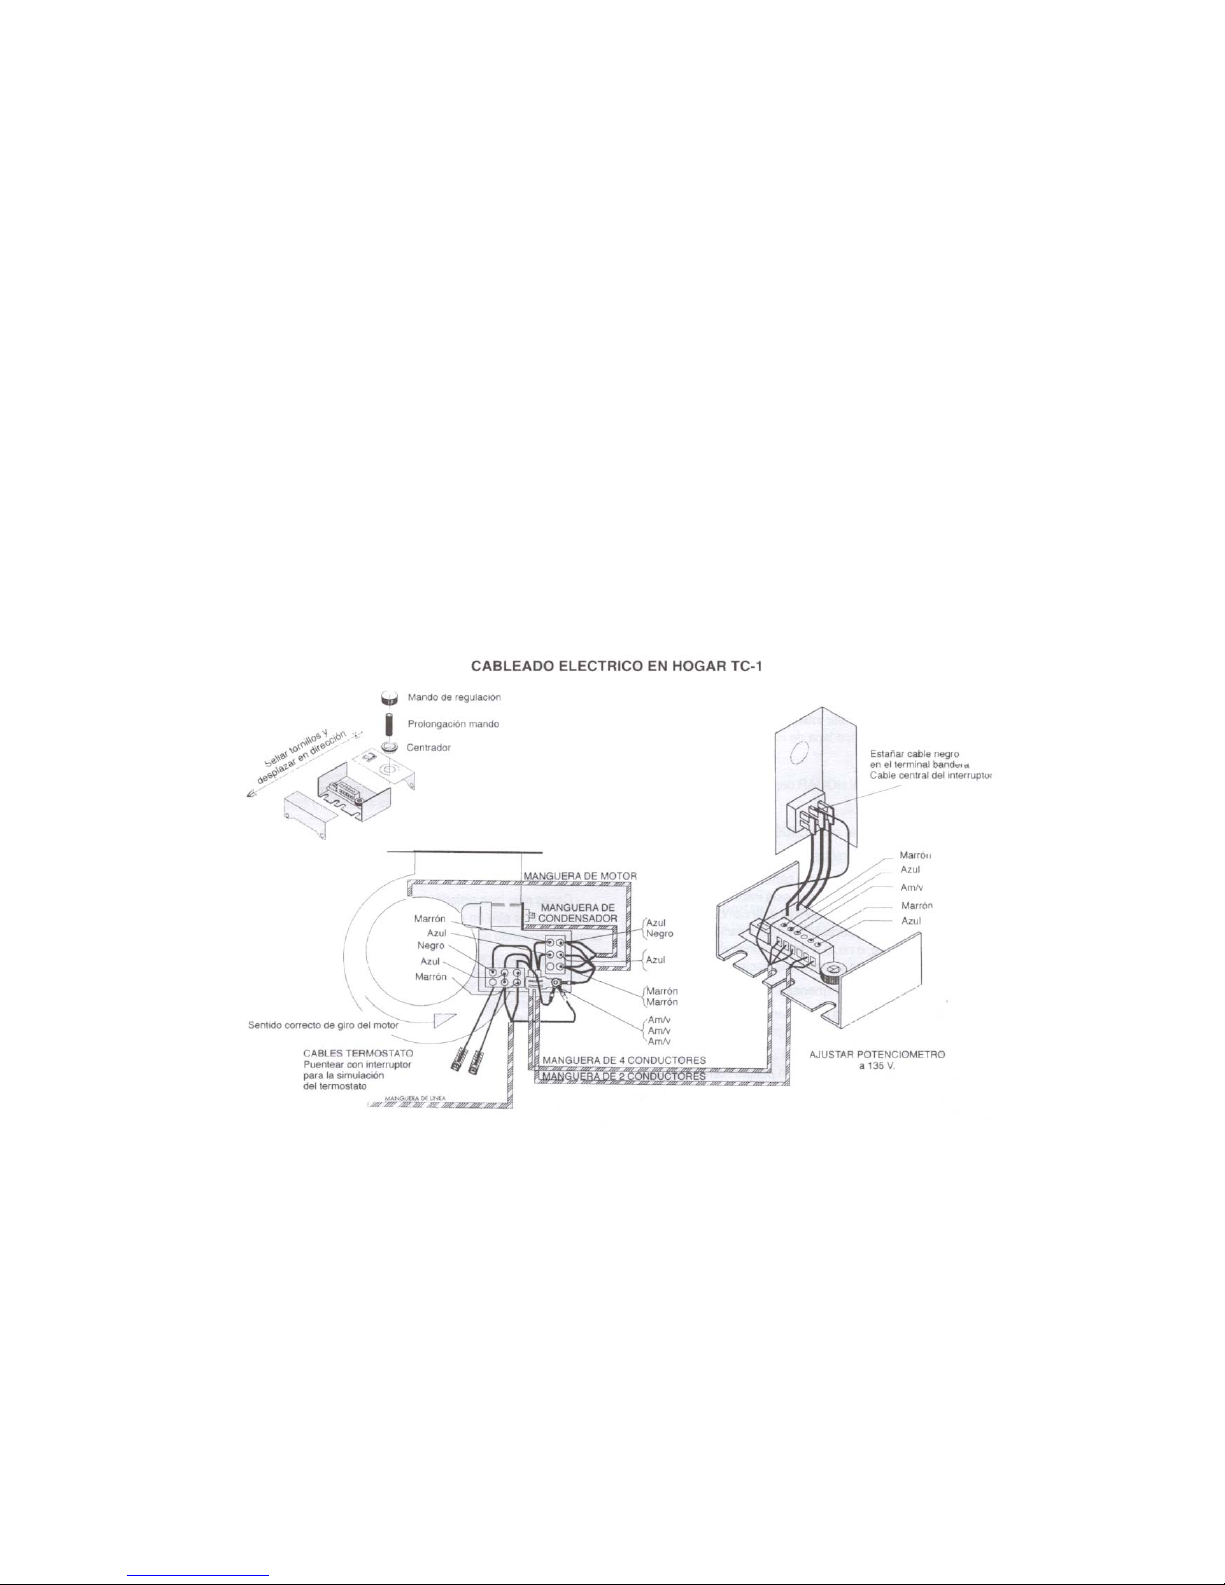
3.5INSTALLING THE MOTOR-FAN AND ACCESSORIES IN
HEARTH TC-1.
In order to install the motor-fan and other elements, please follow the
detailed instructions indicated below.
1. Select the side that is most convenient to place the motor-fan and
thermostat.
2. If the side selected is not the open side, change the cover to the other
side.
3. Screw the motor bracket to the side of the frame.
4. The thermostat can be installed on either side. Loosen the relevant tray
and screw it directly to the cast iron projection.
5. Connect the two white wires (loose) to the thermostat connectors and the
power cable to the power supply.
VERSION “A” VERSION “B”
Page 6
- 26 -
6. Ensure you have access in order to dismantle the motor in the event of
any break-down.
3.6USING AND HANDLING ELECTRICAL ACCESSORIES
The thermostat has been regulated to a temperature of 55ºC and, therefore,
does not require any adjustments, except connecting the wires.
The regulation box (SWITCH-POTENTIOMETER) must be installed in an
accessible place, near the Hearth.
There are two independent controls: a start-stop switch and a regulator
that features the minimum pre-set revolutions for the fan. This control is
used to change the motor rpm, with a view to selecting the optimum rate.
The thermostat operates independently, so that even when the switch has
been disconnected, the fan will start if the temperature exceeds the pre-set
values on the thermostat. Revolutions can be selected with the regulator,
whether the switch is on or off.
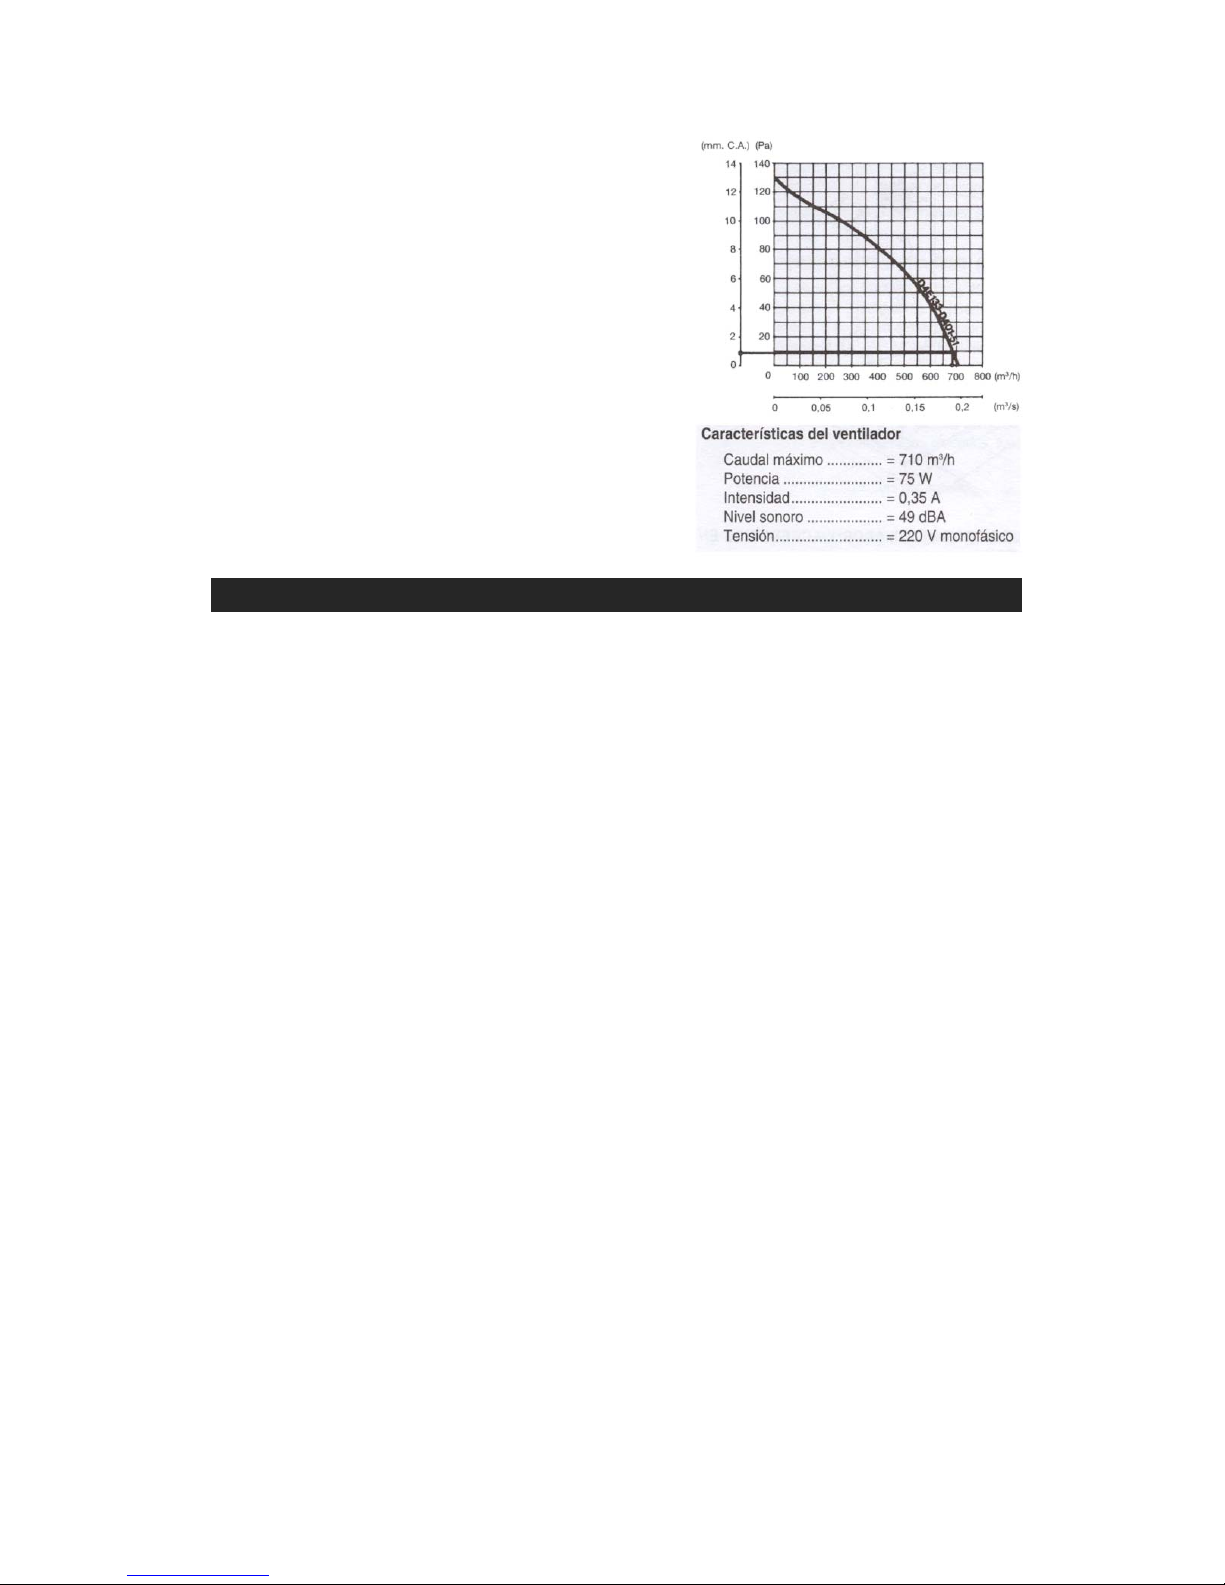
3.7FAN FEATURES, CURVE
The length and diameter of the air pipes affect load loss, reducing the
flow of useful air transported. Therefore, this must be taken into account
when installing the air system.
In order to do this correctly, the fan curve must be known. The y-axis
displays load loss and the x-axis displays flow in m
3
h.
Page 7
- 27 -
VERY IMPORTANT
The fan motor must be connected to the
power supply network permanently in
order to connect automatically,
triggered by the thermostat, whenever
the Hearth is producing heat.
It automatically stops when the Hearth
cools.
If it is disconnected when the Hearth is
hot, the electrical components may be
damaged.
4.- INSTALLATIÓN
IMPORTANT!! All local regulations, including those that refer to
national or European regulations must be applied when installing this
device.
When, in the same room, the device is going to be operating together with
other heating devices that require air for their combustion process, we
recommend planning an intake of additional exterior air to facilitate the
combustion of the said devices.
The use of one or more heating devices in the same room reduces the
level of oxygen which affects combustion and reduces chimney draw.
The way you install the HEARTH will have a decisive effect on safety issues
and on how it operates.
It is important to for the installation to be performed correctly.
The safe installation of the HEARTH and of the Chimney may be
complicated and, therefore, we recommend entrusting the task to a
professional. If you decide to do it yourself and if you have any queries, ask
an expert or call us directly at the factory.
In order to prevent the overheating of the hood lining panels, we
recommend lining the said walls internally with an insulating material,
such as rock wool or a similar product.
4.1 CHIMNEYS
The way the HEARTH works depends on:
a) The chimney.
b) How it is used.
c) The quality of the fuel used.
Page 8

- 28 -
Over the years, you may change the type of fuel you use but, once the
chimney has been installed in a given place, it is not so easy to alter or
reposition.
Therefore, the following information will help you decide whether you can
use your present chimney or not, or whether you need to build a new one.
The base where you are going to place your Hearth must be flat and
provide a perfect seat for your Hearth. The base must be built using heat
resistant materials.
4.1.1 How chimneys work.
A basic knowledge of the dynamics of chimneys will help you make the most
of your HEARTH.
Chimneys:
a) Safely evacuate smoke and gasses from the house.
b) Provide sufficient draw in the hearth to keep the fire alive.
What is the "chimney draw"?
The tendency air has to rise generates the chimney effect.
When the HEARTH is lit, hot air rises through the chimney. The chimney
flue heats up and keeps it drawing. Until the chimney is hot enough, the
chimney effect will not work properly.
The chimney effect depends on the location, size and height of the chimney.
The following must be taken into consideration:
- Chimneys located inside a house keep warm and, therefore,
chimney draw is greater.
- The chimney size recommended by the manufacturer will provide
a good chimney effect.
- The height of a chimney affects how it draws: greater height,
better chimney effect.
The chimney must project at least one metre over the highest part of the
roof.
Page 9

- 29 -
Other factors also affect chimney draw:
- High trees and/or buildings near the house also have a negative
effect on chimney draw.
- Wind speed. Usually, sustained strong winds increase chimney
draw but stormy winds have a negative effect.
- External temperature. The colder it is outside, the greater the
chimney effect.
- Atmospheric pressure. The chimney effect is usually poor on
rainy, damp or stormy days.
- Intensity of the fire. The hotter the fire, the stronger the chimney
effect.
- Cracks in the chimney, badly sealed or dirty door, air entering
through pipe joints, other devices connected to the chimney.... may
affect chimney draw negatively.
4.1.2 Creosote formation and cleaning.
When wood burns slowly, it produces tar and other organic fumes that,
when combined with a damp atmosphere, form creosote. Creosote fumes
may condense if the chimney walls are cold. If it catches fire, extremely tall
fires may be caused. Any accumulation of creosote must be eliminated. As
the accumulation of creosote depends on a number of variables, it is very
difficult to know when the chimney should be cleaned. The safest way of
ensuring that the chimney of your hearth is creosote free is by performing a
visual inspection. Consequently, we recommend building installations that
are easy to access.
4.1.3 Options.
If you are going to build a chimney for the HEARTH, you have two
alternatives:
a) Brickwork chimneys.
b) Metal chimneys.
Studies have reached the conclusion that there is no great difference in
performance between metal and brick-cement chimneys. You will have to
choose one or the other.
Page 10

- 30 -
Whenever possible, build your chimney inside the house; this will provide
better draw, lower creosote accumulation and a longer life.
THE ADVANTAGES OF BRICK CHIMNEYS INCLUDE:
a) Fumes cool off more slowly inside the chimney due to the mass of
bricks and tiles.
b) As bricks accumulate heat, the house keeps warm longer after the
fire is put out.
c) It can be built to the specific requirements of each person.
d) If well built, it will be more resistant to fire than metal chimneys.
Brick chimneys must be well lined to prevent the fumes from losing
temperature. They must be built with materials that support high
temperatures and corrosion. They may be round, square...., what matters is
the size of the internal section.
Brick-work chimneys for the HEARTH must comply with the measurements
indicated in section 9: TECHNICAL DATA.
THE ADVANTAGES OF METAL CHIMNEYS INCLUDE:
a) Easy installation.
b) It is possible to change the direction of the chimney slightly, which
provides greater flexibility when deciding where the HEARTH
should be installed.
c) Curved joints can be used, which eliminates acute angles that
have a negative effect on draw.
4.1.4 Some rules.
We shall now explain a number of rules that should be followed when
building a chimney:
a) Use resistant, fireproof materials. Do not use cement asbestos
pipes.
Page 11
- 31 -
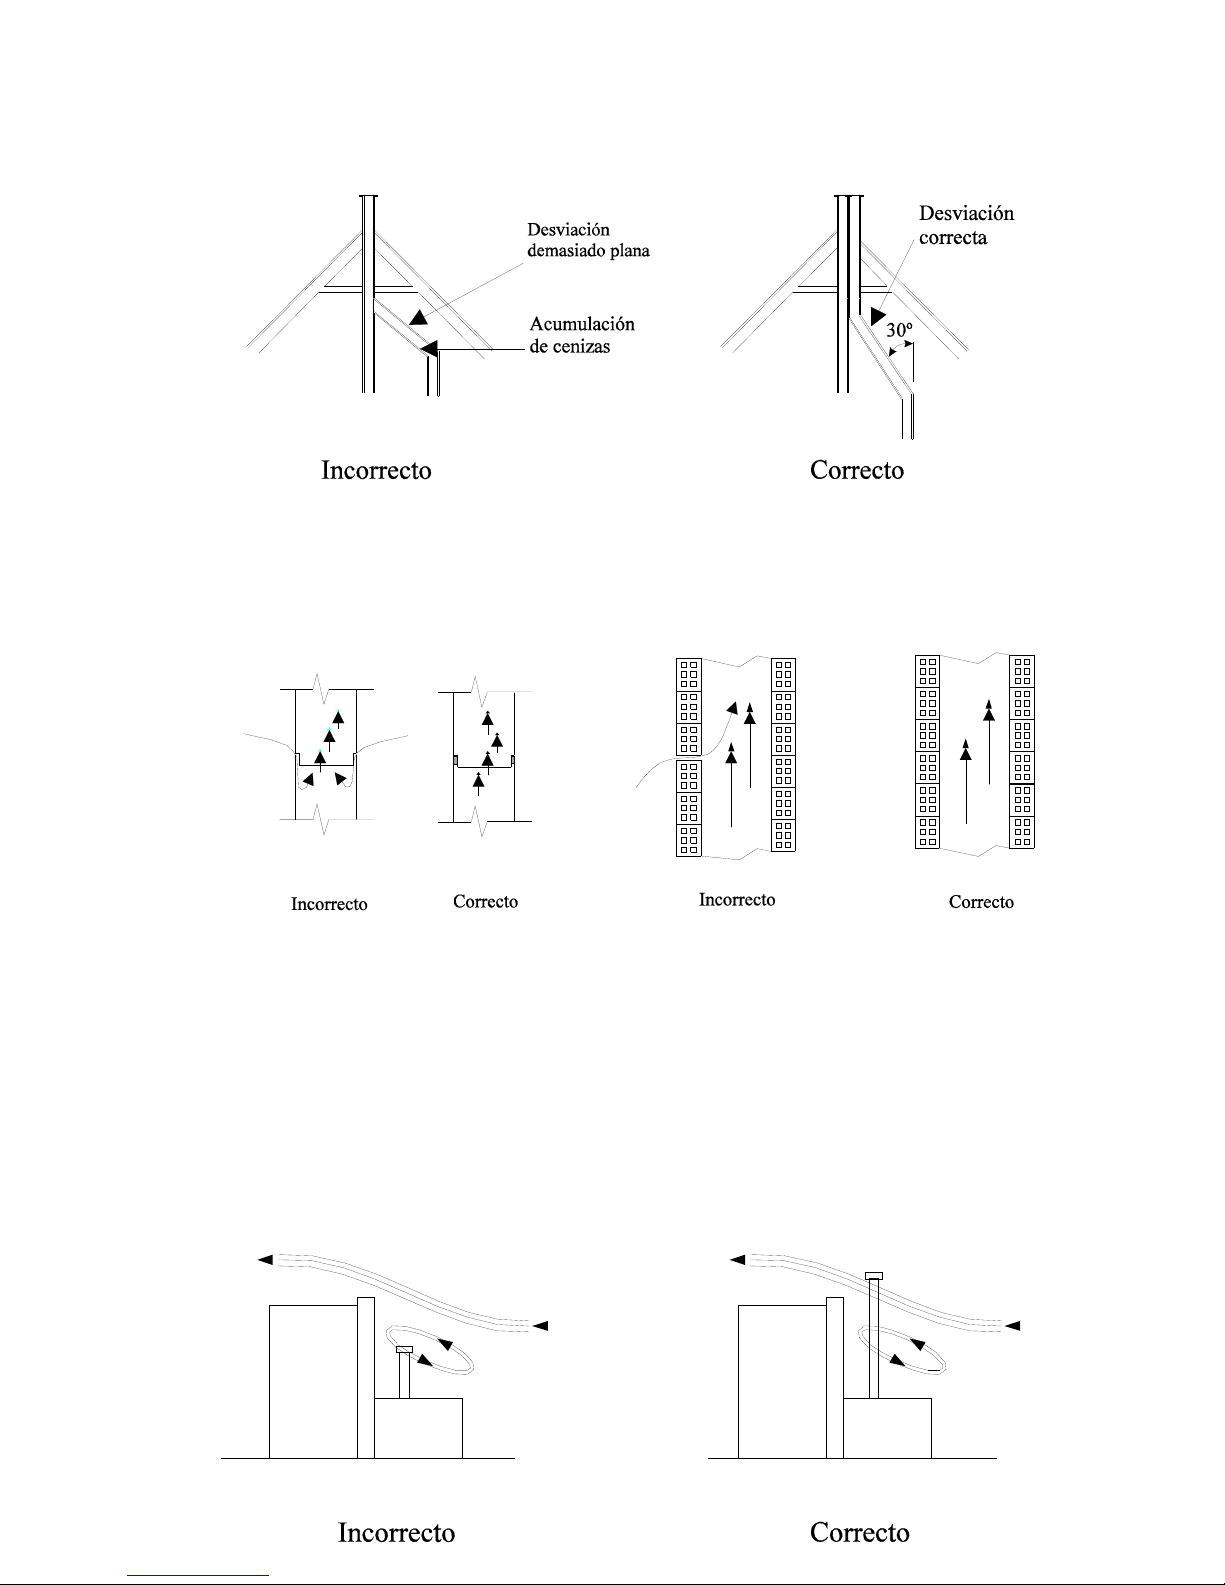
b) Choose the most vertical and straight route possible and do not
connect several devices to the same chimney.
c) The conduit should not come to an end near buildings and must be
higher than the nearest obstacle if there is another building
nearby.
d) Install the conduit in an area as protected from the cold as
possible.
If possible, the chimney should be built inside the house.
Page 12
- 32 -
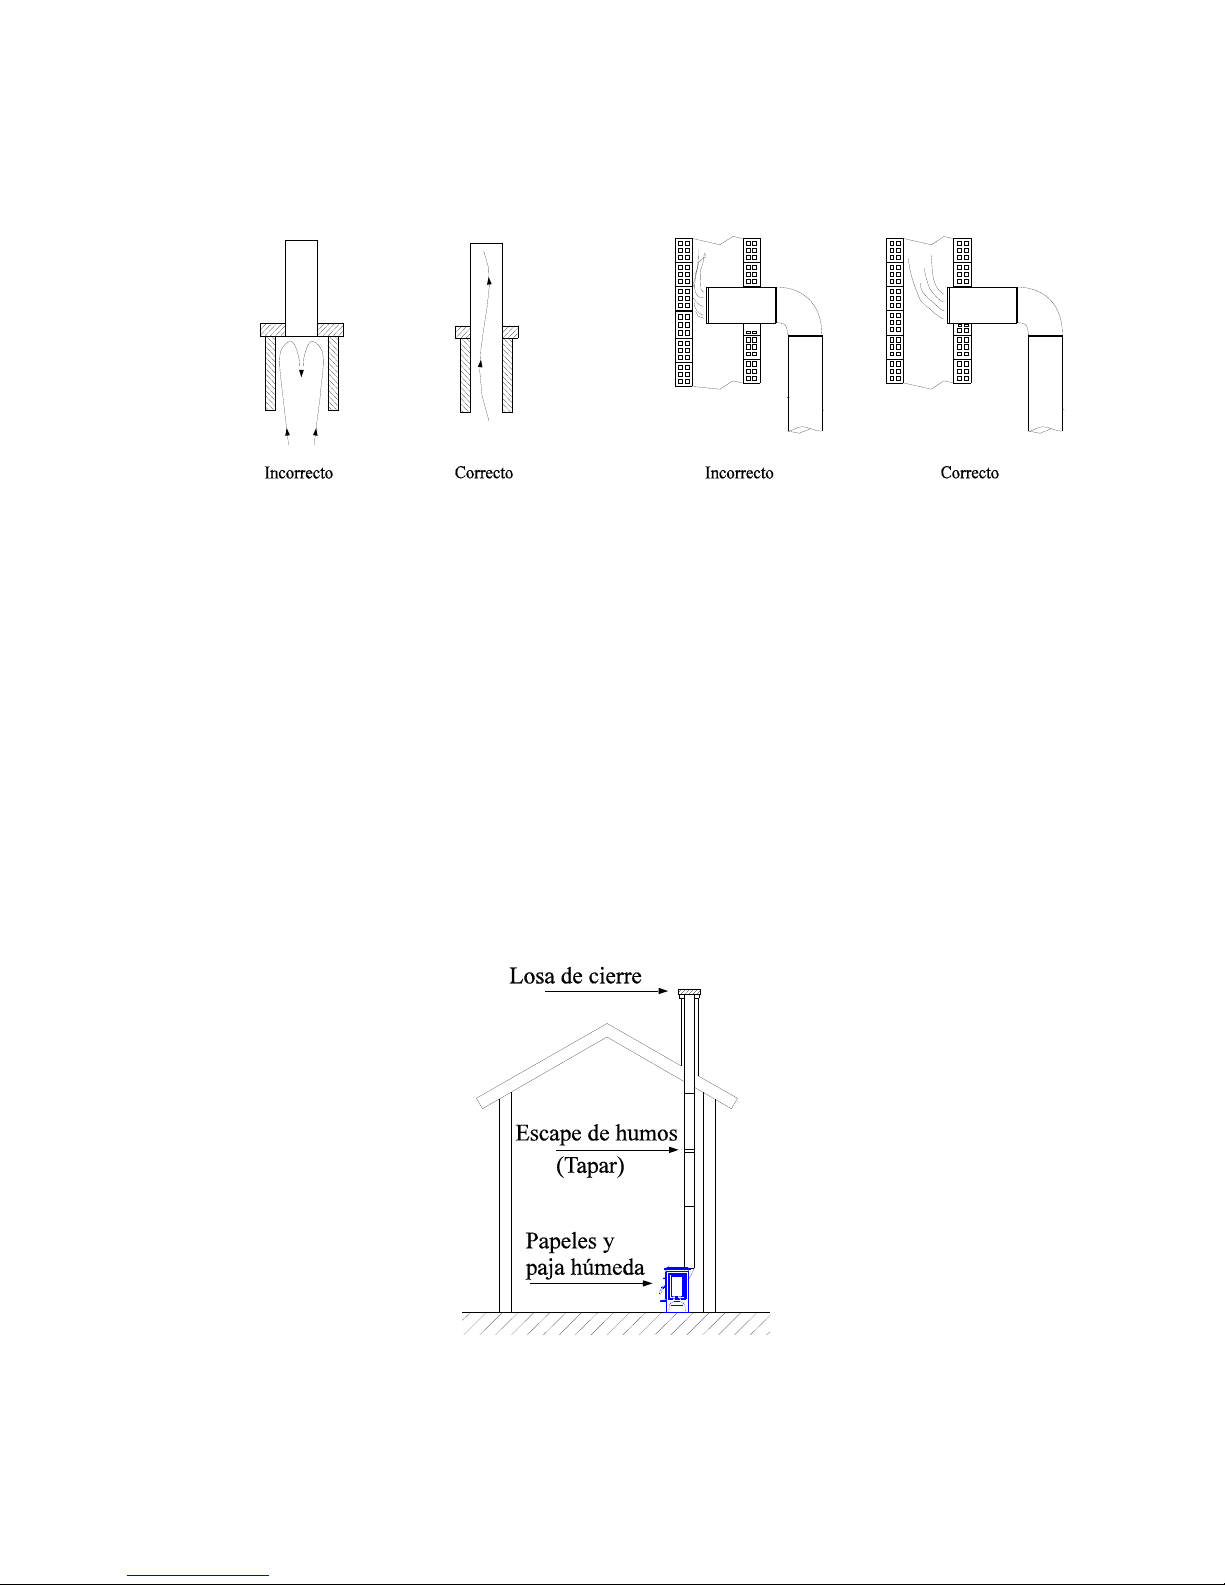
e) The internal walls must be perfectly smooth and free from
obstacles. Avoid bottlenecks where pipes join to the brick
chimneys.
f) It is very important to ensure that the joints of the pipes are well
sealed to avoid possible cracks through which air may enter.
In order to verify the air-tightness of the chimney, you may:
- Cover the outlet on the roof.
- Introduce damp paper and straw at the bottom of the chimney and
light it up.
- Watch for possible cracks through which smoke leaks out and seal
them.
Page 13
- 33 -
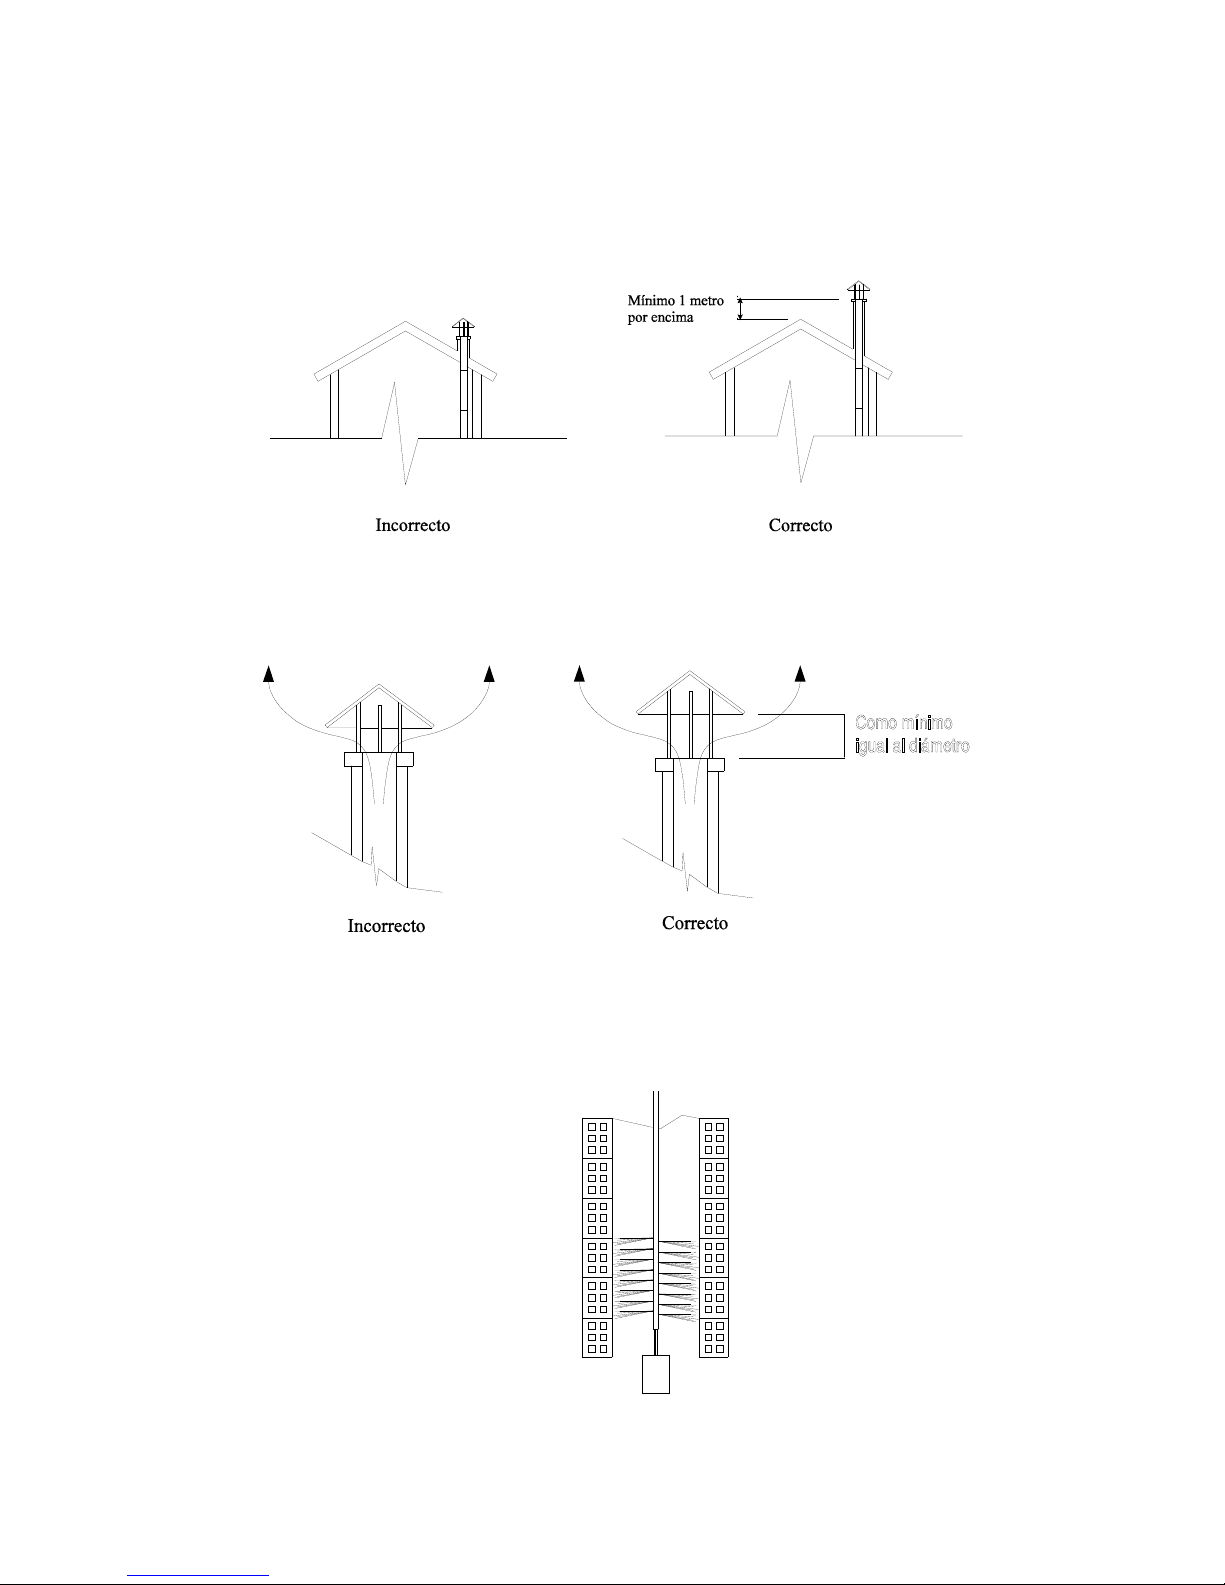
g) It is very important that the chimney should be one metre higher
than the highest part of the house. If you need to increase the
draw, extend the length of the chimney.
.
h) Chimney covers must not affect chimney draw.
i) Clean the chimney at least once a year.
Page 14
- 34 -
The most efficient way of cleaning chimney conduits is using appropriate
chimney brushes. Chemical products are available to help postpone
classical chimney sweeping operations.
Brushes must adapt as closely as possible to the diameter of the chimney.
j) The joints between the pipes that form the chimney, in the case of
simple metal pipes, must be sealed with refractory putty.
The female coupling of the pipes must face upwards to avoid creosote from
leaking out.
k) External metal chimneys must be built with special double
insulated pipes for solid fuels.
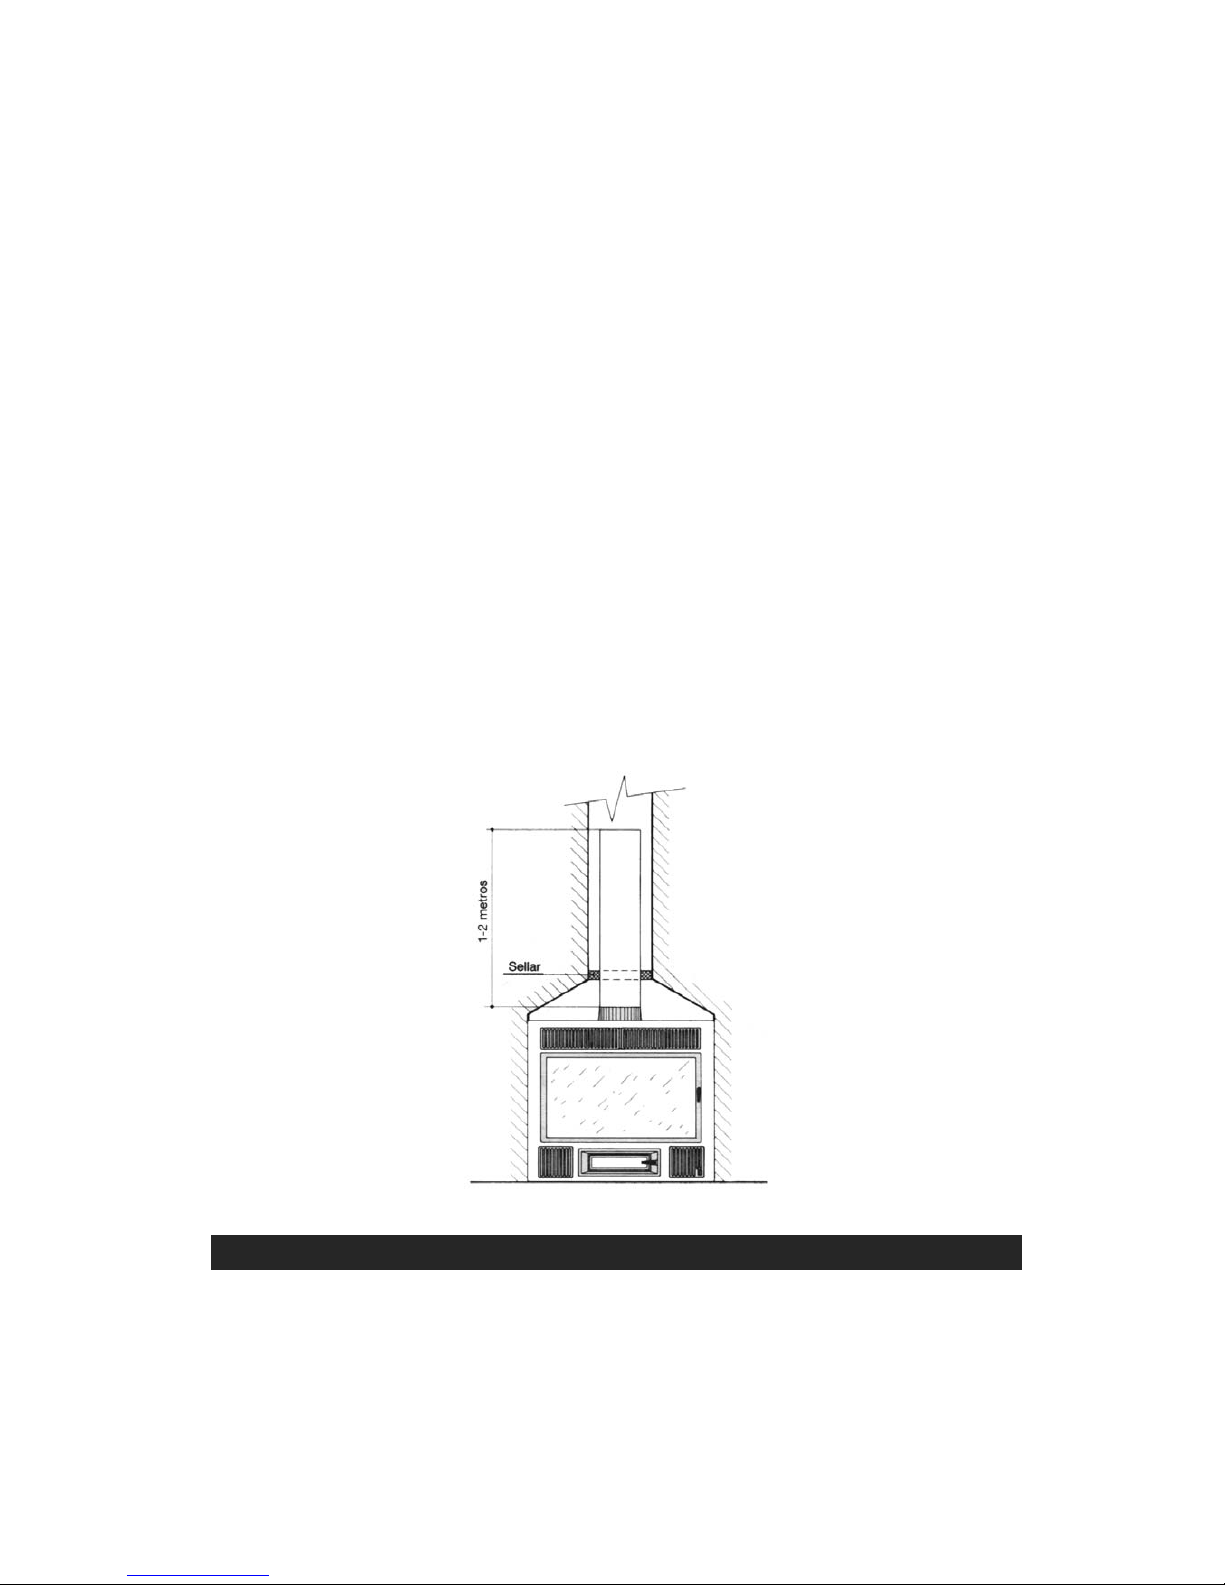
4.1.5 Assembly using existing chimneys.
It is advisable, when using existing chimneys, to place one or two metres of
metal pipe inside the chimney and seal the gap between the pipe and
chimney walls.
5.- INSTRUCTIONS OF USE
5.1 RECOMMENDATIONS
When lighting the hearth for the first time we recommend a slow fire for 3
to 4 hours. This will help stabilise the different components and avoid any
possible breakages.
Important: Do not place the
entire weight of the chimney
on the Compact as this may
cause it to break.
It is advisable to clean
the chimney conduit at
least once a year. In
order to access the
chimney for cleaning
purposes, observe the
following instructions:
1) Remove the hood.
2) Once the hood has
been removed, you
will be able to access
the chimney. Clean the
conduit using a special
Page 15
- 35 -
Once you have installed the hearth, check that all joints have been sealed in
order to prevent air seeping in, which would have a negative effect on the
draw.
Before lining the hearth with bricks or any other material, make sure it
works correctly.
When lighting the hearth for the first time, it is advisable to open the
windows in order to evacuate the fumes and smells that may be caused by
the combustion of the solvents used in the protective paint or of any other
material.
5.2 REGULATING DRAW
In order to regulate fire intensity
in the H-01, turn the chimney
butterfly valve.
If you have the optional glass
door, it is advisable to open the butterfly valve completely and regulate
intensity by sliding the air intake hatch located on the front of the door
frame.
In Models H-02/22 and
TC-1, use the ash pan
(turning the handle) to
regulate intensity.
If you wish to increase the
heating power of the
HEARTH, use a chisel
and hammer to open the holes located on the back of the grate. (This grate
is not provided with models H-02/22 and TC-1).
IMPORTANT!! The hearth must be closed at all times when lit to avoid
smoke from leaking out. Only open to introduce fuel.
6.- CLEANING
6.1ENAMEL CAST IRON FRONT PIECE (ACCESSORY)
Preferably clean when the HEARTH is cold. Use a damp cloth dipped in
soapy water. Avoid the use of strong detergents or abrasive products that
may damage the enamel.
Page 16

- 36 -
6.2PAINTED FRONT PIECE AND CAST IRON PARTS
Preferably clean when the HEARTH is cold. Use a cloth slightly soaked in
clean cooking olive oil. Then clean with a dry cloth.
6.3THE GLASS ON THE DOOR (Accessory)
Hearth glass products are rather effective products. Never try to clean the
glass while the hearth is being used. We recommend using the Hergóm
glass cleaner.
6.4JOINTS AND SEALS
We recommend, at the beginning and towards the middle of the season,
performing a visual check on the state of joints (doors, glass…) and sealing,
in case any replacements or repairs were required.
Replacing: The glass parts on your HEARTH are Thermoshock, especially
manufactured for log and/or coal fired hearths. If it breaks, it must be
replaced by another glass pane of the same type. Ask your Distributor to
supply the appropriate piece, together with instructions on how to install it
and seal the joints.
7.- SAFETY
A number of possible risks are present when operating your solid fuel
HEARTH with fuel of any brand. The said risks can be minimised if the
instructions and recommendations included in this manual are followed.
Below, we shall indicate a number of recommendations and some advice
but, above all else, we recommend common sense.
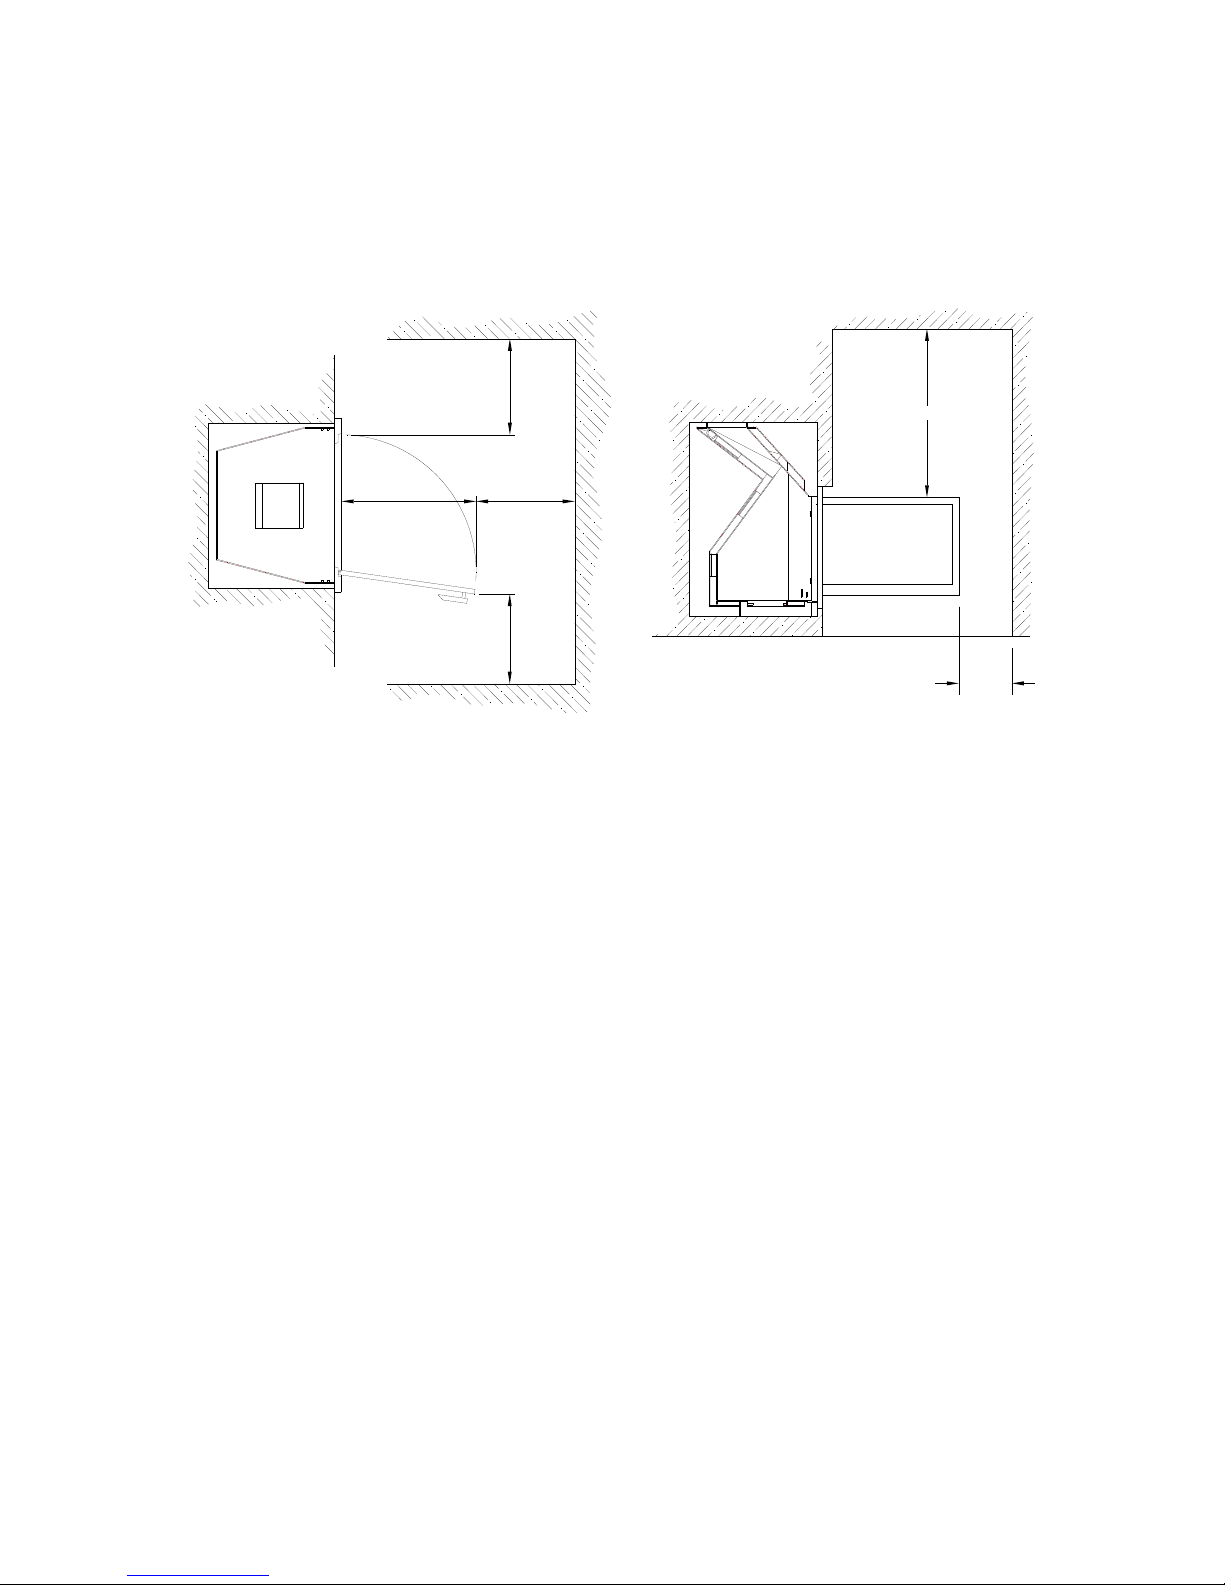
1. Keep any flammable material (furniture, curtains, clothes...) at a
minimum safety distance of 0.90 m.
2. Ash should be emptied into a metal container and immediately
removed from the house
3. Never use flammable liquids to light the hearth. Keep any type of
flammable liquid (petrol, alcohol…) away from the hearth.
4. Periodically inspect the chimney and clean whenever necessary.
Also inspect the state of joints, glass, screws….
5. Do not install near walls that are combustible or that feature any
type of lining that may be damaged or deformed by high
Page 17
- 37 -
temperatures (varnish, paint...). Ensure that the top hot air grilles
are not installed on combustible elements.
6. Protect your hands with a glove or other insulating material
because, during operation, the handle will get hot.
REPLACING THE POWER SUPPLY CABLE
If the power supply cable is damaged, it must be replaced by the
manufacturer or by the S.A.T. or by qualified personnel, in order to avoid
risks.
Industrial Hergóm, S.A. rejects any liability derived from a faulty
installation or incorrect use and reserves the right to alter its products
without prior warning.
Any liability due to manufacturing defects will be subject to the criteria and
verification of the company's experts and will be limited to the repair or
replacement of its products, in accordance with the warranty agreement
that comes with each product.
When installing a H-02/22 Heater Hearth, with a closed expansion vessel,
a number of safety requirements must be considered.
1. When installing the radiators, do not place zone thermostatic valves
on all radiators. Part of the installation (radiators) must be open so
that the hearth may be able to dissipate any overheating.
2. It is obligatory to place a safety valve, regulated at a pressure of 3
bar. The installation should be performed at a pressure of 1 bar.
30
30
30
700
900
300
Page 18

- 38 -
3. It is obligatory to place a closed expansion vessel on the installation.
The vessel’s load pressure must be the same as the filling pressure.
The volume of the expansion vessel must be proportional to the
volume of water in the installation.
4. It is advisable to place a minimum thermostat in the installation that
will cut the circulator when the water from the tubes falls below
50ºC. This will avoid condensation when the hearth is lit.
5. It is advisable that all installation components (safety valve,
circulator, expansion vessel…) should be placed in the return system.
How to act in the event of overheating or fire in the chimney.
If you should detect any overheating of the hearth caused by:
Fan failure
Circulator failure
Thermostat failure
You should shut down the device in order to avoid damaging cast iron
parts.
Follow these recommendations:
x Do not introduce any more fuel.
x Open the door slightly to let more air in; this will cause the flames to
grow and consume the fuel more quickly but will also cool the chimney
and reduce draw which will also cool the device.
In the event of fire in the chimney, follow the same steps as indicated above.
Call the emergency services as soon as possible.
Lighting up the H-02/22
To light up the hearth, first lay a base of paper on the grate at the bottom.
Then place a layer of thin branches or pieces of wood. Before lighting the
paper, it is advisable to place some paper in the cast iron deflector,
accessing through the front door, and light it; this will heat up the chimney,
forcing our any cold air inside (especially on cold winter days), favouring
the draw and avoiding any smoke from leaking into the room.
Now you may light the paper and wooden base; leave the door slightly open
for about 20 minutes. Once the flame has stabilised, close the door and the
device may be regulated by means of the valve on the ash pan.
ATTENTION!! When the hearth is working, the metal parts may reach high
temperatures. Protect your hands with fireproof gloves if you have to touch
it.
Page 19

- 39 -
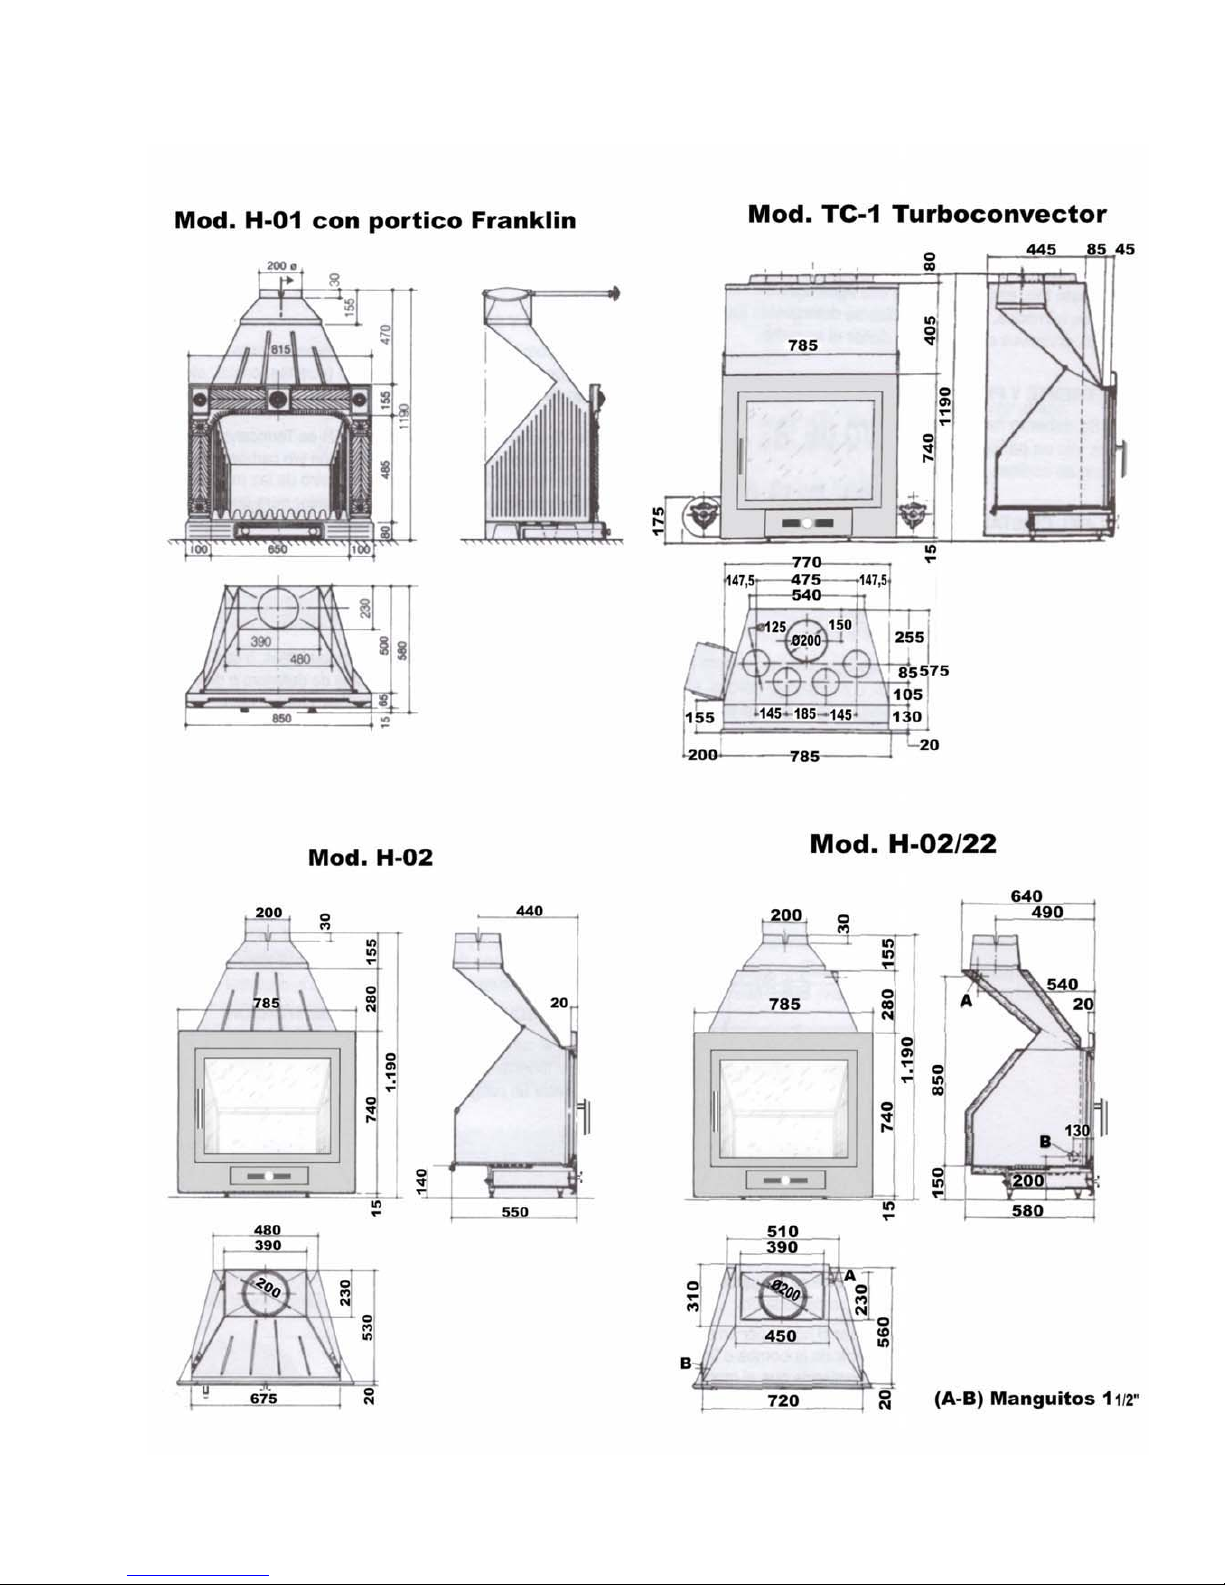
8.- SPECIFICATIONS
SPECIFICATIONS
Nominal thermal power transmitted to the atmosphere: H-01/H-02
11,5
Capable of heating mÈ
250
Dimensions of the combustion hearth
Height mm
630/260
Width mm
630/450
Length mm
430
Volume of combustion chamber dmÈ
105
Diameter of fumes outlet mm
200
Brickwork chimney mm
200X200
Recommended height of the chimney m
5 a 6
Weight without front piece H-01 Kgs
135
Weight FRANKLIN front piece Kgs
23
Weight Mod. H-02 Kgs
187
Weight Mod. H-02/22 Kgs
223
Weight Mod. TC-1 Kgs
199
HEATER HEARTHS
H-02/22 (Nominal thermal power transferred to water) Kw 18
(Nominal thermal power transferred to the environment) Kw 7
Yield %
70
Smoke flow g/s
32,8
Average temperature of smoke ºC
309
Temperature of smoke evacuation ring ºC
333
Minimum recommended draw; Pa
12,5
Average CO
2
concentration %
5,59
Acceptable maximum temperature of service to the water ºC
80
Rehearsal pressure bar 6
Acceptable maximum pressure of service bar 3
TURBO-CONVECTOR HEARTH TC-1
Heat transfer to the air Kw
18
Recommended fuel
Fuel Dimensions L x Ø Weight max. Load per hr H-02/22
Beech 55cm x 7cm (aprox.) 6 Kg.
Hola oak 55cm x 7cm (aprox.) 6 Kg.
Pine 55cm x 7cm (aprox.) 6 Kg.
Attention!! Your hearth should not be used as an incinerator and no other types of
fuel should be used (plastic, coal…). Only use recommended materials.
Fuel Dimensions L x Ø Weight max. Load per hr TC-1
Beech 55cm x 7cm (aprox.) 5,5 Kg.
Hola oak 55cm x 7cm (aprox.) 5,5 Kg.
Pine 55cm x 7cm (aprox.) 5,5 Kg.
Page 20
- 40 -
Fuel Dimensions L x Ø Weight max. Load per hr
H-01/H-02
Beech 55cm x 7cm (aprox.) 3,5 Kg.
Hola oak 55cm x 7cm (aprox.) 3,5 Kg
Pine 55cm x 7cm (aprox.) 3,5 Kg
Approved in accordance with Standard:
UNE-EN 13229:2001 “Insert appliances including open fires fired by
solid fuels. Requirements and test methods”, modified by UNE-EN
13229/A1:2003 and UN
E
-EN 13229:2002/A2:2005
Page 21
- 41 -
Page 22

- 42 -
9.- INSTRUCTIONS FOR INSTALLATIONS
To prevent the hearth from being damaged due to the overheating of the
boiler, pump failure or power supply problems, we recommend that, at
least, the first radiators in the installation be arranged so that they are
capable of operating by means of thermalsiphon systems, using pipes with a
greater diameter in those sections.
We recommend the installation of a thermal discharge valve. The outlet of
this valve must be ample, located in a visible place and protected to avoid
spillage or splashes.
It is imperative to avoid all types of siphon situations in the pipes that go to
the expansion valve.
VERY IMPORTANT
WE RECOMMEND THAT THE INSTALLATION SHOULD BE
INSTALLED BY A PROFESSIONAL.
If, by any mistake, the Hearth is lit when the water circuit is not full, put the
fire out immediately in order not to damage the boiler. In this case, NEVER
FILL THE WATER CIRCUIT WITH WATER WHEN A FIRE IS LIT IN THE
HEARTH.
If water appears on the walls of the boiler, especially the first few times the
hearth is lit, this may be due to condensation and tends to disappear with
use.
The H-02/22 Hearth has not been designed to operate with the intermittent
combustion system; it is a constant fire system.
10.- PRODUCTS
Indústrias Hergóm, S.A.,. places a range of products for the
preservation of its hearths at your disposal:
- Anti-heat paint for cast iron and metal parts.
- Refractory putty, to improve air-tightness and sealing.
- Anti-soot, a powerful catalyst that enhances the elimination of
non-burnt by-products.
- Fire-starters, an essential product when quick, clean ignition is
required.
- Window cleaning liquid, an ideal product to eliminate carbonised
grease from heath windows, chimneys...
 Loading...