

Page 1

UMPC EC-900-H60G-IA
1/62 – User Manual
CONTENTS
Click on any title in the Contents table below to access the relevant section.
1. THE eCAFÉ™ – TAKE IT TO GO!.......................................................................................................................................................................................................2
1.1 Handling your netbook..................................................................................................................................................................................................................2
1.2 A comprehensive package............................................................................................................................................................................................................2
1.3 A closer look at your eCAFÉ™......................................................................................................................................................................................................3
2. eCAFÉTM – UNEQUALLED AND UNRIVALLED..................................................................................................................................................................................4
2.1 My eCAFÉ™...................................................................................................................... ...........................................................................................................4
2.2 Multifunction keyboard..................................................................................................................................................................................................................6
2.3 A netbook suited to large files.......................................................................................................................................................................................................7
2.4 Extensive connectivity options for countless applications..............................................................................................................................................................7
2.5 A desktop device AND a mobile device.........................................................................................................................................................................................9
2.5.1 Operating the eCAFÉ™ when connected to the mains....................................................................................................................................................9
2.5.2 Operating the eCAFÉ™ with the built-in battery..............................................................................................................................................................9
2.5.3 Installing and removing the battery................................................................................................................................................................................10
2.5.4 Optimising your use of the battery.................................................................................................................................................................................12
3. FIRST STEPS WITH MY eCAFÉ™.....................................................................................................................................................................................................13
3.1 Turning the eCAFÉ™ On/Off......................................................................................................................................................................................................13
3.2 Connecting an external display...................................................................................................................................................................................................14
3.3 Connecting a keyboard and a mouse..........................................................................................................................................................................................15
3.4 Connecting headphones and a microphone................................................................................................................................................................................15
3.5 Mastering the touchpad...............................................................................................................................................................................................................16
3.6 Accessing the help interface.......................................................................................................................................................................................................17
3.7 Welcome to the eCAFÉ™ galaxy!...............................................................................................................................................................................................17
3.7.1 All the essentials in just one click.................................................................................................................................................................................. 17
3.7.2 Extensive contents to take you further...........................................................................................................................................................................22
3.8 Adjusting the main settings.........................................................................................................................................................................................................24
3.8.1 eCAFÉ™ Connect and the WiFi feature........................................................................................................................................................................24
3.8.2 Date and time................................................................................................................................................................................................................25
3.8.3 Language...................................................................................................................................................................................................................... 25
3.8.4 Volume..........................................................................................................................................................................................................................25
3.8.5 Printers..........................................................................................................................................................................................................................25
3.9 Customising your world...............................................................................................................................................................................................................26
3.9.1 Defining user profiles.....................................................................................................................................................................................................26
3.9.2 Customising the interface's appearance........................................................................................................................................................................26
4. COMMUNICATIONS...........................................................................................................................................................................................................................27
4.1 Connecting to the Internet...........................................................................................................................................................................................................27
4.1.1 ...using the WiFi feature................................................................................................................................................................................................27
4.1.2 ...via a DSL connection or a local area network.............................................................................................................................................................30
4.2 Sending and receiving emails.....................................................................................................................................................................................................30
4.3 Chatting with friends....................................................................................................................................................................................................................35
5. GAMES...............................................................................................................................................................................................................................................38
6. MULTIMEDIA......................................................................................................................................................................................................................................39
6.1 Viewing and organising your photos............................................................................................................................................................................................40
6.2 Viewing videos............................................................................................................................................................................................................................ 41
6.3 Listening to music.......................................................................................................................................................................................................................42
6.4 Using the webcam.......................................................................................................................................................................................................................44
7. WORK.................................................................................................................................................................................................................................................45
7.1 Creating, editing, saving and more..............................................................................................................................................................................................45
7.1.1 ...A document using OpenOffice.org Writer (word processor)........................................................................................................................................46
7.1.2 ...A spreadhseet using OpenOffice.org Calc (spreadsheet program).............................................................................................................................47
7.1.3 ...A slideshow using OpenOffice.org Impress (slideshow creator).................................................................................................................................49
7.2 Managing your bank accounts.....................................................................................................................................................................................................54
7.3 Managing your schedule.............................................................................................................................................................................................................55
8. INSTALLING APPLICATIONS...........................................................................................................................................................................................................56
9. SAVING AND RESTORING DATA.....................................................................................................................................................................................................57
9.1 Creating backups on a USB key..................................................................................................................................................................................................57
9.2 Creating backups on a memory card...........................................................................................................................................................................................57
9.3 Creating backups on a CD or DVD..............................................................................................................................................................................................57
9.4 Restoring backup data from a USB key.......................................................................................................................................................................................57
9.5 Restoring backup data from a memory card................................................................................................................................................................................58
9.6 Restoring backup data from CD or DVD......................................................................................................................................................................................58
INDEX ............................................................................................................................................................................................................................................................59
WARNING.......................................................................................................................................................................................................................................................60
Always observe the following recommendations when playing video games...........................................................................................................................................60
About photosensitive epileptic seizures...................................................................................................................................................................................................60
TECHNICAL SUPPORT..................................................................................................................................................................................................................................61
WARRANTY INFORMATION..........................................................................................................................................................................................................................61
Page 2
UMPC EC-900-H60G-IA
2/62 – User Manual
1. THE eCAFÉ™ – TAKE IT TO GO!
Thank you for trusting Hercules by choosing to purchase the eCAFÉ™ netbook. The eCAFÉ™ has been designed to allow you to
communicate and create or edit documents such as text files, slideshows or even images; it also includes advanc ed multimedia features
designed to entertain you.
To make the most of your eCAFÉ™ netbook, please follow the instructions provided in this manual.
A number of operations that you can perform on your eCAFÉ™ will require you to provide a password. The default user account
password is "ec-900", and the administration account password is "root".
You can change these passwords in the Security thumbnail of the Computer Configuration application.
1.1 Handling your netbook
Please read this section with care before using the
product.
Like any electronic device, the eCAFÉ™ requires you to obs erve a n umb er of simp le safety rules; thes e are li sted bel ow. In addi tion, observ in g
some simple precautions will enable you to extend your eCAFÉ™'s life.
- In no circumstance should you attempt to open the eCAFÉ™, its adaptor or its components; doing this would expose the dev ice's internal
components to damage. Likewise, never attempt to open the device's batteries.
- Use only the adaptor provided with the product.
- Always place your eCAFÉ™ on a horizontal, stable and flat surface.
- Never exert pressure on the display. Never touch the display with any objects that are liable to damage it or scratch it.
- Always make sure that you have removed a ny objects placed on the device's k eyboard (e.g. USB key, pen or others) before clos ing your
eCAFÉ™'s display.
- To avoid any risk of fire or electric shock, always keep your eCAFÉ™ away from:
- Rain or moisture, as well as all fluids (water, chemical products and any other liquids),
- Heat sources such as radiators, cookers or other heat-emitting devices (including amplifiers),
- Direct sunlight.
- This product should be used only at temperatures ranging from 5 to 35°C.
- Never cover your eCAFÉ™ while the device is powered on.
- Always unplug your eCAFÉ™ before cleaning it. To clean it, use a soft cloth; avoid using chemical sprays.
- The eCAFÉ™ provides a WiFi wireless connection feature. Use of this f eature is liable to cause interferences with the equipme nt located on
planes or in hospitals. Always deactivate this feature before entering these premises.
- Always deactivate the WiFi feature during thunderstorms.
- Never throw the device's batteries into an open fire.
- When transporting the eCAFÉ™, always turn the device off if y ou are carrying it in a closed bag. As a general rule, make sure that your
eCAFÉ™ is placed in a well-vented environment when the device is powered on.
1.2 A comprehensive package
Compact design, an ultra-lightweight device, powerful connectivity, various accessories included. Discover the packaging contents:
- eCAFÉ™ personal computer
- Battery
- Power adaptor
- Quickstart guide
Page 3

UMPC EC-900-H60G-IA
3/62 – User Manual
1.3 A closer look at your eCAFÉ™
- 1.6 GHZ Intel® ATOM™ Processor
- 512 MB DDR2 (SO-DIMM) RAM
- 8.9" backlit LCD screen (max. resolution: 1024 x 600 native)
- Built-in 1,300,000-pixel webcam, built-in microphone
- Built-in Intel® 945GSE video card, built-in sound card
- Built-in WiFi 802.11 b/g/N card
- 1.8" 60 GB PATA/ZIF hard drive
- Rechargeable 6000 mAh (6-cell) lithium battery
- 100–240 V, 50/60 HZ mains adaptor
- 3 USB 2.0 ports (compatible with USB 1.1 devices)
- 1 10/100 MBps Ethernet port
- 1 VGA outlet
- 1 headphone input, 1 microphone input
- 80-key keyboard
- Touchpad with 2 buttons
- Multi-format memory card drive for (Secure Digital), SD HC (Secure Digital HC), MMC (MultiMedia Card)
- Weight: less than 1.2 kg with the battery
- Dimensions: 225 mm x 168 mm x 33 mm
The included operating system is specific to your eCAFÉ™. It is based on the latest Linux Mandriva operating system, and includes all the
essential applications you may require to you us e your netbook at home or "on the road". It can however be extended via the "Computer
Configuration" application.
Page 4
UMPC EC-900-H60G-IA
4/62 – User Manual
2. eCAFÉTM – UNEQUALLED AND UNRIVALLED
The eCAFÉ™ netbook features a very wide range of applications and extensive connectivity interfaces, which will enable you to instantly
connect to the world that is best suited to your use: work, communications, games or multimedia.
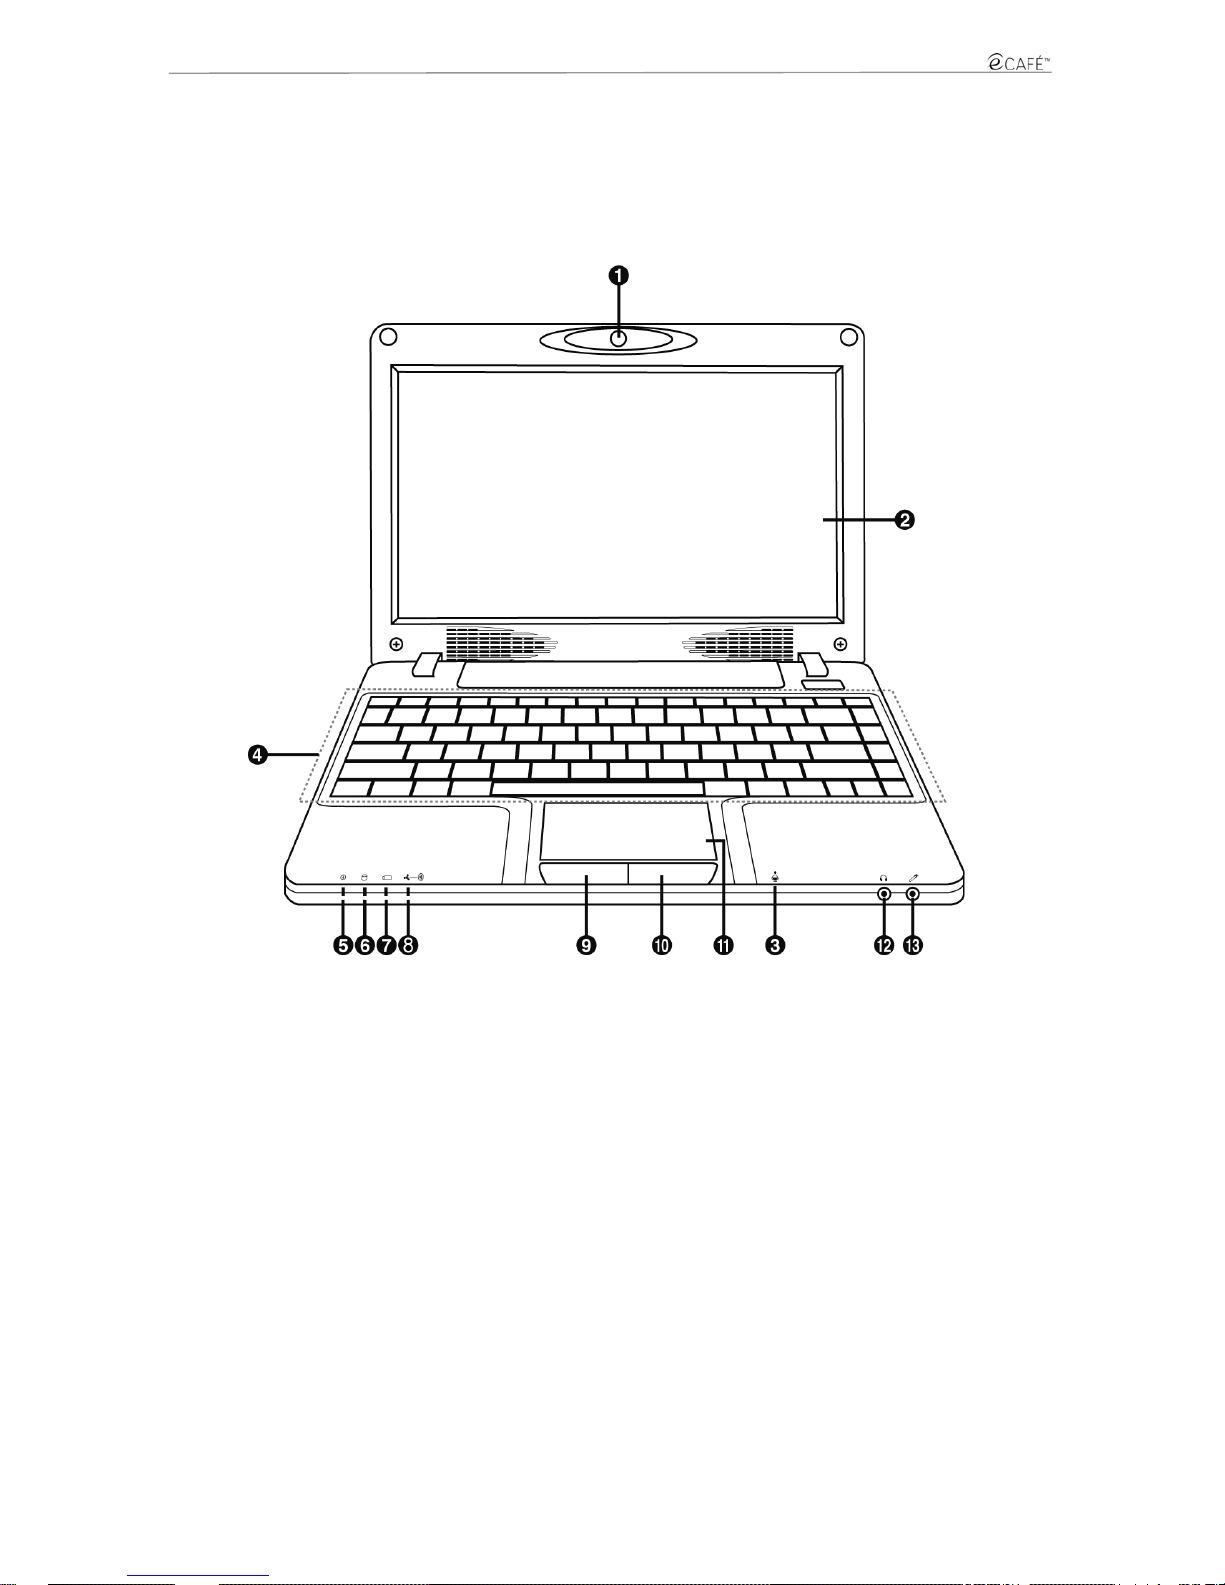
2.1 My eCAFÉ™
1. Webcam 6. Hard drive activity indicator
light
10. Right button
2. 8.9" LCD screen 7. Battery usage indicator
light
11. Touchpad
3. Microphone 8. WiFi indicator light 12. Headphone input
4. English keyboard 9. Left button 13. Microphone input
5. Mains power usage
indicator light
Page 5
UMPC EC-900-H60G-IA
5/62 – User Manual
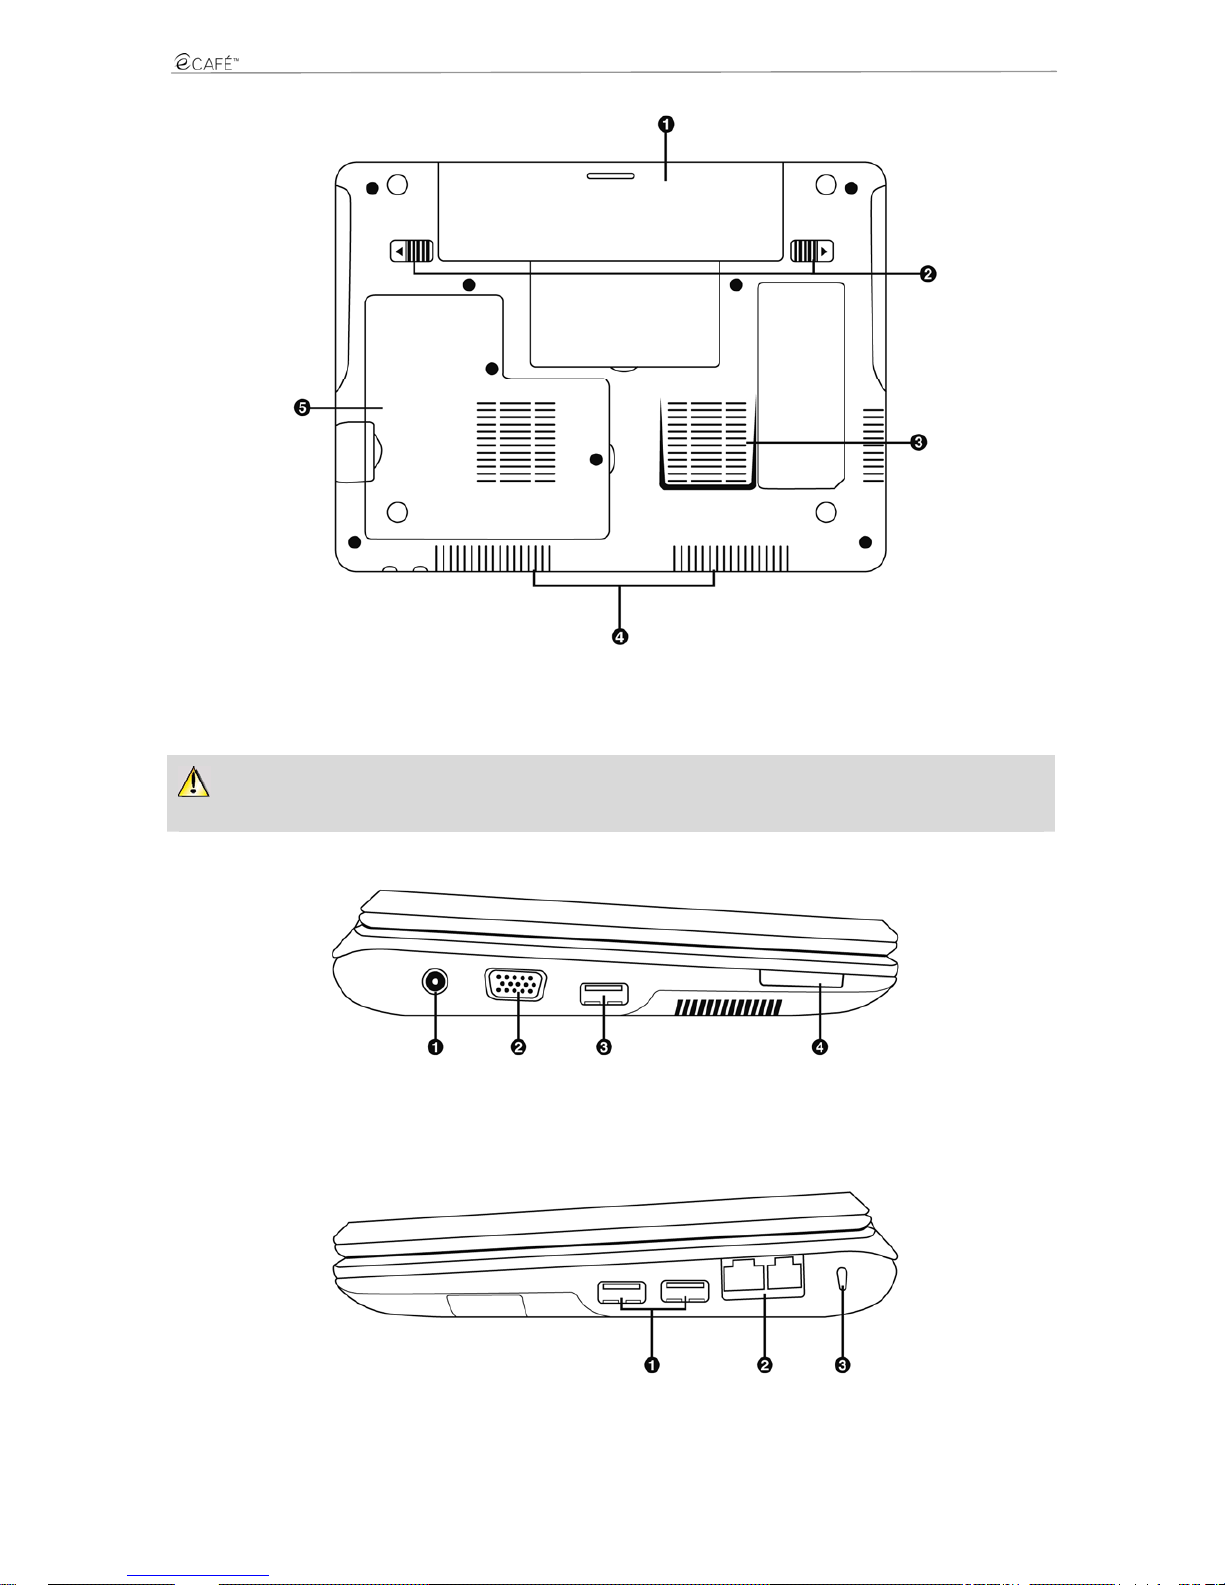
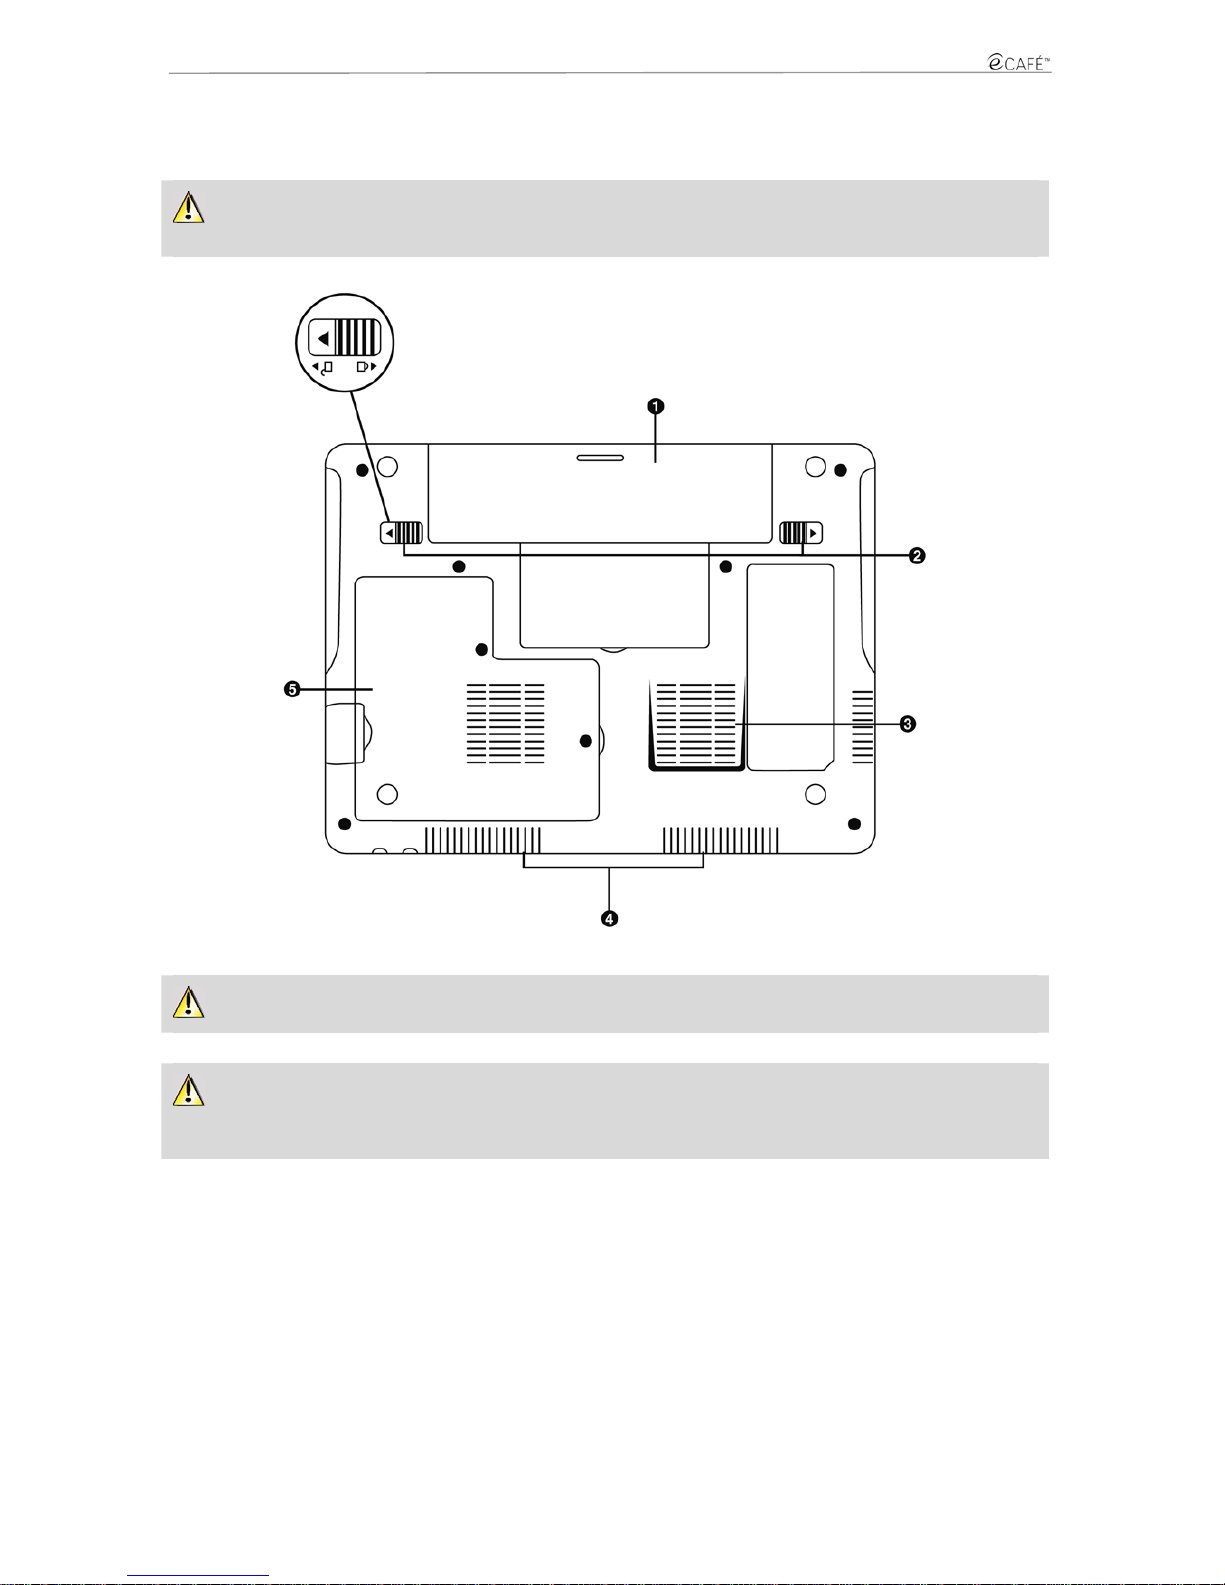
1. Removable battery 3. Air intake vent 5. DDR RAM bay
2. Battery locking latches 4. Speakers
This part of your eCAFÉ™ is liable to heat during operatio n and chargin g. This is normal. However, to improve therm al dissipati on, we
recommend you do not block the vents. Avoid placing your eCAFÉ™ on a soft surface such as a sofa or a bed, for instance.
1. Power cord socket 3. USB 2.0 port
2. VGA outlet 4. Memory card drive
1. USB 2.0 ports 2. LAN/Ethernet ports
3. Kensington® lock
Page 6
UMPC EC-900-H60G-IA
6/62 – User Manual
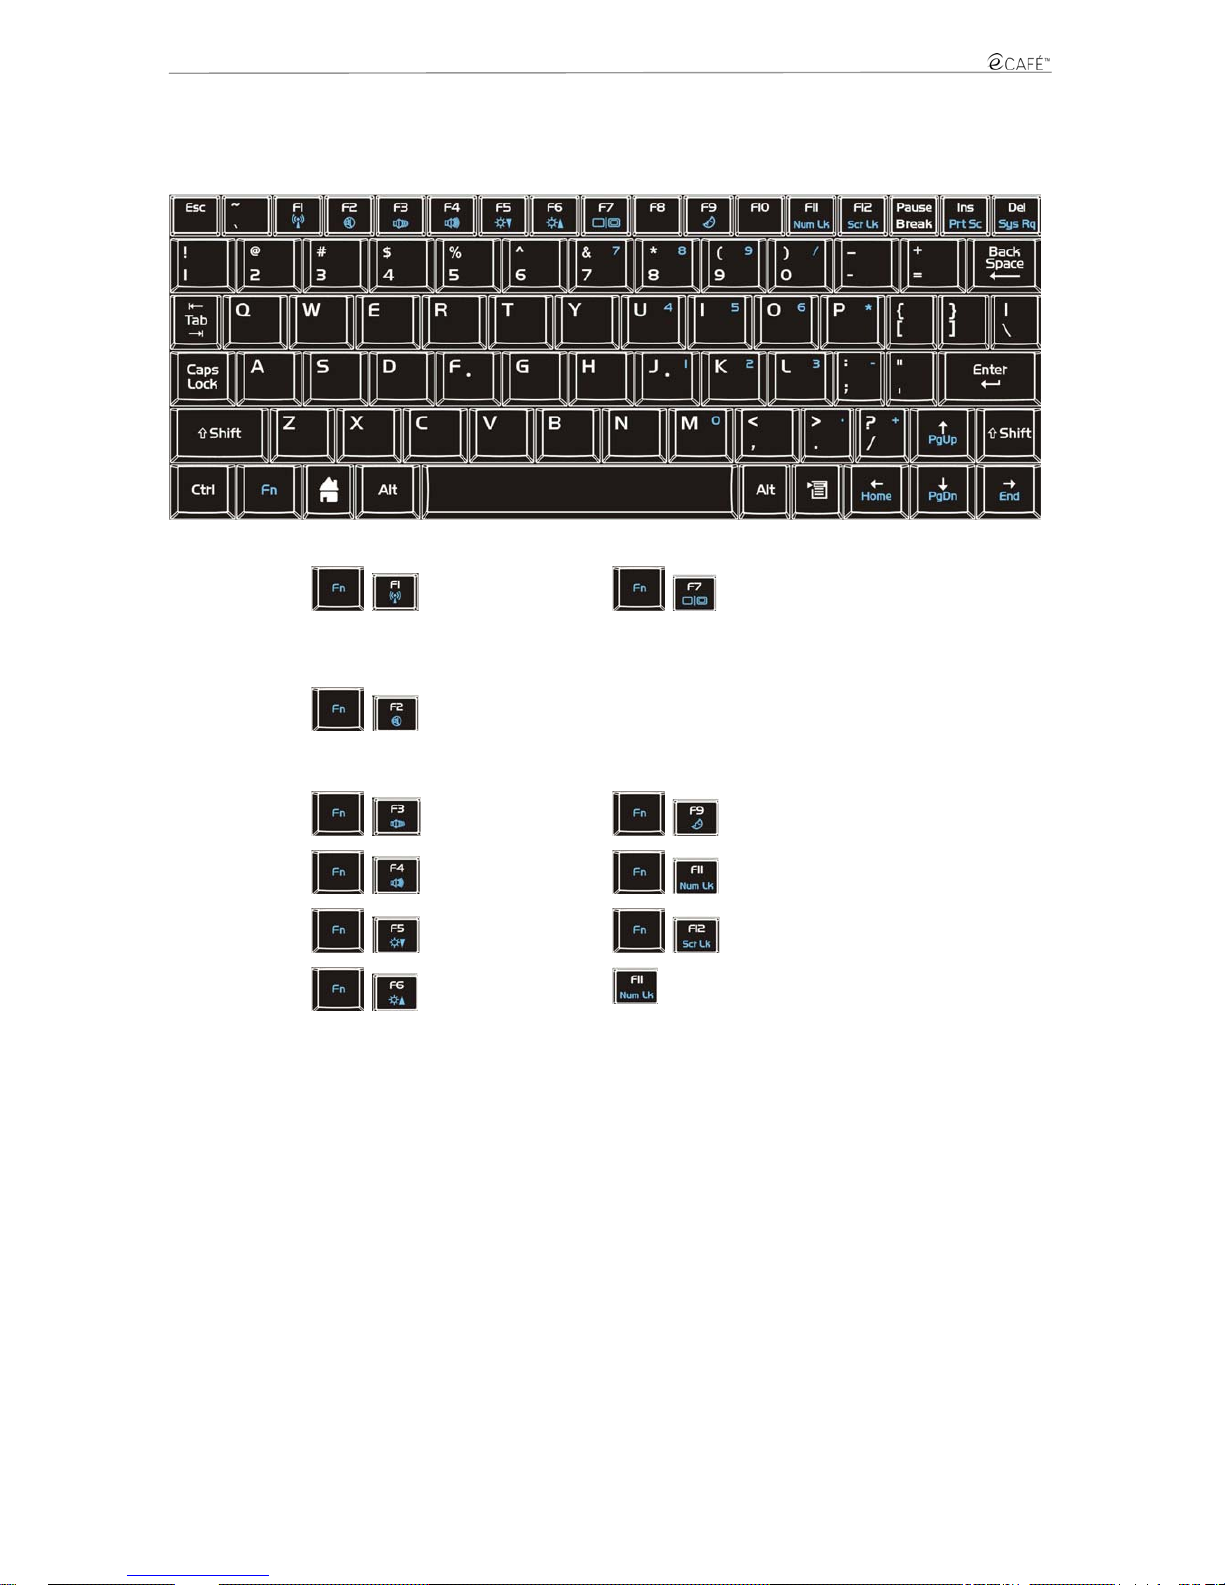
2.2 Multifunction keyboard
eCAFÉ™ features a complete keyboard that lets you control the screen and WiFi connection settings.
+
Activate/Deactivate
WiFi feature (default is
inactive)
+
Activate/Deactivate
audio output
+
Switch from the LCD
display to an external
display (For more
information regarding the
screen resolution, please
refer to the
Personalisation Wizard,
section 3.7.2. Extensive
contents to take you
further)
+
Reduce volume
+
Put computer in standby
mode
+
Increase volume
+
Lock/Unlock the numeric
keypad
+
Reduce display
brightness
+
Lock/Unlock the scroll
lock function
+
Increase display
brightness
Switch between full
screen display and
window display modes in
the Internet browser
Page 7
UMPC EC-900-H60G-IA
7/62 – User Manual
2.3 A netbook suited to large files
Equipped with a hard disk drive and a multiple-format card rea der, the eCAFÉ™ enables you to take your most precious files with you,
regardless of their size.
Hard disk drive
The eCAFÉ™ features a 60 Go (or more, according to versions) hard disk drive, user space is approximately 50GB. This storage capacity
allows you to save movies, images and other large files to your device.
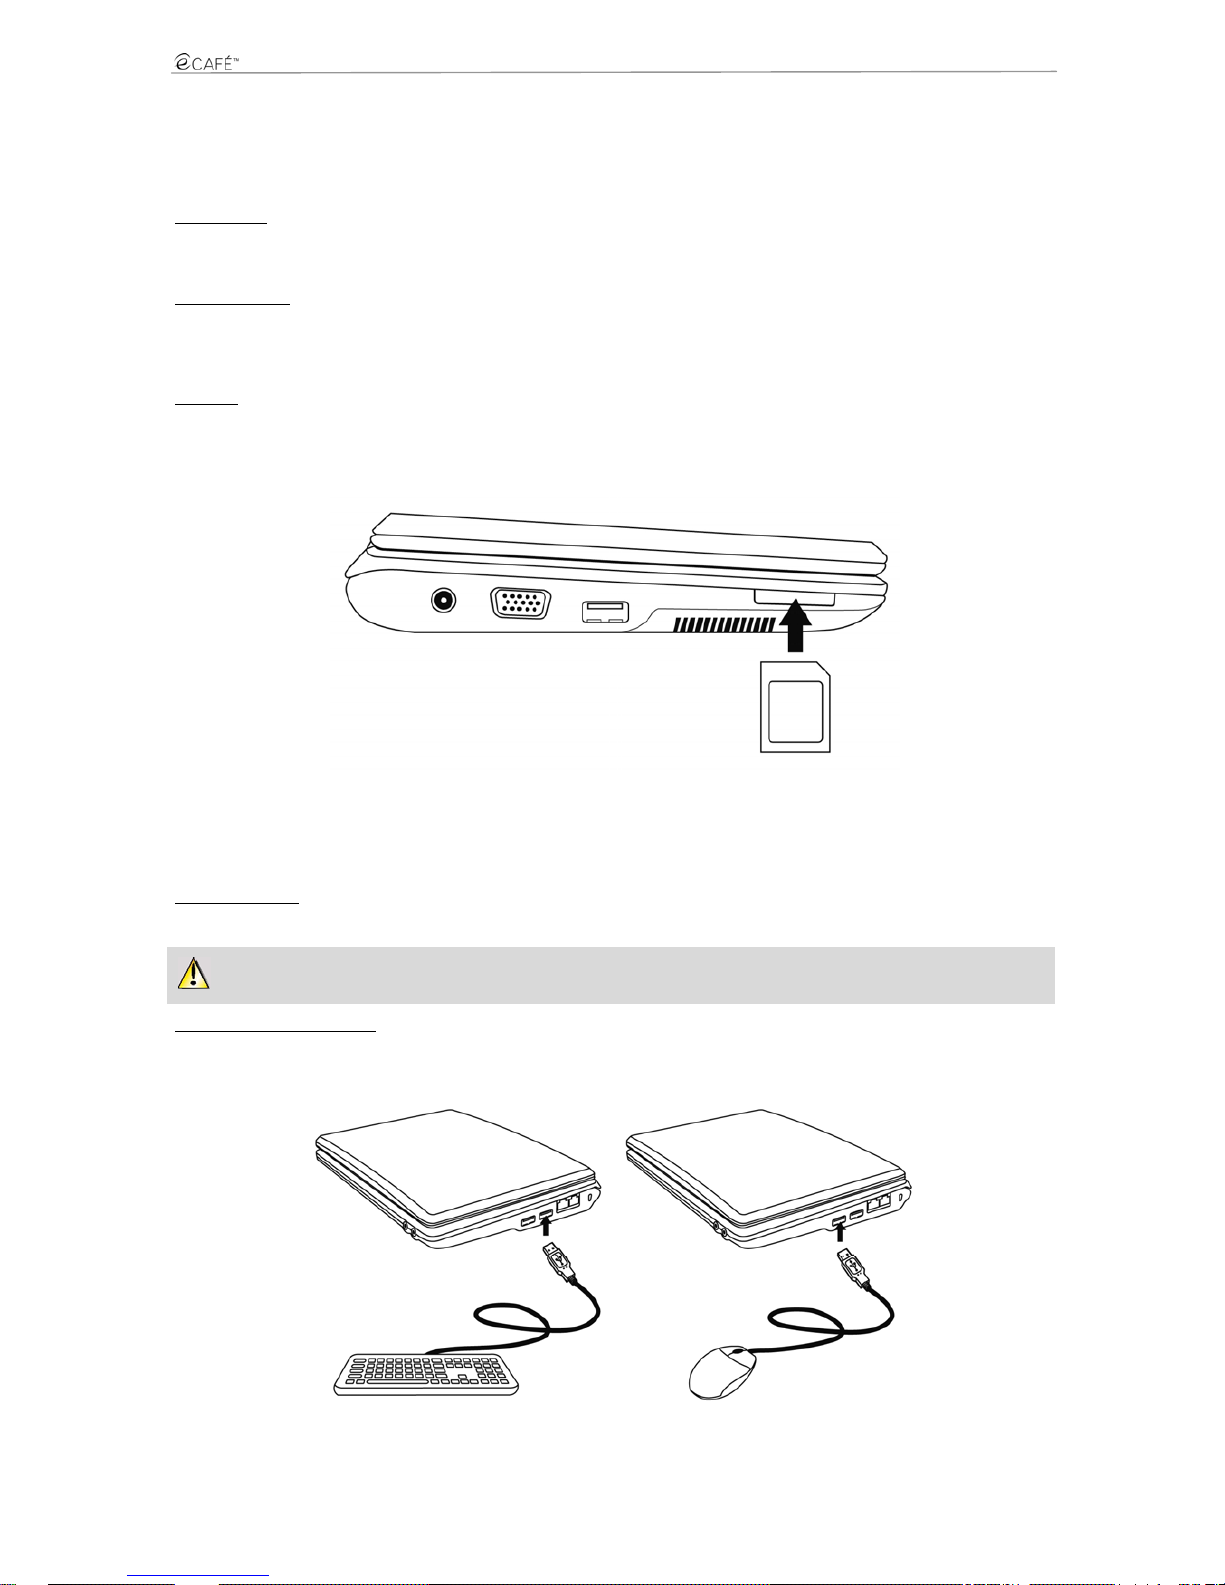
Memory card drive
The eCAFÉ™ is equipped with a multiple-forma t memory card read er supporting SD and SD HC (Secure Digital), MS (Memory Stick ®), MMC
(MultiMedia Card) formats; this device enables you to view pictures taken with your digital camera or to extend your system's storage capacity,
for instance.
USB ports
The eCAFÉ™ is also equipped with three USB ports that enable you to connect a USB storage key or other USB devices (for further
information regarding USB ports, please refer to section 2.4, "Extensive connectivity options for countless applications").
2.4 Extensive connectivity options for countless applications
The ports and connectivity interfaces bui lt into your eCAFÉ™ enable you to connect all kind of USB peripherals, s uch as a mouse or an
external hard disk drive, to your netbook.
General safety rules
Before connecting a peripheral to your netbook, please refer to the installation instructions provided with the device.
Never remove a peripheral while your eCAFÉ™ is reading or saving data; you would risk destroying the data beyond repair.
USB ports (Universal Serial Bus)
The eCAFÉ™ features three USB 2.0 ports (USB 1.1 comp ati ble), t o whi c h y ou c a n c on ne c t many peripherals such as a keyboard, a mouse, a
USB key and more. This interface is hot-swappable, allowing you to connect and remove your peripheral without having to first shut it down.
Page 8

UMPC EC-900-H60G-IA
8/62 – User Manual
If you have connected a USB external hard disk driv e to y our eCAFÉ™, ple ase click on the icon (locat ed in the lower ri ght section
of the screen) and select "Remove media" prior to disconnecting your peripheral.
The system may fail to recognise some USB peripherals if they have been connected during the computer's start-up phase. Should this
be the case, please remove the device from your netbook and connect it again.
Audio connectors
To initiate a communication or view a video, pleas e connec t a mic rop hone, he adpho nes an d/or a hea dset fea turin g a built- in mi crophone to the
relevant connector:
- The jack output connector to connect headphones or a headset
- The jack input connector to connect an MP3 player for recording purp oses, or a microphone to rec ord vocal data or chat with yo ur contacts
using a voice-over-IP application
Local Area Network (LAN)
The eCAFÉ™ is equipped with a RJ45 LAN connectivity interf ace, which enables you to connec t it to a 10/10 0 Mbps wired net work (corporate
network, router, wired modem & router or Internet box, for instance).
Page 9
UMPC EC-900-H60G-IA
9/62 – User Manual
2.5 A desktop device AND a mobile device
Both a desktop device and a mobile device at once, the eCAFÉ™ can be used everywhere thanks to its dual power supply (mains or battery).
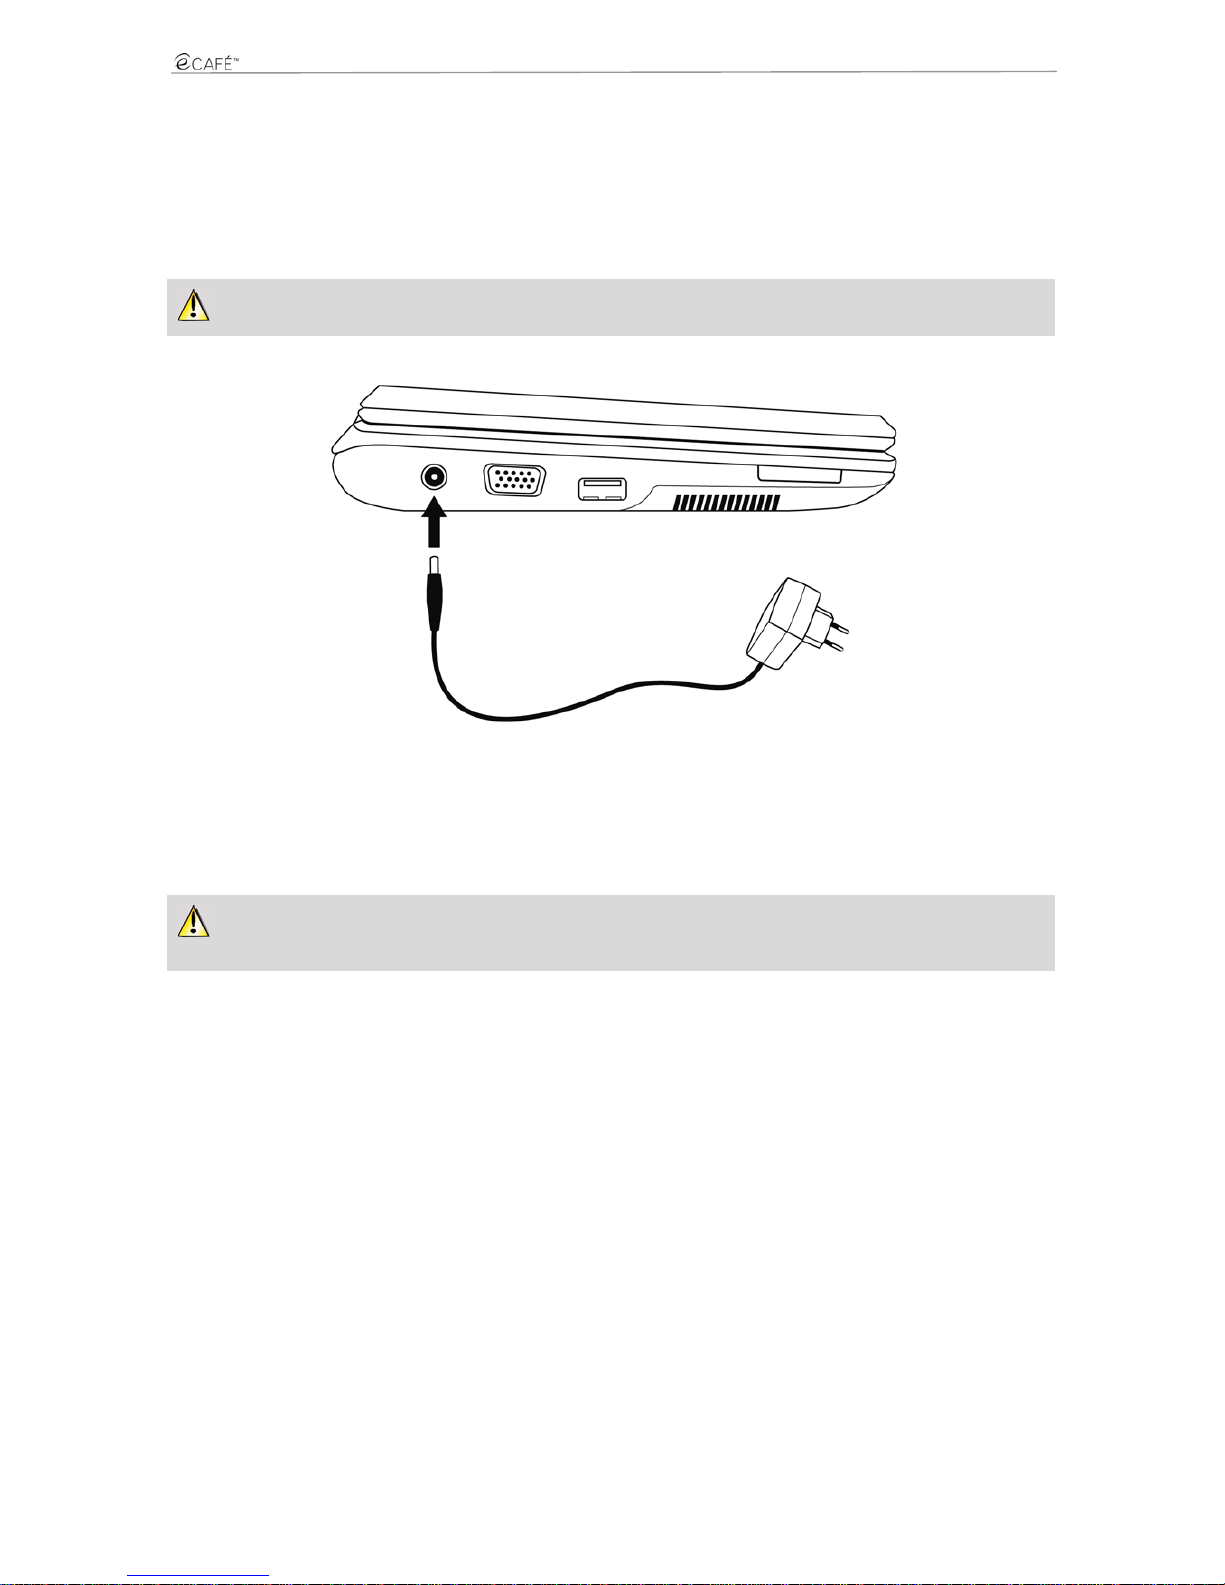
2.5.1 Operating the eCAFÉ™ when connected to the mains
Use the included power adaptor to power your eCAFÉ™. The devic e complies with the specificat ions of the electric network in th e country in
which the device was purchased.
Please make sure that the power supply plug is fully engaged into the computer's power supply connector.
When the eCAFÉ™ is connected to the mains, the device's battery starts to charge autom atically. Pleas e note tha t fully c harging the eCAFÉ™
while the device is in use requires more time than when the eCAFÉ™ is turned off.
2.5.2 Operating the eCAFÉ™ with the built-in battery
The eCAFÉ™ is designed to operate on its built-in battery. When ful ly c harge d, the b uil t-in batt ery guara nte e s ample autonomy (over 5 hours*).
You can purchase additional batteries from your sales output.
To extend your battery's lifespan, we recommend that you charge it fully when using your eCAFÉ™ for the first time. Please refer to the
battery charge status indicator for more information regarding the battery charge level.
* Battery life calculated based on a simulation in which the following activities were carried out in succession: word processi ng, Internet browsing, standby mode approximately 5
minutes per hour of use. Battery life duration may vary and depends on how eCAFÉ™ is used (types of use, network conditions).
Page 10
UMPC EC-900-H60G-IA
10/62 – User Manual
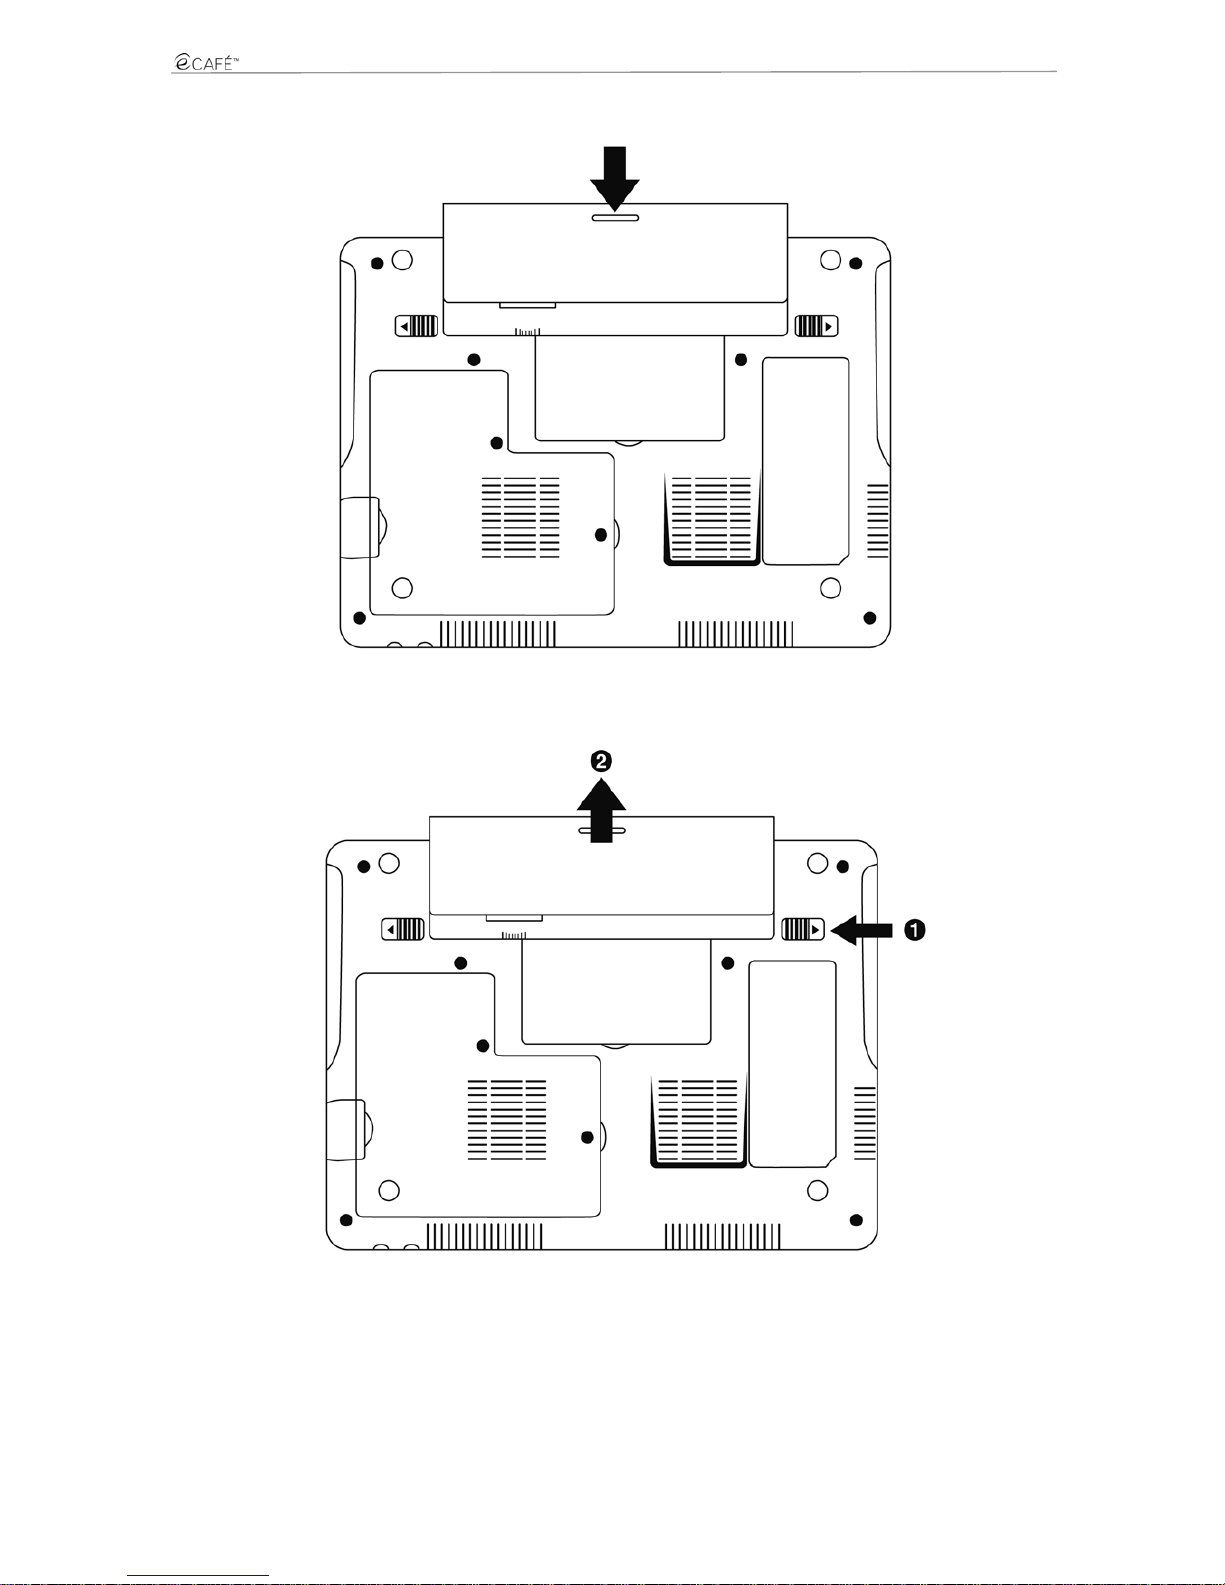
2.5.3 Installing and removing the battery
You may need to install or remove the battery, e.g. when replacing the battery.
Before installing or removing the battery, place t he locks (2) in the "Unlocked" positio n; install or remove the battery, then place the
locks in the "Locked" position again.
Always shut your eCAFÉ™ down before installing or removing the battery!
Use only Hercules batteries that are fully identical to the original batteries inc luded with your eCAFÉ™. Failure to c omply with these
instructions may cause damage to your eCAFÉ™. Similarly, there is a risk of explosion if th e battery is replaced by an inapprop riate batt ery.
Please comply with the regulations on proper battery disposal.
Page 11
UMPC EC-900-H60G-IA
11/62 – User Manual
Installing the battery
Removing the battery
Page 12

UMPC EC-900-H60G-IA
12/62 – User Manual
2.5.4 Optimising your use of the battery
This netbook battery pack uses lithium ion (Li-Ion) battery cells and can be charged at any time. If you will not be using the netbook for 30 days,
please remove the battery pack from the netbook. The battery should be at over 70 % of its capacity before you remove it. The recommended
storage temperature of a Li-based battery is 5°C~3 5°C. It should not be stored in a h ot ca r. The Li-I on bat ter y pack deteriorate s whether or no t
it is used. Typical life is 2~3 years.
To extend your netbook battery's lifespan:
- Adjust the display's luminosity to a level suited to your environment (indoors/outdoors) and to the application that you are using.
+
Reduce display
brightness
+
Increase display
brightness
- Close the display when you are not using your eCAFÉ™ for a short time. The display will automatically turn off.
- When using your eCAFÉ™ for the first time, always charge the battery entirely.
- Deactivate the WiFi function if you are not using WiFi networks.
+
Deactivate WiFi
Page 13
UMPC EC-900-H60G-IA
13/62 – User Manual
3. FIRST STEPS WITH MY eCAFÉ™
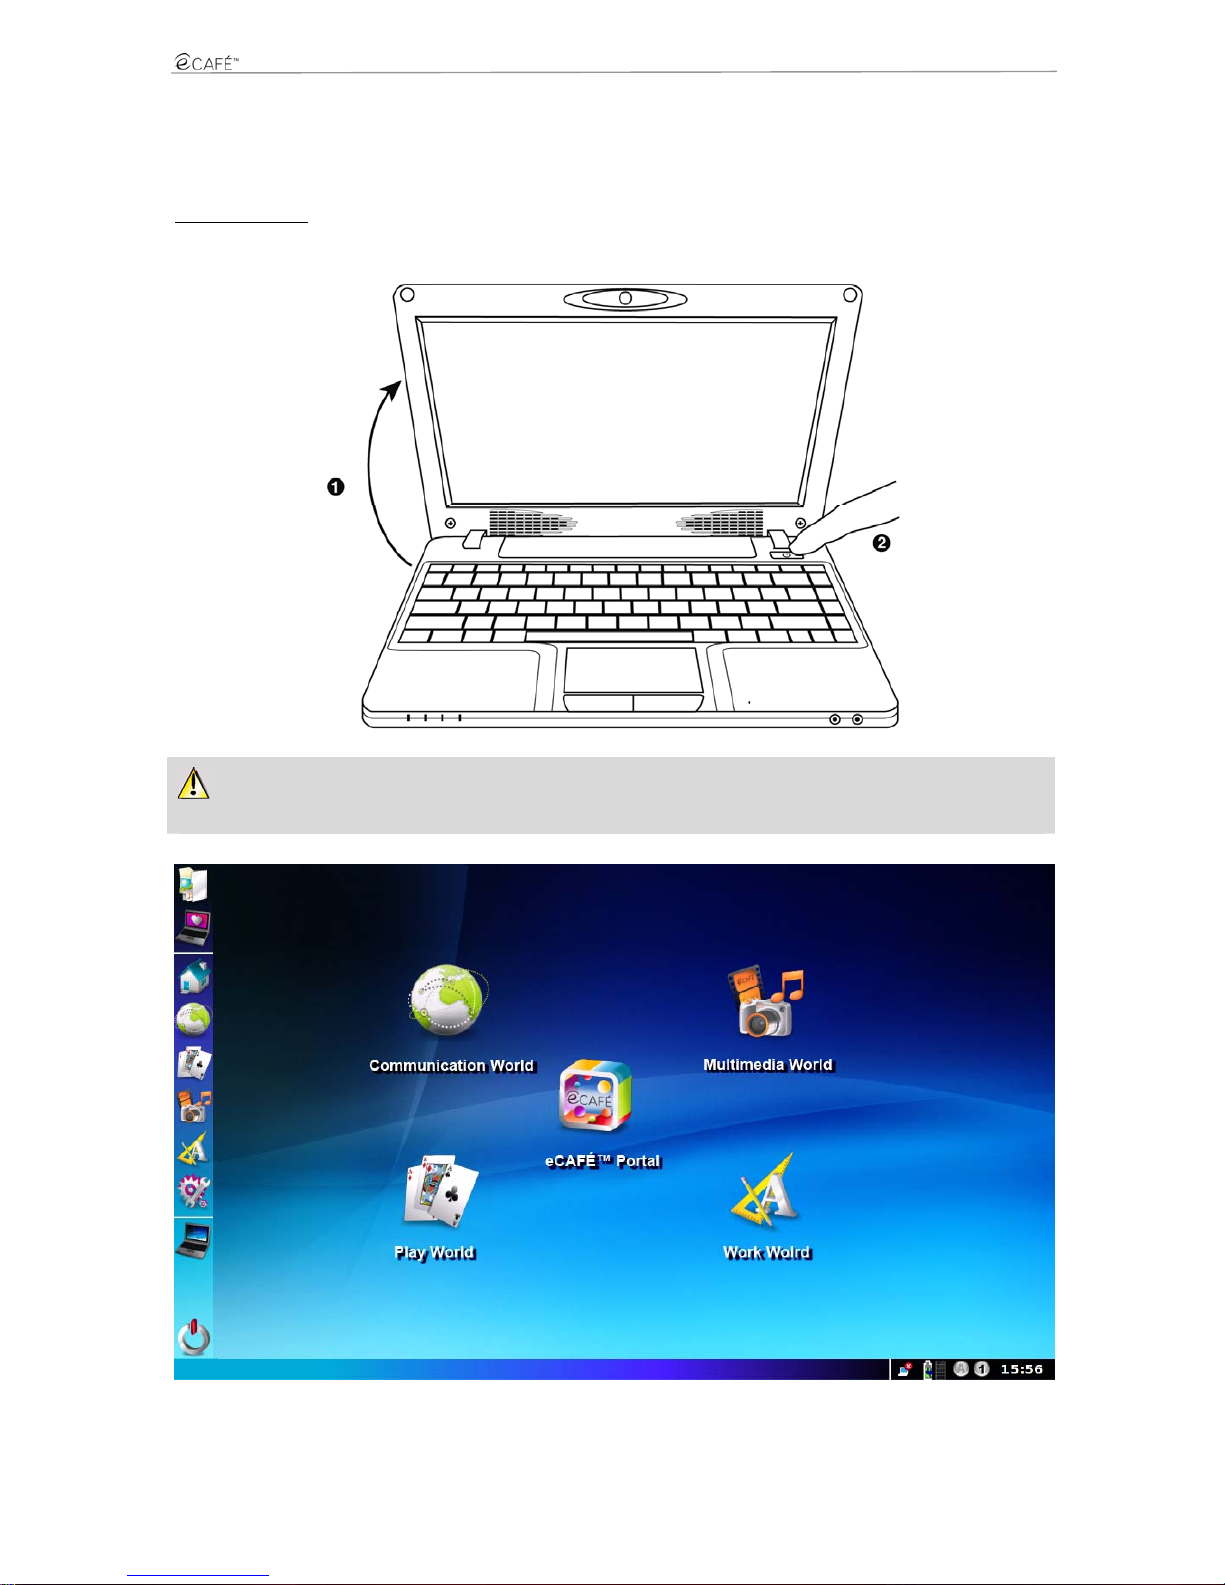
3.1 Turning the eCAFÉ™ On/Off
Turning the device on
- Open the display (1) and press the On/Off button located on the right-hand side of the device (2).
Do not exert excessive strength on the hinges when opening t he display. Do not hold your eCAFÉ™ by the display when carrying th e
device.
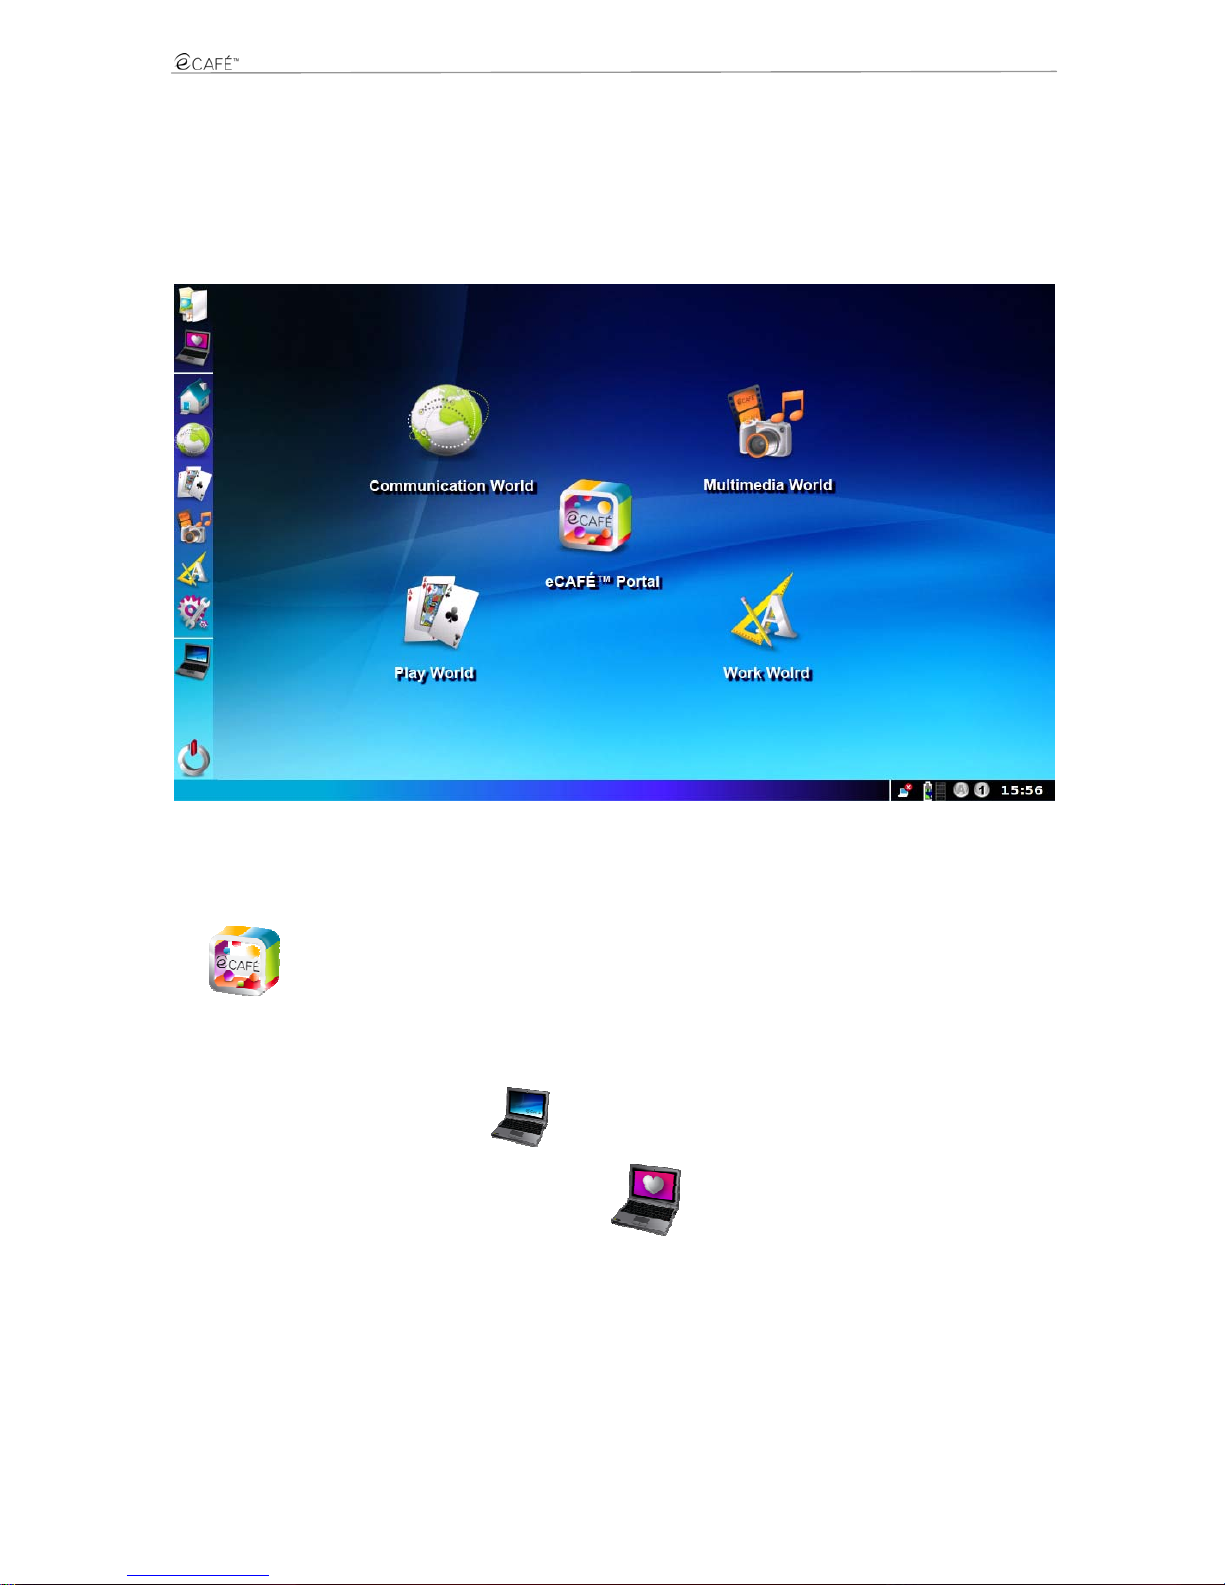
When your computer starts up, the Home world is displayed; this page is the starting point of your journey throughout the eCAFÉ™ galaxy. You
will have the opportunity to discover many other worlds, each world being dedicated to a specific use: Work, Communications, Games ,
viewing Multimedia contents and configuring or modifying your netbook's Settings.
Page 14
UMPC EC-900-H60G-IA
14/62 – User Manual
Shutting the device down
- Before shutting your eCAFÉ™ down, make sure that all your programs and applications have shut down tidily.
- Shut your eCAFÉ™ down by clicking on the
icon in the lower left-hand section of the screen, then select Shut computer down.
Forcing the computer to shut down or restart
If you have trouble starting your computer up, press the device's On/Off button and hold it down until your eCAFÉ™ shuts down.
If an unexpected configuration prevents your eCAFÉ™ from reverting to its initial state when you press the
key, press keys +
+ simultaneously. The system will then proceed to restart the various worlds; this quick restart lasts only a few seconds.
Do not use the forced shutdown or restart procedures when files are open. Irreparable loss of data may occur in this case.
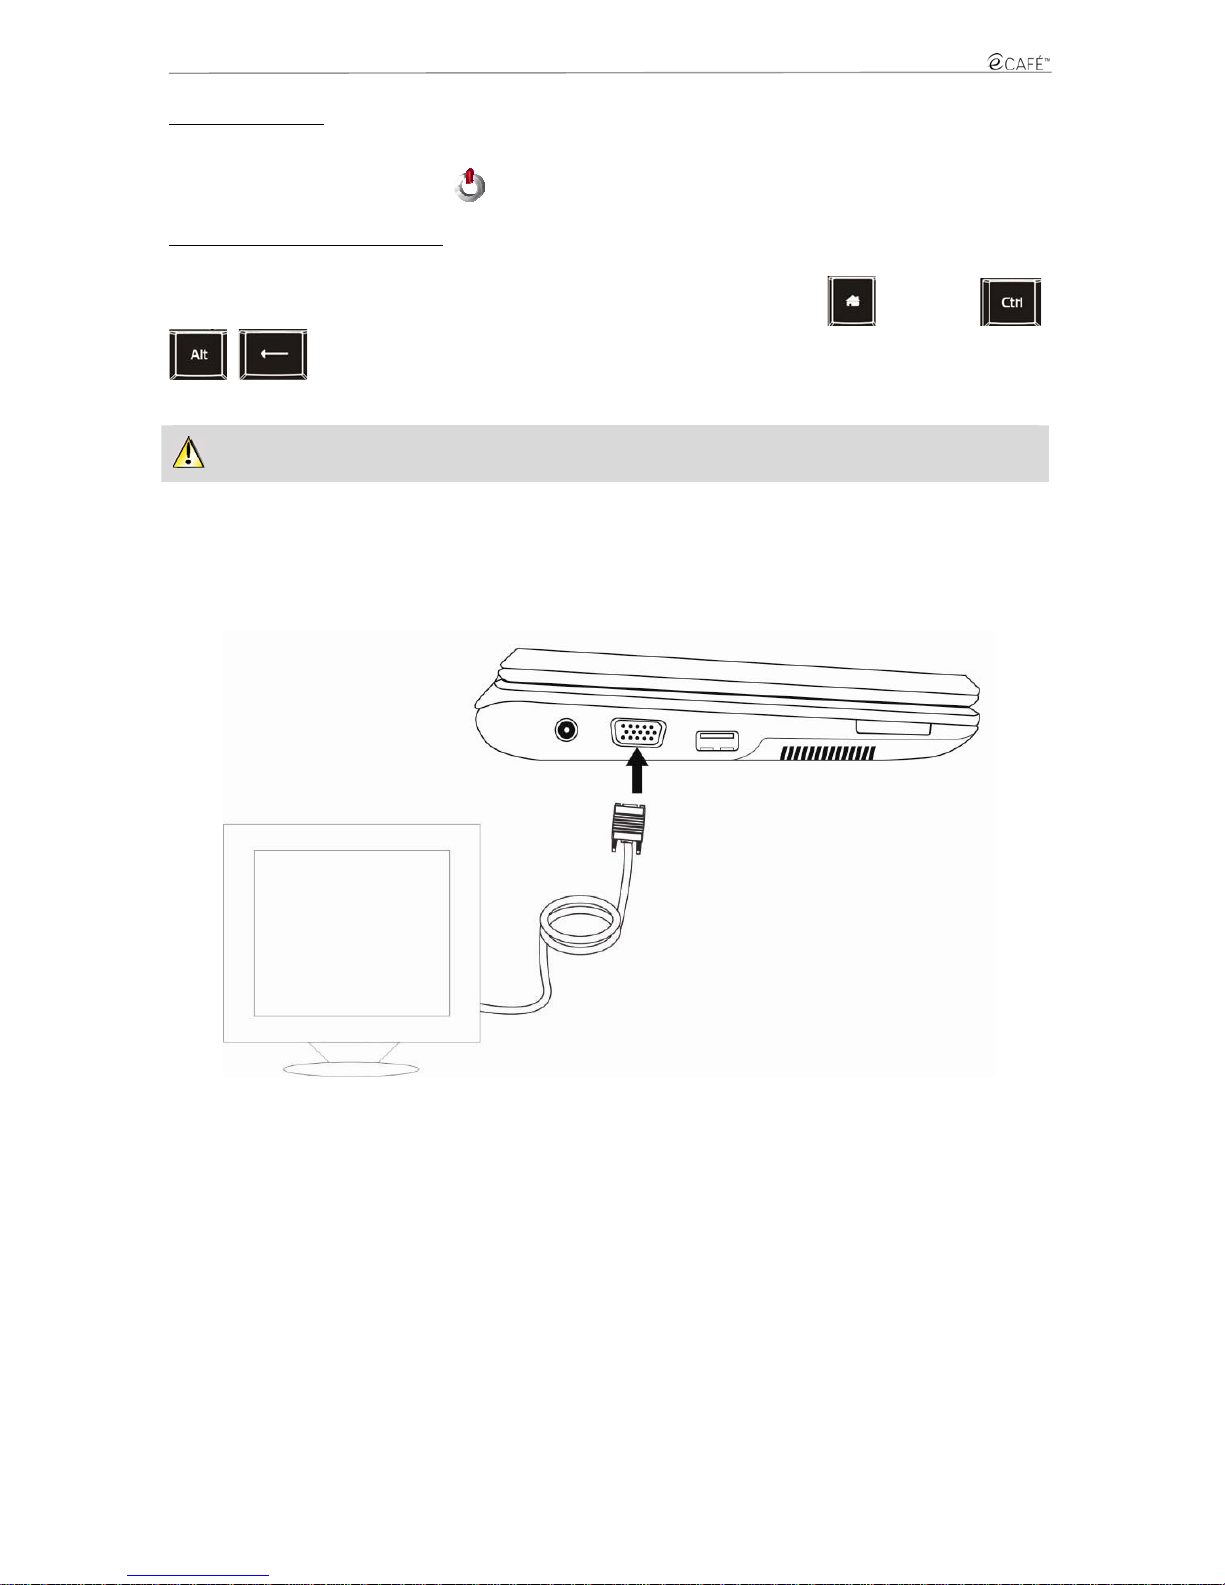
3.2 Connecting an external display
When you are at home or working at the office, you can connect your netbook to a larger screen, e.g. to surf the Intern et or work on large
spreadsheets. To do so, simply connect y our eCAFÉ™ to a VGA screen using the device's VGA connector. For more infor mation regarding
display settings, please refer to the Personalisation Wizard in section 3.7.2., "Extensive contents to take you further").
Page 15
UMPC EC-900-H60G-IA
15/62 – User Manual
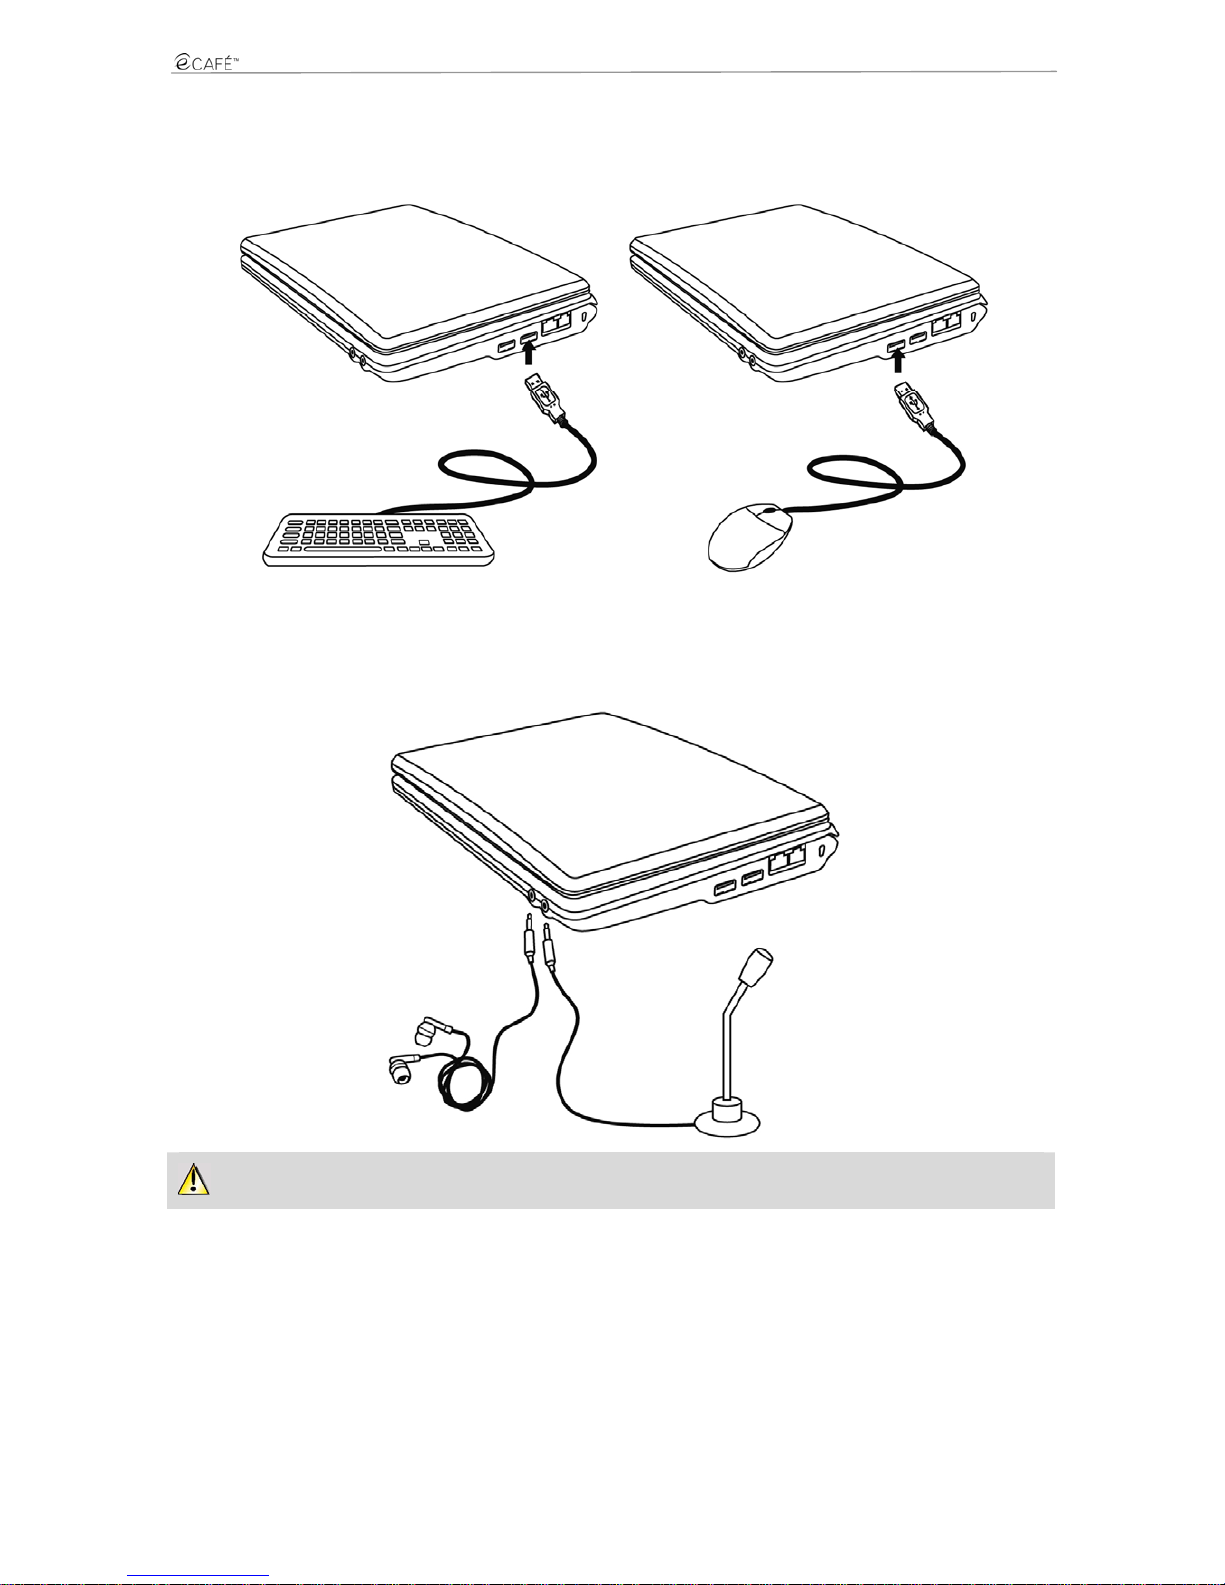
3.3 Connecting a keyboard and a mouse
You can also connect a keyboard and/or a mouse to the device's USB ports.
3.4 Connecting headphones and a microphone
To fully enjoy your music and movies or to chat with friends, you can connect headphones or a speaker kit to your netboo k (3.5-inch jack
connector).
Connecting an audio peripheral automatically deactivates the microphone or speakers eCAFÉ™'s built-in speakers.
Page 16
UMPC EC-900-H60G-IA
16/62 – User Manual
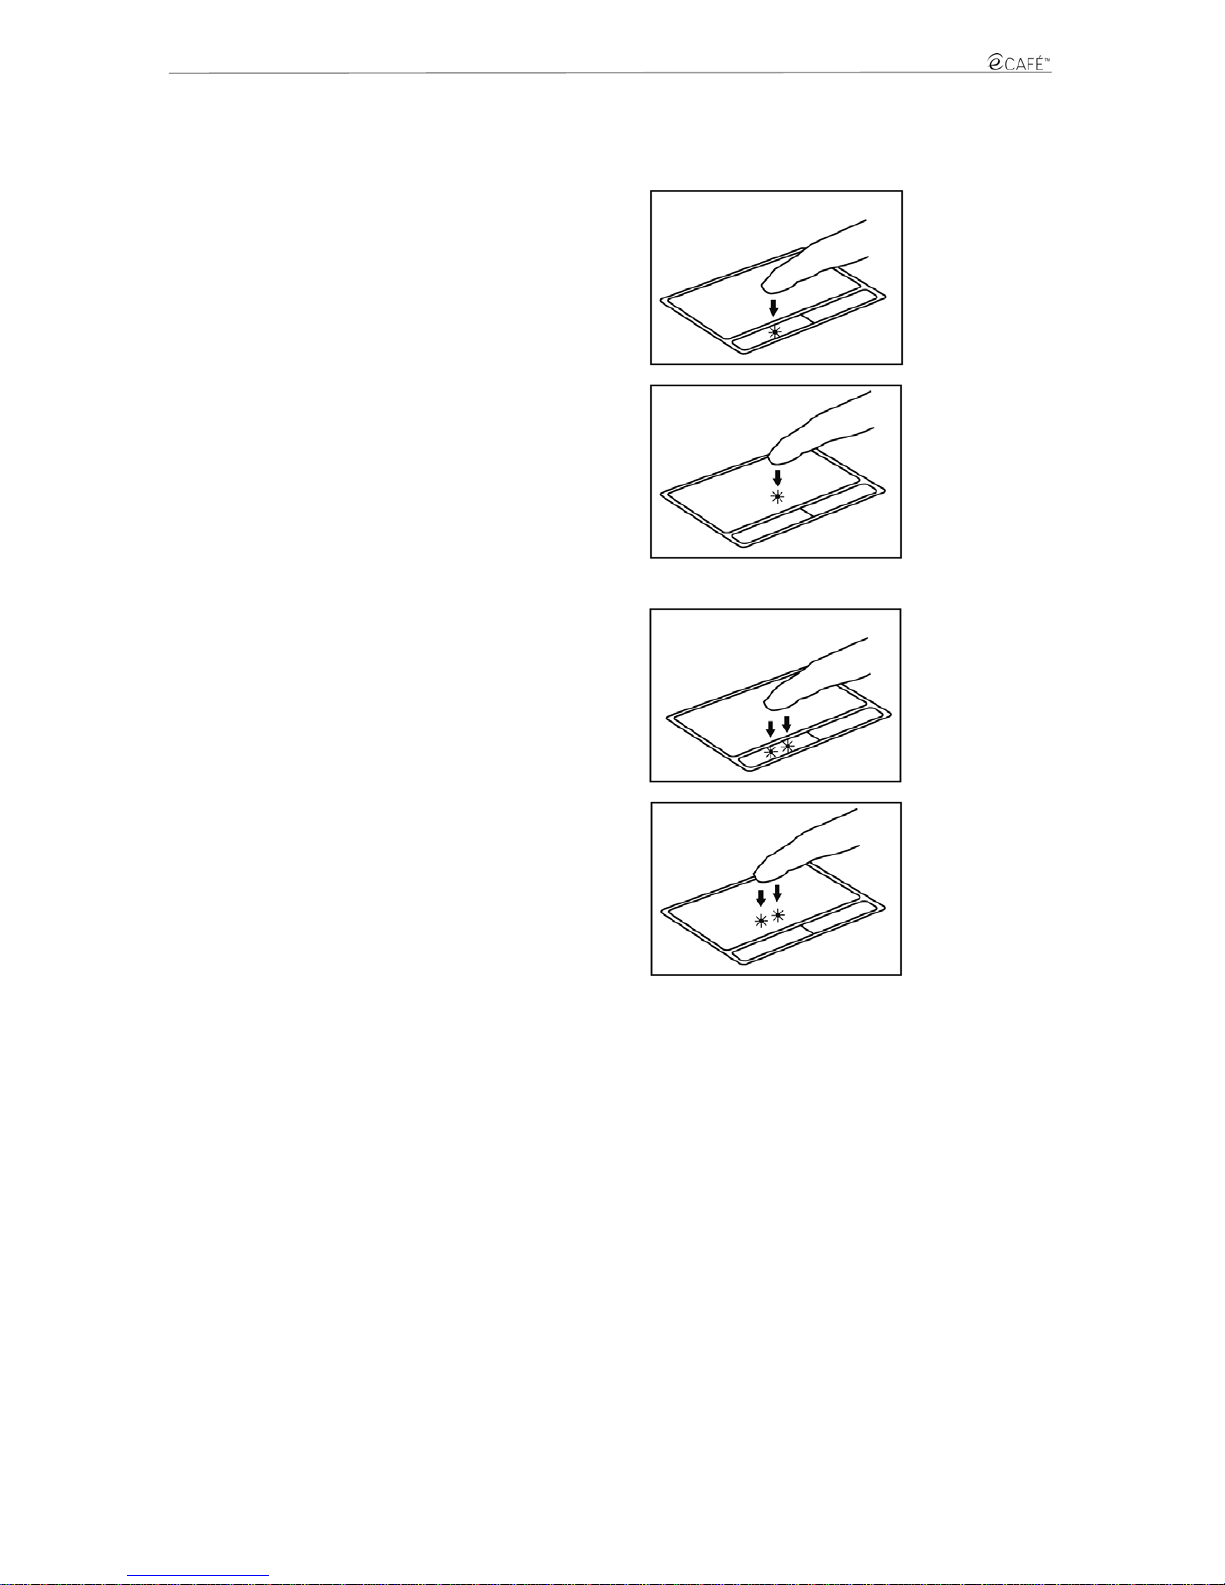
3.5 Mastering the touchpad
Some actions are confirmed by a single click (activating a button or accessing a menu, for instance):
Either by pressing the left touchpad button once
Either by briefly tapping the touchpad
Other actions are confirmed by means of a double-click (opening audio or video contents or a document, for instance):
Either by pressing the left touchpad button twice
Either by briefly tapping the touchpad twice
The right touchpad button is generally used to access the selected object's properties.
Page 17
UMPC EC-900-H60G-IA
17/62 – User Manual
3.6 Accessing the help interface
This guide is available in the "User's Manual" PDF file located on your eCAFÉ™'s hard disk drive (in the folder named "MyFiles", which
contains your personal files).
Specific help is also available within each installed application. Please refer to the relevant help section if necessary.
3.7 Welcome to the eCAFÉ™ galaxy!
3.7.1 All the essentials in just one click
When your computer starts up, the Home world is displayed; this page is the starting point of your journey throughout the eCAFÉ™ galaxy. You
will have the opportunity to discover many other worlds, each world being dedicated to a specific use: Work, Communications, Games ,
viewing Multimedia contents and configuring or modifying your netbook's Settings.
The
icon opens the eCAFÉ™ portal, which allows you to access your online worl d, view detailed inf ormation about the eCAFÉ™
solutions range, discover new applications, obtain hints and tricks, learn whether your netbook is compatible with your equipment or simply
discover new uses for your system.
On the left-hand side of the screen, an icon bar enables users to quickly access the various applications and worlds.
All applications can be accessed by clicking on the
icon.
You can access the eCAFÉ™'s graphic preferences by clicking on the
icon.
Page 18
UMPC EC-900-H60G-IA
18/62 – User Manual
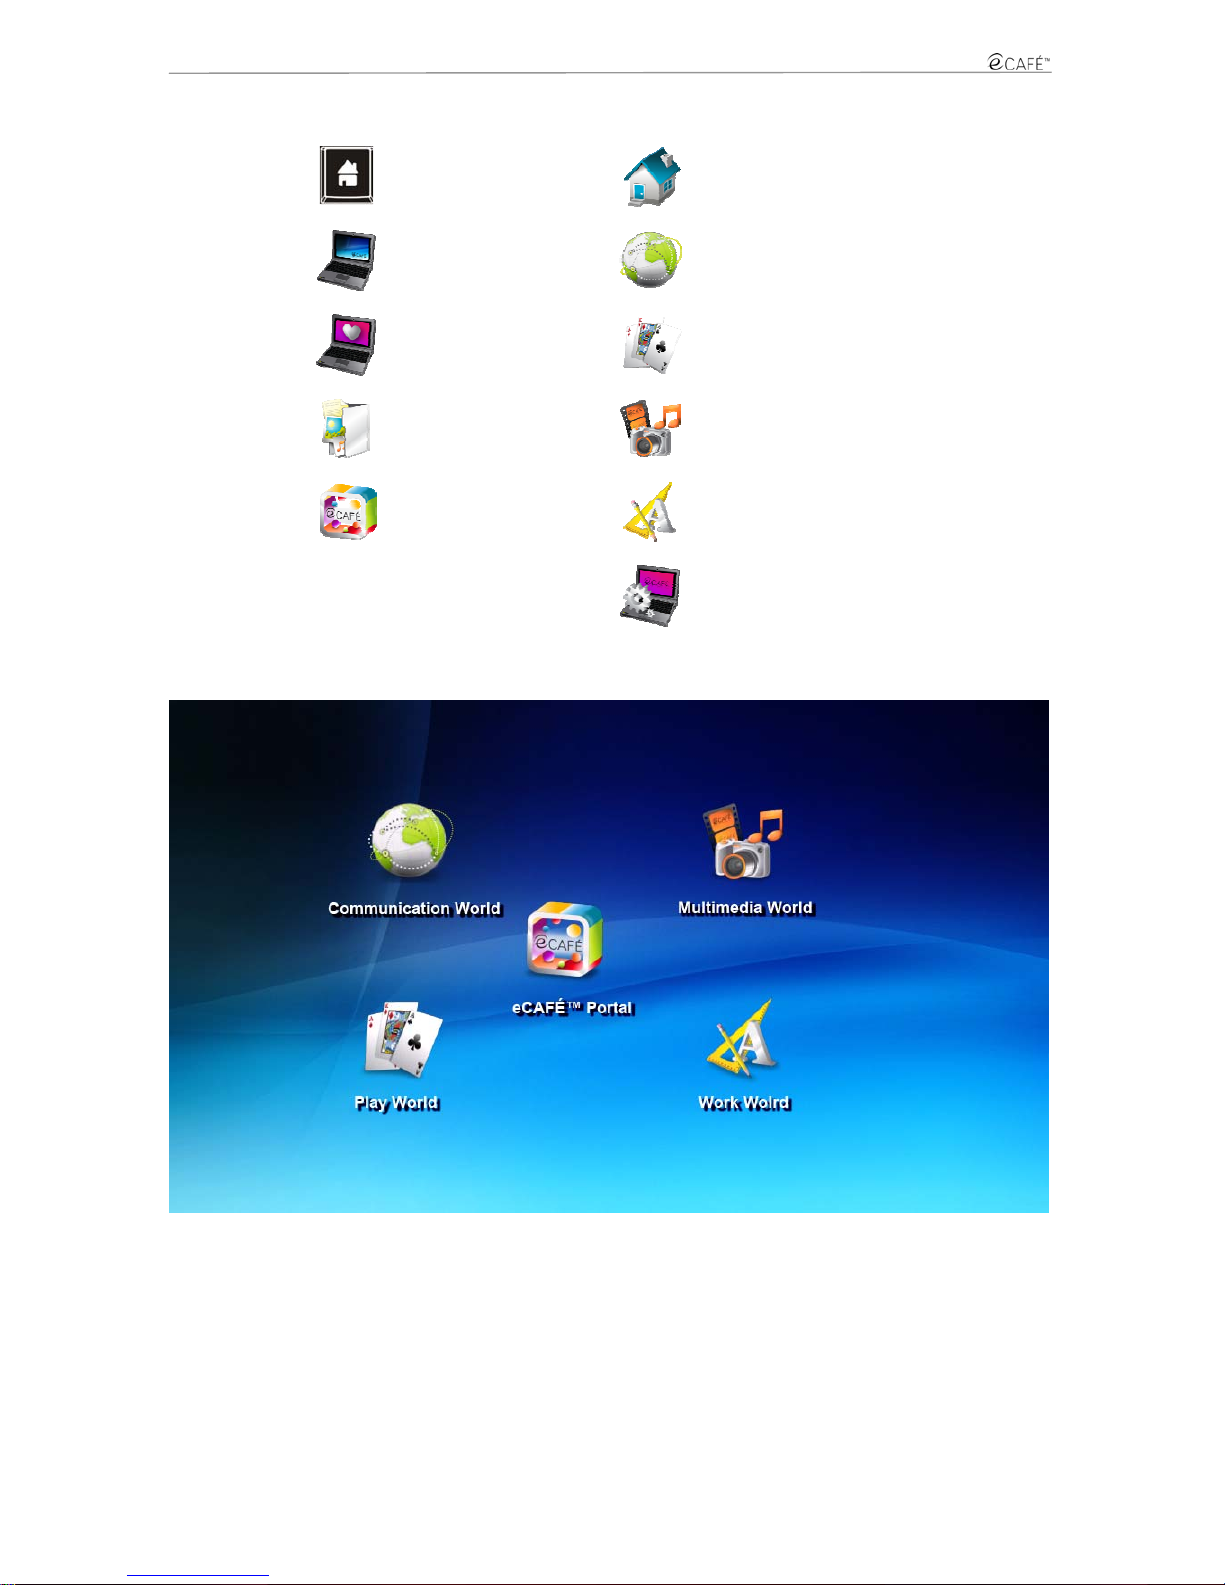
Switch to the Home world key
Access the Home world
Access all applications directly
Access the Communications
world
Access the Personalisation
Wizard to customise your
netbook's settings
Access the Games world
Open the File Browser
Access the Multimedia world
Open the eCAFÉ™ portal
Access the Work world
Access the Settings world
- The Home world
Page 19
UMPC EC-900-H60G-IA
19/62 – User Manual
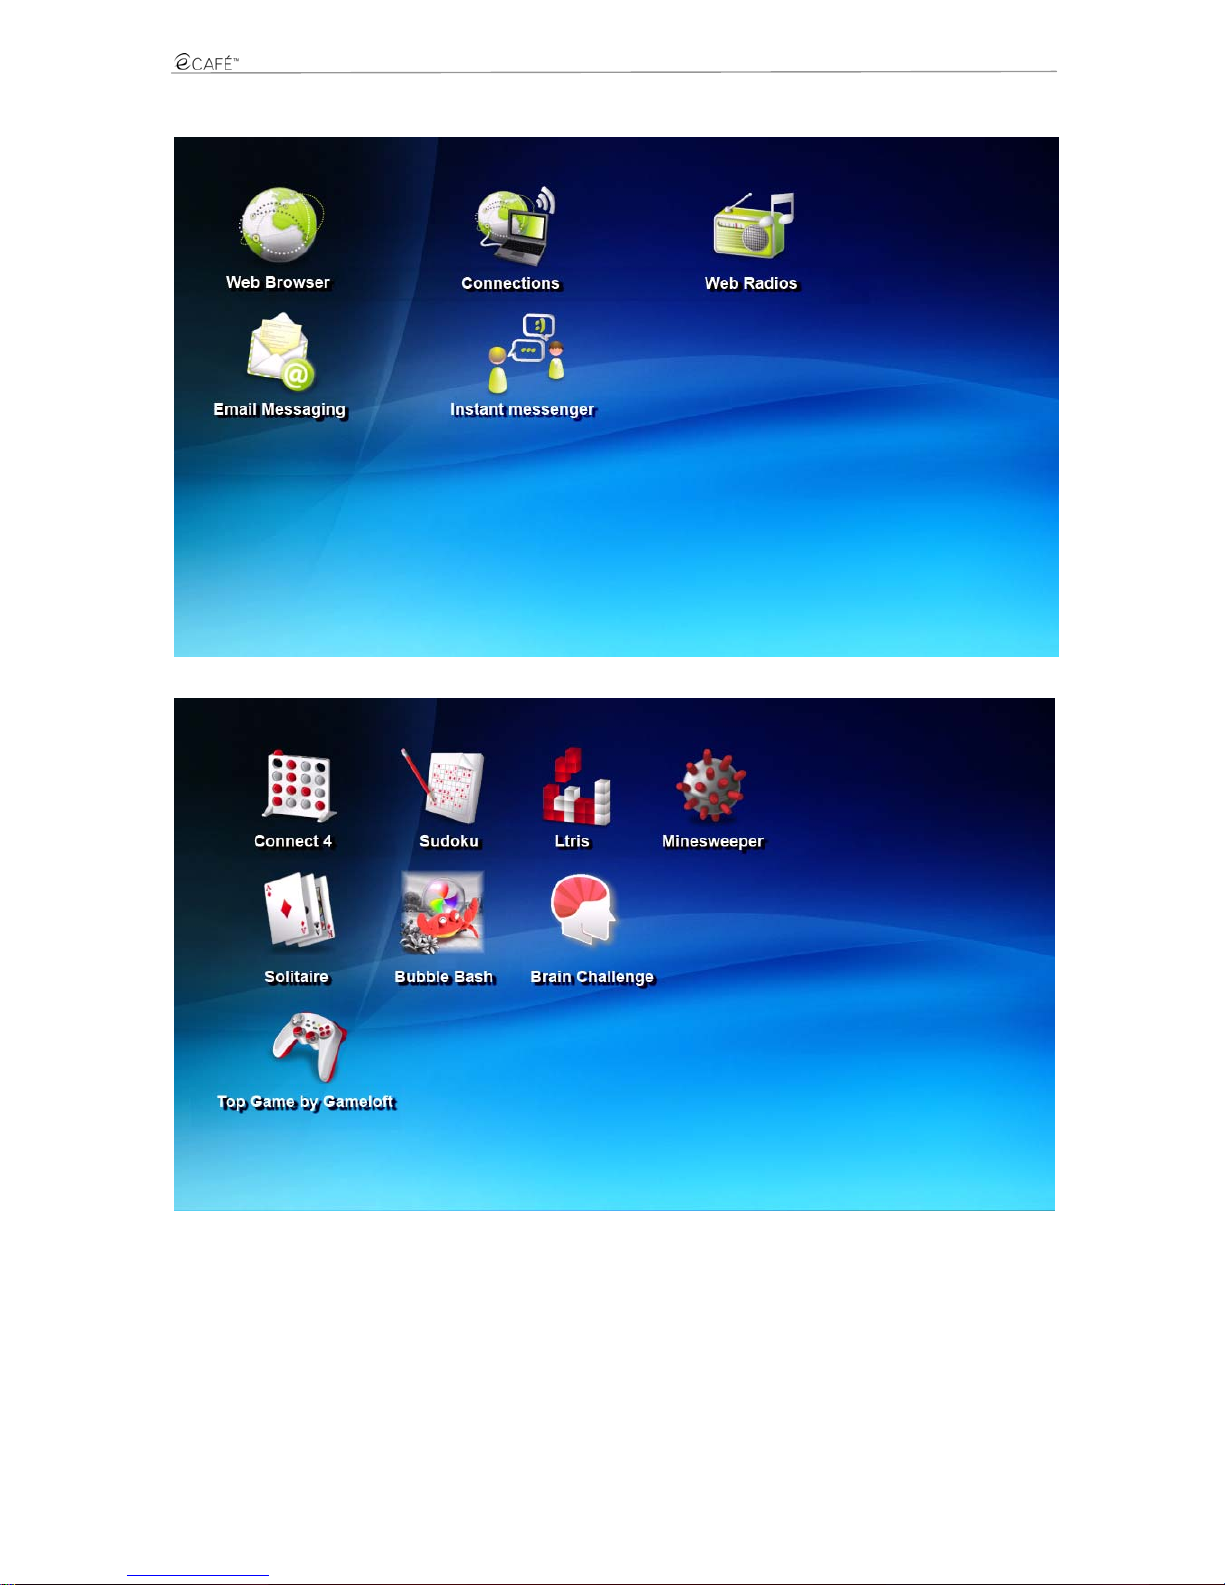
- The Communications world
- The Games world
Page 20

UMPC EC-900-H60G-IA
20/62 – User Manual
- The Multimedia world
- The Work world
Page 21

UMPC EC-900-H60G-IA
21/62 – User Manual
- The Settings world
Page 22

UMPC EC-900-H60G-IA
22/62 – User Manual
3.7.2 Extensive contents to take you further
Users wishing to explore all the eCAFÉ™'s possibilitie s will enjoy the wide ra nge of of fice and co mmunic atio n tools and ga mes ; the eCAFÉ™'s
world can even be customised using user-friendly and intuitive tools.
The Personalisation Wizard
Launch the Personalisation Wizard
Click on the
icon in the upper left section of the screen to open the Personalisation Wizard, which enables you to:
- Adjust screen resolution and select an output display on the Screens and resolutions thumbnail
- Add quick access links to your favourite applications on the Desktop thumbnail
- Customise the Home world by changing the background image on the Background thumbnail
- Configure your screensaver on the Standby thumbnail
To customise your Home world using a background image (without deformatio n or unwanted pixels), we recommend you select an
image with a resolution of 1024x600 pixels.
Direct access to all applications
Access all applications directly
This menu is accessible from the application quick lau nch bar. It enables you to access all install ed applications via an inter face featuring an
array of menus and submenus.
The File Browser
Open the File Browser
The File Browser enables you to access all the files stored on y our eCAFÉ™ and to create new files. Several file types are available: text fi les ,
image files, audio files and video files, among others.
These files can be stored in separ ate directories on your eCAFÉ™' s ha rd disk driv e or on an extern al memory unit (e.g. an ex ternal har d disk
drive, a USB key or a memory card). A folder can contain various types of files. For instan ce, if y ou create a "Birthday" directory, this folder can
contain pictures taken at the birthday party, as well as a video or the invitation card text.
Files can be created directly from the applications available on the eCAFÉ™; they can also be loaded from external peripherals.
Page 23

UMPC EC-900-H60G-IA
23/62 – User Manual
Load my files from a USB key:
- Connect your USB key to one of the two available USB ports. The eCAFÉ™ automatically detects the newly connected device and
displays the USB symbol in the status bar.
- In the File Browser that automatically appears onscreen, click on your USB key's name (it is now displayed in the left-hand pane).
- Select the files that you wish to load (hold the
key to select several consecutive files, or hold the Ctrl key to select
several non-consecutive files).
- In the Edit menu, select Copy.
- In the File Browser, select a destination location for your files.
- In the Edit menu, select Paste.
Load my files from a memory card:
- Insert the memory card in the memory card reader. The eCAFÉ™ automatically detects the newly connected device.
- In the File Browser, click on your memory card's name (which now appears in the left-hand pane).
- Select the files that you wish to load (hold the
key to select several consecutive files, or hold the Ctrl key to select
several non-consecutive files).
- In the Edit menu, select Copy.
- In the File Browser, select a destination location for your files.
- In the Edit menu, select Paste.
Load my files via a network connection:
To load files via a network connection, you must connect your eCAFÉ™ to a network using the Ethernet port or a WiFi connection. You can
then access the relevant files via the network.
Load my photos from a digital camera
- Connect a digital camera to one of the two available USB ports.
- Turn your digital camera on. The eCAFÉ™ automatically detects the newly connected d evice. The Import images from a digital
camera menu is displayed.
- Select Import photos. The Photo Manager software launches automatically.
- Select Copy. All the images store d in the digital camera are selected. They are then copied from the digital camera to your
eCAFÉ™'s hard disk drive (in the Images directory). The message "File copy complete" is displayed onscreen.
- Select OK.
Status bar and Notification area
The status bar displays the thumbnails of the currently launched a ppl icati ons, while t he notif ication area (l ocat ed in the lower right-hand section
of the screen) displays the battery's charge leve l an d s tatus , th e n etwork c onnection (WiFi or Ethernet), the status of the Caps lock and Keyp a d
lock keys, the CPU usage level and a clock.
Page 24

UMPC EC-900-H60G-IA
24/62 – User Manual
3.8 Adjusting the main settings
3.8.1 eCAFÉ™ Connect and the WiFi feature
Launch eCAFÉ™ Connect from the
Communications world
Option no. 1
Launch eCAFÉ™ Connect from the
status bar
Option no. 2
+
Activate/Deactivate the WiFi feature
eCAFÉ™ Connect is a software application developed by Herc ules, which enables you to manage your network connections (both Ethernet
and WiFi) in a user-friendly, intuitive way. It is the essential complement of the eCAFÉ™'s built-in WiFi card
To access eCAFÉ™ Connect (option no. 2):
- Right-click on the Hercules eCAFÉ™ Connect icon located in the status bar using the right touchpad button.
- Select Network connection status.
- Activate your eCAFÉ™'s WiFi feature by pressing on keys and . The computer's WiFi indicator should light up.
This feature is not activated when the system starts up, and the WiFi indicator is off.
- Click on the Connect button facing the wireless connection.
You will now access the WiFi connection manager named eCAFÉ™ Connect WiF i Station . For more informa tion regar ding th e WiFi conn ection
manager, and for more information on how t o connect to a WiFi network and store your favourite networks on your computer, please refer to
section 4.1.1., "Connecting to the Internet... using the WiFi feature".
Page 25

UMPC EC-900-H60G-IA
25/62 – User Manual
3.8.2 Date and time
To adjust the date and time, click on the clock located in the status bar, in the lower right-hand section of the screen.
The settings pane displays:
3.8.3 Language
To select the interface language, access the Settings world, and then click on Computer Configuration.
The Control Centre displays. Select the System thumbnail, and then click on the M anage your syste m's lo cal setting s icon.
Select a language in the displayed list. Click on Next, then Next again, and then click on OK to confirm your choice.
3.8.4 Volume
Click on the volume icon located in the status bar.
You can also click on the applications quick access icon
. Select Settings, then Volume control.
The settings pane displays.
3.8.5 Printers
Access the Settings world, then click on Computer Configuration.
The Control Centre displays. Select the System thumbnail, then click on the Configur e printer(s) icon. Follow the instructions displayed
onscreen.
Page 26

UMPC EC-900-H60G-IA
26/62 – User Manual
3.9 Customising your world
3.9.1 Defining user profiles
Access the Settings world, then click on Computer Configuration.
The Control Centre displays. Select the Security thumbnail, then click on the Manage the system's users icon.
3.9.2 Customising the interface's appearance
Launch the Personalisation Wizard.
The Personalisation Wizard enables you to easily add quic k access links to y our favourite applications, or t o customise the appe arance of the
Home world by changing the background imag e. This application is accessible v ia the
icon located in the upper left-hand section of
the screen.
To add quick access links, access the Desktop thumbnail and select your world (upper left-hand section of the screen). This list of
applications currently featured in this world displays onscreen. To add an application, selec t the chosen application in the right-hand lis t and
drag it towards the world.
To change the background image:
- Access the Desktop thumbnail.
- Select the Home world.
- Click on the image that appears at the bottom of the window, then click on the Browse button.
- Select the location of your image file (the recommended image size for optimum display quality is 1024x600 pixels).
- Click on OK to apply the new background image.
Page 27

UMPC EC-900-H60G-IA
27/62 – User Manual
4. COMMUNICATIONS
Access the Communications world.
4.1 Connecting to the Internet
4.1.1 ...using the WiFi feature
Connect to the Internet with unrivalled ease – and without cables – thanks to eCAFÉ™ Connect, the software applic ation developed by
Hercules, which enables you to manage your WiFi network connections in a user-friendly, intuitive way.
In this section, we will take a closer look at how to connect to the Internet using your netbook's WiFi feature – a feature that is hu gely
appreciated by mobile users who need to connect to the Internet or check their email account at all times.
- Access the Communications world and click on Connections, or click on the Hercules eCAFÉ™ Connect icon located in the status bar.
The eCAFÉ™ Connect window opens.
- Activate your eCAFÉ™'s WiFi feature by pressing on keys
and .. The computer's WiFi indicator should light up.
Page 28

UMPC EC-900-H60G-IA
28/62 – User Manual
We shall now proceed to locate the available WiFi networks and proceed to set up a wireless connection to the Internet.
- Click on the Configuration button facing the wireless connection.
The eCAFÉ™ Connect WiFi Station application proceeds to automatically locate the available networks, and displays the detected networks.
Connecting to a non-secure network (no key type appears in the Secure field):
- Select the relevant network.
- Click on the Connect to the network button.
A Connection Wizard launches, and asks you if you wish to add this network to your favourites.
- If you wish to do so, you can add the network to your favourites by checking the Yes box; you will then be requested to provide a name for the
network.
A few seconds later, a green icon displays facing the network, indicating that you are successfully connected.
If you want your computer to automatically connect to a spec ific network when th e WiFi feat ure is ac tivated, add th e network to your Fav ourites
list and select the Connect automatically option.
Page 29

UMPC EC-900-H60G-IA
29/62 – User Manual
If the connection to the chosen network fails in the Infrastructure mode, check your router's s ecurity settings (key, MAC address
filtering etc.).
Note: The Infrastructure mode is a c ommunication mode that consists in c reating a network connecti ng several c omputers equipped wit h
a WiFi feature via a wireless access point such as an Internet box, a modem/r outer or a router conn ected to a modem. The Infrastructure
mode is idea l for exchanging data or pl aying games over a network, b ut also for sharing an Internet c onnection and/or a printer betw een
several computers.
The Ad hoc mode is a mode that e nables several computers equipped with a WiFi feature to communicate directly with eac h other. This
mode is also called "Peer to Peer ".
A MAC address is a unique address created by the router's v endor; it serves to identify this device o n a network. The MAC address is
comprised of the organisation's (i.e. the vendor's) identifier, followed by the device's unique identifier.
To connect to a secure network (a key type appears in the Secure field):
- Select the relevant network.
- Click on Connect to the network.
- Enter the security key when asked by the WiFi Station application.
- If you wish to do so, you can add the network to your favourites by checking the Yes box; you will then be requested to provide a name for the
network.
If you wish to connect to a secure network, you must hav e access to the network' s security key . Before the connection ca n be m ade,
the eCAFÉ™ Connect WiFi Station application will ask you to provide this key (a message will help you identify the required type of key).
To connect to a hidden network (the Network name (SSID) field is empty):
If, among the located networks, one or more networks do not have a name (i.e. the Network name (SSID) field is empty), th is means that the
network is not broadcasting its name. To connect to this network, select it, then:
- Click on the Connect to the network button.
- Enter the network's name (SSID) in the window that displays.
- If this network is secure, enter the used security key.
- If you wish to do so, you can add the network to your favourites by checking the Yes box; you will then be requested to provide a name for the
network.
For greater browsing comfort, you can either use your Internet browser’s zoom function or press the F11 key to switch between
full screen mode and window display mode.
For more information about the connection's status:
The eCAFÉ™ Connect icon appears in the notification area. It provides updated information about the connection's status:
Internet connection: an Ethernet or WiFi
peripheral is active and physically
connected; Internet access is available.
Your Internet connection is perfectly
operational.
Local connection: an Ethernet or WiFi
peripheral is active and physically
connected; no Internet access is available.
You are connected to a modem, a
router or an Internet box or to a
corporate network; however, this
device or network is not connected
to the Internet. Please check the
Internet connection settings on your
local area network or your modem.
Connection problem: an Ethernet or
WiFi peripheral is active and physically
connected; no Internet access is available.
Please check your network
connection settings (IP address,
subnet mask etc.) on your local area
network or your modem. If
necessary, contact your router's or
modem/router's vendor.
No connection: an Ethernet or WiFi
device is active but is not connected
physically.
Connect your eCAFÉ™ to a local
area network via the WiFi
connection (please refer to the
previous section) or via the Ethernet
port.
No peripheral: no Ethernet and/or WiFi
peripheral has been activated.
Activate your peripheral: to activate
your WiFi peripheral, simultaneously
press on keys [Fn] and [F1] on your
netbook's keyboard.
Page 30

UMPC EC-900-H60G-IA
30/62 – User Manual
4.1.2 ...via a DSL connection or a local area network
To connect to the Internet via a DSL connection or a local area netw ork, simply connect your eCAFÉ™ to the DSL modem or local area
network's Ethernet port.
An information window displays in your eCAFÉ™'s status bar, enabling you to view the network connection. Then, launch your Internet
browser.
For greater browsing comfort, you can either use your Internet browser’s zoom function or press the F11 key to switch between
full screen mode and window display mode.
For more information about the connection's status:
The eCAFÉ™ Connect icon appears in the notification area. It provides updated information about the connection's status:
Internet connection: an Ethernet or WiFi
peripheral is active and physically
connected; Internet access is available.
Your Internet connection is perfectly
operational.
Local connection: an Ethernet or WiFi
peripheral is active and physically
connected; no Internet access is available.
You are connected to a modem, a
router or an Internet box or to a
corporate network; however, this
device or network is not connected
to the Internet. Please check the
Internet connection settings on your
local area network or your modem.
Connection problem: an Ethernet or
WiFi peripheral is active and physically
connected; no Internet access is available.
Please check your network
connection settings (IP address,
subnet mask etc.) on your local area
network or your modem. If
necessary, contact your router's or
modem/router's vendor.
No connection: an Ethernet or WiFi
device is active but is not connected
physically.
Connect your eCAFÉ™ to a local
area network via the WiFi
connection (please refer to the
previous section) or via the Ethernet
port.
No peripheral: no Ethernet and/or WiFi
peripheral has been activated.
Activate your peripheral: to activate
your WiFi peripheral, simultaneously
press on keys [Fn] and [F1] on your
netbook's keyboard.
4.2 Sending and receiving emails
Whether at home or "on the road", it is often useful to be a ble to ac cess your em ail ac coun t. Once conn ected to the In ternet, y ou can send and
receive emails and attachments using the Email application provided with your eCAFÉ™.
Please refer to the connection information provided b y your Internet Ser vices Provider. Yo u will need this inf ormation to confi gure your
email account correctly.
The Email Configuration Wizard launches when you first run the Email application, in order to help you setup your email account.
Page 31

UMPC EC-900-H60G-IA
31/62 – User Manual
1. In the Welcome window, click on Next.
2. Enter your n ame. This information will appe ar in the emails that you will send. Also en ter your email address (please mak e sure that it is
valid). Click on Next.
Page 32

UMPC EC-900-H60G-IA
32/62 – User Manual
3. Select the incoming server type (POP or IMAP). Enter the names of the incoming and outgoing ma il servers, which respectively deal with
receiving and sending your emails. Click on Next.
4. Enter your user name (as it appears on the printed material provided by your ISP). Click on Next.
Page 33

UMPC EC-900-H60G-IA
33/62 – User Manual
5. Review your email account's information. Click on Finish.
6. Your email account appears onscreen.
7. To check if you've received any new emails, click on Get Mail. The system will ask you to provide your email login and password. If an error
message displays, you can modify your email account's information by accessing Edit–Account settings.
Page 34

UMPC EC-900-H60G-IA
34/62 – User Manual
Email
Page 35

UMPC EC-900-H60G-IA
35/62 – User Manual
4.3 Chatting with friends
Instant messaging has become an es sential comm unicatio n tool, wh ich allows you to c hat in real t ime with y our friends or collea gues (i.e. y our
Contacts). This is why the eCAFÉ™ features Pidgin, a multi- protocol instant messaging service that is c ompatible with the most common
instant messaging applications.
The Pidgin configuration wizard launches when you first run the instant messaging application, in order to help you setup your instant
messaging account.
1. Click on Add.
2. In the Protocol drop-down list, select your instant messaging service (e.g. MSN).
Page 36

UMPC EC-900-H60G-IA
36/62 – User Manual
3. Enter your username, your password and a local nickname (i.e. the name that will appear in your friends' contacts list).
4. In the User options section, you can customise your account by adding an image. Check the Use this buddy icon for this account box an d
click on the suggested image to access the File Brower interface; then, select the image you wish to use in any of your directories.
5. Your instant messaging account's configuration procedure is almost finished. Click on Save.
6. Your instant messaging account appears onscreen.
Note: Your instant messaging account remains accessible via th e icon located in the notification area, in the lower right-hand section of the
screen, until you definitely close Pidgin.
Page 37

UMPC EC-900-H60G-IA
37/62 – User Manual
Pidgin
Page 38

UMPC EC-900-H60G-IA
38/62 – User Manual
5. GAMES
Access the Games world.
The eCAFÉ™ offers a selection of popular ga mes, as well as two games developed s pecially for your eCAF É™: Brain Challenge a nd Bubble
Bash.
Page 39

UMPC EC-900-H60G-IA
39/62 – User Manual
6. MULTIMEDIA
Access the Multimedia world.
Page 40

UMPC EC-900-H60G-IA
40/62 – User Manual
6.1 Viewing and organising your photos
Launch the Photos
application
Your eCAFÉ™ features a comprehensive photo management t ool . You can import new photos, sort your photos by date or tag them in order to
sort them by category.
Page 41

UMPC EC-900-H60G-IA
41/62 – User Manual
6.2 Viewing videos
Launch the Videos application
Thanks to the multimedia player include d on your eCAFÉ™, you can t ake your favourite movies with you and view your favo urite videos and
home-made holiday movies. To save time and access your favourite videos directly, you can also create playlists easily.
The multimedia player is compatible with MPEG, WMV and WMA formats and the most frequently video formats available on the Internet.
Page 42

UMPC EC-900-H60G-IA
42/62 – User Manual
6.3 Listening to music
Launch the Music application
Enjoy a genuine digital music player includi ng extensive playback, import and playlist creation functions. If y ou are constantly lo oking for new
audio contents, subscribe to podcast streams and n ever miss your favourite radio progra m again, or create your own personal list of Intern et
radio stations.
Page 43

UMPC EC-900-H60G-IA
43/62 – User Manual
Page 44

UMPC EC-900-H60G-IA
44/62 – User Manual
6.4 Using the webcam
Starting the webcam
Explore another side of digital communic ations thanks to the webcam b uilt into your eCAFÉ™: take pictur es and record v ideo sequ ences with
unrivalled ease thanks to the included software.
Page 45

UMPC EC-900-H60G-IA
45/62 – User Manual
7. WORK
Access the Work world.
7.1 Creating, editing, saving and more
Included on your eCAFÉ™, OpenOffice is a us er-friendly office applic ation suite that allows you to create documents (e.g. let ters, reports and
more), simple or complex spreadsheets and elaborate slideshows.
In the Work world, you can click on the Spreadsheet, Text or Slideshows icons to directly access the required application. Regardles s of the
OpenOffice application in which you are workin g, you can create a new document (in this case, OpenOffice automatically switches to the
relevant application) or open an existing document.
For further information regarding the selected application, pleas e refer to the a pplication's onl ine help file; y ou can acces s this c ontent
by pressing on F1.
Page 46

UMPC EC-900-H60G-IA
46/62 – User Manual
7.1.1 ...A document using OpenOffice.org Writer (word processor)
Page 47

UMPC EC-900-H60G-IA
User Manual - 47/62
7.1.2 ...A spreadhseet using OpenOffice.org Calc (spreadsheet program)
Page 48

UMPC EC-900-H60G-IA
48/62 – User Manual
Page 49

UMPC EC-900-H60G-IA
User Manual - 49/62
7.1.3 ...A slideshow using OpenOffice.org Impress (slideshow creator)
We shall now create a simple slideshow in 5 steps, using the Pres entation Wizard that launches when you click on the Slideshows icon
located on your desktop.
1. Create a slideshow from a template. Choose one of the available templates, then click on Next.
2. Choose your background. Click on Next.
Page 50

UMPC EC-900-H60G-IA
50/62 – User Manual
3. Select a Slide transition and the speed of the transition between two slides. Click on Next.
4. Enter the information that you wish to include in your slideshow. You will be able to amend this information after. Click on Next.
Page 51

UMPC EC-900-H60G-IA
User Manual - 51/62
5. Select the pages that will comprise the structure of your slideshow. Click on Create.
Your slideshow is now displayed in OpenOffice.org Impress. You can now finalise your presentation by creating objects, connectors, etc.
Page 52

UMPC EC-900-H60G-IA
52/62 – User Manual
Page 53

UMPC EC-900-H60G-IA
User Manual - 53/62
Page 54

UMPC EC-900-H60G-IA
54/62 – User Manual
7.2 Managing your bank accounts
Manage your bank accounts from home with the HomeBank application provided with your eCAFÉ™.
Page 55

UMPC EC-900-H60G-IA
User Manual - 55/62
7.3 Managing your schedule
The Schedule application allows you to take yo ur schedule wit h you, to mak e sure that yo u will never forg et an importa nt event. You c an very
quickly fill in your tasks list or manage your schedule (meetings, appointments etc...) over several weeks.
Page 56

UMPC EC-900-H60G-IA
56/62 – User Manual
8. INSTALLING APPLICATIONS
To install new applications or updates on your eCAFÉ™ netbook, you mus t connect to the Internet v ia a WiFi connection or use th e
Ethernet port to connect to a modem, an Internet box or a corporate network connected to the Internet, for instance. Y our netbook will use
this connection to search for all available applications on a dedicated server.
To install new applications or updates, access the Settings world, then click on Computer Configuration.
The Control Centre displays. Select the Software Manager thumbnail, then click on the Add and remove software thumbnail.
Before allowing the installation, the applic ation may request that you enter the user ac count password (the default password is "ec-
900") and the administration account password (the default password is "root").
- Select the relevant applications category in the list: Office, Development, Graphics, etc.
Packages (lists of applications) matching the selected category are displayed.
- Select a package to view its description.
- Check the box to select the package that you wish to install.
- You can also install the required additional packages, if necessary.
- Click on Apply.
- Confirm the installation by clicking on Yes.
Page 57

UMPC EC-900-H60G-IA
User Manual - 57/62
9. SAVING AND RESTORING DATA
In the following sections, you will learn how to create bac kups on various types of storage media and learn how to rest ore your data using
these backups. You can also connect to the
6www.hercules.com website. In the section dedicated to the eCAFÉ™, you will find a ll the relevant
information required to create your backups.
We also recommend that you frequently create backups of any personal or sensitive data that you may have stored on your netbook.
9.1 Creating backups on a USB key
- Connect the USB key to one of the two available USB ports. The eCAFÉ™ automatically detects the newly connected device.
- In the File Browser, select the files and/or directories that you wish to backup (hold the
key to select several consecutive files, or
hold the Ctrl key to select several non-consecutive files).
- In the Edit menu, select Copy.
- In the File Browser, click on the name of your USB key (which now appears in the left-hand pane).
- Choose the destination location for the files.
- In the Edit menu, select Paste.
9.2 Creating backups on a memory card
- Insert the memory card in the memory card reader. eCAFÉ™ automatically detects the newly connected device.
- In the File Browser, select the files and/or directories that you wish to backup (hold the key to select several consecutive files, or
hold the Ctrl key to select several non-consecutive files).
- In the Edit menu, select Copy.
- In the File Browser, click on the name of your memory card (which now appears in the left-hand pane).
- Choose the destination location for the files.
- In the Edit menu, select Paste.
9.3 Creating backups on a CD or DVD
- Connect a CD/DVD drive to one of the two available USB ports. The eCAFÉ™ automatically detects the newly connected device.
- Launch the application External CD/DVD Drive using the quick access icon.
- Create a backup project.
- In the File Browser, select the files and/or directories that you wish to bac kup (hold the
key to select several files in a row, or hold
the Ctrl key to select several non-consecutive files).
- Click on the Add button.
- Insert a blank CD or DVD in the CD/DVD drive.
- Click on the Burn button.
9.4 Restoring backup data from a USB key
- Connect the USB key to one of the two available USB ports. The eCAFÉ™ automatically detects the newly connected device.
- In the File Browser, click on the name of your USB key (which now appears in the left-hand pane).
- Select the files and/or directories that you wish to restore (hold the
key to select several files in a row, or hold the Ctrl key to select
several non-consecutive files).
- In the Edit menu, select Copy.
- In the File Browser, select a destination location for your files.
- In the Edit menu, select Paste.
Page 58

UMPC EC-900-H60G-IA
58/62 – User Manual
9.5 Restoring backup data from a memory card
- Insert the memory card in the memory card reader. eCAFÉ™ automatically detects the newly connected device.
- In the File Browser, click on the name of your memory card (which now appears in the left-hand pane).
- Select the files and/or directories that you wish to restore (hold the
key to select several files in a row, or hold the Ctrl key to select
several non-consecutive files).
- In the Edit menu, select Copy.
- In the File Browser, select a destination location for your files.
- In the Edit menu, select Paste.
9.6 Restoring backup data from CD or DVD
- Connect an external CD/DVD driv e to one of the two available USB ports, and insert the CD or DVD containing y our backup data. The
eCAFÉ™ automatically detects the newly connected device.
- In the File Browser, click on the name of the CD/DVD drive (which now appears in the left-hand pane).
- Select the files and/or directories that you wish to restore (hold the
key to select several files in a row, or hold the Ctrl key to select
several non-consecutive files).
- In the Edit menu, select Copy.
- In the File Browser, select a destination location for your files.
- In the Edit menu, select Paste.
Page 59

UMPC EC-900-H60G-IA
User Manual - 59/62
INDEX
A
Audio.............................................................................................7
Audio connectors...........................................................................9
B
Background image ................................................................23, 28
Battery.............................................1, 2, 3, 4, 5, 10, 11, 12, 13, 25
Installing or removing..............................................................11
C
Control Centre.................................................................27, 28, 59
D
Display modes
Full screen ................................................................................7
Window.....................................................................................7
E
eCAFÉ™ Connect.....................................1, 26, 27, 29, 30, 31, 32
eCAFÉ™ galaxy................................................................1, 14, 18
eCAFÉ™ portal.....................................................................18, 19
Email Messaging.............................................................32, 33, 37
F
File Browser ........................................................19, 23, 25, 60, 61
Forcing the computer to shut down or restart .............................15
H
Hard disk drive ..............................................................................8
Hard drive......................................................................................3
Home...................................................................14, 18, 19, 23, 28
I
Instant Messaging...........................................................38, 39, 40
L
Local Area Network.......................................................................9
M
Manage your bank accounts.......................................................56
Memory card drive.................................................................3, 5, 8
MMC......................................................................................3, 8
SD..........................................................................................3, 8
SD HC...................................................................................3, 8
Multifunction keyboard..................................1, 2, 3, 4, 7, 8, 31, 32
Music................................................................................. 1, 16, 45
N
Netbook...1, 2, 3, 4, 8, 9, 13, 14, 15, 16, 18, 19, 29, 31, 32, 59, 60
P
Password.................................................................... 2, 36, 39, 59
Personalisation Wizard..........................................7, 15, 19, 23, 28
Photos............................................................................... 1, 25, 43
S
Schedule......................................................................................58
Security key...........................................................................30, 31
Shutting the device down.............................................................15
Slideshow creator....................................................................1, 52
Spreadsheet program..............................................................1, 50
T
Turning the device on..................................................................14
U
USB ports...................................................... 3, 5, 8, 16, 25, 60, 61
V
VGA connector.............................................................................15
Video................................................................. 3, 9, 17, 23, 44, 47
W
Webcam.......................................................................... 1, 3, 4, 47
WiFi feature....................................... 1, 2, 7, 13, 26, 27, 29, 30, 31
Word processor........................................................................1, 49
World
Communications....................................... 14, 18, 19, 20, 26, 29
Games............................................................14, 18, 19, 20, 41
Multimedia...................................................... 14, 18, 19, 21, 42
Settings............................................... 14, 18, 19, 22, 27, 28, 59
Work............................................................... 14, 18, 19, 21, 48
Page 60

UMPC EC-900-H60G-IA
60/62 – User Manual
WARNING
Read the following warnings before you or your child play video games.
Always observe the following recommendations when playing video games.
Avoid playing if you are tired or lacking sleep.
Always play in a well-lit room, and reduce the brightness of your screen.
When playing a video game on a television screen, sit at good distance from the screen, as far away the connection cable will allow.
When playing a video game, stop playing for ten to fifteen minutes every hour.
About photosensitive epileptic seizures
Some people may experience a seizure with loss of consciousness or loss of sight when ex posed to intense v isual stimulatio n, such as series
of flashing images or the repeated display of simple geometrical shapes, flashing lights or explosions.
These persons are prone to experience photos ensitive epileptic seizures when pl aying video games featuring s uch visual stimulati on, even if
they have no history of seizures or epilepsy.
If you, or anyone in your family, have already experienced an epil eptic condition (seizure or loss of c onscience) when subjected to the visual
stimulation described above, consult your physician before using a video game.
Parents should look out for, or ask their children ab out, the a bove sy mpto ms - c hildren a nd teen agers ar e mor e likely than adul ts to exper ienc e
these seizures. These seizures may have a variety of sy mptoms including light-headedness, altered vision, eye or face twitchin g, jerking or
shaking of arms or legs, disorientation, confusion or momentary loss of awaren ess. Should you or your children exp erience any of the above ,
stop playing immediately and consult a physician.
Page 61

UMPC EC-900-H60G-IA
User Manual - 61/62
TECHNICAL SUPPORT
If you have trouble using your device or one of its components, please connect to the http://ts.hercules.com/fr website and select your language. Here, you will be able to access
different services (Frequently Asked Questions (FAQs), the latest versions of all available drivers and software) that may help you solve your problem. If this fails to solve the problem,
please get in touch with Hercules' Technical Support.
Via email:
To reach our Technical Support via email, you must first register online on the http://ts.hercules.com/eng/index.php
website. The information that you provide will help our technicians
solve your problem as swiftly as possible.
Click on Online Support - FAQ, then on Visit the Technical Support website, then click on Product registration and follow the instructions provided onscreen..
By telephone (if you do not have Internet access):
United Kingdom
08450800942
Charges at local rate
Monday to Friday from Noon to 4pm and 5pm to 10pm
Saturday from 9am to Noon and 1pm to 7pm
Sunday from 9am to Noon and 1pm to 4pm
Connect to the Hercules website (www.hercules.com/fr) now to download the latest versions of all availa ble drivers an d software, view t he Fre quently Asked Questions (FAQs) relevant
to your product and download the latest upgrades of your product's User Manual. You can also discover the extensiv e range of Hercules product s and download inf ormation about the
forthcoming releases.
WARRANTY INFORMATION
Guillemot Corporation S.A. ("Guillemot") guarantees consumers worldwide that this Hercules product is free from material and manufacturing defects for a period of two (2) years
beginning on the original date of purchase. Should the product seem defective during the period covered by the warrant y, please contact our Technical Support immediately for further
information on how to proceed. After contacting our Technical Support, if it appears necessary to return the product to us, please return the product and its accessories in the original
packaging, well packaged and protected, according to the instructions provided by our Technical Support.
According to the terms of this warranty, following our Technical Support's decision, the defective product may be repaired or replaced. When authorised by applicable law, any liability
incurred by Guillemot and its subsidiaries (including consequential damages) will be limited to repair or replacement of the product manufact ured by Hercules. The consumer's stat utory
rights on account of applicable law on the sale of consumer goods are not affected in any way by this warranty.
This warranty will not apply:
(1) If the product has been modified, opened, altered in any way or damaged by inappropriate or abusive use, negligence, an accident or no rmal wear; (2) I f the pr o duct has been used
or stored in abnormal conditions (e.g. exposition to adverse weather conditions, to direct sunlight, to water or to sand) ; (3) For any other reason not relating to a material or
manufacturing defect; (4) In the event of non-observance of the instructions provided in the Us er Manual or by our Technical Sup port; (5) To any soft ware not edit ed by Guillemot, sai d
software being covered by a specific warranty granted by the software's editor; (6) If the warranty seals have been removed or altered in any way; (7) For damages to or the loss of
programs, data or storage media, or for the costs arising from the retrieval of said data; (8) For damages to or the loss of programs or personal data occurring aft er repair or
replacement of the product; (9) For damages caused by the installation of third-party software or by computer viruses.
Guillemot shall in no event be held responsible for any damage to or loss of personal data, programs, sof tware or removable storage media. Before ret urning this program to Technical
Support, please create a backup of any personal and/or sensitive data. Guillemot shall in no event be held responsible for rein st alling or retriev ing persona l data or pro grams ot her than
those installed at the time of the product's commercialisation.
The warranty applies to your product's display if the display features at least 5 defective pixels (i.e. bright spots or dark spots, a bright spot being a white pixel permanently displayed on
the screen, and a dark spot being a pixel that does not display on the screen.)
In the event where the product is returned to out Technical Support and the warranty cannot be applied owing to the presence of one or several of the exclusion condit ions stated
above, the incurred shipping and processing costs will be charged to the consumer.
Registered trademarks
Hercules® and eCAFÉ™ are registered trademarks of Guillemot Corporation S.A. Mandriva® is a registered trademark of Mandriva S.A.. Mozilla® is a registered trademark of Mozilla
Foundation. RealNetworks® and RealPlayer® are registered trademarks of RealNetworks Inc . Fluendo is a registered trademark of F luendo S.A. Corel® is a registered trademark of
Corel Corporation. OpenOffice.org® is a registered trademark of Sun Microsystems Inc. Windows®, Windows XP®, Windows Vista® and the Windows logo are trademarks or
registered trademarks of Microsoft Corporation in the United States and/or other countries of the world. Intel®, Intel® Atom™ and I ntel® Atom™ Inside are registered trademarks of
Intel Corporation in the United States and other countries of the world. WiFi Certified & WiFi Protected Setup are registered trademarks or brands of the WiFi Alliance. All other
registered trademarks and brand names are hereby acknowledged and are the property of their respective owners. Illustrations not binding. Contents, designs and specificat ions are
liable to change without prior notice and may vary according to countries.
Made in China
Statement of Compliance with EU Regulations
Guillemot Corporation S.A. hereby declares that the device UMPC EC-900-H60G-IA complies with the with the main requirements and other relevant clauses of Directive RTTE
1999/5/CE, of Directive CEM 2004/108/CE and with the standards relating to electrical security (IEC 60950, 2001 Editio n / EN 60950-1, 2001 Edition / NF EN 60950, Amendment A11-
2004). The compliance statement can be viewed on the following website:
ftp://ftp.hercules.com/EC-900/H60G-IA/DoC-fra_UMPC_EC-900-H60G.pdf
Page 62

UMPC EC-900-H60G-IA
62/62 – User Manual
Copyright
© 2008 Guillemot Corporation S.A. All rights reserved.
No part of this manual may be copied, summarised, issued, posted, stored in a search engine or translated in any language or computer language, for any purpose or by any mea ns
that may be, whether electronic, mechanical, magnetic, manual, by means of photocopies, recordings or others, without the express authorisation in writing of Guillemot
Corporation S.A.
End User License Agreement
IMPORTANT: Please read the following End User License Agreement before using the eCAFÉ™ device. The term "Software" refers to all executable programs, managers, libraries,
data files and to any documentation relating to the programs, as well as the complete operating system included in the eCAFÉ™ product. The Software is licensed, and not sold, to the
User, exclusively for use complying with the terms of this License Agreement. The Software is comprised of f ree software sub-applications provided by the Free Sof tware Foundation
(applications, product administration programs, etc.), which are sub-licensed by Guillemot Corporation S.A. under the conditions described in point 5 above. You hereby accept and
agree to abide by the Terms & Conditions of this License Agreement. If you disagree with the Terms & Conditions of this License Agreement, please do not use the Software.
The Software is protected by international copyright laws and agreements, as well as other international laws and agreements relating to intellectual property .
The Software (excluding the software sub-applications) remains the property of Guillemot Corporation S.A. All rights reserved. Guillemot Corporation S.A. grant s only a limited and nonexclusive right to use the Software.
Guillemot Corporation S.A. reserves the right to cancel this License Agreement in the event of failure to abide by its Terms & Conditions.
License granted:
1. The license is granted to the original Buyer alone. Guillemot Corporation S.A. remains the sole owner and holder of the Software (excluding the software sub-applications), and
reserves all rights that are not expressly granted by this License Agreement. The User is not allowed to sub-license the rights granted by this License Agreement. The User is
allowed to transfer this License, provided that the original Buyer retains no part of the Software and that t he Transferee reads and accepts the Terms & Conditions of this Licens e
Agreement.
2. The Buyer may only use the software on one computer at a time. The machine-readable part of the Software may be copied to another computer, provided that the Software is
deleted from the first computer and that it is impossible to use the Software on several computers at the same time.
3. The Buyer hereby acknowledges and accepts the copyright be longing to Guillemot Corporation S.A. The copyright shall in no event be removed from the Software, nor from any
documentation, whether printed or electronic, provided with the Software.
4. The License grants the User the right to perform one (1) copy of the machine-readable part of the Software for archival purposes, provided that the User also copies Software's
copyright.
5. The free software sub-applications provided by the Free Soft ware Foundation and sublicensed by Guillemot Corporat ion S.A. are subject to the Terms & Conditions of the G eneral
Public License (GPL), which is available at the following address: http://fsffrance.org/gpl/gpl-fr.fr.html.
The source codes of these software sub-applications are available at the
following address: http://www.hercules.com/fr.
Some of these software sub-applications have been modified by Guillemot Corporation S.A. (the list of these software sub-
applications is available on the following website: http://www.hercules.com/fr).
6. Except within the limits expressly allowed by this License Agreement , the Buyer may not agree or allow any third party to agree to: grant a sublicense; provide or divulge the
Software to other third parties; allow use of the Software on several computers at a time; perform alterations or copies of any kind; reverse engineer, decompi le or modify the
Software in any way or attempt to obtain information relating to the Software that is not accessible to the User; perform copies or translations of the User Manual.
Warranty limitation:
The Software is provided "as is", with no guarantee whatsoever from Guillemot Corporation S.A. regarding its use and/or performance. Guillemot Corporation S.A does not guarantee
that the operation of the Software will be free from interruptions or errors. The use or the performance of the Software remain under the Buyer's entire responsibility, and Guillemot
Corporation S.A. can provide no guarantee of any kind with regard to the performance and results obtained by the B uyer while using the Soft ware. No guarantee of any kind, whether
explicit or implied, is offered by Guillemot Corporation S.A. with regard to the non-violation of third party rights, the merchantability or the adequacy of the Software to a specific use.
In no event shall Guillemot Corporation S.A.'s liability be engaged in the event of damages of any kind arising from the use or the incapacity to use the Software.
Applicable law:
The Terms & Conditions of this License Agreement are subject to French Law.
ENVIRONMENTAL CARE RECOMMENDATIONS
At the end of its useful life, this product should not be discarded with standard household refuse but should be given to a collection point for waste from electric
and electronic devices, where it shall be recycled.
This is stated by the symbol that appears on the product, the User Manual or the packaging.
According to their specificities, these materials may be recycled. By supporting recycling and other methods of recovering waste from electr ic and electronic
equipment, you help care for the environment.
Please consult with the local authorities, who will refer you to the relevant waste collection point.
 Loading...