

Page 1

eCAFÉ™ Slim HD eCAFÉ™ EX HD
CONTENTS
1. eCAFÉ™ – TAKE IT TO GO!™ .......................................................................................................3
1.1. Handling your netbook...............................................................................................................3
1.2. A closer look at your eCAFÉ™..................................................................................................4
2. eCAFÉ™: ULTRA-MOBILITY BY HERCULES...............................................................................5
2.1. Unpacking your eCAFÉ™ for the first time ...............................................................................5
2.2. Getting started with your eCAFÉ™ ...........................................................................................7
2.2.1. Turning on your eCAFÉ™ .............................................................................................7
2.2.2. Configuring your eCAFÉ™'s settings and administrator password...............................7
2.3. Overview....................................................................................................................................9
2.4. Multifunction keyboard.............................................................................................................12
2.5. An ultra-mobile computer suited to large files .........................................................................13
2.6. Extensive connectivity options for countless applications.......................................................14
2.7. A desktop device AND a mobile device ..................................................................................16
2.7.1. Operation via an electrical outlet, and charging the battery........................................16
2.7.2. Operation via the built-in battery..................................................................................17
2.7.3. Optimizing battery use.................................................................................................17
2.8. Switching off your eCAFÉ™....................................................................................................18
2.9. Restoring your system.............................................................................................................19
3. FIRST STEPS WITH MY eCAFÉ™................................................................................................20
3.1. An introduction to eCAFÉ™ ....................................................................................................20
3.2. The eCAFÉ™ interface ...........................................................................................................21
3.3. Protecting your eCAFÉ™.........................................................................................................26
3.3.1. Password protection on login ......................................................................................26
3.3.2. A safe to secure your passwords (the Keyring)...........................................................29
3.4. Checking your battery power...................................................................................................30
3.5. Connecting an external monitor or HDTV set* ........................................................................31
3.6. Navigating the interface...........................................................................................................32
3.6.1. The touchpad...............................................................................................................32
3.6.2. The scrollbar................................................................................................................33
3.6.3. Fullscreen display........................................................................................................33
Page 2

eCAFÉ™ Slim HD eCAFÉ™ EX HD
3.7. Connecting to the Internet.......................................................................................................34
3.7.1. Connecting to the Internet via Wi-Fi............................................................................34
3.7.2. Connecting to the Internet using an Ethernet cable ....................................................35
3.7.3. Viewing the connection status.....................................................................................36
3.8. Sending and receiving emails..................................................................................................36
3.9. Chatting with the instant messaging application .....................................................................37
3.10. Social networks – just a click away .........................................................................................38
3.11. Adding and removing shortcuts to your favorite applications..................................................38
3.12. Copying files from an external source.....................................................................................40
3.13. Saving data to removable media (USB key, memory card) ....................................................41
3.14. Customizing the menu bar.......................................................................................................41
3.15. Updating the system and applications.....................................................................................42
3.16. Accessing the help interface....................................................................................................43
3.17. Creating a new user ................................................................................................................43
3.18. Transferring data with Hercules eCAFəSync ......................................................................45
TECHNICAL SUPPORT...........................................................................................................................48
WARRANTY INFORMATION ..................................................................................................................50
ENVIRONMENTAL PROTECTION RECOMMENDATION .....................................................................52
Page 3

eCAFÉ™ Slim HD eCAFÉ™ EX HD
Please read this section with care before using the product.
1. eCAFÉ™ – TAKE IT TO GO!™
Thank you for trusting in the quality of Hercules' devices and choosing to purchase the eCAFÉ™ netbook.
Offering a compact, lightweight design, excellent battery life and complete connectivity options, eCAFÉ™
is designed to help you communicate, create and edit files such as text documents, presentation
slideshows or photos, and also to entertain you with advanced multimedia features.
To make the most of your eCAFÉ™ netbook, please follow the instructions provided in this manual.
1.1. Handling your netbook
Like any electronic device, the eCAFÉ™ requires you to comply with a number of simple safety rules,
listed below. In addition, observing some simple precautions will allow you to extend your eCAFÉ™'s
working life.
- Never attempt to open up the eCAFÉ™, the adapter or its components: by doing so, you risk damaging
the internal components. Likewise, never attempt to open up the device's batteries.
- Only use the adapter provided with the product.
- Always place your eCAFÉ™ on a horizontal, stable and flat surface.
- Never exert pressure on the display. Never touch the display with any objects which may damage it or
scratch it.
- Always take care to remove any objects placed on the device's keyboard (e.g. USB key, pen or other) before
closing your eCAFÉ™'s display.
- To avoid any risk of fire or electric shock, always keep your eCAFÉ™ away from:
- Rain or moisture, as well as all fluids (water, chemical products and all other liquids),
- Heat sources such as radiators, stoves and other heat-emitting devices (including amplifiers),
- Direct sunlight.
- This product should be used only at temperatures ranging from 5 to 35°C.
- Never cover your eCAFÉ™ while the device is powered on.
- Always unplug your eCAFÉ™ before cleaning it. To clean it, use a soft cloth; avoid using chemical
sprays.
- eCAFÉ™ offers a Wi-Fi wireless connection feature. Use of this feature can cause interference with
equipment located in planes or hospitals. Always disable this feature before entering these locations.
- Unplug your eCAFÉ™’s power supply during thunderstorms.
- Never attempt to burn the device's batteries.
- When transporting your eCAFÉ™, always turn off the device if you are carrying it in a closed bag. As a
general rule, make sure that your eCAFÉ™ is in a location where air can circulate when the device is
turned on.
- Attention: At full power, prolonged listening with headphones can result in damage to the user’s hearing.
User Manual – 3/52
Page 4

eCAFÉ™ Slim HD eCAFÉ™ EX HD
1.2. A closer look at your eCAFÉ™
This section lists your eCAFÉ™'s specifications and the contents of the package:
- Freescale™ i.MX515 processor, 800MHz, with ARM®Cortex™ A8 core
- Free operating system: Hercules eCAFÉ™ Netbook Edition
- 512MB DDR2 RAM
- 10.1" backlit LCD display (max. native resolution 1024*600)
- 300,000 pixel built-in webcam
- Built-in microphone
- Built-in sound card
- Built-in Wi-Fi 802.11 b/g/n card (up to 150Mbps)
- 8GB iNand Flash memory (or more, depending on your model; contains the operating system
and preinstalled applications)
- Internal Flash memory SDHC expansion slot, up to 32GB
- Rechargeable Li-Ion polymer battery, 17W/h (7.4 V/2400mAh) (eCAFÉ™ Slim HD) / 50W/h
(7.4V/6800mAh) (eCAFÉ™ EX HD)
- 100-240VAC, 50/60Hz, 12VCC/3 A power adapter
- 3 USB 2.0 ports (compatible with USB 1.1 devices)
- 1 mini-USB port
- 10/100Mbps Ethernet port
- 1 HDMI output (eCAFÉ™ EX HD)
- 1 headphone connector, 1 microphone connector
- 82 key chiclet keyboard, with flat and separate keys
- 2-button touchpad
- Multimedia touch controls (eCAFÉ™ EX HD)
- System On/Off button
- Wi-Fi On/Off switch
- 2 x 1 Watt RMS speakers
- Multi-format memory card reader: SD (Secure Digital®), SD HC (Secure Digital®HC), MMC
(MultiMedia Card)
- Kensington lock
- USB/mini-USB cable
- Weight: 880g with battery (eCAFÉ™ Slim HD) / 1.1kg with battery (eCAFÉ™ EX HD)
- Dimensions: 300 x 171 x 21mm (eCAFÉ™ Slim HD) / 300 x 171 x 28 mm (eCAFÉ™ EX HD)
- User Manual included
eCAFÉ™ Slim HD/eCAFÉ™ EX HD is equipped with the Hercules eCAFÉ™ Netbook Edition operating
system, based on the Ubuntu operating system, a part GNU-Linux distribution. It can be added to by
installing applications compatible with this system. Under no circumstances shall Guillemot Corporation
S.A. be liable in the event of damages of any kind (including, but not limited to, the loss of data) resulting
from the installation or incorrect use of these applications. For more information, please visit
http://www.ecafe.hercules.com/.
4/52 – User Manual
Page 5

eCAFÉ™ Slim HD eCAFÉ™ EX HD
- Remove your eCAFÉ™ from its packaging.
- Remove the protective film from the display.
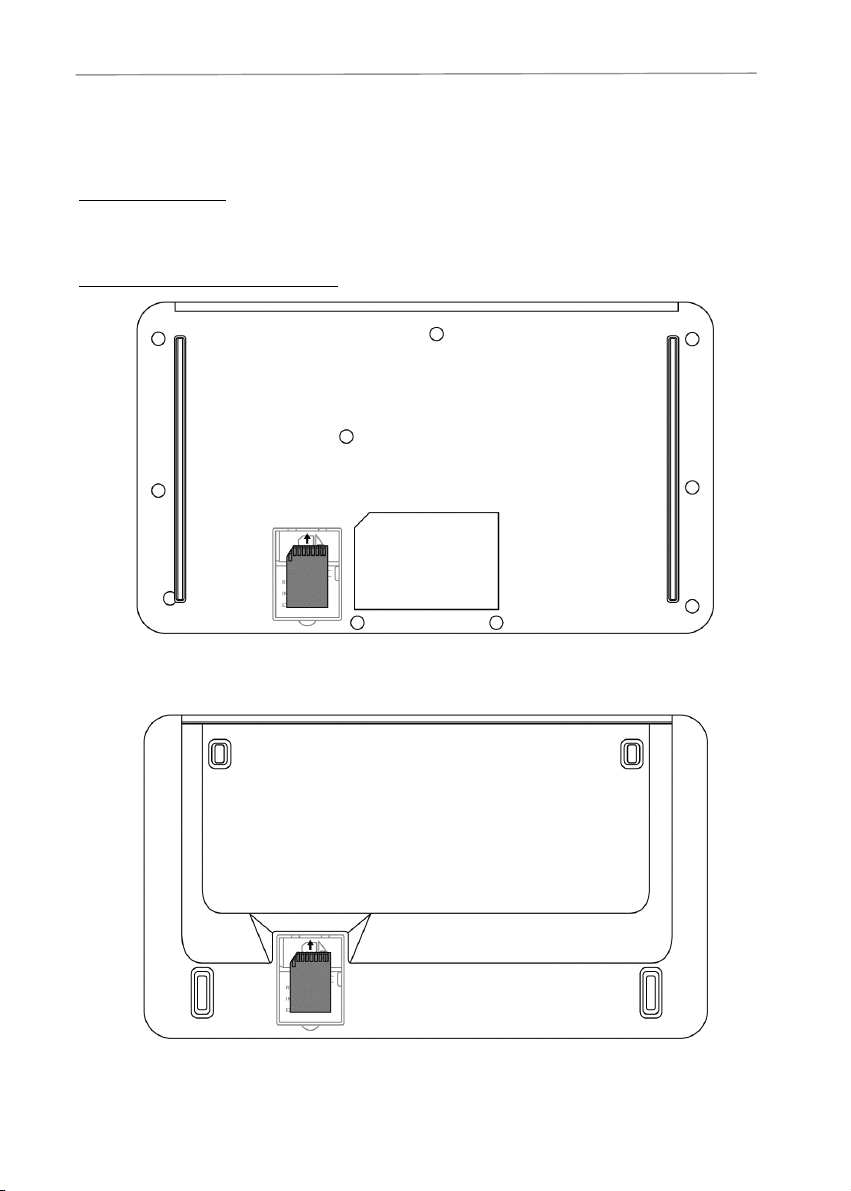
When using your eCAFÉ™ as a portable device (i.e., when your netbook is not plugged into an
electrical outlet), remember to enable your netbook's battery!
1. Open up the cover plate located on the
underside of the computer, as shown above.
2. Set the battery switch (BAT) to ON.
2. eCAFÉ™: ULTRA-MOBILITY BY HERCULES
eCAFÉ™ is an ultra-mobile computer that will follow you wherever you go, thanks to its compact size and
lightweight design. Offering extended battery life and a wide range of applications combined with
comprehensive connectivity features, this computer allows you to instantly get started with your favorite
activities: social networking, Internet, email, video chatting, music and videos... and much more!
2.1. Unpacking your eCAFÉ™ for the first time
User Manual – 5/52
Page 6

eCAFÉ™ Slim HD eCAFÉ™ EX HD
3. Put the cover plate back in place.
4. Connect the power adapter connector to your eCAFÉ™, then plug the adapter into an electrical outlet.
6/52 – User Manual
Page 7

eCAFÉ™ Slim HD eCAFÉ™ EX HD
- Open up the display (1) and press on the On/Off button (2) located to the top right of the keyboard.
Do not exert excessive force on the hinges when opening up the display. Never hold your
eCAFÉ™ by its display when carrying the device.
2.2. Getting started with your eCAFÉ™
2.2.1.Turning on your eCAFÉ™
2.2.2.Configuring your eCAFÉ™'s settings and administrator password
When you turn your eCAFÉ™ on for the first time or after a system restore, you are prompted to configure
a number of basic settings in 4 steps.
- In step 1, select in which language applications, menus and messages will be displayed. Click Next.
- In step 2, select the time zone that corresponds to your geographical location. Click Next.
- In step 3, select your keyboard layout. Click Next.
- In step 4, enter your full name (first name and/or family name) and a user name (the user name will be
displayed when you log in).
- Define an administrator password for your eCAFÉ™.
User Manual – 7/52
Page 8

eCAFÉ™ Slim HD eCAFÉ™ EX HD
The password selected when you turn your eCAFÉ™ on the first time will become the
administrator password. Make sure you don't forget it, as the operating system will ask you to enter
it every time an application performs an administrator-level task: adding a user, changing a password
or accessing the safe (for more information, please refer to section 3.3.2. A safe to secure your
passwords).
The administrator password differs from the password requested to connect to a secure Wi-Fi
network (in that case, the password will be described as a security key). For more information
regarding Wi-Fi networks, please refer to section 3.7.1 Connecting to the Internet via Wi-Fi.
For optimum protection, particularly if you share your computer with other users, we recommend
that you configure your systemto request a password when logging in and accessing the safe (option 2).
- You can now select the protection mode you require when logging in:
1. Log in automatically: no password is requested when you log in. However, you will be
required to enter the administrator password to access the safe.
2. Require a password to log in: the system will request your user password when you log in,
and you will be required to enter your administrator password to access the safe.
3. Require a password to log in and decrypt your home folder: the system will request
your user password only when you log in. You will not be required to enter the administrator
password to access the safe.
- Click Next.
- Wait while the system applies the settings.
You can now access your eCAFÉ™ Desktop.
8/52 – User Manual
Page 9

eCAFÉ™ Slim HD eCAFÉ™ EX HD
1. Webcam
2. 10.1" LCD display
3. Multimedia touch controls
(eCAFÉ™ EX HD)
4. Speakers
5. Ambient light sensor
(eCAFÉ™ EX HD)
6. Microphone
7. UK or US keyboard
8. Left touchpad button
9. Touchpad
10. Right touchpad button
11. Num. lock indicator
12. Caps lock indicator
13. Power On/Off button
14. Status indicators: battery,
Wi-Fi, Ethernet
2.3. Overview
Front view with display open
User Manual – 9/52
Page 10

eCAFÉ™ Slim HD eCAFÉ™ EX HD
1. Cover plate providing access to internal memory SDHC expansion slot, SIM connector and
battery On/Off switch
This part of your eCAFÉ™ may heat up slightly during operation and charging. This is
completely normal.
Hercules eCAFəSlim HD
Hercules eCAFəEX HD
Bottom view
10/52 – User Manual
Page 11

eCAFÉ™ Slim HD eCAFÉ™ EX HD
1. Kensington lock
4. 2 USB ports
2. Mini-USB port
5. Microphone connector
3. Wi-Fi On/Off switch
6. Headphone connector
1. Memory card reader
4. Ethernet Port
2. USB port
5. Power supply connector
3. HDMI connector (eCAFÉ™ EX HD)
Left view
Right view
User Manual – 11/52
Page 12

eCAFÉ™ Slim HD eCAFÉ™ EX HD
+
Enable eCAFÉ™'s
standby mode
+
Mute/unmute sound
+
Toggle between the
LCD display and
external HDMI display
+
Lower volume
+
Lower display
brightness
+
Increase volume
+
Increase display
brightness
eCAFÉ™ Desktop
access key
2.4. Multifunction keyboard
The eCAFÉ™ features a complete keyboard, allowing you to configure different settings (volume,
brightness, etc.) and access the eCAFÉ™ Desktop at any time (please refer to section 3. First steps
with my eCAFÉ™).
UK keyboard:
US keyboard:
12/52 – User Manual
Page 13
eCAFÉ™ Slim HD eCAFÉ™ EX HD
2.5. An ultra-mobile computer suited to large files
Equipped with Flash memory, an additional internal storage memory expansion slot and a multi-format
memory card reader, eCAFÉ™ allows you to take your favorite files with you, regardless of their size.
System Flash memory
eCAFÉ™ features 8GB of Flash memory (or more, depending on your model), which serves to store the
operating system and installed applications.
Internal storage memory expansion slot
Hercules eCAFəSlim HD
Hercules eCAFəEX HD
User Manual – 13/52
Page 14

eCAFÉ™ Slim HD eCAFÉ™ EX HD
The internal storage memory expansion slot must not be confused with a removable media card
reader, in which you can connect or disconnect an SDHC card at any time. To read or transfer data,
please use the USB port or the external memory card reader.
Never remove (disconnect) a device while your eCAFÉ™ is reading or saving data: should you
do so, you risk permanently losing or damaging your data.
Thanks to the internal storage memory SDHC expansion slot, you can add up to 32GB of system Flash
memory (in which your applications and personal data are stored).
External memory card reader
eCAFÉ™ is equipped with a multi-format memory card reader supporting the SD (Secure Digital®), SD
HC (Secure Digital®HC) and MMC (MultiMedia Card) formats: this reader allows you to view pictures
taken with your digital camera or to extend your system's storage capacity, for example (by up to an extra
32GB).
USB ports
eCAFÉ™ is also equipped with three USB ports, which enable you to connect a USB storage key or other
USB devices (for more information regarding USB ports, please refer to section 2.6 Extensive
connectivity options for countless applications).
2.6. Extensive connectivity options for countless applications
The ports and connectivity built into your eCAFÉ™ allow you to connect all kind of USB devices, such as
a mouse or an external hard disk drive, to your netbook.
General safety rules
Before connecting a device to your netbook, please refer to the installation instructions provided with the
device.
USB ports (Universal Serial Bus)
eCAFÉ™ features three USB 2.0 ports (USB 1.1-compatible), to which you can connect many devices
such as a keyboard, a mouse, a USB key and more. This interface is hot-swappable, allowing you to
connect and remove your device without having to first shut it down.
14/52 – User Manual
Page 15

eCAFÉ™ Slim HD eCAFÉ™ EX HD
The system may fail to recognize some USB peripherals if these have been connected during
the computer's start-up phase. Should this be the case, please disconnect the device from your
netbook, and then connect it again.
eCAFÉ™ features:
- a mini-jack output connector to connect
speakers or headphones
- a mini-jack input connector to connect an MP3
player for recording purposes, or a microphone to
record vocal data or chat with your contacts using
a voice-over-IP application
eCAFÉ™ is equipped with an RJ45 LAN
connector, allowing you to connect it to a wired
10/100Mbps Ethernet network (corporate
network, router, wired modem/router or Internet
“box,” for example).
Audio connectors
Local Area Network (LAN)
User Manual – 15/52
Page 16

eCAFÉ™ Slim HD eCAFÉ™ EX HD
Connect eCAFÉ™ EX HD to an external
monitor or HDTV set equipped with an
HDMI port (cable not included), and
enjoy high-definition image display.
Insert the power adapter into your netbook’s power supply connector until it stops. Do not exert
excessive force on the connector!
The battery only charges if the battery On/Off switch (BAT) is set to ON. For more information,
please refer to section 2.1. Unpacking your eCAFÉ™ for the first time.
HDMI connector (not available on all versions)
2.7. A desktop device AND a mobile device
Both a desktop device and a mobile device, your eCAFÉ™ can be used everywhere, thanks to its dual
power supply capabilities (plugged into an electrical outlet, and battery power).
2.7.1.Operation via an electrical outlet, and charging the battery
Use the included power adapter to supply power to your eCAFÉ™. The power adapter complies with the
specifications of the electrical network in the country in which the device was purchased.
When your eCAFÉ™ is plugged into an electrical outlet, the device's battery starts to charge
automatically. Please note that fully charging eCAFÉ™ while the device is in use requires more time than
when eCAFÉ™ is powered off.
16/52 – User Manual
Page 17

eCAFÉ™ Slim HD eCAFÉ™ EX HD
To extend your battery's lifespan, we recommend that you charge it fully when using your
eCAFÉ™ for the first time. Please refer to the battery charge status indicator for more information
regarding the battery charge level.
The battery installed in your eCAFÉ™ is fixed in place. Never attempt to remove it or replace it
yourself; by doing so, you risk damaging your netbook. Likewise, using an inappropriate battery may
cause an explosion. Only certified Hercules maintenance centers are able to replace the battery with
a Hercules battery that is identical to the original battery supplied with your netbook.
For more information regarding battery replacement, please refer to:
http://www.ecafe.hercules.com/.
2.7.2.Operation via the built-in battery
eCAFÉ™ is designed to operate via its built-in battery. On a full charge, the battery offers comfortable
battery life.
2.7.3.Optimizing battery use
The Lithium-Ion (Li-Ion) polymer battery in your eCAFÉ™ can be charged at any time using the included
power adapter.
To extend the battery's lifespan:
- If you do not intend to use your computer for several days, set your netbook's battery On/Off switch
(BAT) to OFF. You can access this switch by opening up the cover plate located on the underside of the
netbook. Beforehand, make sure that the battery is charged to 70% of its capacity. Always store your
computer in a room in which the temperature is between 5 and 35°C, and avoid leaving it in a vehicle
parked in direct sunlight. The Lithium-Ion (Li-Ion) battery loses its qualities over time, even if you don't use
it.
- If your eCAFÉ™ is always plugged into an electrical outlet, set the battery's On/Off switch (BAT) to OFF.
You can access this switch by opening up the cover plate located on the underside of the netbook. Doing
so will disconnect the battery from your eCAFÉ™, and you will lose your computer's portable feature. If
you want to take your netbook to another room without turning it off, remember to set the battery's On/Off
switch (BAT) to ON.
User Manual – 17/52
Page 18

eCAFÉ™ Slim HD eCAFÉ™ EX HD
+
Lower display brightness
+
Increase display
brightness
Do not force your computer to shut down or restart when files are open: by doing so, you risk
permanently losing data.
- Adjust the display's brightness according to your location (indoors/outdoors) and the application in use.
- Close the display if you will not be using your eCAFÉ™ for a short period of time. The display
automatically turns off.
- When using your eCAFÉ™ for the first time, fully charge the battery.
- Disable the Wi-Fi feature if you are not accessing a Wi-Fi network. To do so, move the Wi-Fi switch to
the left (the red mark visible behind the switch indicates that Wi-Fi is disabled). The indicator
switches off.
- Configure the power management options in the System/Power Management (Preferences window)
menu.
2.8. Switching off your eCAFÉ™
Turning off your eCAFÉ™
- Before turning off your eCAFÉ™, make sure that all programs and applications have been properly shut
down.
- To turn off your eCAFÉ™, press the power On/Off button located to the top right of the keyboard and
confirm the device's shutdown in the window displayed.
Screensaver mode
Your eCAFÉ™'s display automatically switches to Screensaver mode if the device has not been used for
a certain time. To exit this mode, press any key or touch the touchpad. To access the Screensaver mode
configuration options, open the System menu, then select the Screensaver option in the Preferences
window.
Standby mode
After an extended period without use, your eCAFÉ™ switches to Standby mode. To exit this mode and
start your netbook back up, press the power On/Off switch located to the top right of the keyboard. To
access the Standby mode configuration options, open the System menu, then select the Power
Management option in the Preferences window.
Forcing the computer to turn off or restart
If you have trouble turning your computer off, press and hold down the device's power On/Off button until
your eCAFÉ™ turns off.
18/52 – User Manual
Page 19

eCAFÉ™ Slim HD eCAFÉ™ EX HD
Prior to performing a system restore, remember to save all your important data to an external
device (USB key, external hard disk drive, etc.). The system restore process will delete all data (audio
and video files, new programs, updates, drivers, preferences, etc.) that you have added to your
netbook since you first started using your eCAFÉ™.
2.9. Restoring your system
If you feel that your eCAFÉ™ no longer provides its original level of performance (slower access to
programs, repeated crashes, etc.), you can restore your system: i.e. return it to a "clean" state, identical to
the system installed on your netbook on the day you purchased it. For more information regarding the
system restore feature, please visit http://www.ecafe.hercules.com/.
User Manual – 19/52
Page 20

eCAFÉ™ Slim HD eCAFÉ™ EX HD
Some applications or features (connection to secure Wi-Fi networks and the email application,
for instance) are only accessible after entering a password or a security key. To spare you needing to
enter this confidential information with every request, your eCAFÉ™ makes the process simple by
storing your credentials in a safe (the Keyring). For enhanced protection, this application will – if
required – ask you for permission to store this information. For more details about protecting your
data and using the safe, please refer to section 3.3. Protecting your eCAFÉ™.
3. FIRST STEPS WITH MY eCAFÉ™
3.1. An introduction to eCAFÉ™
When you start up your netbook, you access the eCAFÉ™ Desktop, which contains a selection of
shortcuts leading to your favorite applications. Other applications are also available in the menu bar
located in the left-hand part of the screen. This bar and its contents can be customized; you can therefore
tailor them to your preferences as you get acquainted with your eCAFÉ™.
20/52 – User Manual
Page 21

eCAFÉ™ Slim HD eCAFÉ™ EX HD
3.2. The eCAFÉ™ interface
On the eCAFÉ™ Desktop, you can easily access your favorite applications by using the existing
shortcuts and the shortcuts that you have added, without having to go through the related menu.
The Files menu opens the file Explorer, allowing you to access the contents of your netbook's folders
(Documents, Music, Images, Videos, Downloads), display the contents of the storage devices (memory
card, external hard disk drive or USB key) attached to your computer, and quickly access the most recent
files you have used.
User Manual – 21/52
Page 22

eCAFÉ™ Slim HD eCAFÉ™ EX HD
In the Internet menu, the Web Browser allows you to access all of your favorite websites. An instant
messaging application and a social networking client are also available.
The Sound menu provides access to an audio file player and a video player, allowing you to listen to your
favorite music tracks, Internet radio stations and podcasts, and also watch all of your videos – even HD
videos.
22/52 – User Manual
Page 23

eCAFÉ™ Slim HD eCAFÉ™ EX HD
The Games menu offers a selection of popular games.
Image and photo viewing and editing applications are available in the Graphics menu.
User Manual – 23/52
Page 24

eCAFÉ™ Slim HD eCAFÉ™ EX HD
The Office menu contains a dictionary, an email application and the OpenOffice.org office suite,
allowing you to create and edit text documents, spreadsheets and presentation slideshows.
The Accessories menu contains various useful accessories (eCAFəSync file transfer utility, calculator,
password manager, notepad and more).
24/52 – User Manual
Page 25

eCAFÉ™ Slim HD eCAFÉ™ EX HD
The settings available here allow you to optimize your eCAFəaccording to your specific
preferences and requirements. Please note that some advanced settings directly influence your
netbook's operation: therefore, please make sure that you understand their purpose before changing
them.
The System menu allows you to access your eCAFÉ™'s settings and information. The page is split into
two sections: Administration and Preferences.
In the Administration section, you can adjust various settings (date, time and language), access the
update manager to ensure that you are always using the latest version of your operating system, add
printers, add and remove users and define their user rights, and download new applications.
In the Preferences section, you can access your device's customization options. These allow you to
customize your display’s appearance, select and configure a screensaver, manage your device's power
options, select the applications available in the various menus and much, much more.
The taskbar displays the following information (from left to right): audio volume, available Wi-Fi networks,
selected power supply mode (electrical outlet or battery), email application, date and time, instant
messaging application, system shutdown/standby mode/change user.
User Manual – 25/52
Page 26

eCAFÉ™ Slim HD eCAFÉ™ EX HD
3.3. Protecting your eCAFÉ
™
3.3.1. Password protection on login
Protecting your eCAFəis essential if your netbook contains data that you do not wish to divulge to
anyone: emails, social networking activities, etc. When you configure your eCAFəfor the first time,
remember to enable the option requesting a password on login, particularly if you are sharing your
computer with other users.
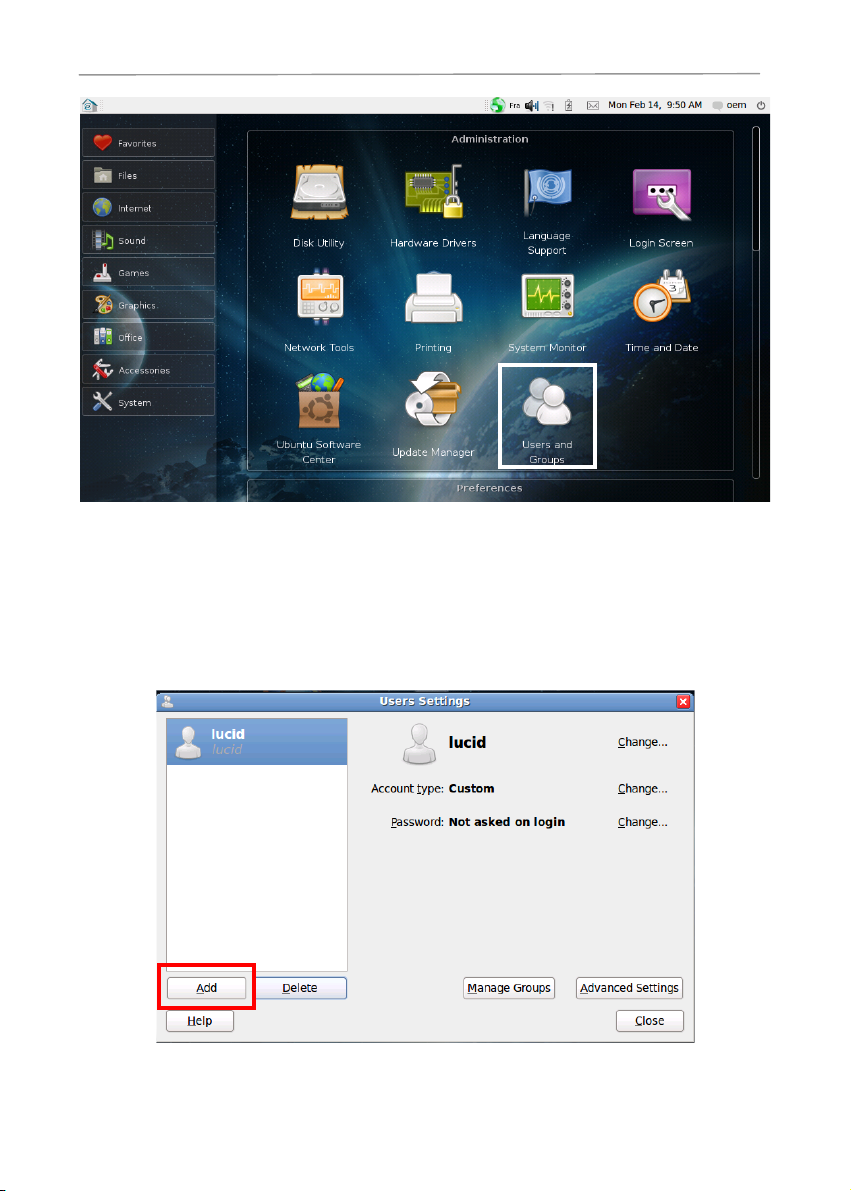
To enable the password request on login from the System menu:
Note: if an authentication request window is displayed, enter the administrator password (you
define this password when starting up your system for the first time – please refer to section
2.2.2. Configuring your eCAFÉ™'s settings and administrator password), then click
Authenticate.
- Click the System menu, then select Users and Groups in the Administration window.
- In the Users Settings window, select the user, then click the Change button facing the Password: Not
asked on login entry.
26/52 – User Manual
Page 27

eCAFÉ™ Slim HD eCAFÉ™ EX HD
- Un-tick (i.e. deselect) Don’t ask for password on login.
- Click the OK button.
To disable the password request on login:
Note: if an authentication request window is displayed, enter the administrator password (you
define this password when starting up your system for the first time – please refer to section
2.2.2. Configuring your eCAFÉ™'s settings and administrator password), then click
Authenticate.
- Click the System menu, then select Users and Groups in the Administration window.
- In the Users Settings window, select the user, then click the Change button facing the Password:
Asked on login entry.
User Manual – 27/52
Page 28

eCAFÉ™ Slim HD eCAFÉ™ EX HD
- Tick (i.e. select) Don’t ask for password on login.
- Click the OK button.
To change the current user's login password:
Note: if an authentication request window is displayed, enter the administrator password (you
define this password when starting up your system for the first time – please refer to section
2.2.2. Configuring your eCAFÉ™'s settings and administrator password), then click
Authenticate.
- Click the System menu, then select About me in the Preferences window.
- In the About [User_Name] window, click the Change password... button.
- Enter the current password.
- Click the Authenticate button to confirm its validity.
- Enter the new password (6 or more alphanumeric characters).
- Confirm the new password.
- Click the Change password button.
To change a user's login password:
Note: if an authentication request window is displayed, enter the administrator password (you
define this password when starting up your system up for the first time – please refer to section
2.2.2. Configuring your eCAFÉ™'s settings and administrator password), then click
Authenticate.
- Click the System menu, then select Users and Groups in the Administration window.
- In the Users Settings window, select the user, then click the Change button facing the Password entry.
28/52 – User Manual
Page 29

eCAFÉ™ Slim HD eCAFÉ™ EX HD
- Enter the new password (6 or more alphanumeric characters).
- Confirm the new password.
- Click the OK button.
3.3.2. A safe to secure your passwords (the Keyring)
For enhanced protection, your eCAFəalso features a safe, which securely stores all the passwords
requested by various applications (Wi-Fi networks management, websites, email and messaging
programs). The safe itself is protected by a password defined by the computer administrator when the
netbook starts up for the first time (please refer to section 2.2.2. Configuring your eCAFÉ™'s settings
and administrator password). Depending on whether you are logged in as an administrator or a
standard user, a window may appear, requesting a password (the administrator password) required by
some applications attempting to store or search for a password.
The main applications liable to store passwords are the following: some websites which request a
password to grant access to a page; and the Wi-Fi networks management application, which requests a
key to connect to a secure network.
User Manual – 29/52
Page 30

eCAFÉ™ Slim HD eCAFÉ™ EX HD
Changing a password or a security key can alter the related application's operation. The
password management feature should therefore only be used by advanced users.
Managing passwords and security keys (for advanced users)
- Click the Accessories menu, then select Passwords and Encryption Keys.
- In the Passwords and Encryption Keys window, you can review your passwords and security keys by
access the relevant tabs.
- For instance, expand the Passwords category and double-click on one of password types to display
more information.
- In the Key tab, click on the arrow facing the Password entry to display the password.
- Tick (i.e. select) Show Password to display the password's characters.
3.4. Checking your battery power
Your eCAFəhas been designed to offer ample battery life when you are on the move. At any time, you
can view your netbook's remaining battery power by checking the battery indicator in the upper right-
hand section of the screen.
30/52 – User Manual
Page 31

eCAFÉ™ Slim HD eCAFÉ™ EX HD
3.5. Connecting an external monitor or HDTV set*
*(only on eCAFəEX HD models equipped with an HDMI port)
When at home or working at the office, you can connect your netbook to a larger screen, e.g. to surf the
Internet or work on large spreadsheets.
- Connect an external monitor or HDTV set equipped with an HDMI port to your eCAFÉ™ (cable not
included).
- Switch to the external display by pressing + .
User Manual – 31/52
Page 32

eCAFÉ™ Slim HD eCAFÉ™ EX HD
Either by pressing the left touchpad button once
Or by briefly tapping the touchpad once
Either by pressing the left touchpad button twice
Or by briefly tapping the touchpad twice
3.6. Navigating the interface
3.6.1. The touchpad
Use the touchpad to navigate the interface (access menus, launch applications, etc.).
Some actions are confirmed by a single click (activating a button, accessing a menu or launching an
application, for example):
Other actions are confirmed by a double-click (opening audio or video files, or documents, for example):
The right touchpad button is generally used to access a selected object's properties.
32/52 – User Manual
Page 33

eCAFÉ™ Slim HD eCAFÉ™ EX HD
Example of a scrollbar which only displays the
current display's position in the window
Example of a scrollbar which allows the user to
scroll through the contents of a window
3.6.2. The scrollbar
When your eCAFÉ™ cannot display all the objects in a file or folder simultaneously, a scrollbar appears,
indicating your position in the window. Two types of scrollbars are available: scrollbars available on menu
screens, and scrollbars specific to each application. The scrollbars available on menu screens only serve
to indicate your position in the window; they do not allow you to scroll through the window's contents. On
the other hand, scrollbars specific to various applications allow you to display contents hidden at the
bottom of a window.
To scroll through the contents of a window in the menu screen:
Place the pointer in the window (preferably at the bottom of the window, if you want to access contents in
the hidden lower section, or at the top of the window, if you want to access contents in the hidden upper
section), then press the left touchpad button and hold it down; then slide your finger from the bottom to
the top of the touchpad to scroll down the window, or from the top to the bottom to scroll up the window.
To scroll through the contents of a window in an application:
Place the pointer on the scrollbar, then press the left touchpad button and hold it down; then slide your
finger from the top to the bottom the touchpad to scroll down the window, or from the bottom to the
top to scroll up the window.
3.6.3. Fullscreen display
Many applications can be displayed in fullscreen mode, i.e. without menu bars. This feature allows you to
make the most of your eCAFÉ™'s display surface.
For instance, open the web browser (in the Internet menu) and press the F11 key. To exit fullscreen
display mode, press the F11 key again.
User Manual – 33/52
Page 34

eCAFÉ™ Slim HD eCAFÉ™ EX HD
If you want to connect to the Internet via Wi-Fi, make sure that the feature is enabled (the WiFi
indicator on the side of the netbook should be flashing).
eCAFÉ™ uses the Wi-Fi feature's current setting. Therefore, if you disabled this feature when
using your netbook, you will need to re-enable it when you next restart your eCAFÉ™, by moving the
switch towards the right (the green mark visible behind the switch indicates that the Wi-Fi
feature is enabled).
3.7. Connecting to the Internet
3.7.1.Connecting to the Internet via Wi-Fi
Your eCAFÉ™ features a built-in Wi-Fi card, allowing you to detect and connect to Wi-Fi networks in the
area; to enable and disable this feature, use the switch located on the left-hand side of your
netbook.
- If required, enable your eCAFÉ™'s Wi-Fi feature by pushing the switch towards the right (the green
mark visible behind the switch indicates that the Wi-Fi feature is enabled). The computer's Wi-Fi indicator
should start flashing.
Connecting to a detected network:
- Click the network icon located in the taskbar.
- In the list of detected networks, click on the relevant network.
- If the network is secure, enter the required security key.
Note: if an authentication request window is displayed, enter the administrator password (you
define this password when starting up your system for the first time – please refer to section
2.2.2. Configuring your eCAFÉ™'s settings and administrator password), then click
Authenticate. Doing so will unlock the safe, allowing you to store the security key requested
by the Wi-Fi network. For more information about the safe, please refer to section 3.3.2. A safe
to secure your passwords (the Keyring).
- Click Connect.
Wait for your eCAFÉ™ to connect to the network: the No connection available icon displayed in the
taskbar bar switches to Signal found, and the netbook's Wi-Fi icon lights up steadily. Then, launch your
web browser.
34/52 – User Manual
Page 35

eCAFÉ™ Slim HD eCAFÉ™ EX HD
To manually connect to a network (if the network does not appear in the list of detected networks):
- Click the network icon located in the taskbar.
- Select the Connect to Hidden Wireless Network option.
- In the window displayed, enter the network's name.
- If the network is secure, select the relevant network security method.
- Enter the network security key.
- Click Connect.
Wait for your eCAFÉ™ to connect to the network: the No connection available icon displayed in the
taskbar switches to Signal found, and the netbook's Wi-Fi icon lights up steadily. Then, launch your web
browser.
3.7.2.Connecting to the Internet using an Ethernet cable
To connect to the Internet over an Ethernet local area network, simply connect your eCAFÉ™ to the
ADSL modem or local area network router's Ethernet port (Ethernet cable not included).
The icon (no connection available) in the taskbar switches to (Ethernet connection). Then,
launch your web browser.
User Manual – 35/52
Page 36

eCAFÉ™ Slim HD eCAFÉ™ EX HD
Ethernet connection: Ethernet
device enabled and physically
connected.
You are connected to the network via the Ethernet
port. You can access the Internet, provided that the
network's Internet connection is active.
No connection: Ethernet device
enabled, but not physically
connected.
Connect your eCAFÉ™ to a local area network via
the Ethernet port.
Internet connection: Wi-Fi device
enabled and physically connected;
Internet access available.
Your Wi-Fi connection to the Internet is fully
operational.
Internet connection: Wi-Fi device
enabled and physically connected;
Internet access available.
You are connected to the Internet, but the signal
strength is low.
Connection problem: Wi-Fi device
enabled and physically connected;
no Internet access available.
Please check your local area network router's or your
modem's network connection settings (IP address,
subnet mask etc.). If necessary, contact your router's
or modem's vendor.
3.7.3.Viewing the connection status
The Networks icon located in the taskbar allows you to view your connection status at any time:
3.8. Sending and receiving emails
Whether at home or "on the road", it is often useful to be able to access your email account. Once
connected to the Internet, you can send and receive emails and attachments using the email application
provided with your eCAFÉ™.
36/52 – User Manual
Page 37

eCAFÉ™ Slim HD eCAFÉ™ EX HD
Make sure that you are connected to the Internet (via Wi-Fi or Ethernet), so that the email
application can automatically configure your settings.
Please refer to the connection information provided by your Internet Service Provider. You will
need this information to configure your email account correctly.
The email application is accessible through the Office and Favorites menus.
The email application configuration Wizard launches when you run the program for the first time, to help
you configure your main email account. Follow the instructions displayed onscreen. If the software fails to
configure your account automatically using the email address and password provided, you will need to
enter the connection settings manually.
3.9. Chatting with the instant messaging application
The instant messaging application is an essential tool, allowing you to communicate in real time with your
friends or colleagues (your contacts). eCAFÉ™ offers an instant messaging service which allows you to
configure several accounts which can be viewed simultaneously.
The instant messaging application is accessible through the Internet and Favorites menus.
The instant messaging application configuration Wizard launches when you run the program for the first
time, to help you configure your account. Follow the instructions displayed onscreen.
User Manual – 37/52
Page 38

eCAFÉ™ Slim HD eCAFÉ™ EX HD
3.10. Social networks – just a click away
Social networks have become an essential component of the Web. They allow you to share your life and
experiences, find friends who share the same interests as you, create interest groups based on specific
subjects and update all this information in real time, 24/7. Social networks offer such immense freedom
that they are followed daily by an increasing number of users, who are drawn to them by their free and
community-oriented aspects.
If you want to keep your friends updated about what you are doing and closely follow your contact's lives
without ever missing the slightest detail, connect to the Internet using your eCAFÉ™, enter your usual
credentials and get all the latest information and news from your contacts, update your wall and send
pokes!
The social networking application is accessible through the Internet menu.
The social networking application configuration Wizard launches when you run the program for the first
time, to help you configure your account. Follow the instructions displayed onscreen.
3.11. Adding and removing shortcuts to your favorite applications
To quickly access your favorite applications, you can add shortcuts providing instant access to these
programs from the eCAFÉ™ Desktop.
To add and remove shortcuts to your favorite applications:
- Click on one of the Desktop's menus (except the Favorites menu) to display the applications in that
category.
- To add a program to your favorites, click on an application using the right touchpad button. The
message Add to favorites is displayed.
- With the left touchpad button, click on the message to add the application to the Favorites menu.
38/52 – User Manual
Page 39

eCAFÉ™ Slim HD eCAFÉ™ EX HD
- To remove a program from your Favorites, access the Favorites menu.
- With the right touchpad button, click on the application that you want to remove from your Favorites. The
message Remove from favorites is displayed.
- With the left touchpad button, click on the message to remove the application from the Favorites menu.
User Manual – 39/52
Page 40

eCAFÉ™ Slim HD eCAFÉ™ EX HD
3.12. Copying files from an external source
The file Explorer allows you to easily transfer your multimedia files to removable media, in order to store
them on your eCAFÉ™.
To copy files from removable media (USB key, SD memory card or external CD/DVD burner):
- Connect the removable media to your netbook. eCAFÉ™ automatically detects the newly
connected device and opens the file Explorer.
- In the file Explorer, select the files that you want to copy to your eCAFÉ™'s memory (hold the
key down to select several files in a row, or hold the key down if
you wish to select several non-consecutive files).
- Press the + keys.
- In the left-hand pane, select a destination for the files.
- Press the + keys.
To copy files via a network connection:
- Connect your eCAFÉ™ to the network using the Ethernet port or a Wi-Fi connection. You can
then access the required files on the network via the file Explorer.
To copy photos from a digital still camera:
- Connect a digital still camera to one of the netbook's three available USB ports.
- Turn your digital camera on. eCAFÉ™ automatically detects the newly connected device.
- In the file Explorer, access the folder containing your digital still camera's photos.
- Select the photos that you want to copy to your eCAFÉ™'s memory (hold the
key down to select several photos in a row, or hold the key down
if you wish to select several non-consecutive photos).
- Press the + keys.
- In the left-hand pane, select a destination for the files.
- Press the + keys.
40/52 – User Manual
Page 41

eCAFÉ™ Slim HD eCAFÉ™ EX HD
We also recommend that you frequently back up any personal or sensitive data that you may
have stored on your netbook.
3.13. Saving data to removable media (USB key, memory card)
In this section, we will explain how to back up your data on various media. You can also visit the
Hwww.ecafe.hercules.comH website: the section dedicated to the eCAFÉ™ will provide you with all the
information you require to create backups of your data.
- Connect the removable media to your netbook. The eCAFÉ™ automatically detects the newly
connected device and opens the file Explorer.
- In the file Explorer, select the files and/or folders that you want to back up (hold the
key down to select several files in a row, or hold the key down to select several nonconsecutive files).
- Press the + keys.
- In the file Explorer, click on the name of the removable media displayed in the left-hand pane.
- Choose a destination for the files.
- Press the + keys.
Your files and/or folders will be copied to your removable media.
3.14. Customizing the menu bar
Your eCAFÉ™ features many preinstalled applications, suited to the most diverse requirements. You can
enable and disable these applications to tailor your computer to your requirements.
To add or remove applications from the menu bar:
- In the menu bar, click System.
- In the Preferences window, click Main Menu.
User Manual – 41/52
Page 42

eCAFÉ™ Slim HD eCAFÉ™ EX HD
- When you click on the menu names in the left-hand section of the screen, the enabled and disabled
applications in that category appear in the right-hand section of the screen.
- To disable an application, select a menu in the Menus list and un-tick (i.e. deselect) the relevant
application's name in the Items list.
- To enable an application, select a menu in the Menus list and tick (i.e. select) the relevant application's
name in the Items list.
- When you’re done, click the Close button.
3.15. Updating the system and applications
42/52 – User Manual
Page 43

eCAFÉ™ Slim HD eCAFÉ™ EX HD
eCAFÉ™ automatically searches for updates to your operating system and installed applications,
according to a planned calendar, to ensure that you always have access to the latest versions. At any
time, you can also run a manual search or change the update search schedule.
Note: if an authentication request window is displayed, enter the administrator password (you
define this password when starting up your system up for the first time – please refer to section
2.2.2. Configuring your eCAFÉ™'s settings and administrator password), then click
Authenticate.
To launch a manual update:
- In the menu bar, click System.
- In the Administration window, click Update Manager.
- Click the Check button to launch the search.
- Select the required updates, then click the Install Updates button.
To plan update searches:
- In the menu bar, click System.
- In the Administration window, click Update Manager.
- Click the Settings button.
- Define the update settings.
3.16. Accessing the help interface
Many applications offer an online help utility, which you can access by pressing F1. For more information
regarding your eCAFÉ™'s applications or operating system, you can also visit the official website:
https://help.ubuntu.com/10.04/index.html.
3.17. Creating a new user
You can create several users for the same eCAFÉ™ netbook, which is particularly useful if you are
sharing your computer with other users. In this case, you will be required to select a user every time you
log in.
User Manual – 43/52
Page 44
eCAFÉ™ Slim HD eCAFÉ™ EX HD
To create a new user:
Note: if an authentication request window is displayed, enter the administrator password (you
define this password when starting up your system for the first time – please refer to section
2.2.2. Configuring your eCAFÉ™'s settings and administrator password), then click
Authenticate.
- Click on the System menu, then select Users and Groups in the Administration window.
- In the Users Settings window, select the user, then click the Add button.
44/52 – User Manual
Page 45

eCAFÉ™ Slim HD eCAFÉ™ EX HD
- Enter the person's full name and user name, then click OK.
- Set the password.
- For more protection, do not tick Don’t ask for password login.
- Click OK.
3.18. Transferring data with Hercules eCAFəSync
To easily transfer your data (videos, music or other documents), you can use Hercules eCAFəSync;
this software is compatible with Windows, Mac and Linux, and is available for download on
www.ecafe.hercules.com.
To install Hercules eCAFəSync:
1. On your computer:
- Download and install Hercules eCAFəSync (Windows, Mac or Linux), following the instructions
displayed onscreen.
2. On your eCAFÉ™:
- Make sure that an SD/SDHC card is inserted in your eCAFÉ™'s internal storage memory expansion slot
(for more information regarding this slot, please refer to section 2.5. An ultra-mobile computer suited to
large files).
- Click on the Accessories menu, then select Hercules eCAFəSync Client to begin the
synchronization process.
- Confirm the synchronization process launch by clicking Yes.
3. Connect the USB/mini-USB cable to your computer's USB port, on one end, and to your eCAFÉ™'s
mini-USB port, on the other.
4. On your computer:
- Click Finish.
Hercules eCAFəSync launches automatically on your computer.
To use Hercules eCAFəSync after installing the software:
1. On your computer:
- Hercules eCAFəSync launches automatically on your computer when you start your computer. The
launch icon is also available on the eCAFÉ™ Desktop.
2. On your eCAFÉ™:
- Make sure that an SD/SDHC card is inserted in your eCAFÉ™'s internal storage memory expansion slot
(for more information regarding this slot, please refer to section 2.5. An ultra-mobile computer suited to
large files).
- Click on the Accessories menu, then select Hercules eCAFəSync Client to begin the
synchronization process.
- Confirm the synchronization process launch by clicking Yes.
- Close the Windows Autoplay window if it appears.
3. Connect the USB/mini-USB cable to your computer's USB port, on one end, and to your eCAFÉ™’s
mini-USB port, on the other.
User Manual – 45/52
Page 46

eCAFÉ™ Slim HD eCAFÉ™ EX HD
Only the contents of the memory card inserted in your eCAFÉ™'s internal storage memory
expansion slot can be accessed (read and written to) from the computer.
Your memory card no longer appears in your eCAFə's File menu, so that Hercules eCAFəSync
retains priority write access.
4. On your computer:
- In Hercules eCAFəSync, click Connect.
Hercules eCAFəSync displays a tree view listing your computer's contents (in the left-hand pane) and
your eCAFÉ™'s contents (in the right-hand pane).
You can now copy data (videos, music tracks or other files) from your PC to your eCAFÉ™(and vice
versa) by simply dragging and dropping the relevant files, or clicking the and arrows after
selecting the relevant files.
46/52 – User Manual
Page 47

eCAFÉ™ Slim HD eCAFÉ™ EX HD
To disconnect from Hercules eCAFəSync and access the contents of your memory card on
eCAFÉ™:
1. On your computer:
- In Hercules eCAFəSync, click the Disconnect button.
- Click the button if you no longer wish to use Hercules eCAFəSync.
2. On your eCAFÉ™:
- Click the icon in the taskbar and confirm your request to disconnect.
Your memory card is now visible again in your eCAFÉ™'s File menu, and you can access its updated
contents.
User Manual – 47/52
Page 48

eCAFÉ™ Slim HD eCAFÉ™ EX HD
United Kingdom
08450800942
Charged at local rate
Monday to Saturday from 8 a.m. to 7 p.m.
United States
1-866-889-5036
Free
Monday to Friday from 9 a.m. to 8 p.m.
Saturday from 8 a.m. to 2 p.m.
(Eastern Standard Time)
Monday to Friday from 6 a.m. to 5 p.m.
Saturday from 5 a.m. to 11 a.m.
(Pacific Standard Time)
Canada
1-866-889-2181
Free
Monday to Friday from 9 a.m. to 8 p.m.
Saturday from 8 a.m. to 2 p.m.
(Eastern Standard Time)
Monday to Friday from 6 a.m. to 5 p.m.
Saturday from 5 a.m. to 11 a.m.
(Pacific Standard Time)
Denmark
80887690
Free
Monday to Saturday from 9 a.m. to 8 p.m.
(English)
Sweden
0200884567
Free
Monday to Saturday from 9 a.m. to 8 p.m.
(English)
Finland
0800 913060
Free
Monday to Saturday from 10 a.m. to 9 p.m.
(English)
TECHNICAL SUPPORT
If you encounter a problem with your product, please go to http://ts.hercules.com and select your
language. From there you will be able to access various utilities (Frequently Asked Questions (FAQ), the
latest versions of drivers and software) that may help to resolve your problem. If the problem persists,
you can contact the Hercules products technical support service (“Technical Support”):
By email:
To reach our Technical Support via email, you must first register online on the http://ts.hercules.com/
website. The information that you provide will help our technicians to resolve your problem as quickly as
possible.
Click on Product Registration and follow the instructions displayed onscreen.
If you have already registered your product, please enter your user info in the Username and Password
fields, then click on Login.
By telephone (if you do not have Internet access):
Hours of operation and telephone numbers are subject to change. Please visit http://ts.hercules.com for
the most up-to-date Technical Support contact information.
Visit the Hercules website (www.ecafe.hercules.com) to view the Frequently Asked Questions (FAQs)
relating to your product, discover your eCAFÉ™'s features and download the latest updates. You can also
discover the extensive range of eCAFÉ™ products and download information about upcoming releases.
48/52 – User Manual
Page 49

eCAFÉ™ Slim HD eCAFÉ™ EX HD
Federal Communication Commission Interference Statement
NOTE: Changes or modifications not expressly approved by the party responsible for compliance could
void the user’s authority to operate the equipment.
This equipment complies with FCC radiation exposure limits set forth for an uncontrolled environment.
End user must follow the specific operating instructions for satisfying RF exposure compliance. This
transmitter must not be co-located or operating in conjunction with any other antenna or transmitter.
NOTE: The mobile device is designed to meet the requirements for exposure to radio waves established
by the Federal Communications Commission (USA). These requirements set a SAR limit of 1.6 W/kg
averaged over one gram of tissue.
NOTE: This equipment has been tested and found to comply with the limits for a Class B digital device,
pursuant to Part 15 of the FCC Rules. These limits are designed to provide reasonable protection against
harmful interference in a residential installation. This equipment generates, uses and can radiate radio
frequency energy and, if not installed and used in accordance with the instructions, may cause harmful
interference to radio communications. However, there is no guarantee that interference will not occur in a
particular installation.
If this equipment does cause harmful interference to radio or television reception, which can be
determined by turning the equipment off and on, the user is encouraged to try to correct the interference
by one or more of the following measures:
- Reorient or relocate the receiving antenna.
- Increase the separation between the equipment and receiver.
- Connect the equipment into an outlet on a circuit different from that to which the receiver is connected.
- Consult the dealer or an experienced radio/TV technician for help.
User Manual – 49/52
Page 50

eCAFÉ™ Slim HD eCAFÉ™ EX HD
WARRANTY INFORMATION
Guillemot Corporation S.A. ("Guillemot") guarantees consumers worldwide that this Hercules product is free from material and manufacturing
defects for a period of two (2) years beginning on the original date of purchase. Should the product seem defective during the period covered by
the warranty, please contact our Technical Support immediately for further information on how to proceed. After contacting our Technical Support,
if it appears necessary to return the product to us, please return the product and its accessories in the original packaging, well packaged and
protected, according to the instructions provided by our Technical Support.
According to the terms of this warranty, following our Technical Support's decision, the defective product may be repaired or replaced. When
authorized by applicable law, any liability incurred by Guillemot and its subsidiaries (including consequential damages) will be limited to repair or
replacement of the product manufactured by Hercules. The consumer's statutory rights on account of applicable law on the sale of consumer
goods are not affected in any way by this warranty.
This warranty will not apply:
(1) If the product has been modified, opened, altered in any way or damaged by inappropriate or abusive use, negligence, an accident or normal
wear; (2) If the product has been used or stored in abnormal conditions (e.g. exposition to adverse weather conditions, to direct sunlight, to water
or to sand) ; (3) For any other reason not relating to a material or manufacturing defect; (4) In the event of non-observance of the instructions
provided in the User Manual or by our Technical Support; (5) To any software not edited by Guillemot, said software being cov ered by a specific
warranty granted by the software's editor; (6) If the warranty seals have been removed or altered in any way; (7) For damages to or the loss of
programs, data or storage media, or for the costs arising from the retrieval of said data; (8) For damages to or the loss of programs or personal
data occurring after repair or replacement of the product; (9) For damages caused by the installation of third-party software or by computer viruses.
Guillemot shall in no event be held responsible for any damage to or loss of personal data, programs, software or removable storage media.
Before returning this program to Technical Support, please create a backup of any personal and/or sensitive data. In addition , in order to preserve
your data's confidentiality, Guillemot recommends you delete any data from your device after backing it up. Guillemot shall in no event be held
responsible for reinstalling or retrieving personal data or programs other than those installed at the time of the product's commercialization.
The warranty applies to your product's display if the display features at least 5 defective pixels (i.e. bright spots or dark spots, a bright spot being a
white pixel permanently displayed on the screen, and a dark spot being a pixel that does not display on the screen.)
In the event where the product is returned to our Technical Support and the warranty cannot be applied owing to the presence of one or several of
the exclusion conditions stated above, the incurred shipping and processing costs will be charged to the consumer.
Trademarks
All rights reserved. eCAFÉ™ are trademarks or registered trademarks of Guillemot Corporation S.A. Freescale and the Freescale logo
are registered trademarks of Freescale Semiconductor, Inc. ARM and Cortex are registered trademarks of ARM Limited. Wi-Fi is a
registered trademark of the Wi-Fi Alliance. HDMI and the HDMI logo are trademarks or registered trademarks of HDMI Licensing, LLC in
the United States and/or other countries. All other registered trademarks and brand names are hereby acknowledged and are the
property of their respective owners. Illustrations not binding. Contents, design and specifications are subject to change without notice
and may vary from one country to another.
This product is not approved, endorsed, affiliated with Ubuntu or its related projects and is not certified by Canonical.
Made in China
Statement of Compliance with EU Regulations
Hereby, GUILLEMOT CORPORATION declares that the eCAFəSlim HD/eCAFəEX HD complies with the main requirements and
other relevant clauses of Directive RTTE 1999/5/CE, of Directive CEM 2004/108/CE and with the standards relating to electrical security
(IEC 60950, 2001 Edition / EN 60950-1, 2001 Edition / NF EN 60950, Amendment A11-2004). The compliance statement can be viewed
on the following website:
ftp://ftp.hercules.com/EC-SlimHD/DoC-en_UMPC_EC-SlimHD.pdf
ftp://ftp.hercules.com/EC-EXHD/DoC-en_UMPC_EC-EXHD.pdf
Copyright
© 2011 Guillemot Corporation S.A. All rights reserved.
No part of this manual may be copied, summarized, issued, posted, stored in a search engine or translated into any language or
computer language, for any purpose or by any means whatsoever, whether electronic, mechanical, magnetic, manual, by means of
photocopies, recordings or otherwise, without the express written authorization of Guillemot Corporation S.A.
50/52 – User Manual
Page 51

eCAFÉ™ Slim HD eCAFÉ™ EX HD
End User License Agreement
IMPORTANT: Please read the following End User License Agreement before using the eCAFÉ™ device. The term "Software" refers to
all executable programs, managers, libraries, data files and to any documentation relating to the programs, as well as the complete
operating system included in the eCAFÉ™ product. The Software is licensed, and not sold, to the User, exclusively for use complying
with the terms of this License Agreement. You hereby accept and agree to abide by the Terms & Conditions of this License Agreement.
If you disagree with the Terms & Conditions of this License Agreement, please do not use the Software.
The Software is protected by international copyright laws and agreements, as well as other international laws and agreements relating
to intellectual property.
The Software (excluding the software sub-applications) remains the property of Guillemot Corporation S.A. All rights reserved. Guillemot
Corporation S.A. grants only a limited and non-exclusive right to use the Software.
Guillemot Corporation S.A. reserves the right to cancel this License Agreement in the event of failure to abide by its Terms
and Conditions.
License granted:
1. The license is granted to the original Buyer alone. Guillemot Corporation S.A. remains the sole owner and holder of the Software
(excluding the software sub-applications), and reserves all rights that are not expressly granted by this License Agreement. The User
is not allowed to sub-license the rights granted by this License Agreement. The User is allowed to transfer this License, provided that
the original Buyer retains no part of the Software and that the Transferee reads and accepts the Terms & Conditions of this License
Agreement.
2. The Buyer may only use the software on one computer at a time. The machine-readable part of the Software may be copied to
another computer, provided that the Software is deleted from the first computer and that it is impossible to use the Software on
several computers at the same time.
3. The Buyer hereby acknowledges and accepts the copyright belonging to Guillemot Corporation S.A. The copyright shall in no event
be removed from the Software, nor from any documentation, whether printed or electronic, provided with the Software.
4. The License grants the User the right to create one (1) copy of the machine-readable part of the Software for archival purposes,
provided that the User also copies Software's copyright.
5. The free software sub-applications sublicensed by Guillemot Corporation S.A. are subject to the Terms & Conditions of open source
licenses or the General Public License (GPL), available at the following address: http://fsffrance.org/gpl/gpl-fr.fr.html. Some of these
software sub-applications have been modified by Guillemot Corporation S.A. (the list of said software sub-applications is available on
the following website: http://www.ecafe.hercules.com).
6. Except within the limits expressly allowed by this License Agreement, the Buyer may not agree or allow any third party to agree to:
grant a sublicense; provide or divulge the Software to other third parties; allow use of the Software on several computers at a time;
perform alterations or copies of any kind; reverse engineer, decompile or modify the Software in any way or attempt to obtain
information relating to the Software that is not accessible to the User; make copies or translations of the User Manual.
Warranty limitation:
The Software is provided "as is", with no guarantee whatsoever from Guillemot Corporation S.A. regarding its use and/or performance.
Guillemot Corporation S.A. does not guarantee that the operation of the Software will be free from interruptions or errors. The use or the
performance of the Software remain under the Buyer's entire responsibility, and Guillemot Corporation S.A. can provide no guarantee of
any kind with regard to the performance and results obtained by the Buyer while using the Software. No guarantee of any kind, whether
explicit or implied, is offered by Guillemot Corporation S.A. with regard to the non-violation of third party rights, the merchantability or the
adequacy of the Software for a specific use.
In no event shall Guillemot Corporation S.A. be held liable in the event of damages of any kind arising from the use or the inability to use
the Software.
Applicable law:
The Terms and Conditions of this License Agreement are subject to French Law.
User Manual – 51/52
Page 52

eCAFÉ™ Slim HD eCAFÉ™ EX HD
ENVIRONMENTAL PROTECTION RECOMMENDATION
At the end of its working life, this product should not be disposed of with standard household waste, but rather
dropped off at a collection point for the disposal of Waste Electrical and Electronic Equipment (WEEE) for
recycling.
This is confirmed by the symbol found on the product, user manual or packaging.
Depending on their characteristics, the materials may be recycled. Through recycling and other forms of
processing Waste Electrical and Electronic Equipment, you can make a significant contribution towards helping to
protect the environment.
Please contact your local authorities for information on the collection point nearest you.
52/52 – User Manual
 Loading...