

Page 1

CONTENTS
1. INTRODUCTION ................................................................................................................ 2
2. THE VIDEO CAPTURE PRESET ...................................................................................... 3
3. THE AUDIO EDITOR PRESET.......................................................................................... 4
4. THE VIDEO EDITOR PRESET .......................................................................................... 5
5. PERSONALIZING A PRESET ...........................................................................................6
6. EXAMPLE OF HOW TO PERSONALIZE A PRESET....................................................... 8
Page 2

1. INTRODUCTION
The ShuttlePRO controller uses presets to link its buttons to different functions in various
programs. The idea is to program an application’s keyboard shortcuts onto the ShuttlePRO’s
buttons.
For example, the standard keyboard shortcut allowing you to save a file is [Ctrl]+[S]. This function
can be attributed to a button on the ShuttlePRO; once this is done, you will no longer have to click
on File/Save to save a file, but rather simply press the corresponding button. This is referred to
as emulating one of the application’s functions.
This manual is a reference guide for the ShuttlePRO, explaining in detail the functions of all
buttons in each of the MediaStudio Pro software suite's three presets: Video Capture, Audio
Editor and Video Editor.
The presets are meant to be generic and are therefore adapted to the needs of the majority of
users. Nevertheless, you may wish to implement other functions that you find yourself using
frequently. This process is explained in detail in the Personalizing a preset
illustrated in the Example of how to personalize a preset
section.
section, and is further
2/9 – User Manual
Page 3
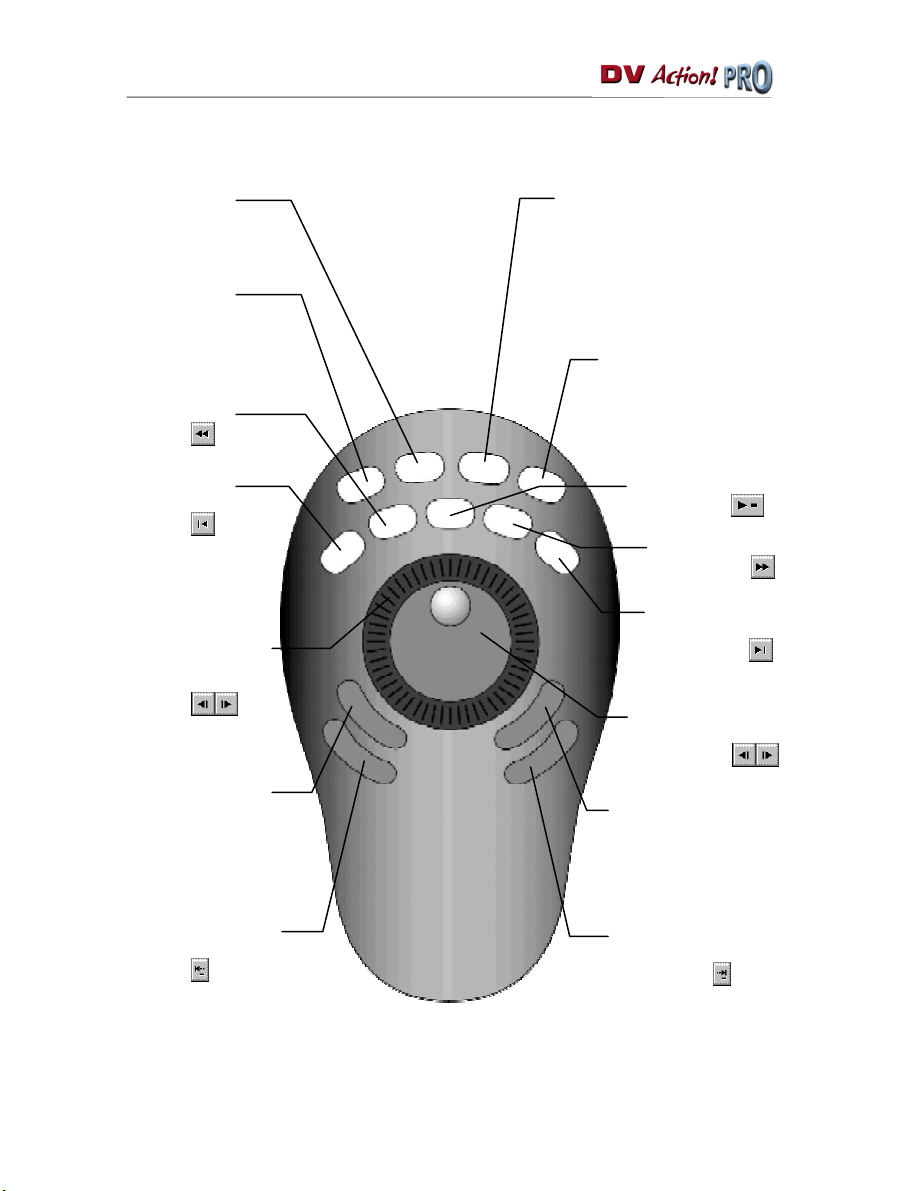
2. THE VIDEO CAPTURE PRESET
Save a video file.
Function emulated:
File/Save As....
Open a video file.
Function emulated:
File/Open...
Fast Rewind.
Icon emulated:
.
Open the Preferences window.
This window allows you to set the
Video Capture module’s general
options.
Function emulated:
File/Preferences...
Exit the Video Capture
module.
Function emulated:
File/Exit.
.
Go to the start of
the video file.
Icon emulated:
Go forward/backward
quickly (between 2 and 60
images per second).
Icon emulated:
(repeated presses).
Close door (for video
peripherals that can be
controlled via software).
Function emulated:
Control/Door Close.
Set the start ("Mark In") of a
video capture.
Icon emulated:
Note: some functions are only active once a video has been captured.
Play/Pause.
Icon emulated:
Fast Forward.
Icon emulated:
Go to the end of the
video file.
Icon emulated:
Go forward/backward
frame by frame.
Icon emulated:
Open door (for video
peripherals that can be
controlled via software).
Function emulated:
Control/Door Open
Set the end ("Mark Out")
of a video capture.
Icon emulated:
.
User Manual – 3/9
Page 4
[Pag
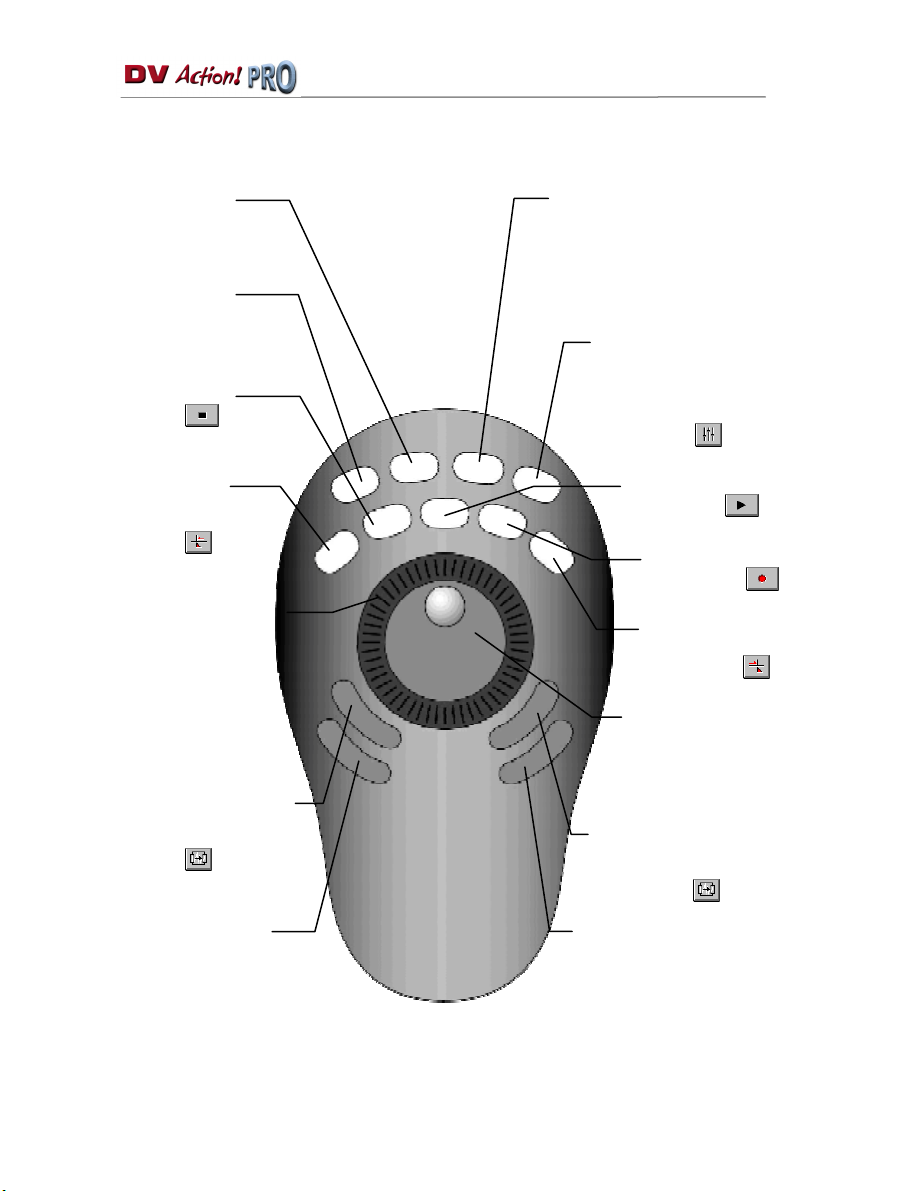
3. THE AUDIO EDITOR PRESET
Save an audio file.
Function emulated:
File/Save.
Open an audio file.
Function emulated:
File/Open...
Stop playback.
Icon emulated:
.
Open the Preferences window.
This window allows you to set the
Audio Editor’s general options.
Function emulated:
File/Preferences...
Open the Windows mixer,
allowing you to adjust the
volume and/or select the
source from which to
record.
Icon emulated:
.
Move the point of
insertion to the
previous cue.
Icon emulated:
Display the next/previous
section of the audio file.
Note: this function is only
active when the audio file is
not displayed in the window in
its entirety.
Function emulated: [Page up]/
e down].
Set the start ("Mark In") of a
selection (during playback of
the sound).
Icon emulated:
Move the point of insertion
to the start of the audio file.
Function emulated:
Control/Go To Start
.
Note: some functions are only active when a sound is being edited.
Play/Pause.
Icon emulated:
Record a sound.
Icon emulated:
Move the point of insertion
to the next cue.
Icon emulated:
Increase/reduce the level
of zoom.
Function emulated:
View/Zoom In View/Zoom Out.
Set the end ("Mark Out") of a
selection (during playback of
the sound).
Icon emulated:
Move the point of insertion
to the end of the audio file.
Function emulated:
Control/Go To End
.
4/9 – User Manual
Page 5

4. THE VIDEO EDITOR PRESET
Set Mark In*.
Icon emulated:
Clear Mark In*.
Set Mark Out*.
Icon emulated:
Clear Mark Out*.
Go to Mark In**.
Icon emulated:
Move the point of
insertion to the start
of the sequence**.
Go forward/backward
quickly (between 5 and 60
images per second)**.
Icon emulated:
(repeated presses).
Play the multimedia element
from Mark In to Mark Out**.
Icon emulated:
Reduce the level of zoom.
This function is accessible in
the Timeline.
Function emulated:
View/Ruler Unit/Zoom Out
.
* This function is only accessible in the Source window.
** This function is accessible in the Source and Preview windows.
Play/Pause**.
Icon emulated:
Go to Mark Out**.
Icon emulated:
Move the point of
insertion to the end of
the sequence**.
Go forward/ backward
frame by frame**.
Icon emulated:
Play the multimedia element
to Mark Out**.
Icon emulated:
Increase the level of zoom.
This function is accessible in the
Timeline.
Function emulated:
Unit/Zoom In
.
View/Ruler
User Manual – 5/9
Page 6

5. PERSONALIZING A PRESET
ShuttlePRO comes with a variety of presets for different video editing applications, including
Ulead MediaStudio Pro. These presets will allow you to access each program’s essential
functions via the ShuttlePRO.
Nevertheless, some presets may suit you better than others. For example, the function
programmed onto a given button may not seem particularly useful to you, while a function that you
find indispensable might not have been integrated into the preset. With this in mind, the software
helpfully allows you to modify existing presets in order to redefine buttons’ functions.
Similarly, if you are using an application for which no preset is available, you can create your own
and define the function of each of the ShuttlePRO’s buttons.
The procedure outlined below explains how to personalize your presets:
- Click on the icon.
- Click on Open ShuttlePRO Control Panel....
The preset personalization interface appears.
If you wish to modify an existing preset:
- Select the preset to be modified from the Target Application list box.
If you wish to create a new preset:
File/Create New Settings
- Click on
- Enable the Create Empty Settings option.
- Click on OK.
.
A dialog box appears, asking you to select the executable file corresponding to the application for which you
would like to create a preset.
- Select the executable file in question and click on Open.
Note: the executable files corresponding to the three MediaStudio Pro modules are located by
default in C:\Program Files\Ulead Systems\Ulead MediaStudio Pro 6.5 VE (aeditor.exe for the
Audio Editor module, VCapture.exe for the Video Capture module and veditor.exe for the Video
Editor module).
- Rename the preset, if necessary (by default, the preset’s name corresponds to the name of the executable
file) by clicking on the icon and selecting the
- Press the button onto which you would like to assign a function (or turn the jog wheel to the appropriate
position, as the interface displays the different positions:
1 to 7).
- Click on the
Computer Response
button to select the type of action to be carried out:
Rename Settings
Shuttle in Left
option.
or
Shuttle in Right
(numbered from
6/9 – User Manual
Page 7

Do Nothing: this option disables the button.
Same as Lower Value: this option can only be used for positions on the Shuttle’s jog wheel. It
allows you to apply the same action to a position as that defined for the previous position.
Example: you have emulated the Fast-forward action on the Shuttle in Right 1 position. By
selecting the Same as Lower Value option, the Shuttle in Right 2 position will automatically
emulate the Fast-forward action.
Type Keystroke: this option allows you to emulate a keyboard shortcut.
Please refer to the software’s documentation for a list of keyboard shortcuts, then click inside the
Keystroke field and press the keys which make up the keyboard shortcut you wish to use.
The Frequency field then allows you to select the manner in which the keyboard shortcut will be
emulated. Three types of frequency are available: a single time, a certain number of times per
second, or hold down. For keyboard shortcuts corresponding to single actions (example: open a
file), the Once Only frequency is appropriate. For actions such as Fast-forward, it is best to
select the Hold Down and Auto-Repeat frequency, or to select a precise rhythm (for each
position on the Shuttle’s jog wheel, for example).
For the action to be carried out immediately, enable the Sync release option. This simulates an
immediate release of the key, resulting in an instantaneous action.
Enter a description of the action in the Comment field, in order to help you to easily identify each
button’s function in your different presets.
Press Modifier Keys: this option allows you to emulate pressing one or more special keys (Shift,
Control, the Windows key, Alt or Alt Gr - the right Alt key on European keyboards). An example:
holding down the [Shift] key often allows you to select several files. Simply click on the button(s)
you wish to use.
For the action to be carried out immediately, enable the Sync release option. This simulates an
immediate release of the key, resulting in an instantaneous action.
Enter a description of the action in the Comment field, in order to help you to easily identify each
button’s function in your different presets.
Scroll Up / Scroll Down: these options allow you to scroll the screen up or down. The Scroll
Amount field appears, allowing you to set the scrolling speed (expressed in number of lines).
Enter a description of the action in the Comment field, in order to help you to easily identify each
button’s function in your different presets.
- Repeat this procedure for each of the buttons you wish to program.
- Once your preset has been defined, click on OK.
User Manual – 7/9
Page 8

6. EXAMPLE OF HOW TO PERSONALIZE A PRESET
What follows is a step-by-step example of how to personalize a preset. The Audio Editor module’s
preset allows you to define the start and end of a selection, but does not enable you to listen to it
again using the ShuttlePRO. Therefore, we will modify the existing preset and replace access to
the Preferences window (which is most useful when getting to know the software) with the Read
selection function.
- Click on the
- Click on
- Select the MediaStudio Pro Audio Editor preset in the
Target Application list box.
- The Preferences window is opened by pressing button 3.
Press this button to modify its function.
- In the Keystroke field, press the shortcut key corresponding
to the Read Selection function, which happens to be [F2].
- Enter a new description of the action in the
- Click on
icon.
Open ShuttlePRO Control Panel...
Apply
to save the changes.
Comment
.
field.
8/9 – User Manual
Page 9

Trademarks
Hercules® and DV Action!™ are trademarks and/or registered trademarks of Guillemot Corporation S.A. Microsoft® Windows® is a registered
trademark of Microsoft Corporation in the United States and/or other countries. Ulead MediaStudio Pro™ is a trademark of Ulead Systems, Inc.
ShuttlePro™ is a trademark of Contour AVS, Inc. All other trademarks and brand names are hereby acknowledged and are property of their
respective owners. Illustrations not binding. Contents, designs and specifications are subject to change without notice and may vary from one
country to another.
Copyright
© Guillemot Corporation S.A. 1999-2002. All rights reserved.
This publication may not be reproduced in whole or in part, summarized, transmitted, transcribed, stored in a retrieval system, or translated into any
language or computer language, in any form or by any means, electronic, mechanical, magnetic, photocopying, recording, manual or otherwise,
without the prior written permission of Guillemot Corporation S.A.
Disclaimer
Guillemot Corporation S.A. reserves the right to make changes to specifications at any time and without notice. The information provided by this
document is believed to be accurate and reliable. However, no responsibility is assumed by Guillemot Corporation S.A. either for its use or for the
infringement of patents or other rights of third parties resulting from its use. This product may exist in a light or special version for PC integration or
other purposes. Certain functions detailed in this manual may not be available in these versions. Wherever possible, a
included on the installation CD-ROM detailing the differences between the supplied product and the product described in the present
documentation.
README.TXT
will be
Log on now to our website (www.hercules.com) to download the latest drivers and software,
consult the list of Frequently Asked Questions (FAQ) relating to your product and take advantage
of user manual updates. You can also have a look at the complete range of Hercules products
and find out about forthcoming releases.
User Manual – 9/9
 Loading...