

GETTING STARTED WITH DJCONTROL AIR+ AND DJUCED™ 40°
1/10 2/10
1 -
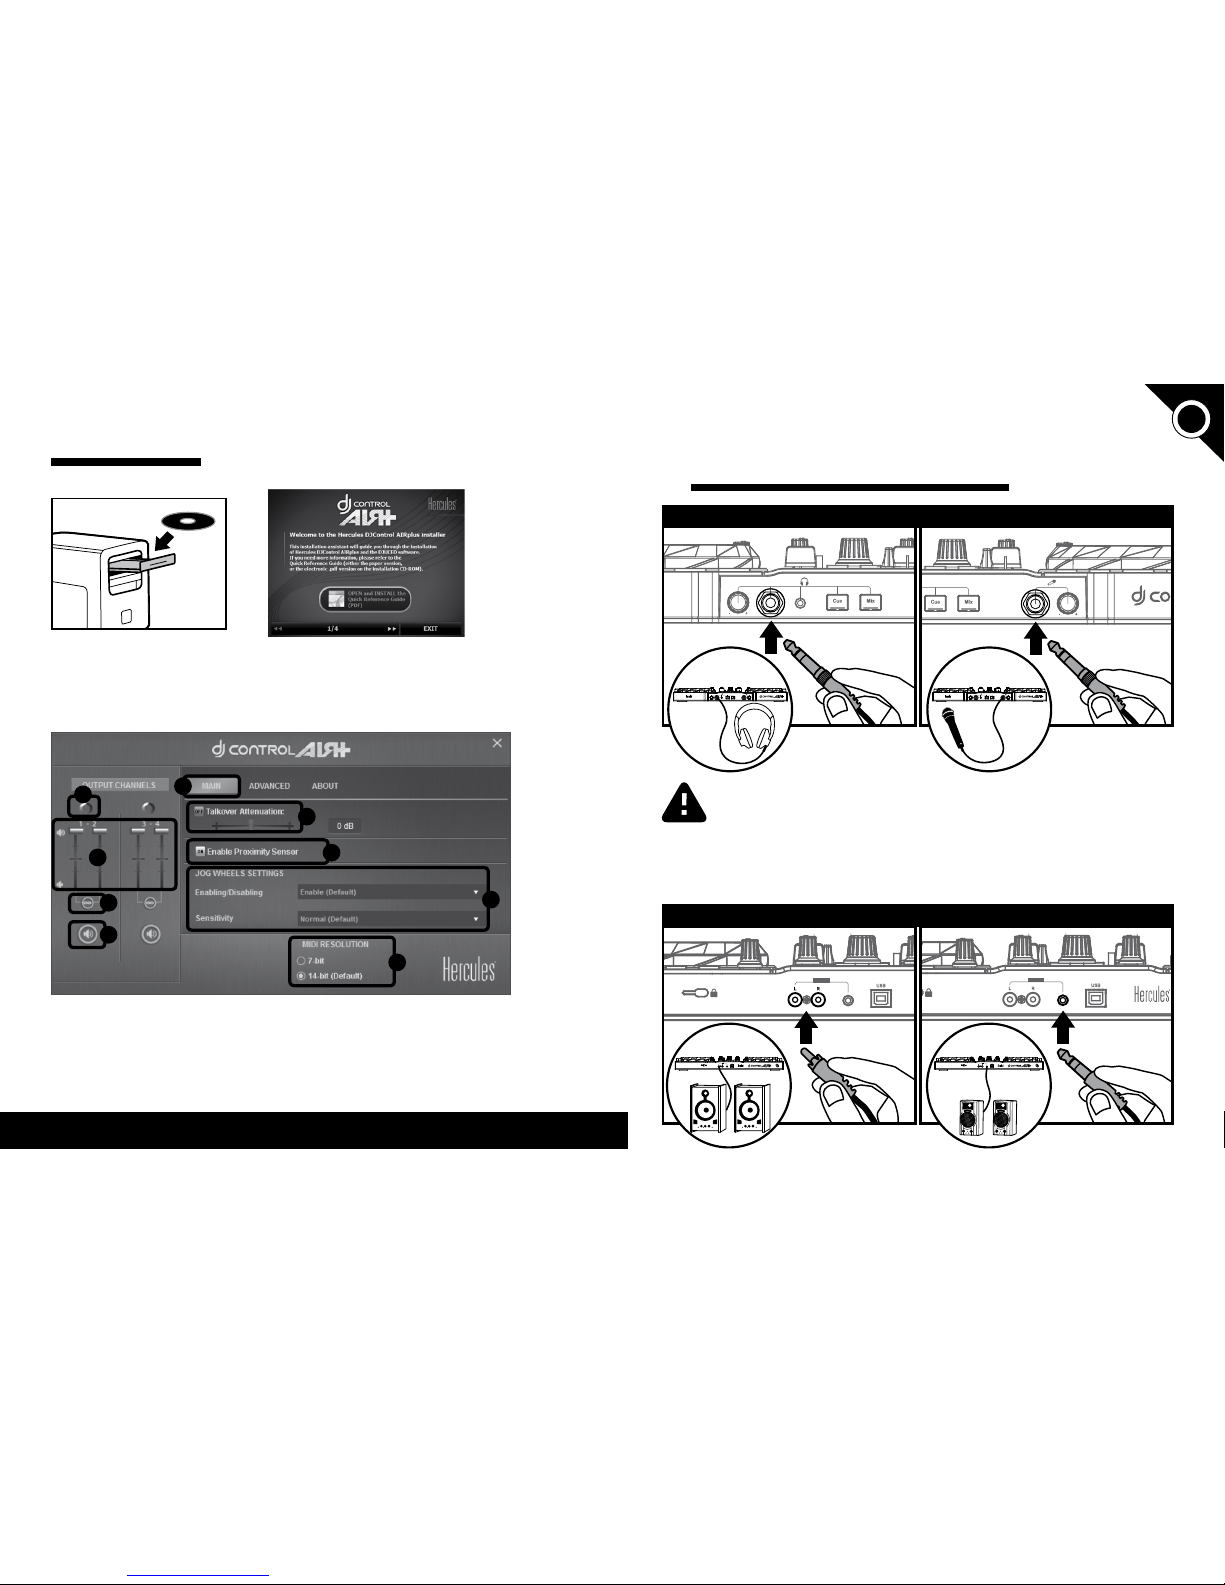
CONNECTING HEADPHONES,
A MICROPHONE
AND SPEAKERS
When connecting headphones, make sure that the volume level is suitable
for listening with headphones: start playing a music track before putting
on the headphones, and turn down the volume if it seems that the sound
coming from the headphones is too loud.
Microphone: you can only connect a balanced microphone, such as a dynamic
balanced microphone.
FRONT PANEL: HEADPHONES AND MICROPHONE
REAR PANEL: SPEAKERS
INSTAllATION
• Run the installer program.
• Follow the instructions.
• Insert the CD-ROM .
The DJContr ol AIR+ drivers and co ntrol panel sof tware are insta lled on your syste m,
along wit h the DJUCED™ 40° softwar e.
The DJContr ol AIR+ control pane l:
1- Main tab
2- Output balance (left/
right) for channels
3- Volume on channels
1-2 and 3-4
4- Unlock/lock right and left
channel volume
5- Mute on/o
6- Adjust talkover
attenuation level
7- Disable/enable proximity
sensor
8- Set jog wheels (disable/
enable and set sensitivit y)
9- Select MIDI resolution
More information (forum, tutorials, videos...) available at
www.HERCUlESDJMIXROOM.com
Please no te that the DJContro l AIR+ control panel m ay dier s lightly on Mac.
1
6
7
2
3
4
5
8
9
UK
US

3/10 4/10
3 -
MONITORING A TRACK
Monitoring lets you prepare the next
track to be played (following the track
that you are currently playing for your
audience). You will use monitoring to
beatmatch the next track to be played,
or pause the track at a precise spot so
that playback will start from this exact
position. Or you can place a HotCue
point, which will let you star t playback
of the track from that point (please also
see section 6 – WORKING WITH HOTCUE
POINTS).
3.1 You are playing a track on deck A, and
want to monitor the next track on deck B.
3.2 Press the Cue button b efore you start
playing the track to be monitored.
3.3 Press the Headphones button on deck
B (the deck on which the track that you
want to monitor is loaded).
3.4 Adjust the vol ume on your headphon es
using the headphones volume knob.
3.5 Start playing the track to be monitored
on deck B. Prepare the track (beatmatch
the track, place a HotCue point...).
B
2 - lOADING YOUR MUSIC
IN DJUCED™ 40°
Use the Files / Folders rotary browser knob to browse through
les and folders.
Browse through the list of
folders or through les:
Press the browser knob to
toggle between folders/les:
Press the Load A or Load B buttons to enter/exit
the selected folder, or load the selected le on the
corresponding deck:
2.1 Browse to the location where your music les are stored on your computer.
2.2 After highlighting a track, press Load A to load the track on deck A, or press Load B
to load the track on deck B. DJUCED™ 40° automatically analy zes the BPM (number of
beats per minute) of the track you have loaded.
DJUCED™ 40 ° lets you play th e most popular a udio le form ats (mp3, wav, wma, aif.. .)
if the codec is installed on your computer. If a le format is not pro perly recognized
in iTunes, Windows Media Player... update your version of the software in question.
LOAD A LOAD B
UK
US

5/10 6/10
5 -
SCRATCHING
ON A TRACK
5.1 Make sure that the Vinyl button is lit up,
so that you are in Scratch mode.
5.2 Star t playing a track loaded on deck A ,
for example.
5.5 ... and gently turn the jog wheel to the
right and to the left, in succession.
5.3 Place your hand on the jog wheel on
deck A, as shown in the illustration.
5.4 Press down slightly on the jog wheel...
A
4 -
MIXING TRACKS
Mixing tracks means to link up songs,
one after another, without any gaps or
silences between them.
4.1 You have loaded a tr ack onto each deck
(A and B). Position the volume faders as
shown below.
4.2 You start o by playing the track on
deck A.
4.3
Set the crossfader to the side of the deck
on whi ch the track is playi ng (he re, to the le ft).
4.4 Press the Mix button on the front
panel. The sound that will be played for
your audience on the speakers will be the
same as the sound being played on your
headphones.
Adjust the volume on your headphones
using the headphones volume knob.
4.7 To make the transition, progressively
move the crossfader toward the deck on
which the new track is being played (here,
to the right).
When there are 30 seconds remaining
until the end of the track, an alert is
displayed to let you know that it's time
to get ready to play the n ext track.
4.5
Before the end of the track being played,
start playing the track loaded on deck B.
4.6
To ensure a transition at th e same tempo,
synchronize the BPM (number of beats per
minute) of the track that you are getting
ready to play. Here, pre ss the Sync button on
deck B (1), so that the BPM value of this track
will match the BPM of the track that is about
to nish (on deck A). Or set the same BPM as
on Deck A using the pitch fader (2).
A
A B
B
A B
1 2
UK
US

7/10 8/10
8 -
WORKING WITH EFFECTS
8.1 Applying an eect on a trac k that has been load ed and is being played :
Make sure that the Bank 1 but ton is on. Press but ton(s) 1, 2 and/or 3 to toggle the corresponding
eect(s) on or o. Press b utton 4 to toggle MacroFx (a combination of eects) on or o.
The Mapping tab in the SETTINGS pan el of th e DJUC ED™ 40 ° sof twa re lets y ou choo se
from among the dierent mapping congurations available for eect s and loops.
Th e corr espon ding e ec t is displaye d in DJUCED™ 40°, and is app lied to the tra ck being pl ayed .
7 -
WORKING WITH SAMPlES
Playing a sample on a track that has
been loa ded and is being playe d:
7.1 Make sure that the HotCue/Sample
button is on (this is Sample mode).
7. 2 Tap on one or more pads to trigger
the samples (a short snippet of music or
sound). The more pressure you apply on
the pad, the louder the volume of the
sample played will be; however, you can
disable this velocity-dependent aspect
in the control panel, if you prefer. When
a sample is triggered on a pad, the pad
stays lit up t he same amount o f time as the
sample length: perhaps one second, for a
short so und like a drum hit ; a few seconds,
for a sample of music (for exampl e).
6 -
WORKING WITH HOTCUE POINTS
A HotCue point is a marker that you can place in a music track . It lets you start
playback of the trac k from that point.
6.1 Make sure that the HotCue/Sample
button is o (this is HotCue mode, the
default mode).
6.2 You can place up to 4 markers, known as HotCue point s: press pad 1 to place HotCue 1,
pad 2 to place HotCue 2, etc. Once this is done, when you are in HotCue mode simply press
one of pads 1 to 4 to access the corresponding marker in the track.
When you pr ess the Cue butt on, playback st arts from th e last HotCue poi nt you have
placed in t he track.
6.3 To delete a HotCue point: when in HotCue mode, press the Shift button and press
the pad associated with the HotCue point that you want to delete. Or you can click on the
Minus sign button (in the DJUCED™ 4 0° soft ware) to delete the corresponding HotCue
point.
UK
US

9/10 10/10
10 - USING THE AIR CONTROl
11 - CREATING A PlAYlIST
10.1 In the DJControl AIR+ control panel, make sure that the proximity sensor (air
control) i s enabled.
A playlist is a set of tracks that you choose to group together – as part of a specic
genre (ele ctro, rock.. .) or theme (favorites, p arty, birthday, 80 s...).
10.2 Make sure that the Bank 1 button is on. Press and
hold button 1, 2, 3 or 4 and move your hand above
the proximity sensor at the same time to modulate the
amount of the eect applied.
11. 2 Click the button to crea te a playlist.
Enter a name for the playlist, then click OK.
11.1 Highlight one of the tracks
that you want to add to the
playlist, using the Files / Folders
rotary browser knob:
The new playlist app ears in the Playlists folder.
11. 3 Return to the folder containing your
music, using these controls:
11. 4 In DJUCED™ 4 0°, select one or more
tracks using your mouse.
By holding down the SHIFT key on your
computer's keyboard, you can select
several con secutive les.
Drag and drop the selected les into the
pl ayli st you ha ve cr eat ed (her e, “My Playlist”).
The button appears on the left.
9 -
WORKING WITH lOOPS
9.1 Looping in or out
Make sure that the Bank 2 but ton is on.
Then press bu tton 1 to set the loop’s st art point, and but ton 2 to set the loop’s end poin t.
Use the vertical lines in DJUCED™ 40° (1 line = 1 beat), as well as the music being played, to
help you determine the best place for the end of the loop.
9.2 Increasing or decreasing the length of the loop
Make sure that the Bank 2 button is on. Then press but ton 3 to divide the length of the
current loop in half, or butt on 4 to double the length of the loop.
Press the MAG IC button to instantly split the current loop into 4 parts, and
assign the par ts of the loop to the 4 pads. If you press the MAGIC button without
having a current loop, nothing will happen and a message will be displayed at the
bottom of the DJUCED™ 40 ° window, instructing you to rst create a loop before
you can generate samples.
DJUCED™ 40° plays a part of the track as a loop.
÷
2
X
2
UK
US
 Loading...