

Page 1
CONTENTS
1. INTRODUCTION................................................................................................................ 3
2. MINIMUM SYSTEM REQUIREMENTS.............................................................................. 3
3. INSTALLATION ................................................................................................................. 4
3.1. Installing drivers and software .................................................................................... 4
3.1.1. Installation in Windows 7 / Vista ..................................................................... 5
3.1.2. Installation in Windows XP.............................................................................. 7
3.1.3. Installation on Mac .......................................................................................... 8
3.2. Connecting and disconnecting your DJ Console 4-Mx............................................. 10
4. OVERVIEW ...................................................................................................................... 11
4.1. The top panel ............................................................................................................ 11
4.2. The back panel ......................................................................................................... 13
4.3. The front panel.......................................................................................................... 14
5. THE DJ CONSOLE 4-MX CONTROL PANEL ................................................................15
5.1. Accessing the control panel on PC........................................................................... 15
5.2. Accessing the control panel on Mac ......................................................................... 15
5.3. Using the DJ Console 4-Mx control panel ................................................................ 15
5.3.1. General control panel settings ...................................................................... 16
5.3.2. Main tab ........................................................................................................ 17
5.3.3. ASIO tab (not available on Mac) ................................................................... 17
5.3.4. Audio tab (not available on PC) ................................................................... 18
5.3.5. Advanced tab ............................................................................................... 18
5.3.6. About tab...................................................................................................... 19
6. OUTPUT OPTIONS.......................................................................................................... 20
6.1. Connecting speakers and/or an external mixer to your DJ Console 4-Mx ............... 20
6.2. Connecting headphones ........................................................................................... 20
7. INPUT OPTIONS.............................................................................................................. 21
7.1. Connecting external audio sources .......................................................................... 21
7.2. Connecting a microphone ......................................................................................... 22
ITALIANO DEUTSCH ESPAÑOL NEDERLANDS ENGLISH FRANÇAIS
Page 2

8. DJ CONSOLE 4-MX FEATURES.....................................................................................22
8.1. Jog wheels ................................................................................................................22
8.2. Faders (sliders) .........................................................................................................23
8.3. Play/Pause, and Cue buttons....................................................................................23
8.4. Stop button ................................................................................................................ 24
8.5. Rewind and Fast forward buttons ............................................................................. 24
8.6. Pitch settings .............................................................................................................24
8.7. Source buttons ..........................................................................................................24
8.8. Shift button (for loops/cue/sampler/effects), and buttons 1-6 ................................... 25
8.9. Load on Left Deck / Load on Right Deck buttons...................................................... 25
8.10. Cue Select Left Deck / Cue Select Right Deck buttons ............................................25
8.11. Browser buttons: Up and Down................................................................................. 25
8.12. Cue/Mix knob ............................................................................................................25
8.13. Equalization knobs ....................................................................................................25
9. DJING BASICS ................................................................................................................26
10. CONFIGURATION IN MIDI MODE...................................................................................27
11. FAQ ................................................................................................................................27
12. TECHNICAL SUPPORT ...................................................................................................28
12.1. Warranty information .................................................................................................29
12.2. Additional warranty provisions................................................................................... 29
ENVIRONMENTAL PROTECTION RECOMMENDATION .......................................................30
Page 3

1. INTRODUCTION
DJ Console 4-Mx is a high-performance DJ controller that opens up the doors to mixing music on
your computer. DJ Console 4-Mx is a 4-deck controller, allowing you to control up to 4 audio
tracks on independent decks, thereby giving you great flexibility in terms of mixing. Intuitive and
fun to use, DJ Console 4-Mx lets you put your own mark on your favorite music and share it with
your friends to host great parties or make creative mixes.
DJ Console 4-Mx comes bundled with a tailored version of the VirtualDJ mixing software,
ompatible with both PC and Mac: the software features an interface that has been tailored for the
c
DJ Console 4-Mx, and supports 4-deck mixing. With many useful features and mixing functions,
VirtualDJ makes it easy to mix like a pro! DJ Console 4-Mx measures 40cm x 25cm (15.7” x
9.8”): large enough for comfortable mixing with tons of controls, but still compact enough to be
portable. DJ Console 4-Mx also includes its own carry bag, making it easy to take with you
wherever you go.
DJ Console 4-Mx functions with digital audio files, including MP3s. We would like to draw your
ntion to the fact that musical creations are protected by copyright and that you should comply
atte
with all applicable laws. We strongly encourage you to support artists by acquiring their works
legally.
2. MINIMUM SYSTEM REQUIREMENTS
PC:
Desktop/laptop PC with Intel Pentium III/Athlon 1.5GHz or compatible processor or higher
Operating system: Microsoft Windows XP® / Vista® / 7™ (32 or 64-bit)
1GB RAM
Available USB bus-powered port: USB 2.0 (recommended) or USB 1.1
Headphones and amplified speakers
CD-ROM or DVD-ROM drive
Graphics card supporting 1024 x 768 resolution
Internet connection (strongly recommended) + 100MB free disk space for installing
lications
app
Mac:
Desktop/laptop Mac with 1.5 GHz processor (G4, G5, Core Duo Series) or higher
Operating system: Mac OS 10.5 / 10.6
1GB RAM
Available USB bus-powered port: USB 2.0 (recommended) or USB 1.1
Headphones and amplified speakers
CD-ROM or DVD-ROM drive
Graphics card supporting 1024 x 768 resolution
Internet connection (strongly recommended) + 100MB free disk space for installing
lications
app
ITALIANO DEUTSCH ESPAÑOL NEDERLANDS ENGLISH FRANÇAIS
User Manual – 3/30
Page 4
3. INSTALLATION
3.1. Installing drivers and software
On both PC and Mac: prior to inserting the installation CD-ROM in your computer,
make sure that you have Administrator rights on your system. Do not install the DJ Console 4Mx with a Guest account: the installation may fail, as you need permission to write in the
Documents folder to install the VirtualDJ software.
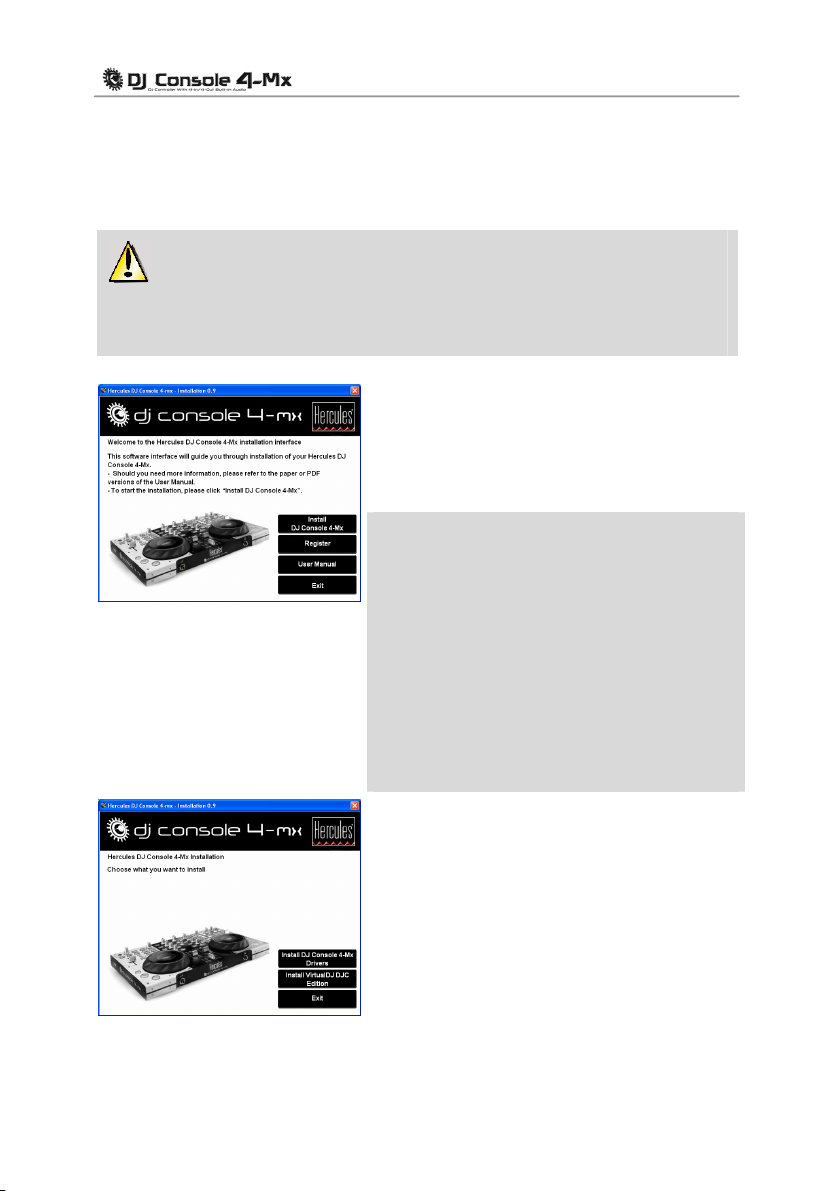
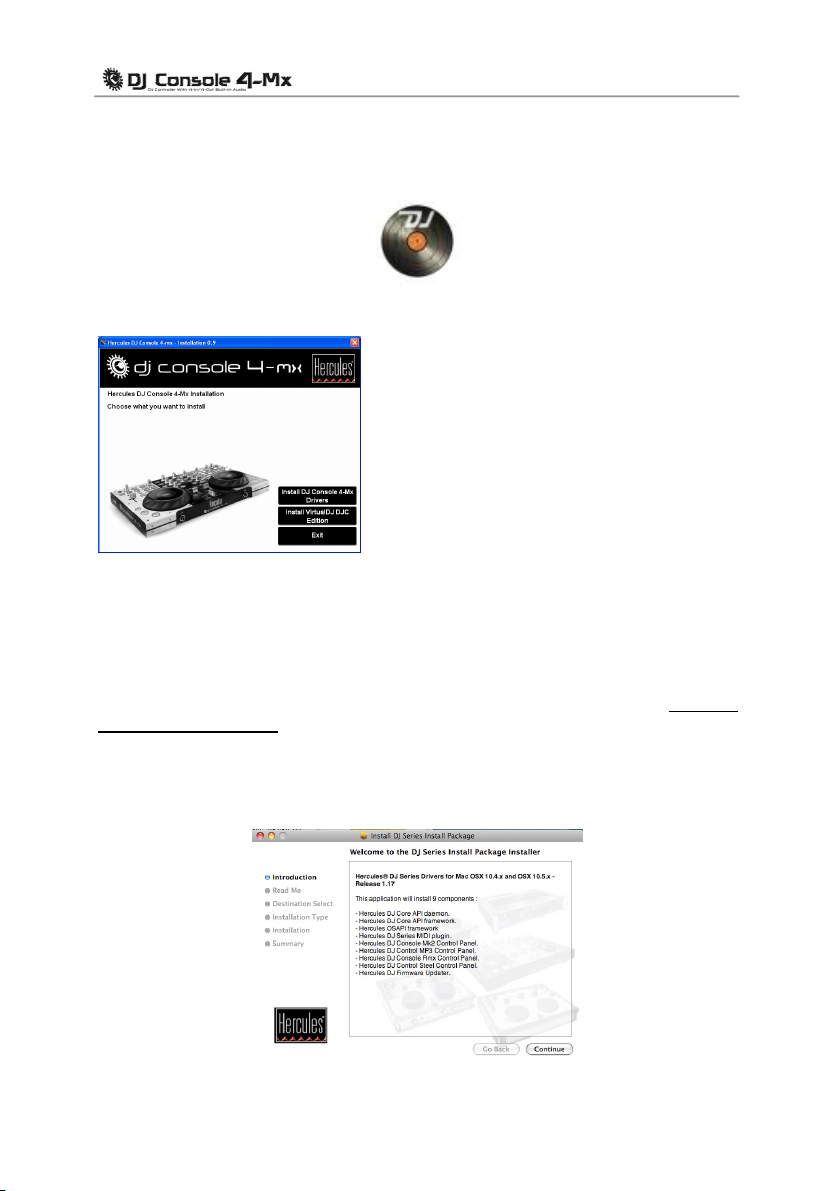
- Insert the installation CD-ROM in your CD-ROM drive.
The installation menu for your DJ Console 4-Mx appears
omatically.
aut
- Click In
stall DJ Console 4-Mx.
If the installation menu is not launched
automatically:
PC:
- Double-click My Computer (Windows XP) or Computer
(Windows Vista / 7).
- Double-click the CD-ROM icon.
- Double-click the installer package.
Mac:
- Open your Finder.
- Double-click the CD-ROM icon.
- Double-click the installer package.
- Click on the option to install the DJ Console 4-Mx drivers and
follow the on-screen instructions.
4/30 – User Manual
Page 5
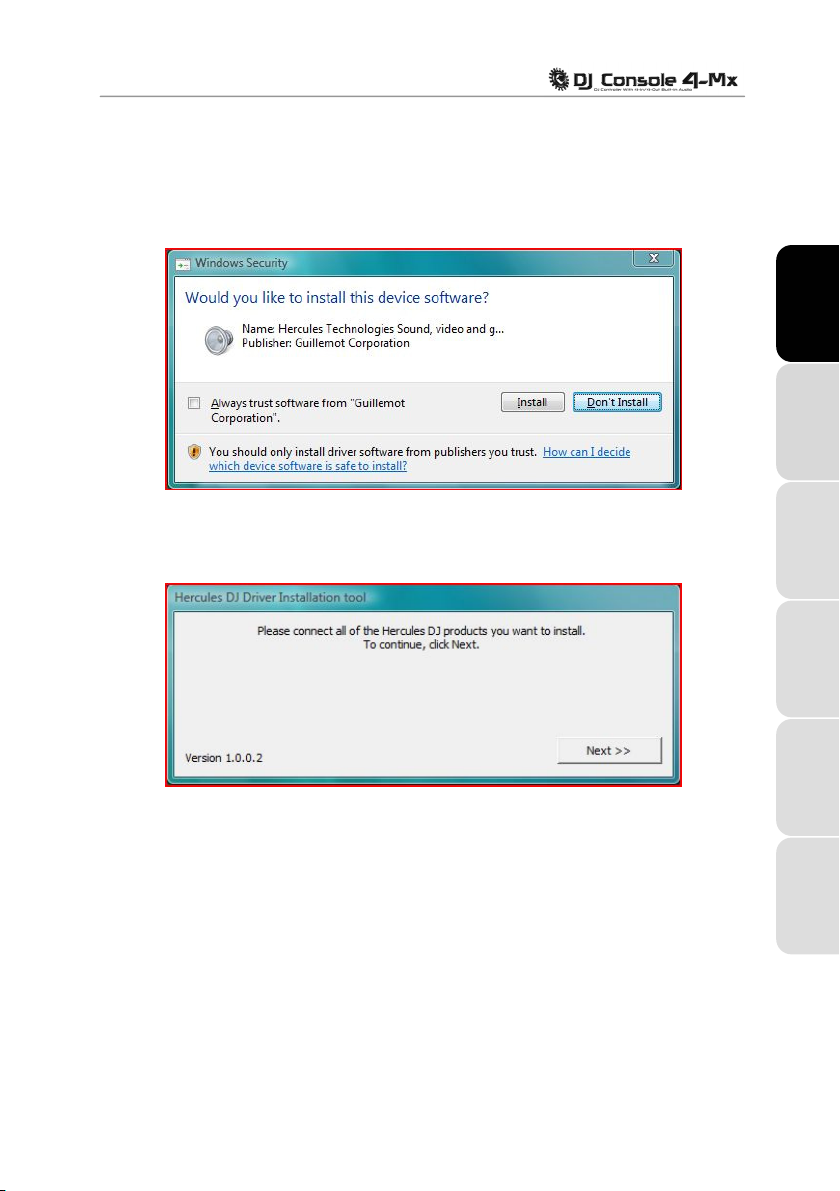
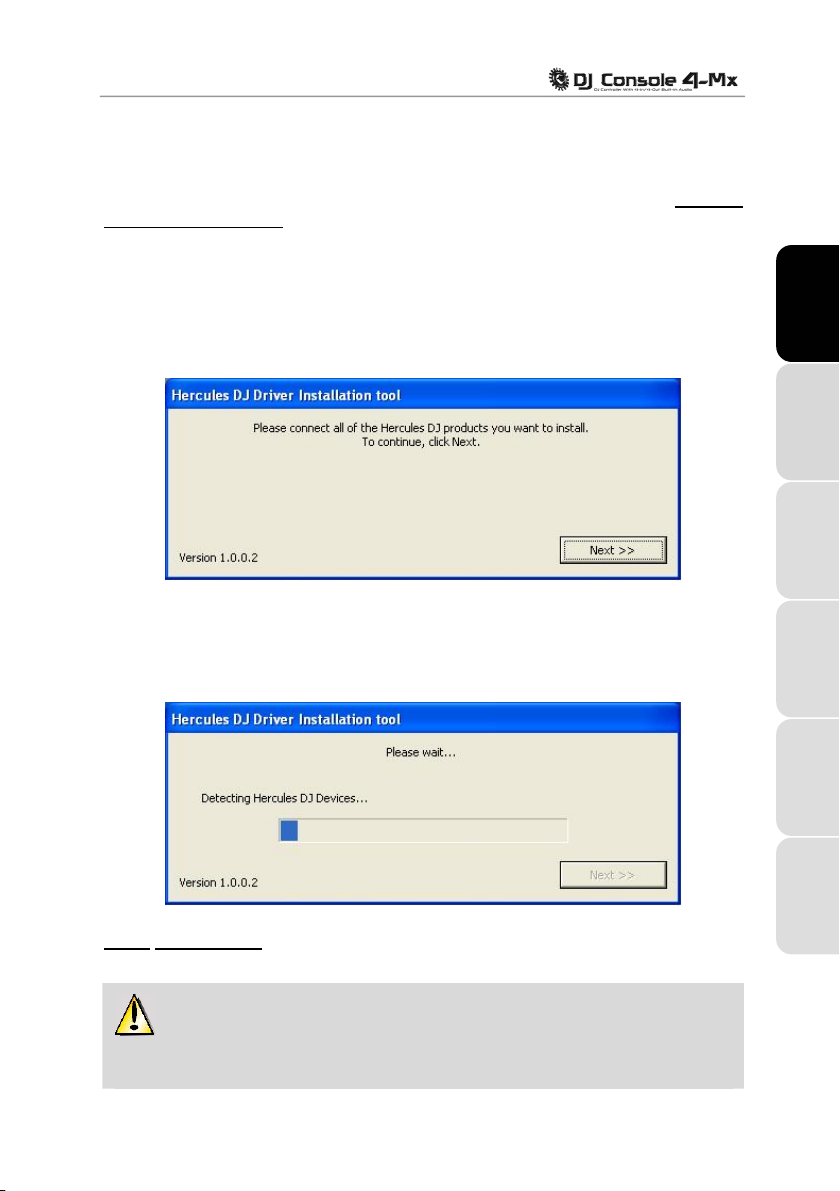
3.1.1. Installation in Windows 7 / Vista
Once files have been copied to your computer, the drivers will be installed. Windows displays
three prompts in succession, regarding installation of the various components.
- Accept to install the software at each of these prompts to proceed with the installation.
A dialog box appears, prompting you to connect DJ Console 4-Mx to your computer's USB port.
ENGLISH FRANÇAIS
DEUTSCH
- Connect DJ Console 4-Mx to your computer's USB port, then click Next.
Your computer automatically detects the DJ Console 4-Mx and completes the installation of the
required drivers.
User Manual – 5/30
NEDERLANDS ITALIANO
ESPAÑOL
Page 6
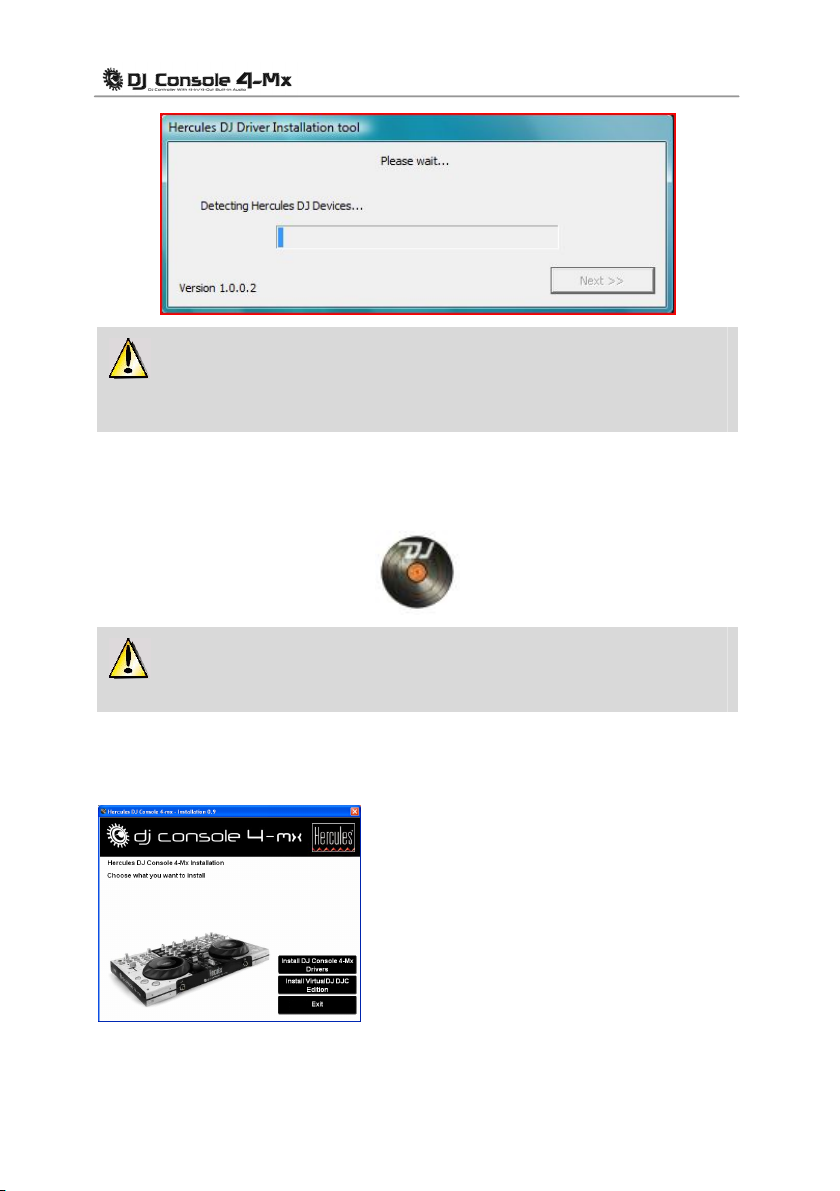
Please note that installation of the drivers may take some time, depending on your
computer’s performance. Let the installation procedure run its course and follow the on-screen
instructions.
You are notified when the installation is complete.
The DJ Console 4-Mx icon appears in your Windows taskbar, next to the clock, indicating that
y
our DJ Console 4-Mx is installed and ready for use:
Please note that in Windows 7, you must click on the Windows taskbar in order to
accept that the DJ Console 4-Mx icon be displayed in the taskbar.
You are notified when the installation is complete.
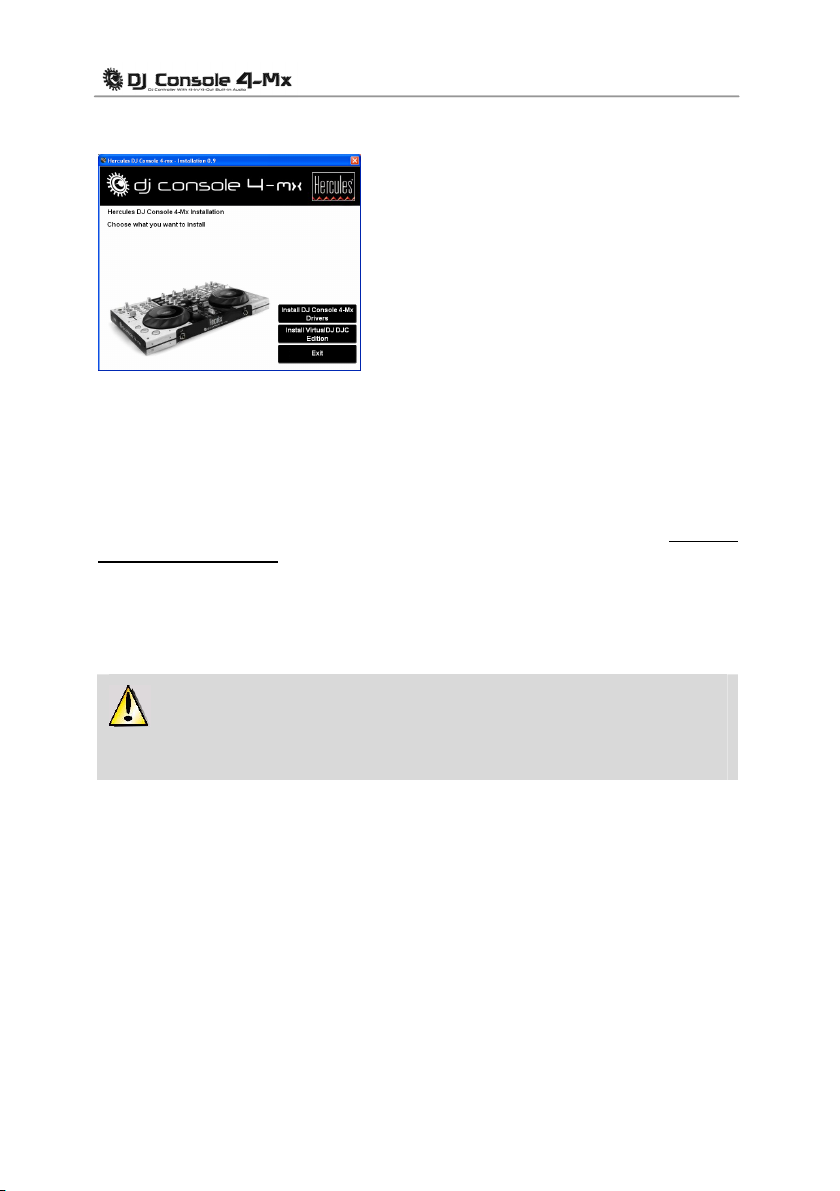
You should now install the VirtualDJ DJC Edition mixing software on your computer:
- In the installation menu, click Install VirtualDJ DJC Edition
and follow the on-screen instructions.
The software is installed on your computer. When installation is complete, the VirtualDJ icon
appears on your desktop.
6/30 – User Manual
Page 7
- Double-click the VirtualDJ icon and enter the VirtualDJ serial number, then click OK. The
VirtualDJ serial number is indicated on a sticker with a barcode found on the underside of your DJ
Console 4-Mx. The VirtualDJ serial number is in the following format: XXXX-XXXX-XXXXX/4-Mx.
For more information on configuring your DJ Console 4-Mx, please refer to chapter 5. The DJ
Console 4-Mx control panel.
3.1.2. Installation in Windows XP
Once files have been copied to your computer, the drivers will be installed.
A dialog box appears, prompting you to connect DJ Console 4-Mx to your computer's USB port.
- Connect DJ Console 4-Mx to your computer's USB port, then click Next.
Your computer automatically detects the DJ Console 4-Mx and completes the installation of the
required drivers.
ENGLISH
FRANÇAIS DEUTSCH
NEDERLANDS
ITALIANO ESPAÑOL
NOTE: Do not interact with any Windows hardware detection windows that may appear during
the installation process; any such windows will disappear in a short while on their own.
Please note that installation of the drivers may take some time, depending on your
computer’s performance. Let the installation procedure run its course and follow the onscreen instructions.
User Manual – 7/30
Page 8
You are notified when the installation is complete.
The DJ Console 4-Mx icon appears in your Windows taskbar, next to the clock, indicating that
y
our DJ Console 4-Mx is installed and ready for use:
You should now install the VirtualDJ DJC Edition mixing software on your computer:
- In the installation menu, click Install VirtualDJ DJC Edition
and follow the on-screen instructions.
The software is installed on your computer. When installation is complete, the VirtualDJ icon
appears on your desktop.
- Double-click the VirtualDJ icon and enter the VirtualDJ serial number, then click OK. The
VirtualDJ serial number is indicated on a sticker with a barcode found on the underside of your DJ
Console 4-Mx. The VirtualDJ serial number is in the following format: XXXX-XXXX-XXXXX/4-Mx.
For more information on configuring your DJ Console 4-Mx, please refer to chapter 5. The DJ
Console 4-Mx control panel.
3.1.3. Installation on Mac
A welcome screen is displayed, informing you as to what will be installed.
8/30 – User Manual
Page 9
- Follow the on-screen instructions.
You may need to enter your password in order to proceed if Administrator access is
required on your system.
Once files have been copied to your computer, the drivers will be installed.
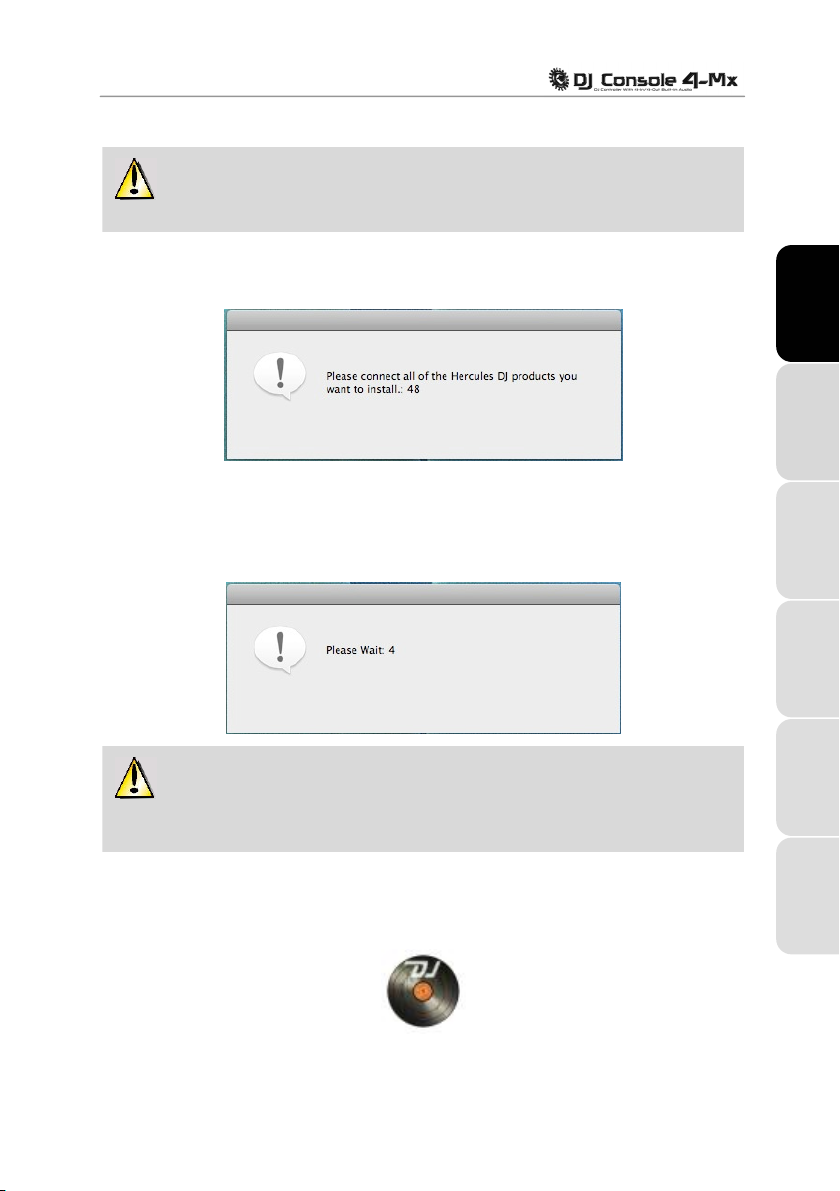
A dialog box appears, prompting you to connect DJ Console 4-Mx to your computer's USB port.
ENGLISH
- Connect DJ Console 4-Mx to your computer's USB port.
Your computer automatically detects the DJ Console 4-Mx and completes the installation of the
required drivers.
Please note that installation of the drivers may take some time, depending on your
computer’s performance. Let the installation procedure run its course and follow the onscreen instructions.
You are notified when the installation is complete.
The DJ Console 4-Mx icon appears on your desktop, indicating that your DJ Console 4-Mx is
ins
talled and ready for use:
FRANÇAIS
DEUTSCH
NEDERLANDS ITALIANO
ESPAÑOL
User Manual – 9/30
Page 10
You should now install the VirtualDJ DJC Edition mixing software on your computer:
- In the installation menu, click Install VirtualDJ DJC Edition
and follow the on-screen instructions.
The software is installed on your computer.
- To launch the VirtualDJ software on your Mac, go to A
- Enter the VirtualDJ serial number, then click OK. The Virtua
sticker with a barcode found on the underside of your DJ Console 4-Mx. The VirtualDJ serial
number is in the following format: XXXX-XXXX-XXXXX/4-Mx.
For more information on configuring your DJ Console 4-Mx, please refer to chapter 5. The DJ
Console 4-Mx control panel.
3.2. Connecting and disconnecting your DJ Console 4-Mx
Your DJ Console 4-Mx can be used in conjunction with another sound card, whether internal or
external, without creating conflicts on your computer.
pplications and then select VirtualDJ.
lDJ serial number is indicated on a
Please note that in Windows operating systems, when you connect your DJ Console 4Mx, it becomes the system’s default sound card. The sound card previously set as the default
sound card becomes the default sound card again when you disconnect the DJ Console 4-Mx.
Therefore, once properly installed, you can connect and disconnect your DJ Console 4-Mx at any
time, even when your computer is powered on, thanks to its USB hot-plug function (although you
should never do so when DJ Console 4-Mx is playing or recording music, or else the application
will terminate and display an error message).
10/30 – User Manual
Page 11
4. OVERVIEW
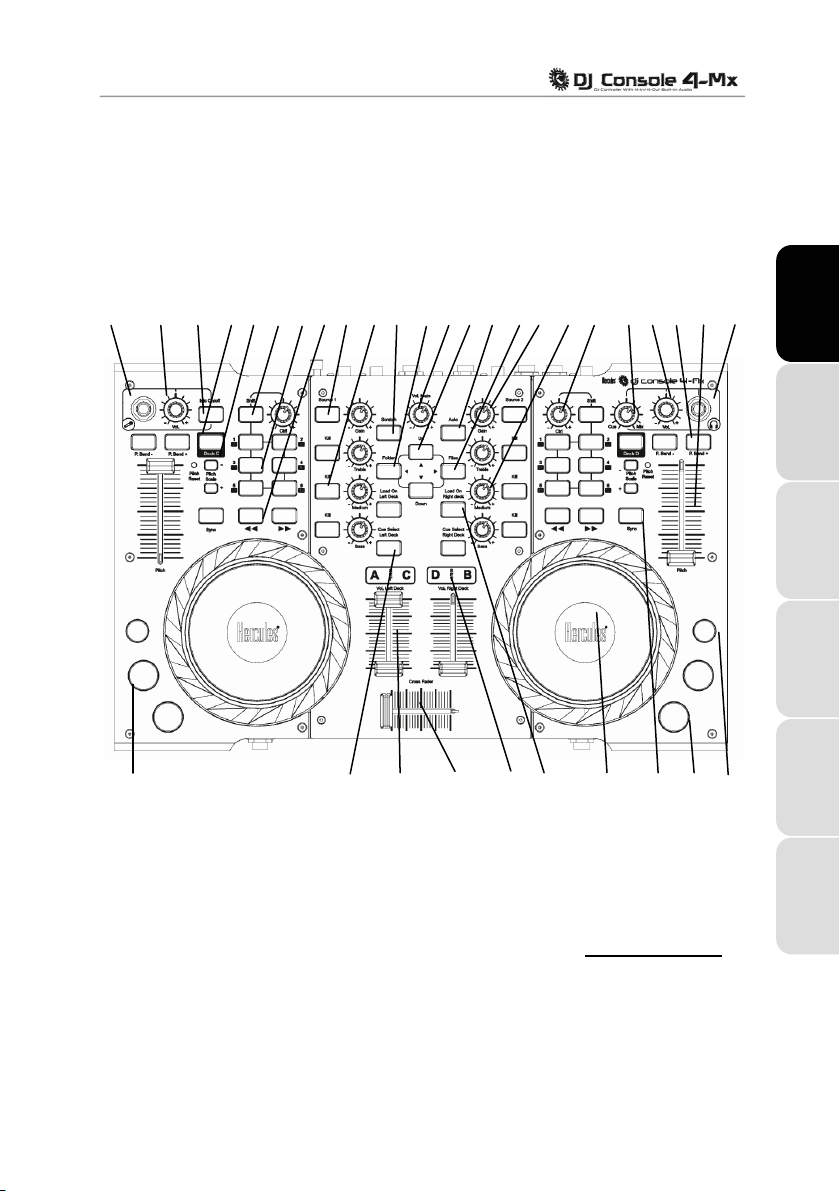
4.1. The top panel
Your DJ Console 4-Mx features a variety of controls allowing you to interact with DJ software.
You can control up to 4 independent decks in DJ software. Descriptions of the default function of
each control are provided below.
1 2 3 4 5 6 7 8 9 10 11 12 13 14 15 16 17 18 19 20 21 22 23 24
ENGLISH
FRANÇAIS DEUTSCH NEDERLANDS ITALIANO
34 33 32 31 30 29 28 27 26 25
1.
Microphone input (1/4" jack / 6.35mm)
Microphone level control knob
2.
3. Microphone on/off button
4. Deck Switch button: depending on the deck mode you select in the control panel, pressing
this button will either: toggle between decks A and C, or B and D (in 4-deck mode, by default);
give you access to a second set of buttons for the deck in question (in 2-deck extended
mode); or have no effect (in 2-deck basic mode). Please see section 5.3.1. Advanced ta
more information.
5. Pitch Scale
the pitch scale range from 6% to 12% in the VirtualDJ software)
Tip: press Pitch Scale - and Pitch Scale + at the same time to reset the pitch: the
pitch fader returns to the central position (while the hardware fader doesn't move).
buttons: adjust the pitch scale in DJ software up or down (for example, change
User Manual – 11/30
b for
virtual
ESPAÑOL
Page 12

6. Shift butt
the equivalent of 12 buttons per deck.
1-2-3-4-5-6 buttons: Apply loops on different numbers of beats, when in loop mode; apply the
7.
corresponding effect, when in effects mode. Functions include: loop in, loop out, hot cue
1/2/3/4, sampler record, sampler play and 4 effects
Rewind and fast forward: fast browsing inside the audio track
8.
Press to toggle between computer audio files or an external audio source on the
9.
corresponding deck
10. Kill bu
11. Scratch
12. Folder b
Master volume knob
13.
14. Up and
15. Auto butto
next
16. Files bu
Set the gain for the corresponding deck
17.
Increase or decrease Treble/Medium/Bass frequencies
18.
Turn to modulate the selected effect or loop
19.
20. Cue/Mix k
cueing up in relation to the overall mix
21. Adjust the volume on your headphones
Pitch bend: decrease (-) or increase (+) speed of track (i.e. pitch) for accurate mixing
22.
Pitch fader: adjust the playback speed of the track on the corresponding deck
23.
24. Headp
25. St
26. Play
27. Sync b
deck that you are controlling, if this beat is within the pitch range (if the reference beat is too
far off, you must increase the pitch scale prior to pushing the Sync button)
Vinyl-style jog wheel with touch detection: a blue light in the center of the jog wheel lights up
28.
when the jog wheel is pressed down
Load selected track on the corresponding deck
29.
Deck indicators: lights up to show you which deck is currently in use
30.
Cross fader for seamless mixing between the decks
31.
Volume fader: control the volume for the corresponding deck
32.
33. Cue Sel
34. Cue bu
on: converts buttons 1 to 6 on the corresponding deck into buttons 7 to 12, providing
ttons: press to cut out/restore treble, medium and bass frequencies, respectively
button: disable or enable scratch mode
utton: browse in the upper directory; also functions as left arrow button
Down buttons: press to navigate within menus
n: applies the “mix next” function, automatically mixing the track so that it plays
tton: browse in the currently selected folder; also functions as right arrow button
nob: adjust the mix of what's being played on your headphones - the track you’re
hones input (1/4" jack / 6.35mm)
op button: stop playback of the track on the corresponding deck
/Pause track
utton: synchronize the beat with the beat of the track currently loaded on the opposite
ect button: enable headphone monitoring on the corresponding deck
tton: set cue point (mark position in the track) on the corresponding deck
These are descriptions of the DJ Console 4-Mx’s default functions in the VirtualDJ
software, which may vary according to the application you are using.
12/30 – User Manual
Page 13
Please note that the Cue/Mix knob is a software function only (and not a hardware
function). This means that when you are using the VirtualDJ software, the knob functions as
described above; while if you are not using DJing software, this knob will have no function –
unless you map a “Cue to Mix” function onto it.
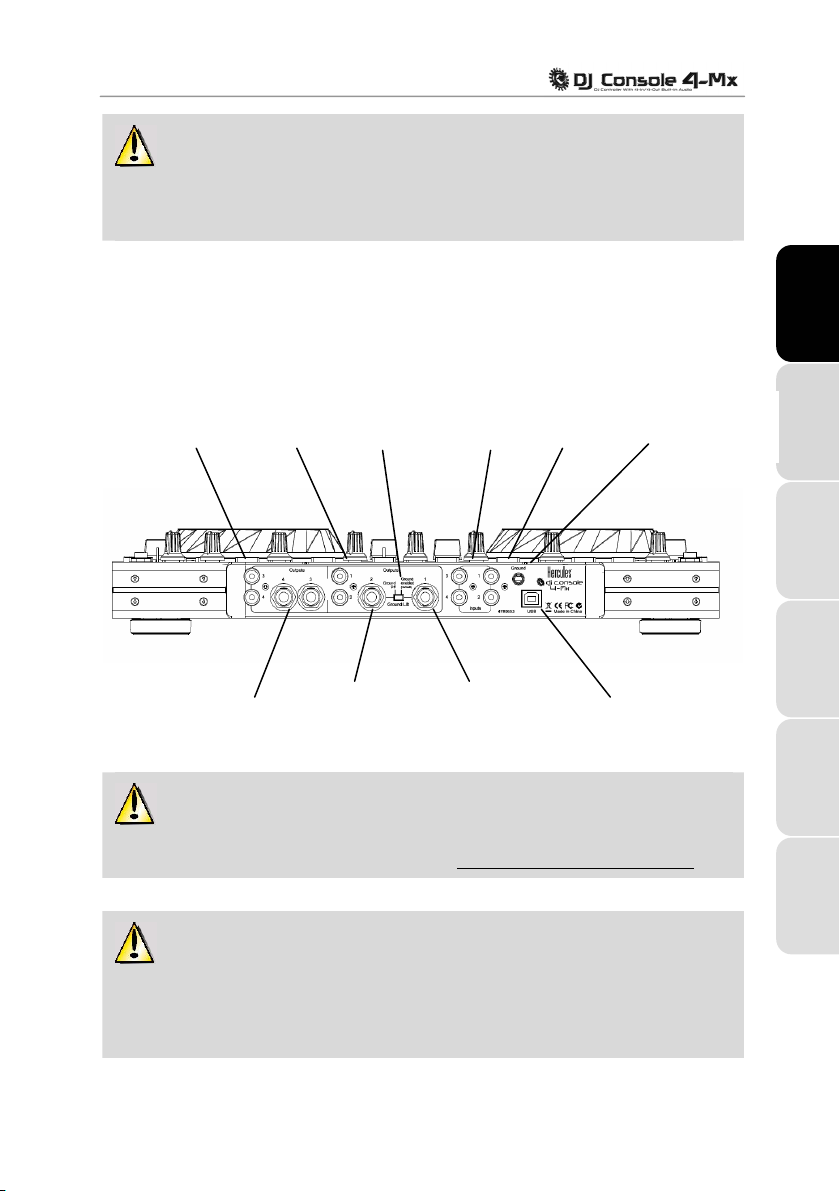
4.2. The back panel
DJ Console 4-Mx has a USB connector on its back panel, allowing you to connect it to your
computer. As DJ Console 4-Mx is USB bus-powered, no external power source is required.
RCA mono output
connectors 3-4
1/4” (6.35mm) mono
output connectors 3-4
RCA mono output
connectors 1-2
1/4” (6.35mm) mono
output connector 2
Ground Lift
switch
RCA mono input
connectors 3-4
1/4” (6.35mm) mono
output connector 1
RCA mono input
connectors 1-2
USB connector
Phono ground
connector
ENGLISH
FRANÇAIS
When connecting a microphone, the microphone can only be used on input channels 12 (please see the front panel description, below). For more information on selecting input
levels for inputs 1-2 and 3-4, please refer to chapter 5.3.1. General control panel settings.
The Ground Lift switch, available on the 1/4” (6.35mm) mono output connectors 1 and
2, can be useful in the event that a ground loop is disturbing the connection between the
console and a power amplifier. In a room with a proper electrical setup, it is safer and better to
keep the Ground Lift switch Off (the default setting). The Ground Lift switch is not active on
RCA outputs 1-2.
User Manual – 13/30
ITALIANO DEUTSCH ESPAÑOL NEDERLANDS
Page 14

4.3. The front panel
1/4” (6.35mm)
microphone input
connector:
channels 1-2 only
Headphones: When using headphones, they are set to channels 3-4 by default; however, you
can also set them to channels 1-2 instead. For more information, please refer to chapter 5.3.5.
Advanced tab.
Before using your DJ Console 4-Mx for the first time, you must unlock the jog wheels:
the jog wheel locks are located on the underside of the controller, preventing the jog wheels
from moving during shipment. If the locks are ON, you can turn the jog wheels, but you can’t
push them down, which disables the touch detection feature.
1/4” (6.35mm)
headphone output
connector
14/30 – User Manual
Page 15

5. THE DJ CONSOLE 4-MX CONTROL PANEL
5.1. Accessing the control panel on PC
An icon representing your DJ Console 4-Mx appears in the right-hand side of your taskbar, next to
the clock display:
In Windows, this icon consolidates all Hercules DJ products you may have installed on your
system. You can select your DJ Console 4-Mx’s control panel by right-clicking the icon and
choosing Select Device.
By right-clicking the icon, you can also select to open the control panel (an alternative to leftclicking the taskbar icon as described above), get hardware information about your DJ Console 4Mx, check for updates for your DJ Console 4-Mx, or exit the control panel. Please note that in
order to check for updates, you must have an active Internet connection.
To check for updates for your DJ Console 4-Mx:
- Right-click the DJ Console 4-Mx icon in the taskbar and select Check for updates.
- If prompted by your system, allow your computer to access the Guillemot FTP server.
If no new version is available, a message will appear indicating that you already have the latest
v
ersion installed. If a new version is available, it will be downloaded and the setup will launch
automatically.
- Follow the on-screen instructions to install the update for your DJ Console 4-Mx.
. To launch the DJ Console 4-Mx control panel, simply left-click the icon.
5.2. Accessing the control panel on Mac
- Access the control panel by double-clicking the icon on your desktop.
5.3. Using the DJ Console 4-Mx control panel
The control panel allows you to manage your DJ Console 4-Mx’s various settings. The following
sections will explain the various features of the control panel, as well as the differences that exist
between the PC and Mac versions.
ENGLISH
FRANÇAIS
DEUTSCH
NEDERLANDS
ITALIANO
User Manual – 15/30
ESPAÑOL
Page 16

5.3.1. General control panel settings
PC Mac
- Output Channel
controls for the corresponding outputs. You can alter the balance (left/right) using the balance
knob on top of each set of output channel sliders. You can click the link icon underneath the
sliders to disable/enable the sliders moving together, as opposed to on their own. You can also
mute the outputs by clicking the volume icon underneath the link icon.
- Input Chan
microphone, phono level, consumer line level (-10dBv), pro line level (+4dBu) or boosted line
level (+8dBu) for channels 1-2; and phono level, consumer line level, pro line level or boosted
line level for channels 3-4 (you can therefore only use a microphone on channels 1-2, and not
channels 3-4). Select the input level that best corresponds to the output level of the audio
source connected to input channels 1-2 and 3-4.
Please note that when recording your microphone, you temporarily lose the use of inputs 1-2.
ou use the talkover option for your microphone, your voice is mixed via hardware and
When y
you can still use inputs 1-2; however, you cannot record your microphone with this configuration.
- Audio mod
for the applications you wish to use:
- WDM is the standard Windows audio mode, also called DirectSound and WASAPI. Select
this mode when using multimedia players, watching movies, and so on.
- ASIO will only work with programs that support this driver mode (for more information, please
refer to chapter 5.3.3. ASIO tab
VirtualDJ switches to ASIO mode automatically, but if you are using other programs, you must
s
witch to ASIO mode manually before
modes when playback is stopped.
- Select De
your Mac, you can switch between their control panels here.
- MIDI pitch resol
mode when the software is launched, and then reverts to 7-bits mode when you exit the
software.
s: There are 2 sets of software sliders (1-2, 3-4), which function as volume
nels: You can select the appropriate input level for input channels 1-2 and 3-4:
e (Windows only, not available on Mac): Lets you select the appropriate audio mode
).
launching the application. You can only switch between
vice (Mac only): If you have more than one DJ Console 4-Mx controller connected to
ution: 7-bits is the default value. VirtualDJ automatically switches to 14-bit
16/30 – User Manual
Page 17

5.3.2. Main tab
- You can disable/enable or adjust the talkover attenuation level in this tab, meaning the level by
which the music is reduced when you activate the Mic On/Off button and are talking on your
microphone (-6dB by default).
- You can disable and re-enable the jog wheels in this tab as well, and set their sensitivity. By
ult, all jog wheels are enabled; if you choose custom mode, only the jog wheels for Deck A
defa
and Deck B are enabled by default, although you can change this to your liking.
5.3.3. ASIO tab (not available on Mac)
“Audio Stream Input/Output” is a multi-channel protocol for audio transfer developed by the
Steinberg company. It allows a variety of programs to communicate with different sound cards
and recognize all of the inputs and outputs available on the sound card, with short latency. Your
DJ Console 4-Mx is ASIO 2.0 compliant.
When in ASIO mode, you can adjust the following settings: Sample Rate, Sample Size, ASIO
Buffer Size.
- The configuration is set to 44100Hz (44.1kHz)/16-bit mode by default. The best audio setting for
VirtualDJ is this default setting, which provides the best response time. For software where
response time is not as important, you can play music in 24-bit mode (44.1kHz or 48kHz) in
Windows (ASIO).
- The most important setting is the ASIO buffer size. The default setting is 480 (10ms), which is a
good average for most computers. Note that the smaller the ASIO buffer size, the shorter the
response time. If you encounter audio problems (such as static or crackling), increase or
decrease the ASIO buffer size until you find the correct setting for your computer (there are no
ideal settings, as all computer configurations are different).
- Changes to the ASIO settings can only be made while your application is not running.
- Please note that when switching to 24-bit mode, inputs 3-4 are not available.
ENGLISH
FRANÇAIS DEUTSCH
NEDERLANDS
ITALIANO
ESPAÑOL
User Manual – 17/30
Page 18

5.3.4. Audio tab (not available on PC)
In the Audio t
24-bit. The best audio setting for VirtualDJ is the default setting of 16-bit/44.1kHz, which provides
the best response time. For software where response time is not as important, you can play music
in 24-bit mode (44.1KHz or 48 KHz) in Mac OS (Core Audio).
ab (on Mac only), you can change the sample size from the default value (16-bit) to
5.3.5. Advanced tab
- This tab allows you to set the MIDI
is some conflict between your DJ Console 4-Mx and another MIDI device. If you have more
than one Hercules device installed on your system, the MIDI channel numbers are assigned in
pairs by order of connection, i.e. incrementally (1-2, 3-4 and so on, up until 16).
- You can adjust the cro
default). The different settings that are available affect the way that the cross fader functions as
you move it from side to side, in relation to the central position: depending on how you will be
mixing, you may wish for the cross fader’s action to be applied much more sharply when it is
moved from the central position (meaning that if you move the cross fader even a little bit to the
left, for example, the effect will be as though it had been moved all the way to the left; and the
same when moving it to the right), or less sharply. You can experiment with the different curves
18/30 – User Manual
ss fader settings according to your preference (BeatMix Curve by
channel for controls (1-2, by default), in the event that there
Page 19

available and easily switch from one to another, depending on the kind of mixing you are doing
at any given time.
- The headphon
output channels 1-2, if you prefer; however, you will then hear the mix on your headphones
instead of previewing your next track.
- Output 1-2 Hard
on output 1-2: USB streaming 1-2 (default), USB streaming 1-2 plus your microphone, or USB
streaming 1-2 plus line in 1-2.
USB streaming 1-2 (default) s
software). USB streaming 1-2 plus your microphone, or USB streaming 1-2 plus line in 1-2
sends the signal of the selected source directly to the main output, mixed with the standard
audio signal. This is similar to the talkover function, but without the attenuation.
- Deck mode: 4 decks is the default setting (Decks A/C, B/D), which allows you to control 4
independent decks. In 4-deck mode, every control on each physical deck (transport buttons, jog
wheel, fader, knobs), and every control on the left or right channel mixer (volume fader, EQ and
Kill controls) can send 2 commands depending on the status of the virtual decks it controls.
You can also select 2-deck extended mode, in which Deck C and Deck D operate as shift
buttons which convert the buttons on the decks into new buttons, but have no impact on the
mixer area, on the jog wheels and on the Play, Cue and Stop buttons.
If you wish, you can also select 2-deck basic mode, in which only Deck A and Deck B are
enabled (only one function is assigned to each control).
e channels are set to output channels 3-4 by default. You can also set this to
ware mix option lets you select the way that hardware mixing will be handled
hould always be used for standard operations (i.e with DJ
5.3.6. About tab
ENGLISH
FRANÇAIS
DEUTSCH
- This tab provides all of the information about the package, firmware, driver, MIDI mapping, DJ
API and control panel versions you are using. Please refer to this information when contacting
technical support.
User Manual – 19/30
NEDERLANDS
ITALIANO ESPAÑOL
Page 20

6. OUTPUT OPTIONS
Two types of connectors are available for connecting speakers: RCA and 1/4" jack (6.35mm).
The RCA connectors are mono outputs, each of which corresponds to one channel (left = white,
and right = red). The 1/4" jack (6.35mm) connectors are also mono outputs.
Select the type of connector according to the type of equipment you will be connecting. Normally,
outp
uts 1-2 will be used for your live mix playing in the room, and outputs 3-4 will be used for
monitoring or connecting an external mixer.
6.1. Connecting speakers and/or an external mixer to your DJ
Console 4-Mx
With the included VirtualDJ software, you can play your mix for the audience over a hi-fi system
connected to outputs 1-2 on your DJ Console 4-Mx, for example, and preview upcoming songs on
outputs 3-4, using your headphones or monitoring speakers.
The included version of VirtualDJ is pre-configured to use the DJ Console 4-Mx’s built-
in sound card exclusively. As such, it will not be possible to use your computer’s standard
sound card or integrated speakers. A pair of speakers MUST be connected to Output 1-2 on
the back of your DJ Console 4-Mx.
- Make sure that your computer and other audio equipment is switched off.
- Connect your main set of speakers to the Output 1-2 RCA plugs (plug 1 corresponds to the left
speaker, plug 2 to the right speaker) or to the Output 1-2 1/4" jack (6.35mm) plugs.
- The Output 3-4 RCA plugs play the same channels as those being played on the headphones,
and can be used to connect monitoring speakers (which are used by DJs in clubs, for example,
instead of headphones, when they are mixing in an enclosed DJ booth and separated from the
audience by a window); or, if you upgrade your software to VirtualDJ Pro
Output 3-4 RCA plugs to connect an external mixer, and split up playback with Deck A played
on Output 1-2, and Deck B played on Output 3-4.
Your speakers and/or external mixer are now ready for use with your DJ Console 4-Mx.
, you can use the
6.2. Connecting headphones
Your DJ Console 4-Mx features 1 headphone connector, on the front panel. Headphones are set
to channels 3-4 by default, but can also be set to channels 1-2 instead (for more information,
please refer to chapter 5.3.5. Advan
headphones (stereo, impedance from 16 to 64 ohms).
20/30 – User Manual
ced tab). The console has been designed to function with DJ
Page 21

7. INPUT OPTIONS
7.1. Connecting external audio sources
Your DJ Console 4-Mx allows you to connect virtually any kind of analog audio source you might
wish to use, including vinyl turntables. If you upgrade to VirtualDJ Pro
package), you can even use time-coded vinyl records or CDs to control music files stored on your
computer, giving you the ultimate hands-on mixing experience and combining the best that the
worlds of analog and digital have to offer. Now you can enjoy using hybrid mixing, combining
computer audio tracks on one deck with an analog source connected to the other deck.
Your DJ Console 4-Mx features 2 stereo audio inputs on its back panel (2 pairs of 2 mono RCA
connectors). Define your audio source type in the DJ Console 4-Mx control panel – it can be
phono level, consumer line level (-10dBv), pro line level (+4dBu) or boosted line level (+8dBu) –
and simply connect the audio source of your choice to the white (left) and red (right) RCA
connectors: Input 1-2 for Deck A, and Input 3-4 for Deck B. This allows you to replace the
computer audio track played on Deck A with the music played on Input 1-2, and replace the
computer audio track played on Deck B with the music played on Input 3-4.
Be sure to define your audio source type (i.e. the correct output level for the device you
are connecting) in the control panel before connecting your audio source, and not after the
audio source has been connected. Doing so will avoid any possible audio issues in terms of
distorted sound.
You can even equalize your external audio sources and adjust their volume, just as you can with
a computer audio track (you can use the Gain knobs to adjust the volume for each deck). This
provides for seamless mixing and full control over the sound of your mix.
You can select the input level for each deck in the DJ Console 4-Mx control panel (phono level,
onsumer line level, pro line level, or boosted line level), according the output level of the device
c
you are connecting. For more information, please refer to chapter 5.3.1. General control panel
settings.
(not included in this
ENGLISH
FRANÇAIS
DEUTSCH NEDERLANDS
ITALIANO
Be sure to select the appropriate input level for the device you are connecting;
otherwise, you risk damaging your equipment.
If you are using a turntable with a ground cable:
- In the DJ Console 4-Mx control panel, select the Ph
- Connect the ground wire from your turntable to the ground connector on the DJ Console 4Mx
’s back panel. Grounding helps to eliminate the interference which can otherwise occur with
turntables, giving you crystal-clear sound. You can connect 2 ground wires from 2 turntables
to the ground connector on your DJ Console 4-Mx without any problem.
ono input level for the deck in question.
User Manual – 21/30
ESPAÑOL
Page 22

You can use the two Source
for Deck B) to control the audio input for the corresponding deck. By default, the input is set to
computer audio tracks: simply press the Source button to switch to the external audio source.
Press the button again to disable the external source and return to computer audio (please see
chapter 8.7. Source buttons
7.2. Connecting a microphone
Your DJ Console 4-Mx features one mono ¼" jack (6.35mm) plug on both its front and top panels.
We recommend using a vocal microphone with an impedance of between 1 and 64 ohms. You
can use your microphone to talk over the music and communicate with your audience (mix the
microphone input with audio outputs 1-2, for example), or use your microphone to replace the
music on Deck A with your voice.
Please note that microphones requiring phantom power are not supported by DJ
Console 4-Mx.
Press the Mic On/Off button on your DJ Console 4-Mx to toggle the microphone on or off. You
can use the volume knob to adjust the input volume for your microphone.
The DJ Console 4-Mx features a talkover function for the microphone input, which automatically
reduc
es the level of the music that's playing to allow you to be heard when you're speaking. The
music level is restored once the microphone input is disabled.
Please see chapter 5.3.2. Main tab
function and using your microphone.
buttons on your DJ Console 4-Mx (Source 1 for Deck A, Source 2
).
for more information on adjusting the talkover attenuation
8. DJ CONSOLE 4-MX FEATURES
8.1. Jog wheels
The jog wheels on your DJ Console 4-Mx emulate vinyl turntables: turning a jog wheel lets you
scratch or move the cursor backward or forward within music tracks, allowing you to select the
cue point where playback will start for the audience.
The jog wheels are large in size (12cm in diameter – the size of a CD) and are touch sensitive:
detect when your hand presses down on them, allowing you to scratch, in the same way that
they
your hand can physically stop the playback on a vinyl record. A blue light in the center of the jog
wheel turns on to show the touch detection. The jog wheels are also very precise: the jog wheels’
rotation is detected with an accuracy of 256 steps per revolution.
The jog wheels have dual functions: simply turn the jog wheels (using the sides of the wheels, or
ut putting too much pressure on the top) to use the seek function; or press down on the top
witho
of the wheels slightly in order to scratch.
22/30 – User Manual
Page 23

In the control panel, you can adjust the number of steps that the jog wheels register per revolution
(this is not linked to the touch sensitivity on top of the jog wheels): you can either keep the default
value, or divide it by a factor of 2, 4 or 8. The jog wheels can also be disabled via the control
panel. Please see chapter 5.3.2. Main ta
You can use the Scratch bu
enabled by default): press the button to switch to the seek function, allowing you to move
backward or forward within a track. Press the button again to return to the default scratch
function.
You can also use the jog wheels to browse through music lists. When browsing through a
directory containing lots of music files, simply turn the jog wheel while keeping the Up or Down
button on your console pressed down in order to move through the list more quickly.
tton to change the function of the jog wheels (scratch mode is
b for more information.
8.2. Faders (sliders)
Cross fader
Your DJ Console 4-Mx plays 1 stereo music track per deck (2 stereo music tracks
simult
aneously). The cross fader moves between the left and right decks, allowing the DJ to
adjust the mix between 2 or 4 tracks.
Setting the cross fader completely to the left means that the mix (the music the audience hears)
mes 100% from the left decks: this is necessary, as you’re mixing with 4 decks. Setting the
co
cross fader in the center means that the music comes 50% from the left deck and 50% from the
right, and so on.
Volume faders
The left deck volume fader controls the volume of the music played on Deck A or C, while the
olume fader controls the volume of the music played on Deck B or D.
right v
Changing the volume on t
If the volume on one of the decks is not loud enough w
to its maximum level, simply adjust the Gain knob for that deck to increase the deck's maximum
volume.
he different decks lets you adjust transitions between the 4 decks.
hen the corresponding volume slider is set
ITALIANO DEUTSCH ESPAÑOL NEDERLANDS ENGLISH FRANÇAIS
8.3. Play/Pause, and Cue buttons
These buttons are available for the 2 or 4 decks on the left and right of your DJ Console 4-Mx
central mixer area.
- Play/P
- Cue: pl
ause: starts music playback, or pauses music playback at the current position in the
track.
aces a cue point (a marker where playback should start) at the current position in the
track.
User Manual – 23/30
Page 24

8.4. Stop button
The stop button stops playback of the track on the corresponding deck.
8.5. Rewind and Fast forward buttons
These buttons, found just above the jog wheel on each deck, allow you to move quickly within
music tracks: press the corresponding button to rewind or fast forward within a track (this is an
easy way to quickly get to the exact point in a song that you're looking for).
8.6. Pitch settings
- 2 or 4 Pitch faders (sliders): you can use the pitch faders to adjust the playback speed of a
track, increasing or reducing its BPM (Beats Per Minute) rate, in order to make dancing easy
by setting new music tracks at the same BPM as the previous track so that dancers don’t need
to change their rhythm during the transition from one track to another. The pitch faders are
more precise than on any other Hercules DJ controller, with 14-bit accuracy (versus 7-bit on
other Hercules DJ controllers), 60mm pitch travel, and 2 buttons to control the software pitch
scale (allowing you to change the pitch scale from 6% to 12% in VirtualDJ, for example).
- Pitch Ben
playback speed of a track. Adjustments made in this way are “elastic” adjustments, in that they
are only temporary, and are no longer applied once the button is released.
- Sync: p
corresponding deck to match the BPM rate of the music on the other deck.
In general, adjusting the pitch changes the music’s speed and tone: faster means a higher tone,
s
lower means a lower tone.
d (- and +): you can use these buttons to temporarily increase or decrease the
ushing this button synchronizes the speed (BPM) of the music played on the
8.7. Source buttons
Before enabling the Source buttons, make sure the Inputs field is set to Line-Ins in
VirtualDJ’s Sound setup panel. If set to None, the Source buttons are disabled.
Press the Source 1 or Source 2 buttons to replace the computer music track on Deck A or Deck
B, respectively, with the audio source connected to the corresponding input. Press the button
again to disable the external audio source pass-through and return to the computer music track.
Be sure you have selected the appropriate input level (Phono, Line, Pro Line, Boost) in
the DJ Console 4–Mx Control panel for the device you have connected; otherwise, you risk
damaging your equipment (for more information, please refer to chapter 5.3.1. General control
panel settings). You must then adjust the gain using the corresponding Gain knob for that
deck on the DJ Console 4-Mx.
24/30 – User Manual
Page 25

8.8. Shift button (for loops/cue/sampler/effects), and buttons 1-6
DJ Console 4-Mx provides the equivalent of 12 buttons per deck for effects, loops and Cue
functions, thanks to the Shift button, which converts buttons 1 to 6 on each deck into buttons 7 to
12. Functions include: loop in, loop out, hot cue 1/2/3/4, sampler record, sampler play and 4
effects.
8.9. Load on Left Deck / Load on Right Deck buttons
Use these buttons to load the highlighted music track in the VirtualDJ software on the
corresponding deck.
8.10. Cue Select Left Deck / Cue Select Right Deck buttons
Use these buttons to choose which deck is being monitored on your headphones, when the
Cue/Mix knob is set to the Cue position: you can use them to select between the 4 available
decks.
8.11. Browser buttons: Up and Down
Use the Up and Down buttons to browse through folders and music libraries: move to the
previous (Up) or next (Down) music file/directory. You can move through music lists more quickly
by pressing the Up or Down button and turning the right jog wheel at the same time.
8.12. Cue/Mix knob
Use the Cue/Mix knob to adjust the level of the track you are cueing up in relation to the overall
mix on your headphones or monitoring speakers. The Cue side of the knob’s rotation represents
the selected deck you are cuing up, while the Mix side represents the mix being played for your
audience.
8.13. Equalization knobs
Use the equalization knobs (Bass, Medium and Treble) for each deck to add color to your music
with custom settings. For example:
- Make dancing easier by enhancing the bass (the bass provides the tempo for dancing).
- Remix songs by boosting the mids (the mids contain the singer’s voice) on one track and
mix
ing it with another track on the other deck, where you’ve cut the mids.
You can also manipulate the bass to make transitions between two tracks:
- Synchronize the 4 tracks.
- Cut out the mids and treble on both
- Move the cross fader from the first deck to the second, while restoring the mids and treble.
decks, keeping only the beat of the bass.
User Manual – 25/30
ITALIANO DEUTSCH ESPAÑOL NEDERLANDS ENGLISH FRANÇAIS
Page 26

9. DJING BASICS
For detailed information on how to use the bundled VirtualDJ mixing software, please refer
to the VirtualDJ user manual, included on your DJ Console 4-Mx's installation CD-ROM or
available for download on the Hercules Technical Support website (http://ts.hercules.com).
First off, you will want to make sure that the audio files in your music library have been analyzed
i
n the VirtualDJ software, which will determine the BPM (beats per minute) values of your tracks.
Since mixing music tracks together involves synchronizing their beats while the two songs overlap
with one another, you will need to select tracks whose BPM values are similar to one another, to
make for seamless transitions from one track to the next. Alternatively, you might choose to mix a
track with another track whose BPM value is half or double its own value (60 BPM and 120 BPM,
for example), which can also make for a fairly smooth transition between tracks.
Please note that analyzing files to determine their BPM values in the VirtualDJ software can take
ome time to complete, particularly if you are analyzing a large number of songs, and should be
s
done in advance of a party; this process also consumes a lot of your computer's system
resources while it is being carried out. We therefore recommend that you analyze the entire
contents of your music library overnight, for example.
The VirtualDJ software lets you create “virtual folders”: you can create a virtual folder by clicking
on the re
folder contains a collection of shortcuts to tracks, allowing you to quickly access a group of tracks
you have selected, like a playlist: dragging an audio track into a virtual folder will not physically
move the file into that folder, but rather will create a shortcut to where the track is located. This is
a very handy way to organize groups of songs for your DJing sets, and you can also make sure
that groups of tracks in your virtual folders have similar BPM values to one another. You can use
the file explorer in the VirtualDJ software to browse through your tracks, or use the search feature
to find specific tracks, and then simply drag and drop them into your different virtual folders.
While a track is being played on the left deck for the audience, the DJ presses the Cue Select
Right Deck button on the DJ Console 4-Mx and uses headphones to listen to and adjust the next
track to be played. The DJ might make adjustments to the track’s pitch (using the pitch faders
and the Pitch Bend buttons), and make sure that its beat lines up properly with that of the track
playing on the left deck. As the track on the left deck is nearing its end, the DJ starts moving the
cross fader towards the right deck (and can use the volume faders for each deck to help with the
transition as well), so that the audience gradually hears more of what is being played on the right
deck in the mix. The DJ can adjust the EQ controls on each deck to help tracks blend in smoothly
with one another: for example, by reducing the mid and treble frequencies on one deck, so that
mostly just the bass frequencies (including the song’s beat) are heard as one song transitions into
the next.
While songs are playing, the DJ can also use the effects and looping features on the DJ Console
4-Mx
dancing: the creative possibilities for mixing are endless – and with a bit of practice, you’ll be
mixing like a pro in no time!
d “virtual folder” icon in the software, and then assigning a title to the folder. A virtual
to call attention to different parts of songs or their mix, to pump up the crowd and keep them
26/30 – User Manual
Page 27

10. CONFIGURATION IN MIDI MODE
Your DJ Console 4-Mx can function as a MIDI controller: the buttons, knobs, faders and jog
wheels can send MIDI signals that will then be interpreted by MIDI-capable software. In software
that accepts MIDI commands, you must select your DJ Console 4-Mx as the MIDI controller.
Many music software applications that incorporate MIDI control feature a “learning mode”: simply
c
lick a button, turn a knob or jog wheel or move a slider on your DJ Console 4-Mx to link that
control to a control in the software. Some popular applications to include a MIDI learning mode
include: Native Instruments Traktor, Ableton Live, Mixvibes, and Image Line Deckadance.
For the list of MIDI controls, please refer to the Appendix at the end of this manual.
ENGLISH
11. FAQ
1. Can I use DJ Console 4-Mx with DJ software other than the bundle included in the
package?
Yes: since your DJ Console 4-Mx functions as a MIDI controller and can send MIDI
commands, it can be used with any software that accepts MIDI commands. Please see
chapter 10. Configuration in MIDI mode
2. Can I use DJ Console 4-Mx without a computer?
No, DJ Console 4-Mx cannot function at all without being connected to a computer.
3. Can I mix directly from audio CDs in the DJ mixing software?
Yes, you can mix audio CDs directly from your CD/DVD-ROM drive in VirtualDJ. Simply load
the CD-Au
you can mix it immediately.
4. Will DJ Console 4-Mx function when connected to a USB hub?
Yes, as long as the USB hub’s power supply is connected.
5. Can I save the DJ mixes I create with DJ Console 4-Mx in an audio file?
Yes, you can save your mix by clicking the REC button in VirtualDJ.
6. Is DJ Console 4-Mx able to control 4 decks in Traktor Pro?
Yes – all you need to do is import a TSI file supporting a 4-deck control into Traktor Pro.
If you are familiar with Traktor, you can map your own TSI file; or else download this kind of file
from the Hercules technical support website (http://ts.hercules.com
Product genre: DJ/Music > Product family: Controll
Console 4-Mx > Link: Software.
dio track in your playlist on a DJ Console 4-Mx deck, as if it were an audio file, and
.
), in the downloads area:
er with audio > Product name: DJ
FRANÇAIS
DEUTSCH
NEDERLANDS
ITALIANO
ESPAÑOL
User Manual – 27/30
Page 28

12. TECHNICAL SUPPORT
If you encounter a problem with your product, please go to http://ts.hercules.com and select your
language. From there you will be able to access various utilities (Frequently Asked Questions
(FAQ), the latest versions of drivers and software) that may help to resolve your problem. If the
problem persists, you can contact the Hercules products technical support service (“Technical
Support”):
By email:
In order to take advantage of technical support by email, you must first register online. The
infor
Click Registration on
instructions.
If you have already registered, fill in the Username and Password fields and then click Login.
By telephone:
mation you provide will help the agents to resolve your problem more quickly.
the left-hand side of the Technical Support page and follow the on-screen
Monday to Friday from 7am to 11am and from Noon to 5pm
United States
Canada
United Kingdom
Denmark
Sweden
Finland
1-866-889-5036
Free
1-866-889-2181
Free
08450800942
Charges at local rate
80887690
Free
0200884567
Free
0800 913060
Free
Saturday from 8am to 2pm
Sunday from 8am to 10am
(Eastern Standard Time)
Monday to Friday from 7am to 11am and from Noon to 5pm
Saturday from 8am to 2pm
Sunday from 8am to 10am
(Eastern Standard Time)
Monday to Friday from Noon to 4pm and 5pm to 10pm
Saturday from 9am to Noon and 1pm to 7pm
Sunday from 9am to Noon and 1pm to 4pm
Monday to Friday from 1pm to 5pm and 6pm to 11pm
Saturday from 9am to 1pm and 2pm to 8pm
Sunday from 10am to 1pm and 2pm to 5pm
(English)
Monday to Friday from 1pm to 5pm and 6pm to 11pm
Saturday from 9am to 1pm and 2pm to 8pm
Sunday from 10am to 1pm and 2pm to 5pm
(English)
Monday to Friday from 2pm to 6pm and 7pm to Midnight
Saturday from 10am to 2pm and 3pm to 9pm
Sunday from 11am to 2pm and 3pm to 6pm
(English)
28/30 – User Manual
Page 29

12.1. Warranty information
Worldwide, Guillemot Corporation S.A. (“Guillemot”) warrants to the consumer that this Hercules product will be free from material
defects and manufacturing flaws for a period of two (2) years from the original date of purchase. Should the product appear to be
defective during the warranty period, immediately contact Technical Support, who will indicate the procedure to follow. If the defect is
confirmed, the product must be returned to its place of purchase (or any other location indicated by Technical Support).
Within the context of this warranty, the consumer’s defective product will, at Technical Support’s option, be either repaired or re
Where authorized by applicable law, the full liability of Guillemot and its subsidiaries (including for indirect damages) is limited to the
repair or replacement of the Hercules product. The consumer’s legal rights with respect to legislation applicable to the sale of
consumer goods are not affected by this warranty.
This warranty shall not apply: (1) if the product has been modified, opened, altered, or has suffered damage as a result of inapp
or abusive use, negligence, an accident, normal wear, or any other cause not related to a material defect or manufacturing flaw; (2) in
the event of failure to comply with the instructions provided by Technical Support; (3) to software not published by Guillemot, said
software being subject to a specific warranty provided by its publisher.
placed.
ropriate
12.2. Additional warranty provisions
In the United States of America and in Canada, this warranty is limited to the product’s internal mechanism and external housing. Any
applicable implied warranties, including warranties of merchantability and fitness for a particular purpose, are hereby limited to two (2)
years from the date of purchase and are subject to the conditions set forth in this limited warranty. In no event shall Guillemot
Corporation S.A. or its affiliates be liable for consequential or incidental damage resulting from the breach of any express or implied
warranties. Some States/Provinces do not allow limitation on how long an implied warranty lasts or exclusion or limitation of
incidental/consequential damages, so the above limitation may not apply to you. This warranty gives you specific legal rights, and you
may also have other legal rights which vary from State to State or Province to Province.
Trademarks
Hercules® is a registered trademark of Guillemot Corporation S.A. Intel® and Pentium® are registered trademarks of Intel Corporation.
Microsoft® Windows® XP®, Vista® and 7™ are registered trademarks or trademarks of Microsoft Corporation in the United States and/or other
countries. Mac and Mac OS are trademarks of Apple Inc., registered in the U.S. and other countries. VirtualDJ™ is a trademark of Atomix
Productions. All other trademarks and brand names are hereby acknowledged and are property of their respective owners. Illustrations not
binding. Contents, designs and specifications are subject to change without notice and may vary from one country to another.
Declaration of conformity
EC COMPLIANCE NOTICE: this equipment has been tested and found to comply with the limits of the Council Directive 89/336/EEC of 3 May
1989 on the approximation of the laws of the Member States relating to electromagnetic compatibility, amended by Directive 93/68/EEC. In a
domestic environment this product may cause radio interference in which case the user may be required to take adequate measures.
CANADIAN COMPLIANCE NOTICE: this Class B digital apparatus meets all requirements of the Canadian Interference-Causing Equipment
Regulations.
USA COMPLIANCE NOTICE: this equipment has been tested and found to comply with the limits for a Class B digital device, pursuant to Part 15
of the FCC rules. Operation is subject to the following two conditions:
(1) This device may not cause harmful interference, and
(2) This device must accept any interference received, including interference that may cause undesired operation.
These limits are designed to provide reasonable protection against harmful interference in a residential installation. This equipment generates,
uses and can radiate radio frequency energy and, if not installed and used in accordance with the instructions, may cause harmful interference to
radio communications. However, there is no guarantee that interference will not occur in a particular installation. If this equipment does cause
harmful interference to radio or television reception, which can be determined by turning the equipment on and off, the user is encouraged to try to
correct the interference by one or more of the following measures:
- Reorient or relocate the receiving antenna.
- Increase the separation between the equipment and receiver.
- Connect the equipment into an outlet on a circuit different from that to which the receiver is connected.
- Consult the dealer or an experienced radio/TV technician for help.
In the event of malfunction during use due to electrostatic emission, you should exit the software, disconnect the device from the
computer, then resume normal use by reconnecting the device to the computer, and restarting the software.
ITALIANO DEUTSCH ESPAÑOL NEDERLANDS ENGLISH FRANÇAIS
User Manual – 29/30
Page 30

Copyright
© 2010 Guillemot Corporation S.A. All rights reserved.
This publication may not be reproduced in whole or in part, summarized, transmitted, transcribed, stored in a retrieval system, or translated into
any language or computer language, in any form or by any means, electronic, mechanical, magnetic, photocopying, recording, manual or
otherwise, without the prior written permission of Guillemot Corporation S.A.
Disclaimer
Guillemot Corporation S.A. reserves the right to make changes to specifications at any time and without notice. The information provided by this
document is believed to be accurate and reliable. However, no responsibility is assumed by Guillemot Corporation S.A. either for its use or for the
infringement of patents or other rights of third parties resulting from its use. This product may exist in a light or special version for PC integration or
other purposes. Certain functions detailed in this manual may not be available in these versions. Wherever possible, a README.TXT will be
included on the installation CD-ROM detailing the differences between the supplied product and the product described in the present
documentation.
End-user software license Agreement for Hercules software
IMPORTANT: please read the Agreement carefully prior to opening and installing the Software. By opening the Software package, you agree to
be bound by the terms of this Agreement. The Software enclosed in this package is licensed, not sold, and is only available under the terms of the
present license Agreement. If you do not agree with the terms hereafter, you must promptly return the Software within 15 days, together with the
entire contents of the box, to the place of purchase.
The Guillemot Corporation S.A. Software (hereafter named the “Software”) is copyrighted by Guillemot Corporation S.A. All rights are reserved.
The term “Software” refers to all documentation and related material, including drivers, executable programs, libraries and data files. The
purchaser is granted a license to use the Software only. The licensee also agrees to be bound by the terms and conditions of the present
Agreement concerning copyright and all other proprietary rights for any third party Software, documentation and related material included in the
Software package.
Guillemot Corporation S.A. reserves the right to terminate this license in the event of failure to comply with any of the terms or
conditions laid out in the present Agreement. On termination, all copies of the Software shall immediately be returned to Guillemot
Corporation S.A.; the purchaser remaining liable for any and all resulting damages.
License:
1. The license is granted to the original purchaser only. Guillemot Corporation S.A. retains all title to and ownership of the Software and reserves
all rights not expressly granted. The licensee is not permitted to sub-license or lease any of the rights that are hereby granted. Transfer of the
license is permitted, provided that the transferor does not retain any part or copy of the Software and the transferee accepts to be bound by the
terms and conditions of the present Agreement.
2. The licensee may only use the Software on a single computer at any time. The machine-readable portion of the Software may be transferred to
another computer provided it is previously erased from the first machine and there is no possibility that the Software can be used on more than
one machine at any one time.
3. The licensee acknowledges the copyright
the Software, nor from any copy thereof, nor from any documentation, written or electronic, accompanying the Software.
4. The licensee is granted the right to make one back-up copy of the machine-readable portion of the Software on the condition that al
and proprietary notices are also reproduced.
5. Except where the present Agreement expressly permits, the licensee is strictly prohibited from engaging in, nor may he permit third parties to
engage in, the following: providing or disclosing the Software to third parties; providing use of the Software in a network, multiple PCs, multiuser or time-sharing arrangement where the users are not individual licensees; making alterations or copies of any kind of the Software; making
any attempt to disassemble, de-compile or reverse engineer the Software in any way or form, or engaging in any activity aimed at obtaining
underlying information not visible to the user during normal use of the Software; making copies or translations of the User Manual.
End-user software license Agreement for VirtualDJ Software
Please carefully read the License contract displayed when installing the VirtualDJ software. Afterwards, you can view the text
file installed on your computer at any time.
ENVIRONMENTAL PROTECTION RECOMMENDATION
At the end of its working life, this product should not
rather dropped off at a collection point for the disposal of Waste Electrical and Electronic Equipment
(WEEE) for recycling.
This is confirmed by the symbol found on the product, user manual or packaging.
Depending on their characteristics, the materials may be recycled.
processing Waste Electrical and Electronic Equipment, you can make a significant contribution towards
helping to protect the environment.
Please contact your local authorities for informat
protection belonging to Guillemot Corporation S.A. The copyright notice must not be removed from
l copyright
be disposed of with standard household waste, but
Through recycling and other forms of
ion on the collection point nearest you.
30/30 – User Manual
Page 31

APPENDIX: HERCULES DJ CONSOLE 4-MX MIDI CONTROLS
MIDI messages sent by the DJ Console 4-Mx (Virtual MIDI In port)
Note: values are expressed in hexadecimal base.
Examples:
“7F” means 127 in decimal base, Value 10 = 16 in decimal base
In 9x 0A Value, 9 = Note On/Off MIDI command, x = 1
In 9y 4B Value, 9 = Note On/Off MIDI command, y = 2
In Bx 23 Value, B = Control Change MIDI command, x = 1
base
MIDI Control MIDI Message Message Type Value Description
K1_DA 9x 01 Value Button-Toggling Output “7F” : Pressed – “00” : Released
K2_DA 9x 02 Value Button-Toggling Output “7F” : Pressed – “00” : Released
K3_DA 9x 03 Value Button-Toggling Output “7F” : Pressed – “00” : Released
K4_DA 9x 04 Value Button-Toggling Output “7F” : Pressed – “00” : Released
K5_DA 9x 05 Value Button-Toggling Output “7F” : Pressed – “00” : Released
K6_DA 9x 06 Value Button-Toggling Output “7F” : Pressed – “00” : Released
SHIFTED_K1_DA 9x 07 Value Button-Toggling Output “7F” : Pressed – “00” : Released
SHIFTED_K2_DA 9x 08 Value Button-Toggling Output “7F” : Pressed – “00” : Released
SHIFTED_K3_DA 9x 09 Value Button-Toggling Output “7F” : Pressed – “00” : Released
SHIFTED_K4_DA 9x 0A Value Button-Toggling Output “7F” : Pressed – “00” : Released
SHIFTED_K5_DA 9x 0B Value Button-Toggling Output “7F” : Pressed – “00” : Released
SHIFTED_K6_DA 9x 0C Value Button-Toggling Output “7F” : Pressed – “00” : Released
Cue_DA 9x 0D Value Button-Toggling Output “7F” : Pressed – “00” : Released
Play_DA 9x 0E Value Button-Toggling Output “7F” : Pressed – “00” : Released
CueSel_DA 9x 0F Value Button-Toggling Output “7F” : Pressed – “00” : Released
Stop_DA 9x 10 Value Button-Toggling Output “7F” : Pressed – “00” : Released
Sync_DA 9x 11 Value Button-Toggling Output “7F” : Pressed – “00” : Released
Deck_DA 9x 12 Value Button-Toggling Output “7F” : Pressed – “00” : Released
PIT_SP_DA 9x 13 Value Button-Toggling Output “7F” : Pressed – “00” : Released
PIT_SM_DA 9x 14 Value Button-Toggling Output “7F” : Pressed – “00” : Released
PIT_SR_DA 9x 15 Value Button-Toggling Output “7F” : Pressed – “00” : Released
SOURCE_DA 9x 16 Value Button-Toggling Output “7F” : Pressed – “00” : Released
KILL_T_DA 9x 17 Value Button-Toggling Output “7F” : Pressed – “00” : Released
KILL_M_DA 9x 18 Value Button-Toggling Output “7F” : Pressed – “00” : Released
st
MIDI channel, 0A = 10 in decimal base
nd
MIDI channel, 4B = 75 in decimal base
st
MIDI channel, 23 = 35 in decimal
Appendix – 1/12
Page 32

KILL_B_DA 9x 19 Value Button-Toggling Output “7F” : Pressed – “00” : Released
JOG_TOUCH_DA 9x 1A Value Button-Toggling Output “7F” : Pressed – “00” : Released
Shift_State_DA 9x 1B Value Button-Toggling Output “7F” : Pressed – “00” : Released
Shift_DA 9x 1C Value Button-Toggling Output “7F” : Pressed – “00” : Released
PBM_DA 9x 1D Value Button-Toggling Output “7F” : Pressed – “00” : Released
PBP_DA 9x 1E Value Button-Toggling Output “7F” : Pressed – “00” : Released
Prev_DA 9x 1F Value Button-Toggling Output “7F” : Pressed – “00” : Released
Next_DA 9x 20 Value Button-Toggling Output “7F” : Pressed – “00” : Released
K1_DB 9x 21 Value Button-Toggling Output “7F” : Pressed – “00” : Released
K2_DB 9x 22 Value Button-Toggling Output “7F” : Pressed – “00” : Released
K3_DB 9x 23 Value Button-Toggling Output “7F” : Pressed – “00” : Released
K4_DB 9x 24 Value Button-Toggling Output “7F” : Pressed – “00” : Released
K5_DB 9x 25 Value Button-Toggling Output “7F” : Pressed – “00” : Released
K6_DB 9x 26 Value Button-Toggling Output “7F” : Pressed – “00” : Released
SHIFTED_K1_DB 9x 27 Value Button-Toggling Output “7F” : Pressed – “00” : Released
SHIFTED_K2_DB 9x 28 Value Button-Toggling Output “7F” : Pressed – “00” : Released
SHIFTED_K3_DB 9x 29 Value Button-Toggling Output “7F” : Pressed – “00” : Released
SHIFTED_K4_DB 9x 2A Value Button-Toggling Output “7F” : Pressed – “00” : Released
SHIFTED_K5_DB 9x 2B Value Button-Toggling Output “7F” : Pressed – “00” : Released
SHIFTED_K6_DB 9x 2C Value Button-Toggling Output “7F” : Pressed – “00” : Released
Cue_DB 9x 2D Value Button-Toggling Output “7F” : Pressed – “00” : Released
Play_DB 9x 2E Value Button-Toggling Output “7F” : Pressed – “00” : Released
CueSel_DB 9x 2F Value Button-Toggling Output “7F” : Pressed – “00” : Released
Stop_DB 9x 30 Value Button-Toggling Output “7F” : Pressed – “00” : Released
Sync_DB 9x 31 Value Button-Toggling Output “7F” : Pressed – “00” : Released
Deck_DB 9x 32 Value Button-Toggling Output “7F” : Pressed – “00” : Released
PIT_SP_DB 9x 33 Value Button-Toggling Output “7F” : Pressed – “00” : Released
PIT_SM_DB 9x 34 Value Button-Toggling Output “7F” : Pressed – “00” : Released
PIT_SR_DB 9x 35 Value Button-Toggling Output “7F” : Pressed – “00” : Released
SOURCE_DB 9x 36 Value Button-Toggling Output “7F” : Pressed – “00” : Released
KILL_T_DB 9x 37 Value Button-Toggling Output “7F” : Pressed – “00” : Released
KILL_M_DB 9x 38 Value Button-Toggling Output “7F” : Pressed – “00” : Released
KILL_B_DB 9x 39 Value Button-Toggling Output “7F” : Pressed – “00” : Released
JOG_TOUCH_DB 9x 3A Value Button-Toggling Output “7F” : Pressed – “00” : Released
Shift_State_DB 9x 3B Value Button-Toggling Output “7F” : Pressed – “00” : Released
AUTOMIX 9x 3C Value Button-Toggling Output “7F” : Pressed – “00” : Released
2/12 - Appendix
Page 33

SCRATCH 9x 3D Value Button-Toggling Output “7F” : Pressed – “00” : Released
FILES 9x 3E Value Button-Toggling Output “7F” : Pressed – “00” : Released
FOLDERS 9x 3F Value Button-Toggling Output “7F” : Pressed – “00” : Released
UP 9x 40 Value Button-Toggling Output “7F” : Pressed – “00” : Released
DOWN 9x 41 Value Button-Toggling Output “7F” : Pressed – “00” : Released
Shift_DB 9x 42 Value Button-Toggling Output “7F” : Pressed – “00” : Released
PBM_DB 9x 43 Value Button-Toggling Output “7F” : Pressed – “00” : Released
PBP_DB 9x 44 Value Button-Toggling Output “7F” : Pressed – “00” : Released
Prev_DB 9x 45 Value Button-Toggling Output “7F” : Pressed – “00” : Released
Next_DB 9x 46 Value Button-Toggling Output “7F” : Pressed – “00” : Released
MIC 9x 47 Value Button-Toggling Output “7F” : Pressed – “00” : Released
DECK_STATE_AC 9x 48 Value Button-Toggling Output “7F” : Deck C – “00” : Deck A
DECK_STATE_BD 9x 49 Value Button-Toggling Output “7F” : Deck D – “00” : Deck B
Load_DA 9x 4A Value Button-Toggling Output “7F” : Pressed – “00” : Released
Load_DB 9x 4B Value Button-Toggling Output “7F” : Pressed – “00” : Released
K1_DC 9y 01 Value Button-Toggling Output “7F” : Pressed – “00” : Released
K2_DC 9y 02 Value Button-Toggling Output “7F” : Pressed – “00” : Released
K3_DC 9y 03 Value Button-Toggling Output “7F” : Pressed – “00” : Released
K4_DC 9y 04 Value Button-Toggling Output “7F” : Pressed – “00” : Released
K5_DC 9y 05 Value Button-Toggling Output “7F” : Pressed – “00” : Released
K6_DC 9y 06 Value Button-Toggling Output “7F” : Pressed – “00” : Released
SHIFTED_K1_DC 9y 07 Value Button-Toggling Output “7F” : Pressed – “00” : Released
SHIFTED_K2_DC 9y 08 Value Button-Toggling Output “7F” : Pressed – “00” : Released
SHIFTED_K3_DC 9y 09 Value Button-Toggling Output “7F” : Pressed – “00” : Released
SHIFTED_K4_DC 9y 0A Value Button-Toggling Output “7F” : Pressed – “00” : Released
SHIFTED_K5_DC 9y 0B Value Button-Toggling Output “7F” : Pressed – “00” : Released
SHIFTED_K6_DC 9y 0C Value Button-Toggling Output “7F” : Pressed – “00” : Released
Cue_DC 9y 0D Value Button-Toggling Output “7F” : Pressed – “00” : Released
Play_DC 9y 0E Value Button-Toggling Output “7F” : Pressed – “00” : Released
CueSel_DC 9y 0F Value Button-Toggling Output “7F” : Pressed – “00” : Released
Stop_DC 9y 10 Value Button-Toggling Output “7F” : Pressed – “00” : Released
Sync_DC 9y 11 Value Button-Toggling Output “7F” : Pressed – “00” : Released
PIT_SP_DC 9y 13 Value Button-Toggling Output “7F” : Pressed – “00” : Released
PIT_SM_DC 9y 14 Value Button-Toggling Output “7F” : Pressed – “00” : Released
PIT_SR_DC 9y 15 Value Button-Toggling Output “7F” : Pressed – “00” : Released
SOURCE_DC 9y 16 Value Button-Toggling Output “7F” : Pressed – “00” : Released
Appendix – 3/12
Page 34

KILL_T_DC 9y 17 Value Button-Toggling Output “7F” : Pressed – “00” : Released
KILL_M_DC 9y 18 Value Button-Toggling Output “7F” : Pressed – “00” : Released
KILL_B_DC 9y 19 Value Button-Toggling Output “7F” : Pressed – “00” : Released
JOG_TOUCH_DC 9y 1A Value Button-Toggling Output “7F” : Pressed – “00” : Released
Shift_State_DC 9y 1B Value Button-Toggling Output “7F” : Pressed – “00” : Released
Shift_DC 9y 1C Value Button-Toggling Output “7F” : Pressed – “00” : Released
PBM_DC 9y 1D Value Button-Toggling Output “7F” : Pressed – “00” : Released
PBP_DC 9y 1E Value Button-Toggling Output “7F” : Pressed – “00” : Released
Prev_DC 9y 1F Value Button-Toggling Output “7F” : Pressed – “00” : Released
Next_DC 9y 20 Value Button-Toggling Output “7F” : Pressed – “00” : Released
K1_DD 9y 21 Value Button-Toggling Output “7F” : Pressed – “00” : Released
K2_DD 9y 22 Value Button-Toggling Output “7F” : Pressed – “00” : Released
K3_DD 9y 23 Value Button-Toggling Output “7F” : Pressed – “00” : Released
K4_DD 9y 24 Value Button-Toggling Output “7F” : Pressed – “00” : Released
K5_DD 9y 25 Value Button-Toggling Output “7F” : Pressed – “00” : Released
K6_DD 9y 26 Value Button-Toggling Output “7F” : Pressed – “00” : Released
SHIFTED_K1_DD 9y 27 Value Button-Toggling Output “7F” : Pressed – “00” : Released
SHIFTED_K2_DD 9y 28 Value Button-Toggling Output “7F” : Pressed – “00” : Released
SHIFTED_K3_DD 9y 29 Value Button-Toggling Output “7F” : Pressed – “00” : Released
SHIFTED_K4_DD 9y 2A Value Button-Toggling Output “7F” : Pressed – “00” : Released
SHIFTED_K5_DD 9y 2B Value Button-Toggling Output “7F” : Pressed – “00” : Released
SHIFTED_K6_DD 9y 2C Value Button-Toggling Output “7F” : Pressed – “00” : Released
Cue_DD 9y 2D Value Button-Toggling Output “7F” : Pressed – “00” : Released
Play_DD 9y 2E Value Button-Toggling Output “7F” : Pressed – “00” : Released
CueSel_DD 9y 2F Value Button-Toggling Output “7F” : Pressed – “00” : Released
Stop_DD 9y 30 Value Button-Toggling Output “7F” : Pressed – “00” : Released
Sync_DD 9y 31 Value Button-Toggling Output “7F” : Pressed – “00” : Released
PIT_SP_DD 9y 33 Value Button-Toggling Output “7F” : Pressed – “00” : Released
PIT_SM_DD 9y 34 Value Button-Toggling Output “7F” : Pressed – “00” : Released
PIT_SR_DD 9y 35 Value Button-Toggling Output “7F” : Pressed – “00” : Released
SOURCE_DD 9y 36 Value Button-Toggling Output “7F” : Pressed – “00” : Released
KILL_T_DD 9y 37 Value Button-Toggling Output “7F” : Pressed – “00” : Released
KILL_M_DD 9y 38 Value Button-Toggling Output “7F” : Pressed – “00” : Released
KILL_B_DD 9y 39 Value Button-Toggling Output “7F” : Pressed – “00” : Released
JOG_TOUCH_DD 9y 3A Value Button-Toggling Output “7F” : Pressed – “00” : Released
Shift_State_DD 9y 3B Value Button-Toggling Output “7F” : Pressed – “00” : Released
4/12 - Appendix
Page 35

Shift_DD 9y 42 Value Button-Toggling Output “7F” : Pressed – “00” : Released
PBM_DD 9y 43 Value Button-Toggling Output “7F” : Pressed – “00” : Released
PBP_DD 9y 44 Value Button-Toggling Output “7F” : Pressed – “00” : Released
Prev_DD 9y 45 Value Button-Toggling Output “7F” : Pressed – “00” : Released
Next_DD 9y 46 Value Button-Toggling Output “7F” : Pressed – “00” : Released
Load_DC 9y 4A Value Button-Toggling Output “7F” : Pressed – “00” : Released
Load_DD 9y 4B Value Button-Toggling Output “7F” : Pressed – “00” : Released
JOG_SEEK_DA Bx 01 Value Incremental – Coarse (128 values) 7F > 40 : CCW Slow>Fast – 01 > 3F :
FX_DA Bx 02 Value Incremental – Coarse (128 values) 7F > 40 : CCW Slow>Fast – 01 > 3F :
VOL_DA Bx 03 Value Analog – Coarse (128 values) 00 > 7F : Full Down > Full Up
GAIN_DA Bx 04 Value Analog – Coarse (128 values) 00 > 7F : Full Down > Full Up
PITCH_DA Bx 05 Value Analog – Coarse (128 values) 00 > 7F : Full Down > Full Up
TREBLE_DA Bx 06 Value Analog – Coarse (128 values) 00 > 7F : Full CW : Full CCW
MEDIUM_DA Bx 07 Value Analog – Coarse (128 values) 00 > 7F : Full CW : Full CCW
BASS_DA Bx 08 Value Analog – Coarse (128 values) 00 > 7F : Full CW : Full CCW
JOG_SEEK_DB Bx 09 Value Incremental – Coarse (128 values) 7F > 40 : CCW Slow>Fast – 01 > 3F :
FX_DB Bx 0A Value Incremental – Coarse (128 values) 7F > 40 : CCW Slow>Fast – 01 > 3F :
VOL_DB Bx 0B Value Analog – Coarse (128 values) 00 > 7F : Full Down > Full Up
GAIN_DB Bx 0C Value Analog – Coarse (128 values) 00 > 7F : Full Down > Full Up
PITCH_DB Bx 0D Value Analog – Coarse (128 values) 00 > 7F : Full Down > Full Up
TREBLE_DB Bx 0E Value Analog – Coarse (128 values) 00 > 7F : Full CW : Full CCW
MEDIUM_DB Bx 0F Value Analog – Coarse (128 values) 00 > 7F : Full CW : Full CCW
BASS_DB Bx 10 Value Analog – Coarse (128 values) 00 > 7F : Full CW : Full CCW
JOG_SEEK_DC Bx 11 Value Incremental – Coarse (128 values) 7F > 40 : CCW Slow>Fast – 01 > 3F :
FX_DC Bx 12 Value Incremental – Coarse (128 values) 7F > 40 : CCW Slow>Fast – 01 > 3F :
VOL_DC Bx 13 Value Analog – Coarse (128 values) 00 > 7F : Full Down > Full Up
GAIN_DC Bx 14 Value Analog – Coarse (128 values) 00 > 7F : Full Down > Full Up
PITCH_DC Bx 15 Value Analog – Coarse (128 values) 00 > 7F : Full Down > Full Up
TREBLE_DC Bx 16 Value Analog – Coarse (128 values) 00 > 7F : Full CW : Full CCW
MEDIUM_DC Bx 17 Value Analog – Coarse (128 values) 00 > 7F : Full CW : Full CCW
BASS_DC Bx 18 Value Analog – Coarse (128 values) 00 > 7F : Full CW : Full CCW
JOG_SEEK_DD Bx 19 Value Incremental – Coarse (128 values) 7F > 40 : CCW Slow>Fast – 01 > 3F :
CW Slow>Fast
CW Slow>Fast
CW Slow>Fast
CW Slow>Fast
CW Slow>Fast
CW Slow>Fast
CW Slow>Fast
Appendix – 5/12
Page 36

FX_DD Bx 1A Value Incremental – Coarse (128 values) 7F > 40 : CCW Slow>Fast – 01 > 3F :
VOL_DD Bx 1B Value Analog – Coarse (128 values) 00 > 7F : Full Down > Full Up
GAIN_DD Bx 1C Value Analog – Coarse (128 values) 00 > 7F : Full Down > Full Up
PITCH_DD Bx 1D Value Analog – Coarse (128 values) 00 > 7F : Full Down > Full Up
TREBLE_DD Bx 1E Value Analog – Coarse (128 values) 00 > 7F : Full CW : Full CCW
MEDIUM_DD Bx 1F Value Analog – Coarse (128 values) 00 > 7F : Full CW : Full CCW
BASS_DD Bx 20 Value Analog – Coarse (128 values) 00 > 7F : Full CW : Full CCW
VOL_MAIN Bx 21 Value Analog – Coarse (128 values) 00 > 7F : Full CW : Full CCW
XFADER Bx 22 Value Analog – Coarse (128 values) 00 > 7F : Full CW : Full CCW
CUE_TO_MIX Bx 23 Value Analog – Coarse (128 values) 00 > 7F : Full CW : Full CCW
JOG_SCR_DA Bx 24 Value Incremental – Coarse (128 values) 7F > 40 : CCW Slow>Fast – 01 > 3F :
JOG_SCR_DB Bx 25 Value Incremental – Coarse (128 values) 7F > 40 : CCW Slow>Fast – 01 > 3F :
JOG_SCR_DC Bx 26 Value Incremental – Coarse (128 values) 7F > 40 : CCW Slow>Fast – 01 > 3F :
JOG_SCR_DD Bx 27 Value Incremental – Coarse (128 values) 7F > 40 : CCW Slow>Fast – 01 > 3F :
PITCH_DA_LSBit Bx 28 Value Analog – Coarse (2 values) 00 : LSBit zero
PITCH_DB_LSBit Bx 29 Value Analog – Coarse (2 values) 00 : LSBit zero
PITCH_DC_LSBit Bx 2A Value Analog – Coarse (2 values) 00 : LSBit zero
PITCH_DD_LSBit Bx 2B Value Analog – Coarse (2 values) 00 : LSBit zero
CW Slow>Fast
CW Slow>Fast
CW Slow>Fast
CW Slow>Fast
CW Slow>Fast
01 : LSBit one
01 : LSBit one
01 : LSBit one
01 : LSBit one
Notes:
- CW: ClockWise
- CCW: Counter ClockWise
- x: Depends on the MIDI channel assigned to the device for the first deck (0: MIDI
- y: Depends on the MIDI channel assigned to the device for the second deck (0: MIDI
6/12 - Appendix
channel
1; 1: MIDI channel 2…).
1; 1: MIDI channel 2…).
channel
Page 37

–
–
–
–
–
–
–
–
–
–
–
–
–
–
–
–
–
–
–
–
–
–
–
–
–
–
–
–
–
–
–
–
–
–
–
MIDI messages sent by the Host (Virtual MIDI Out port)
MIDI Control MIDI Message Value Description
K1_DA 9x 01 Value
K2_DA 9x 02 Value
K3_DA 9x 03 Value
K4_DA 9x 04 Value
K5_DA 9x 05 Value
K6_DA 9x 06 Value
SHIFTED_K1_DA 9x 07 Value
SHIFTED_K2_DA 9x 08 Value
SHIFTED_K3_DA 9x 09 Value
SHIFTED_K4_DA 9x 0A Value
SHIFTED_K5_DA 9x 0B Value
SHIFTED_K6_DA 9x 0C Value
Cue_DA 9x 0D Value
Play_DA 9x 0E Value
CueSel_DA 9x 0F Value
Stop_DA 9x 10 Value
Sync_DA 9x 11 Value
PIT_SR_DA 9x 15 Value
SOURCE_DA 9x 16 Value
KILL_T_DA 9x 17 Value
KILL_M_DA 9x 18 Value
KILL_B_DA 9x 19 Value
JOG_TOUCH_DA 9x 1A Value
K1_DB 9x 21 Value
K2_DB 9x 22 Value
K3_DB 9x 23 Value
K4_DB 9x 24 Value
K5_DB 9x 25 Value
K6_DB 9x 26 Value
SHIFTED_K1_DB 9x 27 Value
SHIFTED_K2_DB 9x 28 Value
SHIFTED_K3_DB 9x 29 Value
SHIFTED_K4_DB 9x 2A Value
SHIFTED_K5_DB 9x 2B Value
SHIFTED_K6_DB 9x 2C Value
00 : OFF
7F: ON
00 : OFF
7F: ON
00 : OFF
7F: ON
00 : OFF
7F: ON
00 : OFF
7F: ON
00 : OFF
7F: ON
00 : OFF
7F: ON
00 : OFF
7F: ON
00 : OFF
7F: ON
00 : OFF
7F: ON
00 : OFF
7F: ON
00 : OFF
7F: ON
00 : OFF
7F: ON
00 : OFF
7F: ON
00 : OFF
7F: ON
00 : OFF
7F: ON
00 : OFF
7F: ON
00 : OFF
7F: ON
00 : OFF
7F: ON
00 : OFF
7F: ON
00 : OFF
7F: ON
00 : OFF
7F: ON
00 : OFF
7F: ON
00 : OFF
7F: ON
00 : OFF
7F: ON
00 : OFF
7F: ON
00 : OFF
7F: ON
00 : OFF
7F: ON
00 : OFF
7F: ON
00 : OFF
7F: ON
00 : OFF
7F: ON
00 : OFF
7F: ON
00 : OFF
7F: ON
00 : OFF
7F: ON
00 : OFF
7F: ON
Appendix – 7/12
Page 38

Cue_DB 9x 2D Value
–
–
–
–
–
–
–
–
–
–
–
A
–
–
–
–
–
–
–
–
–
–
–
–
–
–
–
–
–
–
–
–
–
–
–
–
–
–
–
Play_DB 9x 2E Value
CueSel_DB 9x 2F Value
Stop_DB 9x 30 Value
Sync_DB 9x 31 Value
PIT_SR_DB 9x 35 Value
SOURCE_DB 9x 36 Value
KILL_T_DB 9x 37 Value
KILL_M_DB 9x 38 Value
KILL_B_DB 9x 39 Value
JOG_TOUCH_DB 9x 3A Value
UTOMIX 9x 3C Value
SCRATCH 9x 3D Value
FILES 9x 3E Value
FOLDERS 9x 3F Value
K1_DC 9y 01 Value
K2_DC 9y 02 Value
K3_DC 9y 03 Value
K4_DC 9y 04 Value
K5_DC 9y 05 Value
K6_DC 9y 06 Value
SHIFTED_K1_DC 9y 07 Value
SHIFTED_K2_DC 9y 08 Value
SHIFTED_K3_DC 9y 09 Value
SHIFTED_K4_DC 9y 0A Value
SHIFTED_K5_DC 9y 0B Value
SHIFTED_K6_DC 9y 0C Value
Cue_DC 9y 0D Value
Play_DC 9y 0E Value
CueSel_DC 9y 0F Value
Stop_DC 9y 10 Value
Sync_DC 9y 11 Value
PIT_SR_DC 9y 15 Value
SOURCE_DC 9y 16 Value
KILL_T_DC 9y 17 Value
KILL_M_DC 9y 18 Value
KILL_B_DC 9y 19 Value
JOG_TOUCH_DC 9y 1A Value
00 : OFF
00 : OFF
00 : OFF
00 : OFF
00 : OFF
00 : OFF
00 : OFF
00 : OFF
00 : OFF
00 : OFF
00 : OFF
00 : OFF
00 : OFF
00 : OFF
00 : OFF
00 : OFF
00 : OFF
00 : OFF
00 : OFF
00 : OFF
00 : OFF
00 : OFF
00 : OFF
00 : OFF
00 : OFF
00 : OFF
00 : OFF
00 : OFF
00 : OFF
00 : OFF
00 : OFF
00 : OFF
00 : OFF
00 : OFF
00 : OFF
00 : OFF
00 : OFF
00 : OFF
7F: ON
7F: ON
7F: ON
7F: ON
7F: ON
7F: ON
7F: ON
7F: ON
7F: ON
7F: ON
7F: ON
7F: ON
7F: ON
7F: ON
7F: ON
7F: ON
7F: ON
7F: ON
7F: ON
7F: ON
7F: ON
7F: ON
7F: ON
7F: ON
7F: ON
7F: ON
7F: ON
7F: ON
7F: ON
7F: ON
7F: ON
7F: ON
7F: ON
7F: ON
7F: ON
7F: ON
7F: ON
7F: ON
8/12 - Appendix
Page 39

–
–
–
–
–
–
–
–
–
–
–
–
–
–
–
–
–
–
–
–
–
–
–
–
–
–
–
–
–
–
–
–
–
–
–
–
–
–
K1_DD 9y 21 Value
K2_DD 9y 22 Value
K3_DD 9y 23 Value
K4_DD 9y 24 Value
K5_DD 9y 25 Value
K6_DD 9y 26 Value
SHIFTED_K1_DD 9y 27 Value
SHIFTED_K2_DD 9y 28 Value
SHIFTED_K3_DD 9y 29 Value
SHIFTED_K4_DD 9y 2A Value
SHIFTED_K5_DD 9y 2B Value
SHIFTED_K6_DD 9y 2C Value
Cue_DD 9y 2D Value
Play_DD 9y 2E Value
CueSel_DD 9y 2F Value
Stop_DD 9y 30 Value
Sync_DD 9y 31 Value
PIT_SR_DD 9y 35 Value
SOURCE_DD 9y 36 Value
KILL_T_DD 9y 37 Value
KILL_M_DD 9y 38 Value
KILL_B_DD 9y 39 Value
JOG_TOUCH_DD 9y 3A Value
BL_K1_DA 9x 41 Value
BL_K2_DA 9x 42 Value
BL_K3_DA 9x 43 Value
BL_K4_DA 9x 44 Value
BL_K5_DA 9x 45 Value
BL_K6_DA 9x 46 Value
BL_SHIFTED_K1_DA 9x 47 Value
BL_SHIFTED_K2_DA 9x 48 Value
BL_SHIFTED_K3_DA 9x 49 Value
BL_SHIFTED_K4_DA 9x 4A Value
BL_SHIFTED_K5_DA 9x 4B Value
BL_SHIFTED_K6_DA 9x 4C Value
BL_Cue_DA 9x 4D Value
BL_Play_DA 9x 4E Value
BL_CueSel_DA 9x 4F Value
00 : OFF
00 : OFF
00 : OFF
00 : OFF
00 : OFF
00 : OFF
00 : OFF
00 : OFF
00 : OFF
00 : OFF
00 : OFF
00 : OFF
00 : OFF
00 : OFF
00 : OFF
00 : OFF
00 : OFF
00 : OFF
00 : OFF
00 : OFF
00 : OFF
00 : OFF
00 : OFF
00 : OFF
00 : OFF
00 : OFF
00 : OFF
00 : OFF
00 : OFF
00 : OFF
00 : OFF
00 : OFF
00 : OFF
00 : OFF
00 : OFF
00 : OFF
00 : OFF
00 : OFF
7F: ON
7F: ON
7F: ON
7F: ON
7F: ON
7F: ON
7F: ON
7F: ON
7F: ON
7F: ON
7F: ON
7F: ON
7F: ON
7F: ON
7F: ON
7F: ON
7F: ON
7F: ON
7F: ON
7F: ON
7F: ON
7F: ON
7F: ON
7F: ON
7F: ON
7F: ON
7F: ON
7F: ON
7F: ON
7F: ON
7F: ON
7F: ON
7F: ON
7F: ON
7F: ON
7F: ON
7F: ON
7F: ON
Appendix – 9/12
Page 40

BL_Stop_DA 9x 50 Value
–
–
–
–
–
–
–
–
–
–
–
–
–
–
–
–
–
–
–
–
–
–
–
–
–
–
–
–
–
–
–
–
–
–
–
–
–
–
BL_Sync_DA 9x 51 Value
BL_Deck_DA 9x 52 Value
BL_PIT_SR_DA 9x 55 Value
BL_SOURCE_DA 9x 56 Value
BL_KILL_T_DA 9x 57 Value
BL_KILL_M_DA 9x 58 Value
BL_KILL_B_DA 9x 59 Value
BL_JOG_TOUCH_DA 9x 5A Value
BL_K1_DB 9x 61 Value
BL_K2_DB 9x 62 Value
BL_K3_DB 9x 63 Value
BL_K4_DB 9x 64 Value
BL_K5_DB 9x 65 Value
BL_K6_DB 9x 66 Value
BL_SHIFTED_K1_DB 9x 67 Value
BL_SHIFTED_K2_DB 9x 68 Value
BL_SHIFTED_K3_DB 9x 69 Value
BL_SHIFTED_K4_DB 9x 6A Value
BL_SHIFTED_K5_DB 9x 6B Value
BL_SHIFTED_K6_DB 9x 6C Value
BL_Cue_DB 9x 6D Value
BL_Play_DB 9x 6E Value
BL_CueSel_DB 9x 6F Value
BL_Stop_DB 9x 70 Value
BL_Sync_DB 9x 71 Value
BL_Deck_DB 9x 72 Value
BL_PIT_SR_DB 9x 75 Value
BL_SOURCE_DB 9x 76 Value
BL_KILL_T_DB 9x 77 Value
BL_KILL_M_DB 9x 78 Value
BL_KILL_B_DB 9x 79 Value
BL_JOG_TOUCH_DB 9x 7A Value
BL_AUTOMIX 9x 7C Value
BL_SCRATCH 9x 7D Value
BL_FILES 9x 7E Value
BL_FOLDERS 9x 7F Value
BL_K1_DC 9y 41 Value
00 : OFF
00 : OFF
00 : OFF
00 : OFF
00 : OFF
00 : OFF
00 : OFF
00 : OFF
00 : OFF
00 : OFF
00 : OFF
00 : OFF
00 : OFF
00 : OFF
00 : OFF
00 : OFF
00 : OFF
00 : OFF
00 : OFF
00 : OFF
00 : OFF
00 : OFF
00 : OFF
00 : OFF
00 : OFF
00 : OFF
00 : OFF
00 : OFF
00 : OFF
00 : OFF
00 : OFF
00 : OFF
00 : OFF
00 : OFF
00 : OFF
00 : OFF
00 : OFF
00 : OFF
7F: ON
7F: ON
7F: ON
7F: ON
7F: ON
7F: ON
7F: ON
7F: ON
7F: ON
7F: ON
7F: ON
7F: ON
7F: ON
7F: ON
7F: ON
7F: ON
7F: ON
7F: ON
7F: ON
7F: ON
7F: ON
7F: ON
7F: ON
7F: ON
7F: ON
7F: ON
7F: ON
7F: ON
7F: ON
7F: ON
7F: ON
7F: ON
7F: ON
7F: ON
7F: ON
7F: ON
7F: ON
7F: ON
10/12 - Appendix
Page 41

–
–
–
–
–
–
–
–
–
–
–
–
–
–
–
–
–
–
–
–
–
–
–
–
–
–
–
–
–
–
–
–
–
–
–
–
–
–
BL_K2_DC 9y 42 Value
BL_K3_DC 9y 43 Value
BL_K4_DC 9y 44 Value
BL_K5_DC 9y 45 Value
BL_K6_DC 9y 46 Value
BL_SHIFTED_K1_DC 9y 47 Value
BL_SHIFTED_K2_DC 9y 48 Value
BL_SHIFTED_K3_DC 9y 49 Value
BL_SHIFTED_K4_DC 9y 4A Value
BL_SHIFTED_K5_DC 9y 4B Value
BL_SHIFTED_K6_DC 9y 4C Value
BL_Cue_DC 9y 4D Value
BL_Play_DC 9y 4E Value
BL_CueSel_DC 9y 4F Value
BL_Stop_DC 9y 50 Value
BL_Sync_DC 9y 51 Value
BL_PIT_SR_DC 9y 55 Value
BL_SOURCE_DC 9y 56 Value
BL_KILL_T_DC 9y 57 Value
BL_KILL_M_DC 9y 58 Value
BL_KILL_B_DC 9y 59 Value
BL_JOG_TOUCH_DC 9y 5A Value
BL_K1_DD 9y 61 Value
BL_K2_DD 9y 62 Value
BL_K3_DD 9y 63 Value
BL_K4_DD 9y 64 Value
BL_K5_DD 9y 65 Value
BL_K6_DD 9y 66 Value
BL_SHIFTED_K1_DD 9y 67 Value
BL_SHIFTED_K2_DD 9y 68 Value
BL_SHIFTED_K3_DD 9y 69 Value
BL_SHIFTED_K4_DD 9y 6A Value
BL_SHIFTED_K5_DD 9y 6B Value
BL_SHIFTED_K6_DD 9y 6C Value
BL_Cue_DD 9y 6D Value
BL_Play_DD 9y 6E Value
BL_CueSel_DD 9y 6F Value
BL_Stop_DD 9y 70 Value
00 : OFF
00 : OFF
00 : OFF
00 : OFF
00 : OFF
00 : OFF
00 : OFF
00 : OFF
00 : OFF
00 : OFF
00 : OFF
00 : OFF
00 : OFF
00 : OFF
00 : OFF
00 : OFF
00 : OFF
00 : OFF
00 : OFF
00 : OFF
00 : OFF
00 : OFF
00 : OFF
00 : OFF
00 : OFF
00 : OFF
00 : OFF
00 : OFF
00 : OFF
00 : OFF
00 : OFF
00 : OFF
00 : OFF
00 : OFF
00 : OFF
00 : OFF
00 : OFF
00 : OFF
7F: ON
7F: ON
7F: ON
7F: ON
7F: ON
7F: ON
7F: ON
7F: ON
7F: ON
7F: ON
7F: ON
7F: ON
7F: ON
7F: ON
7F: ON
7F: ON
7F: ON
7F: ON
7F: ON
7F: ON
7F: ON
7F: ON
7F: ON
7F: ON
7F: ON
7F: ON
7F: ON
7F: ON
7F: ON
7F: ON
7F: ON
7F: ON
7F: ON
7F: ON
7F: ON
7F: ON
7F: ON
7F: ON
Appendix – 11/12
Page 42

BL_Sync_DD 9y 71 Value
–
–
–
–
–
–
–
–
–
–
–
–
–
BL_PIT_SR_DD 9y 75 Value
BL_SOURCE_DD 9y 76 Value
BL_KILL_T_DD 9y 77 Value
BL_KILL_M_DD 9y 78 Value
BL_KILL_B_DD 9y 79 Value
BL_JOG_TOUCH_DD 9y 7A Value
SET_SHIFT_DA Bx 72 Value
SET_SHIFT_DB Bx 73 Value
SET_SHIFT_DC Bx 74 Value
SET_SHIFT_DD Bx 75 Value
SET_DECK_AC Bx 76 Value
SET_DECK_BD Bx 77 Value
SET_DECK_MODE Bx 78 Value 00 : Basic Control
SET_JW_SENS Bx 79 Value 00 : Most Sensitive -> 7F: Least
LOCK_JOG_DA Bx 7A Value 00 : OFF – 7F: ON
LOCK_JOG_DB Bx 7B Value 00 : OFF – 7F: ON
LOCK_JOG_DC Bx 7C Value 00 : OFF – 7F: ON
LOCK_JOG_DD Bx 7D Value 00 : OFF – 7F: ON
SET_XF_CURVE Bx 7E Value 00 : OFF – 7F: ON
Update_All_Controls Bx 7F Value 00 : OFF – 7F: ON 1
00 : OFF
7F: ON
00 : OFF
7F: ON
00 : OFF
7F: ON
00 : OFF
7F: ON
00 : OFF
7F: ON
00 : OFF
7F: ON
00 : OFF
7F: ON
00 : OFF
7F: ON
00 : OFF
7F: ON
00 : OFF
7F: ON
00 : OFF
7F: ON
00 : Deck_A
00 : Deck_B
01 : Extended Deck
02 : 4-Deck Mode
Sensitive
7F: Deck_C
7F: Deck_D
Notes:
- 1: This command will send (on the Virtual MIDI In port) all updated states of all the
fol
lowing controls: Treble/Medium/Bass knobs, volume faders and the cross fader. It
can be used by software to update its graphic controls to the current position of the
corresponding DJ Console 4-Mx controls.
- x: Depends on the MIDI channel assigned to the device for the first deck (0: MIDI
channel
1; 1: MIDI channel 2…).
- y: Depends on the MIDI channel assigned to the device for the second deck (0: MIDI
1; 1: MIDI channel 2…).
channel
12/12 - Appendix
 Loading...