

Page 1
CONTENTS
1. INTRODUCTION................................................................................................................ 2
2. SYSTEM REQUIREMENTS............................................................................................... 2
3. INSTALLATION ................................................................................................................. 2
3.1. First installation ........................................................................................................... 2
3.1.1. For Windows 98 / 98 SE / Millennium ............................................................. 2
3.1.2. For Windows 2000 / XP .................................................................................. 3
3.2. Connecting and disconnecting the DJ Console.......................................................... 5
4. PRESENTATION ............................................................................................................... 5
4.1. The cover .................................................................................................................... 5
4.2. The shoulder strap ...................................................................................................... 5
4.3. The top face ................................................................................................................ 6
4.4. The connectors ........................................................................................................... 7
5. CONNECTING SPEAKERS............................................................................................... 8
5.1. Connecting speakers in 5.1 mode .............................................................................. 8
5.2. Connecting speakers in DJ mode ............................................................................... 8
6. USING THE DJ CONSOLE AT A PARTY......................................................................... 8
6.1. Overview ..................................................................................................................... 8
6.2. Previewing with headphones ...................................................................................... 9
6.3. Speeding up or slowing down a piece ........................................................................ 9
6.4. Creating loops and cue points .................................................................................... 9
6.5. Switching from one piece to another ........................................................................ 11
6.6. Getting on the microphone........................................................................................ 11
6.7. Scratching ................................................................................................................. 12
7. TECHNICAL SUPPORT .................................................................................................. 13
7.1. Warranty information................................................................................................. 13
7.2. Save time by registering your product online!........................................................... 13
DEUTSCH
NEDERLAND ENGLISH FRANÇAIS
ITALIANO
ESPAÑOL
Page 2
1. INTRODUCTION
There are two ways to use your DJ Console. It can be used in a normal way for gaming and
enjoying surround sound on DVDs thanks to its 5.1-channel connection, or it can be turned into a
mixing deck. A mouse click enables DJ mode, allowing you to mix your musical pieces and
preview them on headphones, just like a real DJ.
The DJ Console functions mainly with digital audio files, including MP3s. We would like to draw
your attention to the fact that musical creations are protected by copyright and that you must
comply with all applicable legislations. We strongly encourage you to support artists by acquiring
their works legally.
Do not hesitate to consult the glossary in the online help for definitions of specific DJ terms found
in this manual.
WARNING: this product contains chemicals, including lead, known to the State of California to
cause birth defects or other reproductive harm. Wash hands after handling.
2. SYSTEM REQUIREMENTS
Desktop/laptop PC with Intel Pentium II 400MHz or compatible
64MB RAM
Operating system: Microsoft Windows 98/98 SE, Me, 2000, XP
Available USB port (dedicated USB root hub for DJ Console recommended)
Headphones or amplified speakers
CD-ROM or DVD-ROM drive (CD-DA support recommended)
16-bit, 800x600 video resolution
Microphone, Internet connection + 100MB free hard disk space for some applications
3. INSTALLATION
3.1. First installation
You must install your DJ Console’s drivers before connecting it to your computer.
Note: your installation screens and procedure may vary slightly from those described in this
manual.
Because drivers and software are constantly being developed, the ones provided on your
CD-ROM may not be the most recent versions. You can visit the Hercules website
(www.hercules.com
2/14 – User Manual
) to verify this and, if necessary, download the very latest versions.
Page 3
3.1.1. For Windows 98 / 98 SE / Millennium
- Insert the installation CD-ROM into your CD-ROM drive.
The DJ Console installation menu automatically appears.
If the installation menu is not launched automatically:
- Double-click on My Computer.
- Double-click on the CD-ROM icon.
- Double-click on Setup.exe if necessary.
- Click on Drivers.
- Follow the on-screen instructions.
Windows prompts you to reboot your computer.
- Click on Finish.
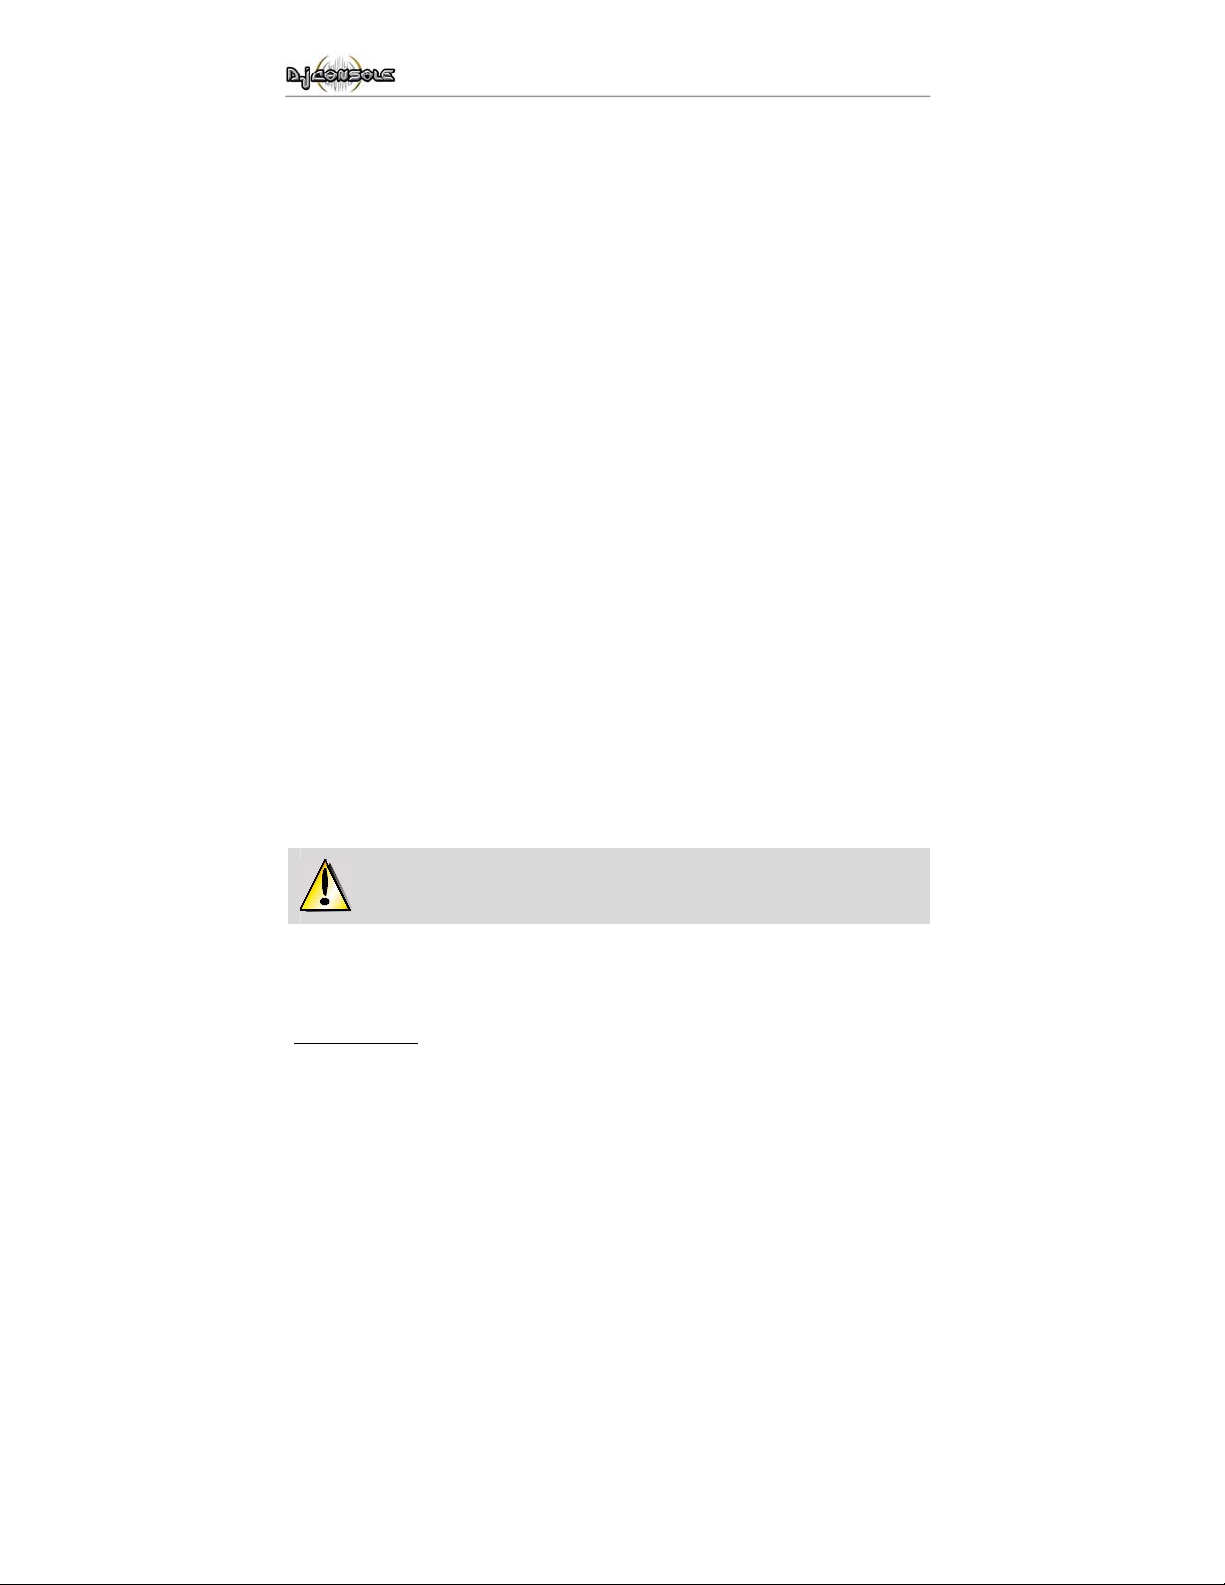
- Once your computer has restarted, connect the DJ Console
to one of the computer’s USB ports using the USB cable
provided.
We recommend that you connect the DJ Console to a USB port on your computer or
a dedicated USB hub, in order to ensure sufficient power supply to the DJ Console.
Windows will automatically detect and install the required drivers. (Please have your Windows 98 SE
CD-ROM handy before commencing installation. You may be prompted to insert it during driver installation.)
If the Add New Hardware Wizard dialog box
appears:
- Click on Next 4 times to install the default drivers.
- Click on Finish to complete the setup.
The
icon appears in the taskbar, indicating that the DJ Console is ready for use.
User Manual – 3/14
DEUTSCH
NEDERLAND ENGLISH FRANÇAIS
ITALIANO
ESPAÑOL
Page 4
3.1.2. For Windows 2000 / XP
- Insert the installation CD-ROM into your CD-ROM drive.
The DJ Console installation menu automatically appears.
If the installation menu is not launched automatically:
- Double-click on My Computer.
- Double-click on the CD-ROM icon.
- Double-click on Setup.exe if necessary.
- Click on Drivers.
- Follow the on-screen instructions.
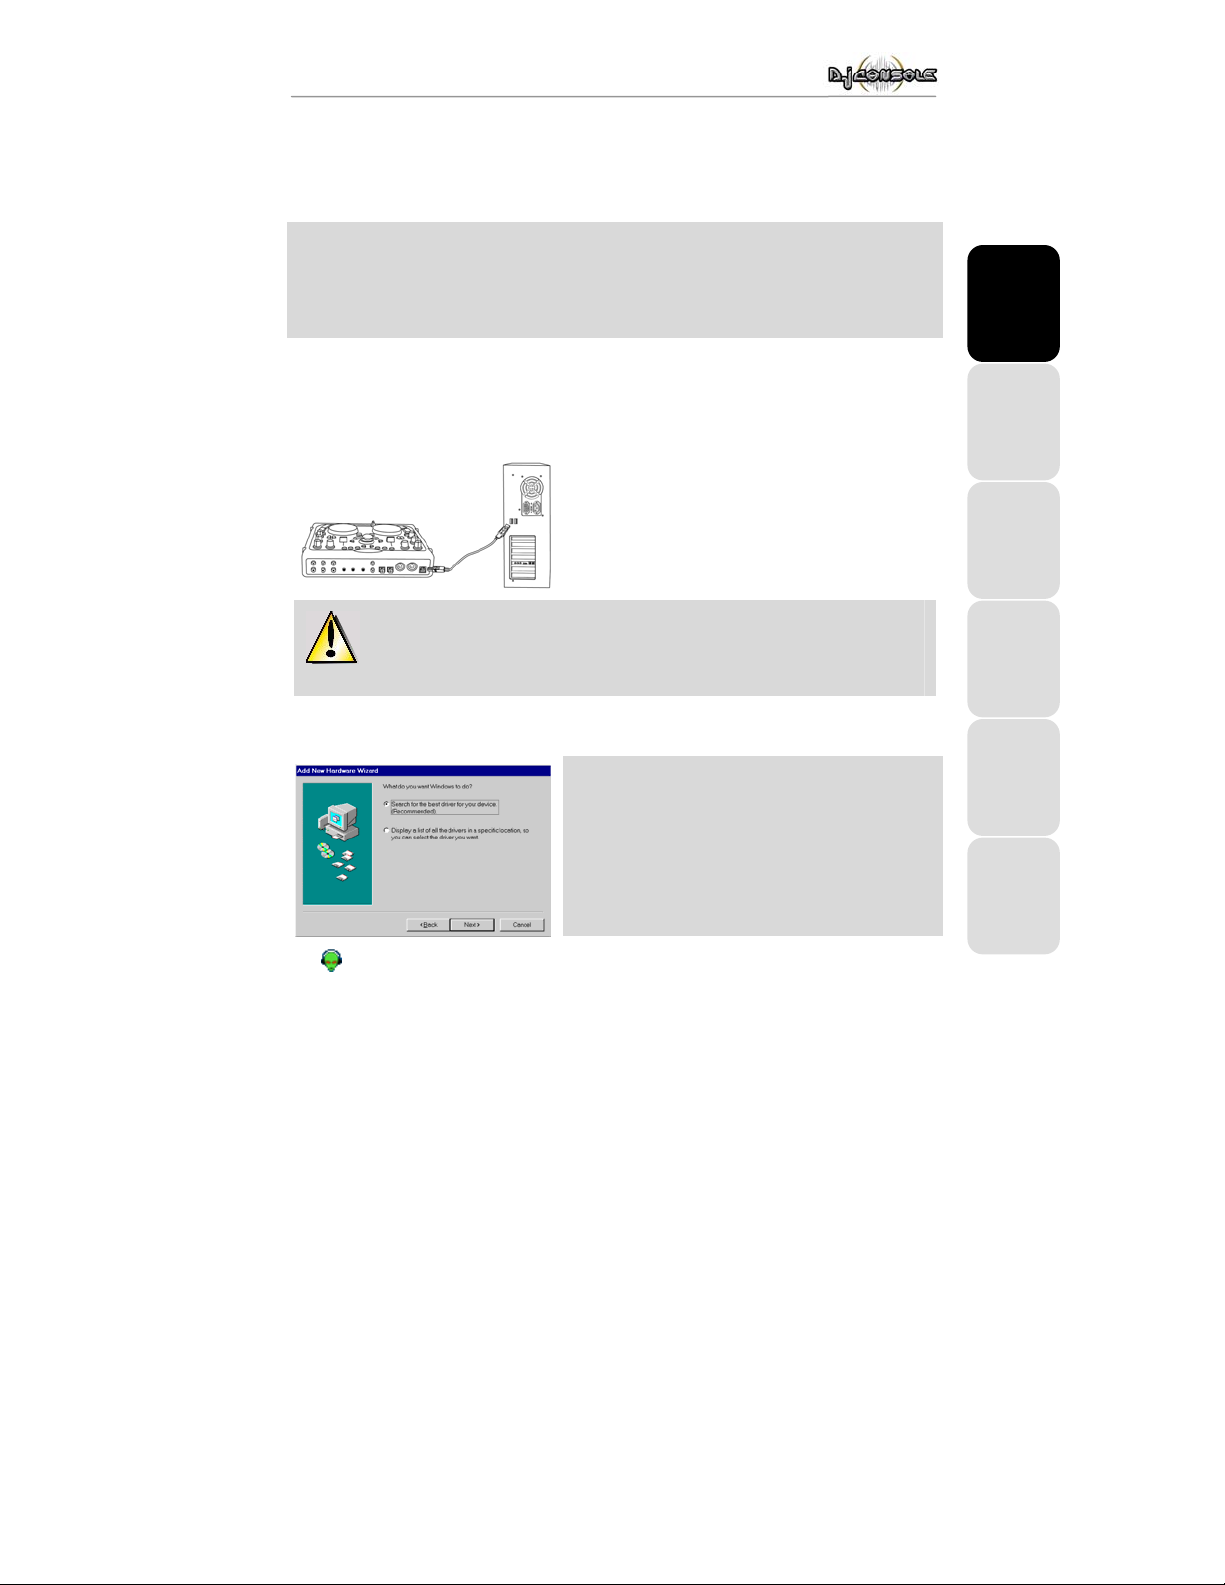
A dialog box appears, prompting you to connect the DJ
Console.
- Connect the DJ Console to one of the computer’s USB ports
using the USB cable provided.
We recommend that you connect the DJ Console to a USB port on your computer or
a dedicated USB hub, in order to ensure sufficient power supply to the DJ Console.
Windows will automatically detect and install the required drivers.
Windows may display a Hardware Installation warning.
- Click on Yes (under Windows 2000) or Continue Anyway
(under Windows XP).
- Once all of the drivers have been installed, click on OK in the
dialog box.
- Click on Finish.
icon appears in the taskbar, indicating that the DJ
The
Console is ready for use.
4/14 – User Manual
Page 5
3.2. Connecting and disconnecting the DJ Console
The DJ Console can be used in conjunction with an internal sound card (dedicated to network
gaming, for example) without causing conflicts on your computer. When you connect the DJ
Console it is automatically recognized as the main sound card, and once it is disconnected the
internal sound card resumes its original functions.
Consequently, you can connect and disconnect your DJ Console at any time, even when the
computer is switched on, thanks to its USB connection.
4. PRESENTATION
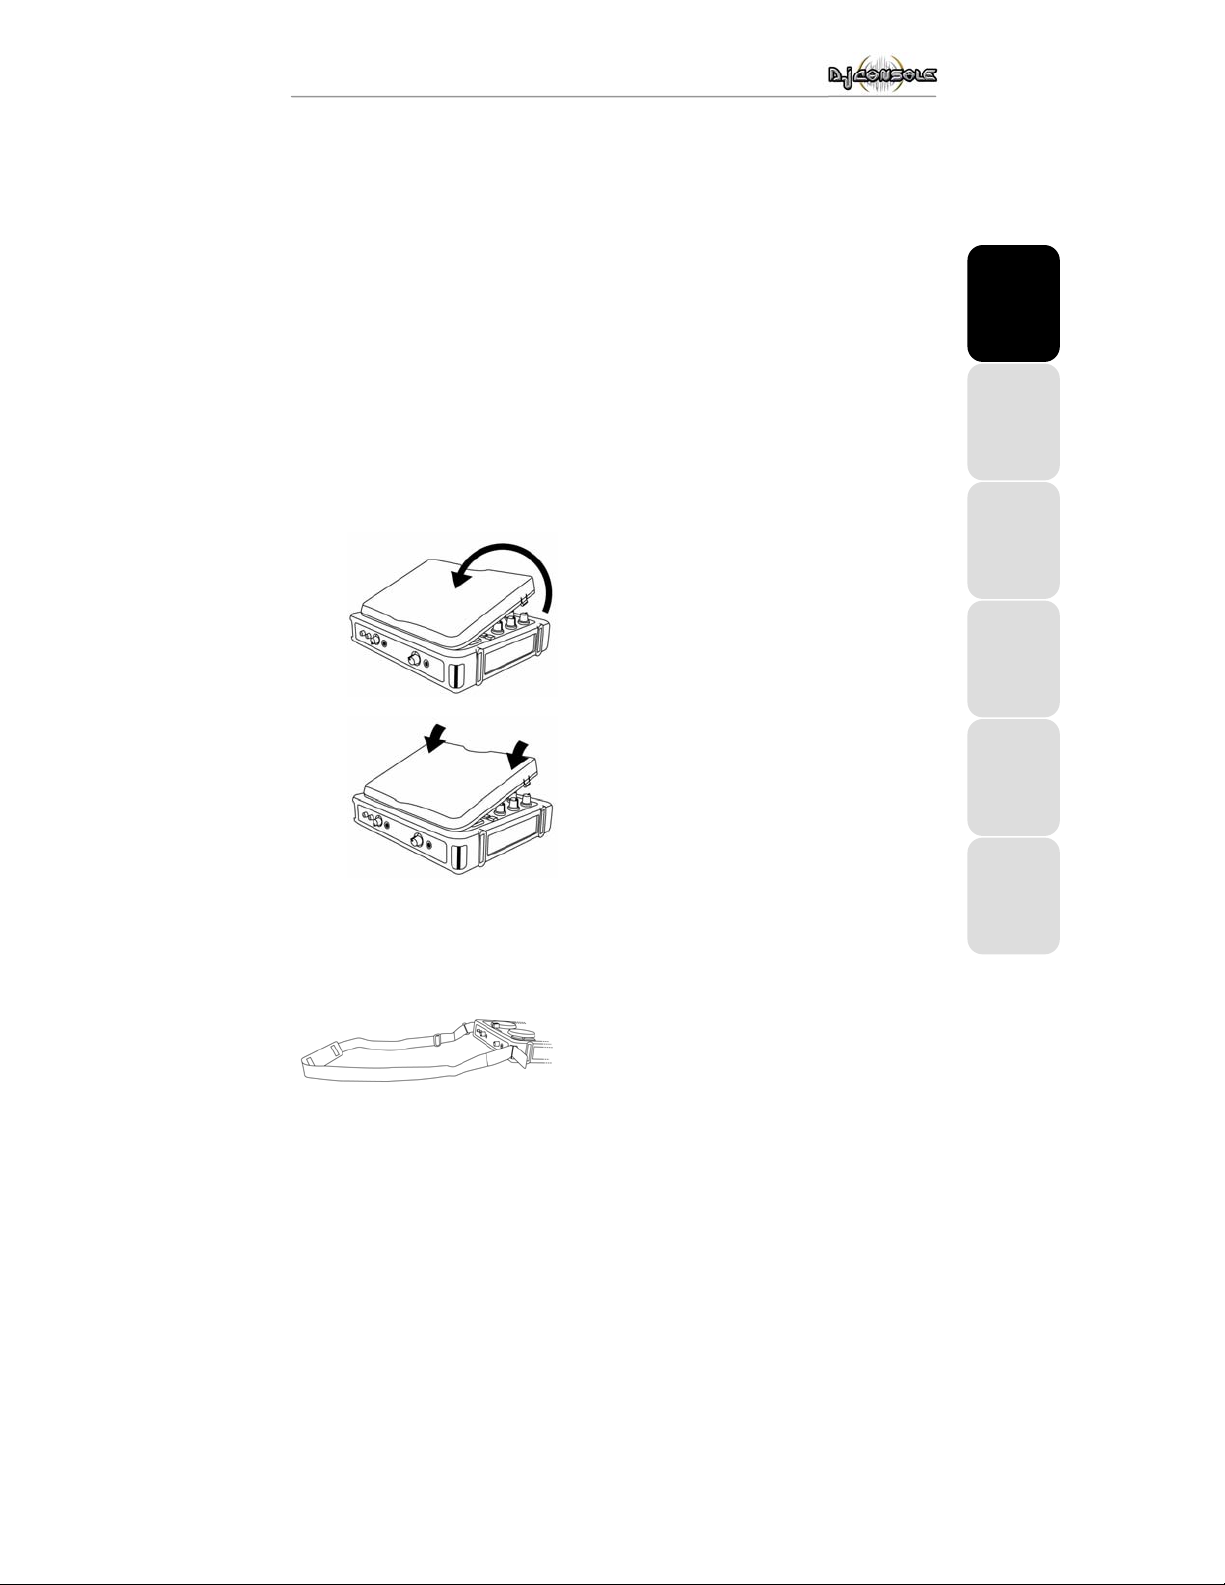
4.1. The cover
Your DJ Console has a cover, allowing you to transport it without any danger of damaging the top
face. This cover can also be attached to the underside of the DJ Console as an inclined base,
allowing you to use your DJ Console under optimal conditions. By default, the cover is configured
as an inclined base.
To detach the cover:
- Turn over the DJ Console and place it on a flat surface.
- Holding the DJ Console with one hand, take hold of the cover
by the OPEN opening.
- Pull the cover up towards you, pulling up on one side and
then the other in order to detach the cover.
To replace the cover:
- Position the tabs on the lower part of the cover in the
corresponding slots on the DJ Console.
- Apply pressure on both sides of the cover where the word
CLOSE appears until it snaps into place.
DEUTSCH
NEDERLAND ENGLISH FRANÇAIS
ITALIANO
4.2. The shoulder strap
Your DJ Console also features a shoulder strap for easy transportation. To install the shoulder
strap:
- Thread the Velcro flaps through the two buckles on the
DJ Console.
- Attach the flaps to the Velcro band.
User Manual – 5/14
ESPAÑOL
Page 6

4.3. The top face
Your DJ Console has a variety of controls allowing you to interact with DJ software. There are
two sets of these controls, as the left and right sections of the DJ Console each correspond to a
separate deck in DJ software applications. Descriptions of the default function of each control are
provided below.
1. Cut or boost Bass/Medium/Treble frequencies
2. Tweak volume, change music speed (pitch/master tempo) in real time
3. Add effects, cue points (song positions), loops on the fly
4. Mouse emulation or special DJ FX control
5. LEDs indicating the current mode at a glance
6. Headphone monitoring for private control of music
7. Speed up or down for accurate mixing
8. Previous/next track or rewind/fast forward
9. Vinyl-style jog wheel
10. Swift crossfader for seamless mixing between the 2 decks
11. Automix your entire playlist
12. Play/Pause song or mark a song position
Note 1: these are descriptions of the DJ Console’s default functions, which may vary according to
the application you are using.
6/14 – User Manual
Page 7

A
Note 2: the software applications provided are
optimized for use with the DJ Console. Nevertheless,
you can use the DJ Console to control any other
application – even games! In order to do this you will
need to use the DJ Console Mapper software, which
allows you to assign a keyboard shortcut to each of
your DJ Console’s controls, corresponding to a specific
function in an application. For more information, please
refer to the DJ Console Mapper’s online help.
4.4. The connectors
Your DJ Console features multiple connectors on the front and back faces. With these
connectors you can connect multiple peripherals, as illustrated in the diagrams below:
Back face
RCA and minijack analog
outputs: speaker system
(from 2 to 5.1 channels)
Optical and coaxial digital
inputs/outputs: DAT (Digital Audio
Tape), MiniDisc player
DEUTSCH
Front face
nalog line input:
record from any
analog peripheral
(stereo system, CD
player, etc.)
Microphone input:
mono microphone
MIDI input/output: MIDI
keyboard
Headphone input: DJ
headphones for
headphone previewing
User Manual – 7/14
NEDERLAND ENGLISH FRANÇAIS
ITALIANO
ESPAÑOL
Page 8

5. CONNECTING SPEAKERS
The DJ Console can be used in two different ways: in 5.1 mode and in DJ mode. 5.1 mode (the
default mode) transforms the DJ Console into a 5.1-channel sound card, perfect for games and
DVDs, while DJ mode allows you to use the DJ Console as a real mixing deck. For more on 5.1
mode and DJ mode, please refer to the online help.
Two types of connectors are available for connecting speakers: RCA and minijack. An RCA plug
corresponds to a channel, while a minijack plug corresponds to an output (composed of two
channels), which is why there are 6 RCA plugs and only 3 minijack plugs. Select the type of plug
according to the type of speakers you will be connecting (RCA and minijack plugs corresponding
to the same output cannot be used simultaneously).
5.1. Connecting speakers in 5.1 mode
- Make sure that your computer is switched off.
- Connect the front speakers to the 1 and 2 RCA plugs (plug 1 corresponds to the front left speaker, plug 2 to
the front right speaker) or to the Front 1-2 minijack plug.
- Connect the center speaker to the 3 RCA plug and the subwoofer to the 4 RCA plug, or connect the center
speaker/subwoofer pair to the Center/LFE 3-4 minijack plug.
- Connect the rear speakers to the 5 and 6 RCA plugs (plug 5 corresponds to the rear left speaker, plug 6 to
the rear right speaker) or to the Rear 5-6 minijack plug.
- Switch on your computer and your speakers.
- Click on the
- Click on the 5.1 / DJ / ASIO switch to enable 5.1 mode.
icon in the taskbar.
Your setup is now ready to reproduce surround sound.
5.2. Connecting speakers in DJ mode
- Make sure that your computer is switched off.
- Connect the speakers to the 1 and 2 RCA plugs (plug 1 corresponds to the front left speaker, plug 2 to the
front right speaker) or to the Front 1-2 minijack plug.
- Connect your headphones to the headphone plug on the front face.
- Switch on your computer and your speakers.
- Click on the
- Click on the 5.1 / DJ / ASIO switch to enable DJ mode.
You are now ready to mix.
8/14 – User Manual
icon in the taskbar.
Page 9

6. USING THE DJ CONSOLE AT A PARTY
6.1. Overview
You are now about to learn everything a DJ needs to know to host his or her first parties. Let’s
start at the beginning, namely setting up the party: no DJ would allow himself to arrive
unprepared, which is why he would have organized his material and selected his records
beforehand.
You should do the same by sorting through your music. Have a good look through your collection
of CDs as well as your MP3 and WMA files and select the songs you are going to use. In order to
be able to mix tracks effectively, you must know the pieces perfectly.
Once this is done, make sure that you have all of the hardware you will need. Got your computer,
DJ Console, a pair of speakers, headphones and microphone handy? Perfect, then you’re ready
to go!
You’re probably asking yourself: and now, how do I get started? By way of introduction, here are
the basic principles of DJing: a DJ works with two decks (or turntables). The first deck plays one
part of the musical piece, while the DJ uses the second deck to listen to the next part on his
headphones. He can then work on this second part (speed it up so that it is at the same tempo as
the rest of the piece, etc.) before playing it out loud. At the end of a part, the DJ plays the part on
the other deck by doing a mix, which is to say a blending of the two parts creating a perfect
transition.
In concrete terms, you will launch a DJ software application provided with your DJ Console and
program pieces onto each of the decks. Please read through the following sections to learn more
about the art of DJing.
Note: the functions of controls may vary according to the application you are using. For example,
some applications will use the Pitch slider to regulate the deck’s volume; similarly, the procedure
for creating loops may vary from one application to another. We therefore recommend that you
consult the online documentation of the software applications provided with your DJ Console for
more information.
DEUTSCH
NEDERLAND ENGLISH FRANÇAIS
ITALIANO
6.2. Previewing with headphones
To prepare his musical line-up, a DJ does a headphone preview: he listens to a track on his
headphones while the other one is being played over the speakers, allowing him to adjust the
tempo so that the tracks flow seamlessly together. He can also add audio effects, set cue points
(markers) to start up at a specific point in a track, create rhythmic loops, adjust bass, medium and
treble frequencies, etc.
Your DJ Console allows you to carry out this kind of headphone preview. In DJ mode two analog
outputs are enabled, each of which can broadcast a different signal (output 1-2 broadcasts sound
over the speakers and output 3-4 is reproduced on the headphone output).
User Manual – 9/14
ESPAÑOL
Page 10

You can select which track or tracks to listen to in your headphones using the Headphone
buttons located in the upper part of the DJ Console. The LED indicates whether the track is being
broadcast over the headphones. When the two LEDs are lit up, tracks A and B are mixed
together on the headphone output.
Note: the functions of controls may vary according to the application you are using.
6.3. Speeding up or slowing down a piece
Now you are listening to one of the tracks on your headphones. The main reason for doing this is
to synchronize the tempo, which consists of matching the speed of the piece you are listening to
with the speed of the piece playing over the speakers. In this way you can mix the two pieces
together smoothly when switching from one deck to another. There are two ways to regulate the
speed of a piece: by adjusting the pitch, and the master tempo.
On vinyl decks, the pitch allows one to adjust the rotation speed of the turntable. This adjustment
therefore changes the speed of a piece by modifying its overall tonality (for example, a piece that
has been sped up significantly will sound much more high-pitched, or sharper).
The master tempo allows you to modify the number of beats per minute (bpms) in a piece, without
modifying its tonality.
You can therefore use one of the DJ Console’s Pitch sliders to modify the pitch of a piece.
A piece’s tempo can be adjusted with these same Pitch sliders. To do this, simply press the
Master tempo button. The red LED then indicates that the Pitch slider now controls the tempo,
and not the pitch.
Note: the functions of controls may vary according to the application you are using.
6.4. Creating loops and cue points
Finished synchronizing the tempos of your pieces? Great – but depending on the pieces you are
using, you may wish to start up playback at a specific point and not simply at the beginning.
This is possible by inserting cue points in your pieces. A cue point is a marker, directly accessible
by pressing a button (the 1, 2 and 3 buttons when the Cue LED is lit up). You must first use the
CUE button to set the cue points, which will allow you to define the beginning of an interesting
rhythm section, for example, and start playing back the piece at that spot.
Using this same marker principle you can also create loops, which are sections of a piece
repeated to infinity. To do this, make sure that the Loop LED is lit up.
Note: the functions of controls may vary according to the application you are using.
10/14 – User Manual
Page 11

6.5. Switching from one piece to another
The art of mixing consists of preparing the next piece while a given piece is being played. When
the piece being played reaches its end, the DJ switches from one piece to the other progressively
using the crossfader, which regulates the volume of the two decks. This technique enables you to
avoid empty space between two pieces.
Example: a piece is being played on the left-hand deck, so the crossfader is therefore pushed
completely to the left. To switch to the next piece, the DJ moves the crossfader to the right at the
same moment he starts up playback on the right-hand deck.
Naturally, there are many ways to switch from one piece to another: you can move the crossfader
slowly, create back-and-forth effects, etc. Just use your imagination!
The transition between two pieces should be perfect thanks to the pitch synchronization carried
out previously. Should you notice a slight discrepancy, however, use the Pitch bend - / +
buttons. These buttons are the equivalents of the DJ giving a little push to the vinyl on his
turntable, or slowing down the deck with his hand. The pitch modification value increases the
more the Pitch bend button is pressed.
6.6. Getting on the microphone
Have an announcement to make? A dedication? Speak up while your music is playing and talk
to your public! The attenuation function allows you to be heard by reducing the ambient volume.
- Make sure that the 5.1 / DJ / ASIO switch is in the DJ position.
- Enable the Talkover Attenuation option.
- Select an attenuation level using the slider (-3, -6 or -9 dB).
- Press the
The sound of the music over the speakers decreases and the
interface, indicating that your voice will be broadcast over the speakers in the room. You can now go ahead
and address the crowd.
- Once you’ve said what you have to say, press the
If the Peak indicator lights up while you’re talking:
This means that the signal being received is too high: the sound from the microphone will saturate
at a certain level, with a resulting loss in sound information.
- Adjust the input volume using the microphone knob.
microphone button.
indication lights up in red in the
microphone button once more.
User Manual – 11/14
DEUTSCH
NEDERLAND ENGLISH FRANÇAIS
ITALIANO
ESPAÑOL
Page 12

6.7. Scratching
The DJ Console allows you to scratch your MP3s and CDs in the same way that a DJ scratches
vinyl records. To do this you will use the DJ Console’s joggles, together with the Volume knob to
boost/interrupt the sound. There are many scratch effects, and the most well-known are
described below:
Baby Scratch
No need to use the volume control for this basic scratch. It consists of doing a forward scratch,
immediately followed by a backward scratch.
Tear Scratch
The Tear Scratch doesn’t use the volume control either. As with the Baby Scratch, you do a
forward scratch followed by a backward scratch, but this backward scratch is broken down into
two different speeds: you must first scratch quickly, and then slowly. Thus, the different steps are
as follows: forward scratch, quick backward scratch, slow backward scratch.
Forward Scratch
You must do a forward scratch and then quickly lower the volume to its minimum setting before
doing a backward scratch to return to the initial position and restore the volume. Only the forward
scratch will be audible.
Backward Scratch
The reverse of the Forward Scratch: you must do a backward scratch and then quickly lower the
volume to its minimum setting just before doing the forward scratch, and then restore the volume.
Pass-Pass
The Pass-Pass is not a scratch technique, strictly speaking, since it uses the scratch as well as
other elements (pitch, crossfader, etc.) to create new compositions. To carry out this technique
you must play the same piece on both decks, and then it’s up to you to make use of the DJ
Console’s functions to create new rhythmic combinations by alternating your manipulations on
each deck. A perfect mastery of the crossfader and of the basic scratch techniques is required,
as well as a good sense of rhythm and excellent familiarity with the piece.
12/14 – User Manual
Page 13

7. TECHNICAL SUPPORT
Log onto our website (www.hercules.com) and check out the Support/Drivers section. From
there you will be able to access various elements (Frequently Asked Questions (FAQ), the latest
versions of drivers and software) that may help to resolve your problem.
If the problem persists you may also contact us by email via the website, taking care to provide
the name of the product for which you require assistance, as well as a description of the problem
and details regarding your configuration (motherboard, processor, operating system). A
telephone assistance service is also available (UK only) by dialing 020 7216 0047.
7.1. Warranty information
Worldwide, Guillemot Corporation S.A. (“Guillemot”) warrants to the purchaser that this Hercules
product will be free from material defects and manufacturing flaws for a period of two (2) years
from the original date of purchase. Should the product appear to be defective during the warranty
period, immediately contact Hercules product support, who will indicate the procedure to follow.
In the event that, following diagnosis, Hercules product support asks you to return the product, a
return authorization number will be provided. This number must be displayed on your return
package, which must be sent with delivery prepaid. Any package without a return authorization
number will not be accepted and may result in extra fees for the sender.
Within the context of this warranty, Guillemot commits solely that it will, at its option, repair or
replace a product recognized as defective by Hercules product support. Where authorized by
applicable law, the full liability of Guillemot and its subsidiaries (including for indirect damages) is
limited to the repair or replacement of the product. The consumer’s legal rights with respect to
legislation applicable to the sale of consumer goods are not affected by this warranty.
This warranty shall not apply: (1) if the product has been modified, opened, altered, or has
suffered damage as a result of inappropriate or abusive use, negligence, an accident, normal
wear, or any other cause not related to a material defect or manufacturing flaw; (2) if the product
has not been returned complete (e.g.: manual, CD, cable, etc.) with its original packaging, a
legible copy of the original receipt and suitably protected in the package; (3) to software not
published by Guillemot, said software being subject to a specific warranty provided by its
publisher.
DEUTSCH
NEDERLAND ENGLISH FRANÇAIS
ITALIANO
7.2. Save time by registering your product online!
Log onto our website (www.hercules.com), click on Support/Drivers and click on Registration
on the left-hand side of the screen. Registering with us in this way will simplify the process if you
ever need to contact our technical support team.
User Manual – 13/14
ESPAÑOL
Page 14

Trademarks
Hercules® is a registered trademark of Guillemot Corporation S.A. Intel® and Pentium® are registered trademarks of Intel Corporation.
Microsoft® Windows® 98, Millennium, 2000 and XP are either registered trademarks or trademarks of Microsoft Corporation in the United States
and/or other countries. Velcro® is a registered trademark of Velcro Industries B.V. All other trademarks and brand names are hereby
acknowledged and are property of their respective owners. Illustrations not binding. Contents, designs and specifications are subject to change
without notice and may vary from one country to another.
Declaration of conformity
EC COMPLIANCE NOTICE: this equipment has been tested and found to comply with the limits of the Council Directive 89/336/EEC of 3 May
1989 on the approximation of the laws of the Member States relating to electromagnetic compatibility, amended by Directive 93/68/EEC. In a
domestic environment this product may cause radio interference in which case the user may be required to take adequate measures.
CANADIAN COMPLIANCE NOTICE
Regulations.
USA COMPLIANCE NOTICE
of the FCC rules. Operation is subject to the following two conditions:
(1) This device may not cause harmful interference, and
(2) This device must accept any interference received, including interference that may cause undesired operation.
These limits are designed to provide reasonable protection against harmful interference in a residential installation. This equipment generates,
uses and can radiate radio frequency energy and, if not installed and used in accordance with the instructions, may cause harmful interference to
radio communications. However, there is no guarantee that interference will not occur in a particular installation. If this equipment does cause
harmful interference to radio or television reception, which can be determined by turning the equipment on and off, the user is encouraged to try to
correct the interference by one or more of the following measures:
- Reorient or relocate the receiving antenna.
- Increase the separation between the equipment and receiver.
- Connect the equipment into an outlet on a circuit different from that to which the receiver is connected.
- Consult the dealer or an experienced radio/TV technician for help.
Copyright
© Guillemot Corporation S.A. 2003. All rights reserved.
This publication may not be reproduced in whole or in part, summarized, transmitted, transcribed, stored in a retrieval system, or translated into
any language or computer language, in any form or by any means, electronic, mechanical, magnetic, photocopying, recording, manual or
otherwise, without the prior written permission of Guillemot Corporation S.A.
Disclaimer
Guillemot Corporation S.A. reserves the right to make changes to specifications at any time and without notice. The information provided by this
document is believed to be accurate and reliable. However, no responsibility is assumed by Guillemot Corporation S.A. either for its use or for the
infringement of patents or other rights of third parties resulting from its use. This product may exist in a light or special version for PC integration or
other purposes. Certain functions detailed in this manual may not be available in these versions. Wherever possible, a README.TXT will be
included on the installation CD-ROM detailing the differences between the supplied product and the product described in the present
documentation.
End-user software license Agreement
IMPORTANT: please read the Agreement carefully prior to opening and installing the Software. By opening the Software package, you agree to
be bound by the terms of this Agreement. The Software enclosed in this package is licensed, not sold, and is only available under the terms of the
present license Agreement. If you do not agree with the terms hereafter, you must promptly return the Software within 15 days, together with the
entire contents of the box, to the place of purchase.
The Guillemot Corporation S.A. Software (hereafter named the “Software”) is copyrighted by Guillemot Corporation S.A. All rights are reserved.
The term “Software” refers to all documentation and related material, including drivers, executable programs, libraries and data files. The
purchaser is granted a license to use the Software only. The licensee also agrees to be bound by the terms and conditions of the present
Agreement concerning copyright and all other proprietary rights for any third party Software, documentation and related material included in the
Software package.
Guillemot Corporation S.A. reserves the right to terminate this license in the event of failure to comply with any of the terms or
conditions laid out in the present Agreement. On termination, all copies of the Software shall immediately be returned to Guillemot
Corporation S.A.; the purchaser remaining liable for any and all resulting damages.
License:
1. The license is granted to the original purchaser only. Guillemot Corporation S.A. retains all title to and ownership of the Software and reserves
all rights not expressly granted. The licensee is not permitted to sub-license or lease any of the rights that are hereby granted. Transfer of the
license is permitted, provided that the transferor does not retain any part or copy of the Software and the transferee accepts to be bound by the
terms and conditions of the present Agreement.
2. The licensee may only use the Software on a single computer at any time. The machine-readable portion of the Software may be transferred to
another computer provided it is previously erased from the first machine and there is no possibility that the Software can be used on more than
one machine at any one time.
3. The licensee acknowledges the copyright protection belonging to Guillemot Corporation S.A. The copyright notice must not be removed from
the Software, nor from any copy thereof, nor from any documentation, written or electronic, accompanying the Software.
4. The licensee is granted the right to make one back-up copy of the machine-readable portion of the Software on the condition that all copyright
and proprietary notices are also reproduced.
5. Except where the present Agreement expressly permits, the licensee is strictly prohibited from engaging in, nor may he permit third parties to
engage in, the following: providing or disclosing the Software to third parties; providing use of the Software in a network, multiple PCs, multiuser or time-sharing arrangement where the users are not individual licensees; making alterations or copies of any kind of the Software; making
any attempt to disassemble, de-compile or reverse engineer the Software in any way or form, or engaging in any activity aimed at obtaining
underlying information not visible to the user during normal use of the Software; making copies or translations of the User Manual.
: this Class B digital apparatus meets all requirements of the Canadian Interference-Causing Equipment
: this equipment has been tested and found to comply with the limits for a Class B digital device, pursuant to Part 15
14/14 – User Manual
 Loading...