

Hercules 802.11G-54 User Manual

Hercules Router 802.11G-54
CONTENTS
Clicking on a title in this table of contents will display the corresponding section
1. YOUR HERCULES ROUTER............................................................................................4
1.1. Recommendations......................................................................................................4
1.2. Specifications..............................................................................................................4
1.3. System requirements..................................................................................................5
1.4. Box contents............................................................................................................... 5
1.5. Front face overview..................................................................................................... 5
1.6. Connectivity overview................................................................................................. 6
2. INSTALLING YOUR HERCULES ROUTER ..................................................................... 7
2.1. Launching the Hercules Router Installation Assistant ................................................7
2.2. Step 1: How to position your router ............................................................................ 7
2.3. Step 2: How to connect your router ............................................................................8
2.3.1. Uninstalling your modem or disablin g the automatic connection to y our
modem............................................................................................................ 8
2.3.2. Getting past the Content Advisor (parental control)......................................10
2.3.3. Connecting the router.................................................................................... 10
3. WIFI MANAGER, THE VERSATILE UTILITY................................................................. 11
3.1. Opening the door to WiFi Manager...........................................................................11
3.2. Changing the WiFi Manager password.....................................................................12
3.3. Navigating within the WiFi Manager interface .......................................................... 13
3.4. Sharing your Internet connection via the router........................................................13
3.4.1. Selecting your Internet connection................................................................ 14
3.4.2. Testing your Internet connection...................................................................15
3.4.3. Resolving any difficulties in accessing WiFi Manager or the Internet...........15
3.5. Mastering your WiFi network at your fingertips......................................................... 19
3.5.1. Personalizing your WiFi network...................................................................19
3.5.2. Securing your WiFi network using the Assistant...........................................20
3.5.3. Limiting access to your WiFi network to certai n WiFi computers and
devices..........................................................................................................22
3.5.4. Disabling your WiFi network.......................................................................... 24
3.6. The firewall: your ultimate protection against Internet attacks..................................24
ESPAÑOL NEDERLANDS ITALIANO ENGLISH FRANÇAIS DEUTSCH
4. WELCOME TO THE WIRELESS ATTITUDETM!............................................................. 25
4.1. A few important points to bear in mind before getting started..................................25
4.2. Computers running Windows Vista: Connecting to a wireless network....................25
4.3. Disconnecting from a wireless network .................................................................... 29
1/82 – User Manual

Hercules Router 802.11G-54
4.4. Managing your favorite networks ..............................................................................30
4.5. Computers running Windows Vista: Sharing folders, a printer or an ADSL
connection.................................................................................................................31
4.5.1. Enabling sharing............................................................................................32
4.5.2. Windows Vista: Sharing public or personal folders.......................................35
4.5.3. Computers running Windows Vista: Accessing shared folders...................................37
4.5.4. Windows Vista: Sharing a printer..........................................................................37
4.5.5. Computers running Windows Vista : Accessing the shared printer..............................39
4.5.6. Windows Vista: Sharing an ADSL connection in an Infrastructure type
network..........................................................................................................41
4.6. Computers running Windows XP: Sharing folders, a printer or an ADSL
connection.................................................................................................................43
4.6.1. Windows XP: Using the Network Setup Wizard in an Infrastructure
network..........................................................................................................43
4.6.2. Windows XP: Sharing folders........................................................................48
4.6.3. Win d o w s X P : A cc e s s i n g s h a r e d fo l d e r s.............................................................49
4.6.4. Windows XP: Sharing a printer......................................................................49
4.6.5. Windows XP: Modifying a workgroup name..................................................51
4.6.6. Windows XP: Manually enabling or disabling your adapter’s WiFi
connection (advanced users) ........................................................................52
4.7. Computers running Windows 2000: Sharing folders, a printer or an ADSL
connection.................................................................................................................52
4.7.1. Creating a workgroup in Windows 2000........................................................52
4.7.2. Windows 2000: Sharing folders.....................................................................53
4.7.3. Windows 2000: Accessing shared folders..............................................................53
4.7.4. Windows 2000: Sharing a printer..........................................................................54
4.7.5. Windows 2000: Modifying a workgroup name..................................................55
4.7.6. Windows 2000: Sharing an ADSL connection in an Infrastructure
network..........................................................................................................56
4.7.7. Windows 2000: Manually enabling or disabling your adapter’s WiFi
connection (advanced users) ........................................................................57
4.8. Computers running Windows Me: Sharing folders, a printer or an ADSL
connection.................................................................................................................57
4.8.1. Windows Me: Using the Home Networking Wizard in an Infrastructure
network..........................................................................................................57
4.8.2. Windows Me: Sharing folders........................................................................59
4.8.3. Win d o w s M e : A c c ess i n g s h a r e d f o l d e r s...............................................................60
4.8.4. Windows Me: Sharing a printer .....................................................................60
4.8.5. Windows Me: Modifying a workgroup name..................................................62
4.8.6. Windows Me: Manually enabling or disabling your adapter’s WiFi
connection (advanced users) ........................................................................62
4.9. Computers running Windows 98 SE: Sharing folders, a printer or an ADSL
connection.................................................................................................................63
2/82 – User Manual

Hercules Router 802.11G-54
4.9.1. Windows 98 SE: Creating a workgroup........................................................ 63
4.9.2. Windows 98 SE: Sharing folders .................................................................. 63
4.9.3. W i n do w s 9 8 S E : A c c e s s i n g s h a r e d fo l d e r s..............................................................64
4.9.4. Windows 98 SE: Sharing a printer................................................................ 64
4.9.5. Windows 98 SE: Sharing an ADSL connection in an Infrastructure
network.......................................................................................................... 66
4.9.6. Windows 98 SE: Manually enabling or disabling your adapter’s WiFi
connection (advanced users)........................................................................67
5. WIFI MANAGER FOR ADVANCED USERS................................................................... 68
5.1. Configuring your WiFi network’s advanced options..................................................68
5.2. Configuring your Internet firewall.............................................................................. 69
5.2.1. Opening doors in your firewall to put your camer a online or authorize
access to a computer for certain Internet services ....................................... 69
5.2.2. Limiting access of one of your network computers to Internet services....... 71
5.2.3. Redirecting Internet requests to a specific computer....................................72
5.3. A toolbox with multiple facets.................................................................................... 72
5.3.1. Restarting the Hercules Router..................................................................... 72
5.3.2. Restoring your original settings..................................................................... 73
5.3.3. Updating the router’s firmware......................................................................73
5.4. Other advanced options............................................................................................74
5.4.1. Configuring the DHCP server........................................................................ 74
5.4.2. Linking an IP address to a dynamic domain name server............................ 75
5.4.3. Controlling your Hercules Router from a remote location via the
Internet..........................................................................................................75
5.4.4. Changing the Hercules Router’s password...................................................76
5.5. Product information...................................................................................................76
6. GLOSSARY......................................................................................................................77
7. TECHNICAL SUPPORT .................................................................................................. 80
8. WARRANTY..................................................................................................................... 80
9. ENVIRONMENTAL PROTECTION RECOMMENDATION.............................................80
3/82 – User Manual
ESPAÑOL NEDERLANDS ITALIANO ENGLISH FRANÇAIS DEUTSCH

Hercules Router 802.11G-54
1. YOUR HERCULES ROUTER
Your Hercules Router opens up the doors of WiFi for you, allowing you to discover a new way of
communicating between several computers, sharing Internet access, peripheral devices, data and more… all
without the constraints of cables.
Great care has been taken in designing your product. Both simple to operate and user-friendly, it is well
suited to beginners and advanced users alike.
And now, it’s time to learn about your new product and join in the Wireless Attitude
1.1. Recommendations
- Never open up your Hercules Router, as you risk damaging its internal components.
- In order to avoid the risk of fire or electrical discharge, keep your router away from:
- rain or humidity, as well as all fluids (water, chemical products and any other liquids),
- sources of heat such as radiators, stoves and any other heat-producing devices (including amplifiers),
- direct sunlight.
- Do not cover your router.
- Unplug the router’s power cable if you do not plan on using it again for an extended period of time. To
unplug the power cable, take hold of and pull on the plug. Never pull on the cable itself.
- Disconnect the router before cleaning. Use a soft cloth for cleaning and avoid using aerosol cleaners.
TM
!
1.2. Specifications
Your Hercules Wireless G Router, referred to hereafter in the manual as the Hercules Router, is equipped
with several functionalities: (1) WiFi 802.11g wireless router, (2) 10/100 LAN switch, and (3) Internet firewall.
WAN mode support (PPPoE, automatic DHCP, static IP)
LAN mode support
Router mode support
802.11g wireless access point
RF specification: frequency band = 2400-24835MHz
Max. transmission power: 100mW
One internal antenna, one slewable external antenna
4 RJ-45 connectors for 10/100Mbps LAN Ethernet connection
Auto MDIX support (automatic detection of crossed cabling)
Complies with the IEEE 802.3u standard
Supports IEEE 802.3x flow control in Full Duplex mode
Security functions: WEP/WPA-PSK/WPA2-PSK/Mixed WPA-WPA2, filtering by MAC address
SPI firewall
External CC power, input: 200~240V, 50/60Hz, output: 9 V CC/1 A
Green LEDs on front face
Software (firmware) update via Ethernet port
4/82 – User Manual
1.3. System requirements
To access configuration settings:
Intel Pentium III, AMD Athlon/AMD-K6
64MB RAM
10/100 RJ45 Ethernet network adapter
CD-ROM drive
Operating system: Microsoft Windows 98 SE, Me, 2000, XP, Vista
To access the Internet:
Active Internet line
Internet Explorer 6.0, Netscape Navigator 4.7 or Mozilla Firefox 1.0 or higher
ADSL Ethernet modem, cable modem, Internet box (Livebox, Freebox…)
1.4. Box contents
Please verify that all of the following elements are present in your Hercules Router box:
Hercules Wireless G Router
Vertical base
CD-ROM containing Installation Assistant and user manual in pdf format
Quick Start Guide in English
Ethernet cable
Power adapter
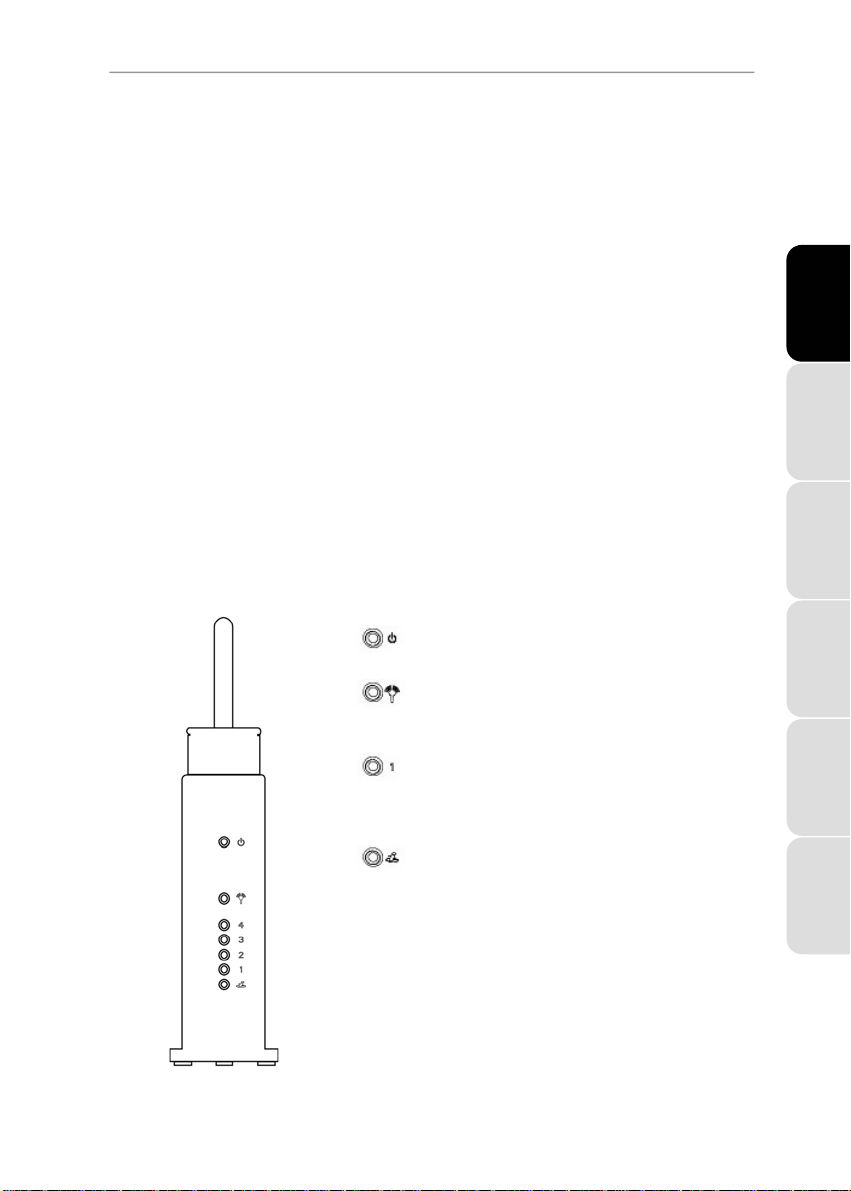
1.5. Front face overview
Hercules Router 802.11G-54
ENGLISH FRANÇAIS DEUTSCH
: Power LED
: WiFi LED: lights up when WiFi connection is active, flashes
during data transfer
: 4 LEDs corresponding to the 4 Ethernet ports: each LED
lights up when a peripheral is connected to the
corresponding port, and flashes during data transfer
: Internet LED: lights up when ADSL line is active, flashes
during data transfer
ESPAÑOL NEDERLANDS ITALIANO
User Manual – 5/82
Hercules Router 802.11G-54
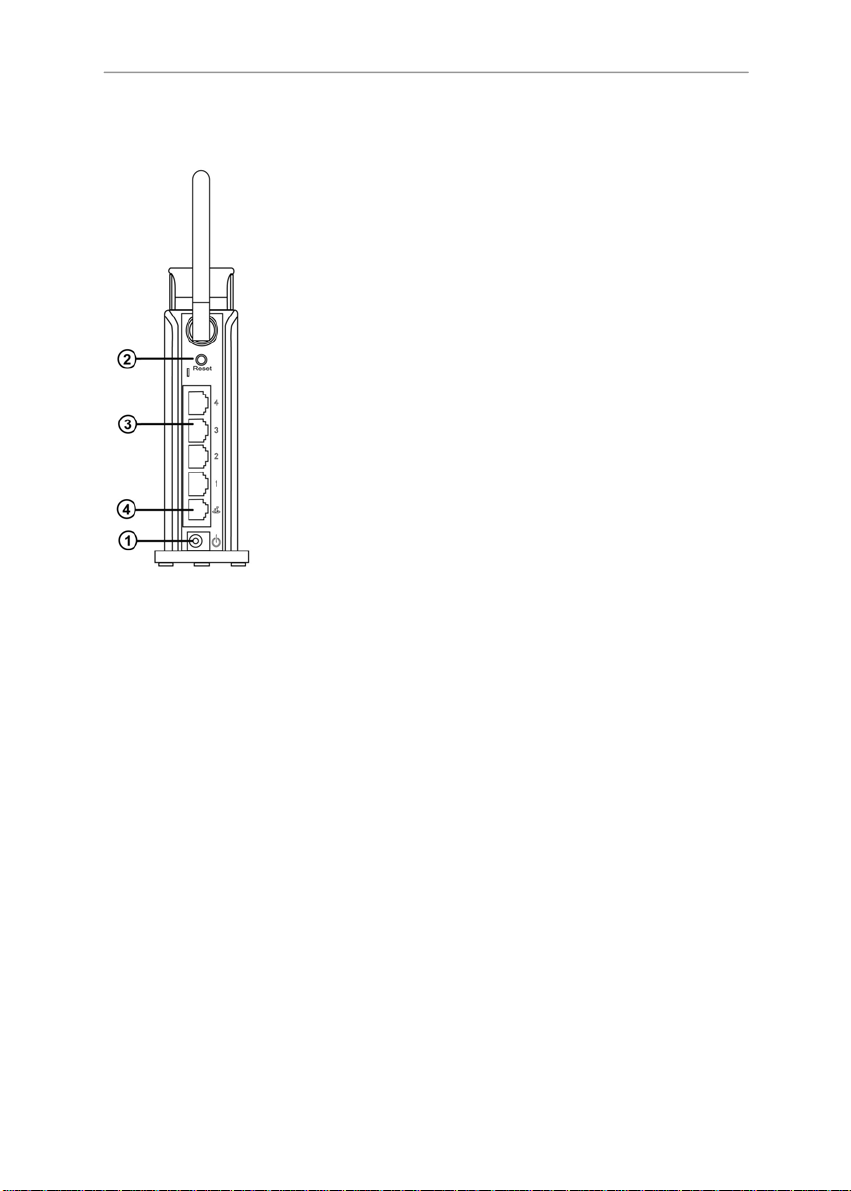
1.6. Connectivity overview
1 Power plug to connect power adapter
2 Restore factory default settings button
3 Four Ethernet ports allowing the Hercules Router to be connected to 4
desktop computers and/or laptop computers and/or game consoles equipped
with Ethernet (RJ-45) ports and/or devices (webcam…) in order to create a
network
4 RJ-45 port, allowing you to connect an ADSL modem, a cable modem or an
Internet “box” to your Hercules Router
6/82 – User Manual
Hercules Router 802.11G-54
2. INST ALLING YOUR HERCULES ROUTER
To simplify this task, Hercules proposes launching an Assistant which will verify with you, step by step, that
the installation of your router is carried out correctly.
2.1. Launching the Hercules Router Installation Assistant
The Assistant, available on the CD-ROM included with the router, will guide you through the different steps of
the installation procedure. To help you with the installation, each of the steps is described below.
- Insert the included CD-ROM into your CD-ROM drive.
The Installation Assistant appears automatically.
If the installation menu does not launch automatically:
- Double-click My Computer.
. - Double-click
- Double-click Setup.exe, if necessary.
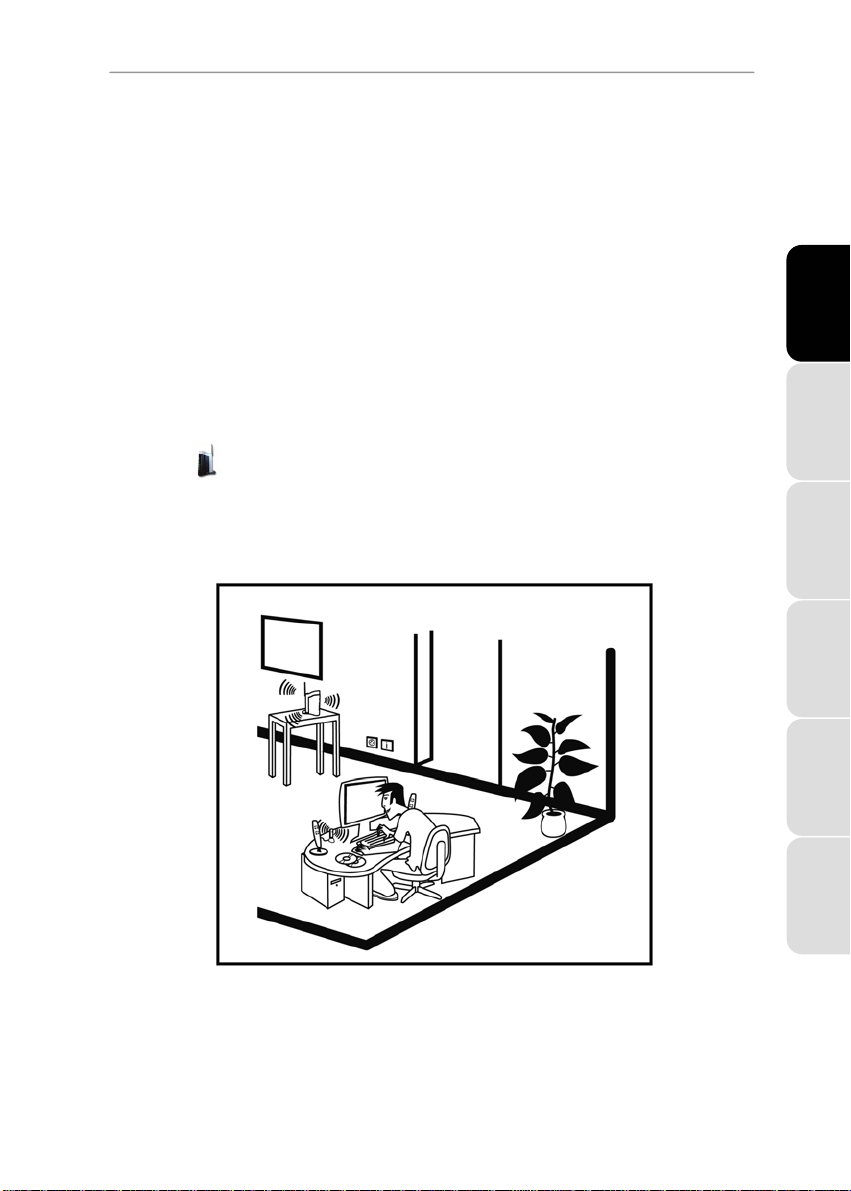
2.2. Step 1: How to position your router
ENGLISH FRANÇAIS DEUTSCH
Remove the router and the power adapter from the box..
To help you select the best spot to position your Hercules Router, we are pleased to offer you the following
tips, which you may adapt according to your environment (the number of rooms, computers, floors in your
home, the presence of any obstacles, the locations of power and telephone plugs…).
Position the router near your modem (ADSL, cable or Internet “box”) and a power outlet.
User Manual – 7/82
ESPAÑOL NEDERLANDS ITALIANO

Hercules Router 802.11G-54
Try to place your router in a room centrally located in relation to your other computers and WiFi devices.
Keep a minimum distance of 2m between the router and any computers and WiFi devices.
If you have several computers or WiFi devices on different floors in your home (on the ground floor and
the second floor, for example), you should ideally try to place your Hercules Router on the ground floor.
Your router’s WiFi performance may be greatly affected by certain obstacles, such as the
presence of paper (a bookcase), metal, water (an aquarium) or a wall made of reinforced concrete
between the Hercules Router and any WiFi adapters.
For better stability, attach the included base to the bottom of the router, as shown below.
The antenna must always be positioned vertically.
2.3. Step 2: How to connect your router
2.3.1. Uninstalling your modem or disabling the automatic connection to your modem
If you already have an Internet “box” or an Ethernet modem connected to your computer, we recommend
that you uninstall it or disable the automatic connection to this modem. The objective of this procedure
is to establish the Internet connection via the local area TCP/IP network created by the Hercules router,
and no longer directly via your old ADSL modem.
This procedure only applies if you connect to the Internet via an Ethernet modem. If you have a
USB modem, you cannot connect the USB modem to your Hercules router and create a local area WiFi
network.
You choose to uninstall the modem’s drivers:
- Switch off your modem and then disconnect it from your computer’s Ethernet port.
8/82 – User Manual
Hercules Router 802.11G-54
- Uninstall the software furnished by your service provider, as well as the modem’s drivers. For more
information, please refer to your modem’s user manual.
- Now connect your modem to the Internet port on your Hercules router.
You choose to disable the automatic connection to the modem:
In order to avoid software conflicts, please follow the procedure outlined below:
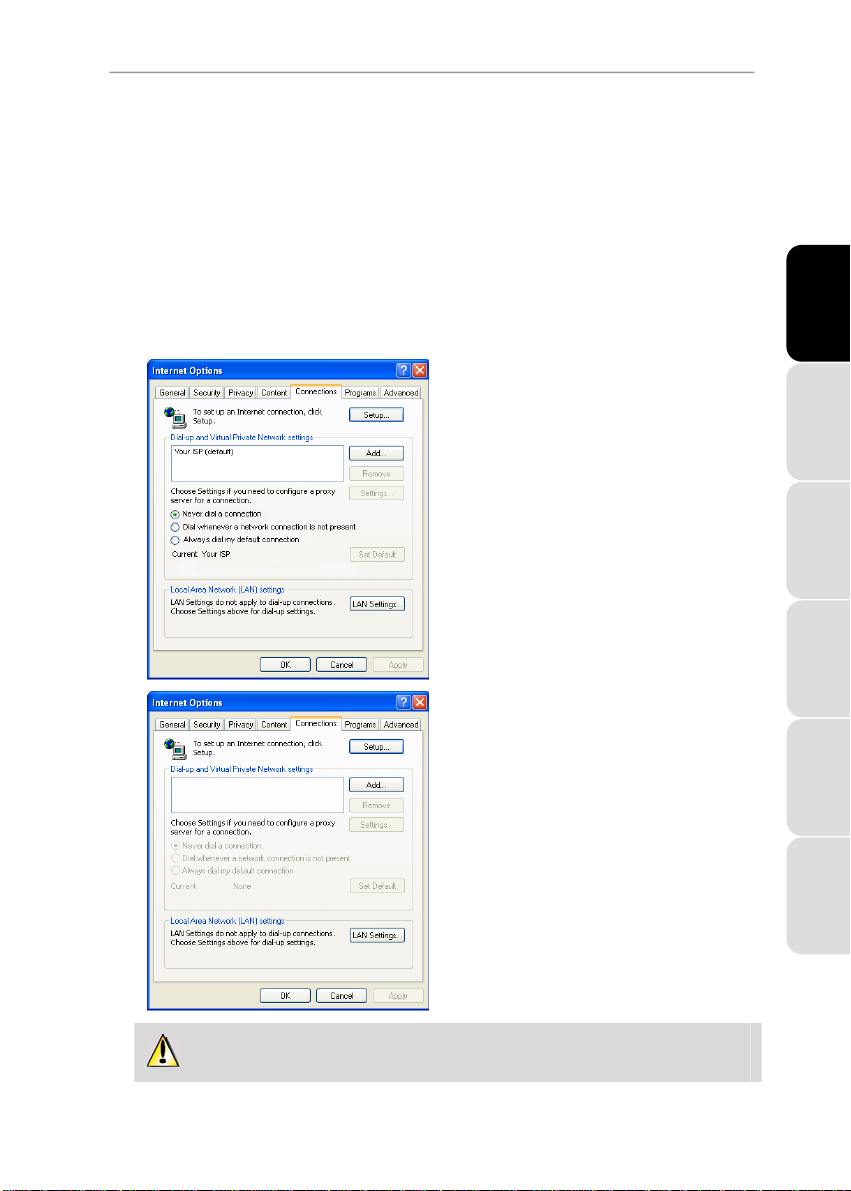
- Launch your Internet Explorer browser.
- Click Tools/Internet Options..
- Select the Connections tab.
The Internet Options window appears.
Scenario 1: your ISP appears in the Internet
Options window.
- Disable the automatic connection to your modem
by selecting the Never dial a connection option.
- Click OK.
ENGLISH FRANÇAIS DEUTSCH
Scenario 2: your ISP does not appear in the
Internet Options window.
The automatic connection is managed directly by
the software furnished by your ISP.
- Refer to the user manual for your ADSL modem or
for the software furnished by your ISP for details
on how to disable the automatic connection
and/or for the Internet connection to be
established via a local area network (TCP/IP).
Reminder: it is the Hercules Router that will create
a local area network through which the computers
will access the Internet.
You can also find information on our website (FAQs etc.): www.hercules.com.
ESPAÑOL NEDERLANDS ITALIANO
User Manual – 9/82
Hercules Router 802.11G-54
2.3.2. Getting past the Content Advisor (parental control)
If you have enabled the Content Advisor in your Internet browser in order to control access to certain
sites which may include contents of a violent or otherwise undesirable nature, you will not be able to
immediately connect to WiFi Manager.
After launching QuickAccess, the Content Advisor will ask you for authorization to view the site
http://192.168.2.1. This site corresponds to the WiFi Manager interface on your router. To access the
site, simply give your authorization to Always allow this Web site to be viewed. Once you have done
so, the router’s address will be stored in your Internet browser and you will then be able to access WiFi
Manager directly.
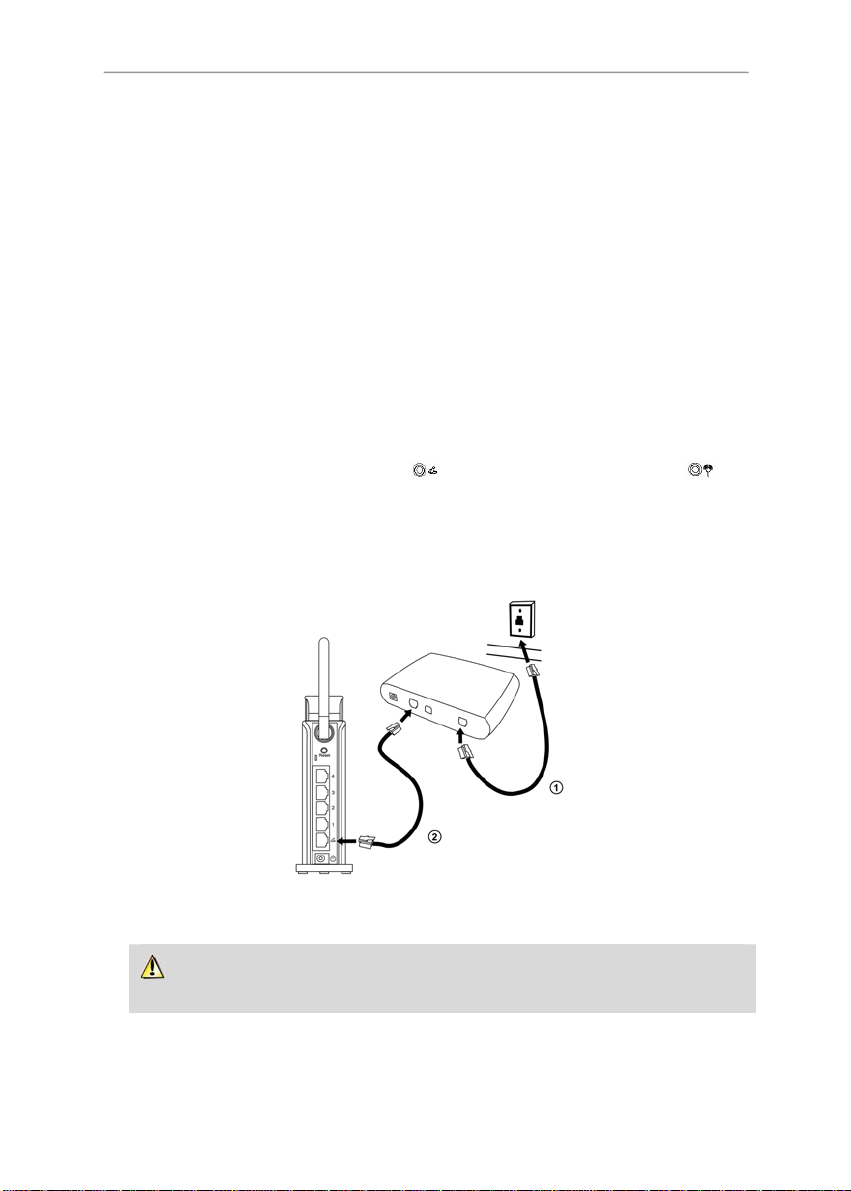
2.3.3. Connecting the router
1. Connect your modem to port 4 on your Hercules router using an RJ-45 cable and switch on the modem.
2. Connect the Hercules Router’s power cable to the power plug 1 and plug the power adapter into an
electrical outlet.
The power LED lights up and the initialization sequence begins. Initialization may take a few seconds, during
which time the WAN and Internet LEDs will light up or flash in succession.
Initialization is complete once the power, Internet
stay lit.
3. You may now connect the included Ethernet cable (gray cable 3) to one of your Hercules Router’s 4
Ethernet ports and the Ethernet (RJ-45) port on your computer’s network adapter.
The LED corresponding to the number of the Ethernet port you have selected lights up.
(if your Internet line is active) and WiFi LEDs
4. The Assistant prompts you to install “Hercules QuickAccess”, a utility for quick connection to the WiFi
Manager application.
If you do not wish to install this utility, you will only be able to access your router by manually
entering its address (please see chapter 3.1. Opening the door to WiFi Manager).
10/82 – User Manual
Hercules Router 802.11G-54
3. WIFI MANAGER, THE VERSATILE UTILITY
With WiFi Manager, nothing could be easier than connecting your high-speed Internet modem to the Hercules
Router and thereby sharing your Internet access with all of the computers in your home or small business, or
simply creating a wireless network.
WiFi Manager is the interface which allows you to communicate with your Hercules Router and configure your
wireless network or Internet firewall.
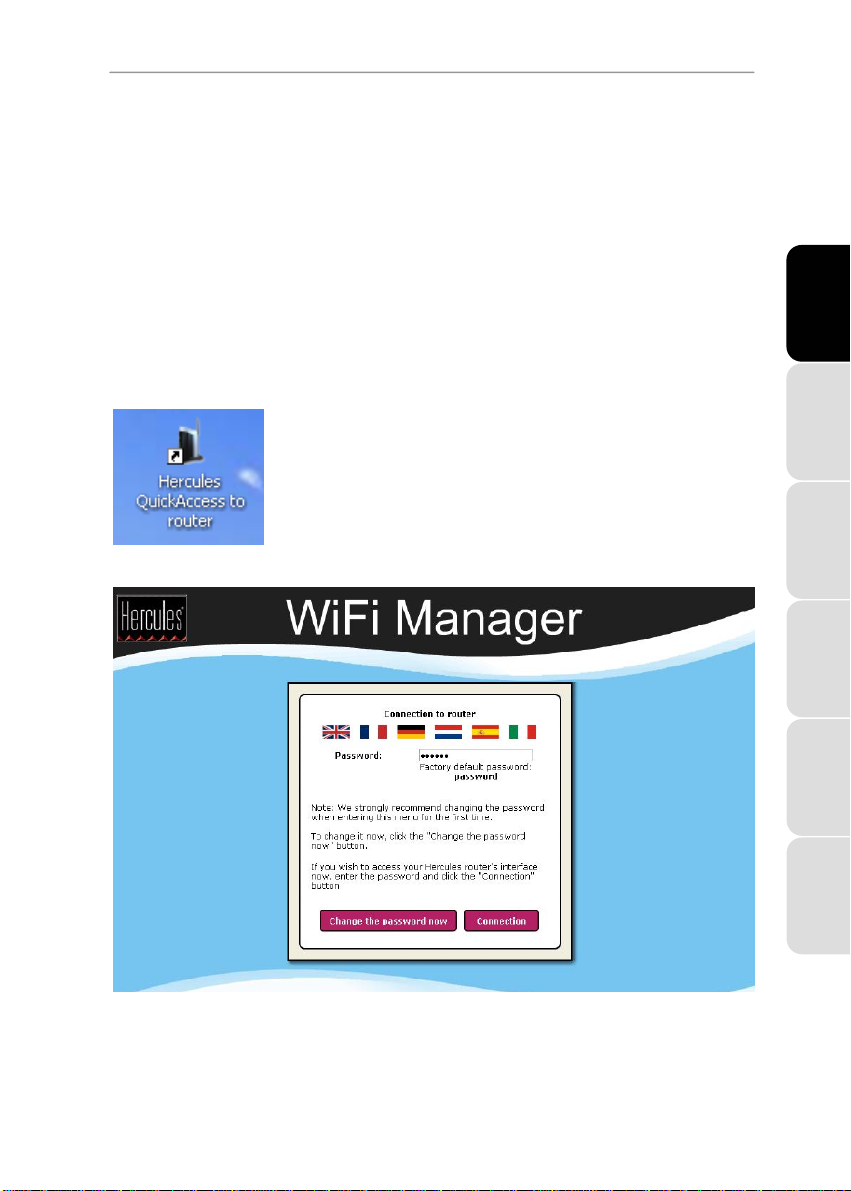
3.1. Opening the door to WiFi Manager
The Installation Assistant you have launched from the CD-ROM has installed a connection utility on your
Desktop, called “Hercules QuickAccess”. This utility will bring you straight to the door (locked with a key, for
the moment) to WiFi Manager.
- To access the door to enter WiFi Manager, simply double-click the Hercules
QuickAccess icon on your Desktop.
The connection window to the router appears.
ENGLISH FRANÇAIS DEUTSCH
User Manual – 11/82
ESPAÑOL NEDERLANDS ITALIANO
Hercules Router 802.11G-54
Or, if you have chosen not to install the QuickAccess icon:
- Open up the browser of your choice (Internet Explorer, Mozilla Firefox or Netscape Navigator) and enter the
address http://192.168.2.1.
You are now at the door to enter WiFi Manager, which you must open using a password.
- To open the door, enter the default password or enter your own password if you have already defined one
(for information on how to define your own password, please refer to chapter 3.2. Changing the WiFi
Manager password).
- Click Connection.
The password ensures that you are the only one who can access your WiFi Manager, and therefore
your Hercules Router’s settings. For this reason, it is important that you change the password when using
WiFi Manager for the first time (see below).
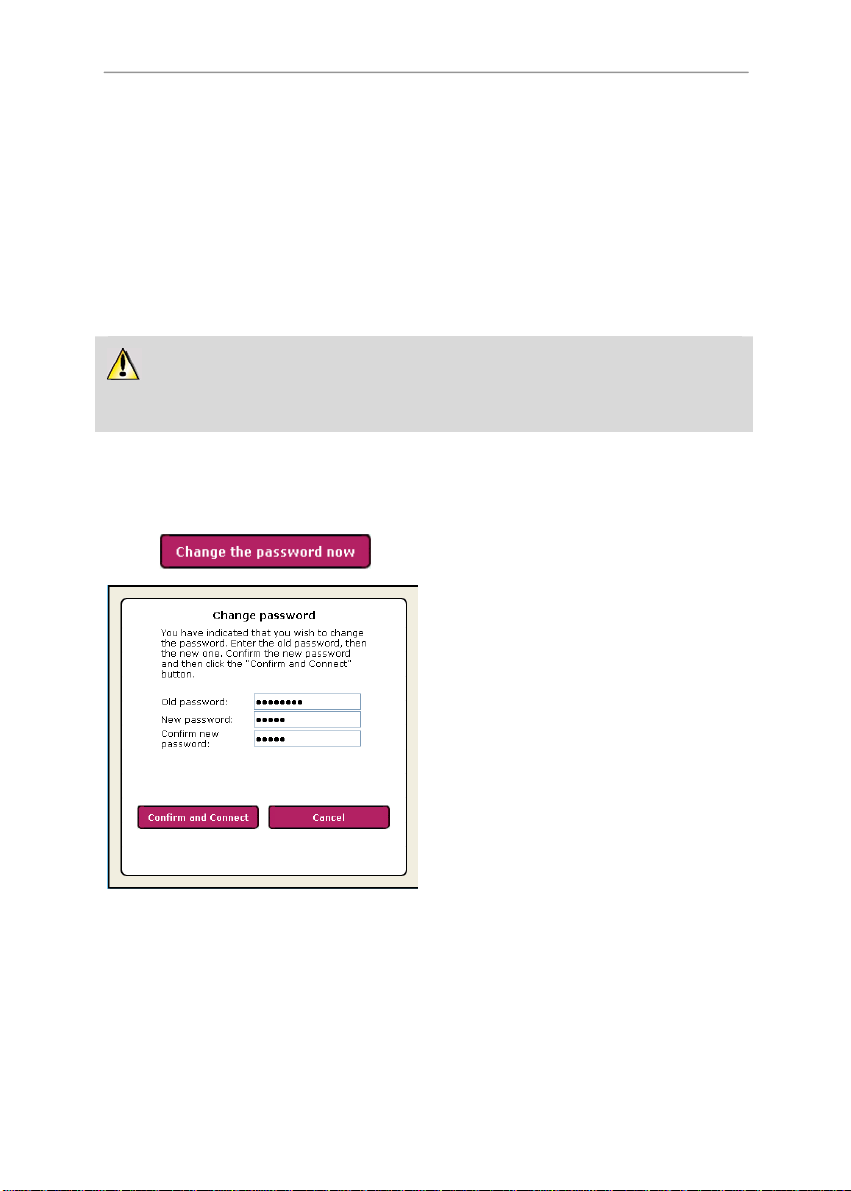
3.2. Changing the WiFi Manager password
When opening the door to WiFi Manager for the first time, we recommend that you change the default
password, password, directly via the Connection to router window.
- Click the Change the password now button.
- Enter the old password (password, if you are
doing this for the first time), the new password,
which you will select, and then confirm the new
password.
- Click Confirm and Connect to store your new
password and connect.
12/82 – User Manual
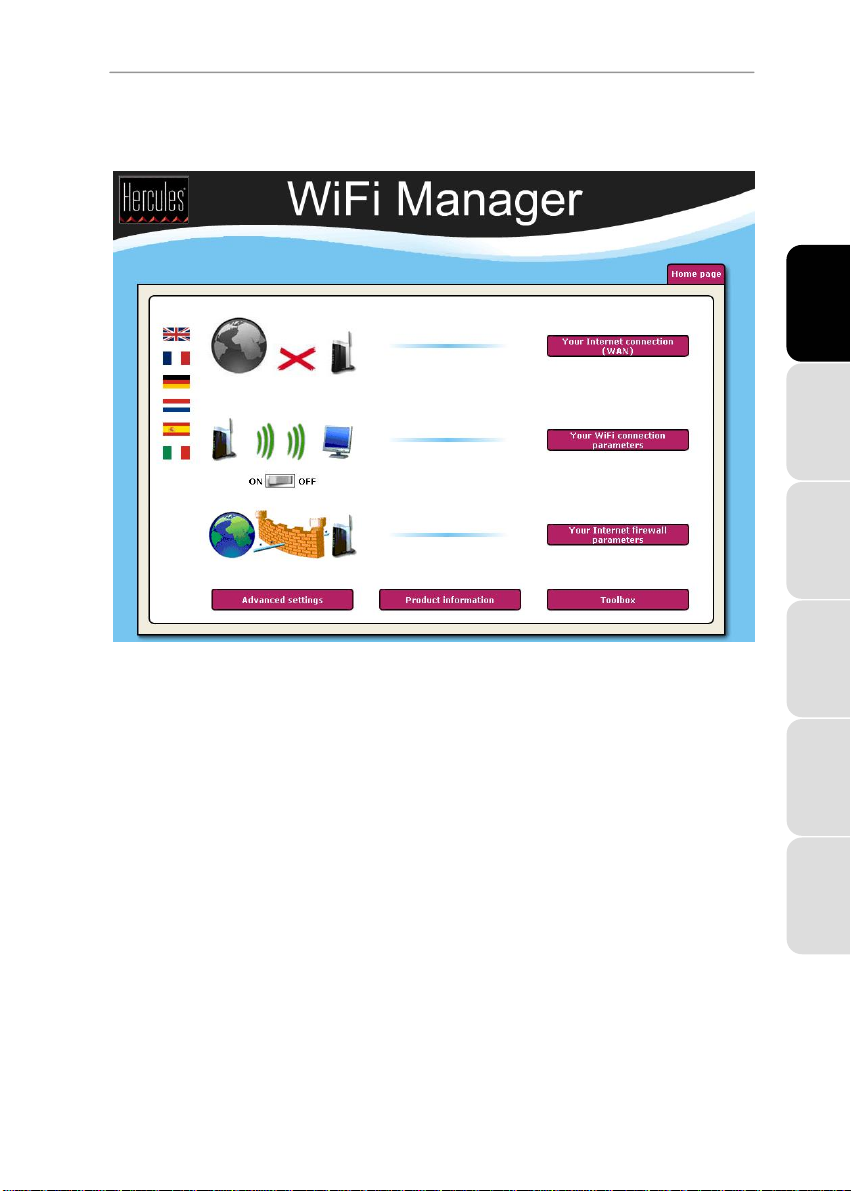
Hercules Router 802.11G-54
The door to WiFi Manager opens to the Home page depicted below. You can now explore all of your
Hercules Router’s functionalities.
ENGLISH FRANÇAIS DEUTSCH
3.3. Navigating within the WiFi Manager interface
The WiFi Manager interface has been designed to simplify navigation through the different menus.
Nevertheless, should you ever feel a bit lost, you can always click the Home page button at any time to return
to the Home page, the starting point for all of your Hercules Router’s functionalities.
3.4. Sharing your Internet connection via the router
You can easily associate your Hercules router with your modem, thereby allowing you to use your Internet
connection with your other computers and/or game consoles.
Once your router’s initialization is complete, your WiFi connection and your firewall are enabled. However,
you must still select your Internet connection type (via Ethernet modem, box or other) and enter the requested
information. To do so, all you need is all the information provided by your ISP, generally found in your
confirmation of membership email or letter (username (or login), connection password…).
User Manual – 13/82
ESPAÑOL NEDERLANDS ITALIANO
Hercules Router 802.11G-54
3.4.1. Selecting your Internet connection
With WiFi Manager, you don’t have to be a computer expert share your Internet connection via WiFi using
your router. Simply gather together the information sent to you by your Internet service provider.
- On the Home page, click Your Internet
- Select the Internet connection mode: ADSL
connection (WAN).
Ethernet Modem or Internet “Box”, Cable Modem
or Router.
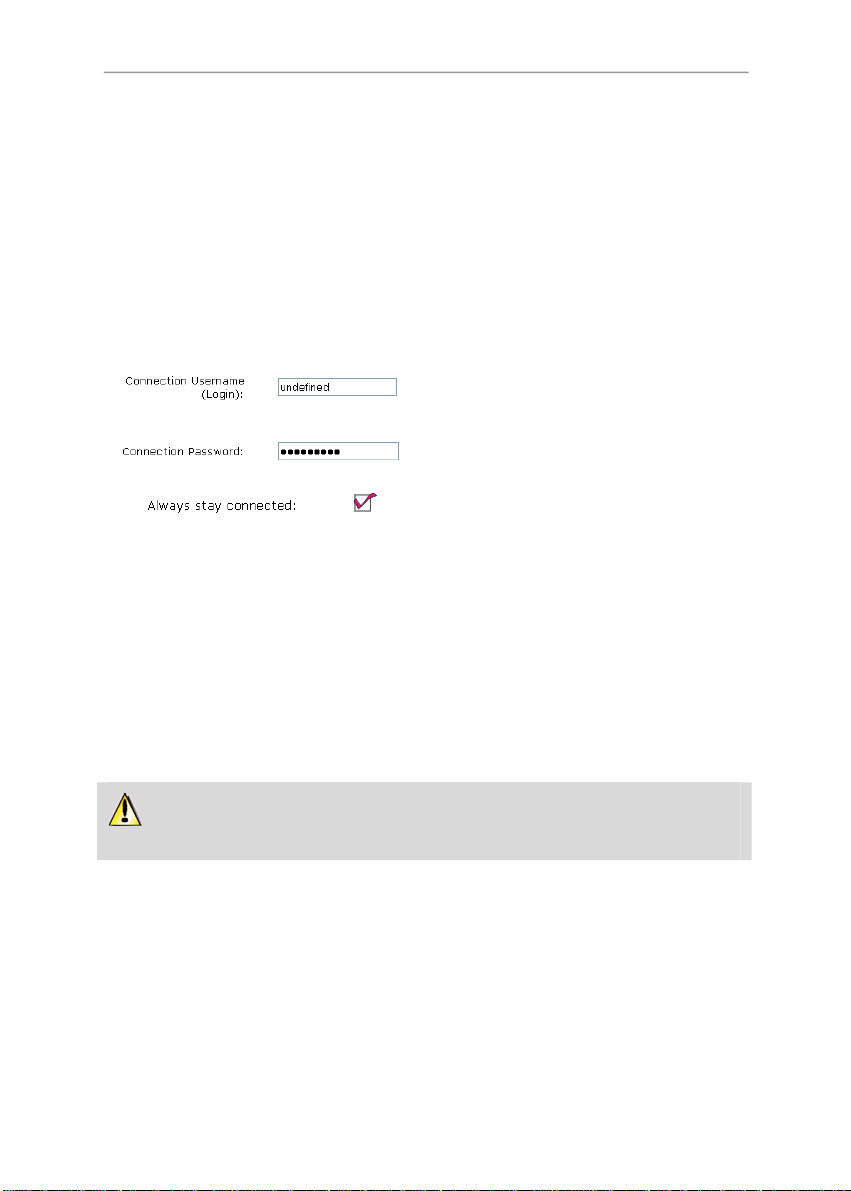
If you have selected mode 1) ADSL Ethernet Modem)
- In the Your Internet connection (WAN) page,
enter your Connection Username (Login) and your
Connection Password in the corresponding fields.
This information is found in your confirmation of
membership email or letter sent to you by your ISP.
- If you wish, you can Always stay connected,
which ensures that your Internet connection is
always active.
If you have selected mode 2) Internet “Box”, Cable Modem or Router
- In the Your Internet connection (WAN) page,the
settings are assigned automatically.
- You can still select Static IP assignment if you
have subscribed to an Internet line with a fixed IP
address.
This information is found in your confirmation of
membership email or letter sent to you by your ISP.
Once you have selected your connection mode, don’t forget to click the Apply and Save button to
save your settings.
14/82 – User Manual

Hercules Router 802.11G-54
3.4.2. Testing your Internet connection
Once you’ve chosen your Internet connection mode for your Hercules Router, you can carry out a first test of
your connection and verify that you have access to the Internet.
During this test, leave the Ethernet cable connected to your Hercules router.
- Launch an Internet browser (Internet Explorer,
Netscape Navigator or Mozilla Firefox) on your
computer.
- Enter the address www.hercules.com.
The Hercules website’s home page should be
displayed.
If your Internet connection is working properly:
It is now time for you to learn how to master your WiFi network (please refer to chapter 3.5. Mastering your
WiFi network at your fingertips).
Do not disconnect your Ethernet cable just yet; since your WiFi network has not yet been created, you
will still need the cable to communicate with your router.
3.4.3. Resolving any difficulties in accessing WiFi Manager or the Internet
If you have not managed to connect to the WiFi Manager interface or to the Internet, your computer’s settings
may not be properly configured. The instructions below will help you to resolve this problem.
ENGLISH FRANÇAIS DEUTSCH
Note: the access paths mentioned below may vary slightly if you have modified the default display
configuration in Windows XP or Vista (meaning the Start menu properties and Control Panel display).
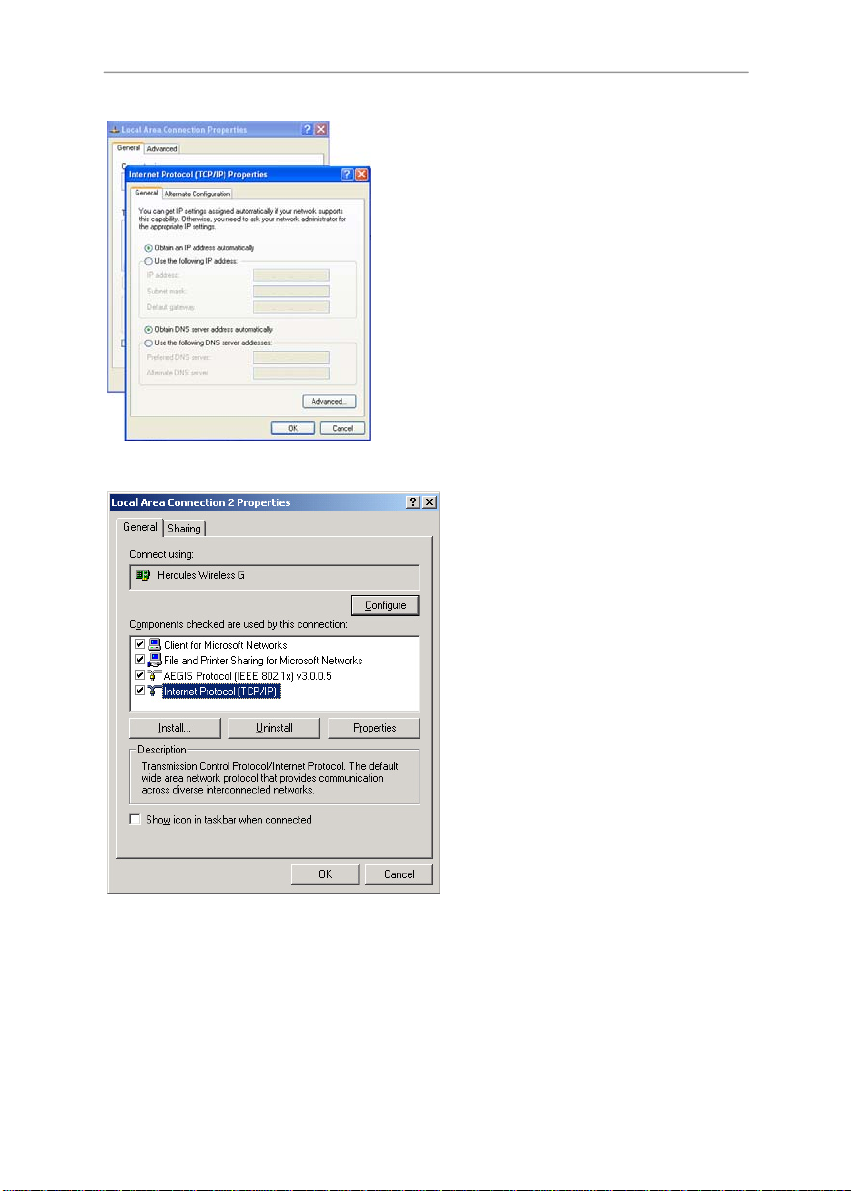
Windows XP or Vista
1. Click Start/Control Panel. Double-click Network
Connections.
2. In the LAN or High-Speed Internet section, right-click the
icon corresponding to your network adapter (or network
bridge, if you have created one) and select Properties.
3. In the General tab of the Local Area Connection
Properties window, scroll through the list and highlight
Internet Protocol (TCP/IP).
User Manual – 15/82
ESPAÑOL NEDERLANDS ITALIANO
Hercules Router 802.11G-54
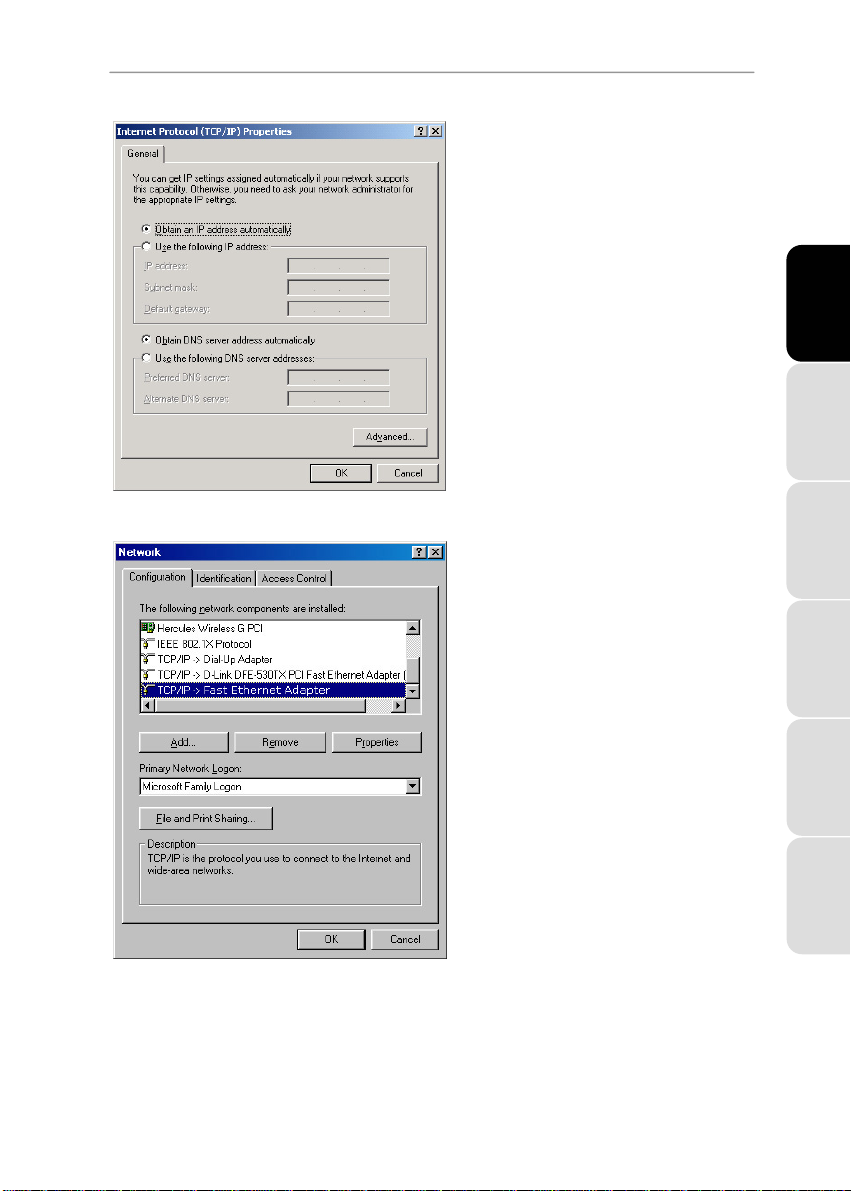
Windows 2000
4. Click Properties, select Obtain an IP address
automatically and Obtain DNS server address
automatically.
5. Click OK to close the windows, then exit the Control
Panel.
The Hercules Router will now be able to assign an IP address
to your computer.
An IP address is a unique address assigned by the router to
the computer. Each computer has its own identity, via its IP
address, allowing it to be identified within the network.
1. Click Start/Settings/Control Panel. Double-
click Network and Dial-Up Connections.
2. Right-click the appropriate connection and
select Properties.
3. In the General tab, highlight Internet Protocol
(TCP/IP).
16/82 – User Manual
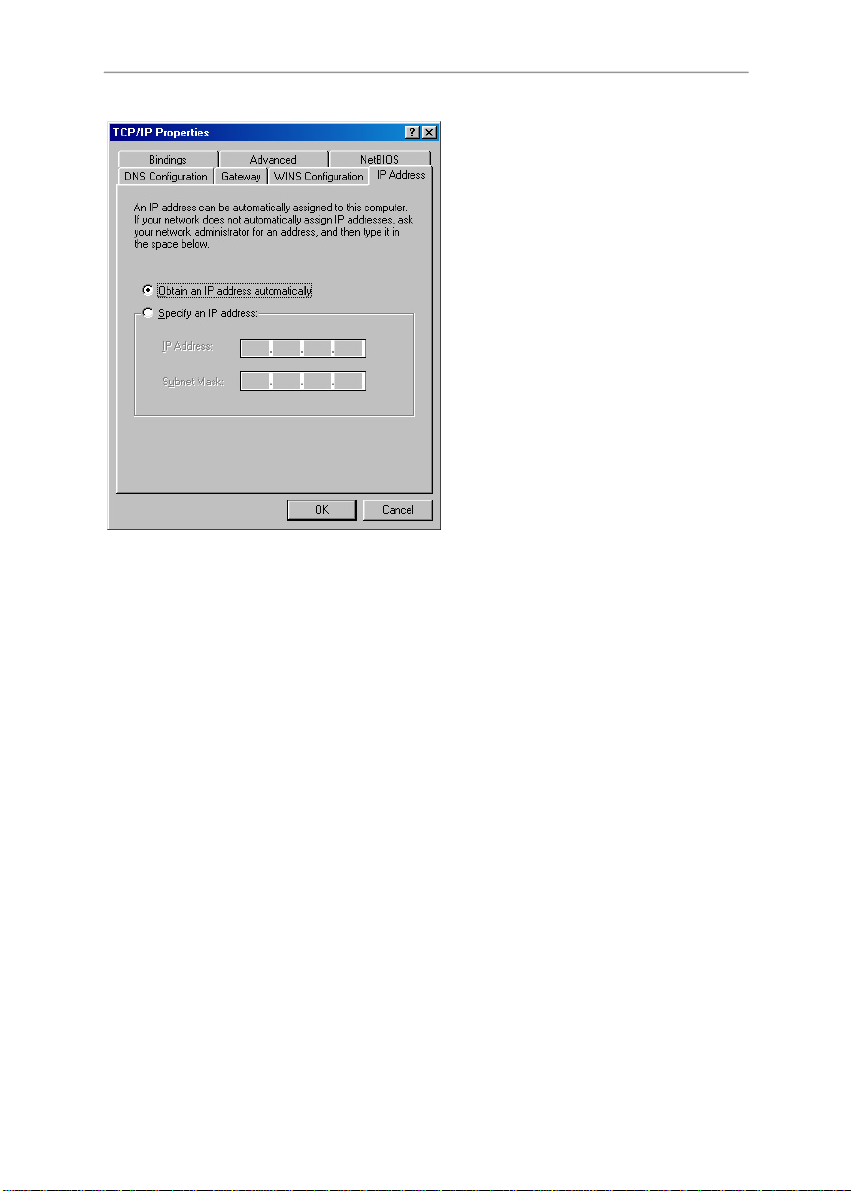
Windows 98 SE/Me
Hercules Router 802.11G-54
4. Click Properties and select Obtain an IP
address automatically and Obtain DNS
server address automatically.
5. Click OK to close the windows, then exit the
Control Panel.
The router will now be able to assign an IP
address to your computer.
An IP address is a unique address assigned by
the router to the computer. Each computer has its
own identity, via its IP address, allowing it to be
identified within the network.
1. Click Start/Settings/Control Panel. Double-
click Network.
2. In the Configuration tab of the Network
window, highlight the name of your network
adapter.
ENGLISH FRANÇAIS DEUTSCH
ESPAÑOL NEDERLANDS ITALIANO
User Manual – 17/82
Hercules Router 802.11G-54
3. Click Properties and select Obtain an IP
address automatically in the IP Address tab.
4. Click OK to close the windows, then exit the
Control Panel.
The router will now be able to assign an IP
address to your computer.
An IP address is a unique address assigned by
the router to the computer. Each computer has its
own identity, via its IP address, allowing it to be
identified within the network.
18/82 – User Manual
Hercules Router 802.11G-54
3.5. Mastering your WiFi network at your fingertips
In this chapter, you will learn how to personalize your WiFi network and secure it against unwelcome intrusion
attempts.
Configuration of your network is carried out via the Ethernet cable connecting your router to your
computer. Once you have finished, you can disconnect this cable and explore all the subtleties of WiFi,
described in chapter 4. Welcome to the Wireless AttitudeTM!
3.5.1. Personalizing your WiFi network
When the wireless access point (your Hercules Router’s WiFi function) is enabled, WiFi Manager displays the
name of your network and the Radio Frequency (RF) channel used. These settings may be modified, under
certain conditions.
Should you decide to modify certain settings, we recommend that you take care to follow the
recommendations below.
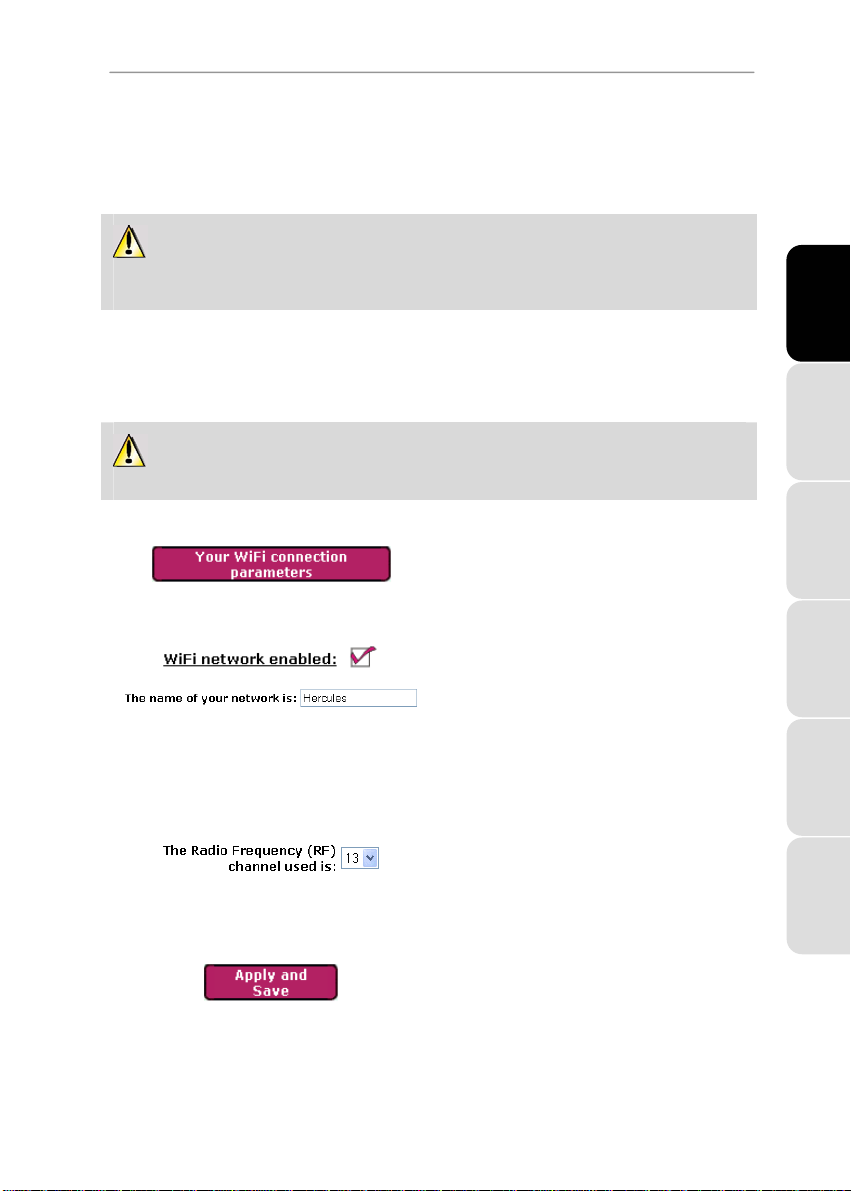
To personalize your WiFi network:
- On the Home page, select Your WiFi connection
parameters.
The name of your network and the RF channel used
are displayed.
- Before personalizing your WiFi network, verify that
the WiFi network enabled box is ticked.
- If you wish, you may personalize The name of
your network, or SSID (Hercules, by default).
The SSID (Service Set Identifier) is the unique
name shared by the WiFi adapters and the access
point in a wireless network. Make sure that you
do not lose or forget this name, as you will need
it to connect your WiFi devices.
- If necessary, change the Radio Frequency (RF)
channel used by the local area WiFi network to
communicate (from 1 to 13).
Change this setting only if another transmitter is
using the same channel, which may result in a drop
in your router’s WiFi performance.
- Click the Apply and Save button to validate your
settings.
The access point restarts. All computers or devices
connected via WiFi are disconnected. The ADSL
connection, however, remains active.
ENGLISH FRANÇAIS DEUTSCH
ESPAÑOL NEDERLANDS ITALIANO
User Manual – 19/82
Hercules Router 802.11G-54
3.5.2. Securing your WiFi network using the Assistant
Creating a WiFi network is very useful if you have several wireless computers or devices, but how can you
avoid having someone on the outside connect to your network without permission or intercept your
unencrypted data exchanges? Thanks to the WiFi Security Assistant, you can define your own security
choices step by step. To help you select the best level of security for your network, we invite you to consult
the table below, which sums up the 5 types of security supported by WiFi Manager.
Type Level of security Key used Authentication
WEAK (WEP
64)
MEDIUM
(WEP 128)
Type Level of security Key used Encryption type
HIGH (WPA-
PSK)
VERY HIGH
(WPA2)
WPA or WPA2 Level of security selected by the router
The lowest level of security, whereby
single encryption is carried out on
exchanged data. Each wireless client
in the network must use the same key
to decode the transmission.
Level of security identical to that of
WEP 64. Only the key length is
different.
Latest-generation heightened level of
security, specially designed for
environments such as a small office or
the home, based on a pre-shared key.
Latest-generation very high level of
security, specially designed for
environments such as a small office or
the home, based on a pre-shared key.
according to the maximum security
level supported by devices on the
network.
64-bit (10 character) key in
hexadecimal format.
A hexadecimal key is
composed of numbers 0 to 9
and letters A to F (example:
A123BCD45E for a 64-bit
key).
128-bit (26 character) key in
hexadecimal format.
A hexadecimal key is
composed of numbers 0 to 9
and letters A to F.
Password with a minimum of
8 alphanumeric
characters.
An alphanumeric character
corresponds either to a
number (0-9), or to a letter
(a-z or A-Z).
Password with a minimum of
8 alphanumeric
characters.
An alphanumeric character
corresponds either to a
number (0-9), or to a letter
(a-z or A-Z).
Password with a minimum of
8 alphanumeric
characters.
An alphanumeric character
corresponds either to a
number (0-9), or to a letter
(a-z or A-Z).
Open (no authentication),
Shared (authentication
method via shared key) or
Auto (authentication when
requested by the device).
Open (no authentication),
Shared (authentication
method via shared key) or
Auto (authentication when
requested by the device).
TKIP
AES
TKIP or AES
20/82 – User Manual
Hercules Router 802.11G-54
You must not select a level of security in WiFi Manager more advanced than that supported by your
computers or other WiFi devices. For example, if your computers or other WiFi devices only support the
WEAK (WEP 64) or MEDIUM (WEP 128) levels, you should not select the HIGH (WPA-PSK) or VERY HIGH (WPA2)
levels.
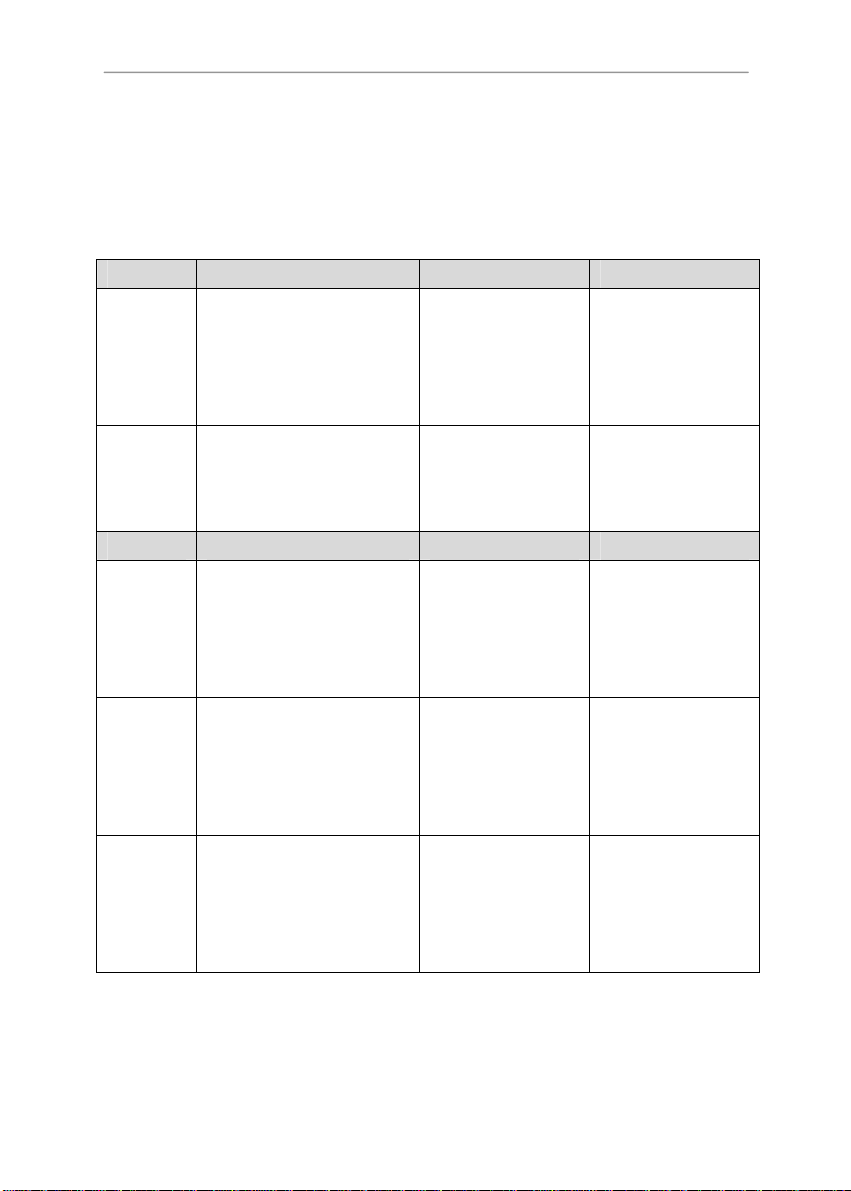
1. Before enabling security for your WiFi network,
verify that the WiFi network enabled box is
ticked.
2. To open the Assistant, enable WiFi security by
ticking the YES box in the Your WiFi
connection parameters window, then click
the Assistant button located in the lower lefthand corner of the window.
3. Read the text explaining the concept of
security.
4. Select your level of security: WEAK
(WEP 64), MEDIUM (WEP 128), HIGH (WPAPSK), VERY HIGH (WPA2) or WPA or WPA2
according to the explanations provided by the
text.
5. Click Next.
ENGLISH FRANÇAIS DEUTSCH
If you have selected “WEAK (WEP 64)” or “MEDIUM (WEP 128)” security:
6. Read the text explaining the concept of
authentication.
7. Select the authentication type: Auto
(authentication carried out when
requested by the device), Open (no
authentication) or Shared (authentication
via shared key).
We recommend that you keep the default
authentication type.
8. Click Next.
User Manual – 21/82
ESPAÑOL NEDERLANDS ITALIANO
Hercules Router 802.11G-54
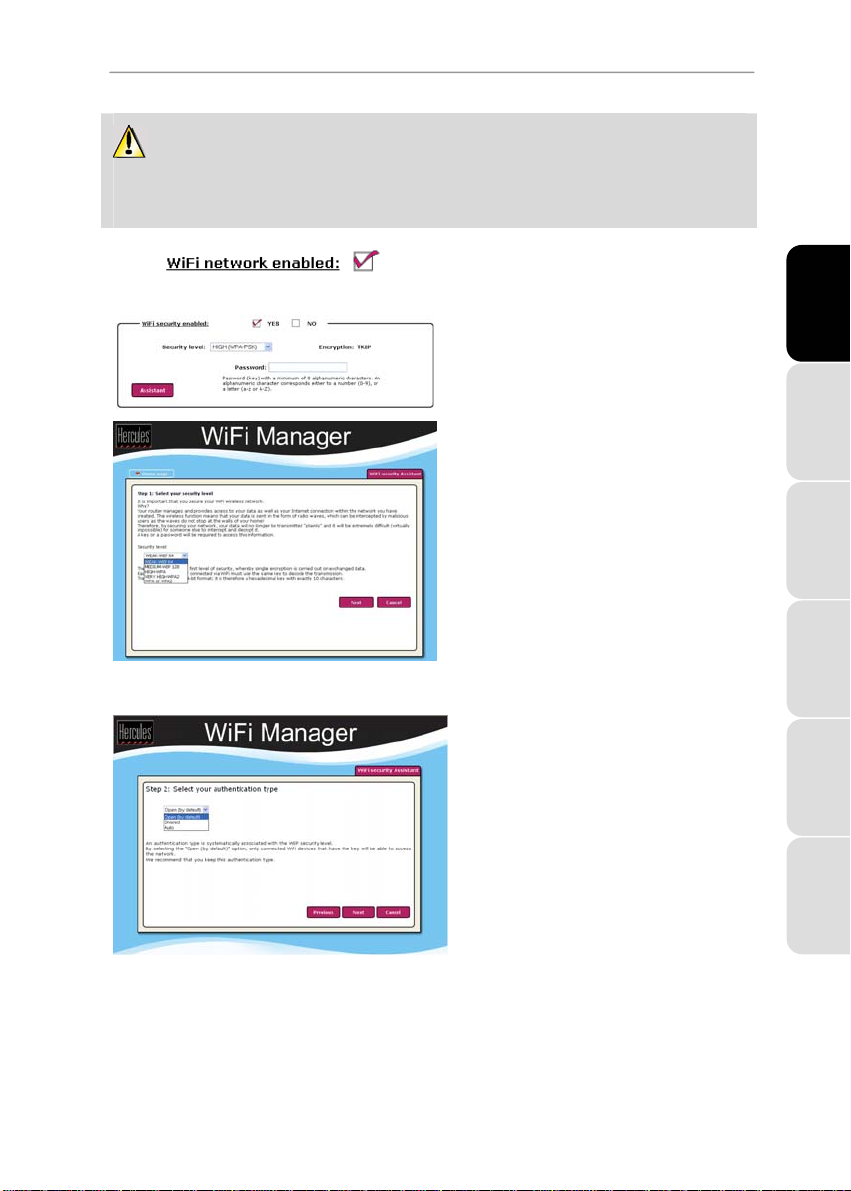
9. Enter a WEP security key according to the
level of security you have selected:
10 hexadecimal characters for a 64-bit
WEP key, 26 hexadecimal characters for
a 128-bit WEP key.
A hexadecimal character is composed of
numbers 0 to 9 and letters A to F (example:
A123BCD45E for a 64-bit key).
10. Click Finish to validate these settings.
11. Click Apply and Save to apply and save
these settings.
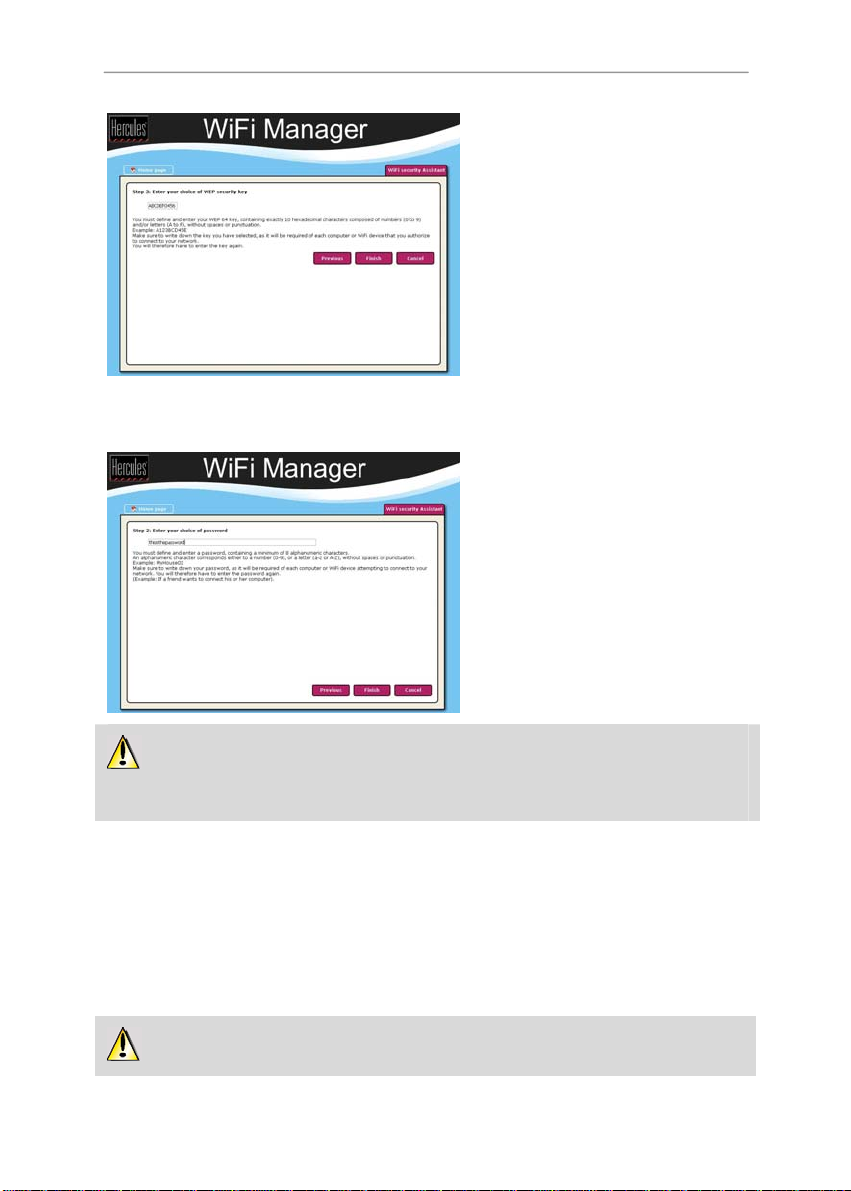
If you have selected “HIGH (WPA-PSK)”, “VERY HIGH (WPA2)” or “ WPA or WPA2” security:
6. Read the text explaining the concept of a
WPA-PSK and WPA2 key.
7. Enter the password of your choice
(minimum of 8 alphanumeric characters).
An alphanumeric character corresponds
either to a number (0-9), or to a letter (a-z or
A-Z).
8. Click Finish.
9. Click Apply and Save to apply and save
these settings.
If you have mastered the concept of WiFi security, you can use the (less user-friendly) method of
directly entering your security parameters. In this case, don’t forget to click the Apply and Save button, or else
your choices will not be applied or saved.
3.5.3. Limiting access to your WiFi network to certain WiFi computers and devices
Filtering by MAC address is a complement to your security parameters, allowing you to select the wireless
computers and devices authorized to connect to your local area WiFi network.
A MAC address is a unique address created by the builder of the network device (WiFi or Ethernet), serving
to identify this element within a network.
Before enabling filtering, we recommend that you connect via WiFi all computers you wish to authorize.
22/82 – User Manual
To enable filtering by MAC address:
Hercules Router 802.11G-54
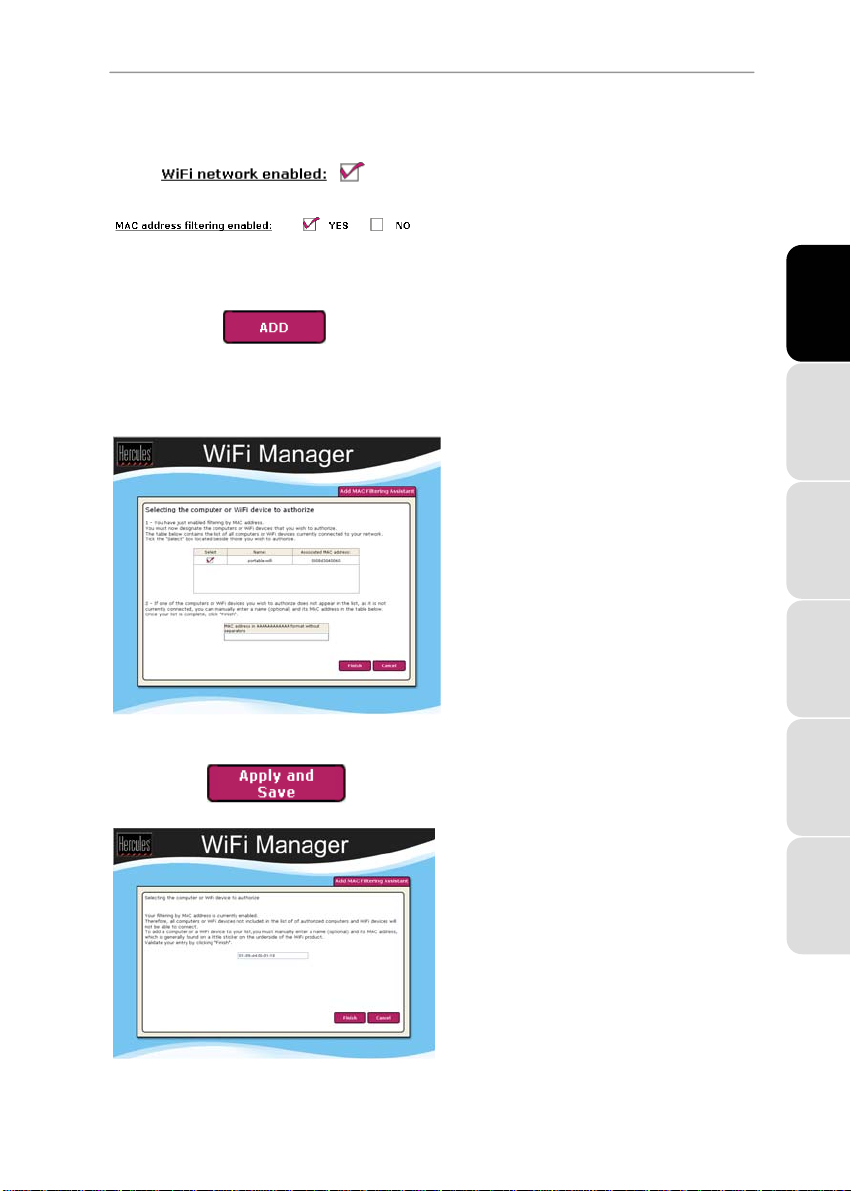
- Before you can enable filtering by MAC address,
verify that your WiFi network is also enabled.
- Tick the Yes box next to MAC address filtering
enabled.
To add a computer or a WiFi device (webcam, game console or other) to the list:
- Click the ADD button.
The Add MAC Filtering Assistant is launched. A
text explaining the concept of filtering by MAC
address is displayed.
- Click Next.
If you are using this function for the
first time:
The list of all WiFi computers or devices currently
connected to your network is displayed in the first
table.
- Tick the Select box next to the names of the
connected computers and devices that you wish
to authorize.
- If a computer is not connected, you can add it
manually in the second table.
- Click Finish.
The list of all WiFi computers and devices
authorized to connect to your network is displayed
in the table.
- Click the Apply and Save button to validate
your settings.
ENGLISH FRANÇAIS DEUTSCH
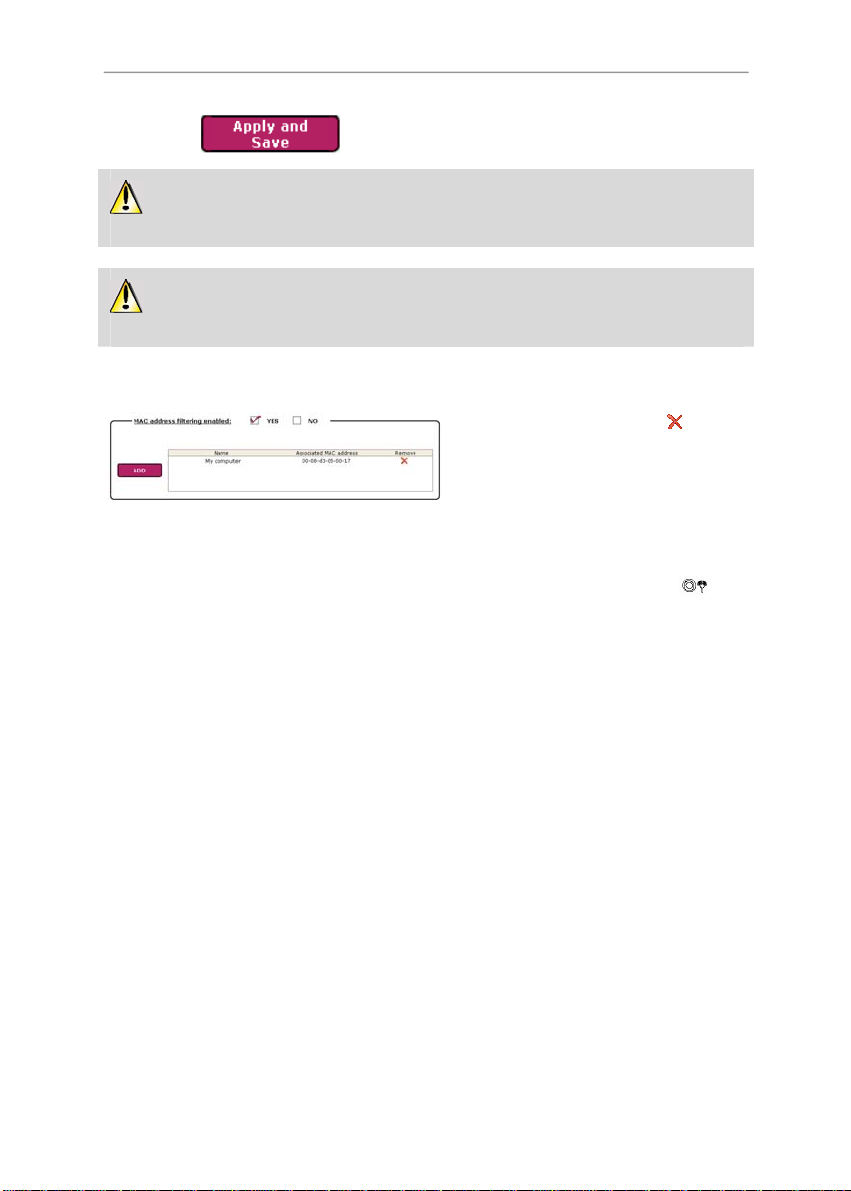
If you have already created a filtering
list:
Any new computer or device must be added
manually.
- Manually enter its MAC address (in
AAAAAAAAAAAA format, without separators).
- Click Finish.
This address has been added to the list of WiFi
computers and devices authorized to connect.
User Manual – 23/82
ESPAÑOL NEDERLANDS ITALIANO
Hercules Router 802.11G-54
- Click the Apply and Save button to validate
Once you have enabled the filtering by MAC address function, only the computers and devices
appearing in this list will be authorized to connect to your Hercules Router.
your settings.
If friends come to visit with their own WiFi computer or device, or if you wish to connect new WiFi
devices, don’t forget to add their MAC address to the filtering list, or else they will never be able to connect.
To remove a computer or a WiFi device (webcam, game console or other) from the list:
- In the Remove column, click the next to the
computers or devices you wish to remove from
the filtering list.
- Click Apply and Save.
3.5.4. Disabling your WiFi network
If you wish to use your Hercules router as a wired router only (that is to say, connected to the computer via the
Ethernet port and not by WiFi), simply un-tick the WiFi network enabled box. The WiFi LED
router switches off.
on the
3.6. The firewall: your ultimate protection against Internet attacks
Like a secure fortress, your network is protected by a drawbridge and ramparts that are impossible to scale.
On top of this, all of your defenses are in a state of alert to repel any intrusion attempts. It is possible,
however, to lower these defenses from time to time, in order to authorize your computers to access specific
Internet services (P2P, web/FTP servers, IP or WiFi camera…), to simply limit access on a specific computer
or device to certain Internet services, or to redirect all Internet requests to a computer designated for this
purpose. For more information, please refer to chapters 5.2.1 Opening doors in your firewall to put your
camera online or authorize access to a computer for certain Internet services, 5.2.2. Limiting access of
one of your network computers to Internet services and 5.2.3. Redirecting Internet requests to a
specific computer.
24/82 – User Manual
Hercules Router 802.11G-54
If your computer is equipped with a software firewall (Norton Personal Firewall, Windows Service
Pack 2 Firewall, McAfee Personal Firewall…), disable it when you connect to the router, as your router’s
firewall is sufficiently strong on its own, or adopt the same configuration settings as those established for
your router in order to avoid any possible conflicts. If you go somewhere else with your computer, however,
or have to connect to other networks, you can re-enable your software firewall.
Be careful not to confuse a firewall with an antivirus program!
An antivirus program analyzes the contents of your computer, your emails, files you have downloaded from
the Internet, etc., and detects, blocks and/or removes any viruses, worms and Trojans in order to ensure that
your computer functions properly.
Your firewall hides your computer on the network, monitors the Internet data arriving at your computer and
blocks intrusion attempts to stop computer hackers from stealing your personal information.
4. WELCOME TO THE WIRELESS ATTITUDETM!
Now that you have mastered the main functionalities of WiFi Manager, it is time to move on to a few practical
applications. In the following chapters, we will show you how wireless computing is closely linked to userfriendliness and ease of use. Sharing your folders, your printer, or letting friends use your ADSL connection
for online gaming are some examples of the things we will help you to do. Enter the world of wireless and join
in the Wireless Attitude
4.1. A few important points to bear in mind before getting started
TM
!
ENGLISH FRANÇAIS DEUTSCH
We advise you to follow the instructions provided hereinafter for each of your computers:
- The procedures described in this chapter differ according to the various operating systems discussed.
Please ensure that you refer to the chapters corresponding to your operating system.
- These procedures also apply to the computers or devices directly connected to your router via an Ethernet
cable.
- To share an Internet connection, your Hercules Router and your modem (ADSL Ethernet, cable or Internet
“box”) must be connected and switched on and your Internet line must be active.
Reminder: the WiFi network you have just finished setting up is an Infrastructure type network (as opposed
to Ad hoc mode), as it is composed of an access point and one or more computers.
4.2. Computers running Windows Vista: Connecting to a wireless network
Note: The procedure described hereafter is deliberately intuitive and non-exhaustive. If you have mastered
Windows Vista, you will note that there are other ways to achieve the same results. You will find our
procedure set out in the pages that follow, although you are free to choose your own preferred method.
Once your computer is switched on, your WiFi adapter automatically detects the wireless networks available
and displays them in a specific window.
User Manual – 25/82
ESPAÑOL NEDERLANDS ITALIANO
 Loading...