

Page 1

Information for Assembling, Operating Type: AK+AK/DVGW
and Servicing Herberholz Shutting Valves Situation as per: 10/02
1 . INFORMATION
These operating instructions have the purpose of helping the customer properly assemble and
service shutting valves to allow disturbance-free operation. Herberholz shutting valves should
remain in the factory packaging until they are used (i.e., assembled) and they should be stored
dust-free and protected against light. They do not have to be preserved if they are properly stored.
Only trained personnel may assemble, disassemble and repair them. However, before
commencing disassembly work, the responsible department should clear the corresponding
pipeline conduit and ensure that there is no pressure. The responsible personnel are in charge of
shutting down the actuators for the Herberholz shutting valves (clearing, disassembling and
securing actuator connections). Herberholz shutting valves are designed for special customer
functions and the fittings should only be used as intended.
2. DESCRIPTION
Herberholz shutting valves have important shutting and regulating functions in pipelines such as
reliably shutting off liquid and gaseous substances and bulk materials. The AK/DVGW shutting
valve is only licensed for gases as per DVGW's G260 work sheet.
3. ASSEMBLY
Herberholz shutting valves are engineered for installation between flanges in conformity with form
A, form B or form E of DIN EN 1092-1. The manufacturer should be notified of other flanges being
used. The medium may flow through in either direction and the shutting valve may be installed in
any position. The sleeve of Herberholz shutting valves acts as a flange seal. Please do not use
any additional flange seals. Furthermore, flanges may not be welded to the pipeline when the
shutting valve is mounted because it burns the sleeve and destroys it. Insert the shutting valve
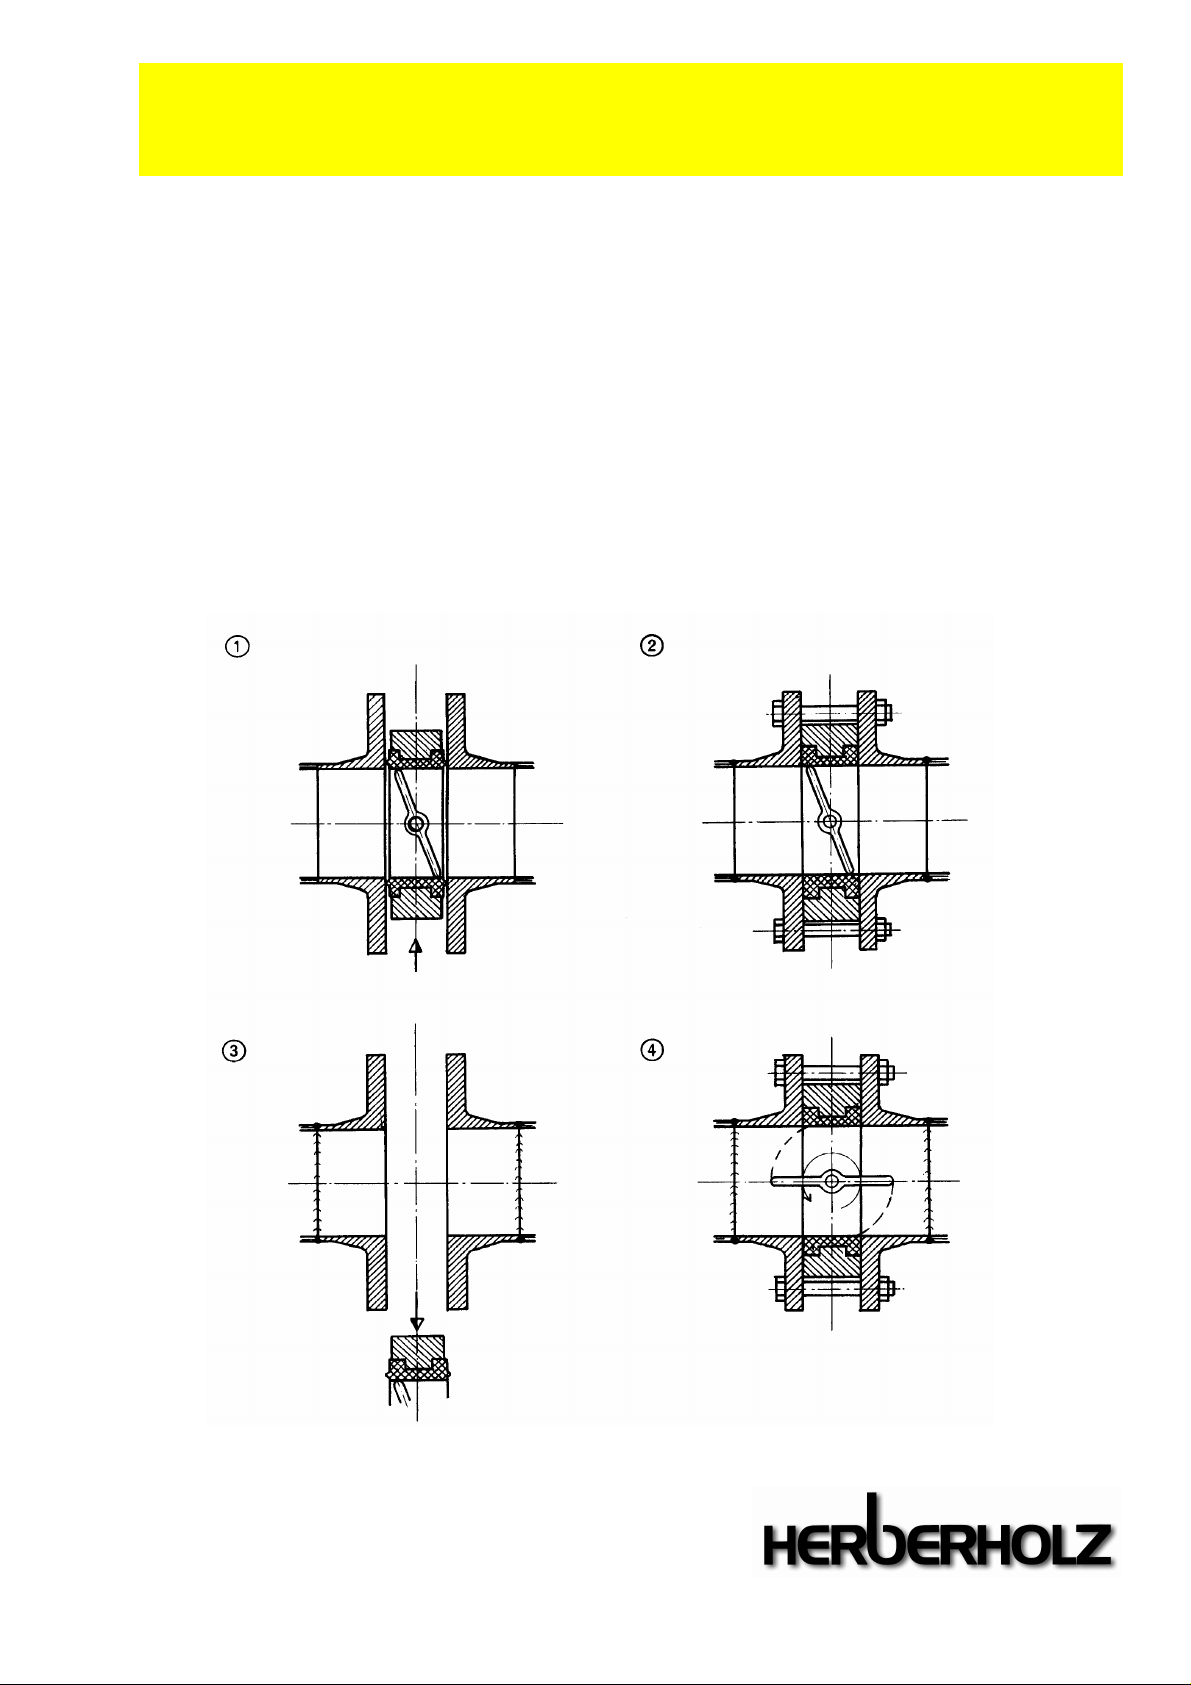
between the flanges with a slightly opened valve disc, tighten slightly and align the shutting valve
with 4 flange bolts. If the flanges are too close to one another in a finished pipeline, they have to
be pressed apart with an expansion tool until the valve can be inserted with a slight amount of play
(refer to Figure 1). Attach the pipeline flange to the pipeline with electrical spot welding (refer to
Figure 2), remove the flange screws again and remove the shutting valve. Then weld the flanges
Herberholz GmbH
Pregelstraße 6 Telefon 02333 / 9898-0
D – 58256 Ennepetal Telefax 02333 / 9898-48
e-Mail: [email protected]
Internet: http://www.herberholz.com
Seite 1 von 9
Page 2
Information for Assembling, Operating Type: AK+AK/DVGW
and Servicing Herberholz Shutting Valves Situation as per: 10/02
onto the pipeline (refer to Figure 3). After the flanges have cooled off, install the shutting valve
again. It must be possible to easily insert the fittings between the flanges to ensure that the sleeve
is not damaged. Align the shutting valve and tighten the 4 flange bolts slightly. Then open the valve
disc and check to see whether it can move freely. Then leave the valve disc slightly open. Tighten
all flange bolts crosswise. Check to see that it functions properly again by opening and closing
again completely (refer to Figure 4).
Important: The flanges should always be parallel to one another, have carefully worked surfaces
and be connected tension-free. With rated widths ≥ DN 200, we recommend installing the shutting
valves with horizontal shafts. In this case, the lower half of the disc should close in the direction of
flow (for self-cleaning).
Herberholz GmbH
Pregelstraße 6 Telefon 02333 / 9898-0
D – 58256 Ennepetal Telefax 02333 / 9898-48
e-Mail: [email protected]
Internet: http://www.herberholz.com
Seite 2 von 9
Page 3

Information for Assembling, Operating Type: AK+AK/DVGW
and Servicing Herberholz Shutting Valves Situation as per: 10/02
4. OPERATION
Before starting, check whether the shutting valve agrees with specifications (i.e., design,
connected loads and machine identification). The sleeve and valve disc have to be resistant to the
flowthrough medium. Herberholz shutting valves are dimensioned to ensure that they can be used
for throttling function in the adjusting angle range of 15 to 70 degrees. Please also ensure that
fittings are not exposed to cavitation.
Acceptable flow velocities:
liquids up to 4.5 m/sec
gases up to 20 m/sec
The shutting valves should be opened or closed slowly to prevent water hammer in the pipeline
system.
5. DISASSEMBLY
The responsible department should clear for disassembly (i.e., clear the conduit with pressure-less
pipe connections) and the authorised personnel should shut down the actuating or control
actuators to the shutting valves before disassembly (clear the actuators and disassembling and
secure the actuator connections). Remove the shutting valve with a closed valve disc from the
pipeline by carefully loosening the flange bolts (since the pipe connections may still be under
pressure). Then take out the shutting valve and set it down on a proper base (such as a wood
board).
6. SERVICE
Herberholz shutting valves do not require service if they are properly operated. However, we
recommend making a visual inspection once a year and a test to see if the shutting valves are in
good working order.
Herberholz GmbH
Pregelstraße 6 Telefon 02333 / 9898-0
D – 58256 Ennepetal Telefax 02333 / 9898-48
e-Mail: [email protected]
Internet: http://www.herberholz.com
Seite 3 von 9
Page 4

Information for Assembling, Operating Type: AK+AK/DVGW
and Servicing Herberholz Shutting Valves Situation as per: 10/02
7. MAINTENANCE
The shutting valve have to be properly disassembled before commencing maintenance work (refer
to 5. Disassembly). Clamp the shutting valve to ensure that the sleeve is not damaged. Then
disassemble the actuator of the shutting valve (also refer to the disassembly instructions for
electrical or pneumatic actuators)
REMOVING AND REPLACING PARTS
A) shutting valves with continuous shaft
After removing the shaft, the valve disc moves freely in the sleeve. Therefore, please ensure that
the valve disc cannot fall out
- remove the safety ring from the housing.
- pull the shaft from the housing (using a screwed-in threaded rod if necessary).
- press the valve disc from the sleeve.
- leverage the sleeve from the housing with a suitable dull tool.
- check the sleeve and replace if necessary
- treat the sleeve with talcum powder on the side towards the housing before installation
- press one shaft duct of the sleeve precisely onto the lower drill hole opposite it on the housing.
- press half of the sleeve into the housing to ensure that the upper shaft duct is exactly flush
with the upper drill hole opposite it on the housing.
- press the sleeve into the housing all the way.
- check to see whether the upper and lower shaft ducts of the sleeve are sitting properly (flush
with the upper and lower drill hole opposite it on the housing).
B) shutting valves with divided shaft
After removing the upper and lower shaft, the valve disc moves freely in the sleeve. Therefore,
please ensure that the valve disc cannot fall out
- remove the safety ring from the housing
Herberholz GmbH
Pregelstraße 6 Telefon 02333 / 9898-0
D – 58256 Ennepetal Telefax 02333 / 9898-48
e-Mail: [email protected]
Internet: http://www.herberholz.com
Seite 4 von 9
Page 5

Information for Assembling, Operating Type: AK+AK/DVGW
and Servicing Herberholz Shutting Valves Situation as per: 10/02
- pull the upper shaft from the housing (using a screwed-in threaded rod if necessary).
- unscrew the thread plugs.
- remove the seal ring from the thread plugs, check and replace if necessary.
- pull the lower shaft from the housing (using a screwed in threaded rod if necessary).
- press the valve disc from the sleeve.
- leverage the sleeve from the housing with a suitable dull tool.
- check sleeve and replace if necessary.
- treat the sleeve with talcum powder on the side towards the housing before installation
- press one shaft duct of the sleeve precisely onto the lower drill hole opposite it on the housing.
- press half of the sleeve into the housing to ensure that the upper shaft duct is exactly flush
with the upper drill hole opposite it on the housing.
- press the sleeve into the housing all the way.
- check to see whether the upper and lower shaft ducts of the sleeve are sitting properly (flush
with the upper and lower drill hole opposite it on the housing).
INSTALLING THE VALVE DISC
A) shutting valves with continuous shaft
- apply suitable grease to shaft (such as Bernlub Hydrohaf 2 fittings grease).
- position the valve disc in the sleeve to ensure that the shaft receptacles for the valve disc
(square on the bottom) are flush with the upper and lower drill hole opposite it on the sleeve
and housing.
- insert the shaft into the housing to ensure that the square catch on the shaft parallel is parallel
to the position of the valve disc.
- if the shaft bends backwards when being inserted into the housing, air is compressed in the
lower shaft receptacle of the valve disc. Keep the shaft pressed in, carefully press a suitable
tool (such as a dull screwdriver) between the sleeve and lower shaft receptacle of the valve
disc to let the compressed air escape. Then press the shaft in all the way.
- mount and adjust the actuator element (refer to the assembly instructions for the electrical
actuators).
- make sealing test before assembling the serviced fittings.
Herberholz GmbH
Pregelstraße 6 Telefon 02333 / 9898-0
D – 58256 Ennepetal Telefax 02333 / 9898-48
e-Mail: [email protected]
Internet: http://www.herberholz.com
Seite 5 von 9
Page 6

Information for Assembling, Operating Type: AK+AK/DVGW
and Servicing Herberholz Shutting Valves Situation as per: 10/02
B) shutting valves with divided shaft
- apply suitable grease to upper and lower shaft (such as Bernlub Hydrohaf 2).
- position the valve disc in the sleeve to ensure that the shaft receptacles for the valve disc
(dihedral on the top) are flush with the upper and lower drill hole opposite it on the sleeve and
housing.
- insert the lower shaft into the housing: loosely screw in the thread plugs with the seal ring.
- insert the upper shaft into the housing to ensure that the dihedral catch in the shaft is parallel
or the square catch with the serrated cut is diagonal to the position of the valve disc.
- if the upper shaft bends backwards when being inserted into the housing, air is compressed in
the upper shaft receptacle of the valve disc. Keep the upper shaft pressed in, carefully press a
suitable tool (such as a dull screwdriver) between the sleeve and upper shaft receptacle of the
valve disc to let the compressed air escape. Then press the upper shaft in all the way.
- mount and adjust the actuator element (refer to the assembly instructions for the electrical
actuators).
- make sealing test before assembling the serviced fittings.
8. TROUBLESHOOTING TABLE
Experience has shown that a number of defects occur. They re listed in the troubleshooting table
below along with how to correct them.
IMPORTANT!
Please observe the safety instructions for assembly and maintenance work before troubleshooting.
Only trained personnel should do troubleshooting and only after the responsible department has
cleared the work (clearing)
Herberholz GmbH
Pregelstraße 6 Telefon 02333 / 9898-0
D – 58256 Ennepetal Telefax 02333 / 9898-48
e-Mail: [email protected]
Internet: http://www.herberholz.com
Seite 6 von 9
Page 7

Information for Assembling, Operating Type: AK+AK/DVGW
and Servicing Herberholz Shutting Valves Situation as per: 10/02
the defect the cause of the defect how to correct the defect
pipe flange leaky shutting valve is not
centred
- clear the pipeline conduit
- disassemble the shutting valve
- check the sleeve for damage
- mount the shutting valve (refer to the „Assembly
Instructions")
- make sure it is good working order
the flange or flanging
diameter is too large
- clear the pipeline conduit;
- disassemble the shutting valve
- check the sleeve for damage;
- check flange or flanging diameter
- mount the flange or flanging with sufficient
base area
- mount the shutting valve (refer to „Assembly
Instructions")
- make sure it is good working order
pipe flange is leaky the sleeve is burned - clear the pipeline conduit;
shutting valve
cannot be closed
solid matter between the
sleeve and valve disc
- disassemble the shutting valve;
- check the sleeve for damage and repair
- mount the shutting valve (refer to „Assembly
Instructions")
- make sure it is good working order
- clear the pipeline conduit;
- disassemble the shutting valve
- remove the solid matter
- check the sleeve and valve disc for damage and
repair if necessary
- mount the shutting valve (refer to „Assembly
Instructions")
- make sure it is good working order.
Herberholz GmbH
Pregelstraße 6 Telefon 02333 / 9898-0
D – 58256 Ennepetal Telefax 02333 / 9898-48
e-Mail: [email protected]
Internet: http://www.herberholz.com
Seite 7 von 9
Page 8

Information for Assembling, Operating Type: AK+AK/DVGW
and Servicing Herberholz Shutting Valves Situation as per: 10/02
the defect the cause of the defect how to correct the defect
the sleeve is porous - check the operating temperature and determine if
it satisfies specifications
- clear the pipeline conduit;
- disassemble the shutting valve;
- check the sleeve for damage and service if
necessary
- mount the shutting valve (refer to „Assembly
Instructions")
- make sure it is good working order.
the pressure of the
medium in the pipeline is
too high (actuator
performance too low)
valve disc is leaky in
closed position
the sleeve is worn
(natural wear and tear)
the sleeve and possibly the
valve disc are is worn
(erosion from excessive
- check the operating pressure and determine if it
satisfies specifications
- (also refer to "Troubleshooting" for actuators).
- clear the pipeline conduit;
- disassemble the shutting valve;
- check the sleeve for wear and tear and service if
necessary
- mount the shutting valve (refer to „Assembly
Instructions")
- make sure it is good working order;
- maintain or shorten service intervals
- check the moisture or flow velocity of the medium
and determine whether they satisfy the
specifications
moisture or flow velocity of
the medium)
- clear the pipeline conduit
- disassemble the shutting valve
- check the sleeve and valve disc for wear and tear
and service if necessary
- mount the shutting valve (refer to „Assembly
Instructions")
- make sure it is good working order
- install drying develop if necessary
Herberholz GmbH
Pregelstraße 6 Telefon 02333 / 9898-0
D – 58256 Ennepetal Telefax 02333 / 9898-48
e-Mail: [email protected]
Internet: http://www.herberholz.com
Seite 8 von 9
Page 9

Information for Assembling, Operating Type: AK+AK/DVGW
and Servicing Herberholz Shutting Valves Situation as per: 10/02
the defect the cause of the defect how to correct the defect
the position of the valve
disc
and position indicator or
valve control mechanism
do not agree
- check the actual position of the valve disc
(observe the groove for square of the upper shaft
or dihedral surface)
- (also refer to "Troubleshooting" for actuators)
Herberholz GmbH
Pregelstraße 6 Telefon 02333 / 9898-0
D – 58256 Ennepetal Telefax 02333 / 9898-48
e-Mail: [email protected]
Internet: http://www.herberholz.com
Seite 9 von 9
 Loading...