

Page 1
1
2
EPOXY
3
4
5
3.
1,5 Nm
1
2.
6
Heper Lighting
Uygurlar Cd. No:1, 06935 &
Organize Sanayi Bölgesi
Sincan/Ankara Turkey
Tel: +90 312 267 54 30
Fax : +90 312 267 54 31
[email protected]
www.heperlighting.com
İnput Cable ( Ø 8- 11 mm )
Line Cable ( Ø 8- 11 mm )
1,5 Nm
Zerox S and M
Installation&Maintenance Instructions
Montaj&Bakım Kılavuzu
2
1 Nm
1
REV0/21.01.2021
Page 2
MONTAJ TALİMATLARI
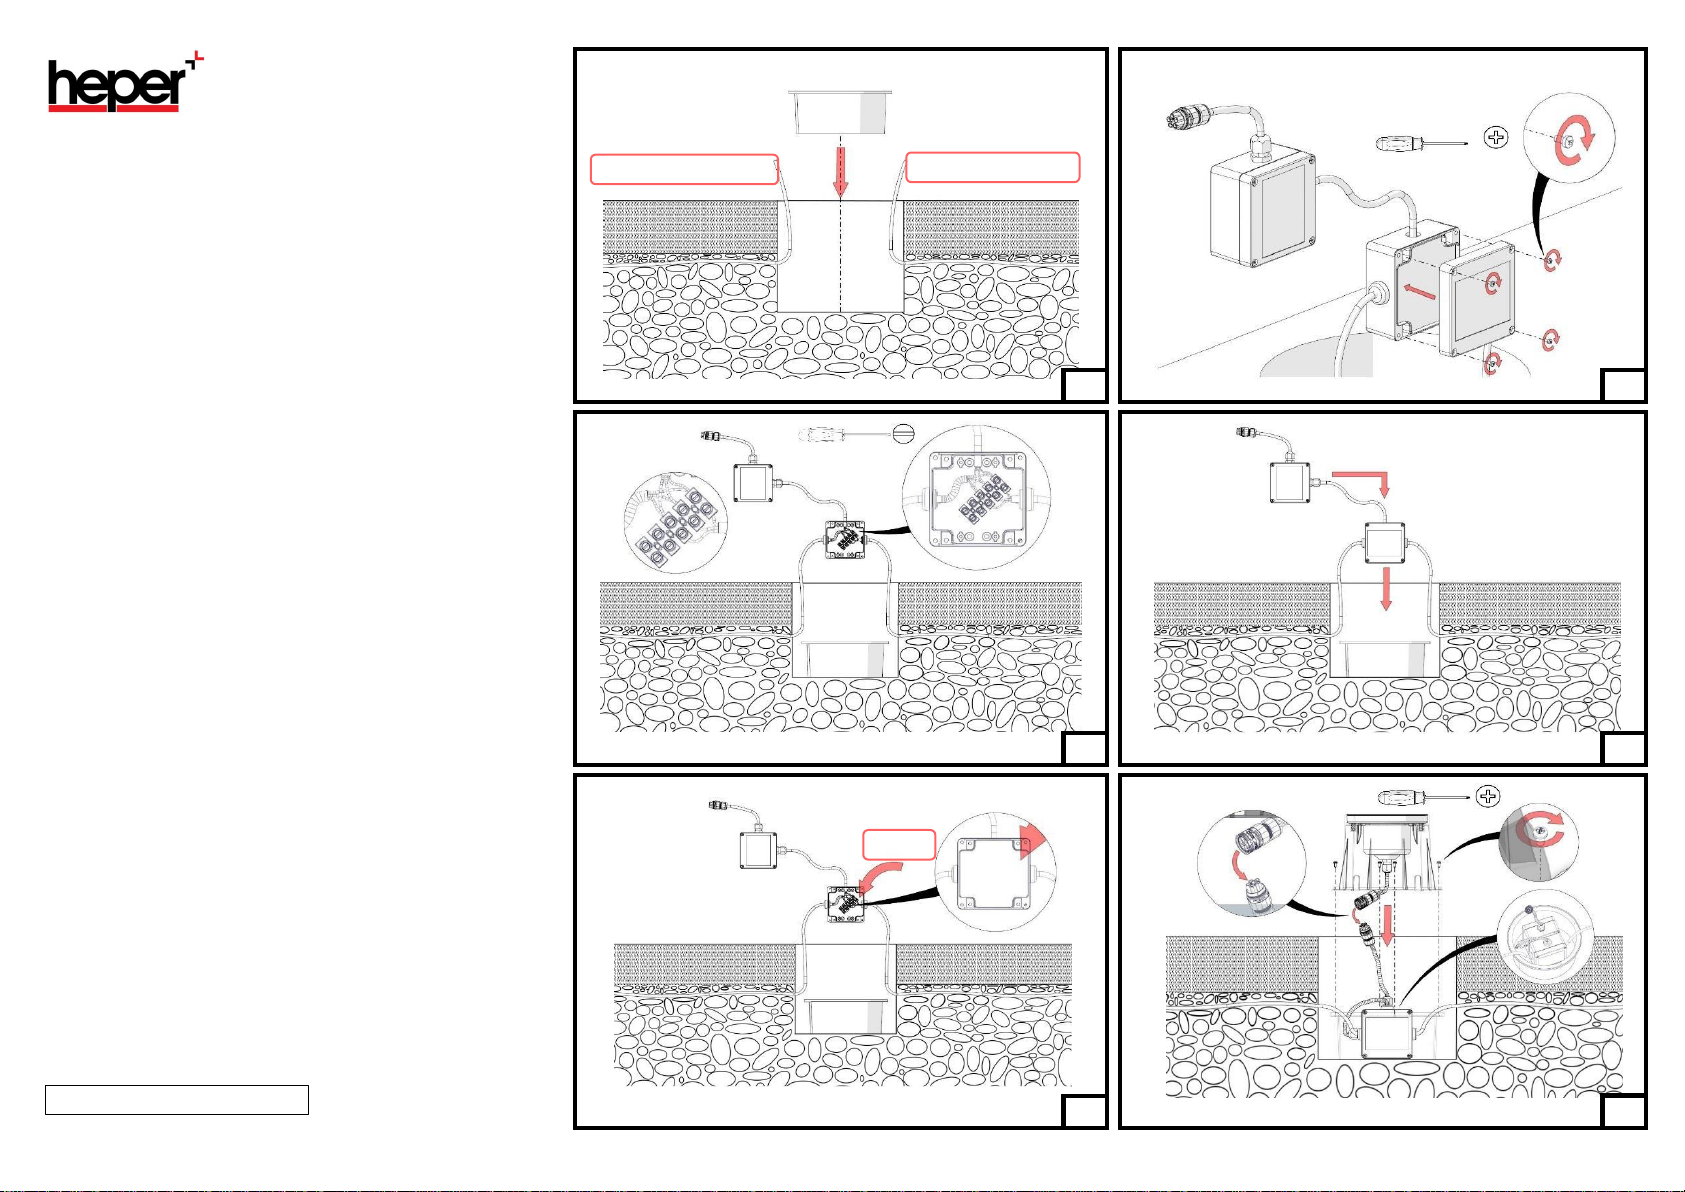
Armatürün montajı için;
1. Armatür için açılan yuvaya koruyucu hazne yerleştirilir.
2. Yer altından gelen kablolalar ve ürüne giden kablolar şekilde
gösterildiği gibi bağlantı kutusunun içindeki klemens yardımıyla
birbirlerine bağlanır. Aynı renkli kabloların karşılıklı olacak şekilde
bağlanmasına dikkat edilmelidir. ( 2.1. Bağlantı Kutusu, 2.2. LED
Sürücü Kutusu )
3. Kablo bağlantıları yapıldıktan sonra bağlantı kutusunun içi, bağlantı
kutusunun kapağının yerine oturmasını engellmeyecek şekilde ve hiç
bir elektriksel komponenti dışarda bırakmayacak seviyede epoxy ile
doldurulur. Epoxy dolgunun tamamen donduğundan emin
olunmalıdır.
4. Epoxy dolgu tamamen donduktan sonra, bağlantı kutusunun kapağı 4
adet vida yardımıyla yerine montajlanır.
5. Bağlantı Kutusu ve LED Sürücü Kutusu koruyucu haznenin içine
yerleştirilir.
6. Armatürün yerine yerleştirilmesi ;
6.1. Armatürden çıkan soket ile LED Sürücü Kutusu' ndan çıkan soket
birleştirilir.
6.2. Armatür koruyucu haznenin etrafındaki vida yuvaları ile koruyucu
haznedeki vida yuvalarını birbirleriyle karşılatarak, armatür
koruyucu haznenin üzerine oturtulur. Yerleşim sırasında
kabloların hasar görmediğinden emin olunur.
6.3. 4 adet vida yardımıyla hazneler birbirine sabitlenir
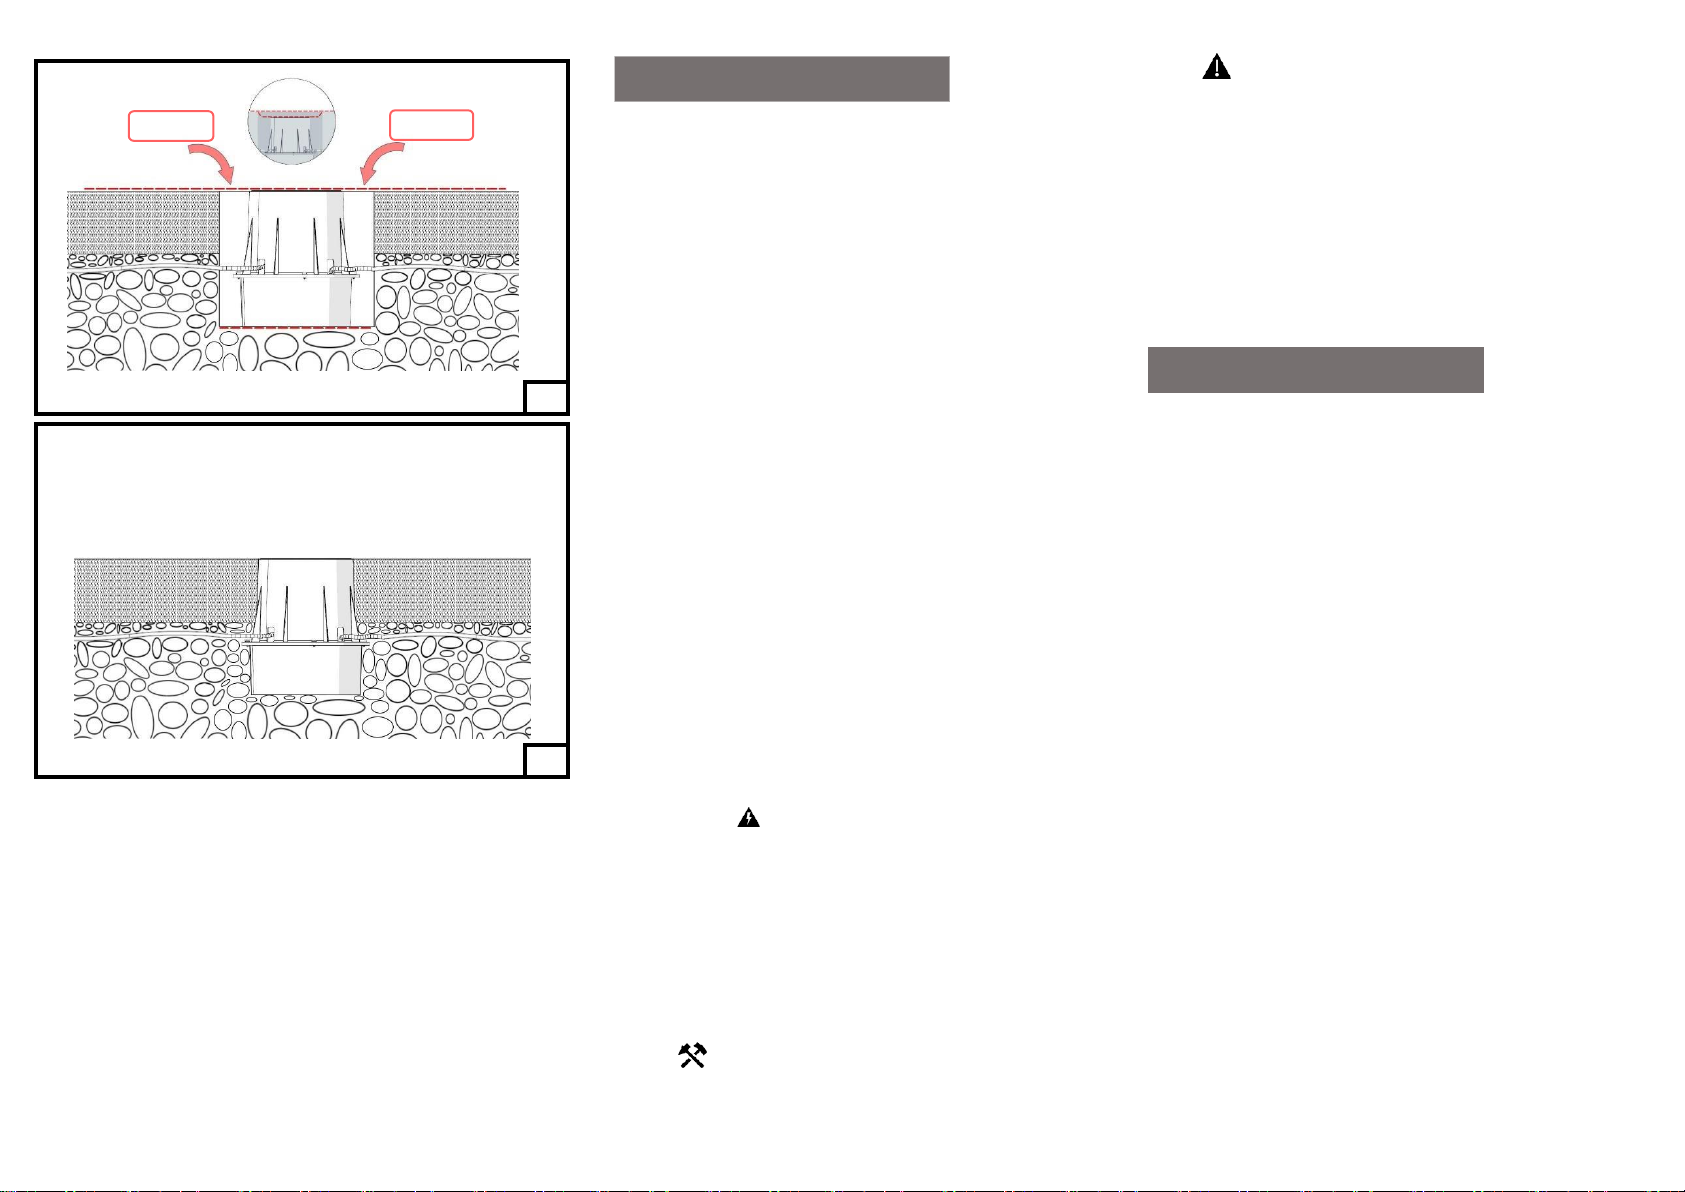
7. Yerleşimi yapılan armatürün yerine sabitlenmesi;
7.1. Koruyucu haznenin tabana boşluksuz oturduğundan emin olunur.
7.2. Tabana boşluksuz oturan armatür ile zemin arasında kot farkı
olmadığından ( armatür zemine göre yüksekte ya da armatürün
zemine göre alçakta kalması ) emin olunur.
7.3. Armatürün yanındaki boşluklar dikkatlice toprak ile doldurulur.
Armatürün sabitlendiğinden ve yerinden oynamayacağından
emin olunur.
8. Armatür kullanıma hazırdır.
KURULUM VE BAKIM İÇİN UYARILAR
Güvenlik Uyarıları
• Bu armatürdeki ışık kaynağı sadece üretici, üreticinin yetkili servisi ya da
kalifiye bir teknisyen
tarafından değiştirilebilir.
• Kurulum, bakım ve tamir işlemleri sırasında her zaman güç
kapatılmalıdır.
• Eğer kurulumdan sonra başka biri tarafından değişim ya da tamir
işlemleri yapılırsa bu üreticiden
ziyade bu işlemleri yapan kişi sorumluluğu altındadır.
• Sakatlanma, elektrik çarpması, yangın kazası, düşebilecek parçalardan
oluşacak kazalarda ölüm
riskini azaltmak için kurulumdan önce bu kılavuza riayet edilmelidir.
Kurulum
• LED ürünleri yüksek kalite elektronik parçalardır. Lütfen kurulum
sırasında dikkatli ve yavaş bir
şekilde işlemleri tamamlayın.
Türkçe
Önemli
Güvenli kurulum için önce armatür içindeki haznenin düzgün
yerleştirildiğinden emin olun.
Temizlik ve Bakım
• Armatürü düzenli olarak solventsiz malzemeler ile temizleyin. Temizleme
sırasında yüksek basınçlı
sıvılarla işlem yapmamaya özen gösterin.
LED Modüllerin Değiştirilmesi
• LED modül gösterimi armatürün etiketinde not olarak düşülmüştür.
• Işık rengi ve ışık çıkışı HEPER modüllerine aittir. Başka bir modül
kullanıldığında istenilen değerler
elde edilemeyebilir. Değişim standart ekipmanlarla yapılabilir.
ASSEMBLY INSTRUCTIONS
For assembly of the luminaire;
1. A protective chamber is placed in the slot opened for the luminaire.
2. Cables that comes from underground and the cables go to luminaire are
connected each other with a connector as shown in the figure. It is highly
important that the cables that have same color must be joined together.
erine bağlanır. ( 2.1. Junction Box, 2.2. LED Driver Box )
3. After the cable connections were done, inside of the junction box must
be filled with epoxy such a way that it should not block to fit the cap of the
junction box. While filling the epoxy, all of the electrical components must
be surrounded with epoxy. It should be ensured that epoxy sealant is
freezed completely.
4.After the Epoxy sealant is freezed completely, the cap of the junction box
is screwed with 4 bolts to assemble.
5. The Junction Box and LED Driver Box are placed into the chamber.
6. The placement of the luminaire ;
6.1. The socket from the luminaire and socket from the LED Driver Box are
connected to each other.
6.2. The screw sockets around the protective shield that encloses the
luminaire and the screw sockets in the protective shield must fit each
other. Then, luminaire is settled onto the protective shield. During the
installation, it should be made sure that any electronical cables were not
damaged.
6.3. The chambers are integrated each other using with 4 screws.
7. Stabilization of the luminaire;
7.1. It is ensured that the protective chamber fits to the bottom without
any gaps.
7.2. There should not be any difference in height between luminare that
fits to the bottom without any gaps ground. Luminaire might be higher
than level of ground or it might be lower than level of ground. This must be
avoided.
7.3. The gaps around luminaire is carefully filled with soil. It is ensured that
any movement of the luminare was already prevented.
8. Luminaire is ready to use.
English
SOIL
2.
SOIL
3.
1.
7
8
Page 3
WARNINGS AND REMARKS FOR INSTALLATION AND MAINTENANCE
Safety Instructions
• The light source contained in this luminaire shall only be replaced
by the manufacturer or his service
agent or a similar qualified person. Always switch off the power prior
to installation, maintenance or
repair activities.
• The manufacturer is then discharged from liability when damage is
caused by improper use or
installation.
• If any luminaire is subsequently modified, the persons responsible
for the modification shall be
considered as manufacturer.
• To reduce the risk of death, personal injury or property damage
from fire, electric shock, falling parts,
cuts, abrasions and other hazards, please read all warnings and
instructions included with the
luminaire, on the luminaire’s packaging and affixed to the luminaire
itself..
Installation
• LEDs are high-quality electronic components! Please avoid
contacting the light output opening of the
LED directly during installation or relamping.
IMPORTANT
• To ensure secure connection, the luminaire housing must be
positioned precisely in relation to the
mounting plate.
Cleaning and Maintenance
• Clean luminaire regularly with solvent-free cleaners from dirt.
Please do not do not clean the
luminaire with using high-pressure liquids.
Replacing the LED module
• The designation of the LED module is noted on a label in the
luminaire.
• The light colour and light output of HEPER replacement modules
correspond to those of the
modules originally fitted. The module can be replaced by qualified
persons using standard tools.
• Disconnect the electrical installation.
• Open the luminaire.
• Please follow the installation instructions for the LED module.
• Close the luminaire.
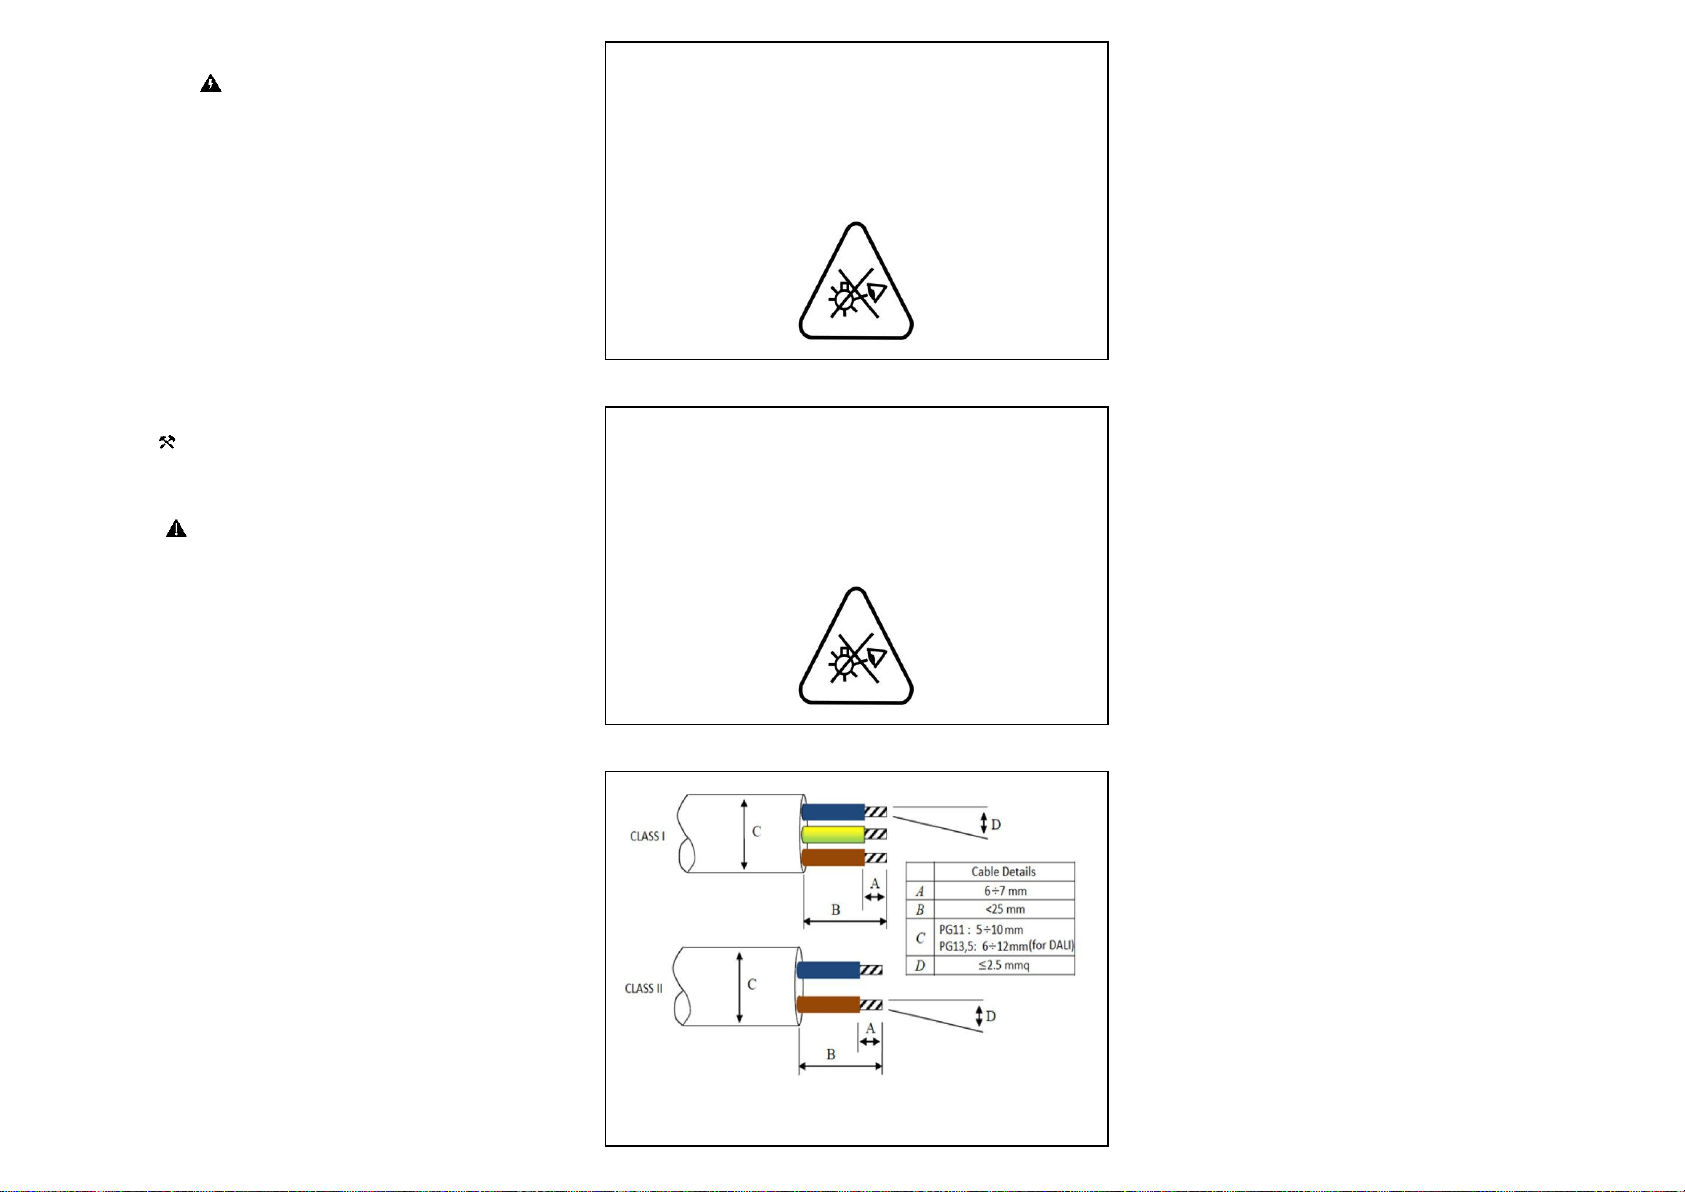
* GÖZ SAĞLIĞI UYARISI
D- Light V2 armatürü IEC/EN 62471. fotobiyolofik
güvenlik standartlarınca "muaf grup" olarak
sınıflandırılmıştır. Operatörler ve son kullanıcı için
herhangi bir risk taşımamaktadır
* EYE SAFETY WARNING
D-Light V2 luminaire is classified under “EXEMPT
GROUP” according to photobiological safety
standard IEC/EN 62471. NO RISK for the
operators and end-users.
 Loading...