

Page 1
Contents
.
Setup Use Troubleshooting Status LED Appendix
NETWORKED MULTI-ROOM AMPLIFIER
Owner’s Manual
HEOS Drive
.
1
Page 2
Contents Setup Use Troubleshooting Status LED Appendix
Contents
Introduction
Before your begin
System requirements
Network requirements
Controller requirements
Getting to know your HEOS Drive
Front panel
Back panel
Placing your HEOS Drive
Attaching the rack mount brackets
Mounting in a rack
Zone connection
Connecting speakers (4 stereo zones)
Connecting speakers
Connecting speakers (two bridged zones)
Connecting to an external amplifier or AV receiver
Connecting a subwoofer
Connecting a USB storage device
Trigger control
Connecting external devices (assignable)
Connecting an audio playback device
Connecting to network
Powering your HEOS Drive
Getting the HEOS app
5
Adding more HEOS devices
6
Adding wired HEOS devices
6
Adding wireless HEOS devices
6
USING YOUR HEOS DRIVE
7
Selecting a room
8
Listening to radio
9
Playing music stored on your mobile device
10
11
12
12
13
14
14
15
16
16
17
17
18
18
19
20
20
Playing music from your networked PC or NAS
Playing music from an external audio device
Streaming an external audio device to any HEOS device
Playing music from a USB device
HEOS account
What is a HEOS account?
Why do I need a HEOS account?
Signing up for a HEOS account
Changing your HEOS account
Playing from streaming music services
Adding a music service
Changing music service settings
Managing inputs
Changing the name of the inputs
Hiding an input
Managing your phone
21
21
22
23
23
24
24
25
26
27
28
29
29
29
29
29
30
30
30
31
31
31
32
2
Page 3
Contents Setup Use Troubleshooting Status LED Appendix
Listening to the same music in multiple rooms
Grouping rooms
Ungrouping rooms
Grouping all rooms (party mode)
Ungrouping all rooms
Using the now playing queue
Play Now
Play Now & Replace Queue
Play Next
Add to End of Queue
Rearranging the now playing queue
Deleting songs from the play queue
Deleting all songs from the play queue
Saving playlists
Performing repeat and shuffle playback
Using the favorite
Adding to HEOS favorite
Deleting station from the HEOS favorite
33
Making adjustments
33
34
35
36
37
37
37
37
37
38
38
39
39
39
40
40
40
Changing the name of a HEOS Drive
Changing the name of a zone
Adjusting the equalizer
Adjusting the balance
Adjusting the output mode
Adjusting the audio quality
Adjusting the volume limit
Adjusting the preamp out
Adjusting the high pass filter
Using a subwoofer
Adjusting the low pass filter
Adjusting the line out
Adjusting the status light brightness
Advanced settings
Network settings
Firmware upgrade
About
External device control
IP control
Trigger out
41
41
41
42
42
42
42
43
43
43
44
44
44
44
45
45
45
46
47
47
48
3
Page 4
Contents Setup Use Troubleshooting Status LED Appendix
Updating your system
Advanced features
Sharing music from your mobile device
Submit diagnostics
Resetting your controller app
Power management
Power modes
Quick Start Mode
Deep Standby
Off
BASIC TROUBLESHOOTING
I get a message “Device was not found”
My HEOS device turns off and the power LED flashes in red
Music cuts out or delays sometimes
I hear a delay when using the external input with my TV
Resetting your HEOS device
Restoring the HEOS device to factory defaults
Contact Denon
49
Status LED table
50
Supported file types and codecs
50
50
50
51
51
51
51
51
52
52
52
53
53
54
54
55
Supported audio formats (Coaxial/Optical)
Specifications
Information
Trademarks
License
License information for the software used in the unit
The Spotify software is subject to third party licenses found
here:
56
63
63
64
67
67
68
68
77
4
Page 5
HEOS Drive QUICK START GUIDE
Contents
Setup Use Troubleshooting Status LED Appendix
Thank you for purchasing this HEOS product. To ensure proper operation, please read this owner’s manual carefully before using the product.
NOTE
THIS DOCUMENT CONTAINS INFORMATION THAT IS SUBJECT TO CHANGE WITHOUT NOTICE.
0
For latest information, please visit HEOSbyDenon.com
Introduction
The HEOS Drive is part of the HEOS wireless multi-room sound system that enables you to enjoy your favorite music anywhere and everywhere around
your home. By utilizing your existing home network and the HEOS app on your iOS or Android™ device, you can explore, browse, and play music from
your own music library or from many online streaming music services.
True multi-room audio - play different songs in different rooms or the same song in every room
0
Utilizes your existing home network for quick and easy setup
0
Industry leading microsecond audio synchronization between HEOS device confirm microsecond sync with Drive
0
Legendary Denon audio quality
0
If you are in a hurry, you can be enjoying great sounding music in no time by following the steps outlined in the HEOS Quick Start Guide (packaged with
your HEOS device).
.
Please continue reading this Owner’s Manual for more detailed information about the features and benefits of your HEOS Drive.
5
Page 6
Contents
Setup Use Troubleshooting Status LED Appendix
Before your begin
NOTE
If you have already installed at least one HEOS device, please skip to the section “Adding more HEOS devices” (v p. 21).
0
System requirements
Before you begin installing your first HEOS device, please make sure you understand and meet a few basic requirements.
Network requirements
o
Wireless Router - In order to use your HEOS music system, you should have a working wireless (Wi-Fi) network in your home. If you do not have a
wireless network, please contact your local Denon dealer or electronics retailer to assist you with purchasing and installing a wireless network in your
home.
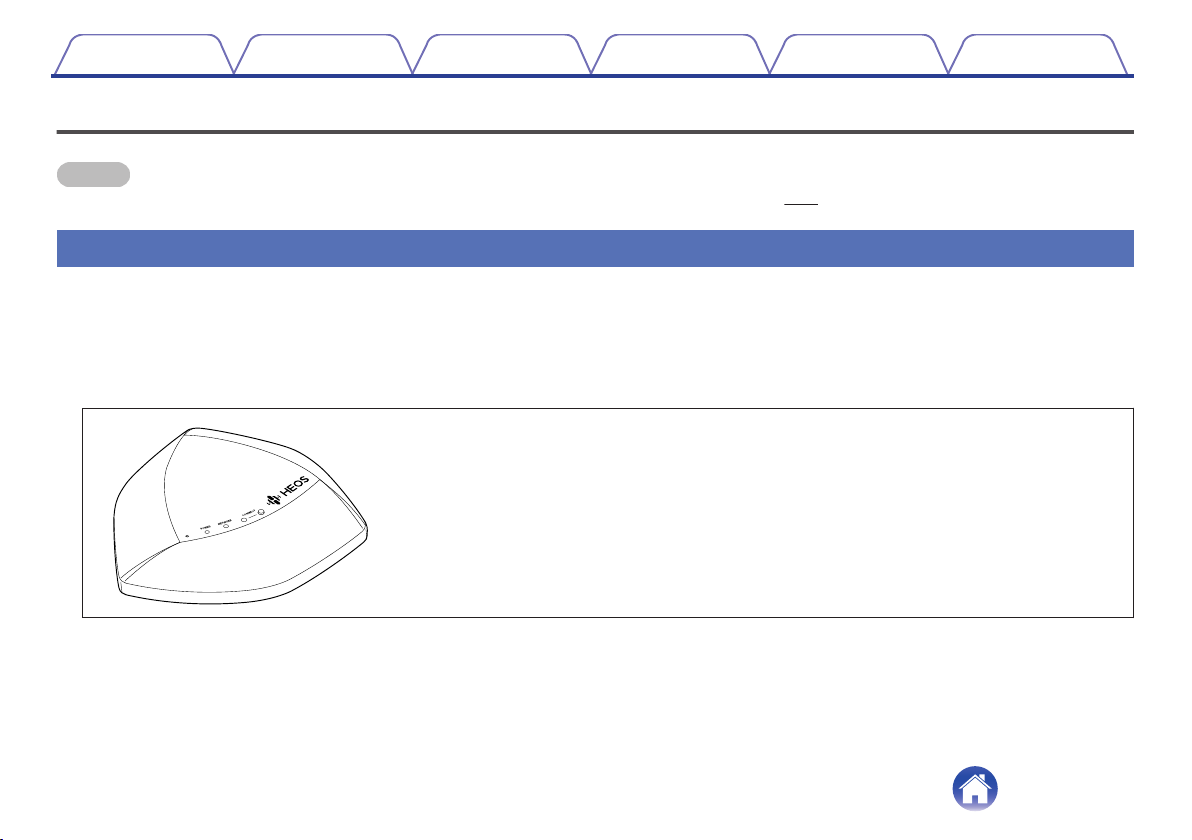
The HEOS Extend Wireless Range Extender (sold separately) is available as an accessory, should
you need to setup a new wireless network or extend the range of your existing network. Please
contact Denon for more information about the Wireless Extender.
.
High Speed Internet Connection - HEOS accesses the Internet to stream music to your home from many popular online music services. HEOS is
also designed to provide you with software updates, which are delivered via your home Internet connection. DSL, Cable, and Fiber services will
provide the best experience and reliability. You may experience performance issues with slower Internet connections like satellite based services.
6
Page 7
Contents Setup Use Troubleshooting Status LED Appendix
Controller requirements
o
You can control your HEOS wireless multi-room sound system using the free HEOS app on any iOS or Android mobile device that meets these
minimum requirements:
.
iOS Minimum Requirements
iOS version 7.0 or later
0
0
iPhone® 4 or newer
0
iPad® 2 or newer
0
iPod touch® (5th generation) or newer
.
Android Minimum Requirements
Android OS version 2.3 or later
0
All resolutions
0
7
Page 8
QUICK STRT GUIDE
HEOS Drive
Ethernet cable Rack mount brackets
Quick Start Guide Safety Instructions
Warranty
(North America model only)
Extended Protection Plan
(North America model only)
Power cords
(for North America)
(for Europe) (for UK)
(for Australia)
Contents Setup Use Troubleshooting Status LED Appendix
Getting to know your HEOS Drive
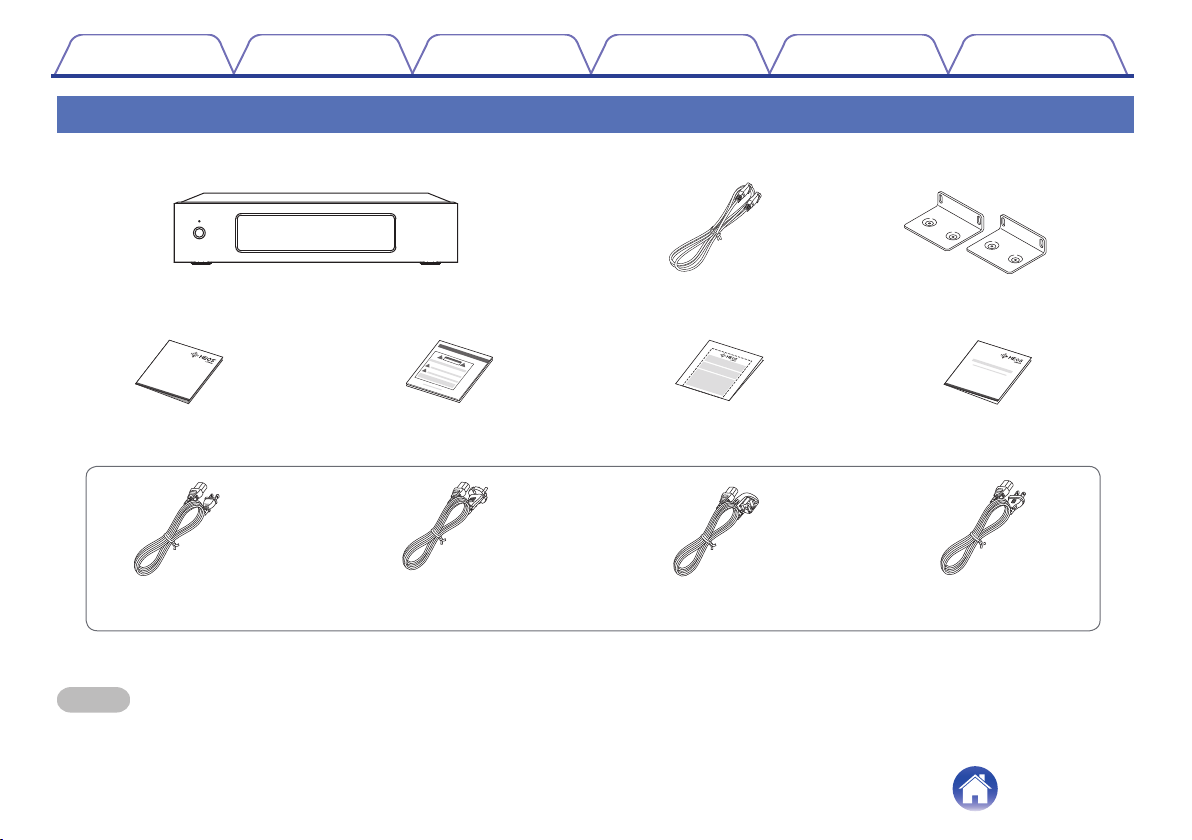
Unpack your HEOS Drive from the box and verify that the following items are included:
.
NOTE
Please use the power cord included in the box for your device.
0
8
Page 9
req w
Contents Setup Use Troubleshooting Status LED Appendix
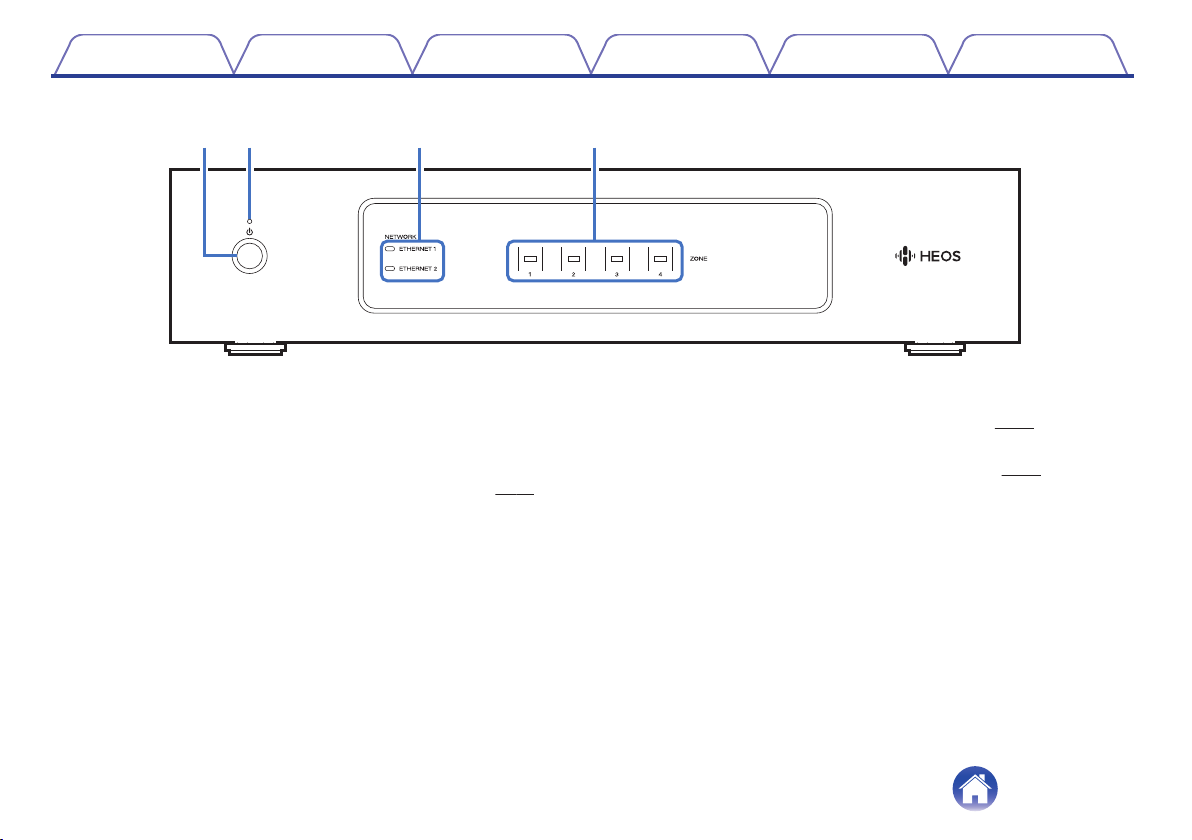
Front panel
o
.
Power operation button (X)
A
Used to enter Quick Start Mode or Deep Standby and return from
them.
Power indicator
B
This is lit as follows according to the power status: (v
White: Power on
0
Off: Deep Standby
0
Red: When all Zone enter Quick Start Mode
0
p. 56)
Network indicators
C
Flashes green to indicate network activity. (v
Zone indicators
D
p. 57)
Please refer to the “Status indicator Table”. (v p. 58)
9
Page 10
q we r t y u i Q0o Q1
Contents Setup Use Troubleshooting Status LED Appendix
Back panel
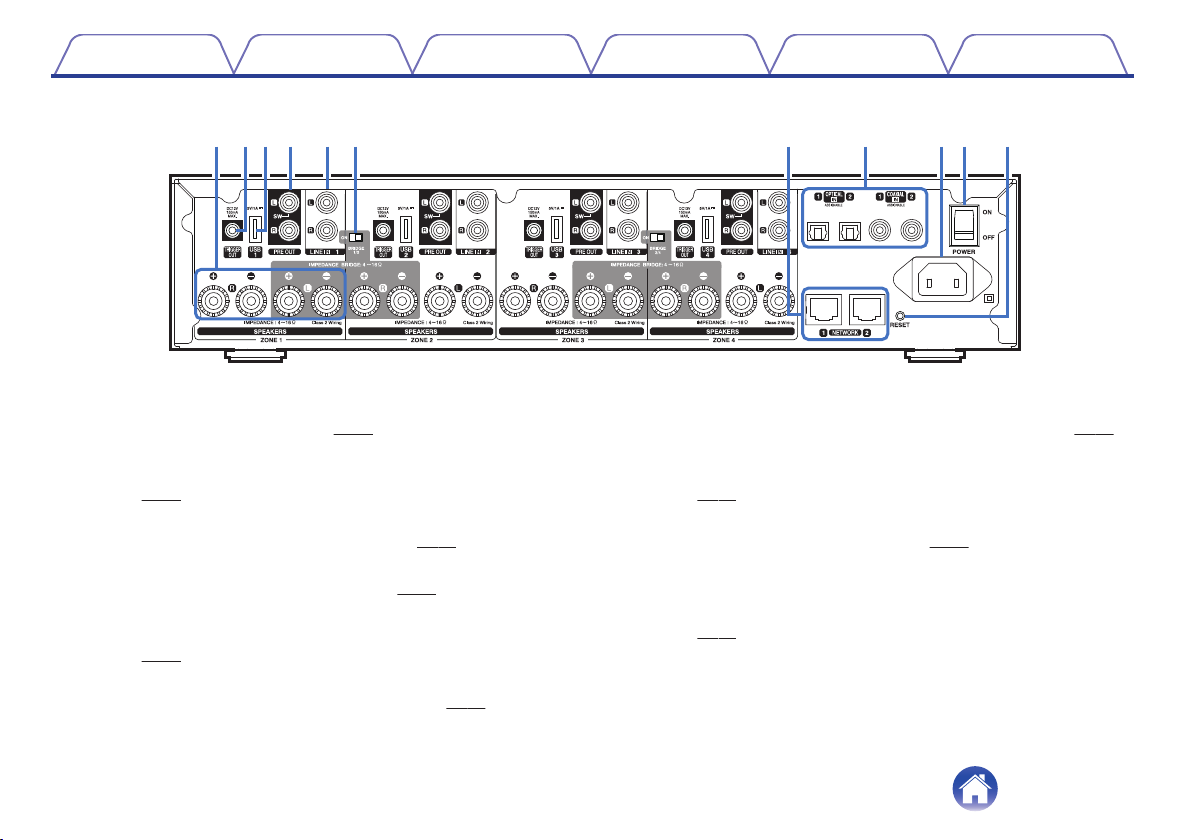
o
.
Speaker terminals (SPEAKERS)
A
Used to connect speakers. (v
TRIGGER OUT jack (TRIGGER OUT)
B
Used to connect devices equipped with a trigger function.
(v
p. 17)
USB Input (USB 5 V/1 A)
C
Used to connect USB storage devices. (v
Analog output (PRE OUT)
D
Used to connect external amplifiers. (v
Analog Input (LINE IN)
E
Used to connect devices equipped with analog audio outputs.
(v p. 18)
Bridge Mode Switch (BRIDGE)
F
Used to enable the amplifier bridge setting. (v p. 15)
p. 14)
p. 17)
p. 16)
10
Network Connector (NETWORK)
G
Used to connect this unit to a wired Ethernet network. (v
Digital Input (OPTICAL IN/COAXIAL IN)
H
Used to connect devices equipped with digital audio outputs.
(v
p. 18)
AC inlet
I
Used to connect the power cord. (v
Master Power Switch (POWER)
J
Reset Button (RESET)
K
Various settings are reset to the factory default values.
p. 54)
(v
p. 21)
p. 20)
Page 11
Contents
Setup Use Troubleshooting Status LED Appendix
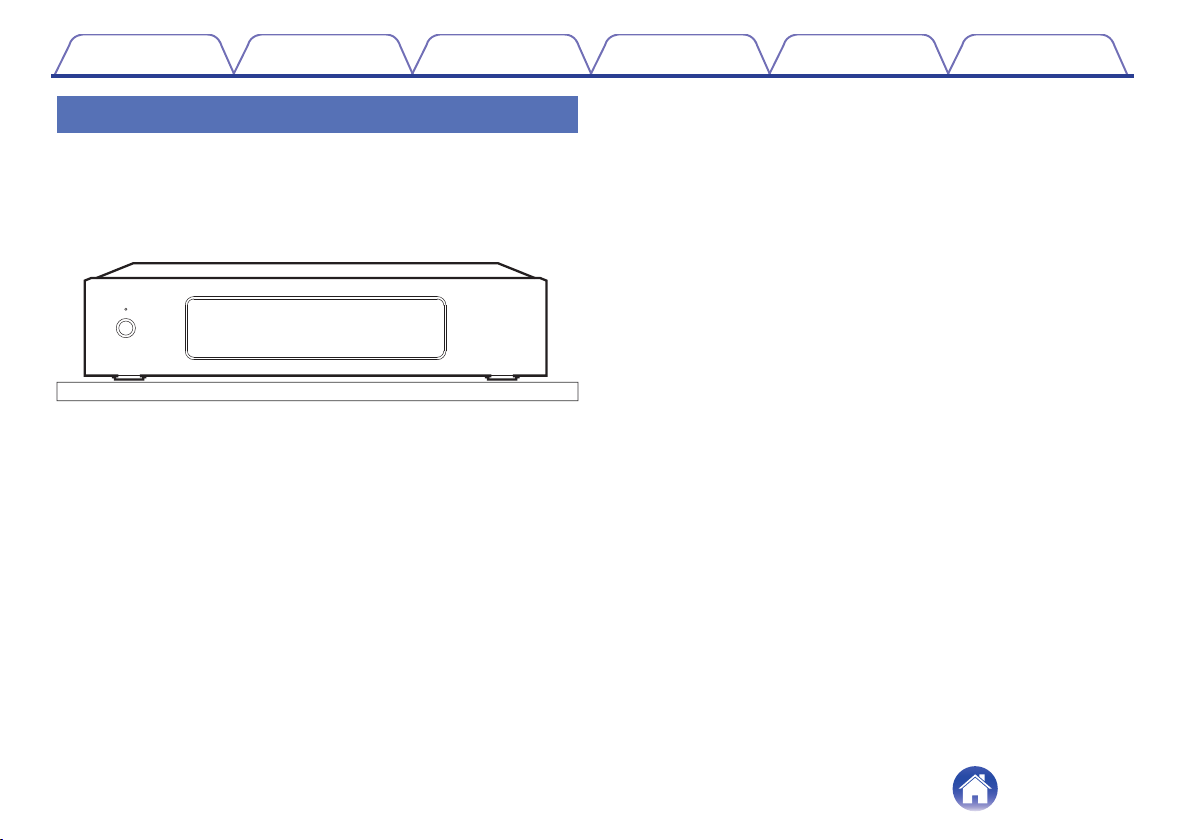
Placing your HEOS Drive
The HEOS Drive is designed to add HEOS multi-room audio functionality
to passive loud speakers. You should place your HEOS Drive in a
convenient location near your speaker wires.
The HEOS Drive is not waterproof. Do not place it near any water
0
source and do not leave it outside in the rain or snow.
.
11
Page 12
Contents
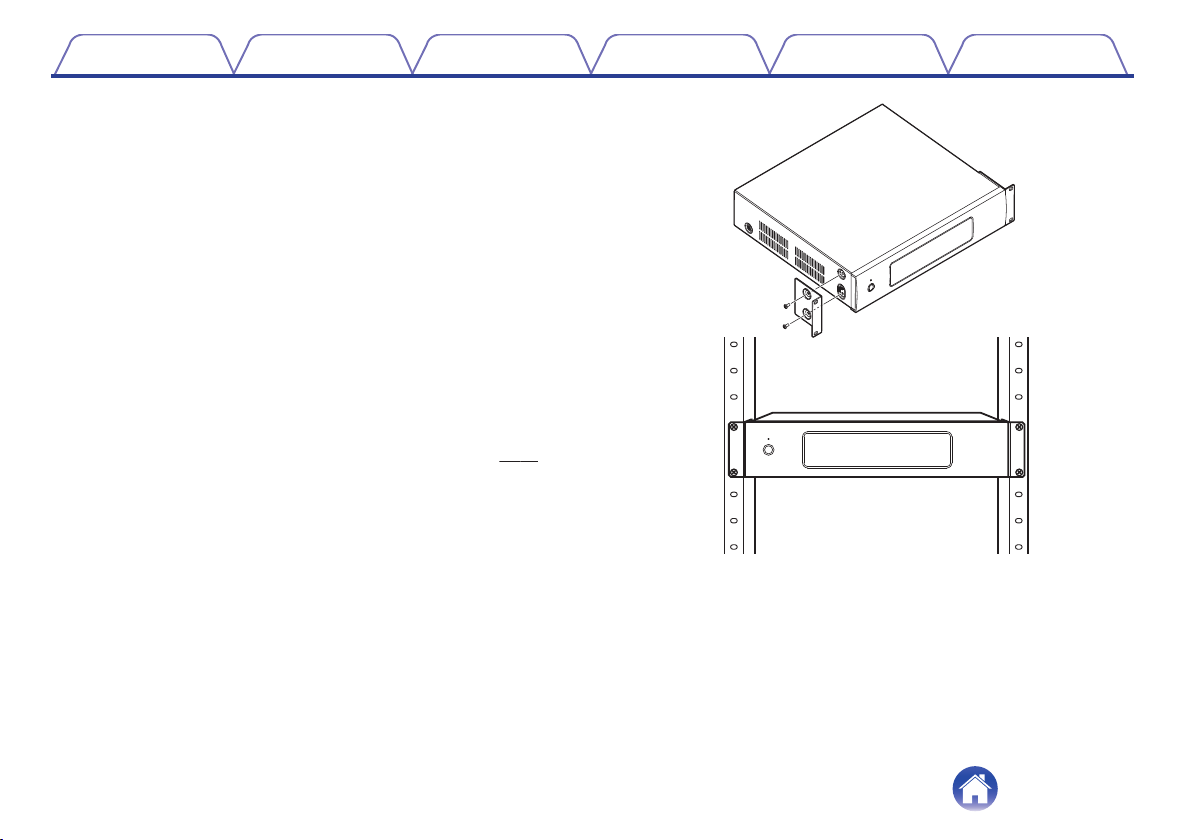
Attaching the rack mount brackets
o
Attach the included rack mounting brackets to the sides of the HEOS
Drive if you want to mount the HEOS Drive in a standard EIA
equipment rack.
Remove the two screws on each side of the HEOS
1
Drive.
Align the brackets with the screw holes and reattach
2
the screws making sure they are secure.
Mounting in a rack
o
Do not cover the side of the unit. Remember, heat is dispersed from
0
the HEOS Drive's side surface.
Set up the installation environment carefully. For example, take care
0
to protect the HEOS Drive from heat from other devices. If
necessary, use forced ventilation. The surrounding conditions must
meet the specifications described in “Specifications” (v
If the unit is not to be mounted in a rack, remove the rack mount
0
brackets.
Setup Use Troubleshooting Status LED Appendix
p. 64).
.
12
Page 13
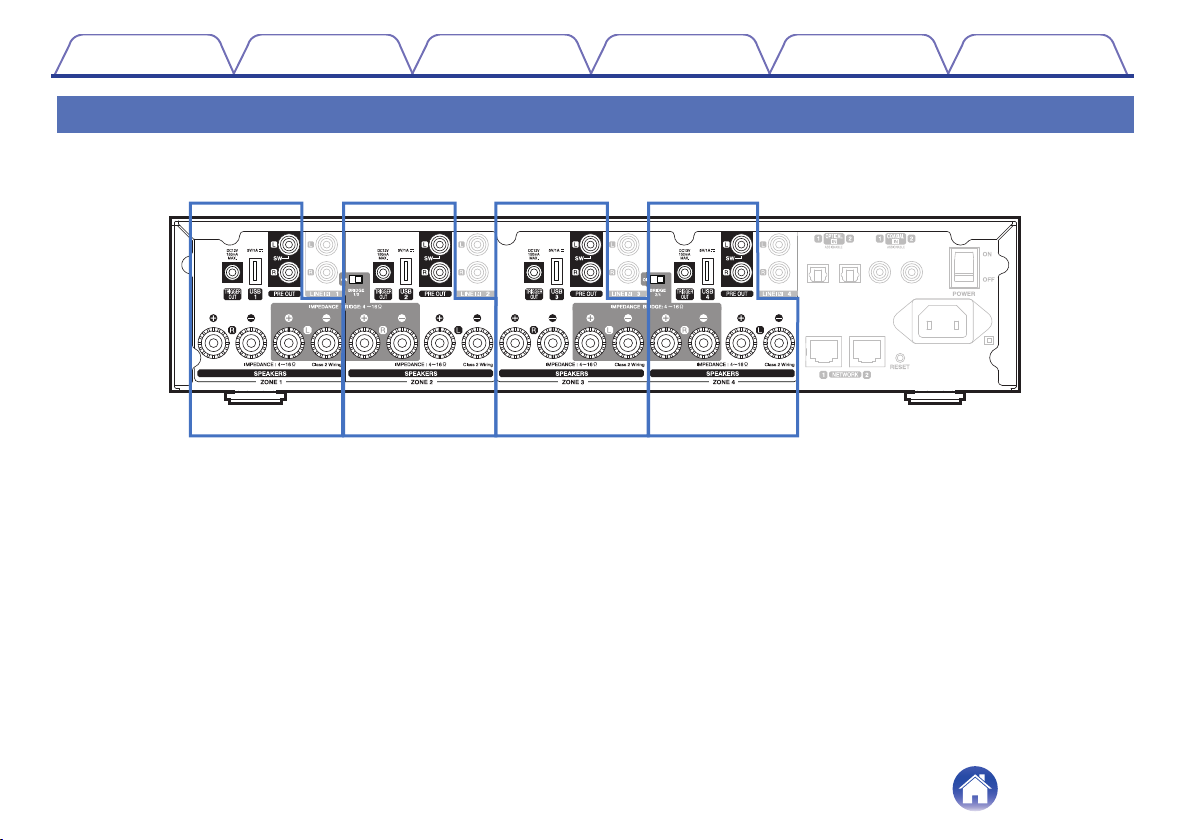
ZONE1 ZONE2 ZONE3 ZONE4
Contents
Setup Use Troubleshooting Status LED Appendix
Zone connection
You can simultaneously play the same source in all four HEOS Drive Zones if desired. You can also play different sources in different zones.
Connection and function of page 14 to 18 are ZONE1. ZONE2, ZONE3 and ZONE4 are same as ZONE1.
.
13
Page 14
(R)
wq
wq
(L)
Contents
Setup Use Troubleshooting Status LED Appendix
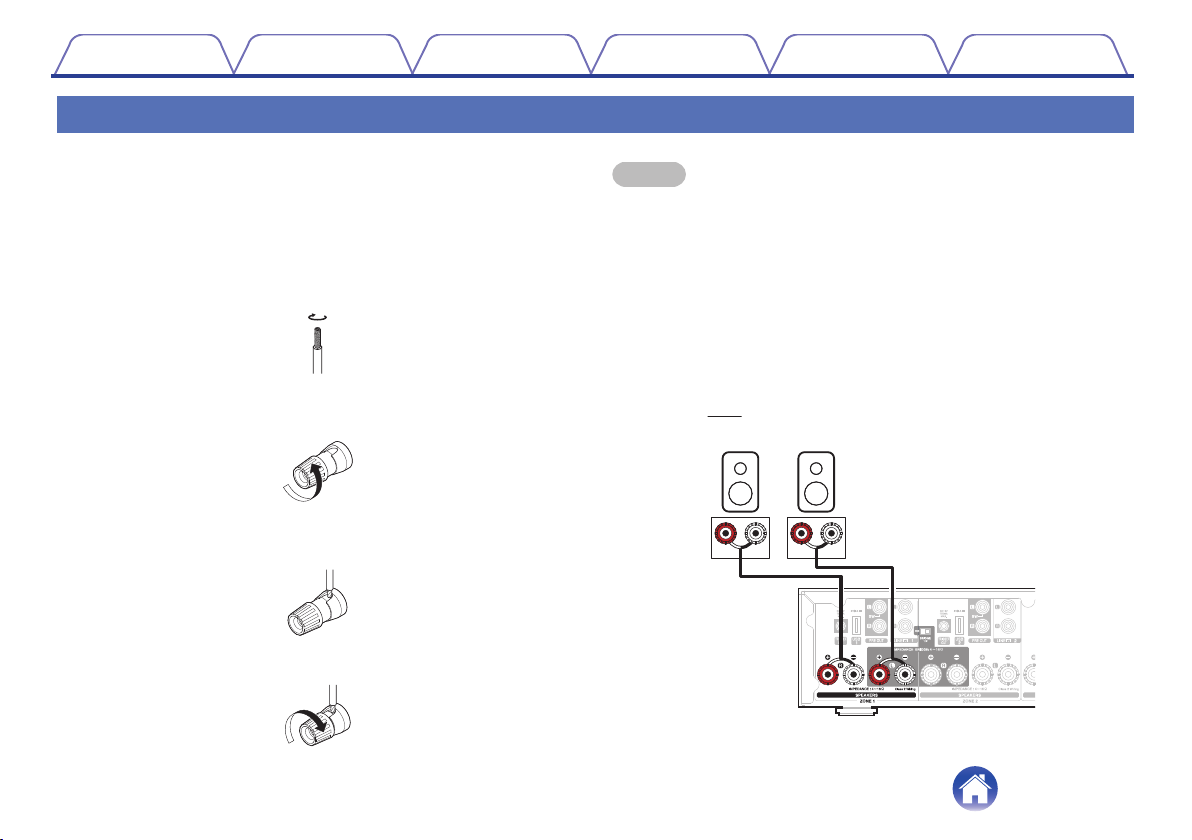
Connecting speakers (4 stereo zones)
Connecting speakers
o
Carefully check the left (L) and right (R) channels and + (red) and –
(black) polarities on the speakers being connected to this unit, and be
sure to connect the channels and polarities correctly.
Peel off about 3/8 inch (10 mm) of sheathing from the
1
tip of the speaker cable, then either twist the core wire
tightly or terminate it.
.
Turn the speaker terminal counterclockwise to loosen
2
it.
.
Insert the speaker cable’s core wire to the hilt into the
3
speaker terminal.
.
NOTE
Turn off the power switch of rear panel before connecting the speakers. Also, turn
0
off any connected powered subwoofers.
Connect so that the speaker cable core wires do not protrude from the speaker
0
terminal. The protection circuit may be activated if the core wires touch the rear
panel or if the + and – sides touch each other.
Never touch the speaker terminals while the power cord is connected and power
0
switch of rear panel is turned on. Doing so could result in electric shock.
Use speakers with an impedance of 4 – 16 Ω/ohms. The protection circuit may be
0
activated if speakers with an impedance other than specified are used.
Depending on the speakers that are connected, the protection circuit may activate
0
and the power may be turned off when music is played at a high volume (The
Power indicator flashes in red). If this happens, configure the “Volume Limit”
setting. (v
p. 43)
Turn the speaker terminal clockwise to tighten it.
4
.
.
14
Page 15
(L)
wq
wq
(R)
Contents
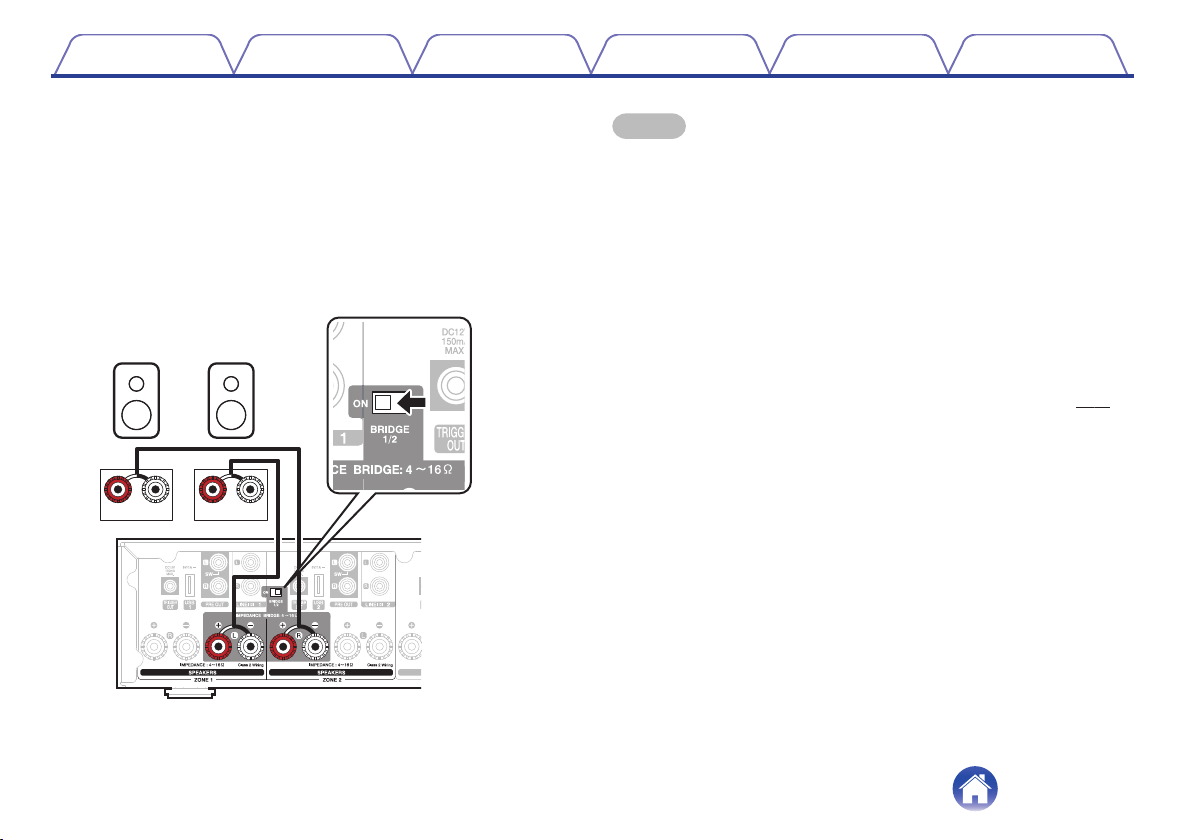
Connecting speakers (two bridged zones)
o
Larger output can be obtained by connecting using a bridged
connection.
Turn off the power switch of rear panel.
1
Connect speakers to the adjacent gray colored speaker
2
terminals between zones 1 and 2 OR zones 3 and 4.
Slide the Bridge switch to the “ON” position.
3
Setup Use Troubleshooting Status LED Appendix
NOTE
Turn off the power switch of rear panel before connecting the speakers. Also, turn
0
off the subwoofer.
Connect so that the speaker cable core wires do not protrude from the speaker
0
terminal. The protection circuit may be activated if the core wires touch the rear
panel or if the + and – sides touch each other.
Never touch the speaker terminals while the power cord is connected and power
0
switch of rear panel is turned on. Doing so could result in electric shock.
Use speakers with an impedance of 4 – 16 Ω/ohms. The protection circuit may be
0
activated if speakers with an impedance other than specified are used.
In BRIDGE mode, one channel is output from one ZONE. In the example shown
0
here, no signal is output from the speaker Rch of ZONE1 and Lch of ZONE2.
Zones 1 and 2 connected using a bridge connection operate as Zone 1, and
0
Zones 3 and 4 connected using a bridge connection operate as Zone 3.
When a bridge connection is used, Zone2/Zone4 are not displayed in “Rooms
0
view”. To display as Preamp Out, refer to “Adjusting the preamp out” (v p. 43).
.
15
Page 16
R
L
R
L
AUDIO
AUDIO
RL
IN
Your amplifier or
AV receiver
IN
Subwoofer
with built-in
amplifier
Contents
Setup Use Troubleshooting Status LED Appendix
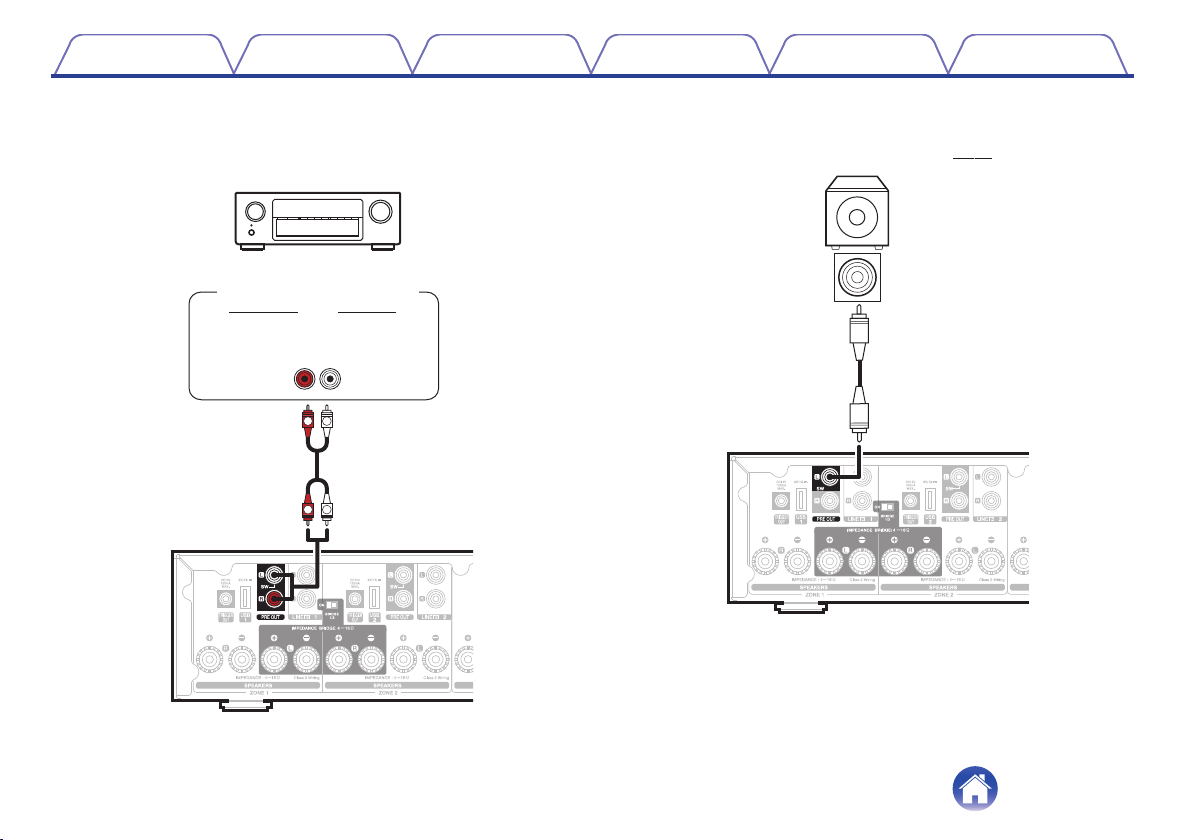
Connecting to an external amplifier or AV
o
receiver
Connect the PRE OUT output to an available input on your amplifier or
AV receiver using the appropriate cables.
Connecting a subwoofer
o
Connect the PRE OUT “L” output to an input on your powered
subwoofer or your subwoofer amplifier. (v
.
p. 44)
.
16
Page 17
USB memory
device
Power amplifier
Contents
Setup Use Troubleshooting Status LED Appendix
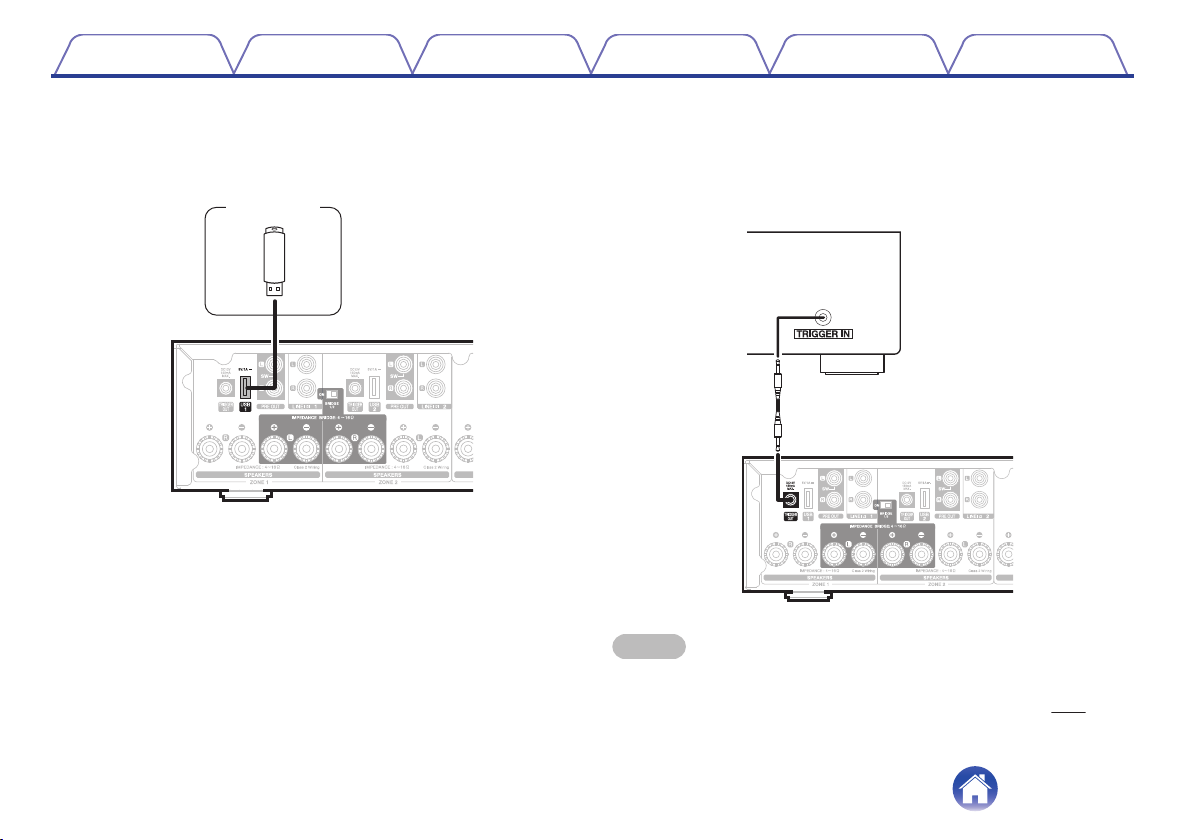
Connecting a USB storage device
o
Connect a FAT32 formatted USB mass storage device containing
digital music files to any available USB port.
Trigger control
o
If the power amplifier connected to this unit has a trigger input
connector, connect it to the TRIGGER OUT jack of this unit using a
3.5mm cable (not included). A signal up to 12 V/150 mA is output from
the TRIGGER OUT jack.
.
.
NOTE
Use a monaural mini-plug cable for connecting the TRIGGER OUT jacks. Do not
0
use a stereo mini-plug cable.
The Trigger settings must be set in order to use Trigger Control. (v p. 48)
0
17
Page 18
R
L
R
L
AUDIO
AUDIO
RL
OUT
OUT
OPTICAL
OUT
COAXIAL
AUDIO
or or
Analog
device
Digital
device
Contents
Setup Use Troubleshooting Status LED Appendix
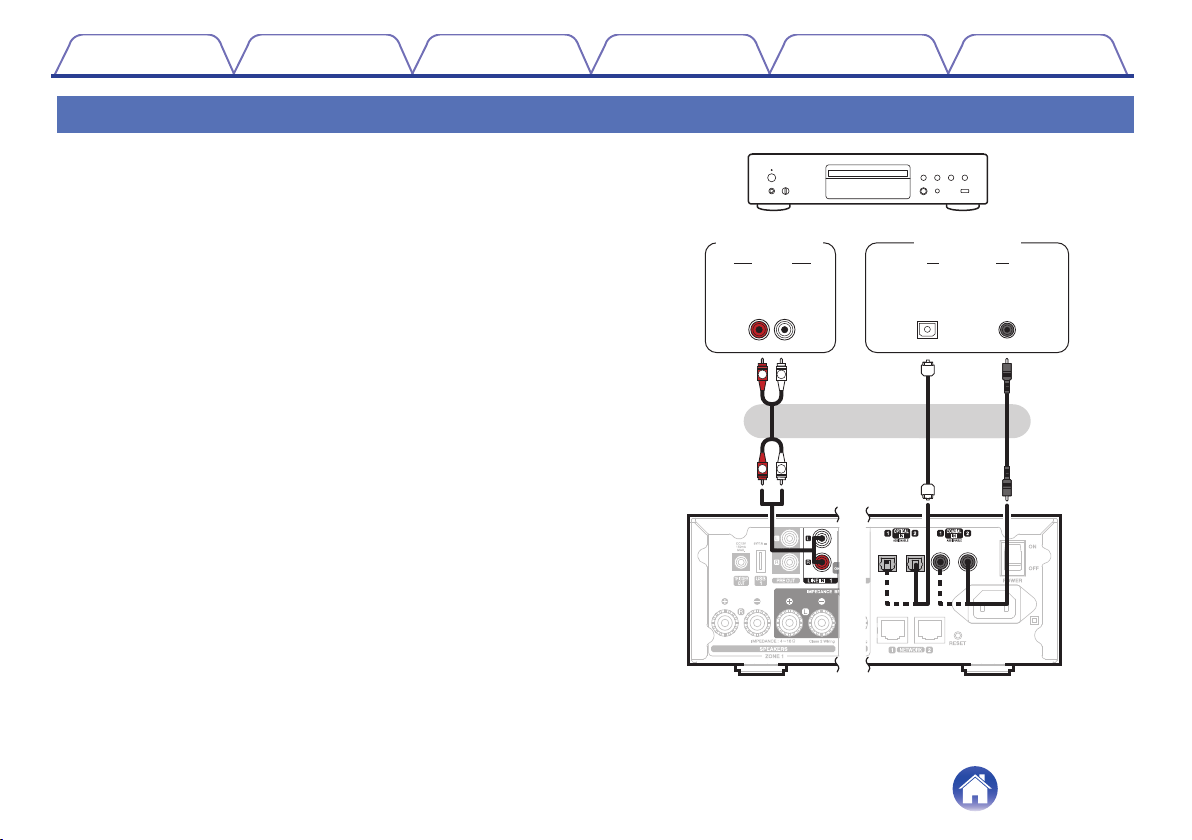
Connecting external devices (assignable)
Connecting an audio playback device
o
Connect the LINE IN, COAXIAL IN or OPTICAL IN input to an audio
playback device (CD player, portable music player, etc...) using the
appropriate cables.
.
18
Page 19
Router
Router
Contents Setup Use Troubleshooting Status LED Appendix
Daisy chain
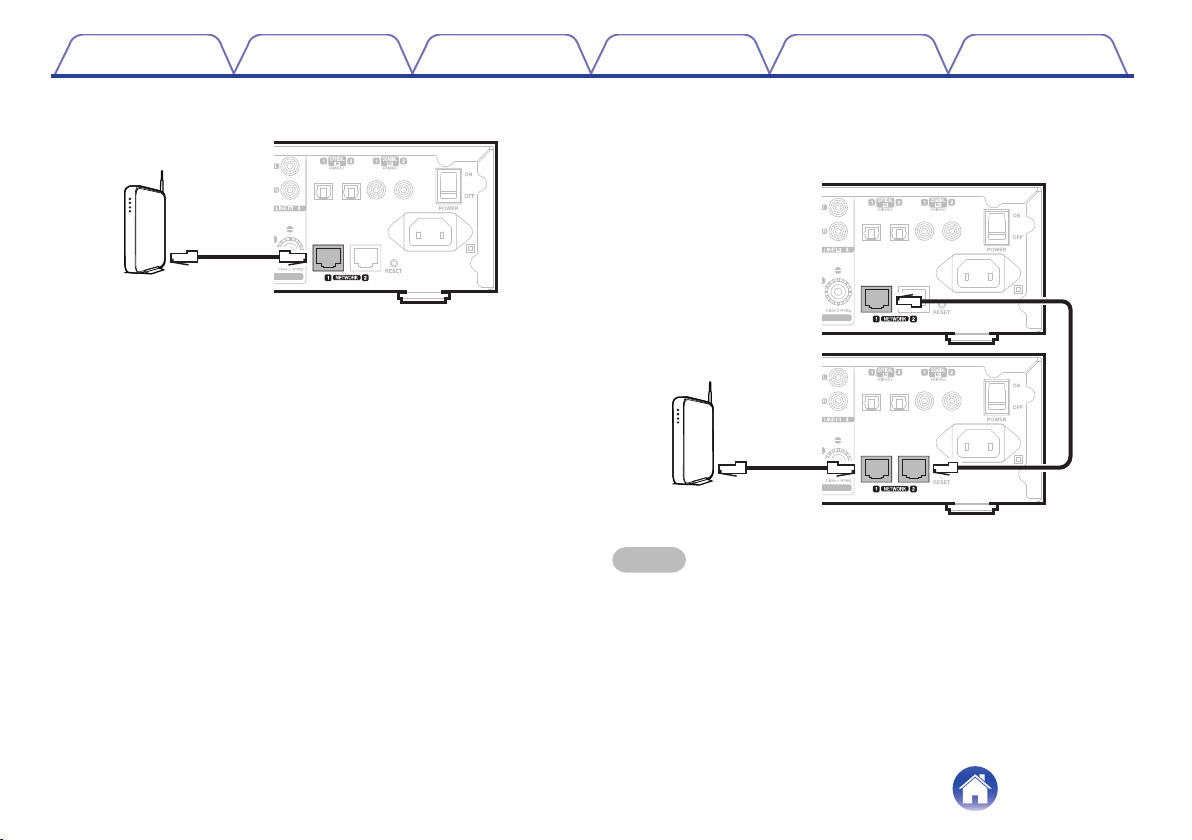
Connecting to network
o
.
n
You can use the second Ethernet connection to connect another
HEOS Drive to your network.
.
NOTE
Each HEOS Drive contains four HEOS modules and therefore always counts as
0
four devices towards the maximum number of 32 HEOS devices supported on any
one network. Up to 8 HEOS Drive units are supported on a single network.
19
Page 20
for UK
(AC 220 - 240 V, 50 Hz)
for Europe
(AC 220 - 240 V, 50/60 Hz)
for Australia
(AC 220 - 240 V, 50 Hz)
for North America
(AC 120 V, 60 Hz)
Contents
Setup Use Troubleshooting Status LED Appendix
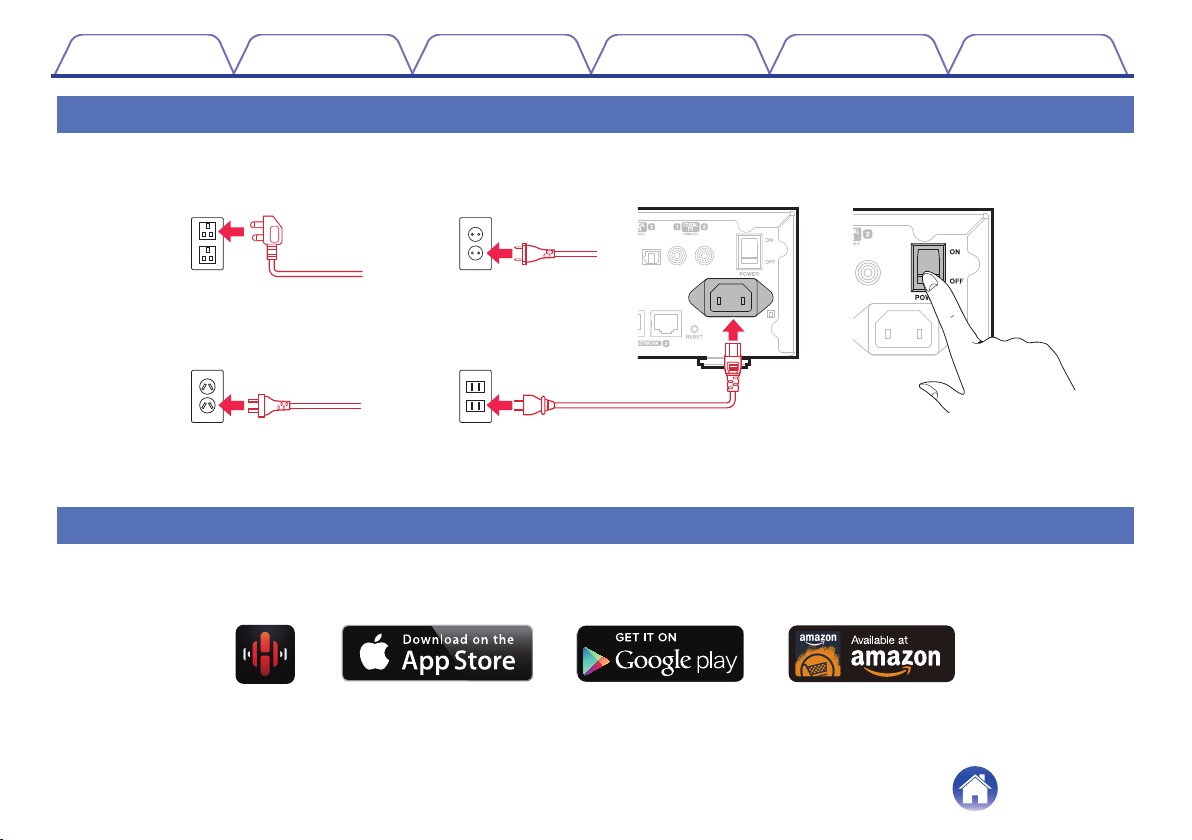
Powering your HEOS Drive
Connect the appropriate power cord for your region between the back of the HEOS Drive and a wall outlet and then switch the rear panel power switch to
the ON position.
.
Getting the HEOS app
The HEOS app is the heart of the HEOS experience. Using your mobile device and the HEOS app, you can setup, browse, explore, and control your
HEOS system right in the palm of your hand, from anywhere in your home.
Download the HEOS app for iOS or Android by searching App StoreSM, Google Play™ store or Amazon for “HEOS by Denon”.
For the purpose of improvement, the specifications and design are subject to change without notice.
.
20
Page 21
Contents Setup Use Troubleshooting Status LED Appendix
Setup
Adding more HEOS devices
The HEOS multi-room sound system is a true multi-room audio system that automatically synchronizes audio playback between multiple HEOS devices
so that the audio coming from different rooms is perfectly in sync and always sounds amazing! You can easily add up to 32 devices to your HEOS system.
NOTE
Each HEOS Drive contains four HEOS modules and therefore always counts as four devices towards the maximum number of 32 HEOS devices supported on any one
0
network. Up to 8 HEOS Drive devices are supported on a single network.
Adding wired HEOS devices
Just connect the HEOS devices to your home network using an Ethernet cable and the HEOS devices will appear on your HEOS app as a new room in
the “Rooms” screen.
At your convenience, you can assign a name to the HEOS devices to indicate which room you have it placed in.
Use only a shielded STP or ScTP LAN cable which is easily available at electronics stores (CAT-5 or greater recommended).
0
Do not connect a Network Connector directly to the LAN port/Ethernet connector on your computer.
0
21
Page 22
1
2
Music
Add Device
Settings
Music
Contents Setup Use Troubleshooting Status LED Appendix
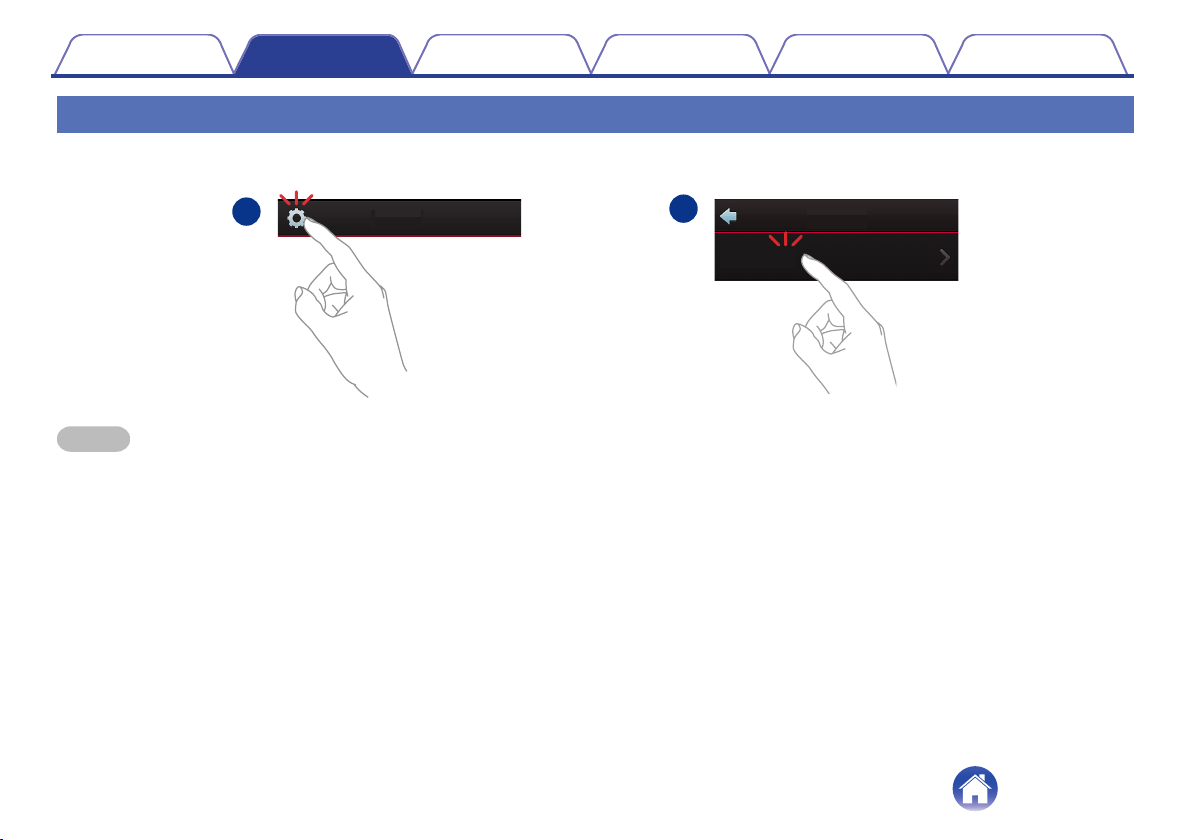
Adding wireless HEOS devices
You can add additional wireless HEOS devices to your HEOS system by selecting “Add Device” from the HEOS app’s settings menu and follow the
instructions:
.
NOTE
HEOS Drive can not be connected to a wireless network.
0
22
Page 23
1
2
3
Now PlayingMusicRooms
Song Name 5
Song Name 4
Song Name 3
Song Name 2
Song Name 1
Outside
Bedroom
Dining
Living
Kitchen
Drag one room into another to group them
Rooms
Contents
Setup Use Troubleshooting Status LED Appendix
Use
USING YOUR HEOS DRIVE
Once you have your HEOS Drive connected to your network and the HEOS app installed on your mobile device, it’s easy to start enjoying your favorite
music. You can listen to something different in every room or the same music perfectly synchronized in all rooms. It’s up to you!
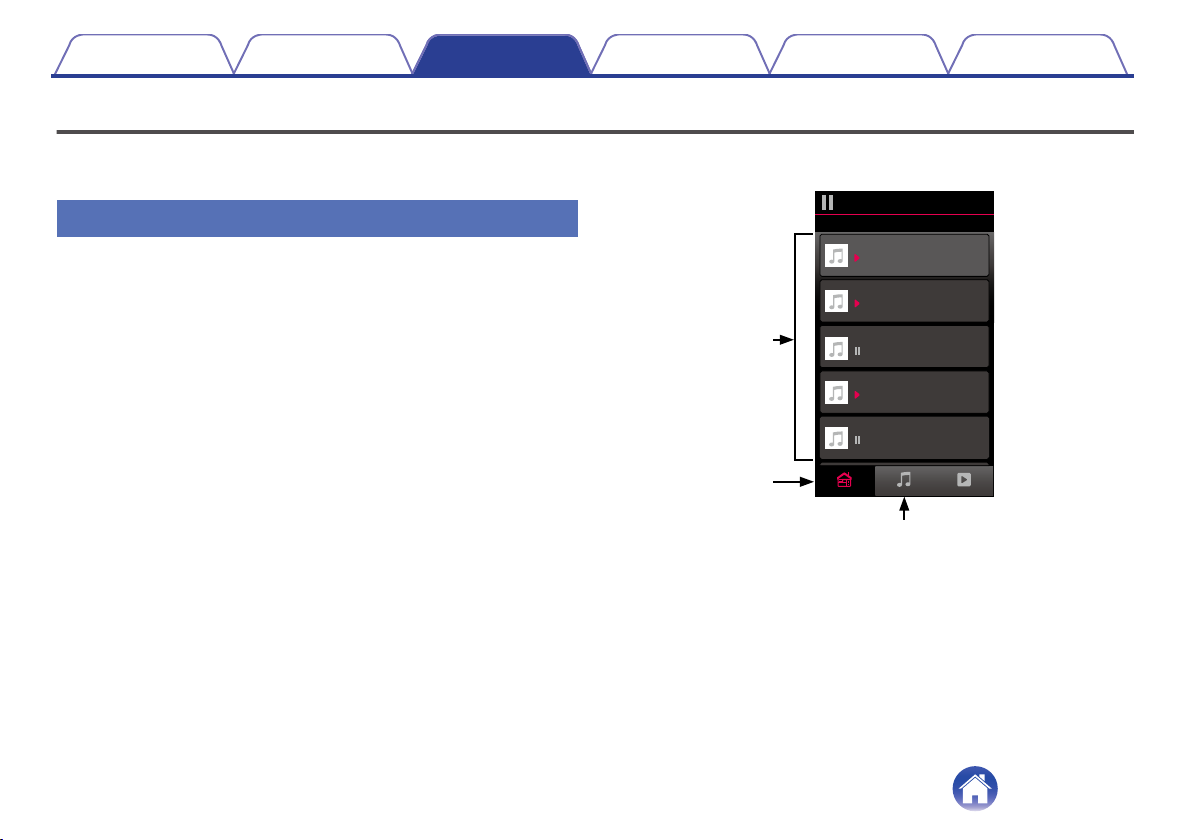
Selecting a room
If you have more than one HEOS Drive, you must tell the HEOS system
which one you want to control:
Tap the “Rooms” tab.
1
Select the Room you want to control.
2
Select the “Music” tab to select a music source or the
3
“Now Playing” tab to control what is currently playing
in the selected room.
.
23
Page 24
Audio signal
Audio signal
Contents
Setup Use Troubleshooting Status LED Appendix
Listening to radio
The HEOS system includes access to more than 100,000 free internet
radio streams from all corners of the globe via the TuneIn radio service.
Just select the TuneIn logo from the main “Music” menu and browse
among the 100,000 stations neatly organized into popular categories and
select a station that appeals to your mood.
NOTE
If you have a TuneIn account, you can sign into the TuneIn service under Settings Music Sources - TuneIn, and access all of your “My Favorites” TuneIn stations.
.
Playing music stored on your mobile
device
Tap the “Music” tab.
1
Select “This iPhone/iPod/iPad/Phone”.
2
Browse the local music on your phone and select
3
something to play.
.
24
Page 25
NAS
(Network Attached
PC Storage)
PC
Audio signal
Contents
Setup Use Troubleshooting Status LED Appendix
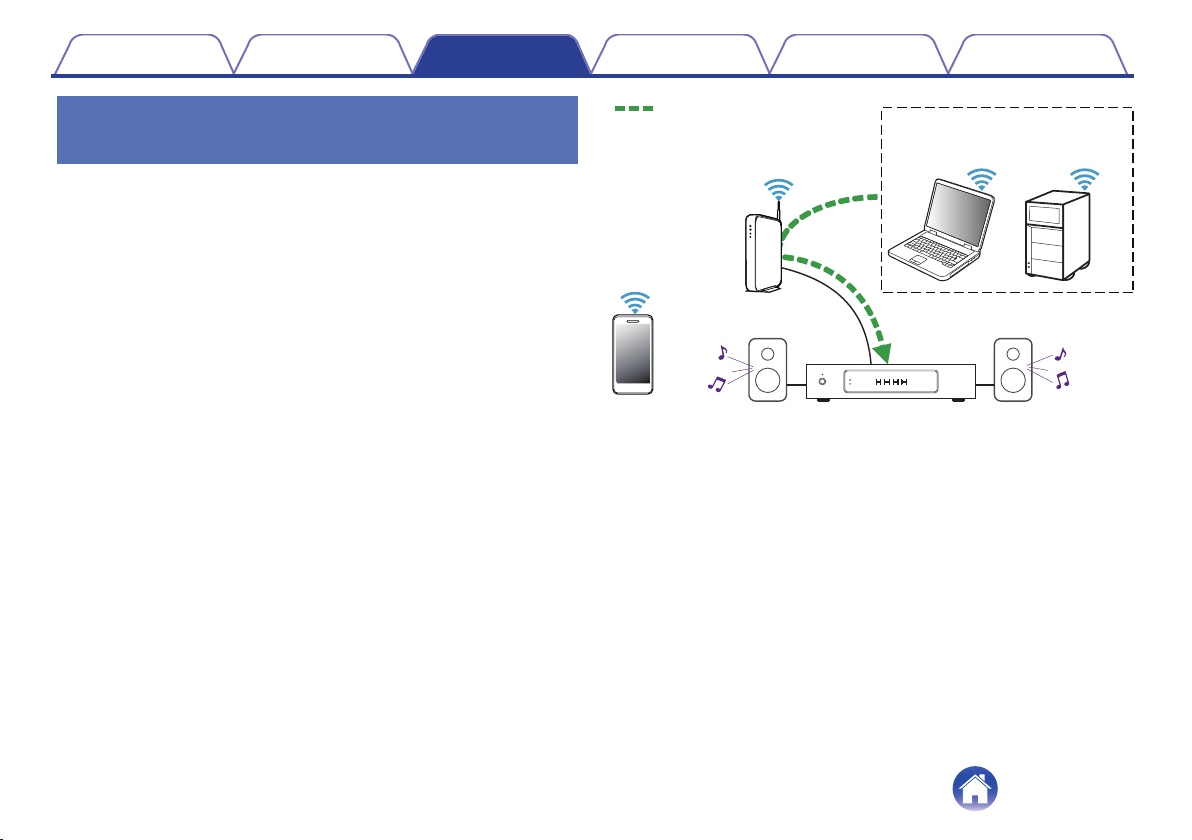
Playing music from your networked PC
or NAS
Select “Music Servers” from the “Music” tab.
1
Select the name of your networked PC or NAS (network
2
attached storage) server.
Browse the music on your PC/NAS and select
3
something to play.
.
25
Page 26
Audio signal
Contents
Setup Use Troubleshooting Status LED Appendix
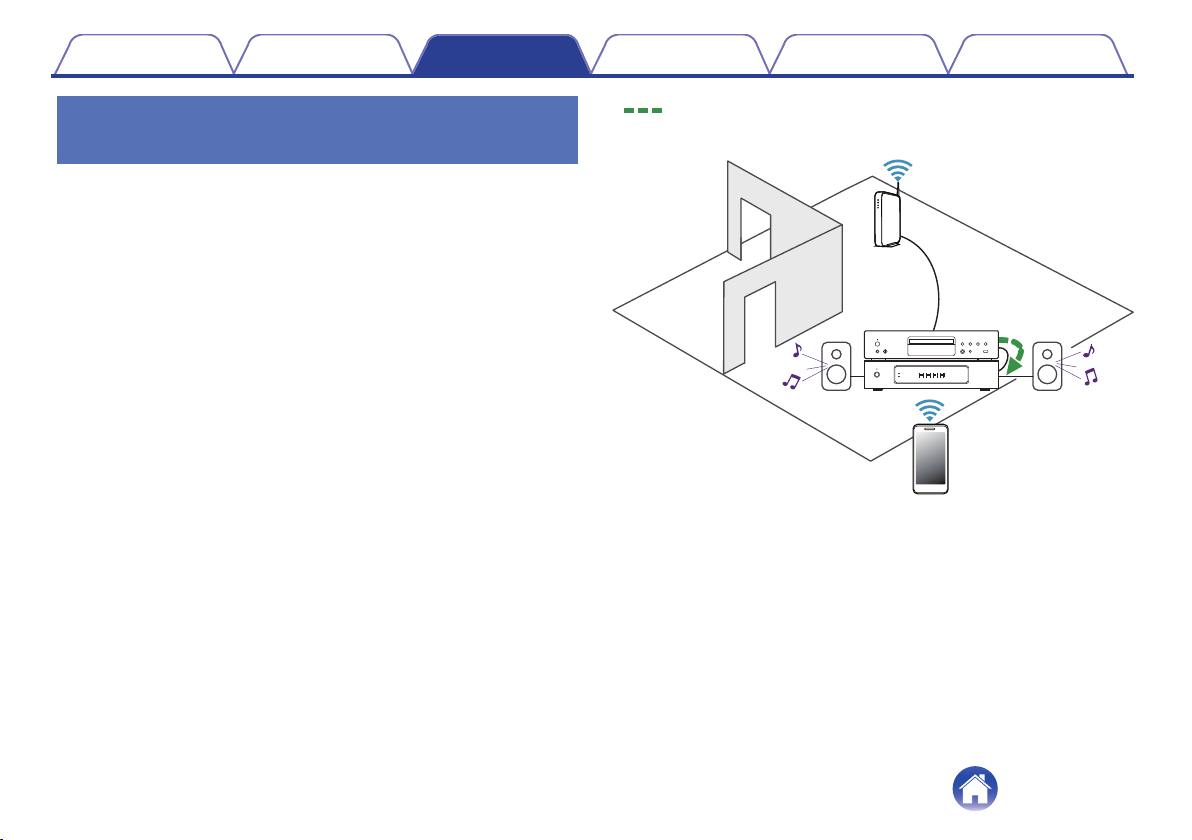
Playing music from an external audio
device
Connect an external audio device to the digital optical,
1
coaxial or analog RCA stereo input on the back of the
HEOS Drive.
Select “Inputs” from the Music tab.
2
Select the name of the HEOS Drive and which input to
3
which you connected the audio device in step 1.
Initiate playback on the audio device.
4
.
26
Page 27
Audio signal
Contents
Setup Use Troubleshooting Status LED Appendix
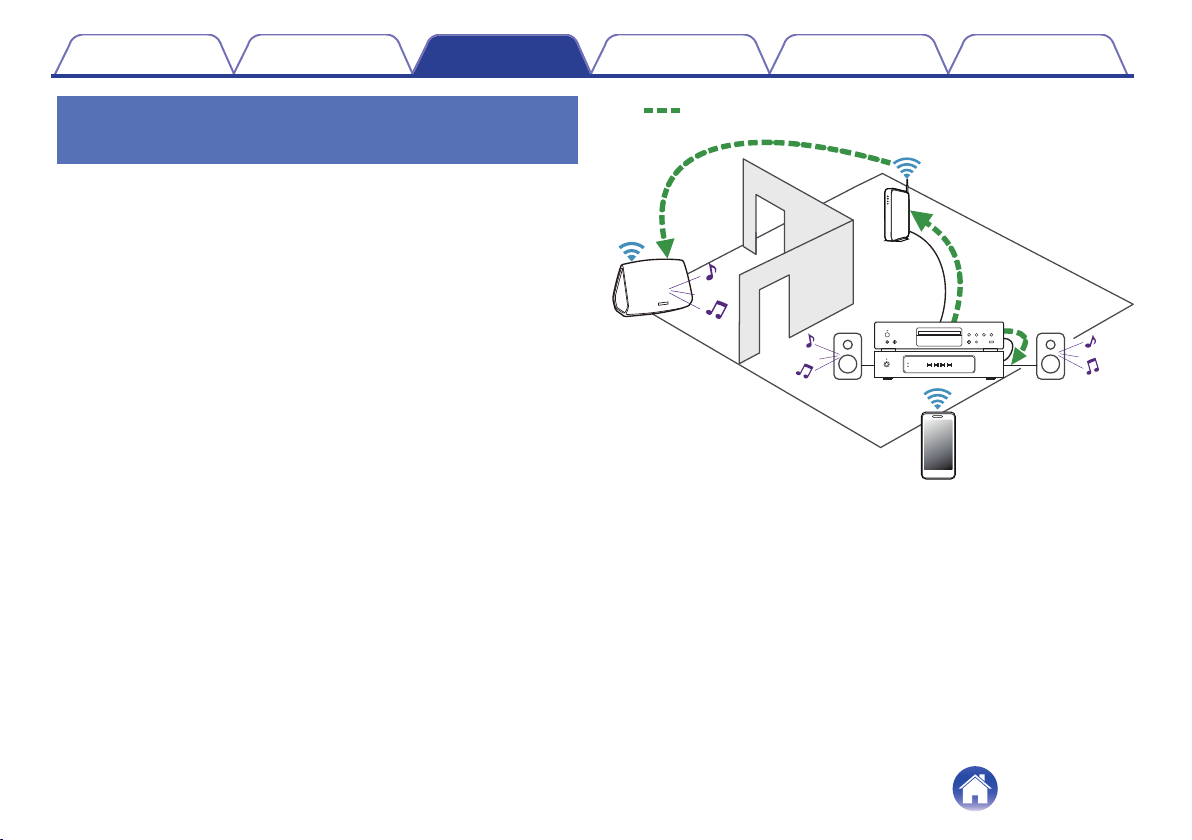
Streaming an external audio device to
any HEOS device
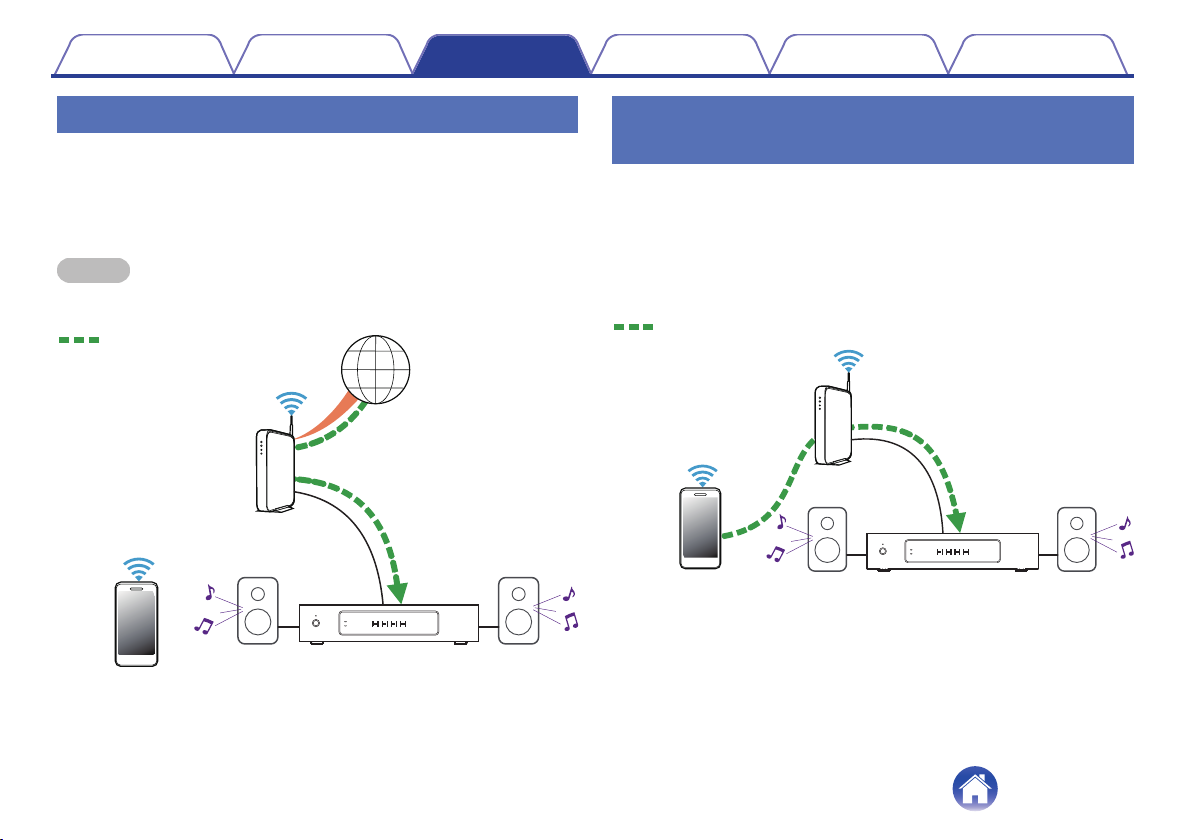
The sound from the audio device can be played directly on the selected
device or digitized and sent over your network to other HEOS devices.
Connect an external audio device to the digital optical,
1
coaxial or analog RCA stereo input on the back of the
HEOS Drive.
Select “Inputs” from the Music tab.
2
Select the name of the HEOS Drive and which input to
3
which you connected the audio device in step 1.
Initiate playback on the audio device.
4
.
27
Page 28
Audio signal
Contents
Setup Use Troubleshooting Status LED Appendix
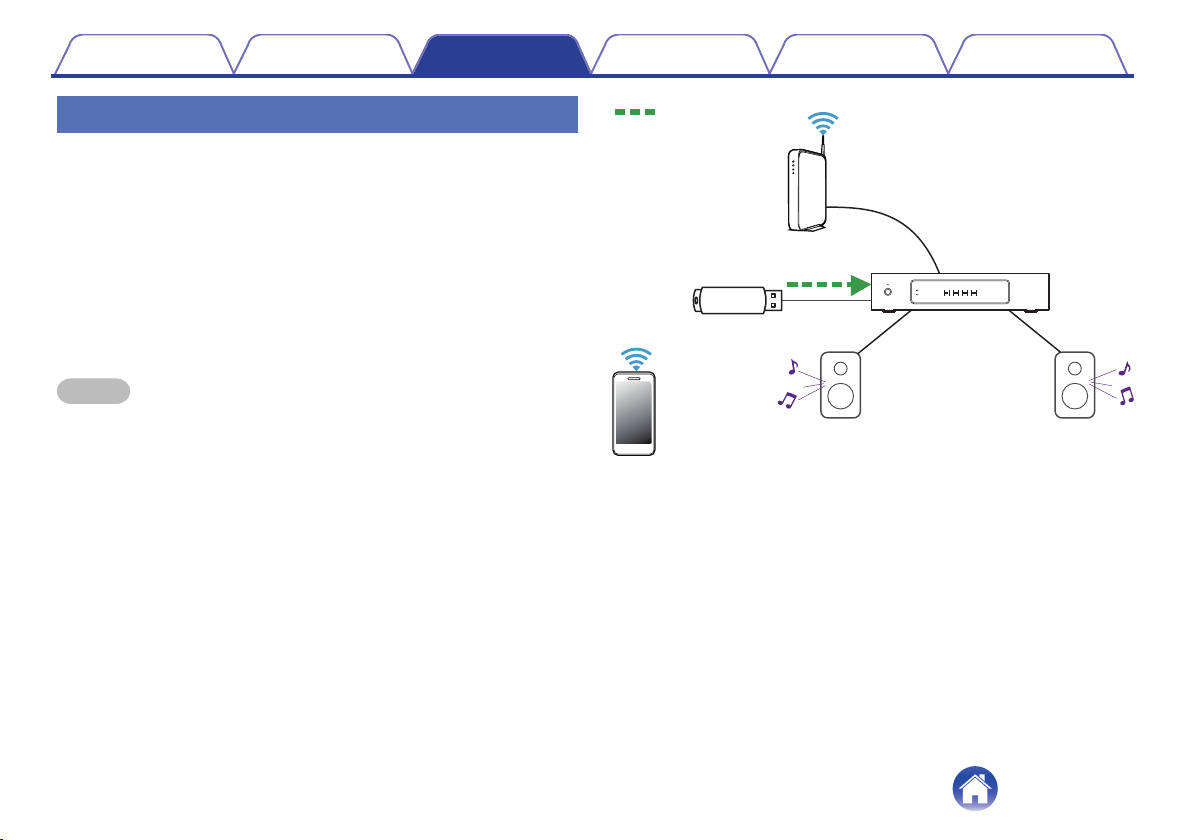
Playing music from a USB device
Insert a FAT32 formatted USB device into the USB port
1
on the back of the HEOS Drive.
Select “USB Music” from the “Music” tab.
2
Select the name of the HEOS Drive and which input to
3
which you connected the audio device in step 1.
Browse the music on your USB device and select
4
something to play.
NOTE
It may take several minutes for the name of your HEOS Drive to appear in the
0
“USB Music” list if you have a large number of files on your USB device.
It is not possible to connect and use a computer via the USB port of this unit using
0
a USB cable.
.
28
Page 29
Contents Setup Use Troubleshooting Status LED Appendix
Changing your HEOS account
HEOS account
What is a HEOS account?
o
A HEOS account is master account or “keychain” for managing all of
your HEOS music services with one single username and password.
o
Tap the “Music” tab.
1
Select the Settings a icon in the upper left corner of
2
the screen.
Why do I need a HEOS account?
o
With the HEOS account you just have to enter your music services
login names and passwords one time. This allows you to easily and
quickly use multiple controller apps on different devices. You just log
into your HEOS account on any device and you will have access to all
of your associated music services, play history and custom playlists,
even if you are at a friend’s house listening to music on their HEOS
system.
Signing up for a HEOS account
o
You will be instructed to signup for a HEOS account the first time you
try to access any music service from the main “Music” menu of the
HEOS app.
29
Select “HEOS Account”.
3
Change your location, change your password, delete
4
your account or sign out of your account.
Page 30
Contents Setup Use Troubleshooting Status LED Appendix
Changing music service settings
Playing from streaming music services
A music service is an online music company that provides access to vast
music collections via free and/or paid subscriptions. Depending upon your
geographical location, there are several options to choose from. For more
information about which services are available in your area please visit
HEOSbyDenon.com
Adding a music service
o
Once you’ve setup your HEOS account, you can add supported music
services to your HEOS system by tapping on the music service logo in
the “Music” tab.
Follow the instructions on the screen to add your username and
password for the selected music service. You only have to enter your
account information once as the HEOS account service will securely
remember your login information so you don’t have to enter it each
time you want to play music from the music service.
Additional music services may be available under Settings - Music
Services.
o
Tap the “Music” tab.
1
Select the Settings a icon in the upper left corner of
2
the screen.
Select “Music Sources”.
3
Select “Online Music”.
4
Select the name of the online music service you want
5
to edit.
Sign out, then sign in again to associate your
6
username and password with your HEOS account.
Select “Hide for Now” to prevent the service logo from
7
appearing on the main “Music” menu.
30
Page 31
Contents Setup Use Troubleshooting Status LED Appendix
Changing the name of the inputs
Managing inputs
If you connected external audio source components (like CD players,
portable music players, Cable Boxes, etc...) to any of your HEOS devices
inputs, you can rename the default input names to describe the actual
source or hide any inputs that are not being used.
Select the Settings a icon located in the upper left
1
corner of the main “Music” menu to display the
Settings menu.
o
Select the name of the input you want to edit.
1
Select "Name".
2
Select or enter a new name to describe the source that
3
you connected.
Select the Save button to save your changes.
4
Select “Music Sources”.
2
Select “Inputs”.
3
Select the HEOS devices which you connect your
4
external audio source device to.
Hiding an input
o
Select the name of the input you want to edit.
1
Toggle “Hide Input” to ON to prevent this input from
2
appearing under the Inputs tile on the main “Music”
menu.
31
Page 32
Contents Setup Use Troubleshooting Status LED Appendix
Managing your phone
Your smartphone or tablet can be hidden if it does not need to be in the
“Music Sources” menu.
Select the Settings a icon located in the upper left
1
corner of the main “Music” menu to display the
Settings menu.
Select “Music Sources”.
2
Select “This iPhone/iPod/iPad/Phone”.
3
Toggle “This iPhone/iPod/iPad/Phone” to OFF to
4
prevent the service logo from appearing on the main
“Music” menu.
32
Page 33
1
3
2
4
Now PlayingMusicRooms
Song Name 1
Dining
Kitchen
Drag one room into another to group them
Rooms
Now PlayingMusicRooms
Song Name 3
Song Name 3
Song Name 2
Song Name 2
Song Name 1
Bedroom
Bedroom
Dining
Living
Kitchen
Drag one room into another to group them
Rooms
Living
Drag a room out of this group to ungroup it
Living+Kitchen
Contents
Setup Use Troubleshooting Status LED Appendix
Listening to the same music in multiple
rooms
The HEOS system is a true multiroom audio system that automatically
synchronizes audio playback between multiple devices so that the audio
coming from different rooms is perfectly in sync and always sounds
amazing!
You can easily add up to 32 devices to your HEOS system.
You can join or group up to 16 individual HEOS devices into a group of
HEOS devices that function as if they were a single HEOS device.
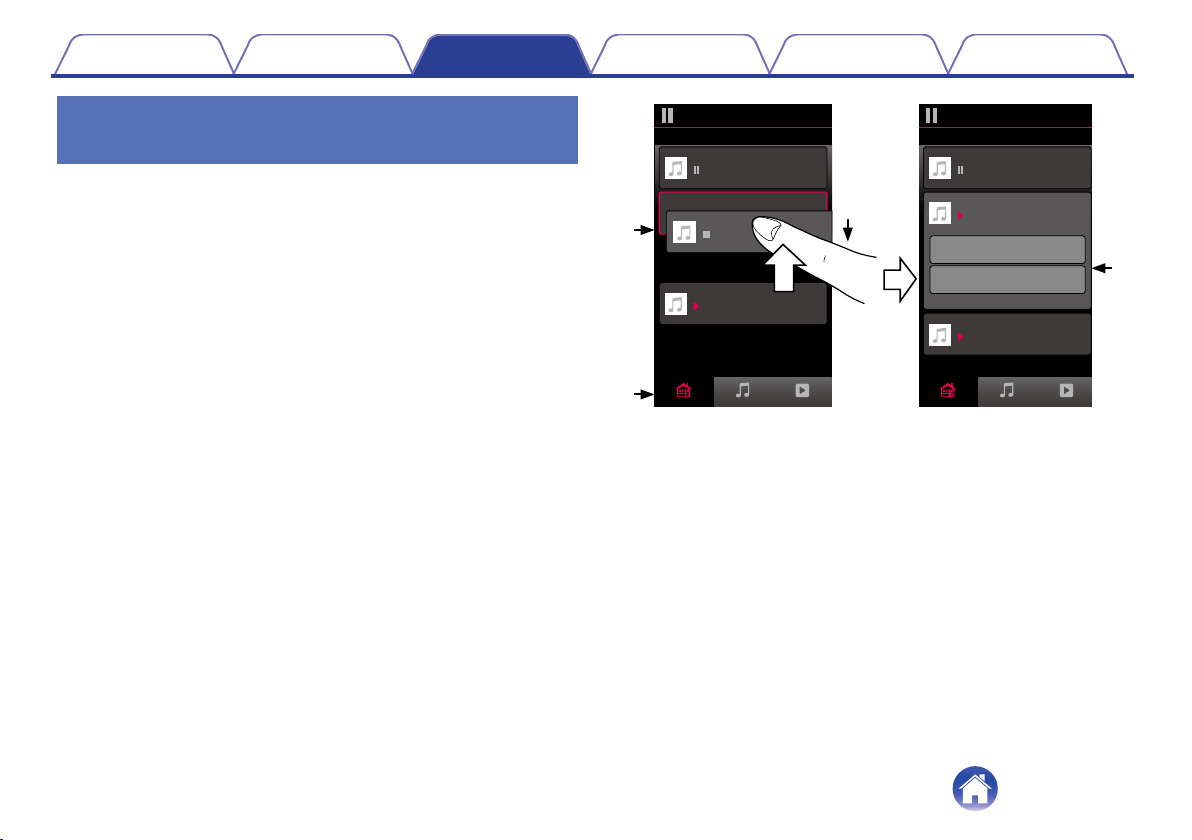
Grouping rooms
o
Tap the “Rooms” tab.
1
Press and hold your finger on room that is not playing
2
music.
Drag it into the room that is playing music (indicated by
3
the red outline) and lift your finger.
4
The two rooms will be grouped together into a single
device group and both rooms will be playing the same
music in perfect sync.
.
33
Page 34
1
3
2
4
Now PlayingMusicRooms
Song Name 3
Song Name 2
Song Name 1
Bedroom
Dining
Living
Kitchen
Drag one room into another to group them
Rooms
Now PlayingMusicRooms
Song Name 4
Song Name 3
Song Name 2
Song Name 1
Bedroom
Dining
Living
Kitchen
Drag one room into another to group them
Rooms
Living
Contents
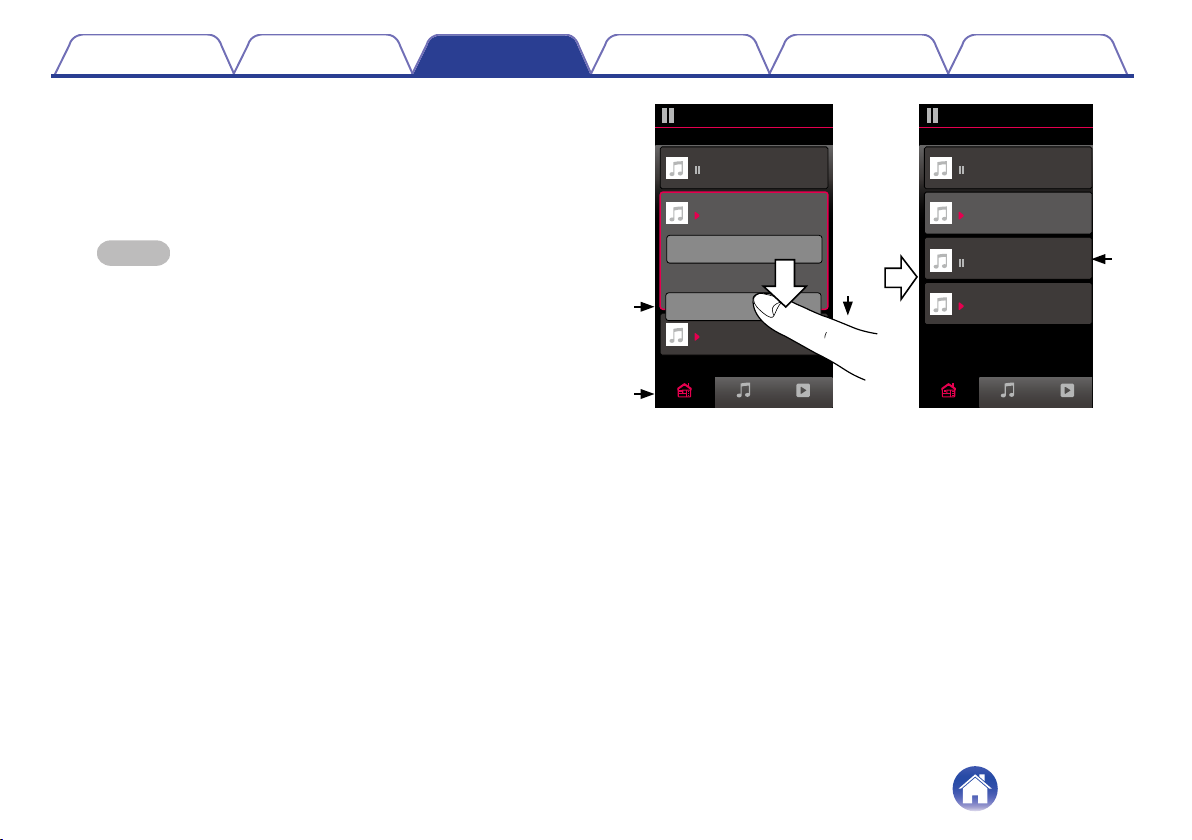
Ungrouping rooms
o
Tap the “Rooms” tab.
1
Press and hold your finger on room that you want to
2
remove from the group.
Setup Use Troubleshooting Status LED Appendix
NOTE
You can not remove the first room that started playing the music before
0
grouping.
Drag it out of the group and lift your finger.
3
Music will stop playing in the room you dragged out of
4
the group but will continue playing in any remaining
rooms.
.
34
Page 35
1
2
3
4
Now PlayingMusicRooms
Song Name 1
Bedroom
Dining
Kitchen
Drag one room into another to group them
Rooms
Now PlayingMusicRooms
Song Name 4
Song Name 3
Song Name 2
Song Name 1
Bedroom
Dining
Living
Kitchen
Drag one room into another to group them
Rooms
Living
Drag a room out of this group to ungroup it
Dining+Living+...
Contents
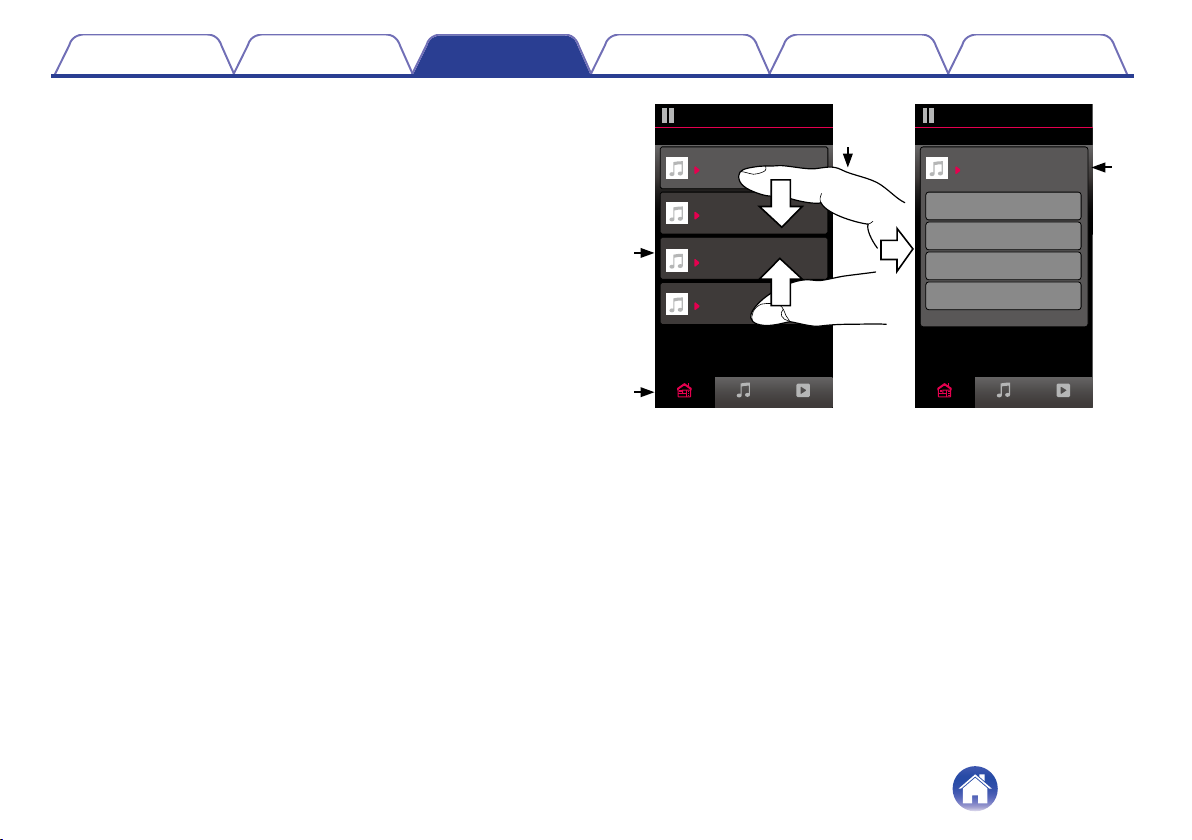
Grouping all rooms (party mode)
o
You can easily group the eight rooms together into Party Mode by
using a “pinch” gesture.
Tap the “Rooms” tab.
1
Place two fingers on the screen over the list of rooms.
2
Quickly pinch your two fingers together and release.
3
All of your rooms will be joined together and begin
4
playing the same music in perfect sync.
Setup Use Troubleshooting Status LED Appendix
.
35
Page 36
1
2
3
4
Now PlayingMusicRooms
Song Name 1
Bedroom
Dining
Dining
Kitchen
Drag one room into another to group them
Rooms
Now PlayingMusicRooms
Song Name 4
Song Name 3
Song Name 2
Song Name 1
Bedroom
Dining
Living
Kitchen
Drag one room into another to group them
Rooms
Living
Drag a room out of this group to ungroup it
Contents
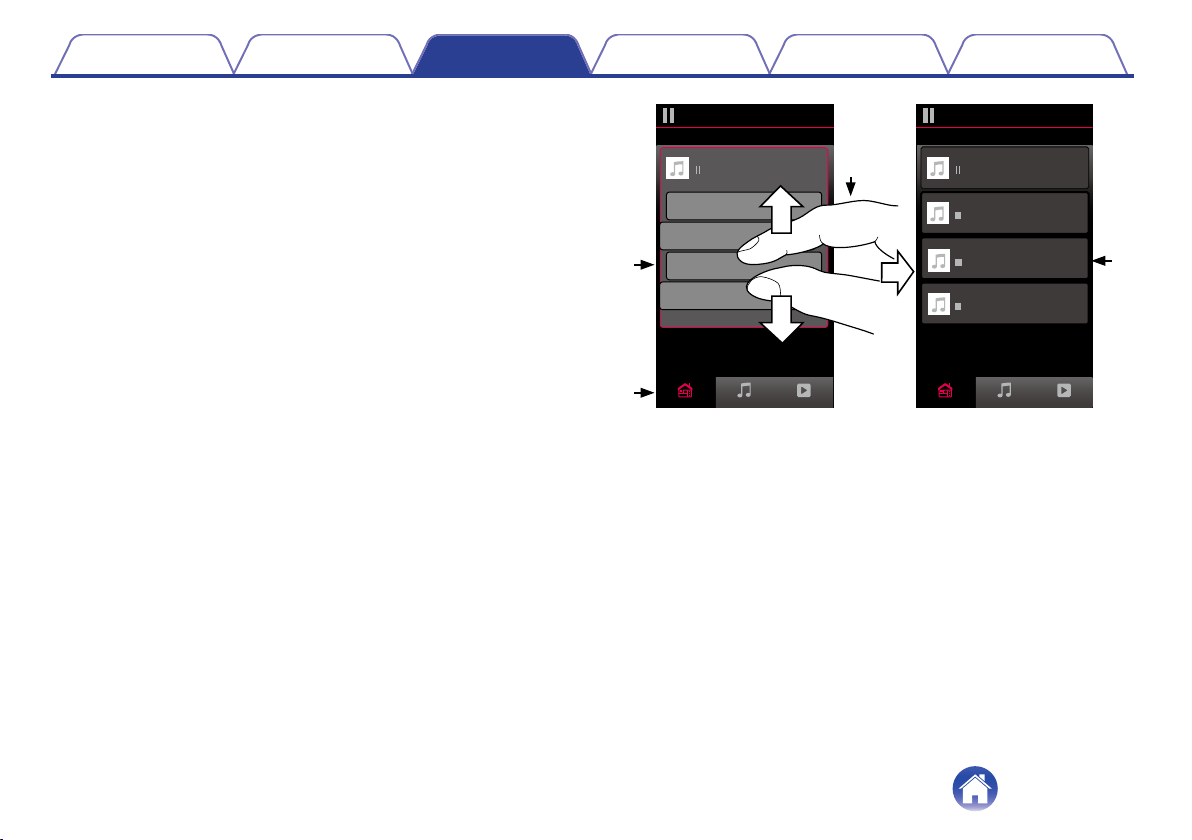
Ungrouping all rooms
o
You can easily ungroup all of your rooms and exit Party Mode by using
a “spread” gesture.
Tap the “Rooms” tab.
1
Place two fingers close together on the screen over list
2
of rooms.
Quickly spread your two fingers apart from each other
3
and release.
All of your rooms will be ungrouped and music will
4
stop playing in every room (except the original
Setup Use Troubleshooting Status LED Appendix
“master” room that was playing before you grouped
the rooms together).
.
36
Page 37
Play AIbum
Track 6
6
0:20
Play Now
MusicRooms Now Playing
Cancel
Play Now & Replace Queue
Play Next
Add to End of Queue
Track 1
1
Track 2
2
Track 1
HEOS Device
Album
0:20
0:20
1
Track 2
2
Track 3
3
Track 4
4
Track 5
5
HEOS Device
0:19
0:20
0:20
0:20
0:20
MusicRooms Now Playing
Track 1
Album
HEOS Device
MusicRooms Now Playing
e r t
w
y
q
Contents
Setup Use Troubleshooting Status LED Appendix
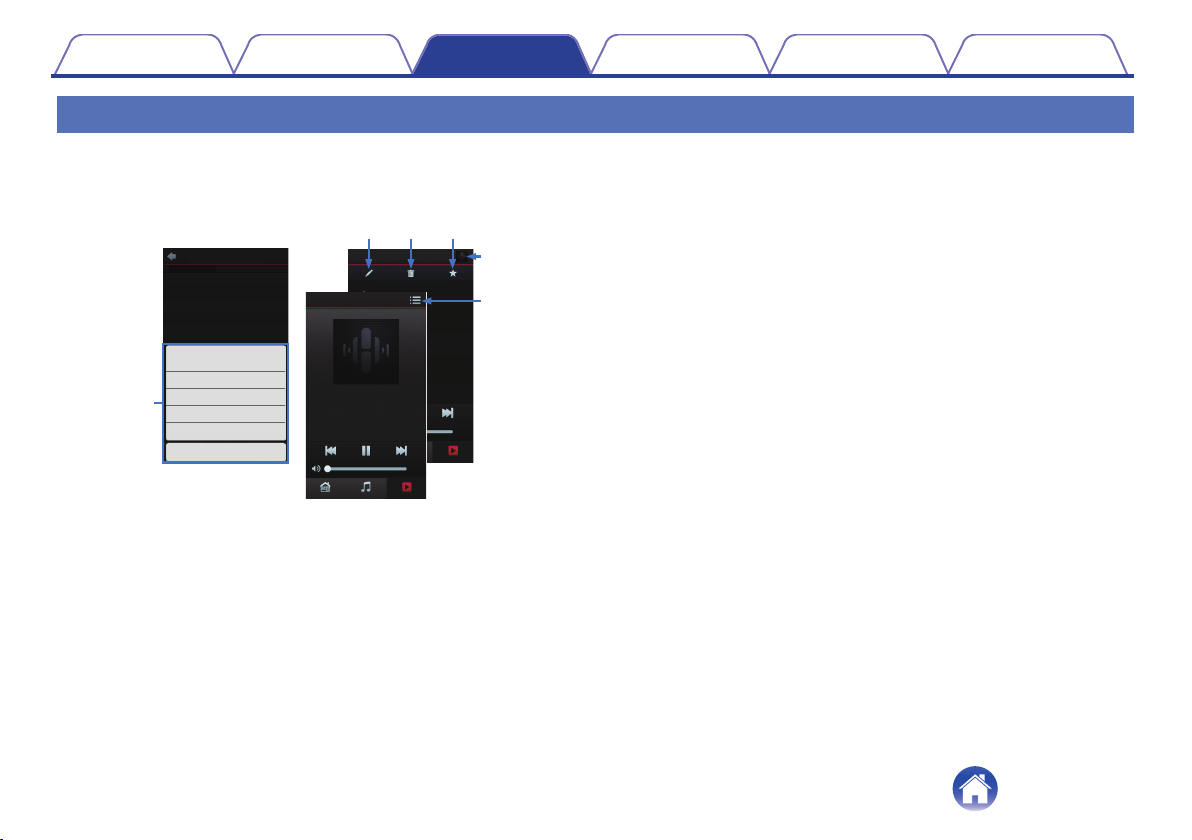
Using the now playing queue
HEOS uses a Now Playing “Queue” to line up music that you want to listen to. Music can be selected from any of your local or online music sources (as
long as they are not preprogrammed “radio” or “station” type streams). This feature works similarly to how a jukebox works. You select something to play
(a song, album, playlist or even your entire music collection) and add it to the “Queue”. When you select something to play you will be asked how you want
to queue up your music.
Play Now
o
Inserts the item into the queue after the currently playing track and
plays the selected item immediately.
Play Now & Replace Queue
o
Clears the queue and plays the selected item immediately.
Play Next
o
Inserts the item into the queue after the current song and plays it when
the current song ends.
Add to End of Queue
o
Adds the item to the end of the queue.
37
.
Queue Menu
A
When you select something to play you will be asked how you want to
queue up your music.
Queue icon
B
Pencil icon
C
Delete icon
D
Save icon
E
F
Cover art or HEOS icon
You can return to the “Now Playing” screen display by tapping the
cover art or the HEOS icon.
Page 38
Contents Setup Use Troubleshooting Status LED Appendix
Rearranging the now playing queue
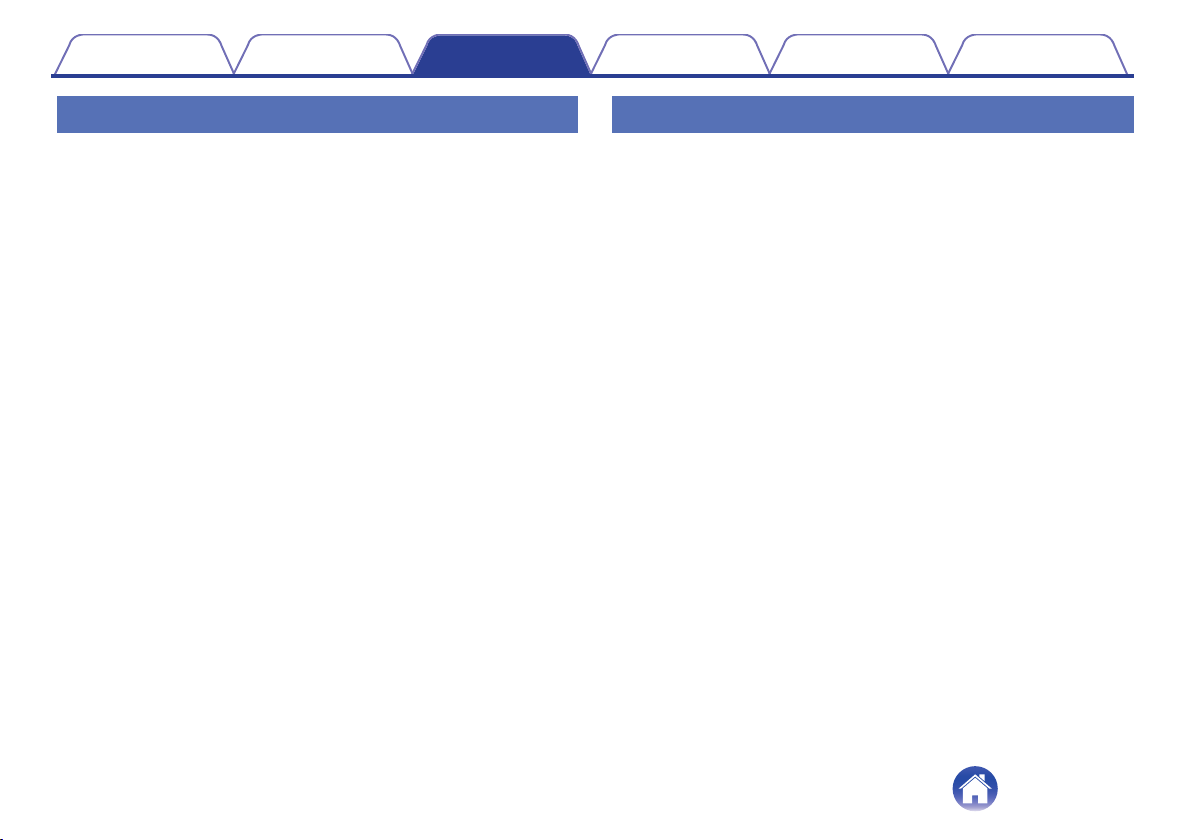
Once you have songs lined up in your queue, you might want to rearrange
the order or remove some songs:
Tap the “Now Playing” tab.
1
Tap the Queue d icon in the upper right corner of the
2
screen.
Tap the Pencil e icon to enter Edit mode.
3
Rearrange the order of your queue by dragging the list
4
f icon (on the right side of each track row) up or
down.
Deleting songs from the play queue
You can remove songs one at a time from the Now Playing Queue:
Tap the “Now Playing” tab.
1
Tap the Queue d icon in the upper right corner of the
2
screen.
Tap the Pencil e icon to enter Edit mode.
3
Tap the track(s) that you want to delete.
4
Tap the Delete g icon to delete all of the selected
5
tracks from the play queue.
38
Page 39
Contents Setup Use Troubleshooting Status LED Appendix
Deleting all songs from the play queue
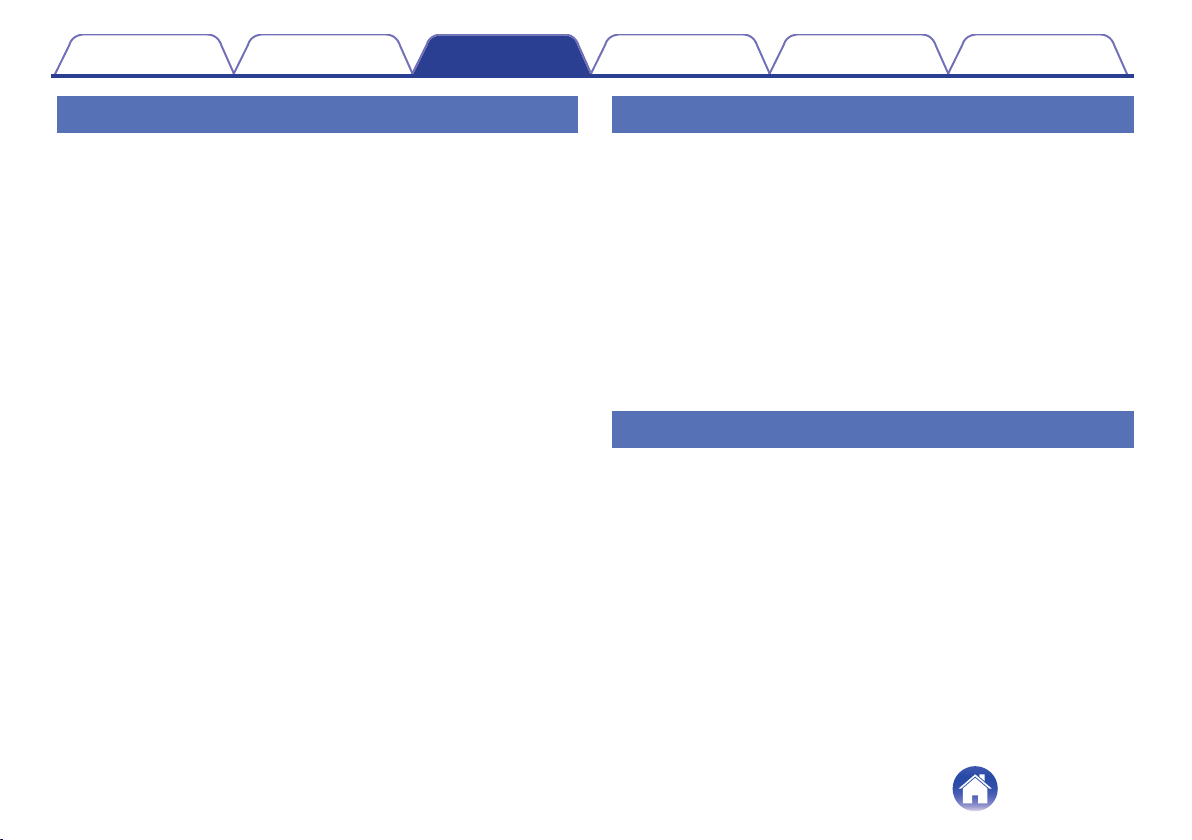
You can remove all of the songs from the Now Playing Queue:
Tap the “Now Playing” tab.
1
Tap the Queue d icon in the upper right corner of the
2
screen.
Tap the Delete g icon to confirm that you want to
3
delete all songs from the queue.
Saving playlists
You can save the Now Playing Queue as a HEOS Playlist that you can
recall later. The new playlist will be available from the Playlists button on
the “Music” tab on every controller app connected to your HEOS system.
Tap the “Now Playing” tab.
1
Tap the Queue d icon in the upper right corner of the
2
screen.
Tap on the Save h icon.
3
Enter a name for your Playlist and tap the Save icon.
4
Performing repeat and shuffle playback
The playback controls are visible on the “Now Playing” screen.
Tap the “Now Playing” tab.
1
Tap the cover art to reveal the repeat b and shuffle c
2
controls.
39
Page 40
Contents Setup Use Troubleshooting Status LED Appendix
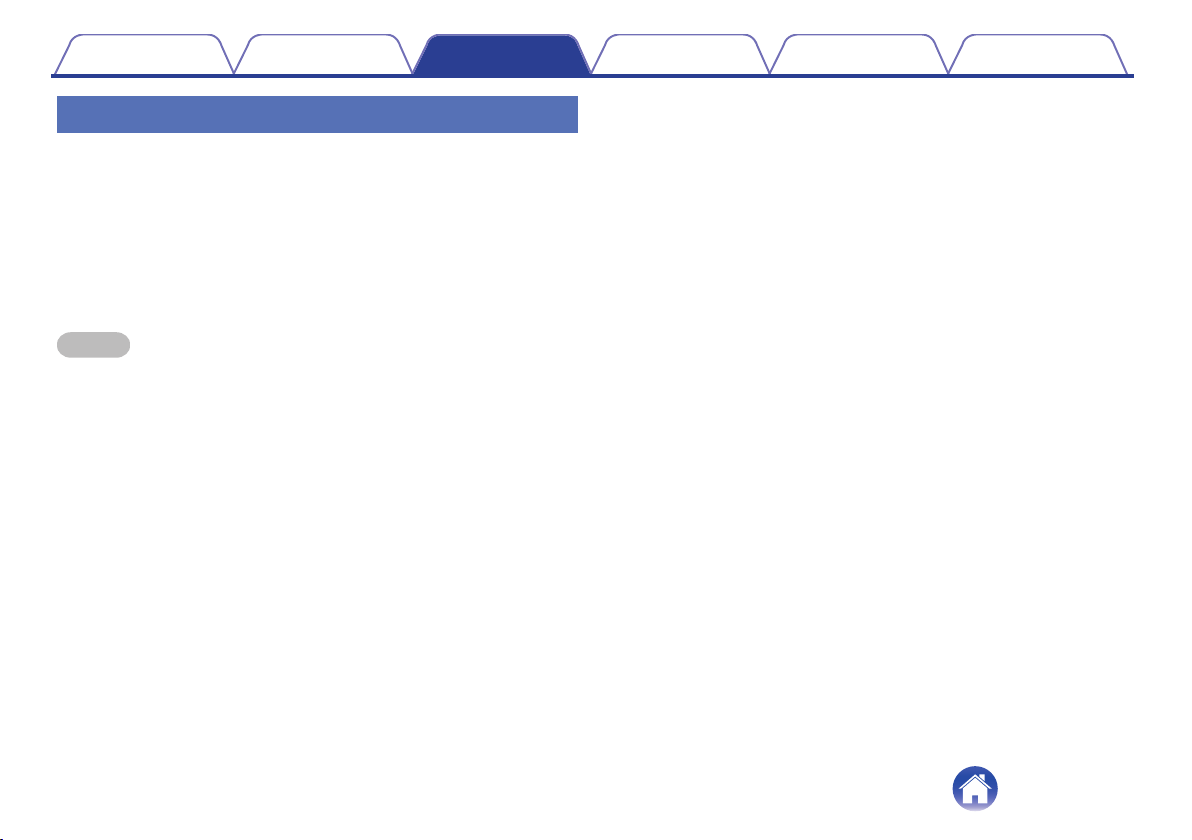
Deleting station from the HEOS favorite
Using the favorite
HEOS uses a "HEOS Favorite" to line up station you want to start play
quickly the favorite stations.
Station can be selected from online music sources such as "Radio" or
"Station" type streams. "HEOS Favorite" will display a list of the stations of
various services.
Adding to HEOS favorite
o
Select a station of an online music source. When the action menu
screen is displayed, select "Add station to HEOS favorite".
NOTE
This can also be done by selecting "Add station to HEOS favorite" from the station
0
menu of the station being played.
o
Tap the “Music” tab.
1
Select "Favorite".
2
Tap the Pencil e icon to enter Edit mode.
3
Tap the "Delete" that you want to delete station.
4
40
Page 41
Contents Setup Use Troubleshooting Status LED Appendix
Making adjustments
You can adjust specific settings for each of your HEOS Drives in your
system:
Select the Settings a icon located in the upper left
1
corner of the main “Music” menu to display the
Settings menu.
Select “My Devices” to display a list of your devices.
2
Select the HEOS Drive and the Zone you want to adjust.
3
Changing the name of a HEOS Drive
Select “Name”.
1
Select or enter a new name for your HEOS Drive.
2
Tap the “Next” to save your changes.
3
Changing the name of a zone
Select “Name”.
1
Select or enter a new name for your HEOS Drive.
2
Tap the “Next” to save your changes.
3
41
Page 42
Contents Setup Use Troubleshooting Status LED Appendix
Adjusting the equalizer
Select “EQ”.
1
Adjust the Treble or Bass up or down.
2
Select the Reset button to restore the default settings.
0
Adjusting the balance
Select “Balance”.
1
Adjust the Balance to the left or right.
2
Adjusting the output mode
Select “Output Mode”.
1
Select Stereo or Dual Mono.
2
Adjusting the audio quality
Selects the transcoding option for rebroadcasting audio from one HEOS
device to another HEOS device (or group of devices) across the network.
When set to “Normal”, high bit rate audio sources originating from the first
device (such as AUX input, WAV, FLAC and PCM) will be transcoded to
ensure the highest level of reliability for the audio stream.
Select “Quality”.
1
Select Normal (default) or High.
2
If you have selected High and you experience audio dropouts when streaming
0
sources from one device to other devices, please select Normal (default).
42
Page 43
Contents Setup Use Troubleshooting Status LED Appendix
Adjusting the volume limit
You can set the maximum volume of the HEOS Drive amplifiers to prevent
sudden loud volume.
Select “Volume Limit”.
1
Select the maximum volume percentage (95, 90, 85,
2
80).
NOTE
Depending on the speakers that are connected, the protection circuit may activate
0
and the power may be turned off when music is played at a high volume. (The
Power indicator flashes in red.) If this happens, configure the “Volume Limit”
setting.
Adjusting the preamp out
ZONE2 and ZONE 4 “Volume limit” will change to “Preamp Out”, when you
set the Bridge switch to “ON”.
Select “Preamp Out”.
1
Select Disabled or Enabled.
2
Disabled
(Default):
Enabled:
PRE OUT is disabled and does not appeared
in Rooms view.
PRE OUT is enabled and Zone Name
appeared in Rooms view.
Adjusting the high pass filter
Set the High Pass Filter to limit the low frequency signal being sent to your
speakers.
Select “High Pass Filter”.
1
Select the frequency cutoff point:
2
40 Hz / 80 Hz / 90 Hz / 100 Hz / 110 Hz / 120 Hz / 150 Hz / 200
Hz / 250 Hz
If you enable the IP control, “High Pass Filter” will be disappeared and forced to
change.
43
Page 44
Contents Setup Use Troubleshooting Status LED Appendix
Using a subwoofer
Select “Subwoofer”.
1
Enable the Sub Out (L) setting.
2
If you enable the IP control, “Subwoofer” will be disappeared and forced to change.
Adjusting the low pass filter
When Subwoofer is set to on, you can limit the high frequency signal being
sent to your subwoofer.
Select “Subwoofer”.
1
Select “Low Pass Filter”.
2
Set the frequency cutoff point.
3
40 Hz / 60 Hz / 80 Hz / 90 Hz / 100 Hz / 110 Hz / 120 Hz
Adjusting the line out
Select “Line Out Level”.
1
Select Fixed to lock the volume at the optimal level or
2
select Variable to control the volume from the Now
Playing screen.
If you enable the IP control, “Line Out Level” will be disappeared and forced to
change.
Adjusting the status light brightness
Select “Status Light”.
1
Adjust the brightness up or down or set the slider to
2
the OFF position to completely disable the status light.
44
Page 45
Contents Setup Use Troubleshooting Status LED Appendix
Firmware upgrade
Advanced settings
Caution
Adjusting these settings may disconnect your device from your network
0
and possibly render your device unusable. Do not use these features
unless you are comfortable making advanced adjustments.
Network settings
o
Select “Advanced”.
1
Select “NETWORK SETTINGS” tab.
2
a. Manual or static IP address for your device
b. Deep Standby (v p. 51)
Select Save Settings to apply the new settings or
3
Cancel Changes to revert to the previous settings.
NOTE
“Deep Standby” needs to be set in all four zones to enable this setting.
0
o
Select “Advanced”.
1
Select “FIRMWARE UPGRADE” tab.
2
Update status
n
Follow the instructions on screen to install any available updates to
your HEOS system.
Manually check for a firmware upgrade.
Allow updates
n
ON: Allows updates
OFF: Does not allow updates
Select Save Settings to apply the new settings or
3
Cancel Changes to revert to the previous settings.
45
Page 46

Contents Setup Use Troubleshooting Status LED Appendix
About
o
Viewing technical details about the HEOS device.
Select “Advanced”.
1
Select “ABOUT” tab.
2
Scroll down to see information about the device’s
3
a. Hardware
b. Software
c. Device
46
Page 47
Contents Setup Use Troubleshooting Status LED Appendix
External device control
The HEOS Drive can tightly integrate with most Denon AVR to allow them
to operate as if they were one device.
You can configure your HEOS Drive to tell the connected device when to
turn on, turn off, select the correct input and adjust volume and mute.
You can adjust specific settings for each of your HEOS Drive in your
system:
Select the Settings a icon located in the upper left
1
corner of the main “Music” menu to display the
Settings menu.
Select “My Devices” to display a list of your devices.
2
Select a HEOS Drive.
3
Select the Zone you want to set.
4
Select “Control”.
5
Select the method which is most appropriate for your
6
configuration:
IP Control
o
IP Control is available for Denon AV receiver models sold after 2010
which are connected to the same network as the HEOS Drive and
Controller devices.
Select IP.
1
Select the AVR that you have your HEOS Drive is
2
connected to.
Select the input on the AVR that you have your HEOS
3
Drive connected to.
Select Done.
4
NOTE
You can test the connection to the AVR by pressing the power on, off, and input
0
buttons.
The following settings are forced to change when IP Control is set.
0
Line Out Level: Fixed
0
High Pass Filter: Off
0
Subwoofer: Off
0
47
Page 48
Contents Setup Use Troubleshooting Status LED Appendix
Trigger out
o
Select Trigger Control when you are connecting your HEOS to a
power amp that supports +12 V trigger input.
The HEOS app can control the power on and off for the amp.
Select Trigger.
1
Select Done.
2
NOTE
You can test the connection to the amp by pressing the power on, off in setting
0
screen for the amp.
48
Page 49
Contents Setup Use Troubleshooting Status LED Appendix
Updating your system
HEOS has the ability to add enhancements and updated functionality via your high speed Internet connection. Follow the instructions on the
screen to update the HEOS device and/or your controller App.
Select the Settings a icon located in the upper left
1
corner of the main “Music” menu to display the
Settings menu.
Select “Software Update”.
2
Check for Update
n
Follow the instructions on screen to install any available updates to
your HEOS system.
Auto-Update
n
ON: Valid updates are performed automatically.
OFF: You will be notified of valid updates on the HEOS app.
49
Page 50
Contents
Setup Use Troubleshooting Status LED Appendix
Advanced features
There are a few advanced features of the HEOS system that you may want to explore once you become familiar with the basic operations. You can
access the advanced features of the HEOS system by following these steps:
Select the Settings a icon located in the upper left
1
corner of the main “Music” menu to display the
Settings menu.
Select “Advanced Settings” to display a list the
2
available settings.
Sharing music from your mobile device
The HEOS app has a feature called “Music Sharing” which can share the
local music stored on your mobile device to other HEOS app users on your
local network. To enable this feature, select “Music Sharing”, and set it on
“ON”.
The name of the device you are sharing from will appear as a music server
allowing other HEOS controller apps to browse and play music from the
your device.
Submit diagnostics
If you are having trouble with your network or HEOS system, you may be
asked by Denon technical support personnel to select this option. This
feature will automatically send Denon technical support diagnostic
information about your HEOS system.
NOTE
No personal information is sent and your information will never be shared with
0
anyone.
Resetting your controller app
This feature will reset the control app to its original state when you first
installed it on your mobile device without requiring you to remove,
download, and reinstall it from the app store.
50
Page 51
Contents
Setup Use Troubleshooting Status LED Appendix
Power management
Power modes
Quick Start Mode
o
To save power, the device will automatically enter “Quick Start Mode”
whenever there is no network access or playback for 20 minutes and
will automatically resume to full power whenever the device is selected
and playing music.
The each Zone indicator will be dimmed during Quick Start Mode as it
is a fully automatic function.
Also push Power button, the device enter Quick Start Mode.
When all zone enter Quick Start Mode, Power indicator will be red.
Deep Standby
o
The device also has the ability to automatically enter “Deep Standby”
whenever the wired network connection is removed for more than 60
minutes in Quick Start Mode. Power indicator will turn off during Deep
Standby. To “wake” a HEOS device from Deep Standby, you must
press the standby button which will immediately turn on Power
indicator.
Power button for more than 6 seconds, the device enter Deep
Standby.
NOTE
“Deep Standby” needs to be set in all four zones to enable this setting.
0
Off
o
To completely turn off the power to the device you must switch to OFF
of power switch on rear panel.
51
Page 52
Contents Setup Use Troubleshooting Status LED Appendix
Troubleshooting
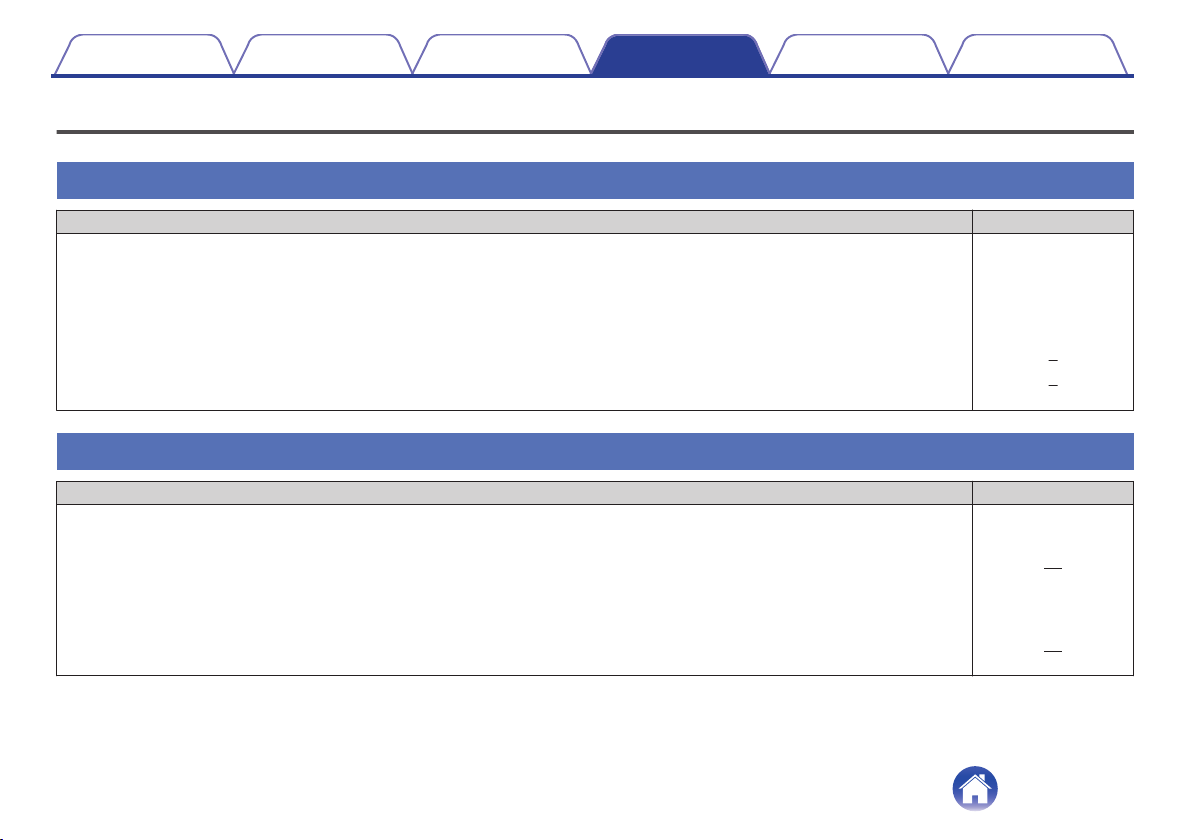
BASIC TROUBLESHOOTING
I get a message “Device was not found”
Solution Refer to Page
Your HEOS devices and controller device may not be on the same network. Verify that the controller device is on the same
0
network as your HEOS devices. This is usually configured under the Settings feature on your mobile device.
If you have more than one network, your mobile device may hop to a different network as you move around your home.
Make sure you don’t have any other electronic devices interfering with your wireless network signals. Microwave ovens,
0
cordless phones, and some televisions can cause wireless network interference.
If your HEOS devices are located far away from your router, consider adding a Wireless Range Extender like the HEOS Extend. 6
0
In case your wireless router is incompatible with HEOS device, please use the optional HEOS Extend Wireless Range Extender
0
and hard-wire it to your router.
My HEOS device turns off and the power LED flashes in red
Solution Refer to Page
The protection circuit has been activated due to a rise in temperature within your HEOS device. Turn the power off, wait about
0
an hour until this device cools down sufficiently, and then turn the power on again.
Check the speaker connections. The protection circuit may have been activated because speaker cable core wires came in
0
contact with each other or a core wire was disconnected from the connector and came in contact with the rear panel of this
device. After unplugging the power cord, take corrective action such as firmly re-twisting the core wire or taking care of the
connector, and then reconnect the wire.
Depending on the speakers that are connected, the protection circuit may activate and the power may be turned off when music
0
is played at a high volume. (The Power indicator flashes in red) If this happens, configure the “Volume Limit” setting.
–
–
6
–
14
43
52
Page 53
Contents Setup Use Troubleshooting Status LED Appendix
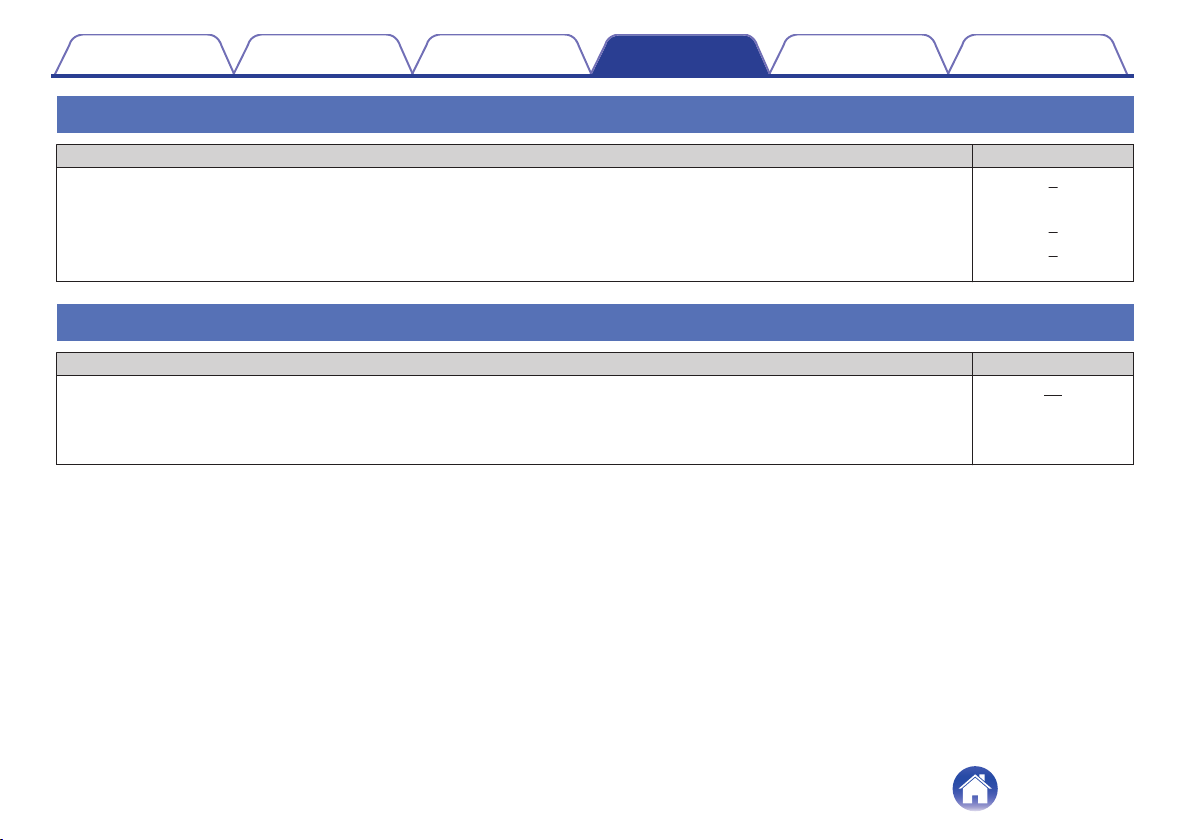
Music cuts out or delays sometimes
Solution Refer to Page
Make sure your Internet connection is operating correctly. If you are sharing your network with other users or devices, they may
0
be using most of your bandwidth (especially if they are streaming video).
Make sure your HEOS devices are within range of your wireless network. 6
0
Make sure your HEOS devices are not located near other electronic devices that could interfere with it’s wireless connectivity
0
(like microwave ovens, cordless phones, TVs, etc…).
I hear a delay when using the external input with my TV
Solution Refer to Page
If you are connecting the External input with your cable or satellite box for enjoying TV audio through multiple HEOS devices,
0
you may hear a delay between when you see someone speak and when you hear the audio. This is because the HEOS system
must buffer the audio before it sends it out to the HEOS devices so that it arrives at all devices at the same time.
You can avoid this delay by listening only to the device which is directly connected to the set top box. -
0
6
6
26
53
Page 54
Contents
Setup Use Troubleshooting Status LED Appendix
Resetting your HEOS device
Solution Refer to Page
Resetting your HEOS device will clear out EQ, and name but retain it’s current software. You will have to use Settings->Add
Device to reconnect the device to your home network before it can be used. To reset your HEOS Drive, press the Reset button on
the back and hold it in until the Zone LED begins to flash amber.
Restoring the HEOS device to factory defaults
Solution Refer to Page
Restoring the HEOS device to its factory defaults will clear all of the settings and restore the original software which was installed
at the factory.
Caution
All settings will be erased and the software will likely be downgraded!
0
To restore your HEOS Drive to the factory defaults, turn off the power switch of rear panel. Press the Reset button on the back,
turn on the power switch of rear panel, and hold it in until the Zone LED begins to flash amber.
* For further information, please visit HEOSbyDenon.com
–
–
54
Page 55
Contents Setup Use Troubleshooting Status LED Appendix
Contact Denon
For U.S. & Canada only:
If you need further assistance with your HEOS product, please contact HEOS by Denon Customer Support Services below:
Website: www.HEOSbyDenon.com/Support
Email: [email protected]
Live Chat: www.HEOSbyDenon.com/LiveChat
Telephone: Toll Free (855) 499 2820
(M-F 10:00AM to 10:00PM EST / Sat 12:00PM to 8:00PM EST)
For the other region:
If you need additional help in solving problems, please contact Denon customer service in your area or visit HEOSbyDenon.com
55
Page 56
Contents
Setup Use Troubleshooting Status LED Appendix
Status LED
Status LED table
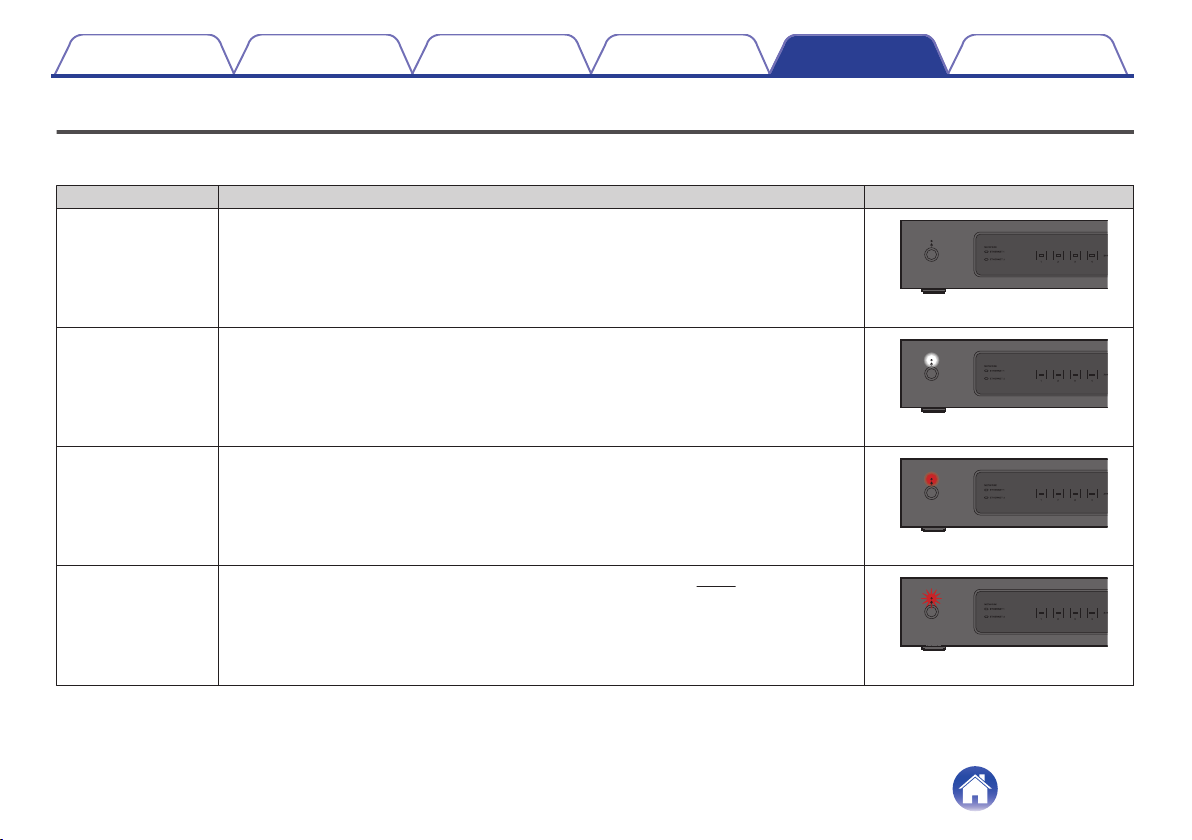
Power indicator
o
Device Operation Description Front LED Action
OFF No AC power, Master Power Switch OFF, Deep Standby
.
(off)
ON Power ON
.
(solid)
Power Management Quick Start Mode-When all Zone enter Quick Start Mode
.
(solid)
Error
Hardware protection - Refer to “BASIC TROUBLESHOOTING” (v p. 52)
56
.
(blink)
Page 57
Contents Setup Use Troubleshooting Status LED Appendix
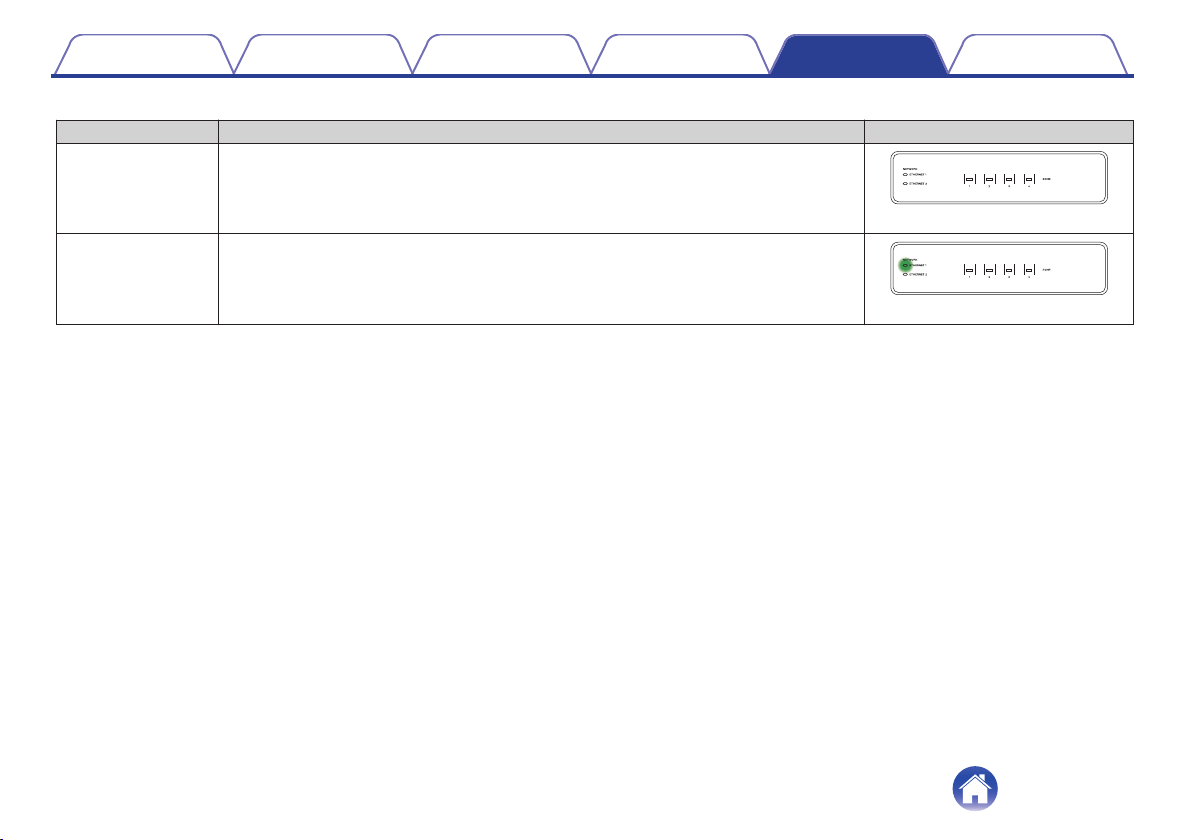
Network indicators
o
Device Operation Description Front LED Action
OFF Not Connected to your network
.
(off)
Connect Connected to your network
.
(blink)
57
Page 58
Contents Setup Use Troubleshooting Status LED Appendix
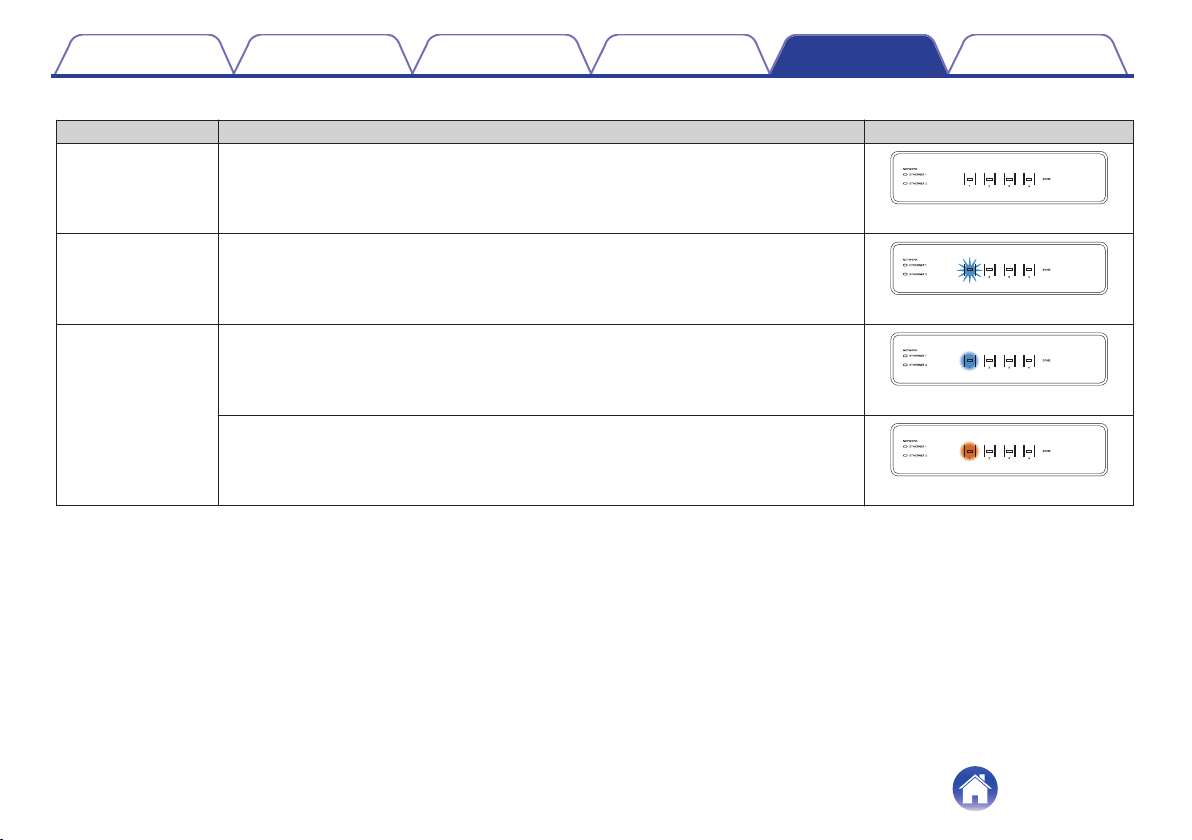
Zone indicators
o
Device Operation Description Front LED Action
OFF No AC Power, Master Power Switch OFF, Deep Standby
Master Power Switch
ON
Booting
Ready-Configured and connected to your network
ON
Not Connected to your network
.
(off)
.
(blink)
.
(solid)
.
(solid)
58
Page 59
Contents Setup Use Troubleshooting Status LED Appendix
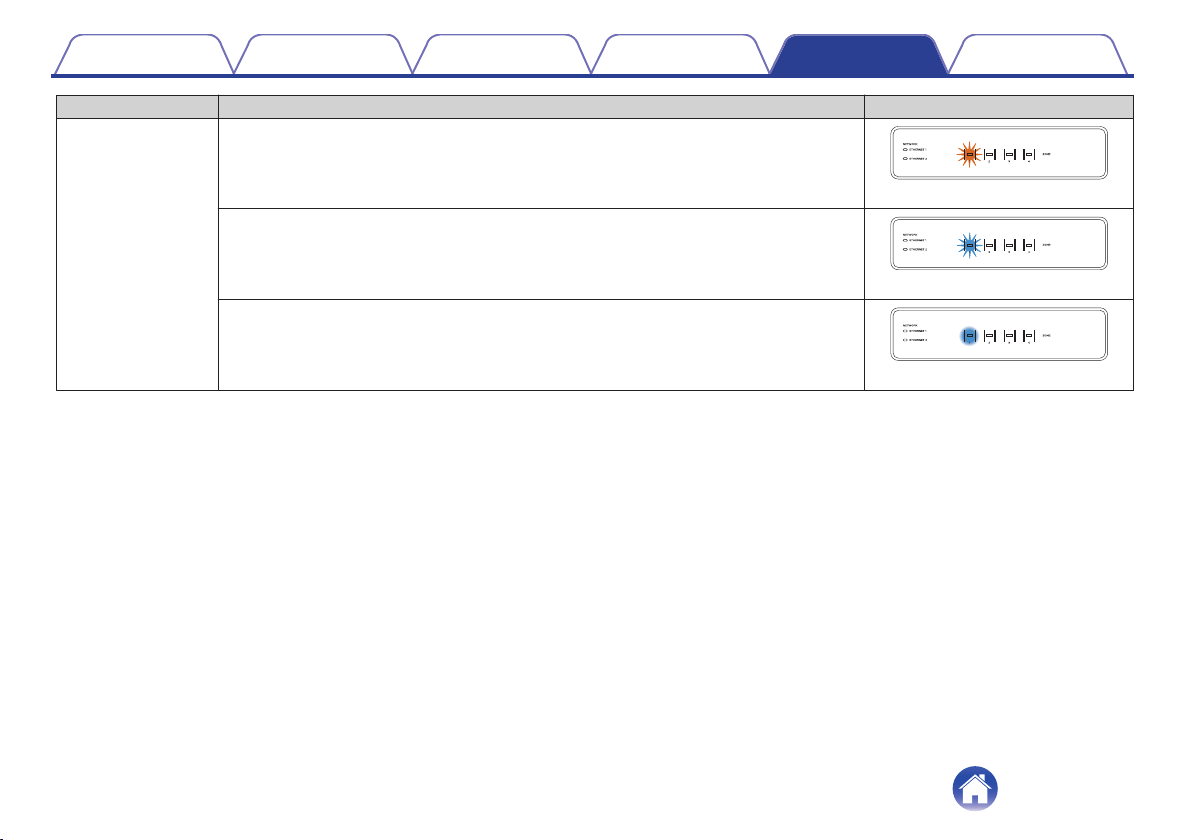
Device Operation Description Front LED Action
Update
Updating
Rebooting
Ready-Configured and connected to your network
.
(blink)
.
(blink)
.
(solid)
59
Page 60
Contents Setup Use Troubleshooting Status LED Appendix
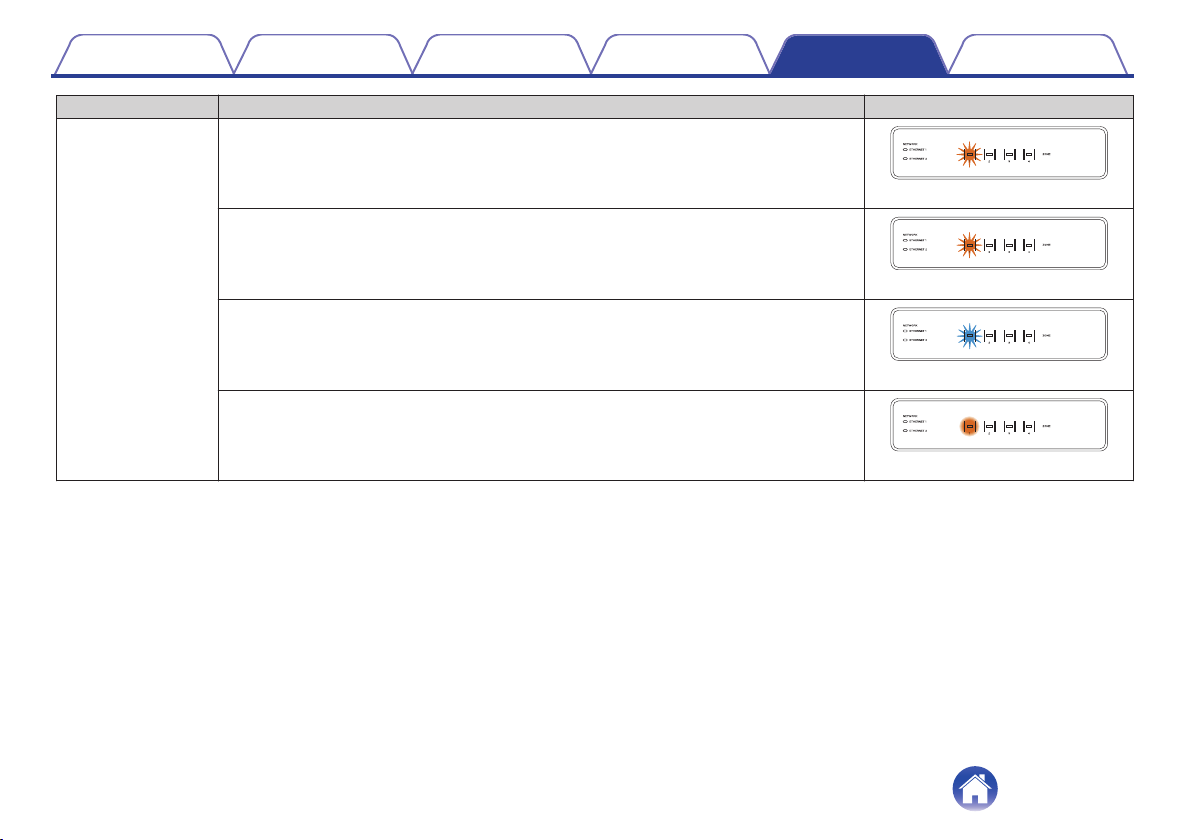
Device Operation Description Front LED Action
Reset
Soft reset - Clear user settings
Hard reset - Factory restore
Rebooting
Ready-Not Configured
.
(fast blink)
.
(blink)
.
(blink)
.
(solid)
60
Page 61
Contents Setup Use Troubleshooting Status LED Appendix
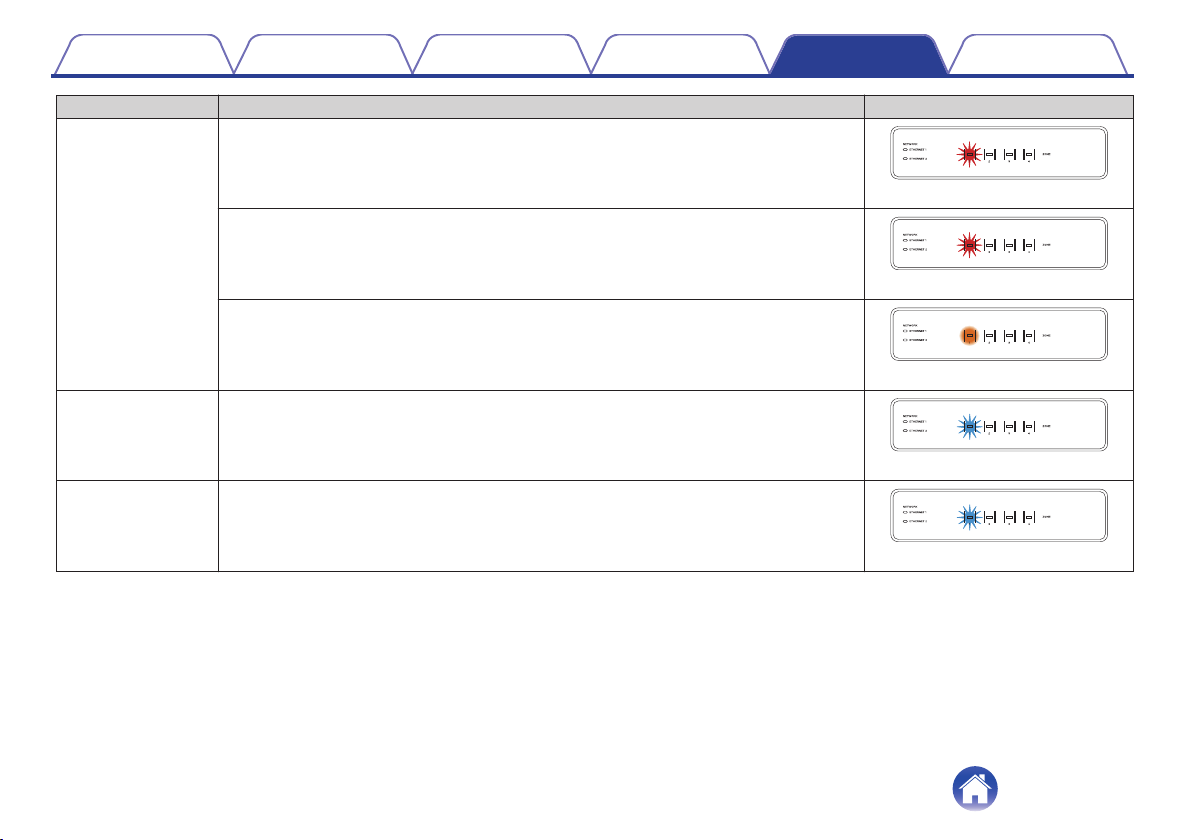
Device Operation Description Front LED Action
Errors
Volume Change
Mute
Firmware Error
Hardware Error
Network Error
.
(slow blink (NOT fade))
.
(fast blink)
.
(solid)
.
(quick blink)
.
(slow blink)
61
Page 62
Contents Setup Use Troubleshooting Status LED Appendix
Device Operation Description Front LED Action
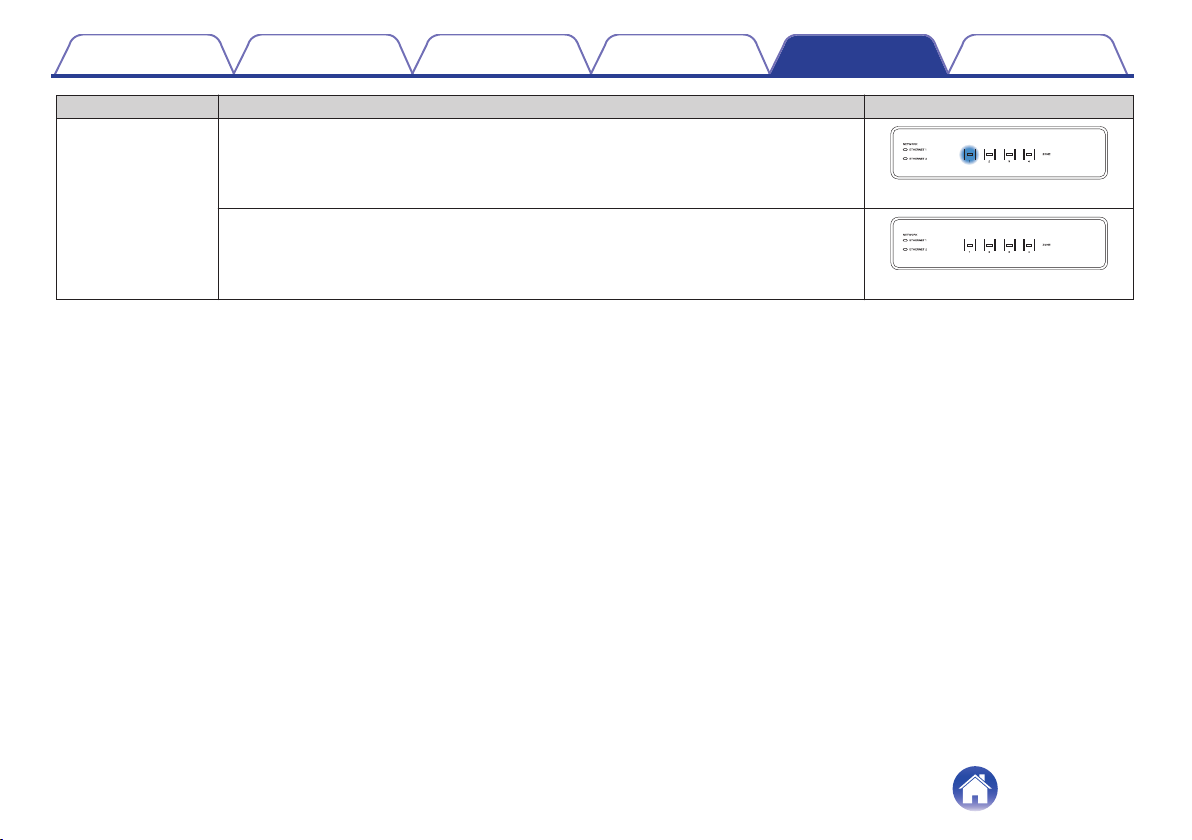
Power Management
Quick Start mode-When all Zone enter Quick Start Mode
Deep Standby
.
(solid)
.
(off)
62
Page 63
Contents
Setup Use Troubleshooting Status LED Appendix
Supported file types and codecs
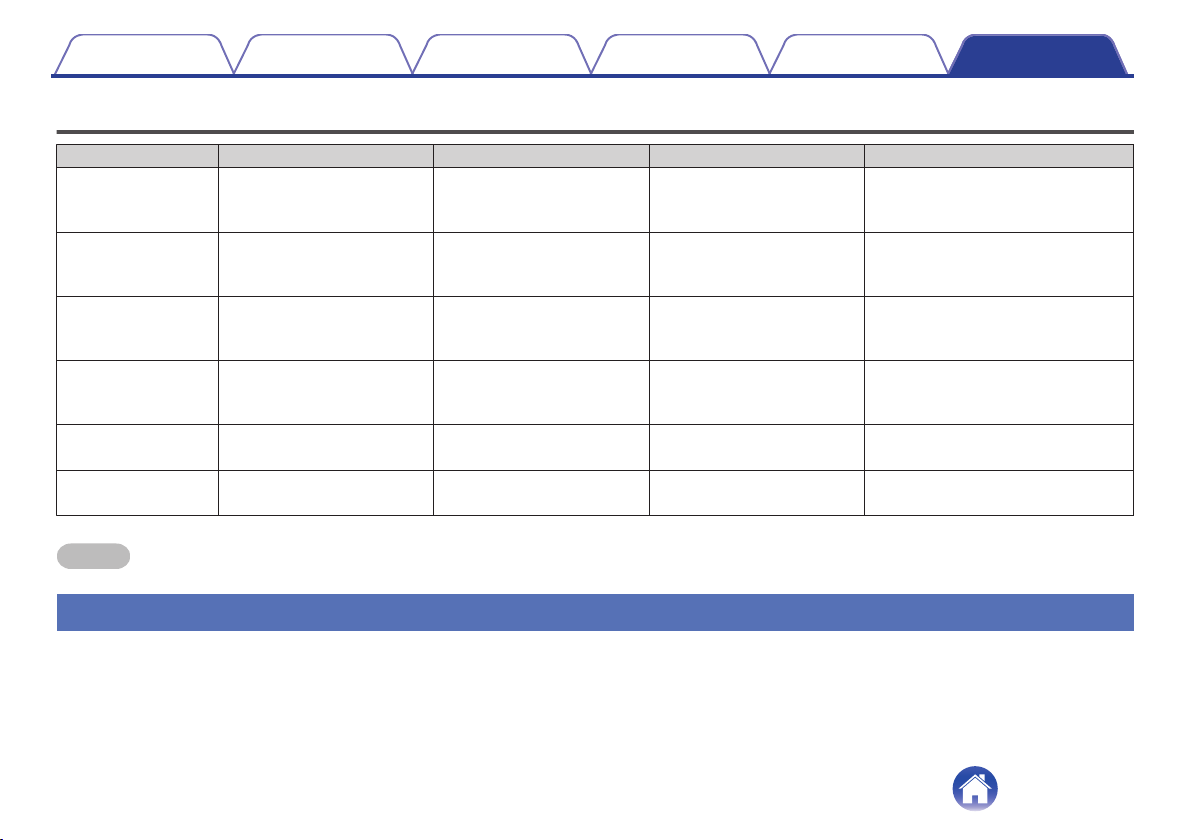
Frequency Sample Rate File Extension Codec Bit Rates
32 kHz
44.1 kHz
48 kHz
32 kHz
44.1 kHz
48 kHz
32 kHz
44.1 kHz
48 kHz
32 kHz
44.1 kHz
48 kHz
44.1 kHz
48 kHz
44.1 kHz
48 kHz
NOTE
Files protected by DRM such as Apple’s Fairplay DRM, are not supported.
0
Supported audio formats (Coaxial/Optical)
16 bit wav PCM ---
16 bit mp3
16 bit
16 bit wma
16 bit flac flac ---
16 bit m4a ALAC ---
m4a
aac
MPEG-1 Audio Layer 3
CBR/VBR
AAC-LC 48 - 320 kbps
wma9
CBR
32 - 320 kbps
CBR:48 - 192 kbps
Appendix
2-channel Linear PCM:2-channel, 32 kHz – 192 kHz, 16/20/24 bit
Bitstream:Dolby Digital
63
Page 64
Contents Setup Use Troubleshooting Status LED Appendix
Specifications
Audio section
o
Power amplifier
0
Maximum output power:
Rated output: (NORMAL OPERATION)
Output connectors: (NORMAL OPERATION)
THD+N: 0.05 % (20 Hz - 20 kHz)
S/N: 95 dB (IHF–A weighted)
Frequency response: 20 Hz to 20 kHz: ±1 dB
(NORMAL OPERATION)
8-channel driving
60W + 60W (8 Ω/ohms, 20 Hz – 20 kHz, T.H.D. 0.05 %)
(BRIDGE OPERATION)
4-channel driving
130W + 130W (8 Ω/ohms, 20 Hz – 20 kHz, T.H.D. 0.05 %)
8-channel driving
60W + 60W (8 Ω/ohms, 20 Hz – 20 kHz, T.H.D. 0.07 %)
(BRIDGE OPERATION)
4-channel driving
120W + 120W (8 Ω/ohms, 20 Hz – 20 kHz, T.H.D. 0.07 %)
4 – 16 Ω/ohms
(BRIDGE OPERATION)
4 – 16 Ω/ohms
64
Page 65
Contents Setup Use Troubleshooting Status LED Appendix
General
o
Operating temperature: 41 °F - 95 °F (5 °C - 35 °C)
Power supply: AC 120 V, 60 Hz (for North America)
AC 220 - 240 V, 50/60 Hz (for Europe, UK and Australia)
Power consumption: 170 W (for North America)
160 W (for Europe, UK and Australia)
Power consumption in Deep Standby mode: 0.3 W
65
Page 66
10 3/4
(272)
2 1/8
(53)
3
(74)
3 1/2 (88)
3 3/4 (94)3 1/2 (88)
1/4
(6)
15 7/8 (402)
17 (430)
1 1/4 (30)1 1/4 (30)
1 3/4
(43)
1 3/4
(43)
1/8
(3)
1
(23)
14 7/8 (376)
19 1/8 (484)
13 5/8 (344)
Contents
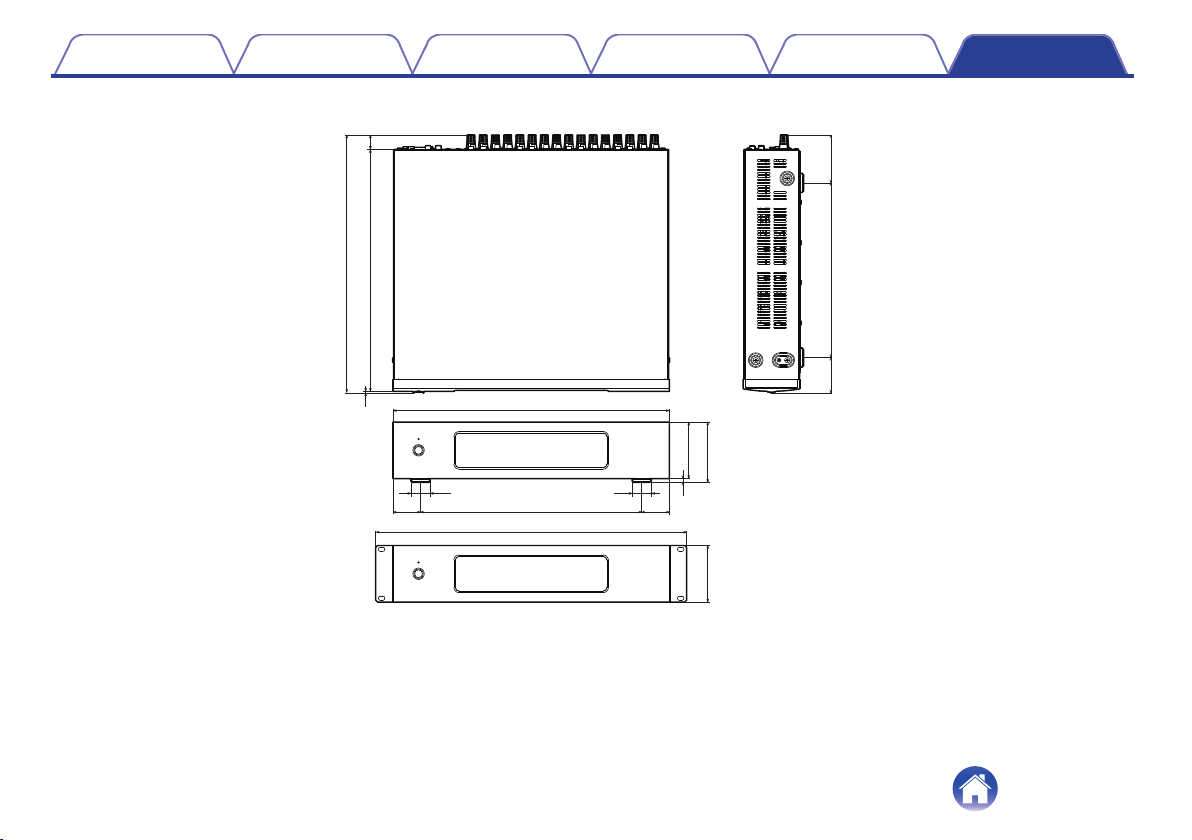
Dimensions (Unit : in. (mm))
o
Setup Use Troubleshooting Status LED Appendix
Weight :
o
.
16 lbs 9 oz (7.5 kg) (with brackets)
15 lbs 14 oz (7.2 kg) (w/o brackets)
For the purpose of improvement, the specifications and design are subject to change without notice.
66
Page 67
Contents Setup Use Troubleshooting Status LED Appendix
Information
Trademarks
.
Manufactured under license from Dolby Laboratories. Dolby and the
double-D symbol are trademarks of Dolby Laboratories.
.
Google Play is a trademark of Google Inc.
.
Apple, the Apple logo, iPad, iPhone, and iPod touch are trademarks of
Apple Inc., registered in the U.S. and other countries. App Store is a
service mark of Apple Inc.
.
Amazon, Kindle, Fire and all related logos are trademarks of
Amazon.com, Inc. or its affiliates.
67
Page 68
Contents
Setup Use Troubleshooting Status LED Appendix
License
License information for the software used in
o
the unit
About GPL (GNU-General Public License), LGPL (GNU Lesser
General Public License) License
This product uses GPL/LGPL software and software made by other
companies.
After you purchase this product, you may procure, modify or distribute
the source code of the GPL/LGPL software that is used in the product.
Denon provides the source code based on the GPL and LPGL
licenses at the actual cost upon your request to our customer service
center. However, note that we make no guarantees concerning the
source code. Please also understand that we do not offer support for
the contents of the source code.
This section describes software license used for this unit. To
maintain the correct content, the original (English) is used.
GPL
n
Open Source Used Version
bridge-utils 2.8
busybox 1.21.1
ebtables 2.0.10-4
Linux kernel 2.6.30
mtd-utils 1.4.3
ntfs-3g_ntfsprogs 2011.4.12
ntpclient 2007
u-boot 2011.06
wireless-tools version 29
LGPL
n
Open Source Used Version
ffmpeg 0.8.3
glibc 2.9
libmms 0.6.2
curl-7.24.0
n
COPYRIGHT AND PERMISSION NOTICE
Copyright (c) 1996 - 2014, Daniel Stenberg, <[email protected]>.
All rights reserved.
Permission to use, copy, modify, and distribute this software for any
purpose with or without fee is hereby granted, provided that the above
copyright notice and this permission notice appear in all copies.
THE SOFTWARE IS PROVIDED “AS IS”, WITHOUT WARRANTY OF
ANY KIND, EXPRESS OR IMPLIED, INCLUDING BUT NOT LIMITED
TO THE WARRANTIES OF MERCHANTABILITY, FITNESS FOR A
PARTICULAR PURPOSE AND NONINFRINGEMENT OF THIRD
PARTY RIGHTS. IN NO EVENT SHALL THE AUTHORS OR
COPYRIGHT HOLDERS BE LIABLE FOR ANY CLAIM, DAMAGES
OR OTHER LIABILITY, WHETHER IN AN ACTION OF CONTRACT,
TORT OR OTHERWISE, ARISING FROM, OUT OF OR IN
CONNECTION WITH THE SOFTWARE OR THE USE OR OTHER
DEALINGS IN THE SOFTWARE.
Except as contained in this notice, the name of a copyright holder shall
not be used in advertising or otherwise to promote the sale, use or
other dealings in this Software without prior written authorization of the
copyright holder.
68
Page 69
Contents
Setup Use Troubleshooting Status LED Appendix
e2fsprogs-libs-1.40.8/lib/uuid
n
Redistribution and use in source and binary forms, with or without
modification, are permitted provided that the following conditions are
met:
1. Redistributions of source code must retain the above copyright
notice, and the entire permission notice in its entirety, including the
disclaimer of warranties.
2. Redistributions in binary form must reproduce the above copyright
notice, this list of conditions and the following disclaimer in the
documentation and/or other materials provided with the distribution.
3. The name of the author may not be used to endorse or promote
products derived from this software without specific prior written
permission.
THIS SOFTWARE IS PROVIDED “AS IS” AND ANY EXPRESS OR
IMPLIED WARRANTIES, INCLUDING, BUT NOT LIMITED TO, THE
IMPLIED WARRANTIES OF MERCHANTABILITY AND FITNESS
FOR A PARTICULAR PURPOSE, ALL OF WHICH ARE HEREBY
DISCLAIMED. IN NO EVENT SHALL THE AUTHOR BE LIABLE FOR
ANY DIRECT, INDIRECT, INCIDENTAL, SPECIAL, EXEMPLARY, OR
CONSEQUENTIAL DAMAGES (INCLUDING, BUT NOT LIMITED TO,
PROCUREMENT OF SUBSTITUTE GOODS OR SERVICES; LOSS
OF USE, DATA, OR PROFITS; OR BUSINESS INTERRUPTION)
HOWEVER CAUSED AND ON ANY THEORY OF LIABILITY,
WHETHER IN CONTRACT, STRICT LIABILITY, OR TORT
(INCLUDING NEGLIGENCE OR OTHERWISE) ARISING IN ANY
WAY OUT OF THE USE OF THIS SOFTWARE, EVEN IF NOT
ADVISED OF THE POSSIBILITY OF SUCH DAMAGE.
expat-2.0.1
n
Copyright (c) 1998, 1999, 2000 Thai Open Source Software Center Ltd
and Clark Cooper
Copyright (c) 2001, 2002, 2003, 2004, 2005, 2006 Expat maintainers.
Permission is hereby granted, free of charge, to any person obtaining a
copy of this software and associated documentation files (the
“Software”), to deal in the Software without restriction, including
without limitation the rights to use, copy, modify, merge, publish,
distribute, sublicense, and/or sell copies of the Software, and to permit
persons to whom the Software is furnished to do so, subject to the
following conditions:
The above copyright notice and this permission notice shall be
included in all copies or substantial portions of the Software.
THE SOFTWARE IS PROVIDED “AS IS”, WITHOUT WARRANTY OF
ANY KIND, EXPRESS OR IMPLIED, INCLUDING BUT NOT LIMITED
TO THE WARRANTIES OF MERCHANTABILITY, FITNESS FOR A
PARTICULAR PURPOSE AND NONINFRINGEMENT.
IN NO EVENT SHALL THE AUTHORS OR COPYRIGHT HOLDERS
BE LIABLE FOR ANY CLAIM, DAMAGES OR OTHER LIABILITY,
WHETHER IN AN ACTION OF CONTRACT, TORT OR OTHERWISE,
ARISING FROM, OUT OF OR IN CONNECTION WITH THE
SOFTWARE OR THE USE OR OTHER DEALINGS IN THE
SOFTWARE.
69
Page 70
Contents
Setup Use Troubleshooting Status LED Appendix
getopt
n
http://cvsweb.netbsd.org/bsdweb.cgi/src/lib/libc/stdlib/
Copyright (c) 1987, 1993, 1994 The Regents of the University of
California. All rights reserved.
Redistribution and use in source and binary forms, with or without
modification, are permitted provided that the following conditions are
met:
1. Redistributions of source code must retain the above copyright
notice, this list of conditions and the following disclaimer.
2. Redistributions in binary form must reproduce the above copyright
notice, this list of conditions and the following disclaimer in the
documentation and/or other materials provided with the distribution.
3. Neither the name of the University nor the names of its contributors
may be used to endorse or promote products derived from this
software without specific prior written permission.
THIS SOFTWARE IS PROVIDED BY THE REGENTS AND
CONTRIBUTORS “AS IS” AND ANY EXPRESS OR IMPLIED
WARRANTIES, INCLUDING, BUT NOT LIMITED TO, THE IMPLIED
WARRANTIES OF MERCHANTABILITY AND FITNESS FOR A
PARTICULAR PURPOSE ARE DISCLAIMED. IN NO EVENT SHALL
THE REGENTS OR CONTRIBUTORS BE LIABLE FOR ANY DIRECT,
INDIRECT, INCIDENTAL, SPECIAL, EXEMPLARY, OR
CONSEQUENTIAL DAMAGES (INCLUDING, BUT NOT LIMITED TO,
PROCUREMENT OF SUBSTITUTE GOODS OR SERVICES; LOSS
OF USE, DATA, OR PROFITS; OR BUSINESS INTERRUPTION)
HOWEVER CAUSED AND ON ANY THEORY OF LIABILITY,
WHETHER IN CONTRACT, STRICT LIABILITY, OR TORT
(INCLUDING NEGLIGENCE OR OTHERWISE) ARISING IN ANY
WAY OUT OF THE USE OF THIS SOFTWARE, EVEN IF ADVISED
OF THE POSSIBILITY OF SUCH DAMAGE.
jQuery
n
Copyright 2014 jQuery Foundation and other contributors
http://jquery.com/
Permission is hereby granted, free of charge, to any person obtaining a
copy of this software and associated documentation files (the
“Software”), to deal in the Software without restriction, including
without limitation the rights to use, copy, modify, merge, publish,
distribute, sublicense, and/or sell copies of the Software, and to permit
persons to whom the Software is furnished to do so, subject to the
following conditions:
The above copyright notice and this permission notice shall be
included in all copies or substantial portions of the Software.
THE SOFTWARE IS PROVIDED “AS IS”, WITHOUT WARRANTY OF
ANY KIND, EXPRESS OR IMPLIED, INCLUDING BUT NOT LIMITED
TO THE WARRANTIES OF MERCHANTABILITY, FITNESS FOR A
PARTICULAR PURPOSE AND NONINFRINGEMENT. IN NO EVENT
SHALL THE AUTHORS OR COPYRIGHT HOLDERS BE LIABLE FOR
ANY CLAIM, DAMAGES OR OTHER LIABILITY, WHETHER IN AN
ACTION OF CONTRACT, TORT OR OTHERWISE, ARISING FROM,
OUT OF OR IN CONNECTION WITH THE SOFTWARE OR THE USE
OR OTHER DEALINGS IN THE SOFTWARE.
70
Page 71
Contents
Setup Use Troubleshooting Status LED Appendix
libpcap-1.4.0
n
License: BSD
Redistribution and use in source and binary forms, with or without
modification, are permitted provided that the following conditions are
met:
1. Redistributions of source code must retain the above copyright
notice, this list of conditions and the following disclaimer.
2. Redistributions in binary form must reproduce the above copyright
notice, this list of conditions and the following disclaimer in the
documentation and/or other materials provided with the distribution.
3. The names of the authors may not be used to endorse or promote
products derived from this software without specific prior written
permission.
THIS SOFTWARE IS PROVIDED “AS IS” AND WITHOUT ANY
EXPRESS OR IMPLIED WARRANTIES, INCLUDING, WITHOUT
LIMITATION, THE IMPLIED WARRANTIES OF MERCHANTABILITY
AND FITNESS FOR A PARTICULAR PURPOSE.
libtar-1.2.11
n
Copyright (c) 1998-2003 University of Illinois Board of Trustees
Copyright (c) 1998-2003 Mark D. Roth
All rights reserved.
Developed by: Campus Information Technologies and Educational
Services, University of Illinois at Urbana-Champaign
Permission is hereby granted, free of charge, to any person obtaining a
copy of this software and associated documentation files (the “Software”),
to deal with the Software without restriction, including without limitation
the rights to use, copy, modify, merge, publish, distribute, sublicense,
and/or sell copies of the Software, and to permit persons to whom the
Software is furnished to do so, subject to the following conditions:
z
Redistributions of source code must retain the above copyright
notice, this list of conditions and the following disclaimers.
z
Redistributions in binary form must reproduce the above copyright
notice, this list of conditions and the following disclaimers in the
documentation and/or other materials provided with the distribution.
z
Neither the names of Campus Information Technologies and
Educational Services, University of Illinois at Urbana-Champaign,
nor the names of its contributors may be used to endorse or promote
products derived from this Software without specific prior written
permission.
THE SOFTWARE IS PROVIDED “AS IS”, WITHOUT WARRANTY OF
ANY KIND, EXPRESS OR IMPLIED, INCLUDING BUT NOT LIMITED TO
THE WARRANTIES OF MERCHANTABILITY, FITNESS FOR A
PARTICULAR PURPOSE AND NONINFRINGEMENT.
IN NO EVENT SHALL THE CONTRIBUTORS OR COPYRIGHT
HOLDERS BE LIABLE FOR ANY CLAIM, DAMAGES OR OTHER
LIABILITY, WHETHER IN AN ACTION OF CONTRACT, TORT OR
OTHERWISE, ARISING FROM, OUT OF OR IN CONNECTION WITH
THE SOFTWARE OR THE USE OR OTHER DEALINGS WITH THE
SOFTWARE.
71
Page 72
Contents
Setup Use Troubleshooting Status LED Appendix
mDNS 320.10.80
n
The majority of the source code in the mDNSResponder project is licensed
under the terms of the Apache License, Version 2.0, available from:
<http://www.apache.org/licenses/LICENSE-2.0>
To accommodate license compatibility with the widest possible range
of client code licenses, the shared library code, which is linked at
runtime into the same address space as the client using it, is licensed
under the terms of the “Three-Clause BSD License”.
The Linux Name Service Switch code, contributed by National ICT
Australia Ltd (NICTA) is licensed under the terms of the NICTA Public
Software Licence (which is substantially similar to the “Three-Clause BSD
License”, with some additional language pertaining to Australian law).
mongoose
n
https://github.com/cesanta/mongoose/
Copyright (c) 2004-2013 Sergey Lyubka
Permission is hereby granted, free of charge, to any person obtaining a
copy of this software and associated documentation files (the
“Software”), to deal in the Software without restriction, including
without limitation the rights to use, copy, modify, merge, publish,
distribute, sublicense, and/or sell copies of the Software, and to permit
persons to whom the Software is furnished to do so, subject to the
following conditions:
The above copyright notice and this permission notice shall be
included in all copies or substantial portions of the Software.
THE SOFTWARE IS PROVIDED “AS IS”, WITHOUT WARRANTY OF
ANY KIND, EXPRESS OR IMPLIED, INCLUDING BUT NOT LIMITED
TO THE WARRANTIES OF MERCHANTABILITY, FITNESS FOR A
PARTICULAR PURPOSE AND NONINFRINGEMENT. IN NO EVENT
SHALL THE AUTHORS OR COPYRIGHT HOLDERS BE LIABLE FOR
ANY CLAIM, DAMAGES OR OTHER LIABILITY, WHETHER IN AN
ACTION OF CONTRACT, TORT OR OTHERWISE, ARISING FROM,
OUT OF OR IN CONNECTION WITH THE SOFTWARE OR THE USE
OR OTHER DEALINGS IN THE SOFTWARE.
72
Page 73
Contents
openssl-1.0.0d
n
Copyright (c) 1998-2011 The OpenSSL Project. All rights reserved.
Redistribution and use in source and binary forms, with or without
modification, are permitted provided that the following conditions are
met:
1. Redistributions of source code must retain the above copyright
notice, this list of conditions and the following disclaimer.
2. Redistributions in binary form must reproduce the above copyright
notice, this list of conditions and the following disclaimer in the
documentation and/or other materials provided with the distribution.
3. All advertising materials mentioning features or use of this software
must display the following acknowledgment:
“This product includes software developed by the OpenSSL Project
for use in the OpenSSL Toolkit. (
4. The names “OpenSSL Toolkit” and “OpenSSL Project” must not be
used to endorse or promote products derived from this software
without prior written permission. For written permission, please
contact [email protected].
5. Products derived from this software may not be called “OpenSSL”
nor may “OpenSSL” appear in their names without prior written
permission of the OpenSSL Project.
6. Redistributions of any form whatsoever must retain the following
acknowledgment:
“This product includes software developed by the OpenSSL Project
for use in the OpenSSL Toolkit (
Setup Use Troubleshooting Status LED Appendix
http://www.openssl.org/)”
http://www.openssl.org/)”
THIS SOFTWARE IS PROVIDED BY THE OpenSSL PROJECT “AS
IS” AND ANY EXPRESSED OR IMPLIED WARRANTIES,
INCLUDING, BUT NOT LIMITED TO, THE IMPLIED WARRANTIES
OF MERCHANTABILITY AND FITNESS FOR A PARTICULAR
PURPOSE ARE DISCLAIMED. IN NO EVENT SHALL THE OpenSSL
PROJECT OR ITS CONTRIBUTORS BE LIABLE FOR ANY DIRECT,
INDIRECT, INCIDENTAL, SPECIAL, EXEMPLARY, OR
CONSEQUENTIAL DAMAGES (INCLUDING, BUT NOT LIMITED TO,
PROCUREMENT OF SUBSTITUTE GOODS OR SERVICES; LOSS
OF USE, DATA, OR PROFITS; OR BUSINESS INTERRUPTION)
HOWEVER CAUSED AND ON ANY THEORY OF LIABILITY,
WHETHER IN CONTRACT, STRICT LIABILITY, OR TORT
(INCLUDING NEGLIGENCE OR OTHERWISE) ARISING IN ANY
WAY OUT OF THE USE OF THIS SOFTWARE, EVEN IF ADVISED
OF THE POSSIBILITY OF SUCH DAMAGE.
This product includes cryptographic software written by Eric Young
([email protected]). This product includes software written by Tim
Hudson (
73
Page 74
Contents
Setup Use Troubleshooting Status LED Appendix
portmap-6.0
n
Copyright (c) 1990 The Regents of the University of California.
z
All rights reserved.
z
Redistribution and use in source and binary forms, with or without
modification, are permitted provided that the following conditions are met:
1. Redistributions of source code must retain the above copyright
notice, this list of conditions and the following disclaimer.
2. Redistributions in binary form must reproduce the above copyright
notice, this list of conditions and the following disclaimer in the
documentation and/or other materials provided with the distribution.
3. A ll advertising materials mentioning features or use of this software
must display the following acknowledgement:
This product includes software developed by the University of
California, Berkeley and its contributors.
4. Neither the name of the University nor the names of its contributors
may be used to endorse or promote products derived from this
software without specific prior written permission.
z
THIS SOFTWARE IS PROVIDED BY THE REGENTS AND
CONTRIBUTORS “AS IS” AND ANY EXPRESS OR IMPLIED
WARRANTIES, INCLUDING, BUT NOT LIMITED TO, THE IMPLIED
WARRANTIES OF MERCHANTABILITY AND FITNESS FOR A
PARTICULAR PURPOSE ARE DISCLAIMED. IN NO EVENT SHALL
THE REGENTS OR CONTRIBUTORS BE LIABLE FOR ANY DIRECT,
INDIRECT, INCIDENTAL, SPECIAL, EXEMPLARY, OR
CONSEQUENTIAL DAMAGES (INCLUDING, BUT NOT LIMITED TO,
PROCUREMENT OF SUBSTITUTE GOODS OR SERVICES; LOSS OF
USE, DATA, OR PROFITS; OR BUSINESS INTERRUPTION)
HOWEVER CAUSED AND ON ANY THEORY OF LIABILITY, WHETHER
IN CONTRACT, STRICT LIABILITY, OR TORT (INCLUDING
NEGLIGENCE OR OTHERWISE) ARISING IN ANY WAY OUT OF THE
USE OF THIS SOFTWARE, EVEN IF ADVISED OF THE POSSIBILITY
OF SUCH DAMAGE.
pstdint.h-0.1.12
n
z
BSD License:
z
Copyright (c) 2005-2011 Paul Hsieh
z
All rights reserved.
z
Redistribution and use in source and binary forms, with or without
modification, are permitted provided that the following conditions are
met:
1. Redistributions of source code must retain the above copyright
notice, this list of conditions and the following disclaimer.
2. Redistributions in binary form must reproduce the above copyright
notice, this list of conditions and the following disclaimer in the
documentation and/or other materials provided with the distribution.
3. The name of the author may not be used to endorse or promote
products derived from this software without specific prior written
permission.
z
THIS SOFTWARE IS PROVIDED BY THE AUTHOR “AS IS” AND
ANY EXPRESS OR IMPLIED WARRANTIES, INCLUDING, BUT
NOT LIMITED TO, THE IMPLIED WARRANTIES OF
MERCHANTABILITY AND FITNESS FOR A PARTICULAR
PURPOSE ARE DISCLAIMED.
z
IN NO EVENT SHALL THE AUTHOR BE LIABLE FOR ANY
DIRECT, INDIRECT, INCIDENTAL, SPECIAL, EXEMPLARY, OR
CONSEQUENTIAL DAMAGES (INCLUDING, BUT NOT LIMITED
TO, PROCUREMENT OF SUBSTITUTE GOODS OR SERVICES;
LOSS OF USE, DATA, OR PROFITS; OR BUSINESS
INTERRUPTION) HOWEVER CAUSED AND ON ANY THEORY OF
LIABILITY, WHETHER IN CONTRACT, STRICT LIABILITY, OR
TORT (INCLUDING NEGLIGENCE OR OTHERWISE) ARISING IN
ANY WAY OUT OF THE USE OF THIS SOFTWARE, EVEN IF
ADVISED OF THE POSSIBILITY OF SUCH DAMAGE.
74
Page 75
Contents
Setup Use Troubleshooting Status LED Appendix
rl78flash 2000.3.1
n
License
=======
The MIT License (MIT)
Copyright (c) 2012 Maxim Salov
Permission is hereby granted, free of charge, to any person obtaining a
copy of this software and associated documentation files (the
“Software”), to deal in the Software without restriction, including
without limitation the rights to use, copy, modify, merge, publish,
distribute, sublicense, and/or sell copies of the Software, and to permit
persons to whom the Software is furnished to do so, subject to the
following conditions:
The above copyright notice and this permission notice shall be
included in all copies or substantial portions of the Software.
THE SOFTWARE IS PROVIDED “AS IS”, WITHOUT WARRANTY OF
ANY KIND, EXPRESS OR IMPLIED, INCLUDING BUT NOT LIMITED
TO THE WARRANTIES OF MERCHANTABILITY, FITNESS FOR A
PARTICULAR PURPOSE AND NONINFRINGEMENT. IN NO EVENT
SHALL THE AUTHORS OR COPYRIGHT HOLDERS BE LIABLE FOR
ANY CLAIM, DAMAGES OR OTHER LIABILITY, WHETHER IN AN
ACTION OF CONTRACT, TORT OR OTHERWISE, ARISING FROM,
OUT OF OR IN CONNECTION WITH THE SOFTWARE OR THE USE
OR OTHER DEALINGS IN THE SOFTWARE.
sqlite 2003.5.7
n
SQLite Copyright
SQLite is in the
Public Domain
All of the code and documentation in SQLite has been dedicated to the
public domain by the authors. All code authors, and representatives of
the companies they work for, have signed affidavits dedicating their
contributions to the public domain and originals of those signed
affidavits are stored in a firesafe at the main offices of Hwaci. Anyone
is free to copy, modify, publish, use, compile, sell, or distribute the
original SQLite code, either in source code form or as a compiled
binary, for any purpose, commercial or non-commercial, and by any
means.
The previous paragraph applies to the deliverable code and
documentation in SQLite - those parts of the SQLite library that you
actually bundle and ship with a larger application. Some scripts used
as part of the build process (for example the “configure” scripts
generated by autoconf) might fall under other open-source licenses.
Nothing from these build scripts ever reaches the final deliverable
SQLite library, however, and so the licenses associated with those
scripts should not be a factor in assessing your rights to copy and use
the SQLite library.
All of the deliverable code in SQLite has been written from scratch. No
code has been taken from other projects or from the open internet.
Every line of code can be traced back to its original author, and all of
those authors have public domain dedications on file. So the SQLite
code base is clean and is uncontaminated with licensed code from
other projects.
75
Page 76
Contents Setup Use Troubleshooting Status LED Appendix
strlcpy.c , v1.11
n
z
Copyright (c) 1998 Todd C. Miller <[email protected]>
z
Permission to use, copy, modify, and distribute this software for any
purpose with or without fee is hereby granted, provided that the
above copyright notice and this permission notice appear in all
copies.
z
THE SOFTWARE IS PROVIDED “AS IS” AND THE AUTHOR
DISCLAIMS ALL WARRANTIES WITH REGARD TO THIS
SOFTWARE INCLUDING ALL IMPLIED WARRANTIES OF
MERCHANTABILITY AND FITNESS. IN NO EVENT SHALL THE
AUTHOR BE LIABLE FOR ANY SPECIAL, DIRECT, INDIRECT, OR
CONSEQUENTIAL DAMAGES OR ANY DAMAGES
WHATSOEVER RESULTING FROM LOSS OF USE, DATA OR
PROFITS, WHETHER IN AN ACTION OF CONTRACT,
NEGLIGENCE OR OTHER TORTIOUS ACTION, ARISING OUT OF
OR IN CONNECTION WITH THE USE OR PERFORMANCE OF
THIS SOFTWARE.
taglib-1.5
n
copyright : (C) 2002 - 2008 by Scott Wheeler
email : [email protected]
“The contents of this file are subject to the Mozilla Public License
Version 1.1 (the “License”); you may not use this file except in
compliance with the License. You may obtain a copy of the License at
http://www.mozilla.org/MPL/
Software distributed under the License is distributed on an “AS IS”
basis, WITHOUT WARRANTY OF ANY KIND, either express or
implied. See the License for the specific language governing rights and
limitations under the License.
tinyxml 2002.4.3
n
www.sourceforge.net/projects/tinyxml
Original file by Yves Berquin.
This software is provided 'as-is', without any express or implied
warranty. In no event will the authors be held liable for any damages
arising from the use of this software.
Permission is granted to anyone to use this software for any purpose,
including commercial applications, and to alter it and redistribute it
freely, subject to the following restrictions:
1. The origin of this software must not be misrepresented; you must
not claim that you wrote the original software. If you use this
software in a product, an acknowledgment in the product
documentation would be appreciated but is not required.
2. Altered source versions must be plainly marked as such, and must
not be misrepresented as being the original software.
3. This notice may not be removed or altered from any source
distribution.
76
Page 77
Contents
Setup Use Troubleshooting Status LED Appendix
Tremor
n
http://wiki.xiph.org/index.php/Tremor
Copyright (c) 2002, Xiph.org Foundation
Redistribution and use in source and binary forms, with or without
modification, are permitted provided that the following conditions are
met:
1. Redistributions of source code must retain the above copyright
notice, this list of conditions and the following disclaimer.
2. Redistributions in binary form must reproduce the above copyright
notice, this list of conditions and the following disclaimer in the
documentation and/or other materials provided with the distribution.
3. Neither the name of the Xiph.org Foundation nor the names of its
contributors may be used to endorse or promote products derived
from this software without specific prior written permission.
THIS SOFTWARE IS PROVIDED BY THE COPYRIGHT HOLDERS
AND CONTRIBUTORS “AS IS” AND ANY EXPRESS OR IMPLIED
WARRANTIES, INCLUDING, BUT NOT LIMITED TO, THE IMPLIED
WARRANTIES OF MERCHANTABILITY AND FITNESS FOR A
PARTICULAR PURPOSE ARE DISCLAIMED. IN NO EVENT SHALL
THE FOUNDATION OR CONTRIBUTORS BE LIABLE FOR ANY
DIRECT, INDIRECT, INCIDENTAL, SPECIAL, EXEMPLARY, OR
CONSEQUENTIAL DAMAGES (INCLUDING, BUT NOT LIMITED TO,
PROCUREMENT OF SUBSTITUTE GOODS OR SERVICES; LOSS
OF USE, DATA, OR PROFITS; OR BUSINESS INTERRUPTION)
HOWEVER CAUSED AND ON ANY THEORY OF LIABILITY,
WHETHER IN CONTRACT, STRICT LIABILITY, OR TORT
(INCLUDING NEGLIGENCE OR OTHERWISE) ARISING IN ANY
WAY OUT OF THE USE OF THIS SOFTWARE, EVEN IF ADVISED
OF THE POSSIBILITY OF SUCH DAMAGE.
zlib
n
http://www.zlib.net/
zlib.h -- interface of the ‘zlib’ general purpose compression library
version 1.2.3, July 18th, 2005
Copyright (C) 1995-2004 Jean-loup Gailly and Mark Adler
This software is provided ‘as-is’, without any express or implied
warranty. In no event will the authors be held liable for any damages
arising from the use of this software.
Permission is granted to anyone to use this software for any purpose,
including commercial applications, and to alter it and redistribute it
freely, subject to the following restrictions:
1. The origin of this software must not be misrepresented; you must
not claim that you wrote the original software. If you use this
software in a product, an acknowledgment in the product
documentation would be appreciated but is not required.
2. Altered source versions must be plainly marked as such, and must
not be misrepresented as being the original software.
3. This notice may not be removed or altered from any source
distribution.
Jean-loup Gailly [email protected], Mark Adler
[email protected]
The Spotify software is subject to third party
o
licenses found here:
www.spotify.com/connect/third-party-licenses
77
Page 78

Page 79

HEOSbyDenon.com
78
Copyright © 2015 D&M Holdings Inc. All Rights Reserved.
3520 10405 00ADB
 Loading...