


3.5 inch Wireless Digital
Video Baby Monitor
UserManual
1.SAFETY INSTRUCTIONS
1.CAUTION: Keep the device away from the reach of children.
2.Strangulation Hazrd: Children can become entangled in the cords, therefore power
cords should be kept more than 3 feet away from the crib and baby's reach at all times.
Baby monitors and cameras with power cords should never be hung on or near the crib.
This product is not a toy and should be kept out of children's reach.
3. Read and Keep to instructions: All the safety and operating instructions should be
read before the video baby monitor is operated. This product cannot replace responsible
adult supervision. You MUST Check your child’s activity regularly, as this product will not
alert parents to slient activities of child.
4. This product is intended for indoor use only.

5. Test monitor before use and after changing camera location. Check the reception
regularly. Obstacles , such as concrete walls, may shorten the wireless siginal transfer
range.
6. Use only the AC adapters provided. Always unplug AC adapter from wall outlets and
power source during periods of non-use.
7. Do not touch the plug contacts with sharp or metal object.
8. Do not allow water damage to the monitor unit, charging port , or charging cable which
cause overheat of the charging components.
9. Do not let this unit be exposed to rain, moisurse, dripping or splashing and dricect heat
sources shuch as a candle, radiator, heat register, stove or other appliance that emits
heat.
10. Do not attempt to repair or adjust any of the electrical or mechanical functions of the
units, if you do, the gurantee will be made void.
2.MAIN FEATURES
1.Unlike internet cameras: no loading time to open app. Instant play, lag-free, and does n
ot hog up your smartphone screen thanks to a dedicated 3.5" TFT LCD with full visual
angle.
2.Remote pan/zoom. Pan angle: 355, Zoom: X2
3.Interchangeableoptical lens capability: allows you to customize viewing angle .
4. Two-way talk, crystal clear calls. Built-in 4 lullabies
5. Live temperature monitoring. Night vision: 5 meters distance.
6. Max 4 cameras can be added, 1 monitor plus 4 cameras
7. 30s later into ECO mode, waked up by audio from Baby unit. Eco mode to energy
saving (Screen on :6 hours, Standby mode:10 hours)

3.PACKAGE INCLUDES
1 x 3.5" Parent Unit(Monitor) 1 x Baby Unit (Camera)
2 x AC Power Adapters 1 x User Manual
1 x Wide Angle Lens
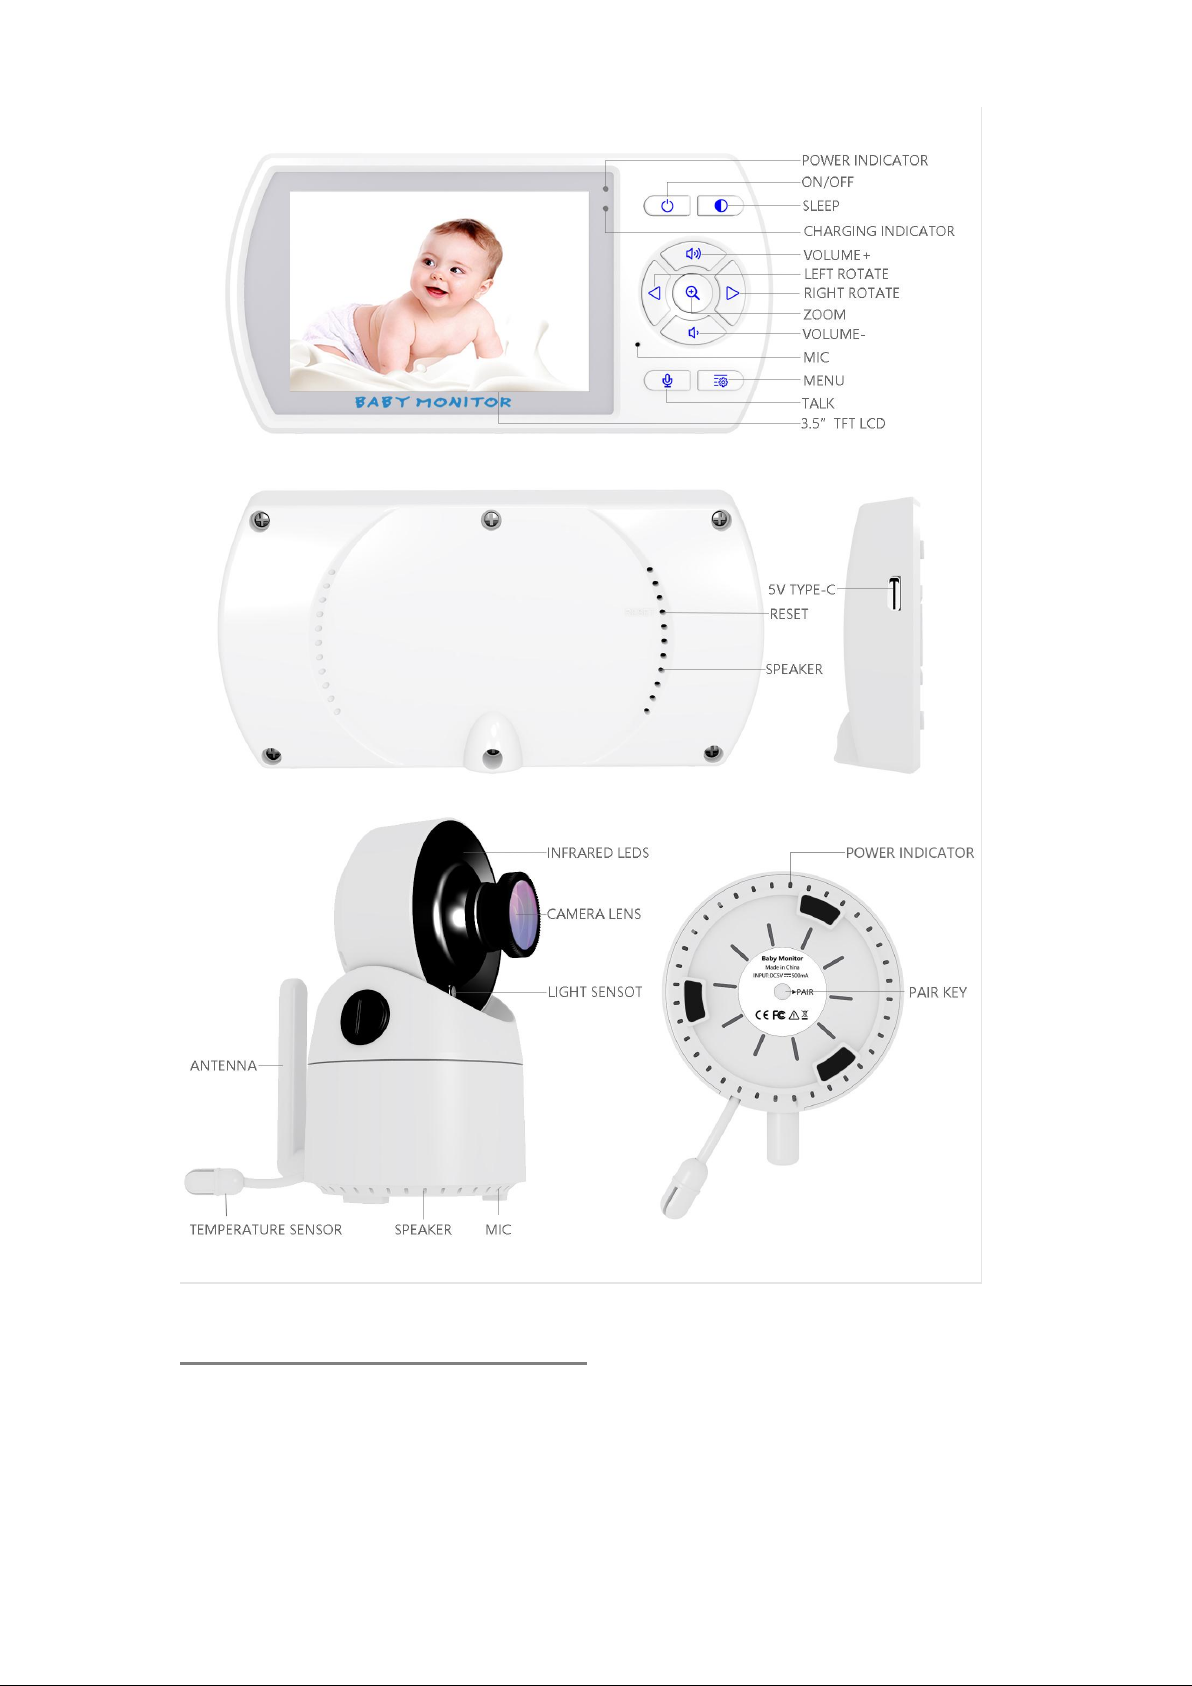
4. PRODUCT OVERVIEW
4.1 Parent unit and Babyunit overview
4.2 Menu Options Overview
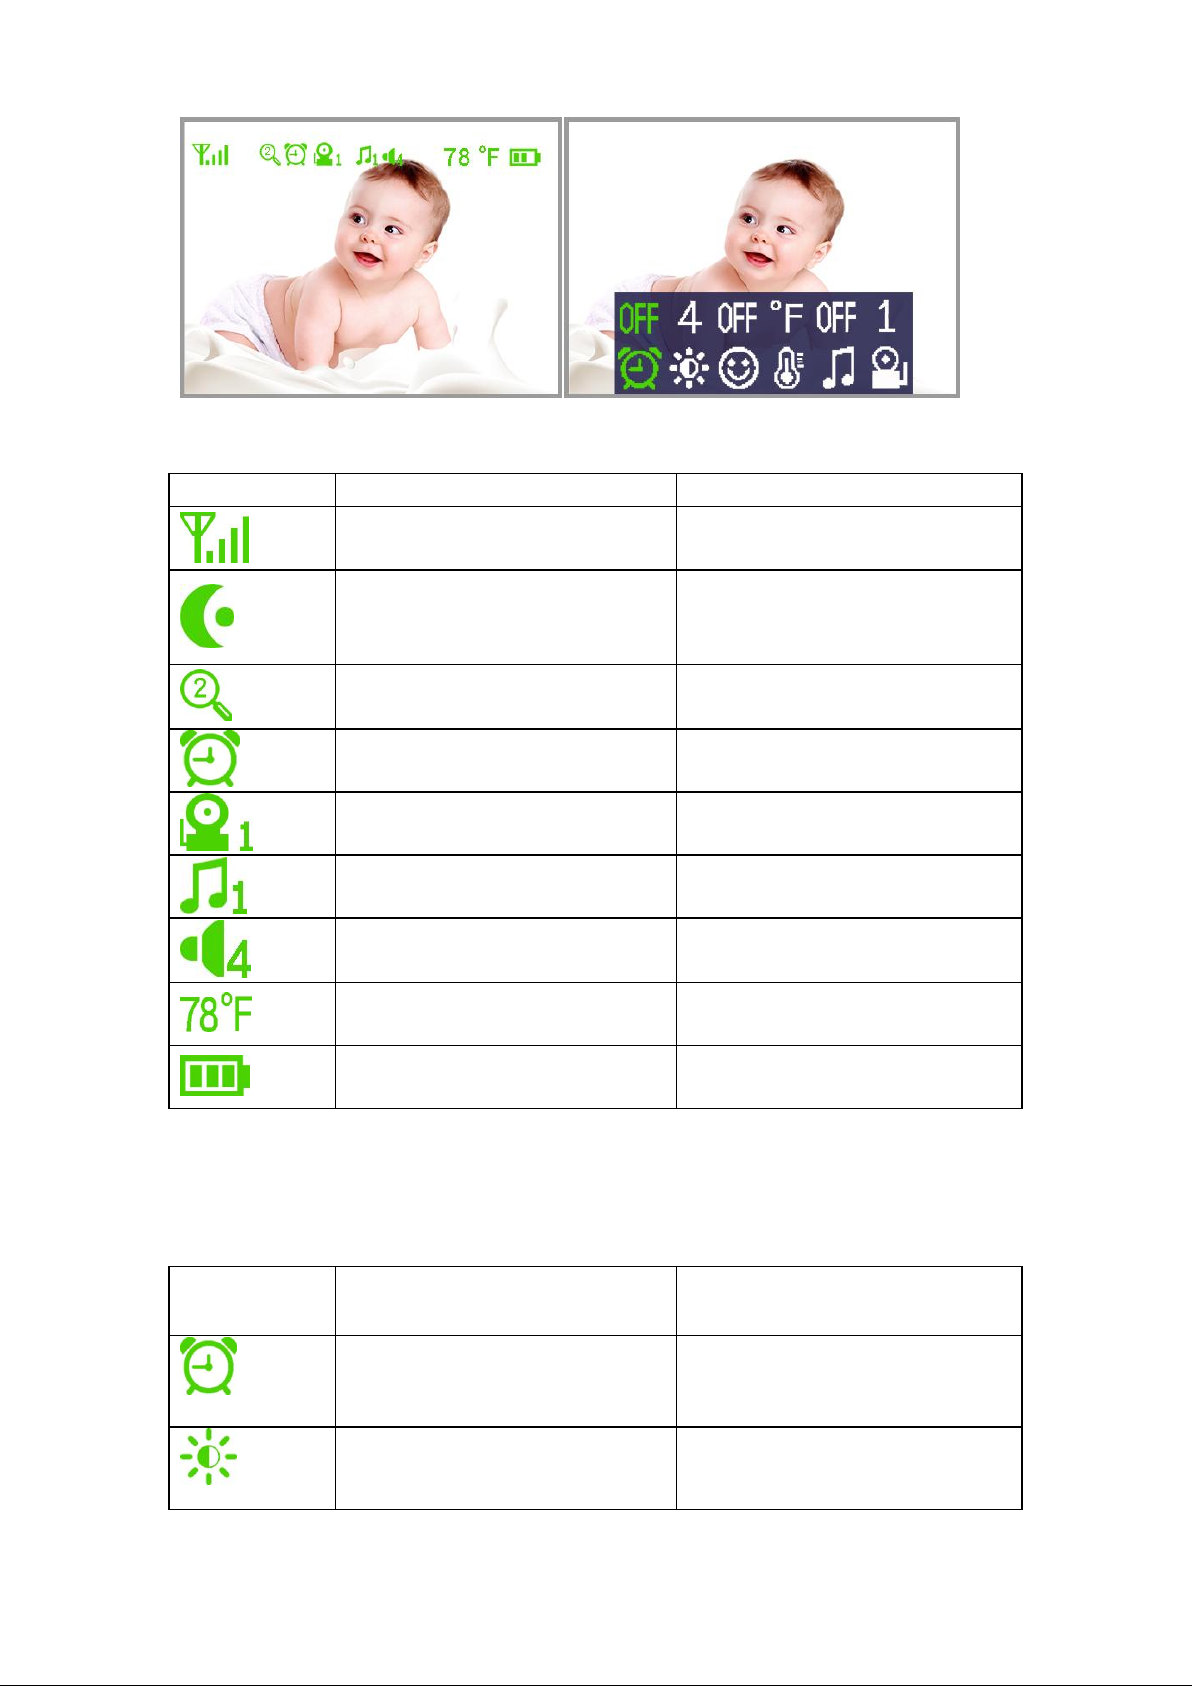
Status Indication Overview ( Upper Screen Bar)
Icon
Description
Options
Signal Strength lndicator
4 levels
Night Vision
ON/OFF
Digital Zoom
1X/2X
Feed Time Setting
1H/2H/3H/4/OFF
Camera Selected
Cam1/ Cam2/ Cam3/ Cam4
Lullabies
1/2/3/4/OFF
Volume
6 levels
Room Temperature
°C / °F
Battery Power
3levels, or flashing (low battery)
Icon
Description
Options
Feed Time Setting
1H/2H/3H/4/OFF
Screen Brightness
6 levels
Menu Options Overview(Lower Screen Bar)

Sleep Mode
ON/OFF
Room Temperature
°C / °F
Lullabies
1/2/3/4/OFF
Camera Selected
Cam1/ Cam2/ Cam3/ Cam4/
Cam cycle
5. INSTRUCTIONSFOR USING
5.1 Turn on the Baby Unit:
﹡Only use A/C adapter included in this package (5V );
1. Locate the connector socket on the back of the baby unit ;
2. Connect the adapter cable to the baby unit ;
3. Plug the A/C adapter into the wall outlet.
5.2 Turn on the Parent Unit:
﹡Only use the A/C adapter included in this package (5V );
The parent unit is supplied with a built-in rechargeable Li-ion battery ( 3.7V 950mAh).
We suggest to connect the monitor to adapter plugged into the mains whenever possible,
in order to keep the battery charged.
1. Locate the connector socket on the right side of the parent unit;
2. Connect the adapter cable to the parent unit;
3. Plug the A/C adapter into the wall outlet;
4. Press and hold the ON/OFF button for 3 seconds on the parent unit.
5. Once parent unit is on , it will display the video captured by the baby unit on the LCD.
Warning:
Choking hazard- Keep the cord out of the baby's reach. Never place a camera with cables
less than 3 feet from the cot. Never use extension cords with A/C adapters. Use only the
A/C adapters supplied.

NOTE:
The Parent Unit can work without plugging in after fully charged, the Baby Unit requires to
be plugged in at all times.
6. BASICOPERATION OF BUTTONS
6.1 Screen On/Off
Press the ON/OFF button for 3 seconds to turn on/off the screen.
6.2 Sleep Mode
Short press the SLEEP button to turn the LCD screen off while keeping the audio
on.This mode conserves power.Short press the SLEEP button to turn screen
back on
6.3 Volume Adjustment
Short press the VOLUME UP button or VOLUME DOWN button to select
the desired volume level from level 1- 6 .
Level 0 is mute.
6.4 Pan
The Baby Unit can be remotely controlled from the Parent Unit.
Press the LEFT button or RIGHT button to pan left or right.
6.5 Digital Zoom

Press the DIGITAL ZOOM button to zoom 1X or 2X (Default setting is 1X).
6.6 Talkto Baby
Press and hold the TALK button on the front of the monitor.A microphne icon
will be displayed on the top of the LCD screen while this functions is working. Release the
button when you have finished talking and listening to the sound from the baby’s room
again. Bear in mind that you can't listen to your baby while you're talking to it; to listen it,
you will have to stop press this button.
6.7 Enter / Exit Menu Mode
Pressthe MENU button to enter the menu mode; press it again to exit menu
mode.
7.MENU OPERATION
In menu mode these buttons mean:
… Up button …Down button
… Left button …Right button
7.1Feed TimeSetting
1.Press the MENU button and the menu bar will pop up
2.Press the LEFT button or RIGHT button until Feed Time icon is
highlighted
3. Press the UP button or DOWN button to select the desired time from
1,2,3,4h and OFF .(The default setting is OFF)
7.2 Screen Brightness

1.Press the MENU button and the menu bar will pop up
2.Press the LEFT button or RIGHT button until Brightness icon is
highlighted.
3. Press the UP button or DOWN button to choose the desired
Brightness level from level 0-6 .
7.3 Sleep Mode Delay (Video OFF, Audio ON)
This sets the delay time for the screen to turn off automatically ( entering SLEEP MODE).
1.Press the MENUbutton and the menu bar will pop up.
2.Press the LEFT button or RIGHT button until Sleep Mode Delay icon
is highlighted.
3. Press the UP button or DOWN button to choose between ON
and OFF .(If choose ON that meansafter 30 seconds LCD screen turns off
automaticallywhile keeping the audio , LCD screen turns on again automatically when the
Baby unit makes sound.)
7.4 Temperature Scale Display Setting
1.Press the MENUbutton and the menu bar will pop up.
2.Press the LEFT button or RIGHT button until Temperature iconis
highlighted.
3. Press the UP button or DOWN button to choose between °C
and °F .
7.5 Lullabies

1.Press the MENUbutton and the menu bar will pop up.
2.Press the LEFT button or RIGHT button until Lullabiesicon is
highlighted.
3.Press the UP button or DOWN button to choose the desired from
1-4 Lullabies, Cycle or OFF .(The default setting is OFF)
7.6 Pairing
The baby unit is pre-paired to your parent unit.You do not need to pair it again unless the
baby unit loses it link with the parent unit. To re-pair your baby unit, follow the procedure
bellow:
Note: Before you begin pairing, be sure to have the monitor and the camera side by side.
1. One Parent Unit , One Baby Unit:
1.1. Make sure the power indicator on the bottom of the baby is always on and
the parent is in the power off state.
1.2. Press and hold the ON/OFF button until the blue LED light flashes
rapidly in the upper right corner of the screen. The screen enters the pairing
mode then release the ON/OFF button. Immediately pressand hold the pair
button on the bottom of the baby unit until this indicator flashes quickly.
1.3. If sucessful, the video will display on the screen. If unsucessful, please try
it again.
2. One Parent Unit ,Two Baby Units:
2.1.Press the MENU button and the menu bar will pop up
2.2. Press the LEFT button or RIGHT button until Camera Selected icon is
highlighted
2.3.Press the UP button or DOWN button to select the desired camera
channel from 1-4 Camera Channel ,press the ON/OFF button to turn off.

2.4.Then operate as above ( One Parent Unit , One Baby Unit)
2.5. Add the 3rd cameras as the same
NOTE
A Baby Unit can only be paired to one Parent Unit at any one time.
7.7View a Camera
1.Press the MENU button and the menu bar will pop up.
2.Press the LEFT button or RIGHT button until Camera Selected icon is
highlighted.
3.Press the UP button or DOWN button to choose the desired camera from
1-4 Camera Channel . If choose camera cycle ,the paired cameras will switch
automatically every 30 seconds.
8.Optical Wide Angle Lens
The optiical wide angle lens is available to obtain a wider range of vision around the baby
unit. It provides a zoomed-out effect, allowing you to see more around the baby unit.This
setup is recommended for surveillance use or monitoring movement in playroom or large
rooms.
Warning: Choking Hazard. The optical lensare small parts. Keep baby unit away
from baby's reach at all time.
Always ensure that the lens are screwed tightly onto the baby unit.

9. SPECIFICATIONS
Promble
Solution
No pictures from a
camera
1.Check all the connection of Parent Unit and Baby Unit, ensure
these are properly connected.
2, Make sure parent unit and baby unit are working separately.
3. Check they are paired.
4. Check the distance it is effective between the two separate kits.
No sound from the
camera when operating
the Parent Unit
1. Make sure the mirrcophone is open or not.
2. Check the battery of the Parent Unit is slow or enough.
3. Check the distance from the Baby Unit to the baby.
4. The Parent Unit may be out of reach of the Baby Unit.
Interference or poor
reception (Flashing
image on the screen)
1. Move the monitor close to the camera.
2. The camera or monitor may be placed too close to many metal
object.
3. Other electronic devices may be interfering with the signal
Items
Camera
LCD
Type of modulation
GFSK
GFSK
Type of spread spectrum
FHSS
FHSS
Transmission frequency
2400 MHz-2483MHz
2400 MHz-2483MHz
Transmission range
328-984ft
328-984ft
Lens size/Screen size
1/4 CMOS
3.5” TFT-LCD
Effective pixels
640x480(VGA)
480x320
Power supply/battery
Type-C 5v
Type-C 5v lithium polymer/3.7V 950mAH
Operation temperature
0℃―50℃
0℃―50℃
Operation humidity
15%―85%
15%―85%
10.TROUBLE SHOOTING

4. The battery power may be too low.
Image frozen
1. Restart the baby unit ( plug out the adapter, then plug it into the
socket again).
2. Press the power key of monitor to turn off, then turn on.
11. WARRANTY TERMS
We take quality very seriously; this is why all of our products come with a one year
warranty from the original purchase date against defects in workmanship and materials .
This warranty does not apply to any product that has been subject to abuse, misuse,
negligence or accident, nor does it apply to any batteries that may be supplied with the
product. Defects caused by tampering, unauthorized alterations or repairs are not coverd
by this warranty.
12. REMARKS
Dear customers or consumers, if you are experiencing difficulties in using our products,
please contact the relevant personnel for the after-sales service. We will be very
enthusiastic to response it for you.

 Loading...