

Page 1
Model MP-941/942/943/944
SECTION 3. OPERATION
3-1. INTRODUCTION This section provides operating procedures for the
multipurpose holding cabinets. Read the Introduction,
Installation and Operation Sections, and all instructions
should be followed before operating the cabinet.
This section contains an explanation of all controls,
components, and information on operating procedures
and daily maintenance.
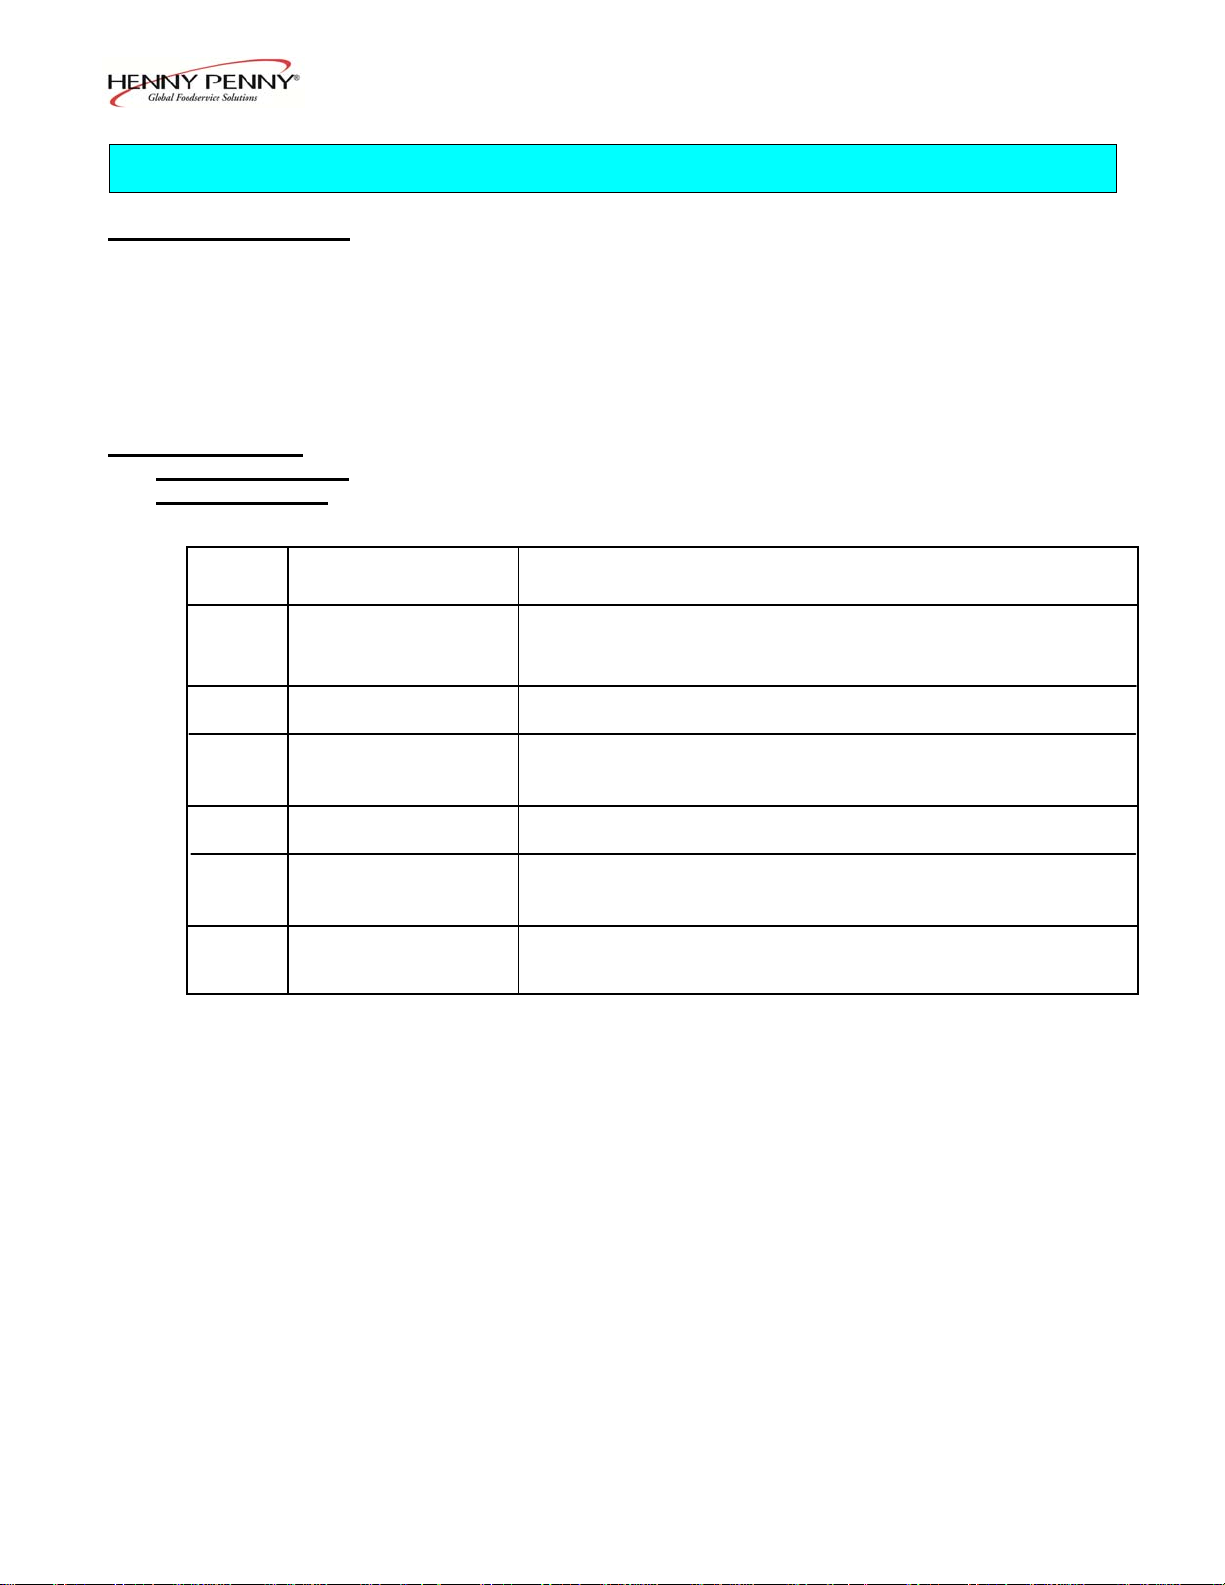
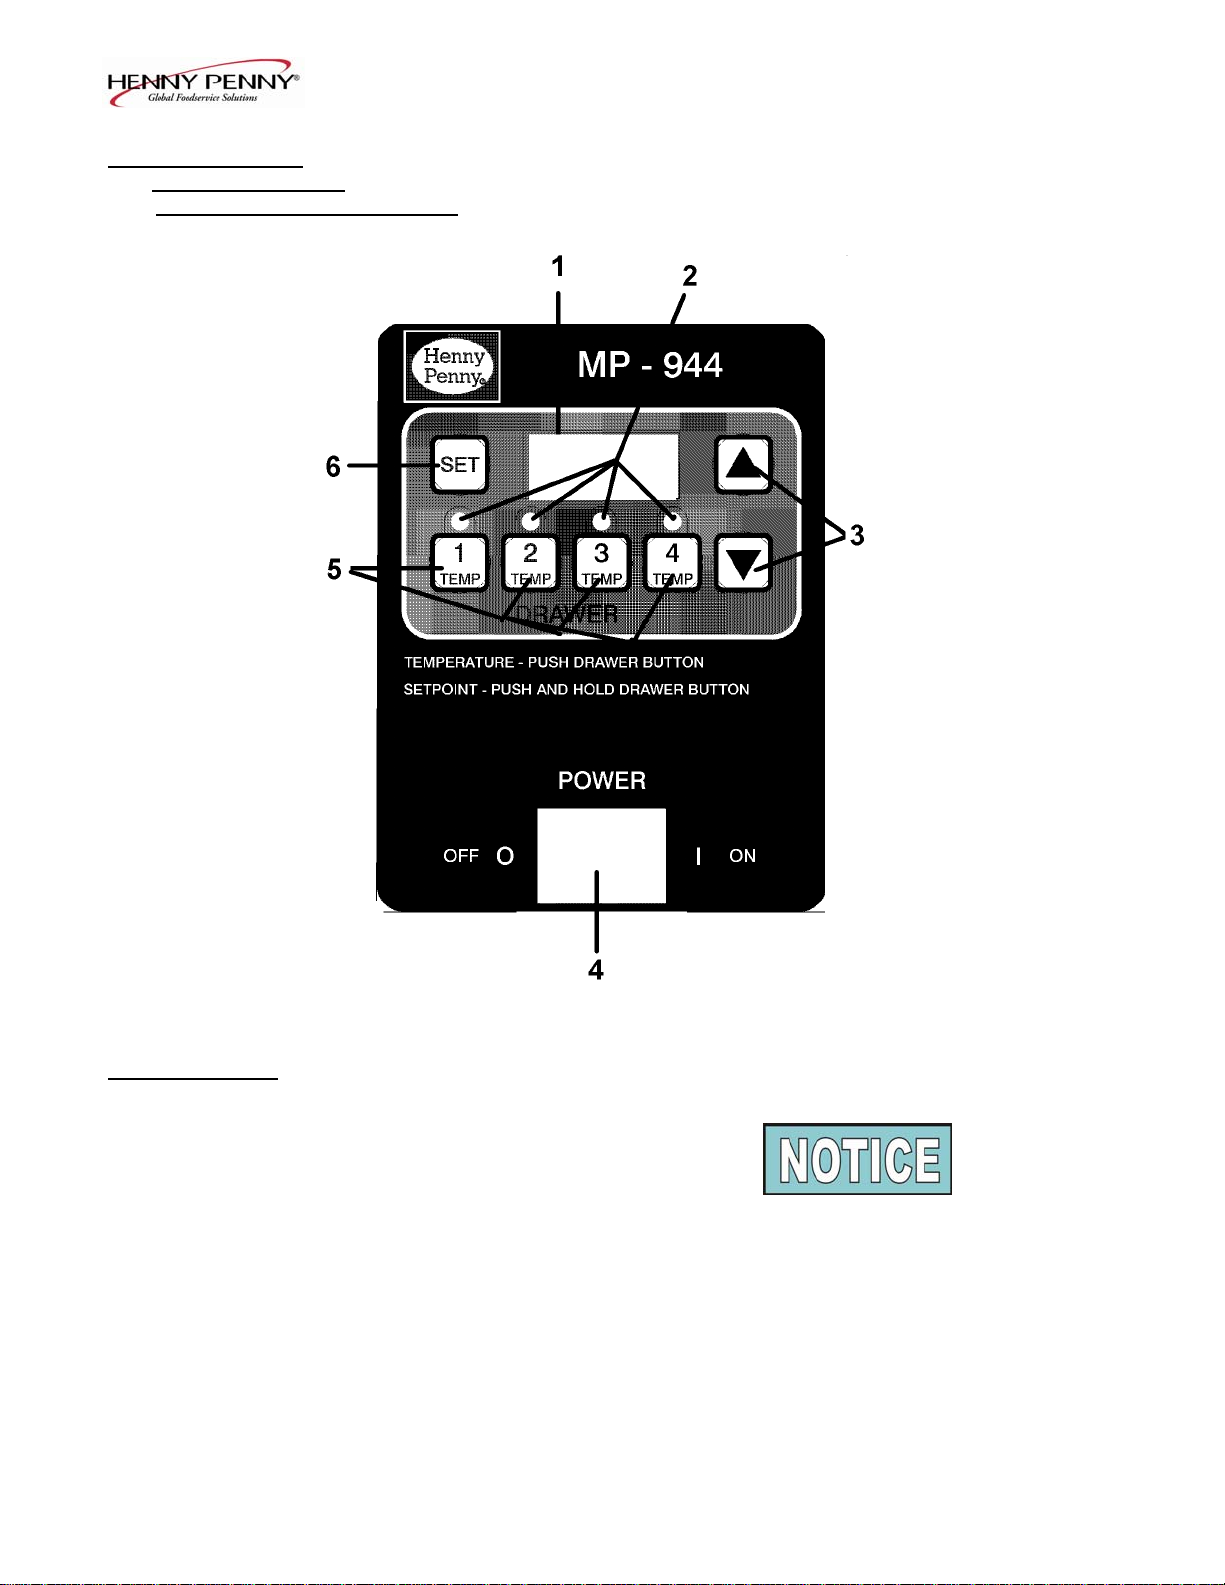
3-2. OPERATING Figure 3-1 identifies and describes the functions of all
CONTROLS AND the operating controls and components of the cabinet.
COMPONENTS
Item Description Function
No.
1 Digital Display An LED display which shows the time of day and drawer
temperature
2 LEDs When illuminated, setpoint temperature has been reached
3 UP and DOWN Used when programming the controls, changing the
Buttons display, and accessing the Special Program Mode
4 POWER Switch A rocker switch that controls the power to the unit
5 Drawer TEMP Used to view the drawer temperature, and to set the
Buttons setpoint temperature for the drawer
6 SET Button Used in the Program Mode
1210 3-1
Page 2
3-2. OPERATING
CONTROLS AND
COMPONENTS (Continued)
3-3. START-UP
Model MP-941/942/943/944
Figure 3-1
Before using the cabinet, it should be thoroughly
cleaned as described in the cleaning procedures
section of this manual. To put the cabinet into
operation, move each POWER switch to the ON
position and adjust each control to the appropriate
temperature. The power light should illuminate
indicating that the unit is operating. The operating
temperature of this unit should be achieved in
approximately 30 minutes.
3-2 103
Page 3

Model MP-941/942/943/944
3-3. START-UP (Continued) 1. Turn the POWER switch to the ON position.
2. The display will show the time of day or “ON”.
Press and hold the appropriate drawer button to
view the actual temperature of the drawer.
3. When the temperature LED illuminates, the setpoint
temperature has been reached and product can now
be loaded into the drawer.
3-4. OPERATING WITH 1. Place the hot product inside one of the drawers.
PRODUCT
2. Serve the product first that has been in the cabinet
the longest.
3. Open the drawers only as necessary to load and
serve the product.
3-5. CLEANING 1. Move the POWER switch to the OFF position.
2. Disconnect the electrical supply to the unit.
To avoid burns, allow the unit to cool before
cleaning by opening all the drawers fully for
approximately 20 minutes.
3. Remove the drawers by pulling straight out and
tilting up.
Step 3
4. Clean drawers with a cloth and soapy water.
203 3-3
Page 4

Model MP-941/942/943/944
3-5. CLEANING (Continued) 5. Clean the interior of the cabinet thoroughly with a
cloth and soapy water.
Do not use steel wool, other abrasive cleaners or
cleaners/sanitizers containing chlorine, bromine,
iodine or ammonia chemicals, as these will
deteriorate the stainless steel material and shorten
the life of the unit.
Do not spray the unit with water, such as, with
a garden hose. Failure to follow this caution could
cause component failure.
6. Wipe down the exterior of the cabinet with a damp
cloth. Avoid getting water in the area of the control
panel.
7. Replace the drawers.
8. If the unit is to be left off, leave the drawers open
two or three inches.
3-6. OPERATION AND
Unit Operation
PROGRAMMING
1. Turn POWER switch to the ON position.
2. The display will show the time of day, or “ON”.
Press and hold any of the drawer buttons to view the
actual temperature of the drawer.
Time of Day Programming
Press and hold the SET button while using the UP
and DOWN buttons to set the desired time. When
the SET button is released the time will be saved.
Temperature Setpoint Programming
1. Press and hold the appropriate drawer button for 6
seconds. The actual temperature will be shown first
followed by the flashing setpoint temperature.
3-4 203
Page 5

Model MP-941/942/943/944
3-6. OPERATION AND 2. While holding in on the drawer button, press and
PROGRAMMING release the SET button. Now the setpoint temperature
(Continued) will be blinking at a faster rate. Now release the
drawer button.
3. Press the UP and DOWN buttons to change the
setpoint temperature.
4. Once the desired setpoint temperature is reached,
press the SET button to return to normal operation
mode and the setpoint will be saved.
Special Program Mode
1. Turn the POWER switch off. Press and hold both
the UP and DOWN buttons and turn the POWER
switch back on. Press and hold the UP and DOWN
buttons until “SP” shows on the display, then release
the UP and DOWN buttons. Display will now show
“°F” or “°C”.
2. Press the UP or DOWN buttons to toggle from
“°C” (Celsius), or “°F” (Fahrenheit).
3. Press and release the SET button, and display will
show “CAL”. Press and hold the button of the drawer
to be calibrated, and use the UP and DOWN buttons
to match the display to the actual temperature.
4. After the calibration mode, press and release the SET
button to access Initialization Mode.
5. Press and hold either the UP or DOWN button until
display reads “In- SYS”. This resets all setpoint
temperatures to 180 º F (82º C).
6. After the initialization mode, press and release the
SET button the access the Output Test Mode.
7. “OP” will show in the display. Press and release any
of the drawer buttons to turn the relays and heaters off
and on.
8. After the output test mode, press and release the SET
button to access the Display Mode.
9. If “C=y” shows in the display, the time of day shows
in the display during normal operation. If “C=n”
shows in the display, “ON” shows on the display
during normal operation. Press and release the UP
and DOWN buttons to toggle from “y” to “n” or
vice versa.
10. Press and hold the set button to exit Special Program
Mode at any time.
203 3-5
Page 6

Model MP-941/942/943/944
3-6. OPERATION AND Setting Control to the Correct Number of Drawers
PROGRAMMING
(Continued) The different models, MP-941, 942, 943, and 944, all use
the same control board. The boards are programmed at
the factory for the correct unit. But, should the unit show
“E06” or some drawers will not heat, the board may not
be programmed for the appropriate unit.
The LED flashes at a fast rate for the drawer(s) not
programmed correctly.
To check the drawer programming, turn the unit off, then
back on. The display will flash the number of drawers
the unit is programmed for. If the unit is not programmed
correctly, follow these steps:
1. Turn the power switch off, then press and hold the
SET button and the drawer button, which corresponds
to the number of drawers that the unit has, and turn
unit back on, ex: MP-944=SET and number 4 button.
2. Release the buttons, and now the unit should be set
up for use.
Pressing and holding the drawer button shows the
temperature of that drawer. If no temperature is
displayed, the unit may need to be programmed by
the above steps.
3-7. ERROR CODES
DISPLAY CAUSE PANEL BOARD CORRECTION
“E-4” Control board Turn switch to OFF position, then turn switch back to
overheating ON; if display shows “E-4,” the control board is
getting too hot; make sure unit is not overheating
“E-6” Faulty temperature Check to see if unit is set to the correct number of
probe drawers, ex: MP-942=2 drawers (see programming
instructions)
“E-41” Memory scrambled Press and release the UP and DOWN buttons to
initialize the program; if “E-41” persists replace the
control board
“Hi” Unit overheating; Have relay or control board replaced
faulty relay or
control board
3-6 203
 Loading...