

Page 1
OPERATOR’S
MANUAL
FlexFusionTM GAS PLATINUM COMBI
MODEL
FPG-615
FPG-621
FPG-115
FPG-121
FPG-215
FPG-221
REGISTER WARRANTY ONLINE AT WWW.HENNYPENNY.COM
REGISTER WARRANTY ONLINE AT WWW.HENNYPENNY.COM
Read instructions before operating the appliance
Page 2

Operating and display elements
2
a
On Off
button
f
"Automatic cooking" button
b
FlexiHelp
button
g
"Equipment functions" button
c
Operating element with
touchscreen
h
Back
button
d
"Manual cooking" button
i
Information bar
e
Language selection
button
a
b
c d e
i h g
f
Operating and display elements
Page 3

Directory of contents
3
1
Introduction
8
1.1
About this manual
8
1.1.1
Explanation of signs
9
1.2
Intended use
11
1.3
Warranty
11
2
Safety information
12
3
Rules of conduct when the smell of gas is detected
16
4
Description of the unit
17
4.1
Overview of the unit
17
4.1.1
Countertop unit
17
4.1.2
Floor-standing unit
18
4.2
Features
19
4.2.1
Characteristics
19
4.2.2
Operating modes
19
4.2.3
Types of cooking
20
4.2.4
Expanded cooking functions
21
4.2.5
Core temperature measurement
23
4.2.6
Barcode scanner
24
4.2.7
USB port
24
4.2.8
HACCP logging
24
4.2.9
VideoAssist
24
4.2.10
ChefsHelp
25
4.2.11
WaveClean automatic cleaning
25
4.2.12
CombiDoctor (self-diagnostic program)
25
4.3
Operating, control and display element functions
25
Directory of contents
Page 4

Directory of contents
4
4.4
Application
26
4.4.1
Plate capacity during regeneration
26
4.4.2
Loading capacity
27
4.4.3
Temperature standard setting
27
4.4.4
Core temperature standard setting
28
4.5
Chef’s Touch equipment controls
28
4.5.1
Touchscreen operation
28
4.5.2
Display elements
31
5
Putting the unit into service
33
6
Operating the unit
34
6.1
Switching the unit on and off
34
6.1.1
Switching on
34
6.1.2
Switching off
34
6.2
Opening and closing the cooking zone door
35
6.2.1
Opening the single-stage door latch
35
6.2.2
Closing the single stage door latch
35
6.2.3
Opening the two-stage door latch
36
6.2.4
Closing the two-stage door latch
36
6.3
Loading and emptying the unit
37
6.3.1
Loading and emptying
37
6.3.2
Loading and emptying with a tray rack trolley
38
6.3.3
Loading and emptying with a tray trolley
39
6.4
Using the core temperature sensor
41
6.4.1
Measuring with a 4-point core temperature sensor
41
6.4.2
Measuring with a sous-vide core temperature sensor
42
6.4.3
Measuring the core temperature when cooking frozen food
42
6.5
Making the basic settings
43
6.5.1
Opening the Setting menu
43
Page 5

Directory of contents
5
6.5.2
Retrieving equipment information
44
6.5.3
Setting the date and time
45
6.5.4
Presetting the language selection
46
6.5.5
Activating and cancelling inhibit operation
47
6.6
Basic functions
48
6.6.1
Setting the cooking temperature
48
6.6.2
Setting the cooking time and continuous operation
49
6.6.3
Setting the core temperature
51
6.6.4
Setting the fan speed and direction of rotation
52
6.6.5
Preparing the USB flash drive for initial use
52
6.6.6
Inserting and removing a USB flash drive
53
6.6.7
Exporting the HACCP log
53
6.7
Equipment functions
53
6.7.1
Opening the Equipment function menu
54
6.8
Manual cooking
54
6.8.1
Opening the Manual cooking menu
54
6.8.2
Creating a cooking program
54
6.9
User's own cooking programs
55
6.9.1
Creating a cooking program
55
6.9.2
Saving the cooking program
58
6.9.3
Exporting a cooking program
61
6.10
Automatic cooking (autoChef)
61
6.10.1
Opening the Automatic cooking menu
61
6.10.2
Finding and opening a cooking program
62
6.10.3
Starting the cooking program
63
6.10.4
Ending the cooking program
64
6.10.5
Modifying the cooking program
65
6.10.6
Delete cooking program
66
6.10.7
Exporting and importing a cooking program
66
Page 6

Directory of contents
6
6.11
Pausing and finishing use
68
7
Cleaning and caring for the unit
69
7.1
Preventing corrosion
69
7.2
Remove rust spots
69
7.3
Cleaning the housing
70
7.4
Cleaning the handle, operating elements and operating panel
membrane
70
7.5
Cleaning the touchscreen
71
7.6
Cleaning the door seal
72
7.7
Cleaning the cooking zone door
73
7.7.1
Cleaning the door with hygienic glazing
73
7.8
Cleaning the steam outlet
73
7.9
Cleaning the condensation hood (optional)
74
7.10
Removing calcium deposits from the unit
75
7.11
Cleaning the cooking zone automatically with WaveClean
75
7.11.1
Preparing for cleaning
75
7.11.2
Selecting the cleaning level
76
7.11.3
Inserting the cleaning cartridge
76
7.11.4
Starting automatic cleaning
77
7.11.5
Cancelling automatic cleaning
77
7.11.6
Ending automatic cleaning
77
7.12
Cleaning the cooking zone manually
78
7.12.1
Preparing the cooking zone
78
7.12.2
Starting the cleaning program
78
7.12.3
Spraying the cleaner
79
7.12.4
Allowing the cleaner to act
79
7.12.5
Starting cleaning
79
7.12.6
Rinsing the cooking zone
80
Page 7

Directory of contents
7
7.12.7
Drying the cooking zone
80
7.13
Swinging the air diverter open and closed
81
7.14
Inspecting the unit
82
7.14.1
Performing a visual inspection
82
7.14.2
Running CombiDoctor (self-diagnostic program)
82
8
Troubleshooting
84
8.1
Causes of errors and remedies
84
8.2
Nameplate
84
9
Dispose of unit in an environmentally responsible manner
85
Page 8

1
Introduction
About this manual
8
1
1.1
Target group
Figures
Introduction
About this manual
The instruction manual is part of the unit and contains information:
▪ on safe operation
▪ on cleaning and care
▪ on remedial actions in case of faults
Observe and adhere to the following instructions:
▪ Read the instruction manual completely before operating the unit for the
first time.
▪ Make the instruction manual available to the operator at all times at the
operating site of the unit.
▪ Insert any supplements from the manufacturer.
▪ Preserve the instruction manual throughout the service life of the unit.
▪ Pass on the instruction manual to any subsequent operator of the unit.
The target group of the instruction manual is the operator, who is entrusted
with the operation, cleaning and care of the unit.
All figures in this manual are intended as examples. Discrepancies between
these and the actual unit can arise.
Page 9

Introduction
1
About this manual
9
DANGER
Imminent threat of danger
Failure to comply will lead to death or very severe injuries.
WARNING
Possible threat of danger
Failure to comply can lead to death or very severe injuries.
CAUTION
Dangerous situation
Failure to comply can cause minor or moderate injuries.
SAFETY INSTRUCTIONS
Material damage
Failure to comply can cause material damage.
NOTICE
Information
Notes for better understanding and operation of the unit.
1.1.1
Explanation of signs
Page 10

1
Introduction
About this manual
10
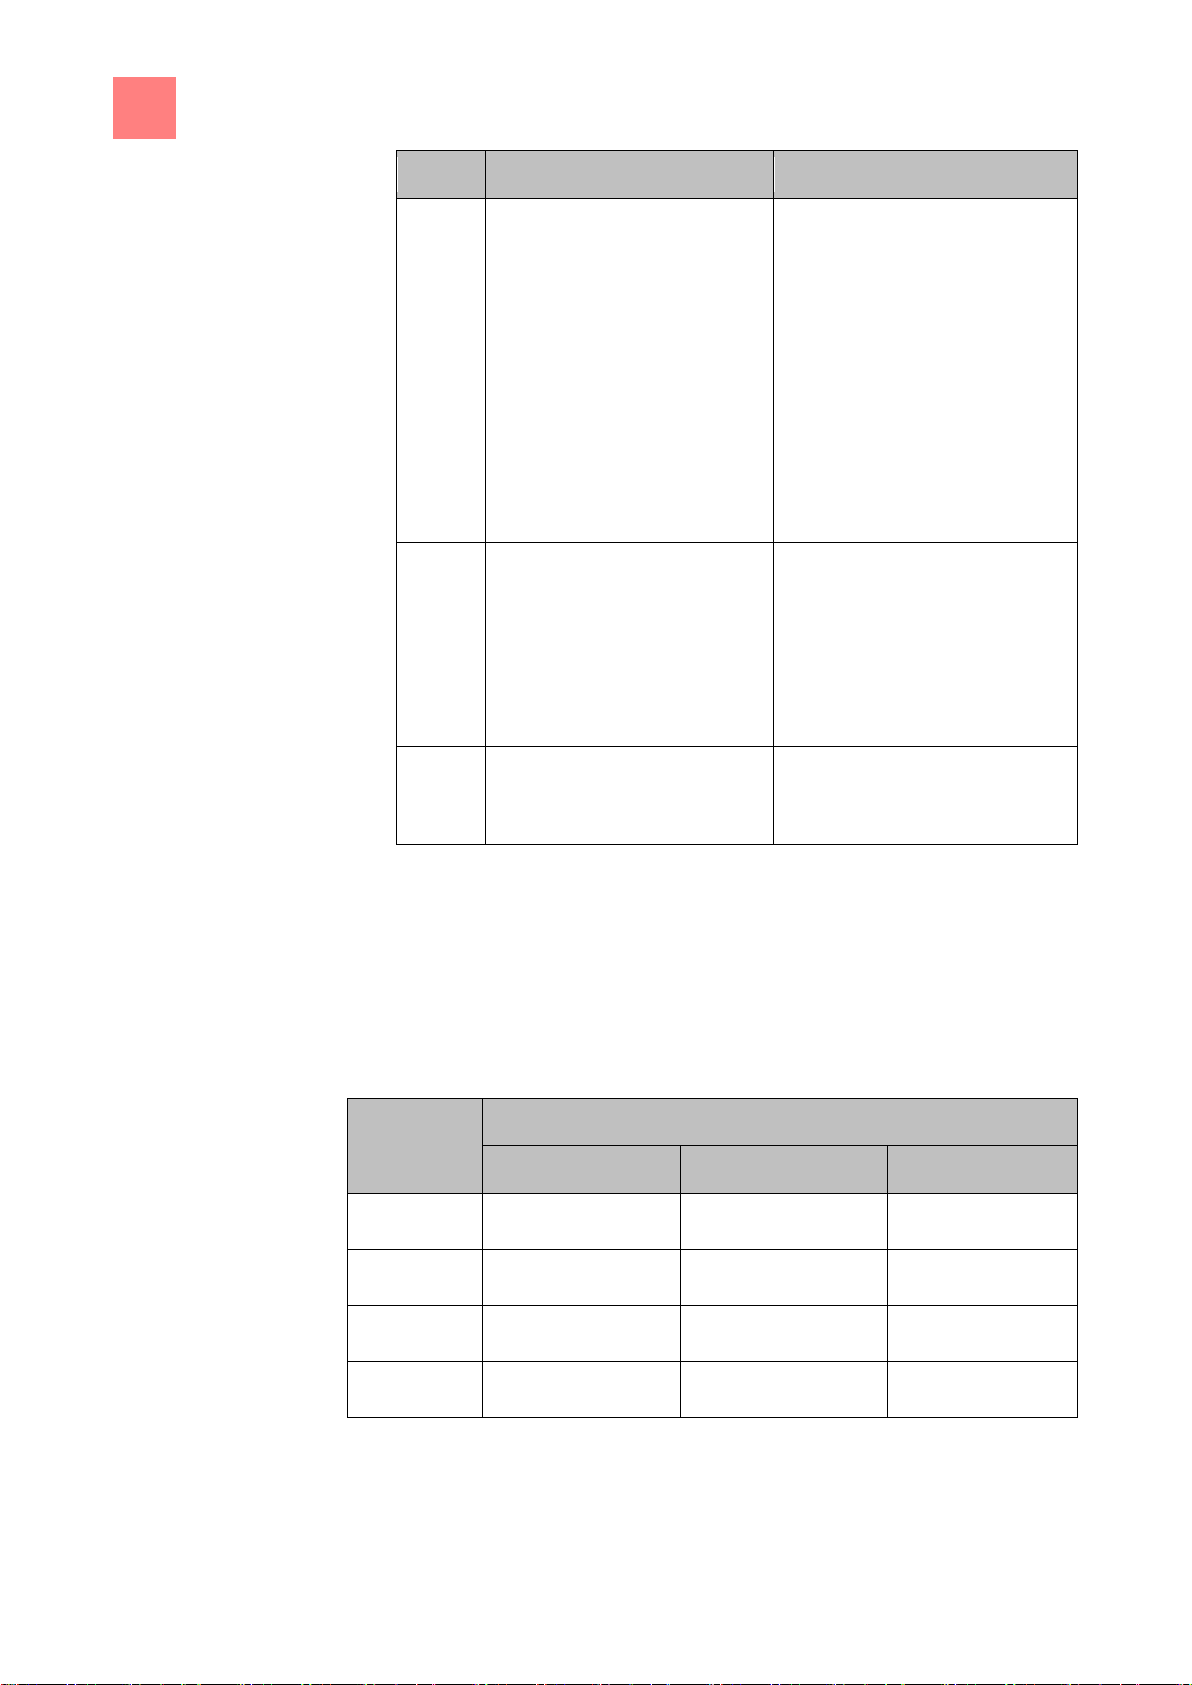
Symbol / sign
Meaning
▪
Listing of information.
Action steps, which can be
performed in any sequence.
1.
2.
Action steps, which must be
performed in the prescribed
sequence.
Result of a listed action.
Page 11

Introduction
1
Intended use
11
1.2
1.3
Intended use
This unit is intended to be used solely for commercial purposes, particularly
in commercial kitchens.
This unit may only be used with suitable accessories and for the cooking of
food.
It is forbidden to use the unit for purposes, which include the following:
▪ Washing dishes
▪ Storing supplies
▪ Drying cloths, paper or dishes
▪ Heating acids, alkaline solutions or other chemicals
▪ Heating preserved food
▪ Heating flammable liquids
▪ Heating rooms
▪ Cleaning air filters
This unit is certified in the following:
Warranty
The warranty is void and safety is no longer assured in the event of:
▪ Modifications or technical changes to the unit,
▪ Improper use,
▪ Incorrect startup, operation or maintenance of the unit,
▪ Problems resulting from failure to observe these instructions.
Page 12

2
Safety information
12
2
Operation
Hot surfaces
Hot liquids
Defective unit
Safety information
The operator must be familiar with regional regulations and observe them.
During operation, the following group of individuals must be supervised by
an individual who is responsible for safety:
▪ Individuals with physical, sensory, or mental handicaps, or who lack the
knowledge and experience to operate the unit properly.
The supervising individual must be familiar with the unit and the risks
associated with it.
Risk of burns from hot surfaces
▪ Protect arms and hands by wearing suitable protective gloves.
▪ Allow surfaces to cool prior to cleaning.
▪ Remove hot cookware only with suitable protective gloves or potholders.
▪ Remove containers and baking sheets only with suitable protective
gloves or potholders.
Risk of burns from hot liquids
▪ Protect arms and hands by wearing suitable protective gloves.
▪ Remove, transport and empty containers carefully.
Risk of chemical burns from evaporating cleaners
▪ Follow the instructions of the cleaning agent manufacturer.
▪ Allow the cooking so to clean to a temperature below 60°C (140°F) and
then clean.
Risk of burns from steam
▪ Protect arms and hands by wearing protective gloves.
▪ Do not hold hands in front of the extractor hood.
▪ First open the cooking zone door slightly and allow the steam to escape.
Then open the cooking zone door completely.
▪ Dry unit completely after cleaning it.
Risk of injury from a defective unit
▪ Disconnect a defective unit from the electric mains.
Page 13

Safety information
2
13
Escaping gas
Fire prevention
Unit on casters
▪ Use gas shut-off valve to isolate unit from gas supply.
▪ Do not operate a defective unit.
▪ Allow only an authorized technician to repair the unit.
Risk of asphyxiation and explosion from escaping gas
▪ Follow the rules of conduct when the smell of gas is detected (see
"Rules of conduct when the smell of gas is detected").
Risk of fire from dirt and grease deposits
▪ Clean the unit when finished using it.
▪ Do not use the unit as a deep fat fryer.
▪ Do not store any combustible objects or plastic containers in the cooking
zone.
Risk of fire from objects
▪ Do not obstruct the exhaust gas duct.
Firefighting
▪ In the event of a fire, disconnect the unit from the electric mains.
▪ In the event of a fire, use the gas shut-off valve to isolate the unit from
the gas supply.
▪ Use a Fire Class F fire extinguisher, never water, to extinguish grease
fires. Other fires, for instance, can be extinguished with fire extinguishers
suitable for Fire Classes A, B, C, CO2 fire extinguishers or extinguishing
media suitable for the fire class confronted.
Risk of injury from a unit on casters
▪ Move the unit only for cleaning or maintenance.
▪ Lock casters during operation.
▪ Only move an empty unit.
Risk of electric shock from live components
▪ Security electric power cable to the wall at the installation location by
means of a chain as strain relief.
Page 14

2
Safety information
14
Improper cleaning
Hygiene
Core temperature
measurement
Improper use
Risk of chemical burns from cleaning agent
▪ Follow the instructions of the cleaning agent manufacturer.
▪ Take appropriate protective measures when handling aggressive
cleaning agents.
Risk of falling on smooth floors
▪ Keep the floor in front of the unit clean and dry.
Risk of injury from improper cleaning
▪ Clean the cooking zone carefully. The cooking zone sensor protrudes
into the cooking zone.
Risk of physical damage from improper cleaning
▪ Clean the unit after using it.
▪ Do not clean the unit with a high-pressure cleaner.
▪ Do not clean the housing with highly abrasive or chemically aggressive
cleaning agents.
▪ Do not clean the housing with highly abrasive sponges.
▪ Follow the instructions of the cleaning agent manufacturer.
▪ Do not cool shock the unit by cooling it abruptly.
▪ Clean the cooking zone carefully. The cooking zone sensor protrudes
into the cooking zone.
▪ Do not use any bleaching or chlorine-containing cleaners.
▪ Remove rust spots with an abrasive.
▪ Keep the unit free of calcium deposits.
Health risk from insufficient hygiene
▪ Observe applicable regional hygiene regulations.
Risk of injury from overheated core temperature sensor
▪ Do not heat the core temperature sensor over an open flame.
Risk of physical damage from improper use
▪ Use only original accessories.
Page 15

Safety information
2
15
▪ Train operators regularly.
▪ Do not heat food warmer plates or tins of preserved food.
▪ Do not cover air inlet and outlet openings.
▪ Do not operate the unit at temperatures below 4°C (39°F).
▪ Remove the core temperature sensor before the cooked food is
removed.
▪ Insert the core temperature sensor back into the holder after use.
Page 16

3
Rules of conduct when the smell of gas is detected
16
DANGER
Risk of asphyxiation and explosion from escaping gas
Follow the rules of conduct when the smell of gas is detected.
3
Rules of conduct when the smell of
gas is detected
▪ Remain calm.
▪ Open windows and doors and ventilate rooms.
▪ Avoid rooms with the smell of gas.
▪ Do not smoke.
▪ Do not ignite any flames. Extinguish flames.
▪ Do not strike any sparks. Do not operate any switches, electrical devices
or use telephones.
▪ Remove mobile phones and radio-controlled devices from the hazard
area.
▪ Close gas shut-off valves at the gas meter, at the main feed and, if
possible, at the units.
▪ Warn other individuals in the building. Call out and knock, do not ring
doorbells.
▪ Leave the building and prevent entry by others.
▪ Observed the safety instructions of the gas utility.
▪ Once outside the building, notify responsible parties:
– If the smell of gas comes from the unit, notify customer service.
– If the source of the smell of gas cannot be localised immediately,
notify the gas utility.
– If the escaping gas is audible, leave the building immediately,
prevent others from entering and notify the fire brigade, police and
gas utility.
– If the smell of gas comes from inaccessible rooms, notify the fire
brigade, police and gas utility.
Page 17
Description of the unit
4
Overview of the unit
17
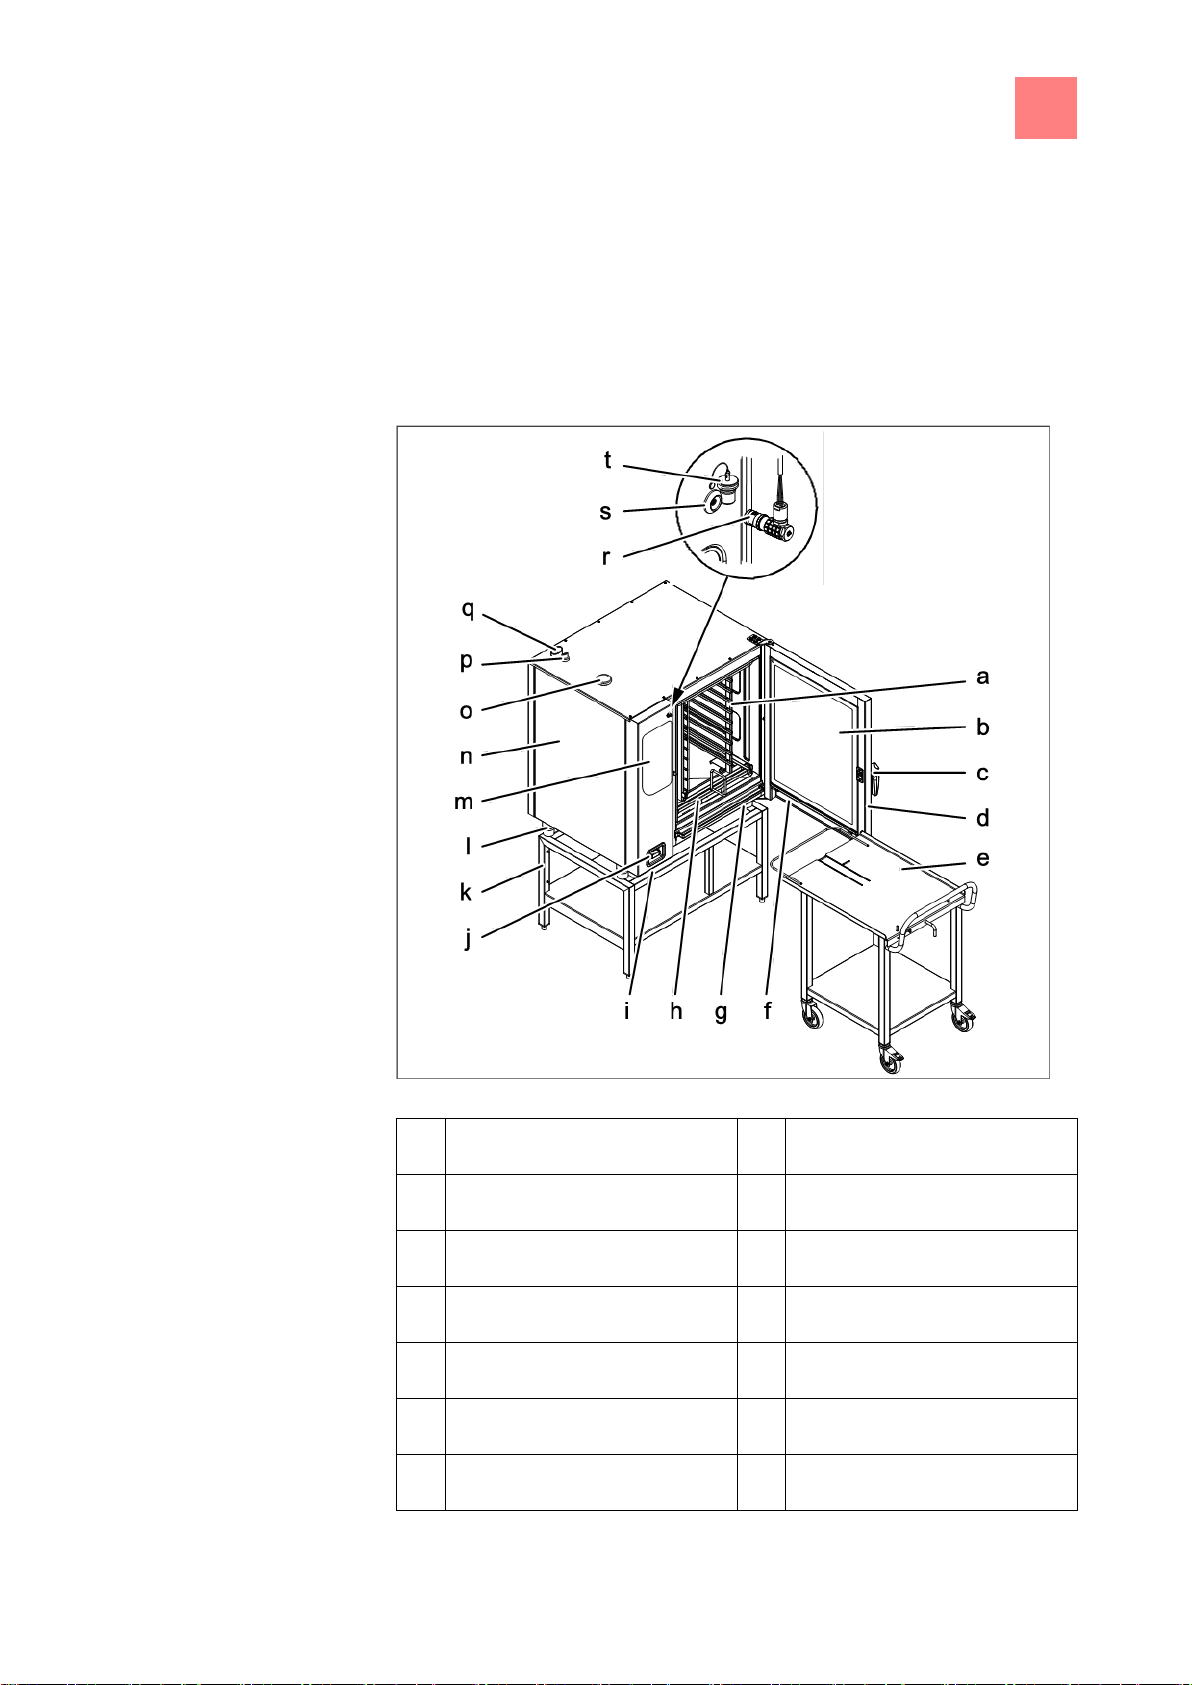
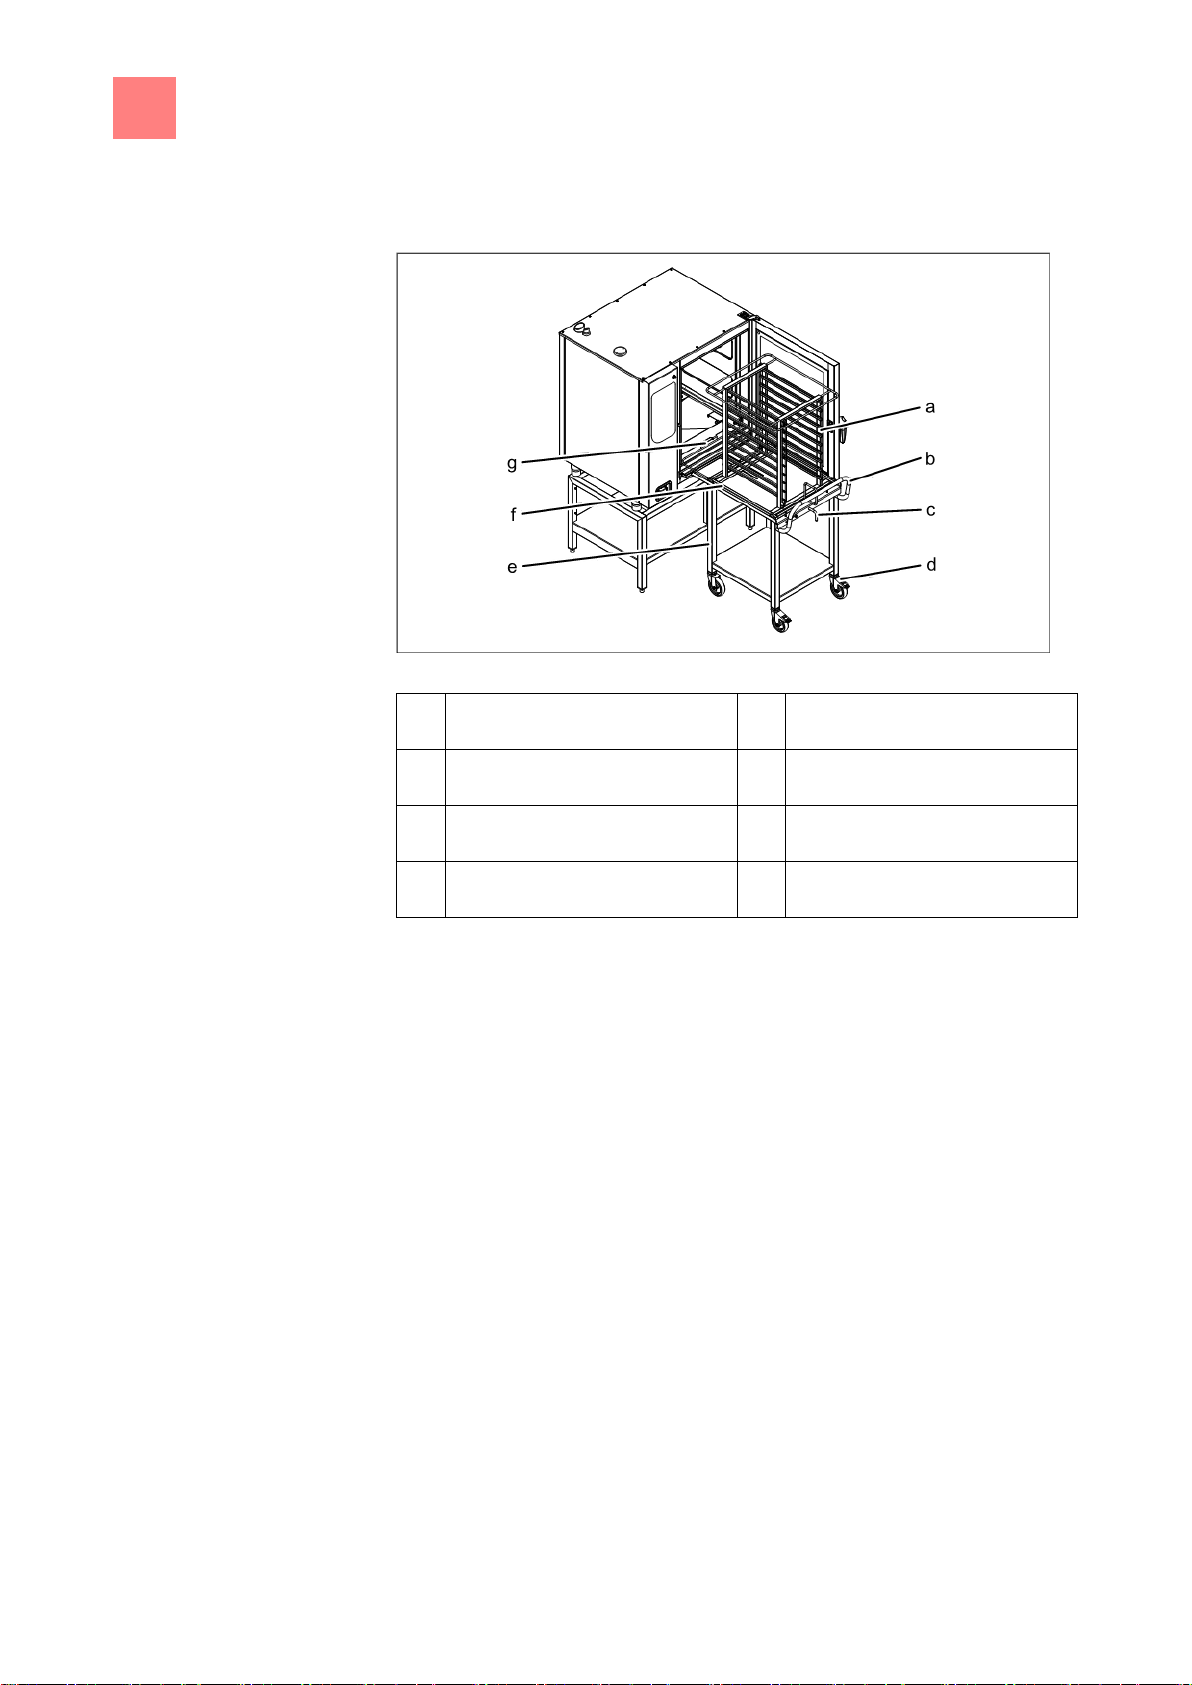
a
Tray rack
k
Base frame (optional)
b
Insulated window
l
Equipment foot
c
Door handle
m
Operating control
d
Cooking zone door
n
Housing
e
Tray rack trolley (optional)
o
Air intake connection fitting
f
Steam drain channel, door
p
Waste gas connection
g
Steam drain channel, unit
q
Steam outlet connection fitting
4
4.1
4.1.1
Description of the unit
Overview of the unit
Countertop unit
Gas FlexFusion with tray rack trolley
Page 18
4
Description of the unit
Overview of the unit
18
h
Guide rail for tray rack
(optional)
r
Core temperature sensor
(optional)
i
USB port (covered)
s
Connection (optional)
j
Hand shower
t
Protective cap (optional)
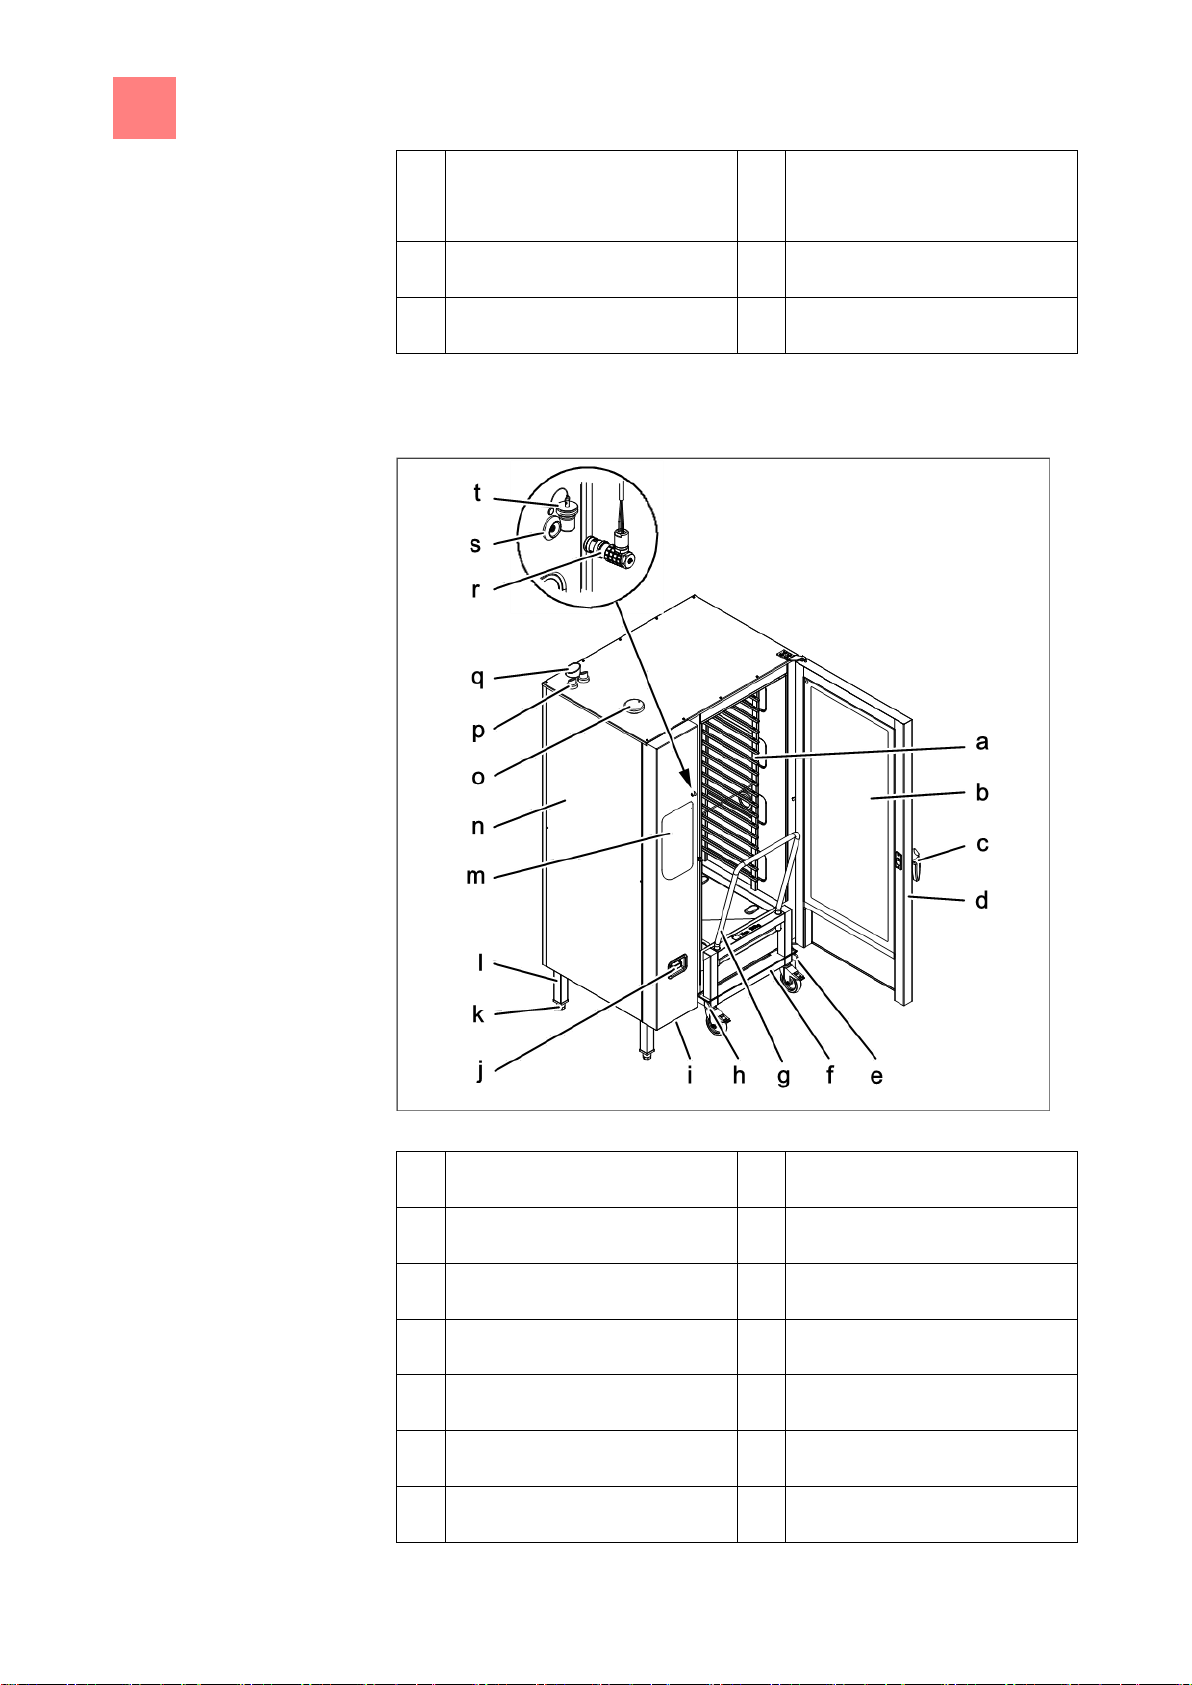
a
Tray rack
k
Equipment leg
b
Insulated window
l
Equipment foot
c
Door handle
m
Operating control
d
Cooking zone door
n
Housing
e
Guide rail (right)
o
Air intake connection fitting
f
Tray trolley
p
Waste gas connection
g
Push handle
q
Steam outlet connection fitting
4.1.2
Floor-standing unit
Gas FlexFusion with tray trolley
Page 19

Description of the unit
4
Features
19
h
Guide rail (left)
r
Core temperature sensor
(optional)
i
USB port (covered)
s
Connection (optional)
j
Hand shower
t
Protective cap (optional)
4.2
4.2.1
4.2.2
Features
Characteristics
▪ 4-point core temperature sensor
▪ Sous-vide core temperature sensor or a second 4-point core
temperature sensor (optional)
▪ Hand shower
▪ Cooking zone door with hygienic glazing
▪ Single-stage door latch
▪ Two-stage door latch (optional); this feature is standard on size 20 units
▪ Power optimizing system (optional)
▪ Ethernet connection (optional)
▪ Cooking zone door hinged at right
▪ Cooking zone door hinged at left (optional), not on size 20 floor-standing
units
▪ WaveClean
▪ Barcode scanner (optional)
▪ Steam Exhaust System (SES)
Operating modes
Manual cooking
In the manual cooking mode, individual cooking programs and equipment
functions can be actuated directly. The various cooking modes and
equipment functions can be modified individually.
Page 20

4
Description of the unit
Features
20
4.2.3
Automatic cooking (autoChef)
In the automatic cooking mode, stored cooking programs can be actuated
and adapted as necessary.
Types of cooking
Steaming
Steaming is a cooking mode where the food to be cooked is cooked gently in
steam in a temperature range of 30°C (86°F) to 130°C (266°F).
Combi-steaming
Combisteaming is a cooking mode that can be used to cook large roasts,
casseroles and baked goods in a temperature range of 30°C (86°F) to
250°C (482°F).
Hot air
Hot air is a cooking mode where the food to be cooked is cooked without
additional moisture in a temperature range of 30°C (86°F) to 250°C (482°F).
Perfection (regeneration)
Perfection is a cooking mode that can be used to prepare cooled cooked
food quickly in a temperature range of 30°C (86°F) to 150°C (482°F) and
then keep it warm.
Delta-T cooking
Delta-T cooking is a cooking mode where the cooking temperature depends
on the core temperature of the food being cooked.
The cooking temperature is always higher than the current core temperature
by the set value (Delta-T value, cooking temperature difference). The
resulting cooking time is longer than with other cooking modes.
Delta-T cooking is especially well-suited for general cooking. The food being
cooked remains tender and juicy with little weight loss.
Low-temperature cooking
Low-temperature cooking is a cooking mode where the food to be cooked is
cooked in an especially gentle manner in a temperature range of 30°C
(86°F) to 100°C (212°F).
Page 21

Description of the unit
4
Features
21
NOTICE
When using the start time delay, temperatures that promote the growth of
harmful microorganisms on the food being cooked can occur in the cooking
zone. Observe food processing regulations.
4.2.4
The cooking time is considerably longer than at higher temperatures, but no
supervision is required and the cooking time can be extended considerably
without any loss in quality.
The food being cooked remains tender and juicy with little weight loss.
Baking
Baking is a cooking mode where the food to be cooked is cooked and
browned by hot air in a temperature range of 30°C (86°F) to 220°C (428°);
this opens up the texture of the food. Humidification and an associated idle
time may precede baking.
Expanded cooking functions
Expanded cooking functions can be used to modify individual cooking steps
for the particular food being cooked.
The following expanded cooking functions are available:
PerfectHold
PerfectHold is a cooking function where the prepared food is held in the unit
in a temperature range of 50°C (122°F) to 100°C (212°F) after the actual
cooking process until it is ready to be served.
Ready2Cook (preheating)
For many cooking programs such as baking, for instance, the correct starting
temperature is important.
With Ready2Cook, the cooking zone can automatically be heated or cooled
to the correct starting temperature.
Start-time preselection
The start time delay can be used to set a waiting period until the program
starts.
In this way, bottlenecks in production and preparation can be avoided.
Page 22

4
Description of the unit
Features
22
The prepared food can be loaded into the unit and the desired cooking
program selected.
Steam Exhaust System (SES)
This function is activated by default for all cooking programs that have a
cooking time longer than 6 minutes.
The Steam Exhaust System (SES) is activated automatically shortly before
the end of cooking.
After the cooking time, the Steam Exhaust System (SES) extracts the steam
from the cooking zone. It is then possible to open the cooking zone door
without risk of injury.
RackControl
With the expanded cooking function RackControl, different foods such as
potatoes, cauliflower, peas, carrots and meat can be cooked simultaneously
for different times.
RackControl monitors the various cooking times in one process. When one
cooking time has elapsed, a signal sounds and the food being cooked can
be removed. RackControl is ideal for rolling cooking.
FamilyMix
With the expanded cooking function FamilyMix, the appropriate cooking
programs are displayed in the
Automatic cooking (autoChef)
menu for the
currently set cooking mode. The cooking programs displayed have the same
cooking climate and an identical or shorter cooking time. Tapping the
individual suggestions transfers the cooking times for the individual products
to the RackControl function and these can then be started when desired
during the cooking process.
Manual humidification
Manual humidification allows the cooking zone humidity to be increased
during operation.
Manual humidification can be used only in the hot air and Delta-T hot air
cooking modes.
Page 23
Description of the unit
4
Features
23
4.2.5
248°F
140°F
104°F
140°F
Idle time
With the idle time expanded cooking function, a cooking step can be inserted
during which the heating and the fans are programmed to switch off for a
certain period of time.
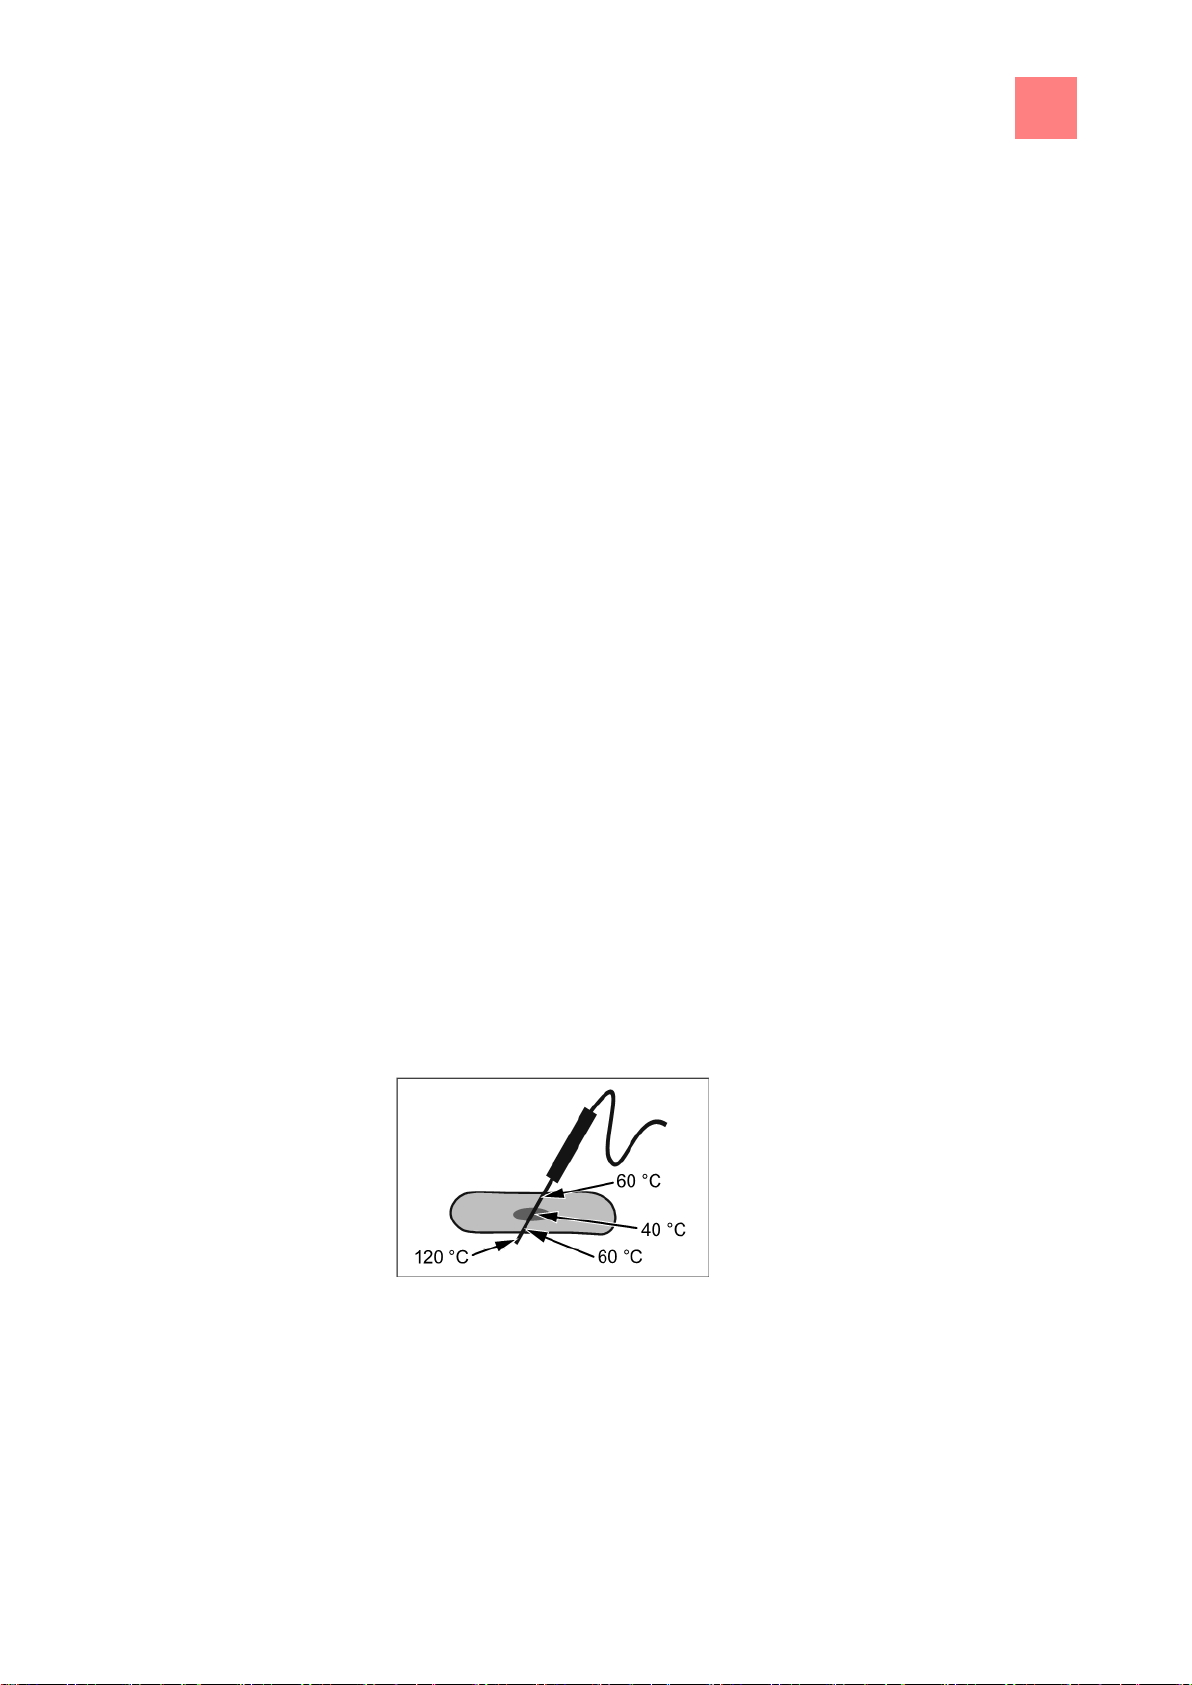
Core temperature measurement
When using core temperature measurement, the temperature inside the food
being cooked is measured by means of a sensor.
The core temperature sensor measures the core temperature at one or more
points, depending on the version. The temperature measured at the coldest
spot is used to control the cooking process.
As soon as the target core temperature has been reached, the cooking
process is ended automatically or, in the case of a multi-step cooking
program, advances to the next cooking step.
The use of core temperature measurement offers the following benefits:
▪ Reduced energy and water consumption
▪ No overcooking
▪Less weight lost by the food being cooked
The following core temperature sensors are available:
▪ 4-point core temperature sensor
or
▪ a second 4-point core temperature sensor (optional)
Core temperature measurement with a 4-point core temperature sensor
or
▪ Sous-vide core temperature sensor (optional)
Page 24

4
Description of the unit
Features
24
a
Sous-vide core temperature
sensor
b
Foam rubber
4.2.6
4.2.7
4.2.8
4.2.9
Core temperature measurement with sous-vide core temperature sensor
Barcode scanner
The barcode scanner scans the barcode on the packaging of the food to be
cooked and transmits it to the unit. The unit then searches for the
appropriate cooking program for the food to be cooked. If several
appropriate cooking programs are found, they are displayed in a list.
A prerequisite is that the cooking programs are assigned a corresponding
identification when saved.
USB port
The unit is equipped with a USB port (USB 2.0).
HACCP logs can be exported via the USB port.
A wireless or corded barcode scanner (optional) can be connected to the
USB port.
HACCP logging
All cooking steps are recorded with a log number in the HACCP log.
The data are exported via the USB port.
VideoAssist
VideoAssist can be used to display videos with additional explanations
regarding operation.
Page 25

Description of the unit
4
Operating, control and display element functions
25
NOTICE
To see the operating and display elements, see next page.
Symbol
Operating and display element
Function
On Off
button
▪ "I" switches on the unit
▪ "O" switches off the unit
"Automatic cooking" button
▪ Opens the
Automatic
cooking
menu for selection
of programs
"Manual cooking" button
▪ Opens the
Manual cooking
menu for selection of the
cooking modes
"Equipment functions" button
▪ Opens the
Equipment
function
menu for selection
of cleaning and settings
4.2.10
4.2.11
4.2.12
4.3
ChefsHelp
Using ChefsHelp, information in the form of text and image can be added to
a specific cooking step at a specific point in time.
WaveClean automatic cleaning
With WaveClean automatic cleaning, the cooking zone is cleaned with the
aid of a cleaning cartridge intended specifically for the program and then
rinsed clean.
CombiDoctor (self-diagnostic program)
CombiDoctor uses a selectable self-diagnostic program to check the
components used for climate control and cleaning.
Operating, control and display element
functions
Page 26
4
Description of the unit
Application
26
Symbol
Operating and display element
Function
Language selection
button
▪ Indicates that the operating
language for the unit can be
selected here by tapping a
country's flag
Selection and the number of
selectable languages can be
specified in the
Equipment
functions
menu in the settings
field "Languages".
Back
button
▪ Tapping once returns the
user to the previous menu
▪ Tapping twice returns the
user directly to the main
menu
FlexiHelp
button
▪ Displays the help texts for
the active menu or window.
Version
Plate diameter
26 cm (10.24 in)
28 cm (11.02 in)
32 cm (12.1 in)
6.15
30 (11.81)
24 (9.45)
22 (8.66)
6.21
30 (11.81)
24 (9.45)
22 (8.66)
10.15
50 (19.69)
40 (15.75)
40 (15.75)
10.21
50 (19.69)
40 (15.75)
40 (15.75)
4.4
4.4.1
Application
Plate capacity during regeneration
Cooking time and cooking temperature depend on the number of plates.
Page 27

Description of the unit
4
Application
27
Version
Plate diameter
26 cm (10.24 in)
28 cm (11.02 in)
32 cm (12.1 in)
20.15
100 (39.37)
80 (31.5)
80 (31.5)
20.21
120 (47.24)
120 (47.24)
80 (31.5)
on
1/1 GN grate
Tray rack or tray
trolley
Version
Max. per tray
(kg) (lbs)
Max. per unit
(kg) (lbs)
6.15
15
33
50
110
6.21
15
33
50
110
10.15
15
33
80
176
10.21
15
33
80
176
20.15
15
33
150
330
20.21
15
33
150
330
Type of cooking
Standard value
(°C) (°F)
Setting range
(°C) (°F)
Change
increments (°C)
Steaming
100
212
0 - 99
86 - 320
1-steps
Combisteaming
150
302
30 - 250
86 - 482
1-steps
Hot air
180
356
30 - 250
86 - 482
1-steps
Regeneration
50
122
30 - 150
86 - 302
1-steps
4.4.2
4.4.3
Loading capacity
Tray rack trolley and tray trolley
Temperature standard setting
The setting range for the cooking zone temperature depends on the type of
cooking.
Page 28

4
Description of the unit
Chef’s Touch equipment controls
28
Type of cooking
Standard value
(°C) (°F)
Setting range
(°C) (°F)
Change
increments (°C)
Steaming
70
158
0 - 99
32-210
1-steps
Combisteaming
70
158
0 - 99
32-210
1-steps
Hot air
70
158
0 - 99
32-210
1-steps
Regeneration
50
158
20 - 99
68-210
1-steps
NOTICE
The touchscreen can be operated with latex gloves.
4.4.4
4.5
4.5.1
Core temperature standard setting
The setting range for the core temperature depends on the type of cooking.
Chef’s Touch equipment controls
Touchscreen operation
The unit is operated solely from the touchscreen. Buttons, windows and
rollers are provided for settings.
Fields and buttons are operated by tapping, rollers by wiping. Tapping a
button once executes commands that operate the unit.
To change the page or the set value, use a wiping gesture up, down, to the
left or to the right with the fingertip after first tapping and then maintaining
contact with the field to be changed.
Page 29

Description of the unit
4
Chef’s Touch equipment controls
29
a
Back
button
e
"Manual cooking" button
b
Information bar
f
"Equipment functions" button
c
FlexiHelp
button
g
"Automatic cooking" button
d
Language selection
button
a
Back
button
d
Window
b
Information bar
e
Clean touchscreen
field
c
FlexiHelp
button
f
N
ext page
arrow symbol
g
f
e
d
a b c
Main menu
Equipment functions menu
Page 30

4
Description of the unit
Chef’s Touch equipment controls
30
a
Back
button
e
FlexiHelp
button
b
"autoChef" button
f
"Perfection" field
c
Barcode scanner
button
g
Next page
arrow symbol
d
Information bar
h
Separating bar
a
Back
button
d
"Hot air" field
b
Information bar
e
Next page
arrow symbol
c
FlexiHelp
button
f
Separating bar
Automatic cooking, AutoChef menu
Manual cooking menu
Page 31

Description of the unit
4
Chef’s Touch equipment controls
31
Display element
Function
Information bar
The information bar is the uppermost bar on
the touchscreen and visible at all times.
The information bar is used to display current
information, for instance, categories or
cooking programs.
Menu
Menus have a coloured border that identifies
the associated subject.
▪ Blue for equipment functions
and
▪ Violet for cooking functions.
Menus frequently contain vertical separating
bars to simplify wiping gestures.
Menus represent central entry points and
provide an overview of the selectable
functions and submenus.
Window
Windows have a coloured border and are
opened from menus or higher-level windows.
Functions are executed and settings
displayed in windows.
Depending on the function, there are several
window types, for instance, Find.
Field
Fields are areas in windows or menus
defined by separating bars.
Tapping fields opens functions and settings.
Button
Buttons are areas enclosed by borders in
windows or menus.
Tapping buttons confirms settings. Buttons
control functions and are used to navigate in
4.5.2
Display elements
The following table lists the basic display elements of the unit's control
system with examples.
Page 32

4
Description of the unit
Chef’s Touch equipment controls
32
Display element
Function
menus and windows.
Page
Pages are the areas with content in windows
and menus. Several pages can follow one
another in sequence.
An arrow symbol displays further pages.
Changing to the next or the previous page is
accomplished by wiping up or down.
Tab
A
blue
and a
green
tab are located on the left
side of the touchscreen. The tabs are
available only in the cooking step display.
Tapping the tabs offers quick access to
equipment functions and cooking program
functions.
Display
Displays are information-containing areas in
windows.
Displays show entries and current information
some of which may be operated by tapping.
Symbol
Symbols are graphical elements in windows
and in the toolbar.
Symbols indicate current states and possible
functions some of which may be operated by
tapping.
Roller
Rollers are areas where settings can be
made by means of wiping gestures.
Page 33

Putting the unit into service
5
33
5
Requirement
Putting the unit into service
➢ Any remaining packaging removed from the cooking zone
➢ Protective film pulled off the housing
a) Clean the unit.
b) Enter the data on the nameplateNameplate [➙ 84].
c) Switch on the unit and select the cooking program
"Manual cooking: menu.
d) Set the temperature to 200°C (392°F) Setting the cooking temperature
[➙ 48].
⇨ Operate the unit for 20 minutes.
Combisteaming
in the
Page 34

6
Operating the unit
Switching the unit on and off
34
NOTICE
Explanatory video clips can be selected under VideoAssist by press the
Help button.
NOTICE
Fans may continue to run for cooling; the unit's control system is
disconnected from power.
6
6.1
6.1.1
6.1.2
Operating the unit
Switching the unit on and off
Switching on
a) Press "I" on the
⇨ The unit is now on
⇨ The control system starts the power-on process automatically. The
progress bar at the lower edge of the touchscreen displays the status
of the process.
⇨ The main menu appears after 1 minute and the unit is ready for use.
Switching off
On Off
button.
a) Press "O" on the
On Off
⇨ The unit is now off.
button.
Page 35

Operating the unit
6
Opening and closing the cooking zone door
35
NOTICE
The single-stage door latch is standard on sizes 6 and 10.
NOTICE
The two-stage door latch is standard on size 20, and optional on sizes 6
and 10.
NOTICE
If the door handle is released, it returns automatically to its initial position.
6.2
6.2.1
6.2.2
Requirement
Opening and closing the cooking zone
door
Opening the single-stage door latch
Opening the single-stage door latch
a) Rotate the door handle anti-clockwise or clockwise.
⇨ The cooking zone door opens.
a) Open the cooking zone door completely.
Closing the single stage door latch
Closing the single stage door latch
➢ Door handle in initial position
a) Close the cooking zone door with pressure.
Page 36

6
Operating the unit
Opening and closing the cooking zone door
36
NOTICE
On size 6 and size 10, first rotate the door handle anti-clockwise.
NOTICE
If the door handle is released, it returns automatically to its initial position.
6.2.3
6.2.4
Requirement
⇨ The cooking zone door is closed.
Opening the two-stage door latch
Opening the two-stage door latch
a) Rotate the door handle to a horizontal position.
⇨ The cooking zone door opens, but is still held.
b) Continue rotating the door handle upwards.
⇨ The cooking zone door is no longer held.
a) Open the cooking zone door completely.
Closing the two-stage door latch
Closing the two-stage door latch
➢ Door handle in initial horizontal position
a) Close the cooking zone door with pressure.
⇨ The cooking zone door latches.
b) Rotate the door handle downwards.
⇨ The cooking zone door is closed.
Page 37

Operating the unit
6
Loading and emptying the unit
37
CAUTION
Risk of burns from hot liquid
a) Never insert a food-carrying tray with cooking liquid above eye level.
b) Use only suitable trays to hold food. The food-containing trays must
rest securely on the support brackets.
c) Always insert the food-containing trays into the U-rails.
CAUTION
Risk of physical damage and personnel injury from exceeding the loading
capacity
a) Do not exceed the maximum loading capacity.
NOTICE
To not use bent or damaged support racks.
6.3
6.3.1
Loading and emptying the unit
Loading and emptying
Loading
a) Open the cooking zone door.
b) Insert food-containing trays into the support racks.
c) Close the cooking zone door.
d) Start the cooking process.
Emptying
a) Open the cooking zone door.
b) Remove the food-containing trays.
c) Remove all food residues from the drain screen.
d) Leave the cooking zone door slightly ajar.
⇨ This extends the service life of the door seal.
⇨ No moisture builds up in the cooking zone.
Page 38
6
Operating the unit
Loading and emptying the unit
38
a
Tray rack
e
Tray rack trolley
b
Push handle
f
Tray rack support plate
c
Lever
g
Guide rail
d
Locking casters
6.3.2
Requirement
Loading and emptying with a tray rack trolley
Loading and emptying with a tray rack trolley
Loading with a tray rack trolley
➢ Remove support racks and place guide rails on pins.
➢ Food-containing trays resting securely on the tray rack
a) Open the cooking zone door.
b) Rotate the lever on the tray rack trolley.
⇨ The tray rack is secured to prevent its rolling down.
⇨ Check that the tray rack is locked in place by pulling on it slightly.
c) Load the tray rack.
d) Position the tray rack trolley at the unit.
⇨ Lock the casters to prevent the trolley's rolling away.
e) Rotate the lever.
⇨ The tray rack is now free to move.
f) Insert the tray rack completely until the rollers rest in the openings in the
guide rail.
g) Retract the tray rack support plate and secure in place with the lever.
h) Move the tray rack trolley away from the unit.
i) Close the cooking zone door.
Page 39

Operating the unit
6
Loading and emptying the unit
39
a
Tray rack
e
Cleaning cartridge holder
b
Push handle
f
Guide rail (left)
c
Tray trolley
g
Guide rail (right)
d
Locking casters
6.3.3
Requirement
j) Start the cooking process.
Emptying with a tray rack trolley
a) Open the cooking zone door.
b) Position the tray rack trolley at the unit.
⇨ Lock the casters to prevent the trolley's rolling away.
c) Insert the tray rack support plate and secure the tray rack on the plate.
d) Pull the tray rack onto the tray rack trolley and secure in place.
e) Release the locking casters and move the tray rack trolley away from the
unit.
f) Remove all food residues from the drain screen.
g) Leave the cooking zone door slightly ajar.
⇨ This extends the service life of the door seal.
⇨ No moisture builds up in the cooking zone.
Loading and emptying with a tray trolley
Loading and emptying with a tray trolley
Loading with a tray trolley
➢ Food-containing trays resting securely on the tray trolley
a) Load the tray trolley.
Page 40

6
Operating the unit
Loading and emptying the unit
40
b) Insert the tray trolley completely.
c) Pull the push handle out of the tray trolley.
d) Close the cooking zone door.
e) Start the cooking process.
Emptying with a tray trolley
a) Open the cooking zone door.
b) Insert the push handle into the tray trolley.
c) Retract the tray trolley.
d) Remove all food residues from the drain screen.
e) Leave the cooking zone door slightly ajar.
⇨ This extends the service life of the door seal.
⇨ No moisture builds up in the cooking zone.
Page 41

Operating the unit
6
Using the core temperature sensor
41
WARNING
Risk of injury from a bursting core temperature sensor
a) The core temperature sensor can burst as the result of overheating of
the measuring tip.
b) Never heat a core temperature sensor with a cigarette lighter or other
heat source.
NOTICE
Measuring the core temperature is recommended for all types of cooking to
achieve an optimal result.
The unit has a core temperature sensor in the cooking zone and can be
equipped with an optional connection for an external core temperature
sensor.
6.4
6.4.1
248°F
140°F
104°F
140°F
Using the core temperature sensor
Measuring with a 4-point core temperature
sensor
Core temperature sensor with four measuring points
a) Completely insert the core temperature sensor into the food to be
cooked.
b) Insert the core temperature sensor into the thickest section of the food to
be cooked.
c) When cooking food with a bone, insert the core temperature sensor
close to the bone.
d) When cooking longer pieces of food, insert the core temperature sensor
across the food to a void a hole in the centre of the slice.
e) When cooking fowl, insert the core temperature sensor into the inside of
the leg.
Page 42

6
Operating the unit
Using the core temperature sensor
42
NOTICE
When cooking frozen food, measuring with a sous-vide core temperature
sensor is not possible.
6.4.2
6.4.3
Measuring with a sous-vide core temperature
sensor
Sous-vide core temperature sensor with sous-vide pads
a) Attach foam rubber or expanded rubber sous-vide pads to the vacuum-
packed food to be cooked.
b) Always insert the sous-vide core temperature sensor through the sous-
vide pads completely into the food to be cooked.
c) Insert the sous-vide core temperature sensor into the thickest section of
the food to be cooked.
d) When cooking food with a bone, insert the sous-vide core temperature
sensor close to the bone.
e) When cooking longer pieces of food, insert the sous-vide core
temperature sensor across the food to a void a hole in the centre of the
slice.
f) When cooking fowl, insert the sous-vide core temperature sensor into
the inside of the leg.
Measuring the core temperature when cooking
frozen food
Drilling a hole with a hand drill
Page 43

Operating the unit
6
Making the basic settings
43
6.5
6.5.1
Requirement
1. Use a hand drill to make a hole for inserting the sensor.
2. Place the food to be cooked on the baking sheet or into the cooking pan.
3. Place the cooking sheet or cooking pan into the unit.
4. Insert the core temperature sensor into the food being cooked.
Making the basic settings
The basic settings for operation can be displayed and changed by entering
the password "111".
Opening the Setting menu
PIN entry window
➢ The unit is on
➢ The main menu is displayed
a) Tap the "Equipment functions" button.
⇨ The
Equipment functions
menu is displayed.
b) Tap the "Settings" field.
⇨ The
PIN
window opens.
c) Enter the password.
d) Tap the
⇨ The
Confirm
button.
Equipment settings
menu is displayed.
⇨ The basic settings can be changed.
The unit has default settings when it is delivered.
These fields can be modified in the " Setting" window:
▪ Equipment information
▪ Export HACCP
Page 44

6
Operating the unit
Making the basic settings
44
NOTICE
The equipment information contains data on the software and hardware
version, the serial number of the unit and contact data.
6.5.2
Requirement
▪ Settings for Favourites
▪ CombiDoctor
▪ Select languages
▪ Installation height
▪ Audio settings
▪ Select signal tones
▪ Date and time
▪ Select cookbook
▪ Import the manufacturer's cookbook
▪ Lock the cookbook
▪ Import HansDampf programs
▪ Software update
▪ Import additional content
▪ Export log data
▪ Setting units
These fields are switched on or off in the "Setting" window:
▪ QualityControl on or off
▪ Inhibit operation on or off
Retrieving equipment information
➢ The
a) Tap the "Equipment information" field.
Setting
⇨ The
menu is displayed
Equipment information
window is displayed.
⇨ Equipment information can now be read.
Page 45
Operating the unit
6
Making the basic settings
45
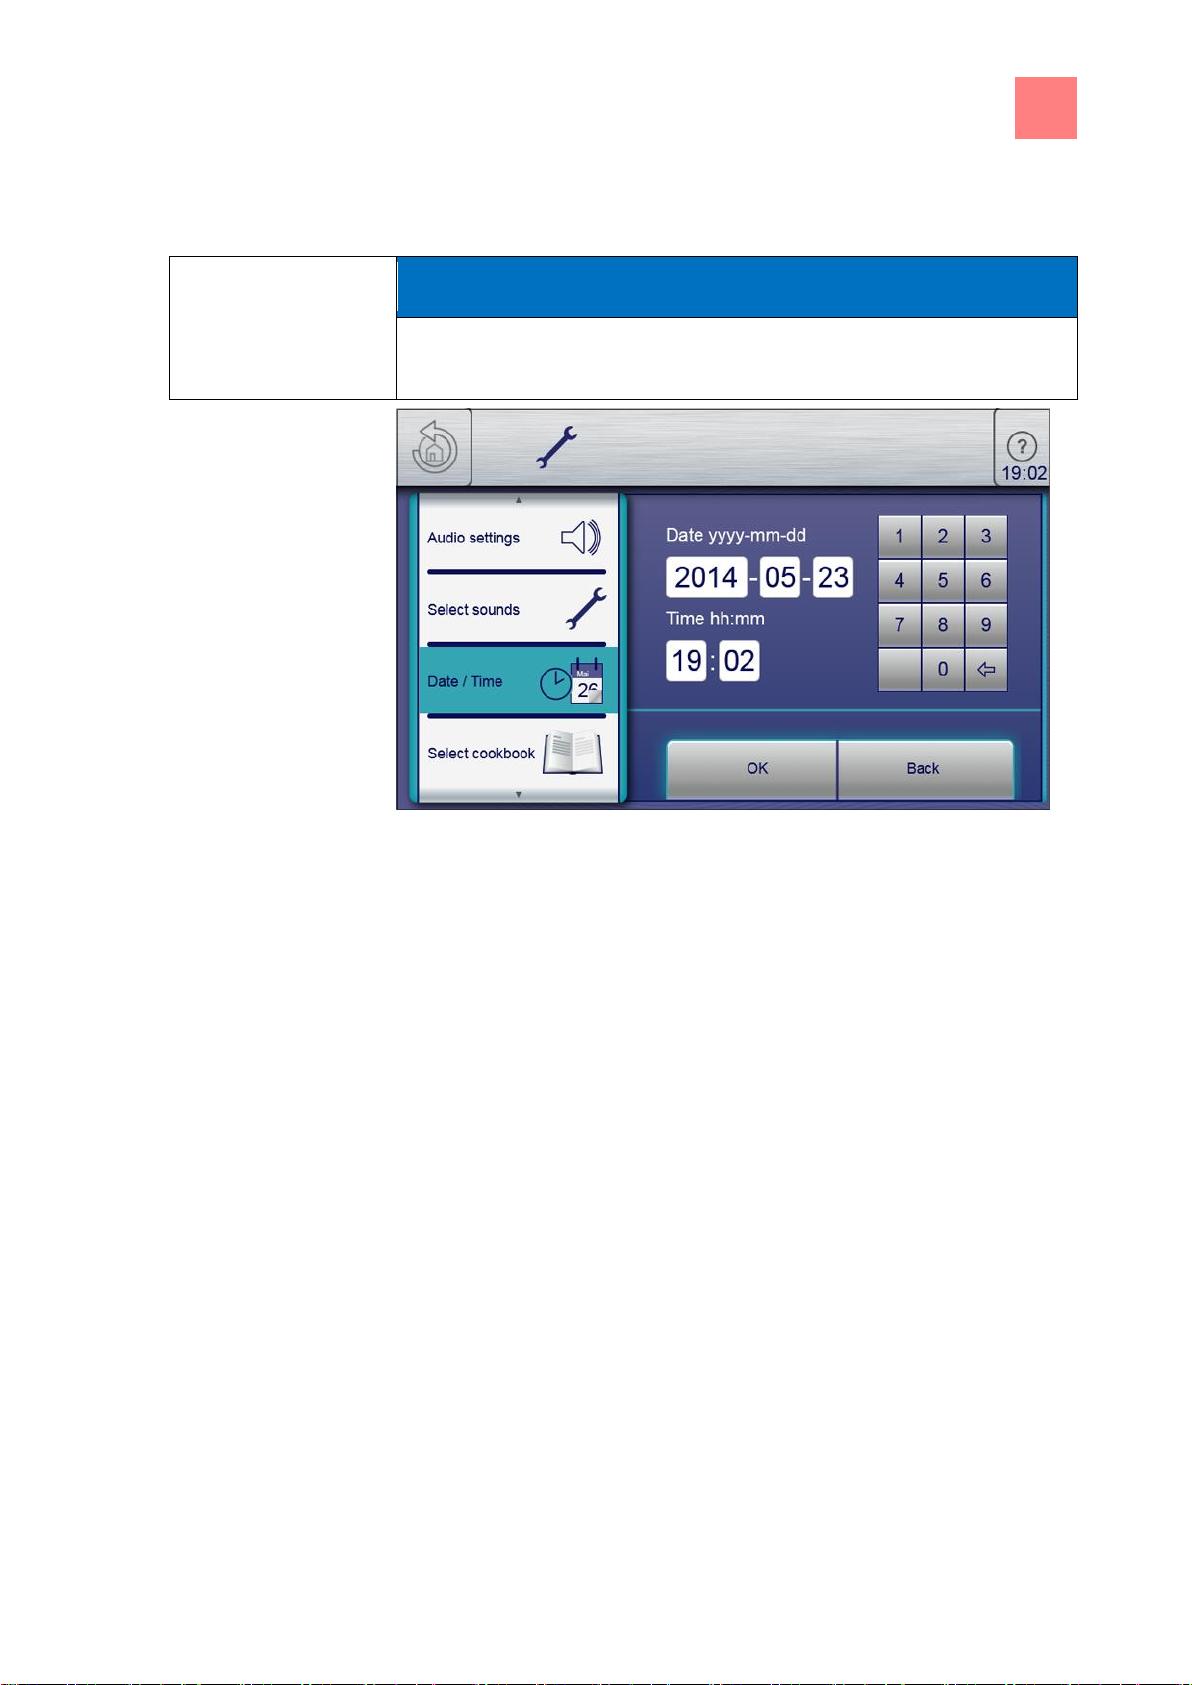
NOTICE
Observe the displayed date and time format carefully. If values are invalid,
the entry is not accepted.
6.5.3
Requirement
Setting the date and time
Date and time setting window
➢ The
Settings
menu is displayed
a) Tap the "Set date and time" field.
⇨ The
⇨ The
Setting
Keypad
window opens.
opens.
b) Enter the date and time.
c) Tap the Confirm button.
⇨ The
Keypad
closes.
⇨ The date and time are set.
Page 46

6
Operating the unit
Making the basic settings
46
NOTICE
A maximum of 5 languages can be specified for language selection in the
main menu.
NOTICE
Highlighted fields represent the specified languages.
Fields that are not highlighted are languages that have not been specified.
NOTICE
The currently set language cannot be deselected.
6.5.4
Requirement
Presetting the language selection
Language setting window
➢ The
Setting
menu is displayed
a) Tap the "Select language" field.
⇨ The
Languages
menu is displayed.
b) Select or deselect the language by tapping the fields with the country's
flag.
⇨ The selected languages are displayed.
c) Tap the "OK" button.
⇨ Languages have been preset for language selection and are available in
the main menu.
Page 47

Operating the unit
6
Making the basic settings
47
6.5.5
6.5.5.1
Requirement
6.5.5.2
Requirement
Activating inhibit operation
Activating and cancelling inhibit operation
➢ The "Inhibit operation ON" function is activated in the
Setting
menu
a) Tap and hold the centre of the information bar for 3 seconds.
⇨ The FlexiHelp button disappears and the lock symbol appears in the
information bar.
⇨ The touchscreen is locked.
Cancelling inhibit operation
Unlock the main menu by entering the PIN
➢ The touchscreen is locked
a) Tap the lock symbol.
⇨ The Keypad opens.
b) Enter the password.
⇨ Inhibit operation is cancelled by entering the password "369".
⇨ The lock symbol and the keypad disappear. The
FlexiHelp
button
appears in the information bar and the touchscreen is unlocked.
Page 48

6
Operating the unit
Basic functions
48
NOTICE
The temperature range differs, depending on the cooking mode. At a
cooking temperature outside the allowed temperature range, the display
turns red.
a
Temperature
field
c
Roller
b
Setting
window
d
Confirm
button
6.6
6.6.1
Requirement
Basic functions
Setting the cooking temperature
Cooking temperature setting window
➢ Cooking program selected
a) Tap the
⇨ The
b) Tap the
Cooking temperature
Setting
Temperature
window is displayed.
field.
field.
c) Using a wiping gesture, set the rollers to the desired temperature.
⇨ Wipe up / down to increase / decrease the cooking temperature.
d) Tap the
⇨ The
⇨ The
Confirm
Setting
button.
window closes.
Cooking mode
window displays the set cooking temperature.
⇨ The cooking temperature is set.
Page 49
Operating the unit
6
Basic functions
49
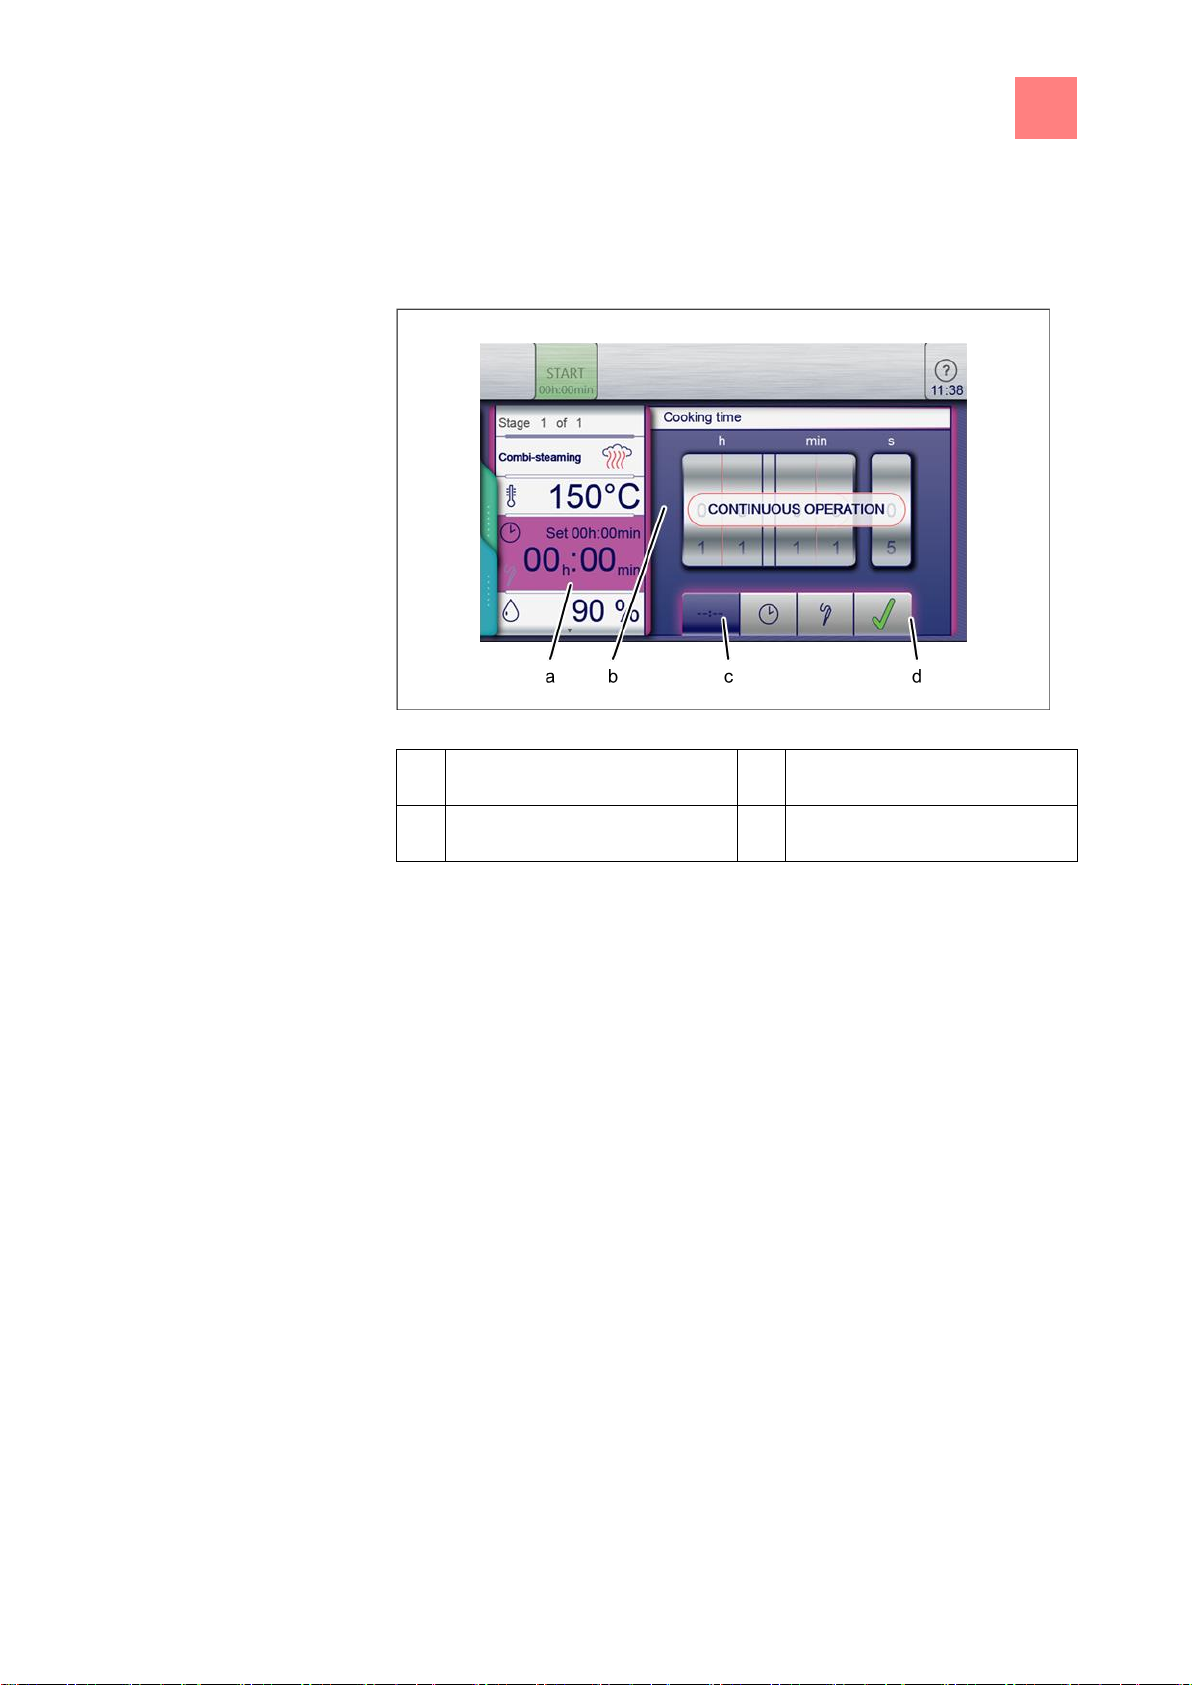
a
Cooking time
field
c
Continuous operation
button
b
Setting
window
d
Confirm
button
6.6.2
Requirement
Setting the cooking time and continuous
operation
Setting the cooking time to continuous operation
➢ Cooking program selected
a) Tap the
⇨ The
b) Tap the
c) Tap the
⇨ The
⇨ The
Cooking time
Setting
field.
window is displayed.
Continuous operation
Confirm
Setting
Cooking mode
button.
window closes.
window displays the cooking time.
button.
⇨ The cooking time is set to continuous operation and will end after
24 hours.
Page 50

6
Operating the unit
Basic functions
50
a
Cooking time
field
d
Cooking time
button
b
Setting
window
e
Confirm
button
c
Roller
Requirement
Setting the cooking time
Setting the cooking time
➢ Cooking program selected
a) Tap the
⇨ The
b) Tap the
Cooking time
Setting
window is displayed.
Cooking time
field.
button.
c) Using a wiping gesture, set the rollers to the desired temperature.
⇨ Wipe up / down to increase / decrease the cooking time.
d) Tap the
⇨ The
⇨ The
Confirm
Setting
button.
window closes.
Cooking mode
window displays the cooking time.
⇨ The cooking time is set.
Page 51
Operating the unit
6
Basic functions
51
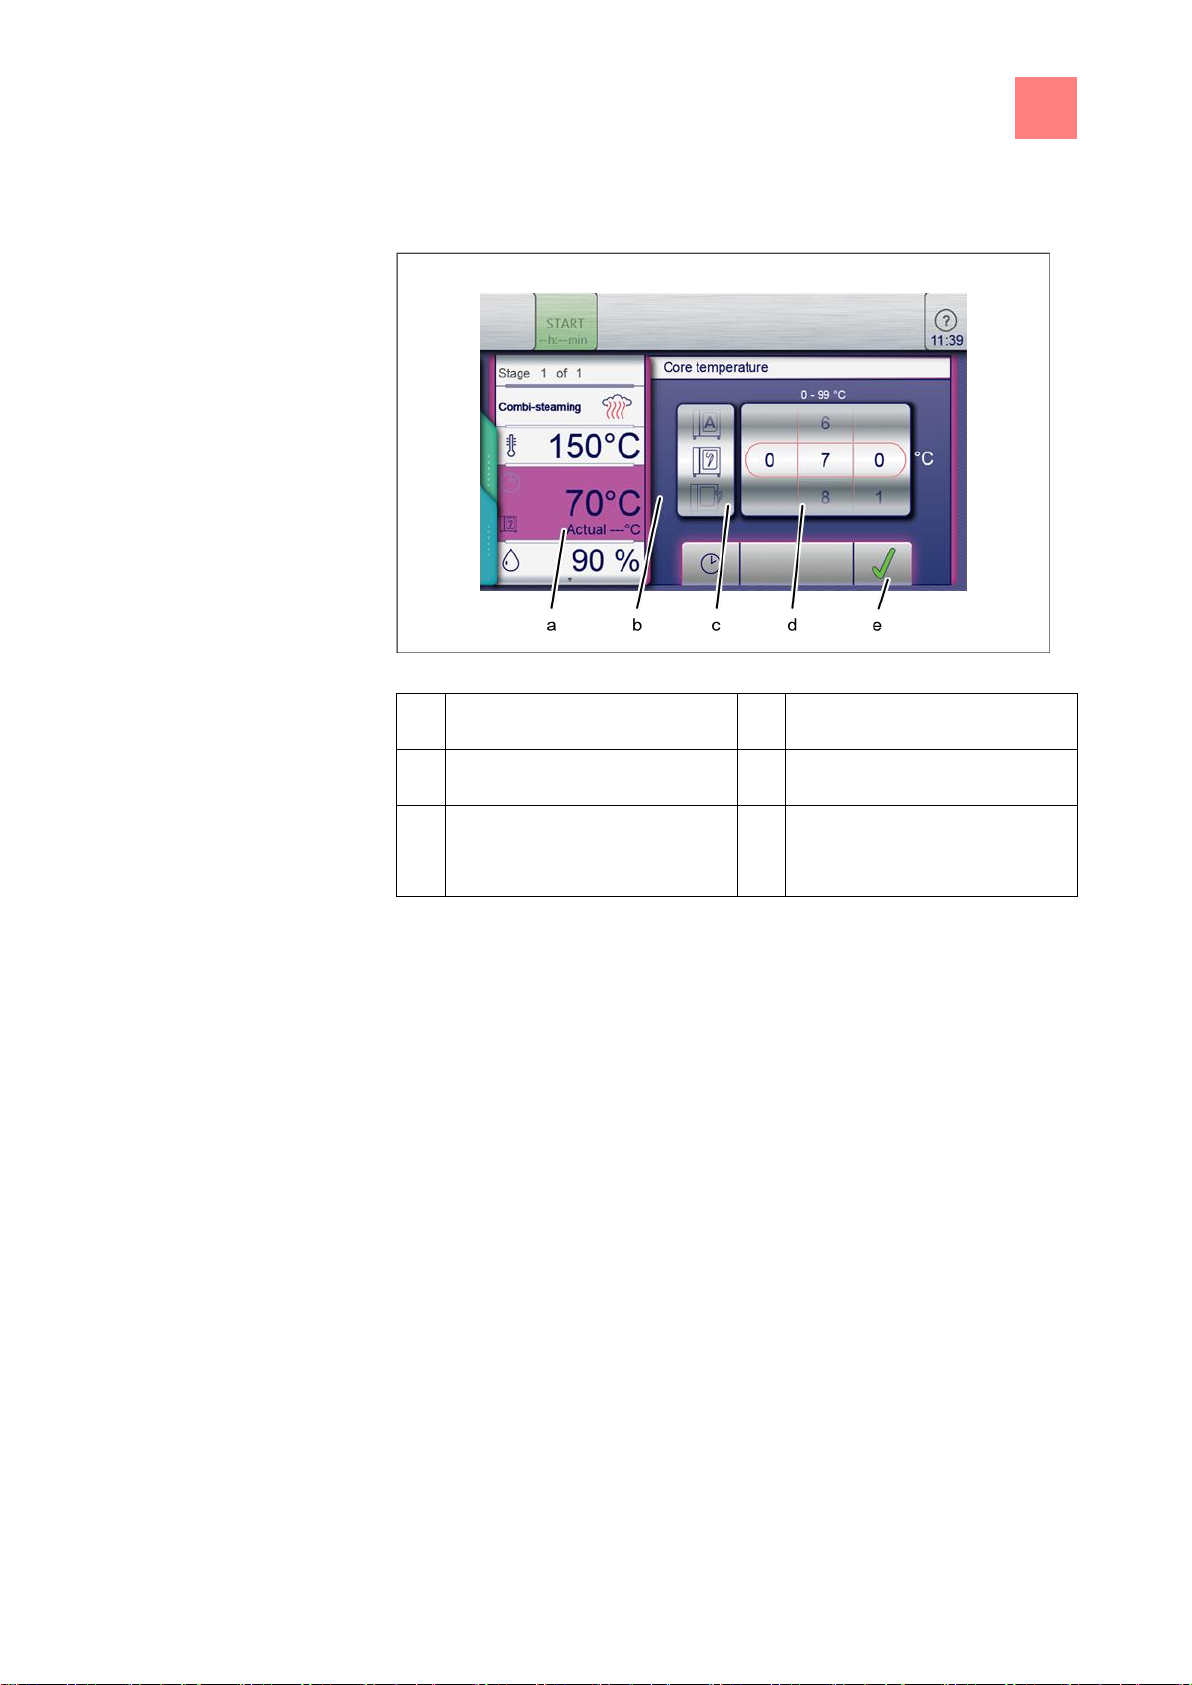
a
Core temperature
field
d
Temperature
roller
b
Setting
window
e
Confirm
button
c
Core temperature sensor type
roller
6.6.3
Requirement
Setting the core temperature
Core temperature setting window for internal and external display
➢ Cooking program selected
➢ Cooking time set
a) Tap the
⇨ The
b) Tap the
⇨ The
Cooking time
Cooking time
field.
setting window is displayed.
Core temperature
Core temperature
button.
setting window is displayed.
c) Using a wiping gesture, set the rollers to the desired temperature.
⇨ Wipe up / down to increase / decrease the core temperature.
d) Tap the
⇨ The
⇨ The
Confirm
Setting
button.
window closes.
Cooking time
field changes to the
Core temperature
field.
Page 52

6
Operating the unit
Basic functions
52
a
Fan setting
field
d
Fan rotation direction
roller
b
Setting
window
e
Confirm
button
c
Fan speed
roller
6.6.4
Requirement
6.6.5
Requirement
Setting the fan speed and direction of rotation
Setting the fan speed and direction of rotation
➢ Cooking program selected
a) Tap the
Fan setting
field.
⇨ The Setting window opens.
b) Using a wiping gesture, set the
c) Using a wiping gesture, set the
Fan speed
roller to the desired value.
Fan rotation direction
roller to the desired
value.
d) Tap the
⇨ The fan speed and fan rotation direction are set.
Confirm
button.
Preparing the USB flash drive for initial use
➢ USB flash drive is formatted
➢ USB flash drive not write-protected
a) Create a folder structure for importing and exporting.
b) Create a folder named "autoChefImages".
⇨ Data exchange of photos in PNG format, resolution of 95x69 pixels,
maximum resolution 150 KB.
c) Create a folder named "FCBrowserFiles".
⇨ Data exchange of text in HTML format.
d) Create a folder named "FCImport".
Page 53

Operating the unit
6
Equipment functions
53
6.6.6
Requirement
Requirement
6.6.7
Requirement
6.7
⇨ Data exchange from cookbooks.
e) Create a folder named "MMIContent".
⇨ Data exchange of additional imported content.
f) Create a folder named "MMiUpdate".
⇨ Data exchange of update files.
⇨ Once the folder structure has been completed, the USB flash drive is
ready for use.
Inserting and removing a USB flash drive
Inserting a USB flash drive
➢ USB flash drive with a minimum of 2 GB and maximum of 32 GB
available storage capacity (not included with delivery)
➢ USB flash drive not write-protected
a) Insert the USB flash drive.
⇨ The USB flash drive is ready after at most 20 seconds.
Removing the USB flash drive
➢ Exporting or importing of data completed
a) Remove the USB flash drive.
Exporting the HACCP log
➢ USB flash drive inserted
➢ User logged in with password under equipment settings
a) Tap the "Export HACCP" field.
⇨ The
b) Tap the
Operating instructions
Confirm
button.
window opens.
⇨ The HACCP log is exported to the USB flash drive.
⇨ The
c) Tap the
⇨ the
⇨ The HACCP log is exported to the USB flash drive.
Confirm
Confirm
Confirm
window opens.
button.
window closes.
Equipment functions
Various functions or settings can be selected in the "Equipment functions"
menu.
Page 54

6
Operating the unit
Manual cooking
54
NOTICE
All equipment functions can also be accessed from within a cooking
program by tapping the
blue
tab.
6.7.1
Requirement
6.8
6.8.1
Requirement
6.8.2
Requirement
Opening the Equipment function menu
➢ The unit is on
➢ The main menu is displayed
a) Tap the Equipment functions button.
⇨ The Equipment functions menu is displayed.
Manual cooking
Cooking modes and other functions are available in the manual cooking
mode. Selecting one of the components automatically creates a single-step
cooking program.
Opening the Manual cooking menu
➢ The unit is on
➢ The main menu is displayed
a) Tap the "Manual cooking" button.
⇨ The
Manual cooking
menu is displayed.
Creating a cooking program
➢ The unit is on
➢ The
Manual cooking
➢ Cooking mode selected
a) Tap the
⇨ The
Cooking temperature
Setting
window is displayed.
b) Using a wiping gesture, set the rollers to the desired value.
c) Tap the
⇨ The
d) Tap the
⇨ The
e) Tap the
Confirm
Setting
button.
window closes.
Cooking time
Setting
window is displayed.
Continuous operation
Core temperature
f) Using a wiping gesture, set the rollers to the desired value.
menus is displayed
field.
field.
button or the
button.
Cooking time
button or the
Page 55

Operating the unit
6
User's own cooking programs
55
NOTICE
Up to 20 steps can be added to a cooking program.
6.9
6.9.1
Requirement
g) Tap the
Confirm
button.
⇨ The
Setting
window closes.
h) Tap cooking zone humidity.
⇨ The
Setting
window is displayed.
i) Using a wiping gesture, set the roller to the desired value.
j) Tap the
⇨ The
Confirm
Setting
button.
window closes.
k) Use a wiping gesture to change to the next page and make further
settings.
l) Tap the
⇨ The
Fan
field.
Setting
window is displayed.
m) Set the fan speed and direction of rotation.
n) Using a wiping gesture, set the rollers to the desired value.
o) Tap the
⇨ The
p) Tap the
⇨ The
q) Save or start the cooking program.
Confirm
Setting
green
tab.
green
tab opens.
button.
window closes.
User's own cooking programs
Cooking modes and other functions are available in the
menu. Using these components, users can create their own programs.
Creating a cooking program
➢ The
a) Tap the field for the desired cooking mode.
b) Modify the desired settings for the first step.
Adding cooking program steps
Manual cooking
menu opens
⇨ The first step of the cooking program is created.
⇨ The cooking program step display reads "Step 1 of 1".
⇨ The first step of the cooking program has been created.
Manual cooking
Page 56

6
Operating the unit
User's own cooking programs
56
NOTICE
If a cooking program has only one step, it cannot be deleted. The function
is not active.
Requirement
Adding a step in the menu item
➢ Cooking program is created and is open
a) A wiping gesture upward opens the next page.
⇨ The next page is displayed.
b) Tap the field " Add step at the left".
or
a) the field "I had step at the right".
⇨ The "New step" window opens.
b) Select the cooking mode or function in the window by tapping it.
⇨ The cooking program step display in the window shows the current
position of the new step in the cooking program.
c) Modify the settings for the step.
⇨ The new step is added.
Deleting a cooking program step
Page 57

Operating the unit
6
User's own cooking programs
57
Requirement
Deleting a step
➢ Cooking program is created and is open
a) Select the step.
b) A wiping gesture upward opens the next page.
⇨ The next page for the step is displayed.
c) Tap the "Delete step" field.
⇨ The
Delete
window is displayed.
d) Tap the "Yes" button.
⇨ This deletes the step.
⇨ The positions of the remaining steps in the cooking program are
updated.
⇨ The step is deleted.
Page 58

6
Operating the unit
User's own cooking programs
58
NOTICE
Cooking programs that have been created can be saved prior to starting or
after completion of the cooking program.
NOTICE
To save a cooking program, at least one cooking program name and one
category must be specified.
a
Green
tab
e
"Subcategory" field
b
"Save cooking program" field
f
"Image" field
c
"Cooking program name" field
g
Next page
arrow symbol
d
"Category" field
h
"Save" button
6.9.2
Requirement
6.9.2.1
Saving the cooking program
Green tab and cooking program in the Save window
➢ Cooking program is created and displayed
a) Tap the
⇨ The
green
tab.
Tab
window is open.
b) Tap the "Save cooking program" field.
⇨ The
Save
window is open.
Saving the cooking program name
a) Tap the "Cooking program name" field.
Page 59

Operating the unit
6
User's own cooking programs
59
6.9.2.2
6.9.2.3
6.9.2.4
6.9.2.5
⇨ The
Keypad
menu is displayed.
b) Views the keys to enter the desired program name.
c) Tap the
⇨ The
⇨ The program name is displayed in the
Confirm
Keypad
button.
menu closes.
Save
window.
Entering a category
a) Tap the "Category" field.
⇨ The
b) Tap the field with the desired
Automatic cooking (autoChef)
Category
menu is displayed.
.
⇨ The category is set.
⇨ The
⇨ The category is displayed in the
Automatic cooking (autoChef)
Save
menu closes.
window.
Entering a subcategory (optional)
a) Tap the "Subcategory" field.
⇨ The
b) Tap the field with the desired
Subcategory
menu is displayed.
Subcategory
.
⇨ The subcategory is set.
⇨ The
⇨ The subcategory is displayed in the
Subcategory
menu closes.
Save
window.
Assigning an image (optional)
a) Tap the "Image" field.
⇨ The
Image
menu is displayed.
b) Select a photo by tapping it.
c) Select the location to save the photo.
d) Tap the "Photos in unit" button or the "Photos on USB flash drive"
button.
⇨ The photo is selected.
⇨ The
⇨ The name of the photo is displayed in the Save window.
Image
menu closes.
Assigning a recipe (optional)
a) Tap the "Recipe" field.
⇨ The
Recipe
menu is displayed.
b) Tap the "Empty recipe" field.
Page 60

6
Operating the unit
User's own cooking programs
60
6.9.2.6
6.9.2.7
6.9.2.8
6.9.2.9
c) Select the save location.
d) Tap the "Recipes in unit" button or the "Recipes on USB flash drive"
button.
⇨ The recipe is set.
⇨ The
⇨ The name of the recipe is displayed in the
e) Tap the "Save" button in the
Recipe
menu closes.
Save
window.
Save
window.
⇨ The cooking program is saved.
⇨ The
Confirm
window is displayed.
f) Tap the Confirm button.
⇨ The
⇨ The cooking program is saved.
green
tab closes.
Selecting favourites (optional)
a) Tap the "Show favourites" field.
⇨ The
Show favourites
menu is displayed.
b) Tap the "Yes" button or the "No" button.
⇨ Tapping Yes displays the cooking program in the Favourites menu.
Selecting characteristics of the food to be
cooked (optional)
a) Tap the "Frozen food" field.
⇨ The
Frozen food
menu is displayed.
b) Tap the "Yes" button or the "No" button.
⇨ Tapping Yes selects the food to be cooked as a frozen food.
Assigning an identification (optional)
a) Tap the "Identification" field.
⇨ The
b) Tap the
Identification
menu is displayed.
Barcode scanner
button.
⇨ Scan the barcode and assign to a cooking program or to food to be
cooked.
Selecting QualityControl
a) Tap the "QualityControl" field.
⇨ The
QualityControl
menu is displayed.
b) Tap the "No" button.
Page 61

Operating the unit
6
Automatic cooking (autoChef)
61
NOTICE
Previously exported cooking programs on the USB flash drive will be
overwritten.
6.9.3
Requirement
6.10
6.10.1
Requirement
⇨ QualityControl is switched off for the cooking program.
c) Tap the "Yes" button.
⇨ Tapping Yes sets the cooking program for a minimal amount of food
to be cooked.
⇨ QualityControl automatically adjusts the cooking time for a larger charge.
Exporting a cooking program
➢ Cooking program open
➢ Cooking program saved
➢ USB flash drive inserted
a) Tap the
⇨ The
b) Tap the "Export cooking programs" field.
⇨ The
c) Read and then close the displayed operating instructions.
d) Close the
green
tab.
Tab
window is open.
Operating instructions
Operating instructions
window opens.
window.
e) Tap the
Confirm
button.
⇨ The cooking program is exported to the USB flash drive.
⇨ The
f) Tap the
⇨ The
⇨ The cooking program is exported.
Confirm
Confirm
window is displayed.
button.
green tab
window closes.
Automatic cooking (autoChef)
In the "Automatic cooking" mode, all cooking programs stored in the unit are
available. The cooking program is selected in the
Opening the Automatic cooking menu
➢ The unit is on
➢ The main menu is displayed
a) Tap the "Automatic cooking" button.
Automatic cooking
menu.
⇨ The
Automatic cooking (autoChef)
menu is displayed.
Page 62

6
Operating the unit
Automatic cooking (autoChef)
62
NOTICE
Arrow symbols in a window always display the next or previous page. A
wiping gesture upward or downward opens the corresponding window.
a
"autoChef" button
d
Category
field
b
BarcodeScan
button
e
Next page
arrow symbol
c
Information bar
f
Separating bar
6.10.2
Requirement
Finding and opening a cooking program
Finding and opening a cooking program by category
Cooking programs can be found in the
Automatic cooking
menu by category
and subcategory.
Automatic cooking menu
➢ The unit is on
➢ Main menu is displayed
a) Tap the "Automatic cooking" button.
⇨ The
Automatic cooking
menu is displayed.
⇨ An additional menu page is displayed.
b) Tap the field with the desired category.
⇨ The Subcategory menu is displayed.
c) Tap the field with the desired subcategory.
⇨ The Recipe menu with all recipes in the subcategory is displayed.
d) Tap the field with the desired recipe.
⇨ The cooking program is selected and being loaded.
Page 63

Operating the unit
6
Automatic cooking (autoChef)
63
NOTICE
The current step in the cooking program is highlighted. Upon completion,
the following step automatically appears in the display.
Requirement
6.10.3
Requirement
⇨ The cooking program steps are displayed.
⇨ The cooking program is open.
Finding and opening a cooking program in the cookbook
All cooking programs are saved in the cookbook in alphabetical order.
Find cooking program window
➢ The unit is on
➢ Main menu is displayed
a) Tap the "Automatic cooking" button.
⇨ The Category menu is displayed.
b) Tap the "autoChef" button in the information bar.
⇨ The
c) Tap the
⇨ The
autoChef
window is displayed.
Find cooking program
Entry
window is displayed.
field.
d) Using the keypad, enter the letters for the name to be found.
⇨ A filtered list is displayed in the
Result
window.
e) Tap the field with the name found.
⇨ The cooking program is selected and being loaded.
⇨ The cooking program steps are displayed.
⇨ The cooking program is open.
Starting the cooking program
➢ Cooking program open
Page 64

6
Operating the unit
Automatic cooking (autoChef)
64
6.10.4
Requirement
a) Tap the "START" button in the information bar.
⇨ The cooking program starts.
⇨ The "START" button in the information bar changes to the "STOPP"
button.
⇨ The remaining cooking program time is displayed in the "STOPP"
button.
⇨ The cooking program is started.
Ending the cooking program
➢ Cooking program started
➢ Cooking program time has not elapsed
a) Tap the "STOPP" button in the information bar.
or
a) Wait for the cooking time to end.
⇨ Cooking program has ended.
⇨ The "STOPP" button in the information bar changes to the "START"
button
⇨ The cooking program has ended.
Page 65

Operating the unit
6
Automatic cooking (autoChef)
65
NOTICE
If the cooking zone door is not opened, the fan continues to run at a low
speed at intervals. This achieves even cooking.
NOTICE
Tabs available only within cooking programs. Tapping the tabs provides
faster access to their functions.
NOTICE
The current step in the cooking program is highlighted and can be modified.
All settings of a step can be modified.
NOTICE
After the settings are made, the modified cooking program can be saved.
The cooking program is overwritten if a new cooking program name is not
specified.
6.10.5
Requirement
Requirement
Modifying the cooking program
Modifying a cooking program after the program has started
➢ Cooking program started
➢ Cooking program has not elapsed
a) Modify the settings for the current step.
⇨ The modifications of the step become active immediately.
⇨ The modifications of the step are displayed.
b) Tap the "Continue" field.
⇨ The active step is being ended.
⇨ The next step is being started.
⇨ Steps advance in the
Settings
window.
⇨ The cooking program is modified.
Modifying a cooking program before the program has started
➢ Cooking program open
➢ Cooking program not started
a) Modify various steps.
b) Use a wiping gesture to reach the individual step to be modified.
c) Modify the settings for the step.
Page 66

6
Operating the unit
Automatic cooking (autoChef)
66
NOTICE
Previously exported cooking programs on the USB flash drive will be
overwritten.
6.10.6
Requirement
6.10.7
⇨ The modifications of the step are displayed.
⇨ The cooking program can be started without being saved.
⇨ If the modifications are to be saved, continue with the next step.
d) Tap the
⇨ The
green
tab.
Tab
window is open.
e) Save the cooking program.
⇨ All modifications to the cooking program are saved.
⇨ The saved cooking program is modified.
Delete cooking program
➢ Cooking program open
➢ Cooking program not started
a) Tap the
b) The
c) Tap the "Delete cooking program" field.
⇨ The
d) Tap the "Yes" button.
⇨ The cooking program is being deleted.
⇨ The
green
tab.
Tab
window is open.
Delete
window is displayed.
Confirm
window is displayed.
e) Tap the
⇨ The
⇨ The cooking program is deleted.
Confirm
green
tab closes.
button.
Exporting and importing a cooking program
Exporting a cooking program
When exporting, all user-created cooking programs in the cookbook are
exported.
Page 67

Operating the unit
6
Automatic cooking (autoChef)
67
NOTICE
Existing cooking programs can be overwritten or the file names of the
imported cooking programs can have a supplement added.
Requirement
Requirement
Export cooking program window
➢ USB flash drive inserted
➢
Automatic cooking
open
➢ User-created cooking programs are saved in the cookbook
a) Tap the "autoChef" button in the information bar.
⇨ The
autoChef
window opens.
b) Tap the "Export cooking programs" field.
⇨ The
Operating instructions
window opens.
⇨ Read the displayed operating instructions.
c) Tap the
Confirm
button.
⇨ All user-created cooking programs are exported to the USB flash
drive from the cookbook.
⇨ The
d) Tap the
⇨ The
Confirm
Confirm
Confirm
window is displayed.
button.
window closes.
⇨ The cooking programs are exported.
Importing cooking programs
When importing, new cooking programs are added to the cookbook.
➢ USB flash drive inserted
➢ Automatic cooking menu open.
a) Tap the "autoChef" button in the information bar.
⇨ The
autoChef
window opens.
b) Tap the "Import cooking programs" field.
Page 68

6
Operating the unit
Pausing and finishing use
68
6.11
Requirement
Requirement
⇨ The
Operating instructions
window opens.
⇨ Read the displayed operating instructions.
c) Tap the
Confirm
button.
⇨ All cooking programs on the USB flash drive are imported to the
cookbook.
⇨ The
Operating instructions
window is displayed.
d) Tap the "OK" button.
⇨ The cooking programs are imported.
Pausing and finishing use
a) Switch off the unit during pauses and when finished using it.
Period of idleness last more than 2 days
➢ GN containers, baking sheets and grates removed from the cooking
zone
➢ No food to be cooked in the cooking zone
a) Operate the hand shower for 1 minute.
b) Run the unit in the Steaming mode for 7 minutes at 100°C (212°F).
Period of idleness lasting more than 7 days
➢ GN containers, baking sheets and grates removed from the cooking
zone
➢ No food to be cooked in the cooking zone
a) Operate the hand shower for 5 minutes.
b) Run the unit in the Steaming mode for 1 hour at 100°C (212°F).
Page 69

Cleaning and caring for the unit
7
Preventing corrosion
69
NOTICE
Risk of burns from hot surfaces
a) Allow surfaces to cool prior to cleaning.
SAFETY INSTRUCTIONS
Risk of physical damage from extremely abrupt cooling
a) Do not cool shock the unit by cooling it abruptly.
SAFETY INSTRUCTIONS
Risk of physical damage from improper cleaning
a) Do not clean the unit with a high-pressure cleaner.
7
7.1
7.2
Cleaning and caring for the unit
Preventing corrosion
▪ Keep the surfaces of the unit clean, with access to air.
▪ Remove lime, grease, starch and protein deposits.
▪ Remove salt accumulations.
▪ Expose parts made from non-rusting steel only briefly to contact with
highly acidic foods, spices, salts or the like.
▪ Avoid damaging the stainless steel surface with other metal items, for
instance, steel spatulas or steel wire brushes.
▪ Prevent contact with iron and steel, for instance, steel wool and steel
spatulas.
▪ Do not use bleaching or chlorine-containing cleaning agents.
▪ Clean contact surfaces with water.
Remove rust spots
▪ Remove fresh rust spots with a mild abrasive or fine sandpaper.
▪ Always remove rust spots completely.
▪ Expose treated areas to fresh air for at least 24 hours. During this time,
do not allow any contact with greases, oils or foods so that a new
protective layer can form.
Page 70

7
Cleaning and caring for the unit
Cleaning the housing
70
SAFETY INSTRUCTIONS
Risk of physical damage from improper cleaning
a) Do not clean the housing with highly abrasive or chemically aggressive
cleaning agents.
b) Do not clean the housing with highly abrasive sponges.
SAFETY INSTRUCTIONS
Risk of physical damage from improper cleaning
a) Do not clean the surface with highly abrasive or chemically aggressive
cleaning agents.
b) Do not clean the surface with highly abrasive sponges.
7.3
Requirement
7.4
Requirement
Unit switched off and cool
a) Clean the housing with warm water and a commercially available
detergent.
Cleaning the handle, operating elements
and operating panel membrane
Cleaning the housing
➢ Unit switched off
a) Clean the door handle, operating elements and control panel with a
damp cloth and commercially available detergent.
Page 71

Cleaning and caring for the unit
7
Cleaning the touchscreen
71
SAFETY INSTRUCTIONS
Risk of physical damage from improper cleaning
a) Do not clean the touchscreen with highly abrasive or chemically
aggressive cleaning agents.
b) Do not clean the touchscreen with highly abrasive sponges.
NOTICE
A cleaning time of 20 seconds is provided. During this time, the
touchscreen cannot be operated.
7.5
Requirement
Cleaning the touchscreen
➢ Equipment function menu displayed
a) Tap the "Clean touchscreen" field.
⇨ The touchscreen no longer reacts when touched.
⇨ The
Clean
window opens.
⇨ The cleaning time is updated.
b) Clean the touchscreen within 20 seconds.
⇨ The Clean window closes.
⇨ The equipment function menu is displayed.
⇨ The touchscreen is clean.
Page 72

7
Cleaning and caring for the unit
Cleaning the door seal
72
SAFETY INSTRUCTIONS
Risk of physical damage from improper cleaning
Animal fats in combination with high temperatures can damage the door
seal very quickly if it is not maintained properly.
a) Clean the door seal regularly.
b) Do not use aggressive cleaners.
NOTICE
During automatic cleaning and semi-automatic cleaning, the outside
surface of the door seal is not cleaned.
The door seal must be cleaned separately after each semi-automatic and
automatic cleaning.
7.6
Cleaning the door seal
a) When finished using the unit, clean the door seal with warm water and a
commercially available detergent.
Page 73

Cleaning and caring for the unit
7
Cleaning the cooking zone door
73
NOTICE
If the unit is used primarily for roasting, also clean the door seal during
pauses in use.
WARNING
Risk of burns from hot surfaces
a) Allow surfaces to cool prior to cleaning.
SAFETY INSTRUCTIONS
Risk of physical damage from improper cleaning of the surface
a) Do not use abrasive cleaners or cloths.
b) Do not use grill cleaners.
7.7
7.7.1
7.8
Cleaning the cooking zone door
Cleaning the door with hygienic glazing
a) Remove residual calcium deposits from the glass window with vinegar or
citric acid.
Cleaning the steam outlet
Cleaning the steam outlet
Page 74

7
Cleaning and caring for the unit
Cleaning the condensation hood (optional)
74
SAFETY INSTRUCTIONS
Risk of physical damage from deposits
a) Check the steam outlet and connected piping for deposits.
NOTICE
Use a liquid cleaner containing at most 20% sodium or potassium
hydroxide.
Flushing with water is not necessary.
CAUTION
Risk of fire from dirt and grease accumulation
a) Clean the hood after use.
b) Follow the cleaning instructions.
WARNING
Risk of burns from hot surfaces
a) Allow surfaces to cool prior to cleaning.
CAUTION
Risk of injury from sharp edges
a) Wear protective gloves.
7.9
Requirement
a) Examine the steam outlet and connected piping for deposits.
b) Spray liquid cleaner into the steam outlet.
Cleaning the condensation hood (optional)
Cleaning the condensation hood
➢ Unit and hood disconnected from the electric mains
➢ Unit and hood cool
a) Clean the housing daily with warm water and a commercially available
cleaner.
Page 75

Cleaning and caring for the unit
7
Removing calcium deposits from the unit
75
NOTICE
To remove calcium deposits manually, fill a manual spray gun with a
special decalcifier.
SAFETY INSTRUCTIONS
Risk of physical damage from improper cleaning
a) Do not clean the unit with a high-pressure cleaner.
7.10
Requirement
7.11
7.11.1
Requirement
b) Push the grease filter upwards.
c) Pull the grease filter on the underside of the hood forward to remove it.
d) Clean the grease filter and hood with a commercially available cleaning
agent.
e) Rinse and dry the grease filter, and replace it in the hood.
Removing calcium deposits from the unit
➢ Cooking zone temperature less than 40°C (140°F)
➢ Cooking zone cleaned
a) Dilute special decalcifier with water in a ratio of 1:2.
b) Open the air diverter.
c) Spray the diluted special decalcifier into the cooking zone.
d) Allow to act for 30 minutes.
e) Rinse the cooking zone thoroughly.
f) Examine the cooking zone for any remaining calcium deposits.
g) If necessary, repeat the decalcification.
h) Open the cooking zone door and leave it ajar until the unit is used again.
⇨ This extends the service life of the door seal.
⇨ No moisture builds up in the cooking zone.
Cleaning the cooking zone automatically
with WaveClean
Preparing for cleaning
➢ GN containers, baking sheets and grates removed from the cooking
zone
a) Remove any food remains from the cooking zone.
⇨ The drain screen is not obstructed.
Page 76
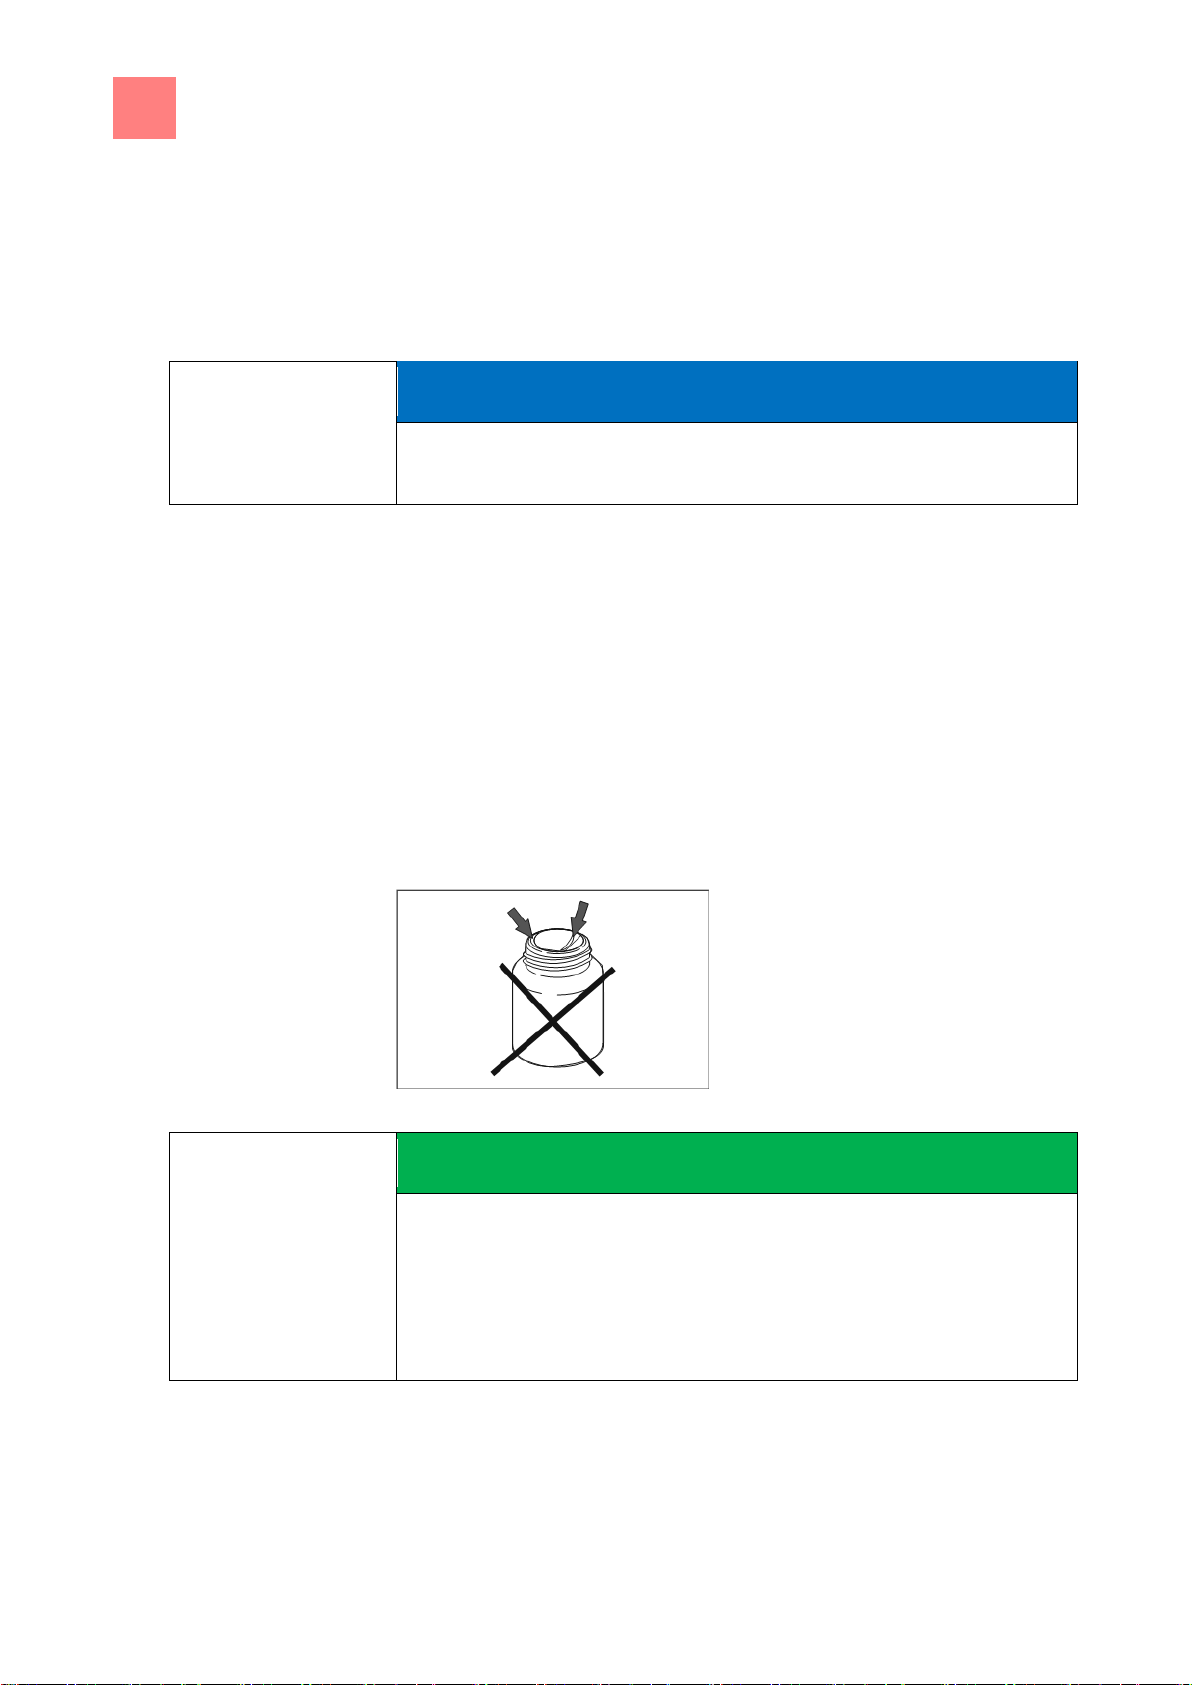
7
Cleaning and caring for the unit
Cleaning the cooking zone automatically with WaveClean
76
NOTICE
Despite different cleaning times, all cleaning levels required the same
amount of water.
SAFETY INSTRUCTIONS
Use only cleaning cartridges with an undamaged wax seal.
If the wax seal is damaged, the cleaner can enter the cleaning circuit
prematurely or not dissolve completely, so that complete cleaning is no
longer assured.
Insert the cleaning cartridges only when requested to do so.
7.11.2
Requirement
7.11.3
Requirement
b) Leave only the support rack in the cooking zone in countertop units and
the tray trolley in the cooking zone in floor-standing units.
c) Close the cooking zone door.
Selecting the cleaning level
➢ The unit is on
➢ Main menu is displayed
a) Tap equipment function.
b) Tap the
c) Select the cleaning level.
d) Tap the "START STOPP" button.
⇨ If necessary, the cooling zone cools until the cleaning temperature of
WaveClean
symbol.
60°C (140°F) is reached.
Inserting the cleaning cartridge
Wax seal on the cartridge damaged
➢ Cleaning cartridges sealed and undamaged
a) Open the cooking zone door.
b) Open the cover on the cartridge.
Page 77

Cleaning and caring for the unit
7
Cleaning the cooking zone automatically with WaveClean
77
SAFETY INSTRUCTIONS
Never operate the unit in the automatic cleaning mode without a cleaning
cartridge
In the event of severe soiling, select the "extra" cleaning level and use 2
cleaning cartridges.
7.11.4
Requirement
7.11.5
7.11.6
Requirement
Inserting the cartridge into the countertop unit or the floor-standing unit
c) Place the cartridge into the holder on the air diverter or into the holder on
the tray trolley.
a) Close the cooking zone door.
Starting automatic cleaning
➢ Water connection is opened
➢ The unit is on
➢ Cooking zone temperature at 60°C (140°F)
a) Tap the "START STOPP" button.
⇨ The display shows the remaining time.
Cancelling automatic cleaning
a) Tap the "STOPP" button.
⇨ Automatic cleaning is cancelled.
⇨ Automatic rinsing starts and cannot be cancelled.
⇨ Upon completion, a request appears to remove the cartridge.
a) Remove the cartridge.
Ending automatic cleaning
➢ Automatic rinsing has stopped after the cleaning program was cancelled
or the cleaning time has elapsed
a) Open the cooking zone door.
b) Remove the empty cleaning cartridge.
c) Use the hand shower to thoroughly rinse away any remaining cleaner or
rinse aid.
Page 78

7
Cleaning and caring for the unit
Cleaning the cooking zone manually
78
SAFETY INSTRUCTIONS
Risk of physical damage from improper cleaning
a) Do not clean the unit with a high-pressure cleaner.
7.12
7.12.1
Requirement
7.12.2
Requirement
d) Leave the cooking zone door open slightly until the unit will be used
again.
⇨ This extends the service life of the door seal.
⇨ No moisture builds up in the cooking zone.
Cleaning the cooking zone manually
Preparing the cooking zone
➢ GN containers, baking sheets and grates removed from the cooking
zone
a) Remove any food remains from the cooking zone.
⇨ The drain screen is not obstructed.
b) Leave only the support rack in the cooking zone in countertop units and
the tray trolley in the cooking zone in floor-standing units.
c) Close the cooking zone door.
Starting the cleaning program
➢ The unit is on
a) Tap manual cleaning.
Page 79

Cleaning and caring for the unit
7
Cleaning the cooking zone manually
79
CAUTION
Dangerous situation
Failure to observe precautions can result in slight to moderately severe
injuries.
a) Wear protective clothing.
b) Wear breathing protection.
SAFETY INSTRUCTIONS
Risk of physical damage from exceeding the recommended acting time of
the cleaner
a) Do not allow the cleaner to act longer than specified by the program.
7.12.3
7.12.4
7.12.5
Spraying the cleaner
Spraying the cooking zone
a) When the message "Spray cleaner" appears, open the cooking zone
door.
b) Spray the cooking zone, heat register and fan wheel with cleaner.
Allowing the cleaner to act
a) Close the cooking zone door.
⇨ The acting time starts.
⇨ The display shows the remaining acting time.
Starting cleaning
a) The acting time has elapsed, the cleaning process starts.
⇨ The cooking zone is heated.
⇨ The display shows the remaining time.
Page 80

7
Cleaning and caring for the unit
Cleaning the cooking zone manually
80
NOTICE
The cooking zone is heated for 5 minutes.
7.12.6
Requirement
7.12.7
Requirement
➢ The cleaning process has completed
a) Open the cooking zone door.
b) Using the hand shower, thoroughly rinse through the openings in the air
diverter.
c) Thoroughly rinse the cooking zone with the hand shower for 3 minutes.
d) Close the cooking zone door.
Drying the cooking zone
➢ Cooking his own door closed
a) The drying process starts automatically.
a) After the end of the drying process, a signal sounds.
⇨ "End" appears on the display.
Rinsing the cooking zone
b) Open the cooking zone door and leave it ajar until the unit is used again.
⇨ This extends the service life of the door seal.
⇨ No moisture builds up in the cooking zone.
Page 81

Cleaning and caring for the unit
7
Swinging the air diverter open and closed
81
CAUTION
Pinch hazard from rotating fan
a) Prior to working on the unit, ensure that the unit has been disconnected
from the mains.
b) Do not operate the unit without the air diverter.
a
Air diverter
c
Lower fastener
b
Upper fastener
d
Centre fastener
7.13
Requirement
Swinging the air diverter open and closed
Air diverter fasteners on countertop and floor-standing units
Swinging the air diverter open
➢ Unit switched off
a) Remove the left support rack; present only in size 6 and size 10.
b) Loosen the upper fastener.
c) Loosen the lower fastener.
d) Loosen the centre fastener; present only in size 20.
e) Swing the air diverter toward the back wall.
Swinging the air diverter closed
a) Swing back the air diverter along the side wall.
b) Close the upper fastener.
c) Close the lower fastener.
d) Close the centre fastener; present only in size 20.
e) Check the fasteners.
f) Insert the left support rack; present only in size 6 and size 10.
Page 82
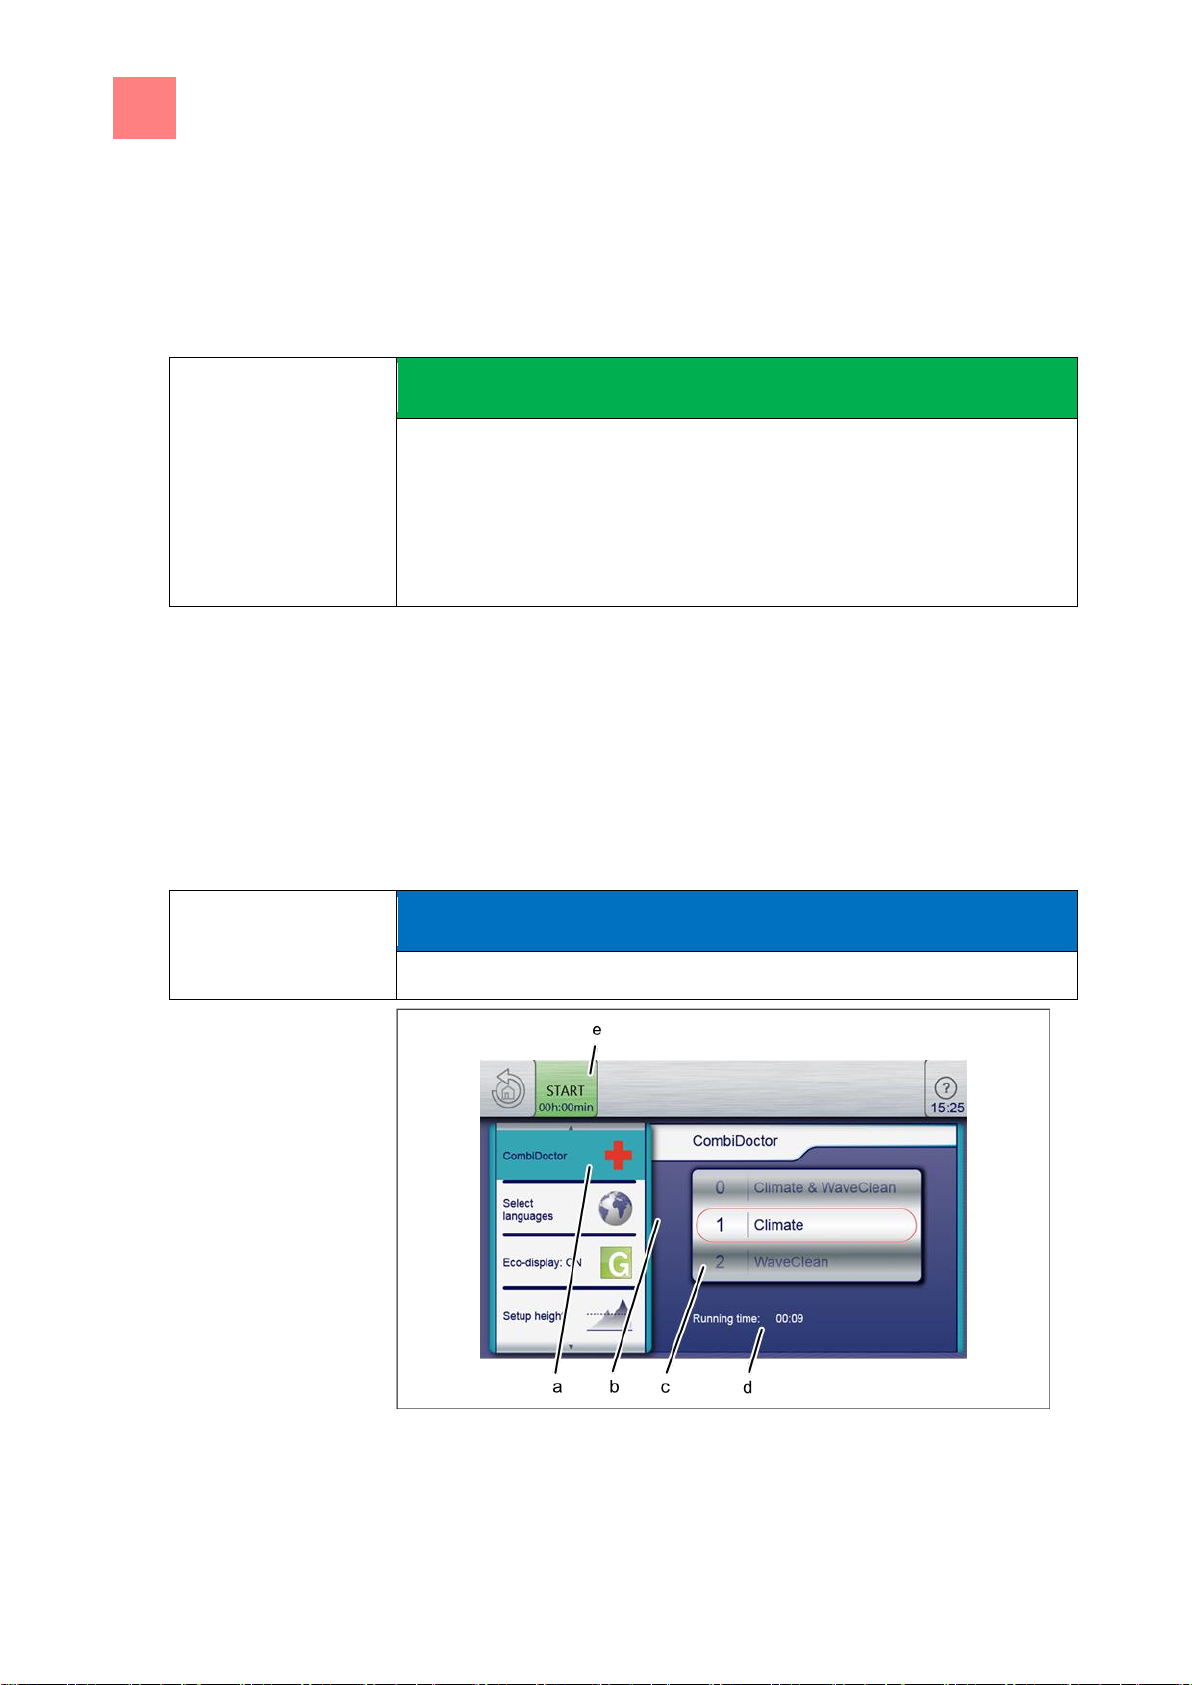
7
Cleaning and caring for the unit
Inspecting the unit
82
SAFETY INSTRUCTIONS
Risk of physical damage from improper inspection
a) Inspect in accordance with the inspection intervals.
b) Have inspections performed by a capable user.
c) In the event of damage or signs of wear, contact customer service
immediately and stop using the unit.
NOTICE
Incorrect results are displayed when the unit is warm. Allow the unit to cool.
7.14
7.14.1
Requirement
7.14.2
Inspecting the unit
Performing a visual inspection
➢ Unit empty and cleaned
➢ Cooking zone door opened completely
a) Inspect housing, cooking zone door and cooking zone yearly for
deformation and cracks.
⇨ Visual inspection has been performed.
Running CombiDoctor (self-diagnostic program)
Select the self-diagnostic program setting
Page 83

Cleaning and caring for the unit
7
Inspecting the unit
83
a
CombiDoctor field
d
Remaining time
b
Setting window
e
START button
c
Roller
Requirement
➢ Water connection is opened
➢ Energy optimization system deactivated (optional)
➢ Cooking zone empty, no grates and no containers, with support rack or
tray trolley
➢ The unit is on
➢ No errors displayed
➢ Equipment functions displayed
a) Open the
Settings
menu.
b) Enter the password.
c) Tap the "CombiDoctor" field.
d) Using a wiping gesture, set the roller to the desired self-diagnostic
program.
⇨ The set self-diagnostic program displays the elapsed time.
e) Press the "START" button.
⇨ A help text is displayed.
f) Open the cooking zone door briefly and then close it.
⇨ The self-diagnostic program continues automatically.
⇨ On completion of self-diagnosis, the result is displayed. Note the error
message and forwarded to your local customer service.
Page 84

8
Troubleshooting
Causes of errors and remedies
84
Serial number
(SN)
Type number
(TYP)
8
8.1
8.2
Troubleshooting
Causes of errors and remedies
If an error occurs during operation, the error group and the error number
within the group are displayed.
Nameplate
When contacting customer service, please always provide the data from the
nameplate:
Page 85

9
Unit
Cleaning agents
Dispose of unit in an environmentally
responsible manner
The unit has been designed to provide a lifetime of 10 years with average
use.
Did not dispose of the unit in normal trash. These materials damage your
health and the environment when disposed of in normal trash or treated
improperly. Dispose of the unit in accordance with local regulations for used
appliances. If you have questions, please contact the responsible agencies
(for instance, waste disposal).
In addition to valuable materials, used electrical and electronic equipment
also contains harmful substances that were needed for their operation and
safety.
Dispose of leftover cleaning agents and cleaning agent containers in
accordance with the information provided by the cleaning agent's
manufacturer. Observe applicable regional regulations.
Page 86

Henny Penny Corporation
P.O.Box 60
Eaton,OH 45320
1-937-456-8400
1-937-456-8402 Fax
Toll free in USA
1-800-417-8417
1-800-417-8434 Fax
*FM0--/* Henny Penny Corp., Eaton, Ohio 45320, Revised 8-15-14
www.hennypenny.com
 Loading...