

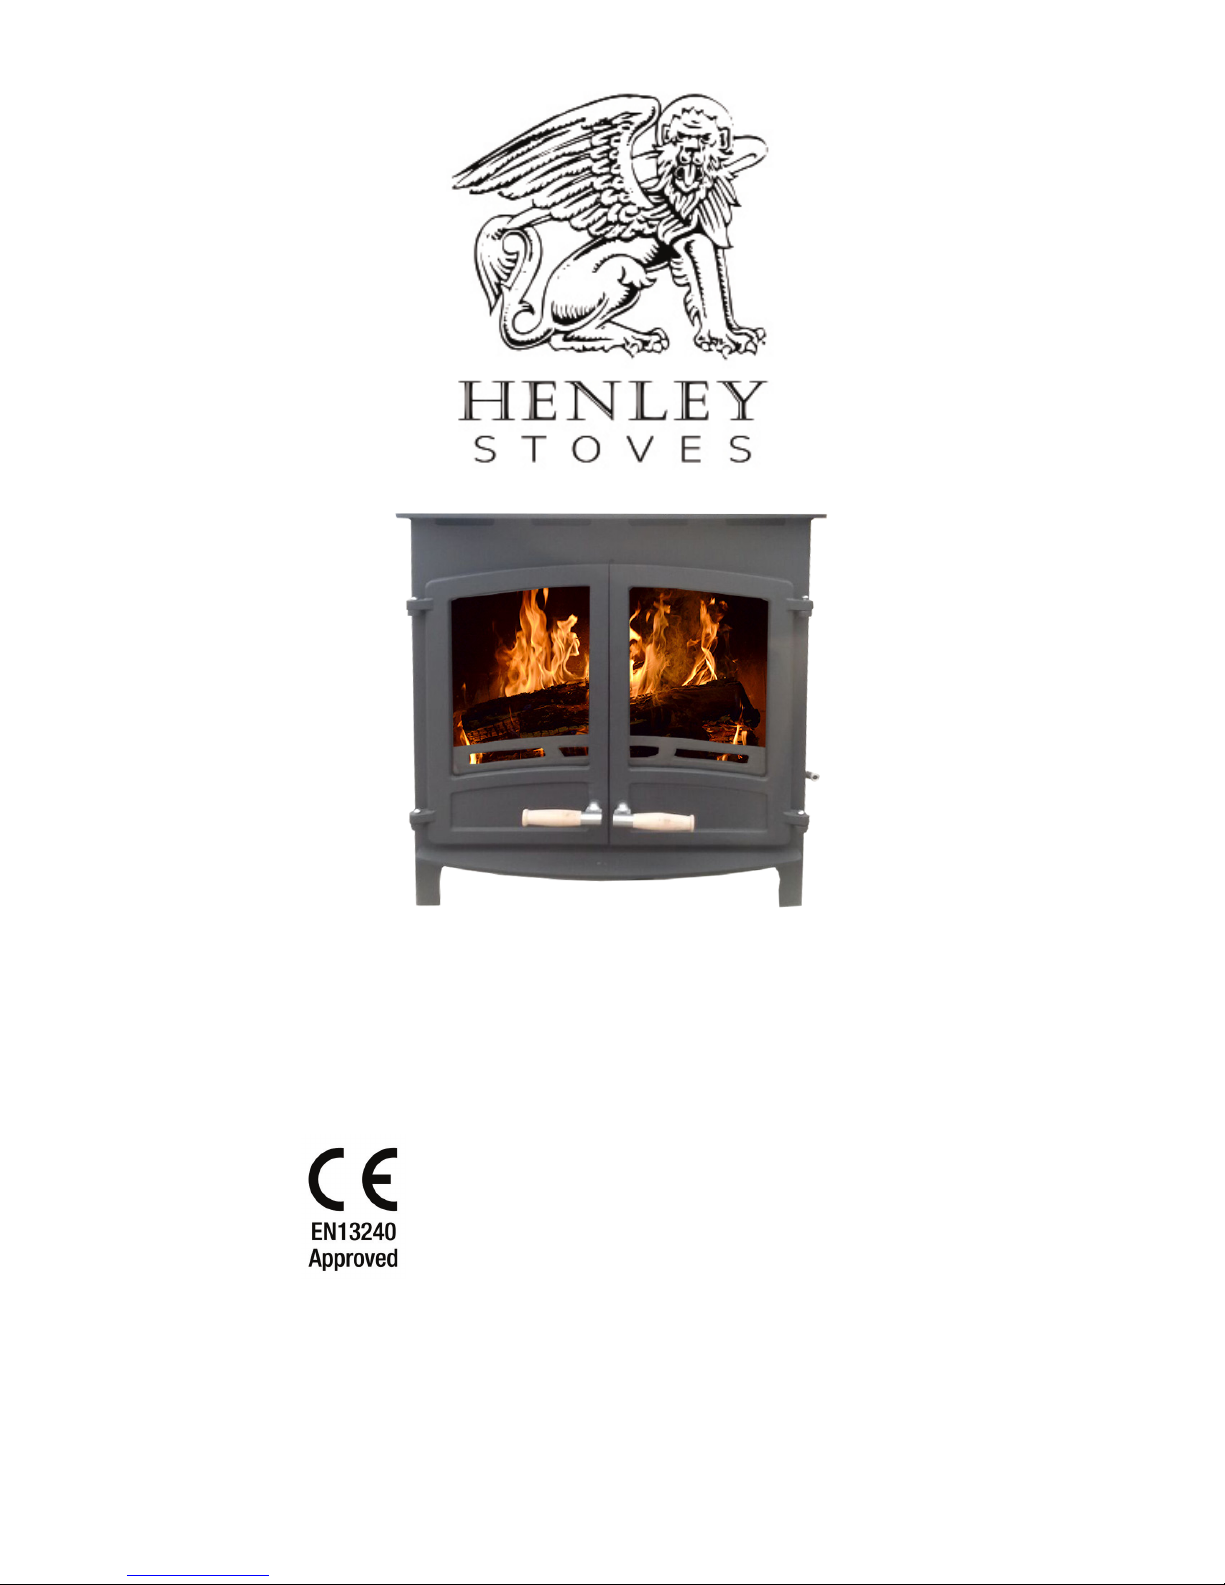
Henley Hampton 21kW, Hampton 30kW, Cambridge 5kW, Cambridge 7.5kW, Cambridge 10.5kW Installation And Operating Instructions Manual
1 | www.henleystoves.com
Important: – This product must be installed by a suitably qualied installer.
PLEASE READ ALL THESE INSTRUCTIONS CAREFULLY!
For safety reasons it is essential that your stove is correctly installed and operated. Henley Stoves cannot
accept responsibility for any fault or consequential problems arising through incorrect installation or operation.
Please hand these instructions to the stove user when the
installation is complete.
Leave the stove ready for operation and instruct the user in
the correct use of the appliance and operation of controls.
Henley Hampton 21kW / 30kW
Boiler / Room Heater Stove Installation and Operating Instructions
Henley Stoves, Curraheen, Tralee, Co. Kerry | www.henleystoves.com

2 | www.henleystoves.com
Table of contents
Technical Specication
Stove Commissioning Checklist
Installation Instructions
Hearth
Ventilation
Chimney
Flue outlet positions
User instructions
Connecting a chimney to a ue
Combustible Materials
Air Controls
Door handle
Recommended Fuels
Lighting the Stove
Re-fuelling
Shutting Down
Maintenance
Chimney Sweeping
Replacing the Fire Rope around your stove door
Removing the Ash
Removing the fuel retainer
Replacing the glass in your stove door
Replacing the bae plate in your stove
Stove Finish (paint)
Warranty
Chimney Fire and Over Firing
Seasonal Use
Frequently Asked Questions
Parts
Servicing
Warranty Registration Form
DEFRA
3
4
5
5
5
6
7
8
8
9
9
9
9
10
10
10
10
11
11
11
12
12
12
12
13
14
14
15
16
Congratulations on your purchase of your Henley Druid Stove. With the proper care and attention your Henley stove will
give you a lifetime of heat, comfort and pleasure. This manual contains instructions on how to install and maintain your
Henley Stove. For both your comfort and safety please take the time to read through it carefully.
Safety
A reguard conforming to BS 8423:2010 should be used in the presence of children, the old or inrm.
Please note, this appliance should be used with the re door closed at all times except when fuelling, de-ashing or initial lighting.
Do not use aerosol sprays or any other ammable materials near the appliance under re. Fire cement is caustic, hand and eye protection should always
be worn, prolonged contact with the skin should be avoided. Henley Stoves will not be responsible for any consequential or incidental loss or injury however caused. Before continuing any further with theinstallation of this appliance please read the following guide to manual handling.
• Always obtain assistance when lifting the appliance
• When lifting always keep your back straight, bend your legs not your back
• Avoid twisting at the waist. It is better to reposition your feet.
• Avoid upper body/top heavy bending. Do not lean forwards or sideways when handling the re
• Always grip with the palms of your hands do not use your ngertips for support, use gloves for a better grip
• Always keep the stove close to the body as this will minimise the cantilever action.
Fire Cement
Some types of re cement are caustic and should not be allowed to come into contact with the skin. In case of skin contact, wash
immediately with plenty of water.
Asbestos
This stove contains no asbestos. If there is a possibility of disturbing any asbestos in the course of installation then please seek specialist guidance and use
appropriate protective equipment.
3 | www.henleystoves.com
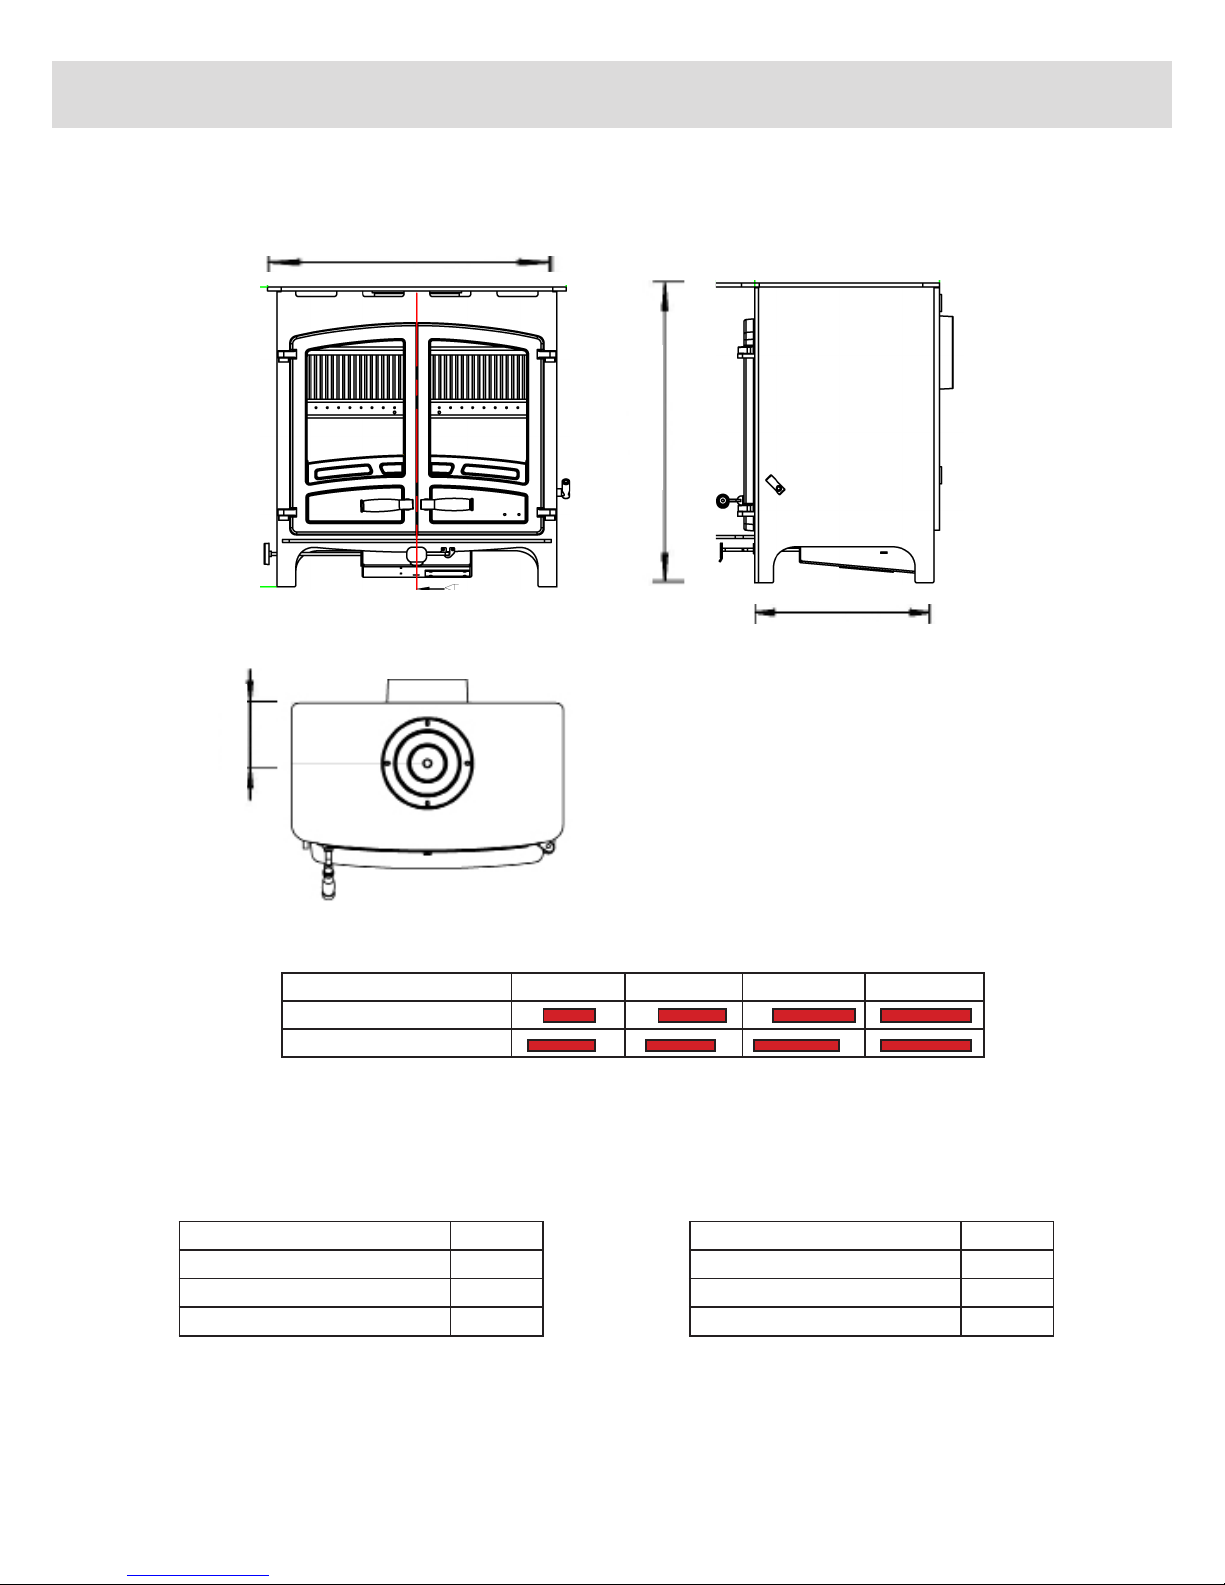
Technical Specication
All sizes in MM
Model Size A Size B Size C Size D
Hampton 21kw
Hampton 30kw
Size B
Size D
Size C
Size A
Diagram shows a Hampton 30kw. Corresponding sizes for both Hampton 21kw and 30kw can be found below:
Hampton 21kw
Wood
Nominal heat output kW 21.0
kW Output to Water 15.0
kW Output to Room 6.0
Hampton 30kw
Wood
Nominal heat output kW 30.0
kW Output to Water 23.0
kW Output to Room 7.0
Results of independent testing to EN 13240
Results of independent testing to EN 13240
***Safe distances to combustible materials should
be 750 mm to the rear and 450 to the side
***Safe distances to combustible materials should
be 800 mm to the rear and 500 to side
***All sizes are correct at time of publish but are subject to change without prior notice. Please
ensure you confrim all measurements before commencing any installation works.
4 | www.henleystoves.com
Stove Commissioning Checklist
Please complete the form below as it will be of great assistance in the unlikely event that there is a problem
with the stove or a warranty claim needs to be made. Please contact the installer or dealer if there is a problem.
Dealer appliance was purchased from
Essential Information - MUST be completed
Installation Engineer
Commissioning Checks (to be completed and signed)
..........................................................................................................................................
..........................................................................................................................................
........................................................................................................................................................
..........................................................................................................................................
............................................................................................................................
............................................................................................................................
............................................................................................................................
Name:
Address:
Phone:
Date installed:
Model Description:
Serial number:
............................................................................................................................
............................................................................................................................
............................................................................................................................
Company name:
Address:
Phone:
Stove correctly ued according to building regulations
Flue swept and integrity of ue veried
Smoke test completed on installed stove
Spillage test completed
Use of appliance and operation of controls explained to end-user
Check that specied clearance to combustibles has been adhered to
Instruction manual handed to end-user
HETAS Approved (Please tick relevant box): Yes No
If Yes, please include certicate of compliance.
Yes No
Yes No
Yes No
Yes No
Yes No
Yes No
Yes No
.............................
....................................................
..................................................
..............................................................................
................
............
.......................................................
Signature:
.......................................................
Print name:
........................................................
5 | www.henleystoves.com
Installation Instructions
1. Before installation and/or use of this appliance please read these instructions carefully to ensure that all requirements
are fully understood. The appliance must be tted by a registered installer*, or approved by your local building control
ocer.
2. All local regulations, including those referring to national and european standards need to be complied with when
installing the appliance. In all cases the installation must comply with current local regulations including Building Regulations, Local Authority Byelaws and other specications or regulations including Ireland, UK or EU standards referred to as
they aect the installation of the stove. Please refer to
Building regulations available on http://www.environ.ie and http://www.planningportal.gov.uk.
3. Only use for domestic heating in accordance with these operating instructions.
4. Only approved fuels must be burned. Do not use with liquid fuels or as an incinerator.
5. Appliance surfaces become very hot when in use. Use a suitable reguard if young children, elderly or inrm persons are
present.
6. Do not place photographs, TV’s, paintings, porcelain or other combustible items on the wall or near the appliance. Exposure to hot temperatures will cause damage. Do not place furniture, or other items such as drying clothing, closer than 1m
from the front of this appliance.
7. Extractor fans or cooker hoods must not be placed in the same room or space as this can cause the appliance to emit
fumes into the room.
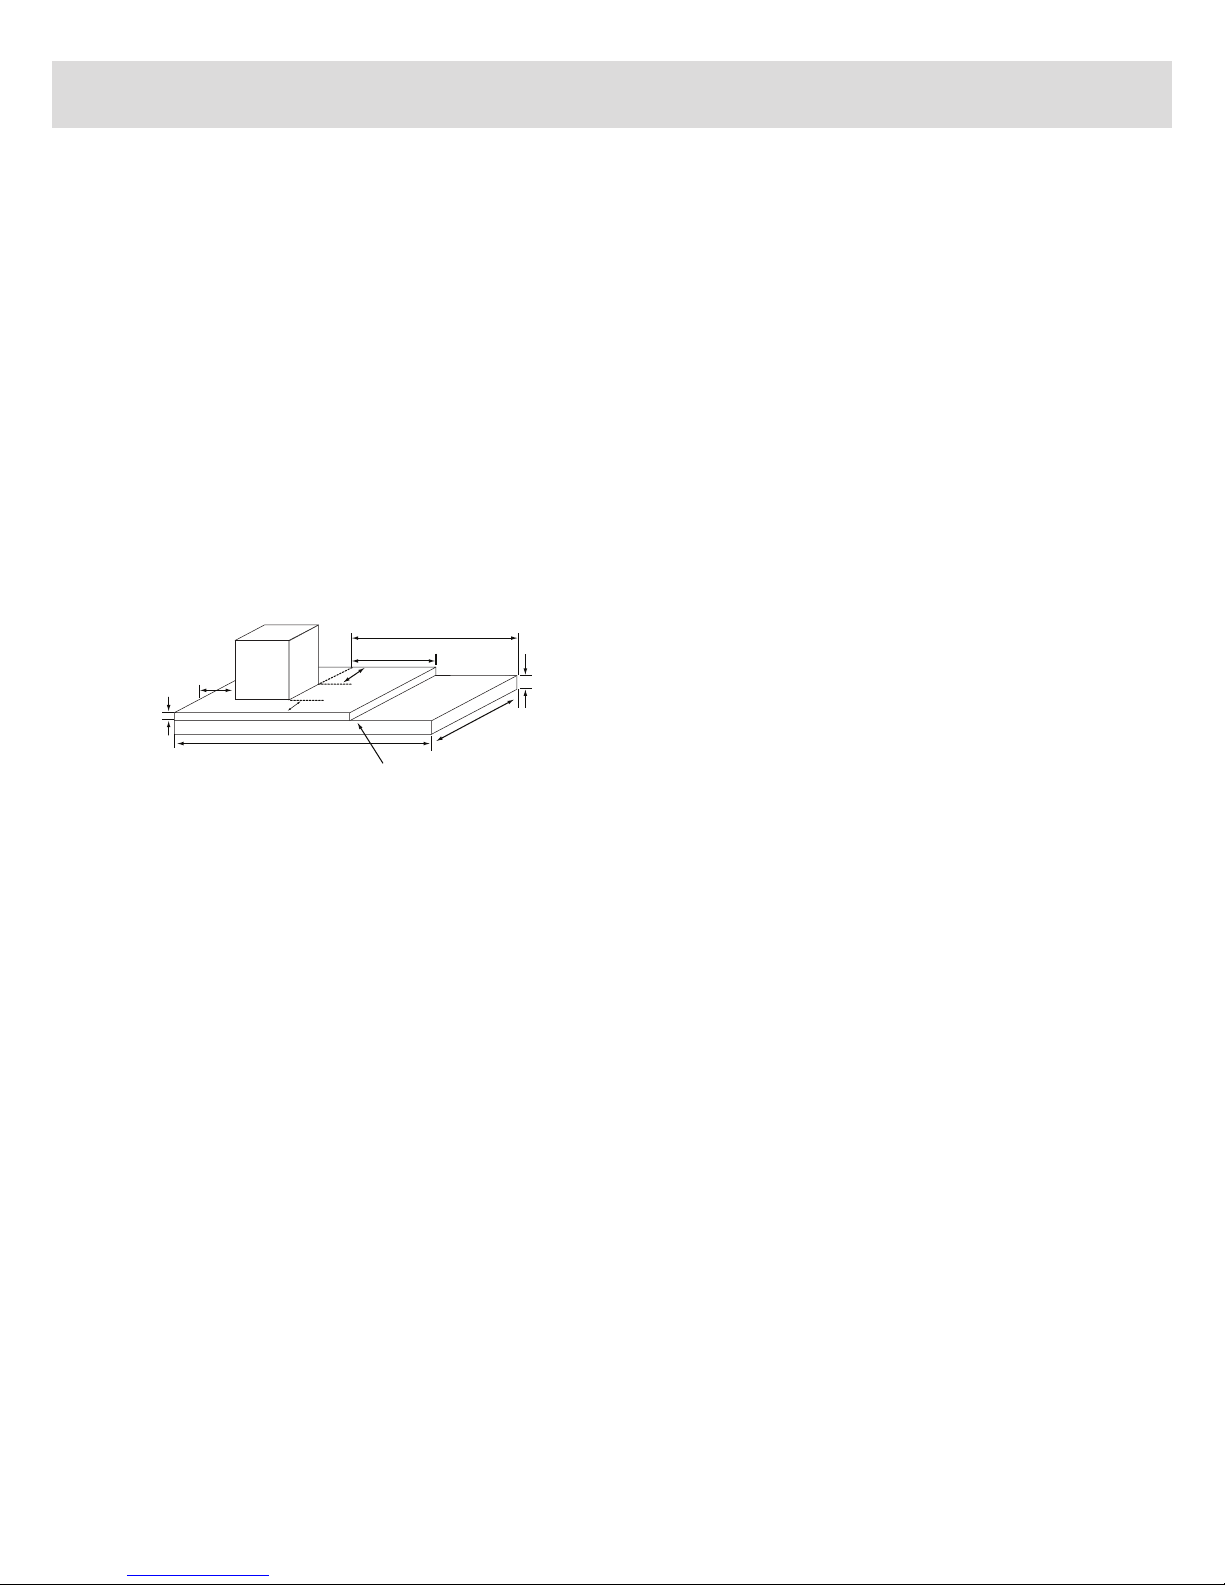
Constructional Hearth
Decorative Hearth
150mm
Minimum
12mm
150mm Min
150mm Min
225mm Minimum
500mm Minimum
Change in level to
mark safe perimeter
840mm Minimum
840mm Minimum
125mm
Appliance
Hearth
The appliance must stand on a non-combustible constructional
hearth which is at least 125mm thick. The building must have
a suitable load-bearing capacity for the hearth and appliance.
Consult a structural engineer for advice before proceeding. When
tting into an existing hearth check that the hearth complies with
current construction regulations and is at least the minimum sizes
shown. If there is no existing replace or chimney it is possible
to construct a suitable non-combustible housing and hearth setting. The ue must be installed in accordance with all local and
national regulations and current rules in force. Check if adding a
new chimney to your property requires planning permission. The
hearth must protrude at least 250mm in front of the stove and
150mm each side. If the hearth is constructed on timber, there
must be a clearance of at least 250mm from the timber to the top
surface of the hearth.
Ventilation
This appliance requires a constant supply of air to maintain proper combustion and eective ue performance. An inadequate air
supply can result in poor combustion and smoke entering the room which is potentially dangerous. This supply of air can come
from either:
• The natural leakage of air into the room in which the product is tted.
• Purpose provided ventilation.
The amount of air required must comply with local building regulations and the rules in force. If spillage is detected during commissioning then there may be insucient natural ventilation and an additional air supply will be necessary. Many older buildings
are suciently ventilated by natural leakage of air to provide suitable air supply for an appliance of 5kW output or less.
Extractor fans should not be installed in the same room as the appliance and any air vents should be positioned so that they are
not liable to blockage.
Chimney
The chimney draw is critical on any installation and should be checked to ensure that it matches what is specied. If it is higher
than
recommended provision must be made to correct the overdraw. The draw can vary in dierent weather conditions and the
customer should be made aware of this. Failure to correct an over-drawing ue will invalidate the warranty, and may damage the
appliance.
Please remember that chimney draught is dependent on four main factors.
• Flue gas temperature • Flue height • Flue size • Flue terminal
The ue or chimney system must be in good condition. It must be inspected by a competent person and passed for use with the
appliance before installation. Products of combustion entering the room can cause serious health risks.
The following must be checked:
• The construction of the masonry chimneys, ue block chimneys and connecting ue pipe system must meet the requirements
of the Building Regulations.
• A exible ue liner system can be used if certied for use with solid fuel systems and installation complies with manufacturer’s
instructions and Building Regulations. The ue liner must be replaced when an appliance is replaced, unless proven to be recently
installed and in good condition.

6 | www.henleystoves.com
• If it is necessary to t a register plate it must conform to the Building Regulations.
• The minimum height of the ue or chimney must be 4.5m from the hearth to the top of the ue, with no horizontal sec-
tions and a maximum of 4 bends. Bends must have angles of less than 45 degrees from the vertical.
• Ensure the connecting ue pipe is kept a suitable distance from any combustible material and does not form part of the
supporting structure of the building.
• Make provision to remove the appliance without the need to dismantle the chimney.
• Any existing ue must be conrmed as suitable for the new intended use as dened in the Building Regulations.
• The ue or chimney systems must be inspected and swept to conrm the system is structurally sound and free from
obstructions.
• If the chimney is believed to have previously served an open re it must be swept a second time within a month of regular
use after installation to clear any soot falls that may have occurred due to dierence in combustion levels.
• The ue exit from the building must comply with local building control rules.
• Do not connect or share the ue or chimney system with another heating appliance.
• Do not connect to systems containing large voids or spaces over 230mm square.
• Suitable access must be provided to enable the collection and removal of debris.
• The ue must be swept and inspected when the appliance is installed.
• The ue draught must be checked with all windows and doors closed and any extraction fans in this, or adjoining rooms,
running at maximum speed (see next section for additional ventilation requirements). Max. draught = 2.0mm Wg, Min.
draught = 1.0mm Wg
Flue outlet positions
NOTE: Under no circumstances should this appliance be connected to a shared ue system,
that serves any other heating appliance.
Installation Instructions
• If it is necessary to t a register plate it must conform to the Building Regulations.
• The minimum height of the ue or chimney must be 4.5m from the hearth to the top of the ue, with no horizontal sections and a
maximum of 4 bends. Bends must have angles of less than 45 degrees from the vertical.
• Ensure the connecting ue pipe is kept a suitable distance from any combustible material and does not form part of the supporting
structure of the building.
• Make provision to remove the appliance without the need to dismantle the chimney.
• Any existing ue must be conrmed as suitable for the new intended use as dened in the Building Regulations.
• The ue or chimney systems must be inspected and swept to conrm the system is structurally sound and free from obstructions.
• If the chimney is believed to have previously served an open re it must be swept a second time within a month of regular use after
installation to clear any soot falls that may have occurred due to difference in combustion levels.
• The ue exit from the building must comply with local building control rules.
• Do not connect or share the ue or chimney system with another heating appliance.
• Do not connect to systems containing large voids or spaces over 230mm square.
• Suitable access must be provided to enable the collection and removal of debris.
• The ue must be swept and inspected when the appliance is installed.
• The ue draught must be checked with all windows and doors closed and any extraction fans in this, or adjoining rooms, running at
maximum speed (see next section for additional ventilation requirements). Max. draught = 2.0mm Wg, Min. draught = 1.0mm Wg
Flue outlet positions
A
B
C
D
At or within 600mm of the ridge
Within 2300mm of an adjoining or adjacent building, whether or
not beyond the boundary (Note 3)
At least 600mm above ridge
At least 2300mm horizontally from the nearest point on the weather surface and:
a) at least 1000mk above highest point of interaction of the chimney with and
the weather surface; or
b) at least as high as the ridge
At least 1000mm above the top of the opening
At least 600mm above any part of the adjacent of the building with 2300mm
Installation Instructions

7 | www.henleystoves.com
Each installation is unique to the property so it is not possible to give details to suit every setting. The installation must comply with
Building Regulations and be made using best practice construction methods. Many replace openings have a supporting lintel. Do not
remove
without supporting the remaining structure of the building. do not support the structure with the appliance or the ue system.
Take care when installing the appliance. Careless handling and use of tools can damage the nish and/or area.
Choose top or rear ue exit and t ue collar to suit installation. Seal with re cement.
Installation Instructions
Place collar at top of stove
Option 1 - Flue out the rear of stove
Place collar at rear of stove
Seal top outlet
with plate provided
Seal rear outlet
with plate provided
Option 2 - Flue out the top of stove
Choose how you are going to connect to the chimney and what pipes you require. Please ensure you comply with all Building Regulations when installing your stove and connecting it to the chimney.
Connecting to the chimney using ue at rear of the stove Connecting to the chimney using ue at top of the stove
Please ensure you comply with Building Regulations when installing your appliance
Straight Pipe
45 degree Pipe
with door
600mm Straight Pipe
(Max 1000mm)
Pipe Door
8” clay lined chimney
Collar sealed with
fire cement
Reducer
Straight Pipe
45 degree
T Pipe
Straight Pipe
Max 150mm
Cap
8” clay lined chimney
Fill with vermiculite
6” Flexi Flue Liner all the
way to teh top of the chimney
Fireplace
Collar sealed with
fire cement
Ensure you comply with all Building Regulations when installing your appliance.

8 | www.henleystoves.com
User Instructions
Air Controls
Henley Stoves appliances have air systems providing
cleaner burning, and greater eciency and control,
please see the diagram to view where the various air
controls are located on your Henley Stove.
1) Primary Air - Turning this wheel anti-clockwise opens
the primary air and allows air into the stove. You would
normally open this wheel when starting a re to allow air
into the stove for maximum combustion.
2) Secondary Air (Airwash)- The secondary air allows a
lm of air to pass over the glass which in turn keeps the
glass clean. Please note the glass may become visibily
darker when the stove is cold.
3) Tertiary Air - Tertiary air further compliments the
cleanburn system as a third air intake. The air is drawn
up the back of the stove via a series of chambers and is
then injected into the back of the upper re chamber
through small steel jets. The jets of superhot air ignite the
remainder of gases that will only burn o at very high
temperatures.
DO NOT USE YOUR BARE
HAND TO ADJUST AIR
CONTROLS WHILE THE
STOVE IS IN USE, USE A
PROTECTIVE GLOVE
Combustible Materials
Safe distances to combustible materials should be 800mm to the rear and 700mm to the side. Ideally, adjacent walls should be of suitable non combustible construction, preferably brickwork. In large replaces take care that any supporting beam is protected by a 13mm
(0.5”) thick sheet of Masterboard / Supalux spaced 13mm (0.5”) o the surface with strips of non-combustible material.
Make sure that there is a gap between an un-insulated ue system and any combustible material. This gap must be at least 3x the outside diameter of the ue pipe, or 1.5x the ue diameter to non-combustible surfaces.
The Clean Air Act 1993 and Smoke Control Areas
Under the Clean Air Act local authorities may declare the whole or part of the district of the authority to be a smoke control area. It is an
oence to emit smoke from a chimney of a building, from a furnace or from any xed boiler if located in a designated smoke control area.
It is also an oence to acquire an "unauthorised fuel" for use within a smoke control area unless it is used in an "exempt" appliance ("exempted" from the controls which generally apply in the smoke control area).
The Secretary of State for Environment, Food and Rural Aairs has powers under the Act to authorise smokeless fuels or exempt appliances
for use in smoke control areas in England. In Scotland and Wales this power rests with Ministers in the devolved administrations for those
countries. Separate legislation, the Clean Air (Northern Ireland) Order 1981, applies in Northern Ireland. Therefore it is a requirement that
fuels burnt or obtained for use in smoke control areas have been "authorised" in Regulations and that appliances used to burn solid fuel in
those areas (other than "authorised" fuels) have been exempted by an Order made and signed by the Secretary of State or Minister in the
devolved administrations.
The Thames has been recommended as suitable for use in smoke control areas when burning wood/ancit.
Further information on the requirements of the Clean Air Act can be found here : http://smokecontrol.defra.gov.uk/
Your local authority is responsible for implementing the Clean Air Act 1993 including designation and supervision of smoke control areas
and you can contact them for details of Clean Air Act requirements
Stove Door
Door Handles
External Air Intake
Stove Legs
Riddle Bar
Thermostat
Push in to
close the primary air
Pull out to
open the primary air

Door handle
Please ensure you use a protective glove when opening the the door on this applicance as it may become hot while in use.
User Instructions
DO NOT USE YOUR BARE HAND TO OPEN DOOR WHILE THE STOVE IS IN USE
Properly installed, operated and maintained, this appliance will not emit fumes into the room. Occasional fumes from de-ashing and
refuelling may occur. Persistent fume emission is potentially dangerous and must not be tolerated.
If fume emission does persist:
• Open doors and windows to ventilate the room.
• Leave the room.
• Allow re to burn out and safely dispose of fuel from the appliance.
• Check for chimney blockage and clean if required.
• Do not attempt to relight until the cause of the emission has been identied and corrected
• If necessary seek expert advice.
All open ued appliances can be aected by temporary atmospheric conditions which may allow fumes to enter the house. Because of this an electronic carbon monoxide detector conforming to the latest edition of BSEN50291 must be tted in the same room as the appliance. The existence of an alarm
must not be considered a substitute for ensuring regular servicing and maintenance of the appliance and chimney system. If the alarm sounds follow
the instructions given under Warning above.
Recommended Fuels
Wood logs - Burn only seasoned timber with a moisture content of less than 20%. To ensure this allow cut wood
to dry for 12 to 18 months. Poor quality timber causes low combustion eciency, produces harmful condensation, reduces eectiveness of the airwash and life of the appliance. DO NOT burn construction timber painted,
impregnated / treated wood, manufactured board products or pallet wood. Wood length max 200mm, and
100mm in diameter.
Solid fuel - Burn only anthracite or manufactured briquette smokeless fuels listed as suitable for use with closed heating appliances.
DO NOT burn bituminous coal, ‘petro-coke’ or other petroleum based fuels as this will invalidate the product warranty.
Lighting the Stove
We recommend that you have two or three small res before you operate your stove to its maximum heat output. This is to allow the paint to cure in
steadily and to give a long service life of the paint nish. During this curing in process you may notice an unpleasant smell whilst the nishes nally
cure. It is non-toxic, but for your comfort we would suggest that during this period you leave all doors and windows open.
First, open the primary and secondary air wash control fully. Load the rebox with plenty of starting fuel, i.e. paper, dry sticks and/or
relighters. Light the re at the base leaving the primary and secondary air control fully open. Leave the door slightly ajar for 10 minutes to enhance
initial starting and reduce smoke emission – DO NOT leave the stove unattended if the door is left ajar. Allow the fuel to reach a steady glow and build
the re up gradually by adding a few small sticks or well split logs at a time. Once you have a good re bed
established across the grate, further fuel can be added step by step as required. Don’t be tempted to overload the re bed with fuel all at once or close
down the air controls too much until the re is really well established for some time. Once the ignition period is well under way close the primary air and
gradually reduce the secondary air wash control opening to establish the burning intensity you require (usually open 25% approx.).
Re-fuelling
When burning wood, the re will die down as the fuel is consumed. When the ames disappear and the remainder is breaking down into glowing
embers it is an appropriate time to consider re-fuelling. Note: If the ames disappear and there are still lumps of solid wood left this indicates excessive
moisture in the wood or insucient air supply/ue draught.
Note: To eliminate unwanted smoke emission, after loading new logs on to the re, open the air wash control up fully for 1-2 minutes to boost the
re and get ames issuing from the top of the fuel as soon as possible. When ames are well established, reduce the air wash to the running setting
required. Burning without ames above the fuel will create unnecessary smoke. Do not load fuel above the tertiary air inlet holes at the back of the
rebox.
Loading 1 to 2 medium sized logs will produce a good output with reasonable burn time, generally small logs will burn up quicker
producing a high output for a short time and a large log will take longer to burn and produce less output over a given time.
This appliance is approved for intermittent operation on wood (0.75 to 1.5 hour burn cycles) although much longer burn times can be achieved by fully
loading the rebox, getting the fuel burning well and then shutting the air controls down. The re will then often need
reviving by rst de-ashing and then using small pieces of wood and plenty of air to get ames issuing from the wood again.
Directly after refuelling it was necessary to operate with the secondary air fully open for a period 3 to 5 minutes before closing to the
desired setting
Refuelling on to a low re bed
If there is insucient burning material in the rebed to light a new fuel charge, excessive smoke emission can occur. Refuelling must be carried out onto
a sucient quantity of glowing embers and ash that the new fuel charge will ignite in a reasonable period. If there are too few embers in the re bed,
add suitable kindling to prevent excessive smoke
Fuel overloading
The maximum amount of fuel specied in this manual should not be exceeded, overloading can cause excess smoke.
Operation with door left open
Operation with the door open can cause excess smoke. The appliance must not be operated with the appliance door left open
Dampers left open
Operation with the air controls or dampers open can cause excess smoke. The appliance must not be operated with air controls or dampers door left
open except as directed in the instructions

10 | www.henleystoves.com
Shutting Down
The stove will normally shut down by itself as the fuel is consumed. In order to shut down the stove for other reasons, close the primary
air controls (if open), then close the secondary air control. If the controls are left in this position, the re will eventually burn out. If you
want to revive the re open the secondary air controls fully.
Maintenance
Inspect the inside of the rebox and above the bae plate every week during use. Only use manufacturers recommended replacement
parts on the appliance.
Chimney Sweeping
Sweeping should be carried out with the correct size brush and rods to suit the chimney size and type. As with all appliances regular
sweeping of the ue is essential to avoid the danger of a blockage and escape of poisonous fumes. Access for cleaning should be
incorporated into the chimney (e.g. soot door, access through the register plate etc.)
Any existing chimney should be swept prior to installation of the stove, and then again a second time within one month of regular use
after installation to establish the frequency of sweeping required. This should be done by and competent person such as a NACS chimney
engineer who will provide a Certicate of Chimney Sweeping. Sweep the whole ue way, including the outlet at least twice a year per
burning season. It is important that the ue ways, ue pipe and chimney be cleaned prior to lighting the re after a prolonged shutdown period.
User Instructions
Removing the Ash
The appliance will require ash to be removed periodically, ash may
be removed with a small metal shovel whilst the re is still alight,
by raking the embers of a low re to one side of the rebox and
carefully removing the ash. Repeating the procedure for the other
side of the rebox. Care must be taken not to risk burning your
hands or household objects from falling embers. The ash pan
should be emptied at least twice a day or when the ash reaches
the top of the ash pan. On no account should the ash be allowed
to build up to touch the underside of the grate bars, as this will
greatly reduce the life span of the grate.
Replacing the Fire Rope around your stove door
Periodically visually check over the door rope seal for any
damage, cuts or tears and detached sections. The rope
gasketing can be replaced, using a universal roping kit.
Instructions for rope replacement are as follows:
• Ensure the appliance is cold
• Unscrew the hinges and lift the door o the appliance and lay
onto a at surface with the rear face upwards
• Carefully remove the old rope gasket and old adhesive. Take note
of the layout of the rope seal. Ensure no traces of the old adhesive
or rust / aky paint is present, as this will result in an unsound joint
• Apply the rope adhesive following the instructions on the bottle
• Press the rope gasketing into the channel on the rear door
casting, following the same layout as the old rope seal
• Just before the nal end, cut the rope seal to length and glue
into position
• Allow at least 30 minutes before retting the door to the
appliance
WARNING: The ash can be very hot. Empty only into a metal container, and do not stand the container on a combustible surface (wooden ooring, carpet, rug etc.)
either during the de-ashing procedure or afterwards as the ash will remain very hot for some time and will rapidly heat the container if left to stand, possibly causing damage or even a re. Even if the ash appears cold, red-hot pieces of ash may be concealed and could easily start a re or cause injury.
The stove will remain very hot for a considerable time after the re has died down or been extinguished.
Petroleum coke fuels or household waste must not be burnt on this appliance.

11 | www.henleystoves.com
Removing the fuel retainer
• Lift fuel retainer clear of the supporting brackets.
• Rotate to clear the sides of the door opening. Do not use appliance
without the fuel retainer in position.
Replacing the glass in your stove door
In the event of the door glass being broken it can easily be replaced using the following procedure:
• Ensure the appliance is cold.
• Lift the door o the appliance and lay onto a at surface with the rear
face upwards.
• Unscrew the four screw xings securing the glass clips and remove both
clips, and xings.
• Carefully remove any pieces of broken glass and sealing gasket. Wear
suitable gloves for this procedure. Take note of the position and joint of
the rope gasket.
• Replace the rope gasket, remove the self adhesive backing on the rope
as you go, start at the bottom of the window, centrally. Push the adhesive
side of the rope into the grove on the rear of the door casting gradually
work your way round until the ends of the rope meet.
• Re-seat the new glass, ensuring the glass sits fully against the gasket.
• Replace the four retaining clips and xing screws. Do not over tighten
the xings as damage may occur to the glass.
• Ret the door assembly back onto the stove, carefully lift the door over
the hinge pins and slot into place.
Replacing the bae plate in your stove
In the event you need to replace the bae plate in your stove, please
ensure you have it installed correctly as shown in the diagram.
The longer section of the bae plate needs to be at the top of the stove
and sits on the metal lip.
The shorter end of the bae plate sits behind the metal plate at the back
of the stove as shown.
Maintenance
Top part of bae
Rear part of bae
Rear of stove
Ensure longer side of the baffle
plate is facing the front of the stove
Front of stove
Rear of stove
Ensure longer side of the baffle
plate is facing the front of the stove
Ensure longer side of the baffle
plate is facing the front of the stove
Ensure shorter lip of the baffle
plate is at the rear of the stove

12 | www.henleystoves.com
Warranty
Please note below what is covered in our warranty policy. You need to register your warranty online or via the post in order to activate
the warranty for your stove. The appliance needs to be installed by a HETAS approved engineer and in accordance of Building Regulations to be valid. In the event you require a service engineer to inspect the appliance, a standard charge of €120 is payable prior to any
inspection. In the event the engineer nd a defect in the stove which warranted the service call, Henley Stoves will reimburse you the
€120. Please note issues such as replacing re rope, replacing the door handle, paint peeling, etc, does not warrant a service call and can
be easily done using the instructions in this manual.
Register online at http://www.henleystoves.com/info/warranty-registration
Chimney Fire and Over Firing
DO NOT over re your appliance. Over ring your stove will cause the paint to peel o your stove and is not covered in our warranty.
Using any ammable liquids, or too much fuel, or ring the stove at maximum for prolonged periods may result in over ring. If the
chimney
connector or casing starts to glow red, the appliance is being over-red. This may result in a chimney re,
If this occurs :
• Call the Fire Service - Dial 999 or 112
• Immediately close all of the air inlets to the appliance to reduce the air supply to the re
• Move items of furniture and combustibles away from the stove to reduce the risk of a re, and allow access for the re service.
• Ensure access to the loft space is available
• Evacuate the property
NOTE: The Chimney re may have caused structural damage to the chimney. Do not use the stove again until the stove, chimney and
connector have been inspected, and any damage parts have been repaired or replaced. This work should only be carried out by a HETAS
registered engineer.
Maintenance
Seasonal Use
Remove the bae and inspect the inside of the stove and the ue ways and ensure they are 100% clear after a period of disuse, for
example if the stove is not used during the warmer periods of the year. Also set the air controls half open to keep the appliance ventilated and stop the build-up of any moisture inside.
Stove Finish (Paint)
The outside of the stove is nished in a durable high temperature paint. It is best cleaned by brushing down with a soft brush. Do not
allow water to remain on the surface when cold or rust may occur. The high temperature paint nish should not require attention for
some time, depending on use. The hotter the re is burned the sooner repainting will be necessary. Aerosol tins of paint are available for
complete refurbishing. Before repainting make sure the stove is out and cold
• Remove door glass
• Lightly wire brush and rub with wire wool the body of the appliance to remove any loose paint powder.
• Mask or remove items such as brass work
• Adjacent brickwork, mantelpiece, hearth etc., should be carefully masked for quite a distance around the appliance. (this precaution is
to prevent the discolouration of the surrounding brickwork, wallpaper etc).
• Re-spray in a well ventilated area, avoid breathing the vapour. Refer to the safety instructions on the paint can.
• When paint is dry ret door glass and any other parts previously removed.
• Leave to dry for 8 hours and ret the door glass etc.
• Burn slowly for the rst 4 hours, then build up heat gradually to cure the paint.
Note: Use only genuine Henley Stoves spray paint as some paints interact and spoil the stove nish and invalidate the warranty.

13 | www.henleystoves.com
Why are my air inlets pung smoke?
Combustion gases can build up in the rebox and ignite as small explosions, causing smoke to pu out of the air inlets and other openings. This occurs if the air controls are shut soon after adding new fuel to a very hot re. Stop by opening the air controls to increase
combustion air and burning rate.
What is a ue draught?
The chimney has two main functions:
1) To safely remove the smoke, gases and fumes from the house.
2) To provide a sucient amount of draught (suction) in the appliance ensuring the re keeps burning.
Draught is caused by the rising hot air in the chimney when the appliance is lit. Symptoms of poor performance related to ue draught
include:
• Excessive fuel consumption (high ue draught).
• Poor burning control and/or overheating (high ue draught).
• Wind noise from air controls (high ue draught).
• Diculty getting a re going and keeping it burning well (low ue draught).
• Low heat output (low ue draught).
• Smoke entering room when doors are opened (low ue draught).
The construction, position, size and height of the chimney all aect the performance of the ue draught. Other factors eecting the ue
draught include nearby trees or buildings causing turbulence. We suggest installing a chimney cowl or anti-downdraught cowl if you are
experiencing issues with draught in your chimney. Please note issues with ue draught is out of the control of Henley Stoves and does
not warrant a service call. We recommend you contact a chimney specialist if the addition of a cowl does not resolve a ue draught issue.
Why is there no heat from my stove?
1) If your stove is installed in an alcove, you need to cap o the area directly above the stove by installing a 3mm mild steel plinth with
insulation to prevent the heat from escaping.
2) If the re continues to consume large amounts of fuel you may need to check the bae plate is tted correctly and also if there is too
much of a draw up the chimney.
3) A simple test would be to open the door of the stove when it is not lighting and listen to see if you can hear wind in the chimney. If so
this means you will need to install a damper in the ue to prevent the up draught. We recommend you contact a piping specialist and
install an anti-up draught cowl.
I’m nding it very hard to light a re in my stove? Why is this?
1) In some houses there may not be sucient ventilation in the room for the re to light eectively. You may need an additional air vent
in the room to use the stove eciently.
There is smoke coming out of the stove when I light it, why is this?
1) To ensure maximum eciency and to prevent the stove from smoking, the pipe at the back to the stove must be max 150mm before
the 45 degree bend in the pipe, otherwise the smoke will not be able to escape up the chimney.
2) Stoves that are installed in at roof houses or extensions may have this issue due to the structure of the building. It may also be
because the chimney of your house is lower than the highest point of your roof which causes the wind to funnel down the chimney. We
recommend you install a rotary cowl to resolve the issue. We recommend you get your stove installed by a professional.
Why is the glass on the door of my stove dirty?
1) Simply open the airwash and pull the lever to the open position and open the primary. The airwash is normally located above the door
of the stove. The glass will become visibly clean. Please note the glass with become visibilly dirty when the re stops. You may wash the
glass when the stove has cooled down. We recommend you always leave the airwash half open.
My grate has already burned out, why is this?
1) Burning large amounts of soley anthracite coal on a continuous basis the grate will burn out much quicker compared to using the
recommended fuel. We recommend you a mixture of fuels such as turf, briquettes smokeless coal and wood.
2) Not cleaning the grate after every re will result in the grate buring out prematurely.
How often should I clean my chimney?
1) The chimney and the connecting ue pipe must be swept at least once a year. Ensure you remove any deposits from the oscillating
grates, the rebox surfaces and the ue collar. We recommend you clean your chimney twice a year.
Frequently Asked Questions

14 | www.henleystoves.com
Over time you may require replacement parts for your Henley Stove. Replacement parts are available through your local stockist. Please
use the below diagram to establish the part you require for your stove. Please ensure you quote the model name and also the serial
number of the stove when orderig your spare parts. ONLY USE GENUINE HENLEY APPROVED REPLACEMENT PARTS FOR YOUR STOVE.
Parts
Annual Service
Before the start of the heating season strip, inspect and clean the appliance as detailed:
• Allow appliance to cool.
• Remove all internal parts: bae, log guard and rebricks. Take care handling rebricks as they can become fragile after a period of use.
• Sweep the appliance at this point if necessary.
• Vacuum clean any remaining ash and debris from the inside of the appliance.
• Check the parts for any damage. Replace any damaged parts using genuine Henley Stoves replacements parts.
• Check and clean the rebricks with a soft brush. Some surface damage will occur during use. The life of the bricks will depend on the
type of fuels burnt and the level of use. Replace damaged bricks as soon as possible.
• Re-t cleaned internal parts.
• On printed glass surfaces, use Glass Cleaner. Do not use abrasive cleaners to remove tar or soot deposits from the glass.
• Fit new door rope seal
• Lightly oil the door catch mechanism and hinge pins. Avoid getting oil onto the door seals and glass.
Servicing
Ref No. Description Ref No. Description Ref No. Description
1. Base 2. Door 3. Front
4. Back 5. Right side 6. Leg
7. Hob 8. Fire Fence 9. Spigot
10. Back Brick 11. Left side 12. Top Bae
13. Grate Frame 14. Middle Bae 15. Air Wash Base
16.
Blanking Plate Locking Bar
17. Flue Cover 18. Operating Tool
19. Moving Grate 20. Back Air Plate 21. Damper Rod
23. Left/Right Brick 28. Ridding Rod 34. Damper Rod Bracket
40. Fiberglass Rope 41. Fiberglass Rope 46. Pipe
47. Cover 49. Door Hinge A 50. Door Hinge B
51. Pull Rod Knob 52. Glass 53. Badge(Henley)
54. Hook Handle 57. Ash Pan

15 | www.henleystoves.com
Warranty Registration
You need to register your warranty online or via the post in order to activate the warranty for your stove. The appliance needs to be
installed by a HETAS approved tter and in accordance of Building Regulations to be valid. In the event you require a service engineer to
inspect the appliance, a standard charge of €120 is payable prior to any inspection. Henley Stoves is not responsible for stoves which have
been tted incorrectly and it is up to you the customer to get the stove re-tted in accordance with our manual. In the event the engineer
nds a defect in the stove which warranted the service call, Henley Stoves will reimburse you the €120. Please note issues such as replacing re rope, replacing the door handle, paint peeling, bricks cracking, etc, does not warrant a service call and can be easily done using
the instructions in the manual. Our products are guaranteed for 5 years from date of purchase against any defect, aw or imperfection.
During this time, all parts judged defective by our warranty control department may be replaced in our workshops. Incidental costs of
transportation and packing payable by the buyer.
There are a number of limitations to the guarantee.
• Grates and parts directly in contact with the burning fuel are guaranteed for 1 year.
• Unfortunately we cannot oer a guarantee on the glass parts or re bricks of our stoves.
Terms of the warranty
This warranty is only valid if:
• The unit has been installed in accordance with the latest building regulations.
• The chimney which services the stove is in accordance with the latest building regulations.
• All installation instructions in the manual have been followed.
• The stove is operated as described in the manual.
• The stove is only used to burn fuel as described in the manual.
This warranty does not cover:
• Any damage resulting from the use of fuel not recommended in the manual.
• Parts which are damaged by external causes such as unadopted chimneys, thunderstorms, dampness, faulty plumbing, faulty
fuel and mistreatment.
• Specications and design subject to change without prior notice. This manual does not engage the responsibility of Henley
Stoves.
• Any nuts or bolts of handles that become loose due to use or mistreatment
• Body paint peeling due to stove being over-red
• Breakage of glass
• If the appliance is not serviced on a yearly basis accourding to our manual
Please note for boiler stoves, please consult with a heating specailist to determine the correct BTU’s for your heating requirements. If you
are experiencing an issue with the plumbing such as no hot water being pushed to the radiators, Henley Stoves can only oer advice. We
can recommend an independent service engineer to determine if there is an issue with the stove or the plumbing. The service engineer
will provide a detailed report outlining any issues (if any) at a cost to you for €350 (this fee may vary depending on location) which is prior
to any inspection. If the report deems the stove at fault, Henley Stoves will refund you the cost. We strongly recommend only qualied
HETAS approved plumber installers as unqualied installers will void your warranty.
All warranty claims will only be addressed when the Warranty Form below is completed and accompanied by the original dated proof of
purchase and Stove Commissioning Checklist. All claims to be submitted to: HENLEY STOVES, CURRAHEEN, TRALEE, CO. KERRY, IRELAND
Please detach this page and post to Henley Stoves, Warranty Registration, Curraheen, Tralee, Co. Kerry, Ireland
Personal Information
Name:
Address:
Phone:
HETAS Approved (Please tick relevant box):
Yes No
If Yes, please include certicate of compliance.
Dealer appliance was purchased from
Name:
Address:
Phone:
Essential Information - MUST be completed
Date installed:
Model Description:
Installation Engineer
Serial number:
Company name:
Address:
Phone:
Date Of Purchase:
NB: Please enclose copy of receipt

16 | www.henleystoves.com
Henley Stoves, Curraheen, Tralee, Co. Kerry, Ireland
Tel: 066 7119788 | Fax: 066 7124200 | Email: info@henleystoves.com | www.henleystoves.com
 Loading...