


Versie 11.10 DIG.EN

BOXER / MARLIN / FALCON / POLAR SERIES USER MANUAL
This manual is for the BOXER/ MARLIN/ FALCON/ POLAR series. The general instructions apply to the models in this category.
Henkelman B.V. cannot be held responsible for any damage caused by deviating machine specifications.
This manual has been established with care. Henkelman B.V. does not accept liability for errors in this manual and/or
consequences of misinterpretation of the instructions.
Henkelman B.V. is not liable for damages and/or problems that arise from using spare parts that are not supplied by Henkelman
B.V.
Henkelman B.V. reserves the right to change specifications and/or spare parts without prior notification.
All rights reserved. No part of this publication may be reproduced by photocopy, printing or in any other way without prior consent
from Henkelman B.V.
LIABILITY
1. We exclude all liability as far as it is not provided for by law.
2. Our liability shall never exceed the total amount of the order in question.
3. Barring the generally applicable legal rules of public order and good faith we are not liable to pay for any damage of any sort
whatsoever, directly or indirectly, including business losses, to movable or immovable property, or to persons, either at the
opposing party as at third parties.
4. We are in any case not liable for damages arising from or cause by the use of the product supplied or by the unsuitability of
it for the goal for which the other party purchased it.
WARRANTY
Subject to the following limitations, the warranty period for products supplied by Henkelman is at least 12 months, as of the date
indicated on the purchase document. This warranty is limited to manufacturing and machining defects and does therefore not
cover breakdowns involving any part of the product that is exposed to any form of wear and tear. Normal wear and tear that can
be expected with the use of this product is therefore hereby excluded.
1.
Henkelman’s responsibility is limited to replacing parts found to be defective; we shall not acknowledge claims for any other
kind of damage or costs.
2.
The warranty does not apply if the defect is the result of incorrect or negligent use, or maintenance that is contrary to the
instructions given in this manual.
3.
The warranty lapses if repairs or modifications on the product have been carried out by third parties.
4.
Defects due to damage or accidents deriving from outside factors are excluded from the warranty.
5.
If we replace parts in compliance with the obligations of this warranty then the replaced parts become our property.
6.
If the other party does not, not sufficiently, or not in an acceptable period of time, fulfils the obligations to the agreement
between the parties, we are not obliged to provide this warranty as long as the situation is occurring.
The stipulations of the warranty and liability are part of the general terms and conditions of sales, which we can send to you if
requested.
Version 11.10 DIG.EN 2

BOXER / MARLIN / FALCON / POLAR SERIES USER MANUAL
INTRODUCTION / LIABILITY /
2
CONTENTS INSTRUCTION MANUAL
……….…………………………………………………………..
3
MACHINE REGISTRATION
……….…………………………………
………………………..
4
!!!! …..
5
!!!!
7 WARNING LABELS
……….…………………………………………………………..
8
IMPORTANT MACHINE PARTS
……….………………
…………………………………………..
9 START
OG BRUK AV PRODUKTET
……….…………………………………………………………..
11
ON/OFF (AV/
PÅ
) BRYTER
+ N
ØDBRYTER
11
S
tandBy funksjon
11
Start maskinen
11
Standard
b
ruk.
Steg for steg
12
MASKINENS
BETJENINGS
PANEL
……….…………………………………………………………..
13
B
etjeningspanel
14
F
orklaring av punkter på betjeningspanel
15
I
nstillinger av programsykluser
(manuel)
16
I
nstillinger av programsykluser (automatisk)
17
Programmodus/
Andre
modus 19
Brogramsykluser
19
PROGRA
MMER
ING ……….…………………………………………………………..
20
Manual programm
e
ring 20
Automatic programm
ering 21
MAC
HINE MAINTENANCE
……….…………………………………………………………..
23
General
23
Important before and during maintenance
23
Standard maintenance schedule
24
Vacuum pump maintenance
24
Seal system maintenance
27
Silicone holder and lid gasket maintenance
29
List of maintenance parts
30
TECHNICAL SPECIFICATIONS
……….…………………………………………………………..
32 ELECTRICAL DIAGRAMS
……….…………………………………………………………..
33 ERRORS CODES
……….…………………………………………………………..
36 PNEUMATIC DIAGRAMS
……….…………………………………………………………..
37
PROBLEM SOLVING
……….…………………………………………………………..
38
FACTORY SETTINGS CONTROL
……….…………………………………………………………..
40
SPECIAL APPLICATIONS
……….…………………………………………………………..
41
Machine with gas flush system
41
Packaging liquid products
41
Externa
l vacuuming of food containers
42
EEC DECLARATION OF CONFIRMITY
...
…………………………………………………………………
43
MAINTENANCE SCHEDULE / NOTES
……….…………………………………………………………..
44 REMOVAL FRONT PANEL
……….…………………………………………………………..
45
CONTENT USER MANUAL
GUARANTEE
…….……………………………………………………………..
IMPORTANT FOR INSTALLATION – READ THIS FIRST
IMPORTANT FOR USE – READ THIS FIRST
………………………………………………………
……………………………………………..
Version 11.10 DIG.EN 3
BOXER / MARLIN / FALCON / POLAR SERIES USER MANUAL
PRIOR TO STARTING TO USE THE MACHINE,
Register the machine using the following data. This information is necessary if the supplier or Henkelman BV is contacted
concerning questions or references about the specific machine.
DATA ON MACHINE TAG
Relevant data for answering questions can be found on the machine tag. The machine tag is located at the rear of the machine.
Note down the following data:
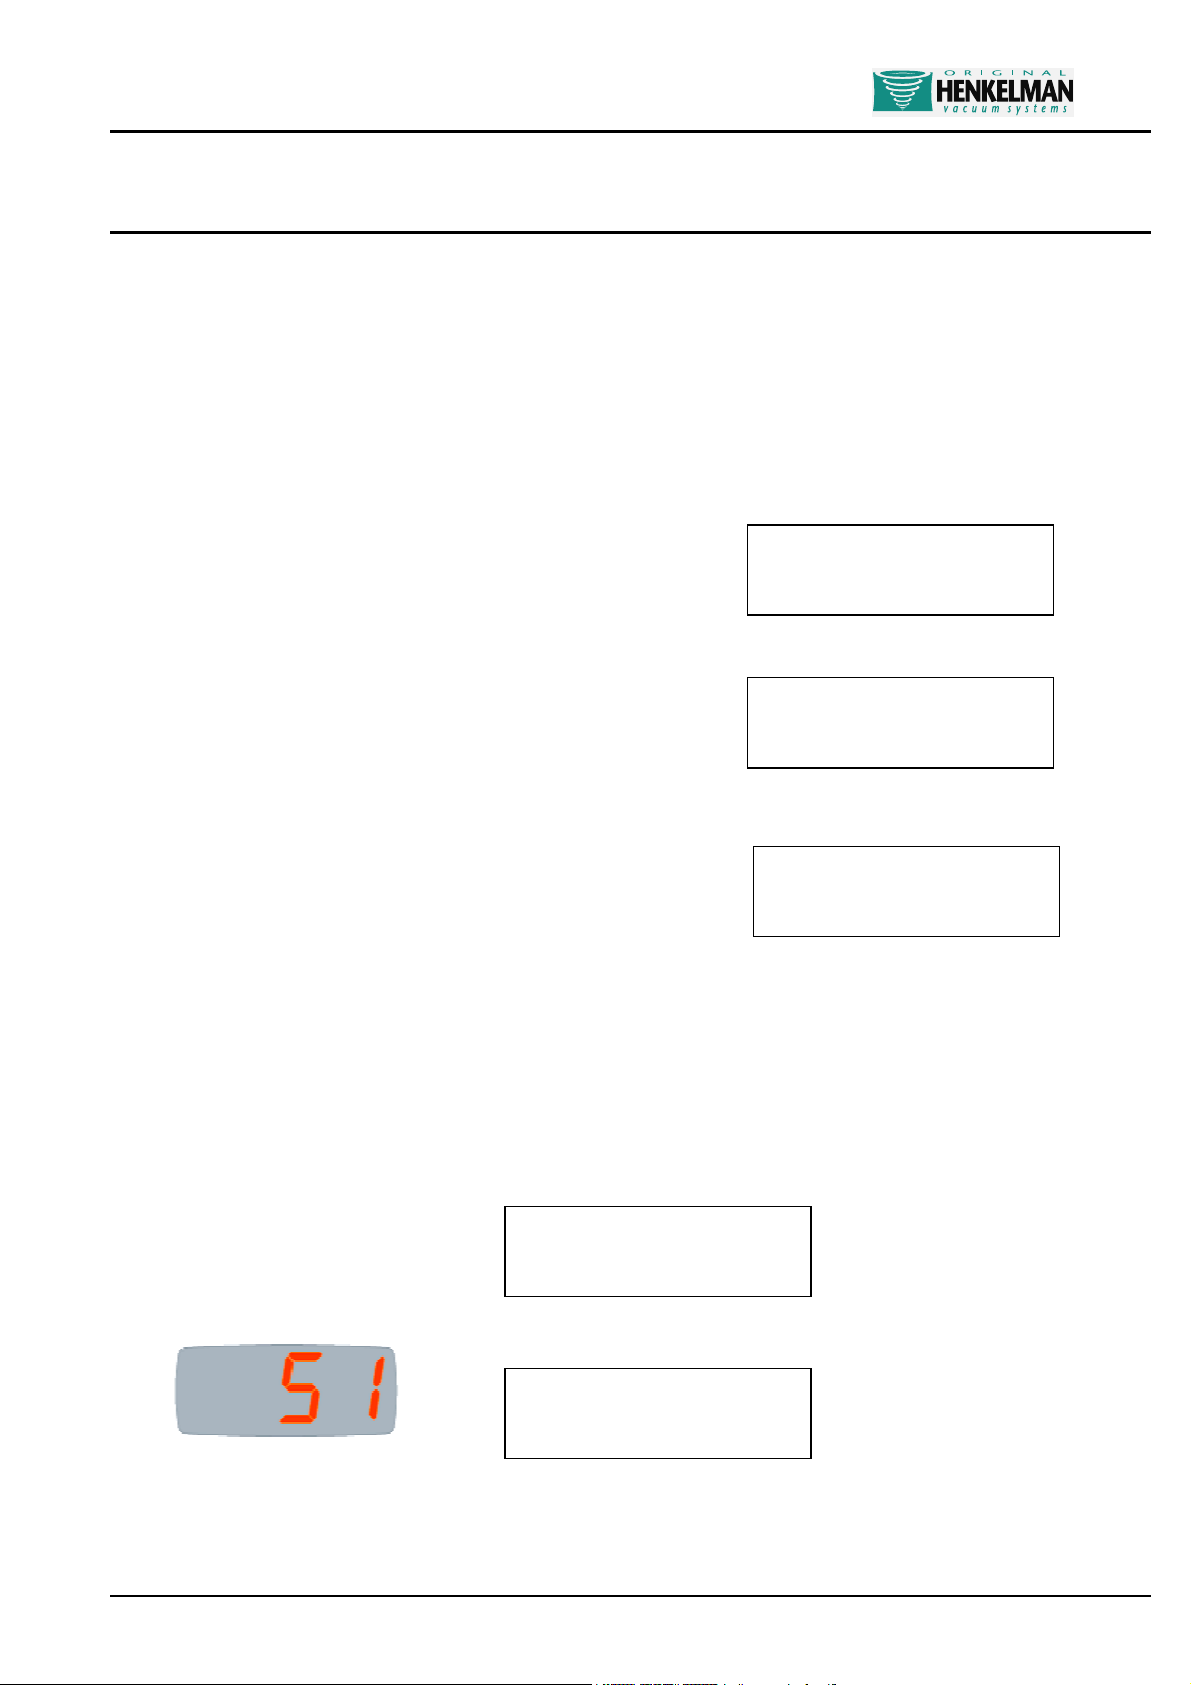
CONTROL PANEL DATA
When starting the machine, two codes appear on the display consecutively, before the control switches to user mode. The first
code indicates the software version of the control software and the second code indicates the active options. Please write down
the codes below:
MACHINE REGISTRATION TO BE COMPLETED BY THE USER
1. MACHINE TYPE
2. MACHINE NUMBER (MACHINE NO.)
3. VOLTAGE (TENSION)
4. CODE 1
5. CODE 2
Version 11.10 DIG.EN 4

BOXER / MARLIN / FALCON / POLAR SERIES USER MANUAL
IMPORTANT FOR INSTALLATION!!! READ THIS FIRST!!!
GENERAL
First read this manual carefully before the machine is put into operation.
This manual contains relevant information and instructions for starting up, maintenance and applications.
If problems arise with the machine that could have been avoided by referring to this manual then the guarantee expires.
Henkelman BV wishes the customer lots of pleasure for an extended period from the purchase of the machine. If there are
any problems or questions then the customer can always approach the supplier or Henkelman BV.
ENVIRONMENT
The machine must be moved or transported in an upright position. The machine may NOT be tilted as this can cause damage
to the pump.
Place the machine on a flat, level floor. This is essential for problem free operation of the machine.
Enough space must be left around the machine for good ventilation. The space must be at least 5 centimetres.
The ambient temperature in which the machine is operated must be between 10 0C and 30 0C. When operating the machine
in other ambient temperatures the user must contact the supplier or Henkelman BV for advice.
NEVER place the machine directly next to a heat source or a steaming device (for example a combi-steamer, dishwasher or
stove)
POWER / EARTH
Check that the voltage stated on the machine tag is the same as the mains voltage.
Check the direction in which the pump is running when the machine is connected to a three phase power source.
Always connect the machine correctly to an earthed socket to avoid danger for fire or electrical shocks (earth connection is
green/yellow).
The power cable must always be free and nothing may be placed on it.
Replace the power cable immediately if damaged.
Always disconnect the power if there are problems with the machine or during maintenance, prior to starting work on the
machine.
If the machine is stationary for long periods then the power should always be disconnected.
Version 11.10 DIG.EN 5

BOXER / MARLIN / FALCON / POLAR SERIES USER MANUAL
VACUUM PUMP
Check before starting the machine if there is oil in the pump (see page 23). NEVER start the machine without oil in the pump.
Use the right type of oil for the pump (see page 24).
After moving and/or transporting the machine, always first check the oil level before re-starting operation.
When starting the machine for the first time or after a lengthy idle period, first run the conditioning program before operating
the machine (see page 22).
Always change the oil before a long period of inactivity of the machine and make sure the pump is clean and free of moisture.
CONNECTING THE GAS FLUSH SYSTEM (if applicable
NEVER use flammable gasses or gas mixtures containing too much oxygen. There is a danger of explosion when using the
aforementioned gasses. Accidents and/or damage caused by using abovementioned gasses void all liability on the part of
Henkelman BV as well as the guarantee.
The gas bottles must always be correctly secured. If the gas flush function and/or the machine is not in use then the main
cock of the gas bottle must always be closed.
The pressure of the pressure reducing valve on the gas bottle may NEVER be set to more than 1 atmosphere/ATO. A higher
pressure may damage the machine.
The diameter of the hose nipple connector for the gas bottle is 6 mm (BOXER and MARLIN 42/42 XL), 13 mm (POLAR 2-85
and 2-95), and 8 mm for other machines. The connector is at the rear of the machine.
For more information about the use of gas bottles, please consult an authorised gas supplier
CONNECTING COMPRESSED AIR FOR EXTERNAL SEALING PRESSURE (if applicable
The pressure from the compressor may NEVER be set to more than 1 atmosphere/ATO. A higher pressure may damage the
machine.
Only dry compressed air may be used for the external seal pressure.
The diameter of the hose nipple connector the compressor is 6 mm (rear machine)
For more information about the use of compressed air, please consult an authorised gas supplier
)
)
Version 11.10 DIG.EN 6

BOXER / MARLIN / FALCON / POLAR SERIES USER MANUAL
IMPORTANT FOR OPERATION !!! READ THIS FIRST !!!
GENERAL
Never pack products that can be damaged during or after vacuum packaging. Live oats may never be vacuumed.
Refer to this manual if in doubt as to the operation and/or functioning of the machine. If the manual does not offer a solution
consult the supplier or Henkelman BV.
The guarantee and/or liability expires if damage is caused by repairs and/or changes made by you. In the case of
malfunctions contact the supplier or Henkelman BV.
In the case of malfunctions always stop the machine and remove the power cable from the wall socket.
GENERAL MAINTENANCE
It is essential that the machine is serviced regularly to guarantee operation and to keep the machine in optimal condition. The
maintenance schedule is clearly defined on page 22. The guarantee automatically expires due to overdue or sloppy
maintenance.
Always remove the power cable from the wall socket for maintenance work; the machine must be completely disconnected.
If there are doubts about the maintenance activities or if the machine fails to work correctly always contact the supplier or
Henkelman BV.
TRANSPARENT LID (if applicable)
Never locate the machine near a heat source. This can cause damage to the lid (cracks).
Never place hot, sharp, or heavy objects on the lid. These can cause damage to the lid (cracks) in the long run.
Always clean the lid with solvent-free cleaning agents. Solvents can damage the lid.
Check at least once a week if there are cracks in the lid. If cracks are visible in the lid then the machine must IMMEDIATELY
be turned off and not used again until the lid has been replaced. Continuing to work with a cracked lid can cause the lid to
implode. All guarantees and/or liability expire in the case of accidents and/or damage caused by working with a cracked lid.
Replace the transparent lid every 4 years as a precautionary measure as a standard maintenance interval.
Version 11.10 DIG.EN 7

BOXER / MARLIN / FALCON / POLAR SERIES USER MANUAL
VACUUM PUMP
Regularly check the level and quality of the oil in the pump. If there is too little oil or the quality of the oil is bad (turbid), replace
or top up the oil before operating the machine (see page 23). Let the pump conditioning program run at least one full cycle
before replacing the oil (see page 22).
Use the right type of oil for the pump when replacing or filling up (see page 24).
Use the conditioning program at least once a week to enhance correct and long-lasting pump operation (see page 22).
USE OF GAS FLUSH SYSTEM (if applicable)
NEVER use flammable gasses or gas mixtures containing too much oxygen. Use thereof can cause risk of explosions.
Accidents and/or damage caused by using abovementioned gasses voids all liability on the part of Henkelman BV as well as
the guarantee.
The gas bottles must always be correctly secured. If the gassing function and/or the machine is not in use then the main cock
of the gas bottle must always be closed.
The pressure of the pressure reducing valve on the gas bottle may NEVER be set to more than 1 atmosphere/ATO. A higher
pressure may damage the machine.
For more information about the use of gas bottles, consult an authorised gas supplier
WARNING SIGNS ON THE MACHINE!!!
ONLY use the prescribed power supply voltage.
Insert the plug firmly into the mains wall socket.
Always connect the machine to an earthed wall socket
Always remove the plug during maintenance or when the machine is not in use for extended periods.
NEVER use flammable gasses or gas mixtures containing too much oxygen. Use thereof can cause risk of
explosions
Accidents and/or damage caused by using abovementioned gasses void(s) all liability on the part of
Henkelman BV as well as the guarantee.
IMPORTANT MACHINE PARTS
Version 11.10 DIG.EN 8

BOXER / MARLIN / FALCON / POLAR SERIES USER MANUAL
POLAR SERIES
BOXER SERIES
MARLIN SERIES
Side view BOXER machines
Vacuum chamber
Rear view BOXER machines
Rear view MARLIN machines
1 2 4 5 6 7 8 1 3 11 12 13
1 2 5 6
7 8 9 14 15 16 18 10 11 12 13 14 17 18 1. Sealing bar(s) in vacuum chamber
FALCON SERIES
Version 11.10 DIG.EN 9
2. Silicone holder(s)
)
3. Gas flush nozzles (if applicable
4. Lid rubber in lid for hermetic seal
5. Gas springs for opening lid after machine cycle
6. Vacuum / Ventilation opening
7. Control panel
8. Vacuum pressure meter
9. ON/OFF Switch
10. Master switch (only MARLIN series)
11. Oil drain plug
12. Oil fill plug
13. Oil inspection window
14. Power cable
15. Fuse holder with fuse
16. Gas bottle connector (if applicable) caution max 1 Bar
17. Machine tag
18. Warning stickers
Appearance of parts and machines can deviate from illustrations

BOXER / MARLIN / FALCON / POLAR SERIES USER MANUAL
1. Sealing bar(s) in lids
Rear view
FALCON series and POLAR single chamber models
Side POLAR double chambers after opening side of housing
Rear view POLAR double chambers
Inside lid POLAR series
1 1 2 4 5 6 8 9 10 10 11 11 12 12 13 13 14 15 16 17 18 7 9 14 15 16 17 18 6 7 8 2 5 1 4 1 2 3 4 5 6 7 8
2. Silicone holder(s) on holders in vacuum chamber
3. Gas flush nozzles mounted on silicone holders (if applicable)
4. Lid rubber in lid for hermetic seal
5. Vacuum / Decompression / Suction pipe
6. Control panel
7. ON/OFF switch
8. Vacuum pressure meter
9. Master switch
10. Oil drain plug/elbow
11. Oil filler cap
12. Oil inspection window
13. Oil spray filter housing
14. Power cable
15. Gas bottle connector (if applicable) caution max 1 Bar
16. Seal pressure connector (if applicable) caution max 1 Bar
17. Machine tag
18. Warning stickers
Appearance of parts and machines can deviate from illustrations
Version 11.10 DIG.EN 10

BOXER / MARLIN / FALCON / POLAR SERIES USER MANUAL
START OG BRUK AV MASKINEN
AV/PÅ bryter Hovedbryter
AV/PÅ bryteren bukes til å skru på før bruk og av etter bruk.
ADVARSEL- AV/PÅ bryteren skrur ikke av all spenning på maskinen. På BOXER serien og alle andre 1fas modeller er det
nødvendig å trekke ut støpselet før maskinen er fullstendig strømløs. På MARLIN, FALCON, POLAR seriene og alle 3 fas
maskiner er det nødvendig å skru av hovedbryter før maskinen er helt strømløs. Vær sikker på at maskinen er helt strømløs når
det utføres service og vedlikehold.
BOXER serien
Når maskinen er skrudd på (med AV/PÅ bryteren ), kjører pumpa kun undrer vakumerings syklusen.
MARLIN / FALCON / POLAR seriene
Når maskinen er skrudd på (med AV/PÅ bryteren ), kjører pumpa kontinuerlig. 3 fas pumpene trenger lengre oppvarming av ved
å skru de av og på har negativ innvirkning på levetiden. Hvis maskinen er skrudd på men er ikke i bruk, vil pumpa skru seg av
automatisk etter 10 minutter. Dette for å unngå overoppheting av olja, og redusere unødvendig forurensing fra eksos filtrene.
Denne funksjonen kalles Sleeper function
SLEEPER FUNCTION
På modellene Marlin, Falcon og Polar er Sleeper Function alltid aktivert. Dette betyr at hvis maskinen er skrudd på men ikke i
bruk, stoppe pumpa automatisk etter 10 minutter. Ved å stenge lokket starter prosessen og pumpa samtidig. Kontakt din
leverandør for nærmere informasjon om Sleeper Function.
OPPSTART AV MASKINEN
Etter at maskinen er tilkoblet og eventuelt hovedbryter er satt på 1, kan maskinen settes på amed AV/PÅ bryteren. Når maskinen
starter vises 2 koder i displayet før kontroll panelet settes i drift modus.
Den første koden indikerer modellen på maskinen. Den andre koden viser kontrollens software
versjon. Noter ned begge disse koder på side 4 siden de er viktige for din leverandør eller Henkeman BV
når du har spørsmål eller om det oppstår et problem.
Etter at maskinen har skiftet til driftsmodus er den klar til bruk. Hvis maskinen er ny eller har vært ute av
drift en lengre periode, anbefaler vi å kjøre vedlikeholdsprogrammet for pumpa (15 minutter) for å varme
opp og rense pumpa. For instruksjon vedlikeholdsprogrammet for pumpa, se side 22
Etter at maskinen har kommet i driftsmodus kan de hende at [ OIL ] vises i displayet. Dette betyr at
driftstids telleren er aktivert og antall driftstimer som er satt er overskredet. Driftstidstelleren er
forhåndsinnstilt, men kan endres av bruker for å benyttes til en påminnelse om regelmessige vedlikeholds
aktiviteter. Når [ OIL ] vises kan maskinen fremdeles brukes som vanlig men vi anbefaler å skifte olje og
resette denne advarsel funksjonen.
Kontakt din leverandør for mer informasjon om hvordan endre driftstidtelleren..
STEGVIS BRUKSANVISNING FOR MASKINEN
1.
Skru på maskinen med AV/PÅ bryteren. Varm opp pumpa med Condition programmet hvis maskinen har vært ute av bruk
en tid (instruksjon på,side 22).
Version 11.10 DIG.EN 11

BOXER / MARLIN / FALCON / POLAR SERIES USER MANUAL
FALCON / POLAR series
2.
Fyll vakumposen med produktet. Velg riktig posestørrelse. Posen må enkelt passé rundt produktet men bør ikke være for
stor. Vær sikker på at alle hygienekrav er ivaretatt undrer denne operasjonen. Pakkemateriale, produktet og hender må
være rene og tørre hvis mulig.
3.
Plasser vakumposen i kammeret. Den åpne enden må plasseres over sveisekinna.
Posen på ikke komme utenfor kammeret. Havis produkteter mye lavere enn høyden på
sveiseskinna brukes de sorte innleggsplatene som følger med maskinen. Dette
forenkler prosessen og reduserer syklus tiden.
4.
Vakum posen må plasseres over sveiseskinna (BOXER og MARLIN) eller silikon
holderen (FALCOM og POLAR) uten bretter.
5.
Med gass flush system må åpningen av posen trekkes over gass dysene (se
illustrasjon.
6.
Flere vakumposer kan plasseres over sveiseskinna /silikonholder hvis
sveiseskinna/silkonholder er lengre enn vakum posen. Vakum posene må ikke legges oppå hverandre på skinna/holderen.
Hvis det er flere skinner/holdere kan alle skinner /holdere benyttes i den samme syklusen.
7.
Bruk [PROG] bryteren til å velge ønsket program. Se side 18 vedrørende instruksjon for programmering.
8.
Steng lokket og maskinen kjører automatisk hele syklusen med alle aktiverte funksjoner.
Lokketåpnes automatisk etter at den siste funksjonen ”utlufting” er fullført.
9.
If necessary the cycle can be partially or fully interrupted by pressing the [VACUUM STOP] key or the [STOP] key.
Om nødvendig kan syklusen delvis eller helt avbrytes ved å trykke på [VACUUM STOP] bryteren eller [STOP] bryteren.
[VACUUM STOP] bryteren avbryter den aktive funksjonen (vakum, gass flush, forseiling eller soft- air utlufting) og går
autimatisk videre til neste funksjon.
[STOP] bryteren avbryter hele syklusen og går direkte til utlufting.
10.
Etter at syklusen er fullført kan det pakkede produktet eller produktene tas ut av maskinen.
11.
Hvis maskinen er utstyrt med et cut-off sealing system, kan den overflødige delen rives av.
SIKKERHET og PRODUKT BESKYTTELSE
Pakke prosessen kan helt eller delvis avbrytes hele tiden
Stopp aktiv funksjon, trykk på [VACUUM STOP] bryteren
Stopp hele syklusen, trykk på [STOP] bryteren
OPTIMALT og EFFEKTIVT PAKKE RESULTAT
Bruk vakumposer av god kvaliset og riktig størrelse
Maximum 75% produkt fylling I vakum posen
Plasser vakum posen fritt over sveiseskinna/silikonholderen (benytt riktig antall innleggsplater i kammeret)
Trekk vakum posene langt nok over gass dysene (for gass flush) slik at ikke gass går tapt og posen ikke flytter seg
ved gass flushing
Version 11.10 DIG.EN 12

BOXER / MARLIN / FALCON / POLAR SERIES USER MANUAL
Betjeningspanel
Generell informasjon
Det digitale betjeningspanelet er inkludert med 9 ferdige program som individuelt kan endres i de forskjellige verdier
(for å vacuumpakke forskjellige produkter). Program 0 kan ikke bli brukt for testing eller service. Et programsyklus
er et komplett program av flere funksjoner som maskinen går gjennom under vacuumpakking av et produkt.
Betjeningspanelet er utformet med en betjeningsmodus og en programmodus.
Betjeningsdelen blir brukt under utførende av valg av programnummer med ønsket programsyklus.
Programdelen blir brukt til å bytte verdier innenfor programmene.
Betjeningspanelet er også for automatisk feilsøking under service/vedlikehold av pumpen og et 2 stegs nøkkel for en
fullstendig avbrudd eller funksjonsavbrudd. Det har også innebygget flere service-/vedlikeholdsprogram.
Digital tidsur
Alle aktive funksjoner kan tidsuropereres. Det vil si at vakuumfunksjonen, gassfunksjonen (hvis installert) og “softair” funksjonen kan innstilles i sekunder opp til 99 sekunder. Sveisefunksjonen kan innstilles i 0,1 sekunder og
maksimum 6,0 sekunder.
Følerkontroll
Verdiene i vacuumfunksjonen og gassfunksjonen (hvis installert) kan velges som en prosentandel av vacuumet. Dette
er prosentandel av trykket i vacuumkammeret relatert til trykket utenfor på 1 ATO (0%).
Den maksimale vacuumprosenten som kan settes er 99 %.
Den laveste vacuumprosenten ved bruk av gass er 30 % under trykk i relasjon til 1 ATO. Det betyr at
vacuumkammeret er pumpet opp til 30 % under sammenlignet med 1 ATO. Dette er ofte uttrykt som 70 % er pumpet
med gass (99 % - 30 % = 70 %).
“Soft air” funksjonen kan også tidsuropereres i sekunder (maksimum 99 sekunder). Sveisefunksjonen kan
tidsuropereres med 0,1 sekunders intervall (maksimum 6,0 sekunder).
VACUUM PLUS funksjonen er alltid standard med digital føler kontrollerbar. VACUUM PLUS funksjonen er en
tidsoperert tilleggs-vacuumfunksjon som kan innstilles med ekstra tid for å oppnå 99 % verdi av vacuumfunksjonen
(kan kun brukes hvis 99 % er innstilt for vacuumfunksjonen. Denne funksjonen krever ekstra vacuumtid for å unngå
å få små luftmengder i vacuumpakkingen.
Hurtig-stopp H20 betjening
Prinsippet for hurtig-stopp H20 funksjonen er et veldig sensitivt følersystem. Hvis H20 vises i displayet indikerer
dette at funksjonen er aktiv. Denne muligheten kan aktiveres i hvert individuelt program.
Den øverste grensen for vacuumprosenten som kan settes er 99 %. Den spesielle sensitive føleren H20 er i stand til å
føle øyeblikket for når fuktigheten i produktet begynner å evaporere (koke). I dette øyeblikk vil det sensitive
følersystemet avbryte og gå til neste trinn/fase og på den måten unngå at produktet tørker ut, taper vekt eller koke ut
vacuumposen som da vil forurense sveisestedet med et resultat at fuktighet ender opp i vacuumpumpen og tilslutt gir
et optimalt vacuumresultat uten bruk av unødvendig tid.
Hurtig-stopp H20 føleren er standard i H20 PLUSS funksjonen. H20 PLUS er tidsuroperert funksjon som muliggjør
ekstra tid etter oppnådd 99 % verdi av vacuumfunksjonen. Tidsinnstilingen for H20 PLUS funksjonen
0,1 sekunders intervall opp til maksimum 5,0 sekunder.
Version 11.10 DIG.EN 13
kan settes med

BOXER / MARLIN / FALCON / POLAR SERIES USER MANUAL
Betjeningspanel
1. Lite display. Viser aktivt program eller programmodus
2. Stort display. Viser aktuell verdi på funksjon mens programmet
utføres eller innstilt verdi i det spesifikke programmet
3. PROG 0-9 tast Valg av lagrede programmer/programmodus
4. REPOG tast Bytter mellom betjeningsmodus til programmodus (for å
innstilling av verdier) og vice versa. Etter å ha innstilt nye funksjonsverdi(er)
innenfor programmet i programmodus, må denne tasten alltid brukes for å lagre den
nye verdien i maskinens hukommelse.
5. Funksjonstast Med den velges funksjon innenfor valgte program og
programmodus. Valgt funksjon indikeres ved at pilotlampen er tent foran
programmet (under det store displayet).
6. Programtilstand Start tilstandsprogrammet for vacuumpumpen (tar ca. 15
minutter). For programinnstillinger se side 22.
7. Pilotlampe- En tent pilotlampe i front av funksjonsbeskrivelsen indikerer
funksjon at funksjonen er aktiv igjennom programsyklusen eller at funksjonen er valgt under
utføringen av programmodus.
NB!
VACUUM PLUS vises under programsykluset (hvis aktivtert). Pilotlampen vil fortsatt lyse
Display under funksjon og programmodus:
Hvis VACUUM PLUS tidsstyrt er aktivert under valgt program vil et lysende punkt vises i
Det finnes i tillegg en tidsuroperert vacuumfunksjon tilgjengelig med digital følerkontroll
med navnet VACUUM PLUS. Denne funksjonen er ikke vist på betjeningspanelet.
VACUUM PLUSfunksjonen kan kun aktiveres hvis standard vacuumfunksjon er innstilt på
99 %.
etter at man oppnår 99 % og under tidsinnstillingen for VACUUM PLUS. Under VACUM
PLUS vacuumsyklusen et lysende punkt vil vises i nedre høyre hjørne av det store displayet.
nedre høyre hjørne av det store displayet under funksjon og programmodus. Hvis funksjonen
er valgt ved å bruke “Funksjonstasten” vil pilotlampen til venstre for VACUUM tennes to
ganger og vacuumprosenten og VACUUM PLUS tiden vil vises konstant i displayet.
Hvis maskinen er utstyrt med integrert gasstilsetningsmulighet og funksjonen er aktiv valgt
program (No) vil et punkt nederst til høyre i det lille displayet lyse opp.
Version 11.10 DIG.EN 14

BOXER / MARLIN / FALCON / POLAR SERIES USER MANUAL
Vacuummeterskala
Vacuum i prosent (%)
0 0
0,2 20 0,3 30 0,4 40 0,5 50
0,6 60 0,7 70 0,8 80 0,9 90
- 1,0 99+
8. + /VACUUM STOP
(fungere under drift) Bryter den aktive funksjonen under programsyklusen. Syklusen fortsetter da
øyeblikkelig med neste funksjon.
(Funksjon i programmodus) Øker verdien av den valgte funksjon innenfor valgte program i
programmodus.
9. - / STOP
(funksjon under syklus) Stopper programsyklusen øyeblikkelig og går over til ventilasjonsyklusen.
(Funksjon i programmodus) Senker verdien av den valgte funksjon innenfor valgt program i
programmodus.
10. Vacuummeter Viser trykket i vacuum-kammeret. Se tabell nedenfor for samsvaret mellom
vacuummeteret og prosentandel vacuum.
11. ON/OFF Hovedstrømbryter. Brukes for å sette maskinen på før bruk og for å slå
maskinen av etter bruk. Ved ON settes alle funksjonene i maskinen i drift.
ADVARSEL. Når maskinen er i OFF modus er strømmen ikke koblet fra
maskinen (hukommelse). For å få maskinen strømløs må man koble fra
stikkontakt.
NÅR MASKINEN ER SLÅTT PÅ (ON)
Når maskinen er slått på går maskinen over til operativmodus etter å ha vist 2
START-koder i displayet. NB! Vær vennlig og noter ned de 2 START-kodene i denne
bruksanvisningen side 4 (teknisk informasjon og DATA-platen). Operativmodus er
standard på betjeningspanelet når man skal vacuumere produkter. Modifisering av verdier
kan ikke utføres under operativmodus.
Med PROG tasten og valgbrytere kan man velge verdier innenfor de forskjellig
programmer som vises. Hvis maskinen er klar for vacuumpakking (og produktet ligger
allerede i kammeret) er det bar å velge program (PROG tasten) og lukke lokket. Programsyklusen starter
da automatisk og går igjennom de valgte funksjonene i programmet.
Version 11.10 DIG.EN 15

BOXER / MARLIN / FALCON / POLAR SERIES USER MANUAL
Beskrivelse av programsyklus med digital tidsinnstilling
1. Velg programnummer med PROG tasten og det lille displayet.
Hvis det valgte program er med aktiv gasstilsetning vil en punkt nederst i høyre hjørne i det lille
displayet lyse opp.
2. Lukk igjen lokket
3. Vacuum funksjon Maskinen starter å vacuumere kammeret.
Pilotlampen foran VACUUM lyser.
Det store displayet: Tidsnedtelling starter etter innstilt tid (maksimum
99 sekunder). Vacuummeteret øker moturs.
4. Gasstilsetning Med en gang vacuumeringen er ferdig vil gasstilsetningen starte.
(hvis installert) Pilotlampen foran GAS vil lyse opp
Det store displayet: Tidsnedtelling starter som innstilt (maksimum 99
| sekunder). Vacuummeteret minker medurs.
5. Gas flush Plus I det øyeblikket gasstilsetning er ferdig er det mulig å legge til
(hvis aktivert) tid for tillegg av gass. Med denne muligheten kan man tilsette mer
gass mens sveisefunksjonen avsluttes.
6. Sveising Når vacuumfunksjonen eller gasstilsetningsfunksjonen (hvis
installert) er ferdig vil sveisefunksjonen starte med sveising av
vacuumposen.
Pilotlampen foran SEAL vil da lyse opp.
Det store displayet: Tidsnedtelling med 0,1 sekund starter etter innstilt
tid (maksimum 6.0 sekunder).
Vacuummeteret vil bli uforandret.
7. Soft-air ventilasjon Når sveisefunksjonen er over vil soft-air funksjonen starte sakte
(hvis installert) med å slippe luft inn i vacuumkammeret.
Pilotlampen foran SOFT AIR vil lyse opp.
Det store displayet: Tidsnedtelling starter som innstilt
(maksimum 99 sekunder). Vacuummeteret minker medurs.
8. Ventilering Etter endt sveise- og Soft-air funksjon (hvis installert) starter
ventilasjon av kammeret til 1 ATO og lokket åpner seg.
Alle pilotlampene foran funksjonene er slukket.
Det store displayet: streker går opp og ned til lokket er helt åpent.
Vacuummeteret går tilbake til 0 og lokket åpnes automatisk.
9. Produktet er nå ferdig vacuumert og kan tas ut/flyttes.
Version 11.10 DIG.EN 16

BOXER / MARLIN / FALCON / POLAR SERIES USER MANUAL
Beskrivelse av programsyklus med digital føler kontrollert
1. Velg programnummer med PROG tasten og det lille displayet.
Hvis det valgte program er med aktiv gasstilsetning vil en punkt nederst i høyre hjørne i det lille displayet lyse opp.
Hvis det valgte program er med aktiv VACUUM PLUS vil en punkt nederst i høyre hjørne i det store displayet lyse
opp.
2. Lukk igjen lokket
3. Vacuum funksjon
Maskinen starter å vacuumere kammeret.
Pilotlampen foran VACUUM lyser.
Det store displayet: Nedtelling av prosent vacuum starter etter innstilt % (maksimum 99 %).
Vacuummeteret øker moturs
4. VACUUM Plus.
(hvis installert) Pilotlampen foran VACUUM lyser opp.
99 %.
Maskinen fortsetter å vacuumere etter oppnådd 99 %.
Det store displayet: Tidsnedtelling starter etter innstilt tid (maksimum 99 sekunder) og
punktet nede i høyre hjørne lyser opp.
Vacuummeteret øker moturs veldig sakte (nesten umerkelig).
Bemerk: Kan kun installeres med vacuumfunksjonen når verdien er satt til maksimum
5. Gasstilsetning
(hvis installert) Pilotlampen foran GAS vil lyse opp.
Med en gang vacuumeringen er ferdig vil gasstilsetningen starte.
Det store displayet: Nedtelling av prosent vacuum som innstilt (minimum 30 %).
Vacuummeteret minker moturs
6. Gas flush Plus
(hvis aktivert) Med denne muligheten kan man tilsette mer gass mens sveisefunksjonen avsluttes.
I det øyeblikket gasstilsetning er ferdig er det mulig å legge til tid for tillegg av gass.
7. Sveising
(hvis installert) starte med sveising av vacuumposen.
Når vacuumfunksjonen eller gasstilsetningsfunksjonen er ferdig vil sveisefunksjonen
Pilotlampen foran SEAL vil da lyse opp.
Det store displayet: Tidsnedtelling pr. sekund starter etter innstilt tid (maksimum 6.0 sekunder).
Vacuummeteret vil bli uforandret.
8. Soft-air ventilasjon
i vacuumkammeret.
Pilotlampen foran SOFT AIR vil lyse opp.
Det store displayet: Tidsnedtelling pr. sekund starter som innstilt (maksimum 99 sekunder).
Vacuummeteret minker medurs
9. Ventilering
1 ATO og lokket åpner seg.
Alle pilotlampene foran funksjonene er slukket.
Det store displayet: streker går opp og ned til lokket er helt åpent.
Vacuummeteret går tilbake til 0 og lokket åpnes automatisk.
Etter endt sveise- og Soft-air funksjon (hvis installert) starter ventilasjon av kammeret til
Når sveisefunksjonen er over vil soft-air funksjonen starte sakte med å slippe luft inn
10. Produktet er nå ferdig vacuumert og kan tas ut/flyttes.
Version 11.10 DIG.EN 17
.
.

BOXER / MARLIN / FALCON / POLAR SERIES USER MANUAL
Beskrivelse av programsyklus med digital Quick Stop H20 kontrollert
1. Velg programnummer med PROG tasten og det lille displayet.
Fundamentet for Quick Stop H20 funksjonen er et meget følsomt kontrollsystem. Tilvalget kan aktiveres til hvert
program ved at H20 vises i displayet og som indikerer at funksjonen er aktiv. For å aktivere Quick Stop H20 kontrollen,
trykk på REPROG tasten, programnummer vil blinke. Trykk så på Programvalg tasten og H20 vil vises i
displayet.Trykk igjen på REPROG tasten for å gå tilbake til driftsmodus. Programnummeret vil ikke lenger blinke som
indikerer at maskinen er klar til bruk.
2. Lukk igjen lokket
3. Vacuum funksjon
Det store displayet: H20 vil vises
Vacuummeteret øker moturs.
4. VACUUM Plus
oppnådd.
Pilotlampen foran VACUUM lyser opp.
Det store displayet: Tidsnedtelling pr. sekund starter etter innstilt tid (maksimum 5 sekunder)
og punktet nede i høyre hjørne lyser opp.
Vacuummeteret øker moturs veldig sakte (nesten umerkelig).
5. Gasstilsetning
(hvis installert) Pilotlampen foran GAS vil lyse opp
Det store displayet: Nedtelling av prosent vacuum som innstilt (minimum 30 %).
Vacuummeteret minker moturs
6. Gas flush Plus
(hvis aktivert) tid for tillegg av gass. Med denne muligheten kan man tilsette mer gass mens
sveisefunksjonen avsluttes.
7. Sveising
installert) er ferdig vil sveisefunksjonen starte med sveising av vacuumposen.
Pilotlampen foran SEAL vil da lyse opp.
Det store displayet: Tidsnedtelling pr. sekund starter etter innstilt tid (maksimum 6.0
8. Soft-air ventilasjon
med å slippe luft inn i vacuumkammeret.
Pilotlampen foran SOFT AIR vil lyse opp.
Det store displayet: Tidsnedtelling pr. sekund starter som innstilt (maksimum 99 sekunder).
.
9. Ventilering
1 ATO og lokket åpner seg.
Alle pilotlampene foran funksjonene er slukket.
Det store displayet: streker går opp og ned til lokket er helt åpent.
Vacuummeteret går tilbake til 0 og lokket åpnes automatisk.
10. Produktet er nå ferdig vacuumert og kan tas ut/flyttes.
Version 11.10 DIG.EN 18
Maskinen starter å vacuumere kammeret.
Pilotlampen foran VACUUM lyser.
Maskinen fortsetter å vacuumere til H20 punktet er oppnådd eller at 99 % er (hvis installert)
Med en gang vacuumeringen er ferdig vil gasstilsetningen starte.
I det øyeblikket gasstilsetning er ferdig er det mulig å legge til
Når vacuumfunksjonen eller gasstilsetningsfunksjonen (hvis
sekunder).Vacuummeteret vil bli uforandret.
Når sveisefunksjonen er over vil soft-air funksjonen starte sakte
Vacuummeteret minker medurs
Etter endt sveise- og Soft-air funksjon (hvis installert) starter ventilasjon av kammeret til

BOXER / MARLIN / FALCON / POLAR SERIES USER MANUAL
PROGRAMMODUS
Programmodusene er brukt til å bytte funksjonsverdier innenfor programmer. Se side 4-6 med
instruksjoner for programmeringen.
ANDRE MODUS
Betjeningspanelet kan også benyttes for service. Programmet som er tilpasset dette er for pumpen og
tidsur/nedtellingsfunksjon som er de mest brukte i dette programmet.
Betjening av timetelleren
(Driftstidstelleren)
En av servicefunksjonene er timetelleren som automatisk gir beskjed om når man trenger service. Denne
registrerer hvor mange timer pumpen er operativ (pr.10 timer). MERK! Boxer serien har en pumpe som
ikke er aktiv hele tiden. I det øyeblikk innstilt tid er nådd vil beskjeden OIL vises i displayet (se side 11
i den kombinerte engelske og norske anvisningen). Maskinen kan fortsatt brukes som vanlig, men
varslingen vil stadig vises i displayet. Bestill service uten å vente.
Fabrikkens standardinnstilling for dette programmet OFF (slått av). Følgende steg kan benyttes for å
aktivere Driftstidstelleren eller nullstille denne.
Trykk på tasten FUNCTION SELECT for minst 3 skunder. Etter 3 sekunder vil
driftstidstelleren vise antall 10 timer som vacuumpakkemaskinen har vært i drift. Antallet vil vises i
2 sekunder. Etter 2 sekunder vil det originale innstilte timer vises (pr. 10 timer). Når
driftstimetelleren er slått av (ikke i bruk) vil brukte timer ikke vises ( i stedet vil det vises beskjeden
OFF) etter at tasten er trykket inn for 3 sekunder.
Den originale innstillingen av kan modifiseres ved å bruke tasten + og – (mellom 0 og 990 timer).
Hvis man stiller inn på 0 vil displayet neste gang automatisk vise OFF etter trykk for minst 3
sekunder.
Den nye innstillingen vil lagres ved å trykke på REPROG tasten. Den virkelige driftstiden vil da bli
satt til null.
Etter trykk på tasten REPROG vil betjeningspanelet bytte over til normal driftsmodus.
Version 11.10 DIG.EN 19

BOXER / MARLIN / FALCON / POLAR SERIES USER MANUAL
A.
Velg ønsket program med tasten PROG 0
-
9 for å stille inn verdier.
B.
Trykk på tas
ten REPROG for å komme inn i programmodusen.
C.
Velg ønsket funksjon for programmet med å trykke på FUNCTION SELECT
D.
Digital Tids Controll
E.
F.
Trykk på tasten REPROG etter innstilling av relevante funksjoner for så å
PROGRAMMERING
Verdifunksjonen i valgte programnummer kan alltid endres enten manuelt eller med automatisk
programmering. For enhet, område eller begrensninger av verdifunksjon henviser vi til forrige kapittel.
10 programmer kan velges (fra 0 til 9). Program 0 kan ikke benyttes av bruker. Dette programmet er for
service. Kun autoriserte personer kan benytte (endre verdier) dette programmet (trykke REPROG tasten for
minst 5 sekunder). Etter valg av program 0 må man bytte til PROGRAM MODE.
MANUELL PROGRAMMERING (oppstart med maskinen PÅ og med lokket åpent)
Programnummeret vises i det lille displayet.
Programnummeret begynner nå å blinke i det lille displayet.
tasten. Pilotlampen vil lyse opp for valgte funksjon.
OBS! Under SEAL (sveising) mulighet 1-2 Cut-Off seal
Under valgmulighet 1-2 cut-off seal vil pilotlampen lyse opp to ganger.
Første gangen for innstilling av sveisetid og andre gangen for innstilling av
kuttetiden.
OBS! Valgmulighet Digital Sensor Control and Quick Stop H20 Control.
Under valgmulighet sensor control, pilotlampen foran VACUUM vil lyse
opp to ganger. Første gangen er for Vacuum funksjonen (vacuum
prosenten) og andre gangen for Vacuum Plus funksjonen (med tid). Se side
8 og 9 i den engelske bruksanvisningen.
Innstill ønsket verdi ved å trykke på + og – tasten
Digital sensor Control og Quick Stop H20 Control
Still inn ønsket verdi prosent av vacuum eller ønsket tid for valgt funksjon
ved å trykke på + og – tasten.
OBS!
Verdiene vil vises i det store displayet.
Funksjonen VACUUM PLUS (sensor control), Gasstilsetning og Soft-Air kan
slås av i programmet hvis ønskelig. For å slå av trykk på – tasten inntil OFF
vises i det store displayet.
Gjenta steg C og D for innstilling av andre verdier.
lagre disse i programmet. Maskinen går da tilbake til normal drift og den
kan brukes til vacuumering. De nye innstilte verdier er nå standardverdier
inntil de blir endret på nytt.
Version 11.10 DIG.EN 20

BOXER / MARLIN / FALCON / POLAR SERIES USER MANUAL
A.
Velg ønsket program med tasten PROG 0
-
9 for å stille inn verdier.
B.
Trykk på tasten REPROG for å komme inn i
programmodusen.
C.
VACUUM funksjon
D.
VA
CUUM PLUS funksjon
E.
GASSTILSETNINGS funksjonen
(ikke standard/kan fås som tillegg)
F. S
VEISING OG SOFT
-
AIR funksjonene. Begge muligheter kan kun stilles inn manuelt
AUTOMATISK PROGRAMMERING (oppstart med maskinen PÅ og med lokket åpent)
Programnummeret vises i det lille displayet.
Programnummeret begynner nå å blinke i det lille displayet.
Lukk lokket. Maskinen starter automatisk
Digital Tidskontroll
Tiden øker. Så snart som Vacuummeteret når -1 trykk så på STOP
VACUUM-tasten. Automatisk vil maskin-syklusen bytte til følgende funksjon:
Bemerk Digital Tids-kontroll
La vacuumfunksjonen gå for 2 til 4 sekunder etter at -1 er oppnådd på
vacuummeteret slik at mulig små rester av luft også er trukket ut.
Digital Sensor Control
Den prosentuelle andel vacuum øker. Så snart som verdien 99 % er oppnådd
trykk på STOP VACUUM tasten. Automatisk vil maskin-syklusen bytte til
følgende funksjon: (NB! Hvis full vacuumering ikke er ønsket trykk på STOP
VACUUM tasten når ønsket verdi er oppnådd).
Digital Sensor Control + Quick Stop H20 Control
Tiden øker. Trykk på STOP VACUUM tasten når ønsket tid oppnås.
Da bytter maskinen automatisk til følgende funksjon.
(NB! VACUUM PLUS funksjonen kan kun deaktiveres med OFF tasten ved
manuell programmering. VACUUM PLUS funksjonen kan kun brukes når
VACUUM funksjonen er blitt innstilt på 99 %).
Digital Tids-drift
Tiden øker. Trykk på STOP VACUUM så snart vacuummeteret oppnår ønsket
undertrykk. Maskinsyklusen vil da automatisk bytte til følgende funksjon
Digital Føler-kontroll
Den prosentuelle andel vacuum øker. Trykk på VACUUM STOP tasten i det
øyeblikk maskinen nå ønsket verdi. Maskinsyklusen vil da automatisk til
neste funksjon. (NB! Det anbefalte minimale undertrykket er 0,5 bar eller 50
% vacuum. Det minste undertrykket som kan innstilles er 0,3 bar eller 30 %.
GAS FLUSH/gasstilsetning funksjonen er kun mulig å deaktivere med OFF
tasten ved manuell programmering).
Etter at syklusene er innstilt vil de automatisk bli lagret.
Version 11.10 DIG.EN 21

BOXER / MARLIN / FALCON / POLAR SERIES USER MANUAL
VÆR SPESIELT OPPMERKSOM PÅ FØLGENDE VED PROGRAMMERING
For DIGITAL SENSOR CONTROL (Digital Føler Kontroll)
Verdiene som blir programmert ved gasstilsetningsfunksjonen er den endelige vacuumprosenten i
vacuumkammeret etter gasstilsetningen.
Eksempel: Vacuum funksjonen er satt til 99 % og gasstilsetningen er satt til 60 %. Det betyr at etter
vacuum funksjonen vil vacuumkammeret få gasstilsetning til det oppnås 60 % vacuum og 40 % (39 %)
gass i vacuumkammeret.
For automatisk programmering
Vær sikker på at alle funksjoner er aktivert i det valgte programmet. Aktivert betyr at funksjonen i
programmet er tildelt en verdi. Hvis verdien er OFF betyr det at verdien ikke er aktivert og vil ikke bli
inkludert i det automatiske programsykluset.
For maskiner med gasstilsetningsfunksjonen
Hvis man programmerer et program med aktiv gasstilssetning vil dette indikeres ved at et punkt nede i høre
hjørne av det lille displayet vil lyse opp når man velger et program med denne modusen.
For maskiner med tillegg av Sensor Control (digital Føler Kontroll)
Hvis et program er satt opp med aktiv VACUUM PLUS funksjonen vil dette indikeres ved at et punkt nede
i de høyre hjørne i det store displayet lyse opp når man velger program med denne modusen.
Hvis funksjonsverdien er OFF er det kun mulig å aktivere denne ved manuell programmering.
Version 11.10 DIG.EN 22

BOXER / MARLIN / FALCON / POLAR SERIES USER MANUAL
MACHINE MAINTENANCE
GENERAL
A regular and complete maintenance is required for long usage of the machine, to avoid malfunctioning and to achieve an optimal
packaging result. If the machine is used intensively (more than 5 hours per day), we recommend professional servicing every 6
months. For normal use of the machine, complete servicing once a year should be sufficient (depending on location, environment
and products).
However, there are small maintenance activities that must be carried out regularly. These maintenance activities can be done by
the user. The following page contains an overview of these activities.
IMPORTANT BEFORE AND DURING MAINTENANCE
The machine must always be completely voltage free before any maintenance is carried out on it. Remove the plug from the
wall socket or put the master switch in the O position.
If the machine is not functioning properly or if it produces strange noises, turn it off immediately with the ON/OFF switch and
contact the supplier or Henkelman BV.
If the machine is equipped with a gas flush system then always close the main crane during standard maintenance activities.
Always note that the pressure on the pressure reducing valve on the gas bottle is never higher than 1 atmosphere/ATO
before, during and after the maintenance activities. A higher pressure may cause irreparable damage to the machine. NEVER
use flammable gasses or gas mixtures containing oxygen.
When cleaning transparent lids (if applicable), NEVER use cleaning agents containing solvents. Check at least once a week if
there are cracks in the lid. In case of cracks, turn off the machine immediately and contact the supplier or Henkelman BV.
High pressure cleaning is not permitted for cleaning the machine. High pressure cleaning can cause considerable damage to
electronic and other parts of the machine.
Water may never be permitted to enter either the extraction nozzle of the chamber or the blow-off opening of the pump. This
would cause irreparable damage to the pump.
Larger services must always be carried out by an authorised supplier.
The BOXER serie machines are designed for a maximum of 5 hours operation per day. Other machines are designed for a
maximum of 8 hours per day. The supplier or Henkelman BV cannot be held responsible for any malfunctions or defects if
these operation time limits are clearly exceeded without consultation.
The machine must be moved or transported in an upright position. The machine may NOT be tilted as it can cause damage to
the pump.
The supplier or Henkelman BV cannot be held responsible for any malfunctions or defects if the maintenance instructions in
this manual are not followed.
Contact the supplier or Henkelman BV if there are any doubts or questions about maintenance or malfunctions.
Version 11.10 DIG.EN 23

BOXER / MARLIN / FALCON / POLAR SERIES USER MANUAL
Daily
Clean the vacuum chamber, lid, and housing after use with a damp cloth.
Weekly
Check the oil level and replace or fill up oil when
the oil is turbid or the oil level is too
Every Six Months
Replace oil at least once every 6 months.
Yearly
Inspect the oil exhaust filter for saturation. If saturated, repl
ace the filter. For
Four
-
yearly
Replace transparent lid and the lid’s gas springs (if applicable)
STANDARD MAINTENANCE SCHEDULE FOR THE MACHINE
Make sure that no cleaning agents containing solvents are used.
Make sure that no high pressure cleaner is used.
low. For instructions, see page 23.
Activate the conditioning program for the pump at least once a week.
Inspect the sealing bar for damage. Replace Teflon tape/sealing wire if the seal quality
is no longer sufficient or if the Teflon tape/sealing wire is no longer tight and straight on
the sealing bar. For instructions, see page 26.
Inspect the lid gasket and replace it when the gasket is damaged or stretched. For
instructions, see page 27.
Inspect the transparent lid (if applicable). When cracks are visible, turn off the machine
immediately and contact the supplier or Henkelman BV.
instructions, see page 24.
Contact the supplier for a professional service
Replace membranes seal cylinder (if applicable)
VACUUM PUMP MAINTENANCE
It is very important to regularly service the pump to ensure extended and correct operation. The following activities are essential
for correct maintenance. If the machine is used regularly then it is advisable to have the pump fully inspected at least once a year
by the supplier to ensure extended and problem free operation. Contact the supplier or Henkelman BV for more advice and
information.
Conditioning Program
key [conditioning program], and close the lid. The program runs automatically. During the program the large display will display
moving lines.
The program can be interrupted at any time using the [STOP] key. It is however important for the sake of good maintenance that
the program completes a full 15 minute cycle and therefore advisable only to interrupt the cycle for something urgent.
It is also advisable to run the program before using the machine for the first time, after the machine has been stationary for a
lengthy period of time, and especially prior to changing oil.
The conditioning program ensures that the pump is thoroughly rinsed. During the program the pump and oil
reaches operation temperature so that the oil can better absorb any moisture and contaminants and filter them.
The high temperature enables any moisture in the pump to evaporate minimising the risk for rust spots.
The program lasts 15 minutes and it is advisable to run it at least once a week. Turn on the machine, press the
Version 11.10 DIG.EN 24

BOXER / MARLIN / FALCON / POLAR SERIES USER MANUAL
Location at rear or side of machine
Take care to use the correct type
1 2
4 1 2
3
Changing Oil / Filling Up
The oil level and oil quality must be checked at least once a week. The oil inspection window serves this purpose. Fill up the oil
level if it is too low. Replace the oil if it is turbid. Oil must be replaced at least once every 6 months.
BOXER series
MARLIN / FALCON / POLAR series
View can differ per model
Filling up oil
After draining or if the oil level has dropped, oil needs to be filled up. The oil fill plug must be removed with the correct size
spanner. The pump can now be filled with oil. Make sure that you add the correct amount (see table on page 24)
TAKE CARE to fill with small amounts at intervals. Fill the oil level to the top of the oil level indicator sticker.
TAKE CARE to replace the oil filter before adding the new oil (see page 24)
Oil types and amounts
It is important to use the correct type and quantity of oil for the pump. The wrong type or too much oil could damage the pump.
The ambient temperature where the machine is operated is also important for the type of oil. See amounts and types with related
ambient temperatures in the table on the next page.
Examples of supplier brands for the standard types of oil are Shell Vitrea, Aral Motanol GM, BP Energol CS, or Texaco Regal R+
O with related viscosity numbering. If the machine is used outside normal specifications regarding ambient temperature, contact
the supplier or Henkelman BV.
1. Oil fill plug
3
2. Oil drain plug
3. Oil inspection window
4. Oil level indicator sticker
of oil for the pump
Beware of hot oil fumes during
drainage
Draining oil
If the oil is white or turbid when checked then it must be replaced. Before draining off the oil
let the conditioning program run a full cycle. The dirt and moisture is absorbed by the oil
and the oil becomes thinner making draining easier.
After the program has ended the drainage plug can be removed.
CAUTION, when unscrewing hot oil fumes can escape. The oil now drains from the drain
hole (an oil pan must be placed underneath). For the BOXER series, when the oil has
drained, tilt the machine slightly so that all residual oil can drain off. After draining the oil
drain plug is replaced.
Version 11.10 DIG.EN 25

BOXER / MARLIN / FALCON / POLAR SERIES USER MANUAL
Ambient Temperature
Machine Type
Pump
Fill
ing
Standard
“Cold”
“Hot”
BOXER 42 / 42 XL
021 m
/h 0.4 Viscosity VG 32
VM 32
VS 32
MARLIN 46
040 m
/h 1.0 Viscosity VG
32
VM 32
VS 32
MARLIN 52 / 90
- FALCON 52 / 2
-
60 –
POLAR 52 / 2
-40
063 m
/h 1.0 Viscosity VG 100
VM 100
VS 100
FALCON 2
-
60 -
POLAR 2
-50
100 m
/h 2.0 Viscosity VG 100
VM 100
VS 100
POLAR 2
-75
160 m
/h 5.0 Viscosity VG 100
VM 100
VS 100
POLAR 2
-
85 / 2
-95 300 m
/h 7.0 Viscosity VG 100
VM 100
VS 100
Oil filter
Filter housings can be
160-300 m3/h
040-063-100 m3/h
Capacity
BOXER 35
Machines are supplied with standard type oil.
The capacity of models with a 063 m3/h pump and 60Hz voltage, is 2.0 litre instead of 1.0 litre.
016 m3/h 0.4 Viscosity VG 32 VM 32
(litres)
3
3
3
3
3
3
Oil Type
10 - 30
o
C
Oil Type
5 - 10
o
C
Oil Type
30 - 40
VS 32
o
C
Changing the oil filter
The pumps of all floor models have oil filters. When replacing the oil the filters must also be
replaced. The oil filter is screwed to the rear of the oil exhaust filter housing.
When replacing the oil, it is first drained off. The old filter is then screwed off and replaced by a new
one. The pump can now be filled with new oil.
For the correct type of oil filters refer to the list of maintenance parts on page 29.
Inspect and change oil exhaust filter
There are one or more oil exhaust filters in the pump which absorb and filter oil vapours. The filters will become saturated after a
period of time and need to be replaced. This is on average between 12 and 18 months. When the filters are saturated it is no
longer possible to achieve maximum vacuum.
Filter housing types
Version 11.10 DIG.EN 26
located at the side or
behind the machine
Appearance can vary
depending on the model
(multiple housings on
pump or multiple filters
in one housing)
BOXER / MARLIN / FALCON / POLAR SERIES USER MANUAL
OFFSEAL
Remove tensioner(s) and
Take care that the filter gasket does not
Pumps and housing can have a different appearance but the principle of replacing remains the same.
Place and tension the new filter (take
Open rear or side of
machine for pump
Change oil exhaust filter(s)
filter(s) from the housing
Take care that the correct type of filter is used for the pump type, see page 29 for the correct type of filter for the type of
SEAL SYSTEM MAINTENANCE
pump
It is advisable to have the suppler do this service.
All or some of the following sealing systems are possible in the BOXER/MARLIN/FALCON/POLAR series. It is essential to know
which sealing system is applicable to the relevant machine.
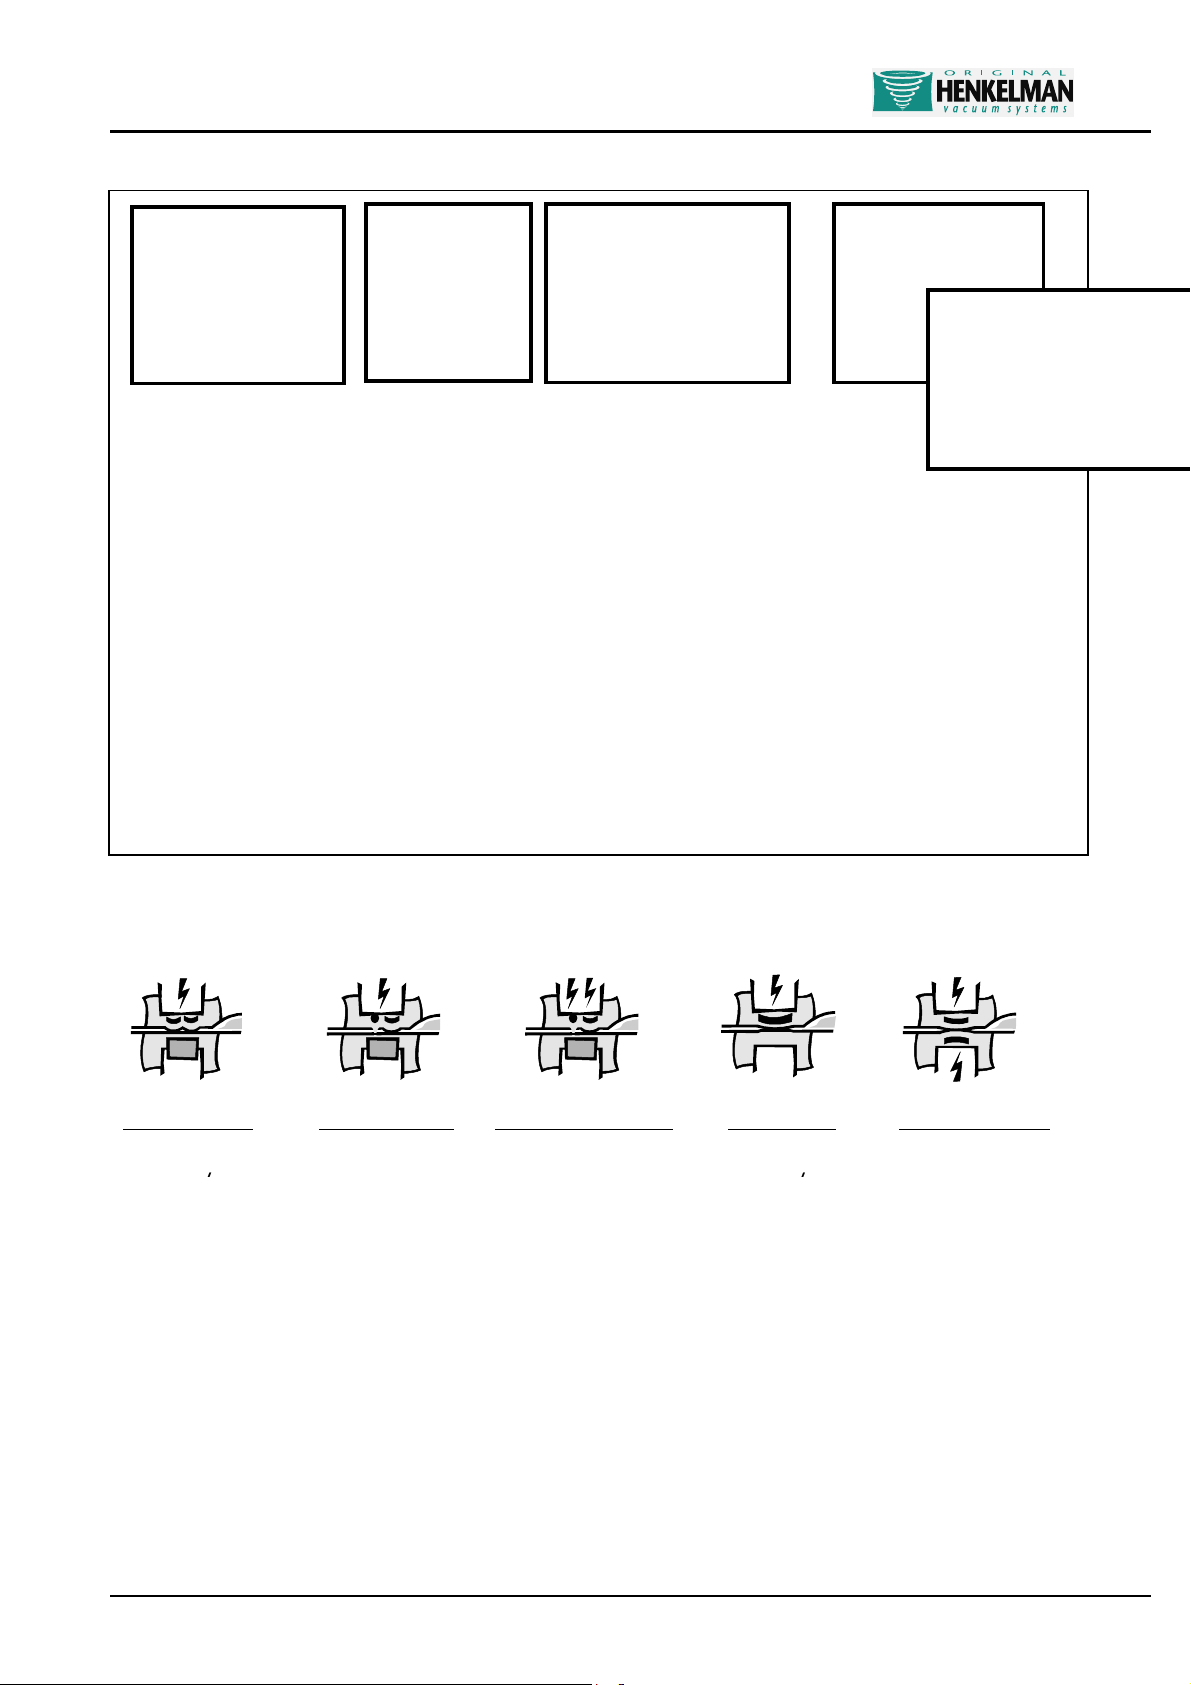
DOUBLE SEAL
2 x 3,5 mm
CUT-OFFSEAL
1 x 3,5 mm seal
1 x 1,1 mm cut
Servicing the sealing bar is almost identical for all systems. The seal quality is partially dependent on the maintenance of the
sealing bar and contra-bar (silicone holder). The main maintenance activities are the daily cleaning of the sealing bar and the
silicone holder with a damp cloth and a weekly inspection of the bars with replacement of the sealing wire, teflon tape or silicone
rubber if irregularities appear on top of the bar or the seal quality is insufficient.
The average maintenance cycle of the sealing bar (teflon tape / sealing wire) is at least once every 3 months.
(This indication refers to regular use of the machine, on average 8 hours per day and packaging standard products with standard vacuum packaging materials.
No rights can be derived from this indication)
care that the gasket is correctly
positioned) in the housing
Screw the cover back onto the housing
Screw the back or side plate on the
machine
remain behind when removing the filter
1-2 CUT-
1 x 3,5 mm seal
1 x 1,1 mm cut
WIDE SEAL
1 x 8,0 mm
BI-ACTIVE SEAL
1 x 5,0 mm seal
above and below
Version 11.10 DIG.EN 27

BOXER / MARLIN / FALCON / POLAR SERIES USER MANUAL
Pull wires taught using a
Remove teflon tape
Unscrew and remove
Replace the teflon tape
Screw down new wires
Cut off the ends of the sealing wire and stick
Special remark bi
-
active sealing system
Replace sealing wire and teflon tape
1.
Remove the sealing bar(s) from the holders (in the chamber or lid) by releasing the click system or by
sealing wires
onto clamping plate
unscrewing the screws.
2. Remove the teflon tape from the sealing bar.
3.
The old sealing wires and cut-off wires (if applicable) can be removed by unscrewing the clamp (see
illustration) and pulling the wires from the grooves.
4. Remove the teflon tape that is attached to the top of the sealing bar and stick a new piece of teflon tape
to the bar of the same length after having degreased and cleaned the bar with a dust free cloth.
5.
Cut a new peace of sealing wire or cut-off wire to the size of the sealing beam plus about 15 cm (± 6
inches). If 2 sealing wires or an extra cut-off wire is on the sealing beam then a second sealing wire or
cut-off wire must of course be cut.
6.
Place the end of the wire or wires through the groove(s) on the side of the sealing beam and screw the
wires to the bottom.
7. Place the sealing bar top down in a vice and pull the sealing wire or wires through the other side of the
groove(s) on the sealing beam.
8.
Pull the wires tight with a pair of pliers and screw them down at the same time. Ensure that the wire
(wires) is (are) pulled taught and straight with the help of a pair of pliers before the wires are screwed
down.
9. It is handy to use a pair of adjustable pliers as a lever for optimal wire tension. Place one end of the
sealing beam in the vice and stretch the wire (wires) by pressing down the bar.
10. Cut off the extruding wire end(s) on both ends after having screwed it tight.
11. Cut a piece of teflon tape as long as the sealing bar plus about 5 cm (± 2 inches).
12.
Stick the new teflon tape straight over the new sealing wire (wires). Ensure that the teflon is straight on
the sealing bar and that the sticky part is stuck on the side. Ensure that the teflon is stuck on the bar
smoothly and without folds.
13.
Cut the teflon tape off so that the sticky part does not get stuck on the sides of the clamps but that the
teflon extends over the top of the clamps.
14.
Place the sealing bar back in the machine. Ensure that the sealing beam is properly clicked onto the
holders or that the screws are firmly screwed in.
pair of pliers and a vice
and screw the wires down
on the clamping plate.
Version 11.10 DIG.EN 28
The sealing wire must be accurately placed on the upper
and lower beams so that the sealing wires line up with
each other exactly during sealing.
See page 30
for correct parts and quantities
Teflon tape over the sealing beam without folds

BOXER / MARLIN / FALCON / POLAR SERIES USER MANUAL
SILICONE HOLDER AND LID GASKET MAINTENANCE
Replace the rubber silicone holder
The silicone holder must be inspected weekly for irregularities on the silicone rubber (mainly caused by burning by the sealing
wire). If irregularities appear then the silicone rubber must be replaced.
Average maintenance cycle for silicone rubber is at least once every 6 months
(This indication refers to regular use of the machine with standard products. No rights can be derived from this indication)
1.
Remove the old silicone rubber from the holder.
2.
Cut a new piece of silicone rubber the same size as the old one. The same
size is very important, too short or too long will cause problems with sealing.
3.
Place the new piece in the silicone holder. Ensure that the silicone rubber is
completely and evenly placed in the groove. It is also important that the
surface of the silicone rubber is smooth after it is in place and is shows no
signs of tension.
Replace lid gasket
The lid gasket ensures that the vacuum chamber is completely sealed during the
machine cycle. This is essential for achieving a maximum vacuum. The lid gasket wears
due to the extreme pressure differences and must be replaced regularly. Inspect the lid
gasket weekly for tears or damage.
Average maintenance cycle for lid gasket is at least once every 6 months
(This indication refers to regular use of the machine, on average 8 hours a day and with standard
products. No rights can be derived from this indication)
De length of the new lid gasket is determined by using the old gasket. If the lid rubber
is too short or too long it can cause problems closing the lid or leak.
The rubber must be placed evenly and without tension in the holder. The ends must be cut
straight and must be laid tightly against each other to avoid leakage.
Appearance may differ per
Ensure that the ends of
Version 11.10 DIG.EN 29

BOXER / MARLIN / FALCON / POLAR SERIES USER MANUAL
016 m
/h BOXER 35
021 m
/h BOXER 42 / 42 XL / 42 XL BA
040 m
/h MARLIN 46
063 m
/h MARLIN 52 / 90
– FALCON 52 / 2
-
60 –
POLAR 52 / 2
-40
100 m
/h FALCON 80 / 2
-
70 –
POL
AR 80 / 2
-50
160 m
/h POLAR 2
-75
300 m
/h POLAR 2
-
85 / 2
-95
BUSCH
STANDARD OIL
OIL FILTER
OIL MIST FILTER
Henkelman
Henkelman
Henkelman
016 m
/h VG 32
0439510
0.40 - - 50-60Hz 0939163 1
021 m
/h VG 32
0439510
0.40 - - 50-60Hz 0939165 1 040 m
/h VG 100
0439520
1.0 040-063-100 0939090
50-
60Hz 0939
171 1 063 m
/h –
50Hz VG 100
0439520
1.0 040-063-100 0939090
50Hz 0939
171 1 063 m
/h –
60Hz VG 100
0439520
2.0 040-063-100 0939090
60Hz
0939
170 2 100 m
/h VG 100
0439520
2.0 040-063-100 0939090
50-
60Hz 0939170 2 160 m
/h VG 100
0439520
5.0 160-300 0939091
50-
60Hz 0939175 2 300 m
/h VG 100
0439520
7.0 160-300 0939091
50-
60Hz 0939175 3
Teflon tape
46 mm wide teflon tape
0305515
length sealing
bar + 5 cm
Double Seal
2 x 3.5 mm round wire
0305000
2 wires length of sealing
bar + 15 cm
Cut-off seal
1 x 3.5 mm round wire
0305000
1 wire length of sealing
bar +
15 cm
1 x 1.1 mm round wire
0305010
1 wire length of sealing
bar + 15 cm
1-2 Cut
-
off seal
1 x 3.5 mm round wire
0305000
1 wire length of sealing
bar + 15 cm
1 x 1.1 mm round wire
0305010
1 wire length of sealing b
ar + 15 cm
Broad Seal
1 x 8.0 mm flat
wire 0305025
1 wire length of sealing b
ar + 15 cm
Bi-Active Seal
1 x 5.0 mm flat wire
0305020
1 wire length of sealing
bar + 15 cm
1 x 8.0 mm flat wire
0305025
1 wire length of sealing
bar + 15 cm
Silicone Rubber
Silicone 17 x 8
0320200
length s
ilicone holder
LIST OF SERVICE PARTS
VACUUM PUMP PARTS
BUSCH VACUUM PUMPS HENKELMAN MODELS
3
3
3
3
3
3
3
Type
3
3
3
3
3
3
3
3
SEAL SYSTEMS
PARTS
Reference
Litres Type
SPECIFICATIONS
Reference
HENKELMAN
REFERENCE
Type
Reference
QUANTITY
Amount
Bi-active Seal: Single chambers uses 2 x 5,0 mm. Double chambers 1 x 5,0 mm and 1 x 8,0 mm
Version 11.10 DIG.EN 30

BOXER / MARLIN / FALCON / POLAR SERIES USER MANUAL
LID GASKET
MODELS
HENKELMAN
REFERENCE
LENGTHS PER MODEL (in cm)
BOXER SERIES
0320215 BOXER 35
BOXER 42
BOXER 42 XL / BOXER 42 XL BA
MARLIN 46 / 52 / 90
FALCON SERIES
POLAR 52 / 80 / 2-40 / 2-50
0320210 MARLIN 46
MARLIN 52 / FALCON 52 / POLAR 52
MARLIN 90
FALCON 80 / POLAR 80
FALCON 2-60 / 2-70
POLAR 2-40 / 2-50
POLAR 2-75 / 2-85 / 2-95
0320212 POLAR 2-75 / 2-85 / 2-95
Lengths specified are always a little longer and must be cut to the correct length.
175
190
210
255
250
290
300
260 / 300
280 / 300
350 / 390 / 440
Version 11.10 DIG.EN 31

BOXER / MARLIN / FALCON / POLAR SERIES USER MANUAL
MODEL
VACUUM CHAMBER
LID HOUSING
DIMENSIONS
PUMP
FINAL
BOXER SERIES
35 Stainless steel
Transparent
Stainless steel
450x525x385
016 99,80%
42
Stainless steel
Transparent
Stainless steel
490x525x430
021 99,80%
42 XL
Stainless steel
Transparent
Stainless st
eel 490x610x445
021 99,80%
42 XL Bi
-
active
Stainless steel
Transparent
Stainless steel
490x610x420
021 99,80%
MARLIN SERIES
46
Stainless steel
Transparent
Stainless steel
780x660x970
040 99,98%
52
Stainless steel
Transparent
Stainless ste
el 700x690x1030
063 99,98%
90
Stainless steel
Transparent
Stainless steel
1065x480x960
063 99,98%
FALCON SERIES
52
Aluminium
Aluminium/
Sight glass
Stainless steel
700x690x1070
063 99,98%
80
Aluminium
Aluminium/
Sight glass
Stainless steel
900x820x1070
100 99,98%
2-60
Aluminium
Aluminium/
Sight glass
Stainless steel
1060x880x1070
063 99,98%
2-70
Aluminium
Aluminium/
Sight glass
Stainless steel
1260x1010x1070
100 99,98%
POLAR SERIES
52
Stainless steel
Stainless steel
Stainless
steel 700x730x1100
063 99,98%
80
Stainless steel
Stainless steel
Stainless steel
920x790x1125
100 99,98%
2-40
Stainless steel
Stainless steel
Stainless steel
1480x790x1090
063 99,98%
2-50
Stainless steel
Stainless steel
Stainless steel
1480x970x1120
100 99,98%
2-75
Stainless steel
Stainless steel
Stainless steel
1545x1150x1150
160 99,99%
2-85
Stainless steel
Stainless steel
Stainless steel
1900x1300x1150
300 99,99%
2-95
Stainless steel
Stainless steel
Stainless steel
2420x1210x1130
300 99,99%
TECHNICAL SPECIFICATIONS
WORKING PLATE
(mm)
(m
3
/h)
VACUUM
(%)
Specifications can deviate from optional models
Standard ambient temperature 05
For deviating ambient temperatures see page 24 for special oil specifications
0
C – 30 0C
Maximum use per day BOXER series 5 hours per day
Other machines: 8 hours per day
Electricity Voltage: see machine tag
Frequency: see machine tag
Power: see machine tag
Electrical connection Maximum fluctuation ± 10% of the official registered voltage
Gas bottle connector diameter BOXER series diameter 6 mm
(if applicable
) POLAR 2-85 / 2-95: diameter 13 mm
OTHER MODELS: diameter 8 mm
Maximum pressure gas bottle connector 1 ATO
(if applicable
)
External seal pressure connection diameter 6 mm
(if applicable
)
Sound level < 70 DB
Version 11.10 DIG.EN 32

BOXER / MARLIN / FALCON / POLAR SERIES USER MANUAL
ELECTRICAL DIAGRAMS
Control Current Diagram BOXER/ TOUCAN series
Power Circuit Diagram BOXER / TOUCAN series
Diagrams are shown for standard configurations.
Version 11.10 DIG.EN 33

BOXER / MARLIN / FALCON / POLAR SERIES USER MANUAL
Control Current Diagram MARLIN 46/52/90 / FALCON 52/80 / POLAR 52/80
Diagrams are shown for standard configurations.
Control Current Diagram FALCON 2-60/2-70 / POLAR 2-40/2-50/2-75/2-85/2-95
Version 11.10 DIG.EN 34
BOXER / MARLIN / FALCON / POLAR SERIES USER MANUAL
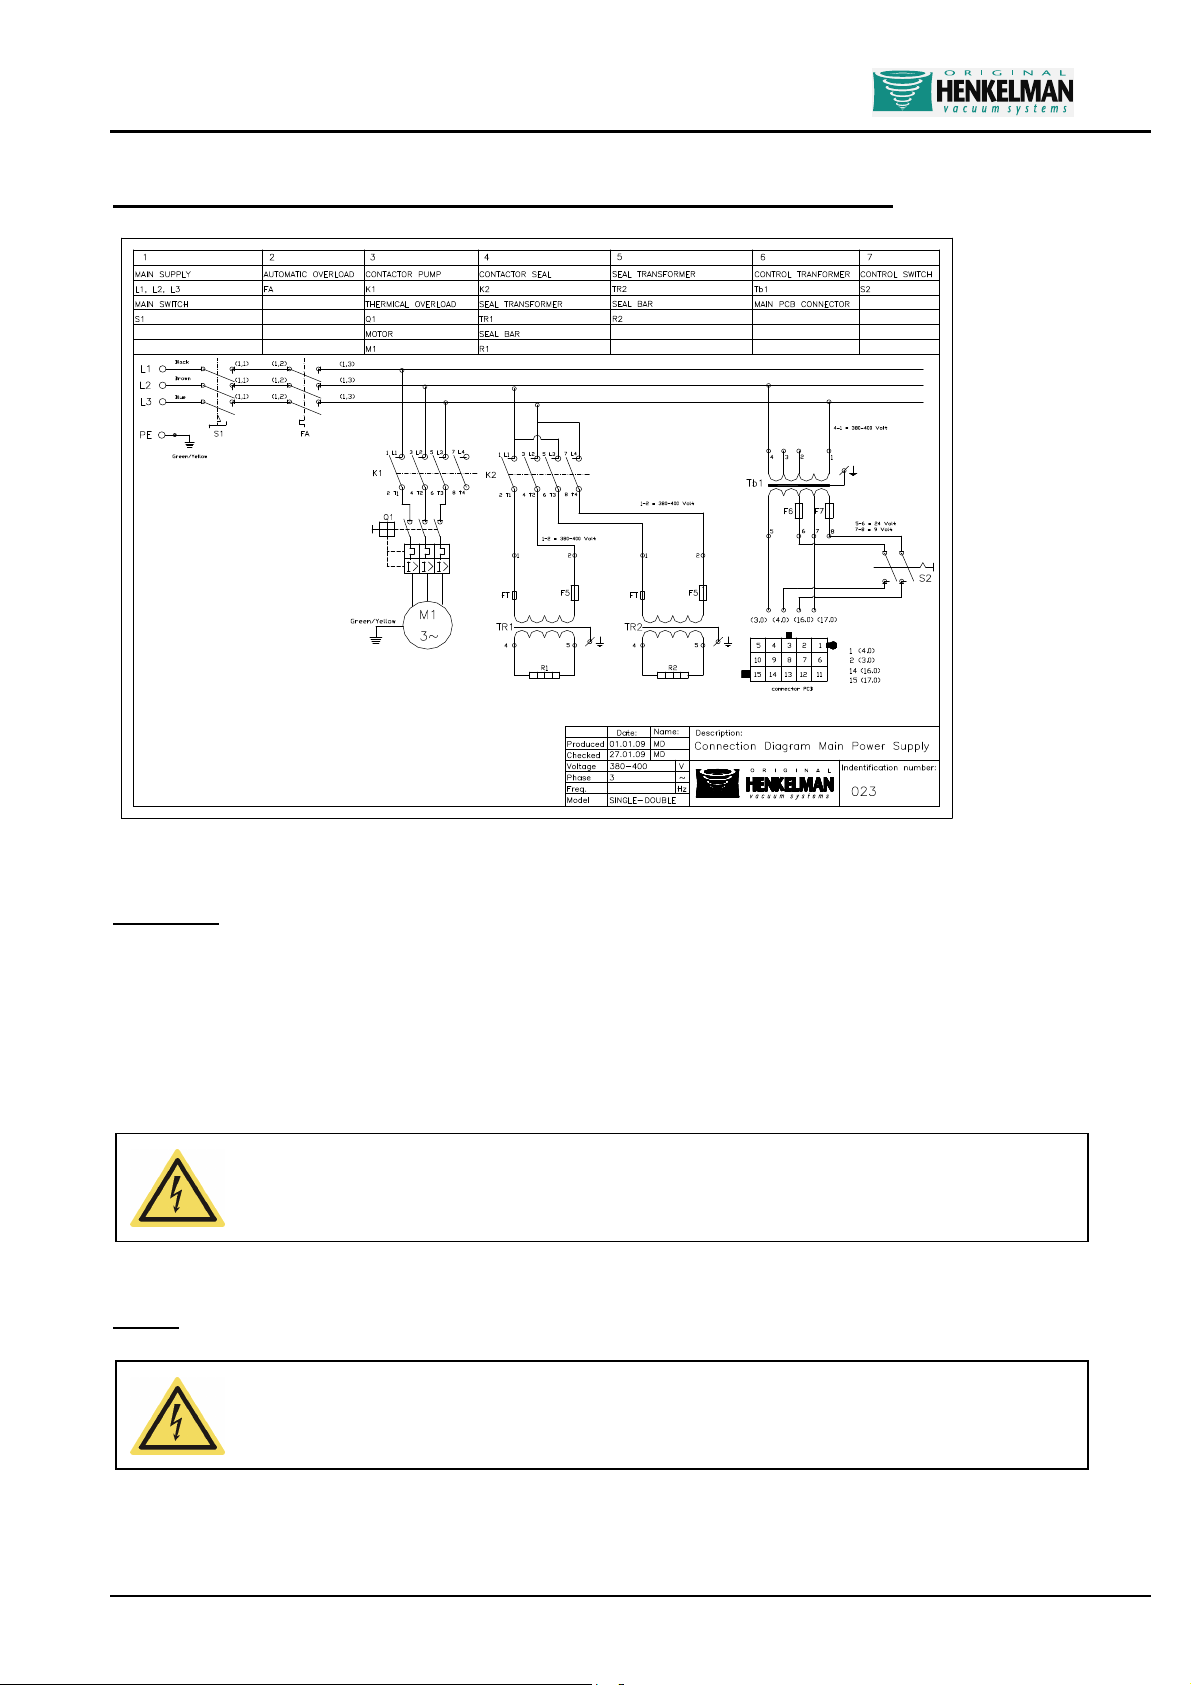
Main Circuit Diagram MARLIN 46-52-90/FALCON 2-60/2-70 / POLAR 2-40/2-50/2-75/2-85/2-95
Diagrams are shown for standard configurations.
List of fuses
Fuses are located where the power enters the component board
Fuses are located on transformers (control and seal)
Two fuses are placed on the control circuit.
Due to different mains voltages and machine models there is a variety of fuse types that can be present in the machine. Refer to
the specifications of the relevant component for the correct types and values of fuses for replacement, or contact your supplier.
Caution, to avoid fire and/or other irreparable damage to the machine, replacement fuses must always be
of the same type with the same value as the fuses being replaced!!
Voltage
Caution, the maximum allowable voltage fluctuation is ± 10% of the official voltage stated on the machine
tag.
Version 11.10 DIG.EN 35

BOXER / MARLIN / FALCON / POLAR SERIES USER MANUAL
ERROR CODES
The controls are programmed with a number of error codes. These error codes are intended to give the user / dealer a clear
indication of what the possible cause might be why starting or packaging is not working as expected.
F1: This code indicates that the cycle (cover switch) will be interrupted prematurely.
Example: the cover of the machine closes after starting, but before sufficient vacuum is present to keep the cover closed the
operator lets go of the cover. The F1 code will now be shown on the display.
In a time-controlled machine, the time for gassing is set in such a way that the entire chamber is gassed and the cover opened
without sealing taking place. Here too the F1 code will immediately be shown on the display.
This message will never be shown directly after the controls are started, but during the course of the cycle.
F2: This code indicates that the sensor is not working properly.
When the controls are started, the condition of the sensor is checked. If the feedback data of the sensor are not correct, F2 is
shown on the display. This message will be shown directly after the sensor controls are started.
RP-: This message will be shown when, due to circumstances, the controls are unable to retrieve the programme values.
The word ‘circumstances’ means peak tensions or a tension drop during starting. When such a situation occurs, the print will start
with this message and go no further. Two options exist now: the machine can be switched off and on again to see if the problem
repeats itself or the reprog key can be pressed. By operating the reprog key, the controls will use the factory settings to start. The
programme values set by the client will be cancelled as a result.
This message will be shown directly after the controls are started.
If one or more of the above messages occur regularly, we advise you to contact your supplier.
Version 11.10 DIG.EN 36

BOXER / MARLIN / FALCON / POLAR SERIES USER MANUAL
PNEUMATIC DIAGRAMS
BOXER series / MARLIN series
FALCON series / POLAR series
Diagrams are shown for standard configurations.
Version 11.10 DIG.EN 37

BOXER / MARLIN / FALCON / POLAR SERIES USER MANUAL
PROBLEM SOLVING
PROBLEM
Machine does not
work
Machine does not
work
Control panel is on
Transparent lid does
not open
automatically
Final vacuum is
insufficient
CAUSE
· The plug is not plugged into the wall
socket.
· The main fuse is burnt.
· The circuit board fuse is burnt.
· The control transformer fuse is burnt.
· The micro switch which is activated when
the lid is closed needs adjustment or is
faulty.
·
There is an internal malfunction.
·
The gas spring is faulty
· The set vacuum time is too short.
· There is too little oil in the vacuum pump.
· The extraction hole at the back of the
vacuum chamber is partially covered by
the vacuum bag during vacuuming.
· The lid gasket is worn.
· The oil is contaminated.
·
The oil exhaust filter is saturated.
SOLUTION
·
Plug the plug into the wall socket.
· Replace the fuse (Ensure the correct
value).
· Disassemble the front panel and replace
the fuse.
· Check this and if necessary replace it.
· The micro switch must be properly
adjusted or replaced
· Consult supplier.
·
Consult the supplier.
· Extend the vacuum time.
·
Check the oil level and fill up if necessary
(Note the type and quantity).
· Place the vacuum bag closer to the
sealing bar.
· Replace the lid gasket.
· Replace the oil (Note the type & amount).
· Replace the oil exhaust filter / Consult
the supplier.
.
The machine builds
up a vacuum slowly
· The pump’s extraction filter is blocked.
·
The oil exhaust filter is saturated.
· Consult the supplier.
· Replace the oil exhaust filter / Consult
the supplier.
Version 11.10 DIG.EN 38

BOXER / MARLIN / FALCON / POLAR SERIES USER MANUAL
PROBLEM
The vacuum bag is
not properly and/or
correctly sealed.
· The vacuum bag is being placed
correctly on the sealing bar.
· The sealing time is too long or too short.
· The silicone rubber in on the silicone
holder is damaged or worn.
· The teflon tape is damaged.
· The inside of the vacuum bag opening is
contaminated.
· There is too much gas in the package.
CAUSE
·
Place the vacuum bag neatly and
smoothly on the sealing bar. Ensure that
the opening of the bag is always within
the vacuum chamber.
· Adjust the sealing time longer or shorter.
· Replace the silicone rubber.
· Replace the teflon tape
· Clean the vacuum bag’s opening.
· Check this by setting the gas function to
the OFF position.
The amount of gas in
the vacuum bag is
insufficient (optional).
· The gas bottle is empty or nearly empty.
· The gas bottle is still closed.
· Gas flush time is too long or too short.
·
The gas flush pressure is incorrectly set.
·
Replace the gas bottle.
·
Check if the valve on the gas bottle is
closed. If so, open it.
· Shorten or extend the gas flush time.
· Check if the manometer or the secondary
pressure of the gas is set to 1
atmosphere (1-ATO).
WARNING! The pressure of the gas mixture
may never be more than 1 atmosphere/ATO.
In the case of other problems or questions contact the supplier or Henkelman BV.
SOLUTION
Version 11.10 DIG.EN 39

BOXER / MARLIN / FALCON / POLAR SERIES USER MANUAL
Program
0** 1 2 3 4 5 6 7 8 9
Program
0** 1 2 3 4 5 6 7 8 9
Program
0 1 2 3 4 5 6 7 8 9
Gas flush time*
DIGITAL TIME CONTROL FACTORY SETTINGS
Vacuum time
Gas flush time*
Sealing time
Soft-air time*
* Only applicable if the machine is equipped with the options in question.
If the machine is not equipped with the gas flush system and/or soft air ventilation then these options will not be available
on the control panel.
** Program 0 cannot be modified
30 25 20 15 10 30 25 20 20 15
OFF OFF OFF OFF OFF 5 5 10 15 15
2.5 2.5 2.5 2.5 2.5 2.5 2.5 2.5 2.5 2.5
3 3 2 2 2 OFF OFF
DIGITAL SENSOR CONTROL FACTORY SETTINGS
Final vacuum pressure %
Vacuum plus time
Final vacuum pressure %
after gas flush*
Sealing time
Soft-air time*
99 90 99 99 99 80 90 50 90 60
15 OFF 15 10 10 OFF OFF OFF OFF OFF
OFF OFF 80 70 60 50 80 OFF 80 30
2.5 2.5 2.5 2.5 2.5 2.5 2.5 2.5 2.5 2.5
3 3 2 2 2 OFF OFF 2 OFF
2 OFF OFF
OFF
* Only applicable if the machine is equipped with the options in question.
If the machine is not equipped with the gassing system and/or soft air ventilating then these options will not be available
on the operating panel.
** Program 0 cannot be modified
CUSTOMER SETTINGS TO BE FILLED IN
Vacuum time
Final vacuum pressure %
Vacuum plus time
Final vacuum pressure %
after gassing*
Sealing time*
Soft-air time*
99
15
OFF
2.5
3
Version 11.10 DIG.EN 40

BOXER / MARLIN / FALCON / POLAR SERIES USER MANUAL
Vacuum pressure
1000
800 600 400 200 100 50 20 10 5 2 Boiling Point
7
REMARKS ON SPECIAL APPLICATIONS
MACHINE WITH GAS FLUSH SYSTEM (if applicable)
If the machine is equipped with the gassing system then the following remarks are important :
NEVER USE GAS MIXTURES WITH MORE THAN 20% OXYGEN AND OR OTHER EXPLOSIVE GASSES. THIS COULD
CAUSE FATAL EXPLOSIONS.
NEVER USE SEPARATE GAS BOTTLES WITH A MIXER WHEREBY ONE OF THE BOTTLES IS ONLY FILLED WITH
OXYGEN. MALFUNCTIONING OF THE MIXER OR IF THE OTHER BOTTLE WERE TO BE EMPTY COULD CAUSE FATAL
EXPLOSIONS.
All guarantees and/or liability expire in the case of accidents and/or damage caused by using oxygen or other explosive gasses.
The maximum gas pressure that can be set in the packaging is 35% (-0.35 bar on the vacuum meter). This means that there is
65% gas and 35% vacuum (under pressure) in the packaging. If a higher gas pressure results in insufficient seal quality contact
the supplier or Henkelman BV for more information about connecting external seal pressure.
Henkelman recommends checking the pressure and amount of gas in the gas bottles regularly. Ensure that the gas bottle(s)
is(are) correctly anchored. Always turn off the main cock on the gas bottle if the machine is not in operation or if the gas flush
function is not active.
PACKAGING LIQUID PRODUCTS
The machines can be also used for packaging liquid products like soups or sauces. In this process the vacuum process must be
carefully monitored (only possible with transparent lid or lid with inspection window). The [STOP VACUUM] key must be pressed
as soon as bubbles appear in the product; the saturation point (same as boiling point) has then been reached.
Settings for programs for packaging liquid products can best be programmed using automatic programming (see page 19-20).
The saturation point of liquids is reached at a certain ratio line of low pressures and high temperatures (see the example table for
water below). The saturation point will be reached sooner in the vacuum process when packaging liquids with a high temperature
(the amount of vacuum will therefore be less).
Henkelman recommends therefore to first cool liquid products before packaging. In this way an optimal vacuum of the product
can be achieved.
Saturation point of water – relation between the pressure and temperature of the water
[mbar]
Temperature [°C]
A handy tip when packaging liquid products is to use a liquid insert plate so that the product remains at the bottom of the
packaging during the vacuuming process and there is less risk of liquid splashing out of the packaging. Contact the supplier or
Henkelman BV for more information about the liquid insert plate.
Version 11.10 DIG.EN 41
100 94
86
76
60
45 33 18
-2
-13

BOXER / MARLIN / FALCON / POLAR SERIES USER MANUAL
EXTERNAL VACUUMING OF FOOD CONTAINERS (if applicable)
The BOXER and MARLIN series can be equipped with an option for externally vacuuming special food containers. This system
can vacuum special containers for longer storage life of the (food) products in the dish. The container has a special lid with valve.
Contact the supplier or Henkelman BV for more information about the containers. The system for the machine consists of a hose
with vacuum applicator.
Operation External Vacuuming Food Containers
1. Start the machine
2. Place the hose connector over the extraction opening of the vacuum chamber of the machine
5. Place the vacuum applicator over the valve of the container and slide the sliding valve towards the lid to open the valve.
6.
7. When the vacuum meter reaches –1 then the container is fully vacuumed.
8. Press the – Key to stop the vacuum pump
9. The vacuum applicator can now be removed from the lid by sliding back the sliding valve.
10. The container is now ready for storage and/or stock.
11. If the machine needs to be used for normal applications then the hose can be removed from the extraction opening and the
required program chosen using the PROG 0-9 Key.
3. Check that the sliding valve on the vacuum
applicator is on the side of the hose (closed
position).
4.
Press the PROG 0-9 Key until [E] (External Vacuuming) appears on
the small display.
Pres the + Key. The vacuum pump starts to run and the container is vacuumed.
Version 11.10 DIG.EN 42

BOXER / MARLIN / FALCON / POLAR SERIES USER MANUAL
EEC DECLARATION OF CONFIRMITY
Concept of an EEC Declaration of Conformity
Henkelman B.V.
Titaniumlaan 10
5221 CK ’s-Hertogenbosch
Netherlands
Declare that the machine complies
with the machine directive 2006/42/EC, the low voltage
directive 2006/95/EEG and the EMC-directive
2004/108/EG.
Machine-Type:
Machine number:
Year of construction of the machine:
The machine and the belonging documentation is in accordance
with the following standards or other normative documents.
NEN-EN 60204-1, NEN-EN IEC 61558-1,
NEN/ EN IEC 61558-2-6
NEN 5509, NEN-EN –ISO 12100-1
NEN-EN-ISO 12100-2, NEN-EN-ISO 13732-1,
NEN-EN-ISO 13857, RoHS 2002-95-EG
If modifications are made to this machine without written
permission, these modifications fall entirely outside our
responsibility and this declaration will be considered
dissolved.
’s-Hertogenbosch,
S.C.H. Fliervoet-Maas
Version 11.10 DIG.EN 43

BOXER / MARLIN / FALCON / POLAR SERIES USER MANUAL
MAINTENANCE SCHEDULE / NOTES
Date
Company
Operations/
Maintenance
Remarks
Version 11.10 DIG.EN 44

BOXER / MARLIN / FALCON / POLAR SERIES USER MANUAL
REMOVAL TOOLS FRONT PANEL
With every machine we enclose two special tools to remove the front panel.
You can slide the tools into the slots at the bottom side of the front panel.
Lift them a little and pull them towards you.
Version 11.10 DIG.EN 45
 Loading...