

Page 1
Instruction Manual and User Guide
Page 2
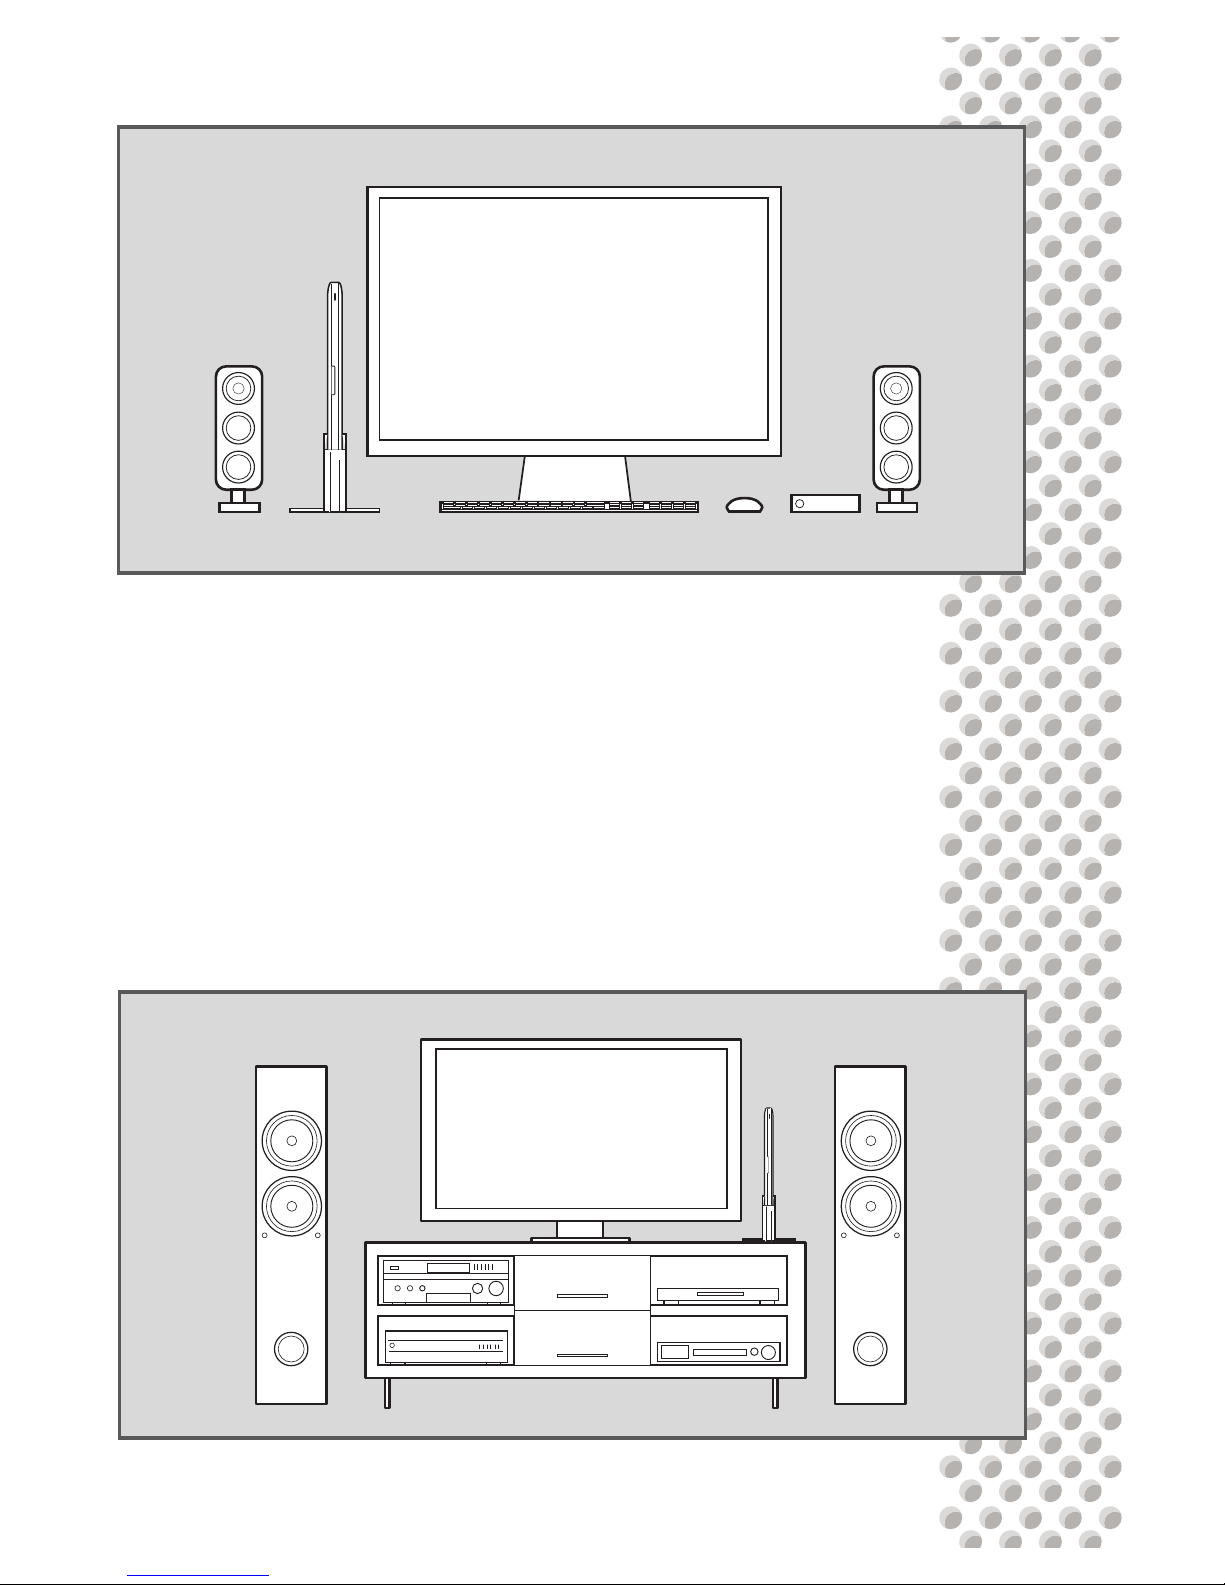
Whether you want to clean up your desktop or integrate
your MacBook into your home theater system, Henge
Docks has you covered. We’ve designed the Henge Dock
system to be as exible as possible, allowing you to
choose only the connections you need, making docking
and undocking your MacBook as smooth as possible.
For more information email [email protected] or
visit our Support Page at www.HengeDocks.com
Page 3
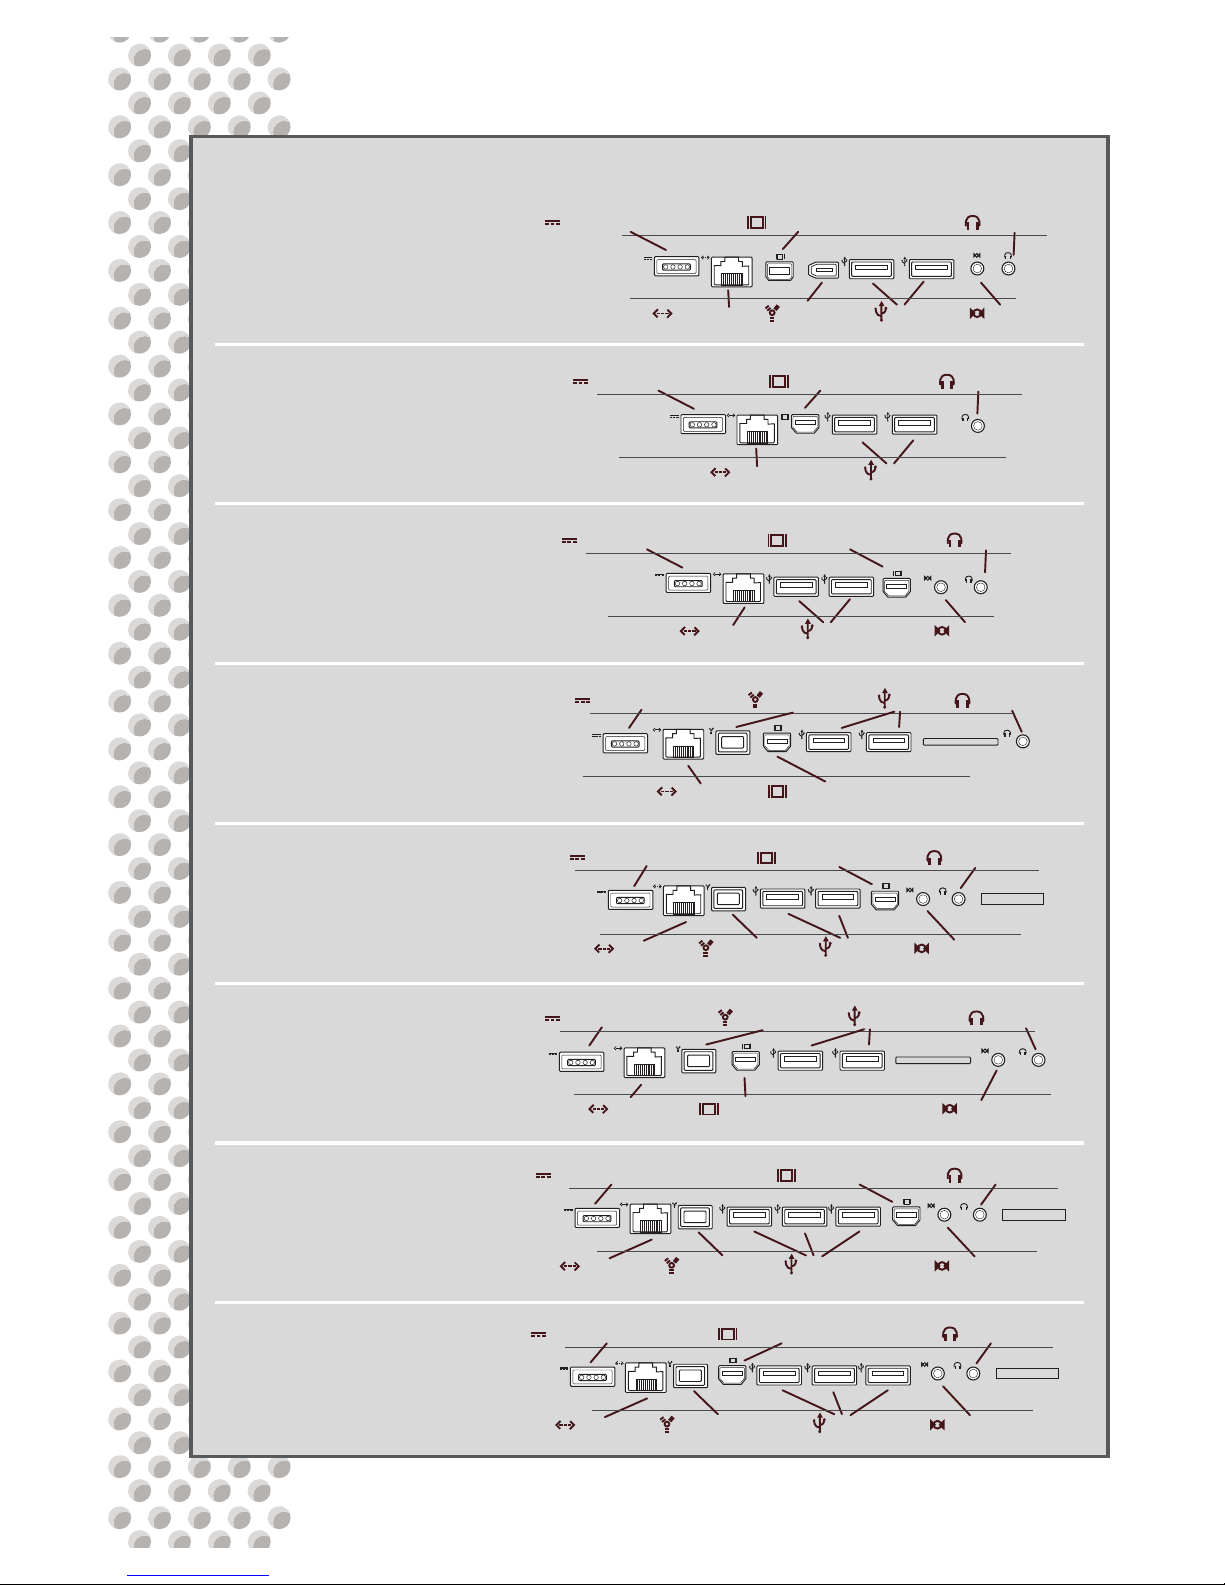
15-inch MacBook Pro, Version A
Model Number - HD01VA15MBP
(Late 2008 to Mid 2009)
15-inch MacBook Pro, Version B
Model Number - HD01VB15MBP
(Mid 2009 to Current)
17-inch MacBook Pro
Model Number - HD01VB17MBP
(Mid 2010 to Current)
17-inch MacBook Pro, Version A
Model Number - HD01VA17MBP
(Early 2009 to Mid 2009)
Audio Out
USB
MagSafe Power Port
Ethernet
Mini DisplayPort
Audio InFireWire
Audio OutMagSafe Power Port Mini DVI
USB
Ethernet
Audio In
Audio Out
USB
MagSafe Power Port
Ethernet
Mini DisplayPort
FireWire 800
Mini DisplayPort
Audio Out
USB
Ethernet
MagSafe Power Port
FireWire 800
Mini DisplayPort
Audio Out
USB
Ethernet
MagSafe Power Port
Audio In
FireWire 800
Audio In
Audio Out
USB
MagSafe Power Port
Ethernet
Mini DisplayPort
FireWire 800
Audio In
Audio Out
USB
MagSafe Power Port
Ethernet
Mini DisplayPort
FireWire 800
Audio In
Audio Out
USB
MagSafe Power Port
Ethernet
Mini DisplayPort
13-inch MacBook
HD01VA13MB
(Late 2008 to Mid 2009)
13-inch MacBook Pro
HD01VA13MBP
(Mid 2009 to Current)
MacBook, Plastic, Version A
HD01VAMB
(Early 2006 to Mid 2009)
MacBook, Plastic, Version B
HD01VBMB
(Mid 2009 to Current)
Port Layouts by Model
Page 4
13-inch MacBook Pro
HD01VA13MBP
(Mid 2009 to
Current)
13-inch MacBook
HD01VA13MB
(Late 2008 to
Mid 2009)
MacBook
HD01VAMB
(Early 2006 to
Mid 2009)
MacBook
HD01VBMB
(Mid 2009 to
Current)
2x
3x 3x 3x 3x 3x 3x3x 3x
2x
2x 2x 2x 2x 3x 3x
2x
2x
2x 1x 2x 2x 2x 2x
1x
1x
1x 1x 1x 1x 1x 1x
1x
1x 1x 1x 1x 1x 1x
nana
na
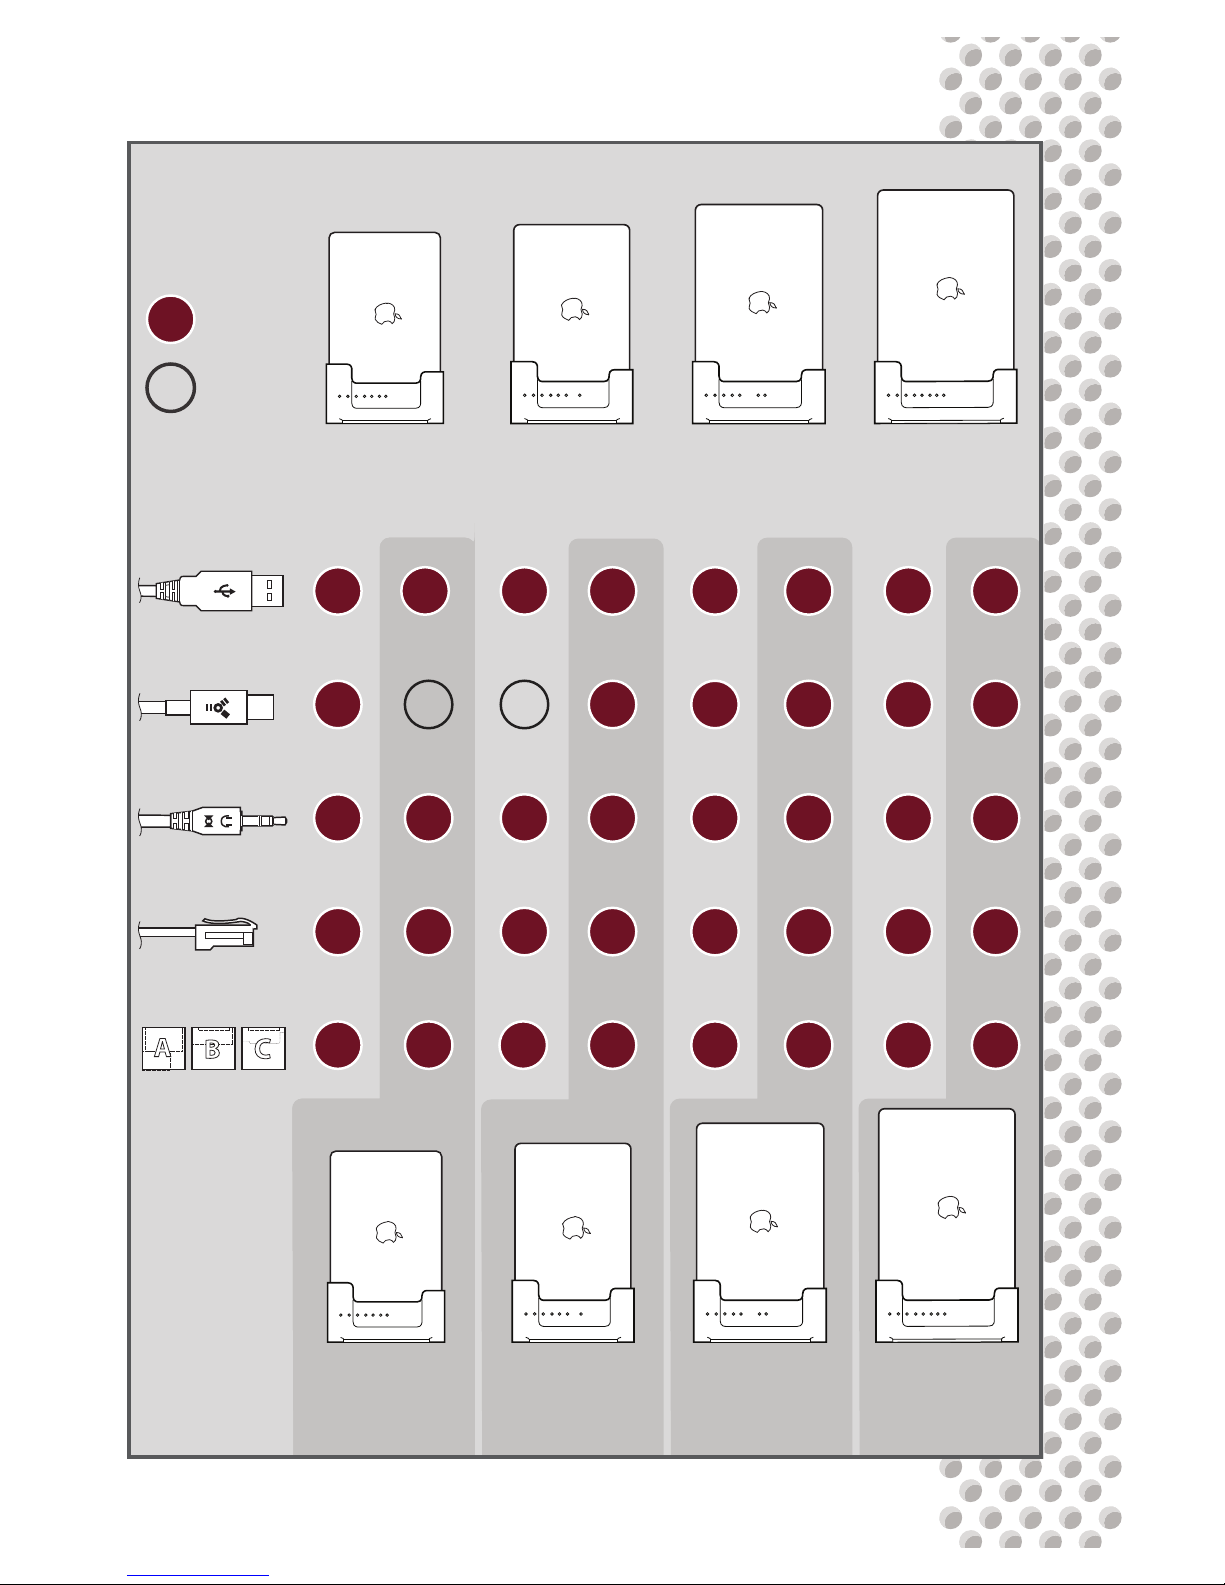
Quantity
Included
Not
Applicable
Icon Chart Key
Included Hardware Chart by Model
15-inch MacBook Pro
HD01VA15MBP
(Late 2008 to
Mid 2009)
15-inch MacBook Pro
HD01VB15MBP
(Mid 2009 to
Current)
17-inch MacBook Pro
HD01VB17MBP
(Mid 2010 to
Current)
17-inch MacBook Pro
HD01VA17MBP
(Early 2009 to
Mid 2009)
Ethernet Cable
Audio In / Out Cable
FireWire Cable
USB 2.0 Cable
MagSafe Adapter Tool
Page 5
X
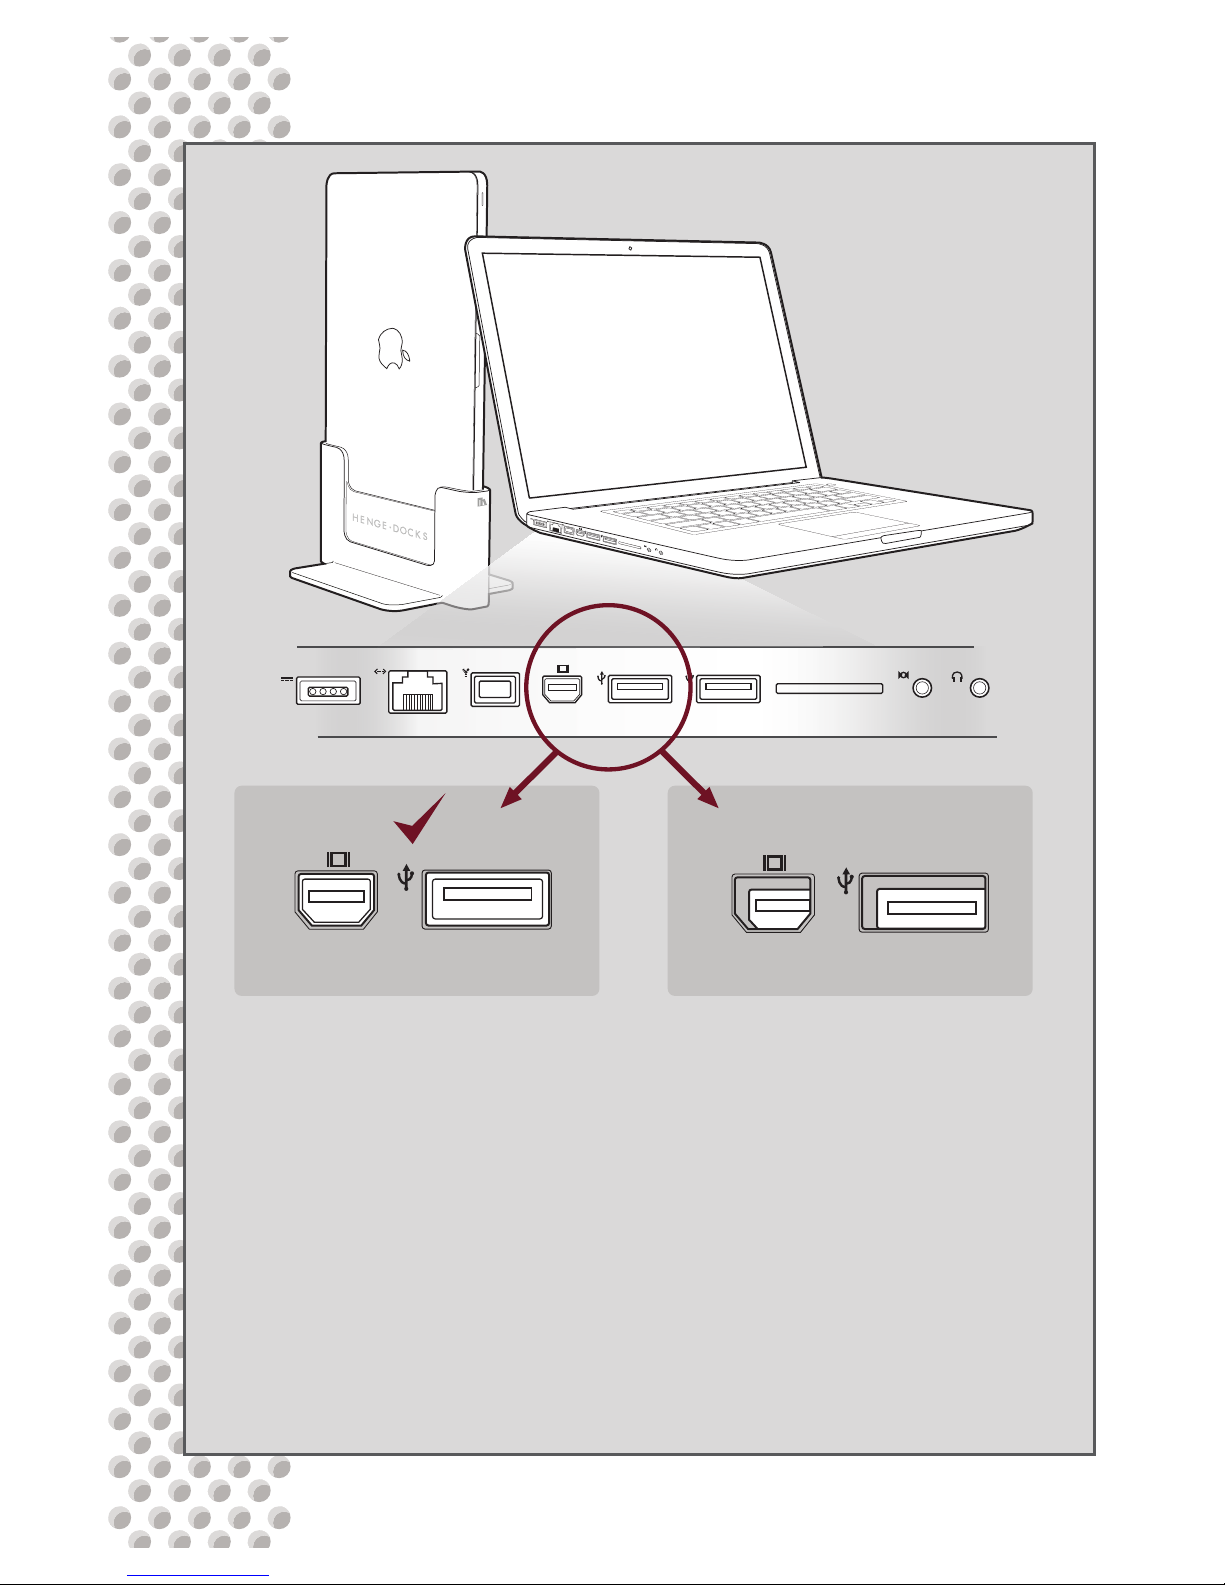
Internal Port Alignment Notice
Mini DisplayPort
USB
Mini DisplayPort
USB
Sample Port Layout
Proper Internal Port Alignment Example of Internal Port Misalignment
Apple’s line of MacBook computers are designed with ports
positioned behind voids in the outer case of the computer for
durability and aesthetic purposes. The ports are mounted inside
of the case and can become misaligned to their corresponding
voids through damage during use or manufacturing variances.
While rare, major internal misalignment of the MacBook’s ports
can cause the connections to bind when used with a Henge
Dock, leading to further alignment issues or damage. Henge
Docks recommends that users repair and resolve any internal port
alignment issues before attempting to setup their Henge Dock.
Page 6
!
X
!
!
!
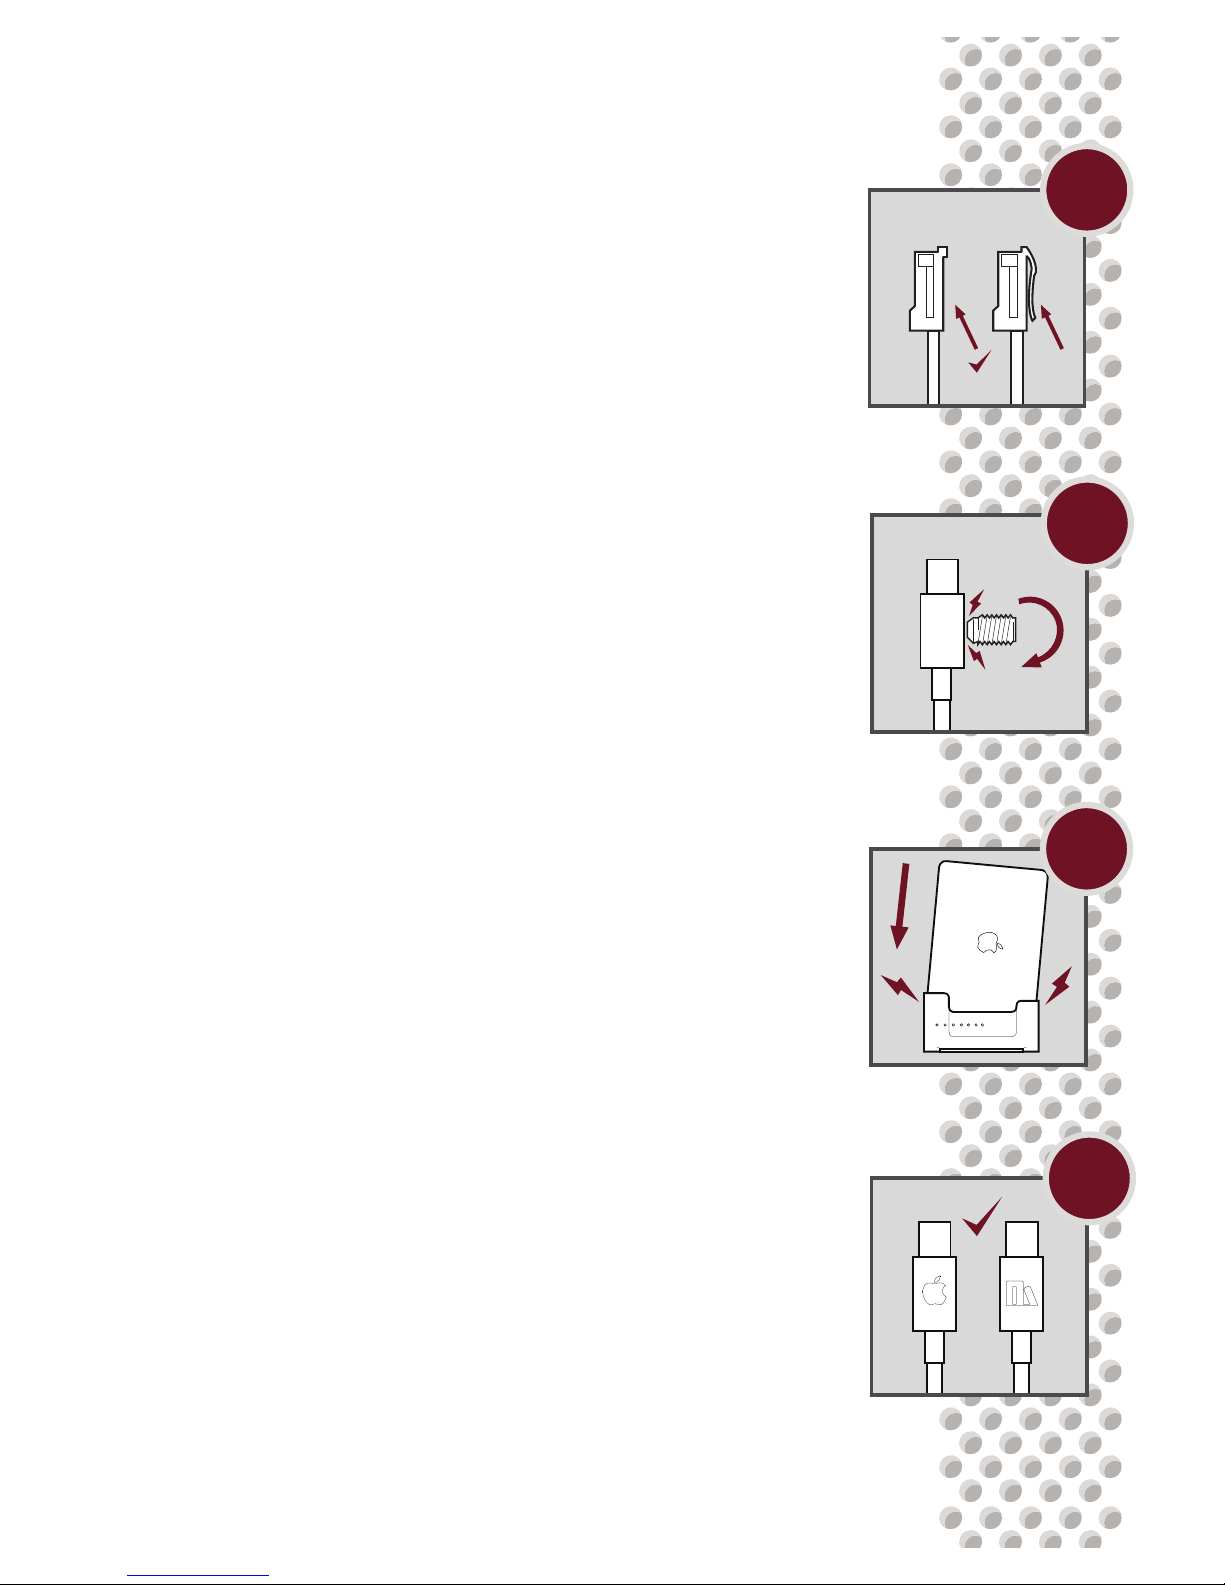
Do not install Ethernet cable heads tted with a
locking tab into the dock. Use only the tabless
head of the included Ethernet cable. Installing
a cable head with a locking tab into the dock
could result in port damage.
All cable heads installed into this Henge Docks
unit will be marked by the set screw during
installation, leaving a light cosmetic indentation
on the surface of the connector.
Make sure your grip on the computer is secure
before docking and undocking. Dropping the
MacBook can damage the ports and dock
connectors. Never force the computer onto the
dock.
Install only original Henge Docks and Apple
sourced accessories into the dock body.
Third party cables and accessories may not
t properly in the dock, possibly leading to
damaged ports.
Page 7
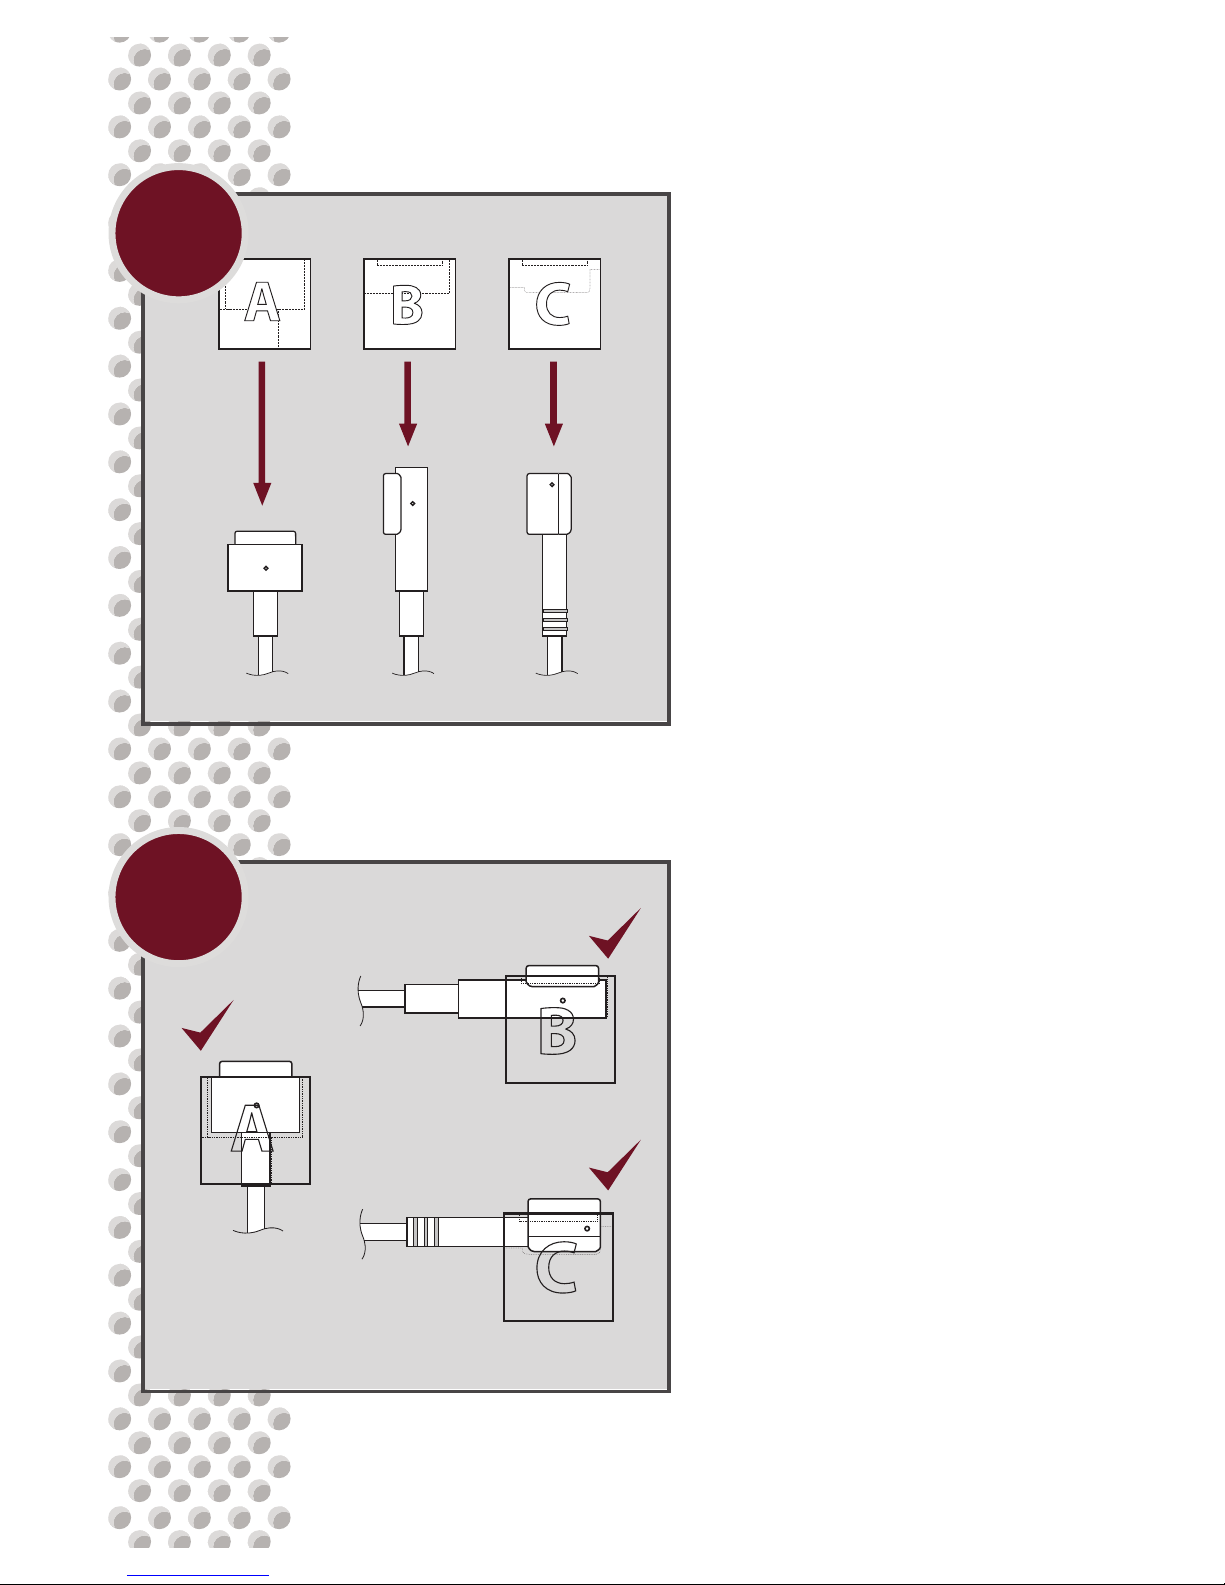
Select the correct MagSafe
Adapter Tool for your type of
power supply. Square style
MagSafe connectors use style
A. Cylindrical style MagSafe
connectors included with
current MacBooks use style B.
MagSafe connectors included
with Apple Cinema Displays use
style C.
Clip the selected MagSafe
Adapter Tool around the
MagSafe connector head as
shown.
A
B
Page 8
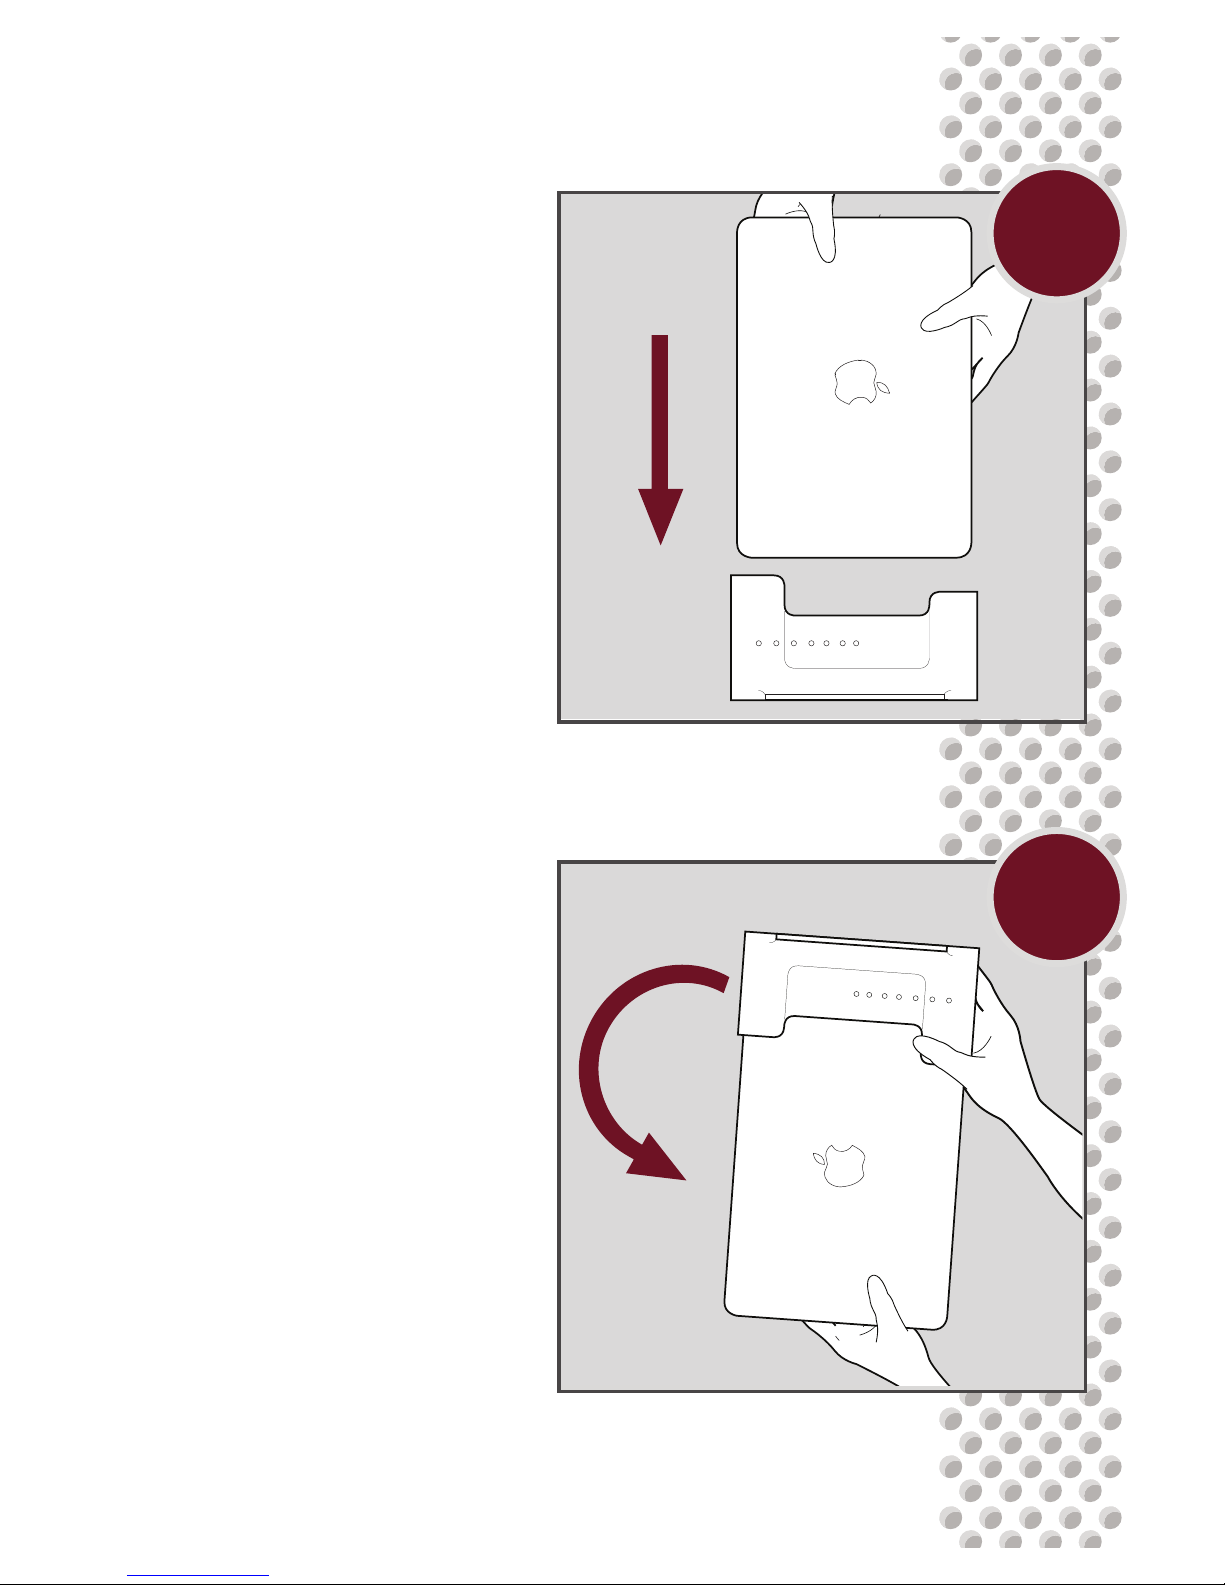
While seated, carefully pick
up the dock and MacBook as
one unit and ip them over
into your lap. The ports on the
computer should be visible
through the bottom of the dock
and lined up with their corresponding voids in the dock.
D
C
Place the MacBook into the
empty dock, port side facing
down.
Page 9
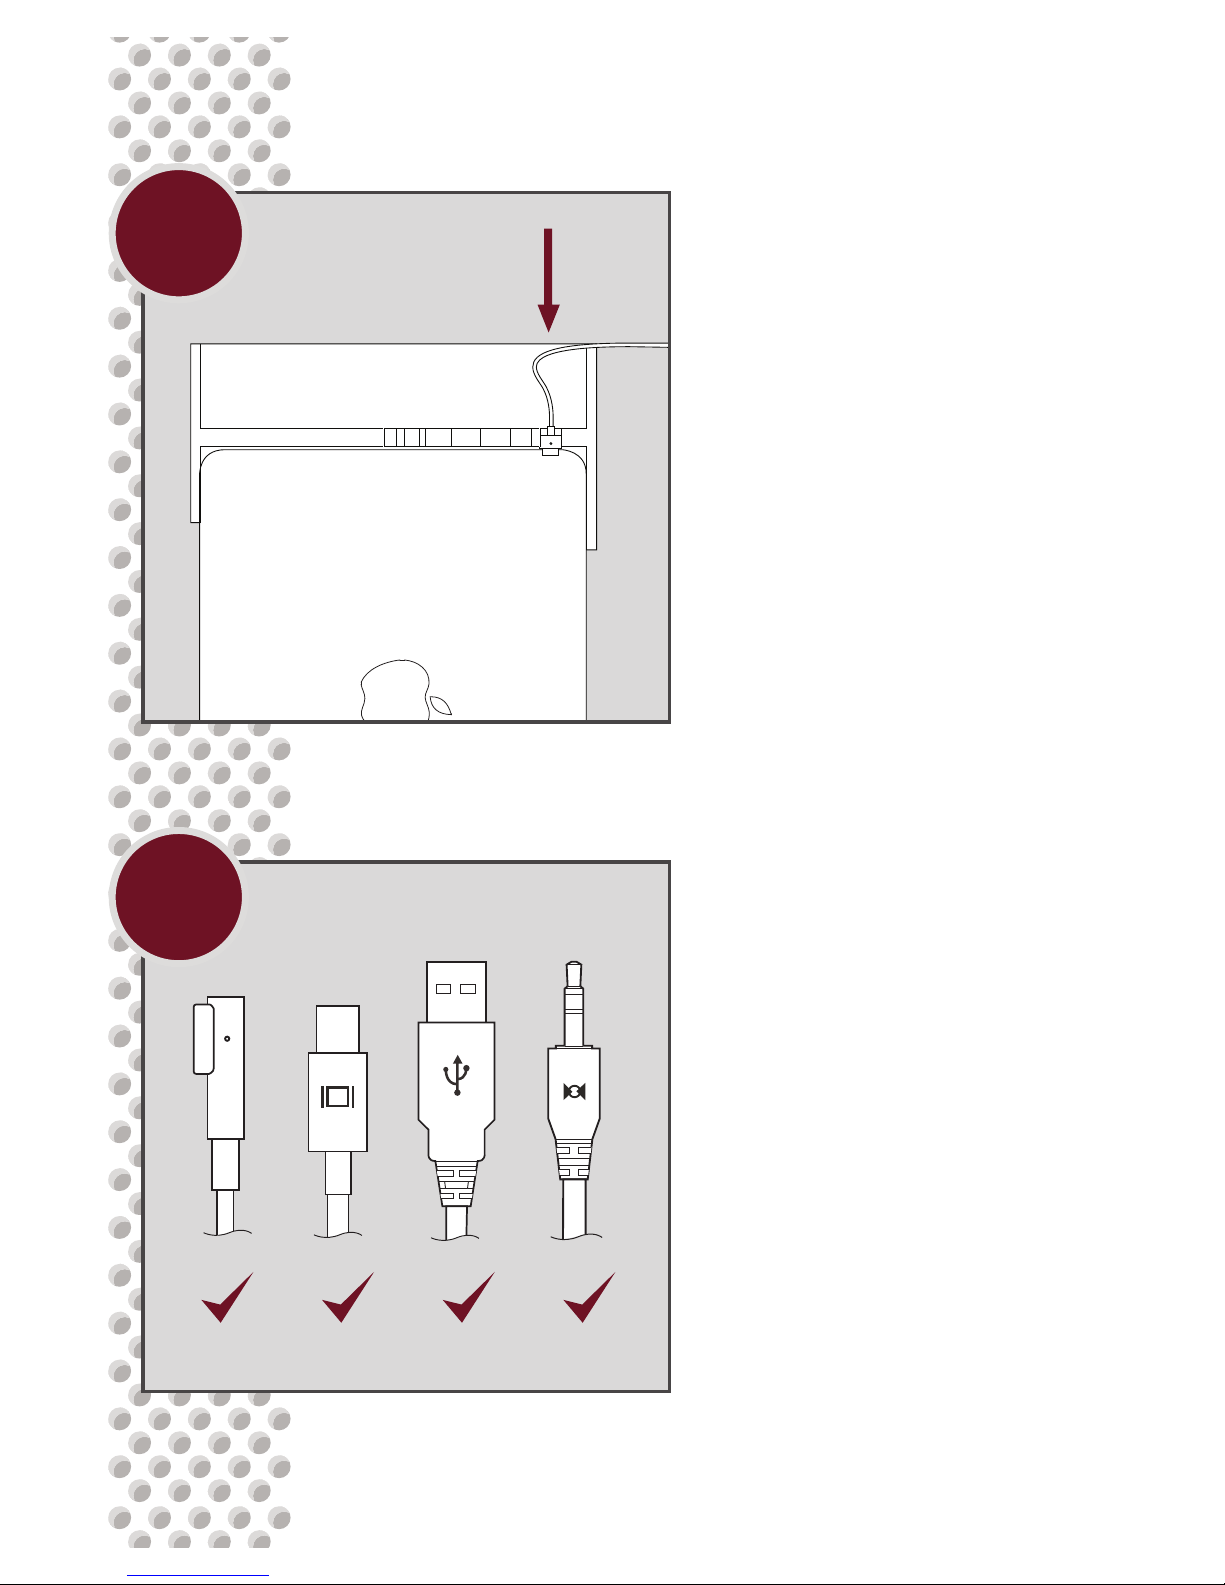
To ensure proper port alignment
all users must install at least
one included USB cable into
the dock even if no peripherals
will be attached.
Henge Docks recommends that
15-inch and 17-inch MacBook
Pro users also install the Line
In, Line Out or both Audio
Cables to prevent port binding.
With the computer and dock
inverted, select the MagSafe
connector and the Mini Display
Port plug. Feed both through
the corresponding voids in the
dock, plugging them directly
into the computer.
E
F
Page 10
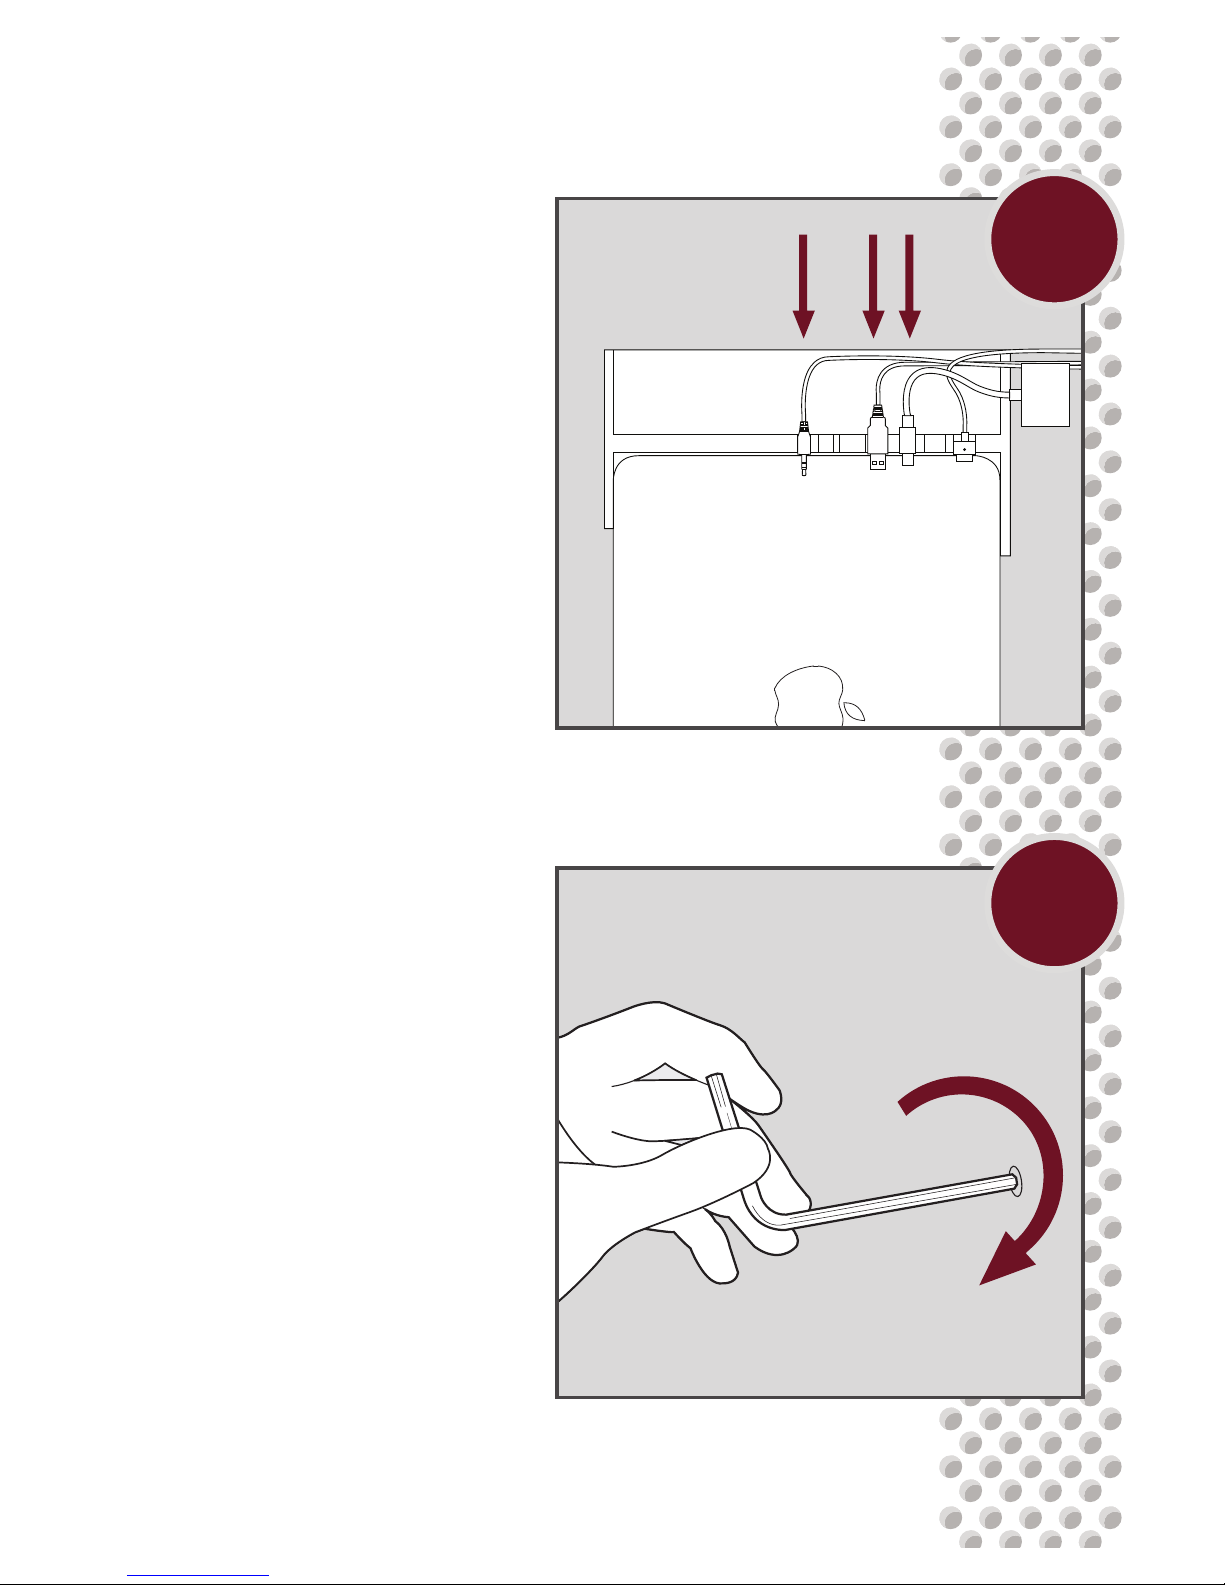
Using the included hex key,
insert and carefully tighten a
setscrew into each port being
installed. Very little effort is
required to secure the cable
head.
Over-tightening the setscrew
could damage the connec-
tor and cause port alignment
issues.
H
G
Select and install the other
desired connectors in the
same manner.
If installing the Ethernet cable,
locate the tabless end of the
cable for the setup process.
Page 11
- OR -
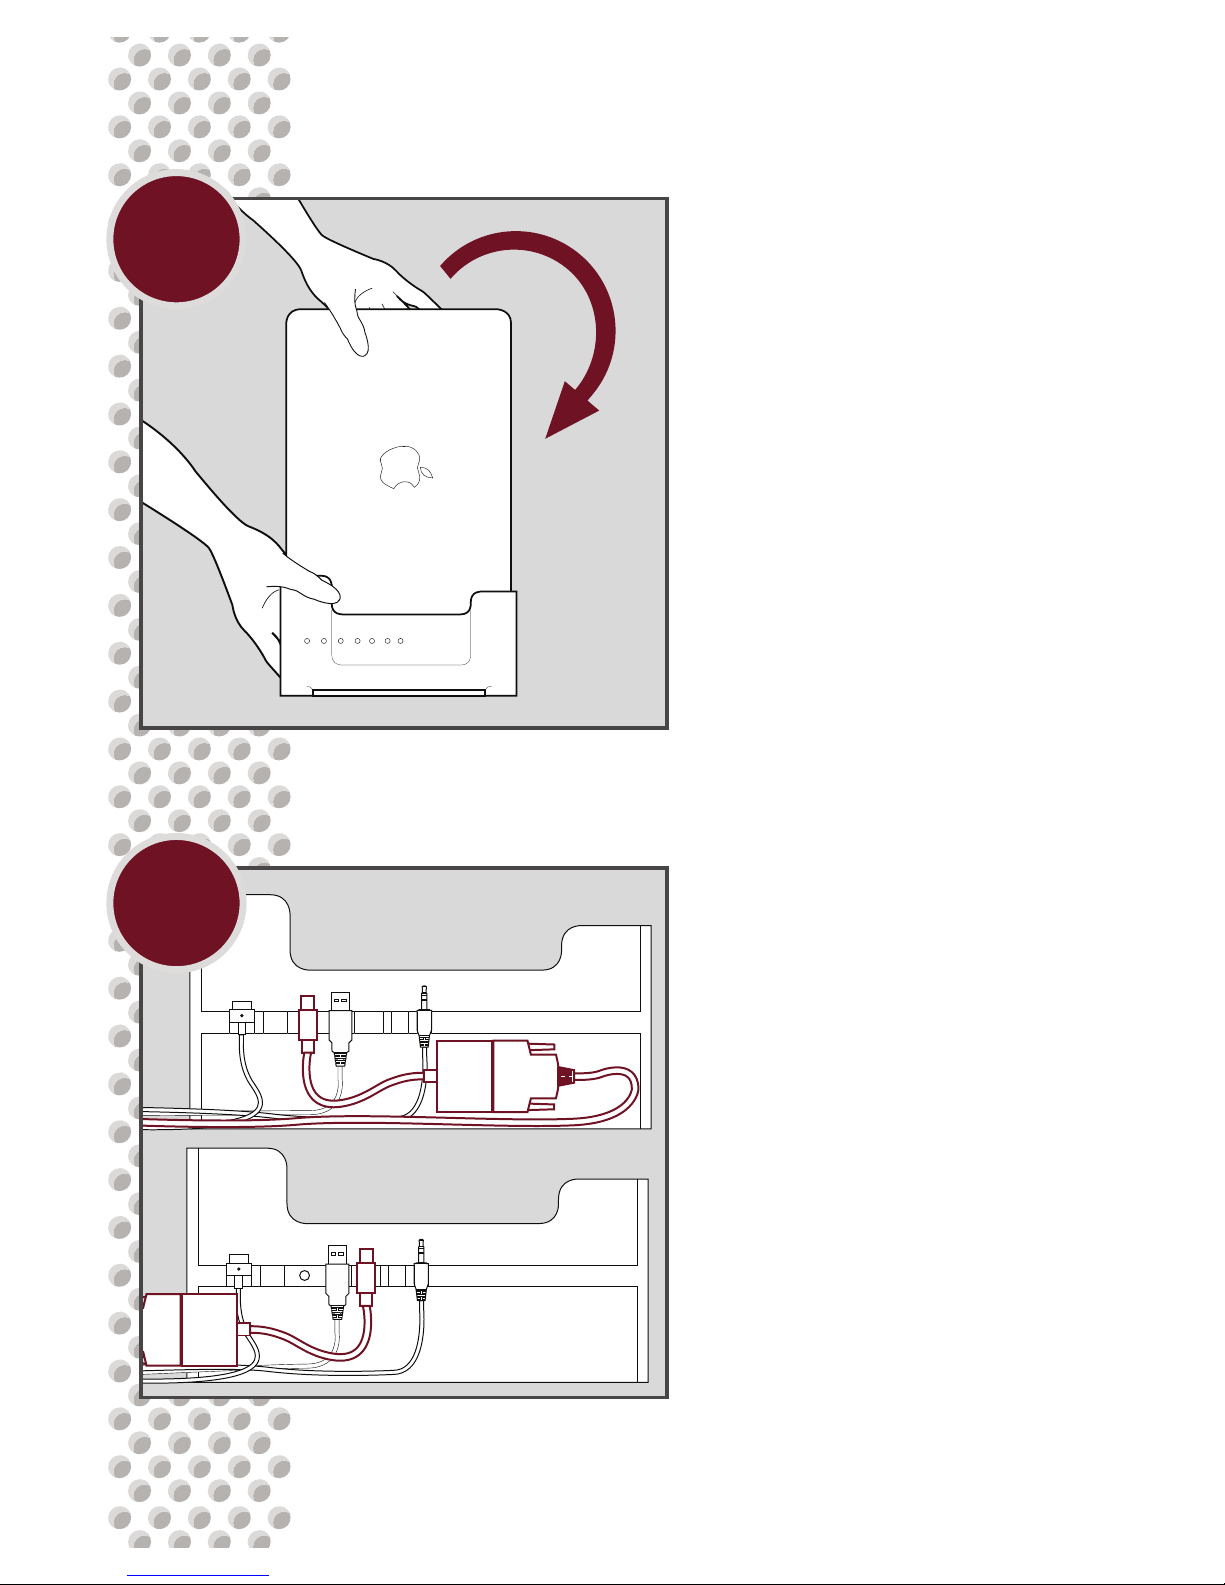
Carefully ip the computer and
dock back over, placing the
unit on a stable, at surface.
Gather the exiting cables into
the channel under the dock.
When using an Apple Mini
DisplayPort Adapter for an external display, route the cable
as shown. All Mini DisplayPort
Adapters made by Henge
Docks may simply be routed
out the rear of the dock.
I
J
Page 12
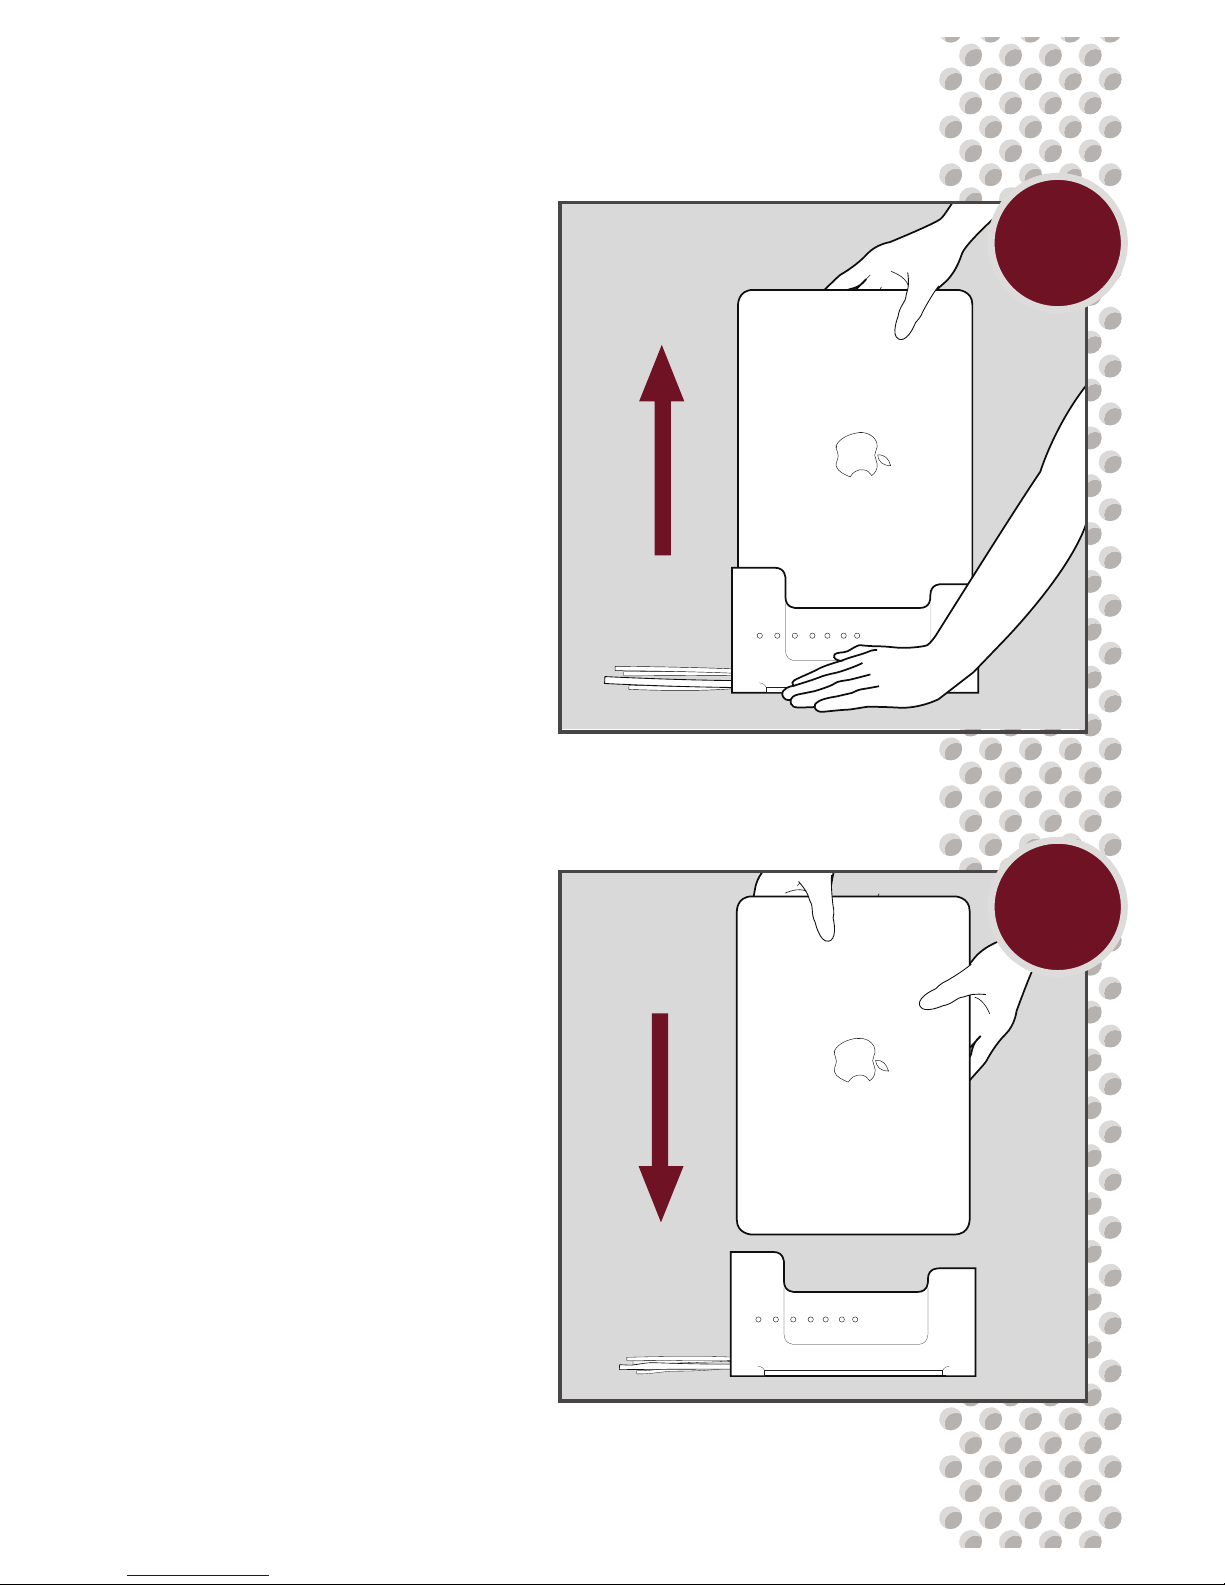
To place the computer in the
dock, gently lower the computer
vertically onto the connections.
No downward force is necessary.
The weight of the computer will
make all of the connections.
Dropping, forcing, walking or
wobbling the computer into the
dock could result in damage to
the ports.
L
K
To undock the computer, place
one hand at on the wing and
grasp the upper end of the
computer securely with the other
hand. Firmly pull the computer
vertically to disconnect the ports,
then remove the computer from
the dock with both hands.
Never walk or rock the MacBook
out of the dock!
Page 13
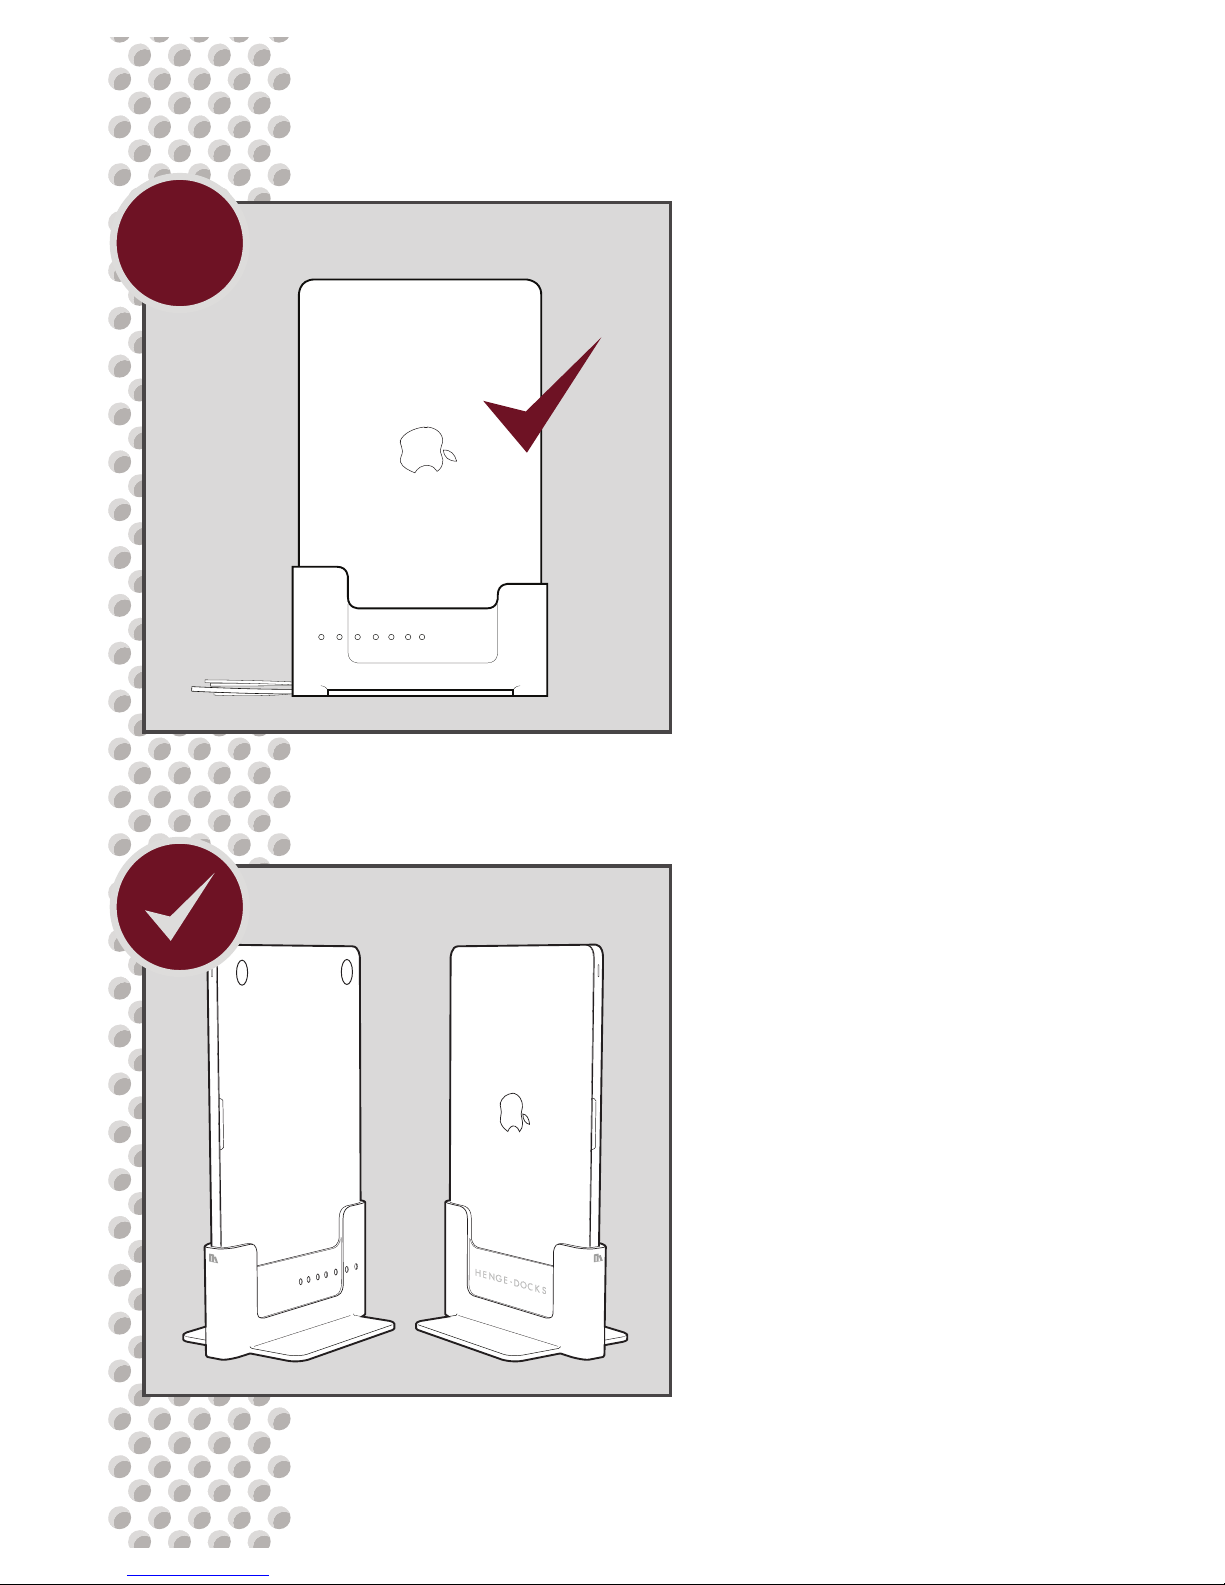
Docking the computer should
be effortless. If any resistance
is encountered remove and
reinstall any connections that
may be binding by repeating
steps D through H.
M
Congratulations, your Henge
Docks setup is complete!
Page 14

For all sleep/wake issues -
All MacBook computers must be connected to a power source,
external display, external keyboard and mouse to run in the closed
position. Most sleep to wake issues can be resolved by simply
repositioning the MagSafe connector in the dock before waking the
computer.
If the problem persists remove all of the connections from the dock
and reconnect them to the computer in the same conguration,
without the dock. With the MacBook still closed, attempt to wake
the computer again. If the computer wakes and runs one or more
connections was not properly seated in the dock.
If the computer will still not wake properly, remove the cables
supplied by Henge Docks and connect the peripherals directly to
computer. If the MacBook still fails to wake the issue is independent
of the docking system, seek service help for your computer.
Mini DisplayPort adapter positioning -
Due to the short length of the Apple Mini DisplayPort adapters the
female end must be placed under the dock body with limited space.
The best solution is to purchase the dock specic Mini DisplayPort
adapter from Henge Docks, however Apple Adapters can be used.
Position the adapter toward the top of the cutout at the rear of the
dock and route the surrounding cables under the adapter (as shown
in Step F). The cables may spring back slightly after installation, but
they will relax over time.
Trouble Shooting Guide
Page 15
!
!
!
X
!
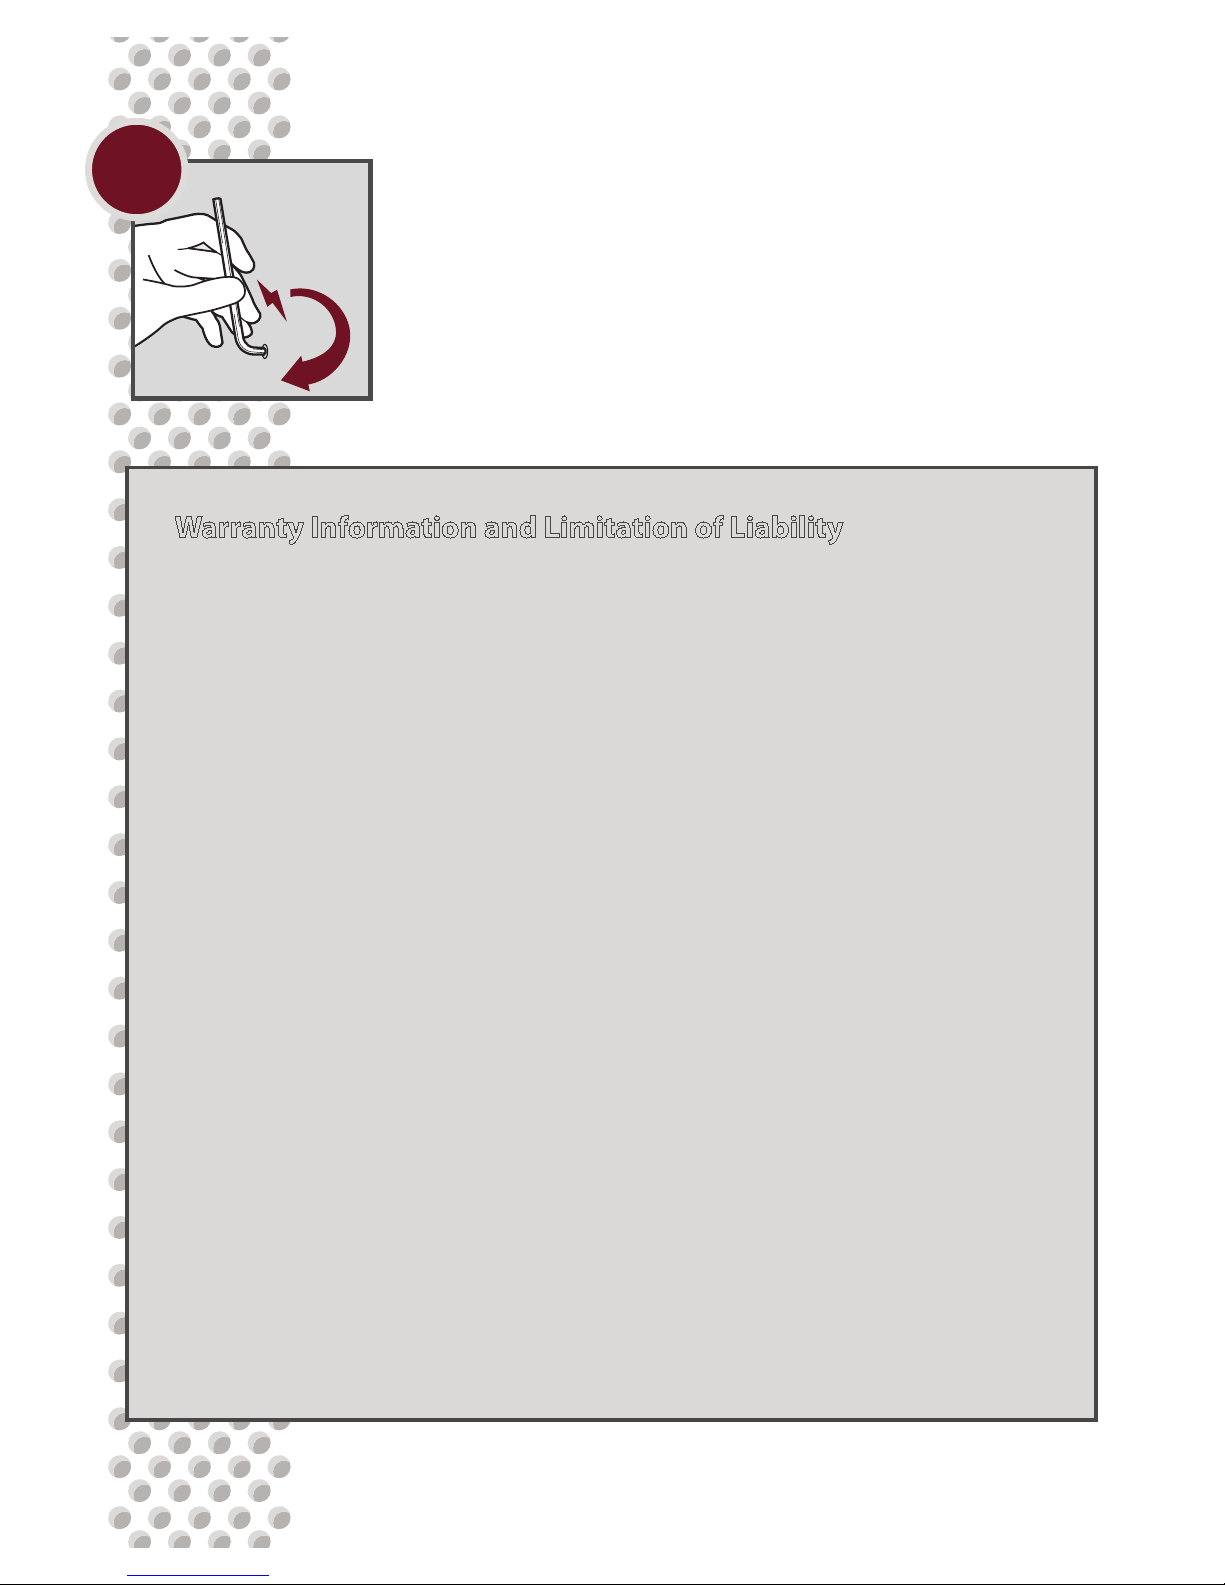
Do not over-tighten the setscrews. Permanent
connector damage can result from overtightening. Very little pressure is required to hold
the cable heads into the docking station.
Warranty -
This product is warranted for a period of 90 days from date of original
purchase. An original sales receipt is required for warranty service.
Henge Docks will, at its sole discretion, repair or replace the defective
product, or issue a refund of the original purchase price excluding
shipping and taxes. Shipping costs to return this product to Henge
Docks shall be borne by the warranty claimant.
Limitation of Liability -
Use this product at your own risk. Henge Docks is not liable for
any damage caused by use of a Henge Docks product. In all cases,
Henge Docks’ liability for any and all damages resulting from the use
or misuse of this product shall be limited to the lesser of the original
purchase price or $100.00. The venue for all legal proceedings shall
be a court of competent jurisdiction in Virginia, USA. Continued use
of this product implies consent to these terms. If you do not agree to
these terms, please return this product to the place of purchase within
5 days for a full refund.
Warranty Information and Limitation of Liability
Page 16

www.HengeDocks.com • Designed in the USA by Henge Docks • Manual v3.2
Manufactured in China • Patent Pending • TM and © Henge Docks, LLC 2011
 Loading...