

Page 1
You should read this user manual carefully before
using the appliance
Bevor Sie das Gerät in Betrieb nehmen, sollten
Sie diese Gebrauchsanweisung aufmerksam lesen
Alvorens de apparatuur in gebruik te nemen dient
u deze gebruiksaanwijzing aandachtig te lezen
Przed uruchomieniem urządzenia należy koniecznie
dokładnie przeczytać niniejszą instrukcję obsługi
Lisez attentivement ce mode d’emploi avant d’utiliser
l’appareil .
Prima di utilizzare l’apparecchio in funzione leggere
attentamente le istruzioni per l’uso.
Citiţi cu atenţie prezentul manual de utilizare înainte
de folosirea aparatului
Внимательно прочитайте руководство пользователя
перед использованием прибора
User manual
Gebrauchsanweisung
Gebruiksaanwijzing
Instrukcja obsługi
Mode d’emploi
Istruzioni per l’utente
Instrucţiunile utilizatorului
Руководство по эксплуатации
Item: 274200
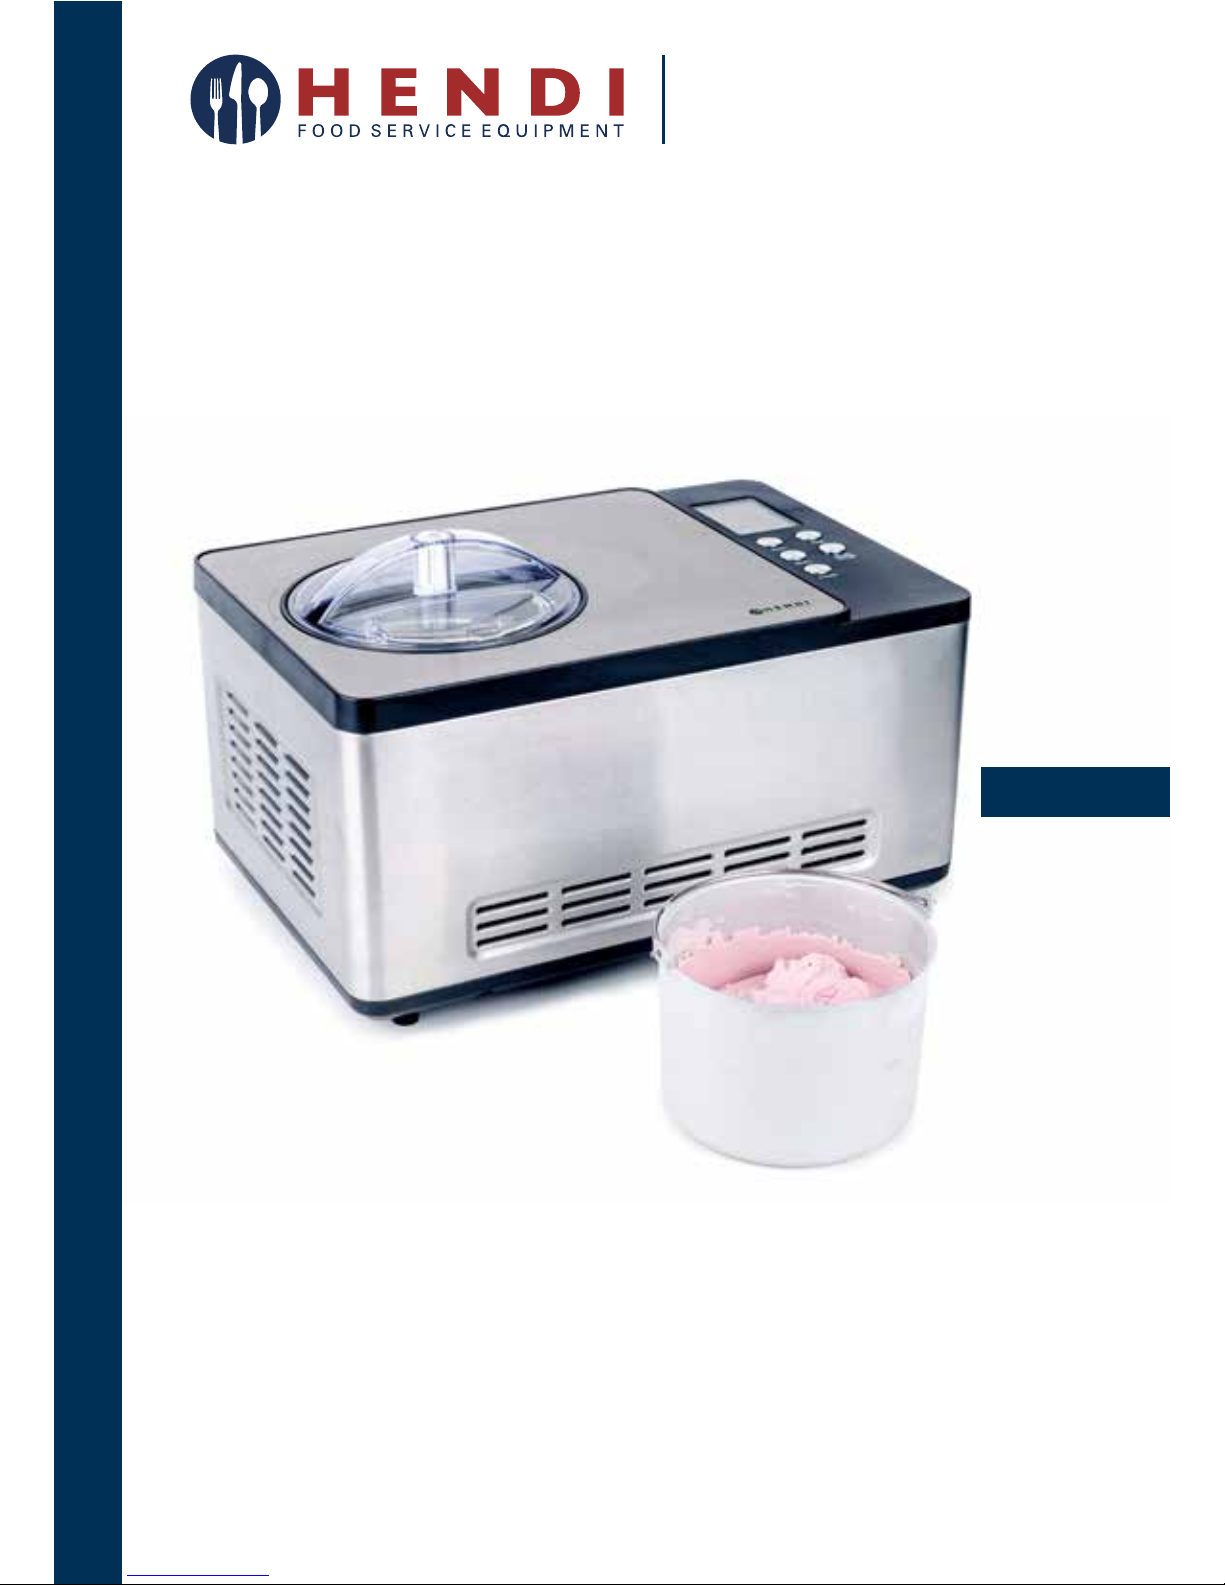
ICE CREAM MAKER
Page 2
2
Keep this manual with the appliance.
Diese Gebrauchsanweisung bitte beim Gerät aufbewahren.
Bewaar deze handleiding bij het apparaat.
Zachowaj instrukcję urządzenia.
Gardez ces instructions avec cet appareil.
Conservate le istruzioni insieme all’apparecchio.
Păstraţi manualul de utilizare alături de aparat.
Хранить руководство вместе с устройством.
For indoor use only.
Nur zur Verwendung im Innenbereich.
Alleen voor gebruik binnenshuis.
Do użytku wewnątrz pomieszczeń.
Pour l’usage à l’intérieur seulement.
Destinato solo all’uso domestico.
Numai pentru uz casnic.
Использовать только в помещениях.
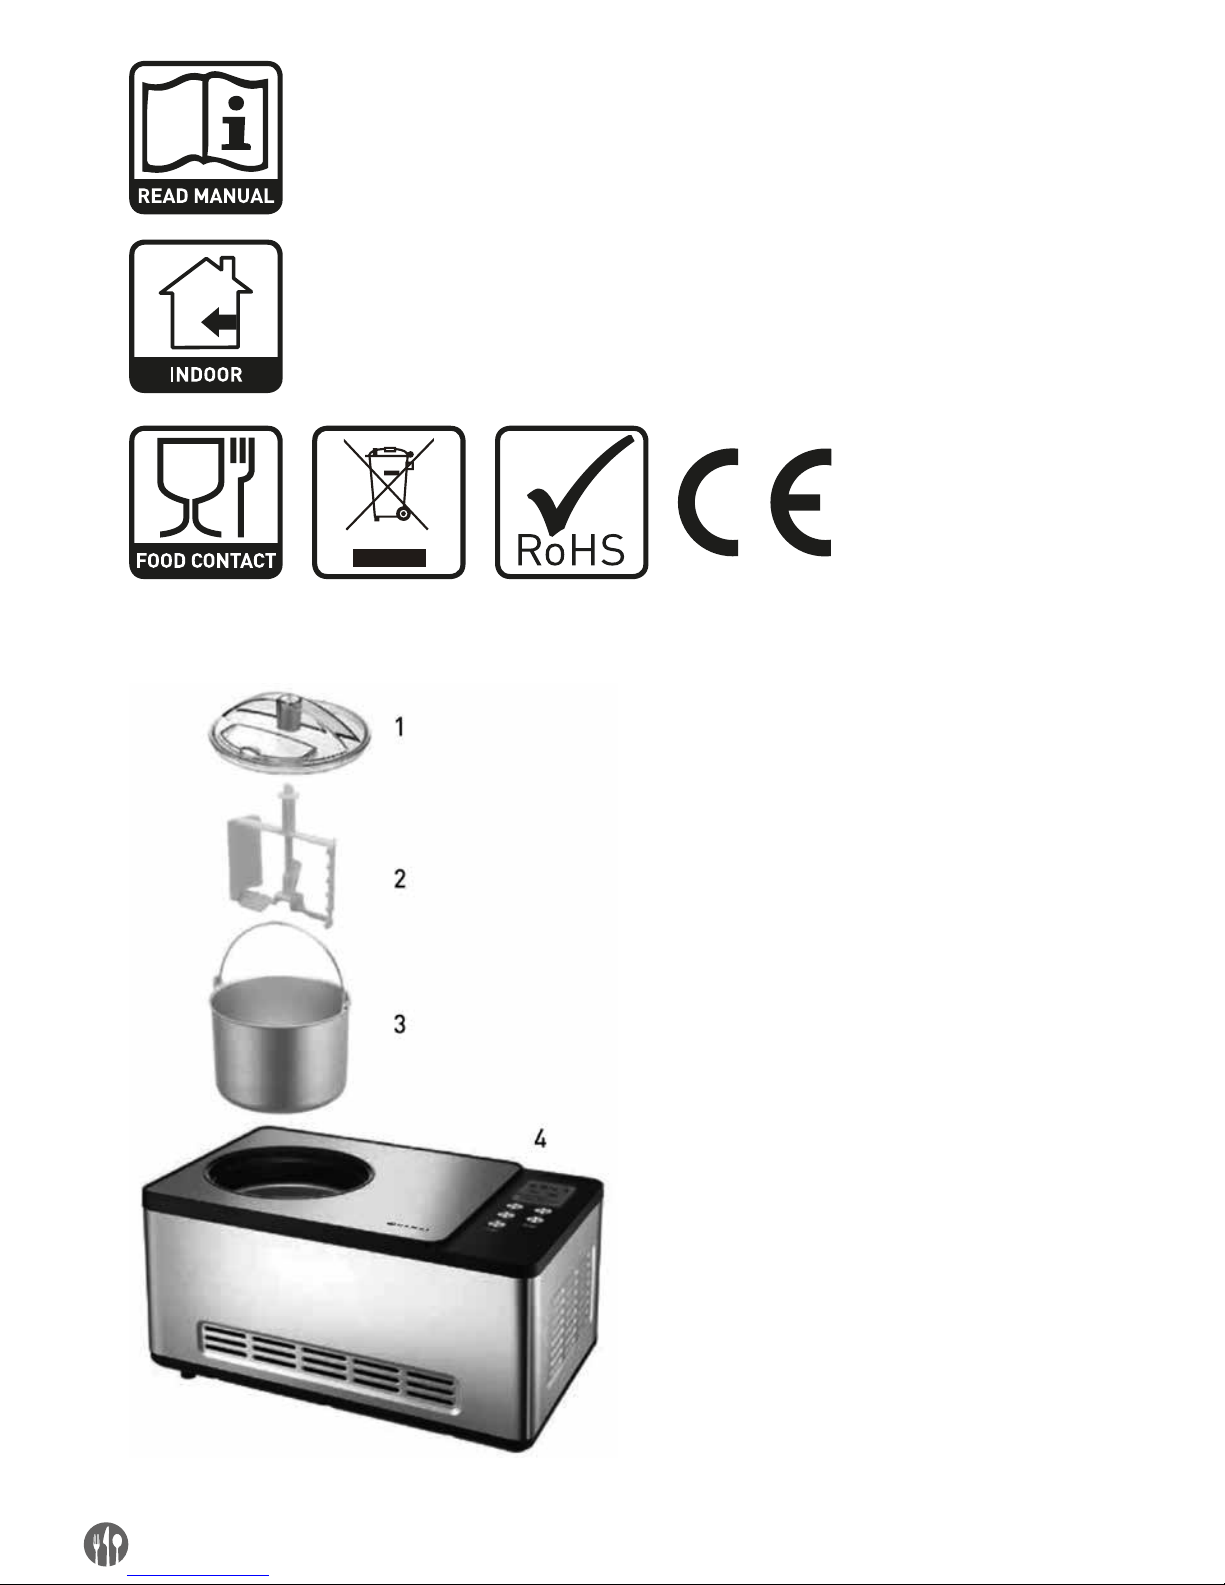
Transparent lid/ Durchsichtiger Deckel/ Transparant deksel/
Przezroczysta pokrywa/ Couvercle transparent/ Copertura trasparente/
Capac transparent/ Прозрачная крышка
Mixing blade/ Mischer/ Mengschoep/ Mieszadło/ Agitateur/ Agitatore/
Braț de amestecare/ Мешалка
Ice cream bowl/ Eisbehälter/ IJsbak/ Pojemnik na lody/
Récipient pour la glace/ Contenitore per gelato/ Vas de înghețată/
Контейнер для мороженого
Compressor housing/ Gehäuse des Verdichters/
Behuizing/ Obudowa sprężarki/ Boîte du compresseur/
Scatola del compressore/ Carcasa compresorului/
Корпус компрессора
Page 3

Dear Customer,
Thank you for purchasing this Hendi appliance. Please read this manual carefully before connecting the
appliance in order to prevent damage due to incorrect use. Read the safety regulations in particular very
carefully.
Safety regulations
• Incorrect operation and improper use of the appliance can seriously damage the appliance and
injure users.
• The appliance may only be used for the purpose
for which it was intended and designed. The manufacturer is not liable for any damage caused by
incorrect operation and improper use.
• Keep the appliance and electrical plug away from
water and any other liquids. In the unlikely event
that the appliance should fall into water, immediately pull the plug out of the socket and have
the appliance checked by a certified technician.
Not following these instructions could give rise to
life-threatening situations.
• Never try to open the casing of the appliance yourself.
• Do not insert any objects in the casing of the appliance.
• Do not touch the plug with wet or damp hands.
• Regularly check the plug and cord for any damage.
Should the plug or cord be damaged have it/them
repaired by a certified repair company.
• Do not use the appliance after it has fallen or is
damaged in any other way. Have it checked and repaired, if necessary, by a certified repair company.
• Do not try to repair the appliance yourself. This
could give rise to life-threatening situations.
• Make sure the cord does not come in contact with
sharp or hot objects and keep it away from open
fire. To pull the plug out of the socket, always pull
on the plug and not on the cord.
• Make sure that no one can accidentally pull the
cord (or extension cord) loose or trip over the cord.
• Always keep an eye on the appliance when in use.
• Children do not understand that incorrect use of
electrical appliances can be dangerous. Therefore,
never let children use home appliances without
supervision.
• Always pull the plug out of the socket when the
appliance is not being used and always before
cleaning.
• Warning! As long as the plug is in the socket the
appliance is connected to the power source.
• Turn off the appliance before pulling the plug out
of the socket.
• Never carry the appliance by the cord.
• Do not use any extra devices that are not supplied
along with the appliance.
• Only connect the appliance to an electrical outlet
with the voltage and frequency mentioned on the
appliance label.
• Avoid overloading.
• Turn off the appliance after use by removing the
plug from the socket.
• Always remove the plug from the socket when filling or cleaning the appliance.
• The electrical installation must comply with the
applicable national and local regulations.
• This appliance is not intended for use by persons
(including children) with reduced physical, sensory
or mental capabilities, or lack of experience and
knowledge, unless they have been given supervision or instruction concerning use of the appliance
by a person responsible for their safety.
Technical specifications
Power: 150 W
Voltage: 220–240V~
Frequency: 50 Hz
Capacity: 1.5 liter
Max. filling quantity: 1,000 ml
Dimensions: 425x285x(H)262mm
Weight: 11.0 kg
Power cord: 150 cm
3
NLEN
Page 4
4
EN
Special safety instructions
•
Ice maker isn’t intended to be operated by means
of an external timer or separate remote-control
system.
•
Don’t clean any parts of the appliance in the dishwasher, but only in warm soapy water.
•
This appliance is intended for domestic and similar use such as: staff kitchen areas in shops, offices and other working environments.
•
Unwind the power cord completely.
•
Do not exceed the maximum filling quantity (max.
3/4 of the ice cream bowl volume), as the ice cream
will expand during freezing.
•
Always fill the ingredients into the removable ice
cream bowl, never directly into the recess of the
compressor housing.
•
Do not hold any tools, cutlery or fingers into the jug
while it is operated - Risk of injuries.
•
Only use the appliance when properly assembled.
•
During operation, the ventilation slots of the compressor housing as well as of the motor block
must be free and uncovered.
•
Never use the device without the ice cream bowl!
•
Do not use the appliance with accessories of other
machines or brands.
•
Do not use any sharp objects to take out the ice
cream. Only use plastic or wooden spoons or spatulas.
Preparations for first use
•
Rinse all removable parts in warm water.
•
Wipe the casing and slot for the ice cream bowl
with a damp, well wrung cloth.
•
Place the appliance on a dry, level work surface.
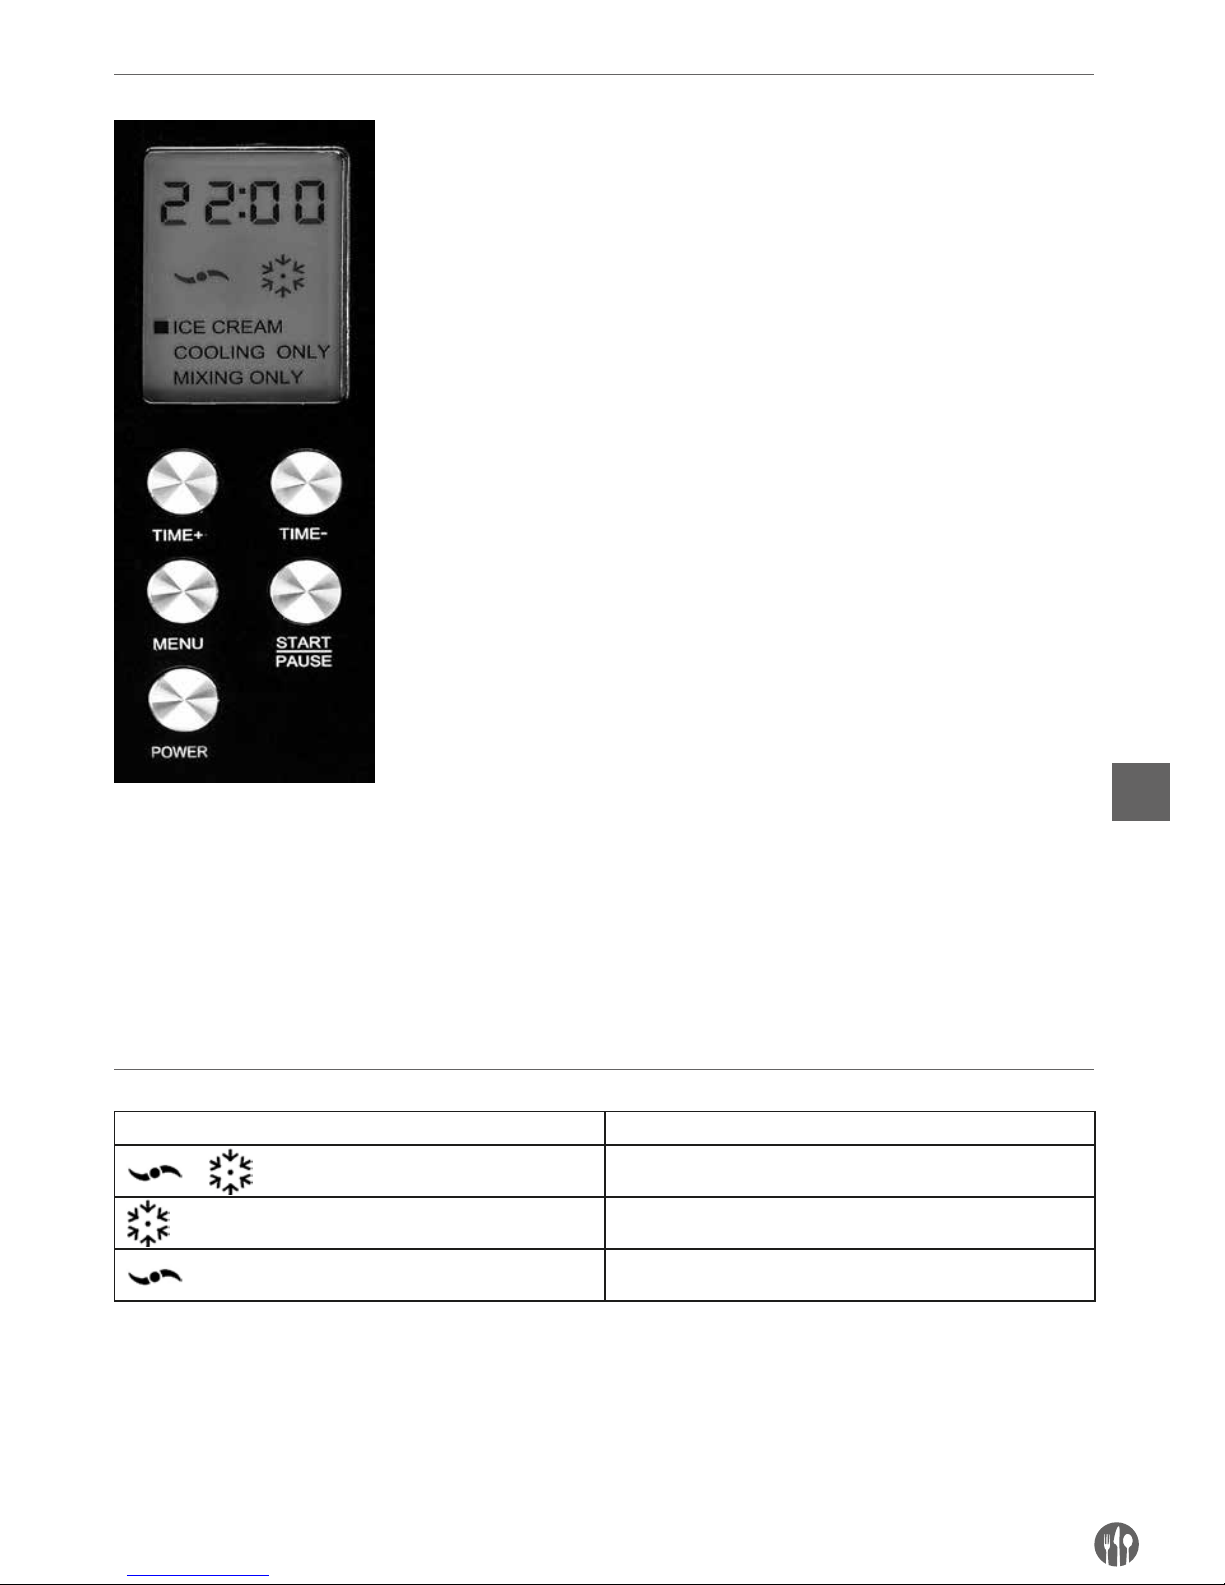
The control panel
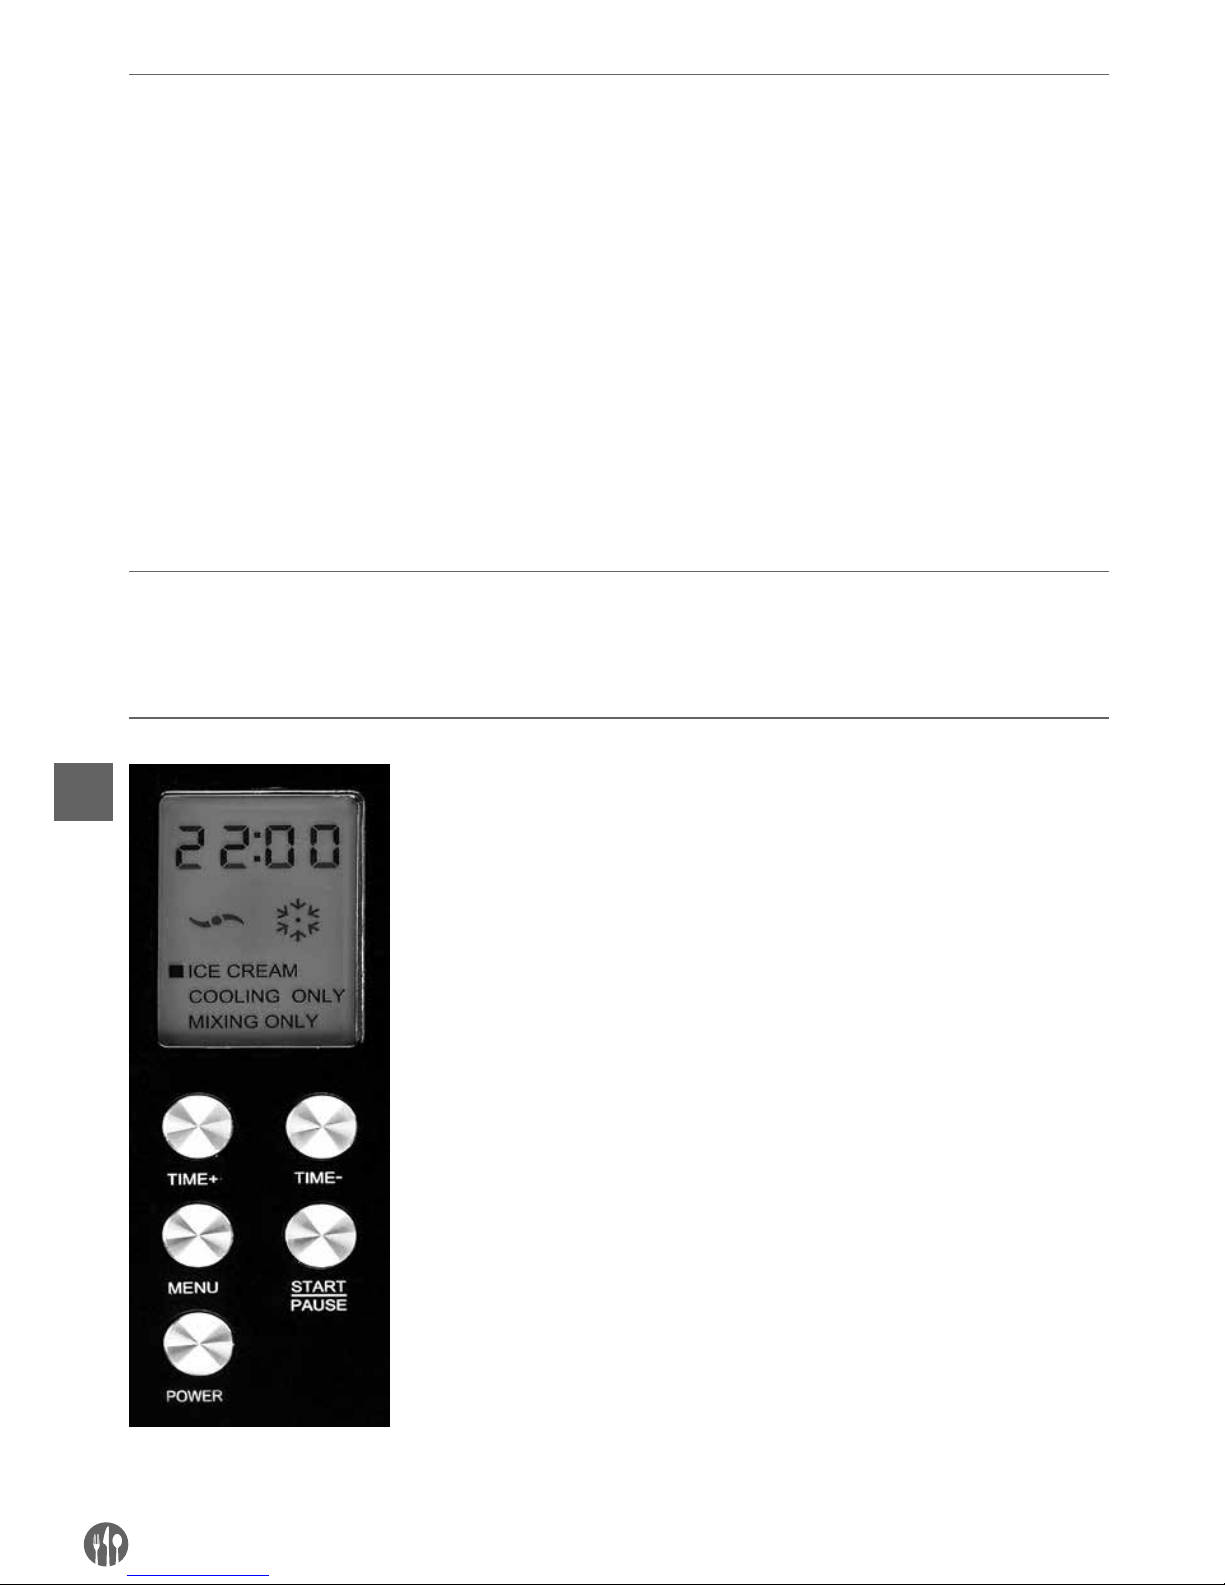
‘POWER’ button
When the plug is in the power socket, the appliance is in the stand-by-mode.
The display will show “00”. Press the ‘POWER’ button to turn on the appliance.
The display lights up and shows ‘60:00’. To turn off the appliance during operation, press the ‘POWER’ button as well.
‘MENU’ button
With this button, you choose between the three preparation programmes ‘Mix
& Freeze’, ‘Freeze’ or only ‘Mix’. When you press the ‘MENU’ button during
operation, the appliance returns to the initial mode.
‘TIME+’ button
This button increases the operation time in 1-minute-steps. Maximum setting
is 60 minutes.
‘TIME-’ button
This button decreases the operation time in 1-minute-steps. Minimum setting
is 5 minutes.
‘START/PAUSE’ button
This button starts the chosen programme. Press the ‘START/PAUSE’ button
as well if you want to interrupt the program. To resume the program press
‘START/PAUSE’ once again. To avoid damages to the compressor, wait at
least 5 minutes before resuming the program. Advice: If the program isn’t
resumed within 20 minutes, the appliance will switch off automatically.
Page 5
5
EN
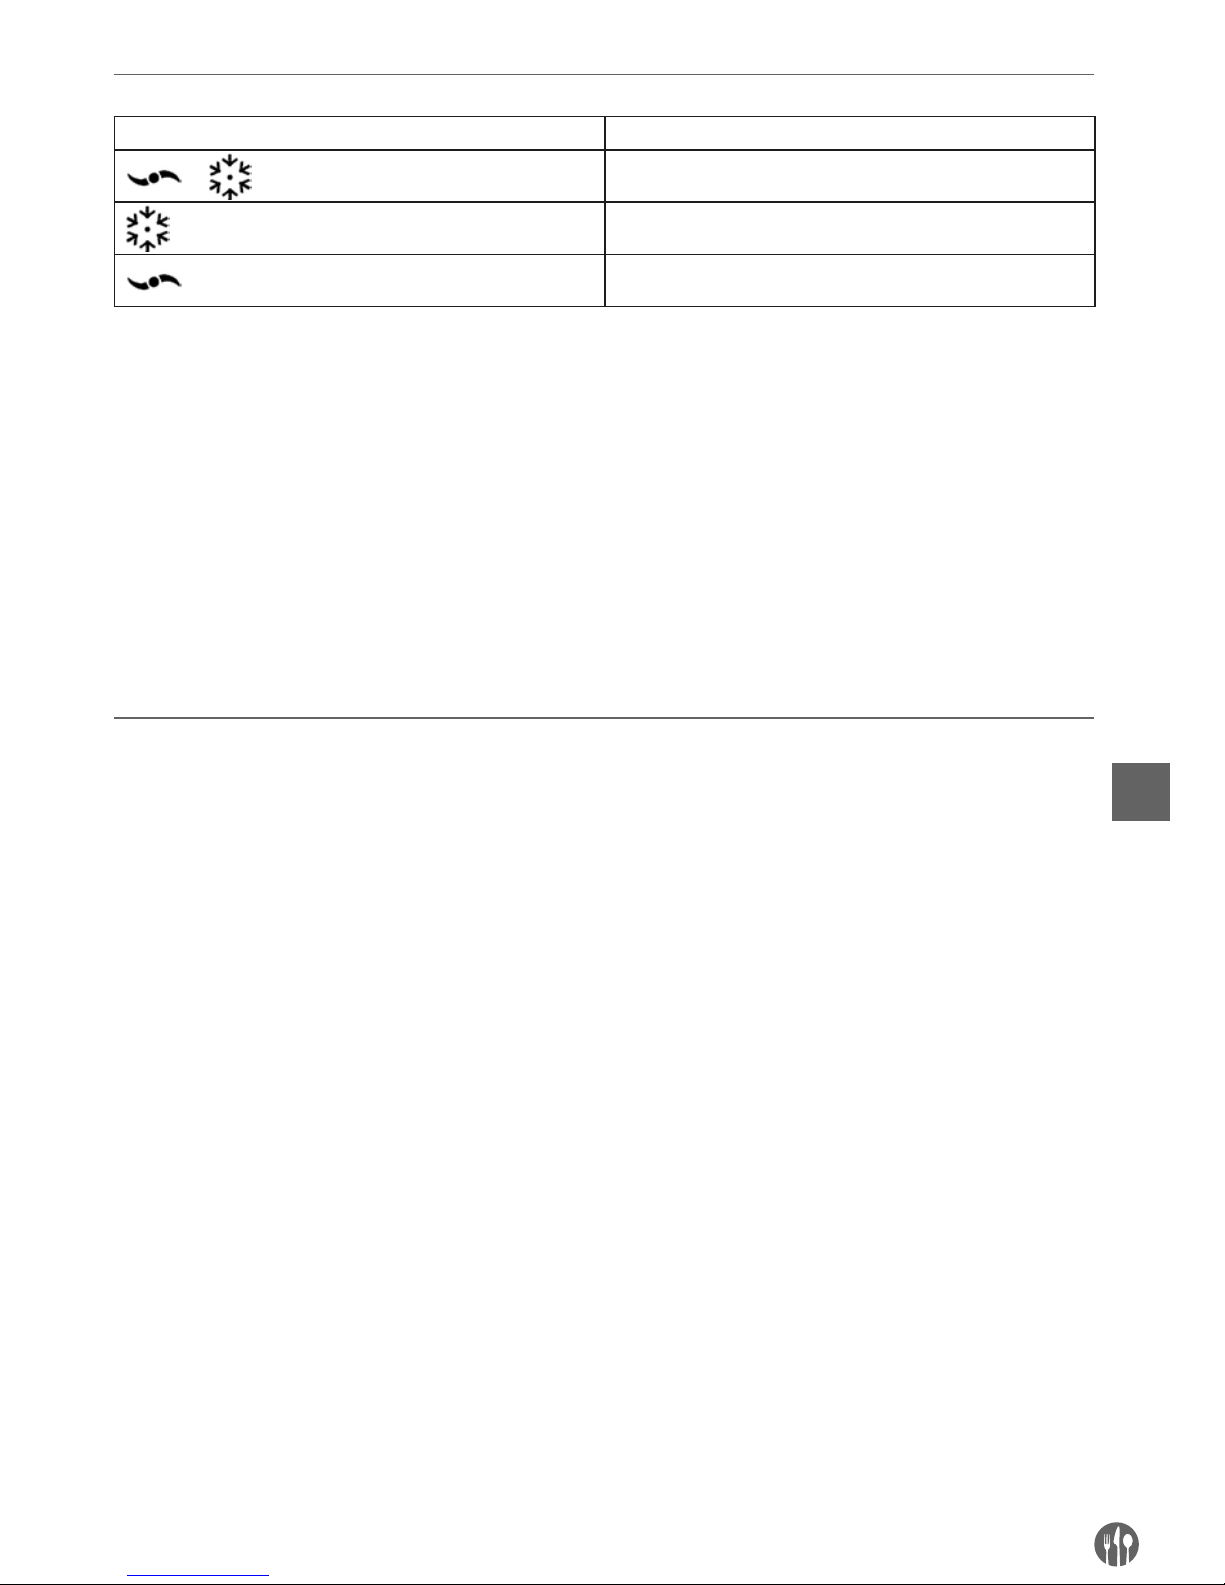
The display
Symbol Display
Ice Cream
Cooling only
Mixing only
‘ICE CREAM’ program
This program is for creating ice cream. The basic setting is 60 minutes and is adjustable by pressing the buttons ‘TIME+’ and ‘TIME-‘.
‘COOLING ONLY’ program
If the ice cream does not have the desired consistency, you can extend the freezing time with this program. The
basic setting is 30 minutes and is adjustable by pressing the buttons ‘TIME+’ and ‘TIME-‘.
‘MIXING ONLY’ program
When the ingredients need to be mixed evenly before starting the freezing process choose this program.
The basic setting is 10 minutes. It is possible to change the mixing time by pressing the buttons ‘TIME+’ and
‘TIME-‘.
Ice cream making
•
Refrigerate the prepared ice cream mixture or the
required ingredients to a temperature of 6–8 °C.
•
Puree fruit just before mixing the ingredients and
add pieces of fruit at the end.
•
Use alcohol sparingly because it prolongs the time
needed for freezing.
•
Place the removable ice cream container in the
space provided in the compressor housing.
•
Place the mixing blade on the shaft in the middle
of the ice cream container.
•
Fill the refrigerated ingredients into the removable
ice cream container. Do not fill the ice cream container more than 3/4 full, since ice cream expands
during the freezing process.
•
Place the lid on the ice cream container.
•
Plug the power cord into an electrical outlet and
switch on the appliance with the ‘POWER’ button. The display lights up blue briefly and displays
“60:00”. The symbol for the standard program Mix
& Freeze blinks.
•
The appliance is ready for operation.
•
You can now select the desired program with the
“Menu” button. The selected program is indicated
by the corresponding symbol.
•
Important: once you have selected a program, you
cannot change it while the program is running.
The ‘ICE CREAM’ and ‘MIXING ONLY’ programs
can be paused by pressing the ‘START/PAUSE’
button. As soon as the ‘START/PAUSE’ button is
pressed again, the appliance will resume operation. The ‘COOLING ONLY’ program cannot be
paused.
•
Press the ‘START/PAUSE’ button. The appliance
starts mixing the ingredients.
•
The remaining time is shown on the display.
•
During operation you can change the operating
time by pressing the ‘TIME+’ or ‘TIME-‘ button in
intervals of 1 minute to a maximum of 60 minutes.
•
After expiration of the set time the appliance automatically switches off and a signal beeps ten
times. The display shows 0:00.
•
If the ice cream is not removed within 10 minutes
after the “finished” signal, the automatic cooling
function switches on to prevent the ice cream from
melting.
•
The automatic cooling function keeps the ice
cream cold for a maximum of one hour.
Page 6

6
EN
Remove ice cream
•
Before removing the ice cream from the appliance,
switch off the appliance with the ‘POWER’ button
and unplug the power cord from the electrical outlet.
•
Remove the transparent lid.
•
Remove the ice cream container from the appliance and carefully pull the mixer out of the container.
•
Transfer the ice cream to a suitable container. Do
not use sharp or pointed objects; instead, use a
plastic or wooden spoon in order not to damage
the ice cream container. We recommend using a
silicone dough scraper.
•
If desired, you can make more ice cream right
away. In this case, start again with the first step.
•
Tip: If you make fruit ice cream or sorbet, remove
the ice cream container as soon as the program
is finished, transfer the ice cream to a container
suitable for freezing and put this container in the
freezer so that the ice cream freezes completely.
Otherwise, this ice cream may be slightly soft inside, even if it is firmly frozen on the outside.
Cleaning and maintenance
•
Before cleaning, always turn off the appliance, unplug it from the electrical outlet.
•
Never clean the appliance with or under water or
other liquids. It is especially important to keep the
motor and the compressor from coming into contact with water.
•
Do not use harsh or abrasive cleaners.
•
The removable parts can be cleaned in warm water with mild dishwashing detergent. These parts
are not dishwasher-safe. Do not immerse the container in water.
•
Wipe off the compressor housing with a damp
cloth.
•
Dry all parts thoroughly with a soft cloth before
reassembly.
Recipes:
General information
In the following chapter you’ll find some general information for the preparation of ice cream as well
as some basic recipes. Please adapt the quantities always to the maximum filling quantity of the
ice maker bowl. The ice cream smells best when it
is fresh. Freshly made ice cream does not contain
any conserving agents and should be served immediately. Ice will loose taste and quality if stored too
long. To conserve the ice cream, do not leave it in the
removable bowl of the ice machine, but put it in an
adequate freezing box with lid. Fresh Ice cream can
be stored for a short period of time in the freezer. If
you want to store the ice cream for a longer period
of time, you should add 20g. of ice cream base which
avoids the formation of big ice crystals.
The ingredients must be cooled thoroughly before
putting them into the ice cream bowl. The cooler
the ingredients, the shorter the preparation time
(approx. 30 minutes). Only use ripe fruits for fruit
ice cream. Fruit pieces or berries should be added
at the end of the freezing procedure. Only use very
fresh eggs. You can replace milk by cream or cream
by milk. The more cream is used, the softer the ice
cream will be. Sugar can be replaced by honey, syrup or sweetener (not in case of soft ice cream). Milk
can be replaced by soy milk. If you want hard ice
cream, put the mixture in the freezer for 15 to 30
minutes before putting it into the ice cream bowl, or
just select a longer freezing time.
Melted ice cream must be used immediately and
shouldn’t be frozen again.
Page 7

7
EN
CREAM ICE
Cream ice is made of milk, cream, egg yolk, sugar
and other ingredients. It becomes smooth and soft
by being stirred constantly during freezing.
Basic recipe vanilla ice cream
250 ml milk
300 ml cream
1 vanilla pod
1 pinch of salt
3 egg yolk
3 tablespoons of sugar
Heat milk and cream, slit the vanilla pod and add the
pulp to the milk, as well as the salt. Beat egg yolk
with sugar and add slowly the warm milk. Heat up
to 75˚C while constantly stirring otherwise the egg
will coagulate. Cool the ice cream mass thoroughly
in the refrigerator, then prepare the ice cream in the
ice cream maker.
SOFT ICE CREAM
Soft ice cream is made of cream, egg yolk and other ingredients. It becomes smooth and soft by being
stirred constantly during freezing. Don’t make the
program to long, soft ice cream needs less time in
the machine.
Basic vanilla soft ice recipe
375 ml cream
Half sliced vanilla pods
80g honey
1 egg yolk
1 egg
1 pinch of salt
Cook cream, vanilla pod and honey the day before
and let it cool down. Mix all ingredients and prepare
ice cream in the ice cream maker.
FRUIT ICE CREAM
Fruit ice cream consists mainly of mashed fruits
with sugar, cream or yoghurt and some egg white.
To have a smooth fruit ice cream, it has to be stirred
during freezing, which is achieved best in a ice
cream maker.
Basic fruit ice cream recipe
300g mashed fruits
1 tablespoon of lemon juice,
75-100g Sugar
1 tablespoon egg white
150ml cream
Mix mashed fruits with sugar and lemon juice. Beat
egg white and cream and add it to the mashed fruits.
Mix all ingredients and prepare ice cream in the ice
cream maker. If canned fruits are used, it might not
be necessary to add additional sugar.
SHERBET
Sherbet can be made from nearly all sorts of fruits
or fruit juice, e g. from raspberries, apricots, peaches. melons, kiwis etc. A sherbet must be stirred constantly during freezing to avoid the formation of big
ice crystals. Sherbets don’t necessarily have to be
sweet. Just try a tomato or a Campari orange sherbet as starter of a dinner. A special delight is a scoop
of sherbet served in a glass of champagne.
Basic sherbet recipe
600-700ml mashed fruits / fruit juice
75-100g sugar (depending on the type of fruit)
1-2 tablespoons egg white
Mix all ingredients and prepare the ice cream in the
ice cream maker. The sherbet can be seasoned with
1 tablespoon of liqueur, brandy, etc. If canned fruits
are used, it is not necessary to add sugar.
Page 8

8
EN
Warranty
Any defect affecting the functionality of the appliance that becomes apparent within one year after
purchase will be corrected by free repair or replacement provided the appliance has been used and
maintained in accordance with the instructions and
has not been abused or misused in any way. Your
statutory rights are not affected. If the appliance is
claimed under warranty, state where and when it
was bought and include proof of purchase (e.g. receipt).
In line with our policy of continuous product development we reserve the right to change the product,
packaging and documentation specifications without notice.
Discarding & Environment
At the end of the life of the appliance, please dispose
of the appliance according to the regulations and
guidelines applicable at the time.
Throw packing materials like plastic and boxes in
the appropriate containers.
Page 9

9
DE
Sehr geehrte Kundin, sehr geehrter Kunde,
wir danken Ihnen für den Kauf des Gerätes Hendi. Machen Sie sich bitte mit dieser Anleitung noch vor der
Inbetriebnahme des Gerätes vertraut, um Schäden durch die unsachgemäße Bedienung zu vermeiden. Den
Sicherheitsregeln ist besondere Aufmerksamkeit zu widmen.
Sicherheitsregeln
• Die unsachgemäße Bedienung des Geräts kann zur
schweren Beschädigung des Geräts sowie zu Verletzungen führen.
• Das Gerät ist ausschließlich zu dem Zweck zu benutzen, zu dem es hergestellt wurde. Der Hersteller
haftet nicht für Schäden, die auf unsachgemäße Bedienung des Geräts zurückzuführen sind.
• Den Kontakt des Gerätes und des Steckers mit Wasser oder einer anderen Flüssigkeit vermeiden. Den
Stecker unverzüglich aus dem Stecker ziehen und
das Gerät von einem anerkannten Fachmann prüfen
lassen, wenn das Gerät unbeabsichtigterweise ins
Wasser fällt. Bei Nichteinhaltung dieser Sicherheitsvorschriften besteht Lebensgefahr.
• Nie eigenständig das Gehäuse des Gerätes zu öffnen
versuchen.
• In das Gehäuse des Gerätes keine Gegenstände einführen.
• Den Stecker nicht mit nassen oder feuchten Händen
berühren.
• Den Stecker regelmäßig auf eventuelle Schäden hin
prüfen. Beschädigte Stecker oder Kabel von einer
zugelassenen Reparaturwerkstatt reparieren lassen.
• Das Gerät nicht mehr benutzen, wenn es heruntergefallen ist oder sonst wie beschädigt wurde. Das Gerät
von einer zugelassenen Reparaturwerkstatt prüfen
und gegebenenfalls reparieren lassen.
• Nicht versuchen, das Gerät eigenständig zu reparieren. Dann besteht Lebensgefahr.
• Das Kabel von scharfen und heißen Gegenständen
sowie von offenem Feuer fernhalten. Beim Rausziehen des Steckers stets am Stecker und nicht am
Kabel ziehen.
• Beachten Sie, dass das (Verlängerungs-) Kabel nicht
irrtümlicherweise gelöst wird und dass man nicht
darüber stolpern kann.
• Das Gerät bei Bedienung stets überwachen.
• Kinder kennen die Gefahr der unsachgemäßen Bedienung elektrischer Geräte nicht. Kinder daher
niemals unbeaufsichtigt Haushaltsgerät bedienen
lassen!
• Den Stecker rausziehen wenn das Gerät nicht benutzt wird und auch vor jeder Reinigung.
• Gefahr! Befindet sich der Stecker in der Steckdose,
so wird das Gerät mit Netzspannung versorgt.
• Das Gerät ausschalten, bevor Sie den Stecker abziehen.
• Das Gerät nie am Kabel tragen.
• Keine zusätzlichen Hilfsmittel benutzen, die nicht mit
dem Gerät mitgeliefert wurden.
• Das Gerät darf nur an eine Steckdose angeschlossen
werden mit dem auf dem Typenschild angegebene
Spannung und Frequenz.
• Überlastung ist zu vermeiden.
• Das Gerät ist nach dem Gebrauch auszuschalten, indem der Stecker aus der Steckdose herausgezogen
wird.
• Vor dem Nachfüllen oder Reinigen ist immer der Stecker aus der Steckdose herauszuziehen.
• Die elektrische Anlage hat den nationalen und regionalen Vorschriften zu entsprechen.
• Dieses Gerät eignet sich nicht für den Gebrauch
durch Personen (gilt auch für Kinder) mit geringerer Motorik, Sensorik oder geistiger Fähigkeit oder
mangelhafter Erfahrung und Wissen, es sei denn, sie
werden bei dem Gebrauch des Gerätes beaufsichtigt
oder erhalten Anweisungen von einer Person, die für
ihre Sicherheit die Verantwortung trägt.
Page 10

10
DE
Technische Daten
Leistungsaufnahme: 150 W
Stromversorgung: 220–240V~
Frequenz: 50 Hz
Volumeninhalt: 1,5 l
Maximale Befüllung des Behälters: 1,000 ml
Abmessungen: 425x285x(Höhe)262mm
Gewicht: 11,0 kg
Länge der Stromversorgungsleitung: 150 cm
Wichtige Sicherheitsinformationen
•
Für die Bedienung der Eismaschine darf man
keine externe Uhr oder keine gesonderte Fernbedienung benutzen.
•
Die Einzelteile des Gerätes darf man nicht in der
Spülmaschine waschen, sondern sie sind manuell
im warmen Wasser mit einem milden Reinigungsmittel zu reinigen.
•
Das Gerät ist für den Hausgebrauch oder Ähnlichem in Küchen für das Personal, in Sozialräumen, in Büros oder anderen Arbeitsorten bestimmt.
•
Vor dem Gebrauch des Gerätes muss man die
Stromversorgungsleitung vollständig entrollen.
•
Die Grenze der maximalen Füllung des Eisbehälters (3/4 des Volumeninhalts) darf nicht überschritten werden – während dem Gefrieren erhöht
das Eis seine Neutralität.
•
Vor dem Einsetzen des Eisbehälters in die Eismaschine sind die Bestandteile in den Behälter
zu legen. Die Bestandteile dürfen nicht durch die
Öffnung im Gehäuse des Verdichters eingebracht
werden.
•
Während des Betriebs des Gerätes dürfen im Behälter weder Werkzeuge noch Bestecke verbleiben. Ebenso dürfen keine Finger in die Mitte gesteckt werden – es besteht Verletzungsgefahr.
•
Vor dem Gebrauch muss man sich davon überzeugen, dass alle Teile des Gerätes richtig montiert
wurden.
•
Die Belüftungsöffnungen des Gehäuses des Verdichters und des Motors dürfen während des Betriebs nicht zugedeckt werden.
•
Während des Betriebs des Gerätes muss sich der
Eisbehälter immer in der Mitte befinden.
•
Die Eismaschine sollte nicht mit dem Zubehör
anderer Geräte oder anderer Marken verwendet
werden.
•
Zur Entnahme des Eises aus dem Behälter müssen Löffel oder Spachtel aus Kunststoff oder Holz
benutzt werden – verwenden Sie keine scharfkantigen Werkzeuge.
Vorbereitung des Geräts vor dem ersten Gebrauch:
•
Alle herausnehmbaren Teile müssen mit warmen
Wasser durchgespült werden.
•
Das Gehäuse sowie die Öffnung für den Eisbehälter sind mit einem feuchten (gut ausgewrungenen) Tuch abzureiben.
•
Das Gerät ist auf einer trockenen und ebenen
Fläche aufzustellen.
Page 11
11
DE
Bedienfeld
Anzeige
Symbol Beschreibung
Mischen und Gefrieren
Gefrieren
Mischen
Programm „MISCHEN UND GEFRIEREN”
Das Programm ist für die Eiszubereitung bestimmt. Die Standardeinstellung der Zeitdauer des Programms
beträgt 60 Minuten und man kann sie mit Hilfe der Tasten „TIME+” und „TIME-” verändern.
Programm „GEFRIEREN
Das Programm dient zur Verlängerung der Gefrierzeit, wenn das zubereitete Eis keine entsprechende Kon-
Taste „POWER” (Einschalten)
Nach dem Anschließen der Eismaschine an die Netzsteckdose befindet sich
das Gerät im Standby-Modus. Auf dem Display erscheint der Wert „00”. Um
das Gerät einzuschalten, muss man die Taste „POWER” drücken: der Bildschirm erleuchtet und zeigt die Zeit „60:00”. Zum Ausschalten des Gerätes
während des Betriebs ist erneut auf die Taste „POWER” zu drücken.
Taste „MENÜ”
Die Taste „MENÜ” zeigt drei zugängliche Betriebsprogramme des Gerätes an:
„Mischen und Gefrieren”, „Gefrieren” und „Mischen”. Das Drücken der Taste
„MENÜ” während des Betriebs der Eismaschine bewirkt die Rückkehr zum
Auswahlbildschirm.
Taste „TIME+” (Zeitverlängerung)
Die Zeitdauer des Programms kann man durch Drücken der Taste „TIME+”
verlängern. Die Betriebszeit des Programms wird in Abständen von 1 Minute
verlängert – die maximale Zeitdauer des Programms beträgt 60 Minuten.
Taste „TIME-” (Zeitverkürzung)
Die Zeitdauer des Programms kann man durch Drücken der Taste „TIME-”
verkürzen. Die Betriebszeit des Programms wird in Abständen von 1 Minute
verkürzt – die minimale Zeitdauer des Programms beträgt 5 Minuten.
Taste „START/PAUSE” (Start/Pause)
Die Taste „START/PAUSE” beginnt den Betrieb des ausgewählten Programms.
Wird die Taste während des Betriebs des Gerätes gedrückt, ist das Anhalten
des aktiven Programms die Folge – um es erneut zu aktivieren, muss man
wieder die Taste „START/PAUSE” drücken. Um Beschädigungen des Verdich-
ters zu vermeiden, muss man vor dem erneuten Aktivieren des Programms
mindestens 5 Minuten abwarten. Hinweis: Wenn das Betriebsprogramm
nicht innerhalb von 20 Minuten erneut aktiviert wird, dann schaltet sich das
Gerät automatisch aus.
Page 12

12
DE
sistenz aufweist. Die Standardeinstellung der Zeitdauer des Programms beträgt 10 Minuten und man kann
sie mit Hilfe der Tasten „TIME+” und „TIME-” verändern.
Programm „MISCHEN”
Das Programm ermöglicht das entsprechende Mischen der Bestandteile vor dem Gefrieren. Die Standardeinstellung der Zeitdauer des Programms beträgt 30 Minuten und man kann sie mit Hilfe der Tasten „TIME+”
und „TIME-” verändern.
Eiszubereitung
•
Die Eismasse oder die Bestandteile zur Eiszubereitung sind auf eine Temperatur von 6–8 °C abzukühlen.
•
Vor dem Vermischen der Bestandteile ist das Obst
zu zerdrücken. Am Ende gibt man die kleinen
Obststückchen hinzu.
•
Keine zu große Menge an Alkohol verwenden, weil
er die Gefrierzeit des Eises verlängert.
•
Den Eisbehälter im Gerät unterbringen.
•
Der Mischer ist in dem entsprechenden Aufsatz in
der der Mitte des Eisbehälters anzubringen.
•
Die abgekühlten Bestandteile in den Eisbehälter
legen. Den Behälter nicht mehr als bis zu ¾ des
Volumeninhalts auffüllen, da während dem Gefrieren das Eis seine Neutralität erhöht.
•
Den Behälter mit einem Deckel zudecken.
•
Das Gerät an die Netzsteckdose anschließen und
die Taste „POWER betätigen. Die Anzeige leuchtet
für einen kurzen Moment in blau auf, zeigt den
Wert „60:00” sowie das blinkende Symbol des
Standardprogramms „Mischen und Gefrieren” an.
•
Das Gerät ist jetzt betriebsbereit.
•
Taste „MENÜ” drücken und das entsprechende
Betriebsprogramm auswählen, wobei man sich
nach den Symbolen auf dem Display richten sollte.
•
HINWEIS: Nach der Wahl des Programms kann
man während des Funktionsbetriebs keine
Änderungen mehr tätigen. Die Programme „Mis-
chen und Gefrieren” sowie „Mischen” können angehalten und mit der Taste „START/PAUSE” neu
gestartet werden. Das Programm „Gefrieren”
kann man nicht anhalten.
•
Die Taste „START/PAUSE” drücken. Das Gerät beginnt mit dem Mischen der Bestandteile.
•
Das Gerät zeigt auch die Zeit an, die bis zum
Beenden des Programms verbleibt.
•
Die Zeit für das Betriebsprogramm kann man mit
den Tasten „TIME+” und „TIME-” in den Abständen
von jeweils 1 Minute verändern, wobei die maximale Betriebszeit des Gerätes 60 Minuten beträgt.
•
Nach Ablauf der festgelegten Zeit schaltet sich
das Gerät automatisch aus und signalisiert das
Betriebsende mit einem zehnfachen Tonsignal.
Die Eismaschine zeigt 00:00 an.
•
Wenn das Eis nicht innerhalb von 10 Minuten nach
dem Signal für das Programmende herausgenommen wird, schaltet sich automatisch ein zusätzliches Gefrieren ein, um dem Schmelzen des Eises
vorzubeugen.
•
Die Funktion des automatischen Gefrierens wird
mit einer niedrigen Temperatur im Behälter über
eine Stunde aufrechterhalten.
Herausnehmen des Eises
• Vor der Herausnahme des Eises muss man das Gerät
ausschalten (Taste „POWER”) und die Stromversorgungsleitung von der Netzsteckdose trennen.
• Den durchsichtigen Deckel abnehmen.
• Den Eisbehälter aus dem Gerät nehmen und vorsichtig den Mischer abnehmen.
• Das Eis in eine entsprechende Verpackung legen und
dabei einen Löffel aus Kunststoff oder Holz verwenden. Zum Herausnehmen des Eises darf man keine
scharfen bzw. scharfkantigen Werkzeuge verwenden, um den Behälter nicht zu beschädigen. Man
empfiehlt den Einsatz des Spachtels aus Silikon.
• Das Gerät ist für die Zubereitung einer nächsten
Portion von Eis sofort nach Beenden des vorhergehenden Programms bereit. Um die nächste Portion
anzurichten, muss man erneut die Tätigkeiten, beginnend mit dem ersten Punkt am Anfang der Anleitung, ausführen.
• Hinweis: Nach der Zubereitung des Früchteeises
oder Sorbets muss man den Eisbehälter sofort nach
Beendigung des gegebenen Programms herausnehmen, das Eis in eine entsprechende Verpackung
legen und im Gefrierfach zwecks vollständigen Gefrierens unterbringen. Im entgegengesetzten Fall
Page 13

13
DE
kann das Eis trotz scheinbaren Gefrierens nach
Beendigung des Programms in der Mitte weiterhin
weich sein.
Reinigung und Wartung
• Vor der Reinigung muss man das Gerät ausschalten
und den Stecker aus der Steckdose ziehen.
• Die Eismaschine nicht in Wasser eintauchen und
auch nicht unter einem Wasserstrahl bzw. einer anderen Flüssigkeit reinigen.
• Für die Reinigung weder Abriebmittel noch ätzende
Substanzen verwenden.
• Die herausnehmbaren Teile muss man mit warmen
Wasser unter Zugabe eines milden Reinigungsmittels waschen. Diese Teile sind nicht in der Spülmaschine zu waschen. Den Eisbehälter darf man nicht
in Wasser tauchen.
• Das Gehäuse des Verdichters ist mit einem feuchten
Tuch abzureiben.
• Vor dem erneuten Montieren sind alle Teile des Gerätes sorgfältig abzureiben.
Vorschriften:
Allgemeine Informationen
Das folgende Kapitel stellt die allgemeinen Informationen bzgl. des Eiszubereitungsprozesses sowie
einige grundlegende Vorschriften dar. Die Menge
der Bestandteile muss man immer an das maximale Niveau des Behälterfüllstands anpassen. Das
frische Eis enthält keine Konservierungsmittel und
hat einen sehr appetitlichen Geruch, deshalb wird
auch ihr Verzehr direkt nach der Zubereitung empfohlen. Das zu lange im Gefrierfach gelagerte Eis
verliert seinen einzigartigen Geschmack. Über einen kurzen Zeitraum kann man es im Gefrierfach in
einem entsprechenden Behälter mit Deckel lagern
(das Eis bitte nicht in dem Behälter lagern, in dem
es zubereitet wurde). Um das Eis über einen längeren Zeitraum zu lagern, muss man 20 g der Basiseismasse hinzugeben; im Ergebnis dessen werden sich
im Eis keine Eisklümpchen bilden.
Die Bestandteile muss man vor ihrer Anordnung im
Eisbehälter abkühlen. Ein längerer Kühlzeitraum
für die Bestandteile verkürzt die Zubereitungszeit
für das Eis (um ca. 30 Minuten). Zur Herstellung von
Früchteeis sind ausschließlich reife Früchte zu verwenden. Die Obststücke oder ganze Früchte muss
man am Ende des Gefrierprozesses hinzugeben.
Für die Zubereitung der Masse sind ausschließlich
frische Eier zu verwenden. Zur Eisherstellung kann
man Sahne oder Milch verwenden. Eine größere
Menge der Sahne bewirkt, dass das Eis sehr weich
sein wird. Zucker kann man durch Milch, Sirup oder
einen Süßstoff ersetzen (bei weichem Eis nicht
empfehlenswert). Kuhmilch kann durch Sojamilch
ersetzt werden. Wenn das Eis hart sein soll, muss
man die fertige Masse für 15-20 Minuten in das Gefrierfach stellen, und zwar vor dem Einstellen in den
Eisbehälter, oder für das Gefrierprogramm eine längere Zeit einstellen.
Geschmolzenes Eis erfordert den sofortigen Verbrauch und eignet sich nicht für ein weiteres Gefrieren.
SAHNEEIS
Für die Zubereitung von Sahneeis werden Milch,
Sahne, Eigelb, Zucker und einige andere Bestandteile benötigt. Durch das ständige Mischen beim
Gefrieren wird das Eis flauschig und glatt.
Hauptrezeptur für Vanilleeis
250 ml Milch
300 ml Sahne
1 Vanilleschote
eine Prise Salz
3 Eigelb
3 Esslöffel Zucker
Milch und Sahne aufwärmen. Eine Vanilleschote
aufschneiden, das Mark aus der Mitte herauskratzen und zum Rest der Bestandteile geben. Salz
hinzugeben. Eigelb mit Zucker schlagen und langsam Milch hinzugeben. Die entstandene Masse bis
auf eine Temperatur von 75°C erhitzen und ständig
mischen, um dem Gerinnen der Eier vorzubeugen.
Danach ist die Masse abzukühlen und im Gefrierfach unterzubringen. Die gefrorene Masse ist dann
fertig für den Einsatz in der Eismaschine.
Page 14

14
DE
WEICHES EIS
Das sehr weiche und flauschige Eis wird aus Sahne,
Eigelb und anderen Bestandteilen zubereitet. Das
Eis wird außergewöhnlich weich und hat auf Grund
des ständigen Mischens während des Gefrierens
eine glatte Konsistenz. Das Programm darf nicht
zu sehr verlängert werden, weil es kein langes Mischen in der Eismaschine erfordert.
Hauptrezeptur für weiches Vanilleeis
375 ml Sahne
aufgeschnittene Vanilleschote
80 g Honig
1 Eigelb
1 ganzes Ei
eine Prise Salz
Sahne mit der Vanilleschote und Honig kochen. Abkühlen und für einen Tag stehen lassen. Die übrigen
Bestandteile vermischen, in den Eisbehälter gießen
und in die Eismaschine einsetzen.
FRUCHTEIS
Fruchteis besteht hauptsächlich aus zerdrückten
Früchten, Zucker, Sahne oder Joghurt sowie Eiweiß.
Damit das Eis eine entsprechend glatte Konsistenz
hat, muss die Eismasse während des Gefrierens
ständig gemischt werden. Für diesen Fall ist die Eismaschine ausgezeichnet geeignet.
Hauptrezeptur für Fruchteis
300 g zerdrückte Früchte
1 Esslöffel Zitronensaft
75-100 g Zucker
1 Esslöffel Eiweiß
150 ml Sahne
Die zerdrückten Früchte mit Zucker und dem Zitronensaft vermischen. Das Eiweiß mit Sahne schlagen
und Fruchtmasse hinzugeben. Alle Bestandteile
genau vermischen und in den Eisbehälter legen, der
dann in die Eismaschine eingesetzt wird. Wenn für
die Zubereitung der Masse Früchte aus der Dose
verwendet werden, dann ist die Zugabe einer zusätzlichen Portion Zucker nicht unbedingt notwendig.
SORBET
Sorbet kann man aus fast allen Früchten oder
Fruchtsäften zubereiten, z.B. aus Himbeeren, Morellen, Pfirsichen, Melonen, Kiwis usw. Sorbet
muss während des Gefrierens ständig gemischt
werden, damit keine Eisklumpen entstehen. Die
Sorbets müssen nicht süß sein. Man kann auch einen Tomaten- oder Orangensorbet mit Campari als
Beilage zubereiten. Eine Kugel Sorbet, gereicht im
Glas, und mit Champagner begossen, das ist ein
schmackhaftes und elegantes Dessert.
Hauptrezeptur für Sorbet
600-700 ml Fruchtmasse oder Fruchtsaft
75-100 g Zucker (in Abhängigkeit von den verwendeten Früchten)
1-2 Esslöffel Eiweiß
Alle Bestandteile vermischen, in den Eisbehälter legen und in die Eismaschine einsetzen. Zu der Masse
kann man auch noch einen Esslöffel Likör, Brandy
oder anderen Alkohol hinzugießen. Wenn für die
Zubereitung der Masse Früchte aus der Dose verwendet werden, besteht nicht die Notwendigkeit der
Zugabe von Zucker.
Page 15

15
DE
Garantie
Alle innerhalb von einem Jahr nach dem Kaufdatum
festgestellten Defekte oder Mängel, die die Funktionalität des Gerätes beeinträchtigen, werden auf
dem Wege der unentgeltlichen Reparatur bzw. des
Austausches unter der Voraussetzung beseitigt,
dass das Gerät in einer der Bedienungsanleitung
gemäßen Art und Weise betrieben und gewartet
wird und weder vorsätzlich vernichtet noch nicht
bestimmungsgemäß genutzt wurde. Ihre Rechte
aus den entsprechenden Gesetzen bleiben davon
unberührt. Eine in der Garantiefrist einzureichende
Beanstandung hat die Angabe des Kaufortes und
Kaufdatums und in der Anlage einen Kaufbeleg (z.B.
Kassenzettel) zu enthalten.
Gemäß unserer Politik der ständigen Weiterentwicklung unserer Produkte behalten wir uns vor,
Änderungen am Produkt, an seiner Verpackung und
an den dokumentierten technischen Daten ohne
vorherige Ankündigung vorzunehmen.
Entsorgung und Umweltschutz
Nach Beendigung seiner Lebensdauer ist das Gerät
rechtmäßig und den jeweils geltenden Richtlinien
entsprechend zu entsorgen.
Verpackungsmaterial, wie Kunststoffe bzw. Schachteln, in die entsprechenden Behälter geben.
Page 16

16
NL
Geachte klant,
Hartelijk dank voor de aankoop van dit Hendi apparaat. Leest u deze gebruiksaanwijzing zorgvuldig voordat
u het apparaat gebruikt, dit om schade door verkeerd gebruik te voorkomen. Lees vooral de veiligheidsinstructies aandachtig door.
Veiligheidsinstructies
• Onjuiste bedie
ning en verkeerd gebruik van het apparaat kan ernstige schade aan het apparaat en verwonding van personen tot gevolg hebben.
• Het apparaat mag alleen worden gebruikt voor het
doel waarvoor het werd ontworpen. De fabrikant aanvaardt geen enkele aansprakelijkheid voor schade als
gevolg van onjuiste bediening en verkeerd gebruik.
• Zorg dat het apparaat en de stekker niet met water
of een andere vloeistof in aanraking komen. Mocht
het apparaat onverhoopt in het water vallen, trek dan
onmiddellijk de stekker uit het stopcontact en laat
het apparaat controleren door een erkend vakman.
Niet-naleving hiervan kan levensgevaar opleveren.
• Probeer nooit zelf de behuizing van het apparaat te
openen.
• Steek geen voorwerpen in de behuizing van het apparaat.
• Raak de stekker niet met natte of vochtige handen
aan.
• Controleer stekker en snoer regelmatig op eventuele
beschadiging. Indien stekker of snoer beschadigd is,
laat het bij een erkend reparatiebedrijf repareren.
• Gebruik het apparaat niet nadat het is gevallen of op
andere wijze beschadigd is. Laat het bij een erkend
reparatiebedrijf controleren en zo nodig repareren.
• Probeer het apparaat niet zelf te repareren. Dit kan
levensgevaar opleveren.
• Zorg dat het snoer niet met scherpe of hete voorwerpen in aanraking komt en houd het uit de buurt van
open vuur. Als u de stekker uit het stopcontact wilt
trekken, pak dan altijd de stekker zelf beet en trek
nooit aan het snoer.
• Zorg dat niemand het snoer (of verlengsnoer) abusievelijk kan lostrekken of erover kan struikelen.
• Houd het apparaat als u het gebruikt steeds in de
gaten.
• Kinderen zien de gevaren van onjuist gebruik van
elektrische apparaten niet. Laat kinderen daarom
nooit zonder toezicht met huishoudelijke apparatuur
werken.
• Trek altijd de stekker uit het stopcontact als het apparaat niet wordt gebruikt en telkens voordat het
wordt schoongemaakt.
• Gevaar! Zo lang de stekker in het stopcontact zit,
staat het apparaat onder de netspanning.
• Schakel het apparaat uit voordat u de stekker uit het
stopcontact trekt.
• Draag het apparaat nooit aan het snoer.
• Gebruik geen extra hulpmiddelen die niet bij het apparaat zijn meegeleverd.
• Sluit het apparaat alleen aan op een stopcontact met
de op het typeplaatje aangegeven spanning en frequentie.
• Vermijd overbelasting.
• Schakel de apparatuur na gebruik uit door de stekker
uit het stopcontact te verwijderen.
• Tijdens het bijvullen of schoonmaken altijd de stekker uit het stopcontact verwijderen.
• De elektrische installatie dient te voldoen aan de nationale en plaatselijk geldende voorschriften.
• Dit apparaat is niet geschikt voor gebruik door personen (inclusief kinderen) met een verminderd fysiek,
sensorisch of geestelijk vermogen, of gebrek aan
ervaring en kennis, tenzij supervisie of instructie is
gegeven betreffende het gebruik van het apparaat
door een persoon welke verantwoordelijk is voor hun
veilighe
id.
Technische specificaties
Vermogen: 150 W
Netspanning: 220–240V~
Frequentie: 50 Hz
Capaciteit: 1,5 liter
Max. vul inhoud: 1,000 ml
Afmetingen: 425x285x(H)262mm
Gewicht: 11.0 kg
Snoer lengte: 150 cm
Page 17
17
NL
Speciale veiligheidsinstructies
•
De ijsmachine is niet bedoeld voor gebruik met
een externe tijdschakelaar of afstandsbediening.
•
Reinig de onderdelen van het apparaat nooit in afwasmachines, maar alleen in warm zeepsop.
•
Dit apparaat is alleen bedoeld voor gebruik binnenshuis; in keukens en kantines e.d.
•
Rol het snoer volledig uit.
•
Vul de ijsbak nooit voorbij het maximum (¾ vol).
Het ijs zal namelijk uitzetten wanneer het bevroren wordt.
•
Plaats ingrediënten altijd in de ijsbak, nooit direct
in de uitsparing in de behuizing.
•
Steek geen vingers of voorwerpen in de ijsbak tijdens gebruik, risico op verwonding.
•
Gebruik het apparaat alleen wanneer alle onderdelen juist geplaatst zijn.
•
Zorg er voor dat tijdens bedrijf de ventilatieopeningen in de behuizing niet afgedekt of verstopt zijn.
•
Gebruik het apparaat nooit zonder de ijsbak.
•
Gebruik het apparaat alleen met origineel meegeleverde onderdelen en accessoires.
•
Gebruik geen scherpe en/of metalen voorwerpen
om de ijsbak te legen. Gebruik alleen kunststoffen
of houten lepels of spatels.
Voorbereiding op het eerste gebruik
•
Reinig alle verwijderbare onderdelen met warm
water.
•
Reinig de behuizing en de uitsparing daarin met
een vochtige doek.
•
Plaats het apparaat op een droge en vlakke ondergrond.
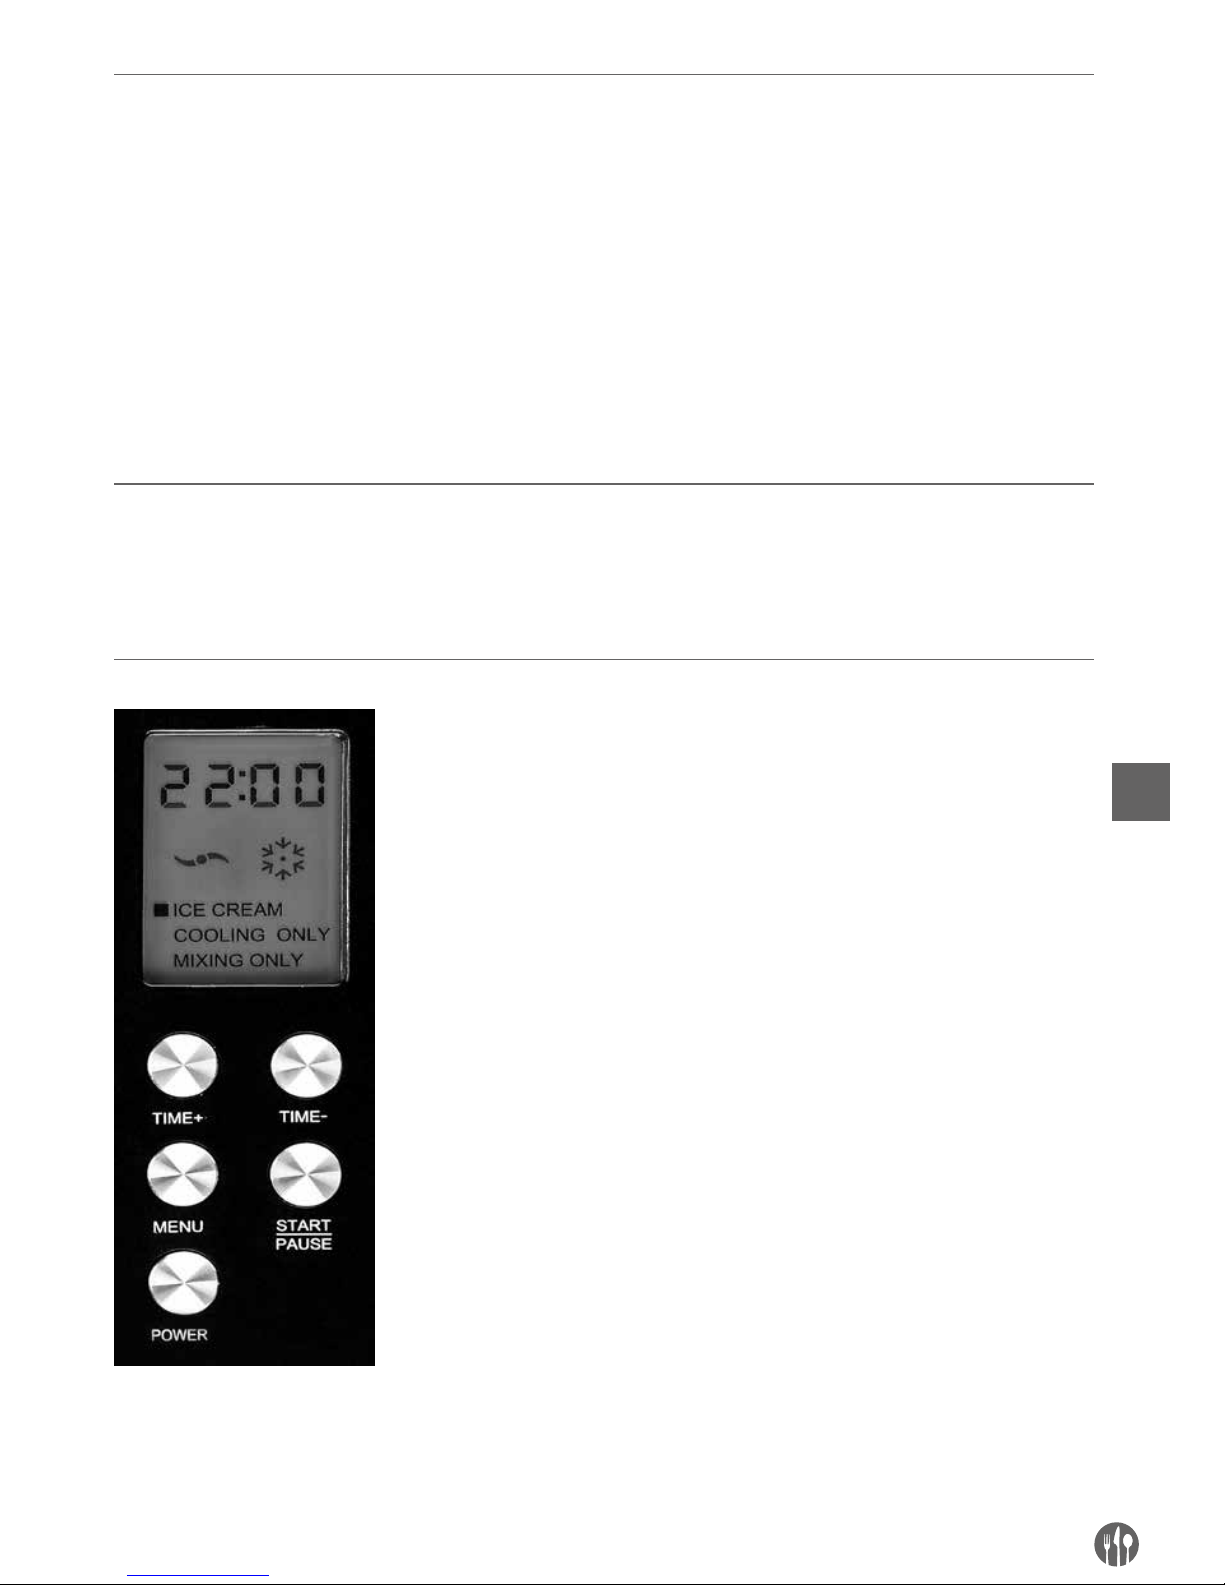
Het bedieningspaneel
‘POWER’ knop
Terwijl de stekker in de contactdoos zit staat het apparaat in de stand-by modus. Het scherm toont “00”. Druk op de “POWER” knop om het apparaat in
te schakelen. Het scherm wordt dan verlicht en toont “60:00”. Op deze knop
drukken terwijl het apparaat in bedrijf is schakelt het apparaat uit.
‘MENU’ knop
Met deze knop kan gekozen worden voor 1 van de 3 programma’s “Ice cream”,
“Mixing only” of “Cooling only”. Op deze knop drukken terwijl het apparaat in
bedrijf is brengt het apparaat terug naar de beginstand.
‘TIME+’ knop
Deze knop verhoogt de duur van een programma met stappen van 1 minuut.
Het maximum is 60 minuten.
‘TIME-’ knop
Deze knop vermindert de duur van een programma met stappen van 1 minuut.
Het minimum is 5 minuten.
‘START/PAUSE’ knop
Deze knop start het gekozen programma. Druk nogmaals op deze knop om
het lopende programma te onderbreken, en druk weer om het programma
te hervatten. Wacht 5 minuten na het onderbreken van een programma al-
vorens deze te hervatten, anders kan de compressor beschadigd worden.
Als een onderbroken programma niet binnen 20 minuten hervat wordt, dan
schakelt het apparaat zichzelf automatisch uit.
Page 18
18
NL
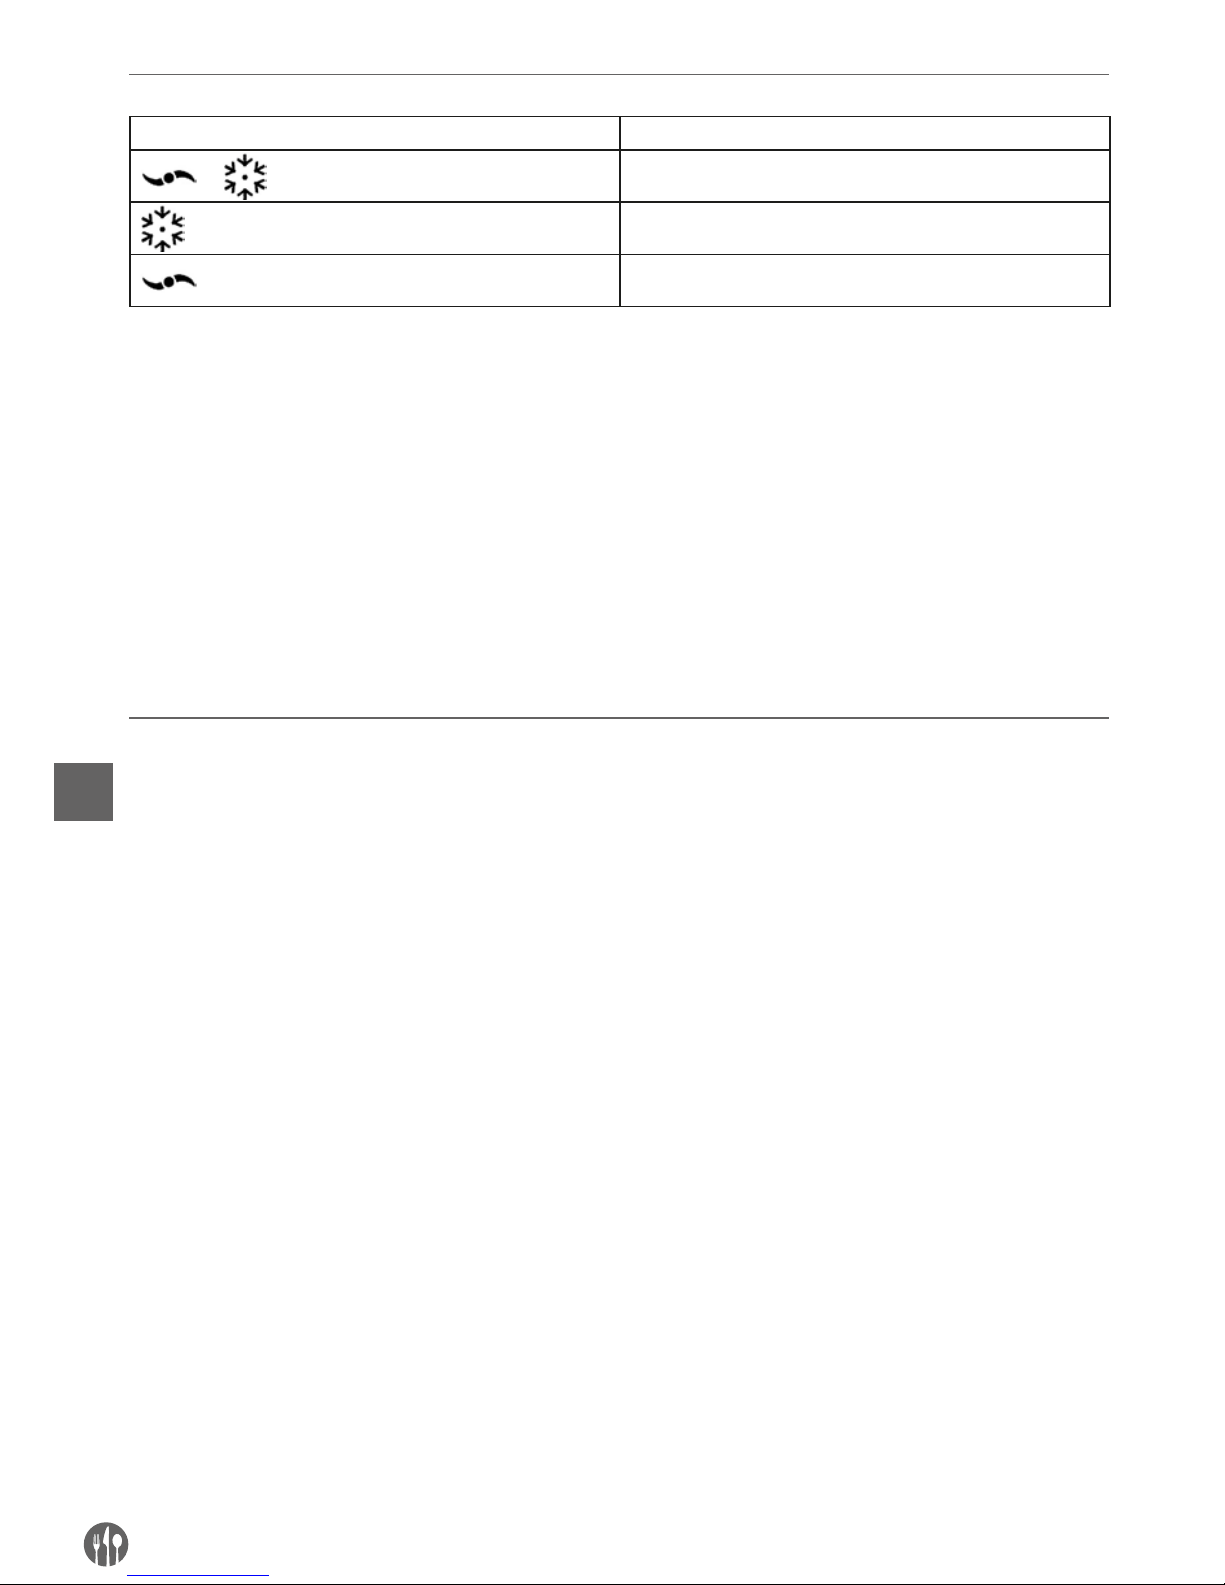
Het scherm
Symbool Tekst
Ice Cream
Cooling only
Mixing only
‘ICE CREAM’ programma
Dit programma is bedoeld om ijs te maken. De standaard instelling is 60 minuten en kan worden aangepast
met de “TIME+” en “TIME-“ knoppen.
‘COOLING ONLY’ programma
Als het ijs niet de gewenste consistentie bereikt kan de vriestijd verlengd worden met dit programma. De
standaard instelling is 30 minuten en kan worden aangepast met de “TIME+” en “TIME-“ knoppen.
‘MIXING ONLY’ programma
Als de ingrediënten extra grondig gemengd moeten worden voordat het invriezen begint kan dat met dit programma. De standaard instelling is 10 minuten en kan worden aangepast met de “TIME+” en “TIME-“ knoppen.
IJs maken
• Koel het te gebruiken mengsel of de ingrediënten
naar 6 tot 8°C
• Pureer fruit kort voor het mengen, en voeg stukjes
fruit pas vlak voor het einde toe.
• Gebruik alcohol met mate omdat dit de vries tijd verlengt.
• Plaats de ijsbak in de daarvoor bedoelde uitsparing
in de behuizing.
• Plaats de mengschoep op de koppeling onderin de
ijsbak.
• Vul de ijsbak met de gekoelde ingrediënten. Vul de
ijsbak nooit verder dan ¾ vol omdat het ijs zal uitzetten tijdens de bereiding.
• Plaats het deksel op de ijsbak.
• Plug de stekker in een contactdoos en schakel het
apparaat in met de “POWER” knop. Het scherm
wordt kort verlicht en toont “60:00”. Het symbool van
het standaard “ICE CREAM” programma knippert.
• Het apparaat is nu klaar voor gebruik.
• Nu kan het gewenste programma gekozen worden
met de “MENU” knop. Het geselecteerde programma
wordt aangegeven door het betreffende symbool.
• Belangrijk: de keuze voor een bepaald programma
kan niet gewijzigd worden terwijl het programma
loopt
. De “ICE CREAM” en “MIXING ONLY” pro-
gramma’s kunnen onderbroken en weer hervat
worden met de “START/PAUSE” knop. Het “COOLING ONLY” programma kan niet onderbroken
worden.
• Druk op de “START/PAUSE” knop, het apparaat begint ingrediënten te mengen
.
• De resterende tijd wordt weergegeven op het scherm
.
• De resterende tijd van het lopende programma kan
aangepast worden met de “TIME+” en “TIME-“ knoppen, in stappen van 1 minuut
.
• Nadat de ingestelde tijd verstreken is zal het apparaat zichzelf uitschakelen. Er klinkt dan 10 maal een
pieptoon. Het scherm toont “0:00”
.
• Als de ijsbak niet binnen 10 minuten na afloop van het
programma verwijderd wordt, dan zal het apparaat
automatisch het “FREEZE ONLY” programma starten
om te voorkomen dat het ijs smelt
.
• Het automatisch gestarte “FREEZE ONLY” programma blijft maximaal 1 uur actief
.
Page 19

19
NL
IJs verwijderen
• Schakel eerst het apparaat uit met de “POWER” knop
en haal de stekker uit de contactdoos.
• Verwijder het transparante deksel.
• Neem de ijskom uit het apparaat en verwijder voorzichtig de mengschoep.
• Verplaats het ijs naar een geschikte houder. Gebruik geen scherpe of puntige voorwerpen; gebruik wel
een lepel of spatel van hout of plastic. Wij raden het
gebruik van een siliconen deegschraper aan.
• Naar wens kan nu het proces herhaald worden om
meer ijs te maken.
• Tip: Sorbetijs of fruit ijs kan van binnen zacht blijven
terwijl het oppervlak goed bevroren lijkt. Wanneer
deze soorten ijs bereid worden is het raadzaam om
direct na afloop van het programma het ijs naar een
diepvriesbak te verplaatsen en deze in de diepvriezer
verder te laten invriezen.
Reiniging en onderhoud
• Voor het begin van de reiniging het apparaat uitschakelen en de stekker uit de contactdoos verwijderen.
• Reinig het apparaat nooit met stromend water of
door het onder te dompelen in water of andere vloeistoffen. Het is van cruciaal belang de motor en compressor droog te houden.
• Gebruik geen bijtende of schurende reinigingsmiddelen.
• De verwijderbare delen kunnen gereinigd worden
met warm water met een mild afwasmiddel. Geen
enkel deel is geschikt voor vaatwasmachines. Dompel de ijskom niet onder in water.
• Veeg de behuizing schoon met een vochtige doek.
• Droog alle delen af met een zachte doek voordat zij
weer teruggeplaatst worden.
Recepten:
Algemene informatie
In het volgende hoofdstuk vindt u algemene informatie voor de bereiding van ijs en een paar basisrecepten. Stel waar nodig s.v.p. de hoeveelheden
bij om de maximale capaciteit van de ijskom niet te
overschrijden. Het ijs zal het beste smaken terwijl
het vers is. Vers ijs bevat geen conserveringsmiddelen en hoort direct geconsumeerd te worden. Het
ijs zal smaak en kwaliteit verliezen als het te lang
bewaard wordt. Bewaar ijs niet in de ijskom maar in
een geschikte diepvriesbak met deksel. Vers ijs kan
zo een korte tijd worden bewaard. Als het ijs langer
moet worden bewaard, voeg er dan 20g ijsmengsel aan toe om de vorming van grote kristallen te
voorkomen.
Voordat ingrediënten de ijskom in gaan moeten zij
goed gekoeld worden. Hoe kouder de ingrediënten,
hoe korter de bereidingstijd van het ijs (ongeveer 30
minuten). Gebruik alleen rijp fruit voor vruchtenijs. Stukken fruit of bessen pas tegen het einde van
de bereiding toevoegen. Gebruik alleen kakelverse
eieren. Melk kan vervangen worden door room of andersom. Hoe meer room wordt gebruikt hoe zachter
het ijs zal zijn. Suiker kan vervangen worden door
honing, stroop of zoetstoffen (behalve bij softijs).
Melk kan vervangen worden door soyamelk. Hard ijs
kan gemaakt worden door het ijsmengsel 15 tot 30
minuten in de vriezer te plaatsen alvorens het in de
ijskom te doen, of door een langer vriesprogramma
in te stellen.
Gesmolten ijs moet direct worden gebruikt en mag
niet opnieuw ingevroren worden.
Page 20

20
NL
ROOMIJS
Roomijs wordt gemaakt met melk, room, eidooier,
suiker en andere ingrediënten. Het wordt zacht en
romig door het continu roeren tijdens het bevriezen.
Basis recept vanille roomijs
250 ml melk
300 ml room
1 vanille peul
1 snufje zout
3 eierdooiers
3 eetlepels suiker
Verhit de melk en de room, snij de vanille peul open
en voeg de pulp daaruit toe, samen met een snufje
zout. Klop de eierdooiers op met suiker en voeg
langzaam de warme melk toe. Verhit het mengsel
tot 75°C terwijl het continu wordt geroerd om te
voorkomen dat de eierdooiers stollen. Koel het ijsmengsel grondig in de koelkast en bereid later het
ijs met de ijsmachine.
SOFTIJS
Softijs wordt gemaakt van room, eidooier en andere
ingrediënten. Het wordt zacht en romig door het
continu roeren tijdens het bevriezen. Maak het programma niet te lang, softijs heeft niet veel tijd in de
machine nodig.
Basis recept vanille softijs
375 ml room
1/2 vanille peul
80g honing
1 eidooier
1 heel ei
1 snufje zout
Meng en verhit de room, vanille en honing een dag
tevoren en laat het afkoelen. Meng alle ingrediënten
en bereid het ijs met de ijsmachine.
VRUCHTENIJS
Vruchtenijs bestaat voornamelijk uit gepureerd fruit
met suiker, room of yoghurt en eiwit. Om vruchtenijs
romig te houden moet het geroerd worden tijdens
bevriezing, bijvoorbeeld met een ijsmachine.
Cook cream, vanilla pod and honey the day before
and let it cool down. Mix all ingredients and prepare
ice cream in the ice cream maker.
Basis recept vruchtenijs
300g fruit puree
1 eetlepel citroensap
75-100g suiker
1 eetlepel eiwit
150ml room
Meng de vruchten puree met suiker en citroensap.
Klop het eiwit op met de room en voeg het toe aan
de vruchten puree. Meng alle ingrediënten, koel hen
grondig, en bereid het ijs met de ijsmachine. Bij gebruik van fruit uit blik kan er minder suiker nodig
zijn.
SORBETIJS
Sorbetijs kan gemaakt worden van allerlei soorten
fruit of vruchtensappen zoals frambozen, abrikozen,
perziken, meloenen, kiwi’s etc. Sorbetijs moet
constant geroerd worden tijdens de bereiding om
de vorming van grote ijskristallen te voorkomen.
Sorbetijs hoeft niet altijd zoet te zijn; bijvoorbeeld
bolletjes sorbet van tomaten of Campari-sinaasappel zijn mogelijke bijzondere voorgerechten. Om nog
maar te zwijgen van het genot van een bolletje sorbetijs geserveerd in een glas champagne.
Basis sorbetijs recept
600-700ml fruit puree / vruchtensap
75-100g suiker (afhankelijk van het sort fruit)
1-2 eetlepels eiwit
Meng alle ingrediënten en bereid het ijs met de
ijsmachine. Naar smaak kan 1 eetlepel likeur zoals
cognac e.d. worden toegevoegd. Bij gebruik van fruit
uit blik kan er minder suiker nodig zijn.
Page 21

21
NL
Garantie
Elk defect waardoor de werking van het apparaat
nadelig wordt beïnvloed dat zich binnen één jaar
na aankoop van het apparaat voordoet, wordt gratis hersteld door reparatie of vervanging, mits het
apparaat conform de instructies is gebruikt en onderhouden en niet op enigerlei wijze verkeerd is
behandeld of misbruikt. Dit laat onverlet uw bij wet
bepaalde rechten. Als de garantie van kracht is, vermeld dan waar en wanneer u het apparaat hebt ge-
kocht en sluit een aankoopbewijs bij (bijv. kassabon
of factuur).
Gezien ons streven naar voortdurende verdere productontwikkeling behouden wij ons het recht voor,
zonder voorafgaande kennisgeving wijzigingen aan
te brengen aan product, verpakking en documentatie.
Afdanken & Milieu
Aan het einde van de levensduur, het apparaat afdanken volgens de op dat moment geldende voorschriften en richtlijnen.
Werp verpakkingsmateriaal zoals plastic en dozen
in de daarvoor bestemde containers.
Page 22

22
PL
Szanowny Kliencie,
Dziękujemy za zakup urządzenia firmy Hendi. Prosimy o uważne zapoznanie się z niniejszą instrukcją przed
podłączeniem urządzenia, aby uniknąć uszkodzeń spowodowanych niewłaściwą obsługą. Należy zwrócić
szczególną uwagę na zasady bezpieczeństwa.
Zasady bezpieczeństwa
• Nieprawidłowa obsługa i niewłaściwe użytkowanie
mogą spowodować poważne uszkodzenie urządzenia
lub zranienie osób.
• Urządzenie należy stosować wyłącznie zgodnie z
przeznaczeniem. Producent nie ponosi żadnej odpowiedzialności za szkody spowodowane nieprawidłową
obsługą i niewłaściwym użytkowaniem urządzenia.
• W czasie użytkowania zabezpiecz urządzenie i wtyczkę kabla zasilającego przed kontaktem z wodą lub
innymi płynami. W mało prawdopodobnym przypadku
zanurzenia urządzenia w wodzie, należy natychmiast
wyciągnąć wtyczkę z kontaktu, a następnie zlecić kontrolę urządzenia specjaliście. Nieprzestrzeganie tej
instrukcji może spowodować zagrożenie życia.
• Nigdy nie otwieraj samodzielnie obudowy urządzenia.
• Nie wtykaj żadnych przedmiotów w obudowę urządzenia.
• Nie dotykaj wtyczki kabla zasilającego wilgotnymi rękami.
• Regularnie kontroluj stan wtyczki i kabla. W przypadku
wykrycia uszkodzenia wtyczki lub kabla, zleć naprawę
w wyspecjalizowanym punkcie naprawczym.
• W przypadku, gdy urządzenie spadnie lub ulegnie
uszkodzeniu w inny sposób, przed dalszym użytkowaniem zawsze zleć przeprowadzenie kontroli i ewentualną naprawę w wyspecjalizowanym punkcie naprawczym.
• Nigdy nie naprawiaj urządzenia samodzielnie może to
spowodować zagrożenie życia.
• Chroń kabel zasilający przed kontaktem z ostrymi lub
gorącymi przedmiotami i chroń go przed otwartym
ogniem. Jeżeli chcesz odłączyć urządzenie z kontaktu,
zawsze chwytaj za wtyczkę, nigdy nie ciągnij za kabel.
• Zabezpiecz kabel (lub przedłużacz), aby nikt przez
omyłkę nie wyciągnął go z kontaktu ani się o niego nie
potknął.
• Kontroluj funkcjonowanie urządzenia w czasie użytkowania.
• Dzieci nie uświadamiają sobie zagrożeń, jakie może
spowodować użytkowanie urządzeń elektrycznych.
Nigdy nie pozwalaj dzieciom posługiwać się elektrycznymi urządzeniami gospodarstwa domowego
bez nadzoru.
• Gdy urządzenie nie jest użytkowane oraz zawsze
przed czyszczeniem odłącz je od źródła zasilania,
wyciągając wtyczkę z kontaktu.
• Uwaga! Jeżeli wtyczka kabla zasilającego jest podłączona do kontaktu, urządzenie cały czas pozostaje
pod napięciem.
• Wyłącz urządzenie, zanim wyciągniesz wtyczkę z
kontaktu.
• Nigdy nie przenoś urządzenia za kabel zasilający.
• Nie używaj akcesoriów innych niż dostarczone z urządzeniem.
• Urządzenie można podłączać wyłącznie do gniazda o
natężeniu i częstotliwości zgodnej z danymi znajdującymi się na tabliczce znamionowej.
• Unikaj przeciążenia.
• Po użyciu wyłącz urządzenie wyjmując wtyczkę z
gniazda.
• Przed napełnieniem lub czyszczeniem zawsze należy
wyjmować wtyczkę z gniazda.
• Instalacja elektryczna musi odpowiadać krajowym i
lokalnym przepisom.
• Z urządzenia nie mogą korzystać osoby (także dzieci),
u których stwierdzono osłabione zdolności fizyczne,
sensoryczne lub umysłowe, albo którym brakuje odpowiedniej wiedzy i doświadczenia, chyba że odbywa
się to pod nadzorem lub zgodnie z instrukcjami osoby
odpowiedzialnej za ich bezpieczeństwo.
Page 23

23
PL
Dane techniczne
Pobór mocy: 150 W
Zasilanie: 220–240V~
Częstotliwość: 50 Hz
Pojemność: 1,5 litra
Maksymalne wypełnienie pojemnika: 1,000 ml
Wymiary: 425x285x(wys.)262mm
Waga: 11,0 kg
Długość kabla zasilającego: 150 cm
Ważne informacje dotyczące bezpieczeństwa
•
Do obsługi maszyny do lodów nie należy używać
zewnętrznego zegara lub oddzielnego pilota.
•
Poszczególnych części urządzenia nie należy myć
w zmywarce. Czyścić ręcznie w ciepłej wodzie z
dodatkiem łagodnego detergentu.
•
Urządzenie przeznaczone jest do użytku domowego lub podobnego w kuchniach dla personelu,
pomieszczeniach socjalnych w biurach lub innych
miejscach pracy.
•
Przed użyciem urządzenia należy w pełni rozwinąć
kabel zasilający.
•
Nie należy przekraczać granicy maksymalnego
wypełnienia pojemnika na lody (3/4 pojemności) –
lody zwiększą swoją obojętność podczas mrożenia.
•
Składniki należy włożyć do pojemnika na lody przed
umieszczeniem go w urządzeniu. Nie wkładać
składników przez otwór w obudowie sprężarki.
•
Podczas pracy urządzenia w pojemniku nie należy
umieszczać żadnych narzędzi ani sztućców, jak
również nie wkładać do środka palców – istnieje
ryzyko obrażeń.
•
Przed użyciem należy upewnić się, że wszystkie części urządzenia zostały poprawnie zamontowane.
•
Nie zakrywać otworów wentylacyjnych obudowy
sprężarki oraz silnika podczas pracy urządzenia.
•
Podczas pracy urządzenia pojemnik na lody musi
zawsze znajdować się w środku.
•
Maszyna nie powinna być używana z akcesoriami
innych urządzeń lub innych marek.
•
Do wyjmowania lodów z pojemnika należy używać
plastikowych lub drewnianych łyżek bądź łopatek –
nie stosować ostrych narzędzi.
Przygotowanie sprzętu przed pierwszym użyciem:
•
Wszystkie wyjmowane części należy przepłukać
ciepłą wodą.
•
Obudowę oraz otwór na pojemnik do lody przetrzeć
wilgotną (dobrze wyżętą) szmatką.
•
Urządzenie ustawić na suchej, równej powierzchni.
Page 24
24
PL
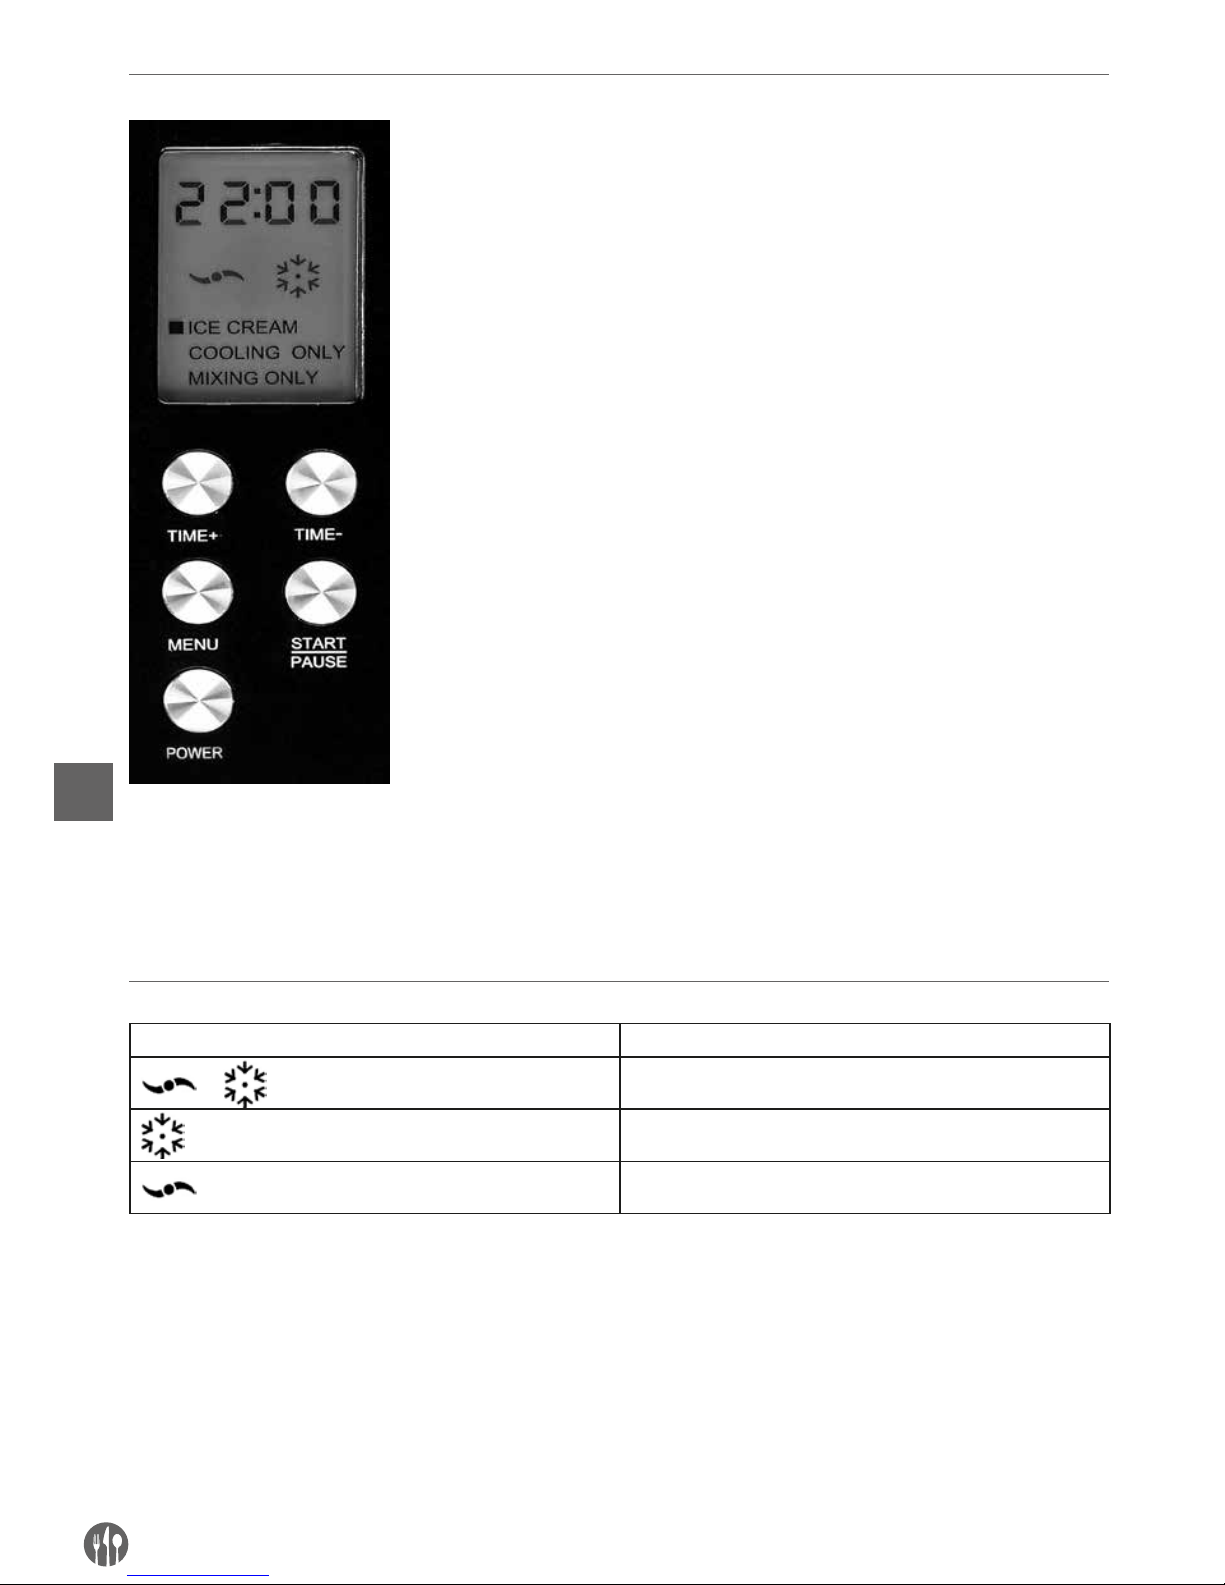
Panel kontrolny
Wyświetlacz
Symbol Opis
Mieszanie i mrożenie
Mrożenie
Mieszanie
Program „MIESZANIE I MROŻENIE”
Program przeznaczony do przygotowywania lodów. Domyślne ustawienie czasu pracy programu wynosi 60
minut i można je zmieniać za pomocą przycisków „TIME+” i „TIME-”.
Program „MROŻENIE”
Program służy do przedłużenia czasu mrożenia, jeśli przygotowane lody nie mają odpowiedniej konsystencji.
Domyślne ustawienie czasu pracy programu wynosi 30 minut i można je zmieniać za pomocą przycisków
przyciskami „TIME+” i „TIME-”.
Przycisk „POWER” (Włączenie)
Po podłączeniu maszyny do lodów do gniazdka, urządzenie znajduje się
w trybie czuwania. Na wyświetlaczu pojawia się wartość „00”. By włączyć
urządzenie, należy wcisnąć przycisk „POWER”: ekran podświetli się pokazując
czas „60:00”. By wyłączyć urządzenie podczas pracy, należy ponownie wcisnąć
przycisk „POWER”.
Przycisk „MENU”
Przycisk „MENU” wyświetla trzy dostępne programy pracy urządzenia:
„Mieszanie i mrożenie”, „Mrożenie” oraz „Mieszanie”. Wciśnięcie przycisku
„MENU” podczas pracy maszyny spowoduje powrót to ekranu wyboru.
Przycisk „TIME+” (Wydłużenie czasu)
Czas trwania programu można wydłużyć wciskając przycisk „TIME+”. Czas
pracy programu będzie wydłużany w odstępach jednominutowych – maksymalny czas trwania programu wynosi 60 minut.
Przycisk „TIME-” (Skrócenie czasu)
Czas trwania programu można skrócić wciskając przycisk „TIME-”. Czas pracy
programu będzie skracany w odstępach jednominutowych – minimalny czas
trwania programu wynosi 5 minut.
‘Przycisk „START/PAUSE” (Start/Przerwa)
Przycisk „START/PAUSE” rozpoczyna pracę wybranego programu. Wciśnięcie
przycisku podczas pracy urządzenia zatrzymuje działający program – by go
wznowić, należy ponownie wcisnąć przycisk „START/PAUSE”. Aby uniknąć
uszkodzenia sprężarki, przed wznowieniem programu należy odczekać
przynajmniej 5 minut. Uwaga: Jeśli program pracy nie zostanie wznowiony w
ciągu 20 minut, urządzenie wyłączy się automatycznie.
Page 25

25
PL
Program „MIESZANIE”
Program umożliwia odpowiednie zmieszanie składników przed rozpoczęciem mrożenia. Domyślne ustawienie
czasu pracy programu wynosi 10 minut i można je zmieniać za pomocą przycisków „TIME+” i „TIME-”.
Przygotowywanie lodów
•
Masę lodową lub składniki do przygotowania lodów
schłodzić do temperatury 6–8 °C.
•
Przed wymieszaniem składników rozgnieść owoce. Na koniec dodać niewielkie kawałki owoców.
•
Nie używać zbyt dużej ilości alkoholu, ponieważ
wydłuża on czas mrożenia lodów.
•
Pojemnik na lody umieścić w urządzeniu.
•
Mieszadło umieścić w odpowiedniej nasadce
pośrodku pojemnika na lody.
•
Schłodzone składniki umieścić w pojemniku na
lody. Pojemnika nie należy wypełniać powyżej ¾
jego pojemności, ponieważ lody zwiększą swoją
obojętność podczas mrożenia.
•
Zakryć pojemnik pokrywą.
•
Podłączyć urządzenie do gniazdka i uruchomić
(przycisk „POWER”). Wyświetlacz na krótką chwilę
podświetli się na niebiesko i pokaże wartość
„60:00” oraz migający symbol programu domyślnego „Mieszanie i mrożenie”.
•
Urządzenie jest gotowe do użycia.
•
Wcisnąć przycisk „MENU” i wybrać odpowiedni
program pracy, kierując się symbolami na wyświetlaczu.
•
UWAGA: Po wybraniu programu nie można
dokonać jego zmiany podczas pracy urządzenia.
Programy „Mieszkanie i mrożenie” oraz „Mieszanie” mogą być zatrzymane i wznowione za pomocą
przycisku „START/PAUSE”. Program „Mrożenie”
nie może zostać zatrzymany.
•
Wcisnąć przycisk „START/PAUSE”. Urządzenie
rozpocznie mieszanie składników.
•
Urządzenie wyświetla czas pozostały do zakończenia programu.
•
Czas pracy programu można zmienić za pomocą
przycisków „TIME+” i „TIME-” w odstępach 1
minutowych, przy czym maksymalny czas pracy
urządzenia wynosi 60 minut.
•
Po upływie wyznaczonego czasu urządzenie automatycznie wyłączy się i zasygnalizuje koniec
pracy dziesięciokrotnym sygnałem dźwiękowym.
Maszyna wyświetli czas 00:00.
•
Jeśli lody nie zostaną wyjęte w ciągu 10 minut po
sygnale zakończenia programu, automatycznie
włączy się dodatkowe mrożenie zapobiegające
rozpuszczeniu lodów.
•
Funkcja automatycznego mrożenia utrzymywać
będzie niską temperaturę w pojemniku przez jedną godzinę.
Wyjmowanie lodów
•
Przed wyjęciem lodów należy wyłączyć urządzenie
(przycisk „POWER” ) i odłączyć kabel zasilający z
gniazdka.
•
Zdjąć przezroczystą pokrywę.
•
Wyjąć pojemnik na lody z urządzenia i ostrożnie
zdjąć mieszadło.
•
Przełożyć lody do odpowiedniego opakowania używając plastikowej lub drewnianej łyżki. Do
wyjmowania lodów nie używać ostrych lub ostro
zakończonych narzędzi, aby nie uszkodzić pojemnika. Zaleca się używanie silikonowej łopatki.
•
Urządzenie jest gotowe do przygotowania kolejnej porcji lodów natychmiast po zakończeniu
poprzedniego programu. W celu przyrządzenia
kolejnej porcji należy wykonać ponownie czynności począwszy od punktu pierwszego na początku
instrukcji.
•
Wskazówka: Po przygotowaniu lodów owocowych
lub sorbetu pojemnik na lody należy wyjąć natychmiast po zakończeniu danego programu, przełożyć
lody do odpowiedniego opakowania i umieścić w
zamrażalniku w celu całkowitego zamrożenia.
W przeciwnym razie po zakończeniu programu,
mimo pozornego zamrożenia, lody mogą być nadal
miękkie w środku.
Page 26

26
PL
Czyszczenie i konserwacja
•
Przed czyszczeniem należy wyłączyć urządzenie i
wyjąć wtyczkę z gniazdka.
•
Nie zanurzać maszyny w wodzie, nie czyścić pod
strumieniem wody lub innego płynu. Silnik oraz
sprężarka nie mogą wejść w bezpośredni kontakt
z wodą.
•
Do czyszczenia nie używać środków ściernych ani
substancji żrących.
•
Części wyjmowane należy myć ciepłą wody z dodatkiem łagodnego środka czyszczącego. Części
tych nie należy myć w zmywarce. Pojemnika na
lody nie należy zanurzać w wodzie.
•
Obudowę sprężarki przecierać wilgotną szmatką.
•
Przed ponownym zamontowaniem starannie
wytrzeć wszystkie części urządzenia.
Przepisy:
Informacje ogólne
Poniższy rozdział przedstawia ogólne informacje
dotyczące procesu przygotowania lodów oraz kilka
podstawowych przepisów na lody. Ilość składników
należy zawsze dostosować do maksymalnego poziomu wypełnienia pojemnika. Świeże lody nie zawierają żadnych konserwantów i mają najbardziej apetyczny zapach, dlatego też zaleca się ich podawanie
bezpośrednio po przygotowaniu. Lody przechowywane zbyt długo w zamrażalniku tracą swój unikalny smak. Przez krótki okres czasu można je
przechowywać w zamrażalniku w odpowiednim pojemniku do przechowywania z pokrywką (nie należy
przechowywać lodów w pojemniku na lody służącym do przygotowania lodów). Aby przechowywania
lody przez dłuższy okres czasu, należy dodać 20 g
lodowej masy bazowej, dzięki czemu w lodach nie
będą się formować grudki lodu.
Składniki należy schłodzić przed umieszczeniem
ich w pojemniku na lody. Dłuższy okres schładzania
składników skróci czas przygotowywania lodów (ok.
30 minut). Do przyrządzenia lodów owocowych należy używać wyłącznie dojrzałych owoców. Kawałki
owoców lub całe owoce należy dodawać na końcu
procesu mrożenia. Do przygotowania masy należy
używać wyłącznie świeżych jaj. Do sporządzenia
lodów można wykorzystać śmietanę lub mleko.
Większa ilość śmietany spowoduje, że lody będą
bardziej miękkie. Cukier można zastąpić mlekiem,
syropem lub słodzikiem (niezalecane w przypadku miękkich lodów). Mleko krowie można zastąpić
mlekiem sojowym. Jeśli lody mają być twarde, gotową masę należy wstawić do zamrażalnika na 15-20
minut przed umieszczeniem w pojemniku na lody
lub ustawić dłuższy czas programu mrożenia.
Lody rozpuszczone wymagają natychmiastowego
spożycia i nie nadają się do kolejnego zamrażania.
LODY ŚMIETANKOWE
Lody śmietankowe przyrządza się z mleka, śmietany,
żółtek jaj, cukru oraz kilku innych składników. Lody
stają się puszyste i gładkie dzięki ciągłemu mieszaniu podczas zamrażania.
Podstawowy przepis na lody waniliowe
250 ml mleka
300 ml śmietany
1 laska wanilii
szczypta soli
3 żółtka
3 łyżki stołowe cukru
Mleko i śmietanę podgrzać. Rozciąć laskę wanilii, zeskrobać ziarenka ze środka i dodać do reszty
składników. Dodać sól. Żółtka ubić z cukrem i powoli
dodać mleka. Powstałą masę podgrzać do temperatury 75˚C, stale mieszając, aby zapobiec ścinaniu
się jajek. Następnie ostudzić masę i umieścić w
zamrażalniku. Zmrożona masa jest gotowa do umieszczenia w maszynie.
MIĘKKIE LODY
Najbardziej miękkie i puszyste lody przygotowuje
się ze śmietany, żółtek i kilku innych składników.
Lody stają się wyjątkowo miękkie i mają gładką
konsystencję dzięki ciągłemu mieszaniu podczas
zamrażania. Programu nie należy zbytnio wydłużać,
ponieważ lody nie wymagają długiego mieszania w
maszynie.
Page 27

27
PL
Podstawowy przepis na miękkie lody waniliowe
375 ml śmietany
Rozcięta laska wanilii
80 g miodu
1 żółtko
1 całe jajko
szczypta soli
Zagotować śmietanę z laską wanilii i miodem.
Pozostawić do wystudzenia i odstawić na jeden
dzień. Wymieszać pozostałe składniki, wlać do pojemnika na lody i umieścić w maszynie do lodów.
LODY OWOCOWE
Lody owocowe składają się głównie z rozgniecionych
owoców, cukru, śmietany lub jogurtu oraz białka.
Aby lody miały odpowiednio gładką konsystencję,
masa lodowa musi być stale mieszana podczas
zamrażania. W tym przypadku doskonale sprawdza
się maszyna do lodów.
Podstawowy przepis na lody owocowe
300 g rozgniecionych owoców
1 łyżka stołowa soku z cytryny
75-100 g cukru
1 łyżka stołowa białka
150 ml śmietany
Rozgniecione owoce wymieszać z cukrem i sokiem
z cytryny. Białka ubić ze śmietaną i dodać do masy
owocowej. Wszystkie składniki dokładnie wymieszać
i umieścić w pojemniku na lody, po czym włożyć do
maszyny. Jeśli do przygotowania masy używane są
owoce z puszki, dodanie dodatkowej porcji cukru
może nie być konieczne.
SORBET
Sorbet można przyrządzać z niemal wszystkich owoców lub soków owocowych, np. z malin, moreli,
brzoskwiń, melona, kiwi itd. Sorbet musi być stale
mieszany podczas zamrażania, aby nie doprowadzić
do powstania lodowych grudek. Sorbety nie muszą
być słodkie. Można przyrządzić sorbet pomidorowy
lub pomarańczowy z Campari jako przystawka. Kulka sorbetu podana w kieliszku i zalana szampanem
to pomysł na pyszny i elegancki deser.
Podstawowy przepis na sorbet
600-700 ml masy owocowej lub soku z owoców
75-100 g cukru (w zależności od użytych owoców)
1-2 łyżki stołowe białek jaj
Wszystkie składniki wymieszać, przełożyć do pojemnika na lody i umieścić w maszynie. Do masy można
dolać jedną łyżkę likieru, brandy lub innego alkoholu. Jeśli do przygotowania masy używane są owoce z
puszki, nie ma konieczności dodawania cukru.
Gwarancja
Każda wada bądź usterka powodująca niewłaściwe
funkcjonowanie urządzenia, która ujawni się w ciągu jednego roku od daty zakupu, zostanie bezpłatnie
usunięta lub urządzenie zostanie wymienione na
nowe, o ile było użytkowane i konserwowane zgodnie z instrukcją obsługi i nie było wykorzystywane w
niewłaściwy sposób lub niezgodnie z przeznaczeniem. Postanowienie to w żadnej mierze nie narusza
innych praw użytkownika wynikających z przepi-
sów prawa. W przypadku zgłoszenia urządzenia do
naprawy lub wymiany w ramach gwarancji należy
podać miejsce i datę zakupu urządzenia i dołączyć
dowód zakupu (np. paragon).
Zgodnie z naszą polityką ciągłego doskonalenia wyrobów zastrzegamy sobie prawo do wprowadzania
bez uprzedzenia zmian w wyrobie, opakowaniu oraz
danych technicznych podawanych w dokumentacji.
Wycofanie z użytkowania i ochrona środowiska
Urządzenie zużyte i wycofane z użytkowania należy
zutylizować zgodnie z przepisami i wytycznymi obwiązującymi w momencie wycofania urządzenia.
Materiały opakowaniowe, jak tworzywa sztuczne i
pudła, należy umieszczać w pojemnikach na odpady
właściwych dla rodzaju materiału.
Page 28

28
FR
Cher client,
Merci d’avoir acheté cet appareil de Hendi. Veuillez lire attentivement ce mode d’emploi avant de brancher l’appareil afin d’éviter tout endommagement pour cause d’usage abusif. Veuillez notamment lire les
consignes de sécurité avec la plus grande attention.
Règles de sécurité
• L’utilisation abusive et le maniement incorrect de
l’appareil peuvent entraîner une grave détérioration
de l’appareil ou provoquer des blessures.
• L’appareil doit être utilisé uniquement pour le but il
a été conçu. Le fabricant décline toute responsabilité
en cas de dommage consécutif à un usage abusif ou
un maniement incorrect.
• Veillez à tenir l’appareil et la prise électrique hors de
portée de l’eau ou de tout autre liquide. Si malencontreusement l’appareil tombe dans l’eau, débranchez
immédiatement la prise électrique et faites contrôler
l’appareil par un réparateur agréé. La non-observation de cette consigne entraîne un risque d’accident
mortel.
• Ne tentez jamais de démonter vous-même le bâti de
l’appareil.
• N’enfoncez aucun objet dans la carcasse de l’appareil.
• Ne touchez pas la prise avec les mains mouillées ou
humides.
• Contrôlez régulièrement la prise électrique et le cordon pour détecter toute éventuelle détérioration. Si
la prise ou le cordon est endommagé, confiez la réparation à un réparateur agréé.
• N’utilisez pas l’appareil si celui-ci est tombé ou s’il
a subi un choc pour toute autre raison. Dans ce cas,
faites contrôler l’appareil par un réparateur agréé à
qui vous confierez la réparation le cas échéant.
• Ne tentez pas de réparer vous-même l’appareil. Cela
présente un risque d’accident mortel.
• Veillez à tenir le cordon électrique éloigné de tout objet coupant ou chaud et à l’écart des flammes. Pour
débrancher la prise électrique, saisissez toujours la
prise et ne tirez jamais directement sur le cordon.
• Veillez à disposer le cordon électrique (ou la rallonge)
de sorte que l’appareil ne puisse pas être débranché
accidentellement et que personne ne trébuche sur le
cordon.
• Surveillez continuellement l’appareil lorsqu’il est en
cours de fonctionnement.
• Les enfants n’ont pas conscience de l’usage incorrect des appareils électriques. Pour cette raison, ne
laissez jamais les enfants utiliser des appareils ménagers sans surveillance.
• Débranchez toujours la prise électrique lorsque l’appareil n’est pas utilisé et lors de son nettoyage.
• Danger ! Tant que la prise électrique est branchée,
l’appareil demeure sous tension.
• Arrêtez l’appareil avant de débrancher la prise électrique.
• Ne portez jamais l’appareil par le cordon électrique.
• N’utilisez pas d’accessoires qui n’ont pas été livrés
avec l’appareil.
• Branchez l’appareil seulement sur une prise de courant avec la tension et la fréquence indiqués sur la
plaque indiquant le type.
• Evitez toute surcharge.
• Après utilisation, débranchez l’appareil en retirant la
fiche de la prise de courant.
• Débranchez aussi toujours l’appareil quand vous le
remplissez ou le nettoyez.
• L’installation électrique doit satisfaire aux règles nationales et locales en vigueur.
• Cet appareil n´est pas apte à être utilisé par des
personnes (enfants compris) avec capacités physiques, sensorielles ou intellectuelles diminuées ou
ne possédant pas l´expérience et les connaissances
suffisantes, à moins qu´une personne responsable
de leur sécurité assure la supervision ou donne des
instructions en ce qui concerne l´utilisation de l´appareil.
Page 29

29
FR
Paramètres techniques
Consommation d’énergie: 150 W
Tension: 220–240V~
Fréquence: 50 Hz
Capacité: 1,5 litre
Remplissage maximal du récipient: 1,000 ml
Dimensions: 425x285x(hauteur)262mm
Poids: 11,0 kg
Longueur du câble d’alimentation: 150 cm
Informations de sécurité importantes
•
Pour utiliser la machine pour la glace il n’est pas
nécessaire d’utiliser une horloge externe ou la
télécommande séparée.
•
Les éléments de la machine ne doivent pas être
lavés dans le lave-vaisselle. Nettoyer manuellement dans l’eau chaude avec un détergent doux.
•
L’appareil est prévu pour l’utilisation domestique
ou similaire, dans des cuisines pour le personnel,
les locaux sociaux, les offices ou autres lieux de
travail.
•
Avant d’utiliser l’appareil il faut déployer le câble
d’alimentation.
•
Ne pas dépasser les limites du remplissage maximal du récipient pour la glace (3/4 de capacité) – la
glace augmente de volume durant la congélation.
•
Les ingrédients doivent être mis dans un récipient
pour la glace avant de le placer dans la machine.
Ne pas mettre les ingrédients à travers l’ouverture
dans le boîtier du compresseur.
•
Pendant le fonctionnement ne pas mettre dans un
récipient des outils ou des couverts de table ni de
vos doigts – il existe un risque de blessure.
•
Avant d’utiliser assurez-vous que tous les composants de l’appareil sont correctement montés.
•
Ne pas couvrir les orifices de ventilation de la boîte
du compresseur et du moteur pendant le fonctionnement de l’appareil.
•
Pendant le fonctionnement le récipient pour la
glace doit être toujours mis à l’intérieur.
•
La machine ne doit pas être utilisée avec d’autres
accessoires provenant des autres appareils ou des
autres marques.
•
Pour enlever la glace, utilisez les cuillères ou les
spatules en plastique ou en bois – ne pas utiliser
d’outils tranchants.
Préparation de l’appareil pour la première utilisation :
•
Lavez toutes les parties amovibles dans l’eau
chaude.
•
Lavez la boîte et l’ouverture avec un chiffon humide (bien essoré).
•
Placez l’appareil sur une surface sèche et plane.
Page 30
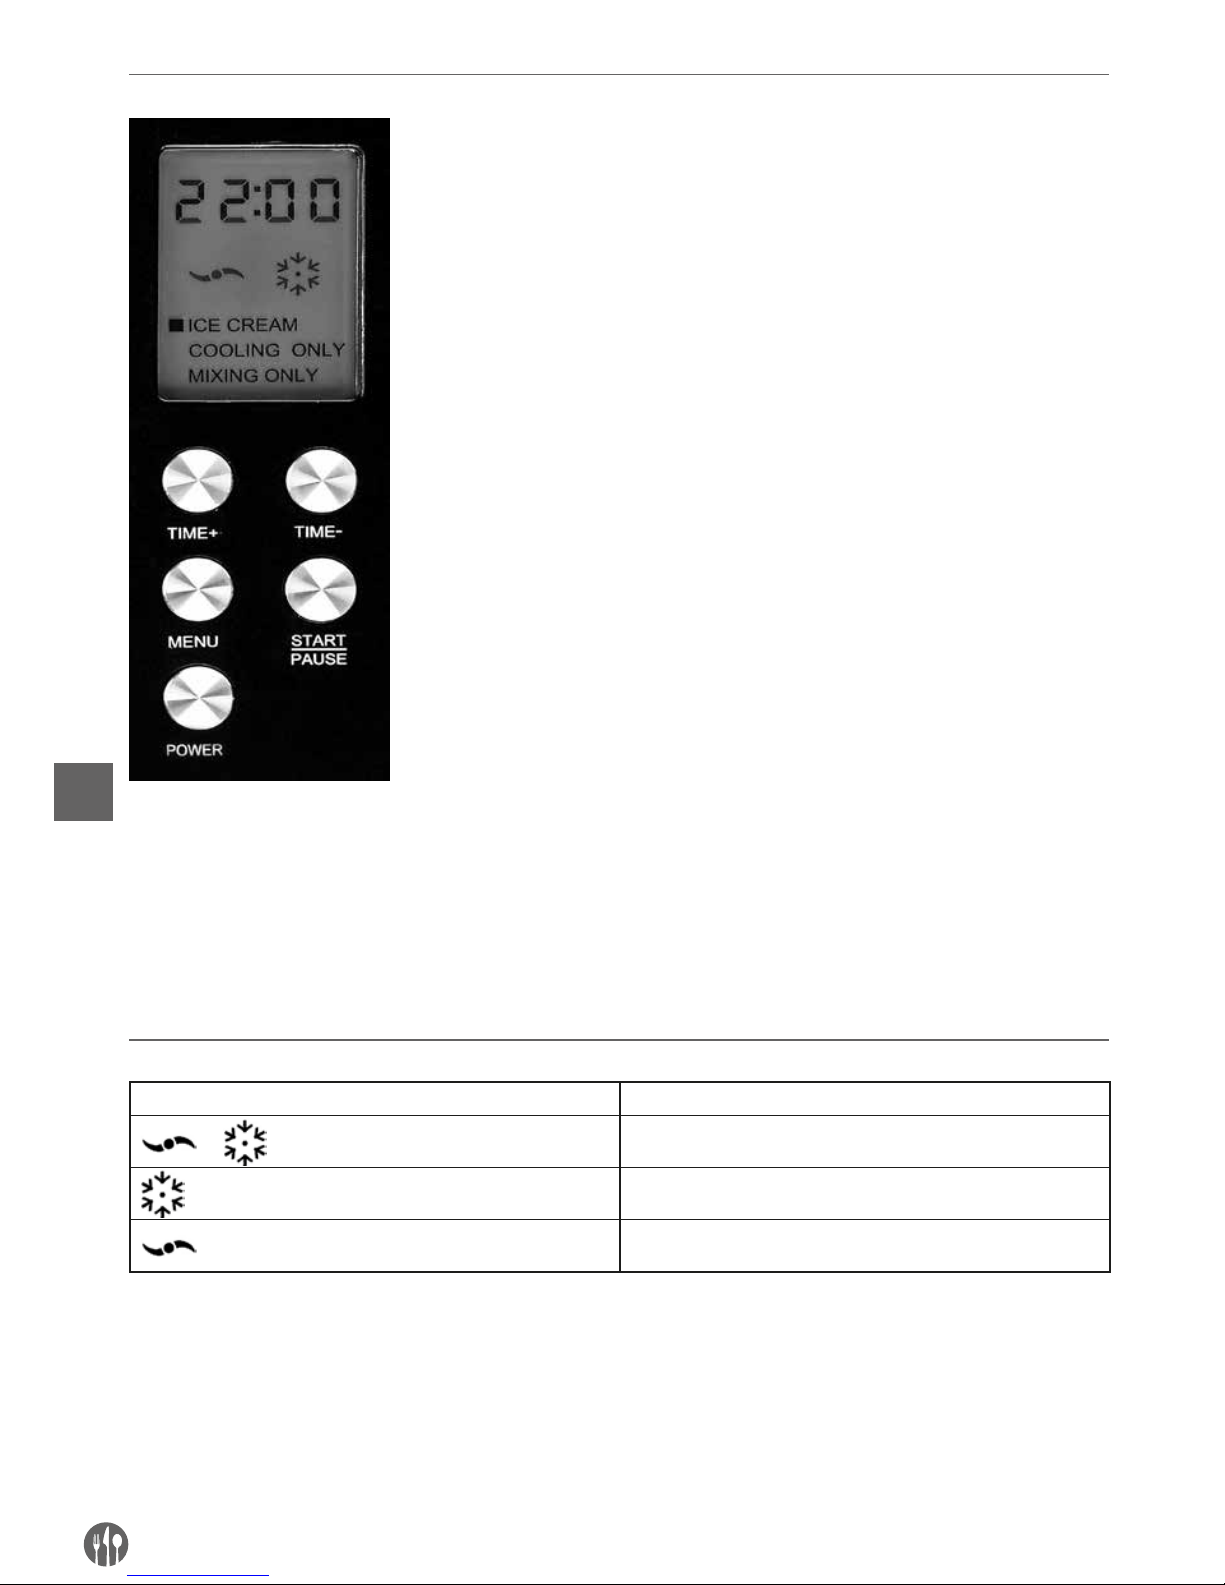
30
FR
Panneau de commande
Afficheur
Symbole Description
Mélange et congélation
Congélation
Mélange
Programme « MELANGE ET CONGELATION »
Le programme est destiné à la préparation de la glace. La durée du programme par défaut est de 60 minutes
et elle peut être modifiée en utilisant les touches « TIME+ » et « TIME- ».
Programme « CONGELATION »
Le programme sert à prolonger la durée de congélation si la glace préparée n’a pas la bonne consistance. La durée
du programme par défaut est de 30 minutes et elle peut être modifiée en utilisant les touches « TIME+ » et « TIME- ».
Touche « POWER » (Mise en marche)
Après avoir connecté la machine à la prise de courant, l’appareil se trouve en
mode veille. L’écran affiche la valeur « 00 ». Pour démarrer l’appareil, appuyez
la touche « POWER » : l’écran s’illumine en indiquant le temps « 60:00 ».
Pour éteindre l’appareil pendant le fonctionnement, appuyez de nouveau sur
la touche « POWER ».
Touche « MENU »
La touche MENU affiche trois programmes disponibles du fonctionnement de
l’appareil : « Mélange et congélation », « Congélation » et « Mélange ». En appuyant la touche « MENU » pendant le fonctionnement de la machine, celle-ci
retourne à l’écran de sélection.
Touche « TIME+ » (Prolongement du temps)
La durée du programme peut être prolongée en appuyant sur la touche «
TIME+ ». La durée du programme sera prolongée en intervalles d’une minute
– la durée maximale du programme est de 60 minutes.
Touche „TIME-” (Réduction du temps)
La durée du programme peut être réduite en appuyant la touche «TIME-».
La durée du programme sera réduite en intervalles d’une minute – la durée
minimale est de 5 minutes.
Touche « START/PAUSE » (Démarrage/Pause)
La touche « START/PAUSE » démarre le programme sélectionné. En appuyant
la touche pendant le fonctionnement de l’appareil le programme fonctionnant
est arrêté – pour le redémarrer il faut appuyer de nouveau la touche « START/
PAUSE ». Pour éviter d’endommager le compresseur, avant de redémarrer
le programme il faut attendre au moins 5 minutes. Remarque : si le programme n’est pas redémarré dans les 20 minutes, l’appareil s’éteint automatiquement.
Page 31

31
FR
Programme « MELANGE »
Le programme permet de mélanger bien les ingrédients avant la congélation. La durée du programme par
défaut est de 10 minutes et elle peut être modifiée en utilisant les touches « TIME+ » et « TIME- ».
Préparation de la glace
•
Refroidissez la masse de glace ou les ingrédients
pour la glace à 6–8 °C.
•
Ecrasez les fruits avant de mélanger les ingrédients. Ajoutez à la fin de petits morceaux de fruits.
•
N’utilisez pas trop d’alcool parce qu’il prolonge le
temps de congélation de la glace.
•
Mettez le récipient dans la machine.
•
Mettez l’agitateur dans un manchon à l’intérieur
du récipient pour la glace.
•
Mettez les ingrédients refroidis dans un récipient.
Ne remplissez pas le récipient en plus de ¾ de sa
capacité parce que la glace va augmenter de volume pendant la congélation.
•
Mettez le couvercle sur le récipient.
•
Branchez l’appareil à la prise de courant et démarrez (la touche « POWER »). L’afficheur va s’allumer
pour un moment en bleu et afficher la valeur « 60
:00 » et le symbole clignotant du programme par
défaut « Mélange et congélation ».
•
L’appareil est prêt à l’emploi.
•
Appuyez la touche « MENU » et sélectionnez le
programme en suivant les symboles sur l’écran.
•
REMARQUE : Après avoir sélectionné le programme il n’est pas possible de le modifier
pendant le fonctionnement. Les programmes «
Mélange et congélation » et « Mélange » peuvent
être arrêtés et redémarrés en appuyant la touche
« START/PAUSE ». Le programme « Congélation »
ne peut pas être arrêté.
•
Appuyez la touche « START/PAUSE ». L’appareil
commence à mélanger les ingrédients.
•
L’appareil affiche le temps restant jusqu’à la fin du
programme.
•
La durée du programme peut être modifiée en
utilisant les touches « TIME+ » et « TIME-« en
intervalles d’une minutes, cependant la durée
maximale du fonctionnement de l’appareil est de
60 minutes.
•
Après la période spécifiée, l’appareil s’éteint automatiquement et communique la fin du fonctionnement en émettant dix fois le signal acoustique.
Alors l’appareil affiche le temps 00 :00.
•
Si la glace n’est pas retirée dans les 10 minutes
après le signale de la fin du programme, la congélation supplémentaire se met automatiquement
pour éviter la dissolution de la glace.
•
La fonction de congélation automatique va maintenir la basse température dans le récipient pendant
une heure.
Retrait de la glace
•
Avant de retirer la glace éteignez l’appareil (la
touche « POWER ») et débranchez le câble d’alimentation de la prise de courant.
•
Enlevez le couvercle transparent.
•
Retirez le récipient pour la glace de l’appareil et
retirez soigneusement l’agitateur.
•
Mettez la glace dans un récipient adéquat en utilisant une cuillère en plastique ou en bois. N’utilisez pas d’objets tranchants ou pointus pour éviter
d’endommager le récipient. Il est recommandé
d’utiliser la spatule en silicone.
•
La machine est prête à préparer une autre portion de la glace juste après la fin du programme
précédent. Pour préparer une autre portion,
répétez toutes les opérations à partir du premier
point au début du manuel.
•
Conseil : Après la préparation de la glace aux fruits
ou du sorbet, retirez le récipient immédiatement
après l’achèvement du programme et mettez la
glace dans un récipient et dans le congélateur
pour les congeler complètement. Sinon, après
l’achèvement du programme, malgré la congélation apparente, la glace peut être encore molle à
l’intérieur.
Page 32

32
FR
Nettoyage et entretien
•
Avant de nettoyer, débranchez l’appareil de la prise
de courant.
•
N’immergez pas l’appareil dans l’eau ou dans un
autre liquide, ne nettoyez pas avec de l’eau et un
autre liquide. Le moteur et le compresseur ne
peuvent pas entrer en contact direct avec de l’eau.
•
N’utilisez pas de substances abrasives ou corrosives pour le nettoyage.
•
Lavez les pièces amovibles à l’eau chaude avec un
détergent doux. Les pièces ne peuvent pas être
lavées dans le lave-vaisselle. Le récipient pour la
glace ne peut pas être immergé dans l’eau.
•
Nettoyez la boîte du compresseur avec un chiffon
humide.
•
Avant la réinstallation des pièces, essuyez-les
soigneusement.
Recettes:
Informations générales
Le présent chapitre fournit des informations
générales sur le processus de préparation de la
glace et quelques recettes de base. La quantité d’ingrédients doit être toujours ajustée au remplissage
maximal du récipient. La glace fraîche ne contient
pas de conservateurs et a de l’odeur plus appétissante et pour ces raisons il est recommandé de servir de la glace juste après la préparation. La glace
conservée trop longtemps dans le congélateur perd
sa saveur unique. La glace peut être conservée pendant une courte période dans le congélateur dans
un récipient approprié avec un couvercle (n’utilisez
pas le récipient pour la glace utilisé pour préparer la
glace). Pour conserver la glace pendant une longue
période, ajoutez 20 de masse de base de glace de
sorte que la glace ne forme pas de morceaux de
glace.
Les ingrédients doivent être bien refroidis avant de
les mettre dans un récipient pour la glace. Si les ingrédients sont refroidis plus longtemps, cela réduira
le temps nécessaire pour la préparation (environ 30
minutes). Pour préparer la glace aux fruits, utilisez
uniquement les fruits mûrs. Les morceaux de fruits
ou des fruits entiers doivent être ajoutés à la fin de
processus de congélation. Utilisez pour la préparation de la masse uniquement des œufs frais. Vous
pouvez utiliser pour la préparation de la crème ou
du lait. Plus grande quantité de crème provoque que
la glace sera plus douce. Le sucre peut être remplacé par du lait, du sirop ou de l’édulcorant (déconseillez en cas de la glace molle). Le lait de vache
peut être remplacé par le lait de soja. Si la glace doit
être dure, mettez la masse prête dans un congélateur pendant 15-20 minutes avant de la mettre dans
un récipient et définissez la durée plus longue du
programme de congélation.
La glace dissoute exige une consommation immédiate et ne peut pas être mise à la nouvelle congélation.
GLACE A LA CREME
La glace à la crème est préparée à partir du lait, de
la crème, des jaunes d’œufs, du sucre et d’autres
ingrédients. La glace est moelleuse et lisse grâce au
mélange continu pendant la congélation.
Recette de base pour la glace à la vanille
250 ml de lait
300 ml de crème
1 gousse de vanille
Pincée de sel
3 jaunes d’œufs
3 cuillères à soupe de sucre
Chauffez du lait et de la crème. Coupez la gousse
de vanille et grattez les graines de l’intérieur et
ajoutez-les au reste des ingrédients. Ajoutez du sel.
Battre les jaunes d’œufs et versez lentement du lait.
Chauffez la masse à 75ºC en mélangeant pour éviter
la formation des morceaux des œufs. Ensuite refroidissez la masse et mettez-la dans le congélateur.
La masse congelée est prête à être placée dans la
machine.
LA GLACE MOLLE
La glace la plus molle et la plus douce est préparée
à partir de la crème, des jaunes d’œufs et d’autres
ingrédients. La glace devient extrêmement molle et
sa consistance est lisse grâce à l’agitation continue pendant la congélation. Le programme ne doit
pas être trop prolongé parce que la glace ne doit pas
être mélangée trop longtemps dans la machine.
Page 33

33
FR
Recette de base pour la glace molle à la vanille
375 ml de crème
gousse de vanille
80 g miel
1 jaune d’œuf
1 œuf
Pincée de sel
Faites bouillir de la crème avec la gousse de vanille
et du miel. Laissez refroidir et laissez reposer pendant une journée. Mélangez le reste des ingrédients
et versez dans un récipient pour la glace. Mettez
dans la machine pour la glace.
GLACE AUX FRUITS
La glace aux fruits se compose essentiellement de
fruits écrasés, de la crème ou du yaourt et du blanc
d’œuf. Pour que la glace ait une consistance lisse,
la masse de glace doit être toujours mélangée pendant la congélation. Dans ce cas la machine pour la
glace remplit parfaitement sa fonction.
Recette de base pour la glace aux fruits
300 g de fruits écrasés
1 cuillère à soupe de jus de citron
75-100 g de sucre
1 cuillère à soupe de blanc
150 ml de crème
Mélangez des fruits écrasés avec du sucre et du
jus de citron. Battez les blancs avec de la crème et
ajoutez à la masse de fruits. Mélangez soigneusement tous les ingrédients et mettez-les dans le
récipient pour la glace et ensuite dans la machine.
Si vous préparez la glace à partir des fruits en conserve, vous pouvez éviter d’ajouter la portion supplémentaire de sucre.
SORBET
Le sorbet peut être préparé presque de tous les
fruits, des jus de fruits par exemple: framboise,
abricot, pêche, melon, kiwi etc. Le sorbet doit être
toujours mélangé pendant la congélation pour ne
pas conduire à la formation de morceaux de glace.
Les sorbets ne doivent pas être sucrés. Il est possible de préparer le sorbet aux tomates ou aux oranges avec du Campari comme un apéritif. Une balle de
sorbet servie dans un verre de champagne est une
idée pour un dessert délicieux et élégant.
Recette de base pour le sorbet
600-700 ml de masse de fruits ou de jus de fruits
75-100 g de sucre (en fonction du fruit utilisé)
1-2 cuillères à soupe de blancs d’œufs
Mélangez tous les ingrédients et mettez-les dans
un récipient pour la glace et mettez dans la machine. Vous pouvez ajouter une cuillère de liqueur,
de brandy ou d’un autre alcool. Si vous utilisez pour
la préparation des fruits en conserve, vous ne devez
plus ajouter de sucre.
Page 34

34
FR
Garantie
Tout vice ou toute défaillance entraînant un dysfonctionnement de l’appareil qui se déclare dans les 12
mois suivant la date de l’achat sera éliminé à titre
gratuit ou l’appareil sera remplacé par un appareil nouveau si le premier a été dûment exploité et
entretenu conformément aux termes de la notice
d’exploitation et s’il n‘a pas été indûment exploité
ou de manière non conforme à sa destination. La
présente stipulation ne porte pas de préjudice aux
autres droits de l’utilisateurs prévus par les dispositions légales. Dans le cas où l’appareil est donné à
la réparation ou doit être remplacé dans le cadre de
la garantie, il y a lieu de spécifier le lieu et la date de
l’achat de l’appareil et produire un justificatif nécessaire (par ex. facture ou ticket de caisse).
Conformément à notre politique d’amélioration
permanente de nos produits, nous nous réservons
le droit d’introduire sans avertissement préalable
des modifications à l’appareil, à l’emballage et aux
caractéristiques techniques précisées dans la documentation.
Retrait de l’exploitation et protection de l’environnement
L’équipement usé et retiré de l’exploitation doit être
valorisé conformément aux dispositions légales et
aux recommandations en vigueur à la date de son
retrait.
Les matériaux d’emballage tels que matières plastiques et cartons doivent être déposés dans les
bennes prévues pour le type du matériau considéré.
Page 35

35
IT
Gentile cliente,
grazie per aver acquistato questo apparecchio Hendi. Ti invitiamo a leggere queste istruzioni per l’uso con
attenzione prima di collegare l’apparecchio al fine di evitare danni dovuti a uso improprio. Ti invitiamo inoltre a prestare particolare attenzione alle precauzioni di sicurezza.
Precauzioni di sicurezza
• L’uso scorretto e improprio dell’apparecchio possono danneggiare seriamente l’apparecchio e ferire gli utenti.
• L’apparecchio può essere utilizzato solo per lo
scopo per cui è stato concepito e progettato. Il
produttore non è responsabile di eventuali danni
provocati da uso scorretto ed improprio.
• Tenere l’apparecchio e la spina elettrica lontani
da acqua ed altri liquidi. Nel caso improbabile
che l’apparecchio cada in acqua, staccare immediatamente la spina dalla presa e fare ispezionare
l’apparecchio da un tecnico certificato. . L’inosservanza delle presenti istruzioni può dare luogo a
situazioni pericolose
• Non provare mai ad aprire l’involucro dell’apparecchio da soli.
• Non inserire oggetti nell’involucro dell’apparecchio.
• Non toccare la presa con le mani bagnate o umide.
• Controllare regolarmente la spina ed il cavo per
la presenza di eventuali danni. Qualora la spina o
il cavo fossero danneggiati, farli riparare da una
società di riparazione certificata.
• Non utilizzare l’apparecchio dopo che è caduto o si
è danneggiato in qualsiasi altro modo. Farlo controllare e riparare, se necessario, da una società di
riparazione certificata.
• Non tentare di riparare l’apparecchio da soli.
Questo potrebbe dar luogo a situazioni pericolose.
• Assicurarsi che il cavo non venga a contatto con
oggetti appuntiti o caldi e tenerlo lontano da fiamme libere. Per staccare la spina dalla presa,
tirare sempre la spina e non il cavo.
• Assicurarsi che nessuno possa accidentalmente
tirare il cavo (o la prolunga) o inciampare sul cavo
• Controllare sempre l’apparecchio mentre è in funzione.
• I bambini non comprendono che l’uso improprio di
apparecchiature elettriche può essere pericoloso.
Pertanto, non lasciare mai che i bambini utilizzino
gli elettrodomestici senza supervisione.
• Staccare sempre la spina dalla presa di corrente
se l’apparecchio non è in uso e sempre prima della
pulizia.
• Avvertenza! Fino a quando la spina è inserita nella presa di corrente, l’apparecchio è collegato alla
fonte di alimentazione
• Spegnere l’apparecchio prima di estrarre la spina
dalla presa di corrente.
• Non trasportare mai l’apparecchio per il cavo.
• Non utilizzare dispositivi aggiuntivi che non sono
in dotazione con l’apparecchio
• Collegare l’apparecchio solo a una presa elettrica
con tensione e frequenza precisati sull’etichetta.
• Evitare di sovraccaricare.
• Spegnare l’apparecchio dopo l’uso togliendo la
spina della presa di corrente.
• Rimuovere sempre la spina dalla presa quando si
riempie o pulisce il dispositivo.
• L’installazione elettrica deve soddisfare le normative nazionali e locali applicabili. Questo apparecchio non è destinato all’uso da parte di persone
(inclusi i bambini) con capacità fisiche, sensoriali o
mentali ridotte, o senza esperienza e conoscenza,
a meno che non siano controllati o istruiti sull’uso
dell’apparecchio da una persona responsabile della loro sicurezza.
Page 36

36
IT
Caratteristiche tecniche
Presa di potenza: 150 W
Alimentazione: 220–240V~
Frequenza: 50 Hz
Capacità: 1,5 litri
Riempimento massimo del contenitore: 1,000 ml
Dimensioni: 425x285x(alt.)262mm
Peso: 11,0 kg
Lunghezza del cavo di alimentazione: 150 cm
Importanti informazioni di sicurezza
• Per utilizzare la macchina per gelato non è necessario utilizzare un orologio esterno o un telecomando separato.
• Non lavare le singole parti del dispositivo in lavastoviglie. Pulire a mano in acqua calda con un detergente delicato.
• Il dispositivo è destinato ad uso domestico o simile
in cucine per personale, locali sociali o uffici o altri
luoghi di lavoro.
• Prima di utilizzare il dispositivo, svolgere il cavo di
alimentazione.
• Non superare i limiti di riempimento massimo del
contenitore per gelato (3/4 di capacità) – il gelato
aumenta il volume durante il congelamento.
• Mettere gli ingredienti in un contenitore per gelato prima di metterlo in macchina. Non mettere gli
ingredienti attraverso l’apertura del compressore.
• Durante il funzionamento non mettere nel contenitore utensili o posate nonché non mettere le dita
all’interno – esiste il rischio di lesioni.
• Prima di utilizzare assicurarsi che tutti le parti del
dispositivo sono state montate correttamente.
• Non ostruire le aperture di ventilazione della
scatola del compressore e il motore durante il
funzionamento del dispositivo.
• Durante il funzionamento il contenitore per gelato
deve essere sempre in mezzo.
• La macchina non deve essere utilizzata con gli accessori di altre macchine o altre marche.
• Per rimuovere il gelato si deve usare cucciai o palette di plastica – non utilizzare utensili taglienti.
Preparazione del dispositivo prima del primo utilizzo:
• Sciacquare con acqua calda tutte le parti rimovibili.
• Pulire il contenitore e l’apertura per contenitore
con un panno umido (ben strizzato).
• Posizionare il dispositivo su una superficie piana
e asciutta.
Page 37
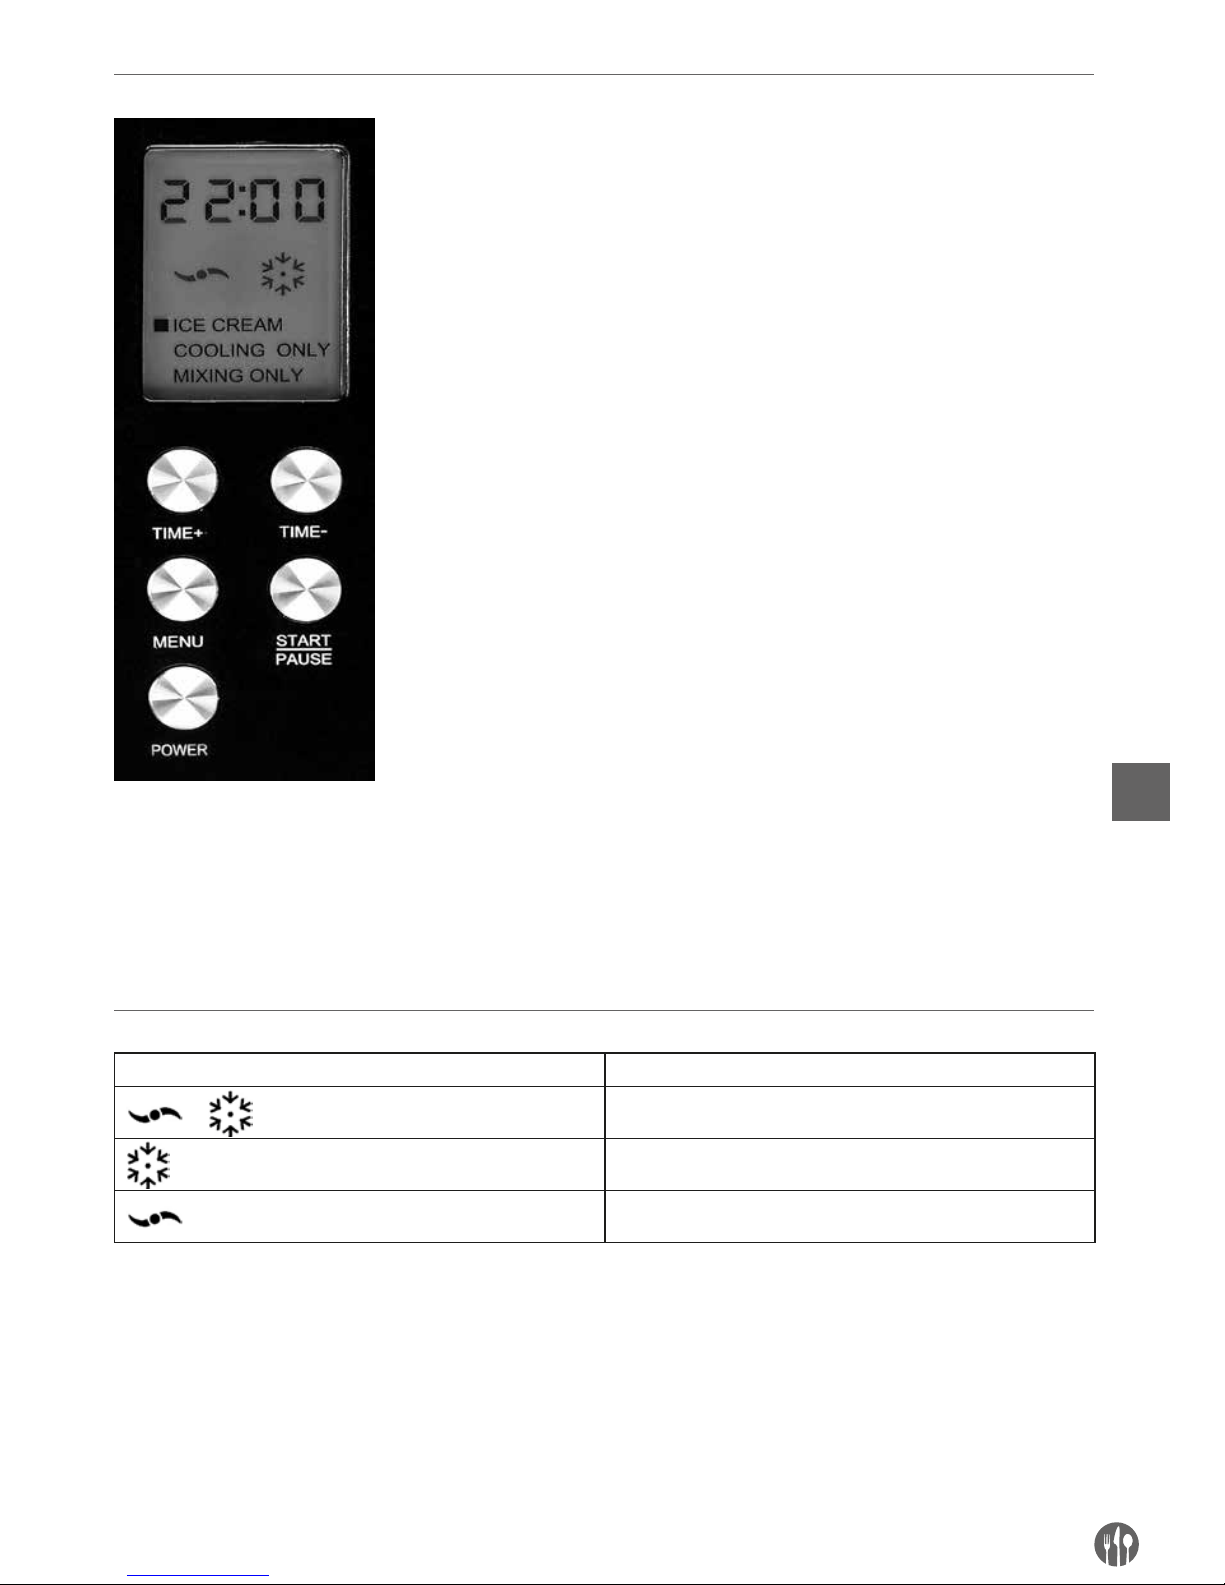
37
IT
Pannello di controllo
Display
Simbolo Descrizione
Miscelazione e congelamento
Congelamento
Miscelazione
Programma „MISCELAZIONE E CONGELAMENTO”
Il programma destinato per preparare il gelato. Il tempo predefinito di programma è di 60 minuti e può essere
modificato con i tasti “TIME+” e “TIME-”.
Programma „CONGELAMENTO”
Il programma è utilizzato per prolungare il congelamento se il gelato preparato non ha la giusta consistenza.
Il tempo predefinito di programma è di 30 minuti e può essere modificato con i tasti “TIME+” e “TIME-”.
Tasto “POWER” (Avviamento)
Dopo aver collegato la macchina per il gelato alla presa il dispositivo è in modalità di attesa. Il display visualizza il valore “00”, Per accendere il dispositivo,
premere il tasto “POWER”: lo schermo si illumina indicando il tempo “60:00”.
Per spegnere il dispositivo durante il funzionamento, premere di nuovo il tasto
“POWER”.
Tasto “MENU”
Il tasto “MENU” visualizza tre programmi disponibili del funzionamento del
dispositivo: “Miscelazione e congelamento”, “Congelamento” e “Miscelazione”. Premendo il tasto “MENU” durante il funzionamento della macchina si
ritorna allo schermo di selezione.
Tasto “TIME+” (Prolungamento del tempo)
La durata del programma può essere prolungata premendo il tasto “TIME+”. Il
tempo del funzionamento sarà prolungato a intervalli di un minuto – la durata
massima del programma è di 60 minuti.
Tasto “TIME-” (Riduzione del tempo)
La durata del programma può essere ridotta premendo il tasto “TIME-”. Il
tempo del funzionamento sarà ridotto a intervalli di un minuto – la durata
minima del programma è di 5 minuti.
Tasto “START/PAUSE” (Avvio/Pausa)
Il tasto “START/PAUSE” avvia il programma selezionato. Premendo del tasto
durante il funzionamento del dispositivo si interrompe il programma – per ria
-
vviarlo, premere di nuovo il tasto „START/PAUSE”. Per evitare di danneggiare
il compressore, prima di riavviare il programma attendere almeno 5 minuti.
Nota: se il programma non è ripreso entro 20 minuti, il dispositivo si spegne
automaticamente.
Page 38

38
IT
Programma „MISCELAZIONE”
Il programma permette un’adeguata miscelazione degli ingredienti prima del congelamento. Il tempo predefinito di programma è di 10 minuti e può essere modificato con i tasti “TIME+” e “TIME-”.
Preparazione del gelato
• Raffreddare la massa per gelato o gli ingredienti a
temperatura di 6-8ºC.
• Prima di miscelare gli ingredienti, schiacciare le
frutta. Alla fine aggiungere piccoli pezzi di frutta.
• Non utilizzare troppo alcol per non prolungare il
tempo di congelamento del gelato.
• Il contenitore per gelato mettere nel dispositivo.
• Inserire l’agitatore in un tappo apposito al centro
del contenitore per gelato.
• Mettere gli ingredienti raffreddati nel contenitore
per gelato. Non riempire il contenitore più di ¾ di
sua capacità perche il gelato aumenta il volume
durante il congelamento.
• Mettere il coperchio sul contenitore.
• Collegare il dispositivo alla presa e avviare (tasto
“POWER”’). Il display si illumina per un breve momento in blu e indica il valore “60:00” e il simbolo
lampeggiante del programma predefinito “Miscelazione e congelamento”.
• Il dispositivo è pronto per l’utilizzo.
• Premere il tasto “MENU” e selezionare il programma adeguato, seguendo i simboli sul display.
• NOTA: Dopo aver selezionato il programma, non
si può cambiarlo durante il funzionamento del
dispositivo. I programmi “Miscelazione e congela-
mento” e “Miscelazione” possono essere arrestati
e riavviato premendo il tasto “START/PAUSA”. Il
programma “Congelamento” non può essere fermato.
• Premere il tasto “START/PAUSE”. Il dispositivo inizierà la miscelazione degli ingredienti.
• Il dispositivo mostra il tempo rimanente del programma.
• Il tempo del programma può essere modificato con i tasti “TIME+” e „TIME-” ad intervalli di 1
minuto, ma il tempo massimo di funzionamento
è di 60 minuti.
• Dopo il tempo predefinito il dispositivo si spegne
automaticamente e segnala la fine del lavoro
emettendo dieci volte il segnale acustico. La macchina visualizza il tempo 0:00.
• Se il gelato non è tolto entro 10 minuti dopo il
segnale della fine del programma, il congelamento supplementare è automaticamente avviato per
impedire la dissoluzione del gelato.
• La funzione del congelamento automatico manterrà la temperatura bassa nel contenitore per
un’ora.
Rimozione del gelato
• Prima di rimuovere il gelato, spegnere il dispositivo (tasto “POWER”) e scollegare il cavo di alimentazione dalla presa.
• Togliere il coperchio trasparente.
• Togliere il contenitore per gelato dalla macchina e
rimuovere attentamente l’agitatore.
• Mettere il gelato in una confezione adeguato utilizzando un cucchiaio di plastica o in legno. Non utilizzare utensili appuntiti o taglienti per rimuovere
il gelato per evitare di danneggiare il contenitore.
Si consiglia di utilizzare una spatola in silicone.
• Il dispositivo è pronto per preparare un’altra porzione di gelato subito dopo la fine del programma
precedente. Per preparare la porzione successiva
si deve ripetere tutte le attività dal primo punto
all’inizio del manuale.
• Nota: Dopo aver preparato il gelato di frutta o il
sorbetto, rimuovere il contenitore per gelato immediatamente dopo la fine del programma, mettere il gelato in una confezione adeguata e mettere
nel congelatore per congelare completamente. Altrimenti dopo la fine del programma, nonostante
il congelamento apparente, il gelato può essere
ancora morbido.
Pulizia e manutenzione
• Prima di pulire il dispositivo scollegare la spina
dalla presa di corrente.
• Non immergere la macchina in acqua. Non pulire
con acqua e altri liquidi. Il motore e il compressore non possono entrare in contatto diretto con
l’acqua.
Page 39

39
IT
• Non utilizzare per pulizia agenti abrasivi o corrosivi.
• Le parti amovibili devono essere lavate con acqua
calda con un detergente delicato. Le parti non
possono essere lavate in lavastoviglie. Il contenitore per gelato non può essere immerso in acqua.
• Pulire la scatola del compressore con un panno
morbido.
• Prima di rimontare pulire accuratamente tutte le
parti del dispositivo.
Ricette:
Informazioni generali
Questo capitolo presenta le informazioni generali riguardanti la preparazione del gelato e alcune
ricette di base. La quantità degli ingredienti deve
essere sempre adattata al livello massimo di riempimento del contenitore. Il gelato fresco non contiene conservanti e hanno l’odore più appetitoso, e
per questi motivi si consiglia di servirlo immediatamente dopo la preparazione. Il gelato conservato troppo a lungo nel congelatore perdono il loro
sapore unico. È possibile conservarlo per un breve
periodo nel congelatore in un contenitore adatto con
coperchio (non conservare il gelato nel contenitore
usato per preparare il gelato). Per conservare il gelato per un lungo periodo, si deve aggiungere 20 g di
massa di base in modo che il gelato non formerà i
grumi di ghiaccio.
Raffreddare gli ingredienti prima di metterli in contenitore per il gelato. Il periodo più lungo di raffreddamento permette di ridurre la preparazione del
gelato (circa 30 minuti). Per preparare il gelato di
frutta si deve usare sempre frutta matura. I pezzi di
frutta o frutti interi aggiungere alla fine del processo
di congelamento. Per preparare la massa utilizzare
sempre uova fresche. Per preparare il gelato si può
utilizzare crema o latte. Più grande quantità di crema permette di preparare il gelato più morbido. Lo
zucchero può essere sostituito da latte, sciroppo o
dolcificante (sconsigliato in caso di gelato morbido).
Il latte di vacca può essere sostituito dal latte di soia.
Il gelato deve essere duro, la massa pronta deve essere messa nel congelatore per 15-20 minuti prima
di metterla in un contenitore per gelato, altrimenti
si deve impostare un tempo più lungo di congelamento.
Il gelato sciolto richiede il consumo immediato e
non deve esser ricongelato.
GELATO DI CREMA
Il gelato di crema è preparato con latte, panna, tuorlo d’uovo, zucchero e alcuni altri ingredienti. Il gelato
diventa soffice e morbido grazie alla continua agitazione durante il congelamento.
Ricetta di base per gelato di vaniglia
250 ml di latte
300 ml di panna
1 baccello di vaniglia
Pizzico di sale
3 tuorli d’uovo
3 cucchiai di zucchero
Scaldare il latte e la panna. Tagliare un baccello di
vaniglia e rimuovere i semi a aggiungere al resto degli ingredienti. Aggiungere il sale. Montare i tuorli
con lo zucchero e aggiungere lentamente il latte.
Riscaldare la massa ottenuta fino a75ºC mescolando continuamente per evitare di formare grumi di
uova. Poi raffreddare la massa e metterla nel congelatore. La massa ghiacciata è pronta per metterla
nella macchina.
IL GELATO MORBIDO
Il gelato più soffice e morbido è preparato da panna,
tuorlo d’uovo e altri ingredienti.
Il gelato diventa estremamente morbido e ha una
consistenza liscia grazie alla miscelazione continua durante il congelamento. Il programma non
deve essere troppo prolungato perché il gelato non
richiede di essere mescolato nella macchina troppo
a lungo.
Page 40

40
IT
Ricetta di base per gelato di vaniglia morbido
375 ml di panna
Baccello di vaniglia
80 g di miele
1 tuorlo d’uovo
1 uovo
Pizzico di sale
Far bollire la panna col baccello di vaniglia e miele.
Lasciare raffreddare e riposare per un giorno. Mescolare altri ingredienti e versare in un contenitore
per gelato e mettere in una macchina per gelato.
GELATO DI FRUTTA
Il gelato di frutta si compone principalmente da
frutta schiacciata, zucchero, panna o yogurt e di albume. Perché il gelato abbia una consistenza liscia,
la massa di gelato deve essere sempre mescolata
durante il congelamento. In questo caso la macchina per gelato riempisce idealmente la sua funzione.
Ricetta di base per gelato di frutta
300 g di frutta schiacciata
1 cucchiaio di succo di limone
75-100 g di zucchero
1 cucchiaio di albume
150 ml di panna
Mescolare la frutta schiacciata con lo zucchero e il
succo di limone. Montare i bianchi con la panna e
aggiungere alla massa di frutta. Mescolare precisamente tutti gli ingredienti e mettere in un contenitore per il gelato. Poi mettere nella macchina. Se
per la preparazione di massa sono utilizzate frutta
in scatola, l’aggiunta di una porzione di zucchero
può essere inutile.
SORBETTO
Il sorbetto può essere preparato con quasi tutta
frutta o tutti succhi di frutta per esempio, lampone,
albicocca, pesca, melone o kiwi ecc. Il sorbetto deve
essere sempre mescolato durante il congelamento
per impedire la formazione di grumi di ghiaccio. I
sorbetti non devono essere dolci. Si può preparare
il sorbetto di pomodoro o arancione con Campari
come antipasto. Una palla di sorbetto servita in un
bicchiere di champagne è un’idea per un dessert
delizioso ed elegante.
Ricetta di base per sorbetto
600-700 ml di massa di frutta o di succo di frutta
75-100 g di zucchero (secondo la frutta utilizzata)
1-2 cucchiai di albumi
Mescolare tutti gli ingredienti e mettere in un contenitore per gelato. Poi mettere il contenitore nella
macchina. Si può aggiungere un cucchiaio di liquore, di brandy o di altro alcol. Se per la preparazione
si usa frutta in scatola non è necessario di aggiungere zucchero.
Garanzia
Qualsiasi difetto che influenza la funzionalità del
dispositivo che compaia entro un anno dall’acquisto sarà corretto a titolo interamente gratuito o con
la sostituzione del prodotto che è stato utilizzato e
sottoposto a manutenzione corretta seguendo le istruzioni, senza alcuna violazione. I diritti legali del
cliente non sono assolutamente modificati. Nel caso
in cui l’intervento di manutenzione o sostituzione sia
previsto nel periodo di validità della garanzia, precisare dove e quando si è acquistato il prodotto, possibilmente allegando lo scontrino.
In linea con la nostra politica di sviluppo continuo dei
prodotti, ci riserviamo il diritto di modificare il prodotto, l’imballo e le specifiche di documentazione,
senza notifica alcuna.
Smaltimento & Ambiente
Alla fine della vita utile del dispositivo, smaltire conformemente alle normative e linee guida applicabili.
Eliminare i materiali di imballaggio, quali plastica e
cartone, negli specifici contenitori.
Page 41

41
RO
Stimate client,
Vă mulțumim pentru achiziționarea acestui aparat Hendi. Vă rugăm să citiți cu atenția acest manual înainte
de a conecta aparatul pentru evitarea defectării ca urmare a utilizării incorecte. Acordați o atenție deosebită
regulilor de siguranță.
Reguli de siguranță
• Operarea incorectă şi utilizarea necorespunzătoare a aparatului poate avaria grav aparatul şi
poate cauza răni oamenilor.
• Aparatul poate fi folosit doar în scopul pentru care
a fost proiectat. Producătorul nu este răspunzător
pentru orice avariere cauzată operării incorecte şi
a utilizării necorespunzătoare.
• Asiguraţi-vă că aparatul şi ştecherul nu intră în
contact cu apă sau alte lichide. În cazul în care
aparatul este scăpat în apă, scoateţi imediat
ştecherul din priză şi un tehnician autorizat trebuie să-l verifice. Dacă nu respectaţi aceste instrucţiuni, acest lucru poate cauza situaţii care vă
pot pune viaţa în pericol.
• Nu incercati sa deschideti singuri carcasa aparatului.
• Nu introduceţi nici un fel de obiecte în carcasa
aparatului.
• Nu atingeţi ştecherul cu mâinile ude sau umede.
• Verificaţi în mod regular ştecherul şi cablul ca
acestea să nu fie avariate. Dacă ştecherul şi cablul
sunt avariate, acestea trebuie reparate de către o
firmă de reparaţii autorizată.
• Nu utilizaţi aparatul după ce a suferit vreo
căzătură sau altă daună. Duceţi-l la reparat, dacă
este necesar, la o companie specializată.
• Nu încercaţi să reparaţi aparatul singuri. Dacă nu
respectaţi aceste instrucţiuni, acest lucru poate
cauza situaţii care vă pot pune viaţa în pericol.
• Asiguraţi-vă ca nici un obiect ascuţit sau fierbinte
să nu intre în contact cu cablul şi feriţi-l de foc.
Pentru a scoate ştecherul din priză, întotdeauna
prindeţi cu mâna priza şi nu scoateţi niciodată din
priză prinzând de cablu.
• Asiguraţi-vă că nimeni nu poate trage de cablu în
mod accidental (sau cablul prelungitor) sau să se
împiedice de cablu.
• Întotdeauna supravegheaţi aparatul atunci când
se utilizează.
• Copiii nu înţeleg că utilizarea incorectă a aparatelor electrice poate fi periculoasă. Prin urmare,
nu permiteţi copiilor să folosească electrocasnice
fără supraveghere.
• Întotdeauna scoateţi aparatul din priză atunci când
aparatul nu este folosit sau înainte de curăţare.
• Avertizare! Cât timp ştecherul este în priză,
aparatul este conectat la sursa de curent.
• Opriţi aparatul înainte de a scoate ştecherul din
priză.
• Nu transportaţi niciodată aparatul de cablu.
• Nu folosiţi alte dispozitive decât acelea furnizate
împreună cu aparatul.
• Conectaţi aparatul la o sursă de electricitate
cu voltajul şi frecvenţa menţionate pe eticheta
aparatului.
• Evitaţi supraîncărcarea.
• Opriţi aparatul după utilizare, scoţând ştecherul
din priză.
• Întotdeauna scoateţi ştecherul din priză când umpleţi sau curăţaţi aparatul.
• Instalaţia electrică trebuie să fie în conformitate
cu reglementările naţionale şi locale.
• Acest aparat nu trebuie folosit de copii sau persoane care au capacităţi mentale, senzoriale sau
fizice reduse, sau lipsă de experienţă şi cunoştinţe,
decât dacă sunt supravegheaţi de o persoană responsabilă care are instructiunile cu privire la utilizarea corecta a aparatului.
Page 42

42
RO
Specificații tehnice
Consum energetic: 150 W
Tensiune: 220–240V~
Frecvența: 50 Hz
Capacitate: 1,5 litri
Cantitate max. de umplere: 1,000 ml
Dimensiuni: 425x285x(H)262mm
Greutate: 11,0 kg
Cablu de alimentare: 150 cm
Instrucțiuni speciale de siguranță
•
Mașina de înghețată nu este creată pentru a fi
utilizată cu ajutorul unui cronometru extern sau a
unui sistem separat de control.
•
Nu curățați nicio parte a aparatului în mașina de
spălat vase, ci numai în apă caldă cu săpun.
•
Acest aparat este destinat uzului casnic sau unuia
similar precum: zone de luat masa pentru angajați
în magazine, birouri și alte spații de lucru.
•
Derulați complet cablul de alimentare.
•
Nu depășiți cantitatea maximă de umplere (max.
3/4 din volumul vasului de înghețată), pentru că
înghețata se va dilata în timpul procesului de congelare.
•
Introduceți întotdeauna ingredientele în vasul detașabil de înghețată și niciodată în nișa carcasei
compresorului.
•
Nu introduceți instrumente, tacâmuri sau degete
în vas în timpul funcționării - Pericol de accidentare.
•
Folosiți aparatul numai atunci când este corect
asamblat.
•
Pe durata utilizării, fantele de ventilare ale carcasei compresorului și blocul motor trebuie să
rămână libere și neacoperite.
•
Nu utilizați dispozitivul fără vasul de înghețată!
•
Nu utilizați aparatul cu accesoriile altor dispozitive
sau mărci.
•
Nu folosiți obiecte ascuțite pentru a scoate înghețata. Folosiți numai linguri sau spatule din plastic sau lemn.
Pregătirea pentru prima utilizare
•
Clătiți toate părțile detașabile în apă caldă.
•
Ștergeți învelișul și fanta vasului de înghețată cu o
cârpă umedă, bine stoarsă.
•
Puneți aparatul pe o suprafață de lucru uscată și
plană.
Page 43
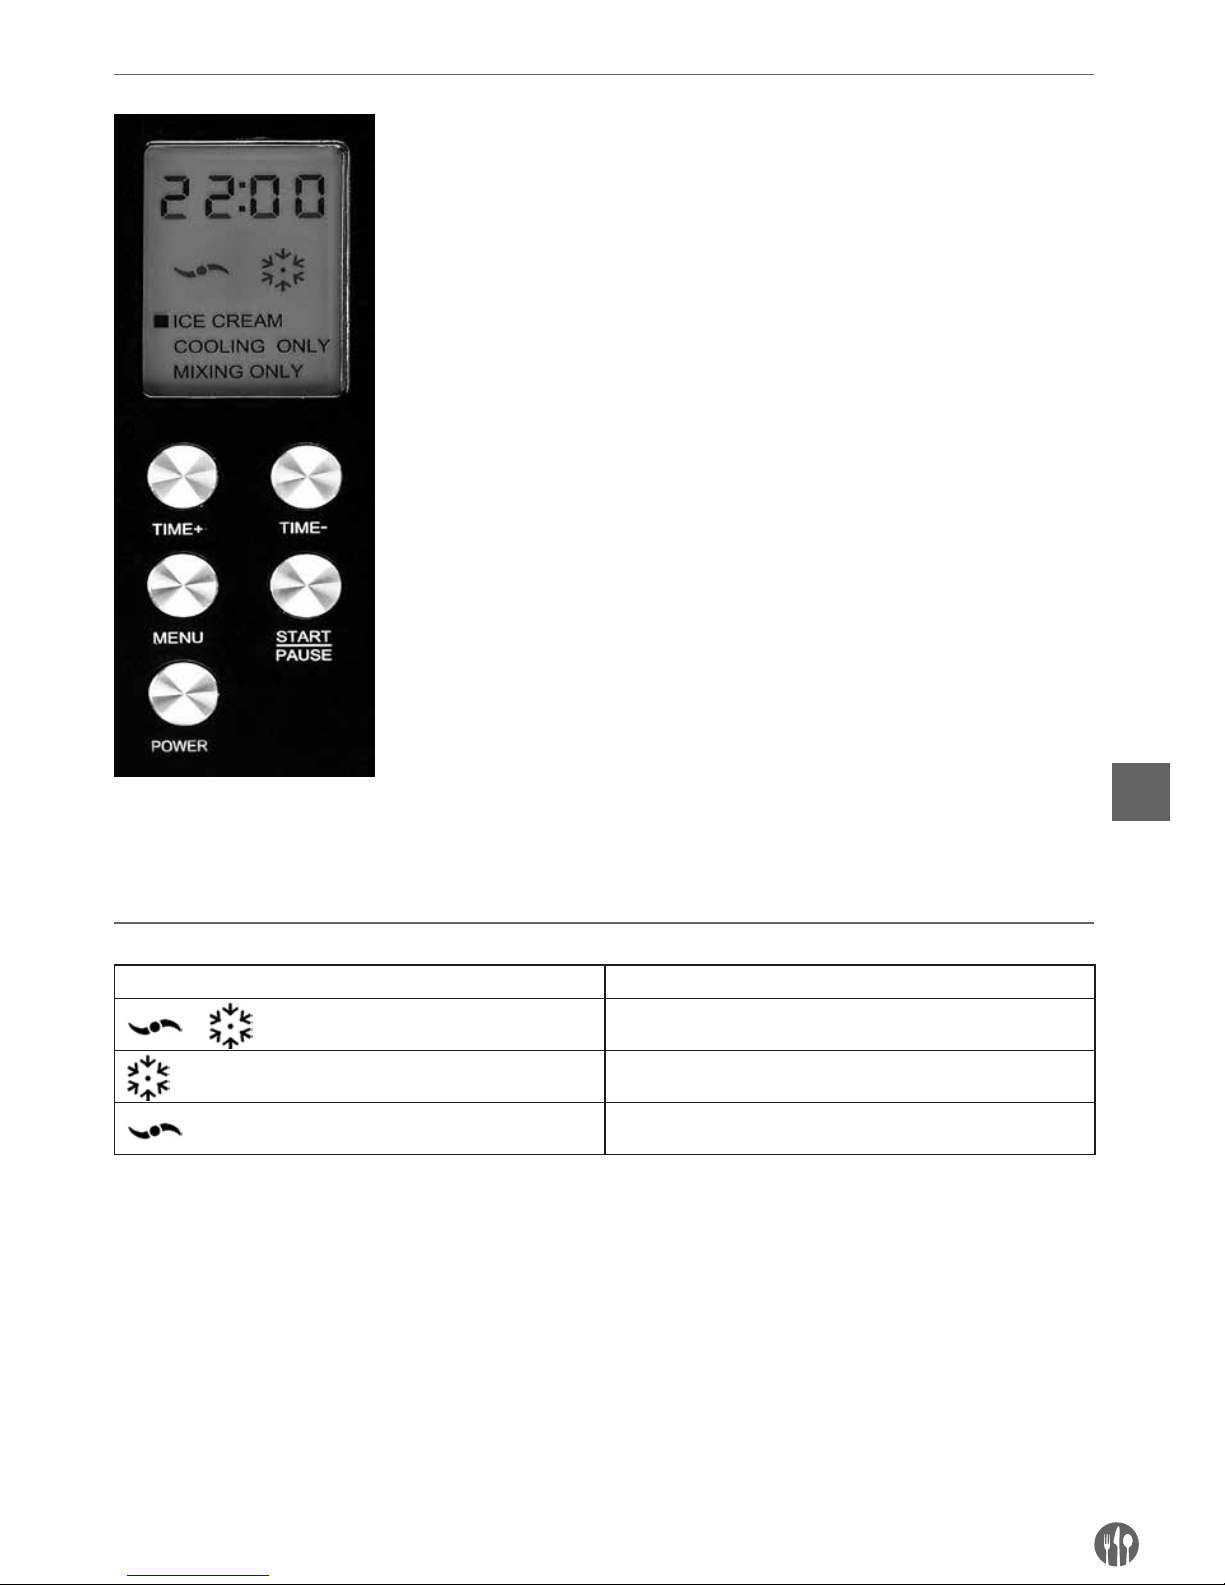
43
RO
Panou de comandă
Ecranul
Simbol Ecran
Mixare & Congelare
Numai răcire
Numai mixare
Programul „MIXARE & CONGELARE”
Acest program este destinat preparării înghețatei. Setarea de bază este de 60 de minute și poate fi ajustată
prin apăsarea butoanelor „TIME+” („TIMP+”) și „TIME-„ („TIMP-”).
Programul „NUMAI RĂCIRE”
Dacă înghețata nu are consistența dorită, puteți mări timpul de congelare cu ajutorul acestui program. Setarea de bază este de 30 de minute și poate fi ajustată prin apăsarea butoanelor „TIME+” („TIMP+”) și „TIME-„
(„TIMP-”).
Programul „NUMAI MIXARE”
Alegeți acest program atunci când este necesară mixarea ingredientelor chiar înainte de a începe procesul
Butonul „POWER” („START/STOP”)
Atât timp cât ștecherul este în priză, aparatul se află în regimul de așteptare.
Ecranul va arăta „00”. Apăsați butonul „POWER” („START/STOP”) pentru a
porni aparatul. Ecranul se aprinde și arată „60:00”. Apăsați butonul „POWER”
(„START/STOP”) pentru a opri aparatul.
Butonul „MENU” („MENIU”)
Cu ajutorul acestui buton puteți alege unul dintre cele trei programe de prepa
rare: „Mix & Freeze” („Mixare & Congelare”), „Freeze” („Congelare”) sau numai „Mix” („Mixare”). Atunci când apăsați butonul „MENU” („MENIU”) în timpul utilizării, aparatul revine la modul inițial.
Butonul „TIME+” („TIMP+”)
Acest buton mărește timpul de preparare cu câte 1 minut pentru fiecare
etapă. Setarea maximă este de 60 de minute.
Butonul „TIME-” („SCURTARE PROGRAM-”)
Acest buton micșorează timpul de preparare cu câte 1 minut pentru fiecare
etapă. Setarea minimă este de 5 minute.
Butonul „START/PAUSE” („START/PAUZĂ”)
Cu ajutorul acestui buton porniți programul ales. Apăsați butonul „START/
PAUSE” („START/PAUZĂ”) dacă doriți să întrerupeți programul. Pentru a rel
ua programul apăsați încă o dată butonul „START/PAUSE” („START/PAUZĂ”).
Pentru a evita deteriorarea compresorului, așteptați cel puțin 5 minute
înainte de a relua programul. Recomandare: Dacă programul nu este reluat
după maxim 20 de minute, aparatul se va opri automat.
Page 44

44
RO
de congelare. Setarea de bază este de 10 de minute. Este posibilă modificarea timpului de mixare cu ajutorul
butoanelor „TIME+” („TIMP+”) și „TIME-„ („TIMP-”).
Prepararea înghețatei
•
Refrigerați compoziția preparată sau ingredientele
necesare la o temperatură de 6–8 °C.
•
Adăugați fructele pasate înainte de a amesteca
ingredientele, iar feliile de fructe - la sfârșitul procesului de mixare.
•
Utilizați alcoolul cu moderație pentru că
prelungește timpul de congelare necesar.
•
Puneți vasul detașabil de înghețată în spațiul
corespunzător din carcasa compresorului.
•
Plasați lama de mixare pe axul din centrul containerului de înghețată.
•
Introduceți ingredientele în vasul detașabil de înghețată. Nu umpleți mai mult de 3/4 din containerul
de înghețată, întrucât aceasta se dilată în timpul
procesului de congelare.
•
Puneți capacul pe containerul de înghețată.
•
Introduceți cablul de alimentare în priza electrică
și porniți aparatul cu ajutorul butonului „POWER” („START/STOP”). Ecranul se aprinde și arată
„60:00”. Simbolul pentru programul standard
„Mixare & Congelare” clipește.
•
Aparatul este gata pentru a fi utilizat.
•
În acest moment puteți selecta programul dorit folosind butonul „Menu” („Meniu”). Programul
selectat este indicat prin simbolul corespunzător.
•
Important: odată ce ați selectat programul, nu îl
puteți schimba atâta timp cât este în desfășurare. Programele MIXARE & CONGELARE și NUMAI
MIXARE pot fi întrerupte prin apăsarea butonului
„START/PAUSE” („START/PAUZĂ”). Programul
este reluat de îndată ce apăsați din nou butonul
„START/PAUSE” („START/PAUZĂ”). Programul
„NUMAI RĂCIRE” nu poate fi întrerupt.
•
Apăsați butonul „START/PAUSE” („START/PAUZĂ”).
Aparatul va începe să mixeze ingredientele.
•
Timpul rămas este afișat pe ecran.
•
În timpul utilizării puteți schimba durata programului prin apăsarea butonului „TIME+” („TIMP+”)
sau „TIME-„ („TIMP-”), pentru a o mări sau micșora cu intervale cuprinse între 1 și 60 de minute.
•
După expirarea timpului setat aparatul se oprește
automat și emite un semnal sonor de zece ori.
Ecranul arată 0:00.
•
Dacă înghețata nu este scoasă în 10 minute după
semnalul „de finalizare” , este pornită funcția
automată de răcire, pentru a preveni topirea înghețatei.
•
Funcția automată de răcire menține înghețata rece
timp de maxim o oră.
Scoaterea înghețatei
•
Înainte de a scoate înghețata din aparat, opriți
mașina de la butonul „POWER” („START/STOP”) și
scoateți cablul de alimentare din priza electrică.
•
Îndepărtați capacul transparent.
•
Scoateți containerul cu înghețată din aparat și retrageți cu atenție mixerul din container.
•
Transferați înghețata într-un container corespunzător. Nu utilizați obiecte ascuțite sau tăioase; utilizați o lingură din plastic sau lemn, pentru a nu
deteriora containerul de înghețată. Se recomandă
utilizarea unei raclete din silicon.
•
Dacă doriți, puteți prepara imediat o altă înghețată.
În acest caz, reluați procesul de la primul pas.
•
Sfat: Dacă preparați înghețată de fructe sau sorbet, scoateți vasul cu înghețată de îndată ce programul a fost finalizat, transferați înghețata într-un container corespunzător pentru congelare
și puneți această cutie în congelator, astfel încât
înghețata să fie congelată în totalitate. În caz contrar, înghețata va fi moale pe interior, chiar dacă
este complet congelată pe exterior.
Page 45

45
RO
Curățare și întreținere
•
Înainte de curățare, opriți întotdeauna aparatul și
scoateți-l din priza electrică.
•
Nu curățați niciodată aparatul cu sau sub apă ori
alte lichide. În special, este foarte important să
evitați contactul direct cu apa al motorului și compresorului.
•
Nu utilizați produse de curățare abrazive sau pe
bază de diluanți.
•
Părțile detașabile pot fi curățate cu apă caldă, în
care a fost adăugat un detergent de vase slab.
Aceste părți nu pot fi introduse în mașina de spălat
vase. Nu scufundați containerul în apă.
•
Ștergeți carcasa compresorului cu o cârpă umedă.
•
Înainte de reasamblare, uscați foarte bine toate
piesele cu o cârpă moale.
Rețete:
Informații generale
În capitolul următor veți găsi informații generale
privind prepararea înghețatei, precum și câteva
rețete simple de înghețată. Vă rugăm să adaptați
cantitățile în funcție de volumul maxim de umplere
al vasului mașinii de înghețată. Înghețata miroase
mai frumos atunci când este proaspătă. Înghețata
proaspăt preparată nu conține niciun agent de conservare și trebuie consumată imediat. Dacă este
păstrată timp îndelungat, înghețata își pierde gustul
și calitatea. Dacă doriți să o păstrați, nu lăsați înghețata în vasul detașabil al mașinii de înghețată, ci
puneți-o într-o cutie corespunzătoare pentru congelare, prevăzută cu capac. Înghețata proaspătă poate
fi păstrată în congelator pentru o perioadă scurtă
de timp. Dacă doriți să păstrați înghețata pentru o
perioadă mai mare de timp, adăugați 20g de bază de
înghețată, ceea ce va împiedica formarea cristalelor
de gheață.
Ingredientele trebuie să fie complet reci înainte de
a le introduce în vasul mașinii de înghețată. Cu cât
ingredientele sunt mai reci, cu atât timpul de preparare va fi mai scurt (aprox. 30 de minute). Folosiți
numai fructe coapte pentru a prepara înghețata cu
fructe. Feliile de fructe sau fructele de pădure trebuie adăugate la finalul procedurii de congelare.
Folosiți numai ouă foarte proaspete. Puteți înlocui
laptele cu frișcă și invers. Cu cât utilizați mai multă
frișcă, cu atât înghețata va fi mai fină. Zahărul poate
fi înlocuit cu miere, sirop sau îndulcitor (nu și în cazul cremei de înghețată). Laptele poate fi înlocuit cu
lapte din soia. Dacă doriți o înghețată mai tare, introduceți compoziția în congelator cu 15 până la 30
de minute, înainte de a o pune în vasul mașinii de
înghețată sau selectați un timp mai mare de congelare.
Înghețata topită trebuie utilizată imediat și nu trebuie congelată din nou.
ÎNGHEȚATĂ
Înghețata se face din lapte, frișcă, gălbenuș de ou,
zahăr și alte ingrediente. Devine moale și fină prin
amestecare continuă pe durata procesului de congelare.
Înghețată de vanilie - rețeta de bază
250 ml lapte
300 ml frișcă
1 păstaie de vanilie
1 praf de sare
3 gălbenușuri de ou
3 linguri de zahăr
Încălziți laptele și frișca, tăiați păstaia de vanilie și
adăugați miezul acesteia în lapte, împreună cu sarea. Amestecați gălbenușurile de ou cu zahărul și
adăugați-le încet peste laptele cald. Încălziți până
la 75˚C, în timp ce amestecați continuu pentru ca
gălbenușurile să nu se lege. Introduceți compoziția
de înghețată în frigider și lăsați să se răcească în
totalitate, apoi introduceți-o în mașina de înghețată
și porniți aparatul.
CREMĂ DE ÎNGHEȚATĂ
Crema de înghețată se face din frișcă, gălbenuș
de ou și alte ingrediente. Devine moale și fină prin
amestecare continuă pe durata procesului de congelare. Nu prelungiți programul, întrucât crema
de înghețată are nevoie să stea mai puțin timp în
mașină.
Page 46

46
RO
Cremă de înghețată din vanilie - rețeta de bază
375 ml frișcă
O jumătate de păstaie de vanilie
80g miere
1 gălbenuș de ou
1 ou
1 praf de sare
Pregătiți cu o zi înainte frișca, vanilia și mierea și
lăsați-le să se răcească. Amestecați toate ingredientele și introduceți compoziția în mașina de înghețată.
ÎNGHEȚATĂ CU FRUCTE
Înghețata cu fructe constă, în principal, din fructe
pasate, zahăr, frișcă sau iaurt și ceva albuș de ou.
Pentru a crea o înghețată cu fructe fină, trebuie să
fie amestecată pe durata congelării, proces care se
realizează cel mai bine în mașina de înghețată.
Înghețată cu fructe - rețetă de bază
300g fructe pasate
1 lingură zeamă de lămâie,
75-100g Zahăr
1 lingură de albuș de ou
150 ml frișcă
Amestecați fructele pasate cu zahărul și zeama de
lămâie. Bateți albușul de ou și frișca și adăugațile peste fructele pasate. Amestecați toate ingredientele și introduceți compoziția în mașina de înghețată. În cazul în care utilizați fructe conservate,
este posibil să nu mai adăugați zahăr.
ȘERBET
Șerbetul poate fi făcut din aproape toate tipurile de
fructe sau suc de fructe, precum zmeură, caise,
piersici, pepeni, kiwi etc. Șerbetul trebuie amestecat continuu pe durata congelării pentru a evita formarea particulelor de gheață. Șerbetul nu trebuie să
fie neapărat dulce. Încercați un șerbet de roșii sau
de portocale cu Campari, ca aperitiv. Un pahar cu
șampanie în care ați adăugat o linguriță de șerbet vă
poate oferi momente de neuitat.
Șerbet - rețetă de bază
600-700 ml fructe pasate
75-100g zahăr (în funcție de tipul de fructe utilizat)
1-2 linguri de albuș de ou
Amestecați toate ingredientele și introduceți compoziția în mașina de înghețată. Șerbetul poate fi
asezonat cu 1 lingură de lichior, coniac etc. În cazul
în care utilizați fructe conservate, nu este necesar
să adăugați zahăr.
Garanție
Orice defecțiune care afectează funcționarea aparatului apărută la mai puțin de un an de la
cumpărarea acestuia va fi remediată prin reparație
sau înlocuire gratuită, cu condiția ca aparatul să fi
fost folosit și întreținut conform instrucțiunilor nu
să nu fi fost bruscat sau folosit necorespunzător în
vreun fel. Drepturile dumneavoastră legale nu sunt
afectate. Dacă aparatul este în garanție, menționați
când și de unde a fost cumpărat și includeți dovada
cumpărării (de ex. chitanța).
Conform politicii noastre de dezvoltare continuă a
produsului, ne rezervăm dreptul de a modifica produsul, ambalajul și documentația fără notificare.
Eliminarea şi mediul înconjurător
La sfârșitul vieții aparatului, vă rugăm să-l eliminați
conform regulamentelor și instrucțiunilor aplicabile
în acel moment.
Aruncați ambalajul (plastic sau carton) în recipientele corespunzătoare.
Page 47

47
RU
Уважаемый Клиент,
Большое Вам спасибо за то, что Вы купили оборудование фирмы Hendi. Вам следует внимательно прочитать настоящую инструкцию пользователя во избежание повреждения машины в результате неправильной эксплуатации. Особенно рекомендуем ознакомиться с предупреждениями.
Правила техники безопасности
• Неправильная эксплуатация и неподходящее использование агрегата может привести к его поломке и поранить оператора.
• Оборудование следует использовать точно по назначению. Производитель не несет ответственности за повреждения, вызванные неправильной
эксплуатацией или неправильным обслуживанием
оборудования.
• Оборудование и электрическую штепсельную вилку следует держать вдали от воды и прочих жидкостей. Если штепсельная вилка попадет в воду,
ее следует тут же вытащить из розетки электропитания и обратиться в службу сертифицированного
сервиса для проверки устройства. Несоблюдение
данных указаний может повлечь за собой угрозу
здоровью и жизни обслуживающего персонала.
• Нельзя снимать кожух без особого разрешения.
• Нельзя класть никаких посторонних предметов
вовнутрь агрегата.
• Нельзя касаться мокрыми, или влажными руками
штепсельной вилки.
• Необходимо систематически проверять состояние
штепсельной вилки и кабеля на предмет возможных повреждений. В случае обнаружения таковых
нужно обращаться в службу сертифицированного
сервиса для устранения повреждений.
• Нельзя пользоваться оборудованием, которое упало, или было повреждено иным способом. В таком
случае оборудование следует осмотреть и обратиться в службу сертифицированного сервиса для
устранения возможных повреждений.
• Нельзя проводить ремонт оборудования самостоятельно. Это может привести к угрозе здоровью и
жизни обслуживающего персонала!
• Следует удостовериться в том, что провод не касается острых и горячих предметов и, кроме того,
следует оберегать его от открытого огня. Если нужно вытащить штепсельную вилку из розетки, нужно
тянуть за вилку, а не за провод.
• Нужно сделать все возможное, чтобы нельзя было
даже случайно вытащить вилку из розетки, зацепиться за неправильно расположенный провод
или удлинитель, споткнуться и упасть.
• Необходимо следить за работой оборудования.
• Дети не понимают, что неправильное использование электрооборудования опасно. Нельзя допускать, чтобы дети пользовались электрооборудованием без присмотра взрослых.
• Перед каждой чисткой оборудования, или отключением на продолжительное время, штепсельную
вилку следует вытащить из розетки.
• Предупреждение! Если вилка остается в розетке
– это означает, что оборудование остается под напряжением.
• Перед тем, как вытащить вилку из розетки, оборудование следует выключить.
• Нельзя тащить оборудование за провод электропитания.
• Нельзя использовать никаких нештатных, не поставленных вместе с оборудованием устройств.
• Агрегат нужно подключать к электросети, которой
параметры – напряжение и частота – соответствуют параметрам, указанным на щитке агрегата.
• Оборудование нельзя перегружать.
• После окончания работы оборудование следует
обесточить, вытащив вилку из розетки.
• После окончания работы оборудование следует
обесточить, вытащив вилку из розетки.
• Электропроводка должна соответствовать требованиям общегосударственных и местных норм.
• Без надлежащего контроля или предварительного
обучения эксплуатации оборудования проводимого лицом, отвечающим за безопасную эксплуатацию, оборудованием не могут пользоваться ни
дети, ни лица с ограниченными физическими, или
психическими возможностями, ни лица, которые
не обладают необходимым опытом работы и знаниями в данной области.
Page 48

48
RU
Технические данные
Потребляемая мощность: 150 Вт
Питание: 220–240В~
Частота: 50 Гц
Ёмкость: 1,5 литра
Максимальное заполнение контейнера: 1,000 мл
Размеры: 425x285x(выс.)262мм
Вес: 11,0 кг
Длина шнура питания: 150 см
Важная информация по безопасности
•
Для использования мороженицы не пользуйтесь
внешним таймером или отдельным пультом
управления.
•
Не мойте в посудомоечной машине отдельные
детали устройства. Мойте вручную в тёплой воде
с мягким моющим средством.
•
Устройство предназначено для домашнего
использования или аналогичного в кухнях для
персонала, социальных комнат в офисах или
других рабочих местах.
•
Перед использованием устройства нужно
полностью растянуть шнур питания.
•
Не превышайте линию максимального
заполнения контейнера для мороженого (3/4
ёмкости) – мороженое увеличивает свой объем
при замораживании.
•
Ингредиенты помещайте в контейнер для
мороженого перед его установкой в устройство.
Не кладите ингредиенты через отверстие в
корпусе компрессора.
•
Во время работы устройства не кладите в
контейнер каких-либо предметов или столовых
приборов, а также не кладите во внутрь пальцы
– есть риск получения травмы.
•
Перед использованием убедитесь в том, что все
компоненты устройства установлены правильно.
•
Не закрывайте вентиляционные отверстия на
корпусе компрессора и двигателя во время
работы устройства.
•
Во время работы устройства, контейнер для
мороженого должен всегда находиться внутри.
•
Мороженица не должна использоваться с
аксессуарами от других устройств или других
брендов.
•
Для того, чтобы вынуть мороженое из
контейнера, пользуйтесь пластмассовыми или
деревянными ложками или лопатками – не
пользуйтесь острыми предметами.
Подготовка перед первым использованием:
•
Все съёмные детали промойте тёплой водой.
•
Корпус и отверстие для контейнера для
мороженого протрите влажной (хорошо отжатой)
тканью.
•
Установите устройство на сухой, ровной
поверхности.
Page 49
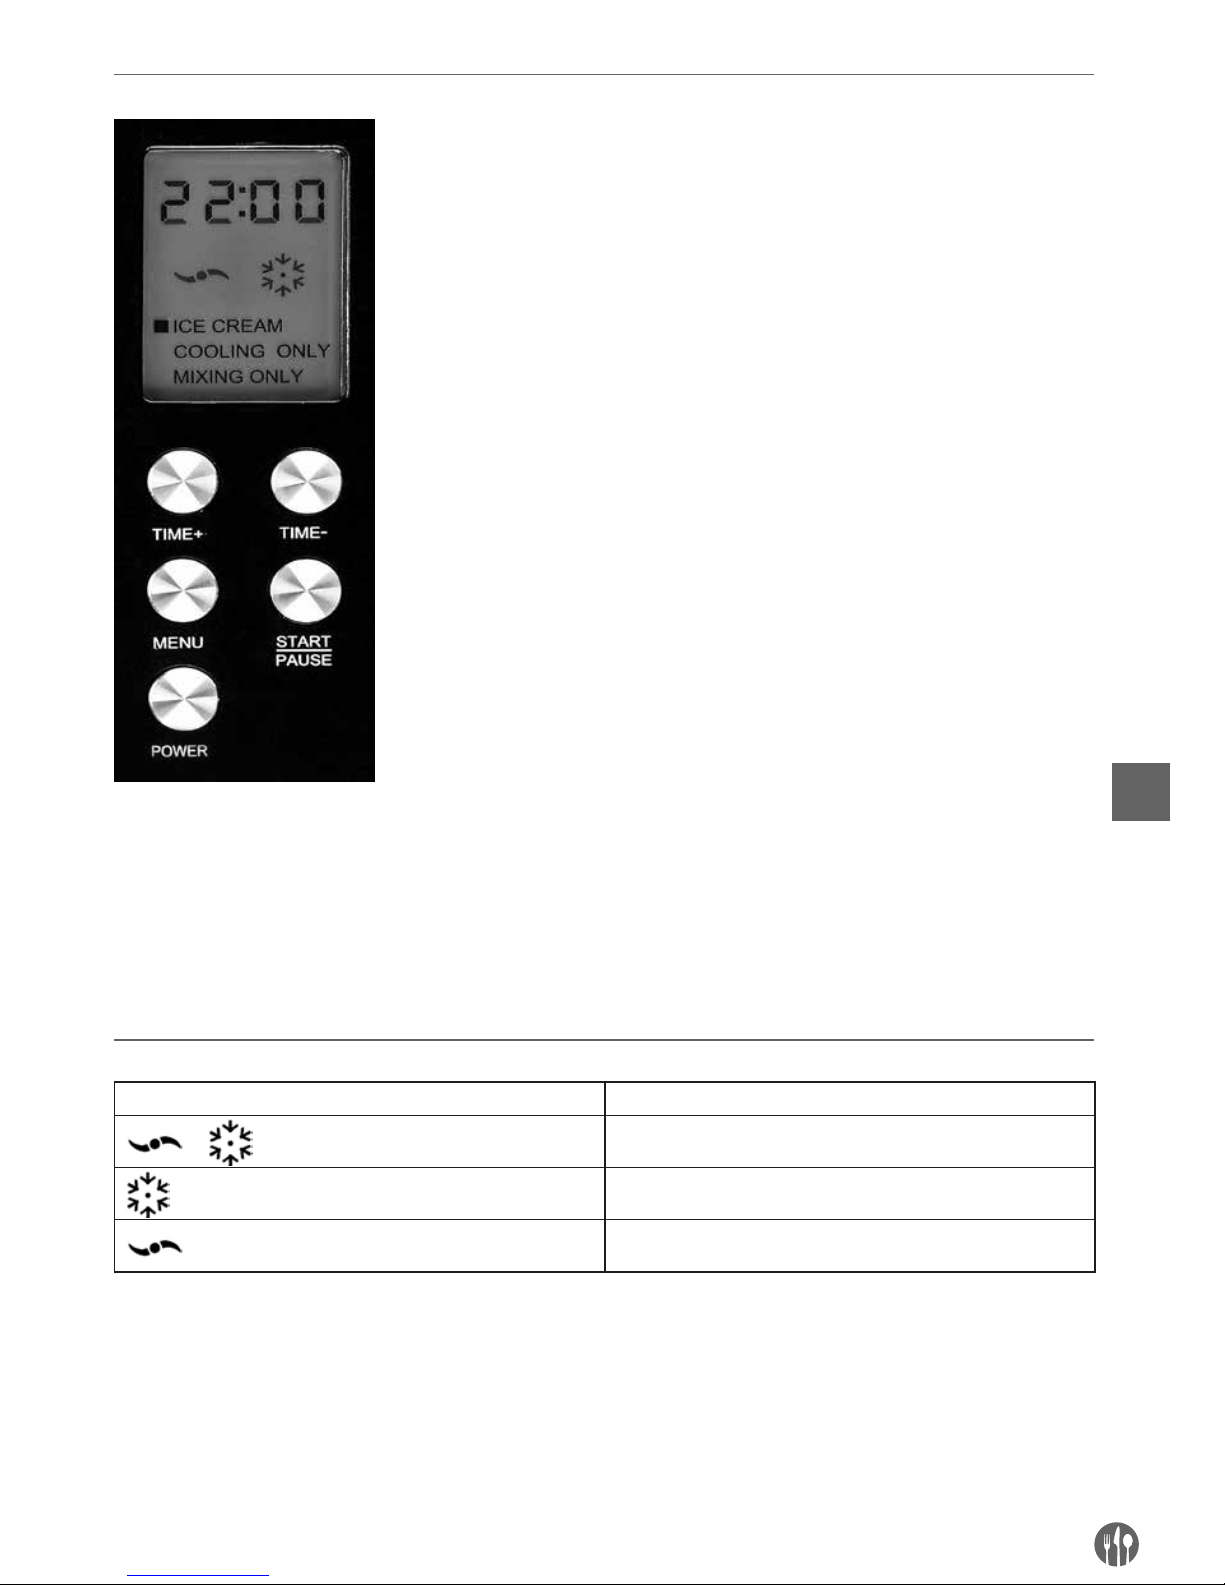
49
RU
Пульт управления
Дисплей
Символ Описание
Смешивание и замораживание
Замораживание
Смешивание
Программа „СМЕШИВАНИЕ И ЗАМОРАЖИВАНИЕ”
Программа предназначена для приготовления мороженого. Время программы по умолчанию составляет
60 минут и можно его изменять с помощью кнопок „TIME+” и „TIME-”.
Программа „ЗАМОРАЖИВАНИЕ”
Программа используется для продления времени замораживания, если полученное мороженное не
имеет необходимой консистенции. Время программы по умолчанию составляет 30 минут и можно его
Кнопка „POWER” (Включение)
После подключения мороженицы к розетке, устройство находится в режиме
ожидания. На дисплее отображается значение „00”. Для включения
устройства, нажмите кнопку „POWER”: загорится экран, показывая время
„60:00”. Для того, чтобы выключить устройство во время работы, нажмите
ещё раз кнопку „POWER”.
Кнопка „MENU”
Кнопка „MENU” отображает три доступные программы работы устройства:
„Смешивание и замораживание”, „Замораживание” и „Смешивание”.
Нажатие кнопки „MENU” во время работы мороженицы приведет к
переходу выбора.
Кнопка „TIME+” (Продление времени)
Продолжительность программы можно продлить, нажимая кнопку „TIME+”.
Время работы программы будет продлеваться в одноминутных интервалах
– максимальная продолжительность программы составляет 60 минут.
Кнопка „TIME-” (Сокращение времени)
Продолжительность программы можно сократить, нажимая кнопку „TIME-”.
Время работы программы будет сокращаться в одноминутных интервалах –
минимальная продолжительность программы составляет 5 минут.
Кнопка „START/PAUSE” (Старт/Пауза)
Кнопка „START/PAUSE” начинает работу выбранной программы. Нажатие
кнопки во время работы устройства остановит работу программы – для
возобновления, нажмите снова кнопку „START/PAUSE”. Чтобы избежать
повреждения компрессора, перед возобновлением программы
подождите, по крайней мере, 5 минут. Внимание: Если программа
не возобновит работу в течение 20 минут, устройство автоматически
отключится.
Page 50

50
RU
изменять с помощью кнопок „TIME+” и „TIME-”.
Программа „СМЕШИВАНИЕ”
Программа позволяет смешивать соответственно ингредиенты перед замораживанием. Время программы
по умолчанию составляет 10 минут и можно его изменять с помощью кнопок „TIME+” и „TIME-”.
Приготовление мороженого
•
Мороженую массу или ингредиенты для
приготовления мороженого охладите до
температуры 6–8 °C.
•
Перед смешиванием ингредиентов измельчите
фрукты. В конце добавьте небольшие кусочки
фруктов.
•
Не добавляйте слишком много алкоголя,
потому что это увеличит время замораживания
мороженого.
•
Контейнер для мороженого поместите в
устройство.
•
Мешалку установите в соответствующей насадке
в середине контейнера для мороженого.
•
Охлажденные ингредиенты поместите в
контейнер для мороженого. Не заполняйте
контейнер более ¾ его ёмкости, потому что
мороженое увеличит свой объём во время
замораживания.
•
Накройте контейнер крышкой.
•
Подключите устройство к розетке и запустите
(кнопка „POWER”). Дисплей на короткое время
засветится синим цветом, покажет значение
„60:00” и мигающий символ программы по
умолчанию „Смешивание и замораживание”.
•
Устройство готово к использованию.
•
Нажмите кнопку „MENU” и выберите
необходимую программу работы по символах на
дисплее.
•
ВНИМАНИЕ: После выбора программы, её
нельзя изменять во время работы устройства.
Программы „Смешивание и замораживание”
и „Смешивание” могут быть остановлены и
возобновлены с помощью кнопки „START/
PAUSE”. Программу „Замораживание” нельзя
остановить.
•
Нажмите кнопку „START/PAUSE”. Устройство
начнёт смешивать ингредиенты.
•
Устройство отображает время, оставшееся до
окончания программы.
•
Время работы программы можно изменять
с помощью кнопок „TIME+” и „TIME” в одноминутных интервалах, при чём
максимальное время работы устройства
составляет 60 минут.
•
По истечении указанного времени устройство
автоматически выключается и сигнализирует
конец работы десятикратным звуковым
сигналом. Машина отобразит время 00:00.
•
Если мороженое не будет вынуто в течение 10
минут после звукового сигнала об окончании
программы, автоматически включится
дополнительное замораживание для
предотвращения таяния мороженого.
•
Функция автоматического замораживания будет
поддерживать низкую температуру в контейнере
в течение одного часа.
Вынимание мороженого
•
Перед тем, как вынете мороженое, выключите
устройство (кнопка „POWER”) и отсоедините
кабель питания от сетевой розетки.
•
Снимите прозрачную крышку.
•
Выньте контейнер для мороженого из устройства
и осторожно снимите мешалку.
•
Переложите мороженое в соответствующую
упаковку с помощью пластмассовой или
деревянной ложки. Для вынимания мороженого
не пользуйтесь острыми или заострёнными
предметами, чтобы не повредить контейнер.
Мы рекомендуем использовать силиконовую
лопатку.
•
Сразу же после предыдущей программы
мороженица готова для приготовления
очередной порции мороженого. Для того, чтобы
приготовить очередную порцию, выполните
снова все действия, начиная с первого пункта в
начале руководства.
•
Указание: После приготовления фруктового
мороженого или шербета, выньте сразу
же контейнер для мороженого после
завершения данной программы, переложите
мороженое в соответствующую упаковку и
Page 51

51
RU
положите в морозильную камеру для полного
замораживания. В противном случае после
завершения программы, несмотря на кажущееся
замораживание, мороженое может быть мягкое
внутри.
Очистка и обслуживание
•
Перед очисткой выключите устройство и выньте
вилку из розетки.
•
Не погружайте мороженицу в воду, не мойте
под струёй воды или в другой жидкости.
Двигатель и компрессор не могут вступать в
непосредственный контакт с водой.
•
Для очистки не пользуйтесь абразивными или
едкими веществами.
•
Съемные детали мойте тёплой водой с мягким
моющим средством. Эти детали нельзя мыть
в посудомоечной машине. Контейнер для
мороженого не погружайте в воду.
•
Корпус компрессора протрите влажной тканью.
•
Перед очередной сборкой тщательно протрите
все детали устройства.
Рецепты:
Общая информация
Эта глава содержит общую информацию о процессе
приготовления мороженого и несколько основных
рецептов мороженого. Количество ингредиентов
следует подобрать для максимального уровня
наполнения контейнера. Свежее мороженое не
содержит каких-либо консервантов и имеет очень
приятный запах, поэтому его рекомендуется
подавать непосредственно после приготовления.
Мороженое, которое хранится слишком долго в
морозильной камере, теряет свой неповторимый
вкус. В течение короткого периода времени
его можно хранить в морозильной камере в
соответствующем контейнере с крышкой (не
храните мороженое в контейнере, который
используется для приготовления мороженого).
Для хранения мороженого в течение длительного
времени, добавьте 20 г основной мороженой
массы, благодаря чему в мороженом не будут
образовываться комки льда.
Ингредиенты охладите перед помещением их в
контейнер для мороженого. Более длительный
период охлаждения ингредиентов сократит время
приготовления мороженого (примерно 30 минут).
Для приготовления фруктового мороженого
используйте только спелые плоды. Кусочки
фруктов или целые плоды добавляйте в конце
процесса замораживания. Для приготовления
массы используйте только свежие яйца. Для
приготовления мороженого используйте сливки
или молоко. Большее количество сливок приведет
к тому, что мороженое будет более мягкое.
Сахар можно заменить молоком, сиропом или
подсластителем (не рекомендуется для мягкого
мороженого). Коровье молоко можно заменить
соевым молоком. Если хотите получить твёрдое
мороженое, готовую массу вложите в морозильную
камеру на 15-20 минут прежде, чем поместить её в
контейнер для мороженого или установите более
длительное время программы замораживания.
Растаявшее мороженое следует сразу же
потреблять, оно не годится для последующего
замораживания.
СЛИВОЧНОЕ МОРОЖЕНОЕ
Сливочное мороженое приготавливается из
молока, сливок, яичных желтков, сахара и
нескольких других ингредиентов. Мороженое
будет пушистое и гладкое благодаря непрерывному
перемешиванию во время замораживания.
Page 52

52
RU
Основной рецепт на ванильное мороженое
250 мл молока
300 мл сливок
1 стручок ванили
щепотка соли
3 желтка
3 столовые ложки сахара
Подогрейте молоко и сливки. Разрежьте стручок
ванили, выскоблите семена и добавьте к
остальным ингредиентам. Добавьте соль. Желтки
взбейте с сахаром и медленно добавляйте молоко.
Полученную массу подогрейте до температуры
75˚C, постоянно мешая, чтобы яйца не свернулись.
Затем охладите массу и поместите в морозильную
камеру. Замороженная масса готова к вложению
в мороженицу.
МЯГКОЕ МОРОЖЕНОЕ
Самое мягкое и пушистое мороженое готовится из
сливок, желтков и нескольких других ингредиентов.
Мороженое становится чрезвычайно мягким
и имеет гладкую консистенцию благодаря
постоянному перемешиванию во время
замораживания. Программа не должна занимать
много времени, так как мороженое не требует
длительного перемешивания в мороженице.
Основной рецепт на мягкое ванильное
мороженое
375 мл сливок
разрезанный стручок ванили
80 г мёда
1 желток
1 целое яйцо
щепотка соли
Вскипятите сливки со стручком ванили и мёда.
Дайте остыть и отставьте на один день. Смешайте
остальные ингредиенты, влейте в контейнер для
мороженого и поместите в мороженицу.
ФРУКТОВОЕ МОРОЖЕНОЕ
Фруктовое мороженое состоит в основном
из измельченных фруктов, сахара, сливок
или йогурта, а также белка. Для получения
гладкой консистенции, массу мороженого
необходимо постоянно перемешивать во время
замораживания. Для этого идеально подходит
мороженица.
Основной рецепт для фруктового мороженого
300 г измельчённых фруктов
1 столовая ложка лимонного сока
75-100 г сахара
1 столовая ложка белка
150 мл сливок
Измельчённые фрукты смешайте с сахаром и
лимонным соком. Взбейте белок со сливками и
добавьте к фруктовой массе. Все ингредиенты
тщательно перемешайте и вложите в контейнер
для мороженого, а потом в мороженицу. Если
для приготовления массы используются
консервированные фрукты, нет необходимости
добавлять дополнительную порцию сахара.
ШЕРБЕТ
Шербет можно приготовить практически из
всех фруктов или фруктовых соков, например,
из малины, абрикосов, персиков, дыни, киви и
т.п. Шербет следует постоянно мешать во время
замораживания, чтобы избежать образования
комков льда. Шербет не должен быть сладким.
Вы можете приготовить томатный шербет или
апельсиновый с Кампари, как стартер. Шарик
шербета, поданный в бокале с шампанским – это
вкусный и элегантный десерт.
Основной рецепт на шербет
600-700 мл фруктовой массы или фруктового сока
75-100 г сахара (в зависимости от использованных
фруктов)
1-2 столовые ложки яичных белков
Смешайте все ингредиенты, переложите в контейнер
для мороженого и установите в мороженицу. К массе
можно добавить одну столовую ложку ликера, бренди
или другого алкоголя. Если для приготовления
массы используются консервированные фрукты, нет
необходимости добавлять сахар.
Page 53

53
RU
Гарантия
Любая недоделка или поломка, которая влечет
за собой неправильную работу устройства, которая будет выявлена в течение первого года от
даты покупки, будет устранена бесплатно, или же
все устройство будет заменено новым, если оно
эксплуатировалось и обслуживалось согласно
инструкции по обслуживанию и не использовалось неправильно, или в разрез с назначением.
Данное положение ни коей мере не нарушает
иных прав потребителя, изложенных в законода-
тельстве. В случае заявления устройства в ремонт
или на замену в рамках гарантии, следует указать
место и дату покупки устройства и приложить счет,
или чековую квитанцию.
Согласно нашей политике совершенствования
наших продуктов оставляем за собой право на
ввод изменений в конструкцию, упаковку и в технические параметры, указываемые в технической
документации без предупреждения.
Списание с эксплуатации. Защита окружающей среды
Оборудование, изношенное и списанное с эксплуатации следует утилизировать согласно правилам
и указаниям, действующим на день снятия с эксплуатации.
Материалы упаковки, такие как пластик, картонные коробки, древесина, следует складировать
раздельно в соответствующие контейнеры.
Page 54

54
Page 55

55
Page 56

Hendi B.V.
Steenoven 21
3911 TX Rhenen, The Netherlands
Hendi Polska Sp. z o.o.
ul. Magazynowa 5
62-023 Gądki, Poland
Hendi Food Service Equipment GmbH
Gewerbegebiet Ehring 15
5112 Lamprechtshausen, Austria
Hendi Food Service Equipment Romania Srl
Str. Ecaterina Teodoroiu nr. 38, Parc Industrial Ramoss
Halele 23-24, Brasov 500450 RO, Romania
Hendi HK Ltd.
1603-5, Tower II, Enterprise Square
9 Sheung Yuet Road, Kowloon Bay, Hong Kong
Find Hendi on internet:
www.hendi.eu
www.facebook.com/HendiFoodServiceEquipment
www.linkedin.com/company/hendi-food-service-equipment-b.v.
www.youtube.com/HendiEquipment
- Changes, printing and typesetting errors reserved.
- Änderungen und Druckfehler vorbehalten.
- Wijzigingen en drukfouten voorbehouden.
- Producent zastrzega sobie prawo do zmian oraz
błędów drukarskich w instrukcji.
- Variations et fautes d’impression réservés.
- Errori di cambiamenti, di stampa e di impaginazione riservati.
- Drepturi rezervate cu privire la modificări şi greşeli de imprimare.
- Изменения, печати и верстки ошибки защищены.
© 2015 Hendi BV Rhenen - The Netherlands Ver: 26-04-2016
 Loading...