

Page 1
User manual
Gebrauchsanweisung
Gebruiksaanwijzing
Instrukcja obsługi
Mode d’emploi
Istruzioni per l’utente
Instrucţiunile utilizatorului
Руководство по эксплуатации
INDUCTION COOKER 2000W
DISPLAY LINE
Item: 239278
You should read this user manual carefully before
using the appliance
Bevor Sie das Gerät in Betrieb nehmen, sollten
Sie diese Gebrauchsanweisung aufmerksam lesen
Alvorens de apparatuur in gebruik te nemen dient
u deze gebruiksaanwijzing aandachtig te lezen
Przed uruchomieniem urządzenia należy koniecznie
dokładnie przeczytać niniejszą instrukcję obsługi
Lisez attentivement ce mode d’emploi avant d’utiliser
l’appareil .
Prima di utilizzare l’apparecchio in funzione leggere
attentamente le istruzioni per l’uso.
Citiţi cu atenţie prezentul manual de utilizare înainte
de folosirea aparatului
Внимательно прочитайте руководство пользователя
перед использованием прибора
Page 2
Keep this manual with the appliance.
Diese Gebrauchsanweisung bitte beim Gerät aufbewahren.
Bewaar deze handleiding bij het apparaat.
Zachowaj instrukcję urządzenia.
Gardez ces instructions avec cet appareil.
Conservate le istruzioni insieme all’apparecchio.
Păstraţi manualul de utilizare alături de aparat.
Хранить руководство вместе с устройством.
For indoor use only.
Nur zur Verwendung im Innenbereich.
Alleen voor gebruik binnenshuis.
Do użytku wewnątrz pomieszczeń.
Pour l’usage à l’intérieur seulement.
Destinato solo all’uso domestico.
Numai pentru uz casnic.
Использовать только в помещениях.
2
Page 3

Dear Customer,
Thank you for purchasing this Hendi appliance. Before using the appliance for the first time, please read
this manual carefully, paying particular attention to the safety regulations outlined below.
Safety regulations
• This appliance is intended for commercial use only and must not be used for household
use.
• The appliance must only be used for the purpose for which it was intended and designed.
The manufacturer is not liable for any damage caused by incorrect operation and
improper use.
• Keep the appliance and electrical plug away from water and any other liquids. In the
event that the appliance should fall into water, immediately remove plug from the socket
and do not use until the appliance has been checked by a certified technician. Failure to
follow these instructions could cause a risk to lives.
• Never attempt to open the casing of the appliance yourself.
• Do not insert any objects in the casing of the appliance.
• Do not touch the plug with wet or damp hands.
• Danger of electric shock! Do not attempt to repair the appliance yourself. In case of
malfunctions, repairs are to be conducted by qualified personnel only.
• Never use a damaged appliance! Disconnect the appliance from the electrical outlet and
contact the retailer if it is damaged.
• Warning! Do not immerse the electrical parts of the appliance in water or other liquids.
Never hold the appliance under running water.
• Regularly check the power plug and cord for any damage. If the power plug or power cord
is damaged, it must be replaced by a service agent or similarly qualified persons in order
to avoid danger or injury.
• Make sure the cord does not come in contact with sharp or hot objects and keep it away
from open fire. To pull the plug out of the socket, always pull on the plug and not on the
cord.
•
Ensure that the cord (or extension cord) is positioned so that it will not cause a trip hazard.
• Always keep an eye on the appliance when in use.
•
Warning! As long as the plug is in the socket the appliance is connected to the power source.
• Turn off the appliance before pulling the plug out of the socket.
• Never carry the appliance by the cord.
• Do not use any extra devices that are not supplied along with the appliance.
• Only connect the appliance to an electrical outlet with the voltage and frequency
mentioned on the appliance label.
• Connect the power plug to an easily accessible electrical outlet so that in case of
emergency the appliance can be unplugged immediately. To completely switch off the
appliance pull the power plug out of the electrical outlet.
• Always turn the appliance off before disconnecting the plug.
NLEN
3
Page 4
• Never use accessories other than those recommended by the manufacturer. Failure to do
so could pose a safety risk to the user and could damage the appliance. Only use original
parts and accessories.
• This appliance is not intended for use by persons (including children) with reduced
physical, sensory or mental capabilities, or lack of experience and knowledge.
• This appliance must not be used by children under any circumstances.
• Keep the appliance and its cord out of reach of children.
• Always disconnect the appliance from the mains if it is left unattended or is not in use,
and before assembly, disassembly or cleaning.
• Never leave the appliance unattended during use.
Special Safety Regulations
• This appliance is designed for cooking a variety of food via heating the cookware. Any
other use may lead to damage of the appliance or personal injury.
• Use the appliance only as described in this manual.
• This appliance should be operated by trained personnel in kitchen of the restaurant,
canteens or bar staff, etc.
•
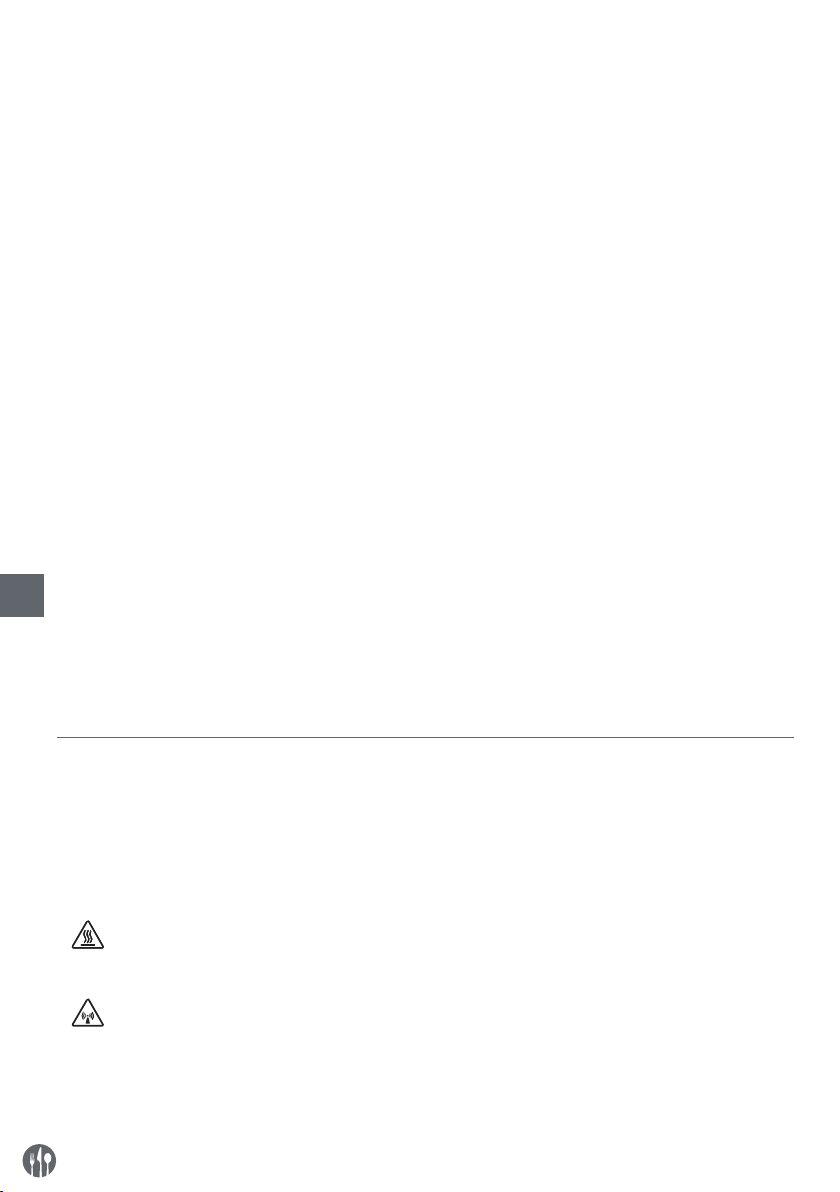
Caution! Danger of burns! The temperature of the heating surface and other acces-
sible surface is very high during use. Touch the control panel only.
•
Caution! This appliance will emit non-ionizing electromagnetic radiation.
• Do not place the appliance near objects that may be affected by a magnetic field TVs,
EN
radios, bank cards and credit cards.
• Do not place the appliance on a heating object (gas, electric, charcoal cooker, etc.) Keep
the appliance away from any hot surfaces and open flames. Always operate the appliance
on a level, stable, clean, heat-resistant and dry surface.
• Make sure the appliance is not placed near water vapour or greasy vapours. The fan in
side of the appliance will take in these vapours and this will cause grease or moisture to
accumulate in the appliance which may result in a short-circuit in the appliance.
• This appliance is not intended to be operated by means of an external timer or separate
remote-control system.
• Metallic objects such as knives, forks, spoons and lids should not be placed on the heat
ing plate since they can get hot.
• WARNING: Keep all ventilation openings in the appliance clear of obstruction.
• WARNING: If the heating surface is cracked or damaged, switch off the appliance to avoid
the possibility of electric shock.
• Allow at least 20 cm spacing around the appliance for ventilation purpose during use.
• Do not use hard utensils to hit the heating plate surface. Do not use water jet, flush di
rectly with water or steam cleaner as the parts will get wet and electric shock might be
resulted.
• Take care when operating the appliance, as rings, watches and similar objects worn by
the user could get hot when in close proximity to the heating surface.
• Caution! Securely route the power cord if necessary in order to prevent unintentional
-
-
-
4
Page 5
pulling or contact with the heating surface.
• Do not wash the appliance with water. Washing can cause leakages and increase the risk
of electric shock.
• Do not clean or store the appliance unless it is completely cooled down.
• Do not place empty cookware on the appliance during operation as this may damage the
cookware.
• Only use the cookware of the type and size recommended. (See - - -> Suitable cooking
equipment).
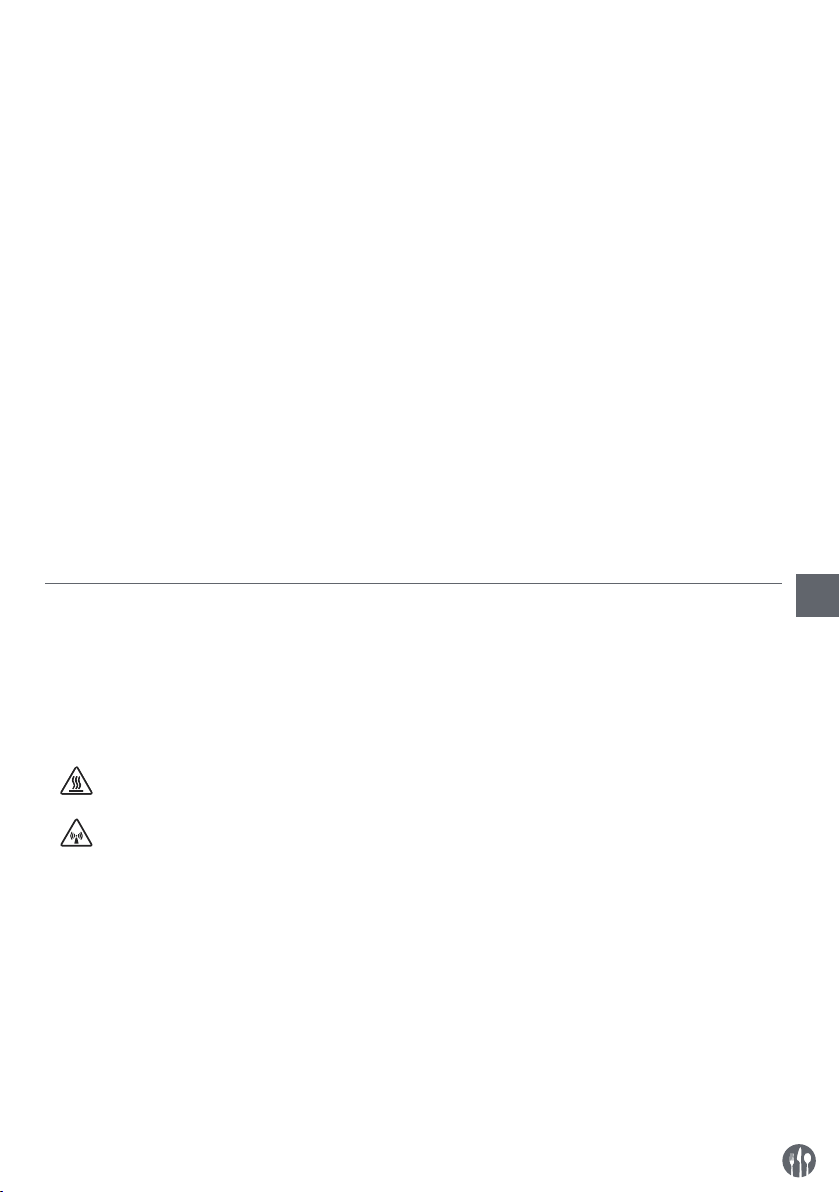
Grounding installation
This appliance is classified as protection class I
appliance and must be connected to a protective
ground. Grounding reduces the risk of electric
shock by providing an escape wire for the electric
current. This appliance is equipped with a cord
having a grounding wire with a grounding plug. The
plug must be plugged into an outlet that is properly
installed and grounded.
EN
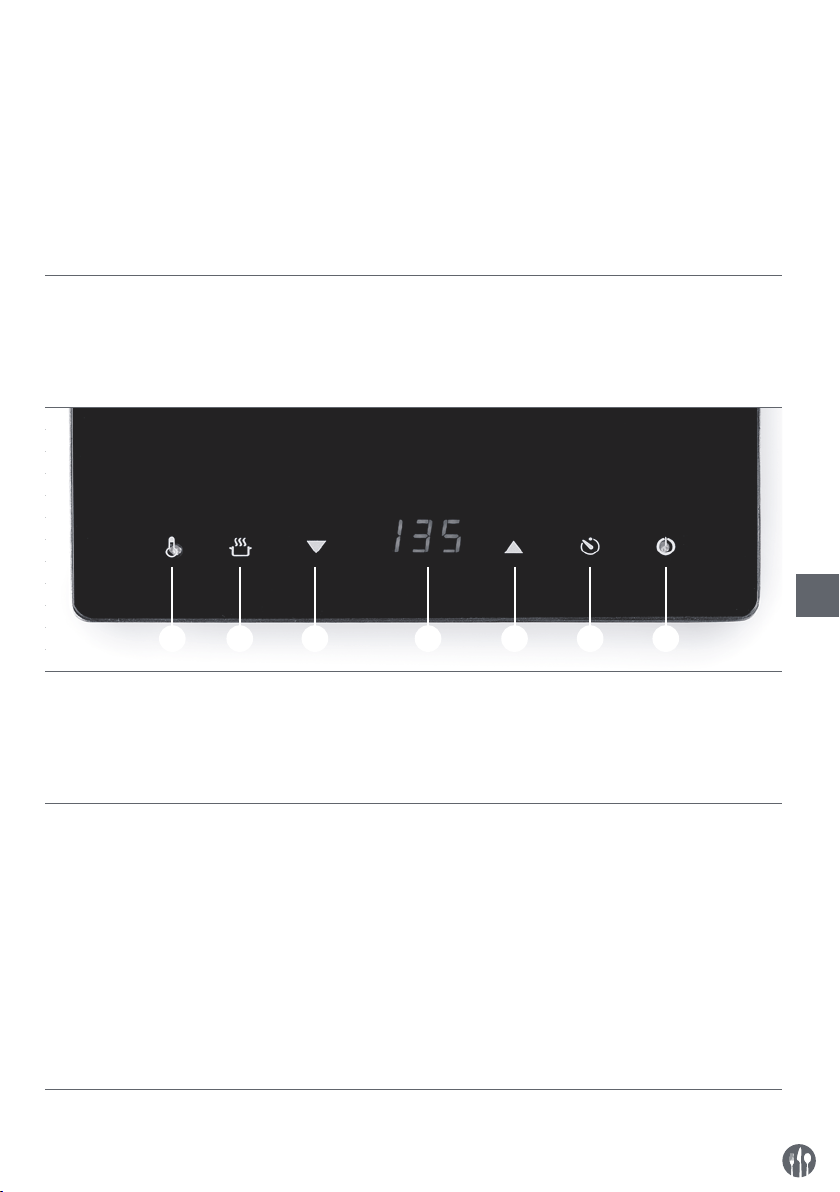
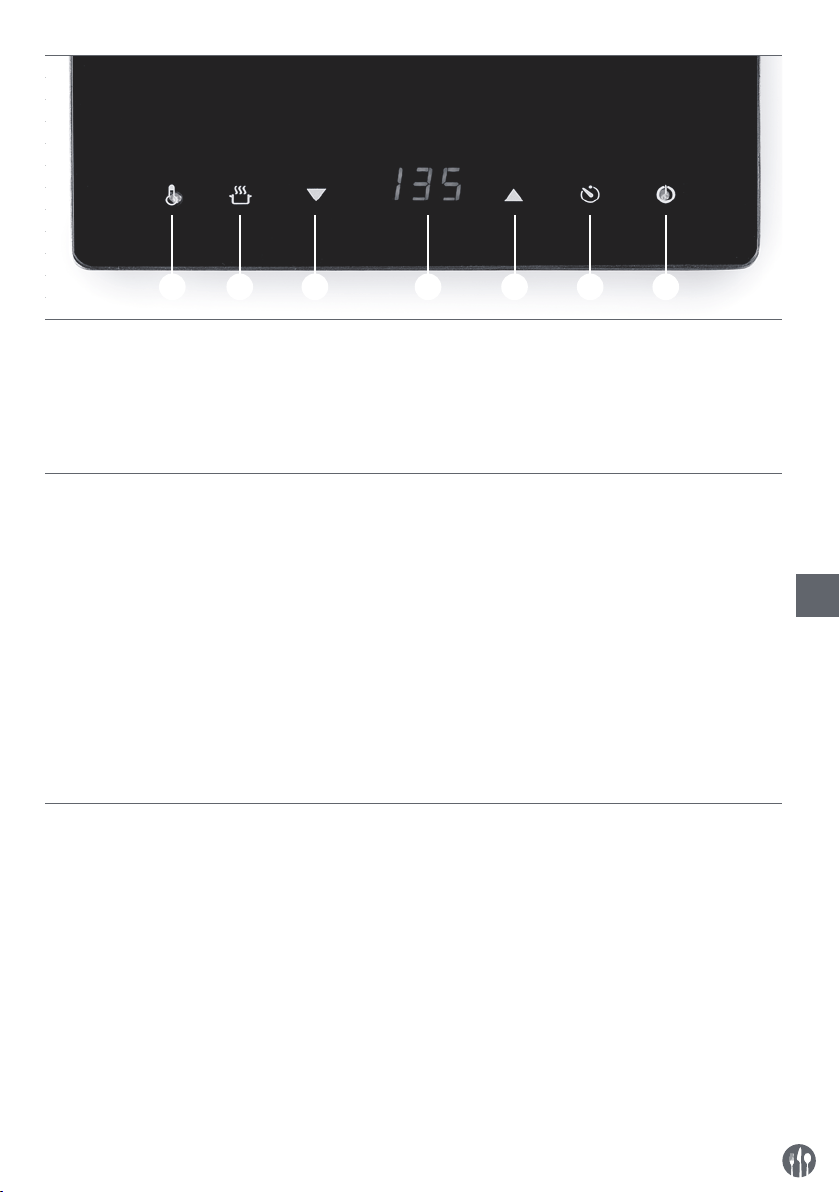
Touch control panel of the appliance
1) ON/Standby button
2) Timer function with indicator light
3) Increase setting: Time / temperature / power
4) Digital display
Preparations before using for the first time
• Remove all protective packaging and wrapping.
• Check to make sure the appliance is undamaged.
In case of incomplete delivery and damages.
Please contact supplier (See == > Warranty).
• Clean the appliance before use (See == > Clean-
ing and Maintenance).
• Make sure the appliance is completely dry.
• Place the appliance on a horizontal, stable and
heat resist surface that is safe against water
splashes.
1234567
5) Decrease setting: Time / temperature / power
6) Power function with indicator light:
7) Temperature function with indicator light
• Ensure that there is sufficient ventilation. Keep
a minimum distance of 15 cm around the appliance.
• Do not place the appliance in close proximity to
devices which are sensitive to disturbances by
magnetic sources (e.g. radios, tape decks).
Note: Due to manufacturing residues, the appliance may emit a slight odor in the first few cycles.
This is normal and does not indicate any defect or
hazard. Make sure the appliance is well ventilated.
5
Page 6
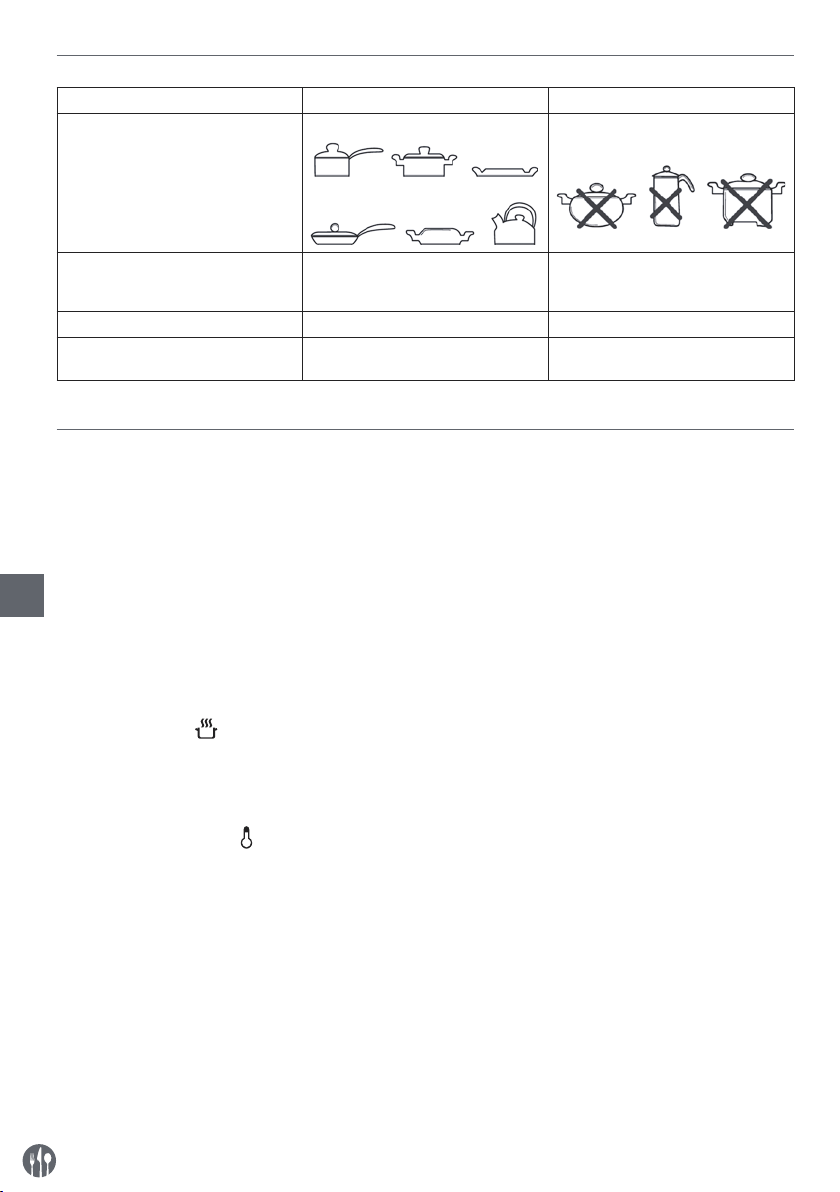
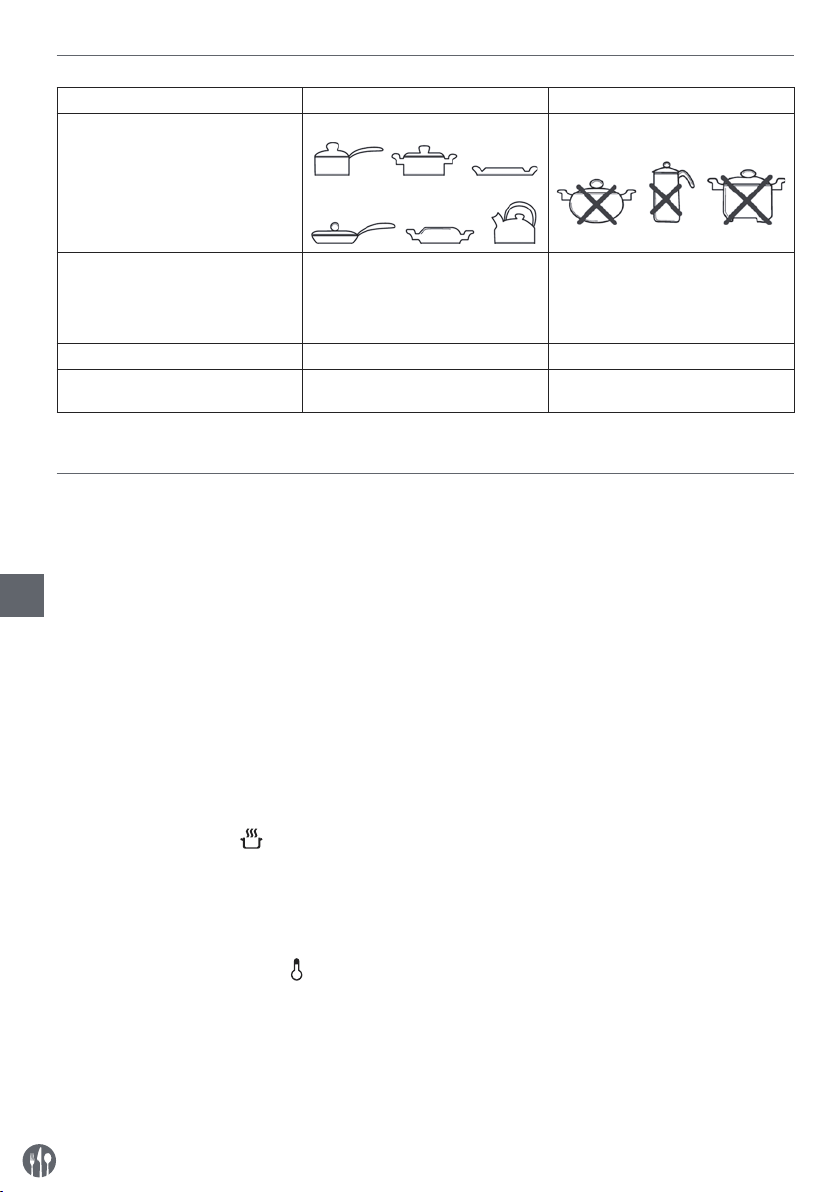
Suitable cooking equipment
Suitable Not suitable
Bottom of cookware Flat bottom
Curved, uneven, rounded bottom
Material Cookware with iron, cast iron, mag-
netic stainless steel or enamelled iron
bottom.
Diameter of the bottom Between 12 cm and 23 cm. Less than 12 cm or more than 23 cm.
Type of cookware Cookware with a bottom thickness
over 1.5 mm.
Cookware with ceramic, glass, copper,
bronze, or aluminium bottom.
Completely closed containers or cans.
Note: Using a pan or pot that’s not suitable for induction cooking may damage the appliance.
Operation
• Place a suitable pan or pot at the centre of the
heating surface of the appliance. (See - - > Suitable pans for the appliance).
Note: Do not place empty pan as this may damage
the pan and the appliance.
• Connect the power plug to a suitable electrical
EN
supply outlet. On/Standby button (1) will be light
up and the appliance now in Standby mode.
• Then, switch On the appliance by pressing On/
Standby button (1) and Power button (6) will flash.
• Next, choose to press either the power button (6)
or temperature button (7) to start cooking. If the
timer button (2) is not set, the appliance will operate continuously.
• Once you have finished cooking, switch to Standby
mode by pressing the On/Standby button (1). The
digital display (4) and all buttons will go off except
On/Standby button (1).
Note: If no any button on the control panel is
pressed during operation for 2 hours, the appliance
will then switch to Standby mode automatically.
Setting Power level
• During operation, press the power button (6) to
activate. The indicator light (6) will light up.
• Use the increase setting (3) or decrease setting
button (5) to increase or decrease the power level
(Range: 100W ~ 2,000W). Default setting is 100W.
Higher power level is suitable for steaming.
Setting Temperature level
• During operation, press the temperature button
(7) to activate. The indicator light (7) will light up.
• Use the increase setting (3) or decrease setting
ture level (Range: 35°C ~ 240°C). Default setting
is 100°C. Higher temperature level is suitable for
roasting, grilling or frying.
button (5) to increase or decrease the tempera-
6
Page 7
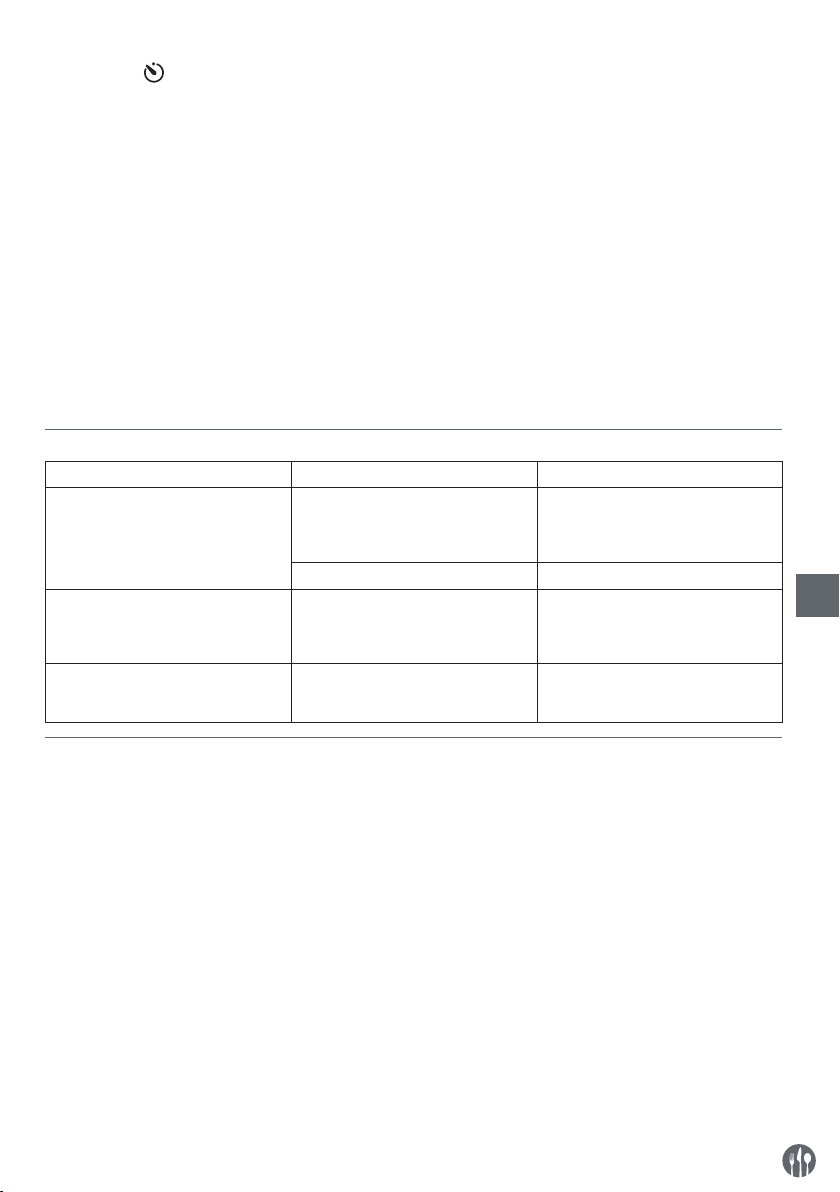
Setting Timer
• After power or temperature setting for cooking,
you can opt for timer setting. Press the timer button (2) to activate. The indicator light (2) lights up.
• Use the increase setting (3) or decrease setting
button (5) to increase or decrease the cooking
time (Range: 0 min ~ 180 mins). Default setting
is 0 min.
• When the timer is set, it will be stored automat-
ically within 5 seconds. The appliance will then
start operation. It will display the remaining time
and the power setting / temperature setting alternately on the display (4).
• The appliance will go into Standby mode when
the set time is elapsed.
• If the set time is reduced to “0 min” manually,
the appliance will go into Standby mode instantly.
Note:
1) Press and hold the increase setting button (3) or
decrease setting button (5) for fast adjustment.
2) After an extended period of operation, it is normal for the cooling fan inside to continue running in Standby mode for some time. Before
unplug the appliance, wait until the cooling fan
stops running.
3) The appliance’s surface is still hot after switch to
Standby mode. Wait completely cool down before
touching.
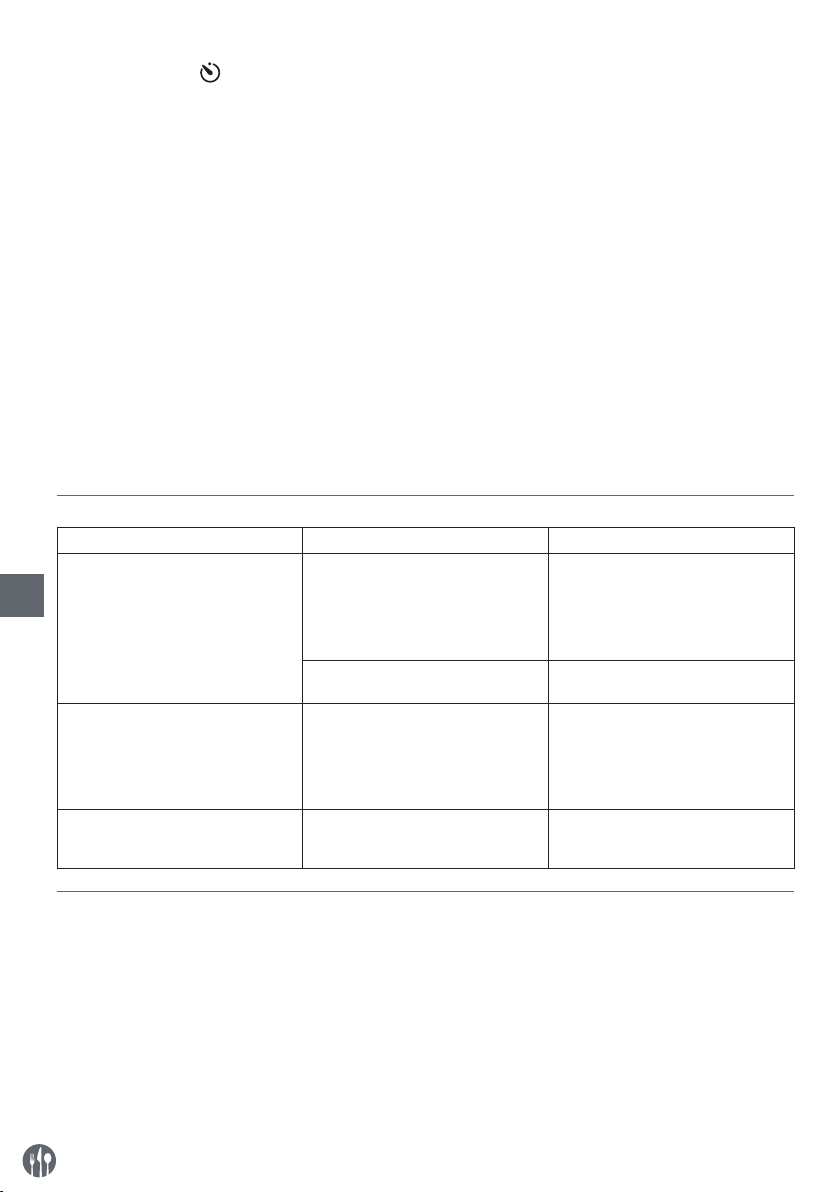
Error codes display
Error codes shown on the display (4) Possible cause Possible solution
E 1 The temperature of the appliance is
too high
Cooling fan defective Contact the supplier.
E 2 The pan or pot is overheated.
Possibly, the pan becomes empty and
appliance will shut down for protection.
E 3 The supply voltage is abnormal. (Sup-
ply voltage is too high or too low)
Clear all obstacles that around the
appliance. Unplug the appliance, remove the pan or pot, wait until the appliance is completely cool down.
Unplug the appliance, remove the
pan or pot, wait until the appliance is
completely cool down. And make sure
water is inside the pan.
Make sure that the appliance is connected to a suitable electrical power
supply.
EN
Cleaning and Maintenance
Attention: Always unplug the appliance from the electrical power outlet and let it cool down completely
before cleaning and storage.
Cleaning
• Never immerse the appliance in water or other
liquids.
• Clean the cooled exterior surface with a slightly
• Never use abrasive sponges or detergents, steel
wool or metallic utensils to clean the interior or
exterior parts of the appliance.
damp cloth or sponge with some mild soap solution.
7
Page 8
Storage
• Before storage, always make sure the appliance
has already been disconnected from the electrical outlet and cooled down completely.
• Store the appliance in a cool, clean and dry place.
• Never put heavy objects on the heating surface
during storage as it may crack it.
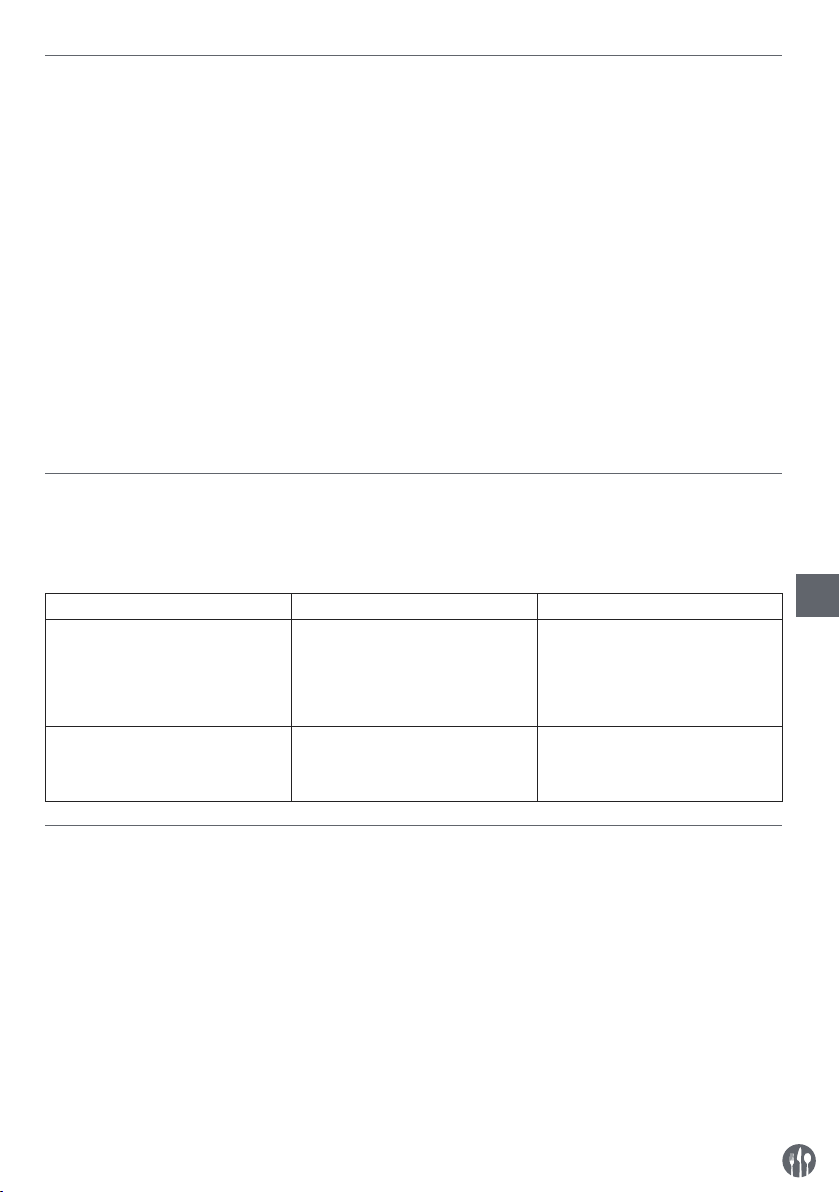
Troubleshooting
If the appliance does not function properly, please
check the below table for the solution. If you are
• Error codes shown on the digital display (3). (See
--> Error codes display)
still unable to solve the problem, please contact the
supplier/service provider.
Problems Possible cause Possible solution
The appliance does not switch ON.
Cooling fan is operating even after
the appliance is switched to Standby
mode.
- Power plug is not connected properly with the electrical outlet.
- On/Standby (1) button is not pressed.
- This is normal. The cooling fan continues running in Standby mode for
some time to cool down all internal
elements.
Technical specification
Item no.: 239278
Operating voltage and frequency: 220-240V~ 50/60Hz
Rated input power: 2000W
EN
Power setting: 100W ~ 2000W
Temperature setting: 35°C ~ 240°C
Timer setting: 0 min ~ 180 min
Protection class: class I
Dimension: 293x373x(H)56 mm
Remark: Technical specification is subjected to change without prior notification
- Check the power plug to make sure
it is connected properly.
- Press the On/Standby (1) button to
start operation.
- Wait until the cooling fan stops rotating.
Warranty
Any defect affecting the functionality of the appliance which becomes apparent within one year
after purchase will be repaired by free repair or replacement provided the appliance has been used
and maintained in accordance with the instructions
and has not been abused or misused in any way.
Your statutory rights are not affected. If the appliance is claimed under warranty, state where and
Discarding & Environment
At the end of the life of the appliance, please dispose of the appliance according to the regulations
and guidelines applicable at the time.
8
when it was purchased and include proof of purchase (e.g. receipt).
In line with our policy of continuous product development we reserve the right to change the product,
packaging and documentation specifications without notice.
Throw packing materials like plastic and boxes in
the appropriate containers.
Page 9

Sehr geehrte Kundin, sehr geehrter Kunde,
wir danken Ihnen für den Kauf des Gerätes Hendi. Machen Sie sich bitte mit dieser Anleitung noch vor der
Inbetriebnahme des Gerätes vertraut, um Schäden durch die unsachgemäße Bedienung zu vermeiden. Den
Sicherheitsregeln ist besondere Aufmerksamkeit zu widmen.
Sicherheitsregeln
• Die unsachgemäße Bedienung des Geräts kann zur schweren Beschädigung des Geräts
sowie zu Verletzungen führen.
• Das vorliegende Gerät ist ausschließlich für den gewerblichen Gebrauch bestimmt und
darf nicht im Haushalt verwendet werden.
• Das Gerät ist ausschließlich zu dem Zweck zu benutzen, zu dem es hergestellt wurde.
Der Hersteller haftet nicht für Schäden, die auf unsachgemäße Bedienung des Geräts
zurückzuführen sind.
• Den Kontakt des Gerätes und des Steckers mit Wasser oder einer anderen Flüssigkeit
vermeiden. Den Stecker unverzüglich aus dem Stecker ziehen und das Gerät von einem
anerkannten Fachmann prüfen lassen, wenn das Gerät unbeabsichtigterweise ins Was
-
ser fällt. Bei Nichteinhaltung dieser Sicherheitsvorschriften besteht Lebensgefahr.
• Nie eigenständig das Gehäuse des Gerätes zu öffnen versuchen.
• In das Gehäuse des Gerätes keine Gegenstände einführen.
• Den Stecker nicht mit nassen oder feuchten Händen berühren.
• Gefahr eines Stromschlags! Das Gerät darf nicht selbstständig repariert werden. Sämt
liche Mängel und Unzulänglichkeiten sind ausschließlich durch qualifiziertes Personal
zu beseitigen.
• Niemals ein beschädigtes Gerät benutzen! Das beschädigte Gerät vom Netz trennen
und sich mit dem Verkäufer in Verbindung setzen.
• Warnung: Die Elektroteile des Gerätes dürfen weder in Wasser noch in andere Flüssig
-
keiten getaucht werden. Ebenso ist das Gerät nicht unter fließendes Wasser zu halten.
• Der Stecker und die Stromversorgungsleitung sind regelmäßig auf Beschädigungen zu
prüfen. Der beschädigte Stecker oder Leitung sind an eine Servicestelle oder einer an
deren qualifizierten Person zur Reparatur zu übergeben, um eventuellen Gefahren und
Verletzungen des Körpers vorzubeugen.
• Man muss sich davon überzeugen, ob die Stromversorgungsleitung weder mit scharf
kantigen noch mit heißen Gegenständen in Berührung kommt; halten Sie die Leitung
weit entfernt von einer offenen Flamme. Um den Stecker aus der Netzsteckdose zu neh
men, muss man immer am Stecker und nicht an der Leitung ziehen.
• Die Stromversorgungsleitung (oder Verlängerungsleitung) ist vor dem zufälligen Heraus
ziehen aus der Steckdose zu schützen. Die Stromversorgungsleitung muss so geführt
werden, dass niemand zufällig darüber stolpern kann.
• Das Gerät muss während seiner Anwendung ständig kontrolliert werden.
• Warnung! Wenn der Stecker in der Netzsteckdose ist, muss man das Gerät als an die
Stromversorgung angeschlossen betrachten.
DE
9
Page 10
• Bevor der Stecker aus der Netzsteckdose genommen wird, ist das Gerät auszuschalten.
• Das Gerät darf beim Tragen nicht an der Leitung gehalten werden.
• Benutzen Sie kein Zubehör, das nicht mit diesem Gerät mitgeliefert wurde.
• Das Gerät muss man ausschließlich an die Steckdose mit solch einer Spannung und
Frequenz anschließen, wie auf dem Typenschild angegeben wird.
• Stecken Sie den Stecker in die Steckdose, die an einem leicht und bequem zugänglichen
Ort angeordnet ist, und zwar so, dass das Gerät bei einer Störung sofort abgeschaltet
werden kann. Um das Gerät vollständig auszuschalten, muss man es von der Stromquel
le trennen. Zu diesem Zweck muss man den Stecker, der sich am Ende der vom Gerät
getrennten Leitung befindet, aus der Netzsteckdose ziehen.
• Vor dem Abtrennen des Steckers ist das Gerät auszuschalten!
• Benutzen Sie kein Zubehör, das nicht vom Hersteller empfohlen wird. Die Anwendung
vom nicht empfohlenen Zubehör stellt eine Gefahr für den Nutzer dar und kann zur Be
schädigung des Gerätes führen. Benutzen Sie ausschließlich Ersatzteile und Zubehör im
Original.
• Dieses Gerät eignet sich nicht für den Gebrauch durch Personen (gilt auch für Kinder)
mit geringerer Motorik, Sensorik oder geistiger Fähigkeit oder mangelhafter Erfahrung
und Wissen.
• Auf keinen Fall darf das Bedienen des Gerätes durch Kinder zugelassen werden.
• Das Gerät mit Stromversorgungsleitung ist außerhalb der Reichweite von Kindern zu
lagern.
DE
• Ebenso muss dafür gesorgt werden, dass die Kinder das Gerät nicht zum Spielen benut
zen.
• Das Gerät ist immer dann von der Stromversorgung zu trennen, wenn es ohne Aufsicht
bleiben soll bzw. auch vor der Montage, Demontage und Reinigung.
• Während der Nutzung darf das Gerät nicht ohne Aufsicht gelassen werden.
-
-
-
Besondere Sicherheitsvorschriften
• Das vorliegende Gerät ist zum Kochen verschiedener Speisen durch das Erwärmen des
Kochgeschirrs bestimmt. Die Verwendung des Geräts für andere Zwecke kann zu seiner
Beschädigung sowie zu Körperverletzungen führen.
• Verwenden Sie das Gerät ausschließlich gemäß der Anleitung.
• Das Gerät ist ausschließlich durch das geschultes Personal in Küchen, Restaurants und
Kantinen oder durch die Bedienpersonen an der Bar zu bedienen.
•
Achtung! Es besteht die Verbrennungsgefahr! Die Heizfläche und die anderen
zugänglichen Flächen erwärmen sich auf sehr hohe Temperaturen. Berühren Sie aus
-
schließlich das Steuerpanel.
•
Achtung! Das Gerät emittiert die nicht ionisierende elektromagnetische Strahlung.
• Stellen Sie das Gerät nicht in der Nähe von Gegenständen ab, die von einem Magnet
feld beeinträchtigt werden können, zum Beispiel Fernseher, Rundfunkempfangsgeräte,
Geldkarten oder Kreditkarten.
• Stellen Sie das Gerät nicht auf einen wärmemittierenden Gegenstand (Gasherd, Elekt
10
-
Page 11

roherd, Grill, usw.). Lagern Sie es weit entfernt von heißen Flächen oder offenem Feuer.
Stellen Sie das Gerät auf eine ebene, stabile, saubere und trockene Fläche auf, die auch
gegen die Einwirkung hoher Temperaturen beständig ist.
• Vergewissern Sie sich, dass sich das Gerät nicht in der Nähe des Entstehungsorts von
Wasserdampf oder fettigen Dämpfen befindet. Der Lüfter des Geräts saugt diese Dämpfe
nämlich heran, was dazu führt, dass sich im Gerät Fett oder Feuchtigkeit ansammelt und
gegebenenfalls Kurzschluss entsteht.
• Das Gerät ist für die Bedienung durch eine externe Schaltuhr oder ein gesondertes Fern
-
steuersystem nicht geeignet.
• Stellen Sie keine Metallgegenstände (z.B. Messer, Gabeln, Löffel oder Deckel) auf die
Fläche der Kochplatte auf, da sie heiß werden können.
• WARNUNG: Verdecken Sie nicht die Belüftungsöffnungen im Gehäuse des Geräts.
• WARNUNG: Wenn die Kochplatte gerissen ist oder beschädigt wird, trennen Sie das Ge
-
rät von der Stromversorgung, um so den Stromschlag zu vermeiden.
• Um eine ausreichende Belüftung des Geräts zu gewährleisten, belassen Sie einen Frei
-
raum von mindestens 20 cm rundum das Gerät.
• Schlagen Sie nicht die Heizplatte mit harten Werkzeugen. Reinigen Sie das Gerät nicht
mit einem Wasserstrahl unter Druck oder einem Dampfreiniger, spülen Sie das Gerät
nicht mit Wasser ab, da die Teile im Gerät feucht werden oder eingetaucht werden kön
-
nen, was den Stromschlag verursacht.
• Achten Sie besonders auf Ringe, Uhren und anderen Schmuck bei der Bedienung des
Geräts, da sie heiß werden können, wenn sie sich in der Nähe der Heizplatte befinden.
• Achtung! Führen und sichern Sie entsprechend das Stromkabel, um ein unbeabsichtig
DE
-
tes Ziehen oder Kontakt mit der Heizplatte zu vermeiden.
• Waschen Sie das Gerät nicht mit Wasser. Beim Waschen des Geräts kann Wasser in den
elektrischen Teil gelangen und so zu einem Stromschlag führen.
• Reinigen und stellen Sie das Gerät nicht am Lagerort ab, bis es nicht vollständig abge
-
kühlt ist.
• Stellen Sie kein leeres Kochgeschirr auf das Gerät auf, um dieses nicht zu beschädigen.
Verwenden Sie nur das Kochgeschirr der empfohlenen Art und Größe. (Siehe - - -> Ge
-
eignetes Küchenzubehör).
Montage der Erdung
Der Induktionskocher ist ein Gerät der I. Schutzklasse und erfordert eine Erdung. Die Erdung
verringert das Risiko eines elektrischen Stromschlags, da über einen Leiter der elektrische
Strom abgeleitet wird. Das Gerät ist mit einem
Schutzleiter mit Schutzkontaktstecker ausgerüstet. Der Stecker ist an eine Netzsteckdose anzuschließen, die richtig montiert und geerdet wurde.
11
Page 12
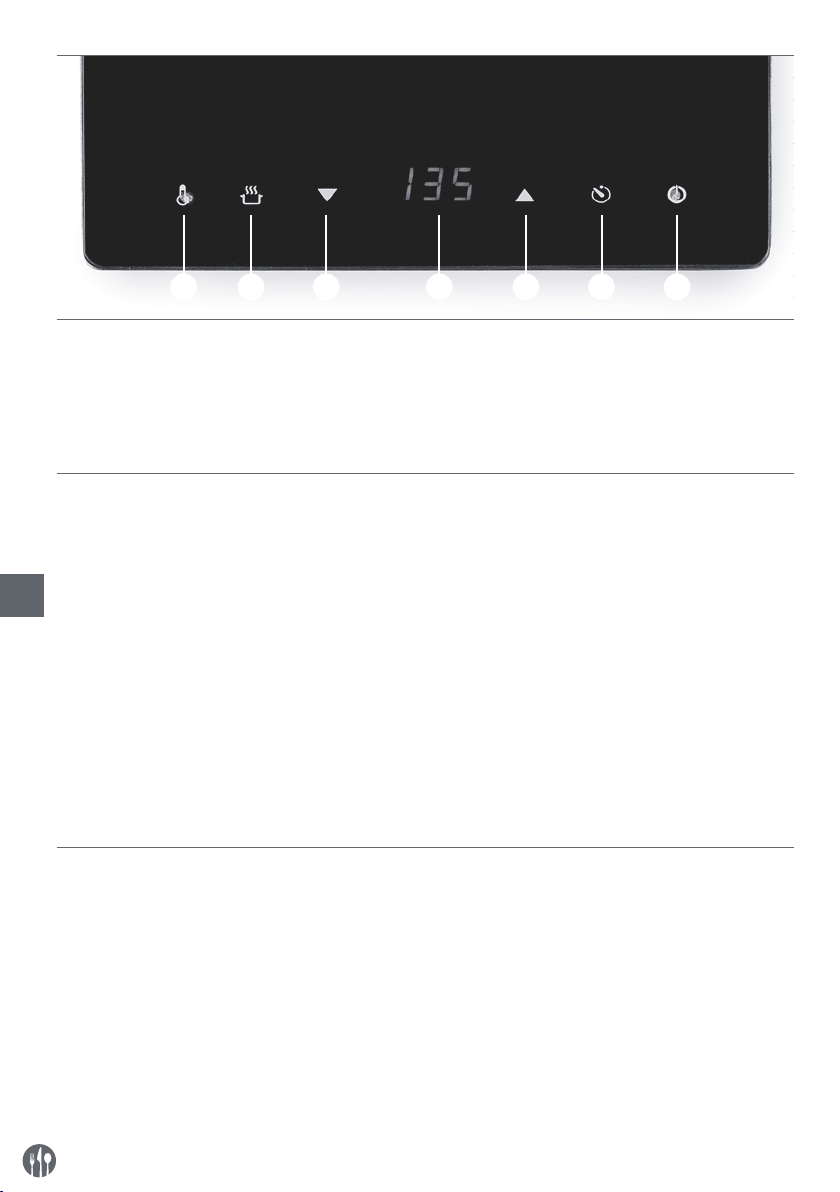
Touch-Steuerpanel des Geräts
1) EIN/Bereitschaftstaste
2) Zeitgeberfunktion mit Kontrollleuchte
3) Einstellung erhöhen: Zeitdauer / Temperatur /
Leistung
4) Digitalanzeige
Vor erstem Gebrauch
• Verpackung und Sicherungselemente abnehmen
und beseitigen.
• Überprüfen Sie es, ob das Gerät nicht beschä-
digt ist. Bei einer unvollständigen Anlieferung
DE
oder Beschädigungen muss man sich mit dem
Lieferanten in Verbindung setzen (Siehe == > Garantie).
• Reinigen Sie das Gerät (siehe ==> Reinigung und
Wartung).
• Prüfen Sie, ob das Gerät vollständig trocken ist.
• Stellen Sie das Gerät auf eine horizontale, stabile
Fläche auf, die auch gegen die Einwirkung hoher
Temperaturen und gegen Spritzer von Flüssigkeiten beständig ist.
• Gewährleisten Sie eine richtige Belüftung. Be-
1234567
5) Einstellung verringern: Zeitdauer / Temperatur
/ Leistung
6) Leistungsfunktion mit Kontrollleuchte:
7) Temperaturfunktion mit Kontrollleuchte
lassen Sie einen Freiraum von mindestens 20 cm
rundum das Gerät.
• Stellen Sie das Gerät nicht in der Nähe von Ge-
genständen ab, die von einem Magnetfeld beeinträchtigt werden können (z.B. Rundfunkempfangsgeräte, Kassettenrecorder).
Hinweis: Auf Grund von Rückständen aus dem
Produktionsprozess kann während der ersten Inbetriebnahmen aus dem Gerät ein schwacher, spezifischer Geruch entweichen. Das ist eine normale
Erscheinung und bedeutet weder eine Beschädigung des Geräts noch eine Gefährdung für den
Nutzer. Prüfen Sie, ob das Gerät gut belüftet wird.
12
Page 13
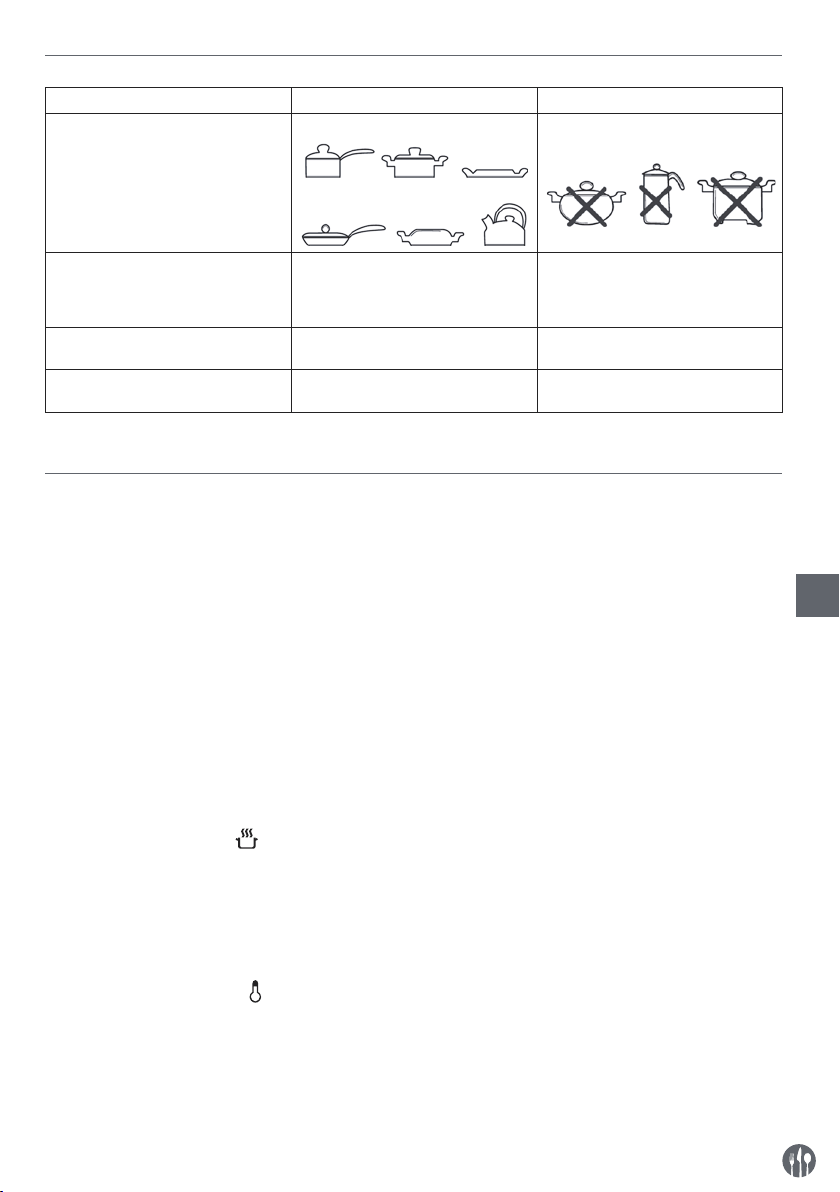
Geeignetes Küchenzubehör
Entsprechende Ausrüstung Nicht entsprechende Ausrüstung
Gefäßboden Ebener Gefäßboden Gekrümmter, unebener, abgerundeter
Gefäßboden
Material Küchengefäße mit Eisen- oder gus-
seisernem Boden oder mit Boden aus
magnetischem Edelstahl oder mit
emailliertem Eisenboden
Abmessungen des Gefäßbodens Von 12 bis 23 cm Weniger als 12 cm oder mehr als 23
Typ des Gefäßes Küchengefäße mit einer Dicke des
Bodens von über 1,5 mm
Küchengefäße mit Keramik-, Glas-,
Kupfer- oder Aluminiumboden oder
mit Boden aus Bronze
cm
Geschlossene Küchengefäße oder
Dosen
Hinweis: Die Verwendung einer Pfanne oder eines Topfes, die zum Induktionskochen nicht geeignet sind,
kann zur Beschädigung des Geräts führen.
Betrieb
• Stellen Sie eine geeignete Pfanne oder einen
Topf in die Mitte der Heizfläche des Gerätes.
(Siehe - -> Geeignete Pfannen für das Gerät).
Hinweis: Stellen Sie keine leere Pfanne auf die
Heizfläche, da dies die Pfanne und das Gerät beschädigen könnte.
• Schließen Sie den Netzstecker an eine geeignete
Steckdose an. Ein/Bereitschafts-Taste (1) leuchtet auf und das Gerät befindet sich nun im Bereit-
die Netz-Taste (6) oder die Temperatur-Taste (7)
drücken, um mit dem Kochen zu beginnen. Wenn
die Zeitgeber-Taste (2) nicht eingestellt wird, arbeitet das Gerät ununterbrochen.
• Sobald Sie mit dem Kochen fertig sind, schalten
Sie in den Bereitschafts-Modus, indem Sie die
Ein/Bereitschafts-Taste (1) drücken. Die Digitalanzeige (4) und alle Tasten werden erlöschen,
bis auf die Ein/Bereitschafts-Taste (1).
schafts-Modus.
• Schalten Sie danach das Gerät durch Drücken
der Ein/Bereitschafts-Taste (1) Ein und die
Netz-Taste (6) wird aufleuchten.
• Als nächstes wählen Sie aus, ob Sie entweder
Hinweis: Wenn während des Betriebs 2 Stunden
lang keine Taste auf dem Bedienfeld gedrückt
wird, schaltet das Gerät automatisch in den Bereitschafts-Modus.
Leistungsniveau einstellen
• Drücken Sie, um zu aktivieren, während des Betriebs die Netz-Taste (6). Die Kontrollleuchte (6)
wird aufleuchten.
• Verwenden Sie die Einstellung erhöhen- (3) oder
tungsniveau zu erhöhen oder zu verringern (Bereich: 100W ~ 2,000W). Standardmäßig sind 100W
eingestellt. Ein höheres Leistungsniveau eignet
sich zum Dampfgaren.
Einstellung verringern-Taste (5), um das Leis-
DE
Temperaturniveau einstellen
• Drücken Sie, um zu aktivieren, während des
Betriebs die Temperatur-Taste (7). Die Kontrollleuchte (7) wird aufleuchten.
• Verwenden Sie die Einstellung erhöhen- (3) oder
Einstellung verringern-Taste (5), um das Tempe-
raturniveau zu erhöhen oder zu verringern (Bereich: 35°C ~ 240°C). Standardmäßig sind 100°C
eingestellt. Ein höheres Temperaturniveau eignet sich zum Braten, Grillen oder Frittieren.
13
Page 14
Zeitgeber einstellen
• Nach der Netz- oder Temperatureinstellung zum
Kochen können Sie die Zeitgebereinstellung vornehmen. Drücken Sie die Zeitgeber-Taste (2), um
zu aktivieren. Die Kontrollleuchte (2) leuchtet auf.
• Verwenden Sie die Einstellung erhöhen- (3) oder
Einstellung verringern-Taste (5), um das Kochdauer zu erhöhen oder zu verringern (Bereich:
0 Min. ~ 180 Min.). Standardmäßig sind 0 Min.
eingestellt.
• Sollte der Zeitgeber eingestellt sein, wird er
innerhalb von 5 Sekunden automatisch gespeichert. Das Gerät wird danach den Betrieb starten. Es wird die verbleibende Zeit und die Leistungs-/Temperatur-Einstellung abwechselnd auf
dem Display (4) anzeigen.
•
Das Gerät wird sich in den Bereitschafts-Modus begeben, sobald die eingestellte Zeit abgelaufen ist.
• Wenn die eingestellte Zeit manuell auf “0 min”
reduziert wird, geht das Gerät sofort in den Bereitschafts-Modus.
Hinweis:
1) Halten Sie, für eine schnelle Anpassung, die
Einstellung erhöhen (3) oder Einstellung verringern-Taste (5) gedrückt.
2) Nach einer längeren Betriebsdauer ist es normal, dass der Lüfter während des Bereitschaftsmodus für einige Zeit läuft. Bevor Sie den Ge-
rätenetzstecker entfernen, müssen Sie solange
warten, bis der Lüfter nicht mehr läuft.
3) Die Oberfläche des Gerätes ist nach dem Umschalten in den Bereitschafts-Modus nach wie
vor heiß. Warten Sie bis es sich vollständig abgekühlt hat, bevor Sie es berühren.
Angezeigte Fehlercodes
Fehlercodes im Display (4) Mögliche Ursache Mögliche Lösung
E 1 Die Temperatur des Geräts ist zu
DE
E 2 Die Pfanne oder der Topf erwärmen
E 3 Die Versorgungsspannung ist abnor-
hoch.
Der Lüfter ist defekt. Setzen Sie sich mit dem Lieferanten
sich auf sehr hohe Temperaturen.
Das Geschirr wurde wahrscheinlich
entleert, wodurch die Aktivierung der
Sicherung erfolgt und der Induktionskocher wird ausgeschaltet.
mal (zu hoch oder zu niedrig).
Entfernen Sie alle Hindernisse rundum das Gerät. Trennen Sie das
Gerät von der Stromversorgung, nehmen Sie die Pfanne oder den Topf und
warten Sie ab, bis das Gerät völlig
abgekühlt ist.
in Verbindung.
Trennen Sie das Gerät von der Stromversorgung, nehmen Sie die Pfanne
oder den Topf und warten Sie ab, bis
das Gerät völlig abgekühlt ist. Vergewissern Sie sich, dass sich Wasser im
Geschirr befindet.
Überprüfen Sie, ob das Gerät an
die entsprechende Stromversorgungsquelle angeschlossen ist.
14
Page 15
Reinigung und Wartung
Hinweis: Vor dem Reinigen und Abstellen des Geräts am Lagerort, ist das Gerät immer von der Netzsteckdose zu trennen und dazu muss man abwarten, bis es abgekühlt ist.
Reinigung
• Tauchen Sie das Gerät nie in Wasser und andere
Flüssigkeiten.
• Nach dem Abkühlen der Oberfläche ist sie mit
einem feuchten Tuch oder Schwamm mit einer
geringen Menge eines milden Reinigungsmittels
• Verwenden Sie weder aggressive Reinigungsmittel und Scheuerschwämme, noch Schwämme aus Stahlwolle oder Metallgegenstände zur
Reinigung des Innenraums und der äußeren Teile
des Geräts.
zu reinigen.
Lagerung
• Bevor das Gerät am Lagerort abgestellt wird,
muss man sich sicherstellen, dass das Gerät von
der Netzsteckdose getrennt wurde und völlig abgekühlt ist.
und trockenen Ort.
• Stellen Sie keine schweren Gegenstände auf die
Heizfläche des Geräts, um seinen Riss zu vermeiden.
• Lagern Sie das Gerät an einem kühlen, sauberen
Diagnostik
Wenn das Gerät nicht richtig funktioniert, muss
man sich zum Finden der richtigen Lösung mit der
das Problem nicht lösen können, dann setzen Sie
sich bitte mit dem Lieferanten in Verbindung.
nachfolgenden Tabelle vertraut machen. Wenn Sie
Problem Mögliche Ursache Mögliche Lösung
- Überprüfen Sie, ob der Stecker
an die Netzsteckdose richtig angeschlossen ist.
- Drücken Sie die EIN-/Standby-Taste
(1), um den Betrieb des Geräts zu
beginnen.
- Warten Sie auf, bis der Lüfter nicht
mehr läuft.
Das Gerät schaltet sich nicht ein.
Der Lüfter läuft noch nach dem Umschalten in den Standby-Modus.
- Der Stecker ist nicht richtig an die
Netzsteckdose angeschlossen.
- Die EIN-/Standby-Taste (1) wurde
nicht eingeschaltet.
- Das ist ganz normal. Der Lüfter
läuft im Standby-Modus für einige
Zeit weiter, um alle internen Elemente abzukühlen.
Technische Spezifikation
Bestellnummer: 239278
Betriebsspannung und -frequenz: 220-240V~ 50/60Hz
Nennleistungsaufnahme: 2000W
Leistungsregelung: 100W ~ 2000W
Temperatur-Einstellbereich: 35°C ~ 240°C
Timer-Einstellbereich: 0 min ~ 180 min
Schutzklasse: class I
Abmessungen: 293x373x(H)56 mm
Hinweis: Die technische Spezifikation kann ohne Vorankündigung verändert werden.
DE
15
Page 16

Garantie
Alle innerhalb von einem Jahr nach dem Kaufdatum festgestellten Defekte oder Mängel, die die
Funktionalität des Gerätes beeinträchtigen, werden auf dem Wege der unentgeltlichen Reparatur
bzw. des Austausches unter der Voraussetzung
beseitigt, dass das Gerät in einer der Bedienungsanleitung gemäßen Art und Weise betrieben und
gewartet wird und weder vorsätzlich vernichtet
noch nicht bestimmungsgemäß genutzt wurde.
Ihre Rechte aus den entsprechenden Gesetzen
Entsorgung und Umweltschutz
Nach Beendigung seiner Lebensdauer ist das Gerät rechtmäßig und den jeweils geltenden Richtlinien entsprechend zu entsorgen.
DE
bleiben davon unberührt. Eine in der Garantiefrist
einzureichende Beanstandung hat die Angabe des
Kaufortes und Kaufdatums und in der Anlage einen
Kaufbeleg (z.B. Kassenzettel) zu enthalten.
Gemäß unserer Politik der ständigen Weiterentwicklung unserer Produkte behalten wir uns vor,
Änderungen am Produkt, an seiner Verpackung
und an den dokumentierten technischen Daten
ohne vorherige Ankündigung vorzunehmen.
Verpackungsmaterial, wie Kunststoffe bzw.
Schachteln, in die entsprechenden Behälter geben.
16
Page 17

Geachte klant,
Hartelijk dank voor de aankoop van dit Hendi apparaat. Leest u deze gebruiksaanwijzing zorgvuldig voordat
u het apparaat gebruikt, dit om schade door verkeerd gebruik te voorkomen. Lees vooral de veiligheidsinstructies aandachtig door.
Veiligheidsinstructies
• Onjuiste bediening en verkeerd gebruik van het apparaat kan ernstige schade aan het
apparaat en verwonding van personen tot gevolg hebben.
• Dit apparaat mag alleen worden gebruikt voor commerciële doeleinden en mag niet wor
-
den gebruikt voor huishoudelijk gebruik.
• Het apparaat mag alleen worden gebruikt voor het doel waarvoor het werd ontworpen.
De fabrikant aanvaardt geen enkele aansprakelijkheid voor schade als gevolg van onjuis
-
te bediening en verkeerd gebruik.
• Zorg dat het apparaat en de stekker niet met water of een andere vloeistof in aanra
king komen. Mocht het apparaat onverhoopt in het water vallen, trek dan onmiddellijk
de stekker uit het stopcontact en laat het apparaat controleren door een erkend vakman.
Niet-naleving hiervan kan levensgevaar opleveren.
• Probeer nooit zelf de behuizing van het apparaat te openen.
• Steek geen voorwerpen in de behuizing van het apparaat.
• Raak de stekker niet met natte of vochtige handen aan.
• Gevaar van elektrische schokken! Probeer het apparaat niet zelf te repareren. In het
geval van storingen, laat reparaties alleen uitvoeren door gekwalificeerd personeel.
• Gebruik nooit een beschadigd apparaat! Als het apparaat is beschadigd, haal de stekker
dan uit het stopcontact en neem contact op met de winkel.
• Waarschuwing! Dompel de elektrische onderdelen van het apparaat niet onder in water
of andere vloeistoffen. Houd het apparaat nooit onder stromend water.
• Controleer de stekker en het netsnoer regelmatig op schade. Als de stekker of het net
snoer is beschadigd, moet het worden vervangen door de technische dienst of een soortgelijk gekwalificeerd persoon om gevaar of letsel te voorkomen.
• Zorg ervoor dat het netsnoer niet in contact komt met scherpe of hete voorwerpen en
houd het uit de buurt van open vuur. Als u de stekker uit het stopcontact wilt halen, trek
dan altijd aan de stekker en niet aan het netsnoer.
• Zorg ervoor dat niemand per ongeluk aan het netsnoer (of verlengsnoer) kan trekken of
kan struikelen over het netsnoer.
• Houd het apparaat in de gaten tijdens gebruik.
• Waarschuwing! Zolang de stekker in het stopcontact zit, is het apparaat aangesloten op
de voedingsbron.
• Schakel het apparaat uit voordat u de stekker uit het stopcontact trekt.
• Draag het apparaat nooit aan het netsnoer.
• Gebruik geen extra hulpmiddelen die niet worden meegeleverd met het apparaat.
• Sluit het apparaat alleen aan op een stopcontact met de spanning en frequentie die is
NL
17
Page 18
vermeld op het typeplaatje.
• Sluit de stekker aan op een stopcontact dat eenvoudig bereikt kan worden, zodat de
stekker in geval van nood onmiddellijk uit het stopcontact kan worden getrokken. Trek de
stekker volledig uit het stopcontact om het apparaat volledig uit te schakelen. Gebruik de
stekker om het apparaat los te koppelen van het lichtnet.
• Schakel het apparaat altijd uit voordat u de stekker uit het stopcontact trekt.
• Gebruik nooit accessoires die niet worden aanbevolen door de fabrikant. Zij kunnen mo
gelijk een veiligheidsrisico vormen voor de gebruiker en kunnen het apparaat mogelijk
beschadigen. Gebruik alleen originele onderdelen en accessoires.
• Dit apparaat is niet geschikt voor gebruik door personen (inclusief kinderen) met een
verminderd fysiek, sensorisch of geestelijk vermogen, of gebrek aan ervaring en kennis.
• Dit apparaat mag onder geen enkele omstandigheid worden gebruikt door kinderen.
• Houd het apparaat en het netsnoer buiten bereik van kinderen.
• Kinderen mogen niet met het apparaat spelen.
• Koppel het apparaat altijd los van het lichtnet als het onbeheerd wordt achtergelaten en
voordat het apparaat wordt gemonteerd, gedemonteerd of gereinigd.
• Laat het apparaat nooit onbeheerd achter tijdens gebruik.
Speciale veiligheidsvoorschriften
• Dit apparaat is ontworpen voor het koken van een verscheidenheid aan voedsel door het
verwarmen van kookgerei. Elk ander gebruik kan leiden tot schade aan het apparaat of
NL
persoonlijk letsel.
• Gebruik het apparaat alleen zoals beschreven in deze handleiding.
• Dit apparaat moet worden gebruikt door getraind personeel in keukens van restaurants
of kantines of barpersoneel, etc.
•
Let op! Gevaar voor brandwonden! De temperatuur van het verwarmingsoppervlak
en andere bereikbare oppervlakken wordt erg hoog tijdens gebruik. Raak alleen het be
dieningspaneel aan.
•
Let op! Dit apparaat straalt niet-ioniserende magnetische straling uit.
• Plaats het apparaat niet in de buurt van voorwerpen die door een magnetisch veld kun
nen worden beïnvloed, zoals TV’s, radio’s, bankpassen en creditcards.
• Plaats het apparaat niet op een warmtebron (kooktoestel op benzine, elektriciteit, kolen,
etc.) Houd het apparaat uit de buurt van hete oppervlakken en open vuur. Gebruik het
apparaat altijd op een vlakke, stabiele, schone, hittebestendige en droge ondergrond.
• Zorg ervoor dat het apparaat niet in de buurt van waterdamp of vetdampen wordt ge
plaatst. De ventilator in het apparaat trekt deze dampen naar binnen en dit zorgt ervoor
dat er vet of vocht in het apparaat kan ophopen en kan uiteindelijk leiden tot korsluiting
in het apparaat.
• Dit apparaat is niet bedoeld om gebruikt te worden met behulp van een externe timer of
aparte afstandsbediening.
• Metalen voorwerpen zoals messen, vorken en deksels mogen niet op de verwarmings
plaat worden gelegd, omdat ze heet kunnen worden.
18
-
-
-
-
-
Page 19

• WAARSCHUWING: Houd alle ventilatieopeningen in de behuizing van het apparaat vrij.
• WAARSCHUWING: Als het verwarmingsoppervlak is gebarsten of beschadigd, schakel
het apparaat dan uit om het risico op elektrische schokken te vermijden.
• Laat tijdens gebruik minimaal 20 cm ruimte vrij rond het apparaat voor ventilatiedoel
-
einden.
• Gebruik geen hard keukengerei of gereedschap om op het oppervlak van de verwar
mingsplaat te slaan. Gebruik geen waterstralen of stoomreiniger en spoel niet rechtstreeks af met water, omdat de onderdelen van het apparaat nat kunnen worden en dit
kan leiden tot elektrische schokken.
• Wees voorzichtig wanneer u het apparaat gebruikt, omdat ringen, horloges en soort
gelijke draagbare voorwerpen erg heet kunnen worden als ze zich in de buurt van het
verwarmingsoppervlak bevinden.
• Let op! Plaats het netsnoer indien nodig op een veilige manier om te voorkomen dat het
netsnoer in contact kan komen met het verwarmingsoppervlak en dat er per ongeluk aan
het netsnoer kan worden getrokken.
• Was het apparaat niet met water. Wassen kan lekkages veroorzaken en het risico op
elektrische schokken verhogen.
• Reinig of berg het apparaat niet op tenzij het volledig is afgekoeld.
• Plaats geen lege pannen op het apparaat tijdens gebruik, omdat dit tot schade aan de
pannen kan leiden. Gebruik alleen pannen en kookgerei van het aanbevolen type en
grootte. (Zie - - -> Geschikte pannen).
NL
Installatie met aarding
Dit apparaat is geclassificeerd als beschermingsklasse I en moet worden aangesloten op een aansluiting met aarde. Aarding verlaagt de kans op
elektrische schokken doordat elektrische stroom
via een ontsnappingsdraad kan weglopen. Dit ap-
paraat is uitgerust met een snoer met een aardedraad en een geaarde stekker. De stekker moet in
een stopcontact worden gestoken dat juist is geïnstalleerd en geaard.
19
Page 20
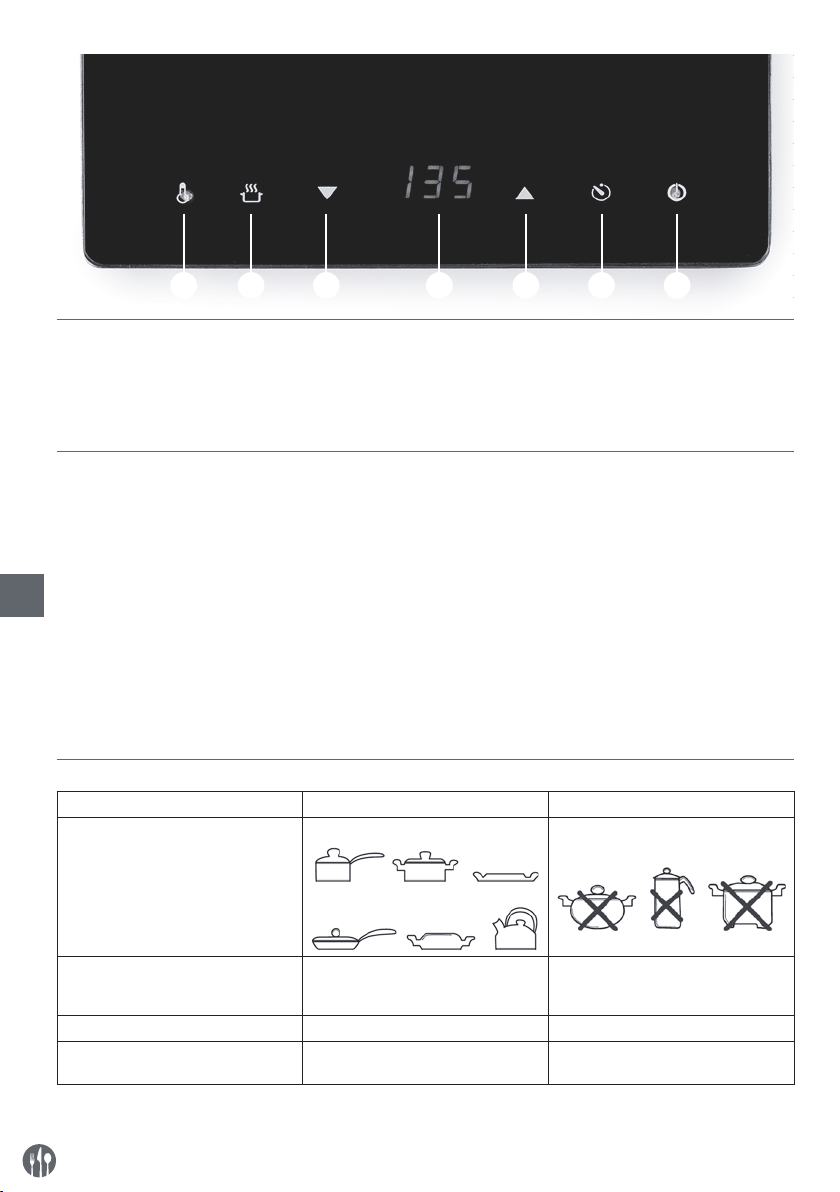
Aanraak-bedieningspaneel van het apparaat
1) Aan/stand-bytoets
2) Timerfunctie met indicatielampje
3) Instelling verhogen: tijd/temperatuur/vermogen
5) Instelling verhogen: Tijd/temperatuur/vermogen
6) Vermogensfunctie met indicatielampje:
7) Temperatuurfunctie met indicatielampje
4) Digitaal scherm
Voorbereidingen voor het eerste gebruik
• Verwijder alle verpakkingsmaterialen.
• Controleer of het apparaat niet is beschadigd.
Neem in geval van schade of een onvolledige
levering contact op met uw leverancier (Zie == >
Garantie).
NL
• Reinig het apparaat vóór gebruik (Zie == > Reini-
een minimale afstand van 20 cm vrij rond het apparaat.
• Plaats het apparaat niet dicht in de buurt bij apparaten die gevoelig zijn voor storingen veroorzaakt door magnetische bronnen (bijv. radio’s,
cassettespelers).
ging en onderhoud).
• Zorg ervoor dat het apparaat volledig droog is.
• Plaats het apparaat op een horizontaal, stabiel
en hittebestendig oppervlak dat bestand is tegen
waterspatten.
• Zorg ervoor dat er voldoende ventilatie is. Houd
Opmerking: Door fabricageresten kan het apparaat de eerste gebruikscycli een lichte geur afgeven. Dit is normaal en duidt niet op een defect of
gevaar. Zorg ervoor dat het apparaat goed wordt
geventileerd.
Geeignetes Küchenzubehör
Geschikt Niet geschikt
Bodem van pan Platte bodem Gebogen, ongelijke, ronde bodem
1234567
Materiaal Pannen met ijzeren, gietijzeren, mag-
netisch roestvrijstalen of geëmailleerd
ijzeren bodem.
Diameter bodem Tussen 12 cm en 23 cm. Minder dan 12 cm of meer dan 23 cm.
Soort pan Pannen met een bodemdikte van min-
imaal 1,5 mm.
20
Pannen met keramische, glazen, koperen of aluminium bodem.
Volledig gesloten pannen of blikken
Page 21
Bediening
• Plaats een geschikte pan of pot op het midden
van het verwarmingsoppervlak van het apparaat.
(Zie - - > Geschikte pannen voor het apparaat).
Opmerking: Plaats geen lege pan, omdat dit de
pan en het apparaat kan beschadigen.
• Steek de stekker in een geschikt stopcontact. De
toets Aan/stand-by (1) licht op en het apparaat is
nu in Stand-by modus.
• Schakel dan het apparaat in door te drukken op
de toets Aan/stand-by (1); de Aan-/uit toets (6)
knippert.
• Druk daarna op de aan-/uit toets (6) of de temperatuur toets (7) om het koken te starten. Als
Instelling vermogensniveau
• Druk als het apparaat in werking is op de aan-/uit
toets (6) om deze te activeren. Het indicatielampje (6) licht op.
• Gebruik de toets voor verhogen (3) of verlagen (5)
Instelling temperatuurniveau
• Druk als het apparaat in werking is op de temperatuur toets (7) om deze te activeren. Het indicatielampje (7) licht op.
• Gebruik de toets voor verhogen (3) of verlagen
de timer toets (2) niet is ingesteld, dan werkt het
apparaat doorlopend.
• Schakel nadat u het koken hebt beëindigd om
naar de Stand-by modus door op de toets Aan/
stand-by (1) te drukken. Het digitale scherm (4)
en alle toetsen gaan uit behalve de toets Aan/
stand-by (1).
Opmerking: Als er tijdens het werken gedurende 2
uur op geen enkele toets op het bedieningspaneel
wordt gedrukt, dan schakelt het apparaat automatisch om naar de Stand-by modus.
om het vermogensniveau te verhogen of te verlagen (bereik: 100 W ~ 2.000 W). De standaardinstelling is 100 W. Een hoger vermogensniveau is
geschikt voor stomen.
(5) om het temperatuurniveau te verhogen of te
verlagen (bereik: 35°C ~ 240°C). Standaardinstelling is 100°C. Een hoger temperatuurniveau
is geschikt voor braden, grillen of bakken.
NL
Instelling timer
• Na het instellen van het vermogen of de temperatuur voor koken kunt u ervoor kiezen om de timer
te gebruiken. Druk op de timertoets (2) om deze
te activeren. Het indicatielampje (2) licht op.
• Gebruik de toets voor verhogen (3) of verlagen (5)
om de bereidingstijd te verhogen of te verlagen
(bereik: 0 min. ~ 180 min.). Standaardinstelling is
0 min.
• Wanneer de timer is ingesteld, dan worden de instellingen automatisch binnen 5 seconden opge-
Opmerking:
1) Houd de toets verhogen (3) of verlagen (5) inge-
drukt voor een snelle aanpassing.
2) Het is normaal dat de koelventilator gedurende
enige tijd in de stand-bymodus blijft draaien,
nadat het apparaat langdurig is gebruikt. Wacht
totdat de koelventilator stopt met draaien voor-
slagen. Het apparaat begint dan te werken. Het
scherm (4) geeft afwisselend de resterende tijd
en de vermogens instelling/temperatuur instelling weer.
• Het apparaat gaat naar de Stand-by modus wanneer de ingesteld tijd is verstreken.
• Als de ingestelde tijd handmatig tot “0 min” wordt
verminderd,dan gaat het apparaat direct naar de
Stand-by modus.
dat u de stekker uit van het apparaat uit het
stopcontact haalt.
3) Het oppervlak van het apparaat is nog heet nadat
naar de Stand-by modus wordt omgeschakeld.
Wacht tot de plaat volledig is afgekoeld voordat
u hem aanraakt.
21
Page 22
Weergave foutcodes
Foutcodes getoond op display (4) Mogelijke oorzaak Mogelijke oplossing
E 1 De temperatuur van het apparaat is
te hoog
Koelventilator defect Neem contact op met de leverancier.
E 2 De pan is oververhit. Het is mogelijk
dat de pan leeg raakt en het apparaat
ter bescherming uitschakelt.
E 3 De voedingsspanning is abnormaal.
(Voedingsspanning te hoog of te laag)
Verwijder alle obstakels rond het apparaat. Trek de stekker uit het stopcontact, verwijder de pan, wacht tot
het apparaat volledig is afgekoeld.
Trek de stekker uit het stopcontact,
verwijder de pan, wacht tot het apparaat volledig is afgekoeld. En zorg dat
er water in de pan zit.
Zorg ervoor dat het apparaat is aangesloten op een geschikt stopcontact.
Reiniging en onderhoud
Let op: Trek de stekker van het apparaat altijd uit het stopcontact en laat het apparaat afkoelen alvorens het
apparaat te reinigen & op te bergen.
Reiniging
• Dompel het apparaat nooit onder in water of andere vloeistoffen.
• Reinig het afgekoelde buitenoppervlak met een
licht vochtige doek of spons met een milde zee-
• Gebruik nooit schuursponsjes of reinigingsmiddelen, staalwol of metalen keukengerei/gereedschap om de onderdelen aan de binnenkant of
buitenkant van het apparaat te reinigen.
poplossing.
NL
Opslag
• Zorg er voordat u het apparaat opbergt altijd voor
dat de stekker van het apparaat uit het stopcontact is getrokken en dat het apparaat volledig is
afgekoeld.
• Als u het apparaat opbergt, plaats dan nooit zware voorwerpen op het verwarmingsoppervlak. Als
u dit toch doet kan het verwarmingsoppervlak
barsten.
• Berg het apparaat op een koele, schone en droge
plek op.
22
Page 23
Problemen oplossen
Als het apparaat niet naar behoren functioneert,
raadpleeg dan de onderstaande tabel voor een oplossing. Als u het probleem nog steeds niet kunt
Problemen Mogelijke oorzaak Mogelijke oplossing
Het apparaat schakelt niet in.
De koelventilator is ingeschakeld,
zelfs nadat het apparaat is overgeschakeld naar de Standby-modus.
- De stekker is niet juist aangesloten
op het stopcontact.
- Er is niet op Aan/Standby (1) gedrukt
- Dit is normaal. De koelventilator
blijft in de Standy-modus een tijdje
draaien om alle interne onderdelen
te koelen.
oplossen, neem contact op met de leverancier/
dienstverlener. Foutcodes worden getoond op het
display (3). (Zie - - > Foutcodes)
- Controleer en zorg ervoor dat de
stekker juist is aangesloten op het
stopcontact.
- Druk op Aan/Standby (1) om het apparaat in te schakekelen.
- Wacht tot de koelventilator stopt
met draaien.
Technische Spezifikation
Itemnr.: 239278
Bedrijfsspanning en frequentie: 220-240V~ 50/60Hz
Nominaal ingangsvermogen: 2000W
Vermogensinstelling: 100W ~ 2000W
Temperatuurinstelling: 35°C ~ 240°C
Instelling timer: 0 min ~ 180 min
Beschermingsklasse: class I
Afmetingen: 293x373x(H)56 mm
Opmerking: Technische specificaties onderhevig aan verandering zonder voorafgaande kennisgeving
Garantie
Elk defect waardoor de werking van het apparaat nadelig wordt beïnvloed dat zich binnen één
jaar na aankoop van het apparaat voordoet, wordt
gratis hersteld door reparatie of vervanging, mits
het apparaat conform de instructies is gebruikt en
onderhouden en niet op enigerlei wijze verkeerd
is behandeld of misbruikt. Dit laat onverlet uw bij
wet bepaalde rechten. Als de garantie van kracht
is, vermeld dan waar en wanneer u het apparaat
Afdanken & Milieu
Aan het einde van de levensduur, het apparaat afdanken volgens de op dat moment geldende voorschriften en richtlijnen.
hebt gekocht en sluit een aankoopbewijs bij (bijv.
kassabon of factuur).
Gezien ons streven naar voortdurende verdere productontwikkeling behouden wij ons het recht voor,
zonder voorafgaande kennisgeving wijzigingen aan
te brengen aan product, verpakking en documentatie.
Werp verpakkingsmateriaal zoals plastic en dozen
in de daarvoor bestemde containers.
NL
23
Page 24

Szanowny Kliencie,
Dziękujemy za zakup urządzenia firmy Hendi. Prosimy o uważne zapoznanie się z niniejszą instrukcją przed
podłączeniem urządzenia, aby uniknąć uszkodzeń spowodowanych niewłaściwą obsługą. Należy zwrócić
szczególną uwagę na zasady bezpieczeństwa.
Zasady bezpieczeństwa
• Nieprawidłowa obsługa i niewłaściwe użytkowanie mogą spowodować poważne uszkodzenie urządzenia lub zranienie osób.
• Niniejsze urządzenie przeznaczone jest wyłącznie do użytku komercyjnego i nie może być
stosowane do użytku domowego.
• Urządzenie należy stosować wyłącznie zgodnie z przeznaczeniem. Producent nie ponosi
żadnej odpowiedzialności za szkody spowodowane nieprawidłową obsługą i niewłaści
wym użytkowaniem urządzenia.
• W czasie użytkowania zabezpiecz urządzenie i wtyczkę kabla zasilającego przed kon
taktem z wodą lub innymi płynami. W mało prawdopodobnym przypadku zanurzenia
urządzenia w wodzie, należy natychmiast wyciągnąć wtyczkę z kontaktu, a następnie
zlecić kontrolę urządzenia specjaliście. Nieprzestrzeganie tej instrukcji może spow
odować zagrożenie życia.
• Nigdy nie otwieraj samodzielnie obudowy urządzenia.
• Nie wtykaj żadnych przedmiotów w obudowę urządzenia.
• Nie dotykaj wtyczki kabla zasilającego wilgotnymi rękami.
PL
• Niebezpieczeństwo porażenia prądem! Nie należy samodzielnie naprawiać urządzenia.
Wszelkie usterki i niesprawności winny być usuwane wyłącznie przez wykwalifikowany
personel.
• Nigdy nie używać uszkodzonego urządzenia! Uszkodzone urządzenie należy odłączyć od
sieci i skontaktować się ze sprzedawcą.
• Ostrzeżenie: Nie zanurzać części elektrycznych urządzenia w wodzie ani w innych
płynach. Nie wkładać urządzenia pod bieżącą wodę.
• Regularnie sprawdzać wtyczkę i sznur zasilający pod kątem uszkodzeń. Uszkodzoną
wtyczkę lub sznur przekazać w celu naprawy do punktu serwisowego lub innej wykwali
fikowanej osoby, aby zapobiec ewentualnym zagrożeniom i obrażeniom ciała.
• Upewnić się, czy sznur zasilający nie styka się z ostrymi ani gorącymi przedmiotami; trzy
mać sznur z dala od otwartego płomienia. Aby wyjąć wtyczkę z gniazdka, zawsze ciągnąć
za wtyczkę, a nie za sznur.
• Zabezpieczyć sznur zasilający (lub przedłużający) przez przypadkowym wyciągnięciem z
kontaktu. Sznur prowadzić w sposób uniemożliwiający przypadkowe potknięcie.
• Stale nadzorować urządzenie podczas użytkowania.
• Ostrzeżenie! Jeżeli wtyczka jest włożona do gniazdka, urządzenie należy uważać za
podłączone do zasilania.
• Przed wyjęciem wtyczki z gniazdka wyłączyć urządzenie!
• Nigdy nie przenosić urządzenia, trzymając za sznur.
-
-
-
-
-
24
Page 25
• Nie używać żadnych akcesoriów, które nie zostały dostarczone wraz z urządzeniem.
• Urządzenie należy podłączać wyłącznie do gniazdka o napięciu i częstotliwości podanych
na tabliczce znamionowej.
• Włożyć wtyczkę do gniazdka zlokalizowanego w dogodnym łatwo dostępnym miejscu, tak
by w przypadku awarii istniała możliwość natychmiastowego odłączenia urządzenia. W
celu całkowitego wyłączenia urządzenia odłączyć je od źródła zasilania. W tym celu wyjąć
z gniazdka wtyczkę znajdującą się na końcu sznura odłączanego urządzenia.
• Przed odłączeniem wtyczki zawsze pamiętać o wyłączeniu urządzenia!
• Nie korzystać z akcesoriów niezalecanych przez producenta. Zastosowanie niezalecanych
akcesoriów może stwarzać zagrożenie dla użytkownika oraz prowadzić do uszkodzenia
urządzenia. Korzystać wyłącznie z oryginalnych części i akcesoriów.
• Z urządzenia nie mogą korzystać osoby (także dzieci), u których stwierdzono osłabione
zdolności fizyczne, sensoryczne lub umysłowe, albo którym brakuje odpowiedniej wiedzy
i doświadczenia.
• W żadnym wypadku nie zezwalać na obsługę urządzenia przez dzieci.
• Urządzenie wraz ze sznurem przechowywać poza zasięgiem dzieci.
• Nie dopuścić, by dzieci wykorzystywały urządzenie do zabawy.
• Zawsze odłączyć urządzenie od zasilania, jeżeli ma być ono pozostawione bez nadzoru, a
także przed montażem, demontażem i czyszczeniem.
• Nie zostawiać urządzenia bez nadzoru podczas użytkowania.
Szczególne przepisy bezpieczeństwa
• Niniejsze urządzenie jest przeznaczone do gotowania różnorodnych potraw poprzez
podgrzewanie naczyń kuchennych. Użycie urządzenia w jakimkolwiek innym celu może
prowadzić do jego uszkodzenia lub do obrażeń ciała.
• Korzystaj z urządzenia wyłącznie zgodnie z instrukcją.
• Urządzenie powinno być obsługiwane wyłącznie przez przeszkolony personel zaplecza
kuchennego restauracji oraz stołówek lub obsługę baru, itp.
•
Uwaga! Ryzyko poparzenia! Powierzchnia grzejna i inne dostępne powierzchnie
nagrzewają się do bardzo wysokich temperatur. Dotykaj wyłącznie panelu sterowania.
•
Uwaga! Urządzenie emituje niejonizujące promieniowanie elektromagnetyczne.
• Nie umieszczaj urządzenia w pobliżu obiektów wrażliwych na promieniowanie magne
-
tyczne, takich jak odbiorniki TV, odbiorniki radiowe, karty bankomatowe lub kredytowe.
• Nie umieszczaj urządzenia na obiekcie emitującym ciepło (kuchenka gazowa, elektry
czna, grill, itp.). Trzymaj urządzenie z dala od jakichkolwiek gorących powierzchni lub
otwartego płomienia. Ustaw urządzenie na równej, stabilnej, czystej i suchej powierzchni,
odpornej na działanie wysokich temperatur.
• Upewnij się, czy urządzenie nie stoi w pobliżu miejsca, w którym powstaje para wodna lub
tłuste opary. Wentylator znajdujący się w urządzeniu będzie zasysać tego rodzaju opary
do wnętrza urządzenia, co spowoduje osadzanie się tłuszczu lub wilgoci w środku, co z
kolei może doprowadzić do zwarcia.
• Urządzenie nie jest przystosowane do obsługi za pomocą zewnętrznego minutnika lub
PL
25
Page 26

oddzielnego systemu zdalnego sterowania.
• Na powierzchni płyty grzewczej nie umieszczać przedmiotów metalowych, takich jak
noże, widelce, łyżki lub pokrywki ze względu na ich nagrzewanie.
• OSTRZEŻENIE: Nie zasłaniaj otworów wentylacyjnych urządzenia.
• OSTRZEŻENIE: Jeśli płyta grzewcza ulegnie pęknięciu lub uszkodzeniu, odłącz urządzenie
od źródła zasilania w celu uniknięcia porażenia prądem.
• Zapewnij co najmniej 20-centymetrowe odstępy wokół urządzenia w celu zapewnienia
prawidłowej wentylacji.
• Nie uderzaj twardymi narzędziami w płytę grzewczą. Nie czyść urządzenia strumieni
em wody pod ciśnieniem ani przy pomocy myjki parowej, nie spłukuj urządzenia wodą,
ponieważ doprowadzi to do zawilgocenia lub zamoczenia części wewnątrz urządzenia, co
może skutkować porażeniem prądem.
• Podczas obsługi urządzenia zwróć szczególną uwagę na pierścionki, zegarki i inną tego
typu biżuterię, ponieważ może ona ulec nagrzaniu, jeśli znajdzie się w pobliżu płyty grze
wczej.
• Uwaga! Odpowiednio poprowadź i zabezpiecz przewód zasilający, aby zapobiec przypad
kowemu pociągnięciu lub kontaktowi z płytą grzewczą.
• Nie myj urządzenia wodą. Mycie urządzenia może spowodować przedostanie się wody do
części elektrycznych i doprowadzić do porażenia prądem.
• Nie czyść ani nie umieszczaj urządzenia w miejscu przechowywania, zanim całkowicie
nie ostygnie.
PL
• Nie umieszczaj pustych naczyń na działającym urządzeniu, ponieważ może to doprow
adzić do ich uszkodzenia. Korzystaj wyłącznie z naczyń kuchennych rekomendowanego
typu oraz rozmiaru. (Patrz - - -> Odpowiednie wyposażenie kuchenne).
-
-
-
-
Montaż uziemienia
Kuchenka jest urządzeniem I klasy ochronności i
wymaga uziemienia. Uziemienie zmniejsza ryzyko
porażenia prądem, dzięki zastosowaniu przewodu
odprowadzającego prąd elektryczny. Kuchenka wy-
26
posażona jest w przewód z uziemieniem z wtykiem
uziemiającym. Wtyczka musi zostać podłączona do
gniazdka sieciowego, które zostało odpowiednio
zamontowane i uziemione.
Page 27
Dotykowy panel sterowania urządzenia
1) Przycisk włączania/stanu czuwania
2) Funkcja czasomierza z lampką wskaźnika
3) Ustawienie zwiększania: czasu/temperatury/
mocy
4) Cyfrowy wyświetlacz
Przed pierwszym użyciem
• Zdejmij i usuń opakowanie i zabezpieczenia.
• Sprawdź, czy urządzenie nie jest nieuszkodzone.
W przypadku niepełnej dostawy lub uszkodzeń
skontaktuj się z dostawcą (patrz == > Gwarancja).
• Wyczyść urządzenie (patrz == > Czyszczenie i
konserwacja).
• Sprawdź, czy urządzenie jest całkowicie suche.
• Umieść urządzenie na poziomej stabilnej powier-
zchni, odpornej na działanie wysokich temperatur i rozbryzgi płynów.
• Zapewnij odpowiednią wentylację. Zapewnij
co najmniej 20-centymetrowy odstęp wokół
urządzenia.
1234567
5) Ustawienie zmniejszania: czasu/temperatury/
mocy
6) Funkcja mocy z lampką wskaźnika
7) Funkcja temperatury z lampką wskaźnika
• Nie umieszczaj urządzenia w pobliżu przedmi-
otów, które są wrażliwe na zaburzenia wywołane
emisją promieniowania magnetycznego (np. odbiorniki radiowe, magnetofony kasetowe).
PL
Uwaga: Ze względu na pozostałości z procesu
produkcyjnego, podczas kilku pierwszych uruchomień z urządzenia może wydobywać się słaby,
specyficzny zapach. Jest to zjawisko normalne i nie
świadczy o uszkodzeniu urządzenia ani zagrożeniu
dla użytkownika. Upewnij się, czy urządzenie jest
dobrze wentylowane.
27
Page 28
Odpowiedni sprzęt do gotowania
Odpowiedni Nieodpowiedni
Dno naczynia Płaskie dno naczynia Wygięte, nierówne, zaokrąglone dno
naczynia
Materiał Naczynia kuchenne o żelaznym lub
żeliwnym spodzie lub spodzie wykonanym ze stali nierdzewnej magnetycznej bądź spodzie żelaznym emaliowanym.
Wymiary dna naczynia Od 12 do 23 cm. Mniej niż 12 cm lub więcej niż 23 cm.
Typ naczynia Naczynia kuchenne o grubości dna
przekraczającej 1,5 mm.
Naczynia kuchenne z ceramicznym,
szklanym, miedzianym lub aluminiowym spodzie lub spodzie wykonanym
z brązu.
Naczynia kuchenne zamknięte lub
puszki
Uwaga: Używanie patelni lub rondla nieodpowiedniego do gotowania na kuchence indukcyjnej może uszkodzić urządzenie.
Działanie
• Umieść odpowiednie naczynie na środku powierzchni grzewczej urządzenia. (Patrz - - > Naczynia
pasujące do urządzenia). Uwaga: Umieszczanie
pustego naczynia może doprowadzić do uszkod-
PL
zenia naczynia lub urządzenia.
• Podłącz wtyczkę do odpowiedniego gniazdka elektrycznego. Przycisk włączania/stanu czuwania
(1) zaświeci się, a urządzenie przejdź do stanu
nie ustawiono czasu za pomocą przycisku czasomierza (2), urządzenie będzie działać nieprzerwanie.
• Po zakończeniu gotowania włącz stan czuwania,
naciskając przycisk włączania/stanu czuwania
(1). Cyfrowy wyświetlacz (4) i wszystkie przyciski
zgasną. Zostanie włączony tylko przycisk włączania/stanu czuwania (1).
czuwania.
• Następnie włącz urządzenie, naciskając przycisk
włączania/stanu czuwania (1). Przycisk zasilania
(6) się zaświeci.
• Teraz naciśnij przycisk zasilania (6) lub przycisk
Uwaga: Jeśli podczas działania urządzenia przez
2 godziny nie zostanie naciśnięty żaden przycisk
na panelu sterowania, urządzenie automatycznie
przejdzie do stanu czuwania.
temperatury (7), aby rozpocząć gotowanie. Jeśli
Ustawianie poziomu mocy
• Podczas działania urządzenia naciśnij przycisk
zasilania (6), aby go aktywować. Zaświeci się
lampka wskaźnika (6).
• Użyj ustawienia zwiększania (3) lub zmniejszania
(5), aby zwiększyć lub zmniejszyć poziom mocy
(Zakres: 100 W – 2000 W). Ustawienie domyślne
to 100 W. Wyższy poziom mocy jest przeznaczony
do gotowania na parze.
Ustawienie poziomu temperatury
• Podczas działania urządzenia naciśnij przycisk
temperatury (7), aby go aktywować. Zaświeci się
lampka wskaźnika (7).
• Użyj ustawienia zwiększania (3) lub zmniejszania (5), aby zwiększyć lub zmniejszyć poziom
28
temperatury (Zakres: 35°C – 240°C). Ustawienie
domyślne to 100°C. Wyższy poziom temperatury
jest przeznaczony do pieczenia, grillowania i
smażenia.
Page 29
Ustawianie czasu
• Po ustawieniu mocy lub temperatury gotowania
możesz ustawić czas. Naciśnij przycisk czasomierza (2), aby go aktywować. Zaświeci się lampka
wskaźnika (2).
• Użyj ustawienia zwiększania (3) lub zmniejszania
(5), aby zwiększyć lub zmniejszyć czas gotowania
(Zakres: 0 min – 180 min). Ustawienie domyślne
to 0 min.
• Ustawiony czas zostanie automatycznie zapisa-
ny w ciągu 5 sekund. Następnie urządzenie
rozpocznie działanie. Wyświetlacz (4) będzie
zawierać na przemian pozostały czas oraz ustawienie mocy/temperatury.
• Po upływie ustawionego czasu urządzenie przejdzie do stanu czuwania.
• Jeśli czas zostanie ręcznie skrócony do 0 min,
urządzenie natychmiast przejdzie do stanu czuwania.
Uwaga:
1) Naciśnij i przytrzymaj przycisk ustawienia
zwiększania (3) lub przycisk ustawienia zmniejszania (5), aby szybko dostosować ustawienie.
2) Po długim czasie działania urządzenia
wewnętrzny wentylator chłodzący może działać
wyłączysz urządzenie, odczekaj aż wentylator
przestanie działać.
3) Po przejściu do stanu czuwania powierzchnia
urządzenia jest nadal gorąca. Przed jej dotknięciem odczekaj aż całkowicie ostygnie.
w stanie czuwania przez pewien czas. Zanim
Wyświetlane kody błędów
Kody błędów widoczne na wyświetlaczu (4)
E 1 Temperatura urządzenia jest zbyt
E 2 Patelnia lub rondel nagrzewają się
E 3 Nieprawidłowe napięcie zasilania
Możliwa przyczyna Możliwe rozwiązanie
wysoka.
Niesprawny wentylator. Skontaktuj się z dostawcą.
do zbyt wysokiej temperatury. Prawdopodobnie naczynie zostało opróżnione, w związku z czym nastąpi aktywacja zabezpieczenia i kuchenka
wyłączy się.
(napięcie zasilania zbyt niskie lub zbyt
wysokie)
Usuń wszelkie przeszkody znajdujące się wokół urządzenia. Odłącz
urządzenie od źródła zasilania, zestaw patelnię lub rondel, odczekaj
do chwili całkowitego wystygnięcia
urządzenia.
Odłącz urządzenie od źródła zasilania, zestaw patelnię lub rondel, odczekaj do chwili całkowitego wystygnięcia urządzenia. Upewnij się, że w
naczyniu znajduje się woda.
Upewnij się, czy urządzenie jest
podłączone do odpowiedniego źródła
zasilania.
PL
29
Page 30
Czyszczenie i konserwacja
Uwaga: Przed rozpoczęciem czyszczenia i umieszczeniem urządzenia w miejscu przechowywania, zawsze
odłącz urządzenie od gniazdka sieciowego i odczekaj, aż kuchenka ostygnie.
Czyszczenie
• Nigdy nie zanurzaj urządzenia w wodzie oraz innych płynach.
• Po ostygnięciu powierzchni zewnętrznej oczyść
ją przy pomocy wilgotnej ściereczki lub gąbki, z
• Do czyszczenia wnętrza i zewnętrznych części
urządzenia nigdy nie używaj szorstkich gąbek ani
żrących detergentów, jak również gąbek z wełny
stalowej lub przyrządów metalowych.
niewielką ilością łagodnego roztworu środka myjącego.
Przechowywanie
• Przed umieszczeniem w miejscu przechowywania, zawsze upewnij się, czy urządzenie zostało
odłączone od gniazdka sieciowego i całkowicie
• Nigdy nie umieszczaj ciężkich obiektów na powierzchni grzejnej urządzenia, ponieważ może doprowadzić to do jej pęknięcia.
ostygło.
• Przechowuj urządzenie w chłodnym, czystym i
suchym miejscu.
Diagnostyka
Jeśli urządzenie nie działa prawidłowo, zapoznaj
się z poniższą tabelą w celu znalezienia prawidłowego rozwiązania. Jeśli nadal nie możesz rozwią-
zać problemu, skontaktuj się z dostawcą. Kody
błędów widoczne na wyświetlaczu (3). (Patrz - - >
Kody błędów)
PL
Problem Możliwa przyczyna Możliwe rozwiązanie
- Sprawdź, czy wtyczka jest prawidłowo podłączona do gniazdka sieciowego.
- Wciśnij przycisk włączenie / czuwanie (1), by rozpocząć pracę
urządzenia.
- Poczekaj do chwili wyłączenia się
wentylatora.
Urządzenie nie włącza się.
Wentylator nadal pracuje po
przełączeniu urządzenia w tryb czuwania.
- Wtyczka nie jest prawidłowo
podłączona do gniazdka sieciowego.
- Nie wciśnięto przycisku włączenie /
czuwanie (1).
- Jest to zjawisko normalne. Wentylator pracuje przez chwilę po wyłączeniu urządzenia, aby schłodzić
wszystkie elementy wewnętrzne.
Technische Spezifikation
Numer produktu: 239278
Napięcie robocze i częstotliwość: 220-240V~ 50/60Hz
Znamionowy pobór mocy: 2000W
Zakres regulacji mocy: 100W ~ 2000W
Zakres ustawienia temperatury: 35°C ~ 240°C
Zakres ustawienia czasu timera: 0 min ~ 180 min
Stopień ochrony: class I
Wymiary: 293x373x(H)56 mm
Uwaga: Specyfikacja techniczna może ulec zmianie bez uprzedzenia.
30
Page 31

Gwarancja
Każda wada bądź usterka powodująca niewłaściwe
funkcjonowanie urządzenia, która ujawni się w ciągu jednego roku od daty zakupu, zostanie bezpłatnie usunięta lub urządzenie zostanie wymienione
na nowe, o ile było użytkowane i konserwowane
zgodnie z instrukcją obsługi i nie było wykorzystywane w niewłaściwy sposób lub niezgodnie z przeznaczeniem. Postanowienie to w żadnej mierze nie
narusza innych praw użytkownika wynikających z
przepisów prawa. W przypadku zgłoszenia urzą-
Wycofanie z użytkowania i ochrona środowiska
Urządzenie zużyte i wycofane z użytkowania należy zutylizować zgodnie z przepisami i wytycznymi
obwiązującymi w momencie wycofania urządzenia.
dzenia do naprawy lub wymiany w ramach gwarancji należy podać miejsce i datę zakupu urządzenia i
dołączyć dowód zakupu (np. paragon).
Zgodnie z naszą polityką ciągłego doskonalenia
wyrobów zastrzegamy sobie prawo do wprowadzania bez uprzedzenia zmian w wyrobie, opakowaniu
oraz danych technicznych podawanych w dokumentacji.
Materiały opakowaniowe, jak tworzywa sztuczne i
pudła, należy umieszczać w pojemnikach na odpady właściwych dla rodzaju materiału.
PL
31
Page 32

Cher client,
Merci d’avoir acheté cet appareil de Hendi. Veuillez lire attentivement ce mode d’emploi avant de brancher l’appareil afin d’éviter tout endommagement pour cause d’usage abusif. Veuillez notamment lire les
consignes de sécurité avec la plus grande attention.
Règles de sécurité
• L’utilisation abusive et le maniement incorrect de l’appareil peuvent entraîner une grave
détérioration de l’appareil ou provoquer des blessures.
• Cet appareil est conçu exclusivement à des fins commerciales et non pour un usage
domestique.
• L’appareil doit être utilisé uniquement pour le but il a été conçu. Le fabricant décline
toute responsabilité en cas de dommage consécutif à un usage abusif ou un maniement
incorrect.
• Veillez à tenir l’appareil et la prise électrique hors de portée de l’eau ou de tout autre li
quide. Si malencontreusement l’appareil tombe dans l’eau, débranchez immédiatement
la prise électrique et faites contrôler l’appareil par un réparateur agréé. La non-observa
tion de cette consigne entraîne un risque d’accident mortel.
• Ne tentez jamais de démonter vous-même le bâti de l’appareil.
• N’enfoncez aucun objet dans la carcasse de l’appareil.
• Ne touchez pas la prise avec les mains mouillées ou humides.
• Risque d’électrocution! Ne tentez jamais de réparer l’appareil. Tous défauts et dysfonc
FR
tionnement doivent être supprimés par le personnel qualifié.
• N’utilisez jamais l’appareil endommagé! Débranchez l’appareil endommagé de l’ali
mentation électrique et contactez votre revendeur.
• Avertissement: N’immergez pas les pièces électriques de l’appareil dans l’eau ou dans
d’autres liquides. Ne mettez pas l’appareil sous l’eau courante.
• Vérifiez régulièrement la fiche et le câble d’alimentation pour les dommages. La fiche
ou le câble d’alimentation endommagé(e) transmettre pour la réparation au service ou
à une personne qualifiée, pour prévenir tous les menaces ou les blessures possibles.
• Assurez-vous que le câble d’alimentation n’est pas en contact avec les objets pointus ou
chauds ; gardez le câble loin des flammes nues. Pour retirer la fiche de la prise murale,
tirez toujours en tenant la fiche et non le câble d’alimentation.
• Protégez le câble d’alimentation (ou la rallonge) contre le débranchement accidentel de
la prise murale. Le câble doit être posé de manière ne provocant pas les chutes acciden
telles.
• Surveillez en permanence l’appareil pendant l’utilisation.
• Avertissement ! Si la fiche est insérée dans la prise murale, l’appareil doit être considéré
comme branché à l’alimentation.
• Avant de retirer la fiche de la prise, éteignez l’appareil !
• Ne transportez jamais l’appareil en tenant le câble.
• N’utilisez aucuns accessoires qui n’ont pas été fournis avec l’appareil.
-
-
-
-
-
32
Page 33
• L’appareil doit être branché à la prise murale avec une tension et la fréquence indiquées
sur la plaque signalétique.
• Insérez la fiche à la prise murale située dans un endroit facilement accessible de sorte
qu’en cas de panne l’appareil puisse être immédiatement déconnecté. Pour éteindre
complètement l’appareil, débranchez-le de la source d’alimentation. Pour cela, retirez la
fiche à l’extrémité du câble d’alimentation de la prise murale.
• Eteignez l’appareil avant de débrancher l’appareil de la prise!
• N’utilisez jamais les accessoires non recommandés par le fabricant. L’utilisation des ac
cessoires non recommandés peut présenter des risques pour l’utilisateur et provoquer
les dommages à l’appareil. Utilisez uniquement des pièces et accessoires originaux.
• Cet appareil n´est pas apte à être utilisé par des personnes (enfants compris) avec capa
cités physiques, sensorielles ou intellectuelles diminuées ou ne possédant pas l´expérience et les connaissances suffisantes.
• Ne laissez jamais les enfants utiliser l’appareil.
• L’appareil et le câble d’alimentation doivent être stockés hors de la portée des enfants.
• Ne permettez pas aux enfants d’utiliser l’appareil pour jouer
• Débranchez toujours l’appareil de l’alimentation s’il doit être laissé sans surveillance et
également avant le montage, le démontage et le nettoyage.
• Ne laissez jamais l’appareil sans surveillance lorsqu’il est utilisé.
Consignes particulières de sécurité
• Le présent appareil est destiné pour la cuisson des plats en chauffant les ustensiles de
cuisine. L’utilisation de l’appareil pour toute autre fin peut entraîner des dommages à
l’appareil ou des blessures.
• Utilisez l’appareil uniquement conformément aux instructions.
• L’appareil doit être utilisé uniquement par du personnel qualifié de cuisine du restaurant,
des cantines ou du bar etc.
•
Attention ! Risque de brûlures ! La surface de chauffage et d’autres surfaces dispo-
nibles chauffent à des températures élevées. Ne touchez que le panneau de commande.
•
Attention ! L’appareil émet un rayonnement électromagnétique non ionisant.
• Sur la partie arrière de l’appareil il y a une prise équipotentielle qui permet l’assemblage
en croix d’un autre appareil.
• Ne placez pas l’appareil près des objets sensibles aux rayonnement magnétique tels que
les téléviseurs, les radios, les cartes bancaires ou de crédit.
• Ne placez pas l’appareil sur un objet émettant de la chaleur (la cuisinière à gaz, élec
trique ou les barbecues etc.) Tenez l’appareil éloignés des surfaces chaudes ou des
flammes nues. Placez l’appareil sur une surface stable, propre et sèche, résistant à des
températures élevées.
• Assurez-vous que l’appareil n’est pas à proximité de l’endroit où la vapeur ou les vapeurs
d’huile peuvent se produire. Le ventilateur qui est à l’intérieur de l’appareil peut aspirer
les vapeurs à l’intérieur de l’appareil ce qi va produire le dépôt de la graisse ou de l’humi
-
dité et en conséquence provoquer un court-circuit.
FR
33
Page 34

• L‘appareil n‘est pas conçu pour fonctionner avec une minuterie externe ou un système
de contrôle à distance séparé.
• Ne placez pas sur la surface de la plaque chauffante des objets métalliques tels que les
couteaux, les fourchettes, les cuillères ou les couvercles parce qu‘ils chauffent
• AVERTISSEMENT: N’obstruez pas les orifices de ventilation.
• AVERTISSEMENT: Si la plaque chauffante est cassée ou endommagée, débranchez l’ap
pareil de l’alimentation pour éviter un choc électrique.
• Assurez au moins 20 cm d’espace autour de l’appareil pour garantir une ventilation adé
quate.
• Ne frappez pas des outils durs contre la plaque chauffante. Ne nettoyez pas l’appareil
à l’aide d’un jet d’eau direct ou un nettoyeur à vapeur, ne rincez pas à l’eau pour ne pas
humidifier ou mouiller les pièces à l’intérieur de l’appareil et éviter le risque d’un choc
électrique.
• Lors de l’utilisation de l’appareil faite une attention particulière aux bagues, aux montres
ou d’autre bijou de ce type parce qu’ils peuvent devenir chauds s’il se trouve très près de
la plaque chauffante.
• Attention! Faites passer et protégez le câble d’alimentation pour éviter tout risque de
traction ou de contact avec la plaque chauffante.
• Ne lavez pas l‘appareil avec de l‘eau. Le lavage de l‘appareil peut provoquer la pénétra
tion de l‘eau dans des composants électriques et provoquer un choc électrique.
• Ne nettoyez pas l‘appareil et ne le placez pas dans le lieu de stockage avant son refroi
FR
dissement complet
• Ne placez pas des récipients vides sur l‘appareil fonctionnant pour éviter de les endom
mager. Utilisez uniquement des ustensiles de cuisine de type et taille recommandés.
(Voir - - -> Equipement de cuisine adéquat).
-
-
-
-
-
Mise à la terre
La cuisinière est un appareil de la Ière classe de
protection et doit être obligatoirement mis à la
terre. La mise à la terre réduit le risque de choc
électrique grâce à un conduit évacuant le courant
34
électrique. L’appareil est équipé d’un conduit avec
la mise à la terre et la prise de terre. N’insérez pas
la fiche à la prise murale si l’appareil n’a pas été
correctement installé et mis à la terre.
Page 35
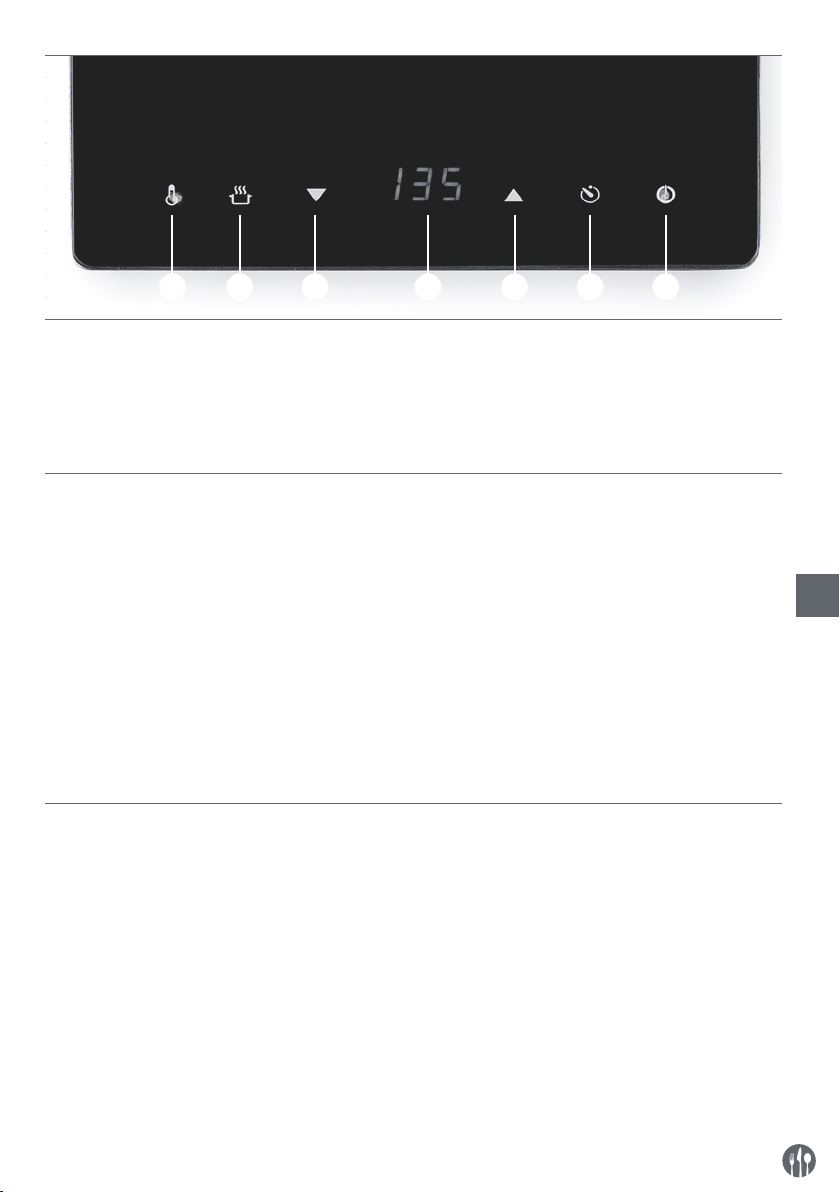
Commandes par effleurement de l’appareil
1) ON/touche de veille
2) Fonction minuterie avec lumière d’indication
3) Réglage pour augmenter : Durée / température
/ puissance
4) Affichage numérique
Avant la première utilisation
• Retirez et éliminez l’emballage et toutes les pro-
tections.
• Vérifiez l’appareil et les accessoires en ce qui
concerne l’intégralité. En cas de livraison incomplète ou de dommages, contactez votre fournisseur (voir==> Garantie).
• Nettoyez l’appareil (voir == > Nettoyage et entre-
tien).
• Vérifiez que l‘appareil est complètement sec.
• Placez l‘appareil sur une surface plane, stable et
résistant à des températures élevées et les projections de liquides.
• Assurez une ventilation adéquate. Garantissez au
1234567
5) Réglage de diminution : Durée / température /
puissance
6) Fonction puissance avec indicateur lumineux :
7) Indicateur lumineux de la fonction température
moins 20 cm d‘espace autour de l‘appareil et du
fond du récipient.
• Ne placez pas l‘appareil à proximité d‘objets qui
sont sensibles aux perturbations provoquées par
l‘émission d‘un rayonnement magnétique (par
exemple les radios, les lecteurs de cassettes).
Attention : En raison des résidus de production,
l’appareil peut émettre une faible odeur caractéristique au début du fonctionnement. Ce phénomène
est tout à fait normal et ne signifie pas un mauvais
fonctionnement ou le fonctionnement dangereux.
Assurez-vous que l’appareil est bien ventilé.
FR
35
Page 36
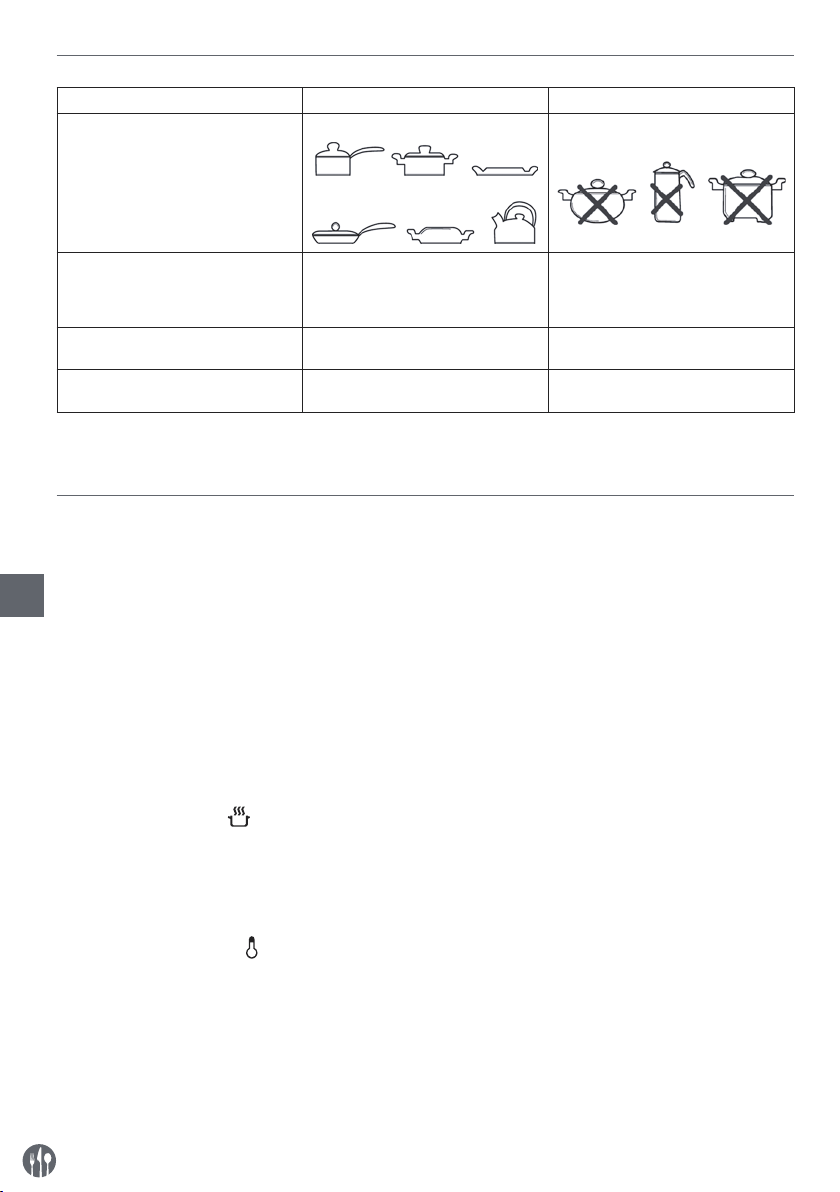
Equipement de cuisson approprié
Approprié Inapproprié
Fond Le fond plat de l’ustensile Le fond de l’ustensile courbe, inégale,
arrondi
Matériau Les ustensiles de cuisine avec le fond
en fer ou en fonte, ou avec le fond en
acier inoxydable magnétique ou le
fond en fer émaillé
Dimensions du fond De 12 à 23 cm Inférieures à 12 cm supérieures à 23
Type de l’ustensile Les ustensiles de cuisine dont l’épais-
seur du fond est supérieure à 1,5 mm
Les ustensiles de cuisine avec le fond
céramique, en verre, en aluminium ou
en bronze
cm
Les ustensiles de cuisine fermés ou
les boîtes
Attention : L’utilisation d’une poêle ou d’une casserole inadéquate à la cuisson sur la cuisinière à induction
peut endommager l’appareil.
Fonctionnement
• Mettre une poêle ou une casserole au centre
de la surface de chauffe de l’appareil. (Cf. - - >
Poêles adaptées à l’appareil).
FR
• Note : Ne pas mettre de poêle vide, ce qui risque
d’endommager la poêle et l’appareil.
• Brancher l’appareil sur une prise adaptée. La
touche On/Veille (1) s’allumera et l’appareil est
commencer la cuisson. Si la touche minuterie (2)
n’est pas réglée, l’appareil fonctionnera en continu.
• Une fois la cuisson terminée, passer en mode
Veille en appuyant sur la touche On/Veille (1).
L’affichage numérique (4) et toutes les touches
s’éteindront sauf la touche On/Veille (1).
alors en mode Veille.
• Puis allumer l’appareil en appuyant sur la touche
On/Veille (1) et la touche électricité (6) clignotera.
• Ensuite choisir d’appuyer soit sur la touche puis-
Note : Si aucune touche n’est active durant le fonctionnement, pendant 2 heures, l’appareil se mettra
automatiquement en mode Veille.
sance (6) soit sur la touche température (7) pour
Réglage de la puissance
- Durant le fonctionnement, appuyer sur la touche
puissance (6) pour l’activer. L’indicateur lumineux
(6) s’allumera.
- Utiliser la touche augmenter (3) ou la touche di-
minuer (5) pour augmenter ou diminuer la puissance (Entre : 100 W ~ 2 000 W). Le réglage par
défaut est 100 W. Une température supérieure
est parfaite pour la cuisson vapeur.
Réglage de la température
• Durant le fonctionnement, appuyer sur la touche
température (7) pour l’activer. L’indicateur lumineux (7) s’allumera.
• Utiliser la touche augmenter (3) ou la touche
diminuer (5) pour augmenter ou baisser la tem-
36
pérature (Entre : 35°C ~ 240°C). Le réglage par
défaut est 100°C. Une température plus élevée
est adaptée pour les rôtis, les grillades ou les
fritures.
Page 37
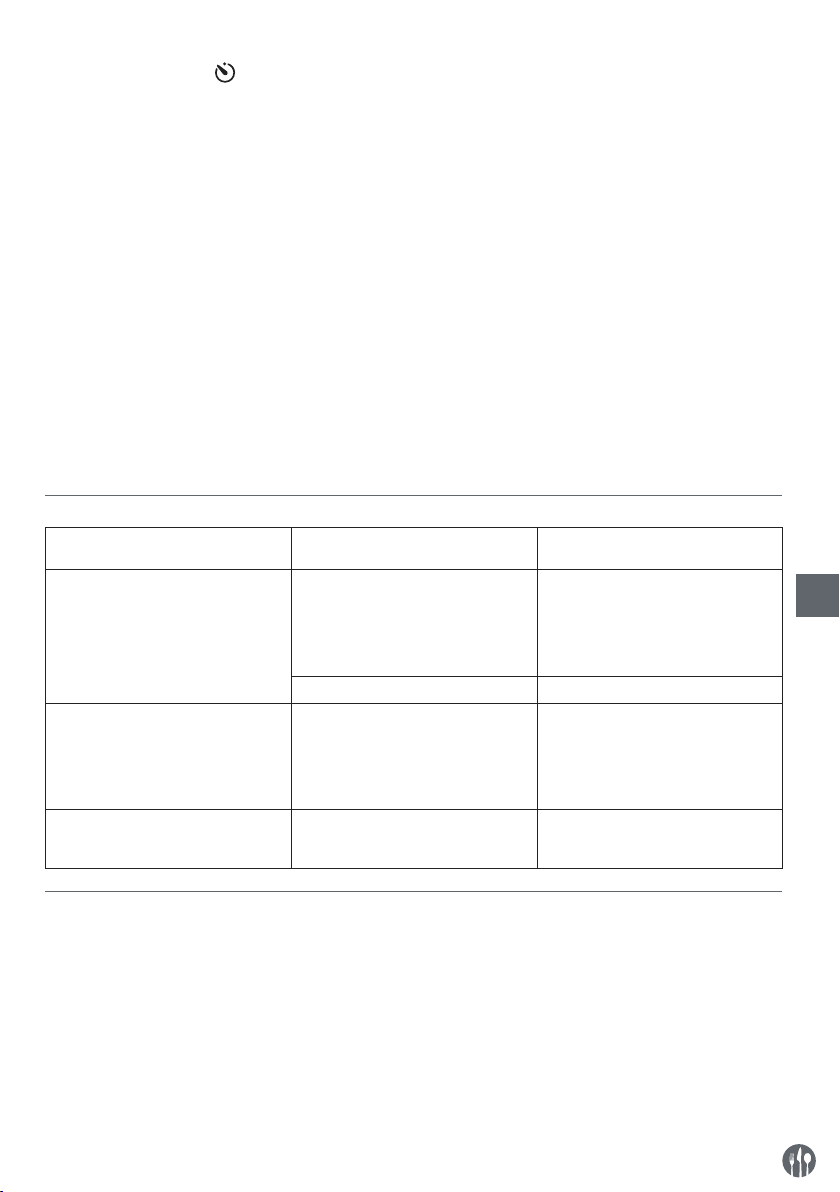
Réglage de la minuterie
• Après avoir réglé la puissance ou la température
de caisson, on peut choisir le réglage de la minuterie. Appuyer sur la touche minuterie (2) pour
l’activer. L’indicateur lumineux (2) s’allume.
• Utiliser la touche augmenter (3) ou la touche diminuer (5) pour augmenter ou diminuer le temps
de caisson (Entre : 0 min ~ 180 mins). Le réglage
par défaut est 0 min.
• Lorsque la minuterie est réglée, elle sera
5 secondes. L’appareil commencera alors à fonctionner. Il affichera le temps restant et le réglage
puissance / température alternativement sur
l’affichage (4).
• L’appareil se mettra en modeVeille lorsque le
temps sélectionné est écoulé.
• Si le temps sélectionné est réduit à “0 min” manuellement, l’appareil se mettra en modeVeille
instantanément.
conserve en mémoire automatiquement pendant
Note:
1) Appuyer et garder appuyée la touche augmenter
(3) ou la touche diminuer (5) pour un ajustement
rapide.
2) Après un long fonctionnement, il est normal que
le ventilateur de refroidissement continue de
temps. Avant de débrancher l’appareil, attendre
que le ventilateur s’arrête.
3) La surface de l’appareil est encore chaude une
fois sur le modeVeille. Attendre jusqu’à complet
refroidissement. down before touching.
fonctionner en mode Veille pendant un certain
Codes d’erreurs affichés
Codes d’erreurs visibles sur l’afficheur (4)
E 1 La température de l’appareil est trop
E 2 La poêle ou la casserole ne chauffent
E 3 La tension d’alimentation incorrecte
Cause possible Solution possible
élevée.
Le ventilateur défectueux. Contactez votre fournisseur.
pas à une température élevée. Probablement le récipient a été vidé et la
protection est activée; la cuisinière
s’éteint.
(la tension trop basse ou trop élevée).
Retirez toutes les obstacles qui sont
autour de l’appareil, débranchez l’appareil de la source d’alimentation, retirez la poêle ou la casserole et attendez jusqu’au refroidissement complet
de l’appareil.
Débranchez l’appareil de la source
d’alimentation, retirez la poêle ou la
casserole, attendez jusqu’au refroidissement complet de l’appareil. Assurez-vous que dans le récipient il y
a de l’eau.
Assurez-vous que l’appareil est
branché à une source d’alimentation
appropriée.
FR
37
Page 38
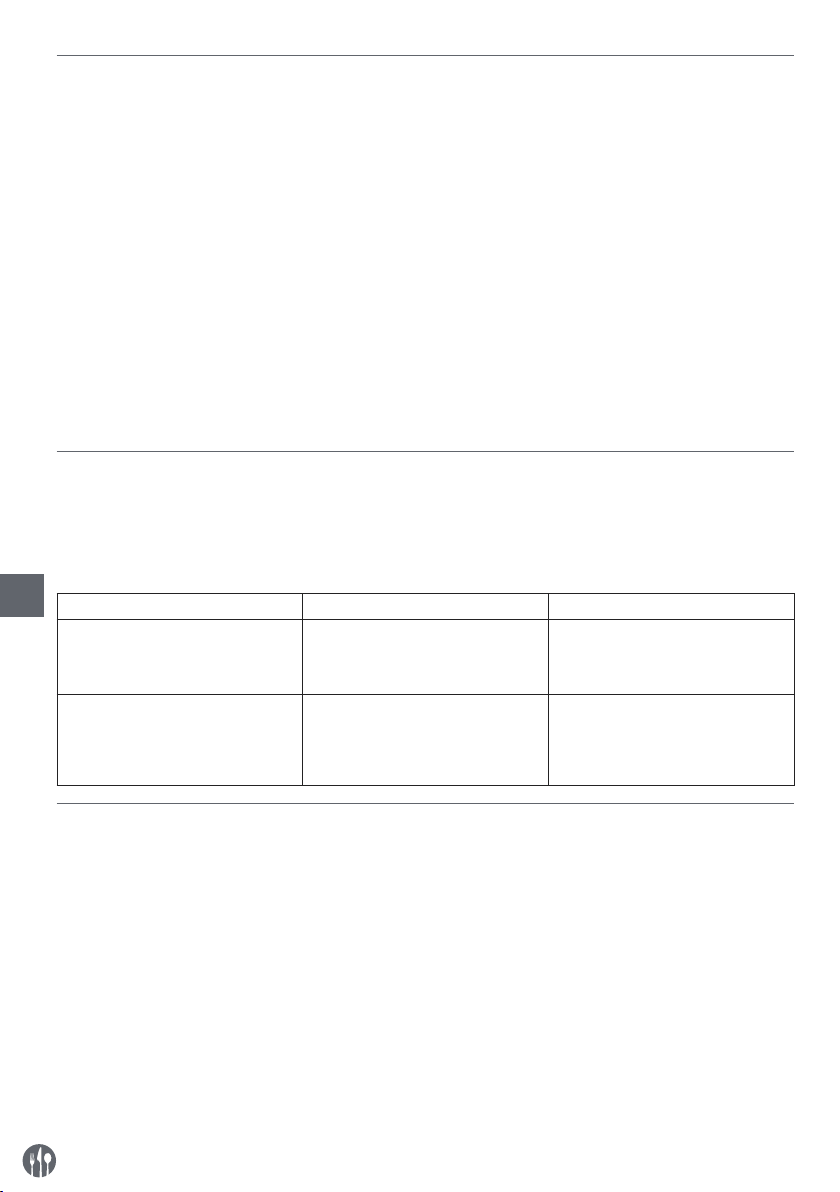
Nettoyage et entretien
Attention : Avant le nettoyage et l’entretien de l’appareil, débranchez l’appareil de la source d’alimentation
en retirant la fiche de la prise électrique et attendez jusqu’à ce que l’appareil refroidisse complètement.
Nettoyage
• N’immergez jamais l’appareil dans l’eau ou
d’autres liquides.
• Après le refroidissement de la surface externe,
nettoyez-la avec un chiffon humide ou une
• N’utilisez jamais pour le nettoyage des parties internes et externes des éponges abrasives ou des
détergents abrasives ou des éponges en laine
d’acier ou des instruments métalliques.
éponge, avec une petite quantité d’une solution
de détergent doux.
Stockage
• Avant de la mise de l’appareil en stock, assurez-vous toujours que l’appareil a été débranché
de la prise électrique et a complètement refroidi.
• Tenez l’appareil dans un endroit frais, propre et
sec.
• Ne placez jamais d’objets lourds sur la surface
chauffante de l’appareil pour éviter sa rupture.
Diagnostic
Si l’appareil ne fonctionne pas correctement, lisez
les instructions dans le tableau ci-dessous pour
Les codes d’erreurs visibles sur l’afficheur numé-
rique (1). (Voir - - > Affichage des codes d’erreurs).
trouver une bonne solution. Si vous ne pouvez pas
résoudre le problème, contactez votre revendeur.
FR
Problème Cause possible Solution possible
L’appareil ne s’allume pas.
Le ventilateur continue le fonctionnement après le passage de l’appareil
en mode de veille.
- La fiche n’est pas correctement
branchée à la prise électrique.
- Le bouton démarrage / veille (1)
n’est pas appuyé.
- Ceci est normal. Le ventilateur
fonctionne pendant un certain
temps après la mise de l’appareil
hors tension pour refroidir tous les
composants internes.
- Vérifiez si la fiche est correctement
insérée dans la prise électrique.
- Appuyez le bouton démarrage / veille (1), pour allumer l’appareil.
- Attendez jusqu’à ce que le ventilateur s’arrête.
Caractéristiques techniques
Numéro de produit: 239278
Tension et fréquence: 220-240V~ 50/60Hz
Puissance nominale: 2000W
Réglage de la puissance: 100W ~ 2000W
Plage de réglage de la température: 35°C ~ 240°C
Plage de réglage de la minuterie: 0 min ~ 180 min
Classe de protection: class I
Dimensions: 293x373x(H)56 mm
Remarque : Les caractéristiques techniques peuvent être modifiées sans préavis.
38
Page 39

Garantie
Tout vice ou toute défaillance entraînant un dysfonctionnement de l’appareil qui se déclare dans
les 12 mois suivant la date de l’achat sera éliminé
à titre gratuit ou l’appareil sera remplacé par un
dans le cadre de la garantie, il y a lieu de spécifier
le lieu et la date de l’achat de l’appareil et produire
un justificatif nécessaire (par ex. facture ou ticket
de caisse).
appareil nouveau si le premier a été dûment exploité et entretenu conformément aux termes de
la notice d’exploitation et s’il n‘a pas été indûment
exploité ou de manière non conforme à sa destination. La présente stipulation ne porte pas de préjudice aux autres droits de l’utilisateurs prévus par
les dispositions légales. Dans le cas où l’appareil
Conformément à notre politique d’amélioration
permanente de nos produits, nous nous réservons
le droit d’introduire sans avertissement préalable
des modifications à l’appareil, à l’emballage et aux
caractéristiques techniques précisées dans la do-
cumentation.
est donné à la réparation ou doit être remplacé
Retrait de l’exploitation et protection de l’environnement
L’équipement usé et retiré de l’exploitation doit être
valorisé conformément aux dispositions légales et
aux recommandations en vigueur à la date de son
retrait.
Les matériaux d’emballage tels que matières
plastiques et cartons doivent être déposés dans les
bennes prévues pour le type du matériau considé-
ré.
FR
39
Page 40

Gentile cliente,
grazie per aver acquistato questo apparecchio Hendi. Ti invitiamo a leggere queste istruzioni per l’uso con
attenzione prima di collegare l’apparecchio al fine di evitare danni dovuti a uso improprio. Ti invitiamo inoltre a prestare particolare attenzione alle precauzioni di sicurezza.
Precauzioni di sicurezza
• L’uso scorretto e improprio dell’apparecchio possono danneggiare seriamente l’apparecchio e ferire gli utenti.
• Questo dispositivo è destinato esclusivamente per uso commerciale e non può essere
utilizzato per uso domestico.
• L’apparecchio può essere utilizzato solo per lo scopo per cui è stato concepito e proget
tato. Il produttore non è responsabile di eventuali danni provocati da uso scorretto ed
improprio.
• Tenere l’apparecchio e la spina elettrica lontani da acqua ed altri liquidi. Nel caso impro
babile che l’apparecchio cada in acqua, staccare immediatamente la spina dalla presa
e fare ispezionare l’apparecchio da un tecnico certificato. . L’inosservanza delle presenti
istruzioni può dare luogo a situazioni pericolose
• Non provare mai ad aprire l’involucro dell’apparecchio da soli.
• Non inserire oggetti nell’involucro dell’apparecchio.
• Non toccare la presa con le mani bagnate o umide.
• Pericoli di scosse elettriche! Non tentare de riparare l’apparecchio da solo. Eventuali
IT
difetti e malfunzionamenti devono essere rimossi soli da personale qualificato.
• Non usare l’apparecchio danneggiato! L’apparecchio difettoso deve essere immediata
mente scollegato dalla rete e contattare il rivenditore.
• Attenzione: Non immergere parti elettriche in acqua o altri liquidi. Non mettere l’appa
recchio sotto l’acqua corrente.
• Controllare regolarmente se la spina e il cavo di alimentazione non sono danneggiati. La
spina o il cavo danneggiati trasmettere al servizio o alla persona qualificare per riparare,
per evitare eventuali pericoli e lesioni.
• Assicurarsi che il cavo di alimentazione non è in contatto con oggetti appuntiti o caldi. Te
nere il cavo lontano da fiamme libere. Per scollegare la spina dalla presa, tirare sempre
la spina, mai il cavo.
• Proteggere il cavo di alimentazione (o di estensione) per la sconnessione accidentale
dalla presa. Disporre il cavo in modo per evitare lo slittamento accidentale.
• Sorvegliare l’apparecchio continuamente durante l’uso.
• Attenzione! Se la spina è inserita nella presa, l’apparecchio è considerato come collegato.
• Prima di rimuovere la spina dalla presa, spegnere l’apparecchio!
• Non trasportare l’apparecchio tenendo il cavo di alimentazione.
• Non utilizzare qualsiasi accessorio che non è stato fornito con l’apparecchio.
• L’apparecchio deve essere collegato ad una presa con tensione e frequenza indicate sulla
targhetta.
-
-
-
-
-
40
Page 41
• Inserire la spina nella presa situata in un punto facilmente accessibile in modo che in
caso di guasto sia possibile scollegare immediatamente l’apparecchio. Per spegnere
completamente l’apparecchio, scollegarlo dalla presa di corrente. Per questo staccare la
spina che si trova sull’estremità del cavo di alimentazione.
• Prima di scollegare la spina, ricordarsi sempre di spegnere l’apparecchio!
• Non usare gli accessori non raccomandati dal produttore. L’uso di accessori non racco
mandati può creare i rischi per l’utente e provocare i danni all’apparecchio. Usare unicamente solo pezzi ed accessori originali.
• L’installazione elettrica deve soddisfare le normative nazionali e locali applicabili. Questo
apparecchio non è destinato all’uso da parte di persone (inclusi i bambini) con capacità
fisiche, sensoriali o mentali ridotte, o senza esperienza e conoscenza.
• Non permettere ai bambini di utilizzare l’apparecchio.
• Tenere l’apparecchio con il cavo fuori dalla portata dei bambini.
• Non permettere ai bambini di giocare con l’apparecchio.
• Scollegare l’apparecchio dalla rete se esso deve essere lasciato incustodito e prima del
montaggio, dello smontaggio o della pulizia.
• Non lasciare l’apparecchio incustodito durante l’utilizzazione.
Regole di sicurezza speciali
• Il presente apparecchio è stato progettato per cucinare vari piatti mediante il riscaldamento di utensili da cucina. L‘uso dell‘apparecchio per qualsiasi altro scopo può causare
danni all‘apparecchio o lesioni.
• Utilizzare l‘apparecchio solo in conformità con le istruzioni.
• L’apparecchio deve essere utilizzato solo da personale qualificato da ristorante, da men
-
sa o bar ecc.
•
Attenzione! Rischio di ustioni! La superficie riscaldante ed altre superfici disponibili
riscaldano a temperature molto elevate. Toccare unicamente il pannello di controllo.
•
Attenzione! L’apparecchio emette la radiazione elettromagnetica non ionizzante.
• Non posizionare l’apparecchio in prossimità di oggetti sensibili alle radiazioni magneti
-
che, quali televisori, radio, carta da banca o di credito.
• Non posizionare l’apparecchio sull’oggetto che emette calore (cucina a gas, elettrica,
grill ecc.). Tenere l’apparecchio lontano da superfici calde o fiamme libere. Posizionare
l’apparecchio su una superficie stabile, pulita e asciutta, resistente alle alte temperature.
• Assicurarsi che l’apparecchio non si trova vicino al luogo in cui vapore o vapori grassi
si producono. Il ventilatore che è all’interno dell’apparecchio può aspirare questi vapori
all’interno, provocando la deposizione di grasso o di umidità e in conseguenza, causare
un corto circuito.
• L’apparecchio non è progettato per funzionare tramite un timer esterno o un sistema di
telecomando separato.
• Sulla superficie della piastra riscaldante non mettere oggetti metallici come coltelli, for
-
chette, cucchiai, coperchi perché essi si riscaldano.
• ATTENZIONE: Non coprire le aperture di ventilazione.
IT
41
Page 42
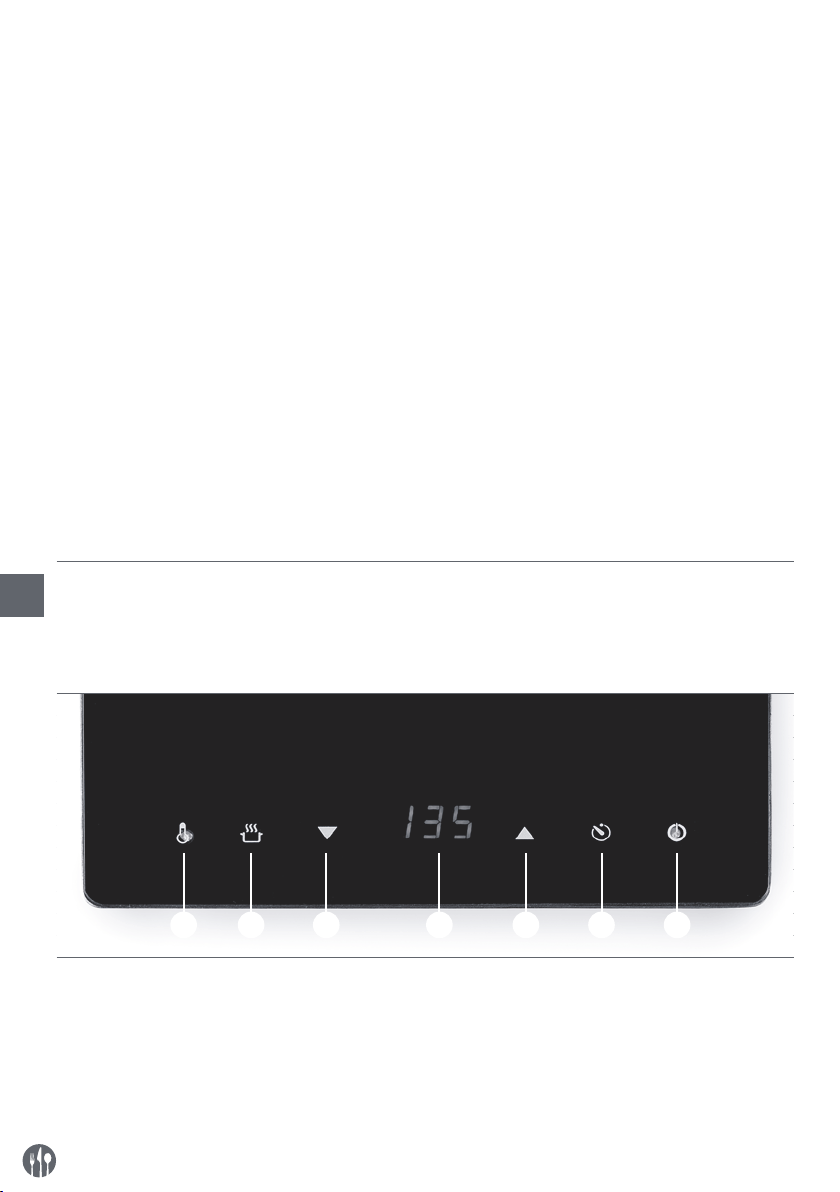
• ATTENZIONE: Se la piastra riscaldante è rotta o danneggiata, scollegare l’apparecchio
dalla rete elettrica per evitare scosse elettriche.
• Fornire almeno 20 cm di distanza attorno all’apparecchio per assicurare un’adeguata
ventilazione.
• No colpire con gli strumenti rigidi la piastra riscaldante. Non pulire l’apparecchio utiliz
zando il flusso diretto di acqua o il pulitore a vapore, non immergere tutto l’apparecchio
in acqua per non bagnare o umidificare le parti all’interno dell’apparecchio e evitare il
rischio di scossa elettrica.
• Durante il funzionamento dell’apparecchio prestare particolare attenzione agli anelli,
orologi o altri gioielli di questo tipo perché essi possono diventare caldi se si trovano
vicino alla piastra riscaldante.
• Attenzione! Fare passare e proteggere in modo appropriato il cavo di alimentazione per
evitare la trazione accidentale o il contatto con la piastra riscaldante.
• Non lavare l’apparecchio con acqua. La pulizia dell’apparecchio può provocare la pene
trazione dell’acqua nelle parti elettriche e provocare scosse elettriche.
• Non pulire o mettere l’apparecchio in deposito prima del riscaldamento completo.
• Non posizionare vasi vuoti sull’apparecchio funzionante per non danneggiarli. Utilizzare
unicamente gli utensili da cucina di tipo e con le dimensioni raccomandate. (Vedere - - ->
Attrezzatura da cucina adeguata).
Messa a terra
IT
DIl fornello è l’apparecchio della I classe di protezione e deve esser messa a terra. La messa a
terra riduce il rischio di scosse elettriche grazie al
cavo evacuante il corrente elettrico. L’apparecchio
è dotato di un cavo con una messa a terra. Non inserire la spina nella presa di corrente se l’apparecchio non è stato correttamente installato o messo
a terra.
-
-
Pannello di controllo touch dell‘apparecchio
1) Pulsante ON/Standby
2) Funzione timer con spia di indicazione
3) Aumentare la regolazione: tempo / temperatura
/ potenza
4) Display digitale
42
1234567
5) Diminuire la regolazione: Tempo / temperatura
/ potenza
6) Funzione alimentazione con spia luminosa:
7) Funzione temperatura con spia luminosa
Page 43
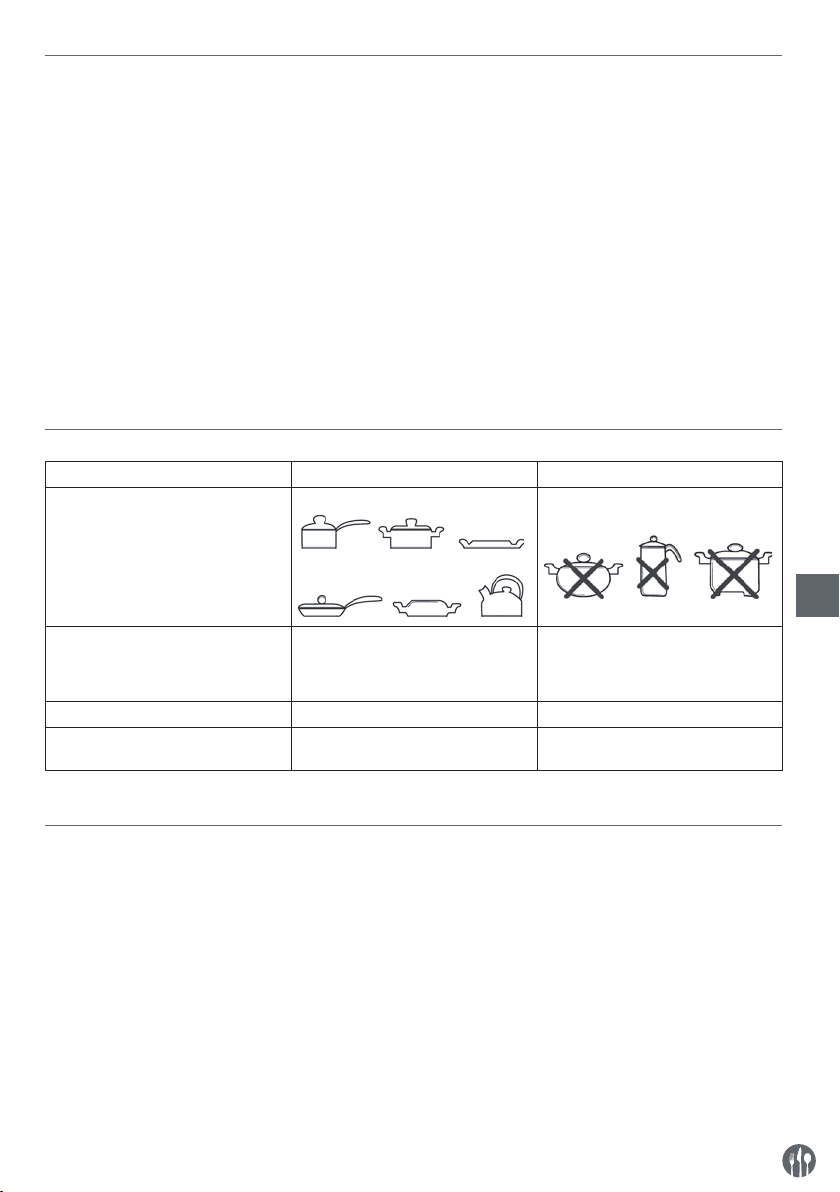
Prima del primo utilizzo
• Rimuovere e eliminare l’imballaggio e le protezioni.
• Controllare l’apparecchio e gli accessori per la
completezza. In caso di consegna incompleta o
• Non posizionare l’apparecchio in prossimità di
oggetti che sono sensibili a disturbi causati dalle
emissioni di radiazioni magnetiche (ad es. radio,
lettori di cassette).
di danni contattare il fornitore (vedere: Garanzia).
• Pulire tutte le parti secondo le istruzioni (Vedere==> Pulizia e manutenzione).
• Verificare che il prodotto è completamente
asciutto.
• Posizionare l’apparecchio su una superficie stabile, resistente alle alte temperature e spruzzi di
Attenzione: A causa di residui di produzione, l’apparecchio può emettere un odore debole e caratteristico all’inizio del funzionamento dell’apparecchio. Questo è normale e non significa che il
funzionamento non corretto o pericolo. Assicurarsi
che l’apparecchio è ben ventilato.
liquidi.
• Assicurare la ventilazione adeguata. Fornire una
distanza di almeno 20 cm attorno all’apparecchio.
Attrezzatura da cucina idonea
Idonea Non idonea
Fondo di un recipiente Fondo piatto Fondo curvato, irregolare, arrotondato
IT
Materiale I recipienti da cucina con fondo in
ferro, in ghisa, in acciaio inossidabile
magnetico o con fondo in ferro smaltato
Dimensioni di recipiente da 12 a 23 cm Meno di 12 cm o più di 23 cm
Tipo di recipiente I recipienti da cucina con fondo cui lo
spessore è superiore a 1,5 mm
I recipienti da cucina in ceramica, vetro, rame o alluminio o in bronzo
I recipienti da cucina chiusi o scatole
Nota: L’uso delle padelle o delle casseruole non adatte alla cottura a induzione può provocare danni
43
Page 44
Funzionamento
• Mettere una padella o pentola adatta al centro
della superficie riscaldante dell‘apparecchio.
(Vedere - -> pentole adatte per l‘apparecchio).
Nota: Non collocare una pentola vuota in quanto
ciò potrebbe danneggiare la pentola e l‘apparecchio.
• Collegare la spina di alimentazione ad una presa
elettrica adeguata. Il pulsante On/Standby (1) si
illuminerà e l‘apparecchio sarà in modalità Standby.
• Quindi, accendere l‘apparecchio premendo il pulsante On/Standby (1) e il pulsante di Accensione
(6) lampeggia.
Impostazione del livello di potenza
• Durante il funzionamento, premere il pulsante di
accensione (6) per attivarlo. La spia luminosa (6)
si accende.
• Usare i pulsanti aumenta regolazione (3) o diminuisci regolazione (5) per aumentare o diminuire
Impostazione del livello di temperatura
• Durante il funzionamento, premere il pulsante
temperatura (7) per attivarlo. La spia luminosa
IT
(7) si accende.
• Usare i pulsanti aumenta regolazione (3) o diminuisci regolazione (5) per aumentare o diminuire
il livello di temperatura (Intervallo di regolazio-
• Quindi, scegliere di premere il pulsante Accensione (6) o il pulsante temperatura (7) per iniziare
la cottura. Se il pulsante timer (2) non è impostato, l‘apparecchio funziona in continuo.
• Una volta terminata la cottura, passare alla modalità Standby premendo il pulsante On/Standby
(1). Il display digitale (4) e tutti i pulsanti si spengono tranne il pulsante On/Standby (1).
Nota: Se non si preme alcun tasto sul pannello di
controllo durante il funzionamento per 2 ore, l‘apparecchio poi passerà automaticamente alla modalità Standby.
il livello di potenza (Intervallo di regolazione: 100
W ~ 2.000 W). L‘impostazione predefinita è 100
W. Livelli di potenza superiori sono adatti per la
cottura a vapore.
ne: 35° C ~ 240° C). L‘impostazione predefinita
è 100° C. Livelli di temperatura superiori sono
adatti per arrostire, grigliare e friggere.
Impostazione del timer
• Dopo l‘accensione o l‘impostazione della temperatura di cottura, si può scegliere di impostare il
timer. Premere il pulsante timer (2) per attivarlo.
La spia luminosa (2) si accende.
• Usare i pulsanti aumenta regolazione (3) o diminuisci regolazione (5) per aumentare o diminuire il tempo di cottura (Intervallo di regolazione:
0 min ~ 180 min). L‘impostazione predefinita è 0
min.
• Quando il timer è impostato, verrà memorizzato
Nota:
1) Premere e tenere premuto il pulsante di impo-
stazione aumenta (3) o diminuisci (5) per la regolazione rapida.
2) Dopo un lungo periodo di funzionamento, è nor-
male che la ventola di raffreddamento all‘interno
continui a funzionare in modalità Standby per un
44
automaticamente entro 5 secondi. L‘apparecchio avvierà quindi il funzionamento. Visualizzerà
il tempo rimanente e le impostazioni potenza /
temperatura alternativamente sul display (4).
• L‘apparecchio entrerà in modalità Standby quando sarà trascorso il tempo impostato.
• Se il tempo impostato è ridotto a “0 min” manualmente, l‘apparecchio andrà in modalità Standby
all‘istante.
po‘ di tempo. Prima di staccare la spina, attendere che la ventola di raffreddamento si sia arrestata.
3) La superficie del apparecchio è calda dopo il
passaggio alla modalità Standby. Attendere il
completo raffreddamento prima di toccare.
Page 45
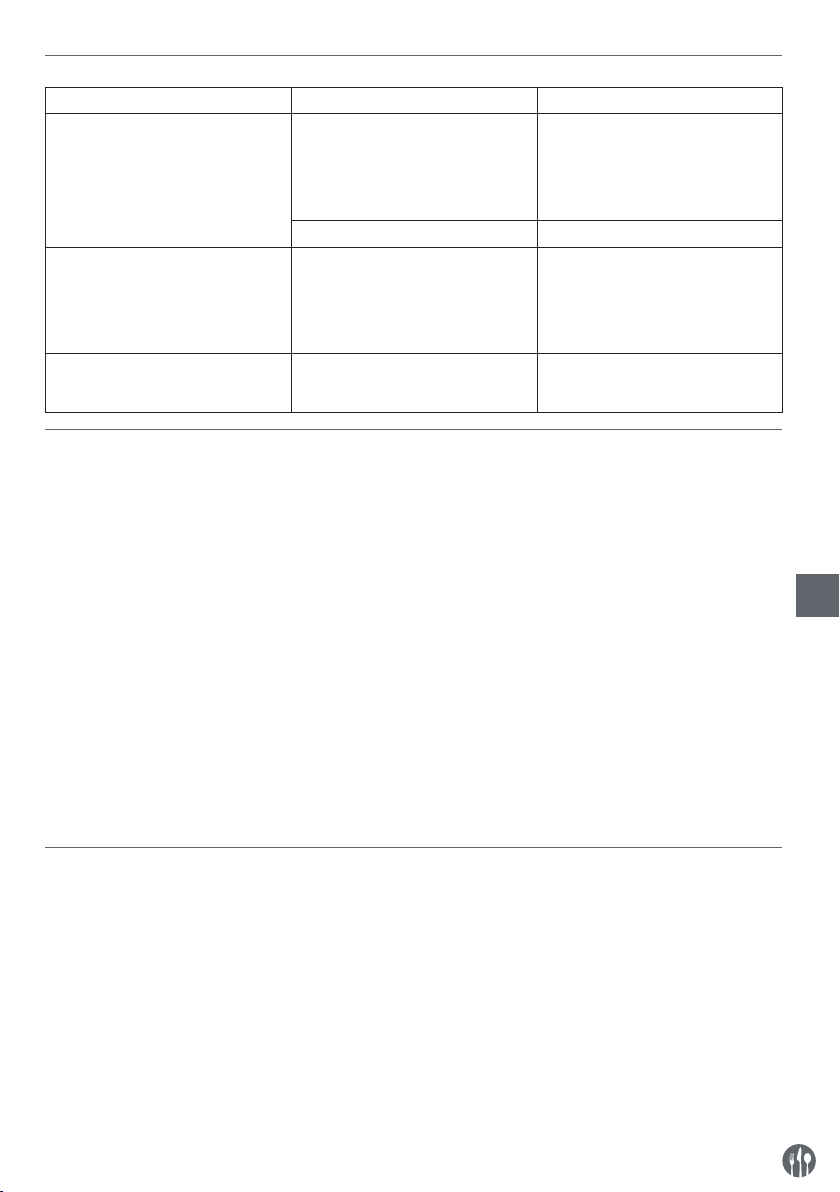
Codici di errori
Codici di errori visibili sul display (4) Causa possibile Soluzione possibile
E 1 La temperatura dell’apparecchio è
troppo alta.
Il ventilatore difettoso. Contattare il fornitore.
E 2 La padella o la casseruola si scaldano
fino a temperature eccessivamente
alte. Probabilmente il recipiente è
stato svuotato, quindi la protezione
del fornello si attiva e il fornello si
spegne
E 3 La tensione di alimentazione non è
corretta (la tensione troppo bassa o
troppo alta).
Rimuovere eventuali ostacoli intorno
all’apparecchio. Scollegare l’apparecchio dalla fonte di alimentazione,
rimuovere la padella o la casseruola
e attendere fino al raffreddamento
completo dell’apparecchio.
Contattare il fornitore.
Scollegare l’apparecchio dalla rete
elettrica, rimuovere il recipiente attendere che l’apparecchio è raffreddato completamente. Assicurarsi che
nel recipiente c’è l’acqua.
Assicurarsi che l’apparecchio è collegato ad una fonte di alimentazione
adeguata.
Pulizia e manutenzione
Attenzione: Prima della pulizia o prima di mettere l’apparecchio in deposito, scollegare sempre l’apparecchio dalla presa di corrente e lasciare raffreddare il fornello.
Pulizia
• Non immergere l’apparecchio in acqua o altri liquidi.
• Dopo il raffreddamento della superficie esterna,
pulirla con un panno umido o una spugna umida con una piccola quantità di un detergente per
• Non usare mai per la pulizia dell’interno o dell’esterno dell’apparecchio spugne abrasive o detergenti abrasivi o spugne di lana d’acciaio o strumenti metallici.
pulizia.
IT
Stoccaggio
• Prima di mettere l’apparecchio in deposito assicurarsi che è stato scollegato dalla presa di corrente e che è raffreddato completamente.
• Conservare l’apparecchio in un luogo fresco, pulito e asciutto.
• Non appoggiare oggetti pesanti sulla superficie
di riscaldamento per non provocare la sua rottura.
45
Page 46
Risoluzione dei problemi
Se l’apparecchio non funziona correttamente, leggere la tabella qui sotto per trovare la soluzione
corretta. Se non è possibile risolvere il problema,
Problema Causa possibile Soluzione possibile
- La spina non è correttamente inser-
L’apparecchio non si accende.
Il ventilatore continua a funzionare
dopo il passaggio in modalità standby.
ita nella presa elettrica.
- Il pulsante accensione / standby (1)
non è premuto
- Questo è normale, il ventilatore funziona per qualche tempo dopo aver
spento l’apparecchio per raffreddare tutti i componenti interni.
contattare il rivenditore. I codici visibili sul display
digitale (3). (Vedere - - > Visualizzazione dei codici
d’errori)
Specifiche tecniche
Numero del prodotto: 239278
Tensione e frequenza: 220-240V~ 50/60Hz
Consumo di energia: 2000W
Impostazione della potenza: 100W ~ 2000W
Campo di impostazione della temp.: 35°C ~ 240°C
Campo di impostazione di timer: 0 min ~ 180 min
Classe di protezione: class I
Dimensioni: 293x373x(H)56 mm
Nota: Le specifiche tecniche sono soggette a modifiche senza preavviso.
Garanzia
IT
Qualsiasi difetto che influenza la funzionalità del
dispositivo che compaia entro un anno dall’acquisto sarà corretto a titolo interamente gratuito o con
zione sia previsto nel periodo di validità della garanzia, precisare dove e quando si è acquistato il
prodotto, possibilmente allegando lo scontrino.
la sostituzione del prodotto che è stato utilizzato
e sottoposto a manutenzione corretta seguendo
le istruzioni, senza alcuna violazione. I diritti legali
del cliente non sono assolutamente modificati. Nel
caso in cui l’intervento di manutenzione o sostitu-
In linea con la nostra politica di sviluppo continuo
dei prodotti, ci riserviamo il diritto di modificare il
prodotto, l’imballo e le specifiche di documentazio-
ne, senza notifica alcuna.
- Assicurarsi che la spina sia inserita
nella presa elettrica.
- Premere il pulsante accensione /
standby (1), per avviare l’apparecchio.
- Attendere fino a quando il ventilatore si spegne.
Smaltimento & Ambiente
Alla fine della vita utile del dispositivo, smaltire
conformemente alle normative e linee guida applicabili.
46
Eliminare i materiali di imballaggio, quali plastica e
cartone, negli specifici contenitori.
Page 47

Stimate client,
Vă mulțumim pentru achiziționarea acestui aparat Hendi. Vă rugăm să citiți cu atenția acest manual înainte
de a conecta aparatul pentru evitarea defectării ca urmare a utilizării incorecte. Acordați o atenție deosebită
regulilor de siguranță.
Reguli de siguranță
• Operarea incorectă şi utilizarea necorespunzătoare a aparatului poate avaria grav aparatul şi poate cauza răni oamenilor.
• Aparatul este utilizat exclusiv în scopuri comerciale și nu trebuie folosit pentru uz casnic.
• Aparatul poate fi folosit doar în scopul pentru care a fost proiectat. Producătorul nu este
răspunzător pentru orice avariere cauzată operării incorecte şi a utilizării necorespun
-
zătoare.
• Asiguraţi-vă că aparatul şi ştecherul nu intră în contact cu apă sau alte lichide. În cazul
în care aparatul este scăpat în apă, scoateţi imediat ştecherul din priză şi un tehnician
autorizat trebuie să-l verifice. Dacă nu respectaţi aceste instrucţiuni, acest lucru poate
cauza situaţii care vă pot pune viaţa în pericol.
• Nu incercati sa deschideti singuri carcasa aparatului.
• Nu introduceţi nici un fel de obiecte în carcasa aparatului.
• Nu atingeţi ştecherul cu mâinile ude sau umede.
• Pericol de electrocutare! Nu încercați să reparați singur/ă aparatul. În cazul unei defec
-
țiuni, reparațiile vor fi efectuate întotdeauna numai de personal calificat.
• Nu utilizați niciodată un aparat defect! Deconectați aparatul de la priza electrică și con
-
tactați distribuitorul în cazul unei defecțiuni.
• Avertisment! Nu scufundați părțile electrice ale aparatului în apă sau în alte lichide. Nu
țineți niciodată aparatul sub jet de apă.
• Verificați în mod regulat ștecărul și cablul pentru a vă asigura că nu sunt deteriorate. În
cazul în care ștecărul sau cablul de alimentare este deteriorat, acesta trebuie înlocuit de
agentul de service sau de alt personal calificat similar pentru a evita orice pericol
• Cablul nu trebuie să intre în contact cu obiecte ascuțite sau fierbinți și trebuie păstrat
departe de foc. Pentru a scoate ștecărul din priză, trageți întotdeauna de ștecăr, nu de
cablu.
• Asigurați-vă că nimeni nu poate trage din greșeală cablul (sau prelungitorul) și că nimeni
nu se poate împiedica de el.
• Supravegheați întotdeauna aparatul atunci când este în funcțiune.
• Avertisment! Atât timp cât ștecărul este în priză, aparatul este conectat la sursa de elec
-
tricitate.
• Opriți aparatul înainte de a scoate ștecărul din priză.
• Nu cărați niciodată aparatul ținându-l de cablu.
• Nu utilizați dispozitive suplimentare care nu sunt livrate împreună cu aparatul.
• Conectați aparatul doar la prize electrice cu intensitatea și frecvența electrice menționa
-
te pe eticheta aparatului.
RO
47
Page 48
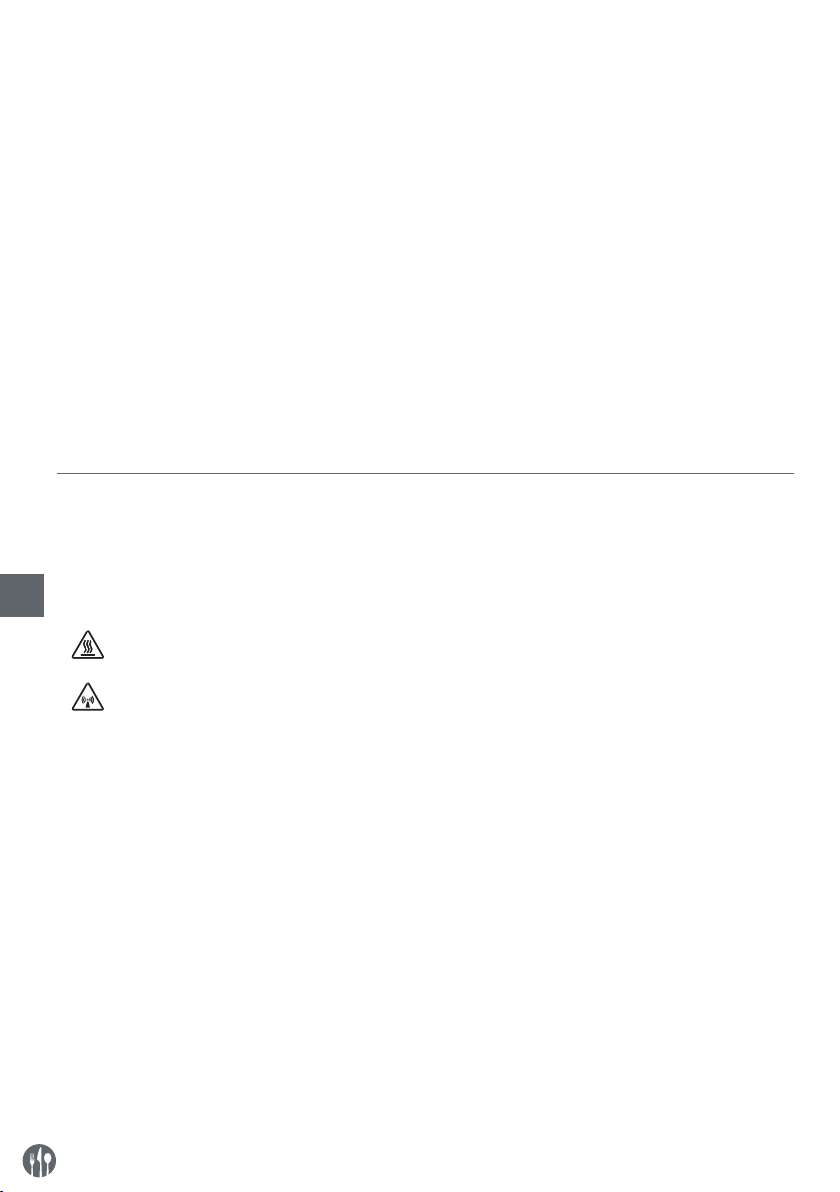
• Conectați cablul de alimentare la o priză electrică ușor accesibilă, astfel încât aparatul
să poată fi deconectat imediat în caz de urgență. Scoateți cablul de alimentare din priza
electrică pentru a opri complet aparatul. Utilizați cablul de alimentare ca dispozitiv de
deconectare.
• Opriți întotdeauna aparatul înainte de a deconecta cablul de alimentare.
• Nu utilizați niciodată accesorii care nu sunt recomandate de către producător. Acestea
pot reprezenta un risc de siguranță pentru utilizator și pot deteriora aparatul. Utilizați
numai piese și accesorii originale.
• Acest aparat nu trebuie folosit de copii sau persoane care au capacităţi mentale, senzo
riale sau fizice reduse, sau lipsă de experienţă şi cunoştinţe.
• Acest aparat nu trebuie utilizat sub nicio formă de către copii.
• Nu țineți produsul și cablurile sale la îndemâna copiilor.
• Copiii nu trebuie să se joace cu acest produs.
• Deconectați întotdeauna aparatul de la sursa de alimentare în cazul în care este lăsat
nesupravegheat, precum și înainte de asamblare, dezasamblare sau curățare.
• Nu lăsați niciodată aparatul nesupravegheat pe parcursul utilizării.
Reguli speciale de siguranță
• Acest aparat este conceput pentru a găti o varietate de alimente prin încălzirea vasului de
gătit. Orice altă utilizare poate avaria aparatul sau poate provoca accidente.
• Utilizați aparatul doar în conformitatea cu indicațiile din acest manual.
• Acest aparat trebuie utilizat de către personalul instruit de la bucătăria restaurantului,
RO
cantinelor sau personalul barului etc.
•
Atenție! Pericol de arsuri! Temperatura suprafeței de încălzire și a altei suprafețe
accesibile este foarte ridicată în timpul utilizării. Atingeți doar panoul de comandă.
•
Atenție! Acest aparat va emite radiații electromagnetice neionizante.
• Nu amplasați aparatul în apropierea unor obiecte care pot fi afectate de câmpurile mag
netice, cum ar fi televizoare, aparate radio, carduri bancare și carduri de credit.
• Nu puneți aparatul pe un obiect de încălzire (aparat de gătit cu benzină, electric, cărbune
etc.) Țineți aparatul la distanță de suprafețele fierbinți și de focul deschis. Utilizați în
totdeauna aparatul pe o suprafață orizontală, stabilă, curată, termorezistentă și uscată.
• Asigurați-vă că aparatul nu este montat în apropierea unor surse de vapori de apă sau de
grăsime. Ventilatorul din interiorul aparatului va aspira acești vapori. Grăsimea și apa pot
forma depozite în aparat, iar acestea pot duce la producerea unui scurt-circuit.
• Acest aparat nu este conceput pentru a fi utilizat cu ajutorul unui cronometru extern sau
al unui sistem de control separat.
• Nu puneți pe placa de încălzire obiecte metalice precum cuțite, furculițe, linguri și capa
ce, deoarece se pot încinge.
• AVERTISMENT: Nu obstrucționați orificiile pentru ventilație ale aparatului.
• AVERTISMENT: Dacă suprafața de încălzire este crăpată sau defectă, opriți aparatul pen
tru a evita posibilitatea unei electrocutări.
• În timpul utilizării, lăsați cel puțin 20 cm în jurul aparatului ca spațiu de ventilație.
-
-
-
-
-
48
Page 49
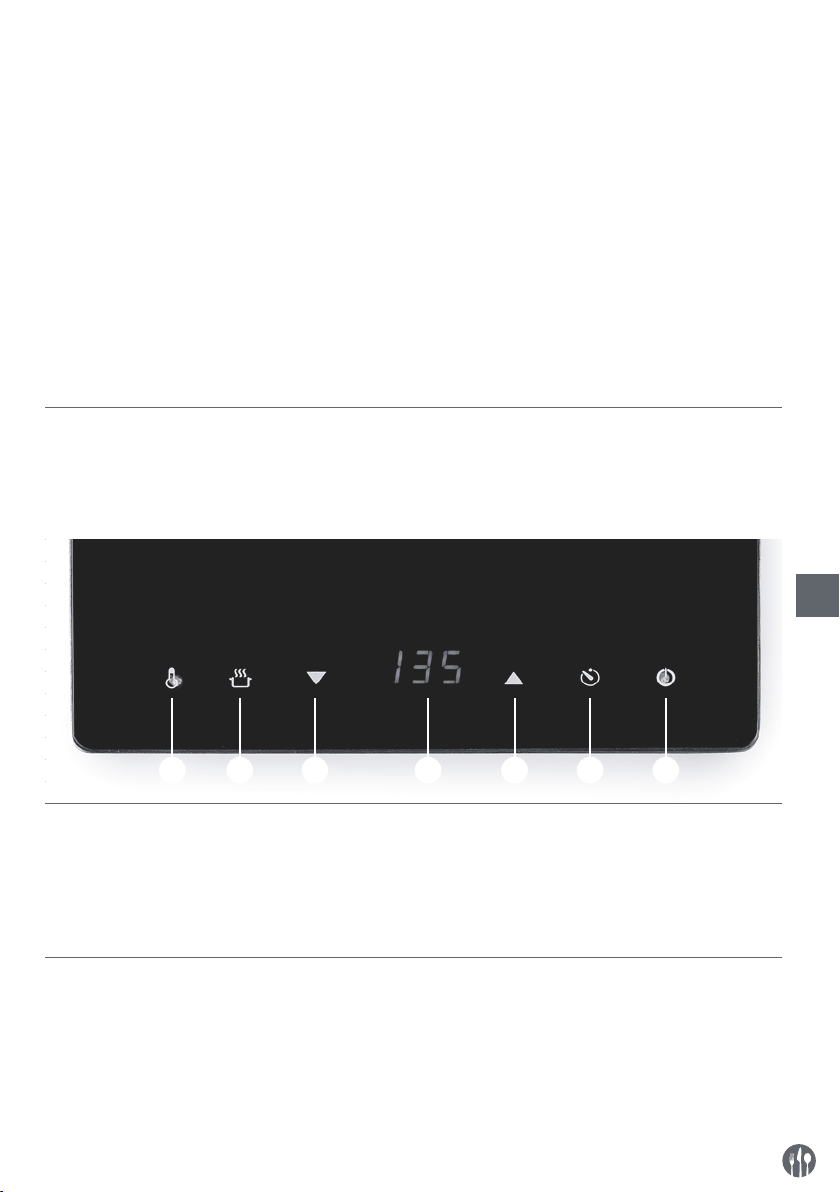
• Nu loviți suprafața plăcii de încălzire cu instrumente dure. Nu folosiți niciodată jeturi de
apă, nu turnați apă direct peste aparat și nu curățați aparatul cu abur, deoarece piesele
se vor uda, ceea ce ar duce la scurt-circuite.
• Nu purtați inele, ceasuri și alte obiecte similare atunci când utilizați aparatul, pentru că
acestea se încing când stau în apropierea suprafeței de încălzire.
• Atenție! Așezați corespunzător cablul de alimentare, dacă este necesar, pentru a împie
-
dica tragerea neintenționată sau contactul cu suprafața de încălzire.
• Nu spălați aparatul cu apă. La spălare se pot produce scurgeri, ceea ce va crește riscul
de scurt-circuit.
• Nu curățați și nu depozitați aparatul decât după ce s-a răcit complet.
• Nu așezați vasele goale pe aparat în timpul funcționării, deoarece acest lucru poate de
teriora vasele. Folosiți numai ustensilele de gătit care corespund tipului și dimensiunilor
recomandate. (A se vedea - - -> Echipamente de gătit corespunzătoare).
Instalația de împământare
Acest aparat este încadrat în clasa de protecție I
și trebuie împământat. Împământarea reduce riscul electrocutării prin asigurarea unui fir de ieșire
pentru curentul electric. Acest aparat este dotat cu
un cablu cu fir de împământare cu ștecăr cu împământare. Ștecărul trebuie conectat la o priză instalată corespunzător și împământată.
RO
Panoul de comandă tactil al aparatului
1) Buton de Pornire/Așteptare
2) Funcție de cronometru cu indicator luminos
3) Creștere valoare: Timp / temperatură / alimentare
4) Afișaj digital
1234567
5) Descreștere valoare: Timp / temperatură / alimentare
6) Funcție de alimentare cu indicator luminos
7) Funcție temperatură cu indicator luminos
49
Page 50
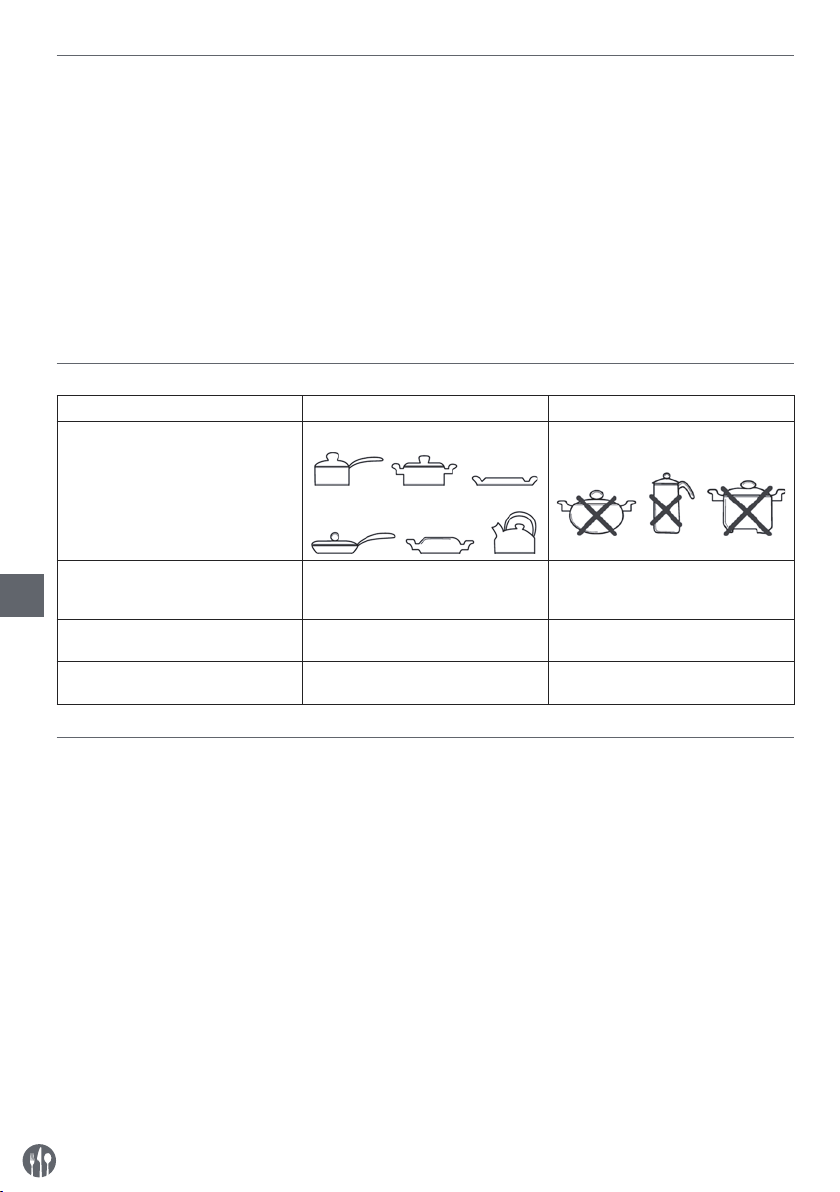
Pregătirea înainte de prima utilizare
• Desfaceți ambalajul și învelitoarea de protecție.
• Asigurați-vă că aparatul nu este defect. În cazul
în care livrarea este incompletă sau dacă există avarii. Luați legătura cu furnizorul (Vezi == >
Garanția).
o distanță minimă de 20 cm în jurul părții inferioare a vasului.
• Nu amplasați aparatul în imediata apropiere a
dispozitivelor sensibile la perturbații prin surse
magnetice (de ex. aparate radio, casetofoane).
• Curățați aparatul înainte de utilizare (Vezi == >
Curățarea și întreținerea).
• Asigurați-vă că aparatul este complet uscat.
• Amplasați aparatul pe o suprafață orizontală,
stabilă și rezistentă la căldură, care este protejată împotriva stropilor de apă.
Notă: Resturile rămase din fabricație pot face ca
aparatul să emită un ușor miros în timpul primelor
cicluri de funcționare. Acest lucru este normal și
nu este un semn de defecțiune sau de pericol. Asigurați-vă că aparatul este bine ventilat.
• Asigurați-vă că există suficientă ventilație. Lăsați
Echipamente de gătit corespunzătoare
Corespunzător Necorespunzător
Fundul vasului de gătit Fund plat Curbat, neregulat, rotund
Material Ustensile de gătit cu fundul din fier,
RO
Diametrul fundului Între 12 și 23 cm Mai mic de 12 cm sau mai mare de 23
Tipul vasului de gătit Ustensile de gătit cu diametrul fundu-
fontă, oțel inoxidabil magnetic sau
emailat
lui ce depășește 1,5 mm
Ustensile cu fundul din ceramică, sticlă, cupru, bronz sau aluminiu
cm
Recipiente sau cutii închise complet
Utilizare
• Așezați o tigaie sau o oală în centrul suprafeței de încălzire a aparatului. (A se vedea
- - > Vase de gătit adecvate pentru aparat).
Observație: Nu așezați o tigaie goală, pentru a nu
deteriora tigaia și aparatul.
• Conectați cablul de alimentare la o priză de curent adecvată. Butonul de Pornire/Așteptare (1)
va fi aprins iar aparatul se va afla în modul de
• În continuare, apăsați fie butonul de alimentare
(6), fie butonul de temperatură (7) pentru a începe să gătiți. Dacă butonul cronometrului (2) nu
este reglat, aparatul va funcționa neîntrerupt.
• După ce ați terminat de gătit, treceți în modul de
Așteptare apăsând butonul de Pornire/Așteptare
(1). Afișajul digital (4) și toate butoanele se sting,
cu excepția butonului de Pornire/Așteptare (1).
Așteptare.
• Apoi, Porniți aparatul apăsând butonul de Pornire/Așteptare (1) iar butonul de Alimentare (6) se
va aprinde.
Observație: În cazul în care, timp de 2 ore, nu este
apăsat niciun buton din panoul de comandă în timpul funcționării, aparatul va trece automat în modul de Așteptare.
50
Page 51
Reglarea puterii de alimentare
• În timpul funcționării, apăsați butonul de alimentare (6) pentru activare. Se va aprinde indicatorul
luminos (6).
• Utilizați butonul cu funcția de creștere (3) sau de-
Reglarea temperaturii
• În timpul funcționării, apăsați butonul de temperatură (7) pentru activare. Se va aprinde indicatorul luminos (7).
Reglarea cronometrului
• După reglarea puterii de alimentare sau a temperaturii pentru gătit, puteți alege reglarea cronometrului. Apăsați butonul cronometrului (2) pentru activare. Se aprinde indicatorul luminos (2).
• Utilizați butonul cu funcția de creștere (3) sau descreștere (5) pentru a mări sau scădea timpul de
gătit (Gamă: 0 min. ~ 180 min.). Valoarea implicită
este de 0 min.
screștere (5) pentru a mări sau scădea puterea
de alimentare (Gamă: 100W ~ 2.000W). Valoarea
implicită este de 100W. Pentru gătitul la aburi
este potrivită o putere mai mare de alimentare.
• Utilizați butonul cu funcția de creștere (3) sau
descreștere (5) pentru a mări sau scădea temperatura (Gamă: 35°C ~ 240°C). Valoarea implicită
este de 100°C. Pentru coacere, frigere sau prăjire
este potrivită o temperatură mai mare.
• După reglarea cronometrului, timpul este stocat
automat după 5 secunde. Apoi, aparatul își începe funcționarea. Acesta va afișa timpul rămas și,
alternativ, reglajul privind alimentarea / temperatura pe afișaj (4).
• După expirarea timpului reglat, aparatul intră în
modul de Așteptare.
• Dacă timpul reglat este redus manual la „0 min.”,
aparatul intră imediat în modul de Așteptare.
Observație:
1) Apăsați și mențineți butonul de creștere (3) sau
descreștere (5) pentru ajustarea rapidă.
2) După o perioadă prelungită de funcționare, este
normal ca ventilatorul de răcire din interior să
rămână pornit o perioadă în modul de Așteptare.
Înainte de a deconecta aparatul de la sursa de
RO
alimentare, așteptați ca ventilatorul de răcire să
se oprească.
3) Suprafața aparatului încă este fierbinte după
comutarea în modul de Așteptare. A se atinge
numai după răcirea completă.
51
Page 52
Afișarea codurilor de eroare
Coduri de eroare afișate pe ecran (4) Cauză posibilă Soluție posibilă
E 1 Temperatura aparatului este prea
mare
Ventilatorul de răcire este defect Contactați furnizorul.
E 2 Tigaia sau oala sunt supraîncălzite.
Este posibil ca tigaia să se golească,
iar aparatul se va opri pentru protecție.
E 3 Tensiunea de alimentare este anor-
mală. (Tensiunea de alimentare este
prea mare sau prea mică)
Îndepărtați toate obstacolele din jurul aparatului. Scoateți aparatul din
priză, îndepărtați tigaia sau oala și
așteptați până când aparatul s-a răcit
complet.
Scoateți aparatul din priză, îndepărtați tigaia sau oala și așteptați până
când aparatul s-a răcit complet. Și
asigurați-vă că este apă în interiorul
tigăii.
Asigurați-vă că aparatul este conectat la o sursă de alimentare electrică
adecvată.
Curățarea și întreținerea
Atenție: Scoateți întotdeauna aparatul din priză și lăsați-l să se răcească complet înainte de curățare și
depozitare.
Curățare
• Nu scufundați niciodată aparatul în apă sau în
alte lichide.
• Curățați suprafața exterioară răcită cu o cârpă
RO
ușor umezită sau un burete cu o soluție delicată
• Nu folosiți niciodată bureți sau detergenți abrazivi, bureți de sârmă sau ustensile metalice pentru a curăța părțile interioare sau exterioare ale
aparatului.
de săpun.
Depozitarea
• Asigurați-vă întotdeauna înainte de depozitare că
aparatul a fost deconectat de la sursa de alimentare și s-a răcit complet.
• Depozitați aparatul într-un loc răcoros, curat și
uscat.
52
• Nu așezați niciodată obiecte grele pe suprafața
de încălzire în timpul depozitării, deoarece este
posibil să se spargă.
Page 53
Depanarea
Dacă aparatul nu funcționează bine, consultați tabelul de mai jos pentru a găsi soluția. Dacă tot nu
rul/agentul de service. Coduri de eroare afișate pe
ecranul digital (3). (Vezi ---> Codurilor de eroare)
puteți rezolva problema, luați legătura cu furnizo-
Probleme Cauză posibilă Soluție posibilă
Aparatul nu pornește.
Ventilatorul de răcire funcționează
chiar și după ce aparatul este comutat în modul Standby.
- Ștecărul nu este bine conectat la
priza electrică.
- Butonul On/Standby (1) nu este apăsat
- Acest lucru este normal. Ventilatorul de răcire continuă să funcționeze în modul de așteptare pentru o
perioadă de timp, pentru a răci toate
elementele interne.
- Verificați ștecărul pentru a vă asigura că este conectat corect.
- Apăsați butonul On/Standby (1) pentru a porni funcționarea.
- Așteptați până când ventilatorul de
răcire se oprește din rotire.
Specificația tehnică
Articol nr.: 239278
Tensiune și frecvență: 220-240V~ 50/60Hz
Puterea nominală de intrare: 2000W
Setare putere: 100W ~ 2000W
Setarea temperaturii: 35°C ~ 240°C
Setarea temporizatorului: 0 min ~ 180 min
Clasa de protecție: class I
Dimensiune: 293x373x(H)56 mm
Observație: Specificația tehnică poate fi modificată fără preaviz
Garanție
Orice defecțiune care afectează funcționarea aparatului apărută la mai puțin de un an de la cumpărarea acestuia va fi remediată prin reparație sau
înlocuire gratuită, cu condiția ca aparatul să fi fost
folosit și întreținut conform instrucțiunilor nu să nu
fi fost bruscat sau folosit necorespunzător în vreun
fel. Drepturile dumneavoastră legale nu sunt afec-
Eliminarea și mediul înconjurător
La sfârșitul vieții aparatului, vă rugăm să-l eliminați conform regulamentelor și instrucțiunilor aplicabile în acel moment.
tate. Dacă aparatul este în garanție, menționați
când și de unde a fost cumpărat și includeți dovada
cumpărării (de ex. chitanța).
Conform politicii noastre de dezvoltare continuă a
produsului, ne rezervăm dreptul de a modifica produsul, ambalajul și documentația fără notificare.
Aruncați ambalajul (plastic sau carton) în recipientele corespunzătoare.
RO
53
Page 54

Уважаемый Клиент,
Большое Вам спасибо за то, что Вы купили оборудование фирмы Hendi. Вам следует внимательно прочитать настоящую инструкцию пользователя во избежание повреждения машины в результате неправильной эксплуатации. Особенно рекомендуем ознакомиться с предупреждениями.
Правила техники безопасности
• Неправильная эксплуатация и неподходящее использование агрегата может привести к его поломке и поранить оператора.
• Настоящее устройство предназначено исключительно для коммерческого использо
вания и не должно использоваться в домашних условиях.
• Оборудование следует использовать точно по назначению. Производитель не несет
ответственности за повреждения, вызванные неправильной эксплуатацией или не
правильным обслуживанием оборудования.
• Оборудование и электрическую штепсельную вилку следует держать вдали от воды
и прочих жидкостей. Если штепсельная вилка попадет в воду, ее следует тут же вы
тащить из розетки электропитания и обратиться в службу сертифицированного сервиса для проверки устройства. Несоблюдение данных указаний может повлечь за
собой угрозу здоровью и жизни обслуживающего персонала.
• Нельзя снимать кожух без особого разрешения.
• Нельзя класть никаких посторонних предметов вовнутрь агрегата.
• Нельзя касаться мокрыми, или влажными руками штепсельной вилки.
RU
• Опасность поражения током! Не следует самостоятельно чинить электроаппаратуру.
Любые поломки и неисправности должны устраняться квалифицированным персо
налом.
• Никогда не следует пользоваться поврежденной электроаппаратурой. Поврежден
ное устройство нужно отсоединить от электросети и обратиться к продавцу.
• Предупреждение: не следует погружать электрических деталей в воду, или иные
жидкости. Не омывать в струе воды.
• Регулярно проверять вилку и провод электропитания на предмет повреждений. По
врежденные вилку или провод передать для ремонта в сервисную точку, или обратиться к квалифицированному электрику во имя предотвращения опасности травм.
• Удостовериться, что провод электропитания не касается острых и горячих предметов;
держать электропровод вдали от открытого огня. Для того, чтобы вынуть вилку из
розетки всегда нужно тянуть за вилку, а не за электропровод.
• Защитить провод электропитания (удлинитель) от случайного выпадения из розетки
Электропровод прокладывать так, чтобы случайно не зацепиться за него.
• Непрестанно наблюдать за работающей электроаппаратурой.
• Предупреждение! Если вилка находится в розетке – это означает, что электроаппара
тура считается подключенной к электропитанию.
• Перед том, как вынуть вилку из розетки, электроаппаратуру следует выключить!
• Никогда нельзя переносить, передвигать электроаппаратуру держа за электропровод.
-
-
-
-
-
-
-
54
Page 55
• Не использовать никаких деталей, аксессуаров, которые не поставляются вместе с
этой электроаппаратурой.
• Электроаппаратуру следует подключать исключительно к розетке, в которой имеется
напряжение и частоту, указанную на щитке электроаппаратуры.
• Вилку следует вставлять в розетку, расположенную в удобном и легкодоступном ме
сте, так чтобы в случае аварии можно бы ее немедленно вынуть. Для полного обесточивания электроаппаратуры ее следует отсоединить от электропитания; для этого
следует вынуть вилку, находящуюся на конце провода электропитания, из розетки.
• Перед тем, как вынуть вилку всегда следует помнить о том, чтобы сначала выключить
электроаппаратуру!
• Не следует использовать детали, аксессуары, не рекомендуемые производителем
данной электроаппаратуры, т.к. использование таких деталей, аксессуаров может
создать для пользователя угрозу его здоровью и жизни, а также может привести к
поломке электроаппаратуры. Следует всего использовать оригинальные детали, ак
-
сессуары.
• Без надлежащего контроля или предварительного обучения эксплуатации оборудо
вания проводимого лицом, отвечающим за безопасную эксплуатацию, оборудованием не могут пользоваться ни дети, ни лица с ограниченными физическими, или
психическими возможностями, ни лица, которые не обладают необходимым опытом
работы и знаниями в данной области.
• Ни в коем случае нельзя допускать к использованию электроаппаратуры детей.
• Электроаппаратуру следует хранить в месте недоступном для детей.
• Нельзя разрешать детям использовать электроаппаратуру в качестве игрушки.
• Всегда электроаппаратуру следует отсоединить от электропитания, если оставляем
ее без надзора, перед монтажом, демонтажем и чисткой.
• Нельзя оставлять работающую электроаппаратуру без надзора.
RU
Специальные правила техники безопасности
• Это устройство предназначено для приготовления различных блюд при нагревании
кухонной посуды. Использование устройства для любых других целей может приве
-
сти к повреждению или травме.
• Используйте устройство только в соответствии с руководством.
• Устройство должен обслуживать исключительно обученный персонал кухни рестора
-
на и столовой или обслуживающий бар и т.п.
•
Внимание! Риск ожогов! Нагревательная поверхность плиты и другие доступ-
ные поверхности нагреваются до очень высоких температур. Прикасайтесь только к
панели управления.
•
Внимание! Устройство излучает неионизирующее электромагнитное излучение
• На задней стороне находится эквипотенциальный разъем для кросс- соединения с
другим устройством.
• Не устанавливайте устройство вблизи объектов, чувствительных к магнитному излу
-
чению, таких как телевизоры, радиоприемники, банковские или кредитные карты.
55
Page 56

• Не устанавливайте устройство на объекте, излучающем тепло (газовая или электрическая плита, гриль и т.п.). Держите устройство вдали от любых горячих поверхностей
или открытого пламени. Устанавливайте устройство на ровной, стабильной, чистой и
сухой поверхности, устойчивой к воздействию высоких температур.
• Убедитесь, что устройство не находится вблизи места, где создается водный пар или
масляные пары. Вентилятор, расположенный в устройстве, будет всасывать такой
пар в устройство, в результате чего произойдет осаждение жира или влаги на вну
тренней стороне, что, в свою очередь, может вызвать короткое замыкание.
• Устройство не предназначено для работы с помощью внешнего таймера или отдель
ной системы дистанционного управления.
• На поверхности нагревательной плиты не размещайте металлические предметы, та
кие как ножи, вилки, ложки или крышки из-за их нагрева.
• ПРЕДУПРЕЖДЕНИЕ: Не закрывайте вентиляционные отверстия.
• ПРЕДУПРЕЖДЕНИЕ: Если нагревательная плита треснула или повредилась, отклю
чите устройство от источника питания, чтобы избежать поражения электрическим
током.
• Обеспечьте, по крайней мере, 20 см пространства вокруг устройства для обеспечения
надлежащей вентиляции.
• Не ударяйте твердым инструментом в нагревательную плиту. Не чистите устройство
с использованием прямой струи воды или паровой мойки и не смывайте водой, так
как это может привести к отсырению или увлажнению частей внутри устройства, а
RU
следовательно - к поражению электрическим током.
• Во время обслуживания устройства, обратите особое внимание на кольца, часы и
другие ювелирные изделия, так как они могут нагреваться, если вы будете находить
ся рядом с нагревательной плитой.
• Внимание! Уложите и защитите шнур питания таким образом, чтобы его случайно не
потянуть или предотвратить контакт с нагревательной плитой.
• Не мойте устройство водой. При мойке устройства вода может попасть в электриче
ские детали и вызвать поражение электрическим током.
• Не чистите и не помещайте устройство на хранение, пока оно полностью не остынет.
• Не оставляйте пустую посуду на работающем устройстве, так как это может привести
к её повреждению. Используйте только кухонную посуду с рекомендованным типом и
размером. (Смотри- - -> Соответствующее кухонное оборудование).
-
-
-
-
-
-
Монтаж заземления
Плита является устройством I класса защиты и
должна быть заземлена. Заземление снижает
риск поражения электрическим током за счет
использования отводящего провода. Вилка
56
должна быть подключена к розетке переменного
тока, которая надлежащим образом установлена
и заземлена.
Page 57
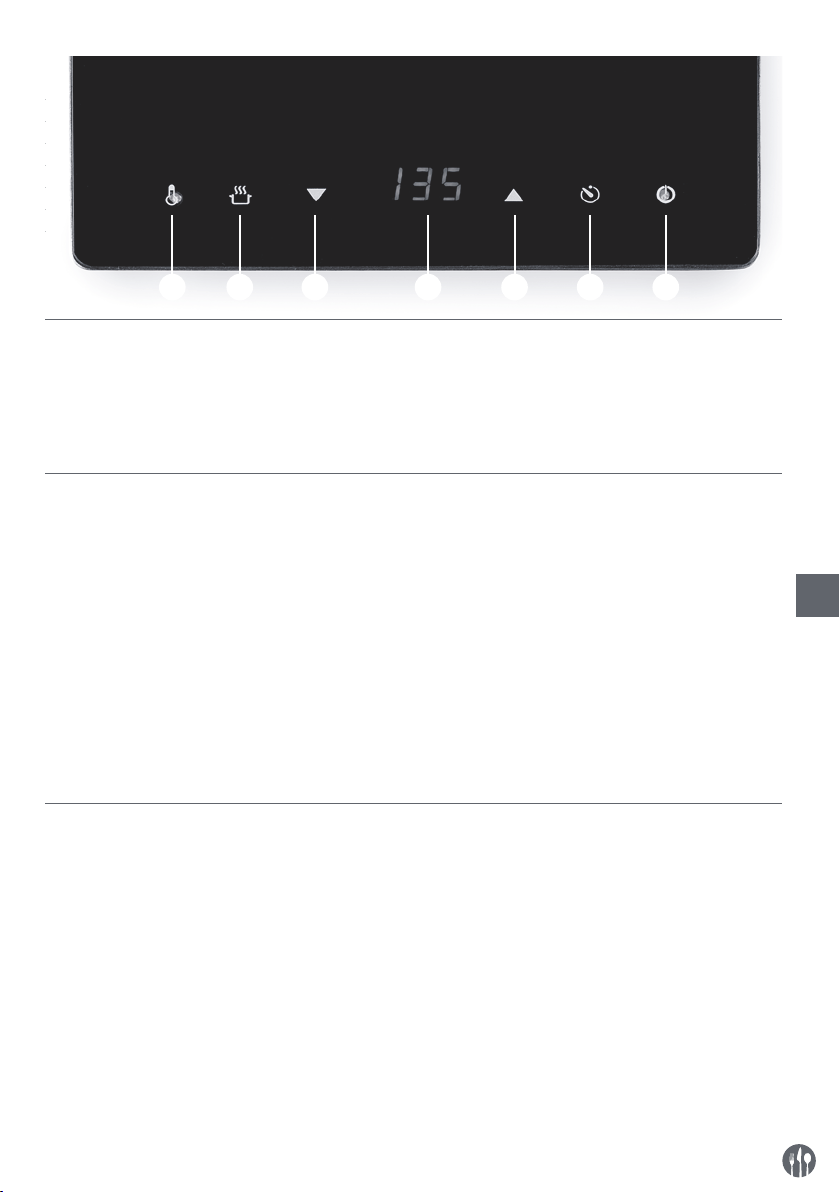
Сенсорная панель управления устройства
1) Кнопка ВКЛ/режим ожидания
2) Функция таймера с индикатором
3) Увеличение настройки: Время / температура /
мощность
4) Цифровой дисплей
Перед первым использованием
• Снимите и удалите упаковку и защиты.
• Убедитесь, что устройство не повреждено. В
случае неполной поставки или повреждения
свяжитесь с поставщиком (смотри == > Гарантия).
• Очистите устройство (смотри == > Очистка и
техническое обслуживание).
• Убедитесь, что устройство полностью сухое.
• Поместите устройство на горизонтальной, ста-
бильной поверхности, устойчивой к воздействию высоких температур и брызг жидкостей.
• Обеспечьте необходимую вентиляцию. Обе-
спечьте, по крайней мере, 20 см пространства
1234567
5) Уменьшение настройки: Время / температура
/ мощность
6) Функция мощности с индикатором
7) Функция температуры с индикатором
вокруг устройства.
• Не размещайте устройство вблизи объектов,
которые чувствительны к помехам, вызванным
магнитным излучением (например, радиоприемники, кассетные магнитофоны).
Замечание: Из-за остатка от производственного
процесса, в течение первых нескольких запусков из устройства может выходить неприятный
запах. Это нормальное явление и не указывает
на повреждение устройства или опасность для
пользователя. Убедитесь, что устройство хорошо
вентилируется.
RU
57
Page 58
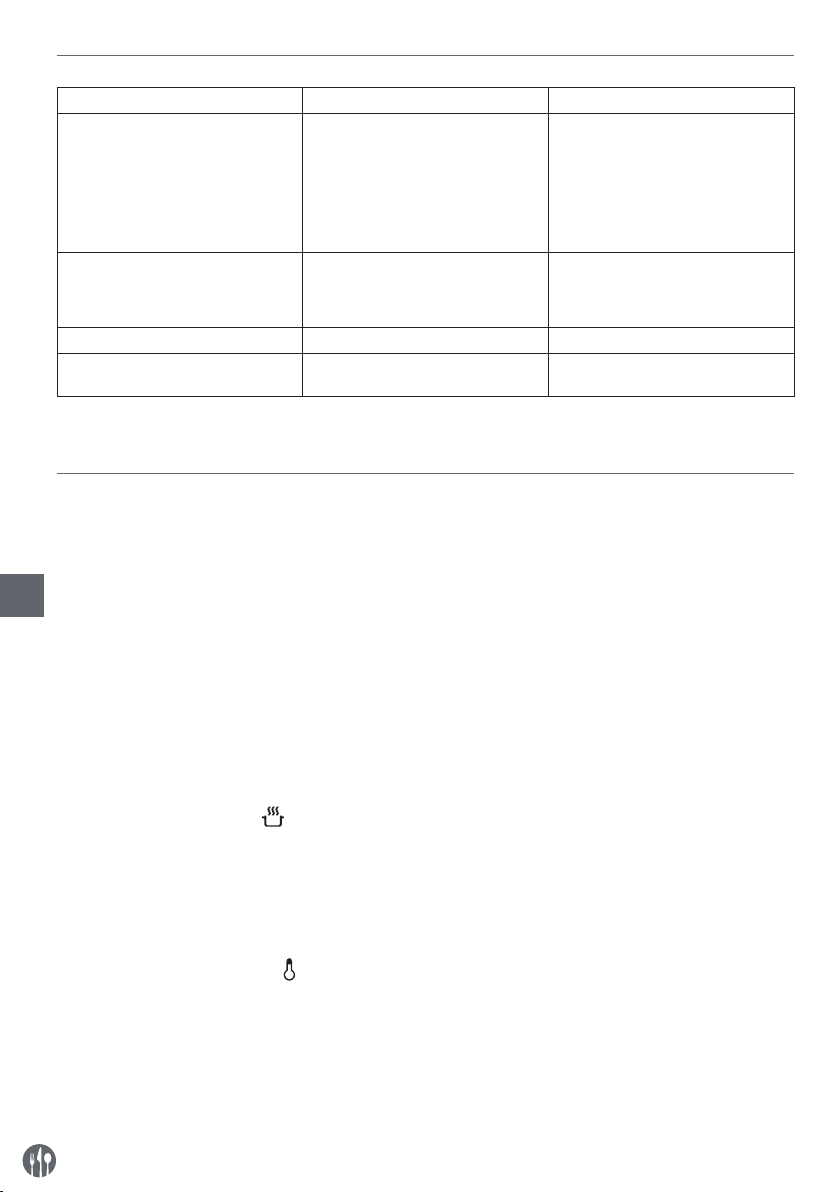
Рекомендованная кухонная посуда
Рекомендуется Не рекомендуется
Подошва посуды Плоское дно посуды Изогнутое, неровное, округлое дно
Материал Кухонная посуда с железным или
чугунным, или из нержавеющей
магнитной стали, или железным
эмалированным дном
Размер дна посуды с 12 до 26 см Меньше 12 см, или больше 26 см
Тип посуды Кухонная посуда, которого дно толще
1,5 мм
Кухонная посуда с керамическим,
стеклянным, медным, или
алюминиевым дном, или из бронзы
Закрытая кухонная посуда, или
закрытые банки
Замечание: Использование сковороды или кастрюли непригодной для приготовления пищи на индукционной плите может привести к повреждению устройства.
Работа
• Поместите подходящую сковороду или кастрюлю в центр нагревательной поверхности плиты. (См. - - > Подходящие сковороды).
Примечание. Не ставьте на плиту пустую ско-
RU
вороду, потому что это может повлечь повреждения сковороды и плиты.
• Подключите штекер питания в подходящую
электрическую розетку. Кнопка Вкл/Режим
• Затем нажмите кнопку Мощность (6) или кнопку Температура (7), чтобы начать готовить.Если
кнопка Таймер (2) не нажата, плита будет работать постоянно.
• После завершения готовки перейдите в режим
ожидания, нажав кнопку Вкл/Режим ожидания
(1). Цифровой дисплей (4) и все кнопки выключатся, кроме кнопки Вкл/Режим ожидания (1).
ожидания (1) загорится, и устройство войдет в
режим ожидания.
• Затем включите устройство, нажав кнопку Вкл/
Режим ожидания (1), кнопка Мощность (6) мигнет один раз.
Примечание: Если во время работы не нажимается ни одна кнопка панели управления в течение 2 часов, плита автоматически переходит в
режим ожидания.
Установка уровня мощности
• Для активации нажмите во время работы кнопку Мощность (6). При этом загорится индикатор
(6).
• Используйте кнопки Увеличение настройки (3)
или уменьшения уровня мощности (Диапазон:
100 Вт ~ 2000 Вт). По умолчанию установлена
мощность 100 Вт. Более высокая мощность может понадобится для готовки на пару.
или Уменьшение настройки (5) для увеличения
Установка уровня температуры
• Для активации нажмите во время работы кнопку Температура (7). При этом загорится индикатор (7).
• Используйте кнопки Увеличение настройки (3)
или Уменьшение настройки (5) для увеличения
58
или уменьшения уровня температуры (Диапазон: 35°C ~ 240°C). По умолчанию установлена
температура 100°C. Более высокая температура может потребоваться для жарки, жарки на
гриле или сушки.
Page 59
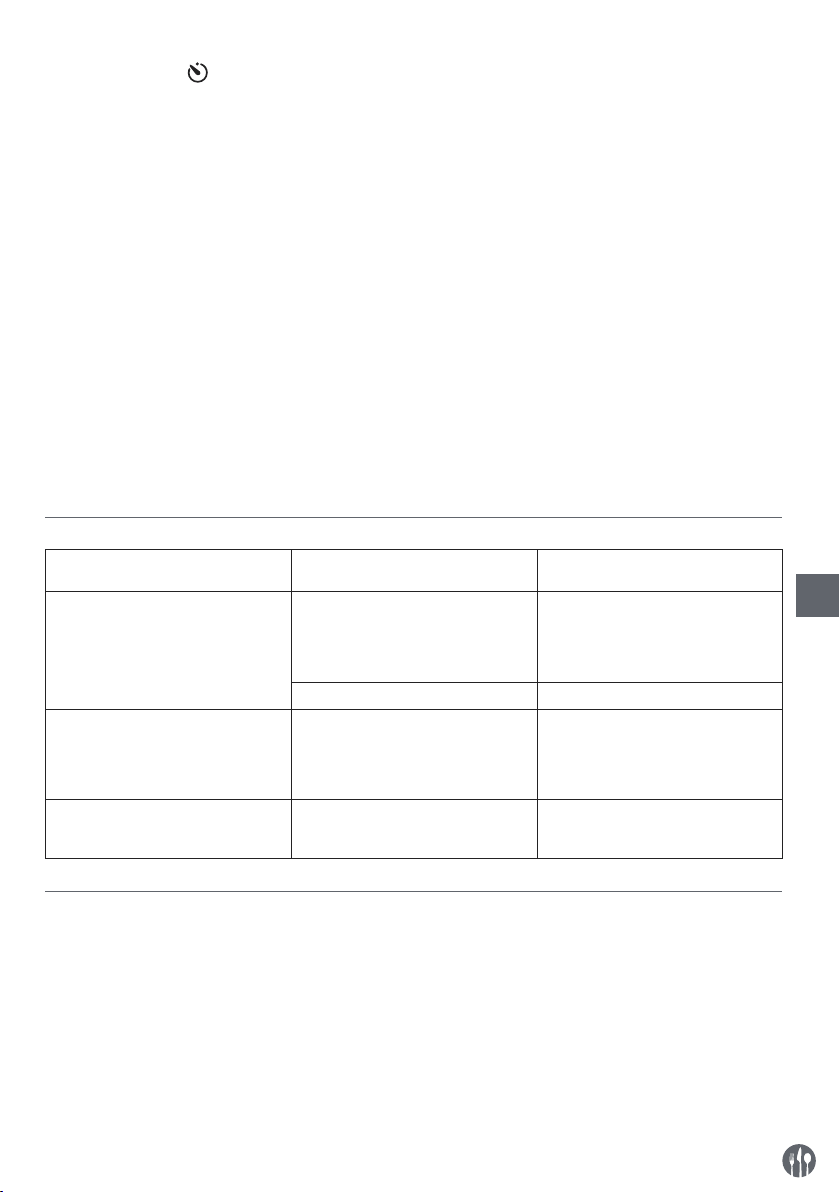
Настройка таймера
• После настройки мощности или температуры
готовки вы можете настроить таймер. Для активации нажмите кнопку Таймер (2). При этом
загорится индикатор (2).
• Используйте кнопки Увеличение настройки (3)
или Уменьшение настройки (5) для увеличения
или уменьшения времени готовки (Диапазон:
0 мин. ~ 180 мин.). По умолчанию установлено
время 0 мин.
чески сохраняется в течение 5 секунд. После
этого плита начинает работать. На дисплее (4)
будут поочередно отображаться оставшееся
время и настройка мощности / температуры.
• После истечения установленного времени плита перейдет в режим ожидания.
• Если установленное время вручную уменьшить
до «0 мин.», плита немедленно перейдет в режим ожидания.
• После установки таймера настройка автомати-
Примечание:
1) Нажмите и удерживайте кнопку Увеличение
настройки (3) или Уменьшение настройки (5)
для быстрого изменения настройки.
2) После длительного периода работы охлаждающий вентилятор может в течение некоторого
времени работать и после перехода в режим
перестанет работать, прежде чем отключать
устройство из розетки.
3) После переключения в режим ожидания поверхность плиты остается горячей. Прежде
чем прикасаться к ней подождите, пока она
полностью остынет.
ожидания. Подождите, пока вентилятор не
Отображаемые коды ошибок
Коды ошибок, отображаемые на
дисплее (4)
E 1 Слишком высокая температура
E 2 Сковорода или кастрюля
E 3 Неправильное напряжение питания
Возможная причина Возможное решение
устройства.
Неисправный вентилятор. Обратитесь к поставщику.
нагревается до слишком высокой
температуры. Вероятно, посуда
пустая, поэтому сработала защита и
плита выключается.
(напряжение питания слишком
высокое или слишком низкое)
Удалите все препятствия вокруг
устройства. Отключите устройство
от источника питания, снимите
кастрюлю или сковороду, подождите,
пока устройство полностью остынет.
Отключите устройство от источника
питания, снимите кастрюлю
или сковороду, подождите, пока
устройство полностью остынет.
Убедитесь, что в посуде есть вода.
Убедитесь, что устройство
подключено к соответствующему
источнику питания.
RU
59
Page 60
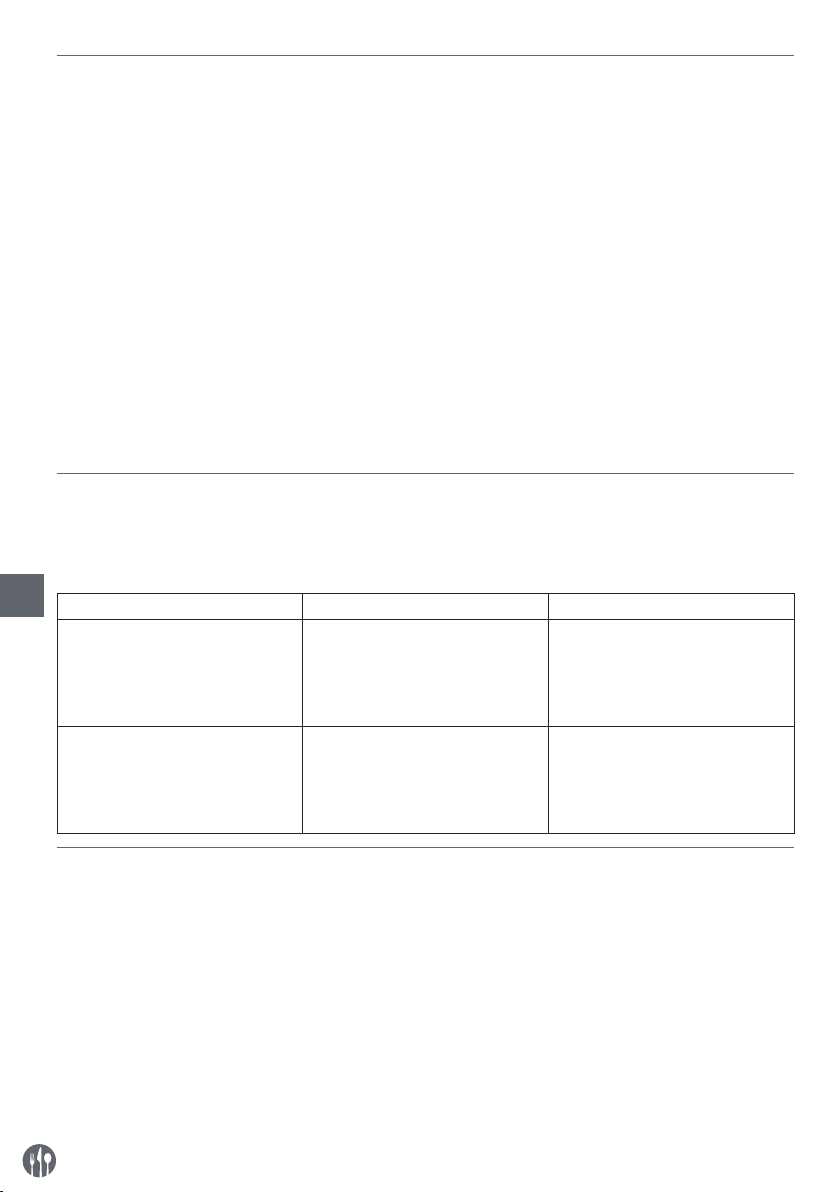
Очистка и техническое обслуживание
Замечание: Перед очисткой и размещением устройства на хранение, всегда отключайте устройство от
электросети и подождите, пока плита остынет.
Очистка
• Никогда не погружайте устройство в воду или
другую жидкость.
• После охлаждения наружной поверхности очищайте её влажной тканью или губкой с небольшим количеством раствора мягкого моющего
• Для очистки внутренней поверхности и наружных частей устройства, никогда не используйте абразивные губки или абразивные моющие
средства, а также губки с металлической мочалкой или металлический инструмент.
средства.
Хранение
• Перед помещением на хранение, убедитесь,
что устройство отключено от сети и полностью
остыло.
• Никогда не ставьте тяжелые предметы на нагревательную поверхность устройства, так как
это может привести к трещине.
• Храните устройство в холодном, чистом и сухом
месте.
Диагностика
Если устройство не работает должным образом,
обратитесь к приведенной ниже таблице, чтобы
найти правильное решение. Если вы все еще не
RU
Проблема Возможная причина Возможное решение
- Вилка неправильно подключена к
Устройство не включается.
Вентилятор продолжает работать
после того, как устройство перешло
в режим ожидания.
сетевой розетке.
- Не нажата кнопка включения /
ожидания (1).
- Это нормальное явление.
Вентилятор работает ещё
некоторое время после
выключения устройства, чтобы
охладить все внутренние
компоненты.
можете решить проблему, обратитесь к поставщику. Коды ошибок отображаются на цифровом
дисплее (3). (Смотри - - > Коды ошибок)
- Убедитесь, что вилка правильно
подключена к электрической
розетке.
- Нажмите на кнопку включения /
ожидания (1), чтобы начать работу
устройства.
- Подождите, пока выключится
вентилятор.
Технические характеристики
Номер продукта: 239278
Рабочее напряжение и частота: 220-240V~ 50/60Hz
Потребляемая мощность: 2000W
Диапазон регулировки мощности : 100W ~ 2000W
Диапазон установки температуры: 35°C ~ 240°C
Диапазон установки времени таймера: 0 min ~ 180 min
Степень защиты: class I
Размеры: 293x373x(H)56 mm
Внимание: Технические характеристики могут быть изменены без предварительного уведомления.
60
Page 61

Гарантия
Любая недоделка или поломка, которая влечет
за собой неправильную работу устройства, которая будет выявлена в течение первого года от
даты покупки, будет устранена бесплатно, или же
дательстве. В случае заявления устройства в ремонт или на замену в рамках гарантии, следует
указать место и дату покупки устройства и прило-
жить счет, или чековую квитанцию.
все устройство будет заменено новым, если оно
эксплуатировалось и обслуживалось согласно
инструкции по обслуживанию и не использовалось неправильно, или в разрез с назначением.
Данное положение ни коей мере не нарушает
иных прав потребителя, изложенных в законо-
Согласно нашей политике совершенствования
наших продуктов оставляем за собой право на
ввод изменений в конструкцию, упаковку и в тех-
нические параметры, указываемые в техниче-
ской документации без предупреждения.
Списание с эксплуатации. Защита окружающей среды
Оборудование, изношенное и списанное с эксплуатации следует утилизировать согласно правилам и указаниям, действующим на день снятия
Материалы упаковки, такие как пластик, картон-
ные коробки, древесина, следует складировать
раздельно в соответствующие контейнеры.
с эксплуатации.
RU
61
Page 62

62
Page 63

63
Page 64

Hendi B.V.
Steenoven 21
3911 TX Rhenen, The Netherlands
Tel: +31 (0)317 681 040
Email: [email protected]
Hendi Food Service Equipment Romania Srl
Str. 13 decembrie 94A, Hala 14
Brașov, 500164, Romania
Tel: +40 268 320330
Email: offi[email protected]
Hendi Polska Sp. z o.o.
ul. Magazynowa 5
62-023 Gądki, Poland
Tel: +48 61 6587000
Email: [email protected]
Hendi Food Service Equipment GmbH
Gewerbegebiet Ehring 15
5112 Lamprechtshausen, Austria
Tel: +43 (0) 6274 200 10 0
Email: offi[email protected]
Find Hendi on internet:
www.hendi.eu
www.facebook.com/HendiFoodServiceEquipment
www.linkedin.com/company/hendi-food-service-equipment-b.v.
www.youtube.com/HendiEquipment
Hendi UK Ltd.
Central Barn, Hornby Road
Lancaster, LA2 9JX, United Kingdom
Tel: +44 (0)333 0143200
Email: [email protected]
Hendi HK Ltd.
1208, 12/F Exchange Tower
33 Wang Chiu Road, Kowloon Bay, Hong Kong
Tel: +852 2154 2618
Email: [email protected]
- Changes, printing and typesetting errors reserved.
- Änderungen und Druckfehler vorbehalten.
- Wijzigingen en drukfouten voorbehouden.
- Producent zastrzega sobie prawo do zmian oraz
błędów drukarskich w instrukcji.
- Variations et fautes d’impression réservés.
- Errori di cambiamenti, di stampa e di impaginazione riservati.
- Drepturi rezervate cu privire la modificări şi greşeli de imprimare.
- Изменения, печати и верстки ошибки защищены.
© 2017 Hendi BV Rhenen - The Netherlands Ver: 21-08-2017
 Loading...