

Page 1
Henan Suwei Electronics Technology Co., Ltd.
- 1 -
CreatBot 3D Printer
User manual
English V7.2
Page 2
Notice
CONTENTS
Icon conventions
Tip icon to remind users to have a good method or technique.
Note icon, to remind the user must be given adequate attention.
Prohibition icons, prevents users from unauthorized operation.
- 2 -
Notice ················································ 3
Machine Diagram
Front············································ 4
Printer Head ····························· 5
Hardware Installation
Unpacking································· 6
Printer Operation
Leveling Platform ··················· 7
Paving Crepe Paper ··············· 7
Load Filament·························· 8
Unload Filament····················· 9
Main menu ······························· 10
Status page······························11
Detail page······························· 12
Printing page··························· 13
Axis operation ························· 14
Filament menu ························ 15
SD Card/U-disk······················· 16
Setting menu ··························· 17
Info. menu ································· 18
Software Operation
CreatWare Setup ·················· 19
Quick Print UI ······················· 20
Print Your First Model ········ 20
Full Setting UI ······················· 21
Mouse Operation ················ 22
Model Rotate/Scale············ 22
Model Mirror·························· 23
View Mode ······························ 24
Right Click on Model ··········· 25
Toolpath Structure················ 25
Basic Setting ··························· 26
Advanced Setting················· 27
Expert Setting ························ 28
Skirt/Brim/Raft ······················ 29
Plugins ····································· 29
Start/End GCode ·················· 30
Dual Head Printing ·············· 30
Frequently Asked Questions
Change Fuse ·························· 33
Routine Maintenance········ 31
Print PLA and ABS ··············· 31
Hardware Troubleshoot ····· 32
Printing Troubleshoot ········ 33
Specifications ······························ 34
7/22/2017
Page 3
Notice
Read First
Thank you for choosing CreatBot 3D printer!
This manual contains important information about the installation, use,
maintenance and common problems of CreatBot 3D printer. Please read this
manual carefully before using 3D printer. All losses caused by the breach of the
notes and the operation process of the operation process will be borne by the user.
Please use the filament provide by CreatBot, or high quality filament of third
manufacturers. Due to the use of third party inferior material caused by the failure
of the printer, the loss will be borne by the user.
Software running environment, 2G or above processors, at least 1G memory,
compatible with Windows, MAC, or Linux, please use memory as much as possible.
I wish you have fun with CreatBot!
Danger Warning
The nozzle's temperature will reach 300 degrees, don't touch.
The platform's temperature will reach 120 degrees, don't touch.
Please make sure that the printer connected to the ground.
Do not attempt to open the case, be careful of electric shock.
Working Environment
The 3D printer can work in the indoor environment of 5 ℃ to 30 ℃.
Long-term not use of the printer, be sure to dust, moisture.
Long-term not use of the filament, please be sealed to prevent deterioration.
- 3 -
Page 4
Machine Diagram Machine Diagram
- 4 -
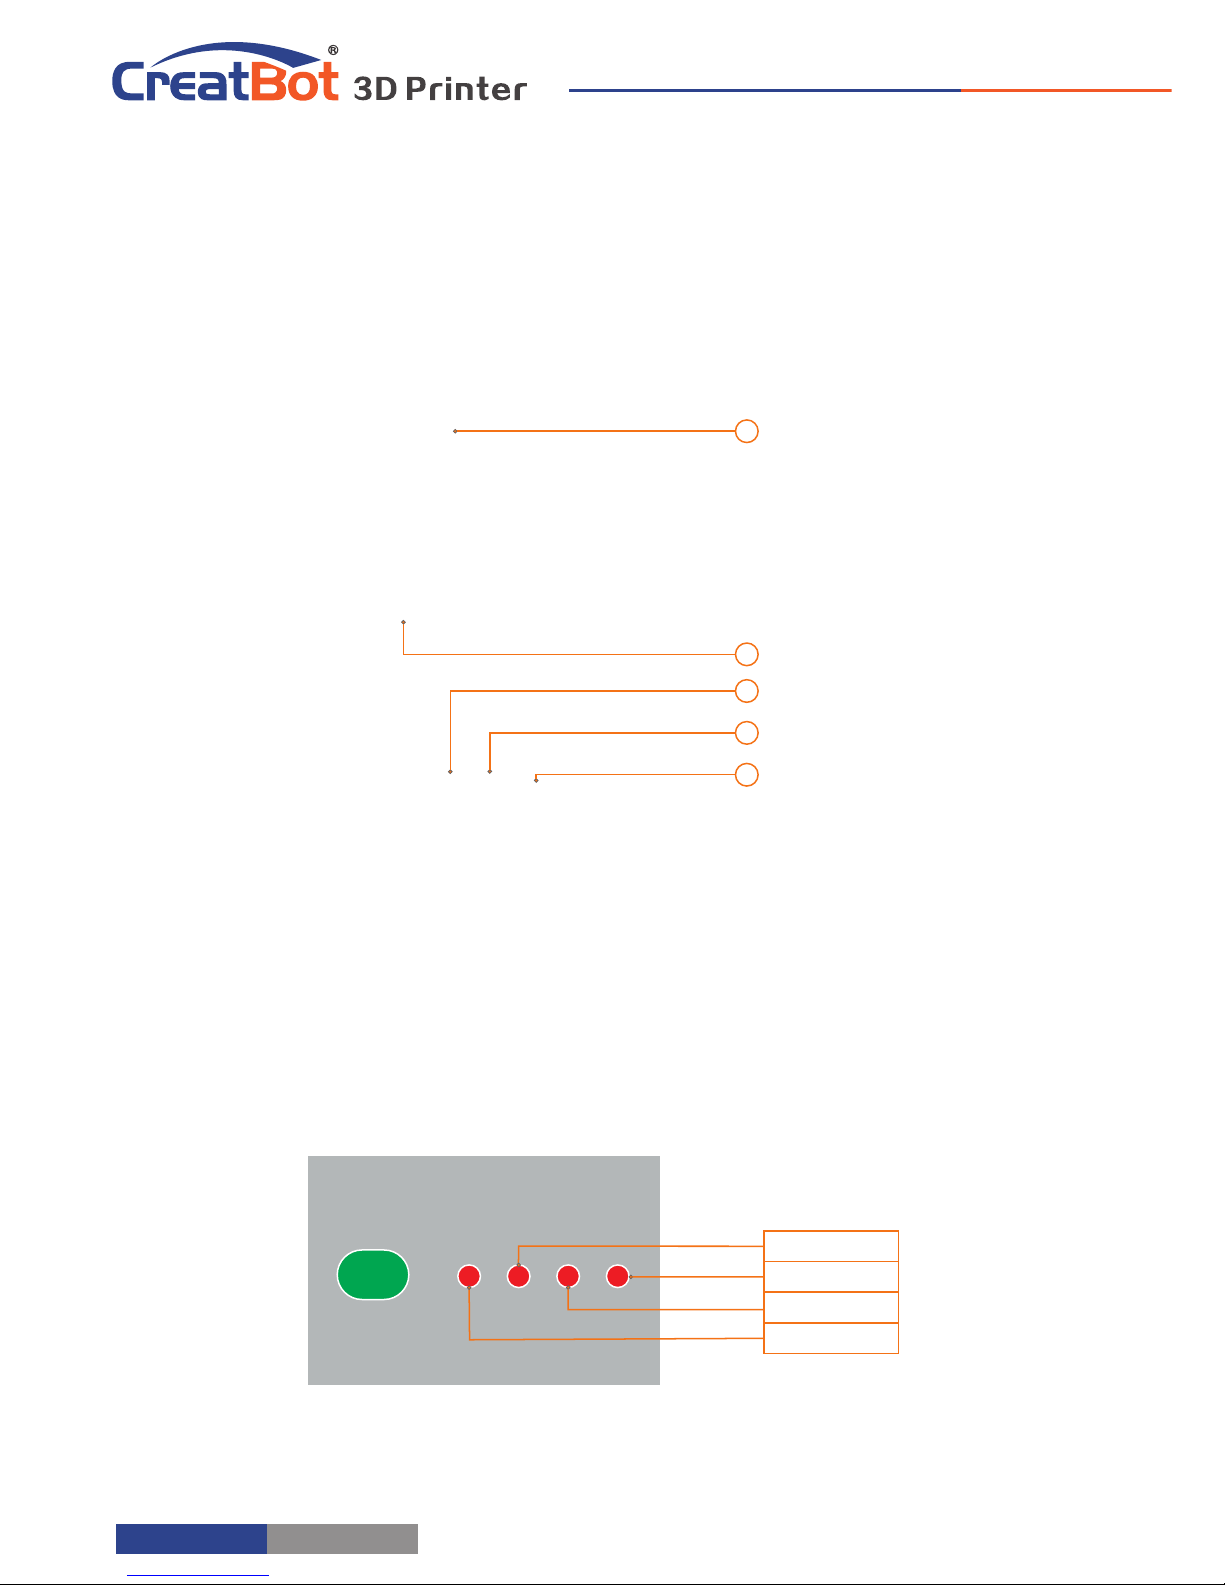
1.Power switch
2.Indicator light
3.U disk
4.Build platform
5.Touch Scanner
2
3
4
5
1
Nozzle 2
Nozzle 1
U disk
Hotbed
Front
Indicator light
Page 5
- 5 -
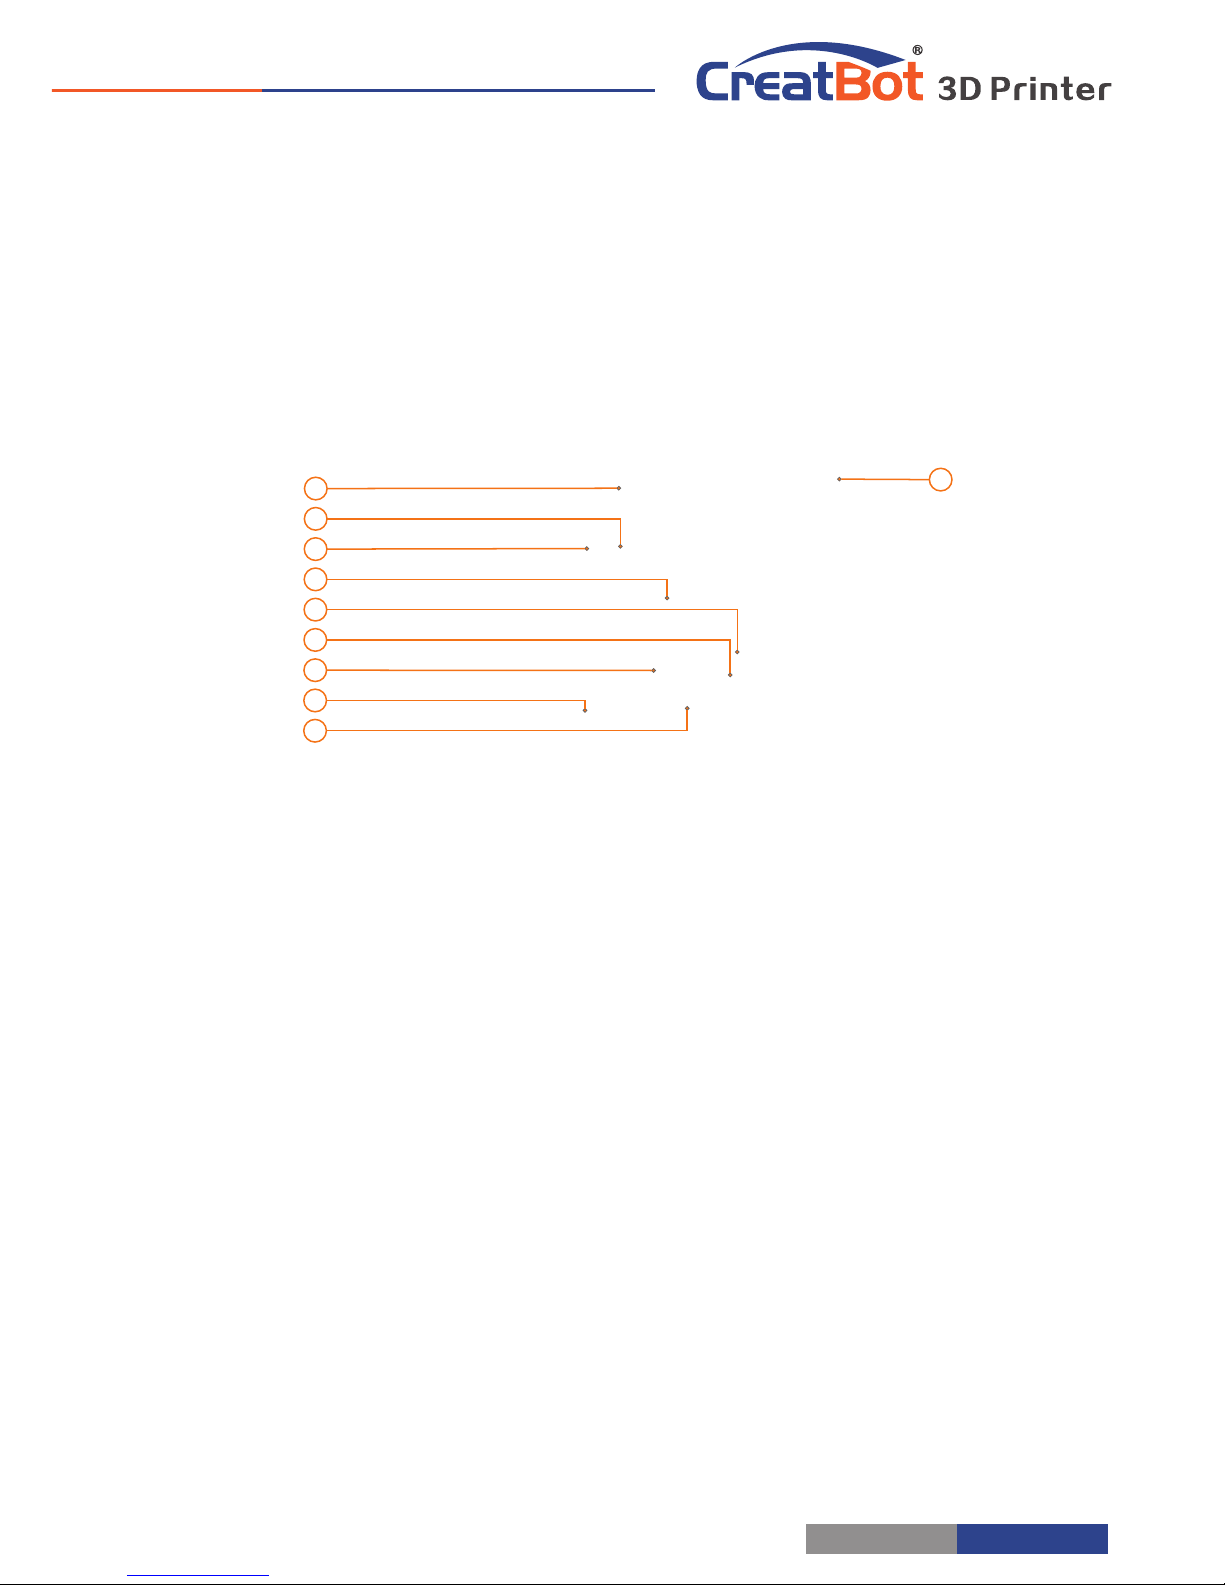
1.Nozzle
2.steering engine
3.Heating block
4.Thermostat tube
5.Heating tube
6.Extruder block
7.Pressure nut
8.Pressure spring
9.Cooling fan
8
1
3
4
5
6
7
10
2
9
Printer Head
Page 6
Printer Operation
Hardware Installation
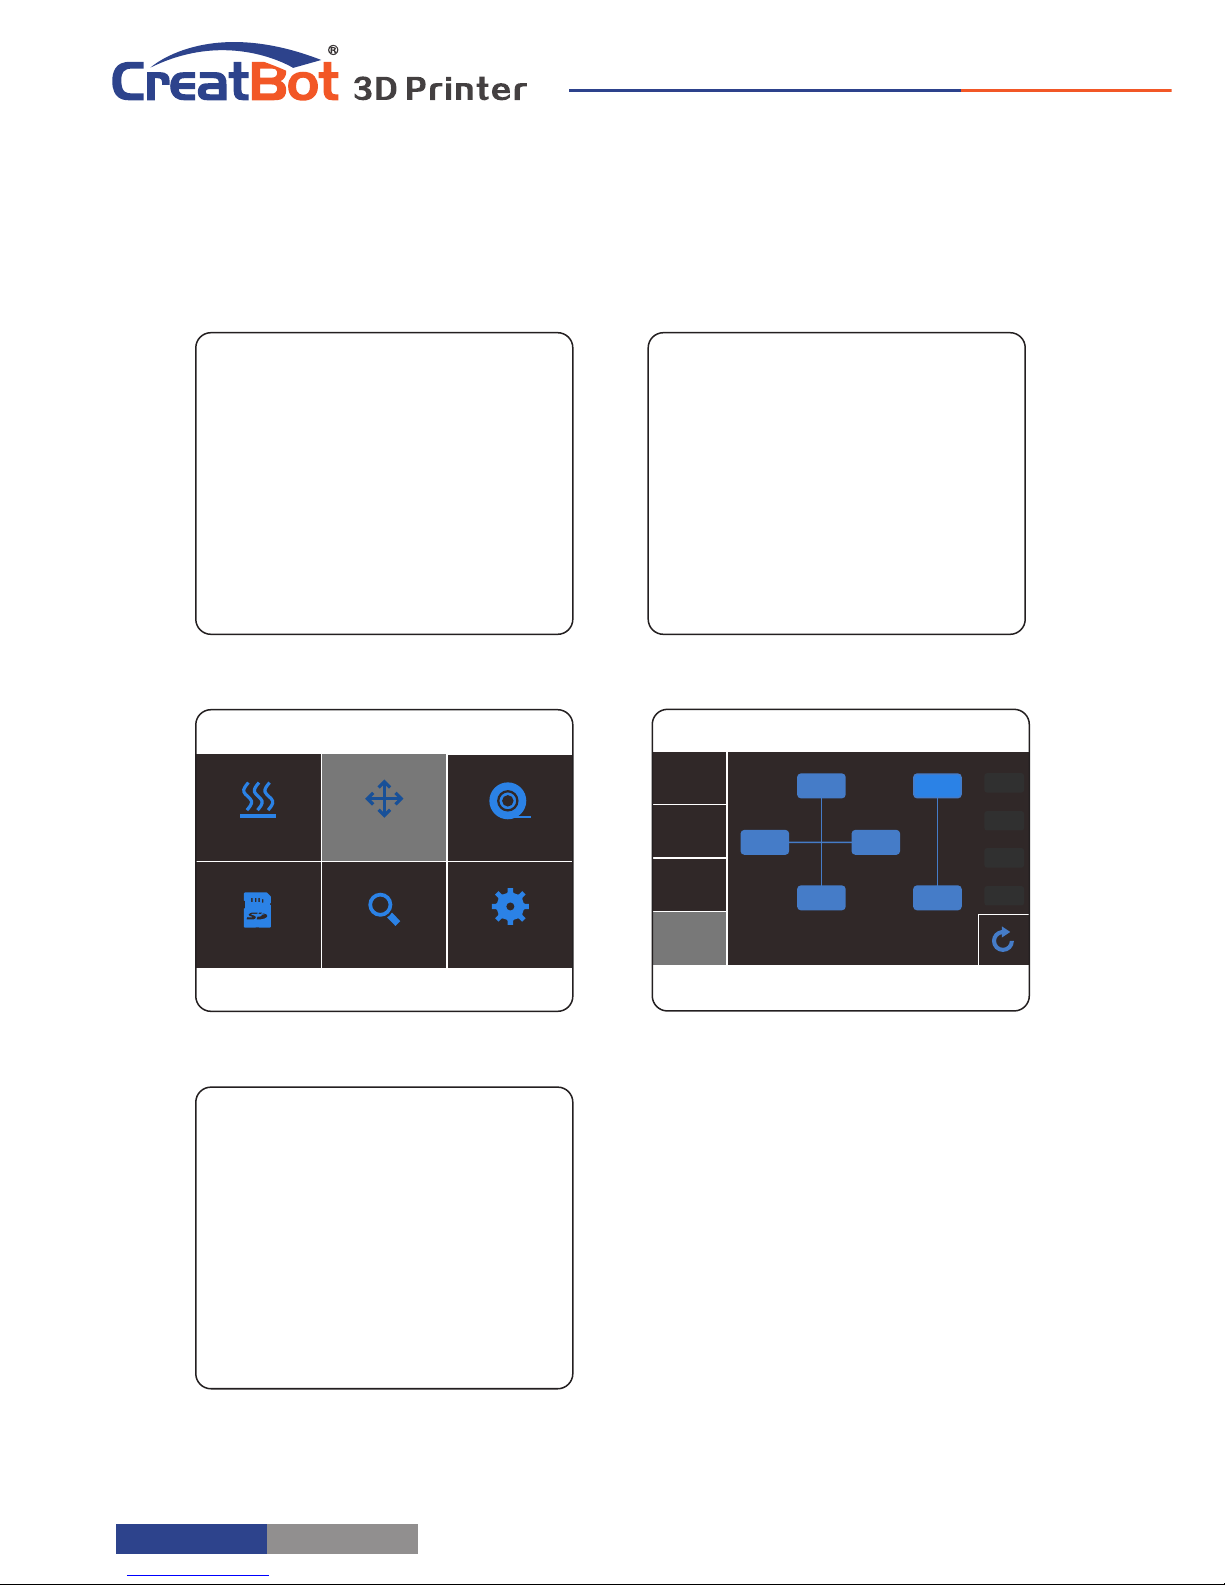
1. Ensure the packing is not broken.
2. Need two people at the same
time.
3. Lift it out by grasping the frame,
not the belt or rails.
4. Turn on the printer, enter "Move
axis" menu, select "All home",
the bracket will rise, now you
can takeout filament.
Unpacking
Move axis
Setting s
Filamen t
Status
Preheat
SD Card
Unpacking
Up platform
Turn on printer
Turn on printer
Takeout filament
+ X
- X
- Z
- Y
+ Y
+ Z
X: Y: Z:
0.1m m
1mm
10m m
100m m
X Home
Y Home
Z Home
All Home
- 6 -
Page 7
Leveling Platform
Printer Operation
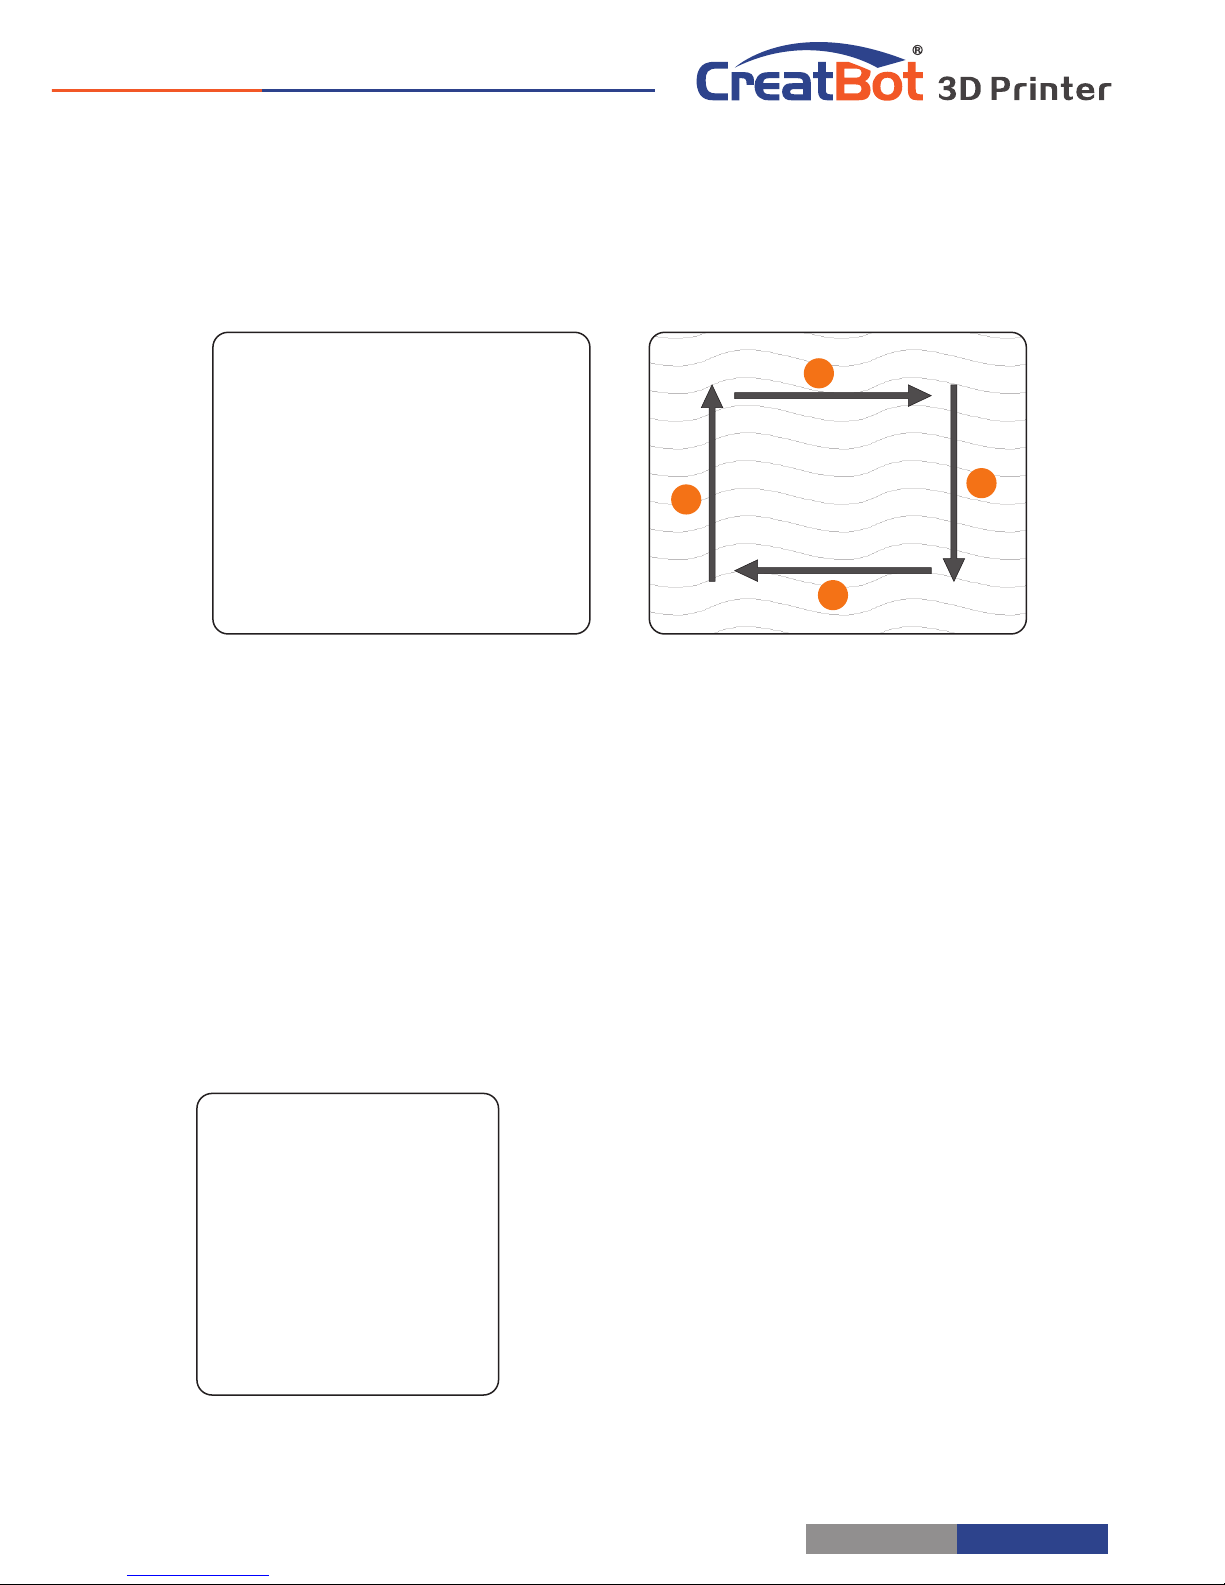
1. Enter setting menu->leveling bed, waiting for the platform back to home.
2. Adjust first leveling nut, make nozzle close to the platform.
3. Press Up/Down button or rotating knob, adjust other three leveling nut.
4. To adjust repeatedly, eventually distance (0.2mm) to insert a name card is
advisable.
5. All the leveling nut should uniform, nozzle can't too close to the platform.
6. All will be subject to the actual effect of print, please make more little adjust at
the beginning of printing.
(The new Printer Head also use this method to adjust machine)
Platform need paste masking paper or
Kapton to achieve best viscosity, and the
model will be firmly fixed on the platform.
Kapton is double-sided tape, please tear
film on both sides.
Paving Masking Paper
1
2
3
4
- 7 -
Page 8
Printer Operation
Move axi s
Settings
Filament
Sta tusUSB
Pre hea t
0
225
300
150
75
Unl oad
Ext rude
Ret ract
Head 1
0
225
300
150
75
Unl oad
Ext rude
Ret ract
Head 1
Printer Operation
Load Filament
Preheat head
Straightened filament
Tighten the nut
Load filament
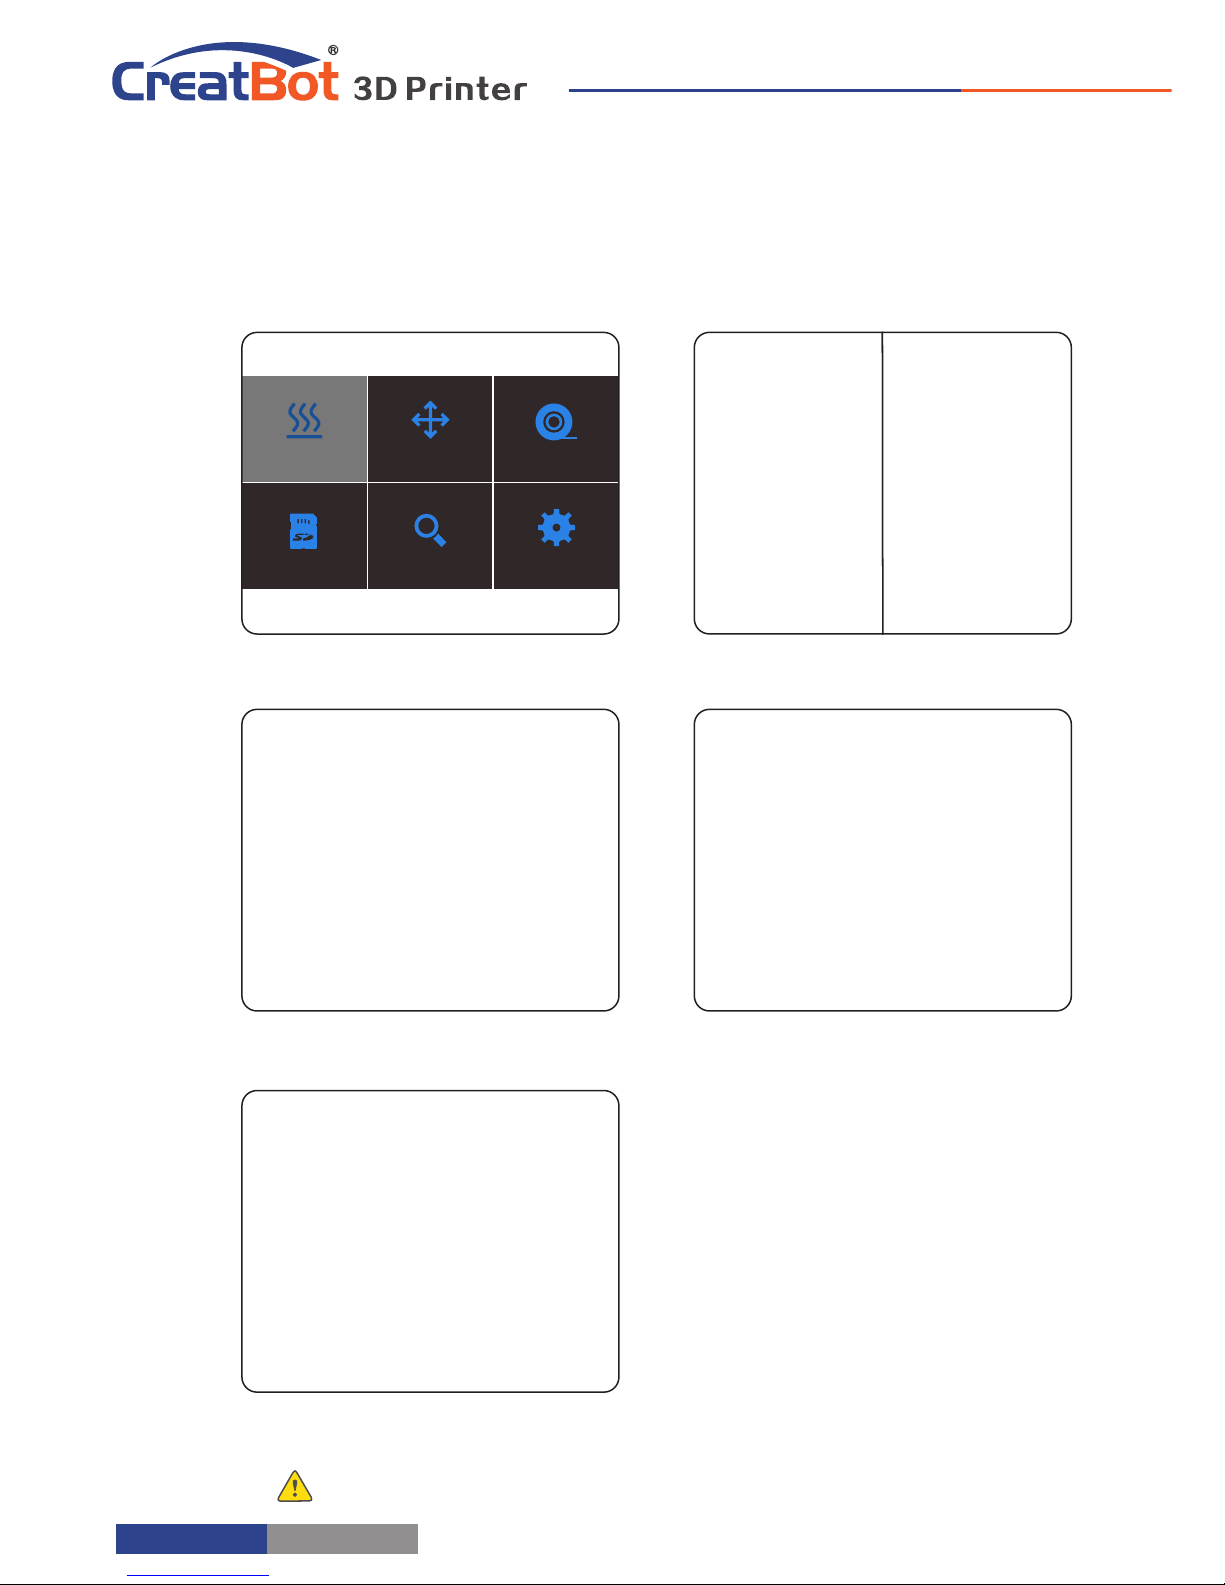
1. Preheat the head you want load
filament.
2. Straightened filament and check
the filament is not self-winding.
3. Insert the filament to the inlet
and push it to the nozzle, until melted
and flowing naturally.
4. Tighten the compression nut,
tightness is "back a circle after firmly" is
appropriate.
Notice: Pressed filament too tight or too loose will affect normal wire feeding.
Move axis
Setting s
Filamen t
Status
Preheat
SD Card
- 8 -
Load filament
Page 9
Unload Filament
Printer Operation
Move axi s
Settings
Filament
Sta tusUSB
Pre hea t
0
225
300
150
75
Unl oad
Ext rude
Ret ract
Head 1
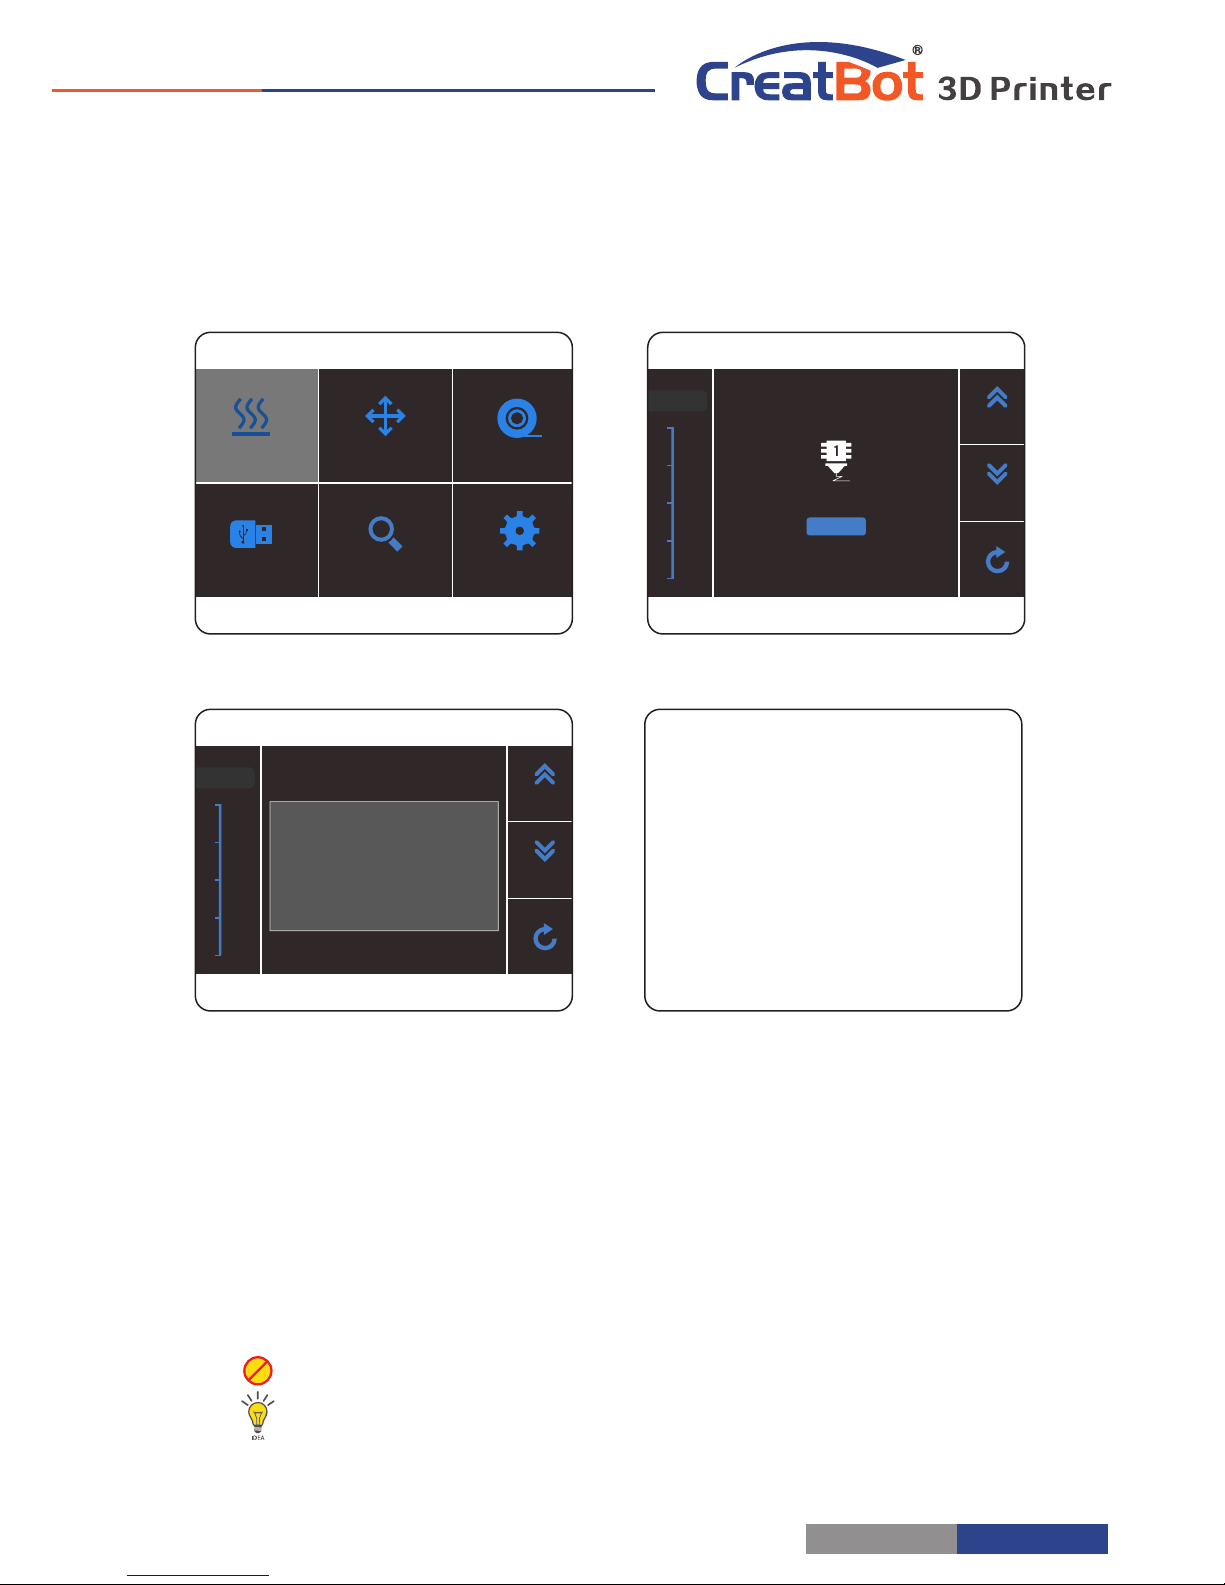
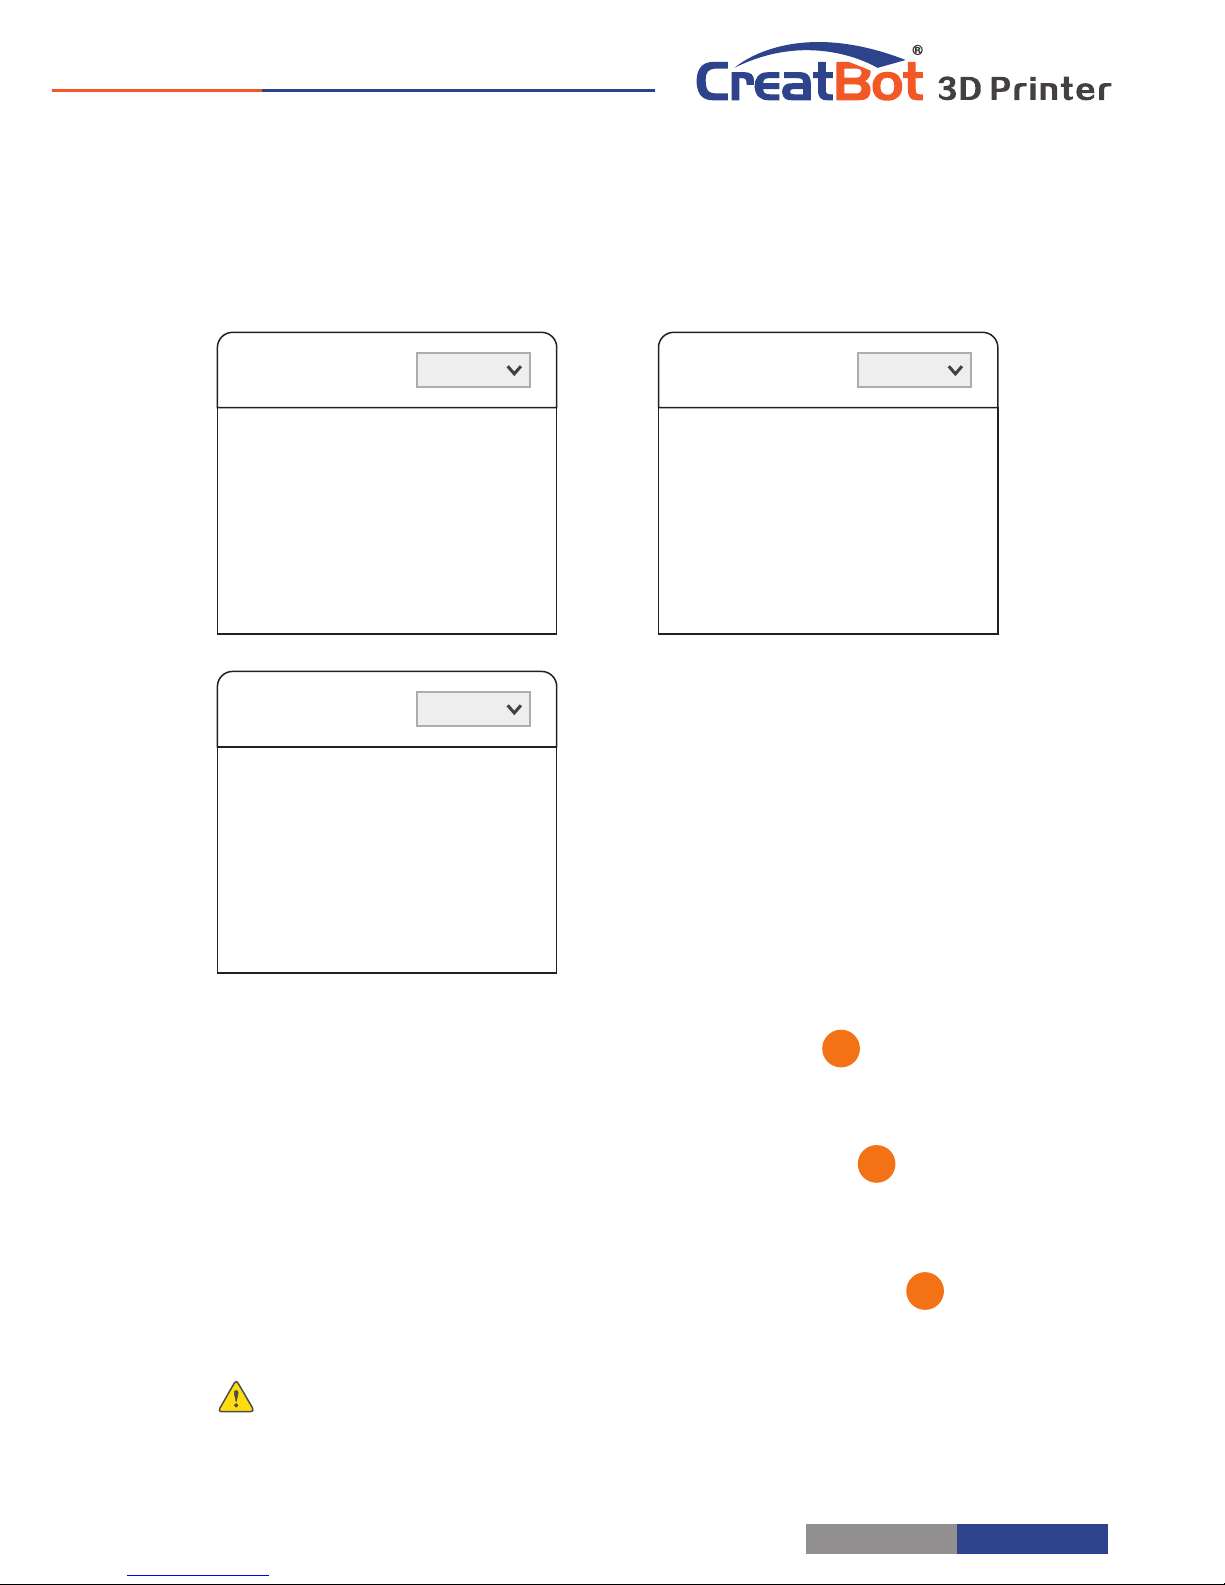
1. Enter "Filament" menu ->"Unload filament", and select the head you want
unload.
2. Wait for the nozzle heated to a suitable temperature.
3. After reching temperature, feeder will send a certain number of filament,
and then automatically withdraw filament.
4. To manually unload filament, same as above mentioned.
Unload filament menu
Preheat head
Pull out filament
Unloading filament
Warning: It is strictly prohibited without heating nozzle.
Tip: If filament stuck in the guide tube, continue printing several lengths and retry.
- 9 -
0
225
300
150
75
Unl oad
Ext rude
Ret ract
Head 1
Unloading filament...
Page 10
Printer Operation
- 10 -
Touchscreen
Printer Operation
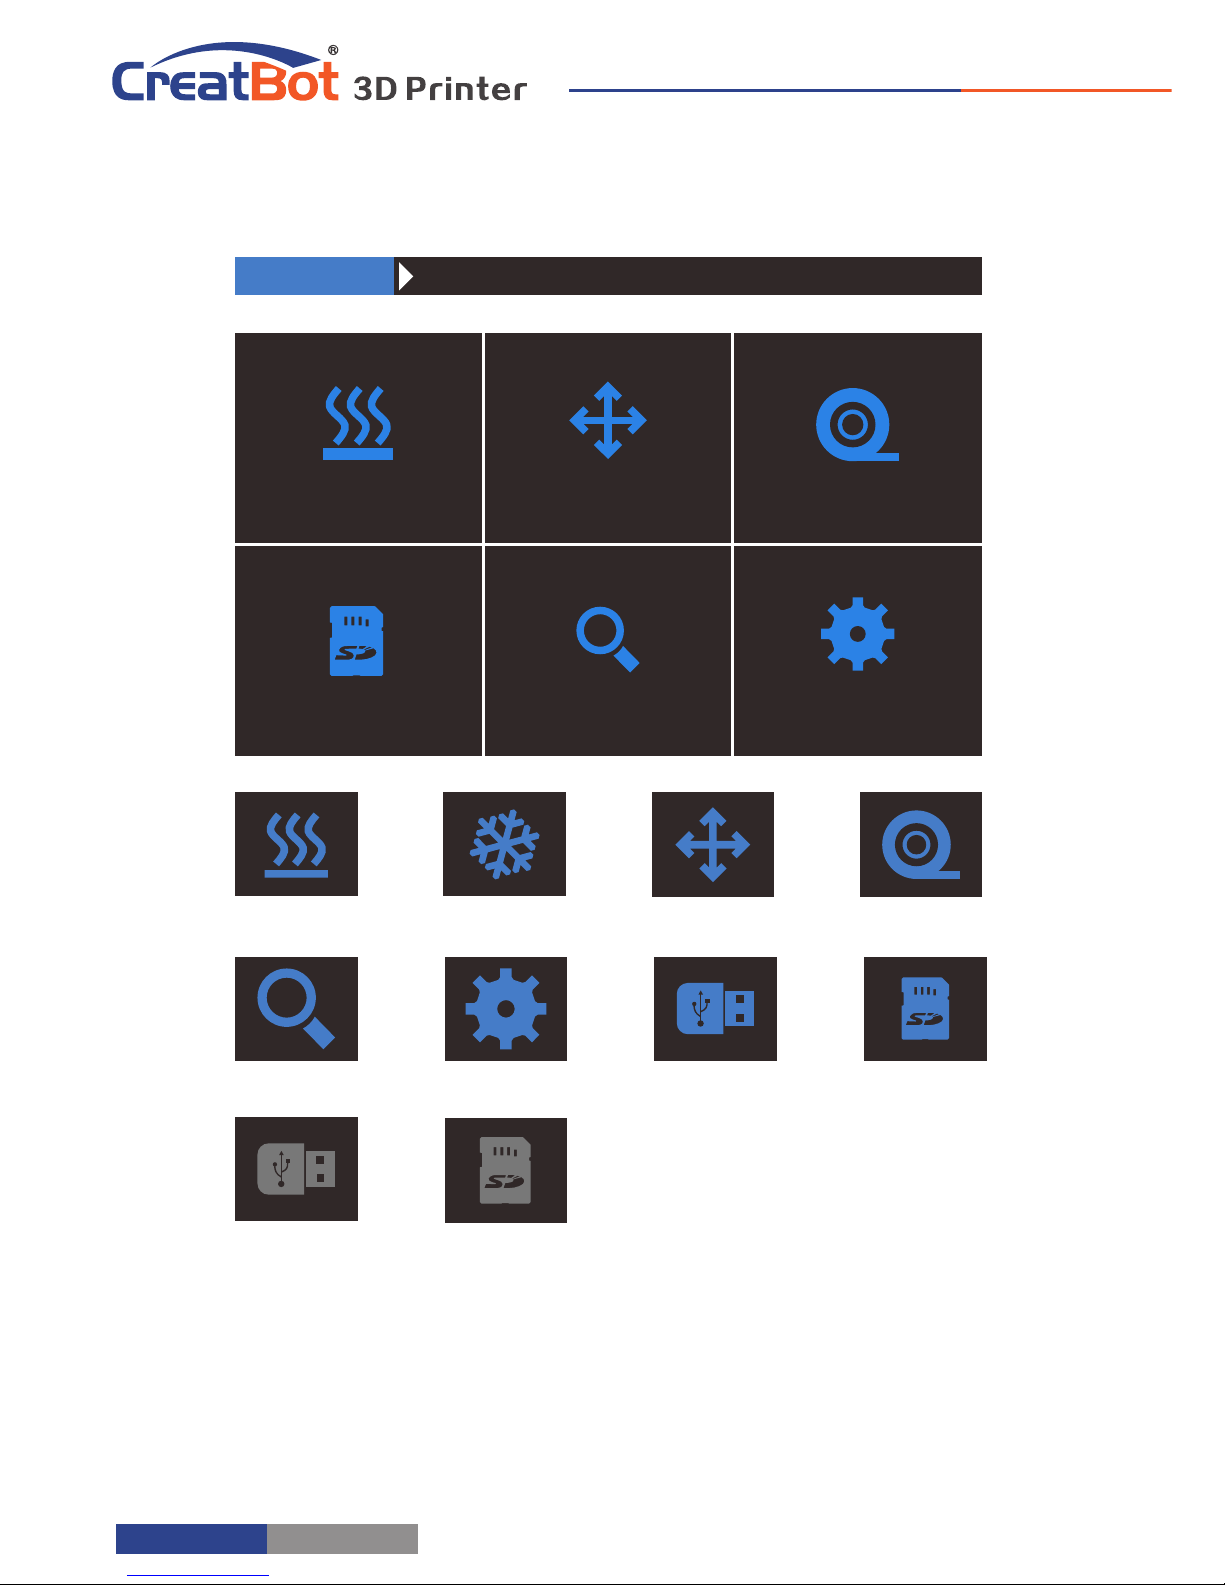
Main Menu
Moveaxis
Settings
Filament
Status
Preheat
SD Card
Preheat PLA Cool down Move axis Filament menu
Check Status Setting Open U-disk Open SD card
USB unavailable SD card
unavailable
Page 11
Use information
Back
210℃
200.0℃
Printing speed
Fan speed
Flow
100%
100%
100%
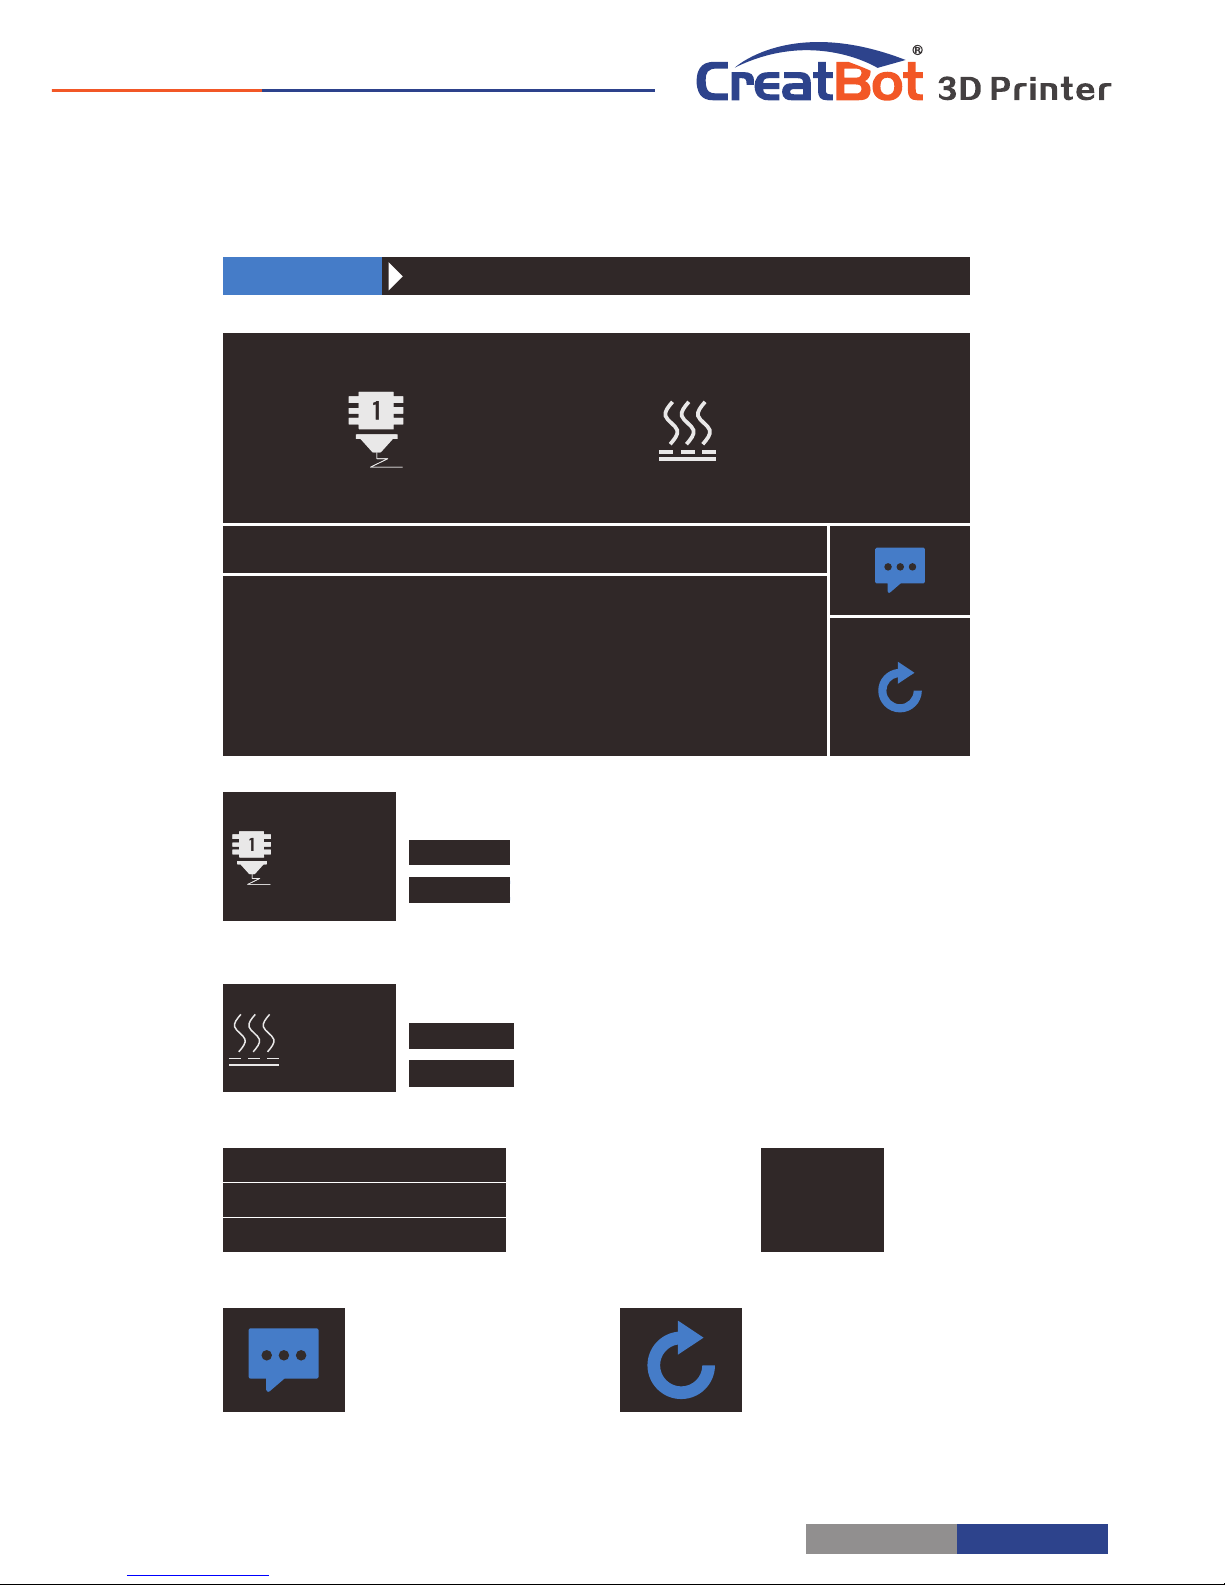
Status Page
X,Y,Z current
position of
hotend.
45℃
40.0℃
Touch and set up the temp of the hotbed
Tar.hotbed.temp
Cur.hotbed.temp
45℃
40.0℃
Touch and set up the temp of the nozzle.
Current Temp.1
Target temp.1
210℃
200.0℃
X:
Y:
Z:
00.00
00.00
00.00
210℃
200℃
45℃
40℃
Print speed
Fan speed
Flow
:
:
:
100%
100%
100%
X: 0.00mm
Y: 0.00mm
Z: 0.00mm
Print speed:
Fan speed :
Flow :
210℃
200℃
45℃
40℃
Touch and set up the temp of the hotbed
Tar.hotbed.temp
Cur.hotbed.temp
45℃
40℃
Touch and set up the temp of the nozzle.
Current Temp.1
Target temp.1
210℃
200℃
- 11 -
Printer Operation
Page 12
Printer Operation
- 12 -
45℃
40℃
210℃
200℃
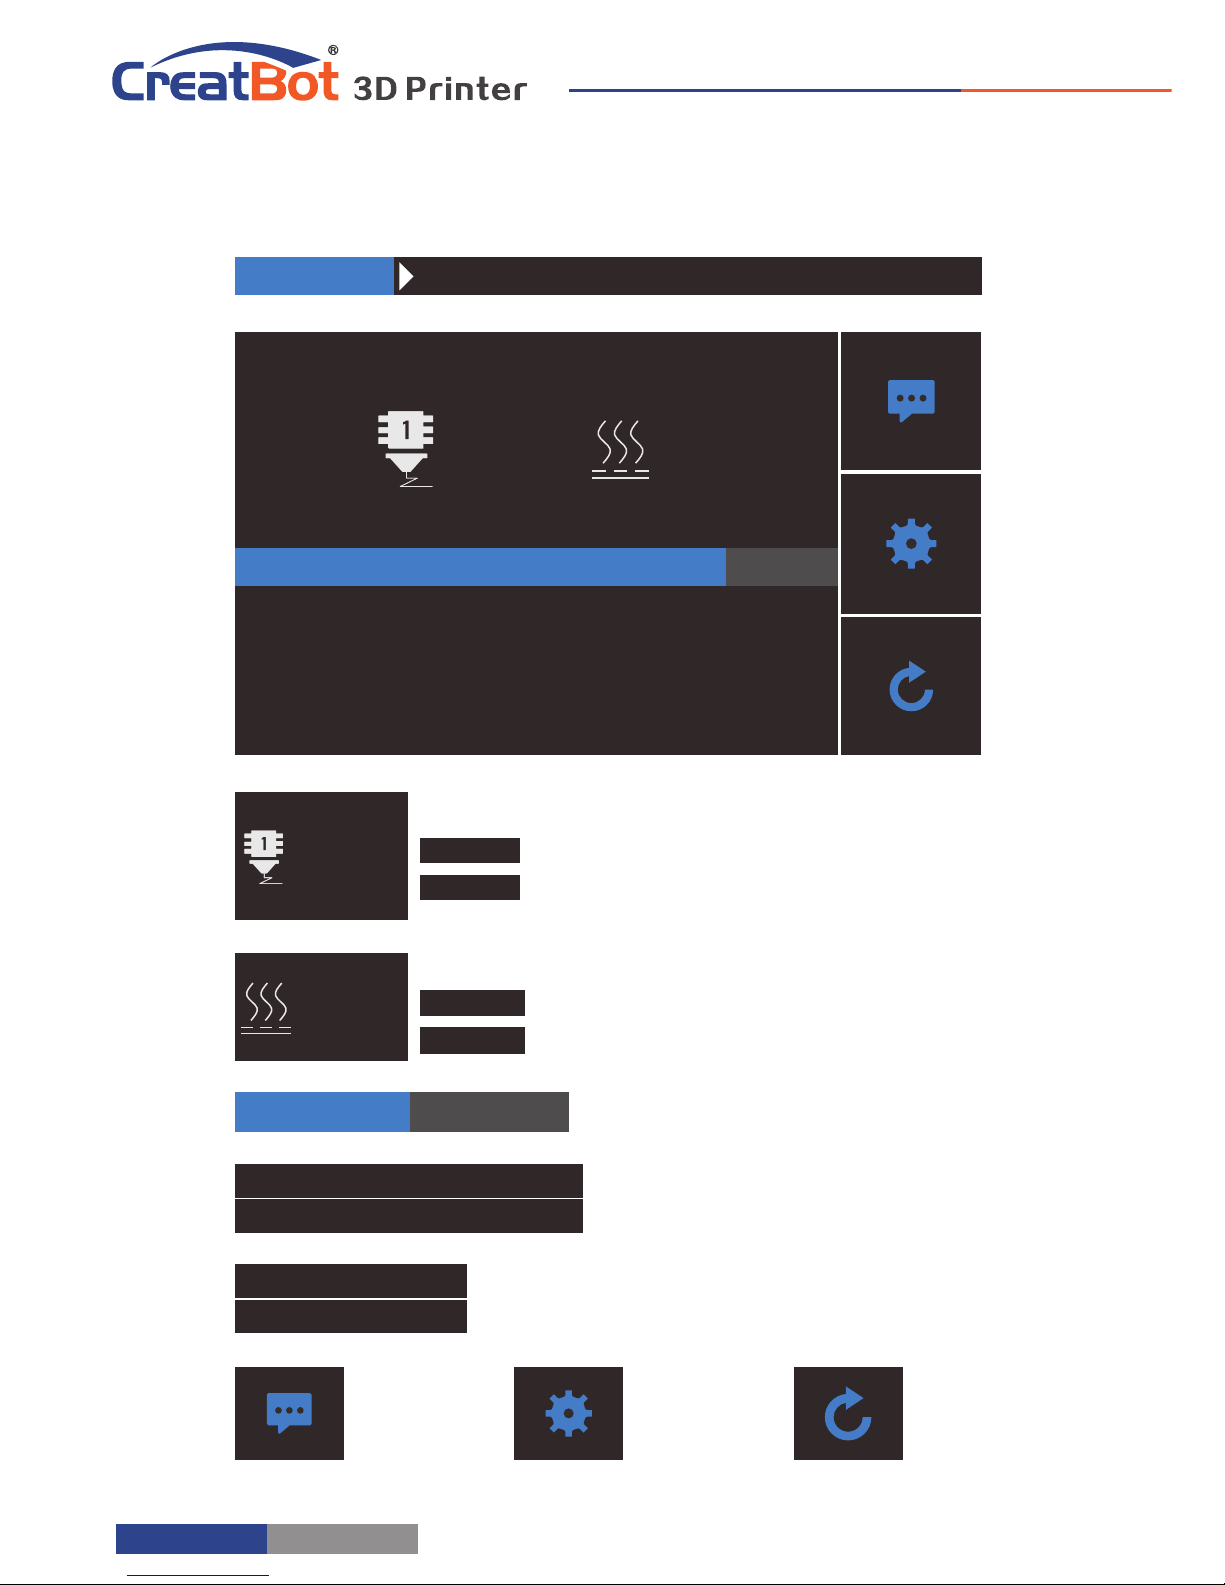
Current printing progress
50.00%
Use
information
Setting
Back
Detail page
400C
400C
400C
400C
Print speed:100%
Fan speed:100%
Flow:100%
Z: 0.00mm
Print speed:100%
Fan speed:100%
Flow:100%
Z: 0.00mm
Touch and set up the temp of the hotbed.
Tar.hotbed.temp
Cur.hotbed.temp
45℃
40℃
Touch and set up the temp of the nozzle.
Current Temp.1
Target temp.1
210℃
200℃
Printing speed
Fan speed
Flow
Current Z position
Printer Operation
Page 13
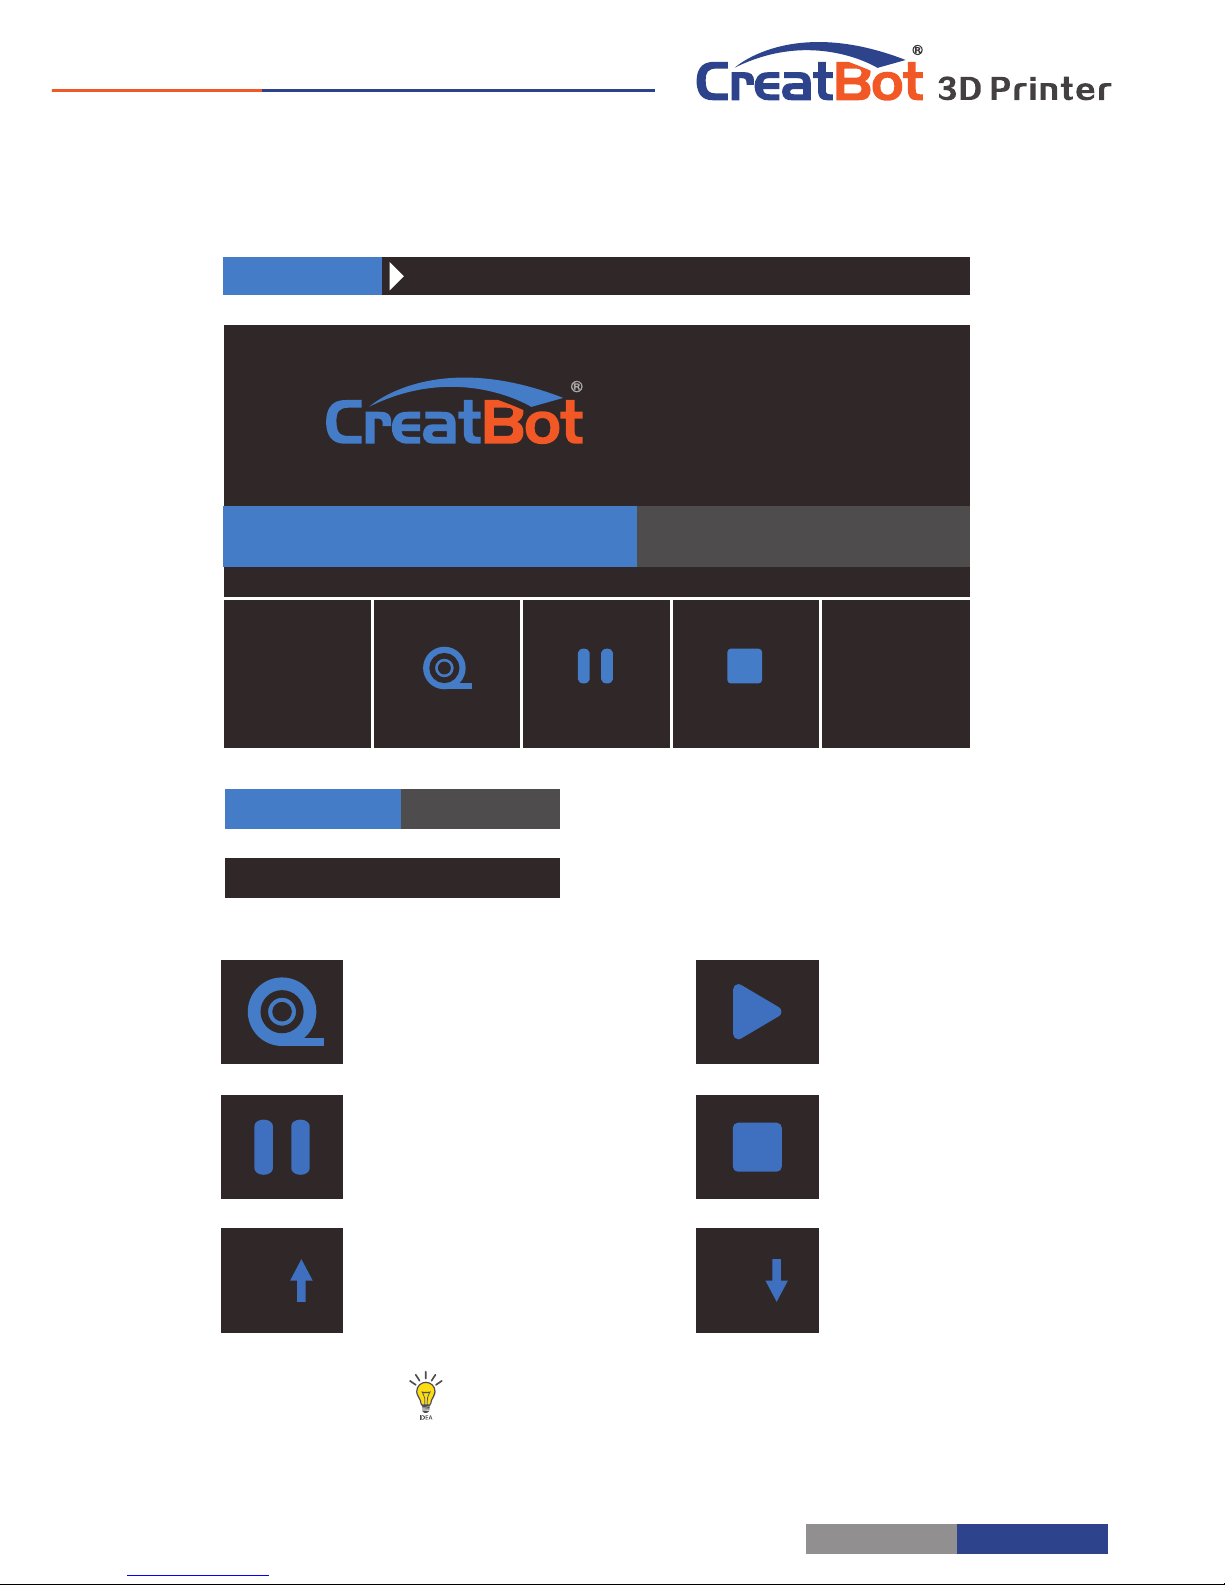
Pause and Change
filament.
Pause print
Z up
Current printing progress
Time printed
50.00%
01.30.00
Continue printing
Z
Cancel print
Z
Z down
Printing page
Stop
Pause
Change
50.00%
Heating:
01.30.00
Heating:
- 13 -
Printer Operation
The display will get darken when no operation in ten seconds and
can be waken by clicking anywhere on the screen.
When the display shows the default print page, click anywhere except
the buttons to turn back to the print details page.
Page 14
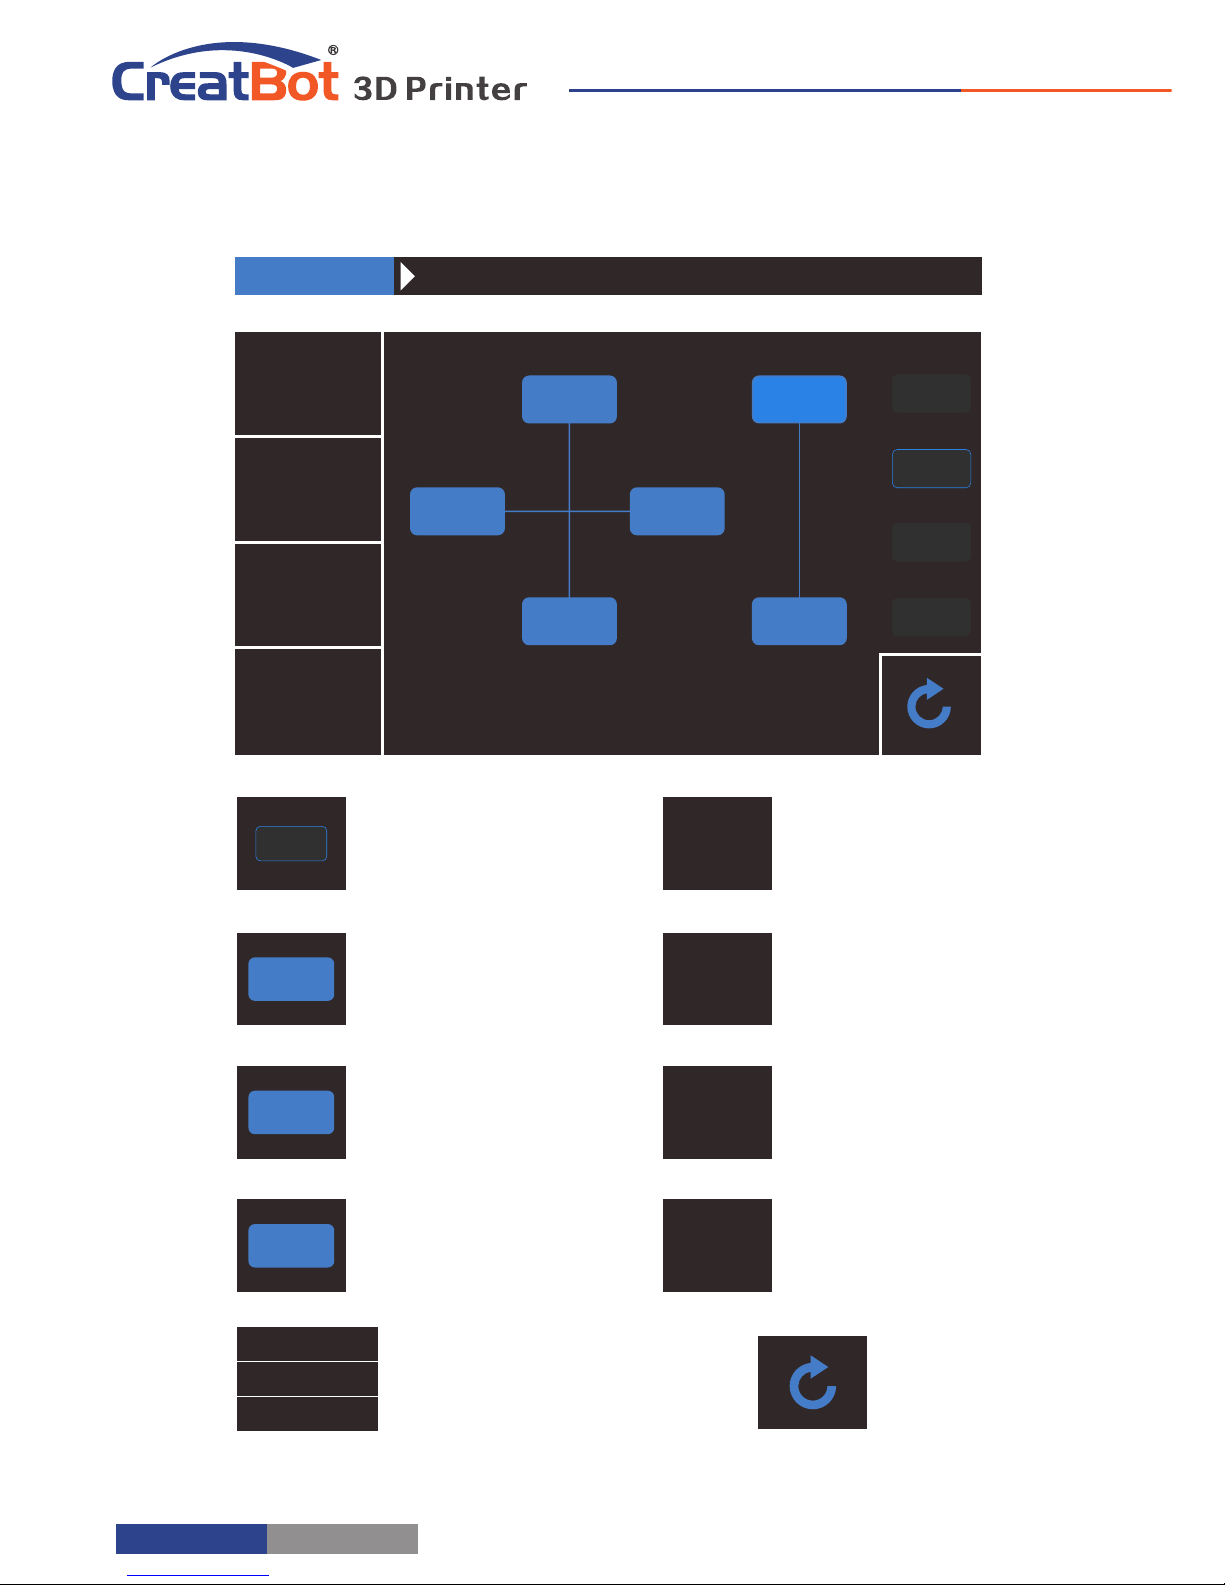
Printer Operation
- 14 -
+ X
- X
- Z
- Y
+ Y
+ Z
0.1mm
1mm
10mm
100mm
X Home
YHome
ZHome
All Home
X: 000 .00 Y:000.00 Z: 000 .00
Move X to home
Move Y to home
Move Z to home
All axis to home
1mm
X Home
Y Home
Z Home
All Home
±X/Y
- Z
+ Z
Back
Minimum units
Move X/Y axis
Z up
Z down
Axis operation
X:
Y:
Z :
00.00
00.00
00.00
X,Y,Z current
position of
hotend.
Printer Operation
Page 15
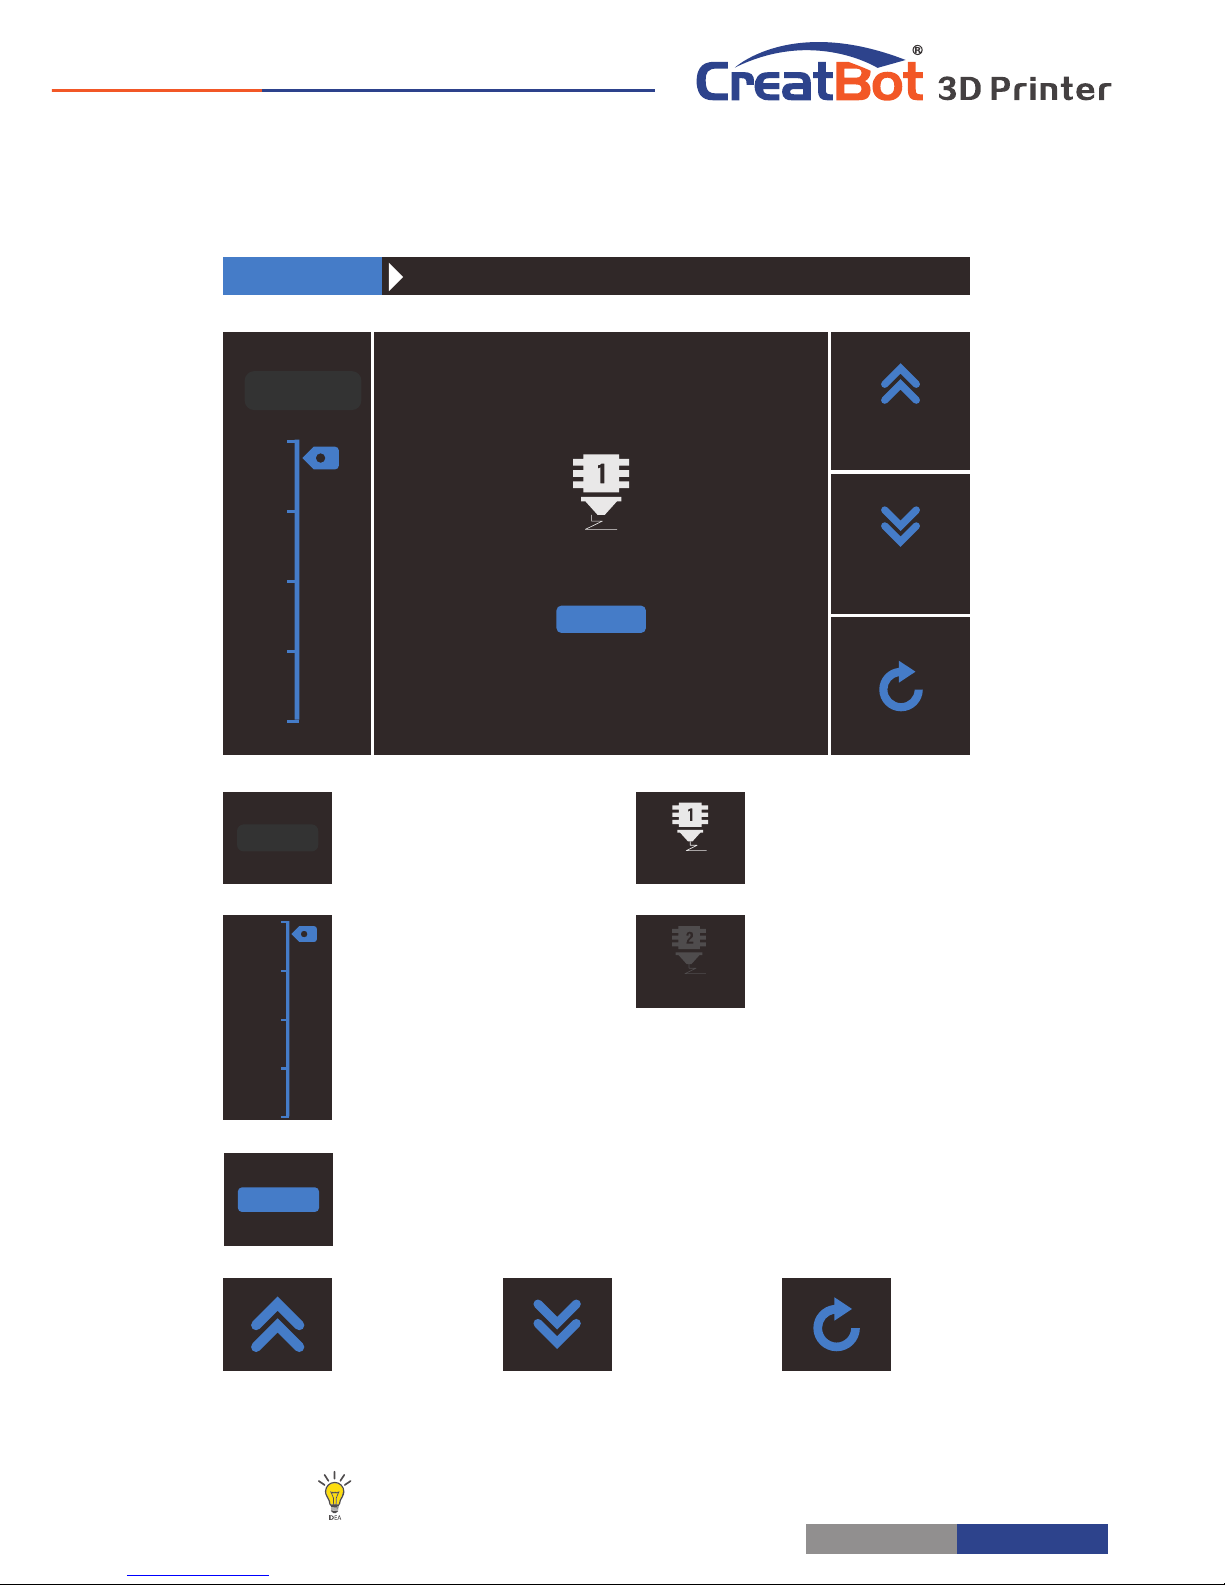
0
225
300
150
75
10
Head 1
10
Click and enter
a value
Head 1
#1 extruder
Head 2
#2 extruder
(unavailable)
Back
Extrude
filament
Retract
filament
Filament menu
0
225
300
150
75
Adjust value when
extrude/retract
filament
Retract filament
Unload
Extrude
Retract
Unload
- 15 -
Printer Operation
When you want to remove the filament, you need first to heat the extruder.
Page 16
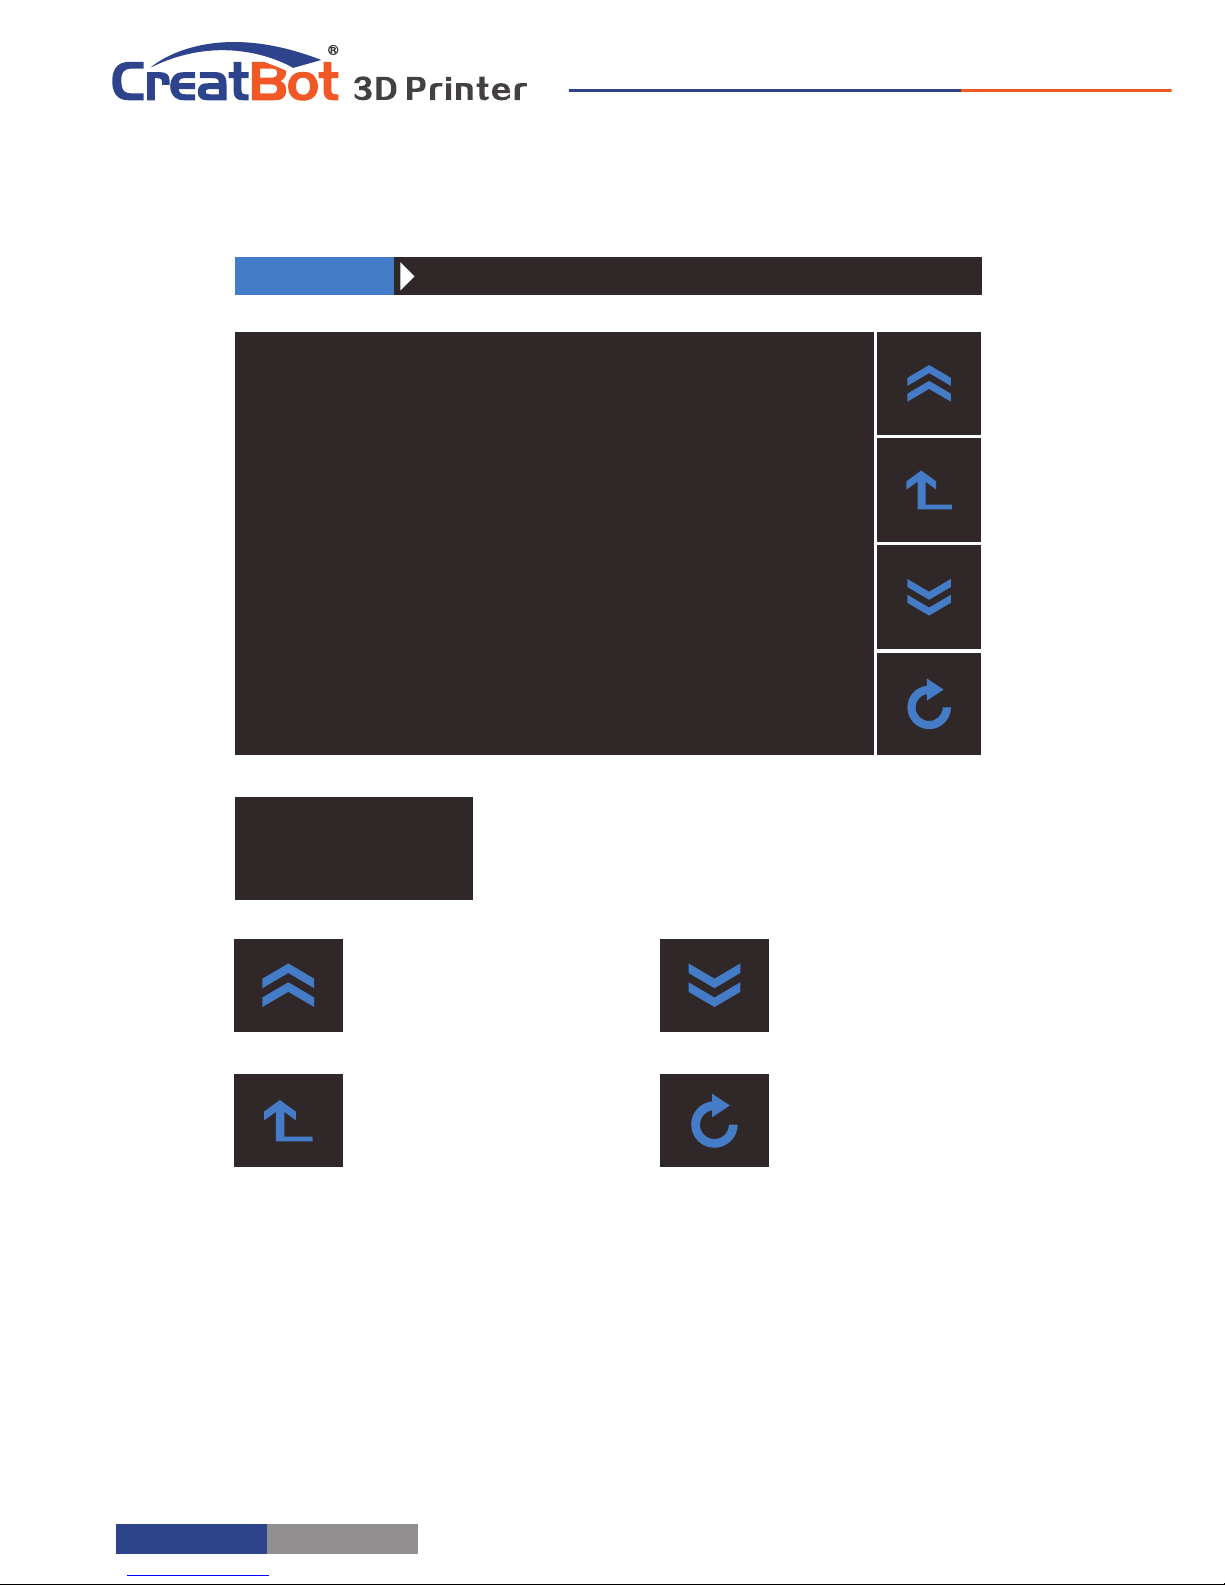
Printer Operation
- 16 -
file1.gcode
file2.gcode
Click and choose a
file to print
Last page
Superior menu
Next page
Back
file1.gcode
file2.gcode
SD Card/U-disk
Printer Operation
Page 17
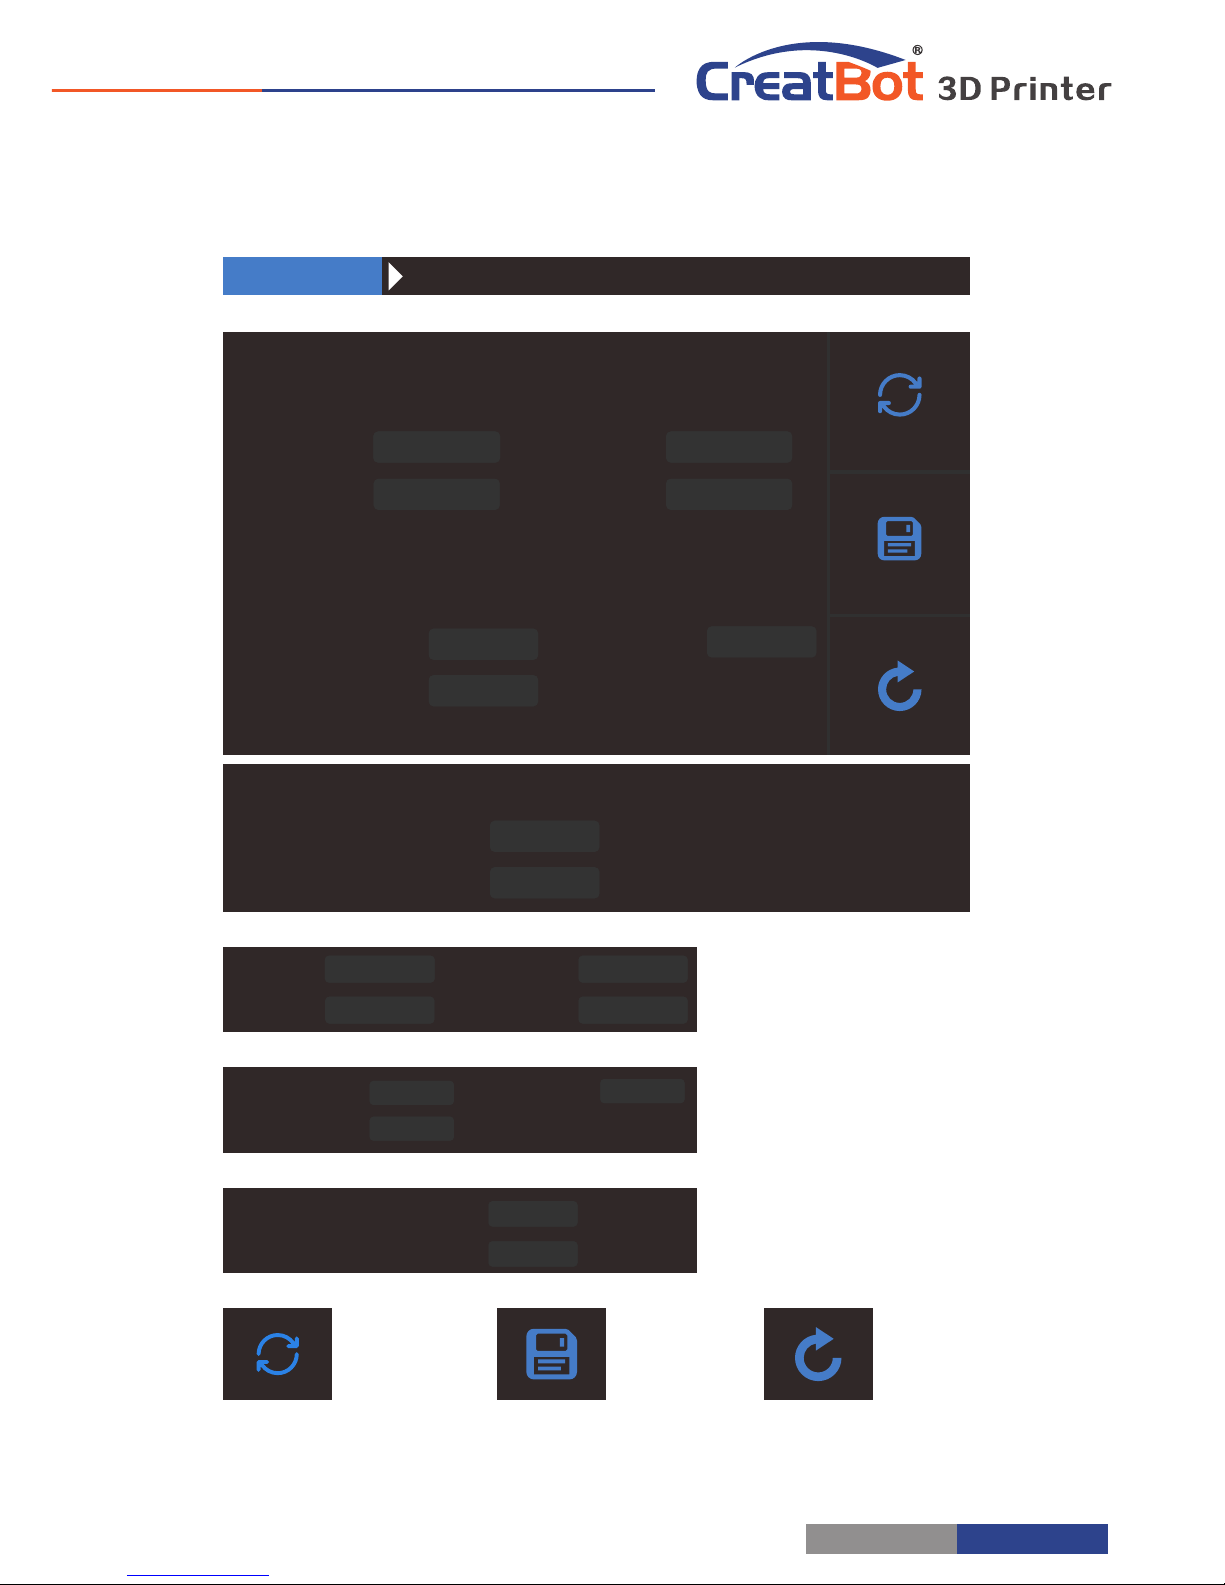
X/Y/Z and exturder motor
setting (range:5-9999)
Preheat setting.
Hotend (range 0~400)
Fan speed (range 0-100)
Bed temp.(range 0-120).
Sink fan speed (range 0-100)
Filter fan speed (range 0-100)
100 %
Reset
Save Back
Setting menu
Motor
Preheat
Extruder temp.: Fan speed :
Reset
Save
X step:
Y step:
Z step:
E step:
More
ㄍ
Bed temp.
:
Sink fan speed:
Fanspeed
Filter fan speed :
78.7401
78.7401
800.0000
125.0000
210 ℃
45℃
0 %
X step:
Y step:
Z step:
E step:
78.7401
78.7401
800.0000
125.0000
Extruder temp. Fan speed :
Bed temp.
:
210 ℃
45 ℃
0 %
Sink fan speed:
Filter fan speed :
100 %
- 17 -
Printer Operation
Page 18
Software Operation
- 18 -
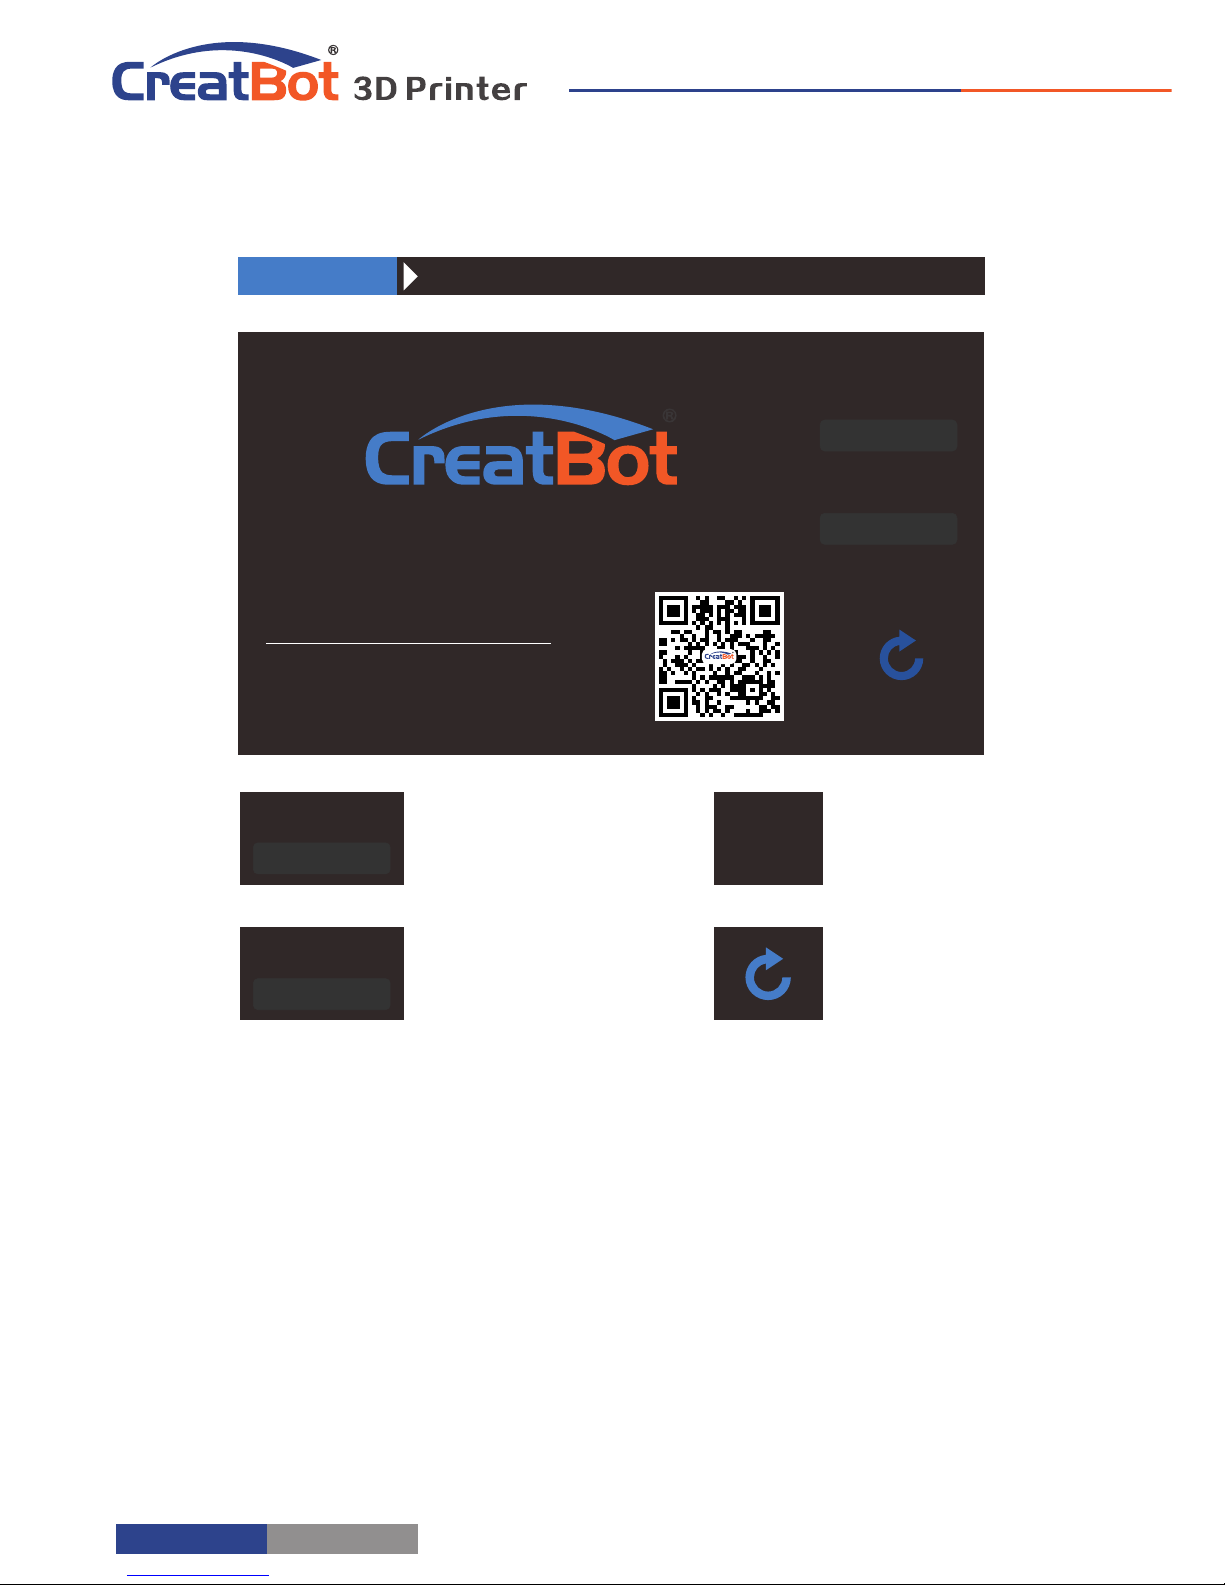
Info. page
Print time used
Firmware version
Back
Screen version
V4.2
河南速维电子科技有限公司
Henan Suwei Elec. Tech. Co,. Ltd.
www.CreatBot.com
+86 4000 558 930
[email protected]
Time used
V4.2
科瑞特3D打印机
3D Printer
0000:00:00
Firmware
5.2.160810
Time used
0000:00:00
Firmware
5.3
Printer Operation
Page 19
Software Operation
CreatWare Setup
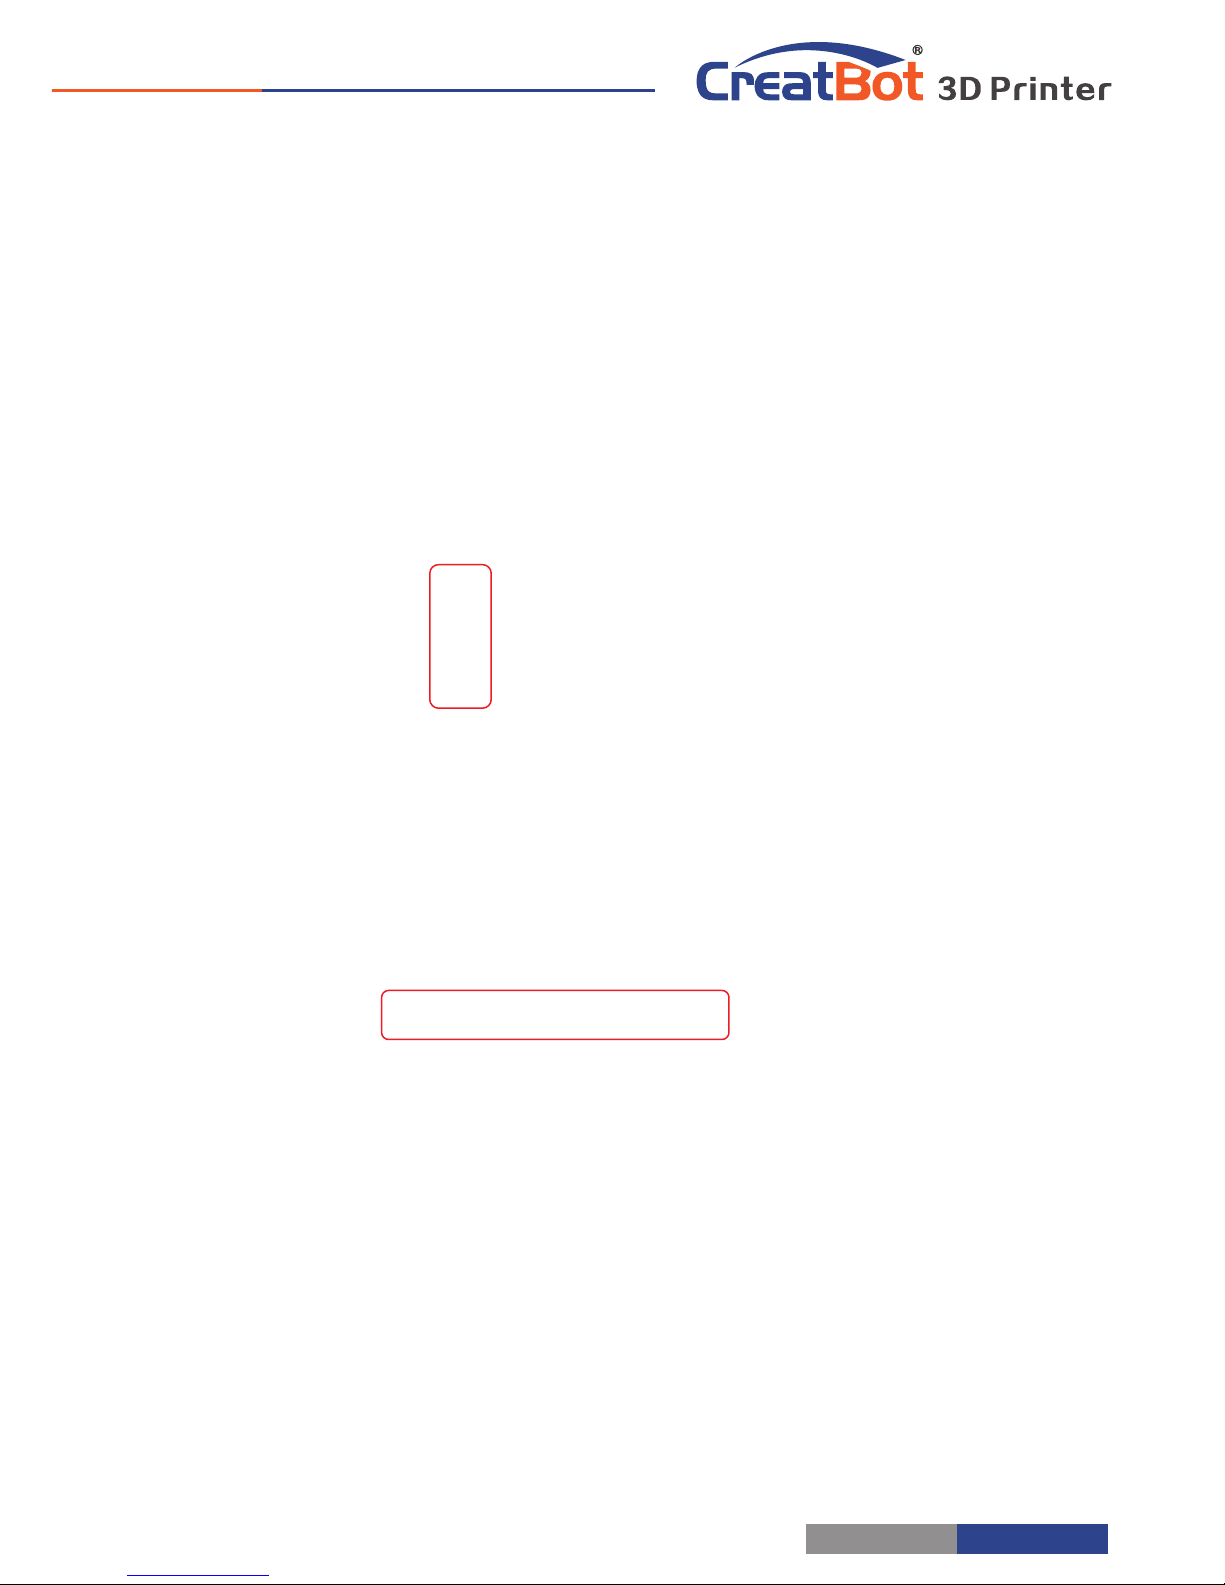
Download CreatWare installation package from the CD-ROM or
www.CreatBot.com, follow the prompts to install the software, try
using the default installation path as well.
Please associated common 3D file format.
Installation path can not contain non-Latinn characters.
Please associated common 3D file format.
When there is a driver digital signature, please choose to agree. When
finished the driver folder will locate at installation directory.
The software will select the correct language according to your OS,
please select the right machine type and number of nozzles and ignore the
other option and guide.
- 19 -
Page 20
Software Operation
- 20 -
Quick Print UI
Software Operation
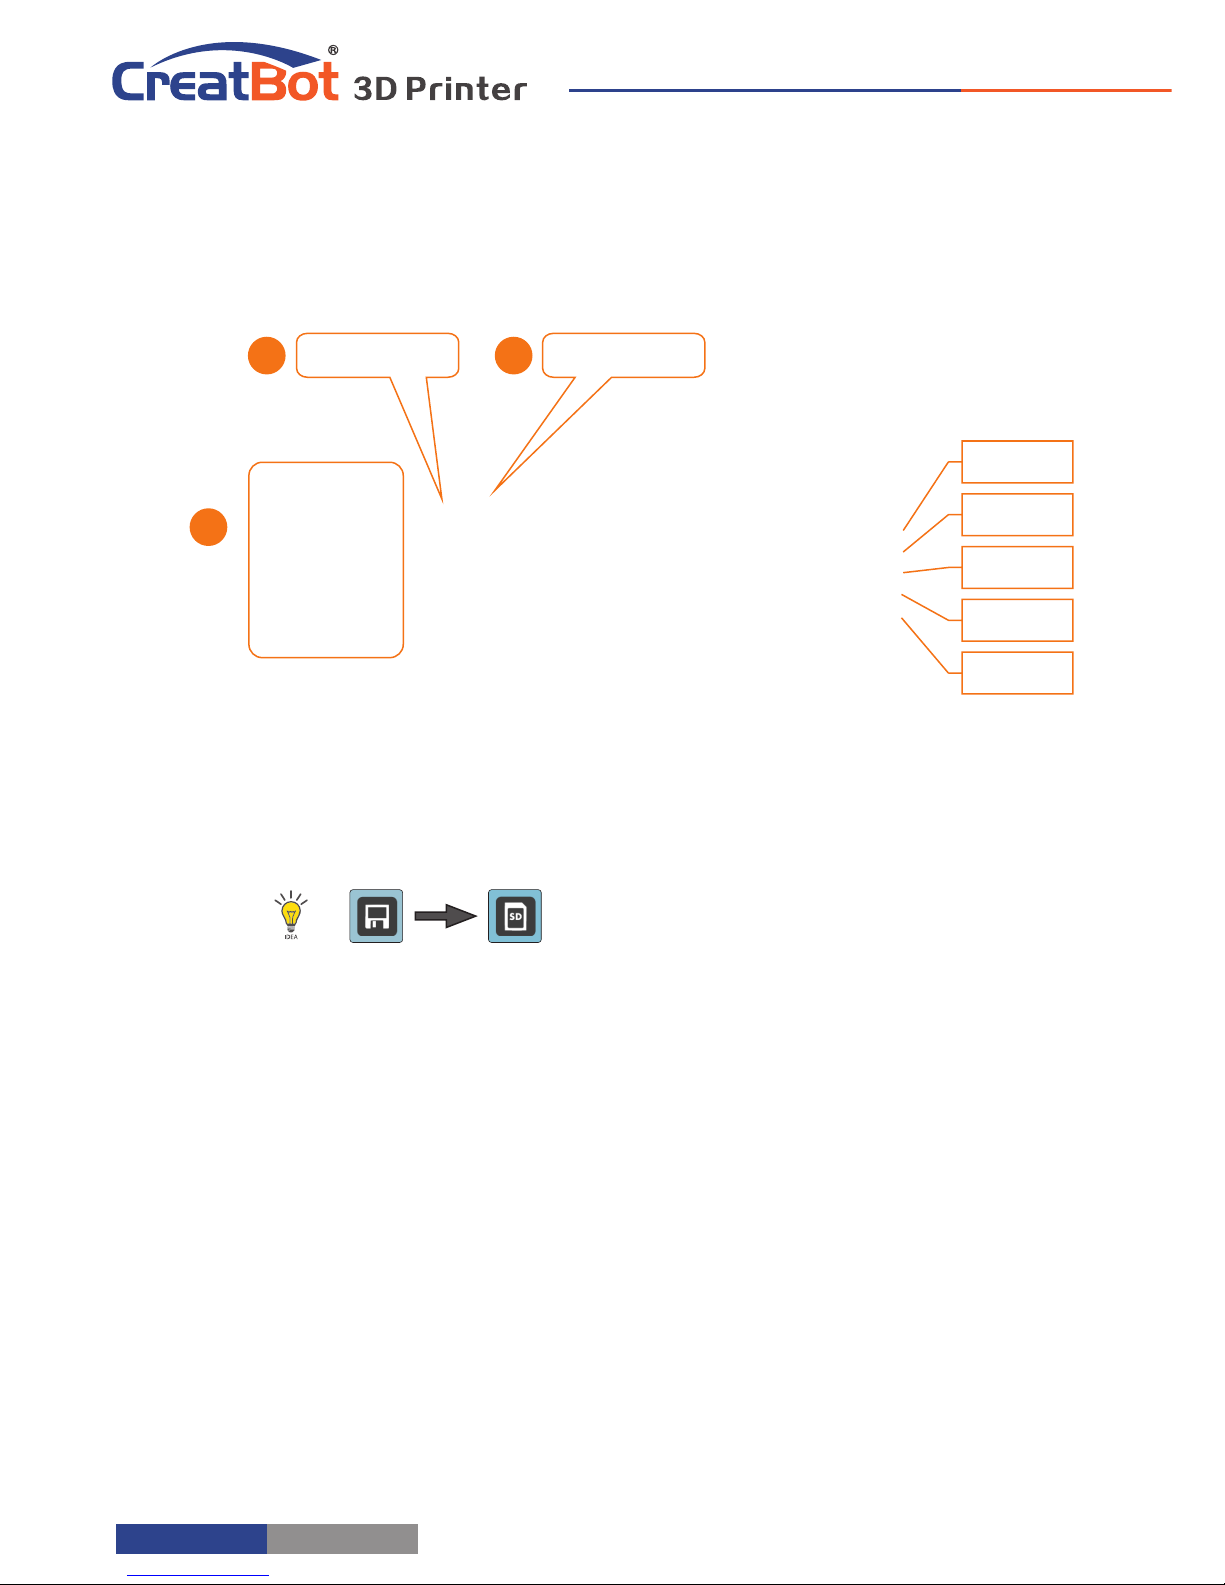
Insert SD card to the card reader, open the CreatWare, load 3D
model file , choose correct filament and option , finally click [1] [2]
save button , you can now finish slice model.[3]
Insert SD card to the printer, browse and select the Gcode file
you just saved, the printer will automatically start to heating, when
the temperature reaches, the printing will start.
When insert SD card, the toolpath will saved
to the SD card.
The file name can not contain non-Latinn
characters.
Print Your First Model
Load model
Save toolpath
31
2
Normal
Overhang
Transparent
X-Ray
Layers
Page 21
Software Operation
Full Setting UI
Tip: Double-click view area can quickly load 3D model file.
The view mode and edit icon will appear when you select the 3D
mode.
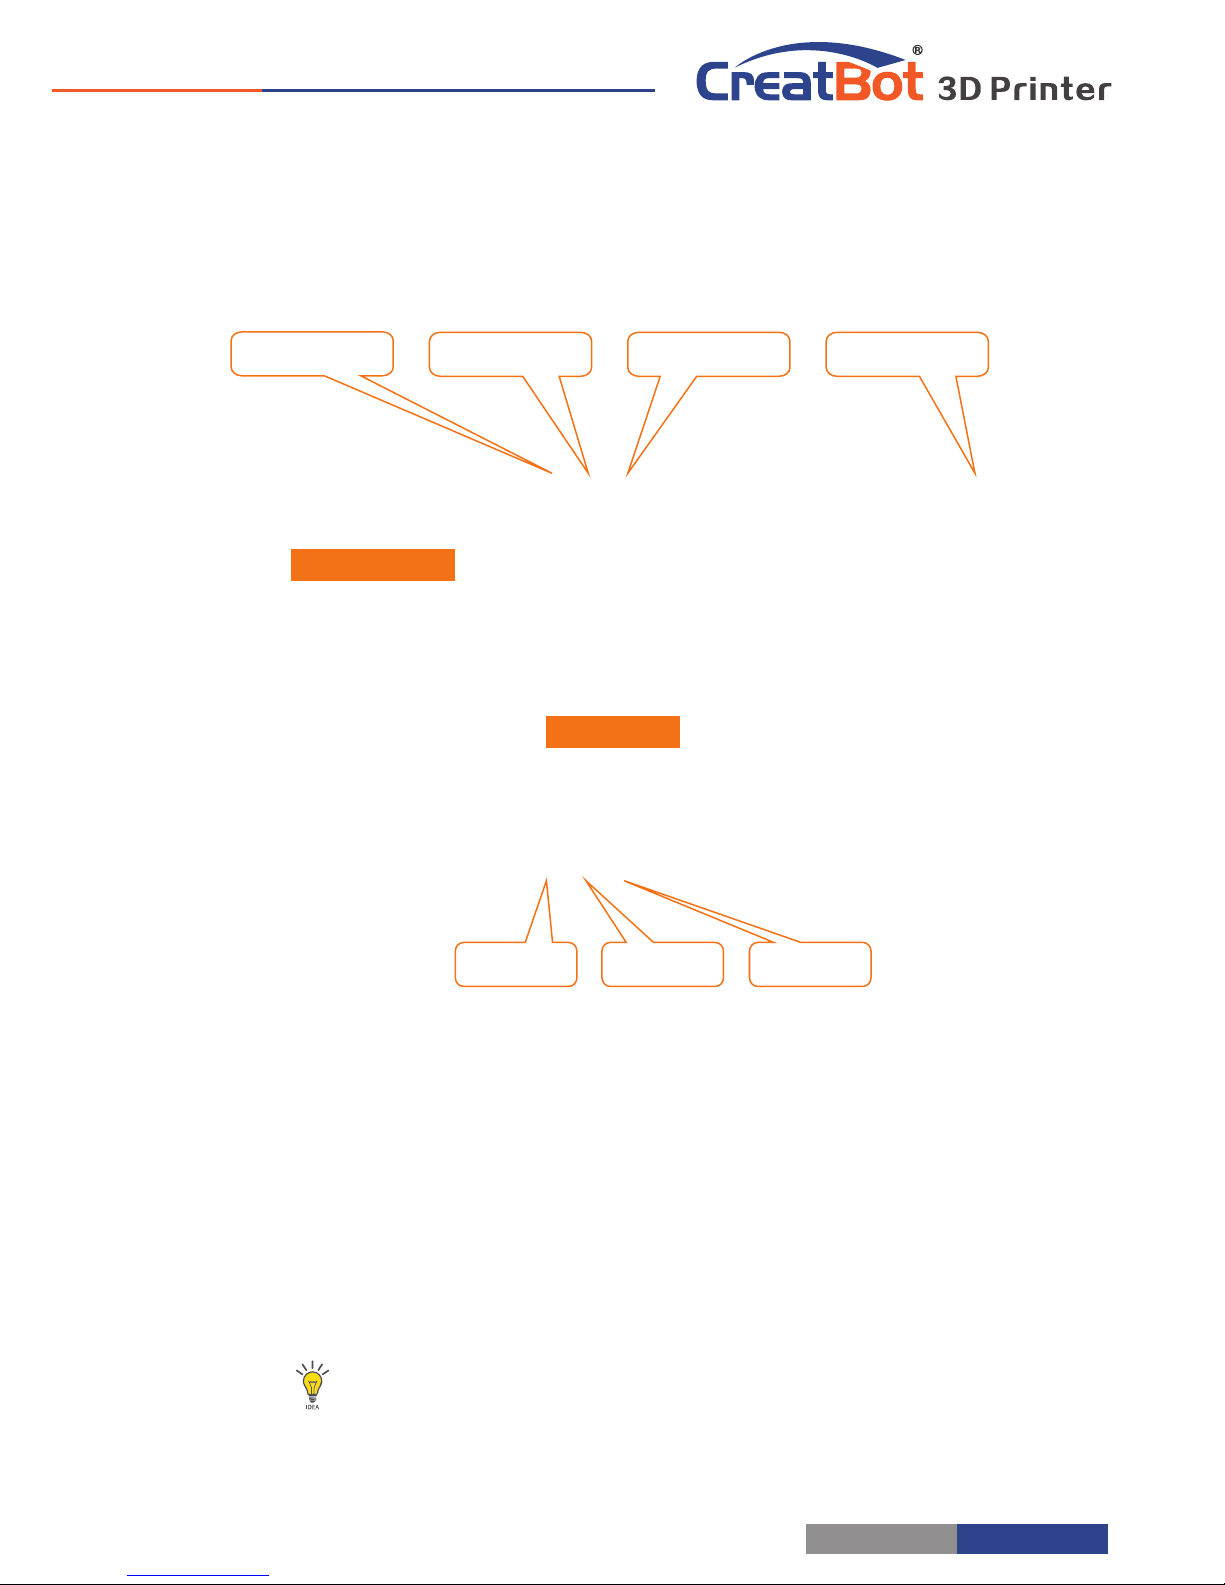
As you can see from the complete UI, the left side of the software is
setting area, the right side is view area. The setting area contain "Basic",
"Advanced", "Plugins", "Start/End GCode" four tabs. The Basic tab is the
most common settings, usually the most frequently used parameters are
here. Each parameter has a mouse-over tips, you can set parameters
according the prompt. If you want to restore the default settings, please
click on the menu "Tools"->"Restore Default".
Manual slicing
Rotate Zoom Mirror
View mode
Save toolpath
Load model
View area
Setting area
- 21 -
Page 22
Software Operation
zoom button , you can see a [1]
contour line around the model,
and shows the current size of the
model. You can input the value of
the zoom ratio in Scale X / Y / Z ,
may also directly enter the size
you need. Button indicates [4]
locking scaling.
button, you can restored the
model to the default size.
model size to the maximum print size.
Mouse Operation
Software Operation
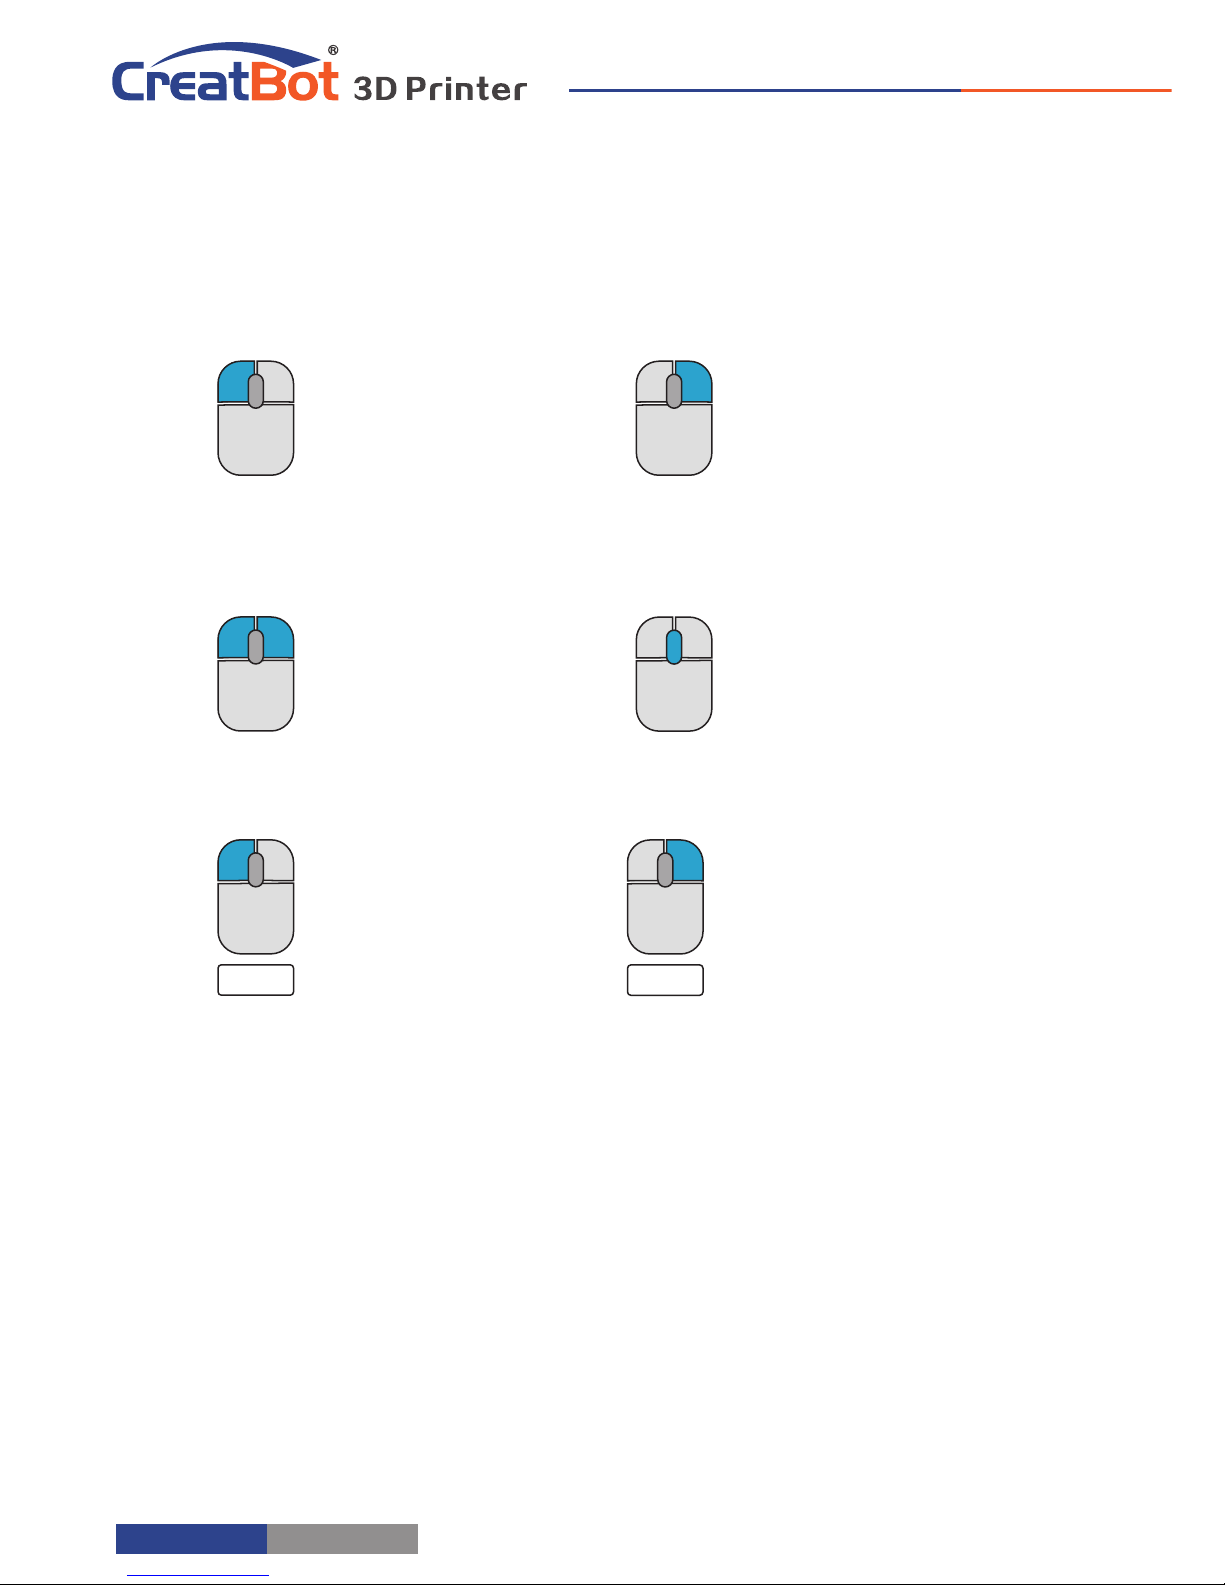
Left click
Select model, hold and
move to change
position, double-click to
load 3D models.
Right click
Hold and move to rotate
the viewpoint around
the 3D model.
Left + Right
Hold and move the
mouse to zoom.
Scrollwheel
Use the scroll wheel to
zoom in or out.
Left + Shift
Click and drag in rotary
model can according to
each 1 degree angle.
+
Shift
Right + Shift
Hold and move the
mouse to pan the 3D
view.
+
Shift
Keyboard Shortcut
Ctrl+L
Load model/Picture
Ctrl+S
Save model as
Delete
Remove model
F5
Refresh view area
Ctrl+E
Export setting
Ctrl+,
Preferences
- 22 -
Page 23
3
1
2
Software Operation
Model Rotate
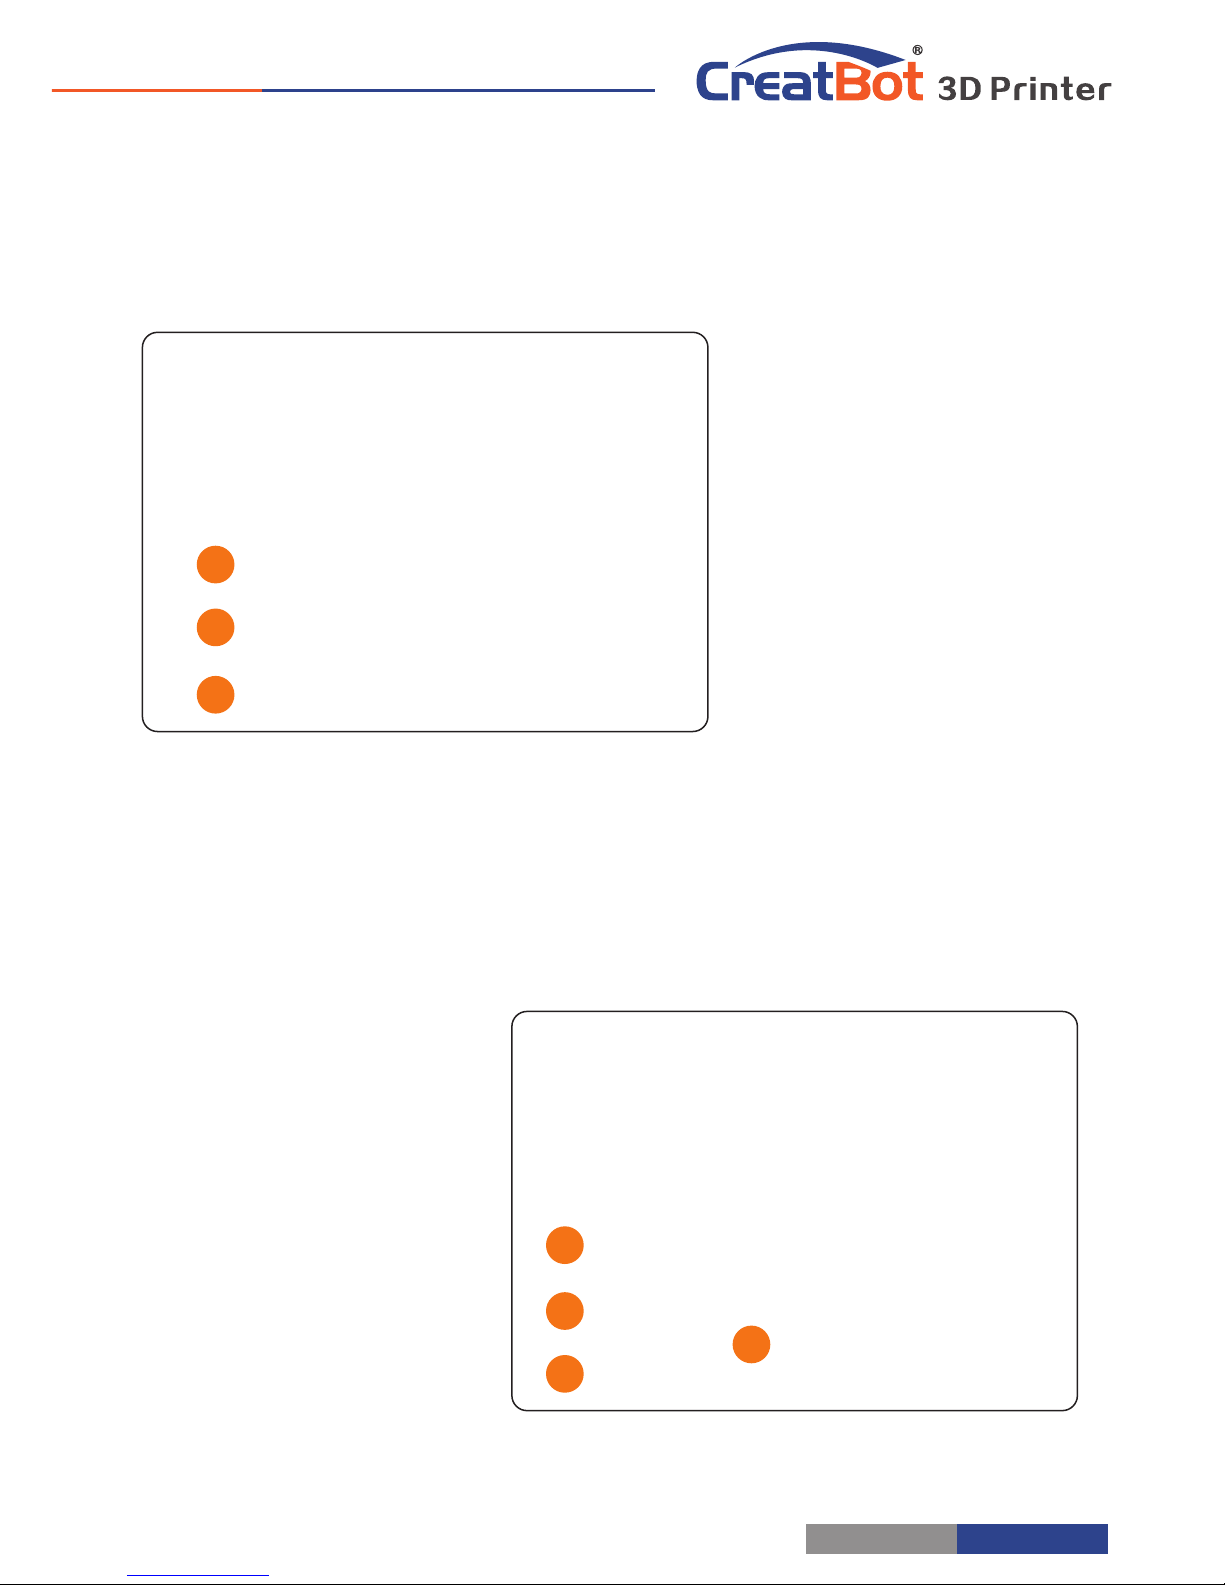
Click on the left corner of
the rotate button , you can [1]
see three ring line around the
model, respectively along the X,
Y, Z direction. The default
rotation angle is 5 degrees,
press the Shift key can restrict
the rotation angle to 1 degree.
Button to is the reset [2]
button, can restore rotate status
to the default state.
Button is lay flat button, [3]
can lay the model flat on the
platform automatically.
Model Scale
3
1
2
4
Click the left corner of the
zoom button , you can see a [1]
contour line around the model,
and shows the current size of the
model. You can input the value of
the zoom ratio in Scale X / Y / Z ,
may also directly enter the size
you need. Button indicates [4]
locking scaling.
Button is zoom reset [2]
button, you can restored the
model to the default size.
Button for the zoom [3]
model size to the maximum print size.
- 23 -
Page 24
Software Operation
Model Mirror
Software Operation
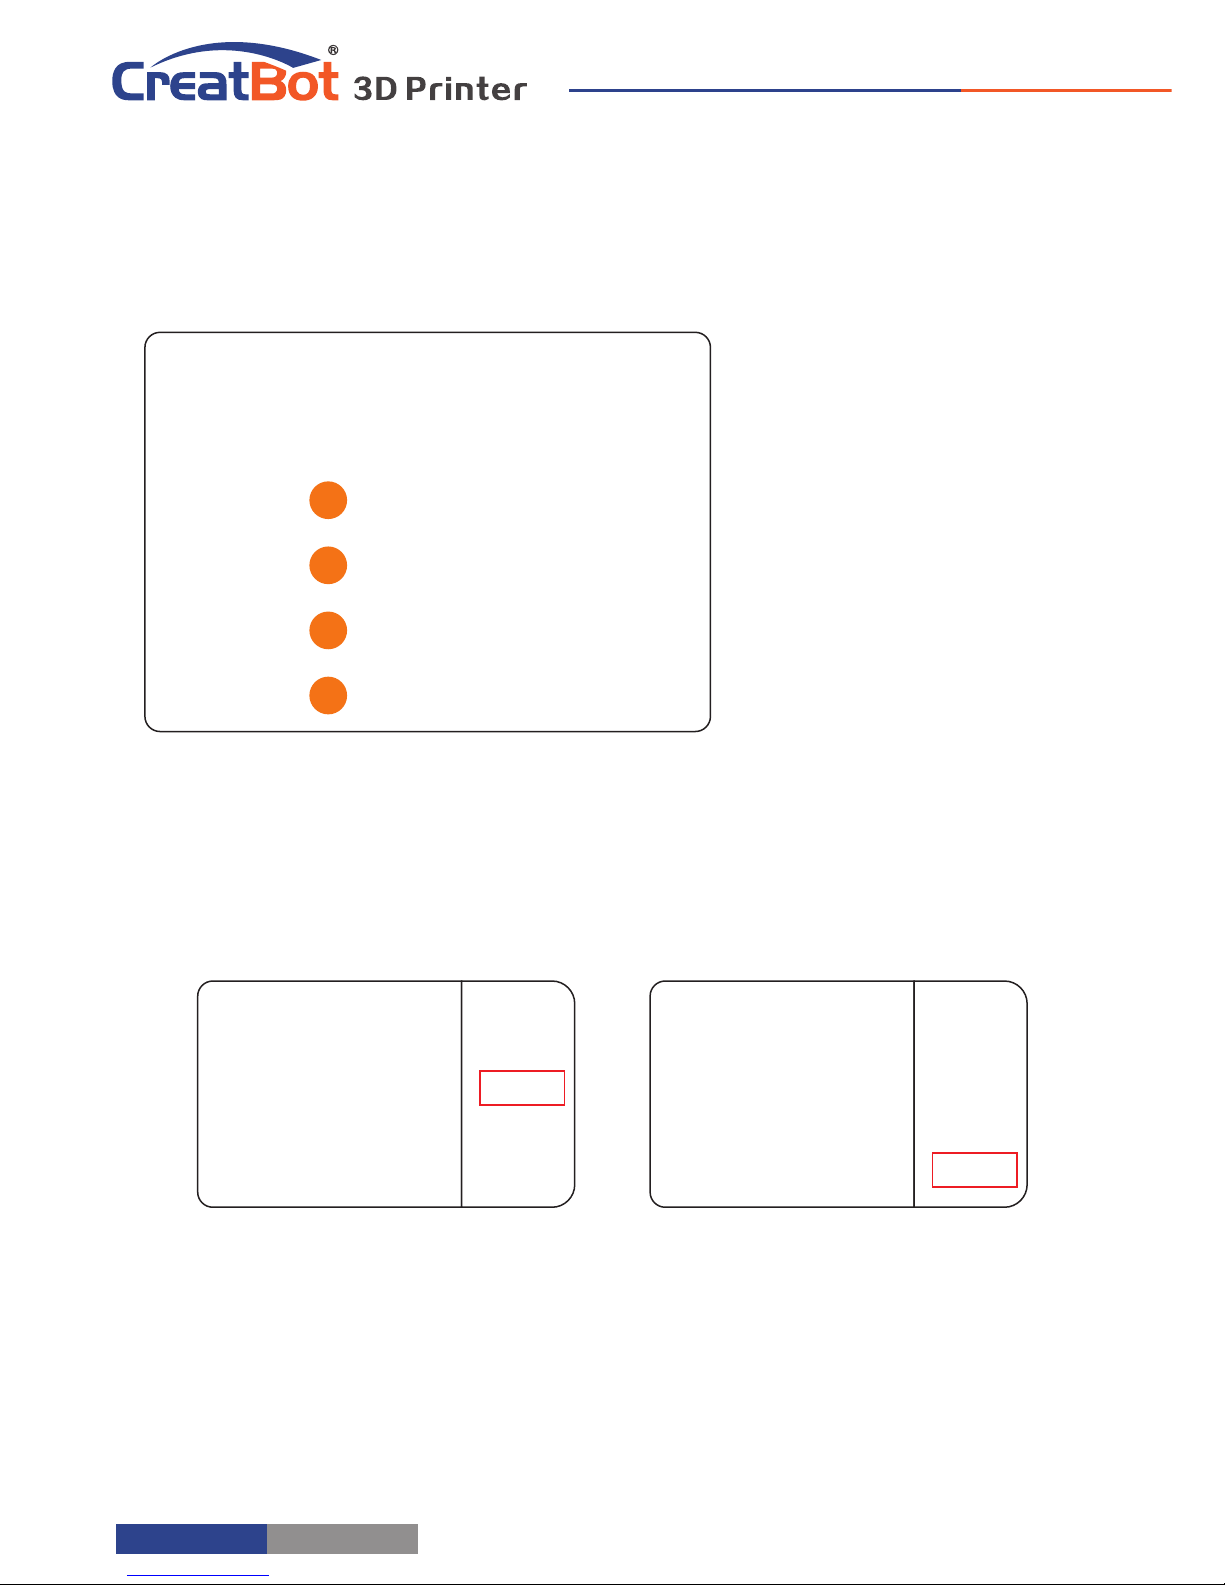
Click the mirror button , [1]
you can pop up the mirror menu.
Button is a mirror along [2]
the X axis.
Button is a mirror along [3]
the Y axis.
Button is a mirror along [4]
the Z axis.
Note that the mirror
transformation is different from
the rotation, such as the mirror
transformation will lead to a
change in the direction of rotation,
and the rotation will not change the model.
3
1
2
4
View Mode
From the overhang view, you
can see the suspended part of the
model which is shown in red color.
By changing the supporting angle
can be seen suspended parts size is
dynamically changing.
By slice view can easily observe
the generated path, you can easily
observe the different layers of sliced
by slicing altitude indicator, use Ctrl
+ arrow keys can also be observed
layer-by-layer.
- 24 -
Page 25
Software Operation
Right Click on Model
3
4
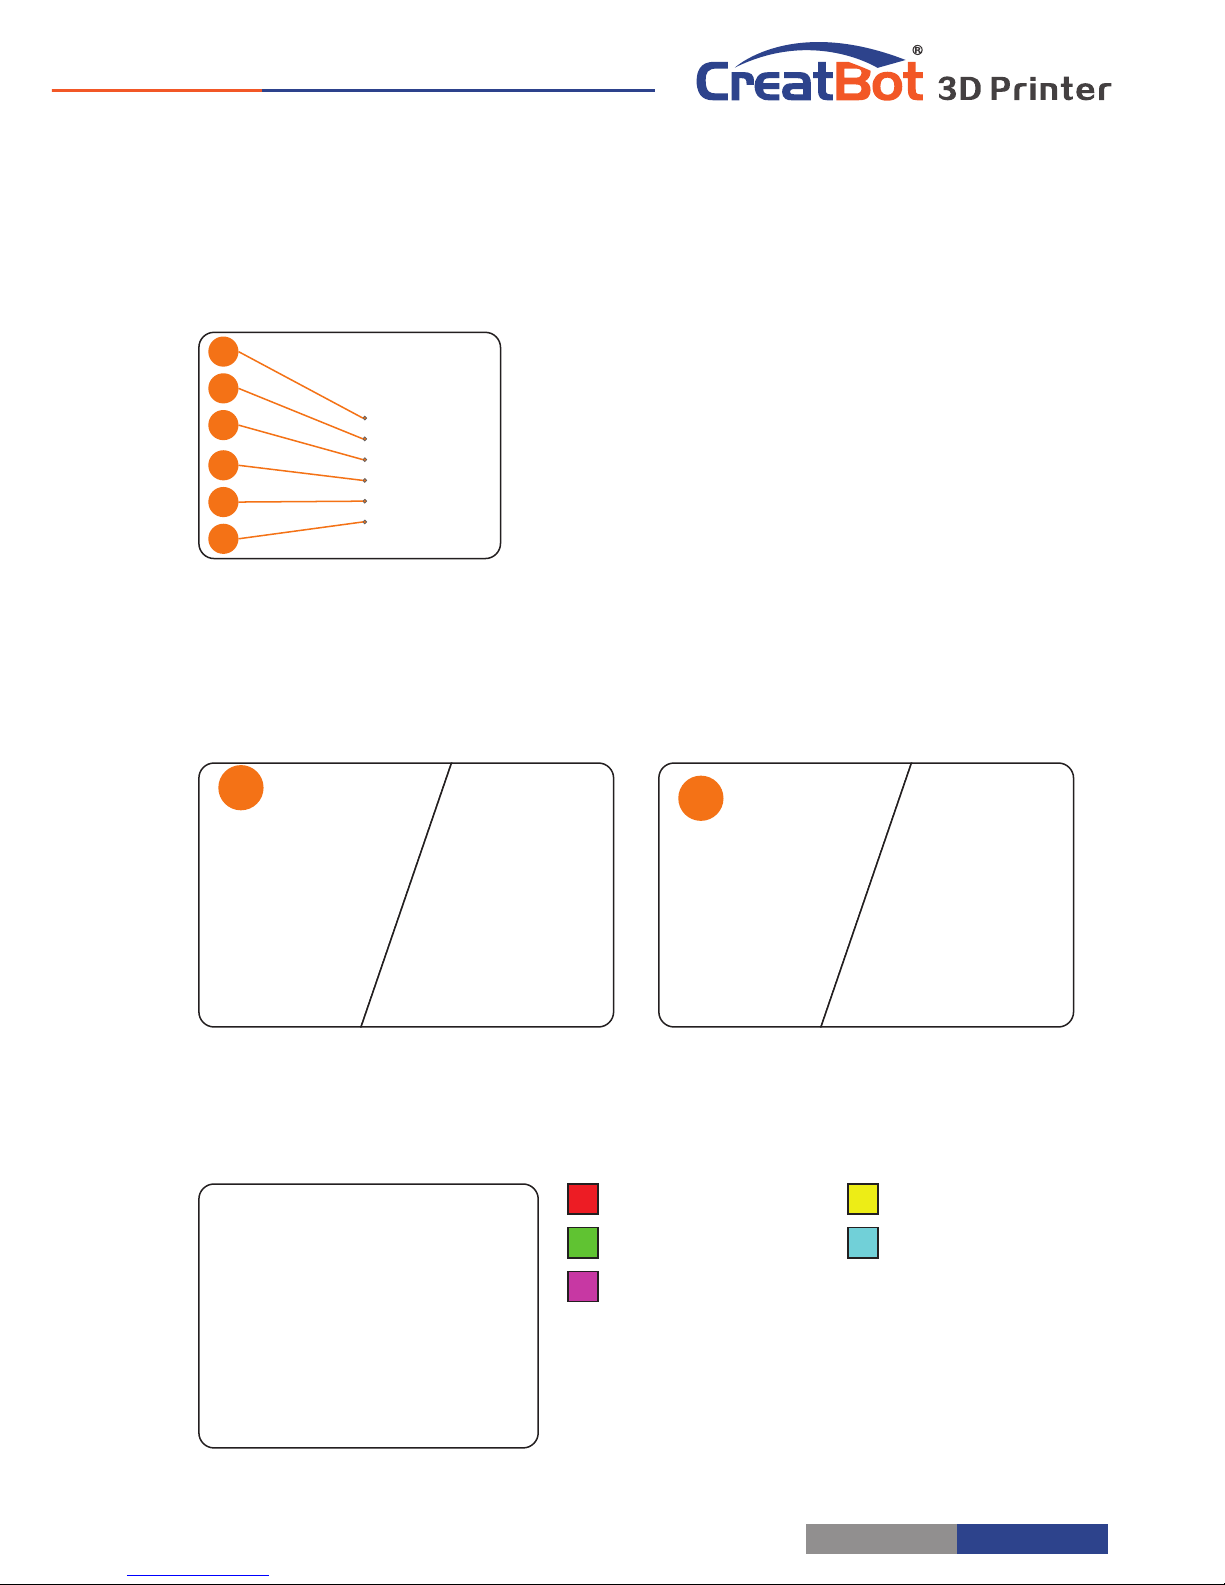
Red represents "outer shell"
Green represents "inner shell"
Yellow represents "infill"
Purple represents "bottom and top shell"
Blue represents "support"
Toolpath Structure
Drag layer indicator can browse different
level paths, Ctrl + arrow keys to browse layer by
layer. 3D printing is the superposition of these
different layers and built layer by layer.
4
6
5
2
3
1
Right-click on the model pop-up shortcut
menu, here are more features:
[1] "Centered" make the model back to the
center position of the platform. "Delete" to [2]
remove the currently selected model. "Multiply" [3]
to copy the currently selected model and
automatically position, which is useful for printing
more than one model at a time. "Split" multi-[4]
component model can be split into its separate components, this process more timeconsuming, try to split the model in the modeling software, models splited can be
printed individually and then assembled together . "Delete All" to delete all the [5]
models loaded. "Reload all" Reload all models, same as F5.[6]
- 25 -
Page 26
Software Operation
Basic Setting
Software Operation
Layer height: This is the most important setting to determent the
quality of your print, maximum value not exceed 80% of the
nozzle diameter.
Shell thickness: Refers to the total thickness of the inner and
outer walls, the outer wall is only one, the inner wall can be
more, set this value to an integer multiple of the diameter of
the nozzle.
Flow: Refer to the amount of printing material, 100% standard
dosage, the more material the model prints more plump.
top/bottom thickness: Is the thickness of the upper and lower
models, usually a multiple of layer height.
Fill density: Control how density filled the insides of your print will
be, a value around 20% is usually enough, 0% for hollow.
Print speed: Speed at which printing happens. Print speed is
affected by many factors, it is recommended to use low
speed for complex model, high speed will cause the feed
shortage, need improve nozzle temperature to compensate.
Nozzle temperature: Is the melting temperature of filament,
general use 200 ℃ for PLA and 240 ℃ for ABS.
Bed Temperature: General use 45 ℃ for PLA and 70 ℃ for ABS.
Default main head: The default is the first nozzle, can also be set
to other nozzles, this can reduce the times of changing
filament.
Support type: The touching build plate support type is shown in
figure , everywhere support is shown in figure [A] [B].
Support angle: The larger the angle, the more support generate.
Fill amount: The larger the fill, the more support generate.
Platform adhesion type: The model which is not easy adhesion
on the platform please use Brim, which easy to warped or ABS filament please use Raft.
Support Type
A B
- 26 -
Page 27
Software Operation
Advanced Setting
Solid fill top: Refers to whether to print the top surface of the
model, uncheck will print it with infill method.
Solid fill bottom: Same as above, and so on.
Spiralis print: Refers to the method of spiral printing the outer
wall of the model (single layer), and this feature is very
suitable for print glass vase model.
Enable retraction: When the nozzle is moving over a none-
printed area, withdraw a certain length length filament to
prevent overflow.
Retract speed: The speed of retraction, too fast can lead
motor out of step, too slow increase printing time.
Retract distance: The length of the filament when enable
retraction.
First layer thickness: Height of the first layer of printing,
generally greater than 0.15mm.
First layer flow: When the set of the first layer is too high, it
can be appropriate to increase the extrusion.
Cut off object bottom: This can be used for objects that do
not have a flat bottom.
Continue print: Being "power outages continued" be
substituted.
Travel speed: The speed when moving over a non-printed
area.
First layer speed: Slightly slow speed can enhance adhesion
model on the platform.
Solid layer speed: The speed is a percentage here, which reference to the global print speed, a
combination of different speeds, you can both get a good print quality and a faster print
time.
Spiralise Printing
- 27 -
Page 28
Software Operation
Export Setting
Software Operation
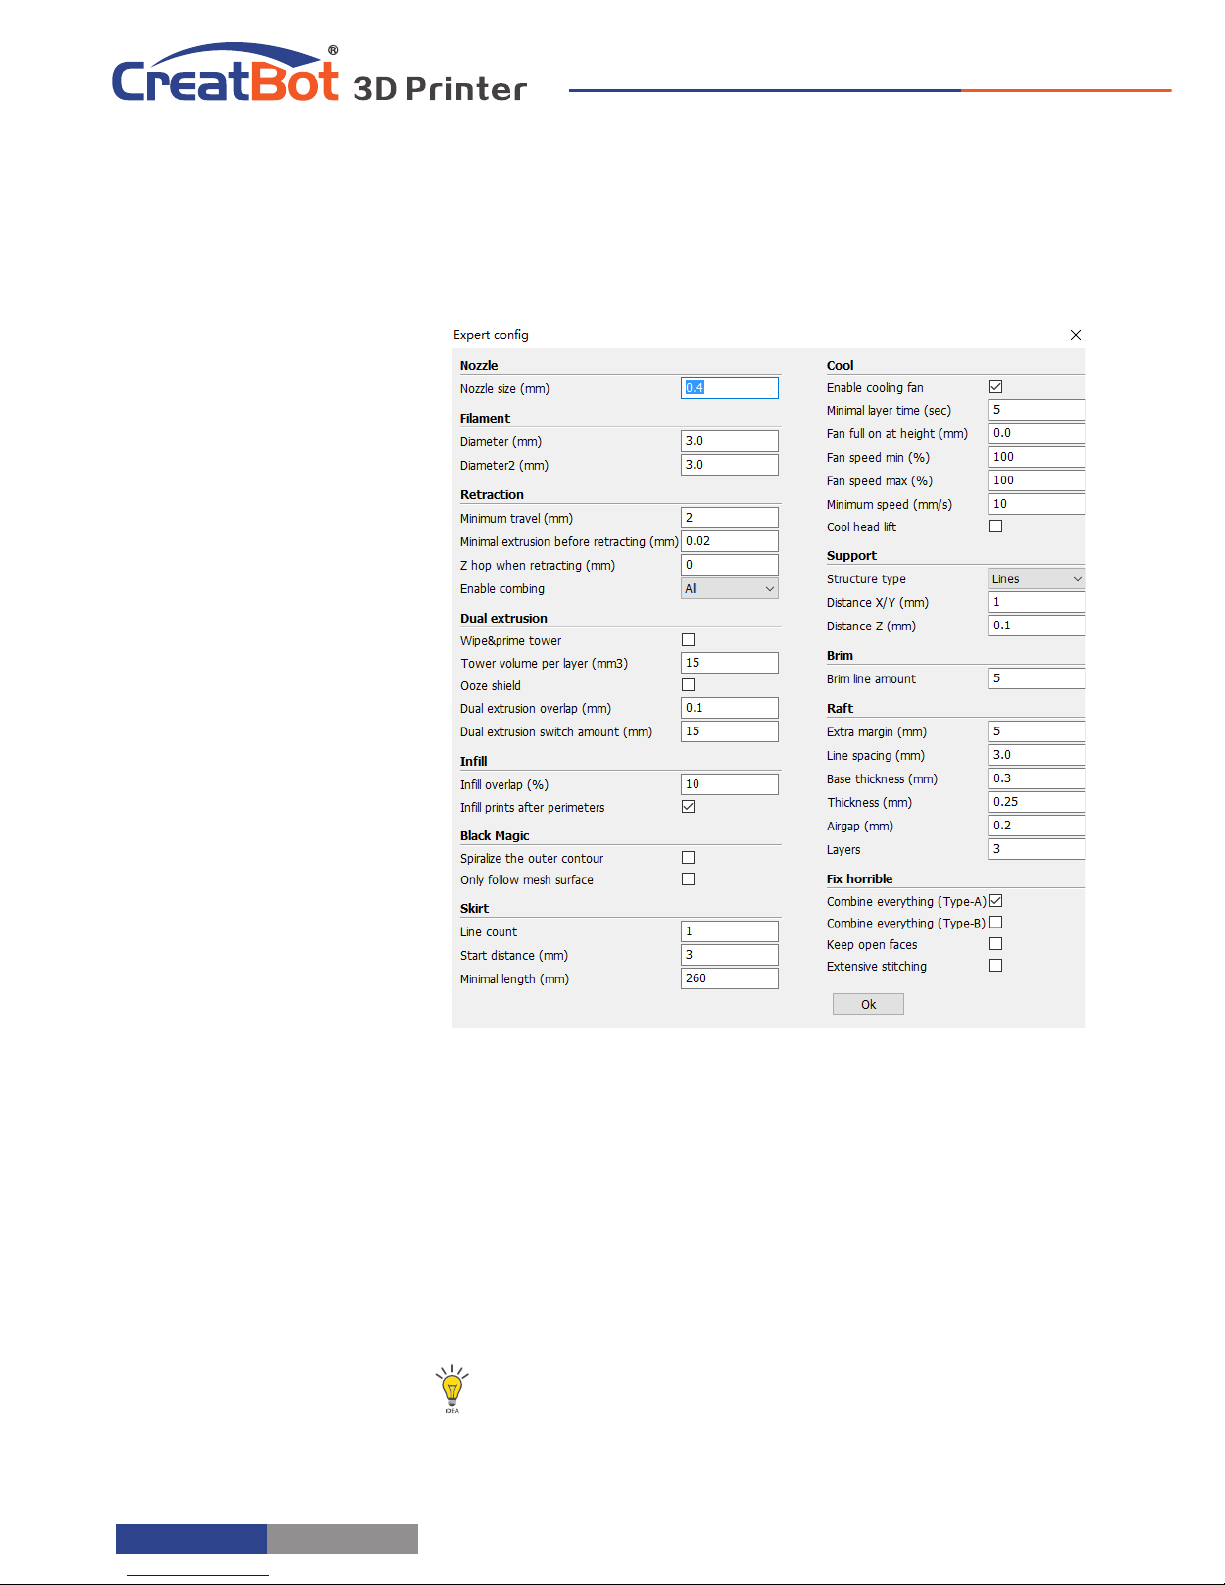
Notice: Most of the setting have been optimized, If you want
restore default configuration,use the menu "Tools"->"Reset
profile to default".
Nozzle size: Set the nozzle
size.
Diameter: Accurate
measurement of your
filament gives better
quality prints.
Minimum travel: The
minimum distance
which can trigger
filament retract.
Minimum extrusion: The
minimal amount of
extrusion that needs to
be done before
retracting.
Enable combing: Combing
is the act of avoiding
holes in the print for the
head to travel over.
Wipe tower: Is a small
tower next to your
print where the nozzle
wipes itself clean when
switching nozzles.
Dual extrusion switch amount: Amount of retraction when switching nozzle with dual-
extrusion, a value of 15mm seems to generate good results.
Cooling fan: The extra cooling fan is essential while printing small model, but when print
ABS material, the max fan speed should not more than 50%.
Skirt: The skirt is a line drawn around the model at the first layer. This helps to prime your
extruder, and to see if the model fits on your platform.
Brim: The amount of lines used for a brim, more lines means a larger brim which sticks better.
- 28 -
Page 29
Software Operation
Skirt · Brim · Raft
Adhesion type:
None
Adhesion type:
Brim
Adhesion type:
Raft
Plugins
Plugin enable you to easily include
your own features, without having to
modify the source code or Gcode. In
the screen shot above, these can be
enabled by clicking on the arrow down
button, then you can configure the
plugin.
Notice: Please remove the plugin
before you close the software.
1
2
3
1
2
3
- 29 -
Page 30
Start / End GCode
Software Operation
A B C
Step 1: oad 2 models L
you want as
shown in figure [A]
and . [B]
Step 2: , Fist click [A]
then right click on
[B], you will get
the option dual :
extrusion merge ,
this will merge
both models into
one model . [C]
Step 3: Set parameters like ordinary single color model and save the GCode.
Tip: The model select first will print by main extruder,
the right clicked one by second extruder.
Dual Head Printing
The start and end gcode are the startup
and end procedure of the print, editing this
requires knowledge of GCode.
If you want to set the automatic heating
station after printing, you can remove the ";"
in the code ";M190 S50".
start.gcode is the start code of single
extruder, start2.gcode is the start code of
double extruder, and so on.
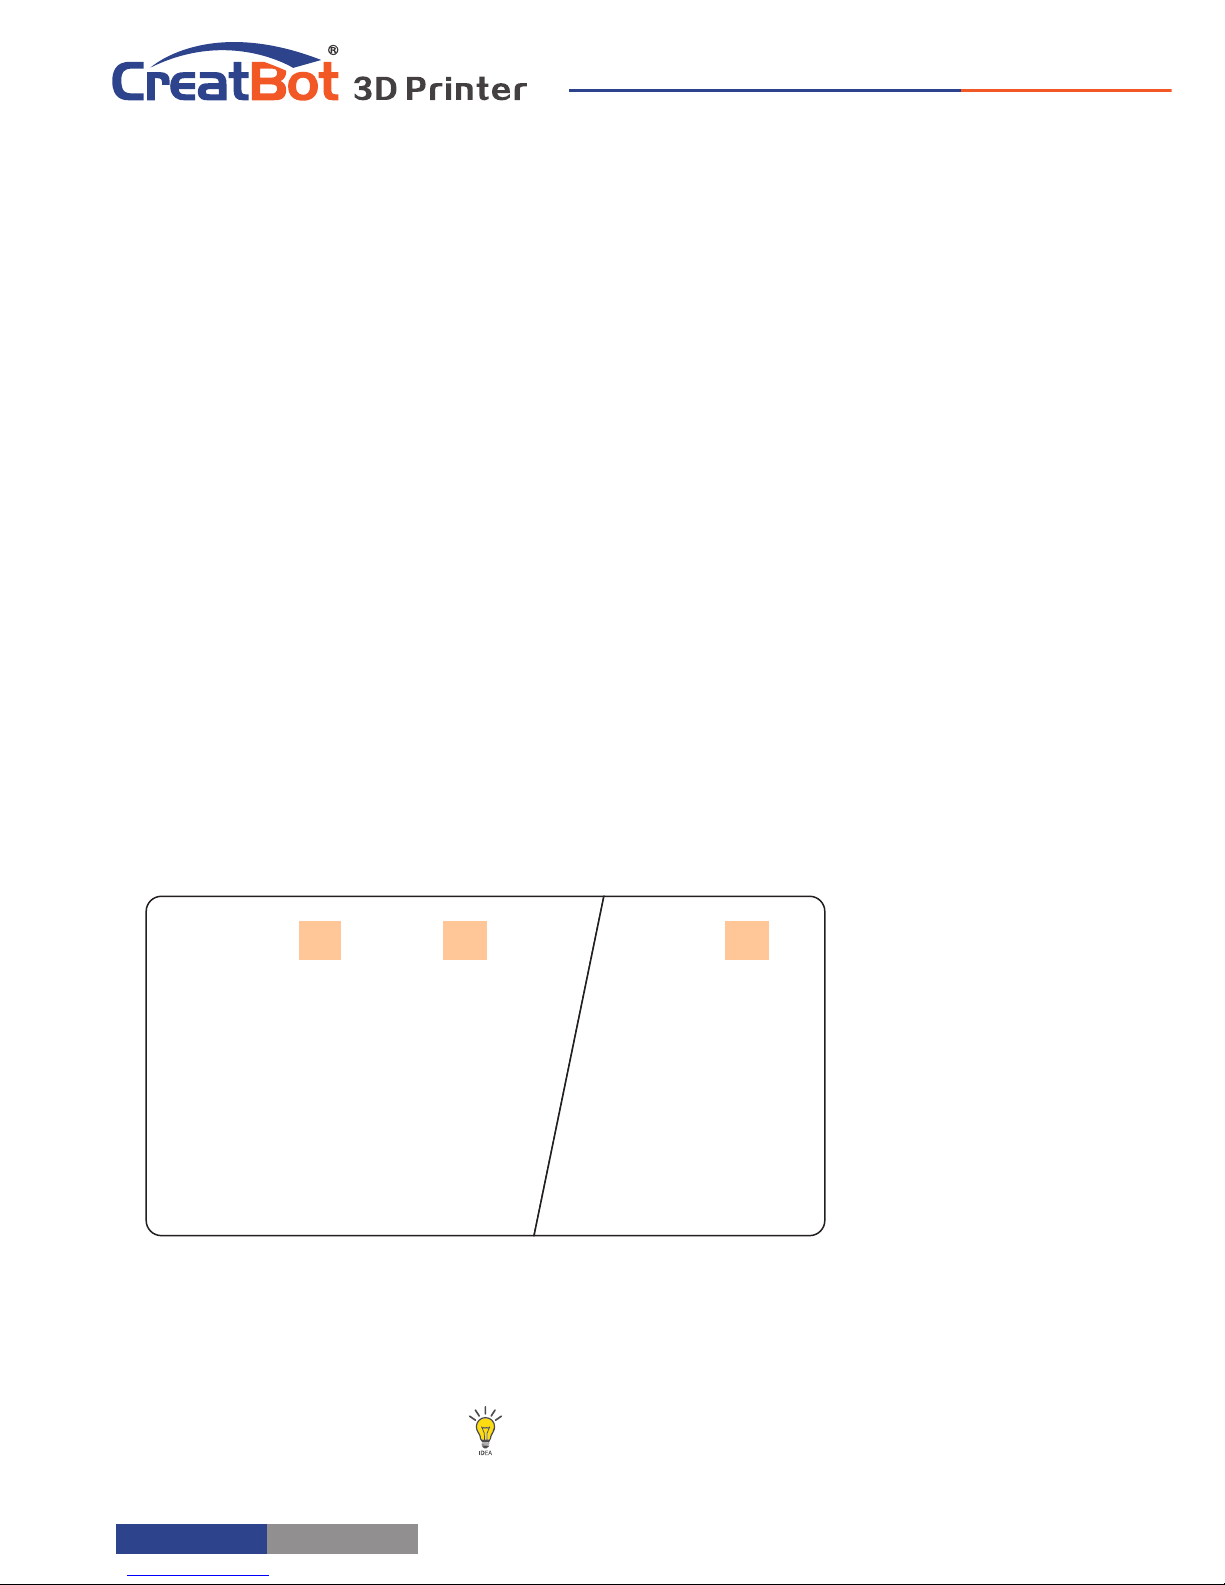
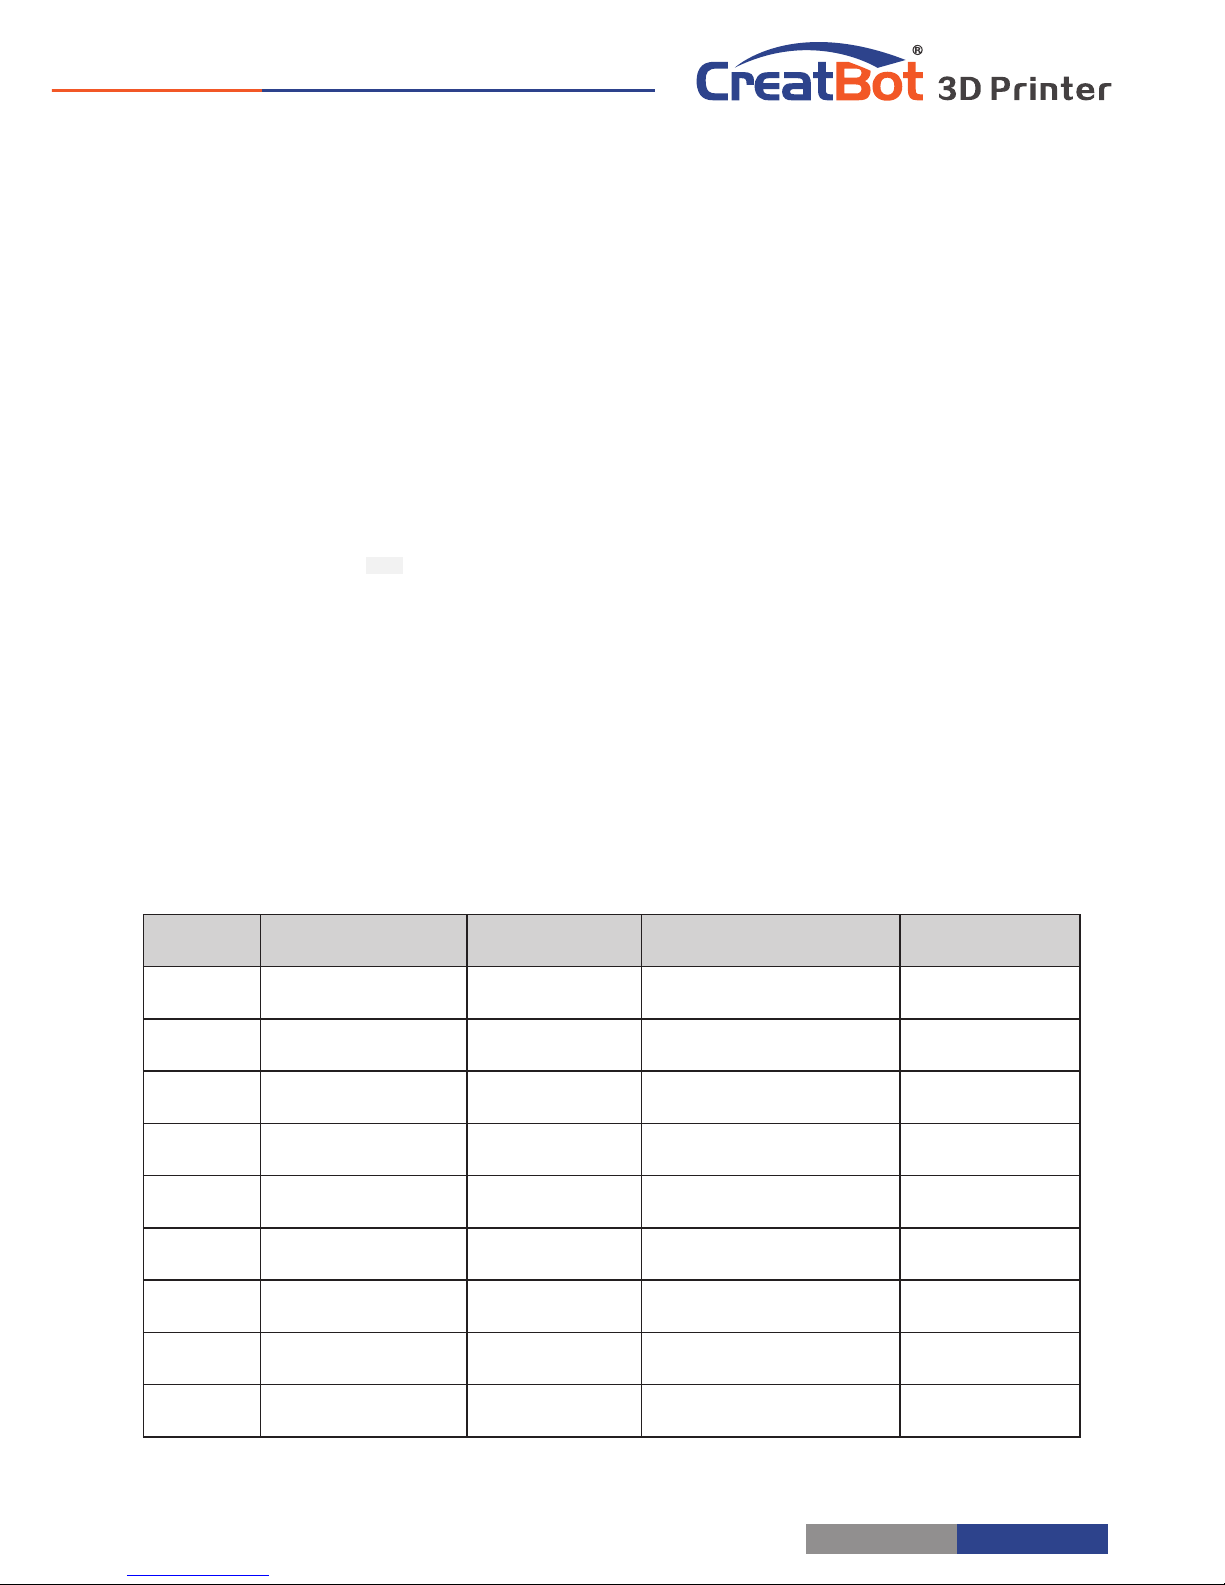
* The data is only for refe ren ce, different environmental data will be different.F160 and F430 can print P EEK.
Nozzle temperature
Hot bed
Plantfo rm adhesion type
Fully enc lose or not
PL A
190~210 ℃
None/45℃
None/Raf t
Can open
ABS
190~210 ℃
90 ℃
Brim/Raf t
Enclosed
Nylon
240~270 ℃
100
Brim/Raft
Enclosed
HIPS
230~260 ℃
100 ℃
None/Brim
Enclosed
PETG
230~260 ℃
100 ℃
None/Brim
Enclosed
Flexible
210~230 ℃
None/45℃
None
Can open
Wood
190~220 ℃
None/45℃
None
Can open
PC
230~260 ℃
100 ℃
Brim
Enclosed
PEEK
380~430 ℃
Bed 120℃/Air 70 ℃
None
Enclosed
Software Operation
- 30 -
Page 31
Print Setting Of Different Filament
* The data is only for refe ren ce, different environmental data will be different.F160 and F430 can print P EEK.
Add Multi Type Printer
You can add more than one
type of CreatBot to the software,
and easily switch between them
without re-config all the different
machine settings.
F160
Nozzle temperature
Hot bed
Plantfo rm adhesion type
Fully enc lose or not
PL A
190~210 ℃
None/45℃
None/Raf t
Can open
ABS
190~210 ℃
90 ℃
Brim/Raf t
Enclosed
Nylon
240~270 ℃
100
Brim/Raft
Enclosed
HIPS
230~260 ℃
100 ℃
None/Brim
Enclosed
PETG
230~260 ℃
100 ℃
None/Brim
Enclosed
Flexible
210~230 ℃
None/45℃
None
Can open
Wood
190~220 ℃
None/45℃
None
Can open
PC
230~260 ℃
100 ℃
Brim
Enclosed
PEEK
380~430 ℃
Bed 120℃/Air 70 ℃
None
Enclosed
Software Operation
- 31 -
Page 32
Routine Maintenance
Using skills
Change Fuse
Open fuse tray
Change new fuse
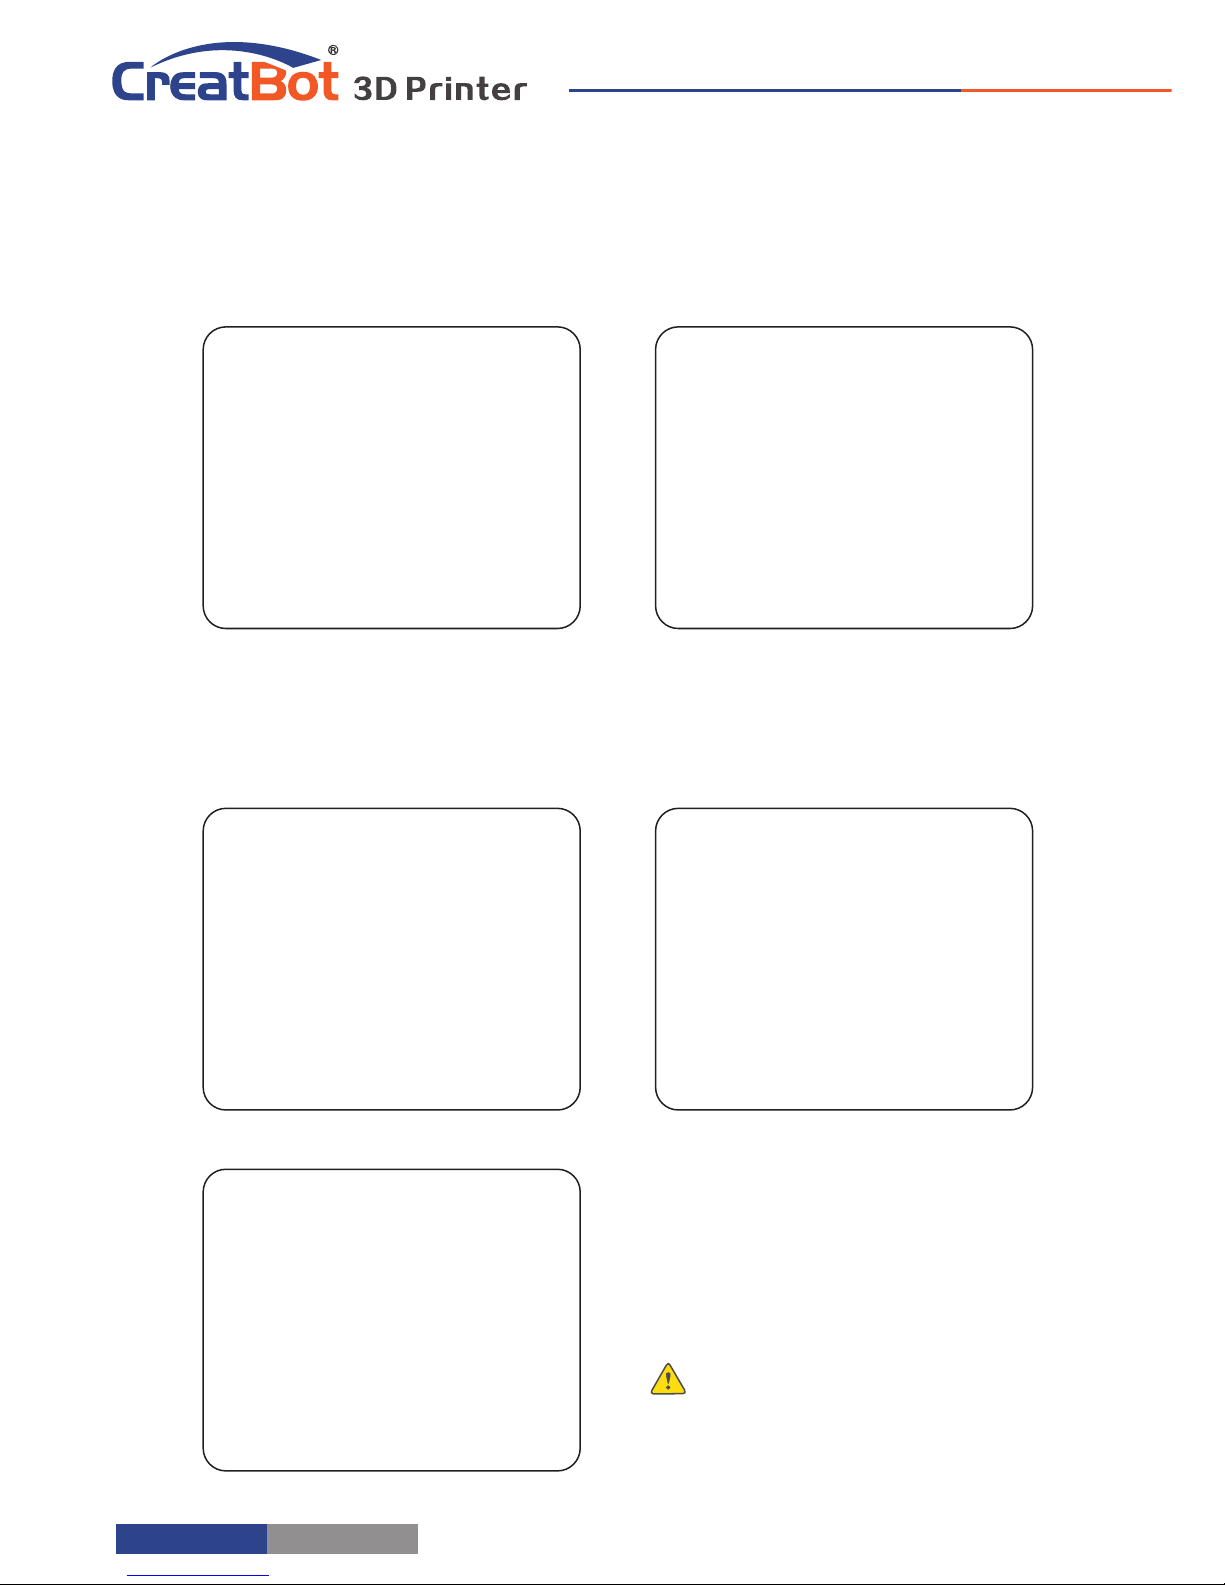
1. Frequent cleaning stains on the rail.
2. Lubricate the four guide rail.
3. Frequent cleaning feeder gear.
Notice: Don’t add too much lubricating
oil.
Using skills
- 32 -
Page 33
Installation section
Using skills
- 33 -
1.Better to use printed spool holders.
Accroading to curl direction of filament,
Get filament through guide tube can
prevent winding filament.
2.After preheating nozzle, Sharpen and
straighten filament head is necessar y.
This will get filament through extruder
easily.
3.if you can’t send filament through
nozzle well, remove pressure nut and
pressure spring first. Then open pressure arm and clear filament scrap. Sight
guide hole and send filament well.
21
3
5
4
1
Page 34
Frequently Asked Questions
Software
1.If your machines are equiped with different diameter nozzle (default
0.4mm). You have to setting:
Expert-open expert setting... Nozzle size (same to yours)
Basic-Quality-Extrusion width (same to yours)
2.Small objects need lower hotend temperature around 190~200°C.
Large objects better to use Support-Raft. Easy to stick when star t
printing.Easy to remove when finish printing.
4.Tighten pressure nut. (twist pressure nut 8~12 times after nut touch
spring. Neither too loose,nor too tight)
5. Extrude filament for a while and pull out quickly when you change
filament. Otherwise, filament may block inside heatbreak. Or choose “
Change Filament” on touch screen.
Use the small stick to poke filament out if there are filament scrap block
inside heatbreak or nozzle.
Using skills
- 34 -
Adjust Z Limit
If the nozzle can't touch the platform even loosen all the leveling nut, you
can move Z stop limit a little up, as you can see from figure.
Page 35
Frequently Asked Questions
Hardware Troubleshoot
1. Display "MINTEMP" ?
The environment is too low, or temperature control tube is damaged, please
keep the room temperature above 0℃.
2. Display "MAXTEMP" ?
Temperature of nozzle or bed too high, or temperature control tube is
damaged, please keep their temperature in a suitable range.
3. USB connection problems ?
Please specify the correct port and baud rate (250000), or change a shorter
USB cable.
4. Nozzle heats up too slowly ?
Temperature in door is too low, or use a fan duct, or turn up output voltage
(24.5v).
5. Print head stuck ?
Clean the guide rail and add lubricating oil.
6. Print head can not move ?
Stepper motor chipset burned, or belt damaged, or belt wheel screw loose.
7. Print head hit the framework ?
Corresponding axis stop limit or circuit fault.
8. Unable to power on ?
Power switch is damaged or fuse is burned, and please check whether the
power adapter is working properly.
Printing Troubleshoot
1. How to set the temperature of the nozzle ?
Different filament temperature is different, general as follows:
PLA temperature 190 ℃ ~210 ℃
ABS temperature 230℃ ~250 ℃
You must leave enough time for filament heating, so the faster printing speed
need the higher temperature, 60mm/s temperature need raise about 10℃. In
the same way, larger thickness need higher temperature.
2. How to set the temperature of the hot bed ?
The main purpose of the hot bed is to prevent model wrapped, PLA need
about 45℃ and 70℃ for ABS is enough, but due to the environment and
filament, we often need to increase the temperature, the highest temperature
- 35 -
Page 36
Frequently Asked Questions
not over 120℃, and you can close the bed above 100mm.
3. The model not stick on the platform ?
Please paste masking paper or Kapton on the platform, or the nozzle is too far
away from the platform, or the bottom of the model is not flat.
4. No or less silk coming on the first layer ?
The distance between nozzle and platform is too small, or the filament has not
been sent to the nozzle.
5. Why nozzle is not spit silk ?
The filament is not pressed or too tight, or print temperature is too low, or the
filament feeder not working.
6. How to prevent model become warped ?
Increase hot bed temperature or use Kapton, or change platform adhesion
type to Raft, or cover the baffle, or reduce indoor ventilation.
7. How far from nozzle to platform appropriate ?
Distance should be 0 in theory, but there is no absolute flat platform, so the
distance should +-0.1mm. Finally, with the actual printing effect as the
standard, too close will lead to a silk blocked, too far will cause the model not
stick on the platform.
8. How to determine whether the temperature is too high ?
PLA temperature is too high will appear liquefaction, ABS will be the carbide,
that will block the nozzle.
9. What reasons will causing nozzle blocked ?
Filament are impurities or print environment dust too much, bad of thermal
conductivity between the nozzle and the heating block.
10. Model surface is loose with crack ?
The layer is too high or the printing speed too fast, nozzle temperature too
low or filament press nut too loose, or filament is wrapped.
11. How to print a small model ?
Multiple the model, and print them at a time.
12. Dual color model not aligned ?
Adjust offset of second nozzle in machine settings.
13. Dual color model color interference ?
Align two nozzle in vertical direction
14. There is too much silk drag on the model ?
Please enable filament retraction, and specified proper retract speed, and
distance, the retract distance should not less than 4mm, and the speed not
less than 10mm/s.
Printing Troubleshoot
- 36 -
ModelDXDX Plus
DE
DE Plus
Build volume
300*250*300
300*250*520
400*300*300
400*300*520
Nozzles
Dual/Tris
Diameter
0.4mm(0.3/0.6/0.8/1.0mm can be customized)
Temperature
400 ℃
Nozzles Type
print head/new print head
Hot bed
120 ℃ (can be closed after certain layers)
Min. Layer
0.04mm
Accuracy
X 、 Y 、 Z axis 0.01mm
Print Speed
120mm/s (inner/outter, top/bottom, fill, first layer speed can be set separately)
Travel Speed
200mm/s
Materials
ABS,PLA,TPU,PETG,HIPS,PVA, PA,PC,Carbon Fibre,etc
Fila. Diameter
3.0mm (1.75mm optional)
Keypad
Yes (nine key)
Auto Turnoff
Yes (pwr manager + relay)
Continue Play
Yes (Power outage, lower plate and save data)
Fila. Check
Yes (pause printing when filament finish, and lower platform)
Adju. Head
Yes (height-adjustable-nozzles)
OS
Windows, Linux, Mac OS, OSX
Languages
Chinese, English multi-language
Software
CreatWare Muti-language
File Format
STL, OBJ, GCode, Amf
Chipset
Atmega 2560-16AU (AVR 8 Bit 16MHz , 256KB Flash)
Display
128*64 monochrome multi-language (support color TFT)
Pwr Supply
110/220V 360W
110/220V 700W
Dimension
420*380*570
420*380*790
590*430*570
590*430*790
Weight
35 Kg
40Kg
45Kg
55Kg
Page 37
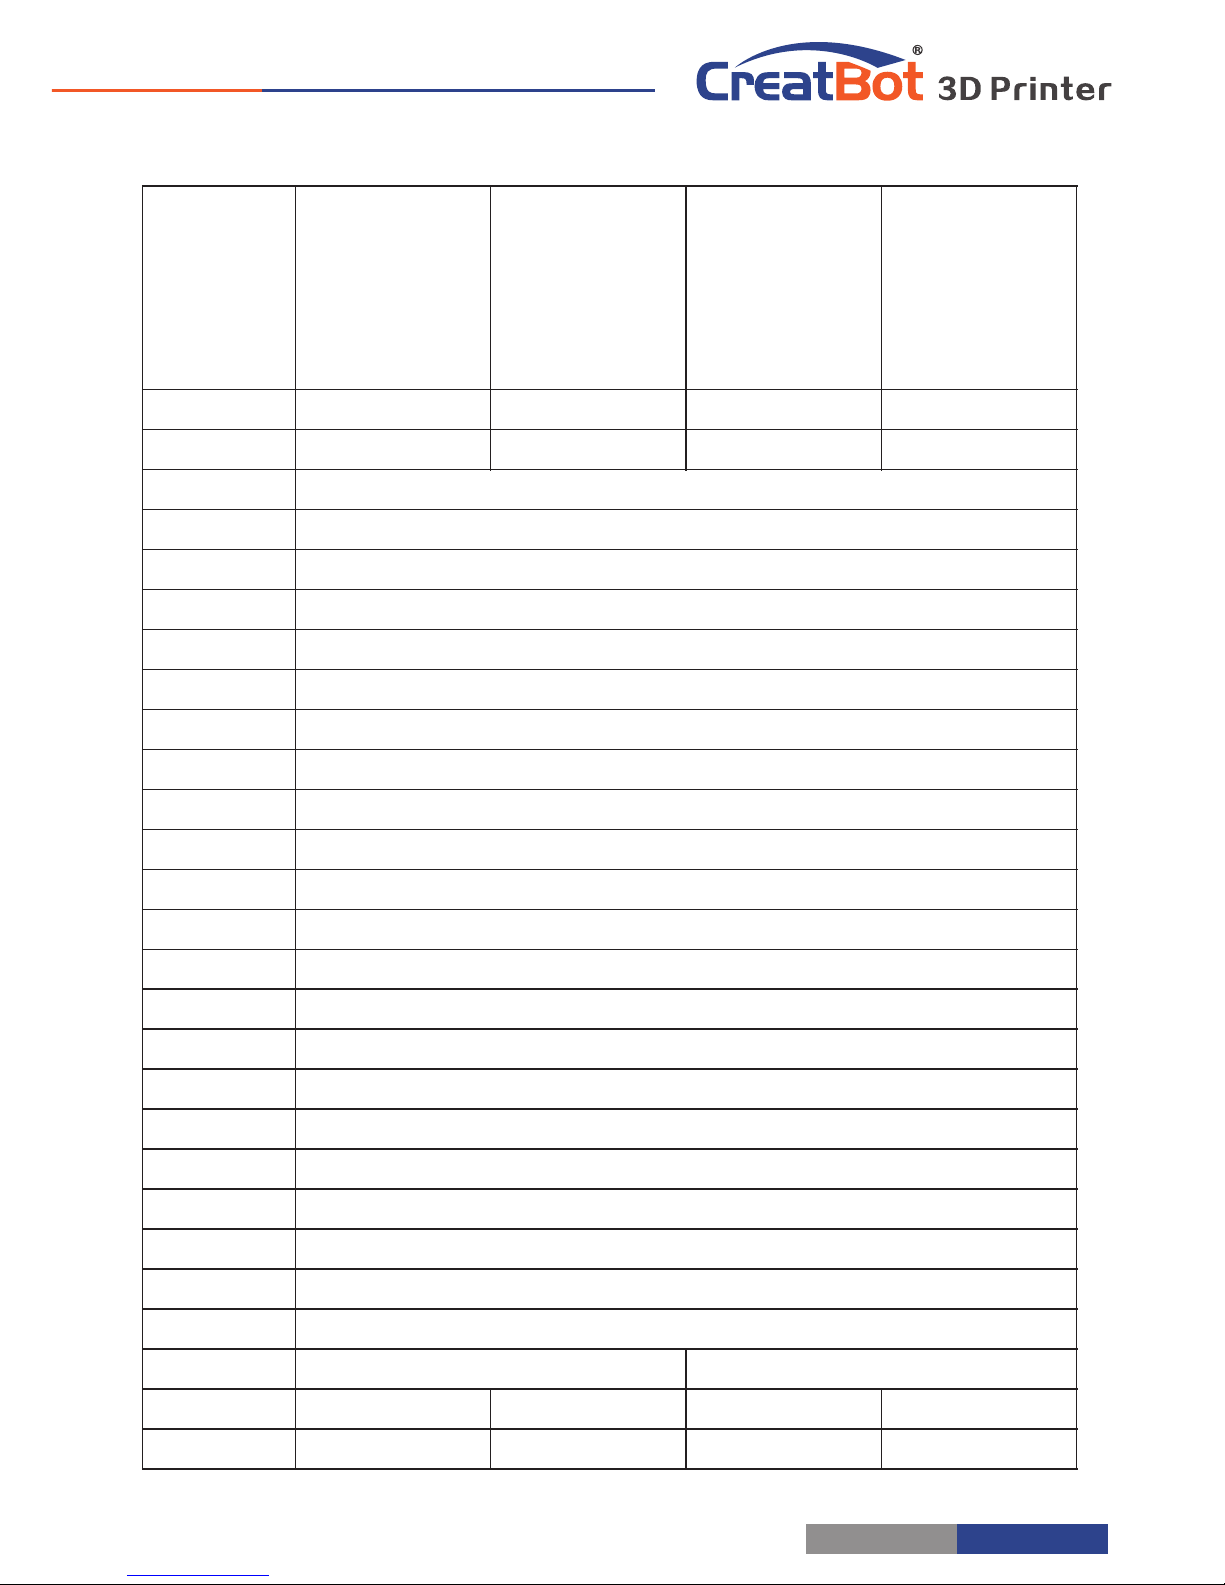
Specifications
- 37 -
Specifications
Model
DX
DX Plus
DE
DE Plus
Build volume
300*250*300
300*250*520
400*300*300
400*300*520
Nozzles
Dual/Tris
Diameter
0.4mm(0.3/0.6/0.8/1.0mm can be customized)
Temperature
400 ℃
Nozzles Type
print head/new print head
Hot bed
120 ℃ (can be closed after certain layers)
Min. Layer
0.04mm
Accuracy
X 、 Y 、 Z axis 0.01mm
Print Speed
120mm/s (inner/outter, top/bottom, fill, first layer speed can be set separately)
Travel Speed
200mm/s
Materials
ABS,PLA,TPU,PETG,HIPS,PVA, PA,PC,Carbon Fibre,etc
Fila. Diameter
3.0mm (1.75mm optional)
Keypad
Yes (nine key)
Auto Turnoff
Yes (pwr manager + relay)
Continue Play
Yes (Power outage, lower plate and save data)
Fila. Check
Yes (pause printing when filament finish, and lower platform)
Adju. Head
Yes (height-adjustable-nozzles)
OS
Windows, Linux, Mac OS, OSX
Languages
Chinese, English multi-language
Software
CreatWare Muti-language
File Format
STL, OBJ, GCode, Amf
Chipset
Atmega 2560-16AU (AVR 8 Bit 16MHz , 256KB Flash)
Display
128*64 monochrome multi-language (support color TFT)
Pwr Supply
110/220V 360W
110/220V 700W
Dimension
420*380*570
420*380*790
590*430*570
590*430*790
Weight
35 Kg
40Kg
45Kg
55Kg
Page 38
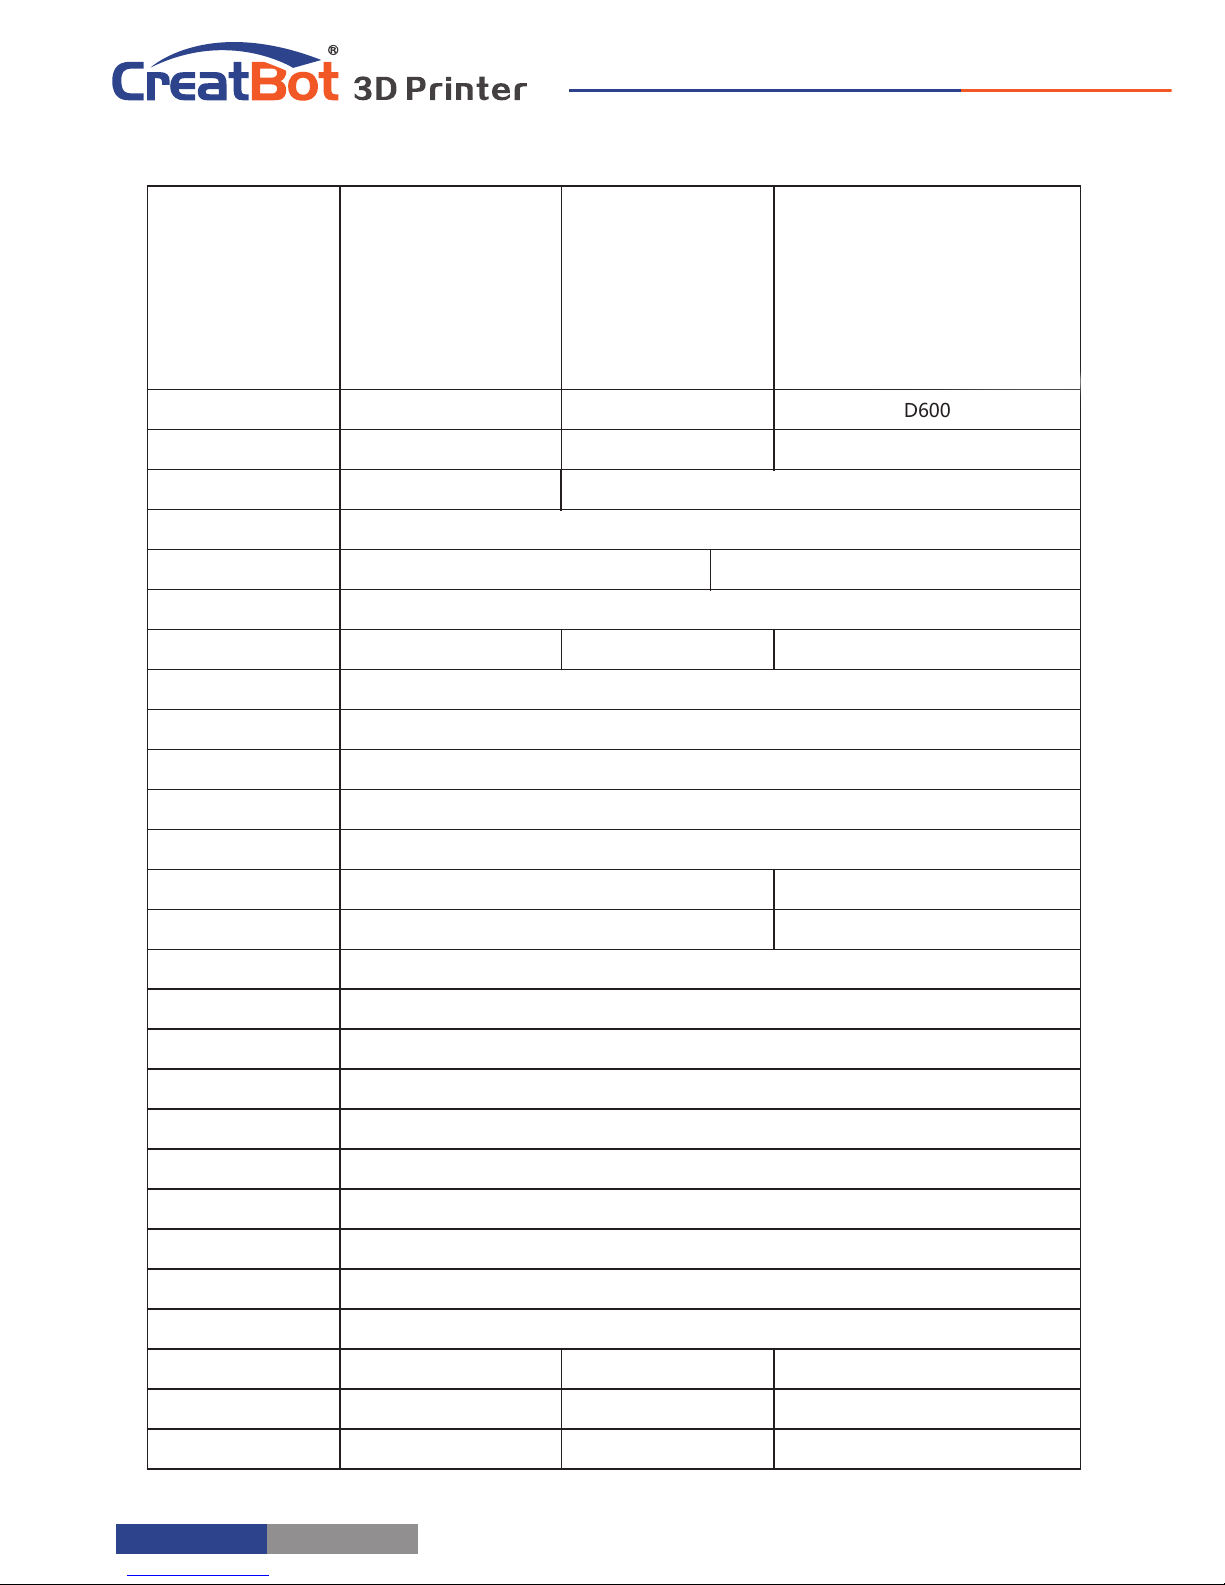
- 38 -
Specifications
Model
F160
F430
D600
Build volume
160*160*200
400*300*300
600*600*600
Nozzles
Single
Single/Dual
Diameter
0.4mm(0.3/0.6/0.8/1.0mm can be customized)
Temperature
400 ℃
360 ℃
Nozzles Type
Direct drive
Hot bed
140 ℃
Bed 120℃/Air 70 ℃
100 ℃
Min. Layer
0.04mm
Accuracy
X 、 Y 、 Z axis 0.01mm
Print Speed
120mm/s (inner/outter, top/bottom, fill, first layer speed can be set separately)
Travel Speed
200mm/s
Materials
ABS,PLA,TPU,PETG,HIPS,PVA, PA,PC,Carbon Fibre,PEEK,etc
Fila. Diameter
1.75mm
3.0mm
Motion Structures
Optic axis
Rectilinear orbit
Auto Turnoff
Yes (pwr manager + relay)
Continue Play
Yes (Power outage, lower plate and save data)
Fila. Check
Yes (pause printing when filament finish, and lower platform)
Adju. Head
Yes (height-adjustable-nozzles)
OS
Windows, Linux, Mac OS, OSX
Languages
Chinese, English multi-language
Software
CreatWare Muti-language
File Format
STL, OBJ, GCode, Amf
Printing Field
Full closed covering
Display
4.3 inches color touch screen
Pwr Supply
110/220V 180W
110/220V 1300W
110/220V 1000W
Dimension
280*280*470mm
660*470*560mm
910*840*1100mm
Weight
22Kg
60Kg
170Kg
Page 39
- 39 -
Henan Suwei Electronics Technology Co., Ltd.
Telephone: +86 4000-558-930
Website: www.CreatBot.com
Email: sales@creatbot.com
Address: A805 XingHua Building,HangHai road,
Zhengzhou City,China
Page 40

Quality · Experience · Service
 Loading...