

MID-8506CM ROCKCHIPS 2 926 说 明书, 封 面 封 底70g书 纸, 135x10 2mm,钉 装
USER'S MANUAL
MID-8506CM

Table of Contents
Table o f C on tents .. .. ..... .. ....... .. ....... .. ..... .. .. P1
Fe at ures. .. .. ..... .. .. .. ... .. .. .. ... .. .. .. ... .. .. .. ..... .. P2
Unit at a Gla nc e ... ..... .. .. ..... .. ....... .. ....... .. ..P3
Getting Started.. .. .. .. ......... .. .. .. ......... .. .. P4 -P5
Ab out App li ca ti ons...... .. .. .. .. .. ......... .. .. .. .. .. .P6
Connect to a Wi-F i netw or k. ..... .. .. ..... .. ..P7-P8
Op ti on al Co nn ec ti on s. .. .. .. .. .. .. ................. .P 9
Specifi ca tions.. .. ..... .. .. ..... .. ....... .. ....... .. ..... P1 0
1

Features
Browse th e Web.
Vis it y ou r favor it e we bsite s
Check you r e- mail
Keep in tou ch w ith fri en ds a nd fami ly
Wat ch YouTub e™ vide os
Browse th e wo rld’s m os t popul ar
video-s ha ring comm un ity
Read your f av orite b oo ks
Downloa d th ousands o f bo oks wit h th e
include d E- book read er *
Discove r th ousands o f ap ps for And ro id ™
Games, ap pl icati on s, a nd more w it h
marketp la ce(ne ed f or c ustom er i ns talle d)
Connect t o th e Inter ne t wi reles sl y
High-sp ee d Wi-Fi 802 .11 b/g/ n ne tworkin g
2
Enjoy you r me dia libra ry a nywhe re
Portabl e po werhous e pl ays pop ul ar m usic,
video,a nd p hoto form at s
microSD m em ory car d re ad er
Increas e yo ur stor ag e ca pacit y (u p to 3 2 GB
support ed )
Built-i n ca mera
Conveni en t front-f ac ing cam er a
Automat ic o rient at io n detec ti on
Read any wa y yo u want; the d is play ad ju st s
automat ic ally!
Reading b oo ks in the ePu b fo rmat re qu ir es the
include d E- book read er a pplic at io n.
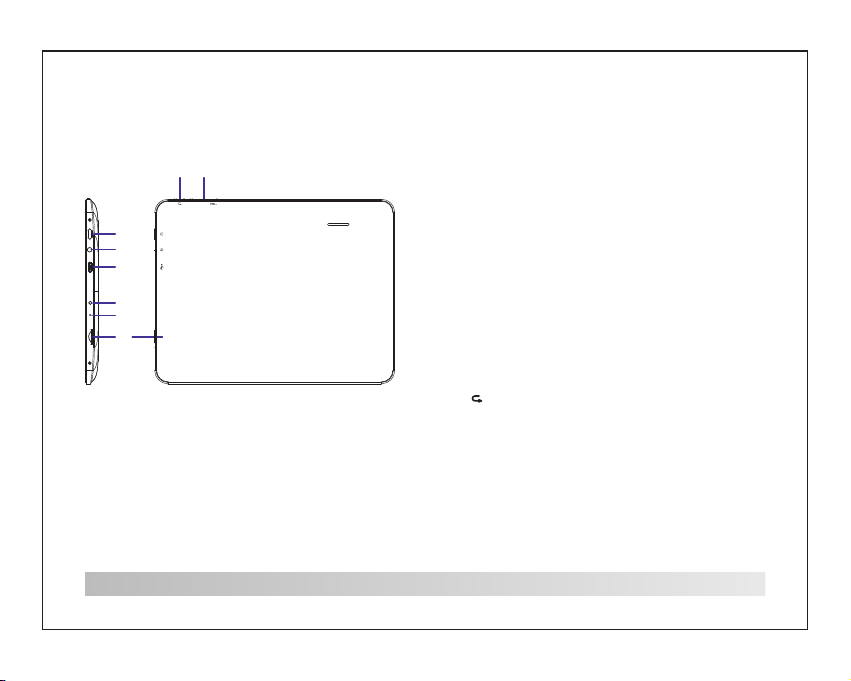
Unit at a Glance
7 8
VOL+
1
2
3
DC IN 5V
4
RESET
5
TF CARD
6
1. Power
Press to tu rn t he unit o n, o r to t urn the s cr ee n
on or off .
Press and h ol d to acce ss t he P ower Of f menu.
2.Headp ho ne
Audio out pu t connect io n for hea dp ho nes.
3.USB OTG AN D HO ST
Connect t o a US B devic e or a c om puter t o
transfe r da ta (e.g . mu si c, vide os ,p hotos , fi le s).
Connect t o a US B devic e
4.DC IN
Connect t o an a dapter or a c om puter t o su pp ly
power.
5.RESET
Press thi s bu tton to r es et t he syst em w he n the
device is h al ted.
6.TF-CA RD
Load exte rn al TF -c ar ds here .
7.
Return ke y
8.VOL+/ VO LPres s
VOL+ to inc re ase the v ol um e level .
Press VOL - to d ecrea se t he v olume l ev el .
3

Getting Started
Turning the Tablet on or off
To turn the tab le t on:
Press and h ol d the Pow er k ey u ntil th e LC D
screen tu rn s on. Wait until t he H ome scree n
appears ; th e tablet is n ow r eady fo r us e.
To turn the tab le t off :
Press and h ol d the Pow er k ey u ntil th e De vi ce
Options m en u appears .
2. Touc h ok t he s creen t o tu rn o ff th e ta blet.
4
Turning the Screen On or off (Standby)
When the ta bl et is on, y ou c an t urn off t he
screen to c on serve b at te ry powe r. Si mp ly
press the P ow er key on ce t o tu rn the sc re en
off . Pr es s the Pow er k ey a gain to t ur n the
screen ba ck o n.
To cons er ve b atter y po wer, the scr ee n can
be set to tur n off aut om at icall y wh en the tabl et
is not in use ( be tween
1 minute an d 30 m inutes) .
This Scre en t imeou t op ti on can be f ou nd i n the
Display m en u.

Getting Started
Unlocking the Screen
When the sc re en turn s of f, you wi ll h ave to
unlock th e sc reen when y ou t urn it ba ck o n.
To unlock the s cr een, drag t he l ock ico n ac ro ss
the scree n to wards t he l oc k icon.
About Ap plications
To open an appl ic ation, to uc h the app li ca tion
icon on the h om e screen or i n th e Launc he r
where you c an t ap theico n ri ght up on t he h om e
screen to g et i n.
Launche r sc reen:
The s cr ee n shown a bo ve i s for ill us trative
purpose s on ly. Re se rv es the ri gh t to modify a nd
improve t he f inal list o f ap plica ti on s avail ab le
on the tabl et .
5

About Applications
Preinstalled Applications
Some appl ic ations ha ve b een ins ta ll ed on you r
tablet fo r yo ur conv en ie nce.
These app li cations i nc lude:
Browse th e we b.
Perform s im ple mat he ma tical o pe ra tions .
Take pictur es o r videos wi th t he
frontfa ci ng came ra .
Check you r e- mail.
Play musi c.
Access th e Se tting s me nu t o adjus t th e
tablet’ s optio ns .
6
Installing Applications
You ca n also down lo ad an insta ll a ddition al
applica ti ons from th e de vice’ s applica ti ons
marketp la ce, the w eb b ro wser, or o th er s ource s.
The table t mu st be set t o al lo w insta ll at ion of
applica ti ons from no n- Marke t so ur ces. Th e
Unknown s ou rces opti on c an be set i n th e
Applica ti on settin gs m enu.

Connect to a Wi-Fi network
The Notification bar d isp lay s icons tha t ind ica te
you r tablet’s Wi- Fi status.
Not ifi cat ion that an o pen Wi-Fi netw ork i s in
ran ge.
Con nec ted to a Wi-F i network
(wa ves indicate conn ect ion s tre ngt h).
[no i co n]
Ther e are no Wi-F i networks in ra nge ,
or the Wi-Fi rad io is of f.
1. Turn on the Wi-Fi r adi o if it is not alr ead y on.
To turn on Wi-Fi:
a.G o to the Home screen: Pr ess t he Home key.
b.O pen the Settin gs me nu: tap the i con right up
on the home scre en to ge t int o the la unc her,
the n touch Settin gs ic on.
c.O pen the Wir ele ss & networks me nu: S lid e the
ico n to ON st atu s.
When Wi-F i is o n, the ta bl et w ill loo k fo r an d
display a l is t of availa bl e Wi-Fi n et wo rks.
If a netw or k th at you ha ve c on necte d to
previou sl y is found, t he t ablet w il l co nnect t o it .
If you don’ t se e your ne tw or k in the li st ,y ou can
force the t ab let to re -s ca n.To scan f or n et works ,
tap the Men u ke y, and t he n to uch Sca n.
7

Connect to a Wi-Fi network
2. Select a n av ailab le W i- Fi netw or k to c onnec t
to: In the sa me W i-Fi se tt in gs menu a bo ve ,
touch a net wo rk in the l is t.
If the netw or k is open ,t he t ablet w il l pr ompt yo u
to confir m co nnect io n to t he netw or k. Touch
Connect t o co nfirm .
If the netw or k is secu re d (a s indic at ed b y a
Lock icon ), the tab le t wi ll prom pt y ou t o enter a
passwor d or o ther cr ed en tials .Tou ch t he
Wireles s pa ssword bo x to s how the o n- sc reen
keyboar d an d then use it t o en ter the p as sw ord.
Touch Conne ct t o confirm .
8
When you ha ve s uccessf ul ly conn ec te d to a
Wi-Fi net wo rk, the N ot if icati on s ba r at the th e
low of the sc re en will sho w a Wi -Fi sig na l
indicat or.
To lear n ab ou t how to ad d a Wi -F i netwo rk
when it is no t in r ange or whe n th e route r is s et
to obscur e th e netwo rk n am e (SSID ); o r to
configu re a dvanced W i- Fi opti on s, p lease
refer to th e ma nual.

Optional Connections
Connecting to a Computer
Connect t he t ablet to a co mp uter to t ra ns fer
files.
1.Conne ct y our tab le t to t he comp ut er.
With the in cl uded USB ca bl e: Plug t he s ma ll
end of the ca bl e into th e US B 2. 0 high sp ee d
connect or o f the tab le t. P lug the l ar ge e nd of
the cable i nt o an availa bl e USB 2.0 h ig h sp eed
port on the c om puter.
2.When yo ur t ablet i s co nn ected ,s li de up
the USB ico n ri ght dow n on t he s creen a nd
then touc h ic on USB co nn ec ted.
3.Mount t he s torag e.
Touch butto n Tur n on USB stor ag e to moun t
the table t’s bui lt -i n stora ge . When it is
mounted , yo u can cop y fi le s to or fro m yo ur
tablet.
9

Specifications
Pro ce sso r
RAM
Sto ra ge
Displ ay
Wi- Fi
Netwo rki ng
Audio O utp ut
PC In te rfa ce
Addit ion al
Fea tu res
Ope ra tin g
Sys te m
Power
Playb ack Ti me
(hour s)
RK 2926 1 GHz (Cort ex A9)
512MB D DR3
(opti on)
4~16G B fla sh b uil t-in;
micro SD ca rd slot ( max .3 2GB
suppo rte d)
8.0”T FT LC D(8 00 x60 0),
Capac tiv e touch s cre en
IEE E 80 2.11 b /g/ n
3.5mm h ead phone
USB 2.0 h igh s peed
Built -in m icrop hon e
Fro nt f aci ng came ra( 0. 3MP )
1x0.7 W spe aker
Andro id™ 4 .1
Recha rge able Li -po ly b att ery
power Ad apt er (DC 5 V,2A )
5 hours m usi c,
2. 5 ho urs v ide o,
3. 5 ho urs w eb br ow sin g
Music was t es ted wit h a 12 8 kb ps MP3 fi le ;
video was t es ted with a 19 20 x1080 M PE G- 4
/AVC f il e; b rowsi ng w as t ested w it h the scree n
brightn es s set to de fa ul t. Actua l pl ay back
results m ay v ary.
10

FCC INFORMATION (ADDITIONAL)
Note: This equipment has been tested and found to comply with the limits for a Class B
digital device, pursuant to part 15 of the FCC Rules. These limits are designed to provide
reasonable protection against harmful interference in a residential installation. This
equipment generate, uses and can radiate radio frequen cy energy and, if not installed
and used in accordance with the instructions, may cause harmful interference to radio
communications. However, there is no guarantee that interference will not occur in a
particular installation. If this equipment does cause harmful interference to radio or
television reception, which can be determined b y turning the equipment off and on, th e
user is encouraged to try to correct the interference by one or more of the following
measures:
—Reorient or relocate the receiving antenna.
—Increase the separation between the equipment and receiver.
—Connect the equipment into an outlet on a circuit different from that to which the
receiver is connected.
—Consult the dealer or an experienced radio/TV technician for help.
RF Exposure
This device was evaluated for compliance with FCC RF Exposure requirements for
typical body-worn operations with a separation distance of 0c m to the body. The use of
accessories with metallic components in its assembly should be avoided. Accessories
that do not satisfy these requirements may not comply with FCC RF exposure
requirement.
 Loading...