

Page 1
MID7326CM ENG LISH MANUAL AMLOGI C AML872 6MX方 案
标准 说 明书 ,70g书 纸, 135x102mm,钉装
USER'S MANUAL
MID-7326CM
Page 2

Table of Contents
Table of C on te nts.. .. .. .. ..... .. .. ..... .. .. ..... .. .. .. .P1
Feat ur es ..... .. .. .. ..... .. .. ..... .. .. ....... .. .. ..... .. .. .P2
Unit a t a Gl an ce .... .. .. .. ..... .. .. ..... .. .. ....... .. .. P3
Gett in g St arted .. .. .. ..... .. .. ..... .. .. ....... .. .. .P4-P 5
Abou t App li catio ns .. ....... .. .. ..... .. .. ..... .. .. P5 -P6
Prei ns ta lled App li ca tions .. .. .. ..... .. .. ..... .. .. ...P6
Conn ec t to a W i-Fi ne tw or k...... .. .. ..... .. .. .P7-P 8
Opti on al C onnec ti on s...... .. .. ..... .. .. ..... .. .. .. ..P9
Spec if ic ation s. .. ....... .. .. ..... .. .. ..... .. .. .. ..... .. P1 0
1
Page 3

Features
Brow se t he W eb .
Vis it your f av or ite web si te s
Chec k yo ur e -mail
Keep i n to uc h with fr ie nd s and fam il y
Wat ch You Tube ™ vi de os
Brow se t he w orld’s most p op ul ar vide oshar in g co mmuni ty
Read y ou r fa vorit e bo ok s
Down lo ad t housa nd s of b ooks wi th t he
incl ud ed E -book r ea de r *
Disc ov er t housa nd s of a pps for An dr oi d™
Game s, a pp licat io ns , and mor e wi th
mark et pl ace(n ee d fo r custo me r in st alled )
Conn ec t to t he Inte rn et w irele ss ly
High -s pe ed Wi-F i 80 2. 11 b/ g/ n netwo rk in g
Enjo y yo ur m edia li br ar y anywh er e
2
Port ab le p owerh ou se p lays po pu la r mu sic,
vide o, an d photo f or ma ts
micr oS D me mory ca rd r ea der
Incr ea se y our sto ra ge c apaci ty ( up t o 32 G B
supp or te d)
Buil t- in c amera
Conv en ie nt fron t- fa cing ca me ra
rear 2 MP
Auto ma ti c orien ta ti on dete ct io n
Read a ny w ay y ou want ; th e di splay a dj us ts
auto ma ti cally !
Read in g bo oks in th e eP ub f ormat r eq ui re s
the in cl ud ed E-bo ok r ea der app li ca ti on.
(0.3 MP ),
Page 4
Unit at a Glance
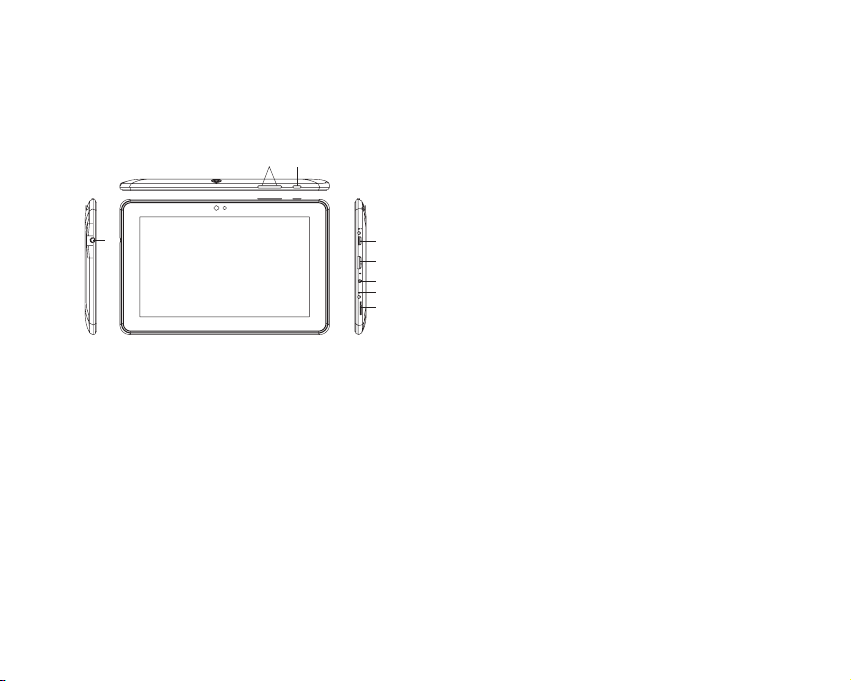
1 2
3
1. VOL+/VOL-
Press VOL+ to increase the volume level.
Press VOL- to decrease the volume level.
2. POWER
Press to turn the unit on, or to turn the screen on
or off.
Press and hold to access the Power Off menu.
3. Headphone
Audio output connection for headphones.
4.USB
Connect to a USB device or a computer to transfer
data (e.g. music, videos,photos, files).
5. HDMI
Connect to a TV or other displays.
4
5
6
7
8
6.DC IN 5V
Change and power the tablet with the included
power adapter.
7.RESET
Press this button to reset the system when the
device is halted.
8. microSD
Load external microSD memory cards here.
3
Page 5
Getting Started
Turnin g the Tablet on o r off
To turn th e ta bl et on:
Pres s an d ho ld the Po we r ke y until the L CD
scre en t ur ns on. Wai t un til the H om e sc reen
appe ar s; t he tabl et i s no w ready f or u se .
To turn th e ta bl et off :
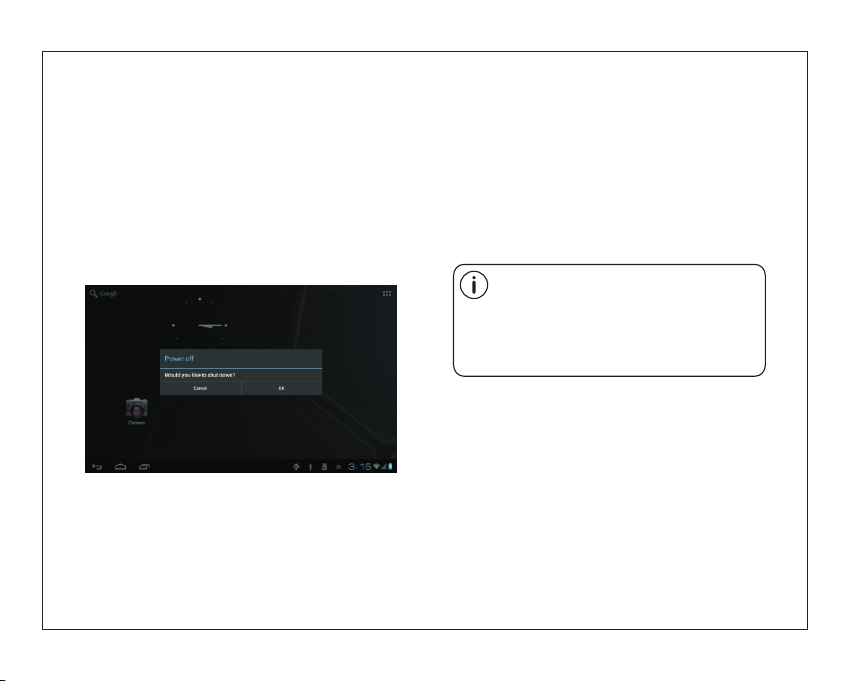
1.Pr es s an d hold th e Po we r key unt il t he
Devi ce O pt ions me nu a pp ears.
2. Touc h ok the sc re en t o turn off the ta bl et .
4
Turnin g the Screen On or off
(Stand by)
When t he t ab let is on , yo u ca n turn off the
scre en t o co nserv e ba tt ery pow er. S im pl y press
the Po we r ke y once to t ur n th e screen
off . Press t he P ow er key ag ai n to t urn the
scre en b ac k on.
To conse rv e ba ttery p ow er, t he scre en
can be s et t o tu rn off a utoma ti ca lly whe n
the ta bl et i s not in us e (b et ween
15 sec on ds a nd 30 min ut es ).
This S cr ee n timeo ut o pt ion can b e fo un d
in the D is pl ay menu .
Page 6
Getting Started
Unlock ing the S creen
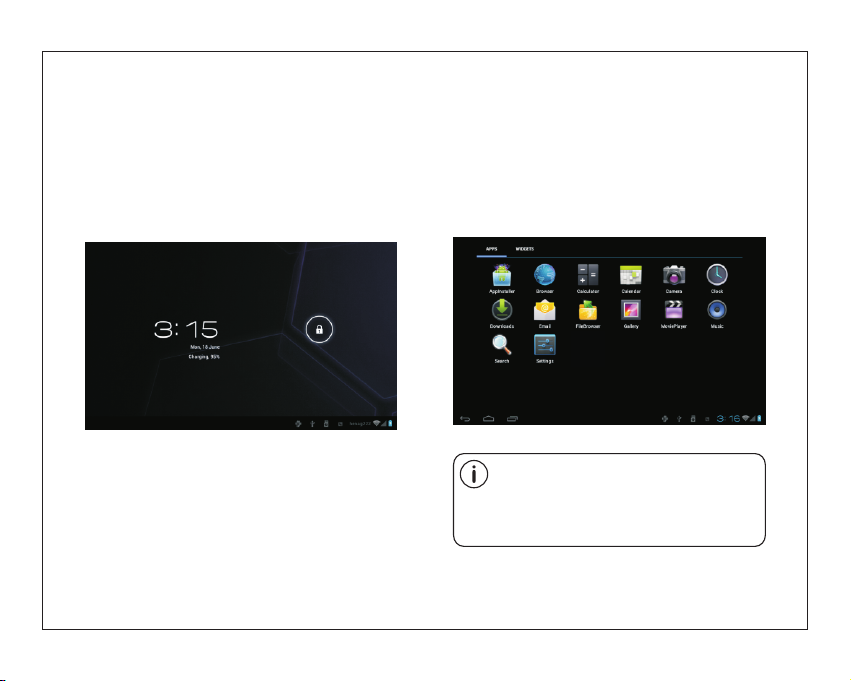
When t he s cr een tur ns o ff , yo u wi ll have t o
unlo ck t he s creen
when y ou t ur n it back o n.
To unloc k th e sc reen, d ra g th e lock ic on a cr os s
the sc re en t oward s th e lo ck icon .
.
About Applications
To open an a pp li catio n, t ou ch the ap pl ic at ion
icon o n th e ho me scre en o r in t he Laun ch er
wher e yo u ca n tap the i co n ri ght up on t he
home s cr ee n to get in ..
Laun ch er s creen :
The screen shown above is for illustrative
purposes only. Reserves the right to modify
and improve the final list of applications
available on the tablet.
5
Page 7

About Applications
Preinstalled Applications
Som e app li catio ns ha ve been instal led on your
tab let for your conven ience .
The se ap pl icati ons inc lude:
Brow se t he w eb.
Perf or m si mple ma th em atica l op er at ions.
Take pic tu re s or vide os w it h the
fron tf ac ing cam er a.
Chec k yo ur e -mail .
Play m us ic .
Music
Acce ss t he S ettin gs m en u to adjust t he
tabl et ’s o pt io ns.
Setti ngs
6
Preinstalled Applications
Instal ling Appl ications
You ca n al so down lo ad a n install a dd it ional
appl ic at ions fr om t he d evice ’s app li ca tions
mark et pl ace, th e we b br owser, o r ot he r
sour ce s.
The ta bl et m ust be se t to a ll ow instal la ti on of
appl ic at ions fr om n on -Mark et s ou rc es. The
Unkn ow n so urces o pt io n can be se t in t he
Appl ic at ion set ti ng s menu.
Page 8
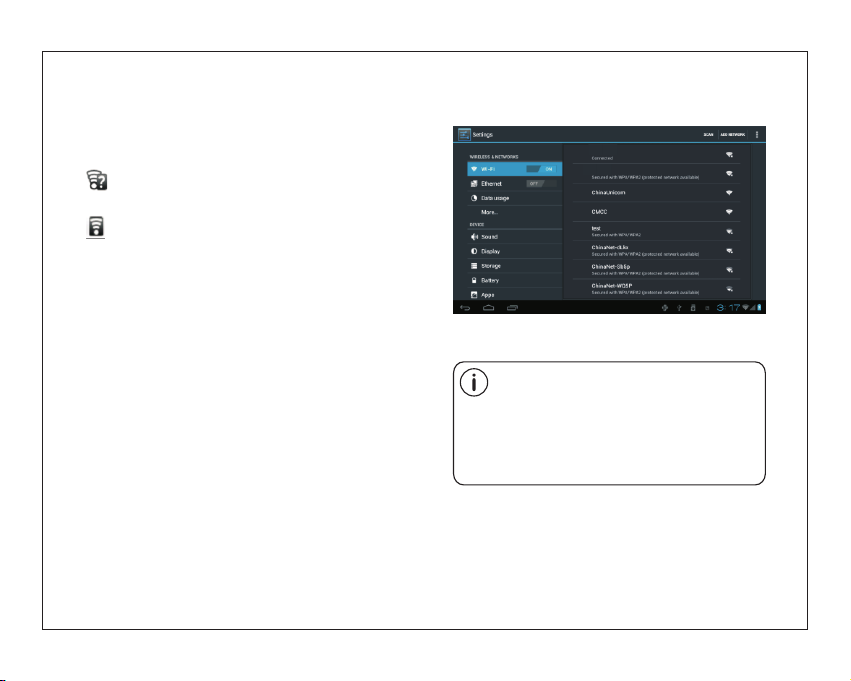
Connect to a Wi-Fi network
The No ti fi catio n ba r di splay s ic on s th at indi ca te
your t ab le t’s Wi -Fi sta tu s.
Noti fi ca tion th at a n op en Wi-Fi ne tw or k is
in ran ge .
Conn ec te d to a Wi-F i ne tw ork (wa ve s
indi ca te c onnec ti on s treng th ).
[no ic on ] Th er e ar e no Wi-F i ne tw orks in
rang e, o r th e Wi-Fi r ad io i s off.
1. Tur n on the Wi-F i ra di o if it is no t al re ady
on. To turn on Wi-F i:
a.Go t o th e Ho me scre en : Pr ess the Hom e
key.
b.Op en t he S ettin gs m en u: tap the ic on r ig ht
up on th e ho me s creen t o ge t in to the
laun ch er, t hen tou ch S et tings i co n.
c.Op en t he W irele ss & n et works men u: S li de
the ic on t o ON s tatus .
WIFI 1
WIFI 2
When W i- Fi i s on, the t ab le t wi ll look f or a nd
disp la y a li st of ava il ab le Wi-F i ne tw or ks.
If a net wo rk t hat you h av e co nnected t o
prev io us ly is fou nd , th e table t wi ll
conn ec t to i t.If yo u do n’ t se e your
netw or k in t he list , yo u ca n force the
tabl et t o re -scan . To scan fo r ne tw orks,
tap th e Me nu k ey, and t hen tou ch S ca n.
7
Page 9
Connect to a Wi-Fi network
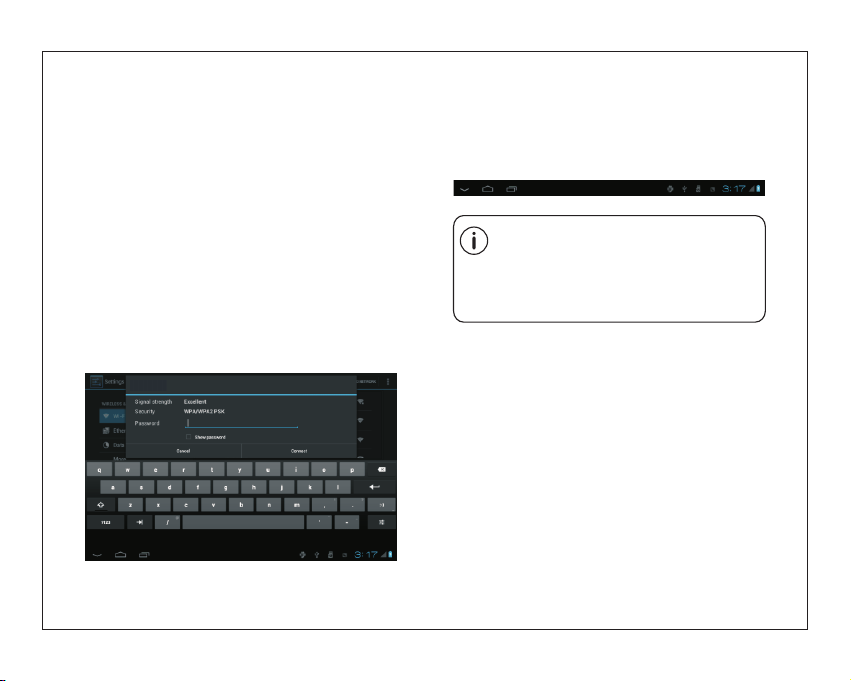
2. Select an available Wi-Fi network to connect
to:
In the same Wi-Fi settings menu above,touch a
network in the list.
If the network is open,the tablet will prompt you to
confirm connection to the network. Touch Connect
to confirm.
If the network is secured (as indicated by a Lock
icon),the tablet will prompt you to enter a
password or other credentials.Touch the Wireless
password box to show the on-screen keyboard
and then use it to enter the password. Touch
Connect to confirm.
WIFI 1
8
When you have successfully connected to a
Wi-Fi network, the Notifications bar at the the low
of the screen will show a Wi-Fi signal indicator.
To learn about how to add a Wi-Fi network
when it is not in range or when the router
is set to obscure the network name (SSID);
or to configure advanced Wi-Fi options,
please refer to the manual.
Page 10
Optional Connections
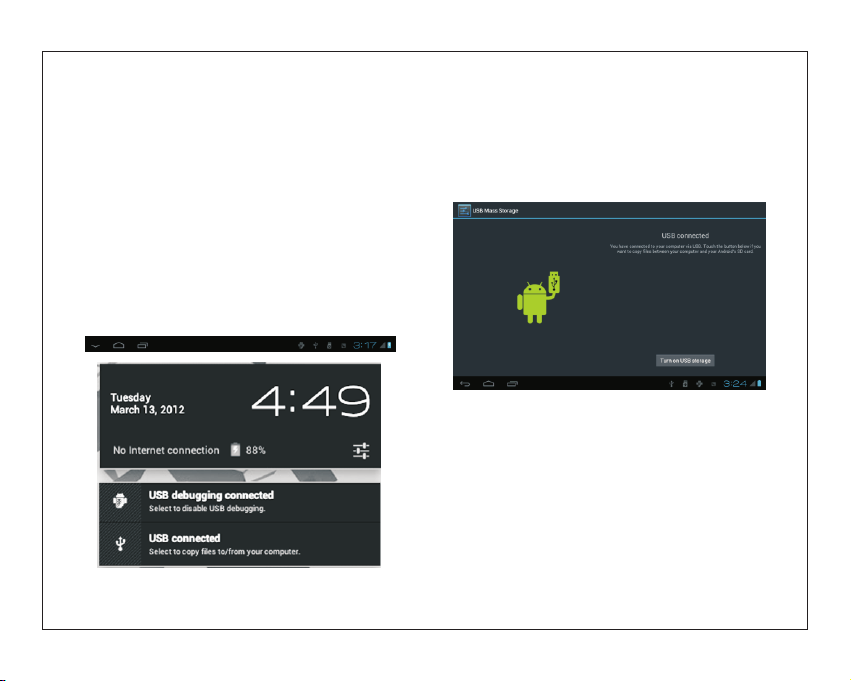
Connecting to a Computer
Connect the tablet to a computer to transfer files.
1.Connect your tablet to the computer.
With the included USB cable: Plug the small end
of the cable into the USB 2.0 high speed
connector of the tablet. Plug the large end of the
cable into an available USB 2.0 high speed port
on the computer.
2.When your tablet is connected,slide up the
USB icon right down on the screen and then
touch icon USB connected.
3.M ount the sto rage.
Touch bu tton Turn on USB storag e to mo unt the
tab let’s buil t-in st orage . Whe n it is mounte d, yo u
can copy f iles to or from you r tab let.
9
Page 11
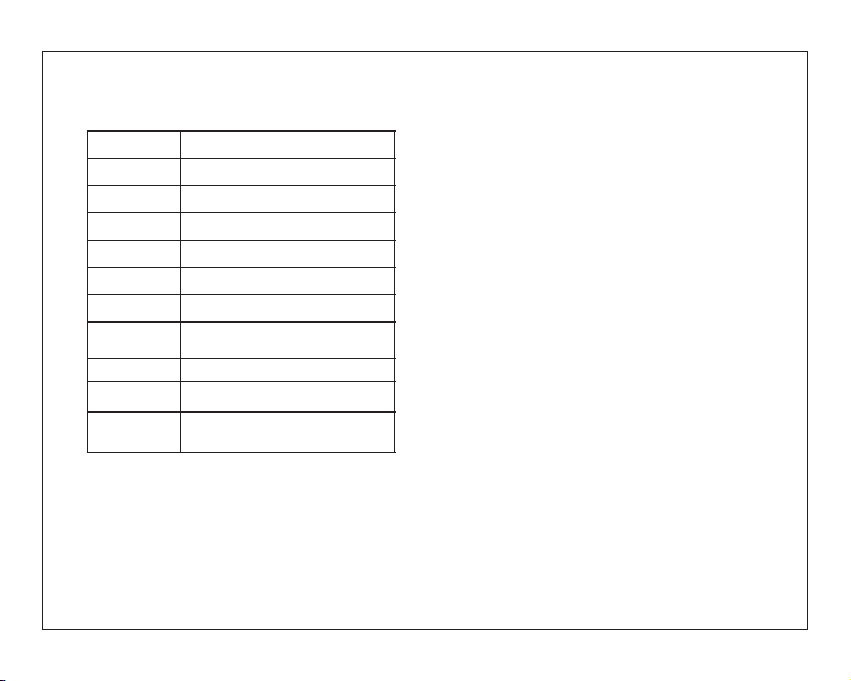
Specifications
Processor
Storage
Display
Wi-Fi Networking
Audio Output
PC Interface
Additional Features
Operating System
Power
Playback Time
(hours)
Amlogic 8726-MX Dual core 1.5GHz(cortex A9)
RAM
1GB DDR3
4~16GB(option) flash built-in; micro
SD card slot (max.32GB supported)
7.0”TFT LCD(1024x600), Capcitive touchscreen
IEEE 802.11 b/g/n
3.5mm headphone
USB 2.0 high speed
Built-in microphone
Front facing camera(0.3MP), rear 2MP
1X1W speaker
And roid™ 4 .0
Rechargeable Li-poly battery power
Adapter(DC 5V, 2A)
Up to 9 hours music,
4 hours video,
4 hours web browsing
10
Music was te sted with a 128 kbps MP3 file; v ideo
was tested w ith a 1920x1080 MPEG-4/AVC file;
browsing w as tested with the screen br ightness
set to defau lt. Actual playback result s may vary.
Page 12

WARNING
Any changes or modifications not expressly approved by the party responsible for compliance could void the user's authority to operate this
equipment.
This device complies with Part 15 of the FCC Rules. Operation is subject to the following two conditions: (1) This device may not cause harmful
interference, and (2) this device must accept any interference received, including interference that may cause undesired operation.
This device and its antenna(s) must not be co-located or operating in conjunction with any other antenna or transmitter.
NOTE: This equipment has been tested and found to comply with the limits for a
Class B digital device, pursuant to Part 15 of the FCC Rules. These limits are
designed to provide reasonable protection against harmful interference in a
residential installation. This equipment generates, uses and can radiate radio
frequency energy and, if not installed and used in accordance with the
instructions, may cause harmful interference to radio communications. However,
there is no guarantee that interference will not occur in a particular installation.
If this equipment does cause harmful interference to radio or television reception,
which can be determined by turning the equipment off and on, the user is
encouraged to try to correct the interference by one or more of the following
measures:
-- Reorient or relocate the receiving antenna.
-- Increase the separation between the equipment and receiver.
-- Connect the equipment into an outlet on a circuit different
from that to which the receiver is connected.
&onsult the dealer or an experienced radio/TV technician for help.
11
 Loading...