

Page 1
USER'S MANUAL
MID-8506CM
MID-8506CM ROCKCHIPS 2926 说明 书, 封面 封底70g书 纸,135x102mm,钉装
Page 2

1
Table of Contents
Table of Contents......................................P 1
Fea tures. ...... ...... ..... . ..... . ..... . ..... ...... ...... ..P2
Unit at a Gl anc e ......................... ... ... ........P3
Getting Started.................. .......... ........P4 -P5
Ab out Ap plicati ons.............. ....... ....... ........P6
Connect to a Wi-Fi ne two rk. ... ...............P7-P8
Op tional Con nections. .... ......... .... .... ......... P9
Specifications...................................... ... ..P 10
Page 3

Features
Browse the Web .
Visi t you r fav ori te we bsites
Check your e-mail
Keep in touch with friends and family
Watch YouTub e™ vi deo s
Browse the world’s mos t pop ular
video-sharing community
Read your favorite books
Download thousands of books with the
included E-book reader *
Discover thousands of apps for Android™
Games, applications, and more with
marketplace(need for customer installed)
Connect to the Internet wirelessly
High-speed Wi-Fi 802.11 b/g/n networking
2
Enjoy your media library anywhere
Portable powerhouse plays popular music,
video,and photo formats
microSD memory card reader
Increase your storage capacity (up to 32 GB
supported)
Built-in camera
Convenient front-facing camera
Automatic orientation detection
Read any way you want; the display adjusts
automatically!
Reading books in the ePub format requires the
included E-book reader application.
Page 4
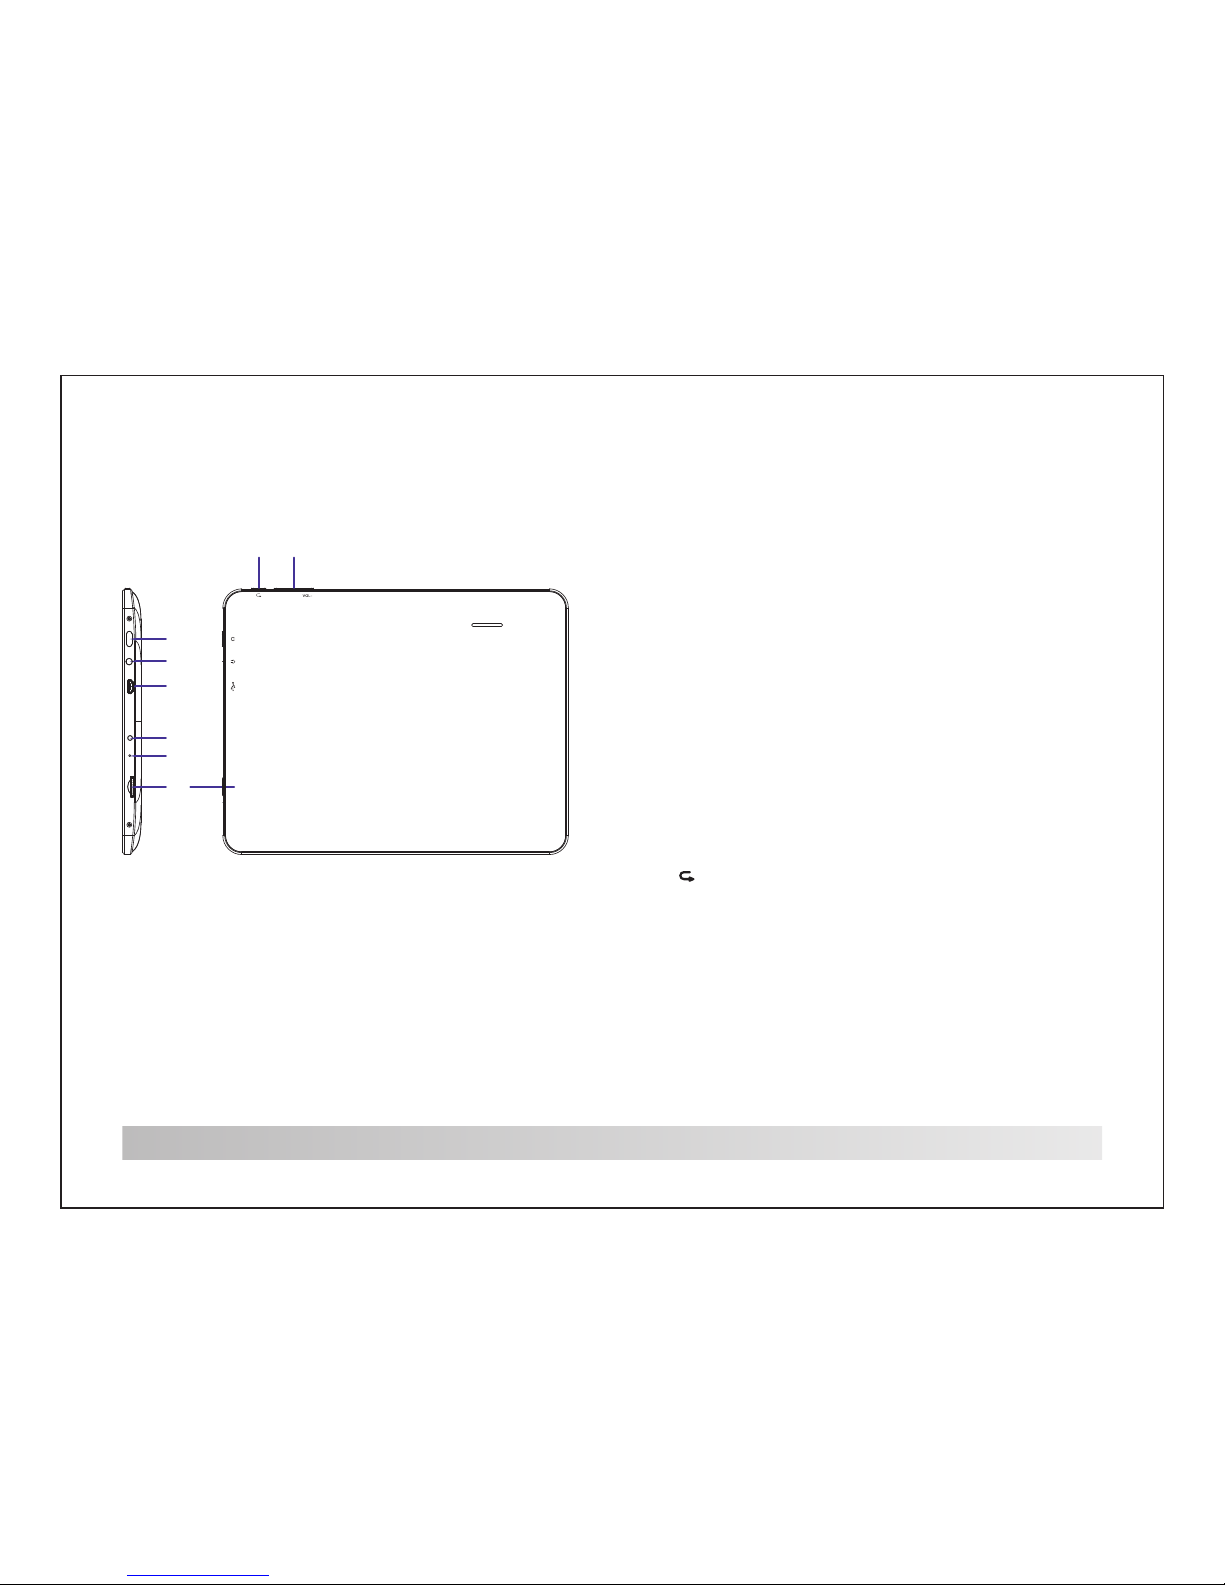
Unit at a Glance
3
1. Power
Press to turn the unit on, or to turn the screen
on or off.
Press and hold to access the Power Off menu.
2.Headphone
Audio output connection for headphones.
3.USB OTG AND HOST
Connect to a USB device or a computer to
transfer data (e.g. music, videos,photos, files).
Connect to a USB device
4.DC IN
Connect to an adapter or a computer to supply
power.
5.RESET
Press this button to reset the system when the
device is halted.
6.TF-CARD
Load external TF- car ds he re.
7.
Return key
8.VOL+/VOLPress
VOL+ to increase the volume level.
Press VOL- to decrease the volume level.
DC IN 5V
TF CARD
RESET
VOL+
1
2
3
4
5
6
7 8
Page 5
Getting Started
4
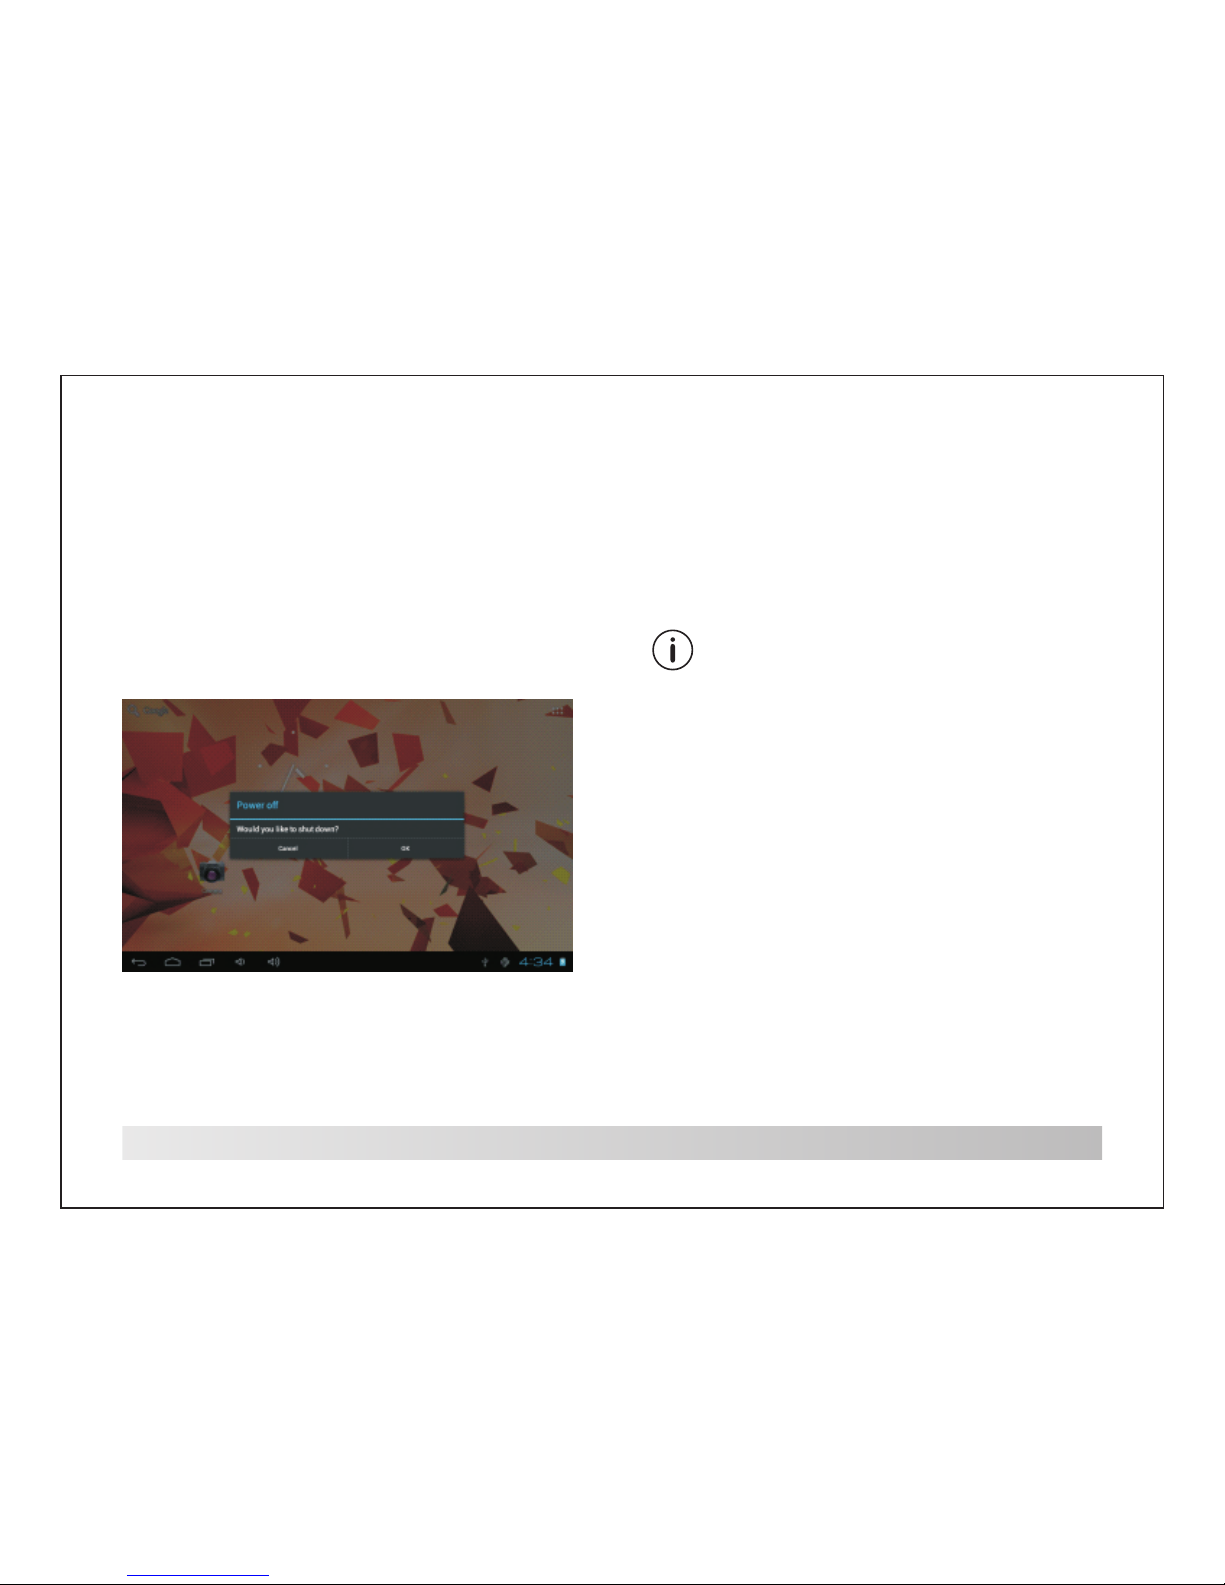
Turning the Tablet on or off
To turn the tablet on:
Press and hold the Power key until the LCD
screen turns on. Wait until the Home screen
appears; the tablet is now ready for use.
To turn the tablet off:
Press and hold the Power key until the Device
Options menu appears.
Turning the Screen On or off (Standby)
When the tablet is on, you can turn off the
screen to conserve battery power. Simply
press the Power key once to turn the screen
off. P res s the P owe r key again to turn the
screen back on.
To conserve battery power, the screen can
be set to turn off a uto matically when the tablet
is not in use (between
1 minute and 30 minutes).
This Screen timeout option can be found in the
Display menu.
2. Touch o k the s cre en to t urn o ff the tablet.
Page 6
Getting Started
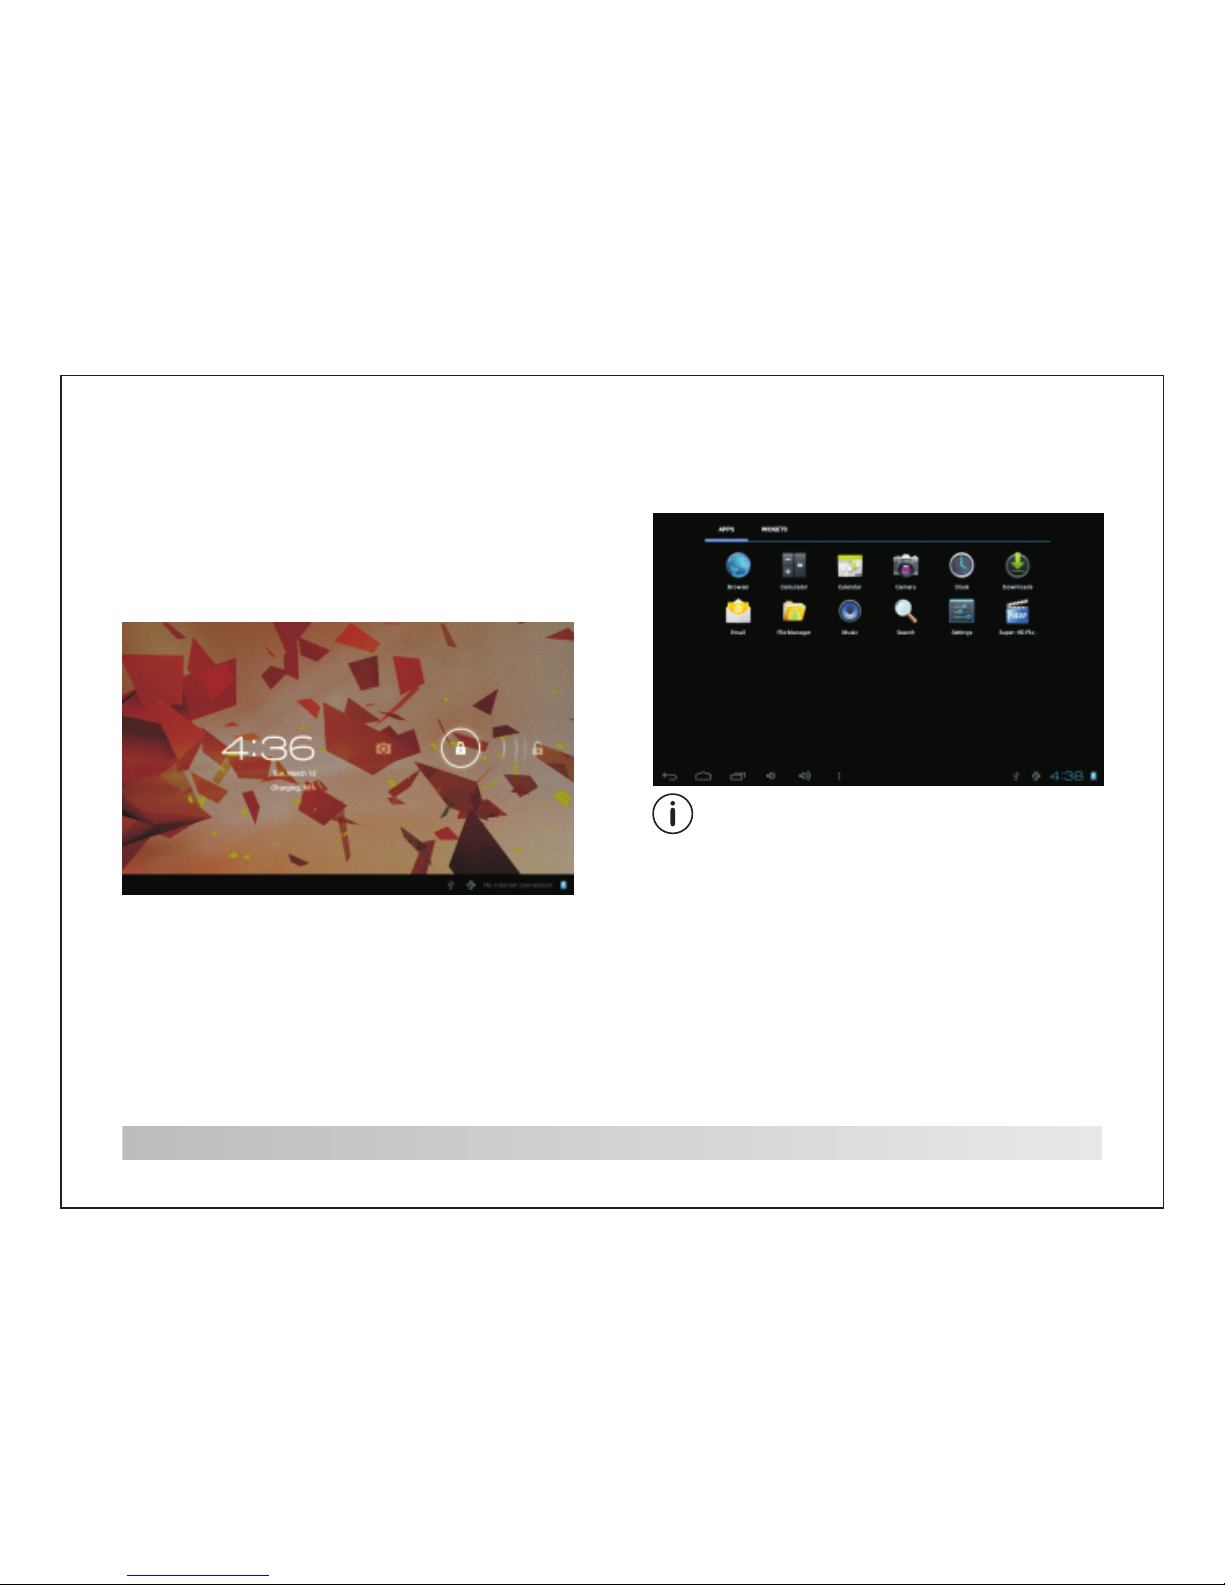
Unlocking the Screen
When the screen turns off, you will have to
unlock the screen when you turn it back on.
To unlock the screen, drag the lock icon across
the screen towards the lock icon.
5
Launcher screen:
About Applications
To open an application, touch the application
icon on the home screen or in the Launcher
where you can tap theicon right up on the home
screen to get in.
The sc ree n sho wn ab ove is for illustrative
purposes only. Res erv es the right to modify and
improve the final list of applications available
on the tablet.
Page 7

About Applications
6
Preinstalled Applications
Some applications have been installed on your
tablet for your convenience.
These applications include:
Browse the web.
Perform simple mathematical operations.
Take pictures or videos with the
frontfacing camera.
Check your e-mail.
Play music.
Access the Settings menu to adjust the
tablet’s opt ion s.
Installing Applications
You can also download an install additional
applications from the device’s applications
marketplace, the web browser, or other sources.
The tablet must be set to allow installation of
applications from non-Market sources. The
Unknown sources option can be set in the
Application settings menu.
Page 8
Connect to a Wi-Fi network
7
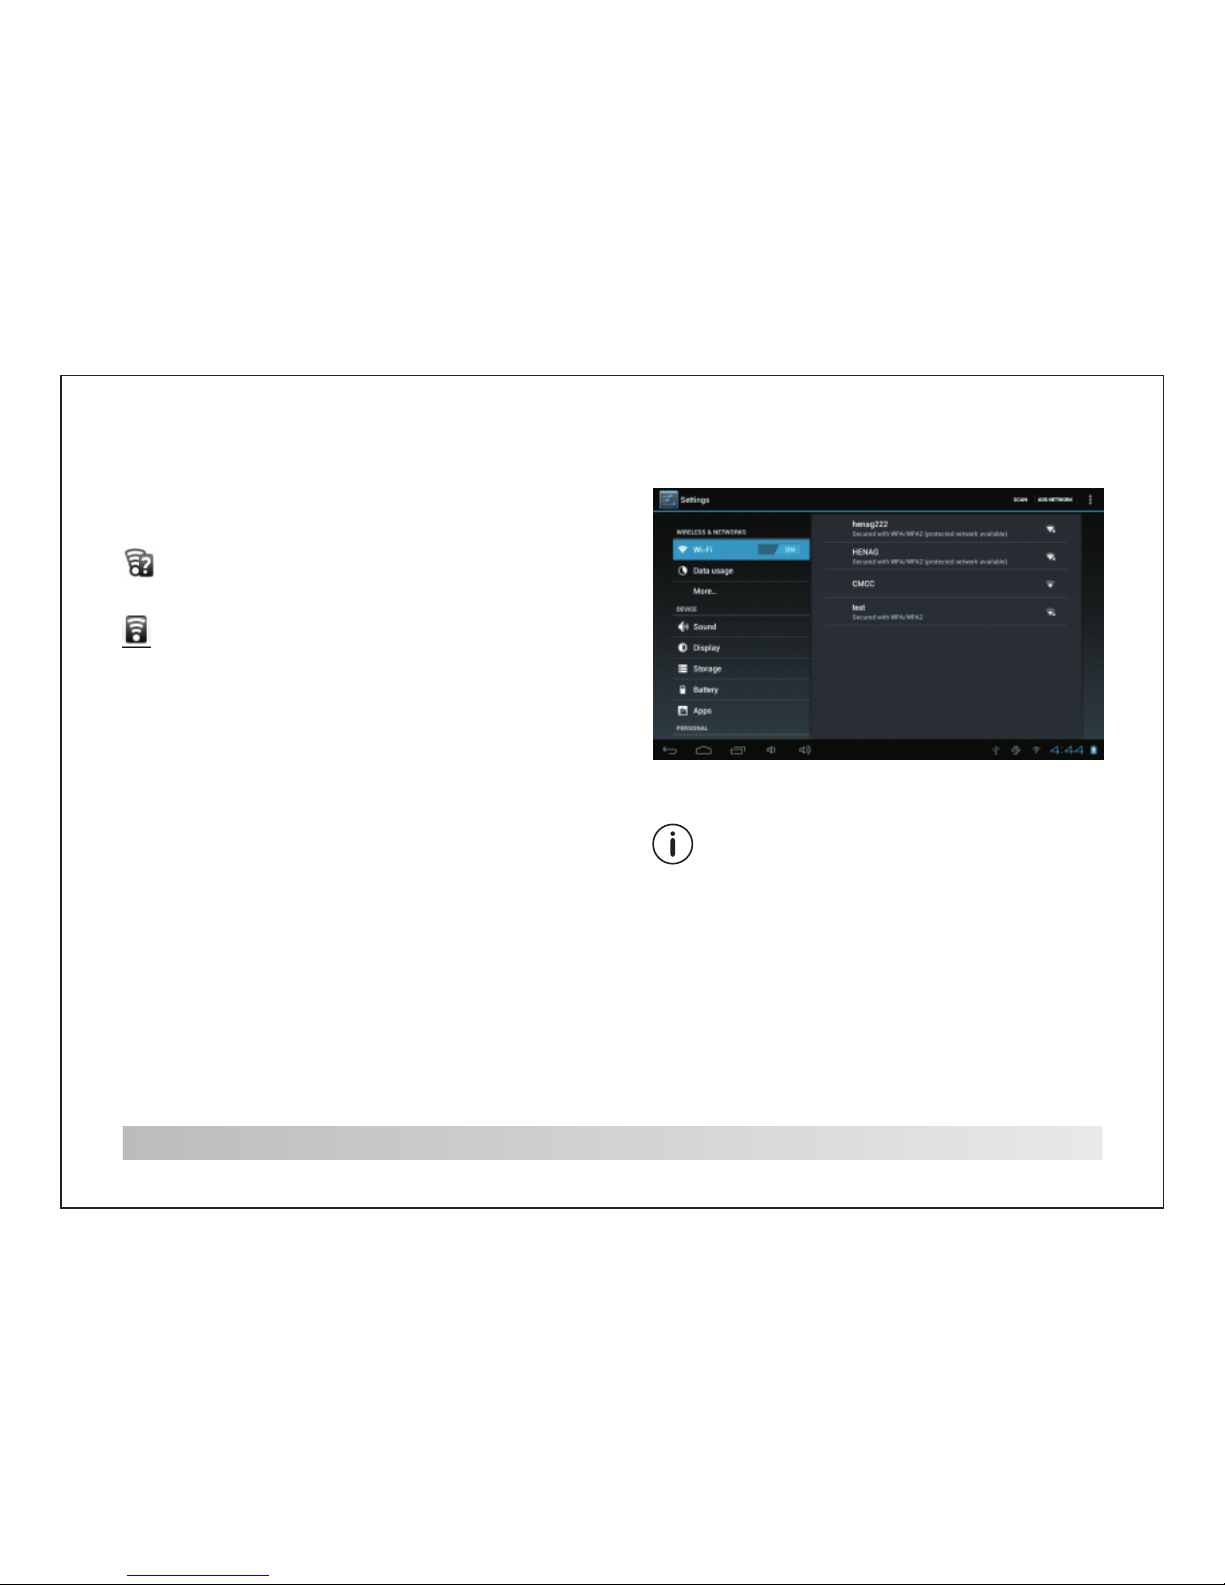
The Notification bar displays icons that indicate
your tablet’s Wi-Fi status.
When Wi-Fi is on, the tablet will look for and
display a list of available Wi-Fi networks.
If a network that you have connected to
previously is found, the tablet will connect to it.
If you don’t see your network in the list,you can
force the tablet to re-scan.To scan for networks,
tap the Menu key, and th en touch Scan.
Notification that an open Wi-Fi network is in
range.
Connected to a Wi-Fi network
(waves indicate connection strength).
There are no Wi-Fi networks in range,
or the Wi-Fi radio is off.
[no ic on]
1. Turn on the Wi-Fi radio if it is not already on.
To turn on Wi-Fi:
a.Go to the Home screen: Press the Home key.
b.Open the Settings menu: tap the icon right up
on the home screen to get into the launcher,
then touch Settings icon.
c.Open the Wireless & networks menu: Slide the
icon to ON status.
Page 9
8
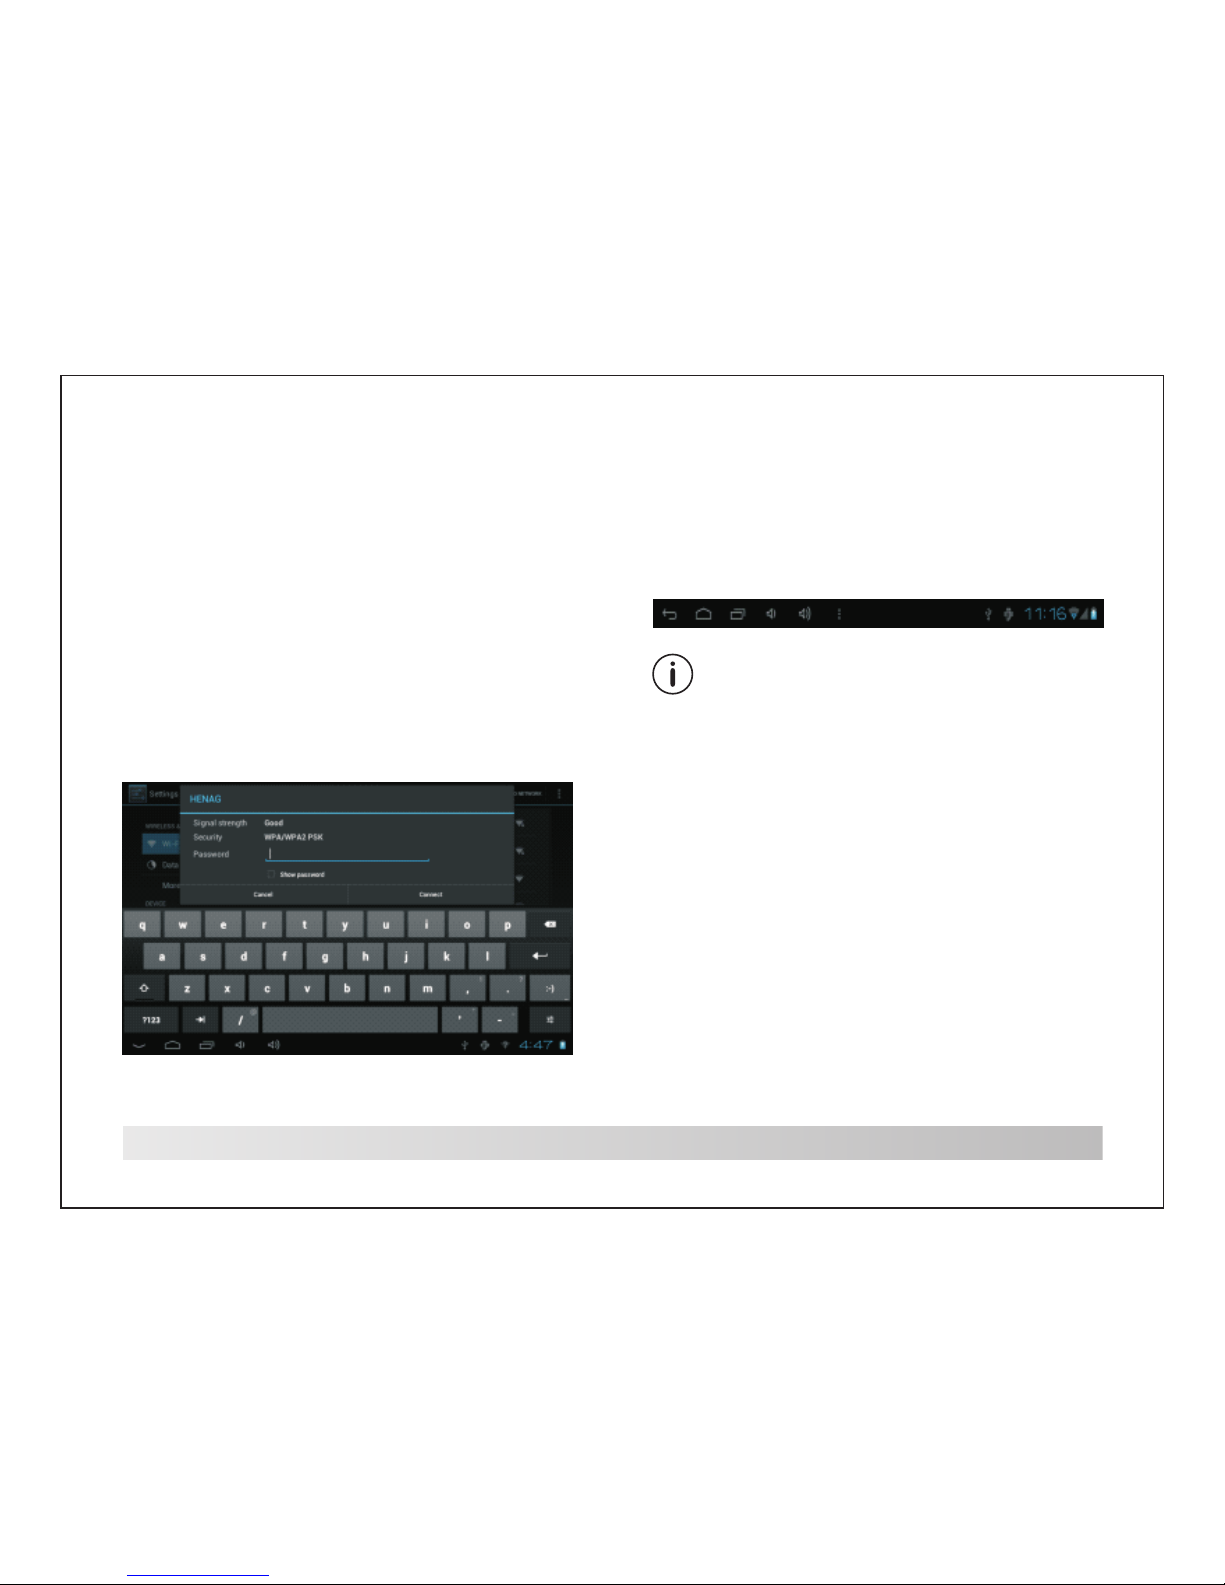
2. Select an available Wi-Fi network to connect
to: In the same Wi-Fi settings menu above,
touch a network in the list.
If the network is open,the tablet will prompt you
to confirm connection to the network. Touch
Connect to confirm.
If the network is secured (as indicated by a
Lock icon),the tablet will prompt you to enter a
password or other credentials.Touch the
Wireless password box to show the on-screen
keyboard and then use it to enter the password.
Touch Connect to confirm.
To learn about how to add a Wi-Fi network
when it is not in range or when the router is set
to obscure the network name (SSID); or to
configure advanced Wi-Fi options, please
refer to the manual.
When you have successfully connected to a
Wi-Fi network, the Notifications bar at the the
low of the screen will show a Wi-Fi signal
indicator.
Connect to a Wi-Fi network
Page 10
9
Optional Connections
Connecting to a Computer
Connect the tablet to a computer to transfer
files.
1.Connect your tablet to the computer.
With the included USB cable: Plug the small
end of the cable into the USB 2.0 high speed
connector of the tablet. Plug the large end of
the cable into an available USB 2.0 high speed
port on the computer.
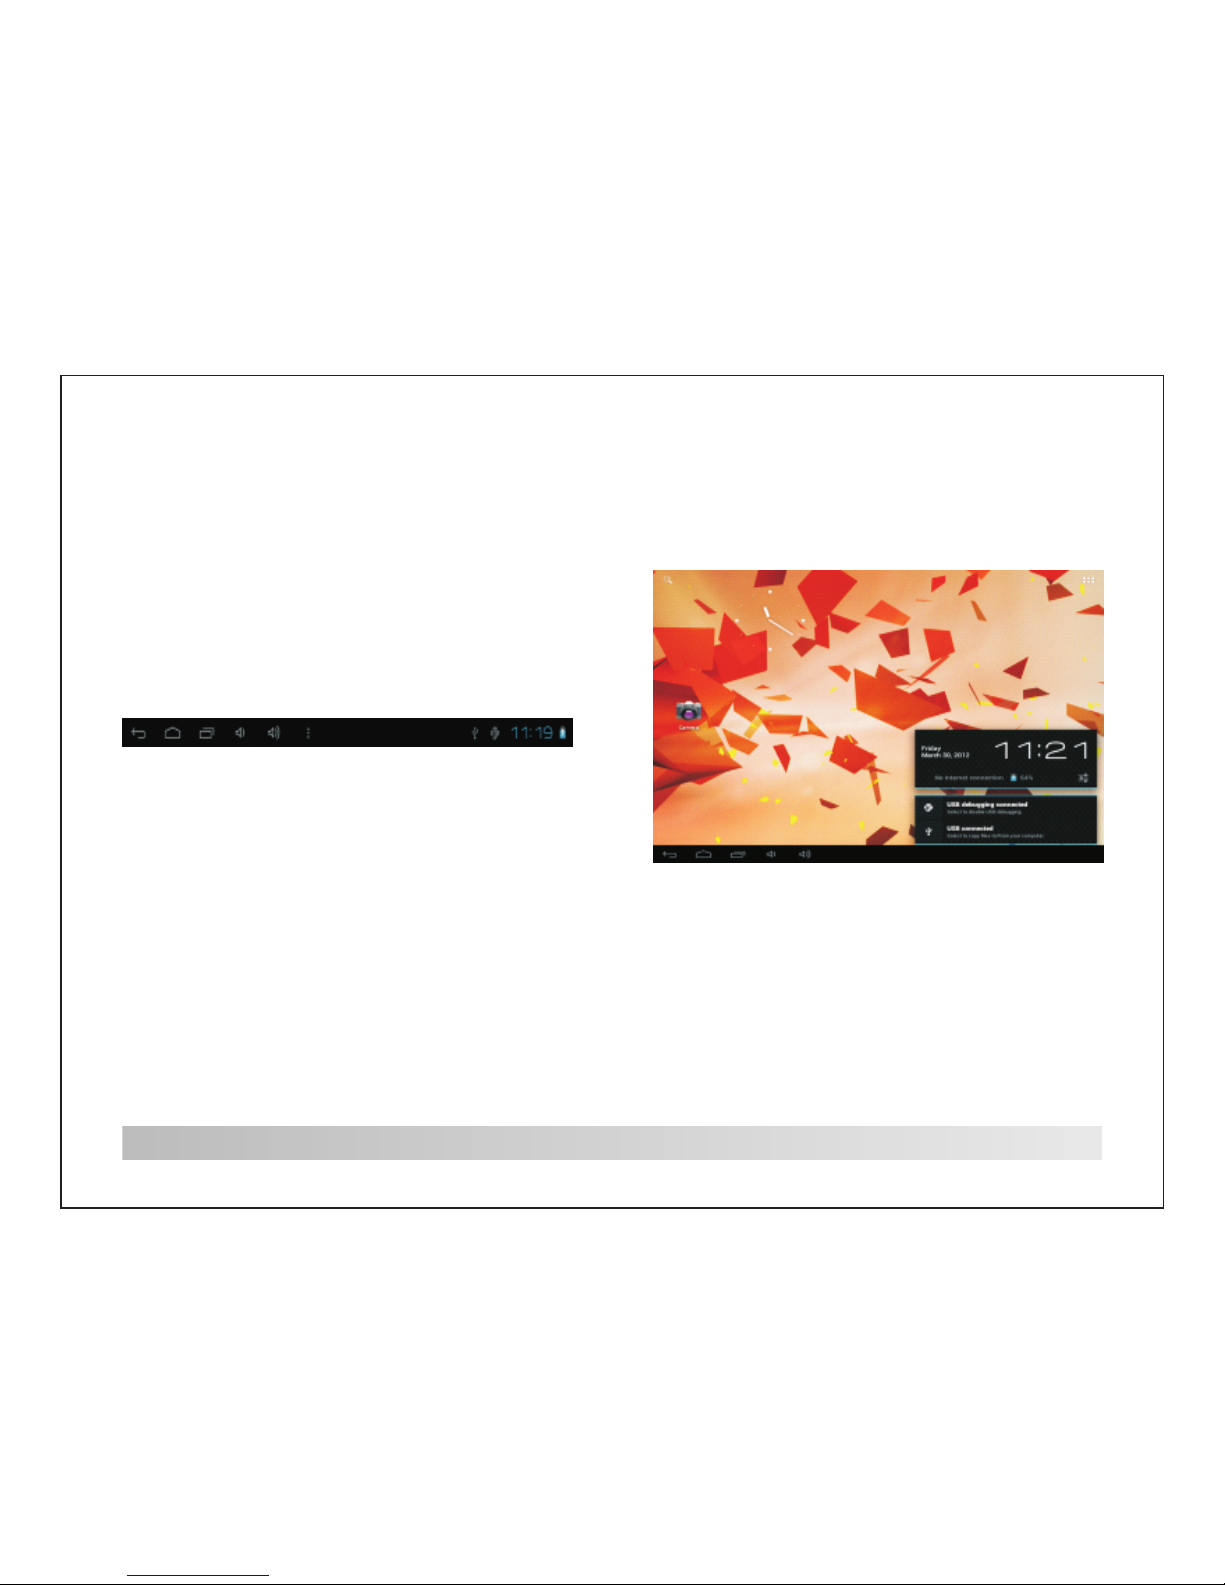
2.When your tablet is connected,slide up
the USB icon right down on the screen and
then touch icon USB connected.
3.Mount the storage.
Touch button Turn on USB storage to mount
the tablet’s b uil t-i n sto rage. When it is
mounted, you can copy files to or from your
tablet.
Page 11
10
Specifications
Proc essor
RK 292 6 1GHz(Co rtex A9)
RAM
512M B DDR3
Stor age
4~16 GB flas h built-i n;
micr oSD card sl ot (max.3 2GB
supp orted)
(opt ion)
Disp lay
8.0” TFT LCD(800 x6 00),
Capa ctive tou ch screen
Wi-F i
Netw orking
IEEE 8 02.11 b/g/n
Music was tested with a 128 kbps MP3 file;
video was tested with a 1920x1080 MPEG-4
/AVC fi le; b row sin g was t ested with the screen
brightness set to default. Actual playback
results may vary.
Audi o Output
3.5m m headpho ne
PC Int erface
USB 2. 0 high spee d
Addi tional
Feat ures
Buil t-in micr ophone
Fron t facing ca mera(0. 3MP)
1x0. 7W speake r
Oper ating
Syst em
Andr oid™ 4. 1
Powe r
Rech argeabl e Li-poly b attery
powe r Adapter( DC 5V,2A)
Play back Time
(hou rs)
5 hour s music,
2. 5 hou rs video,
3. 5 hou rs web brow sing
Page 12

FCC INFORMATION (ADDITIONAL)
Note: This equipment has been tested and found to comply with the limits for a Class B
digital device, pursuant to part 15 of the FCC Rules. These limits are designed to provide
reasonable protection against harmful interference in a residential installation. This
equipment generate, uses and can radiate radio frequenc y energy and, if not installed
and used in accordance with the instructions, may cause harmful in terference to radio
communications. However, there is no guarantee that interference will not occur in a
particular installation. If this equipment does cause harmful interference to radio or
television reception, which can be determined by turning the equipment off and on, the
user is encouraged to try to correct the interference by one or more of the following
measures:
—Reorient or relocate the receiving antenna.
—Increase the separation between the equipment and receiver.
—Connect the equipment into an outlet on a circuit different from that to which the
receiver is connected.
—Consult the dealer or an experienced radio/TV technician for help.
RF Exposure
This device was evaluated for compliance with FCC RF Exposure requirements for
typical body-worn operations with a separation distance of 0cm to the body. The use of
accessories with metallic components in its assembl y should be avoided. Accessories
that do not satisfy these requirements may not comply with FCC RF exposure
requirement.
 Loading...