

Hema HN7 User Manual

USER MANUAL
HEMA NAVIGATOR HN7
PREMIUM ON AND OFF ROAD
GPS NAVIGATION
HN7 User Manual_v2.indd 1 2/04/14 9:04 AM

TABLE OF CONTENTS
Table of Contents
Safety Notes and Maintenance ............................................................... 2
Operating Environment ...................................................................... 2
Safety While Operating the Device ....................................................... 3
Battery ............................................................................................ 3
Cleaning the Unit .............................................................................. 4
Getting Started .................................................................................... 4
Introduction ..................................................................................... 4
About Your NAVIGATOR ..................................................................... 5
HN7 Features ................................................................................... 6
Parts of the HN7 ............................................................................... 7
Inserting & Removing MicroSD cards ................................................. 10
Using the MicroSD Card Adapter ........................................................ 11
Turning the HN7 ON and OFF ............................................................ 12
Charging the Battery ....................................................................... 13
Resetting the HN7 ........................................................................... 14
Screen Interaction ........................................................................... 14
Backing Up Your Data ...................................................................... 15
PC Connectivity ............................................................................... 17
Main Menu ........................................................................................ 18
Introduction ................................................................................... 18
Settings Menu ................................................................................. 20
Bluetooth Menu ............................................................................... 31
FM Transmitter Function ................................................................... 45
Calculator Application ...................................................................... 46
Factory Reset ................................................................................. 46
Video Player ................................................................................... 47
Music Player ................................................................................... 49
Photo Viewer .................................................................................. 53
GPS Information ............................................................................. 54
Street Nav ........................................................................................ 55
Introduction ................................................................................... 55
Getting To Know the Screens and Buttons .......................................... 57
Map Screen and Functions ................................................................ 61
Quick Menu Button .......................................................................... 63
HN7 User Manual_v2.indd 2 2/04/14 9:04 AM

Hema HN7 Quick Start Guide
Using the Find Button ...................................................................... 66
Combined Search ............................................................................ 66
Other Search Options ...................................................................... 68
Finding an Address .......................................................................... 70
Finding a POI .................................................................................. 75
Quick Search Along Route ................................................................ 79
Quick Shortcuts on Find Places Screen ............................................... 81
Using your NAVIGATOR with the CAMPS books .................................... 85
Camps Facility Icons ........................................................................ 88
Finding CAMPS 7 and Caravan Parks Aust Wide POIs ............................ 89
More Menu ..................................................................................... 94
Settings Menu ................................................................................. 96
4WD Nav ......................................................................................... 100
Introduction .................................................................................. 100
Getting to Know OziExplorer ............................................................ 101
Map Overlay Information & Buttons .................................................. 103
Standard Toolbar ........................................................................... 104
Acquiring a GPS Satellite Fix ............................................................ 105
Page Selection ............................................................................... 107
Pages and Their Functions ............................................................... 108
Opening a Map ............................................................................... 110
Adding Waypoints .......................................................................... 112
Exiting OziExplorer ......................................................................... 113
Hema Navigator Explorer – PC Installation ......................................... 114
Important Product Information ........................................................... 117
Software License Agreement ............................................................ 117
Important Street Navigation Data Information ................................... 117
Important Map Data Information ...................................................... 118
Declaration of Conformity ................................................................ 118
Hema NAVIGATOR Limited Warranty ................................................. 118
International Purchases ................................................................... 119
Online Auction Purchases ................................................................ 119
iGO End User License Agreement ...................................................... 120
HN7 Navigator Technical Data Sheet ................................................. 126
TABLE OF CONTENTS
HN7 User Manual_v2.indd 1 2/04/14 9:04 AM

2
SAFETY NOTES AND MAINTENANCE
Hema HN7 User Manual
Safety Notes and Maintenance
Introduction
This section of the User Manual contains some general information and
recommendations related to the use of your Hema HN7 NAVIGATOR.
Operating Environment
External Influences
• Do not allow objects to drop onto the device from above.
• Do not place objects on top of the device or rub the screen with abrasive
materials or objects such as car keys etc.
• Do not drop the device.
• Do not use sharp or abrasive objects to operate the touch screen other
than the stylus designed for this purpose.
• Avoid prolonged use in high vibration and high shock environments.
• Do not carry/transport flammable liquids, gases or explosives in the
same compartment as the device and its accessories.
• Wireless devices can interfere with the reception of satellite signals
causing unstable signal reception.
• Some car audio systems can cause interference with the device.
GPS
• This system uses GPS signals produced and monitored by the United
States government, who are solely responsible for the availability and
accuracy of the system.
• GPS satellite signals do not penetrate solid objects (apart from glass)
and, therefore will not operate from within a building unless an external
re-radiating GPS antenna is fitted.
• GPS signal reception may be impaired by dense obstacles above the
ground such as tall buildings, trees, or extremely bad weather.
• In order to operate efficiently, the Hema HN7 NAVIGATOR should be
positioned with a view to the open sky (through glass is acceptable).
• Glass with a metallic film, as fitted on some vehicles, may impair the
GPS signal. An external automotive re-radiating GPS antenna may be
required.
Temperature
• Do not leave your Hema HN7 NAVIGATOR lying or mounted on your
dashboard where it will be exposed to extreme temperature conditions
which can result in malfunctions and/or dangerous situations. The
device may be operated in a temperature range of 0°C - 45°C or stored
in a temperature range of 0°C - 35°C.
• Keep the device away from excessive moisture. The device should be
used in an atmospheric humidity of 45% - 80% non-condensed and
stored in an atmospheric humidity of 30% - 90% non-condensed.
• Do not expose the device to sudden and extreme temperature
fluctuations. This may result in condensation forming within the device
causing malfunction or failure. When condensation forms, wait for the
device to completely dry out before operating.
HN7 User Manual_v2.indd 2 2/04/14 9:04 AM

3
SAFETY NOTES AND MAINTENANCE
Hema HN7 User Manual
Safety while Operating the Device
Failure to adhere to the following guidelines may result in potentially hazardous
situations and may result in serious injury or even death.
• Never operate/interact with the device while you are driving.
• National road traffic regulations and local traffic conditions always take
precedence over the instructions given by any navigation device.
• Do not install the navigation device in such a manner as to obstruct the
driver's view of the road or interfere with the operation of a vehicle's
controls or safety features such as air bag systems.
• Use voice prompts while driving in order to minimise the time spent
viewing the device. Do not become distracted by the device while
driving.
• The route calculated by the navigation device is a suggested route and
should be used for reference only. It is not a substitute for alert driver
behaviour and common sense. Drivers must continue to pay attention to
all road regulations and hazards regardless of instructions from the
navigation device.
Safety While Travelling
The Hema HN7 NAVIGATOR is a valuable aid for navigation. It should not be
used as a replacement for hard-copy maps and other traditional navigational
aids while travelling, especially in remote areas. Always ensure that you have
adequate backup systems in place to ensure your personal safety.
Local conditions can change rapidly, therefore it is recommended to seek
advice from local authorities and pay attention to road signs, particularly where
those signs advise of serious hazards, such as local flooding etc.
Battery
This product uses a re-chargeable lithium-polymer battery which is not user
serviceable and not user replaceable. Failing to adhere to these guidelines may
reduce the life expectancy of the battery or present the risk of electrolyte leak,
explosion and fire resulting in chemical burn, damage and/or injury.
• When charging from a Personal Computer (PC), switch the device off.
Disconnect the device when it is fully charged (indicated by the device
charge light turning green).
• Before storage, partially charge the battery to approximately 50%
capacity.
• Lithium-polymer batteries do not need to be fully charged. A partial
charge will generally extend the useful life of your battery, but results in
reduced running time from that charge.
• Only use the original 12/24V car adapter supplied with the Hema HN7
NAVIGATOR. Use of nonstandard parts or accessories may result in
malfunctions and/or severely damage the device and may void your
warranty.
• Do not expose the device to a damp, wet or corrosive environment.
• Do not expose the device to excessive pressures, heat sources, high
temperatures, or extreme sunlight conditions, such as an unattended
vehicle on a hot day.
HN7 User Manual_v2.indd 3 2/04/14 9:04 AM

4
GETTING STARTED
Hema HN7 User Manual
• Do not expose the device to operating temperatures outside of the
recommended range of 0°C - 45°C and storage temperatures outside of
the recommended range of 0°C - 35°C.
• There are no user serviceable parts in the device. Do not open the
device. Do not pierce, open or dismantle the battery. If the battery leaks
and you come into contact with the liquid, thoroughly rinse the
contaminated area with water and consult with a doctor immediately.
Cleaning the Unit
The Hema HN7 NAVIGATOR casing can be cleaned using a cloth slightly
dampened with water and a mild detergent and then wiped dry. Care must be
taken not to let moisture into the speaker holes or any of the ports, jacks and
slots on the device.
The touch screen may be cleaned using lint free or microfiber cloths.
Isopropyl alcohol or water may be applied to the cloth where required to gently
wipe the touch screen only.
Do not use harsh or abrasive cloths and avoid the use of chemical
cleaners or solvents as these can damage the NAVIGATOR.
Avoiding Theft
To avoid theft, remove the NAVIGATOR and mount from sight when not in use.
Remove the residue left on the windscreen by the suction mount.
Getting Started
Introduction
Congratulations on purchasing your Hema HN7 NAVIGATOR portable
navigation system.
Hema takes great pride in providing its customers with quality navigation
solutions supported by friendly and effective customer service.
Hema is confident that the NAVIGATOR will prove to be a valuable tool in the
pursuit of your adventures and ensure a safe and pleasant journey wherever
the road or track may lead you.
Please be sure to familiarise yourself with the functions and operation of your
NAVIGATOR by reading this User Manual thoroughly.
If you need assistance, please check our website at
http://www.hemamaps.com for support information, and Frequently Asked
Questions.
HN7 User Manual_v2.indd 4 2/04/14 9:04 AM

5
GETTING STARTED
Hema HN7 User Manual
About Your NAVIGATOR
So, what is the NAVIGATOR? What makes it different to other car GPS devices?
Most in-vehicle GPS systems are designed for use around town and on
suburban streets. They use a mapping system called vector mapping, and they
can tell you how to get from A to B by guiding you with on-screen directions
and spoken instructions as well. There are many other features which may or
may not be included, depending on the make and model.
A typical street-only GPS will effectively create routes between points within
the same suburb, city, state, or even across the country.
Once you leave the main highway, however, and venture into more remote
locations, these types of GPS systems are generally not quite as useful.
This is where the Hema HN7 NAVIGATOR steps in.
The Hema HN7 NAVIGATOR is equipped with iGO Primo 2.4 which performs
the same functions as a typical street-only vehicle GPS. It has several unique
features including full Camps Australia Wide POIs featuring facility icons,
site explanation, road comments and Camps 7 site images.
The following Camps Australia Wide POIs are included:
• Camps Australia Wide 7 POIs.
• Caravan Parks Aust Wide POIs.
• Dump Point (effluent) POIs.
See the section in this guide; Using your NAVIGATOR with the CAMPS 7
and Caravan Parks Australia Wide Books.
The 4WD navigation system features OziExplorer software, which is what
makes the Hema HN7 NAVIGATOR different. It does not work in the same
way as the usual "street-only" GPS units and software.
The basic concept is that you have an electronic map image, which is almost
identical to the existing paper maps published by Hema. These maps are
known as "raster maps". OziExplorer knows the geographical area which is
covered by the electronic map, and therefore, once it knows your vehicle's
position, can identify and display your vehicle's location on the map.
It also has some other useful features, including:
• Adding waypoints at any location. A waypoint is a "marker" on the map,
which you might use so that you can find your way back to a specific
location at a future time (such as a good fishing spot, a nice camping
area, etc.).
• Recording the path your vehicle follows as you travel in bush areas. This
is known as a Track Log or Breadcrumb Trail. This can be a very
handy tool if you are in an area where there are indistinct tracks to
follow. While the screen shows where you are now on the map
displayed, it also shows how you got there.
• Searching for named locations such as "Ayers Rock", or "Fog Bay" etc.
The Name Search Database contains just under 80000 locations. Once a
location is found by searching, you can show it on a map, add a
waypoint for it, or just go directly to it.
HN7 User Manual_v2.indd 5 2/04/14 9:04 AM

6
GETTING STARTED
Hema HN7 User Manual
OziExplorer is not designed for use within towns and suburbs, and it does not
provide Turn-By-Turn Navigation (create a route from point A to point B
automatically), that is the function of the iGO software.
The NAVIGATOR includes additional and exciting features. Please take time to
read the User Manual and Quick Start Guide to familiarise yourself with its
capabilities and functions. You will soon feel at home using it.
There are many other features which the software is capable of, some of which
are explained in this User Manual. Further documentation and assistance are
available on the Hema website, at http://www.hemamaps.com
Enjoy exploring with your Hema NAVIGATOR!
HN7 Features
• Large 7” hi-res (800 x 480 resolution) wide screen.
• 64-Channel GPS for improved location accuracy and faster GPS fix.
• 4GB on-board memory for extra iGO international maps.
• 8GB MicroSD card preloaded with
o Hema 4WD Australian Regional maps.
o Hema Topo 250 Australia seamless map (1:250,000).
o Hema Australia 1M seamless map (1:1,000,000).
o Hema State maps.
o Hema New Zealand Road Atlas North & South Island maps
(1:350,000).
• Bluetooth – Built-in hands free calling.
• FM Transmitter – Sends the speaker audio signal to an FM radio
channel.
• Rear-view camera ready.
• USB port for connection of an USB memory stick to access media files
(USB memory stick not included).
• iGO Primo 2.4 Street Navigation – Preloaded with Australia & New
Zealand mapping, full Camps POIs plus two year free map updates.
• OziExplorer with updated easy to use Hema EziOzi-3 customised
interface with large buttons for easy finger control of menus and
functions.
• 12 month warranty backed by Hema’s excellent support team.
HN7 User Manual_v2.indd 6 2/04/14 9:04 AM
7
GETTING STARTED
Hema HN7 User Manual
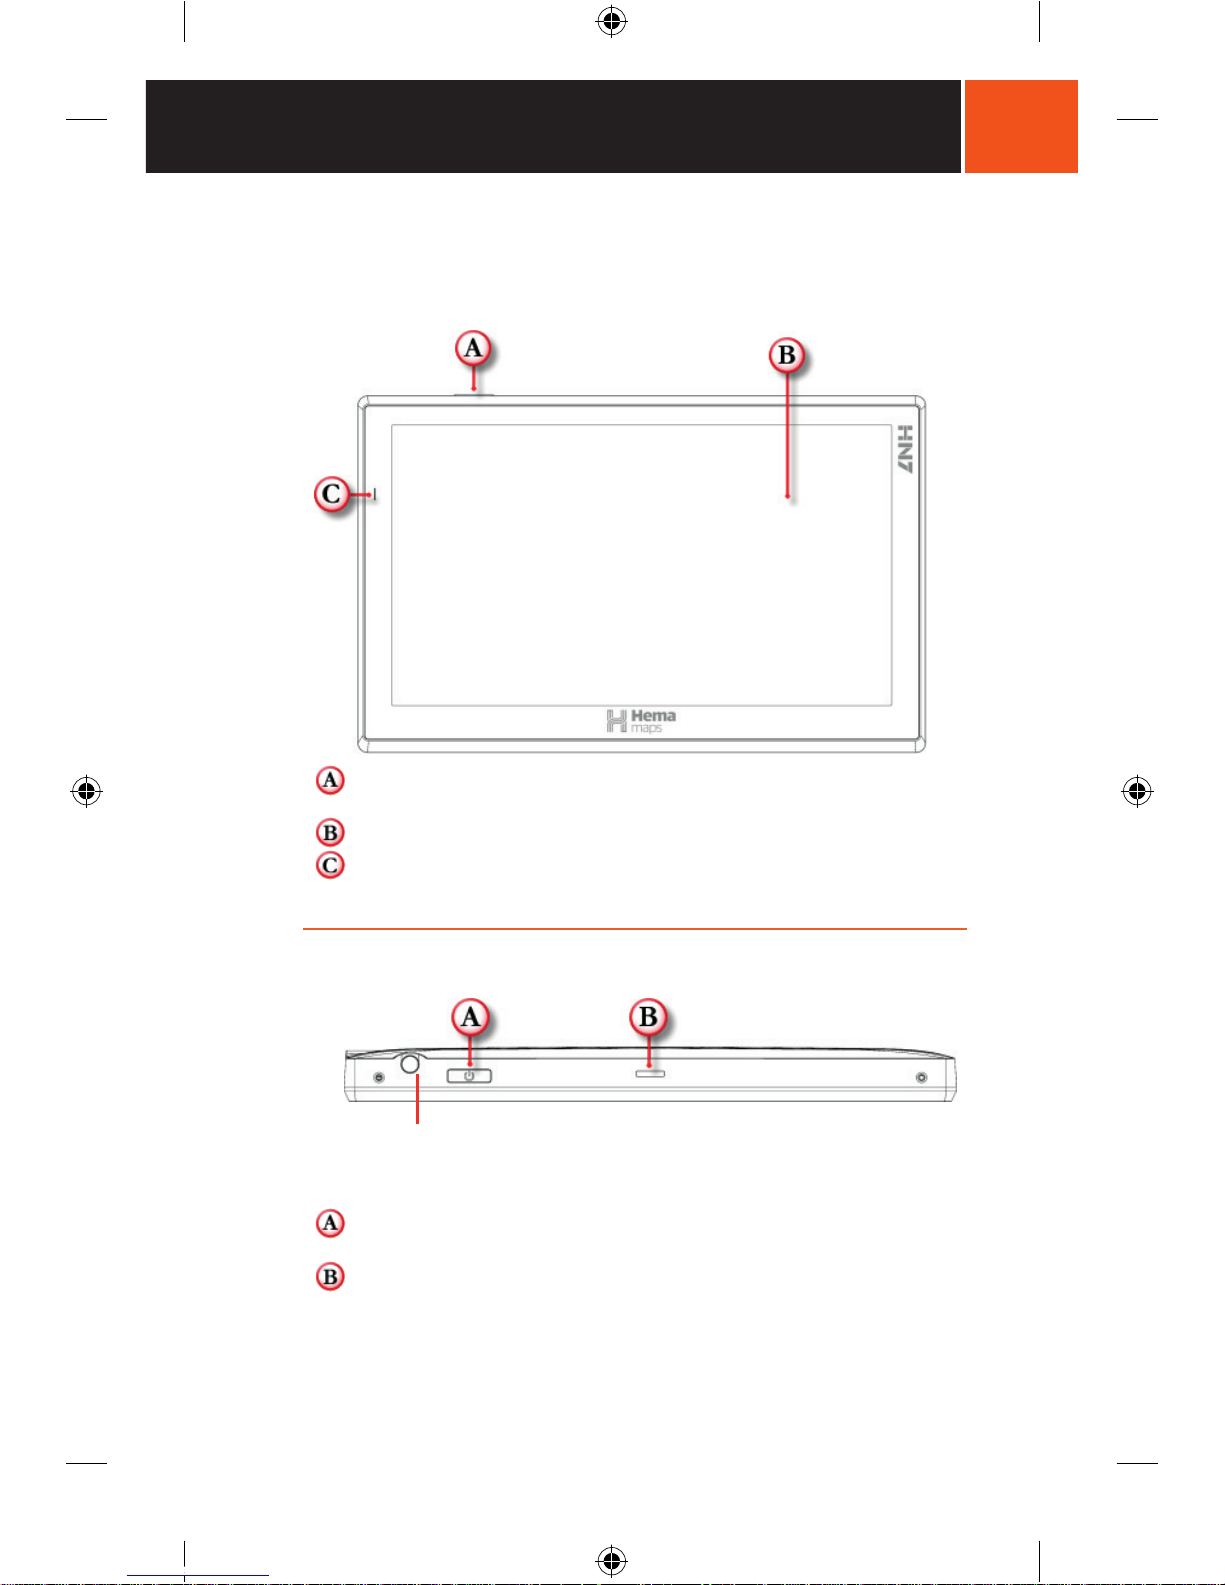
Parts of the HN7
Front View
Power Button: Powers the NAVIGATOR ON/OFF or activates sleep
mode.
LCD Touch Screen Display: 7.0 inch LCD display.
LED Power Indicator: Glows red when charging and will also glow
green when the NAVIGATOR is ON but not connected to a power source.
Top View
Note: This plug is not a Stylus. It has no function.
The Stylus is placed with the Soft Pouch which is located under the
cardboard plinth holding the HN7 in the box.
Power Button: Powers the NAVIGATOR ON/OFF or activates sleep
mode.
Top Mounting cradle slot: Locates and secures the device within the
mounting cradle.
HN7 User Manual_v2.indd 7 2/04/14 9:04 AM
8
GETTING STARTED
Hema HN7 User Manual
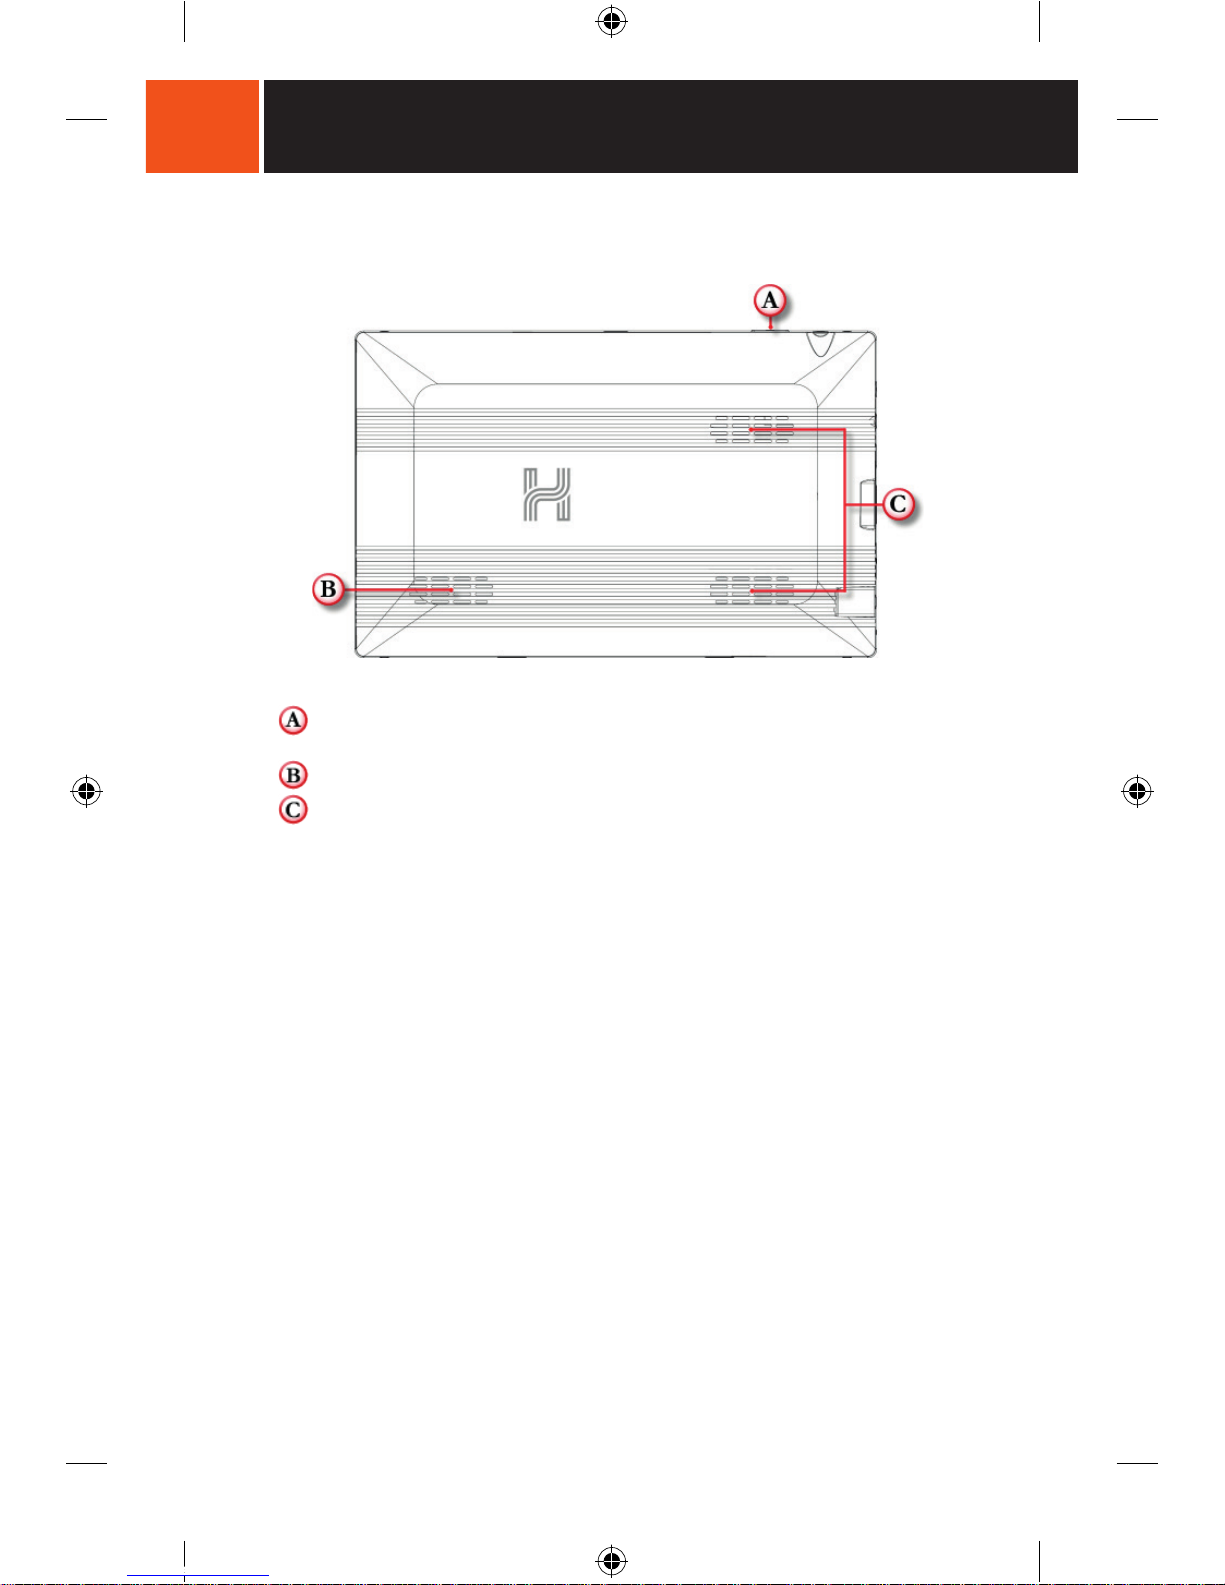
Rear View
Power Button: Powers the NAVIGATOR ON / OFF or activates sleep
mode.
Speaker: Provides audio output.
Case Vents: Provide ventilation. Vents are covered internally with dust
filtering cloth.
Note: Do not cover these vents.
HN7 User Manual_v2.indd 8 2/04/14 9:04 AM
9
GETTING STARTED
Hema HN7 User Manual
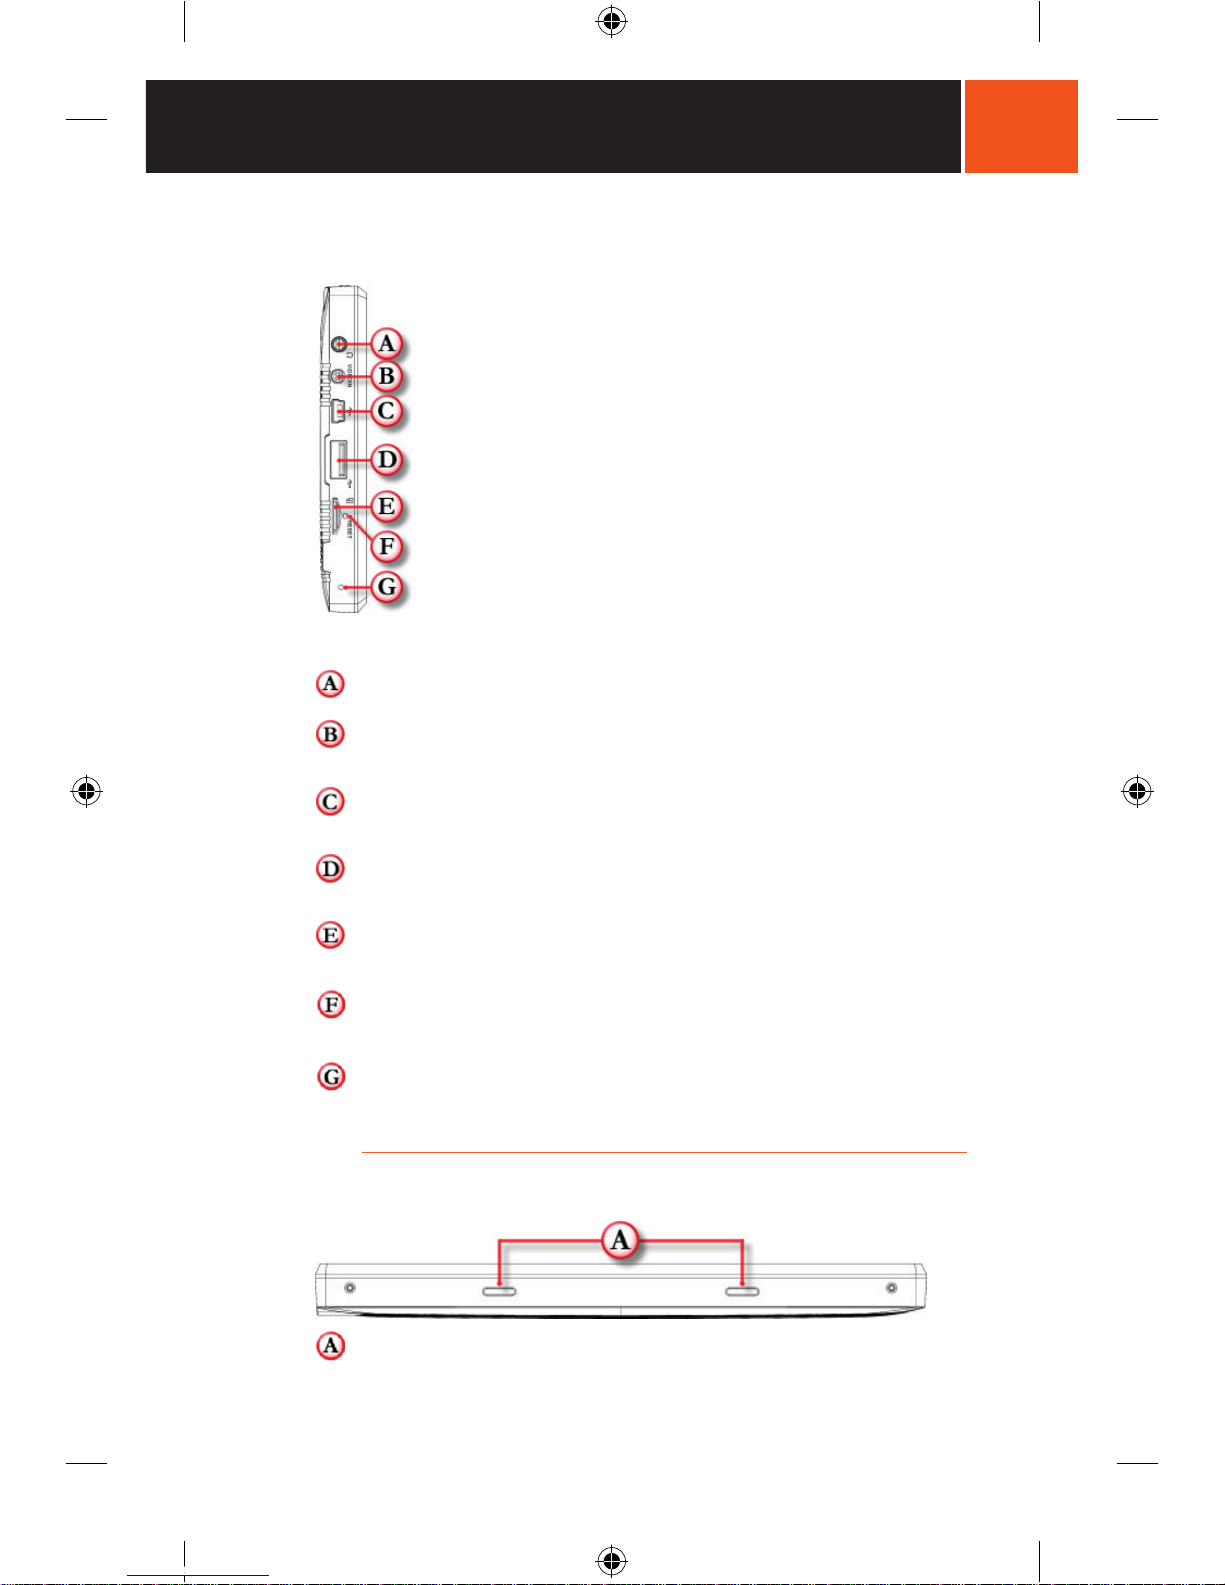
Side View
Headphone socket: Provides audio output (3.5mm output socket).
AV IN: Allows connection of reversing camera (2.5mm input socket)
(camera not supplied).
Mini USB port: Connects the NAVIGATOR to the supplied 12/24V power
source or your Windows™ PC computer system.
USB Port: Allows connection to an USB memory stick for the purpose of
accessing your media files such as photos, music and video. Additional
OziExplorer format maps can also be stored on a memory stick and
accessed from the USB port.
MicroSD Card: Pre-loaded MicroSD card with Hema maps and Hema
Navigator Explorer installation software.
System reset button: Resets the NAVIGATOR system to a stable state.
Use the Stylus (located with the soft pouch) for this task.
Microphone: Used during hands free Bluetooth operation.
Bottom View
Bottom mounting cradle slots: Locates and secures the device within
the mounting cradle.
HN7 User Manual_v2.indd 9 2/04/14 9:04 AM
10
GETTING STARTED
Hema HN7 User Manual
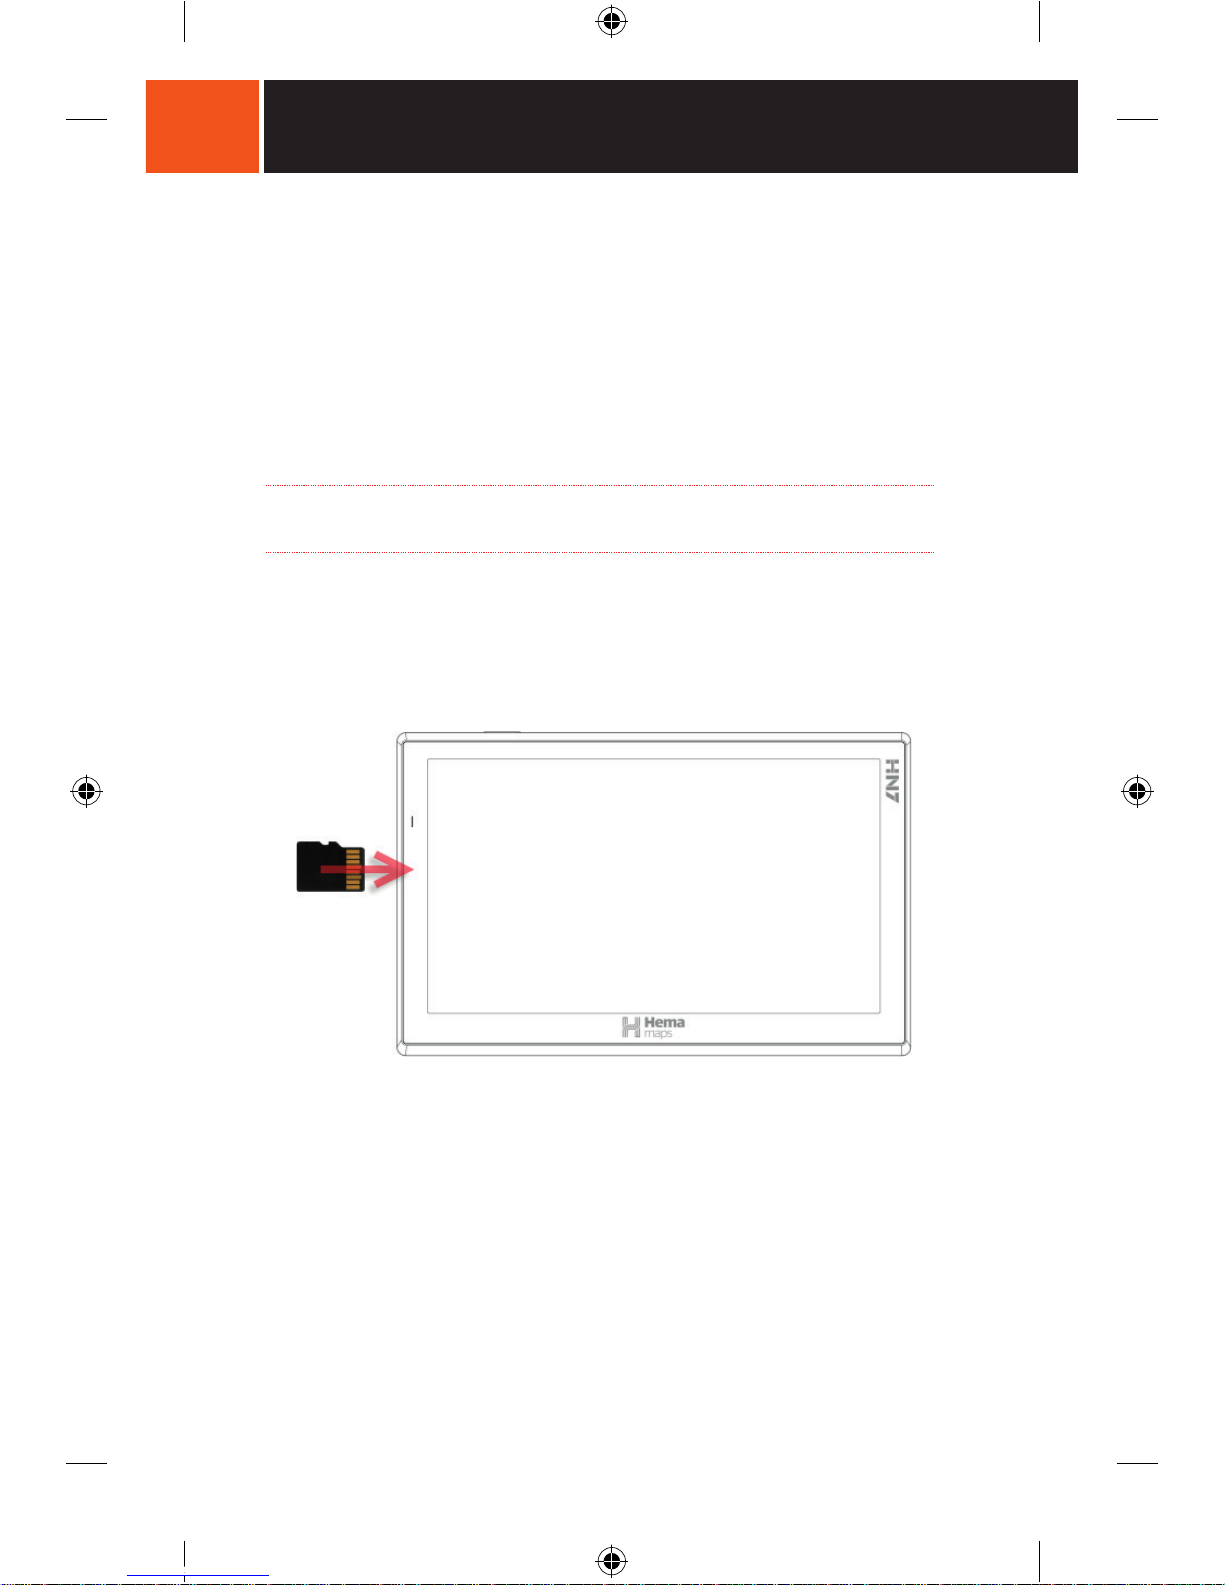
Inserting & Removing MicroSD cards
The Hema HN7 NAVIGATOR comes with a pre-installed 8GB MicroSD card.
To remove the MicroSD card from your HN7:
1. Turn the NAVIGATOR so that the front of the device is visible.
2. Locate the MicroSD card slot on the side of the device.
3. Using your fingernail or the stylus, depress the card further into the slot
and slowly release.
4. The card should spring out of the slot far enough for removal.
NOTE
Avoid letting the MicroSD card eject quickly out of the slot.
To re-insert the MicroSD card
1. Turn the NAVIGATOR so that the front of the device is facing you.
2. Locate the MicroSD card slot on the left side of the device.
3. Position the card with printed side facing away from you as per
illustration.
4. Slide the card gently into the slot until it clicks into place.
HN7 User Manual_v2.indd 10 2/04/14 9:04 AM

11
GETTING STARTED
Hema HN7 User Manual
Using the MicroSD Card Adapter
A MicroSD card adaptor has been included with the
NAVIGATOR so that it can be used in conjunction
with an SDHC (Secure Digital High Capacity)
compliant SD card reader for use with your
Windows™ personal computer.
SD Card Adapter.
MicroSD card.
SD Card Adapter Lock Tab.
NOTE
Do not move lock tab to LOCK. This will WRITE PROTECT the card,
and prevents data being written to the card.
Connecting to Power
1. Plug the Mini USB connector of the car charger into the Mini USB port
located on the left hand side of the NAVIGATOR.
Note: On the HN7, the Mini USB is the smaller of the two USB
ports.
2. Plug the car charger into a 12V or 24V power outlet in the vehicle.
NOTE
Do not use any adapter other than the supplied Hema 12V adapter to
power the unit. Any other 12V power adapters may damage the unit
and void your warranty.
HN7 User Manual_v2.indd 11 2/04/14 9:04 AM
12
GETTING STARTED
Hema HN7 User Manual
Turning the HN7 ON and OFF
Turning On
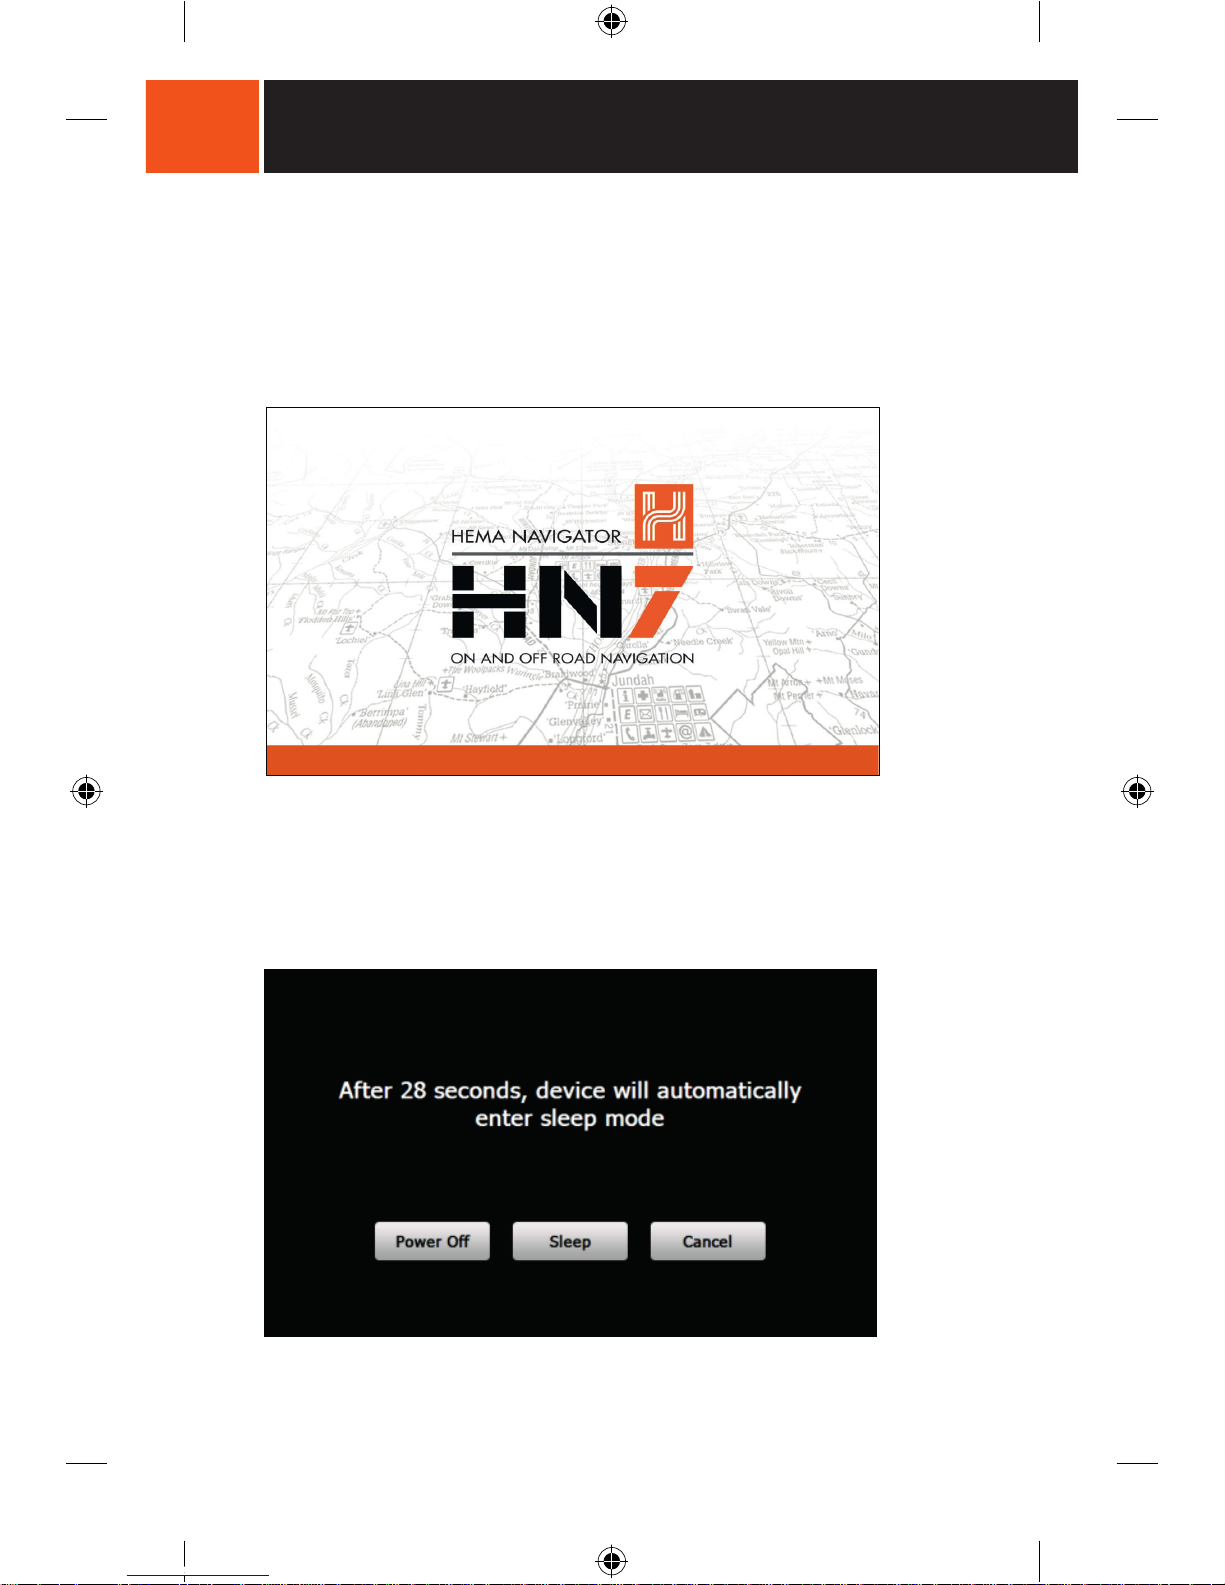
Gently press the power button for 1 second and release. The NAVIGATOR will
display a start-up screen after a few seconds while powering up as shown
below, before displaying the Main Menu.
Turning OFF
The NAVIGATOR can be put into Sleep Mode or completely powered OFF. When
the unit is ON, push the power button for approximately 1 second, you will hear
a beep, and the NAVIGATOR will display the shutdown screen as shown below.
The NAVIGATOR will automatically enter the shutdown screen when an external
power source is removed.
The shutdown screen will remain for 30 seconds. During this time, you can
choose from the three options displayed on this screen.
HN7 User Manual_v2.indd 12 2/04/14 9:04 AM

13
GETTING STARTED
Hema HN7 User Manual
Power Off
Tap the Power Off Button to power off the unit completely. Any
applications that are running will be terminated.
Sleep
Tap the Sleep Button to put the device into Sleep Mode. Sleep Mode is
the default action when the power button is pressed. Example, if you do
not tap any other button during the 30 second display of the shutdown
screen, the unit will enter sleep mode. If you wish to enter sleep mode
immediately, tap the Sleep Button. When the unit is restarted,
applications which were running at the time the unit entered sleep mode
will reactivate.
NOTE
When in SLEEP MODE, the unit is not completely shut down and will
discharge the battery over the course of time.
If left in Sleep mode, a fully charged NAVIGATOR should last
approximately 4 days before requiring recharging.
Cancel
Tap the Cancel Button to cancel the power button action. This will exit
the Shutdown Screen and return you to the previous state.
Charging the Battery
The internal Lithium-polymer battery in the HN7 can be charged using one of
the following methods:
1. Connect the supplied HN7 vehicle cigarette lighter adapter to the Mini
USB port.
2. Connect the Mini USB cable between the NAVIGATOR and a computer.
NOTE:
The full size USB port cannot be used for battery charging
The device charge light will change from RED to GREEN when the battery is
fully charged.
Please see the Battery topic under the Safety Notes & Maintenance section
of this user guide for more information regarding Lithium-polymer batteries.
HN7 User Manual_v2.indd 13 2/04/14 9:04 AM

14
GETTING STARTED
Hema HN7 User Manual
Resetting the HN7
Locate the RESET button on the left hand lower side of the device (with
the device screen facing you). The Reset button is positioned above the
MicroSD card slot.
Press the reset button with the tip of your stylus for around 1 second.
The unit will power off. Turn the unit back on to resume normal operation.
Screen Interaction
Finger and Stylus Techniques
The Street and 4WD Navigation applications can be interacted with by finger
or the provided stylus. All menus feature large finger control buttons, if
desired, the Stylus can be of use if you require greater accuracy when
interacting with the 4WD Navigation screens to plot waypoints, tracks and
routes.
The stylus is stored in the back of the soft HN7 storage pouch.
The following terminology will be used in this guide when describing actions to
be taken by finger or stylus:
Tap/Select/Activate/Press
Touch the screen once to open items or select/activate an option.
Double Tap
Touch the screen twice in quick succession to open or select/activate an
option.
Drag
Hold your finger or the stylus on the screen and continue to hold down
while dragging up/down/left/right or across the screen.
Tap and Hold (applicable to use by Stylus)
Tap and hold the stylus without moving until an action is complete, or a
result or menu is displayed.
HN7 User Manual_v2.indd 14 2/04/14 9:04 AM
15
GETTING STARTED
Hema HN7 User Manual
Backing Up Your Data
During use, the NAVIGATOR will accumulate some data automatically (such as
4WD track logs), and you may also create data yourself (such as iGO
favourites or OziExplorer waypoints and track data).
Examples of this data could be:
• Historical Traffic data in iGO Primo 2.4.
• Waypoints in OziExplorer.
• Track logs in iGO Primo 2.4 and/or OziExplorer.
Where is the data stored, and how can I make a copy of it?
iGO (Street)
iGO Primo 2.4 stores user data in the internal memory of the NAVIGATOR.
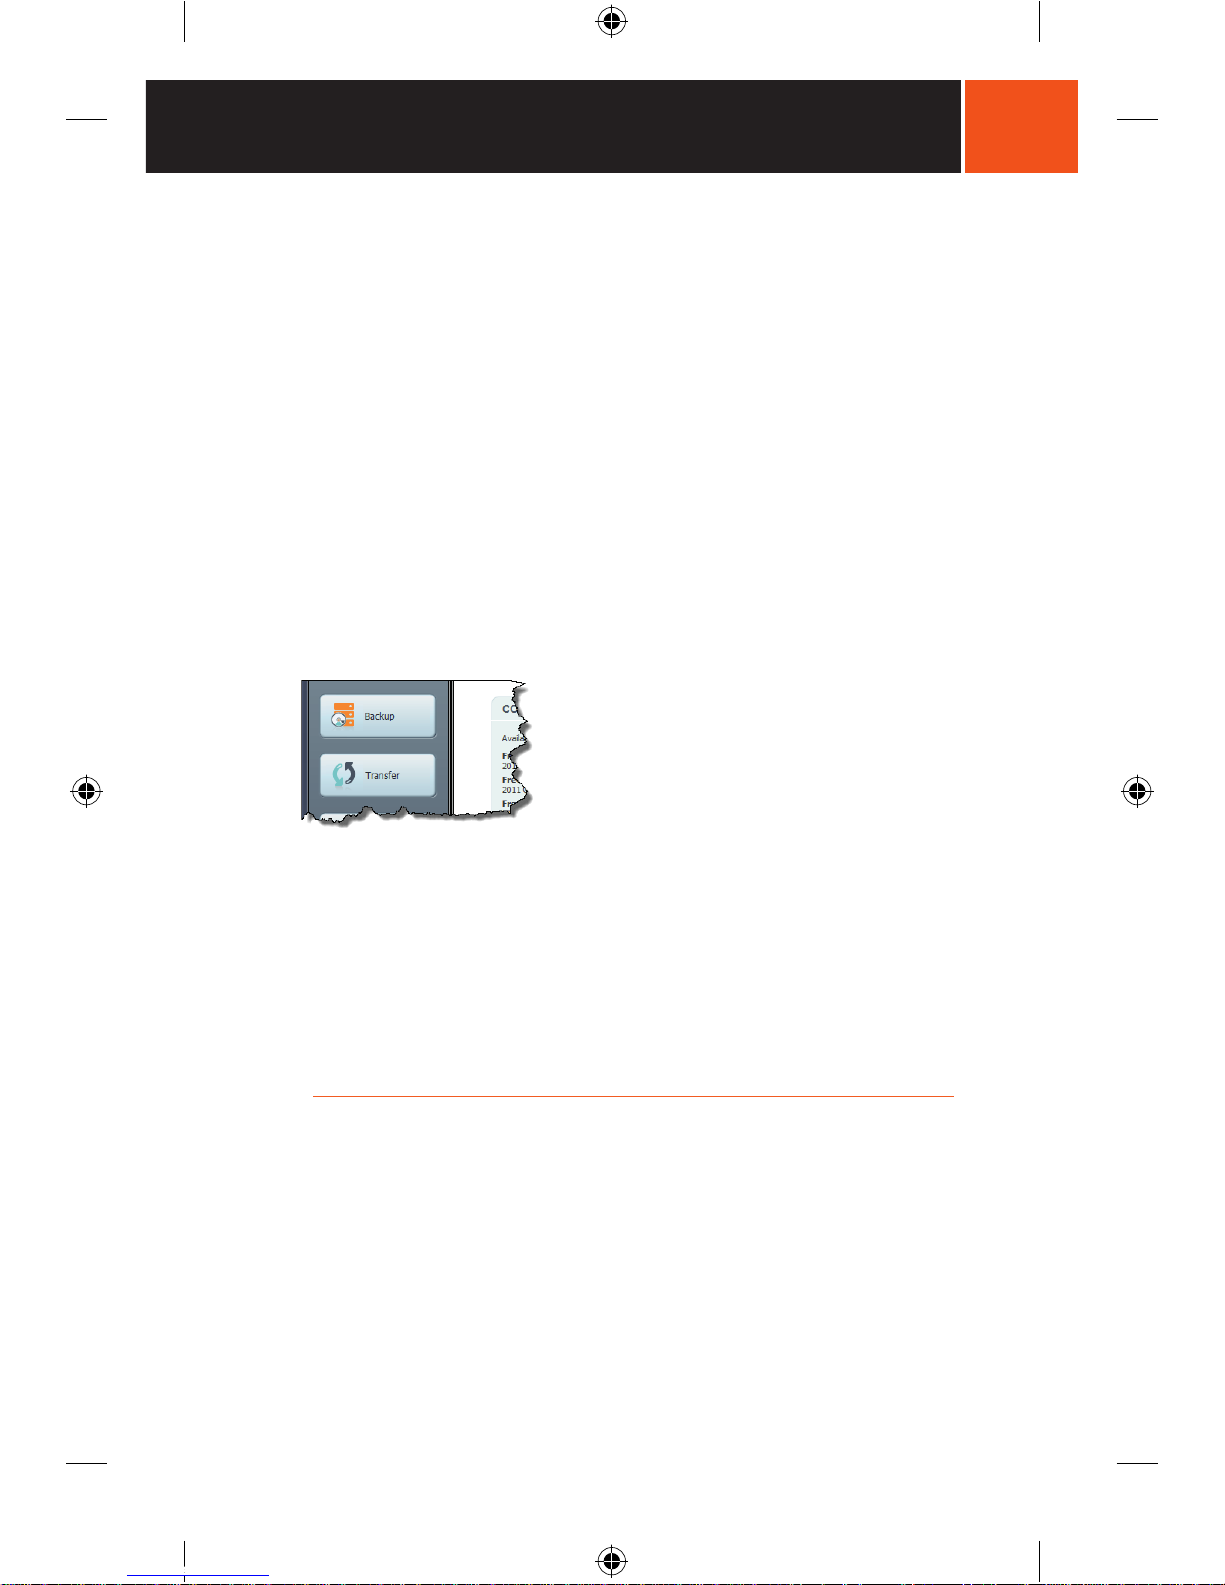
You can back it up using the NaviExtras Toolbox Windows™ PC application.
NaviExtras Toolbox has two options for transferring content to your PC, as
shown below.
The Backup option will take a copy of all content from your device to your PC.
This includes maps, POIs, and user data. The Backup option creates a single
file, named for the date and time the backup was taken, and stores this on
your PC.
The Transfer option allows you to transfer standard content, such as maps,
POIs, vehicle models etc to AND from your PC. You can transfer individual
items using the Transfer option.
See Updating Maps and Other Content in the Street Nav section of this
user guide for further information on using the NaviExtras Toolbox software.
OziExplorer (Ezi Ozi-3 4WD)
OziExplorer stores user data in two locations
• On the internal memory of the NAVIGATOR.
• On the MicroSD card.
The Hema Navigator Explorer application can be installed from the
NAVIGATOR via the supplied Mini USB cable. See the Hema Navigator
Explorer Installation section in this User Manual.
The install will load the Hema maps from the MicroSD card onto your
Windows™ PC and the Hema Navigator Explorer PC application. This
HN7 User Manual_v2.indd 15 2/04/14 9:04 AM
16
GETTING STARTED
Hema HN7 User Manual
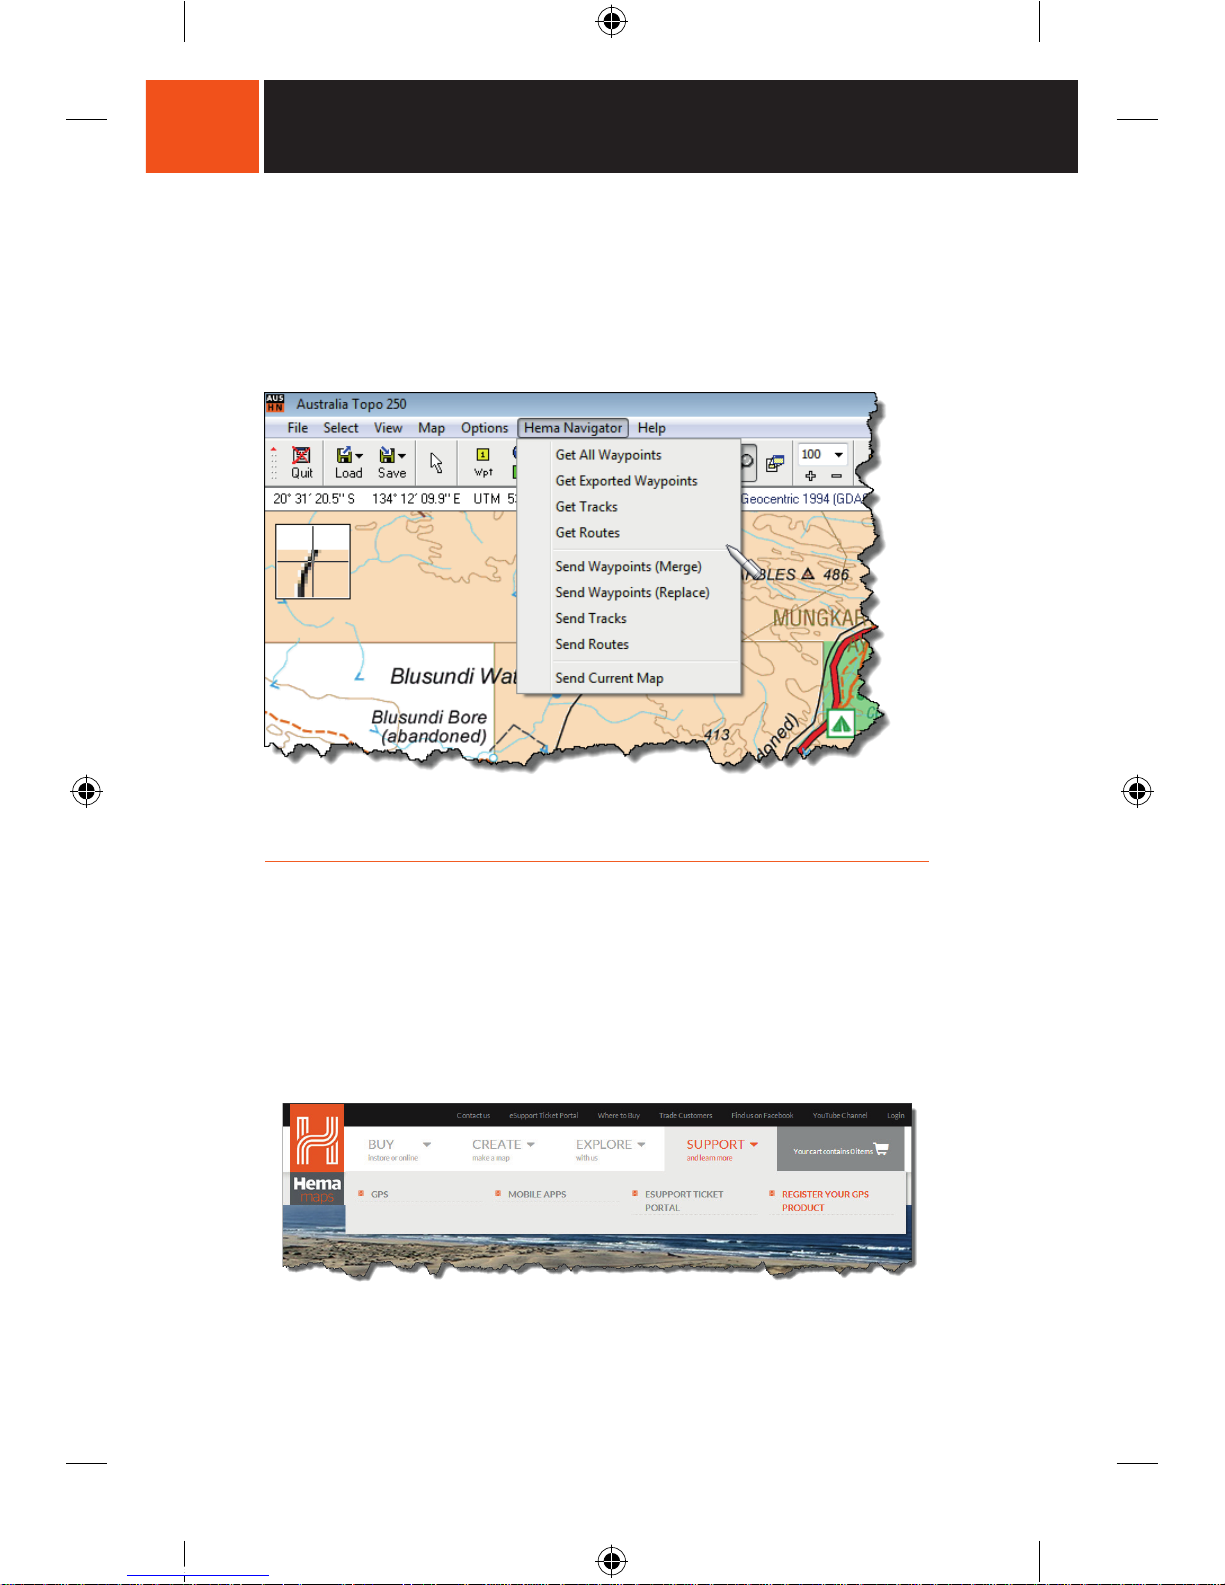
application will enable the viewing of the maps and creation and transfer of
OziExplorer data between your Windows™ PC and HN7 NAVIGATOR. The
following data can be transferred:
• Waypoints.
• Tracks.
• Routes.
The Hema Navigator Explorer application contains detailed in-built help
covering these functions.
More Information
You can find product manuals and support information on the Hema website:
http://www.hemamaps.com
These include User Guides for each of the Navigation applications on the
NAVIGATOR.
To register your Hema HN7 NAVIGATOR, please go to the Hema website;
SUPPORT section and click on the "REGISTER YOUR GPS PRODUCT" button.
HN7 User Manual_v2.indd 16 2/04/14 9:04 AM
17
PC CONNECTIVITY
Hema HN7 User Manual
PC Connectivity
The HN7 connects to your PC using the Mini-USB port located on the
side panel.
Treat the Mini-USB port with care. Make sure that the plug is around the right
way, and do not force the plug into the socket when connecting the cable.
The HN7 can be connected to a Windows™ PC for the following purposes:
• Installing the Hema Navigator Explorer software and maps.
• Accessing the contents of the NAVIGATOR MicroSD Card.
• Using the NaviExtras Toolbox software to perform updates, and
purchase or activate products through the Online Store such as extra
mapping and functionality.
• Using the Hema Navigator Explorer software to create and transfer
data.
NOTE
The HN7 and PC software is only compatible with Microsoft Windows
XP, Windows Vista, Windows 7 and Windows 8.
WARNING: Changing the content of the Resident Flash (on-board memory)
inadvertently may render the device inoperable and void your warranty. Do
not do so unless instructed by the Hema Support Team.
The NAVIGATOR can connect to a Windows™ based PC in either Mass Storage
or Windows Sync mode.
When the Mini-USB cable (supplied with the NAVIGATOR) is plugged into the
PC and the Mini-USB connector inserted into the device, the NAVIGATOR will
connect in the mode defined in the settings. See the Settings Menu > USB
section of this User Guide for further details of the connection modes.
Note: The HN7 is pre-set to Mass Storage mode.
The full size USB port is for the connection of a USB memory stick (not included
or supplied by Hema) to access media such as photos, music, videos and
OziExplorer format maps.
HN7 User Manual_v2.indd 17 2/04/14 9:04 AM
18
MAIN MENU
Hema HN7 User Manual
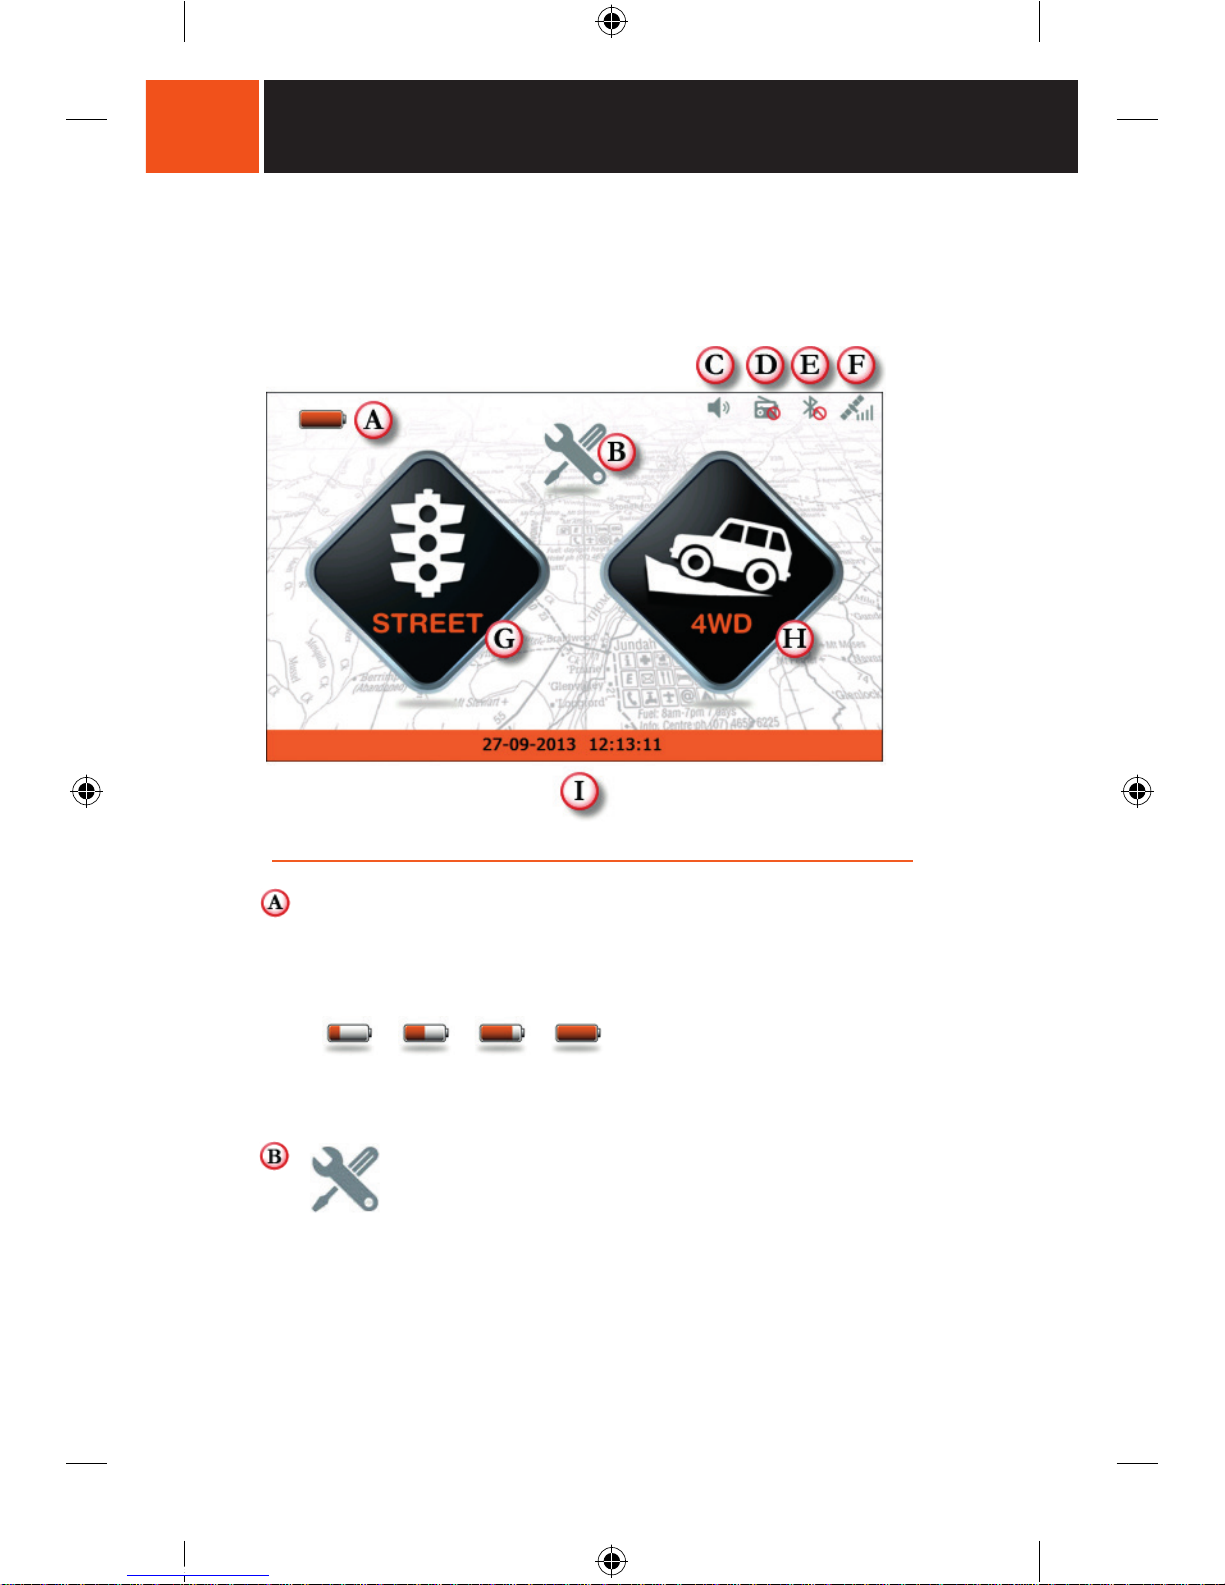
Main Menu
Introduction
Battery Indicator
The Battery Indicator displays the charge state of the internal battery as
shown below. When the unit is charging, the symbol is animated. Note
that the percentage value is not displayed on the screen.
20 % 50 % 80 % 100 %
Settings button
The Settings button allows access to the Settings menu,
where you can access system settings and the Tools Menu.
HN7 User Manual_v2.indd 18 2/04/14 9:04 AM
19
MAIN MENU
Hema HN7 User Manual
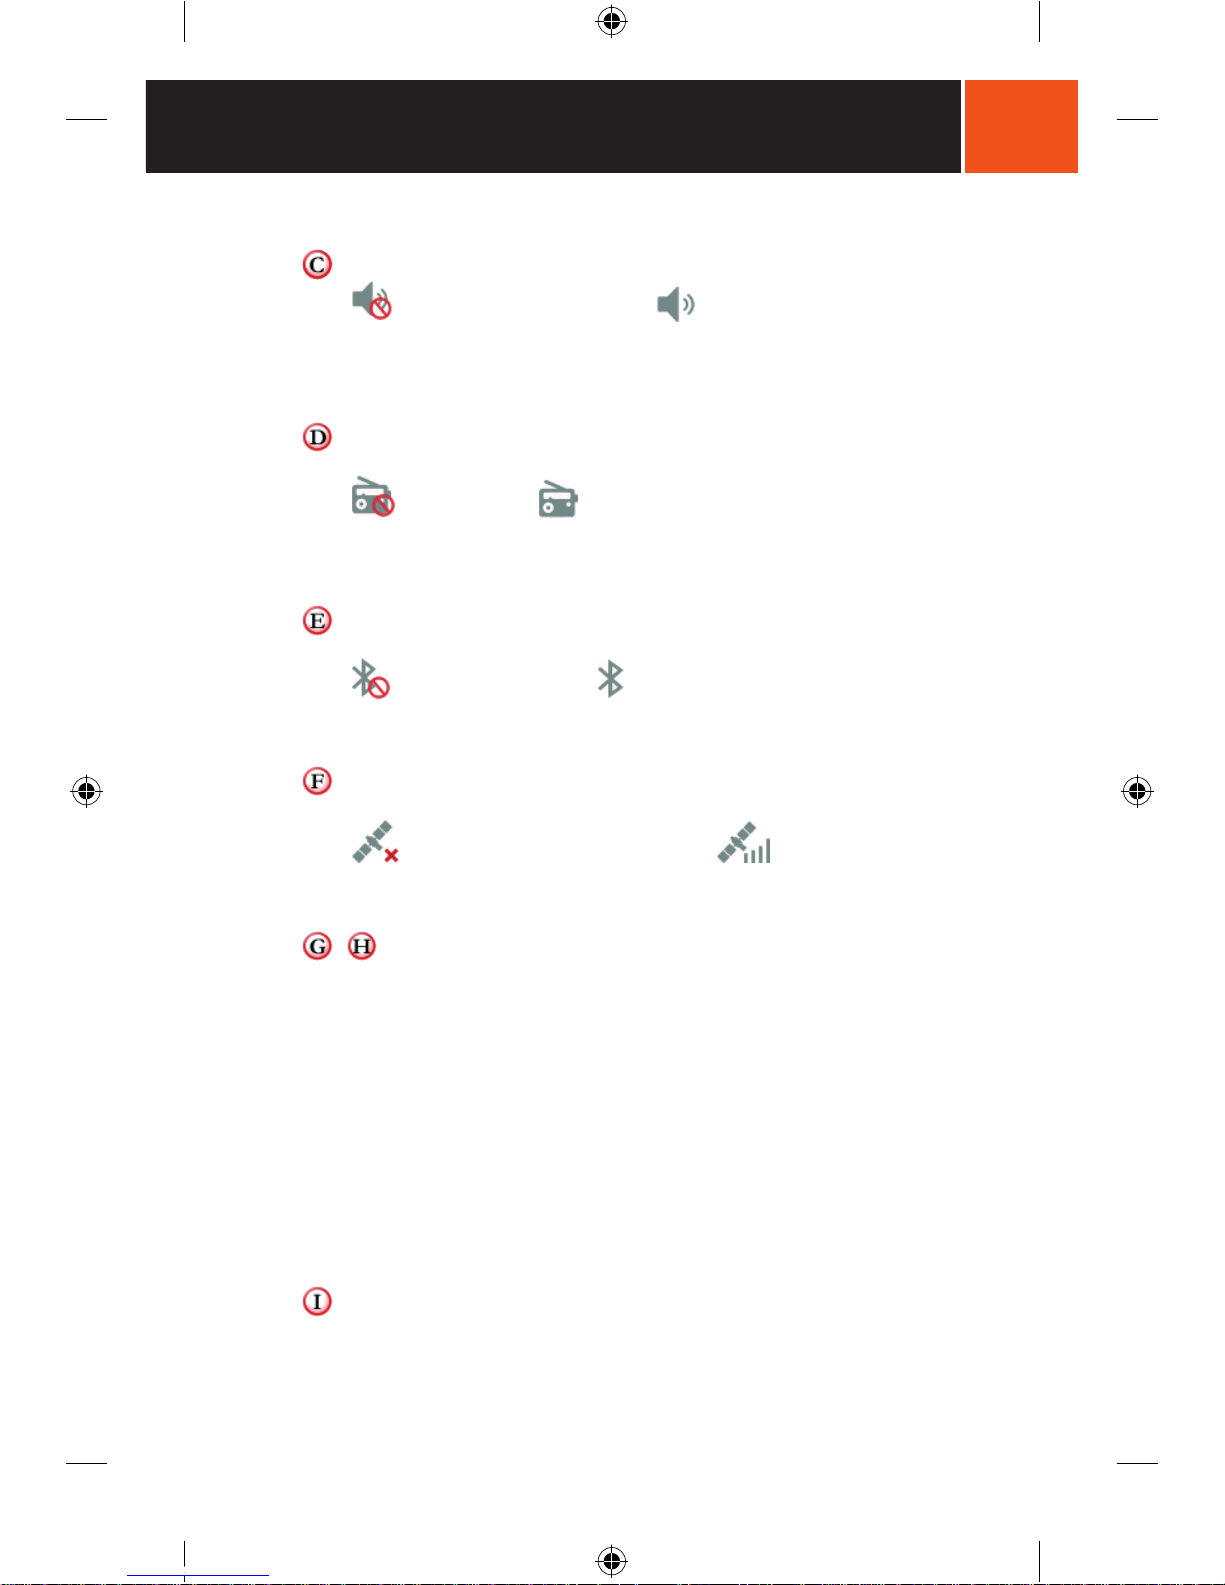
Speaker Indicator
Speaker Inactive (Muted) Speaker Active
The Speaker Indicator displays the internal speaker status.
Note: The HN7 speaker will be muted if the FM Function is active (See
information on the FM page of this user guide).
FM Function Indicator
FM Inactive FM Active
The FM function indicator displays the status of the FM Transmitter
function. You can tap this icon to take you directly to the FM
Transmitter screen.
Bluetooth Indicator
Bluetooth Inactive Bluetooth Active
The Bluetooth indicator displays the status of the Bluetooth function. You
can tap this icon to take you directly to the Bluetooth screen.
GPS Indicator
GPS Inactive (Searching for signal) GPS Active
The GPS Indicator displays the status of GPS Satellite Reception. You can
tap this icon to take you directly to the GPS Information screen.
Navigation Applications
There are TWO separate navigation applications installed on your Hema
HN7 NAVIGATOR:
Street - iGO Primo 2.4
iGO Primo 2.4 is an advanced street navigation program utilising
vector mapping and auto-routing. This application is ideal for use
around populated areas.
4WD – OziExplorer (Ezi Ozi-3)
OziExplorer displays raster maps with your position and various
other items of information overlaid on the maps screens. The
primary purpose of OziExplorer is to provide navigation in off-road
areas. The application shows "Where you are" and "How you got
there".
System Date & Time
The current System Date and Time are displayed in 24 hour format on
the orange strip at the bottom of the screen.
HN7 User Manual_v2.indd 19 2/04/14 9:04 AM

20
MAIN MENU
Hema HN7 User Manual
Settings Menu
Settings & Tools Menus
Tap the Settings button on the Main Menu to get to the System
Settings screen.
Back Button: Tap this button to return to the previous screen.
The NAVIGATOR Settings menu consists of the following elements:
Volume
Adjusts the master volume level of the internal audio.
Backlight
Allows adjustment of the screen brightness and power settings.
Language
Choose the interface language of the NAVIGATOR.
Date Time
Set the date, time and time zone.
Calibration
Allows the touch screen to be calibrated using the supplied stylus.
USB
Sets the USB connection mode for your PC and for a USB memory stick.
Sys Info
Displays the system software version etc.
Tools
Switches to the Tools Menu where you can perform additional functions.
HN7 User Manual_v2.indd 20 2/04/14 9:04 AM
21
MAIN MENU
Hema HN7 User Manual
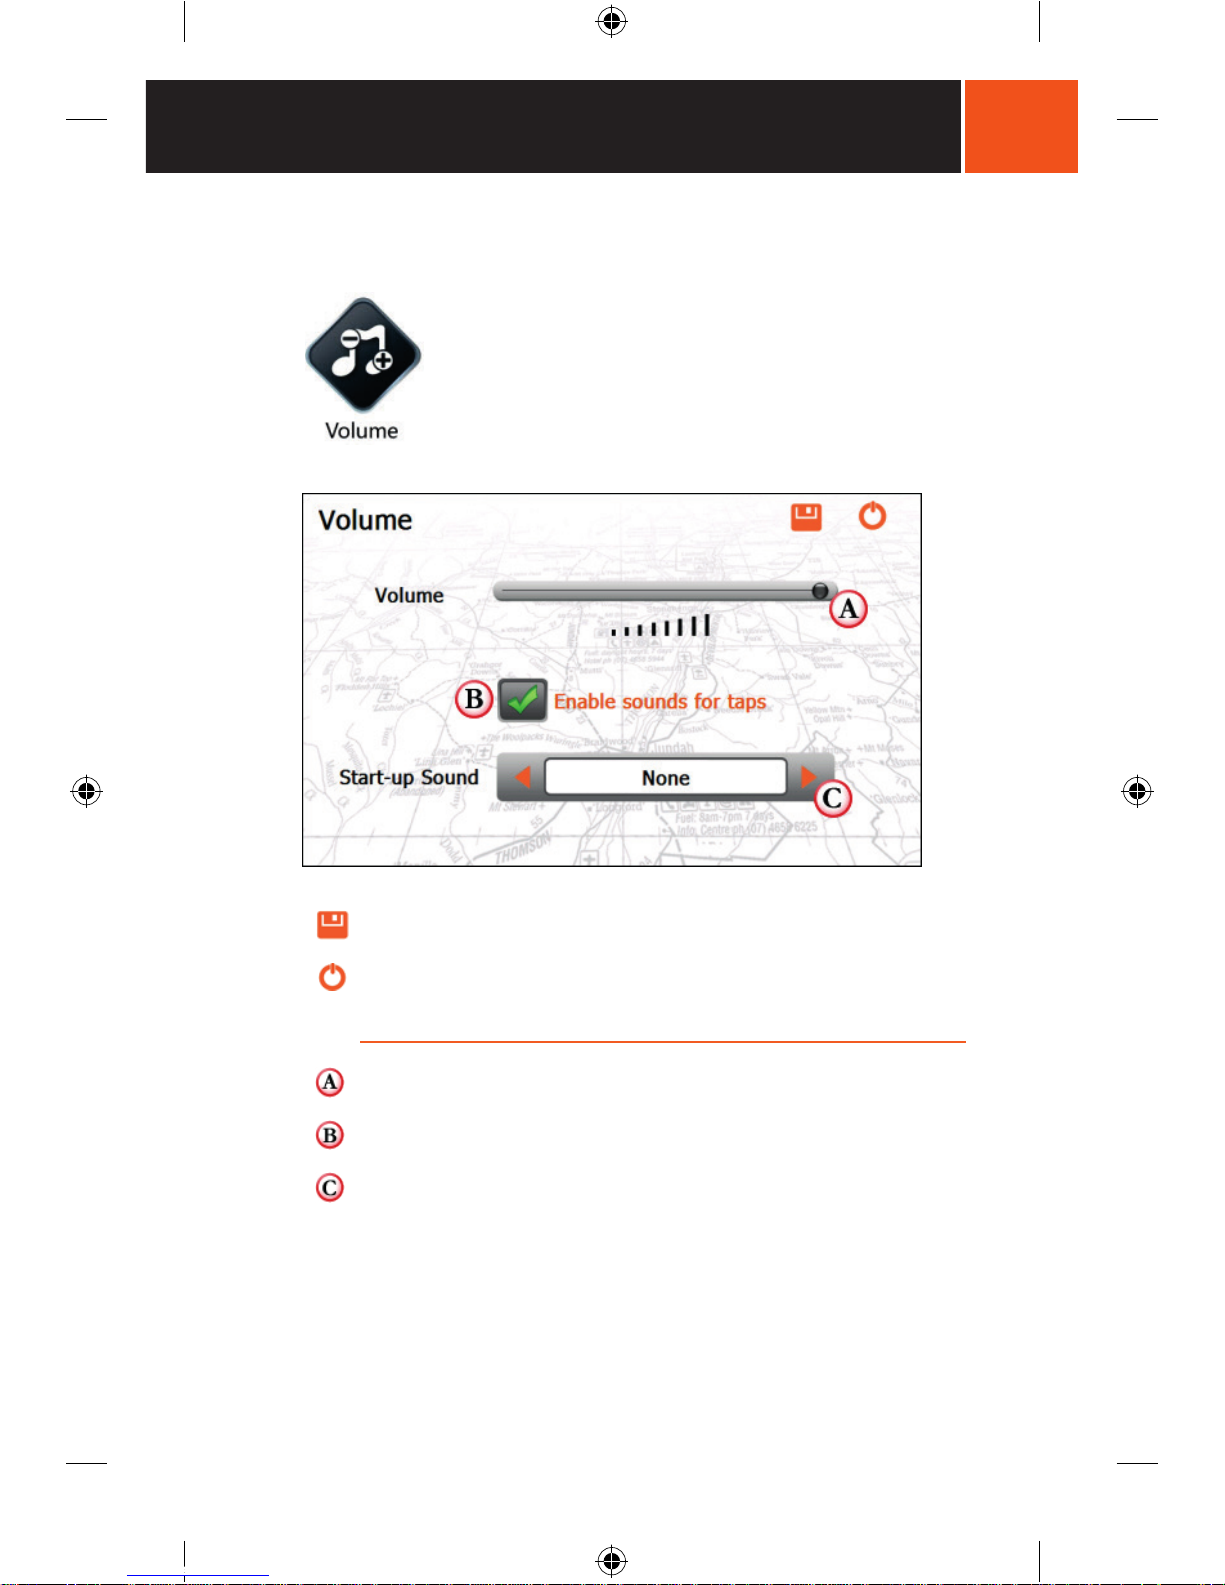
Volume
The Volume produced by the internal speaker in the
NAVIGATOR can be adjusted by tapping the buttons as
shown below.
Save Button: Tap this button to save the settings for the current
screen after making adjustments.
Exit Button: Tap this button to exit from the current screen without
saving any changes you might have made.
Volume Level Slider: Slide the control from left to right to adjust the
volume level up and down.
Enable Sound for Taps Toggle: Tap to enable this option which will
cause the unit to emit a sound whenever the screen is tapped.
Start-up Sound Selector: Tap the left and right arrows to choose a
sound which plays when the unit starts up.
HN7 User Manual_v2.indd 21 2/04/14 9:04 AM
22
MAIN MENU
Hema HN7 User Manual
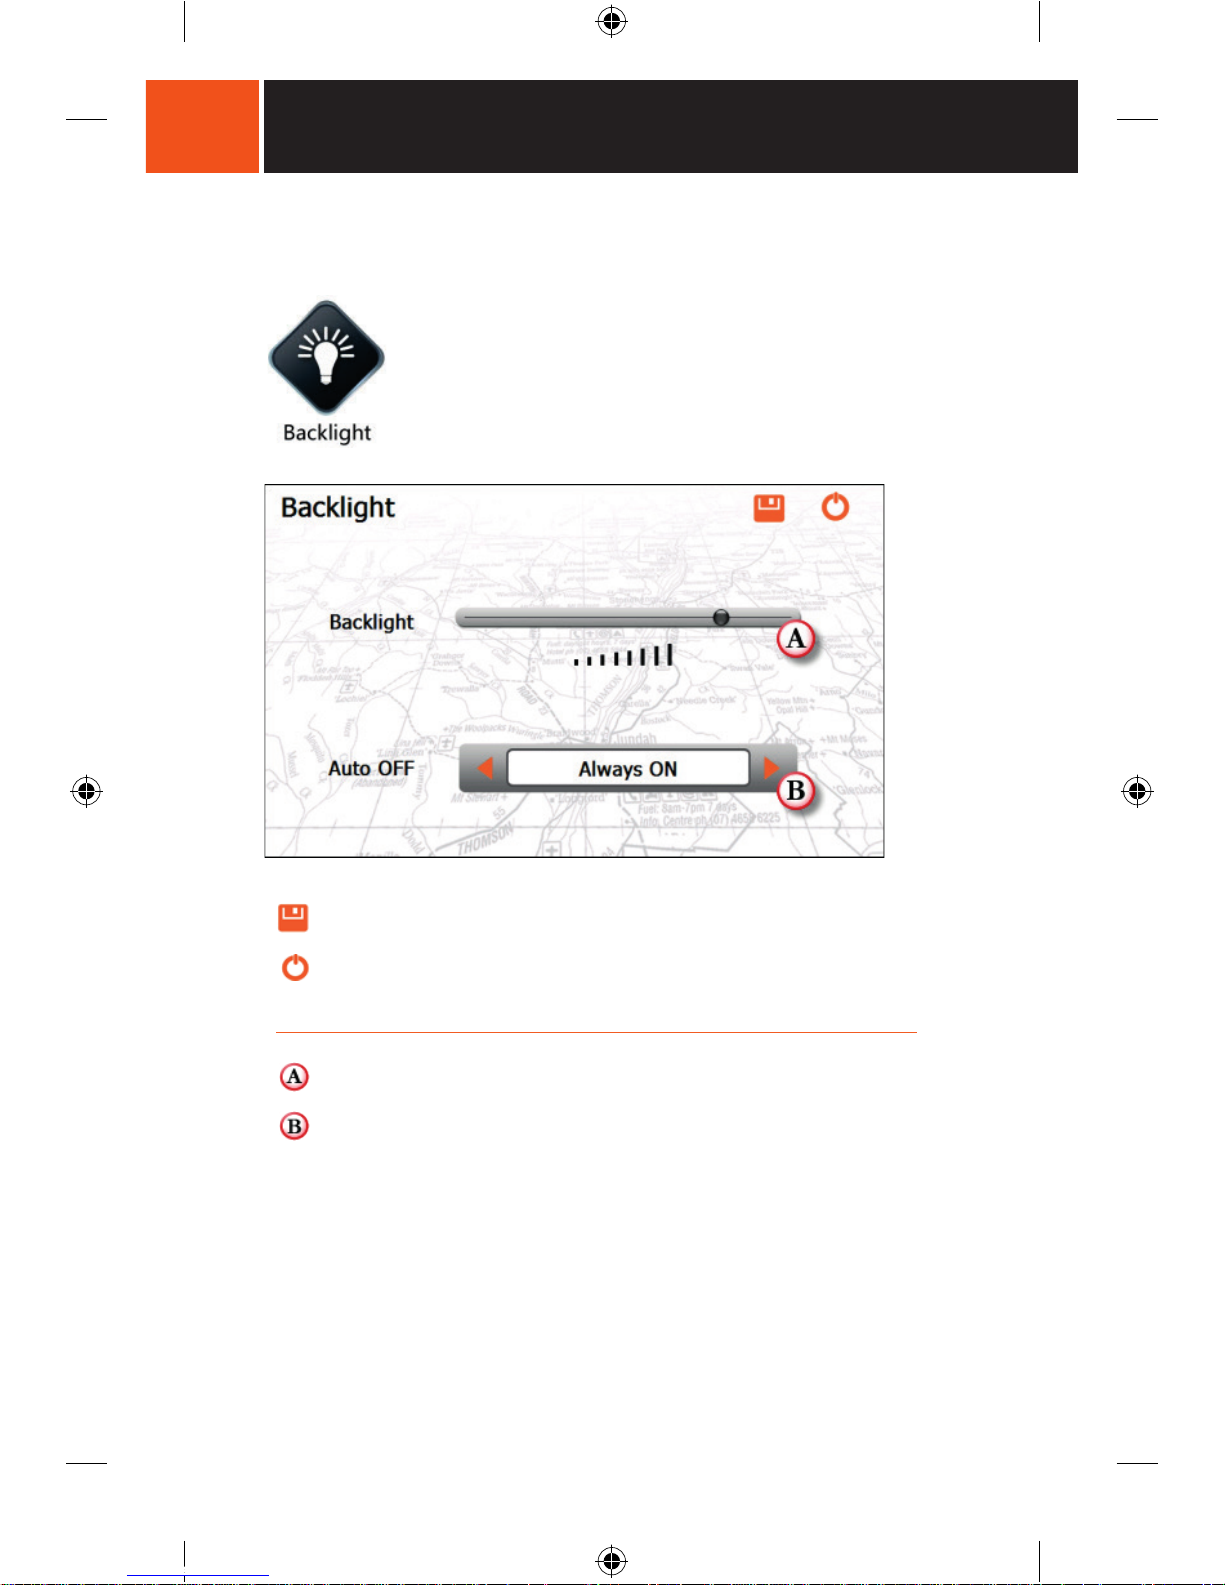
Backlight
Allows adjustment of the system backlight, controlling increase
/decrease of overall screen brightness. Brighter settings will
decrease battery run time.
Save Button: Tap this button to save the settings for the current
screen after making adjustments.
Exit Button: Tap this button to exit from the current screen without
saving any changes you might have made.
Backlight Slider: Slide the control left or right to increase\decrease the
screen backlight level.
Auto Off Selector: Tap the left and right arrows to change the
settings. This option will dim the backlight after the selected time. The
timer starts after the last screen tap.
The options are
•
Always ON
• 10s
• 30s
• 1m
• 2m
• 3m
HN7 User Manual_v2.indd 22 2/04/14 9:04 AM
23
MAIN MENU
Hema HN7 User Manual
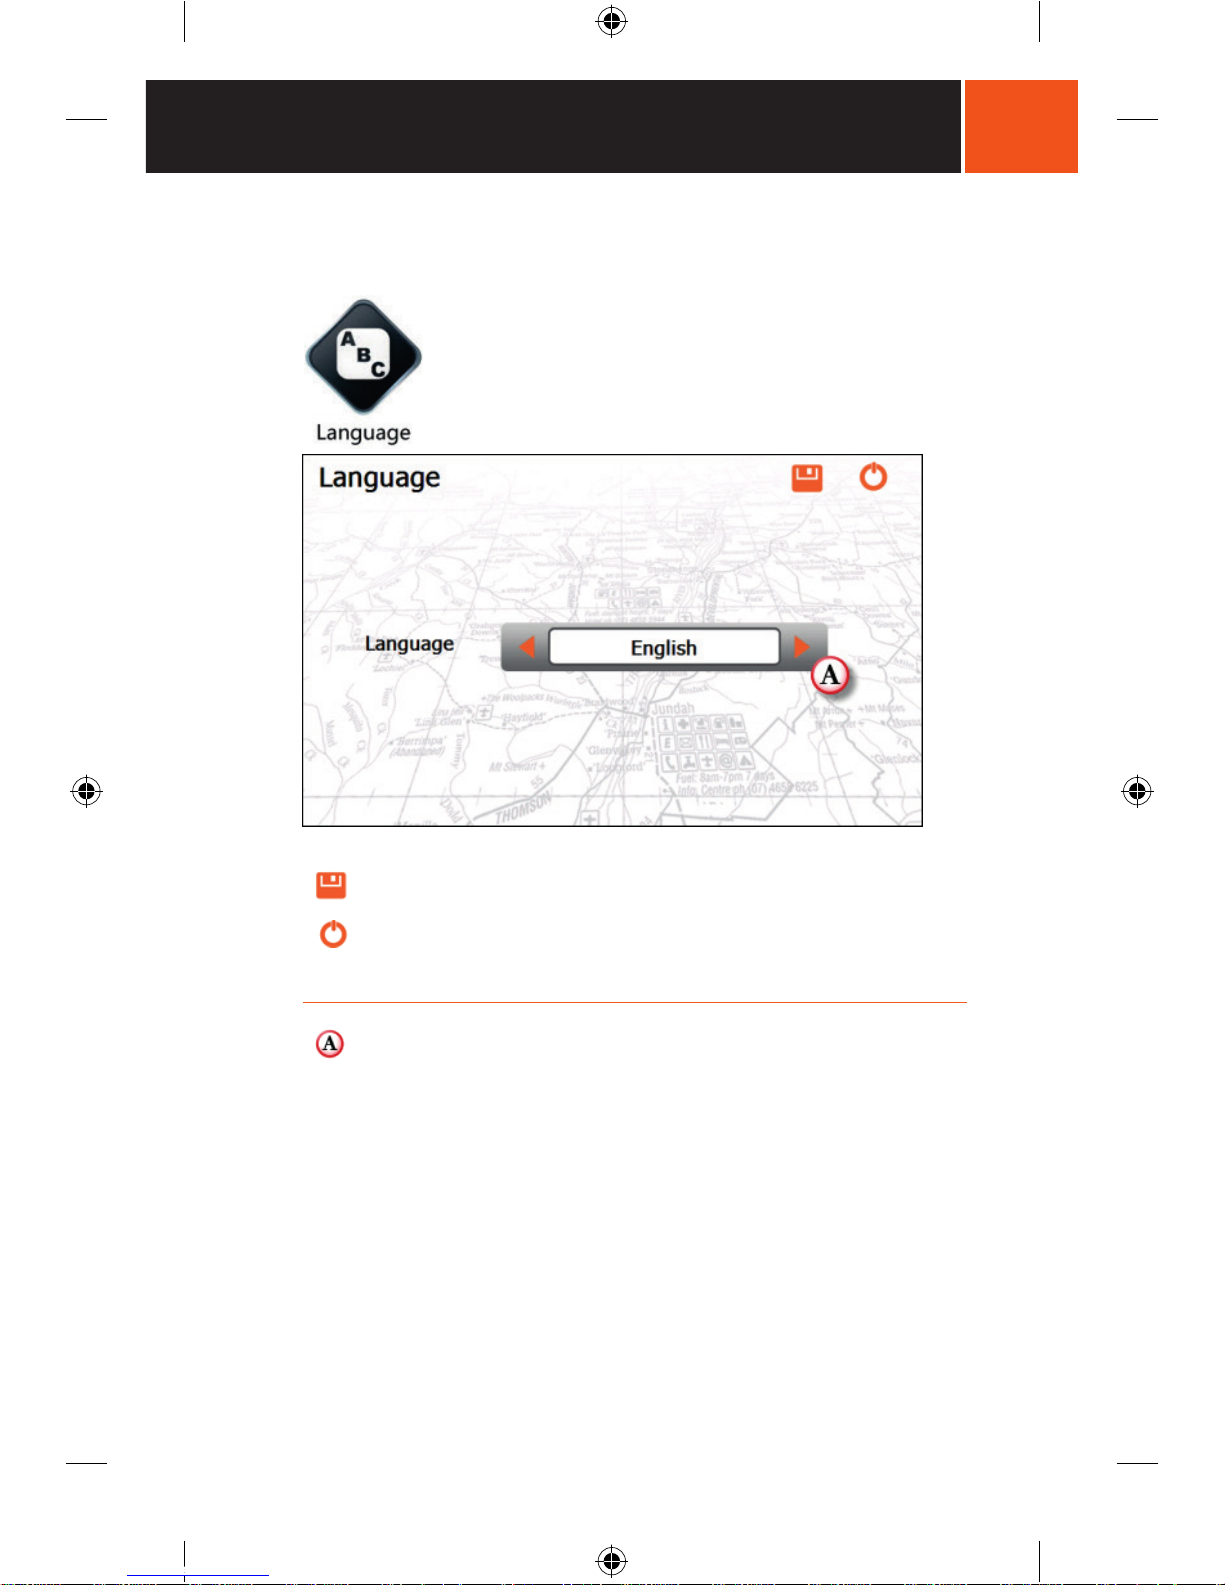
Language
This screen allows selection of language for system menu
screens on the NAVIGATOR.
Note that it may also be possible to select language options in
individual applications.
Save Button: Tap this button to save the settings for the current
screen after making adjustments.
Exit Button: Tap this button to exit from the current screen without
saving any changes you might have made.
Language Selector: Tap the left and right buttons on the selector to
choose the required language. The default language is English.
HN7 User Manual_v2.indd 23 2/04/14 9:04 AM
24
MAIN MENU
Hema HN7 User Manual
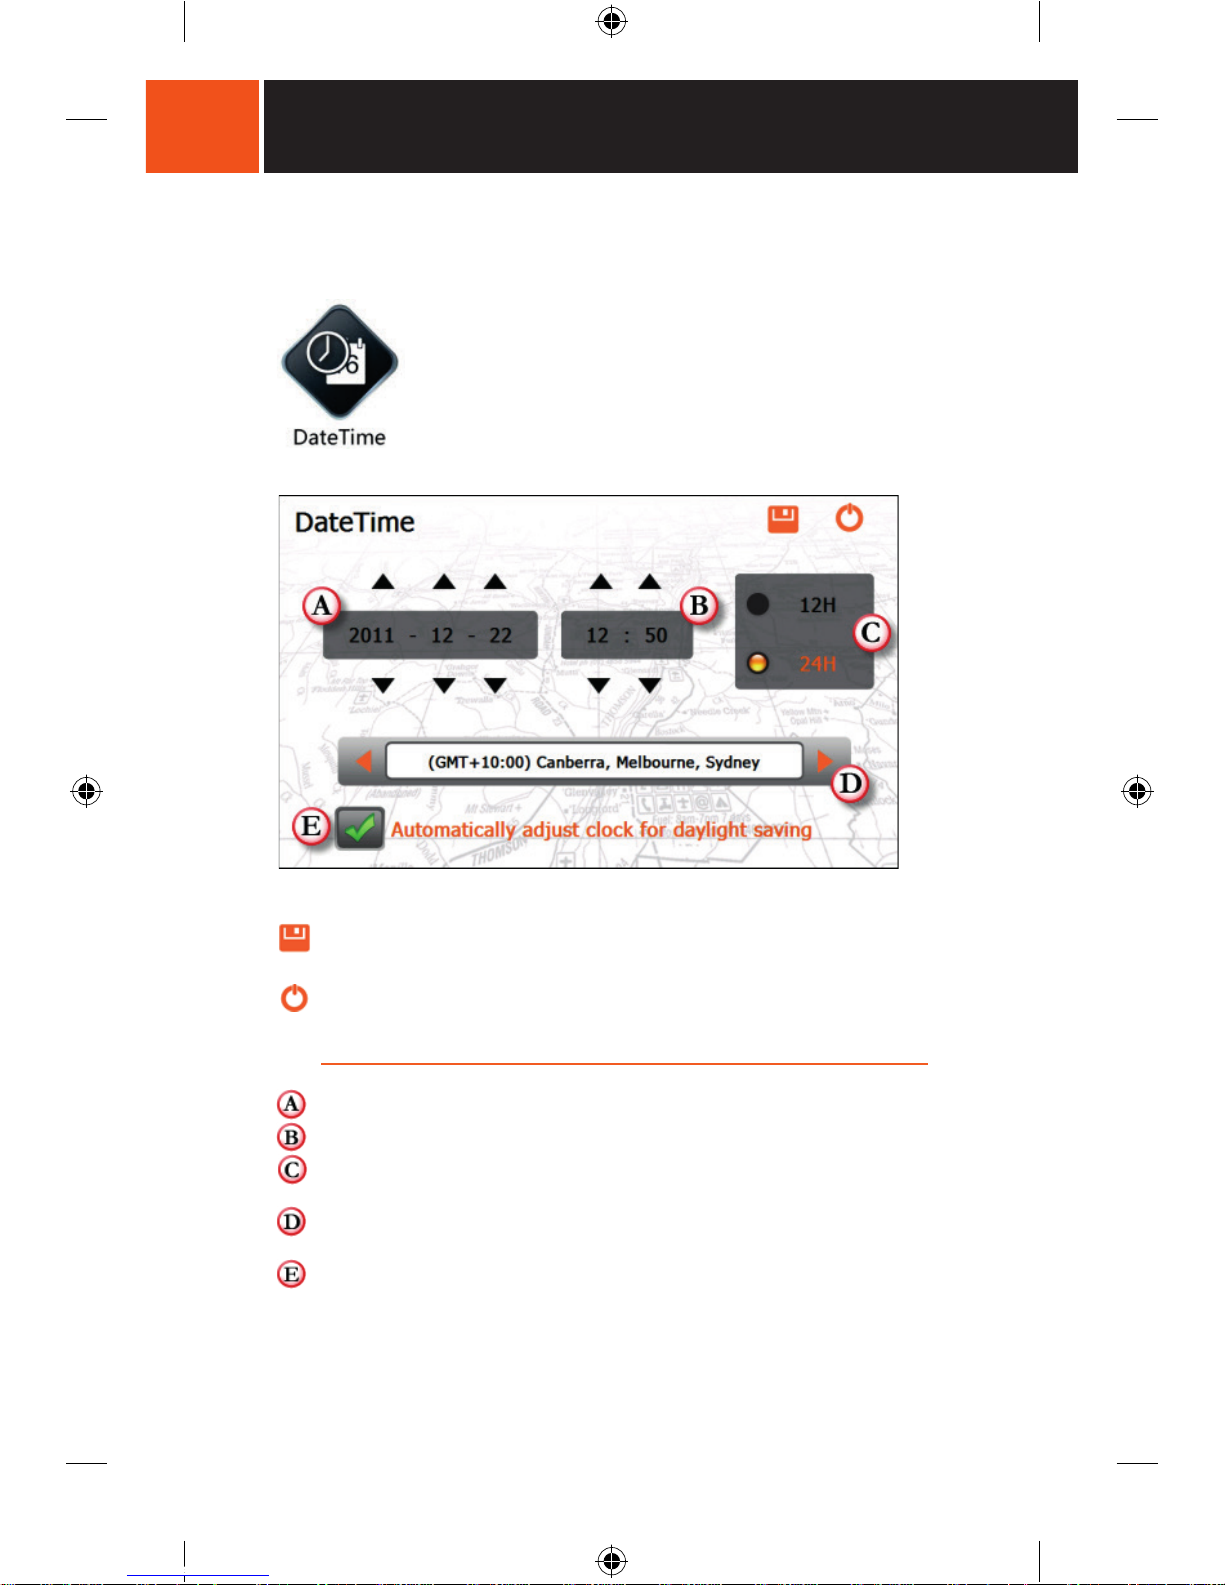
System Date & Time
Set Date, Time and Time zone on the NAVIGATOR
to suit your location.
Save Button: Tap this button to save the settings for the current
screen after making adjustments.
Exit Button: Tap this button to exit from the current screen without
saving any changes you might have made.
Date Controls: Use the up and down arrows to set the current date.
Time Controls: Use the up and down arrows to set the current time.
Hour Selector: Tap the control to set 12 hour or 24 hour mode
according to your preferences.
Time zone Selector: Use the left and right arrows to choose the
correct time zone for your current location.
Daylight Saving Toggle: Tap the box to select or deselect Daylight
Savings.
HN7 User Manual_v2.indd 24 2/04/14 9:04 AM
25
MAIN MENU
Hema HN7 User Manual
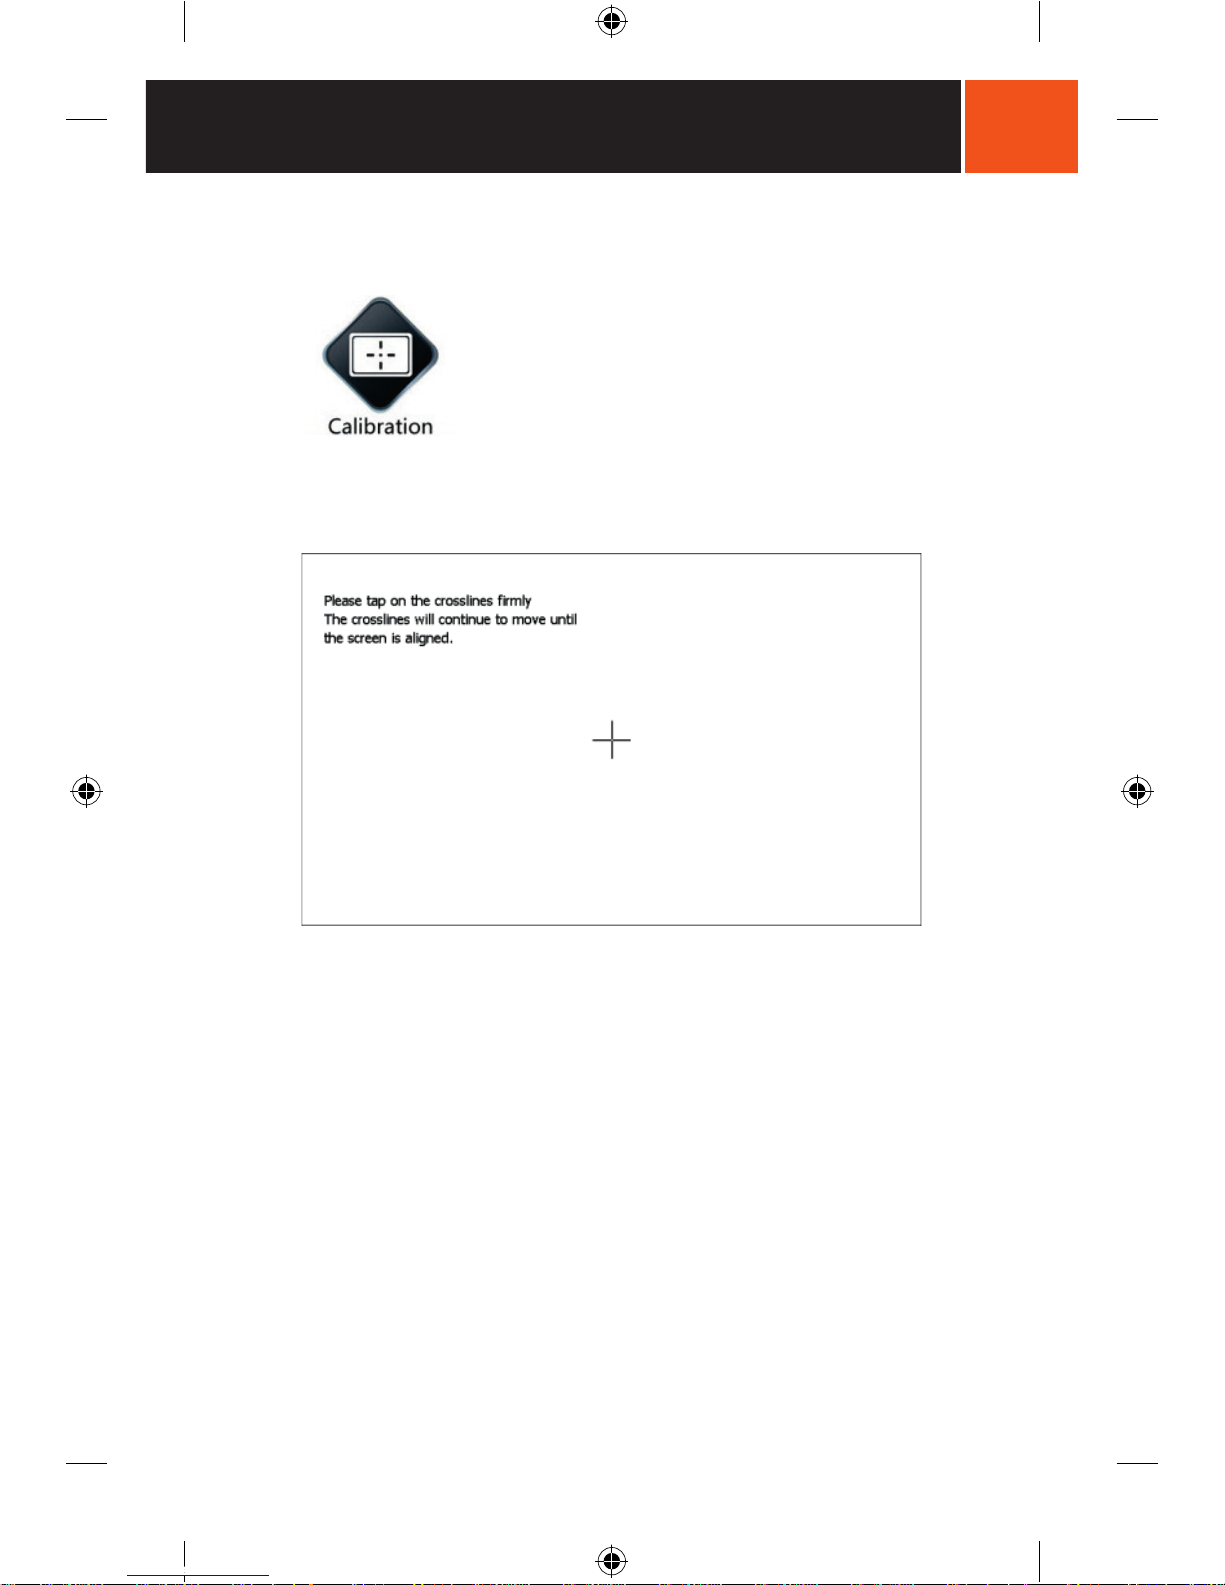
Calibration
A touch screen may require periodic calibration:
If you find that the unit doesn't register your screen taps where you think you
are tapping, then it's probably time to re-calibrate.
When you enter the Calibration screen, there will be a cross hair located in the
middle of the screen.
Simply tap as close as possible to the centre of the cross hair, using
the stylus, and then each subsequent cross hair as they appear around
the screen.
Once you have completed all five cross hairs, the Calibration screen will exit
automatically.
If you do not tap one of the cross hairs correctly, you will need to go around
and re-tap all the cross hairs again.
HN7 User Manual_v2.indd 25 2/04/14 9:04 AM
26
MAIN MENU
Hema HN7 User Manual
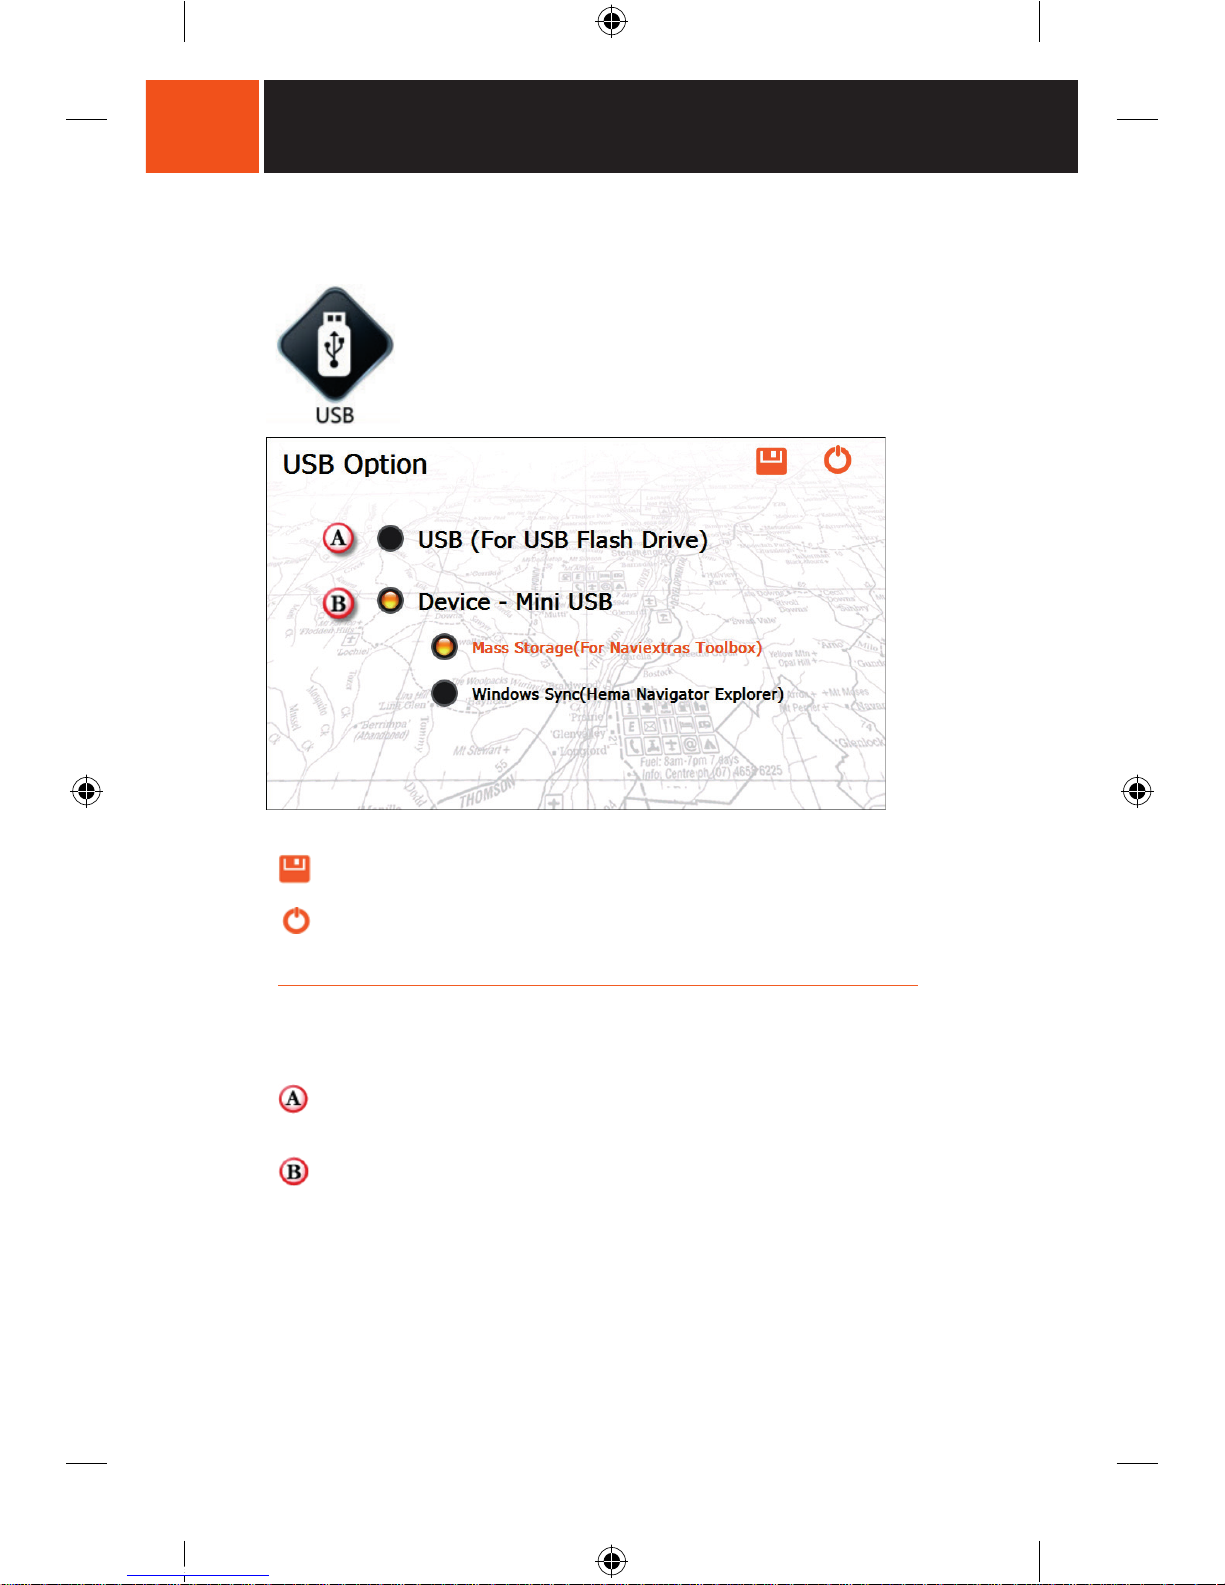
USB
Save Button: Tap this button to save the settings for the current
screen after making adjustments.
Exit Button: Tap this button to exit from the current screen without
saving any changes you might have made.
The USB Option screen allows you to choose between the Device connection
mode for your Windows™ PC and a connection mode for a USB flash drive
(memory stick).
The USB mode will enable you to connect a USB memory stick (not
included or supplied by Hema) to access media such as photos, music,
video and additional OziExplorer format maps.
The Device mode will enable you to connect your HN7 NAVIGATOR to a
Windows™ PC in Mass storage or Windows Sync mode.
Tap the appropriate button to move the highlight to the option you wish
to set, then tap the Save button to save your settings and restart.
The two Device connection modes are:
1. Mass Storage
The NaviExtras Toolbox application requires this connection mode.
NaviExtras Toolbox is used to perform updates etc. of the iGO street
navigation software.
HN7 User Manual_v2.indd 26 2/04/14 9:04 AM

27
MAIN MENU
Hema HN7 User Manual
The Hema Navigator Explorer PC application requires this connection
mode to install the Hema map viewing software and Hema maps to your
Windows™ PC.
When the NAVIGATOR is set to Mass Storage mode, it will appear as two
drive letters on your PC when connected. Windows will choose the next
free drive letters. Example; if you have a C:\, D:\ and E:\ drive on your
PC, then Windows will assign the drive letters F:\ and G:\ when the
NAVIGATOR is connected.
Generally, the first drive letter assigned will represent the internal
memory of the NAVIGATOR, and the second drive letter assigned will
represent the SD Card. Example: If you connect the NAVIGATOR to your
PC with no SD card in it, it will only show on the PC as a single drive
letter.
2. Windows Sync
The Hema Navigator Explorer PC application requires this mode of
connectivity to perform transfers of data (waypoints, tracks, and routes)
to and from the NAVIGATOR.
To facilitate this connection method one of the following applications need
to be installed on your computer:
• ActiveSync for Windows XP.
• Windows Mobile Device Centre for Windows Vista,
Windows 7 and 8.
NOTE
Windows Mobile Device Centre is available in two versions for 32bit and 64-bit versions of Windows.
You need to install the correct version for your Windows Operating
system.
You can determine the version of Windows which is installed on your PC,
as follows:
Windows 7: START MENU > CONTROL PANEL > SYSTEM icon
Windows 8: Control Panel > System and Security > System
The system properties window will be displayed.
Both ActiveSync and Windows Mobile Device Centre are freely available
from the Microsoft Download Centre at:
http://download.microsoft.com/
Hema also has these files available for download at our website for your
convenience at http://www.hemamaps.com. Click on Support.
HN7 User Manual_v2.indd 27 2/04/14 9:04 AM
28
MAIN MENU
Hema HN7 User Manual
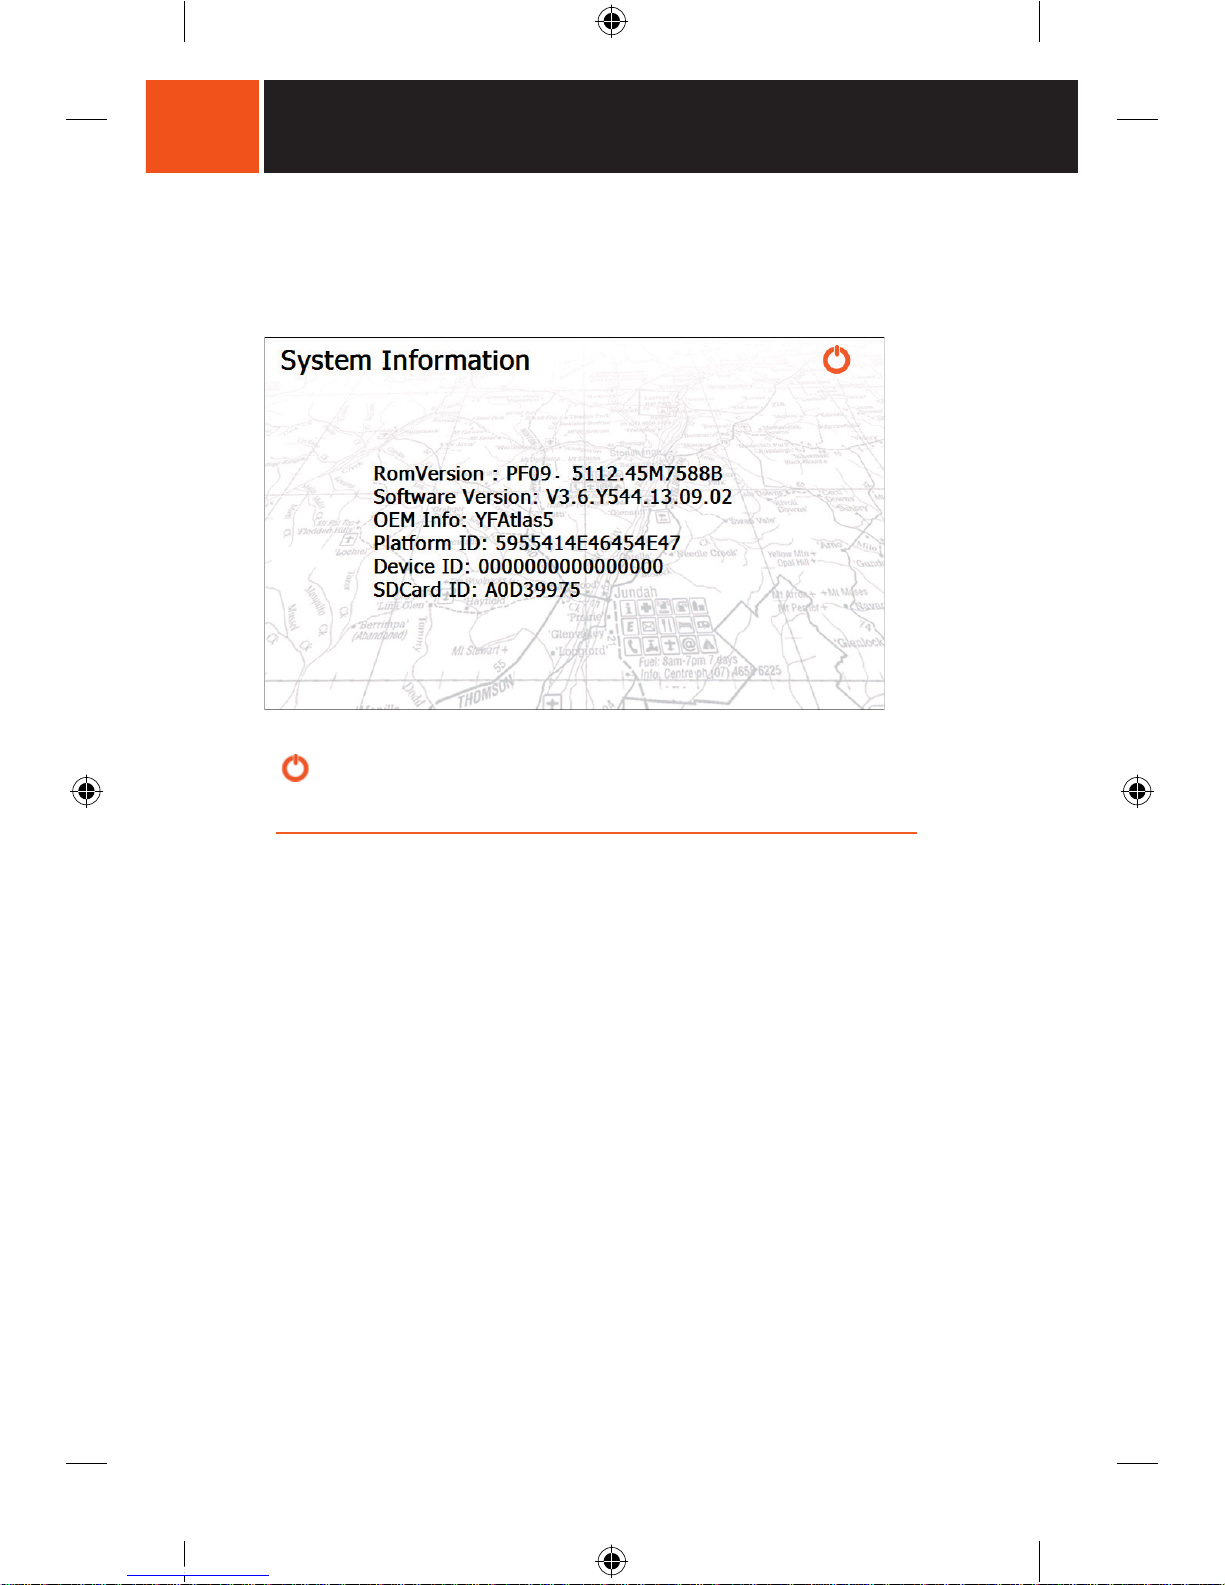
Sys Info.
Displays various items of system information, which may be of use to
support staff.
Exit Button: Tap this button to exit the current screen and return to
the previous screen.
HN7 User Manual_v2.indd 28 2/04/14 9:04 AM
 Loading...