

Hema HN6 Quick Start Manual


Hema HN6 Quick Start Guide


v
Table of Contents
HN6 Quick Start Guide ........................................................................................... 1
Safety Notes and Maintenance ............................................................................. 2
Introduction .................................................................................................... 2
Operating Environment .................................................................................... 3
Safety while Operating the Device ..................................................................... 4
Safety While Travelling ..................................................................................... 5
Battery ........................................................................................................... 6
Cleaning the Unit ............................................................................................. 7
Avoiding Theft ................................................................................................. 8
Getting Started .................................................................................................. 9
Introduction .................................................................................................... 9
About Your NAVIGATOR .................................................................................. 10
Box Contents ................................................................................................ 12
HN6 Features ................................................................................................ 13
Parts of the HN6 ............................................................................................ 14
Inserting & Removing MicroSD cards ................................................................ 17
Using the MicroSD Card Adapter ...................................................................... 18
Mounting the HN6 on the Windscreen ............................................................... 19
Turning the HN6 ON and OFF .......................................................................... 21
Charging the Battery ...................................................................................... 23
Resetting the HN6 ......................................................................................... 24
Stylus Techniques .......................................................................................... 25
Backing Up Your Data .................................................................................... 26
Additional Information .................................................................................... 28
PC Connectivity ................................................................................................ 29
Main Menu ....................................................................................................... 30
Introduction .................................................................................................. 30
Settings Menu ............................................................................................... 33
Street Nav ....................................................................................................... 76
Introduction .................................................................................................. 76
Getting To Know the Screens and Buttons ........................................................ 78
Map Screen and Functions .............................................................................. 82
Quick Menu button ......................................................................................... 84
Map Screen Options during Navigation ............................................................. 86

Hema HN6 Quick Start Guide
vi
Using the Find button ..................................................................................... 88
Finding an Address ........................................................................................ 91
Finding a POI ................................................................................................ 96
Quick Search Along Route ............................................................................. 100
Quick Shortcuts on Find Places Screen ........................................................... 102
Custom Search ............................................................................................ 104
Using your Navigator with CAMPS 6 & Caravan Parks Books .............................. 107
More Menu .................................................................................................. 114
Settings Menu ............................................................................................. 117
4WD Nav ....................................................................................................... 121
Introduction ................................................................................................ 121
Getting to know OziExplorer .......................................................................... 122
Map Overlay Information & Buttons ............................................................... 124
Standard Toolbar ......................................................................................... 126
Acquiring a GPS Satellite Fix ......................................................................... 127
Page Selection............................................................................................. 129
Pages and their Functions ............................................................................. 130
Opening a Map ............................................................................................ 132
Adding Waypoints ........................................................................................ 134
Exiting OziExplorer ...................................................................................... 135
Hema Navigator Explorer DVD Installation ...................................................... 136
Important Product Information ......................................................................... 138
Software License Agreement ......................................................................... 138
Important Street Navigation Data Information................................................. 138
Important Map Data Information ................................................................... 138
Declaration of Conformity ............................................................................. 139
Hema Navigator Limited Warranty ................................................................. 139
International Purchases ................................................................................ 139
Online Auction Purchases .............................................................................. 140
iGo End User License Agreement ................................................................... 141
Technical Data Sheet ................................................................................... 145

1
HN6 Quick Start Guide
Hema NAVIGATOR HN6
PREMIUM ON & OFF ROAD GPS
NAVIGATION
by
Hema
Quick Start Guide
Version 1.1

Hema HN6 Quick Start Guide
2
Safety Notes and Maintenance
Introduction
This section of the Quick Start Guide contains some general information and
recommendations related to the use of your Hema HN6 NAVIGATOR.

HN6 Quick Start Guide
3
Operating Environment
External Influences
Do not allow objects to drop onto the device from above.
Do not place objects on top of the device or rub the screen with abrasive
materials or objects such as car keys etc.
Do not drop the device.
Do not use sharp or abrasive objects to operate the touch screen other than the
stylus designed for this purpose.
Avoid prolonged use in high vibration and high shock environments.
Do not carry / transport flammable liquids, gases or explosives in the same
compartment as the device and its accessories.
Wireless devices can interfere with the reception of satellite signals causing
unstable signal reception.
Some car audio systems can cause interference with the device.
GPS
GPS signals are produced and monitored by the United States government, who
are solely responsible for the availability and accuracy of the system.
GPS Satellite signals do not penetrate solid objects (apart from glass) and,
therefore will not operate from within a building unless an external re-radiating
GPS antenna is fitted.
GPS signal reception may be impaired by dense obstacles above the ground such
as tall buildings, trees, or extremely bad weather.
In order to operate efficiently, the Hema HN6 NAVIGATOR should be positioned
with a view to the open sky (through glass is acceptable).
Glass with a metallic film, as fitted on some vehicles, may impair the GPS signal.
Temperature
Do not leave your Hema HN6 NAVIGATOR lying or mounted on your dashboard
where it will be exposed to extreme temperature conditions which can result in
malfunctions and/or dangerous situations. The device may be operated in a
temperature range of -20°C ~ 55°C or stored in a temperature range of -20°C ~
35°C.
Keep the device away from excessive moisture. The device should be used in an
atmospheric humidity of 45% ~ 80% non-condensed and stored in an
atmospheric humidity of 30% ~ 90% non-condensed.
Do not expose the device to sudden and extreme temperature fluctuations. This
may result in condensation forming within the device causing malfunction or
failure. When condensation forms, wait for the device to completely dry out
before operating.

Hema HN6 Quick Start Guide
4
Safety while Operating the Device
Failure to adhere to the following guidelines may result in potentially hazardous
situations and result in serious injury or even death.
Never operate/interact with the device while you are driving.
National road traffic regulations and local traffic conditions always take
precedence over the instructions given by any navigation device.
Do not install the navigation device in such a manner as to obstruct the driver's
view of the road or interfere with the operation of a vehicle's controls or safety
features such as air bag systems.
The route calculated by the navigation device is a suggested route and used for
reference only. It is not a substitute for alert driver behaviour and common
sense. Drivers must continue to pay attention to all road regulations and hazards
regardless of instructions from the navigation device.

HN6 Quick Start Guide
5
Safety While Travelling
While the Hema HN6 NAVIGATOR is a valuable aid for navigation, it is only that an aid - and as such should not be used as a replacement for hard-copy maps and
other traditional navigational aids while travelling, especially in remote areas. Always
ensure that you have adequate backup systems in place to ensure your personal
safety.
Local conditions can change rapidly, therefore it is wise to pay attention to road signs,
particularly where those signs advise of serious hazards, such as local flooding etc.

Hema HN6 Quick Start Guide
6
Battery
This product uses a re-chargeable Lithium-Polymer battery which is not user
serviceable and not user replaceable. Failing to adhere to these guidelines may
reduce the life expectancy of the battery or present the risk of electrolyte leak,
explosion and fire resulting in chemical burn, damage and/or injury.
When charging from a Personal Computer (PC), switch the device off. Disconnect
the device when it is fully charged (indicated by the device charge light turning
green).
Before storage, partially charge the battery to approximately 50% capacity.
Lithium-Polymer batteries do not need to be fully charged. A partial charge will
generally extend the useful life of your battery, but results in reduced running
time from that charge.
Only use the original 12/24V car adapter supplied with the Hema HN6
NAVIGATOR. Use of nonstandard parts or accessories may result in malfunctions
and/or severely damage the device and may void your warranty.
Do not expose the device to a damp, wet or corrosive environment.
Do not expose the device to excessive pressures, heat sources, high
temperatures, or extreme sunlight conditions, such as an unattended vehicle on a
hot day.
Do not expose the device to operating temperatures outside of the recommended
range of -20°C ~ 55°C and storage temperatures outside of the recommended
range of -20°C ~ 35°C.
Do not pierce, open or dismantle the battery. If the battery leaks and you come
into contact with the liquid, thoroughly rinse the contaminated area with water
and consult with a doctor immediately.

HN6 Quick Start Guide
7
Cleaning the Unit
The Hema HN6 NAVIGATOR casing can be cleaned using a cloth slightly dampened
with water and a mild detergent and then wiped dry. Care must be taken not to let
moisture into the speaker holes or any of the ports, jacks and slots on the device.
The touch screen may be cleaned using lint free or microfibre cloths.
Isopropyl alcohol or water may be applied to the cloth where required to gently wipe
the touch screen.
Do not use harsh or abrasive cloths and avoid the use of chemical cleaners or
solvents as these can damage the NAVIGATOR.

Hema HN6 Quick Start Guide
8
Avoiding Theft
To avoid theft, remove the NAVIGATOR and mount from sight when not in use.
Remove the residue left on the windscreen by the suction mount.

HN6 Quick Start Guide
9
Getting Started
Introduction
Congratulations on purchasing your Hema HN6 NAVIGATOR navigation system.
Hema takes great pride in providing its customers with quality navigation solutions
supported by friendly and effective customer service.
Hema is confident that the NAVIGATOR will prove to be a valuable tool in the pursuit
of your adventures and ensure a safe and pleasant journey wherever the road or
track may lead you.
Please be sure to familiarise yourself with the functions and operation of your
NAVIGATOR by reading this Quick Start Guide thoroughly.
If you need assistance, please check our website at
http://www.hemanavigator.com.au/ for information, and Frequently Asked
Questions.

Hema HN6 Quick Start Guide
10
About Your NAVIGATOR
So, what IS the NAVIGATOR? What makes it different to other car GPS devices?
Most in-vehicle GPS systems are designed for use around town and on suburban
streets. They use a mapping system called vector mapping, and they can tell you how
to get from A to B by guiding you with on-screen directions and (usually) spoken
instructions as well. There are many other features which may or may not be
included, depending on the make and model.
A typical street only GPS will quite happily create routes between points within the
same suburb, city, state, or even across the country.
Once you leave the main highway, however, and venture into more remote locations,
these types of GPS systems are generally not quite as useful.
This is where the Hema HN6 NAVIGATOR steps in.
The Hema HN6 NAVIGATOR is equipped with iGo Primo 2 which performs the
same functions as a typical street-only vehicle GPS. It has several unique features
including:
Camps Australia Wide 6 POIs
Caravan Parks Aust Wide POIs.
Dump Point (effluent) POIs
see the section in this guide Using your NAVIGATOR with the CAMPS 6 and
Caravan Parks Australia Wide Books
The 4WD navigation system features OziExplorer software, which is what makes the
Hema HN6 NAVIGATOR different. It does not work in the same way as the usual
"street only" GPS units and software.
The basic concept is that you have an electronic map image, which is almost identical
to the existing paper maps published by Hema. These maps are known as "raster
maps". OziExplorer knows the geographical area which is covered by the electronic
map, and therefore, once it knows your vehicle's position, can identify and display
your vehicle's location on the map.
It also has some other useful features, including:
Adding waypoints at any location. A waypoint is a "marker" on the map, which
you might use so that you can find your way back to a specific location at a future
time (such as a good fishing spot, a nice camping area, etc.)
Recording the path your vehicle follows as you travel in bush areas. This is known
as a Track Log or Breadcrumb Trail. This can be a very handy tool if you are in
an area where there are indistinct tracks to follow. While the screen shows
where you are now on the map displayed, it also shows how you got there.
Searching for named locations such as "Ayers Rock", or "Fog Bay" etc. The Name
Search Database contains just under 80000 locations. Once a location is found by
searching, you can show it on a map, add a waypoint for it, or just go directly to
it.
OziExplorer is not designed for use within towns and suburbs, and it does not
provide Turn-By-Turn Navigation (create a route from point A to point B
automatically), that is what the iGo software is there for.
The fact that the NAVIGATOR includes additional features means that to get the most
out of it, you may need to spend a bit more time reading the User Guides and

HN6 Quick Start Guide
11
familiarising yourself with its capabilities and functions. You will soon feel at home
using it.
There are many other features which the software is capable of, some of which are
explained in this Quick Start Guide. Further documentation and assistance are
available on the NAVIGATOR website, at http://www.hemanavigator.com.au/.
Enjoy exploring with your NAVIGATOR!

Hema HN6 Quick Start Guide
12
Box Contents
Hema HN6 NAVIGATOR with Stylus
Pre-Installed 8GB MicroSD card
MicroSD to SD card adapter
Luxury Carry Pouch
Superior German Engineered Windscreen Mount
HN6 cradle
12/24V DC Car Charger
USB Cable
Rear-view camera adaptor cable
Hema Navigator Explorer DVD
Quick Start Guide
Map Key

HN6 Quick Start Guide
13
HN6 Features
Large 6” hi-res (800 x 480) wide screen
64-Channel GPS for improved location accuracy and faster GPS fix
4GB on-board memory
8GB microSD card preloaded with
Hema Australian Regional maps
Hema Topo 250 Australia map (1:250,000)
Hema Australia 1M seamless map (1:1,000,000)
Hema Australia State Maps
Hema New Zealand Road Atlas North & South Island maps (1:350,000)
Bluetooth – Built-in hands free calling
FM Transmitter
Rear view camera ready
iGo Primo 2 Street Navigation – Preloaded with Australia & New Zealand
mapping plus 2 year free map updates
OziExplorer with updated easy to use Hema customised interface (EziOzi2)
12 month warranty backed by Hema’s excellent support team
Hema HN6 Quick Start Guide
14
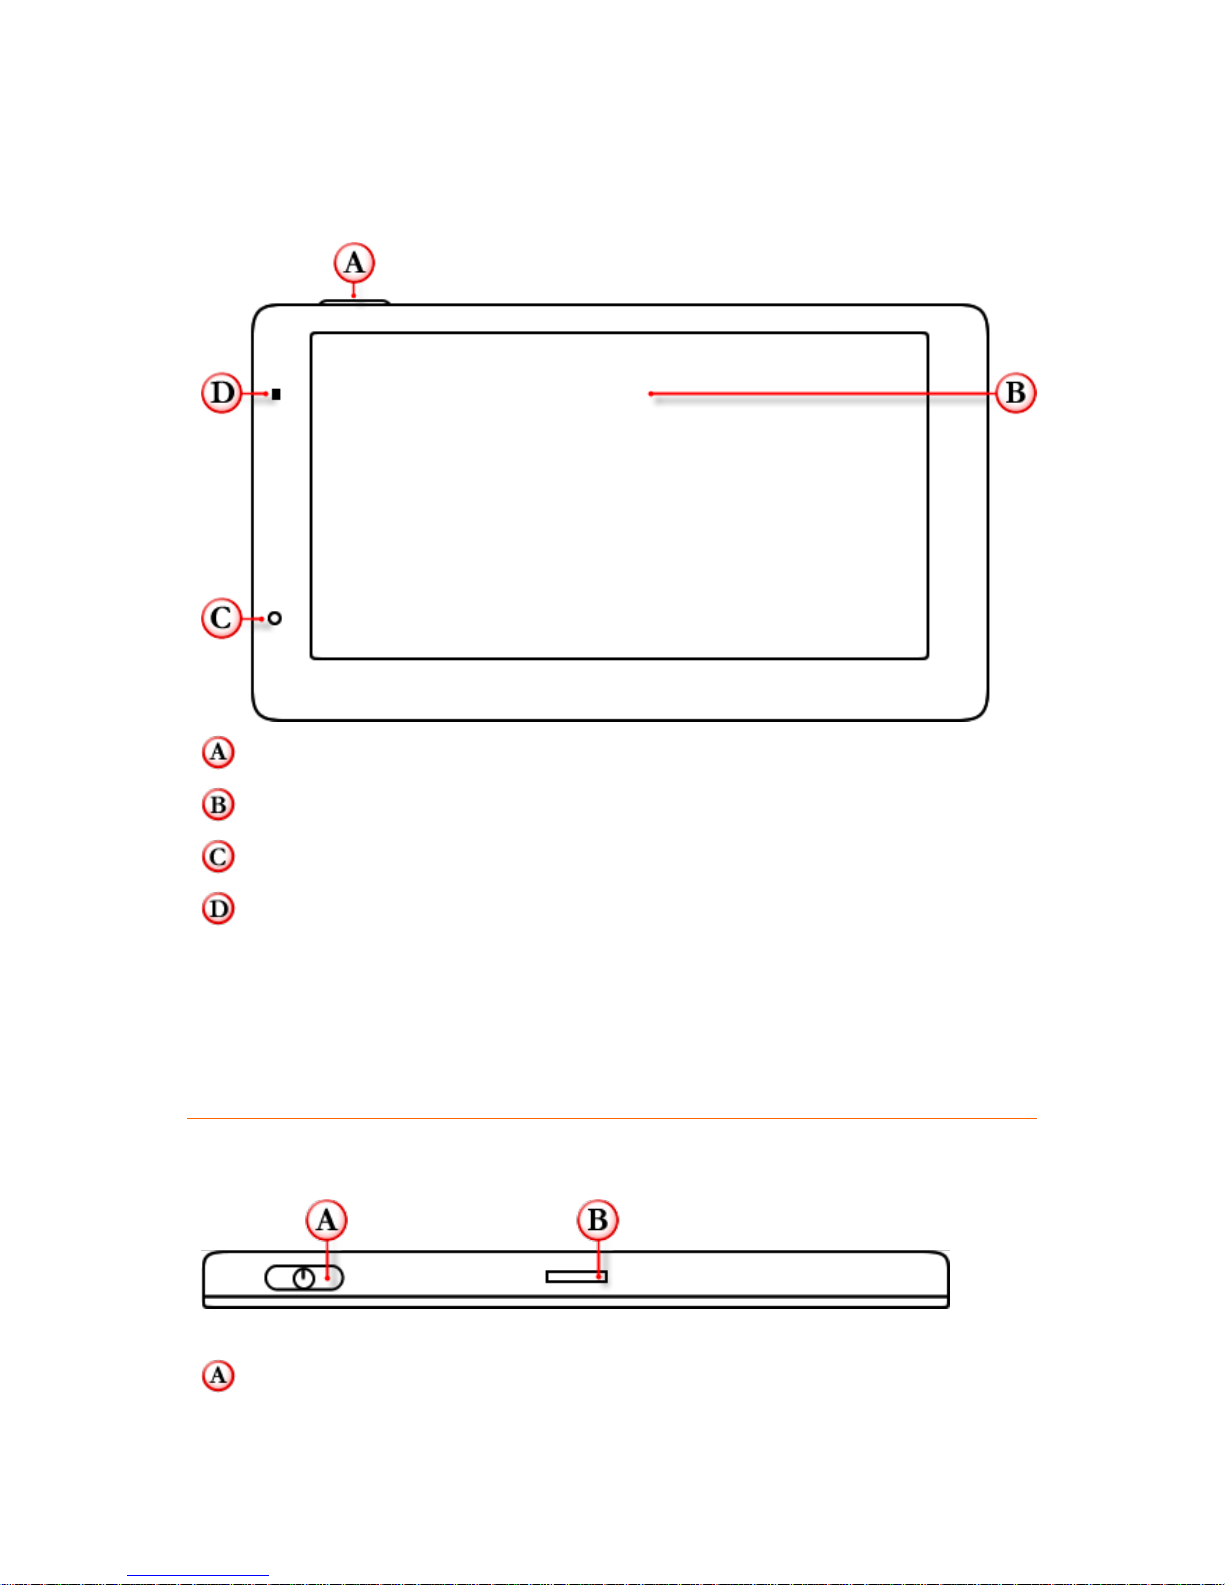
Parts of the HN6
Front View
Power Button: Powers the NAVIGATOR ON / OFF or activates sleep mode
LCD Touch Screen Display: 6.0 inch LCD display
Microphone: Used during hands free Bluetooth operation
LED Power Indicator:
The LED is RED when charging (while charging, the battery indicator on the main
menu is animated).
The LED is GREEN when the unit is powered on, but NOT connected to external
power. (The main menu battery indicator shows approximate battery level as per
the Main Menu - Introduction section of this quick start guide.
Top View
Power Button: Powers the NAVIGATOR ON / OFF or activates sleep mode
HN6 Quick Start Guide
15
Top Mounting cradle slot: Locates and secures the device within the mounting
cradle
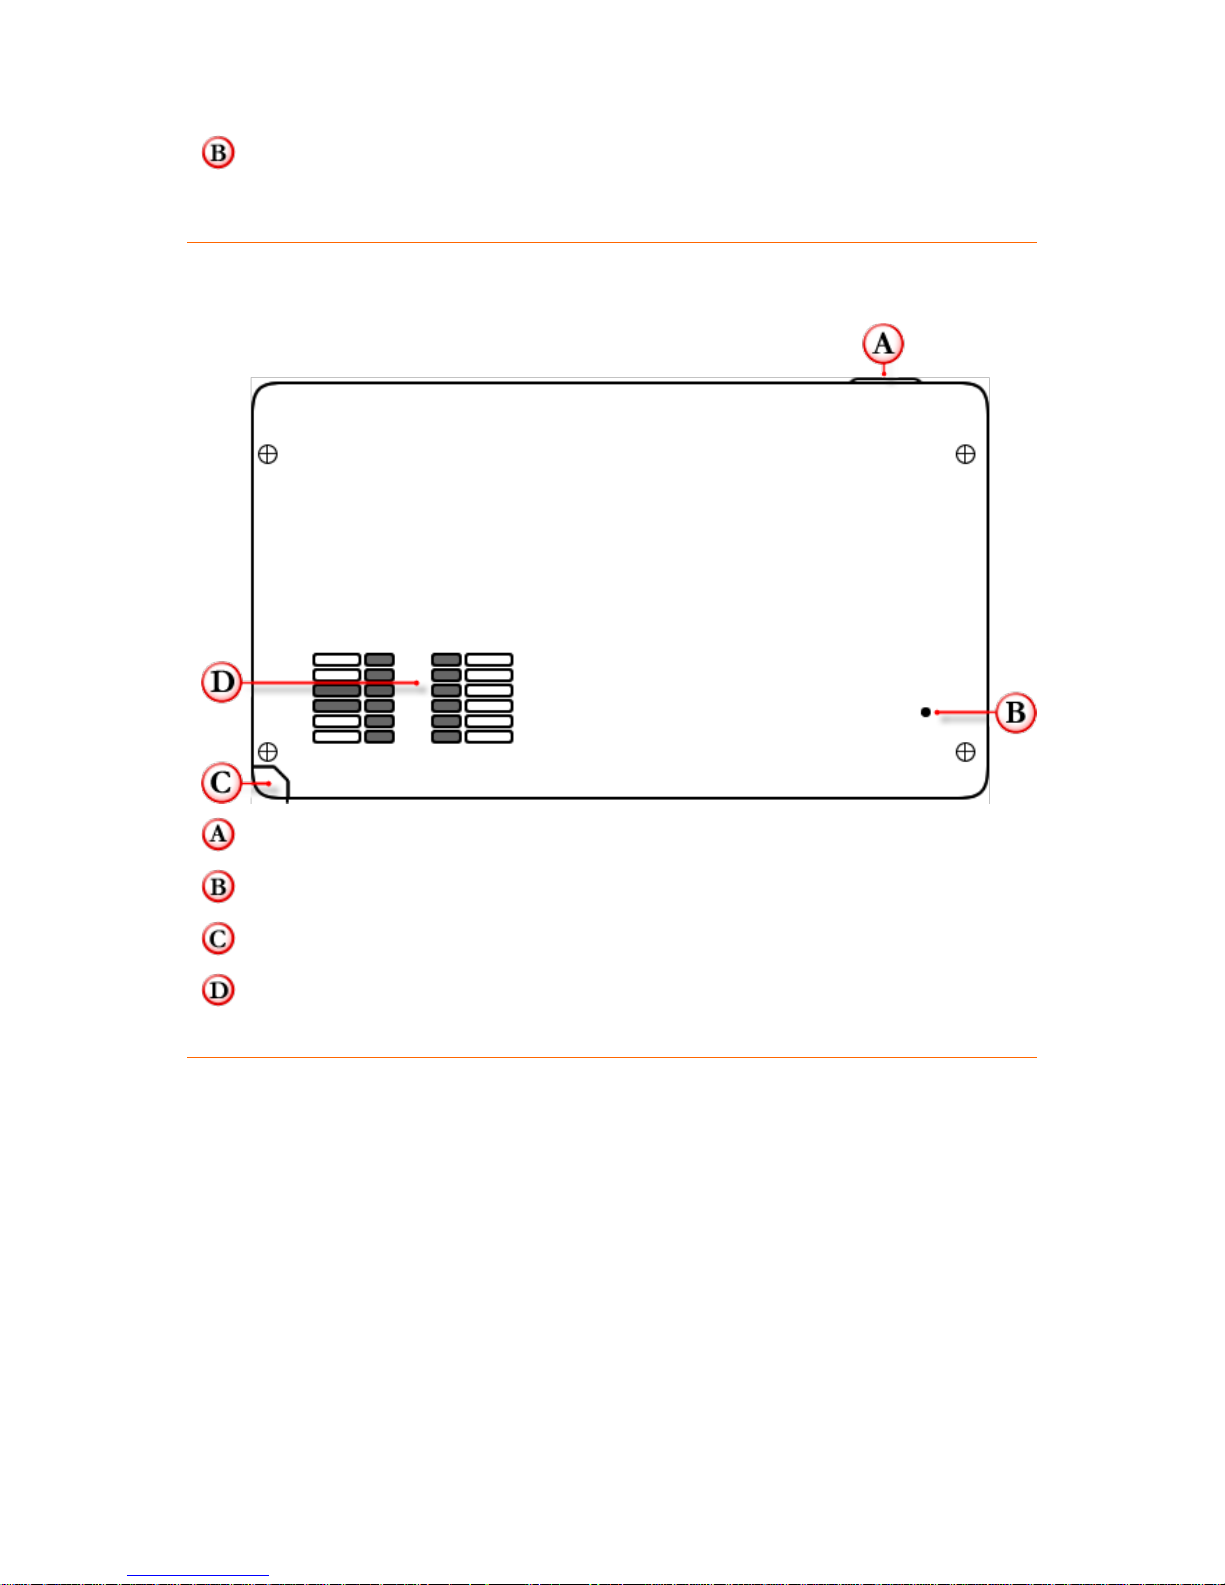
Rear View
Power Button: Powers the NAVIGATOR ON / OFF or activates sleep mode
System reset button: Resets the NAVIGATOR system to a stable state
Stylus: Use with the NAVIGATOR touch screen
Speaker: Provides audio output
Side View
Hema HN6 Quick Start Guide
16
Headphone socket: Provides audio output (3.5mm output socket)
MicroSD card slot: Preloaded 8Gb MicroSD card factory installed
AV IN: Allows connection of reversing camera (2.5mm input socket) (camera not
supplied)
USB port: Connects the NAVIGATOR to the supplied 12/24V power source or
Windows PC computer system
Bottom View
Stylus: Use with the NAVIGATOR touch screen
Bottom mounting cradle slots: Locates and secures the device within the
mounting cradle
HN6 Quick Start Guide
17
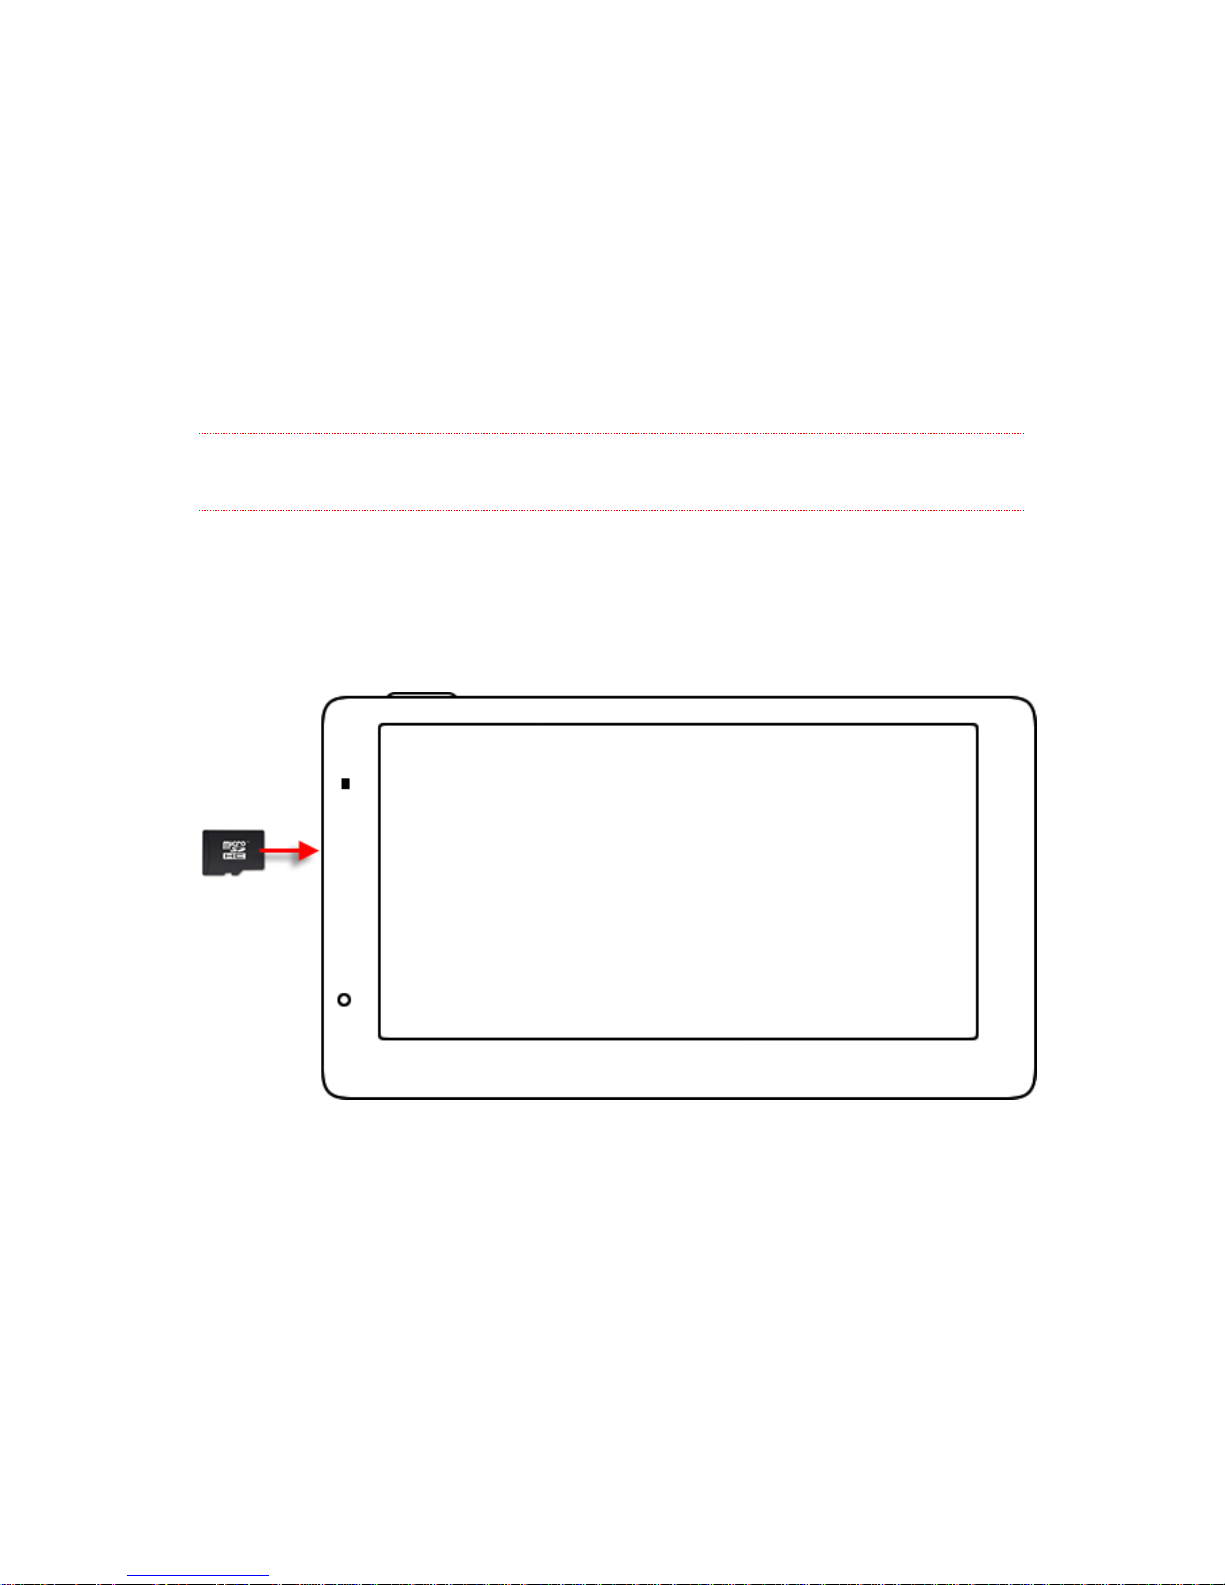
Inserting & Removing MicroSD cards
The Hema HN6 NAVIGATOR comes with a pre-installed 8GB MicroSD card.
To remove the MicroSD card from your HN6
1. Turn the NAVIGATOR so that the front of the device is visible.
2. Locate the MicroSD card slot on the side of the device.
3. Using your fingernail or the stylus, depress the card further into the slot and
slowly release.
4. The card should spring out of the slot far enough for removal.
NOTE
Avoid letting the MicroSD card eject quickly out of the slot.
To re-insert the MicroSD card
1. Turn the NAVIGATOR so that the front of the device is facing you.
2. Locate the MicroSD card slot on the left side of the device.
3. Position the card with printed side facing you and as per illustration.
4. Slide the card gently into the slot until it clicks into place.
Hema HN6 Quick Start Guide
18
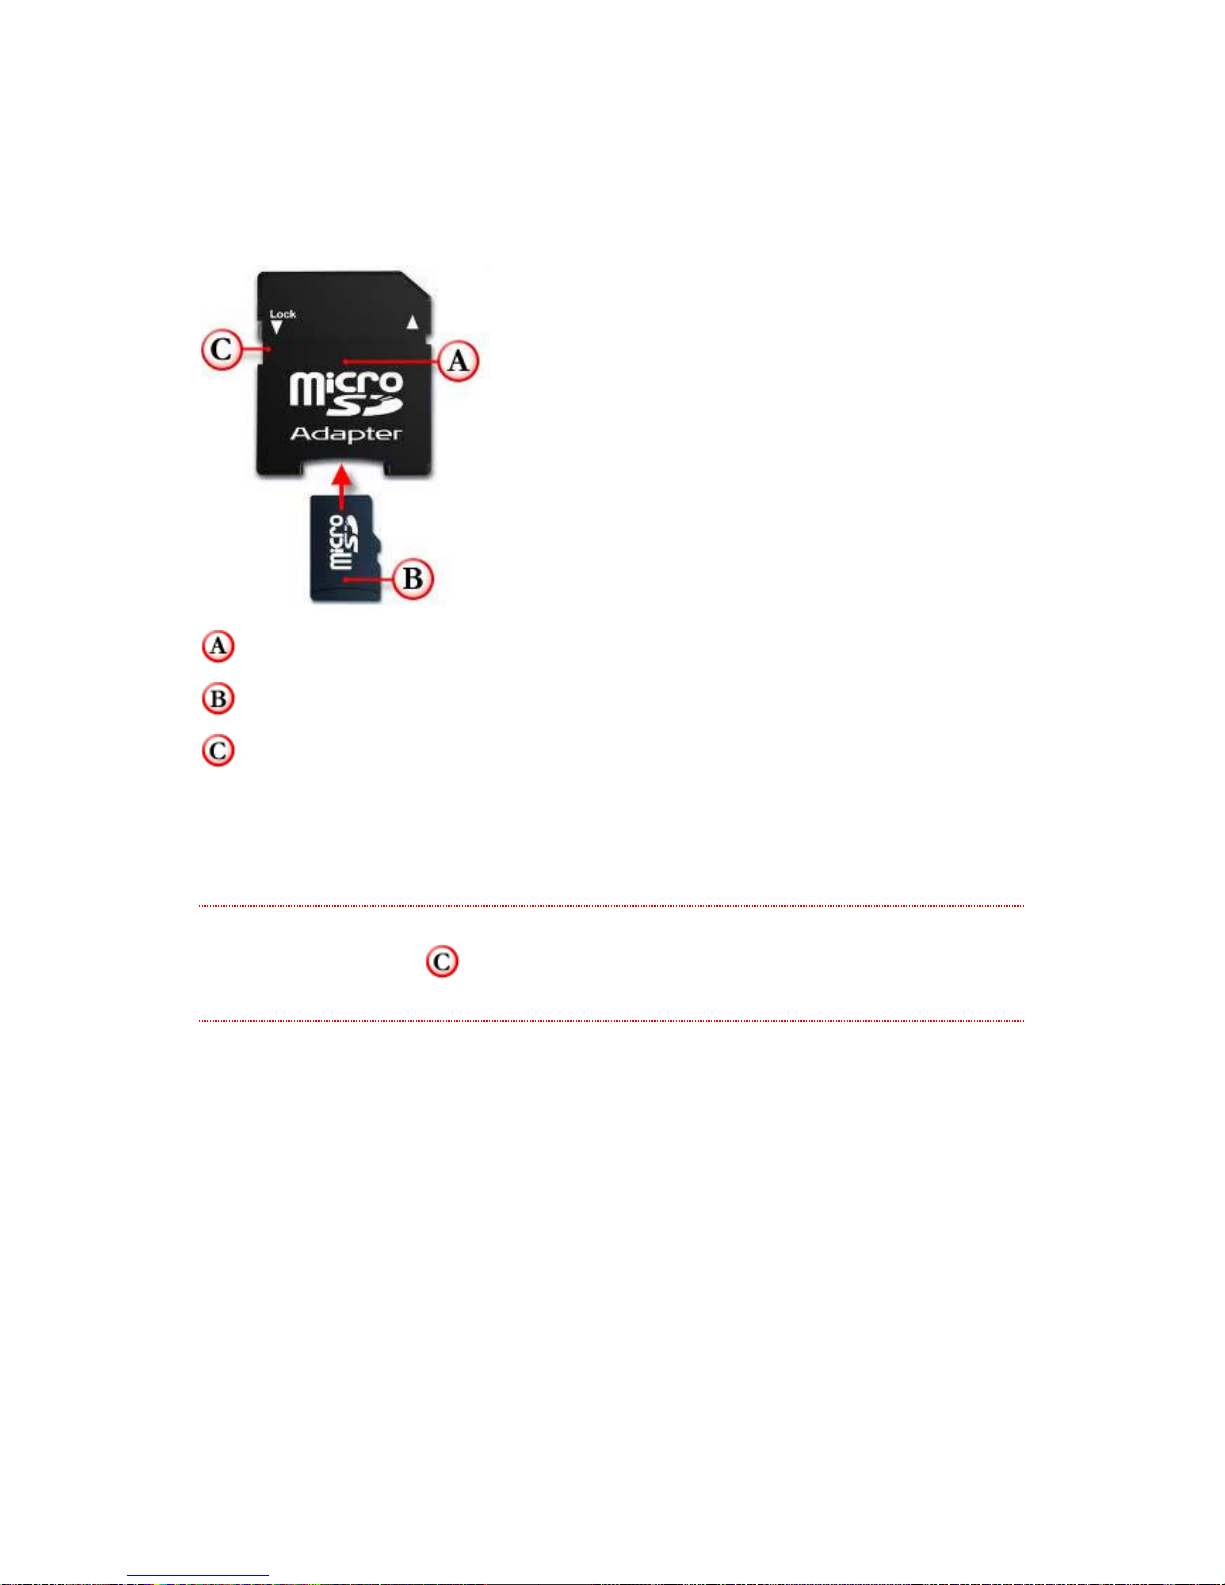
Using the MicroSD Card Adapter
A MicroSD card adaptor has been included with the NAVIGATOR so that it can be used
in conjunction with an SD card reader.
SD Card Adapter
MicroSD card
SD Card Adapter Lock Tab
To use the SD Card adapter; gently slide the MicroSD card into the slot provided in
the end of the adaptor.
The SD card can now be used by devices with standard SDHC (Secure Digital High
Capacity) compliant SD card readers for use with your personal computer.
NOTE
Do not move lock tab to LOCK. This will WRITE PROTECT the card, and
prevent data being written to the card.
HN6 Quick Start Guide
19
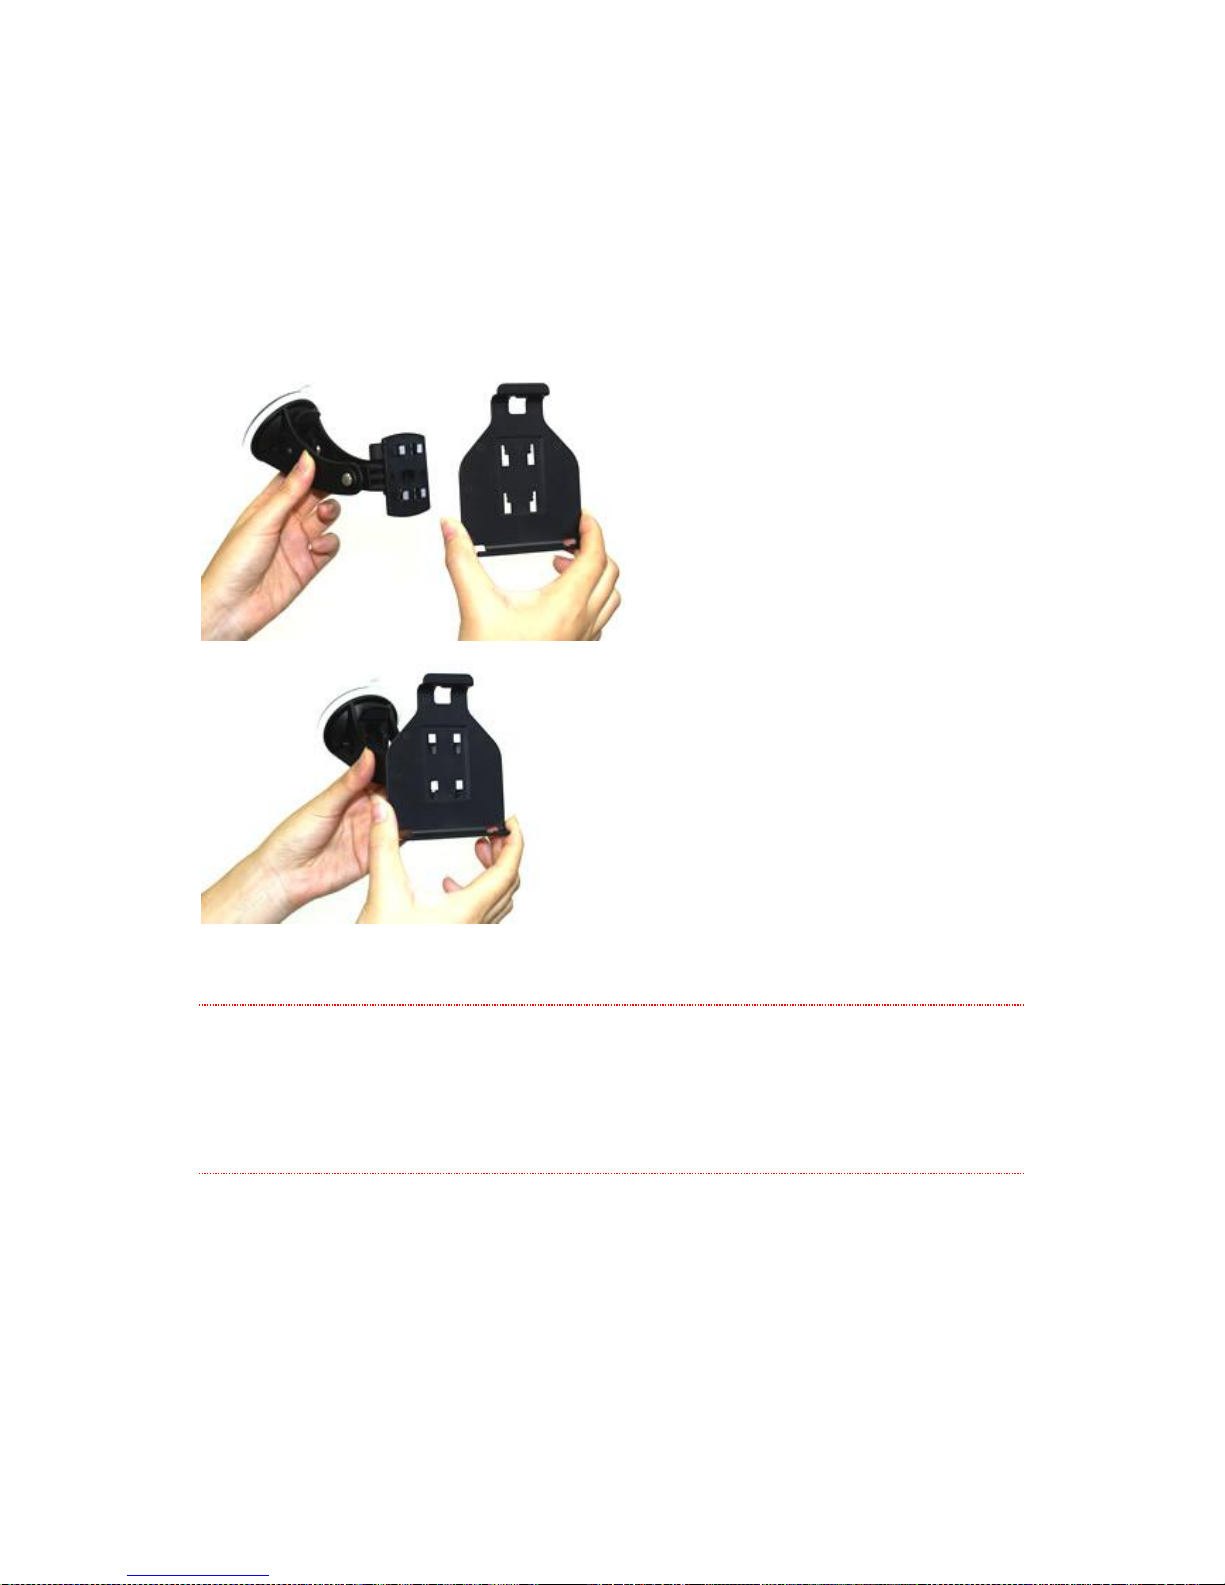
Mounting the HN6 on the Windscreen
Attach Cradle to Windscreen Mount
Attach the cradle to the windscreen mount via the 4 pin system and slide it down until
it snaps/locks securely in place.
Secure the Windscreen Mount
WARNING
The adhesive disc included with the mount is only used for attaching the
mount to the dashboard of your vehicle.
IT IS NOT DESIGNED TO BE ATTACHED TO WINDSCREENS
The disc is very difficult to remove once attached, so if it is to be used, be
sure that it is attached where you want it.
1. Select the desired location for your mount on the windscreen and ensure the area
is clean.
2. Grip the base of the mount and place the suction cup firmly against the
windscreen.
3. Whilst still firmly holding the mount, push the lever on the base towards the
windscreen to secure in place.
4. Adjust the cradle on the windscreen mount until the desired viewing angle is
achieved using the vertical and horizontal adjustment knobs.
Hema HN6 Quick Start Guide
20
Connect the Power
1. Plug the USB connector of the car charger into the USB port located on the left
hand side of the NAVIGATOR.
2. Plug the car charger into a 12V or 24V power outlet in the vehicle.
NOTE
Do not use any other than the supplied Hema 12V adapter to power the unit.
Any other 12V power adapters may damage the unit and void your warranty.
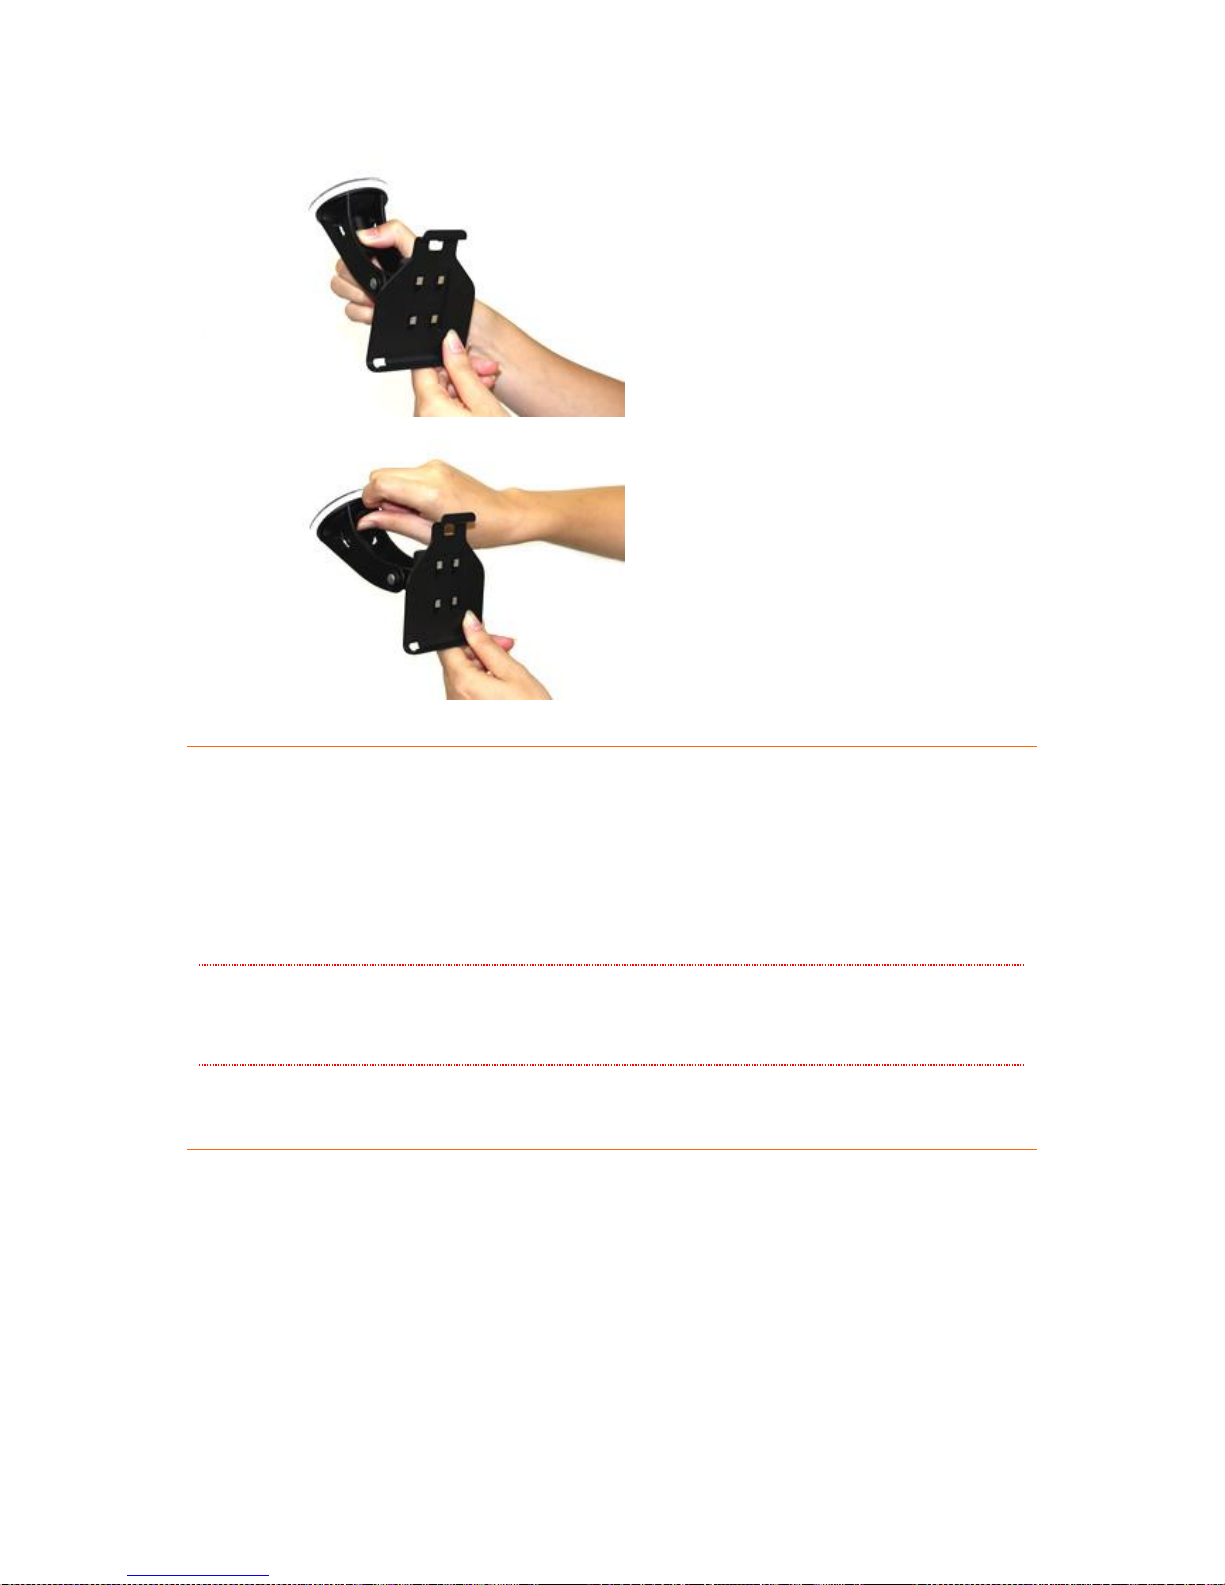
Attach the HN6 to the Mount
1. Secure the NAVIGATOR to the cradle on the windscreen mount by aligning the
base of the device with the bottom tabs on the cradle.
2. Snap the top of the NAVIGATOR into the top tab on the cradle.
HN6 Quick Start Guide
21
Turning the HN6 ON and OFF
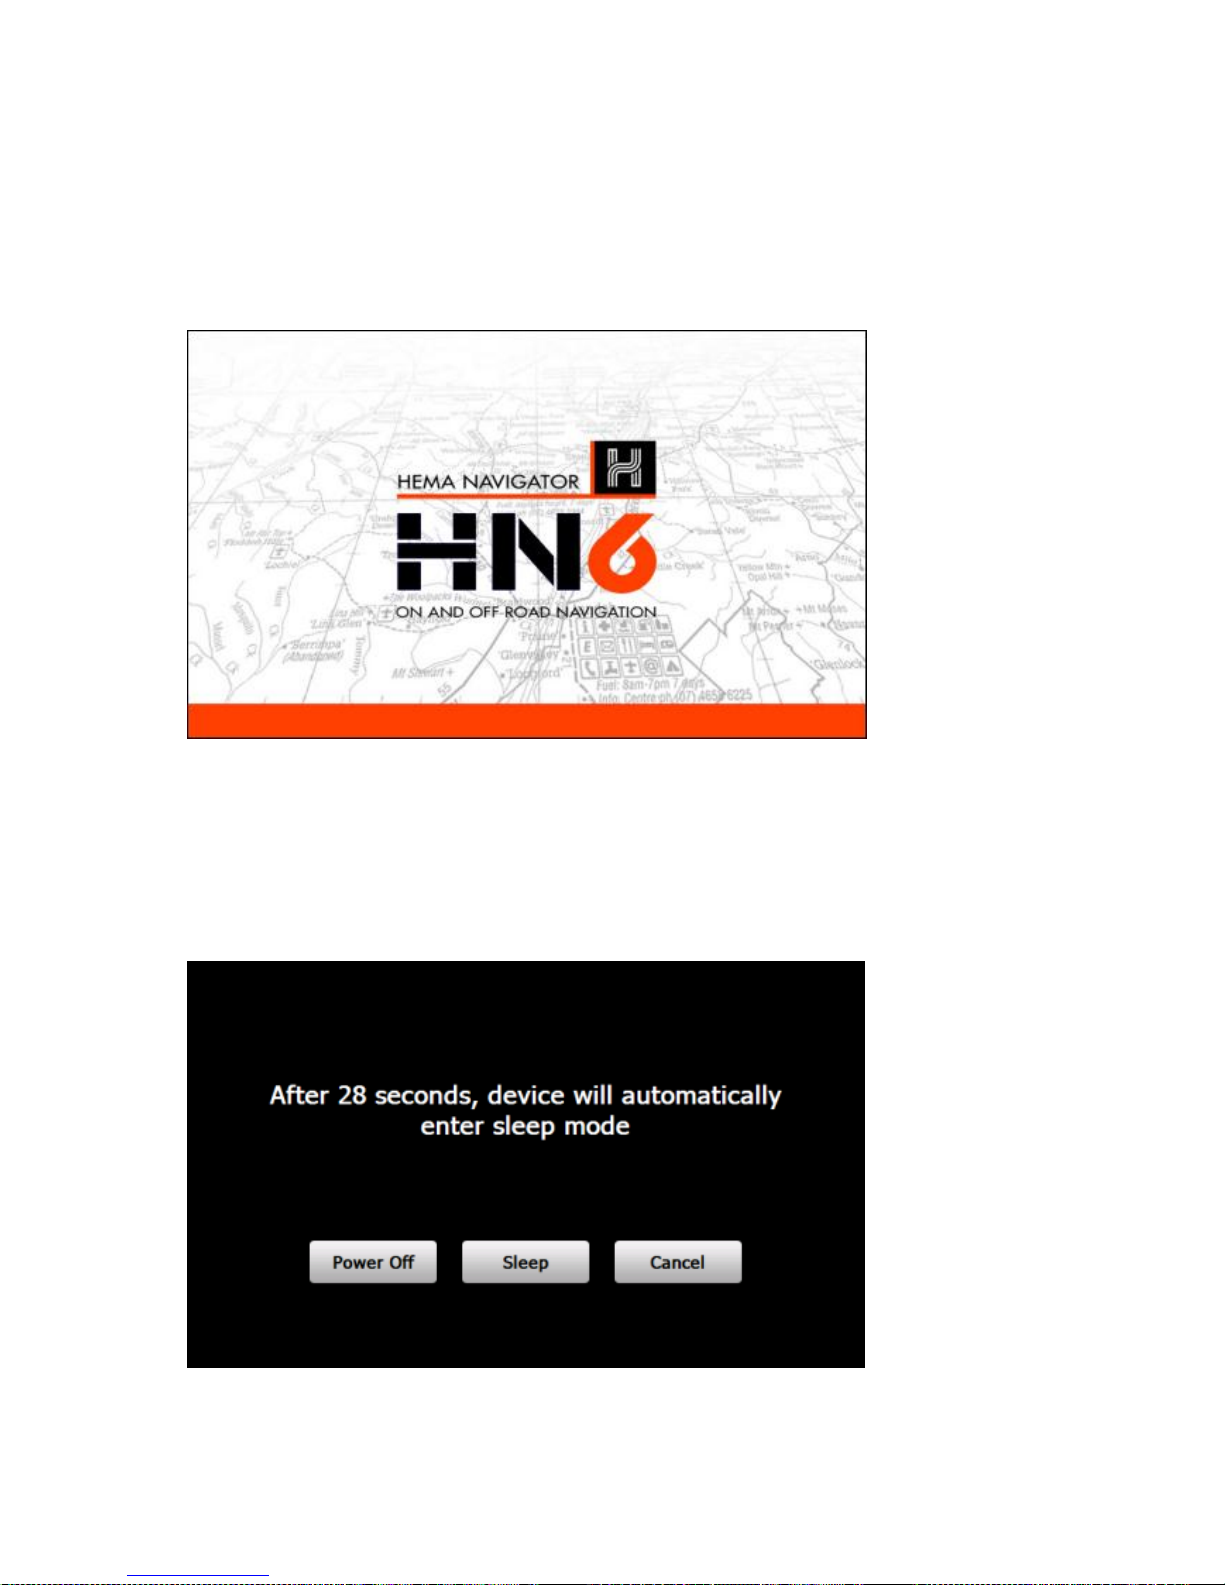
Turning On
Gently press the power button for 1 second and release. The NAVIGATOR will display a
startup screen after a few seconds while powering up as shown below, before
displaying the Main Menu.
Turning OFF
The NAVIGATOR can be put into Sleep Mode or completely powered OFF. When the unit
is ON, push the power button for approximately 1 second, you will hear a beep, and the
NAVIGATOR will display the shutdown screen as shown below.
The NAVIGATOR will automatically enter the shutdown screen when an external power
source is removed.
The shutdown screen will remain for 30 seconds. During this time, you can choose
from the three options displayed on this screen.

Hema HN6 Quick Start Guide
22
Power Off
Tap the Power Off Button to power off the unit completely. Any running
applications will be terminated.
Sleep
Tap the Sleep Button to put the device into Sleep Mode. Sleep Mode is the
default action when the power button is pressed. ie. if you do not tap any other
button during the 30 second display of the shutdown screen, the unit will enter
sleep mode. If you wish to enter sleep mode immediately, tap the Sleep Button.
When the unit is restarted, applications which were running at the time the unit
entered sleep mode will reactivate.
NOTE
When in SLEEP MODE, the unit is not completely shut down and will
discharge the battery over the course of time.
It's important to understand, that, when in Sleep Mode, a fully charged
NAVIGATOR should last approximately 5-7 days before requiring recharging.
The amount of time which a full charge will last in Sleep Mode can be
affected by external influences such as ambient temperature etc.
Cancel
Tap the Cancel Button to cancel the power button action. This will exit the
Shutdown Screen and return you to the previous state.

HN6 Quick Start Guide
23
Charging the Battery
The internal Lithium-Polymer battery in the HN6 can be charged using one of the
following methods:
1. Connect the supplied HN6 vehicle cigarette lighter adapter
2. Connect the USB cable between the NAVIGATOR and a PC
The device charge light will change from RED to GREEN when the battery is fully
charged.
Please see the Battery topic under the Safety Notes & Maintenance section of this
user guide for more information regarding Lithium-Polymer batteries.

Hema HN6 Quick Start Guide
24
Resetting the HN6
Locate the RESET button on the back of the device (the reset button is labelled
clearly).
Gently press the reset button with the tip of your stylus for around 1 second.
The unit will power off.
Turn the unit back on to resume normal operation.
 Loading...