

Page 1
Helvar | Data is subject to change without notice.
www.helvar.com
1
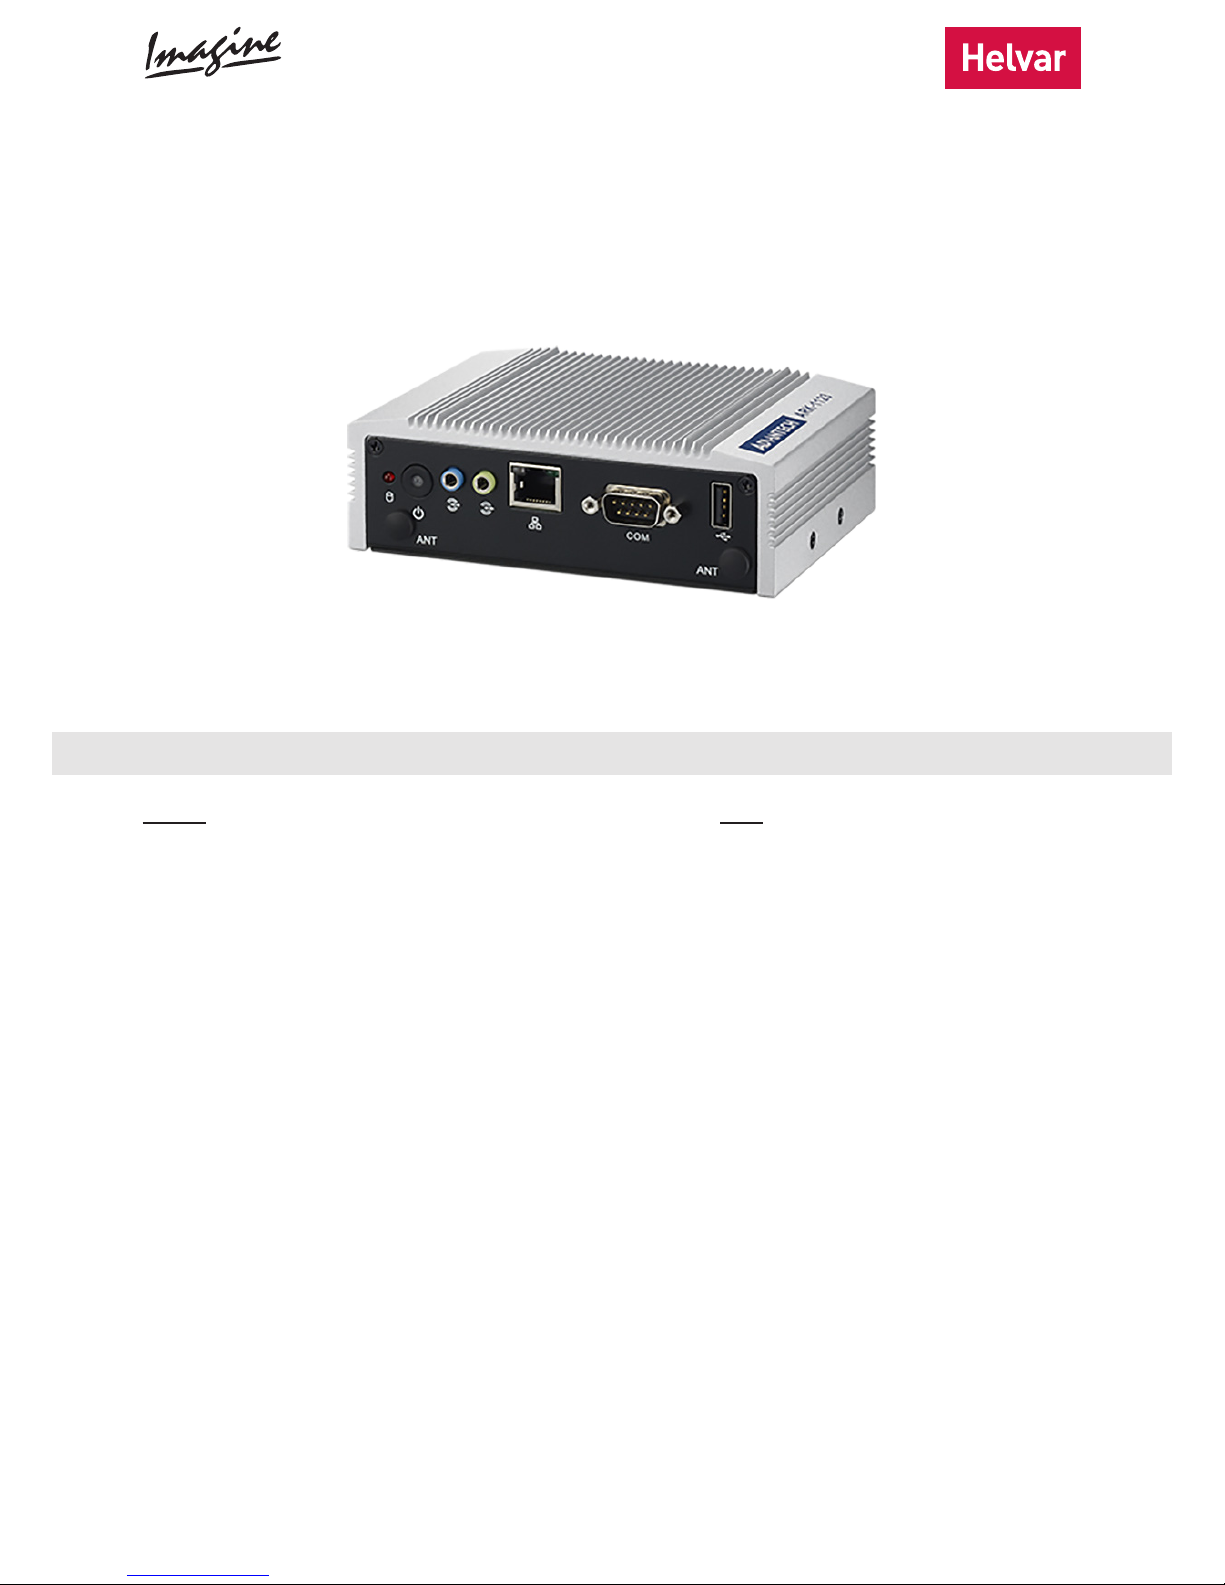
The uSee Web Browser User Interface is a hardware and software platform that, used in conjunction with a Helvar
router system, allows you to view your lighting system, select scenes, programme new scene levels, apply alternate
scene and group names, conduct DALI emergency lighting test and reporting functions and monitor energy use.
This platform provides both wired and wireless connectivity to all popular web-browsing devices, such as tablets and
smartphones, and provides an easy-to-use and intuitive graphical means of controlling your lighting system.
uSee Web Browser User Interface
Installation and Set-Up Guide
ontents
Section Page
1. Package contents 2
2. Installation 2
2.1. Mount the HDR-30-12 PSU on the DIN rail 2
2.2. Mount the uSee unit on the DIN rail 3
2.3. Connect the PSU and the Ethernet cables 4
3. Configuration 4
3.1. Initial access to the uSee unit: Wireless Ethernet 4
3.2. Initial access to the uSee unit: Direct control 9
4. Accessing uSee for the first time 10
4.1. Connect your web-browsing device to the uSee network 10
4.2. Change the default password of the Admin account 10
5. Setting up the uSee Web Browser User Interface 11
5.1. Log in to uSee 11
5.2. Create Editor and BasicUser accounts 12
6. Configuring the uSee Wired Network 14
6.1. Open the Configuration screen 14
6.2. Edit the network settings 15
7. Technical Data 16
Page 2
Helvar 8801 uSee Web Browser User Interface: Installation and Set-Up Guide
2
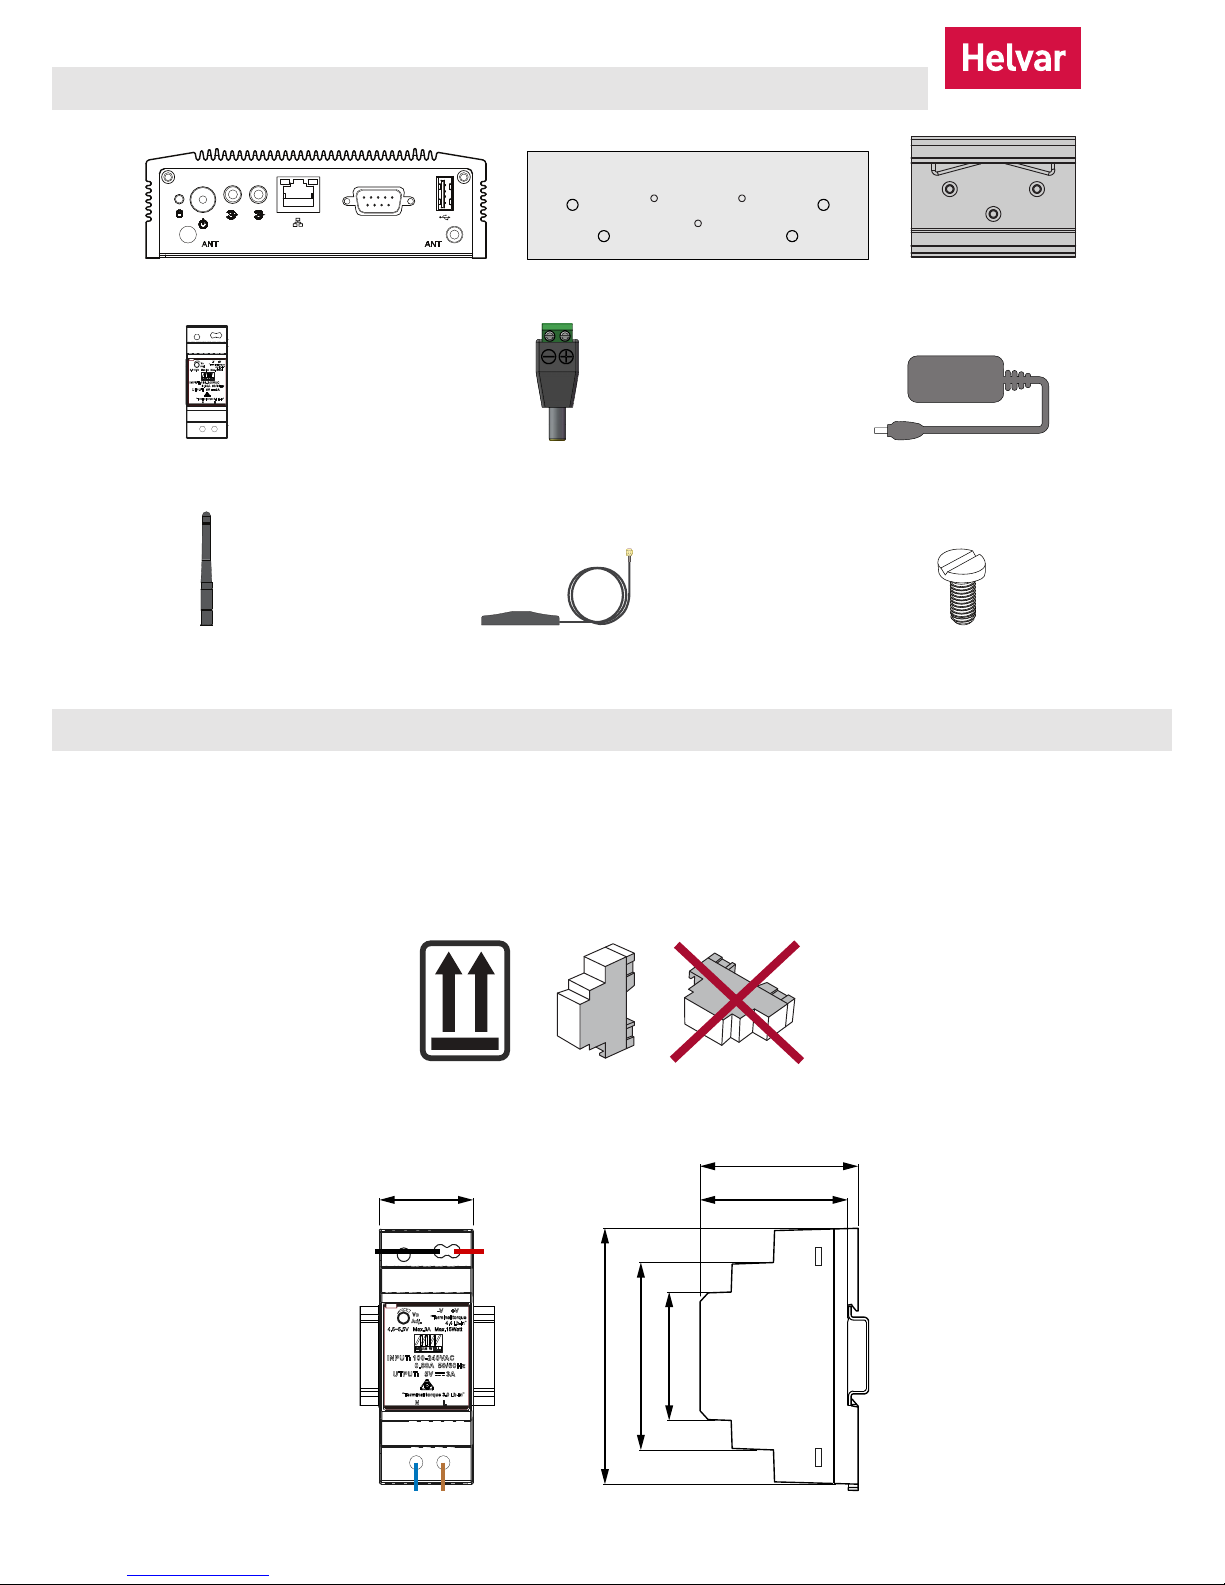
1. Package contents
2. Installation
Take the following steps to mount the uSee unit:
1. Mount the HDR-30-12 PSU on the DIN rail. For details, see section2.1 below on this page.
2. Mount the uSee unit on the DIN rail. For details see section2.1 on page2.
Mounting dimensions (mm) and connections
2.1. Mount the HDR-30-12 PSU on the DIN rail
Wi-Fi antenna 7 × screws
Antenna extension with magnetic base
12 VDC AC/DC power adaptorDC feed plug
HDR-30-12 PSU
uSee unit DIN-rail clip
COM
DIN-rail mounting bracket
54.535
63.65
45.15
90
58.4
N L
−V +V
Page 3
Helvar | Data is subject to change without notice.
www.helvar.com
3
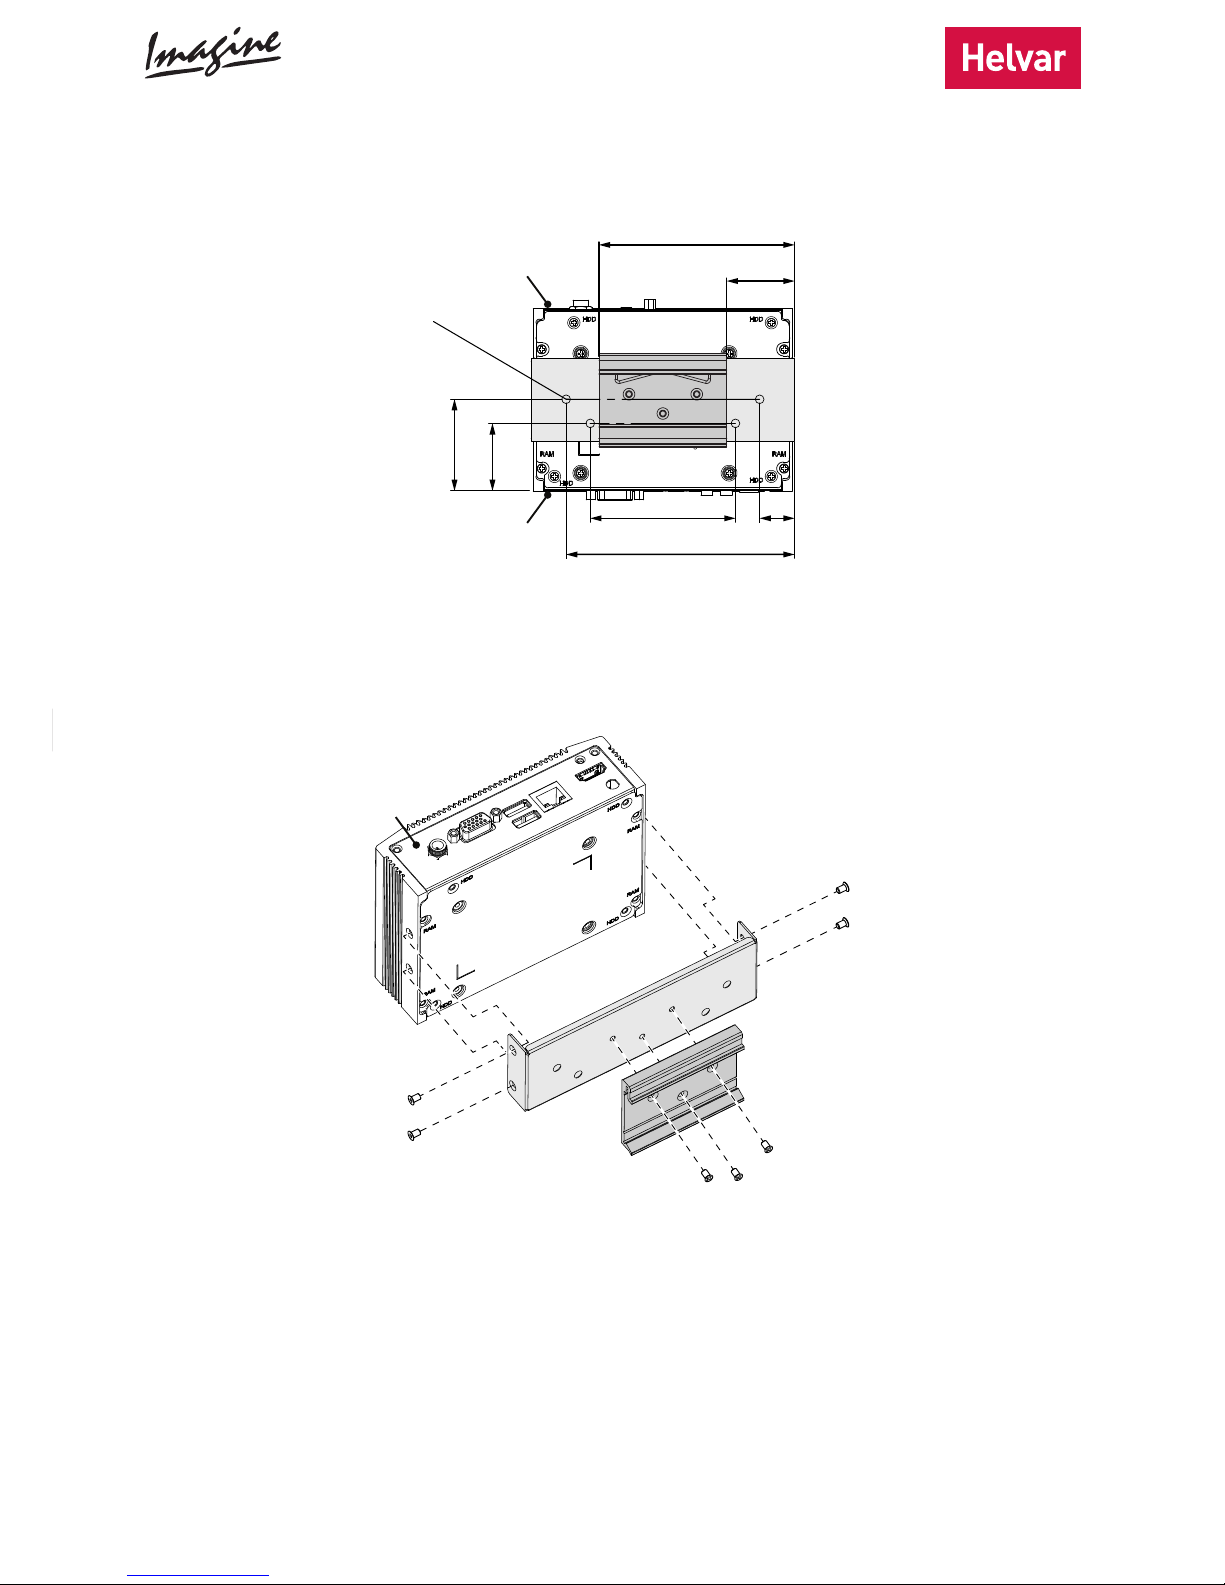
Mounting dimensions (mm)
Rear
panel
Front
panel
118.5
18.5
34.8
47.3
75
101.05
⌀
4.50 (4 ×)
35.05
2.2. Mount the uSee unit on the DIN rail
Mounting procedure
Leave sufficient clearance around
the uSee unit to ensure that the
cables are not crushed or bent
in a manner that may affect their
performance.
Rear
panel
Page 4
Helvar 8801 uSee Web Browser User Interface: Installation and Set-Up Guide
4
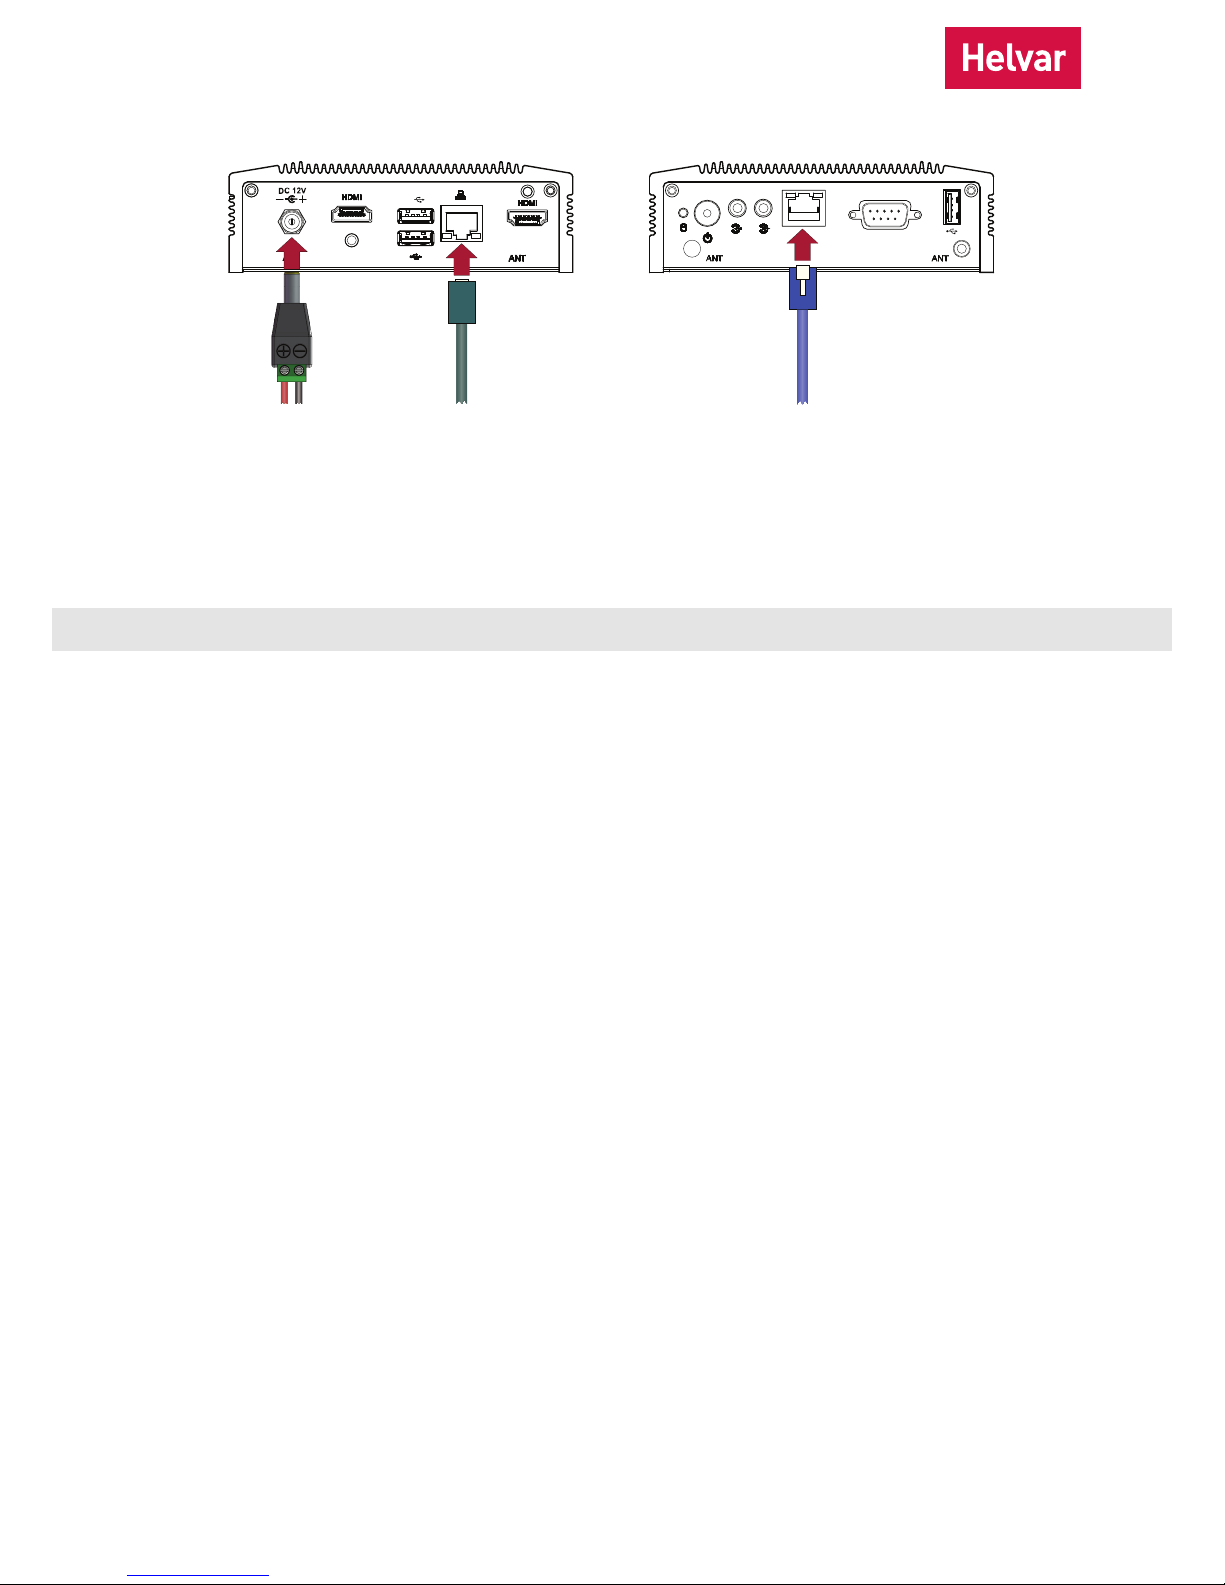
SS
LAN 2 for
router network
COM
LAN 1 for local
computer network
PSU
+V −V
2.3. Connect the PSU and the Ethernet cables
There are two methods of connecting to the uSee unit from a device running a web browser.
1. Wireless Ethernet: Connect to the uSee unit via wireless Ethernet.
For configuration instructions, see section 3.1, ‘Initial access to the uSee unit: Wireless Ethernet’, on this page.
Note: uSee generates an ad-hoc Wi-Fi network that may be incompatible with certain devices. If wireless access is still
required, you can connect a wireless access point (not supplied) to the uSee
2. Direct control: Operate the uSee unit directly, using a keyboard, a mouse and a monitor/display.
For configuration instructions, see section 3.2 on page9.
3. Configuration
3.1. Initial access to the uSee unit: Wireless Ethernet
Follow the steps below to configure the uSee Web Browser User Interface using wireless Ethernet to connect to the
web-browsing device.
Page 5
Helvar | Data is subject to change without notice.
www.helvar.com
5
COM
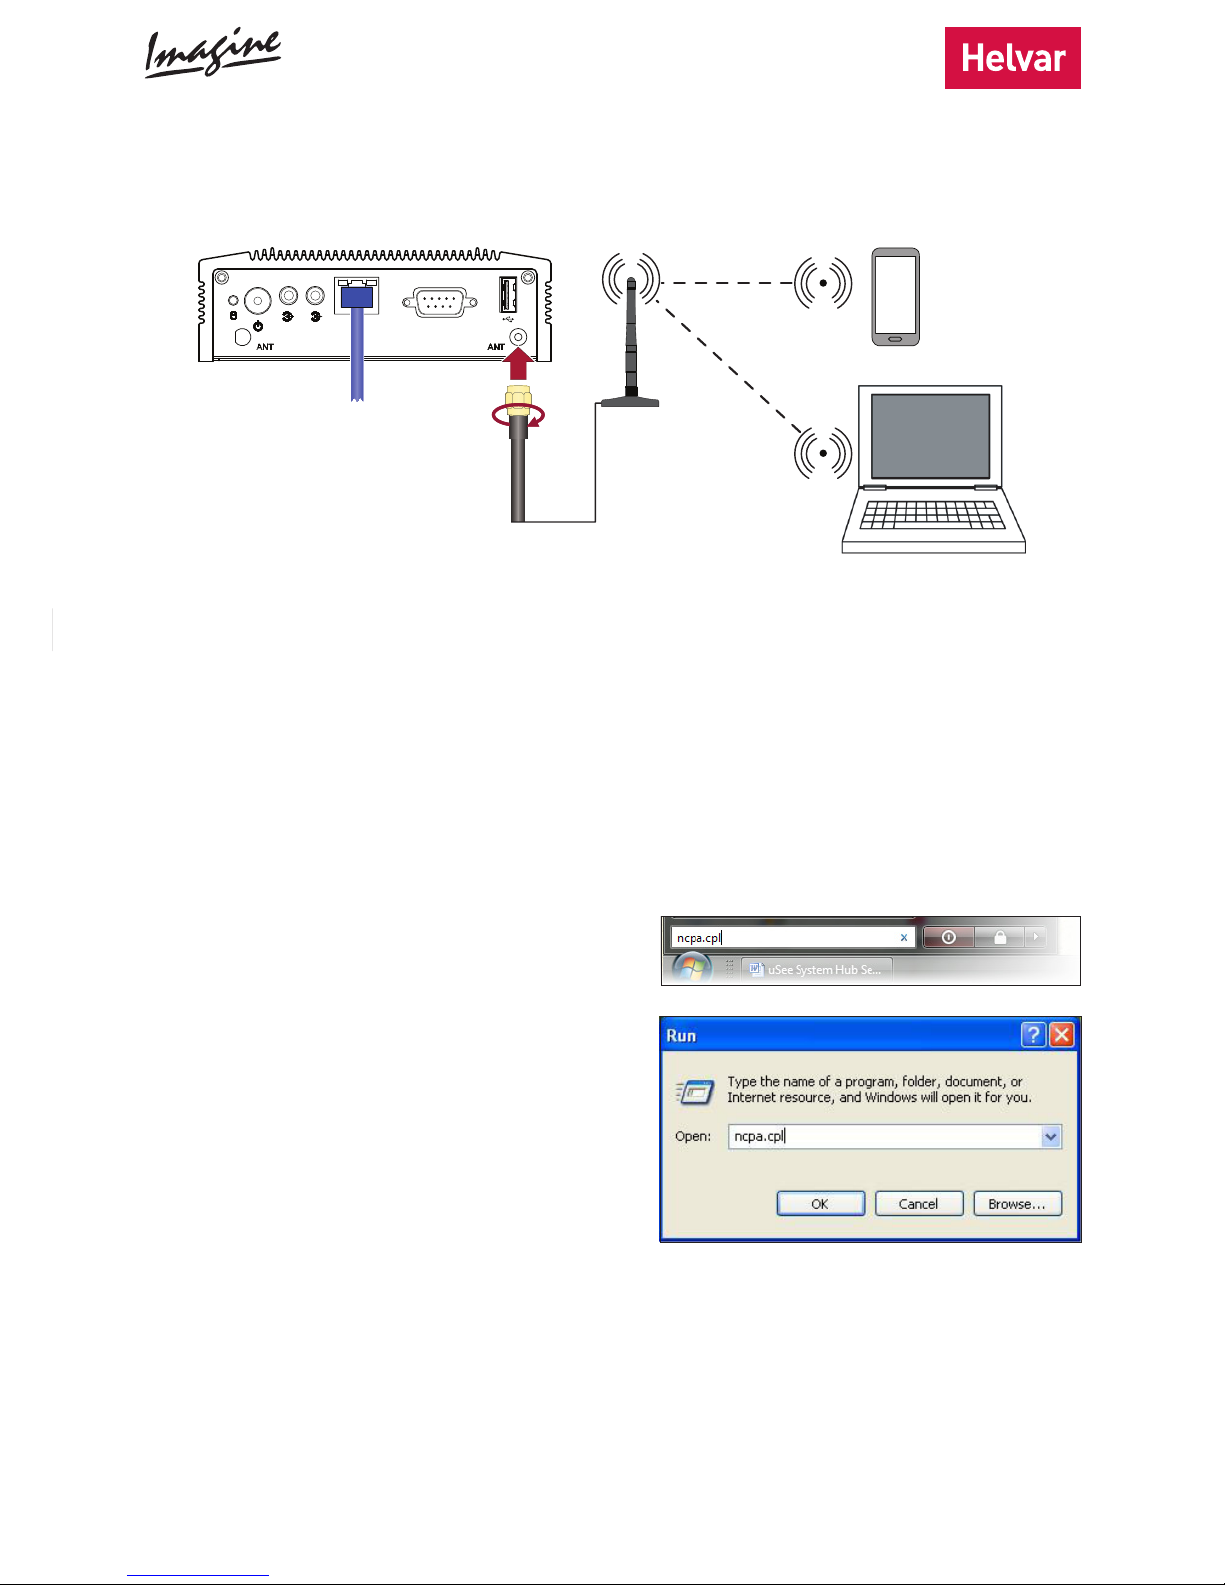
3.1.1. Connect the Wi-Fi antenna
To configure the uSee Web Browser User Interface using a wireless Ethernet connection, follow these steps:
1. Connect the magnetic antenna extension to the rear panel of the uSee unit.
2. Connect the Wi-Fi antenna to the magnetic base of the antenna extension.
Follow these recommendations to optimise the performance and reliability of the wireless connection:
a. Set up your uSee unit as close as possible to the centre of the area for which you want to provide wireless
networking.
b. Keep the antenna away from objects that cause wireless interference. Large metal objects, fluorescent or
halogen lights, microwaves, cordless phones and their base stations and wall ducting or vents can block or
interfere with wireless signals.
c. Place the antenna in an elevated location.
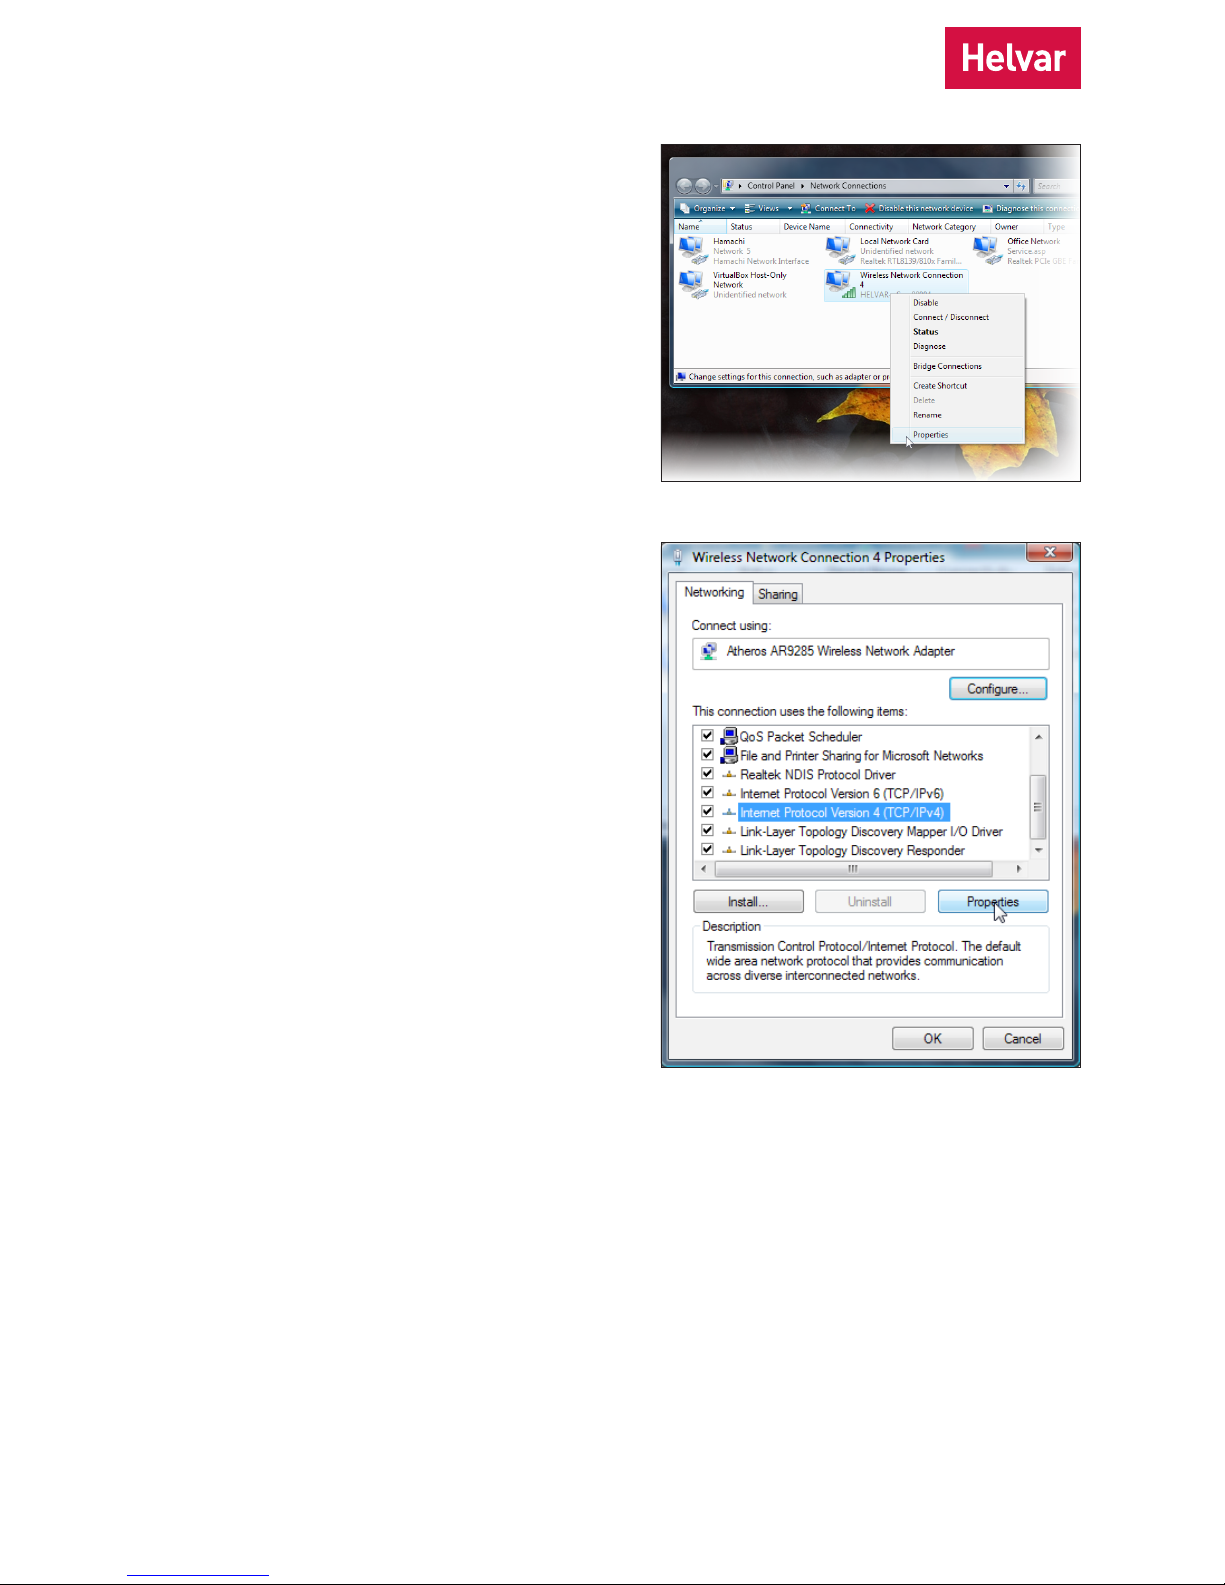
3.1.2. Open the ‘Network Connections’ window
1. Click the Start Menu button.
2. Access ncpa.cpl from the Windows Search box.
Page 6
Helvar 8801 uSee Web Browser User Interface: Installation and Set-Up Guide
6
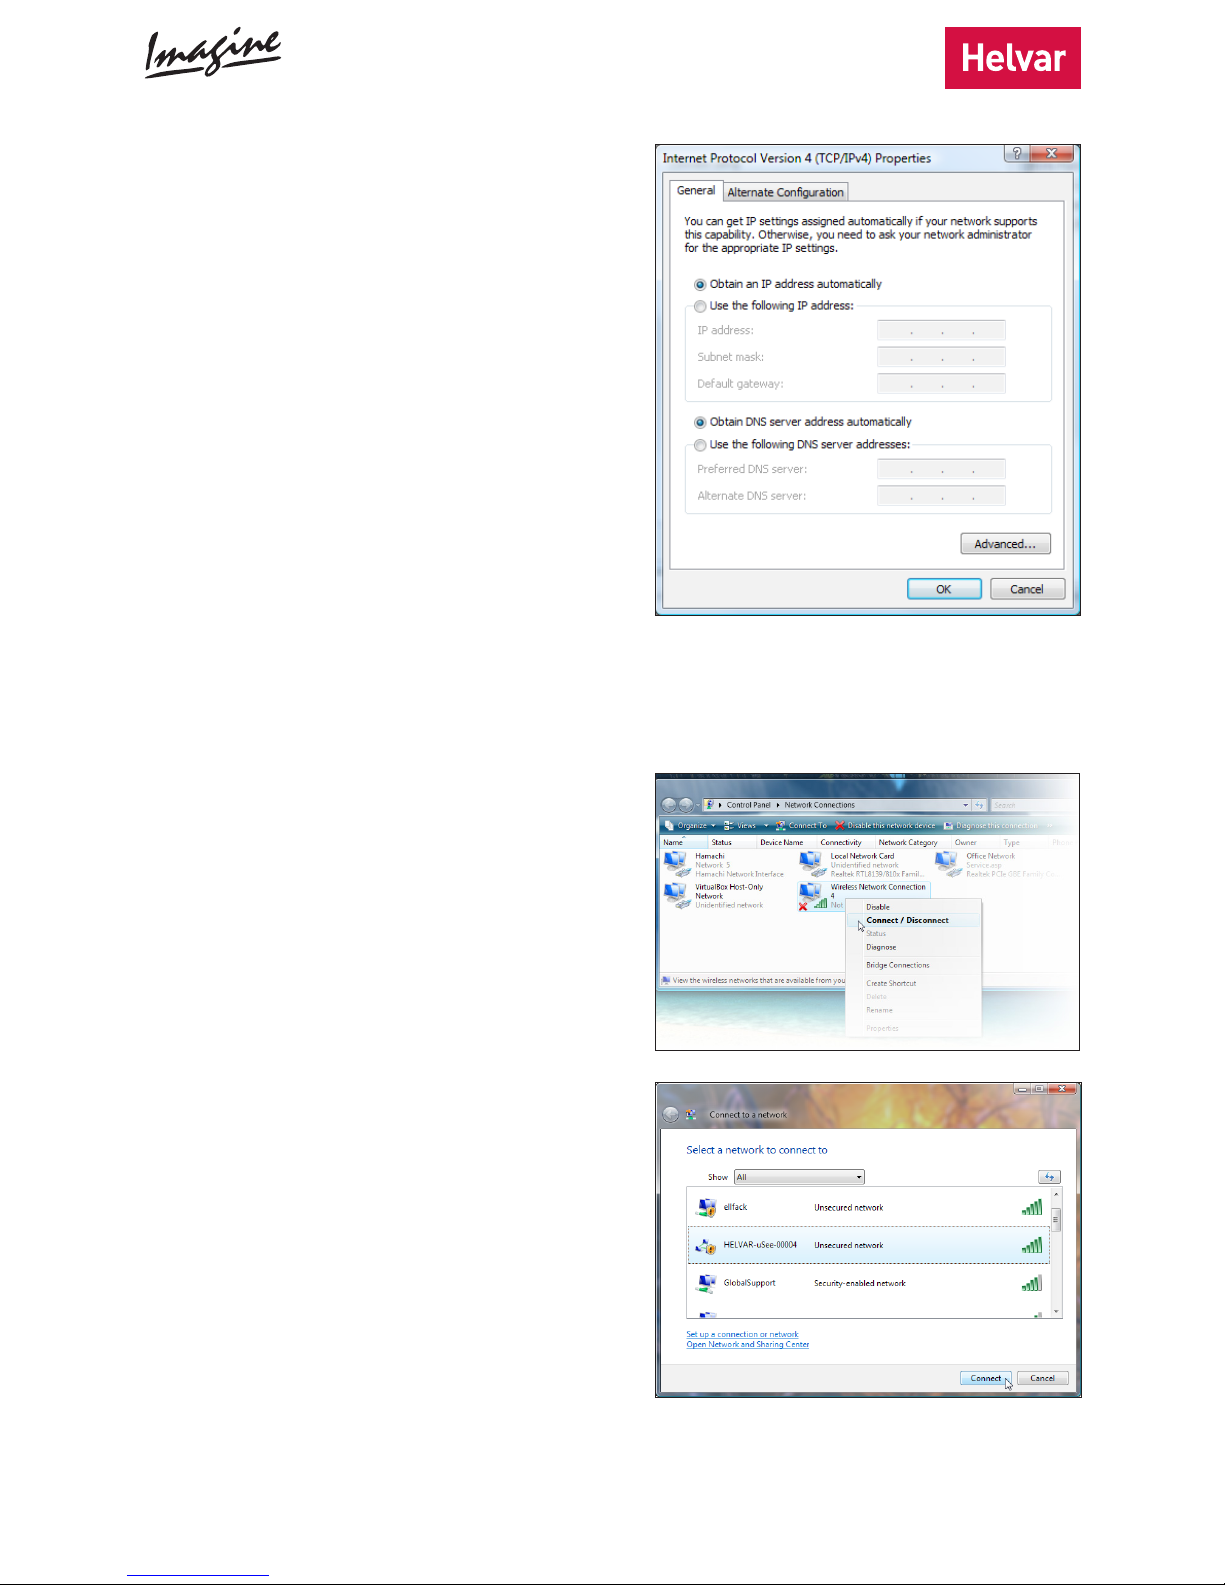
2. Click the Properties button to display the Internet
Protocol (TCP/IP) Properties dialog box.
3.1.3. Access Wireless Network Adapter properties
3.1.4. Access Internet Protocol properties
1. Select the Internet Protocol item. If more than
one is listed, select the IPv4 item.
1. Right-click the wireless network adapter.
2. Select Properties.
Page 7
Helvar | Data is subject to change without notice.
www.helvar.com
7
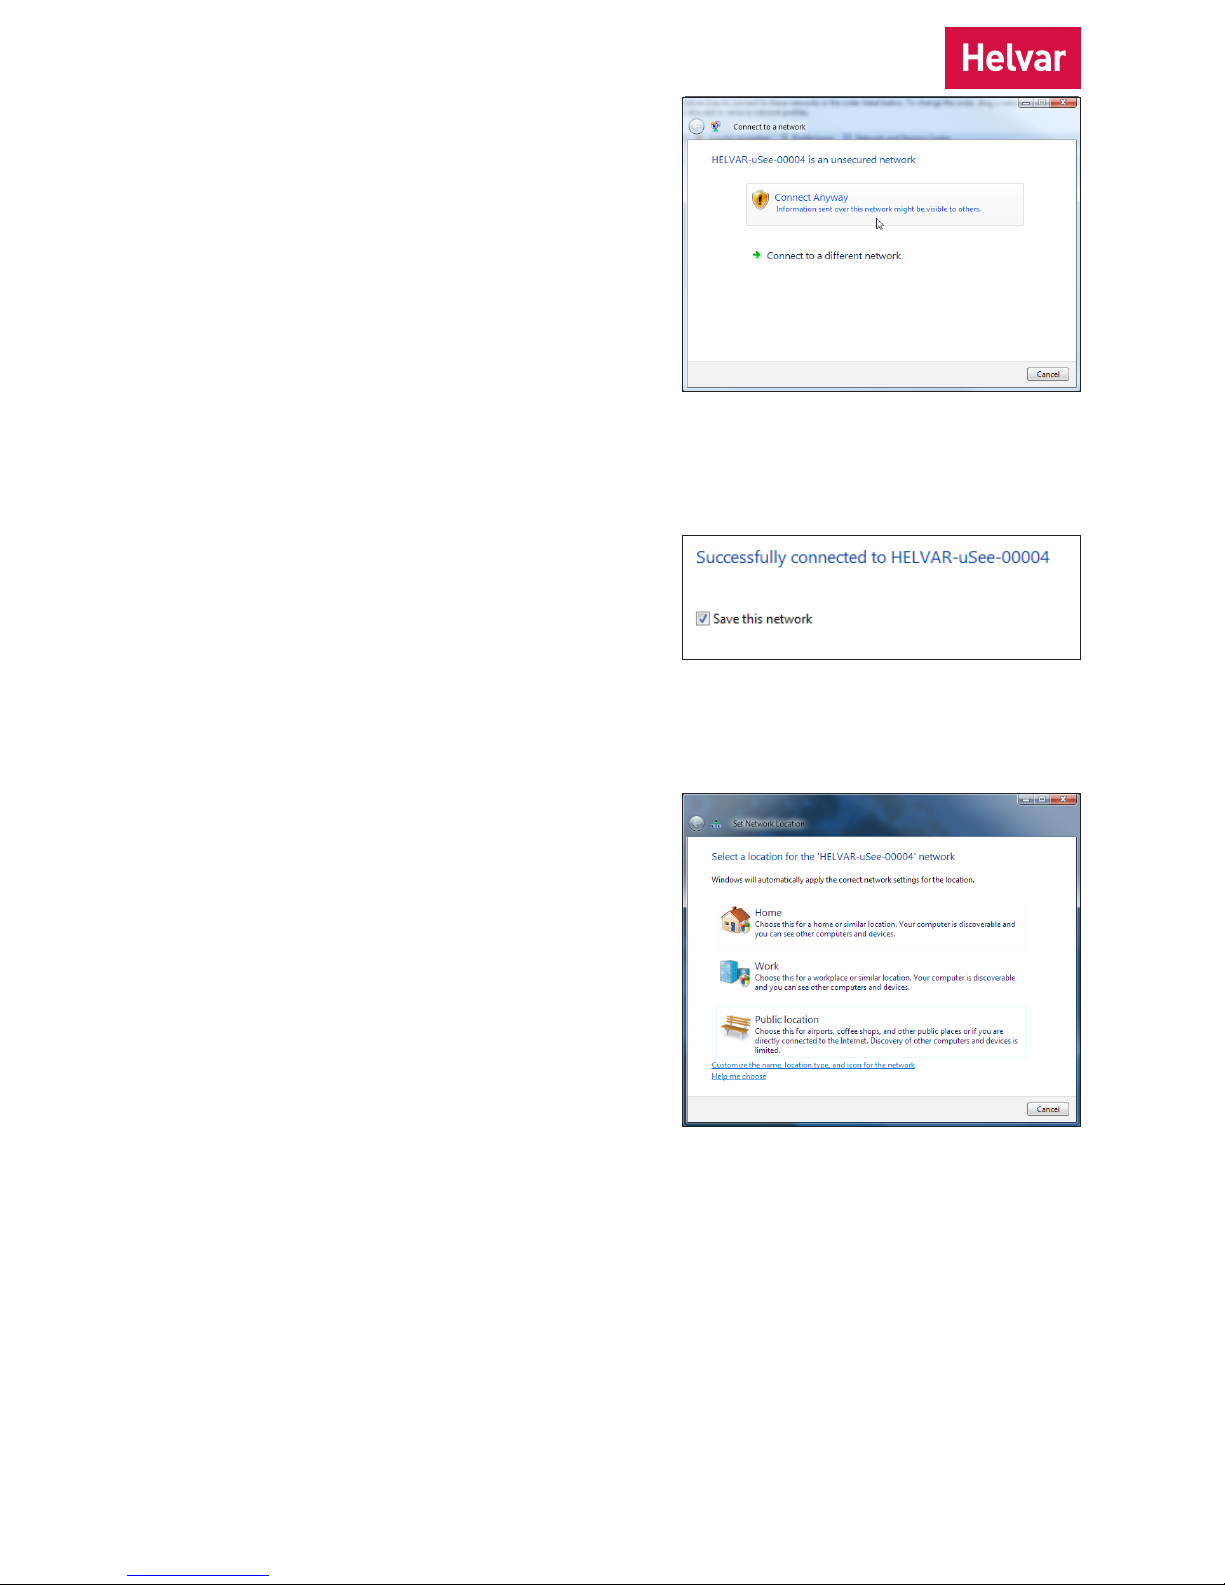
1. Click Obtain an IP address automatically.
2. Click Obtain DNS server address automatically.
3. Click OK.
4. Click Close in the Wireless Network Connections
Properties window.
3.1.5. Set the IP address and subnet mask of the web-browsing device
1. In the Network Connections window, right-click
the wireless network adapter.
2. Select Connect/Disconnect.
3. Select the uSee unit’s wireless network.
The network SSID will be:
HELVARuSeeXXXXX
where XXXXX is the uSee unit’s serial number.
The serial number is printed on a label on the
uSee unit.
4. Click Connect.
3.1.6. Connect the web-browsing device to the wireless network
Page 8
Helvar 8801 uSee Web Browser User Interface: Installation and Set-Up Guide
8
5. Click Connect Anyway (when warned that
information on this network may be visible to
other people).
3.1.7. Save the network settings to your web-browsing device
1. When prompted, select the Save this network
check-box.
3.1.8. Set network location as ‘Public location’
2. When prompted, click the Public location option.
3. Go to section4 on page10.
Page 9
Helvar | Data is subject to change without notice.
www.helvar.com
9
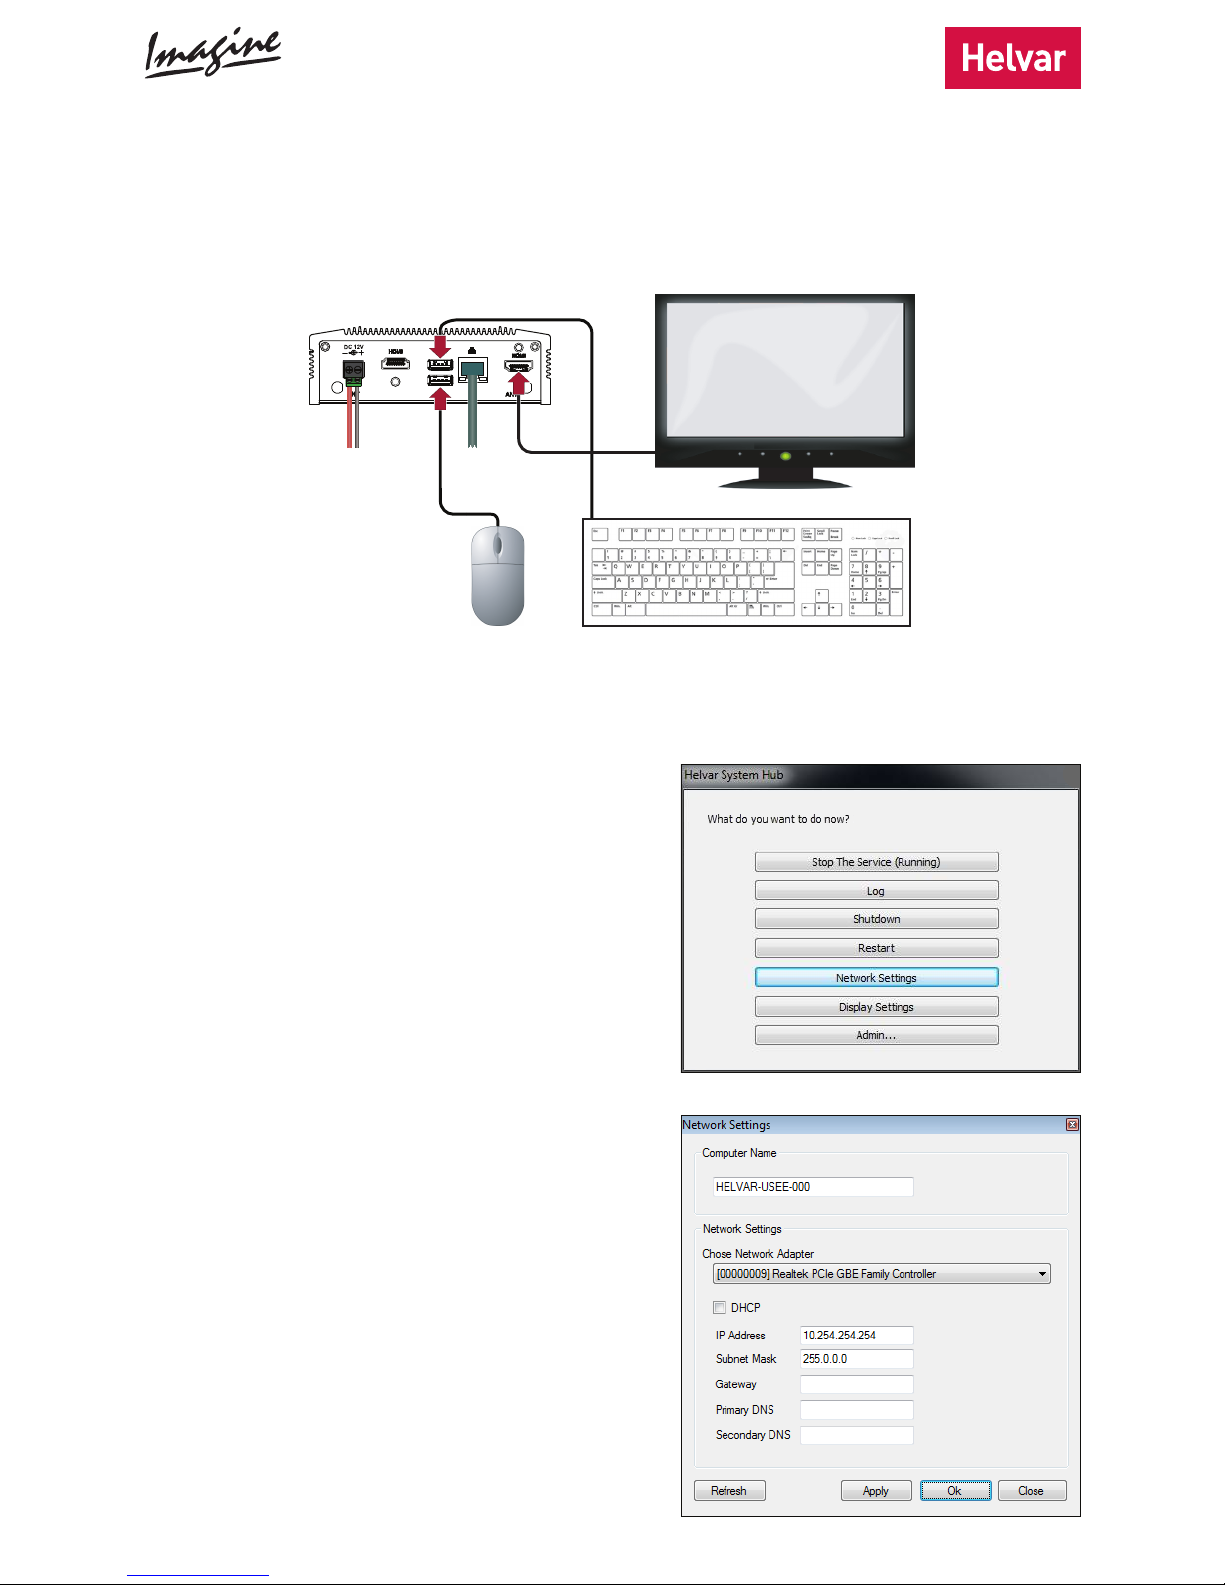
3.2. Initial access to the uSee unit: Direct control
Follow the steps below to operate the uSee unit directly, using a keyboard, a mouse and a monitor/display.
SS
3.2.1. Connect a USB mouse and a USB keyboard to the uSee unit.
3.2.2. Connect a monitor/display to the uSee unit.
As soon as the uSee unit is powered on, it will display
the Helvar System Hub dialog box.
Note: Consult the network administrator for IP settings
compatible with your network.
3.2.3. Configure the uSee unit’s network settings
1. Click Network Settings.
2. When the Network Settings dialog box is displayed,
type the IP address of the uSee unit.
3. Type the subnet mask, the gateway and the DNS
values.
4. Click Apply, and then click Close.
Note: The discovery of a workgroup and any further
setup of the uSee unit should be managed via the
Configuration section of its web interface (see
section4 on page10).
Page 10
Helvar 8801 uSee Web Browser User Interface: Installation and Set-Up Guide
10
4. Accessing uSee for the first time
4.1. Connect your web-browsing device to the uSee network
1. In the Windows notification area, click the Network icon.
2. From the list of available wireless networks, select HELVARuSee[Serial_number].
The serial number is printed on the label at the rear chassis of the uSee unit.
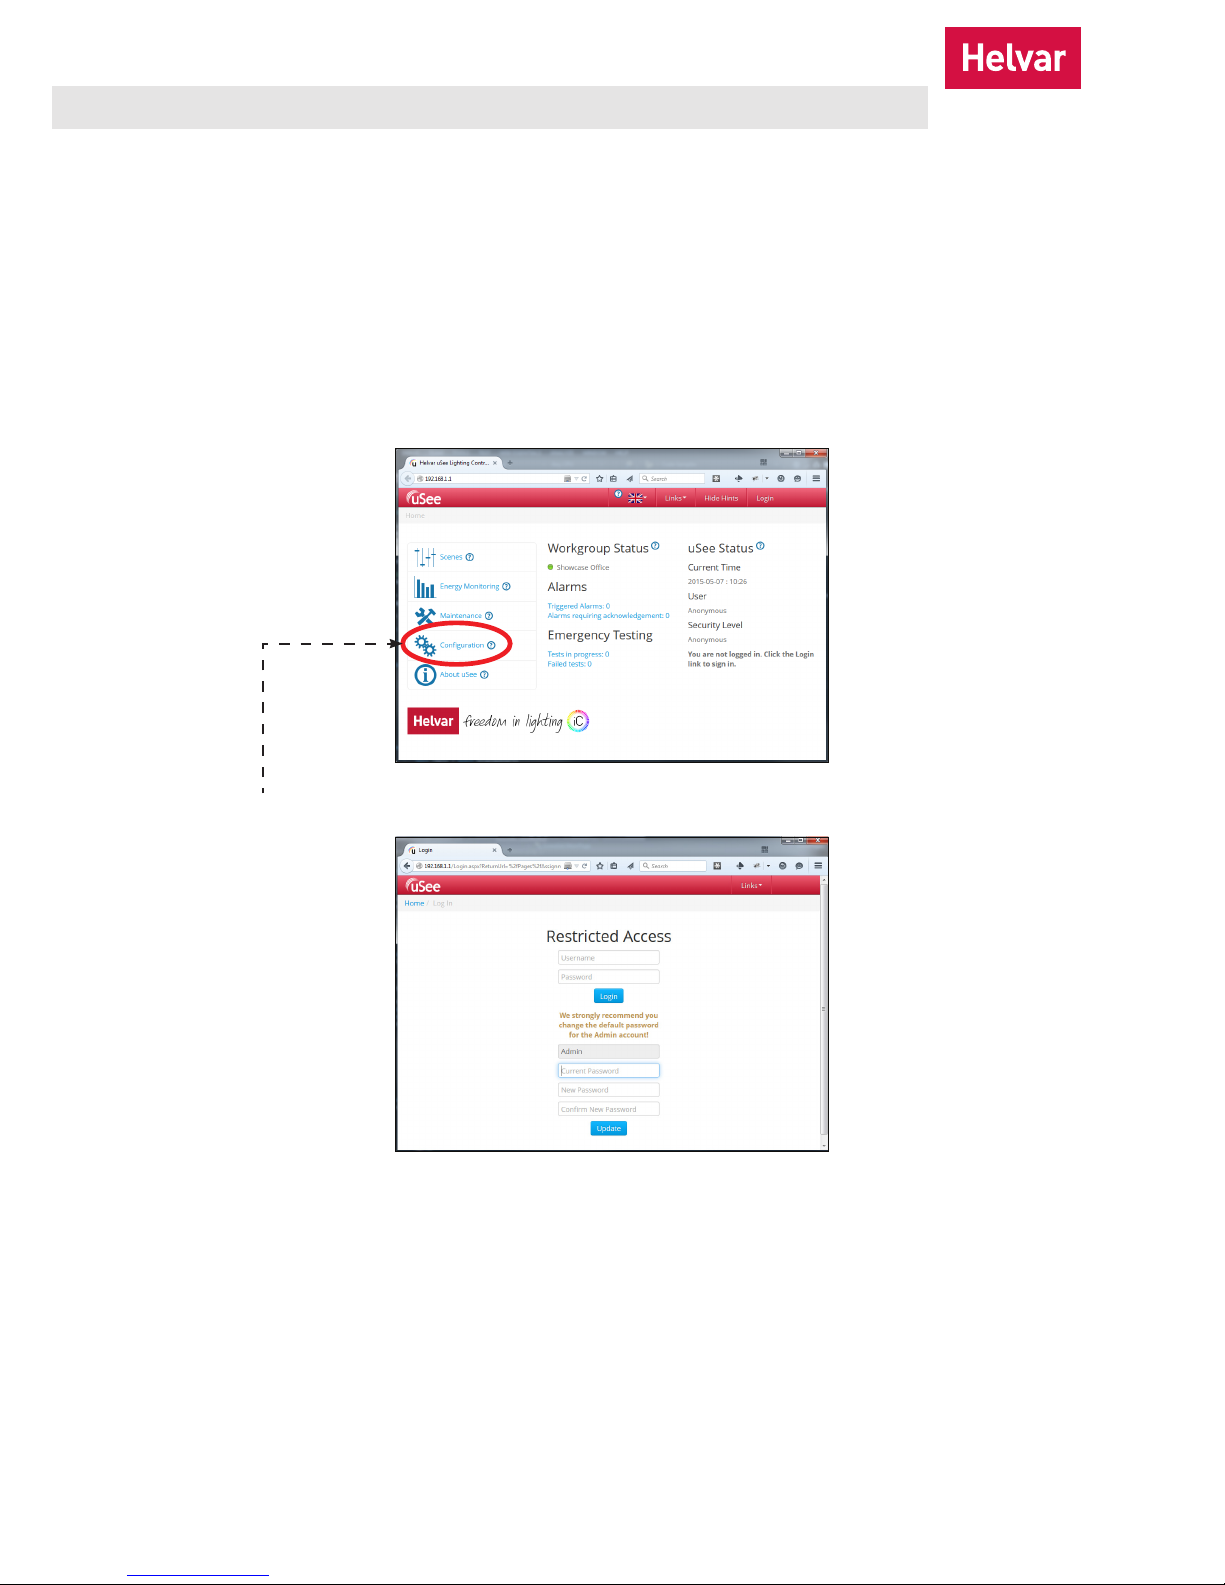
1. In the browser’s address bar, type 192.168.1.1, and then press Enter to display uSee’s main screen.
4.2. Change the default password of the Admin account
2. Click Configuration to display the Restricted Access screen.
3. Note that the username for the Administrator account is Admin. You cannot change this username.
4. In the Current Password text box, type password. This is the default password.
5. In the New Password text box, type the new password that you want to use.
The new password must contain at least eight characters, at least one number, and at least one letter. It must not
contain any special characters.
If you forget your password, contact your Helvar representative.
6. In the Confirm New Password text box, retype the password that you want to use.
7. Click the Update button, and uSee will create the Administrator account.
Once you have completed this task, the options located under the Login button will not appear again.
Page 11
Helvar | Data is subject to change without notice.
www.helvar.com
11
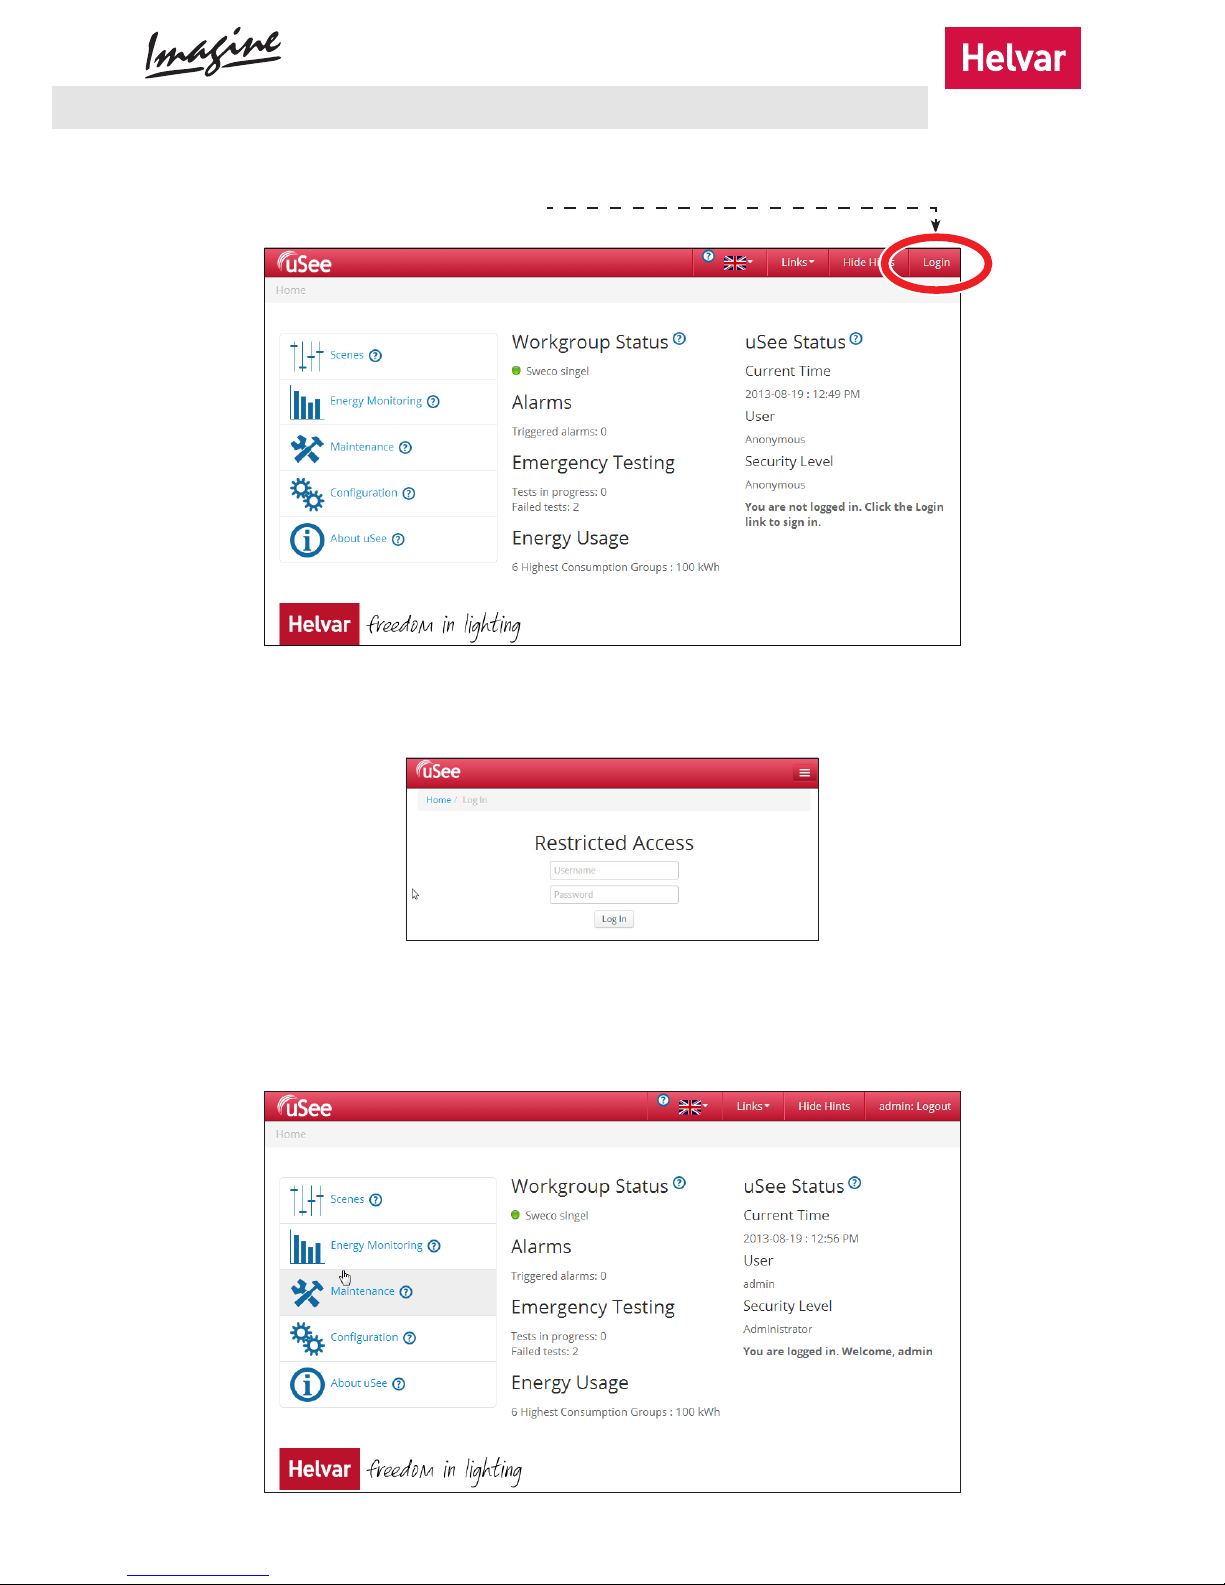
1. Click Login in upper-right corner of the screen.
2. In the Restricted Access window, type the administrator username and password.
3. Click Log In to display the main screen. Now create two more user accounts following the steps described in
section5.2 on page12.
5. Setting up the uSee Web Browser User Interface
5.1. Log in to uSee
Page 12
Helvar 8801 uSee Web Browser User Interface: Installation and Set-Up Guide
12
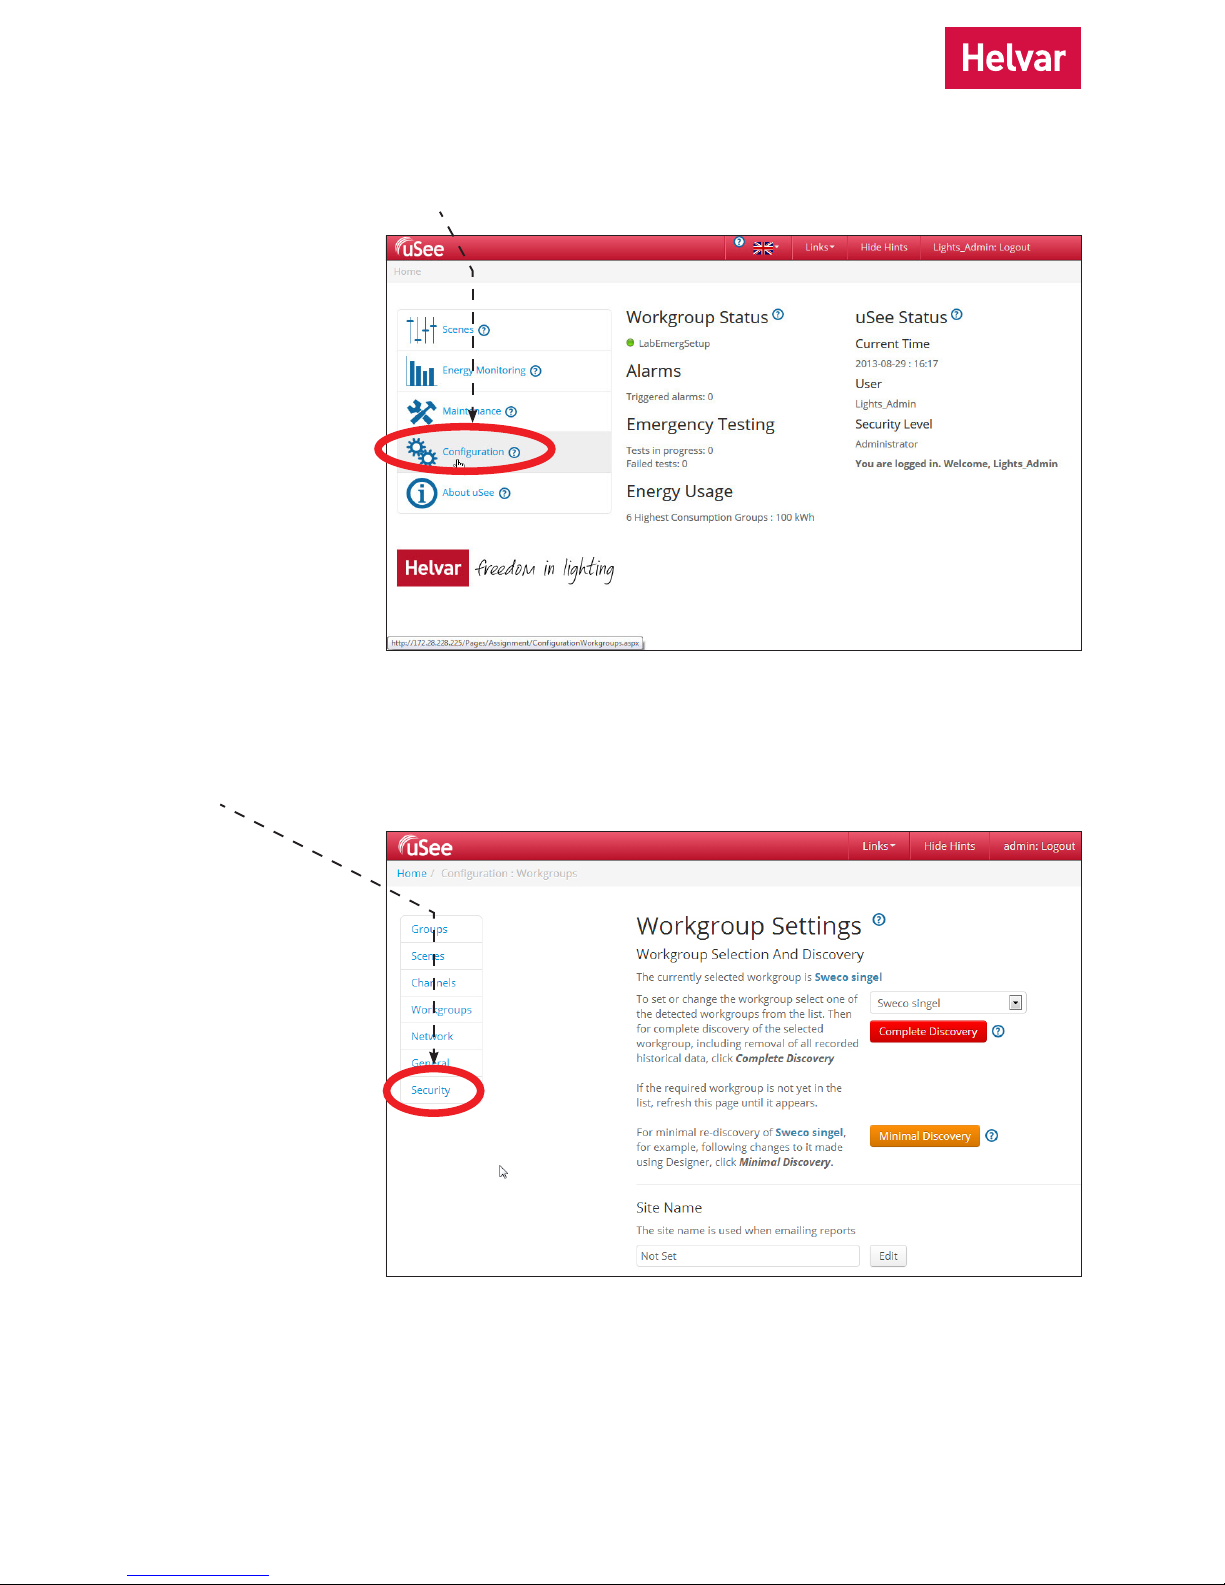
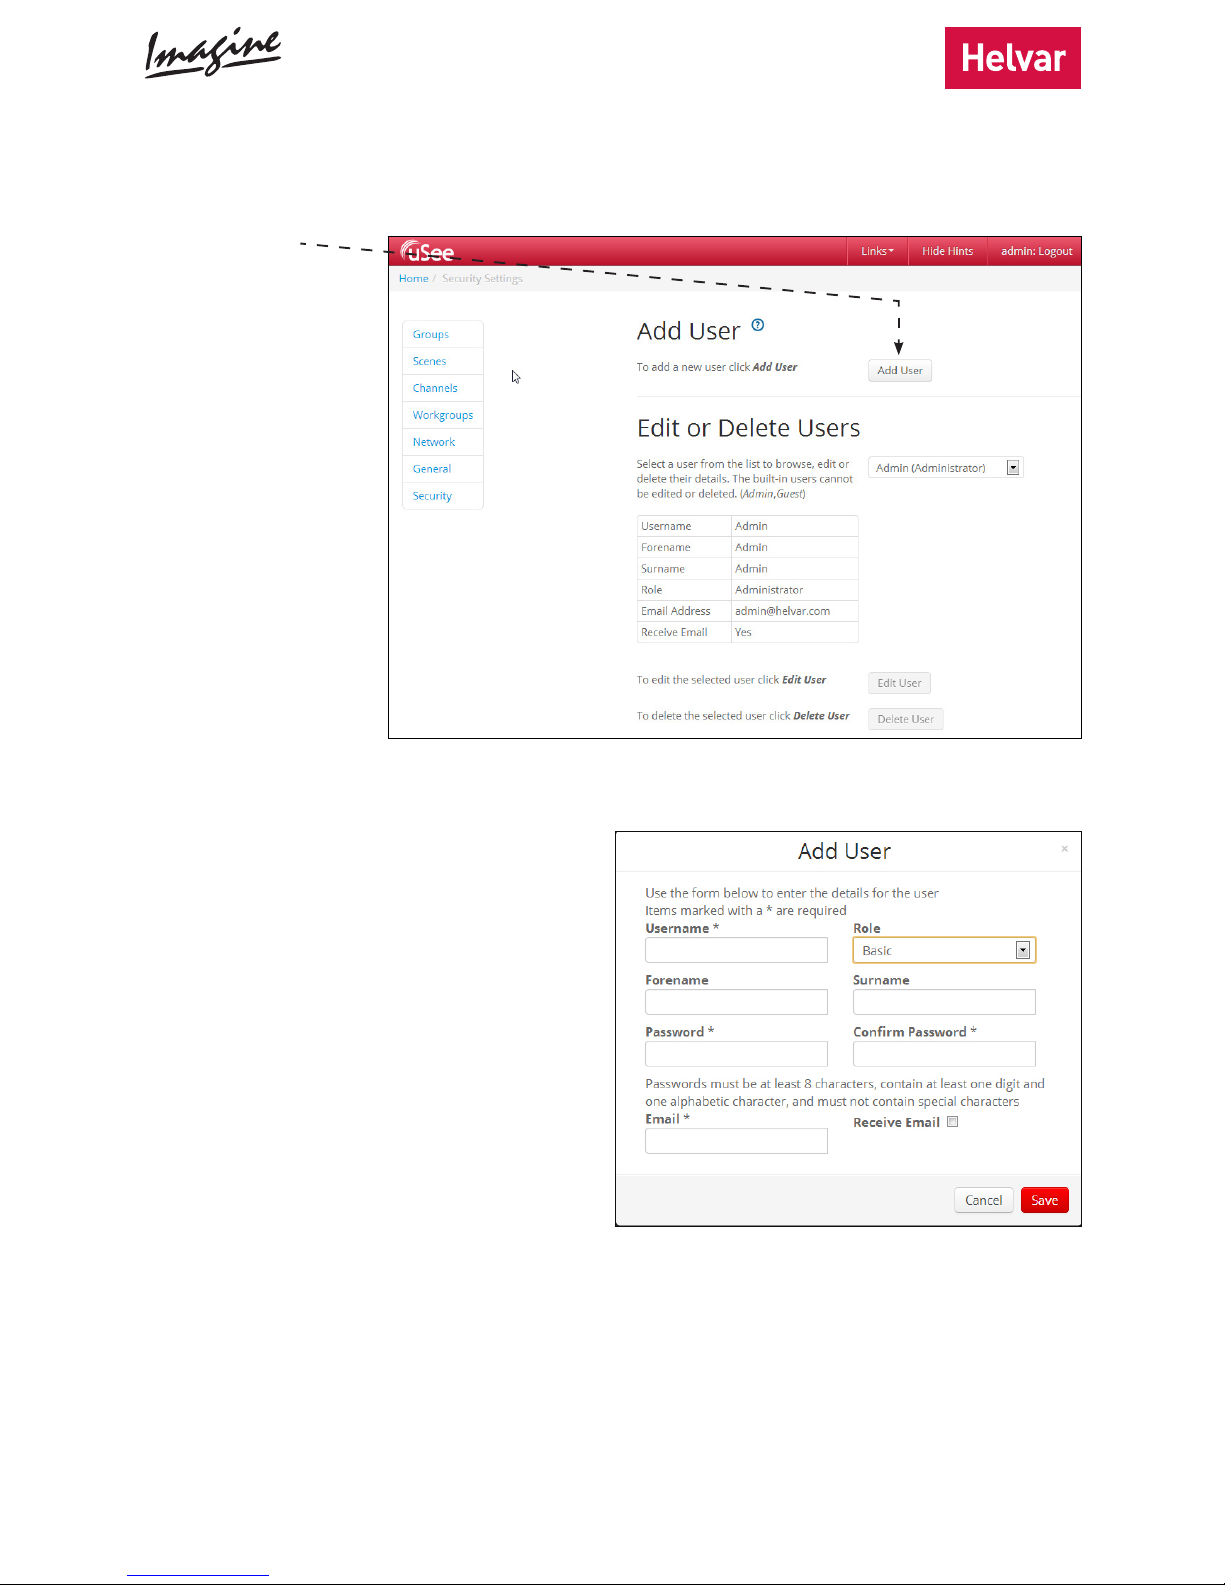
1. On the main screen, click Configuration.
2. Click Security.
5.2. Create Editor and BasicUser accounts
Page 13
Helvar | Data is subject to change without notice.
www.helvar.com
13
4. Type the user details (select the Editor role from the drop-down menu), and then click Save:
Receive Email: if selected,
this user will receive uSee
system emails, such as
alarm notifications.
5. Add another new user in the role of a Basic user.
6. Return to the uSee main screen.
3. Click Add User.
Page 14
Helvar 8801 uSee Web Browser User Interface: Installation and Set-Up Guide
14
6. Configuring the uSee Wired Network
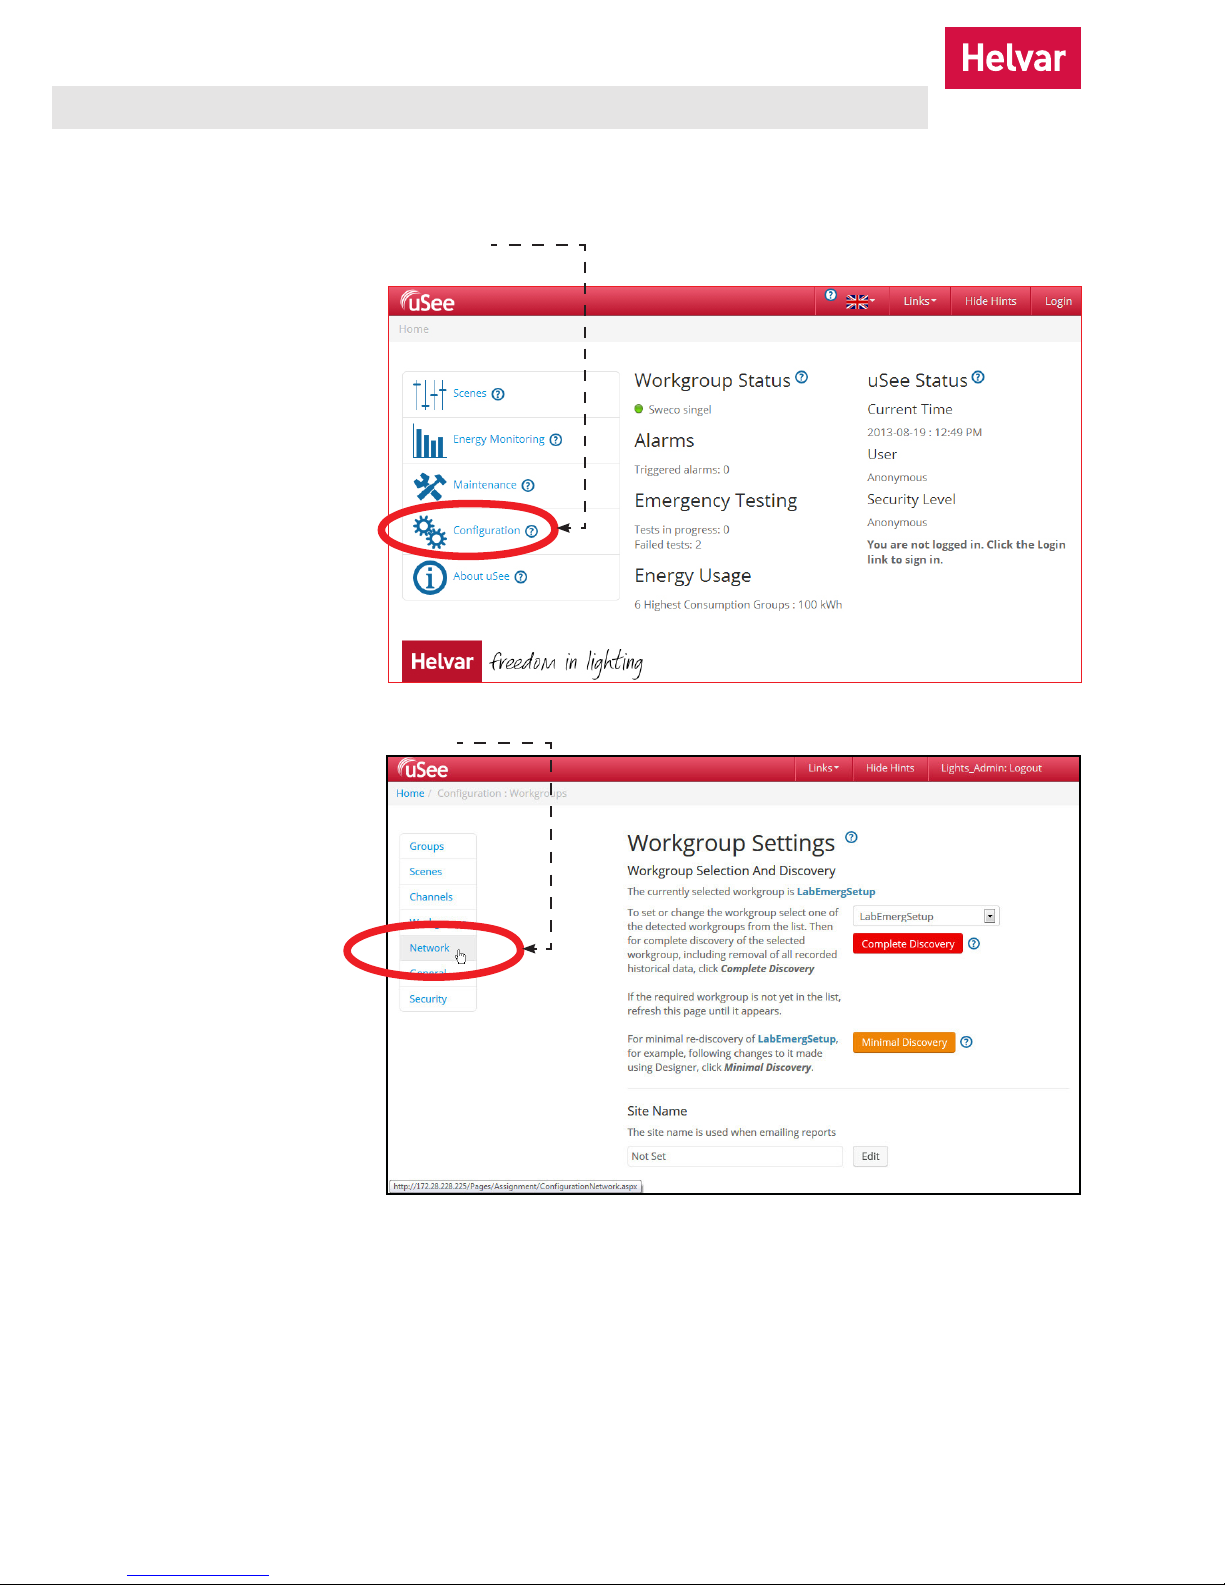
1. On the main screen, click Configuration.
2. On the Configuration screen, click Network.
6.1. Open the Configuration screen
Page 15
Helvar | Data is subject to change without notice.
www.helvar.com
15
1. On the Network Settings
screen, click the Edit
buttons, and then type the
Computer Connection
IP address (i.e.the IP
address of the uSee unit)
and the Lighting Router
Connection IP address
(i.e. the connection from
the uSee unit to the
lighting router).
Note 1: Consult the network administrator or commissioning engineer for IP settings compatible with your lighting router
network.
Note 2: After you change the network settings for the Lighting Router Connection, the uSee Web Browser User Interface
may take several minutes to see the workgroups on that Ethernet network. Go to the Workgroups page and
refresh your browser on a regular basis until the expected workgroup appears in the Workgroups list.
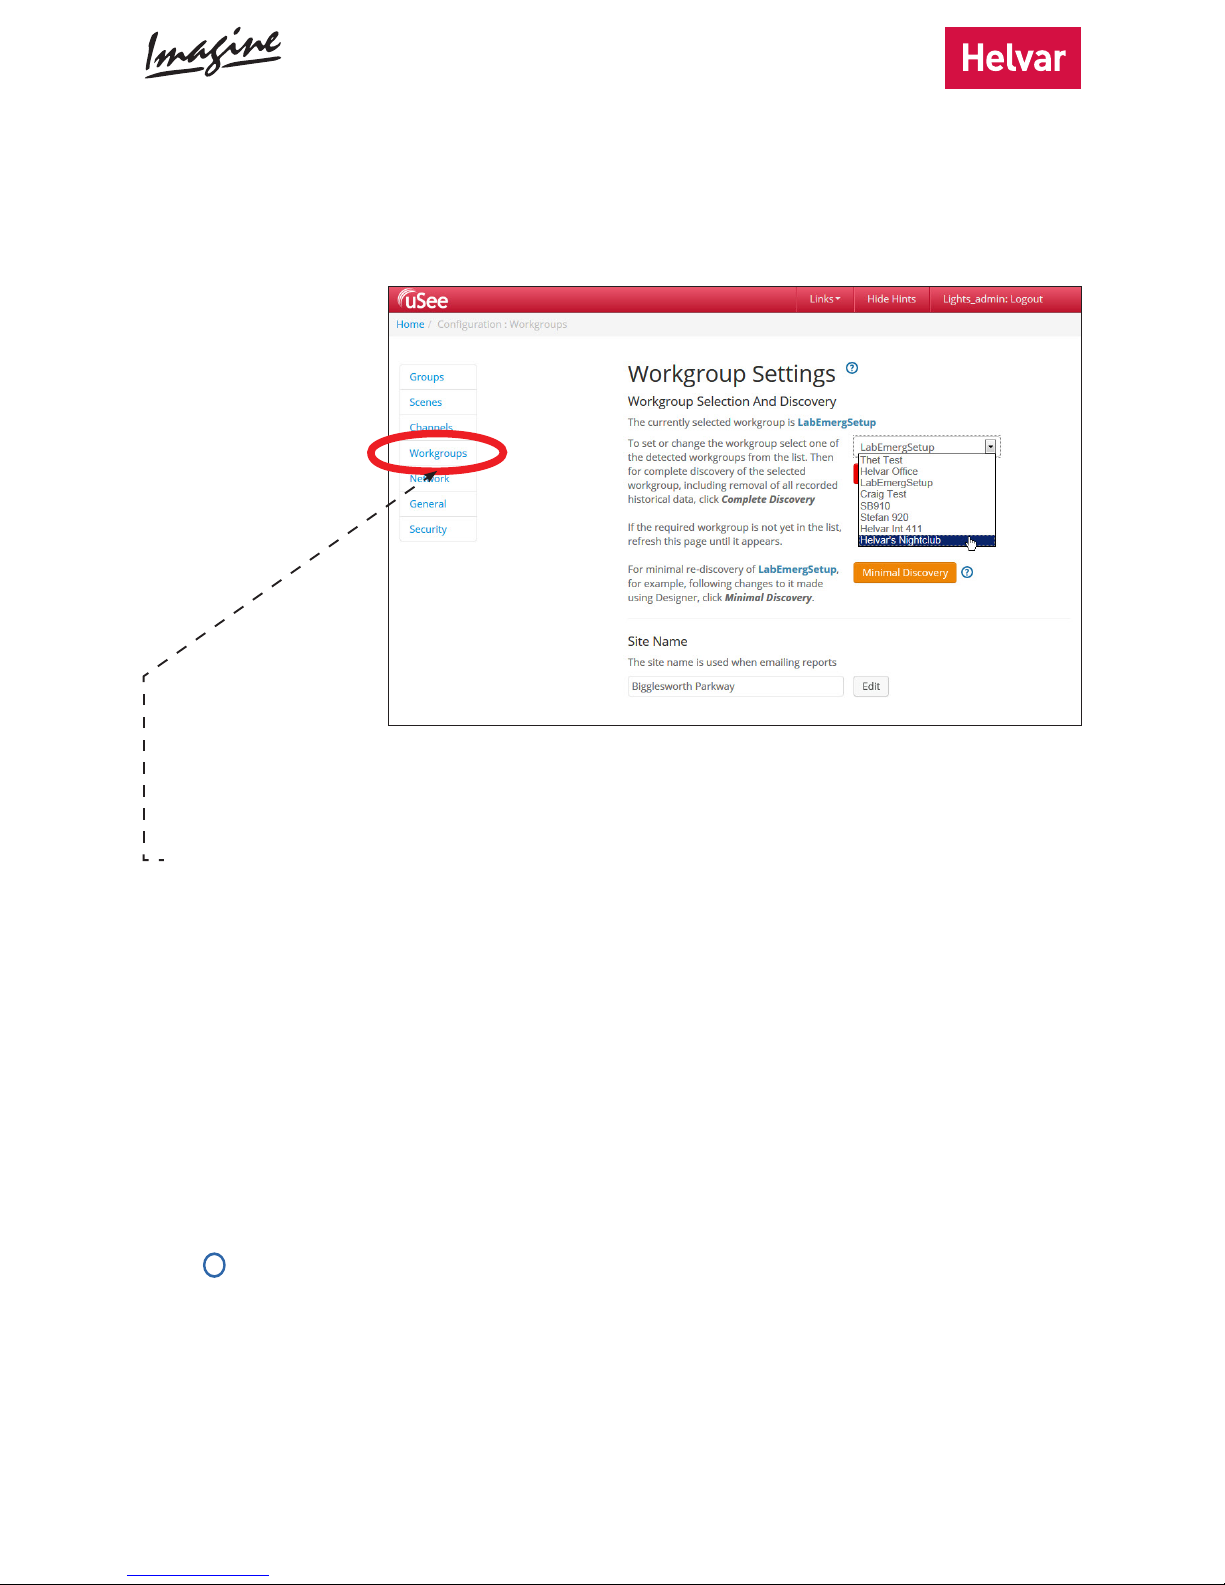
2. Make sure that the connection has been made: click the Workgroup Settings bar.
When the connection is made, the workgroup name will appear in the drop-down list on the Workgroup Settings
section of the Configuration Settings page.
3. Click Workgroups.
4. When the connection is made, the workgroup name will appear in the list: select it.
5. Click Minimal Discover or Complete Discovery.
6. Click Home to return to the uSee main screen.
7. You can now control the lighting system using uSee: context-sensitive help is available by clicking
the icons.
?
6.2. Edit the network settings
Page 16
Helvar 8801 uSee Web Browser User Interface: Installation and Set-Up Guide
16
Doc. 7860395, issue 2,
2019-01-14
Helvar Ltd
Hawley Mill
Hawley Road
Dartford
DA2 7SY
UNITED KINGDOM
7. Technical Data
Power
Input voltage: Single 12VDC ± 10%
Typical power
consumption: 6 W
Connectivity
LAN 1: 10/100/1000 Mbps Intel I210GbE. For
router network.
LAN 2: 10/100/1000 Mbps Intel I210GbE. For
local computer network.
Wi-Fi: Support Wi-Fi 802.11 a/b/g/n
I/O interface
HDMI: 2 × lockable HDMI connectors, support
up to 1920 × 1080 at 60Hz
USB interface: 2 × USB 2.0 & 1 × USB3.0
Mechanical data
Dimensions: 133.8 mm ×43.1 mm ×104mm
Mounting: DIN rail (installation in switchgear/
controlgear cabinet)
Weight: 0.8 kg
IP code: IP20
Operating and storage conditions
Ambient
temperature: 0 °C to +40 °C
Relative
humidity: Max. 90 %, noncondensing
Storage
temperature: –40 °C to +85 °C
Conformity and standards
EMC emission: EN 55032
EMC immunity: EN 55024
Safety: EN 60950
Environment: Complies with WEEE and RoHS
directives.
Order code
8801+HDR-30-12: uSee Web Browser User Interface
with 12 VDC, 30 W DIN-rail PSU.
www.helvar.com
Rear panel
SS
HDMI
HDMIDC input
LAN 2 for router network
USB 3.0
USB 2.0
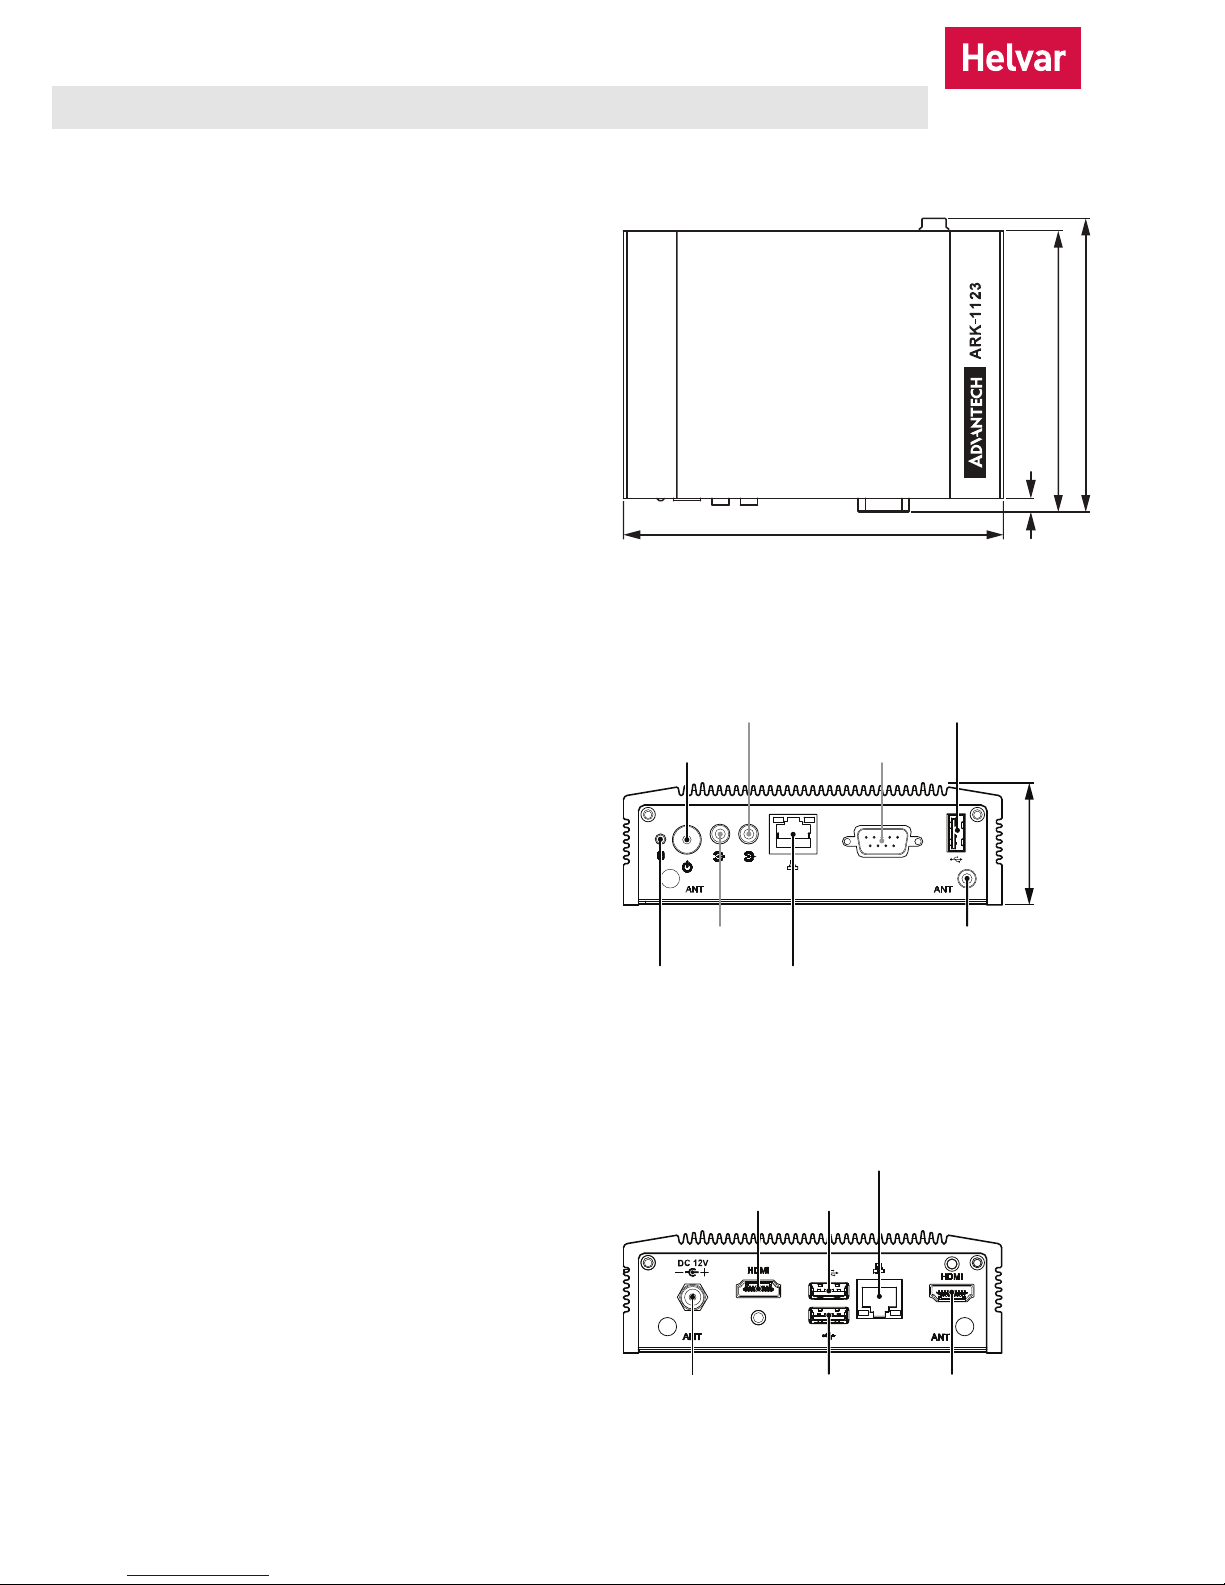
Dimensions (mm) and Connections
133.8
99
4.8
104
Front panel
Not used
USB 2.0
COM
Not used
On/Off
HDD LED LAN 1 for local
computer network
107.5
Not used Wi-Fi antenna
 Loading...