

Helo RONDO User Manual
GENUINE SAUNA & STEAM
User Manual RONDO
Type information Power
1108-961-1705 9.6kW
1108-651-1705 6.5kW
1108-451-1705 4.5kW
Voltage: 400 V 3N~
7014056 314 SKLH 30 D

2
General:
- Read the User Manual carefully.
- These instructions should be kept by the user of the heater.
- Turn the heater so that the lid over the electricity points can be opened easily for connection and
maintenance.
- The mains switch and the overheating limiter reset are located in the bottom part of the front lid.
- Before use it must be checked that the insulation rings are located correctly and are undamaged.
The stones are placed in the manner instructed in the User Manual. Otherwise the use of the heater
is prohibited and the guarantee will not compensate for any damages caused.
- Pre-heat the heater at full power for at least 2 hours. Storage grease is removed from the heater by
this heating. If further odour still occurs, heat the heater for as long as necessary. Ensure sufficient
ventilation during the heating times. A door or a window must not be left open during the heating.
- NOTE! All the capacity measurements have been calculated for fully heat-insulated saunas.
All reserving heaters, such as Rondo, require a fully heat-insulated sauna. The insulation has a
critical effect on the functioning of the sauna and therefore it is recommended that the heat insulation
is undertaken carefully.
- The control panel is intended to be installed next to the heater in the area outlined in the manual.
- Maximum heating time for the use of the sauna using full power is 2 hours.
- Adhere to the given installation measurements.
- Only one heater may be installed into a sauna.
- Wood panelling is recommended as material for the walls and ceiling of the sauna.
- NOTE! Prior to switching the heater on, ensure that the sauna room is ready for heating.
- If any problems occur, contact the nearest authorized service agreement centre. Information can be
found in a separate appendix or via the internet address: www.helo.fi
Installation of the sauna heater:
- The heater represents an upright model standing on the floor. The foundation has to be solid as the
weight of the heater is approximately 130kg stones included.
- The heater is installed using the adjustable legs.
- The heater is fixed using the adjustable legs with the supplied metal fastenings which prevent the
change of protection distances during use.
Connecting the heater to the mains:
- Connection of the heater and the control centre to the mains can only be carried out by an
authorised person in accordance with the current electricity regulations.
- The heater is semi-connected to the mains with H07RN-F (VSN) or A07BB-F(VSB) rubber cable.
- The heater has a connector (55) for the control of the alternating of the electrical heating. Voltage
enters the connector at the same time as the full power for resistors is in use.
- When using the lighting control of the heater controller the maximum permitted load is 100W.
- When testing the heater functions the heater should not be heated without the stones.
Heater stones
- It is recommended that the stones used in the heater are the ones supplied by the manufacturer.
- Wash and load the stones.
- The stones should be sufficiently large in order to provide an airy loading which is not too dense.
- Heat resistors must not be wedged together nor against the heater frame.
- The largest stones in the stone packages are loaded below the resistors so that the radiation heat of
the resistors will not heat the base of the stone space.
- The stones should be reloaded sufficiently often. A good rule of thumb is that annually there should
be as many reloadings as the times the sauna is being used in a week.
- In connection with the reloading small and crumbled heater stones should be removed as they
prevent the transfer of the heat away from the resistors and thus significantly shorten the life cycle of
the resistors.
- The guarantee will not compensate for any damage caused by small, crumbled, poor-quality
or tightly loaded stones!
- Use of ceramic stones is strictly forbidden! The guarantee will not compensate any damage
caused by them!
3
Image 1
Image 2
Image 3
Image 4
Image 5
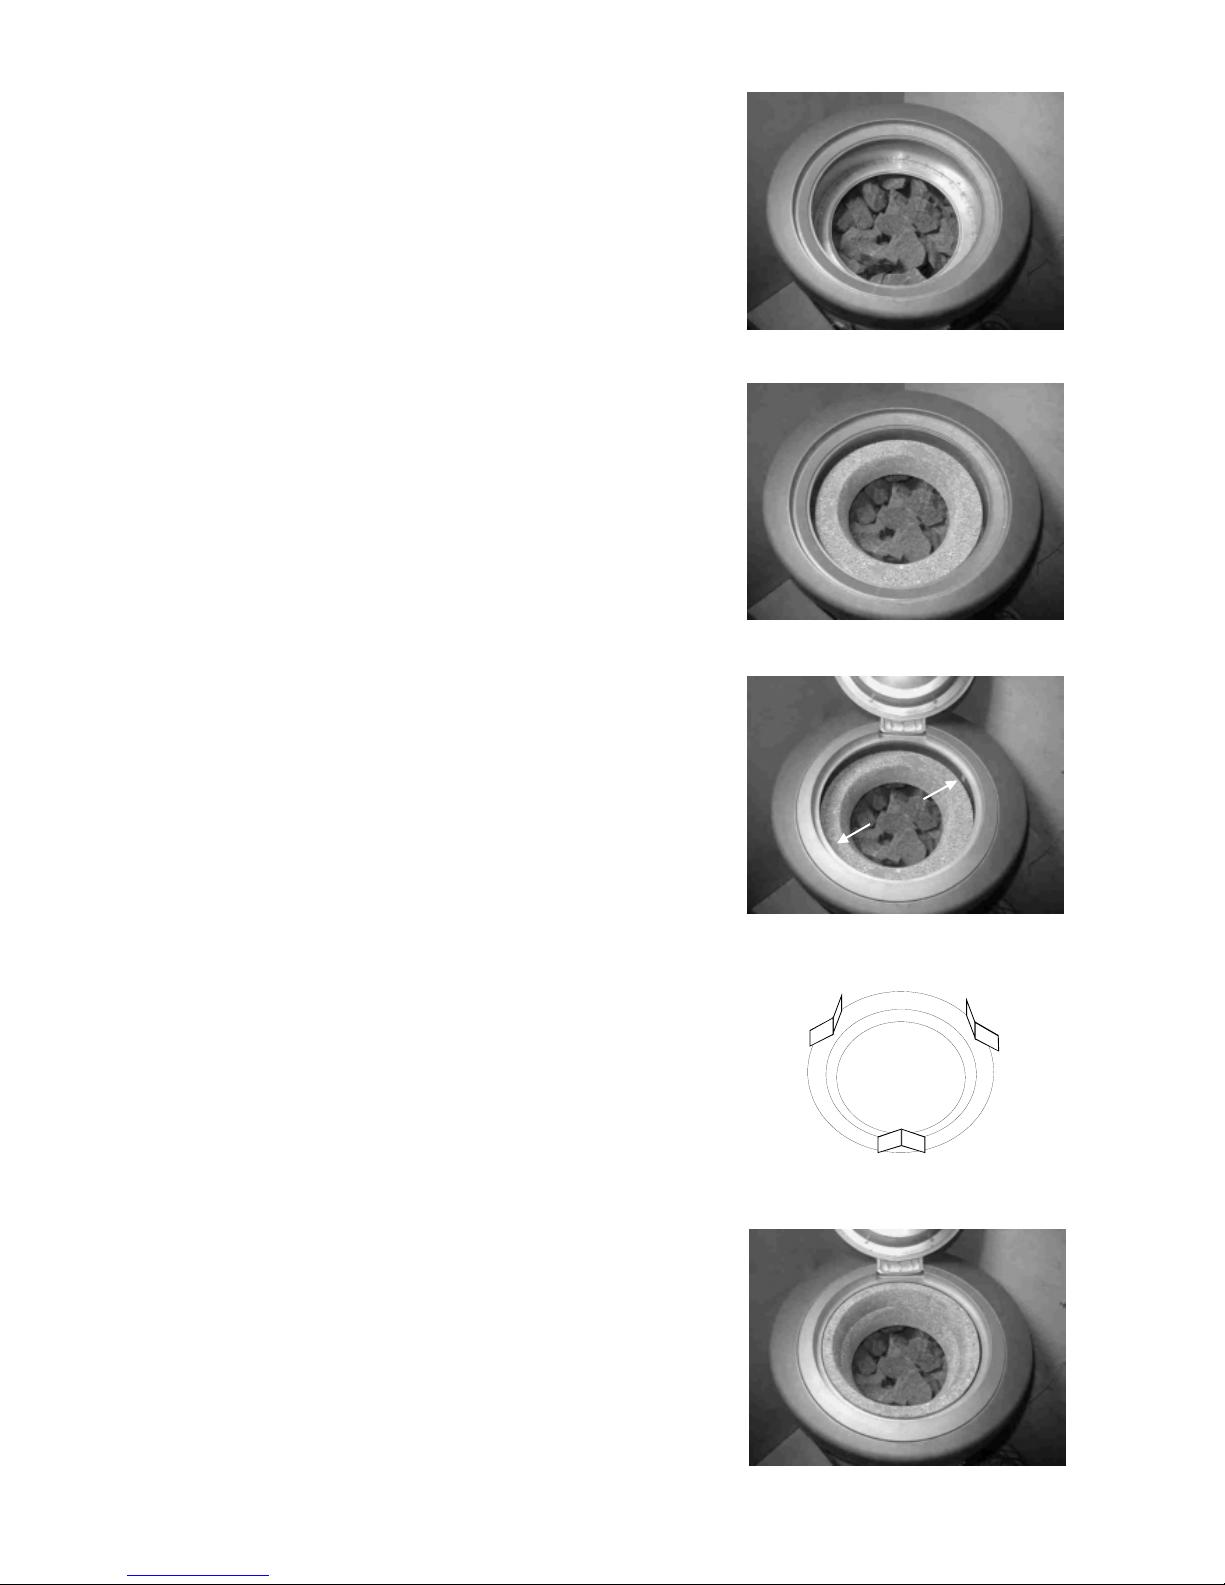
INSTALLATION OF HEATER STONES AND INSULATION RINGS
Before the installation of heater stones and insulation rings the
heater has to be installed into its location and its electrical
connections secured. Moving of the heater while it is full of
heater stones may damage the heater / floor.
-
Remove the insulation rings before the loading of the heater stones.
-
Lift the top insulation ring directly upwards.
-
Loosen the allen screws (2 pcs, see arrows in figure 3) on the
inside circumference of the rotating ring so that the rotating ring
can be lifted away. NOTE! Don't loosen the screws entirely as
they may fall inside the heater.
-
Next lift the lower insulation ring from its location.
-
Load the heater stones meant to be inside the heater as shown in
the figure. The stones must cover the resistors (see figure 1).
-
First install the lower insulation ring in its place (see figure 2).
-
The insulation ring must be set in its location and it must not be
left to rest on the heater stones.
-
Next install the rotating ring with lids into its location (see figure 3).
-
Turn the lid to the desired position before tightening the locking
screws.
-
NOTE! The lid, however, must not direct steam / hot air directly
against the wall or some other obstacle. Note the protection
distances!
-
Tighten the screws so that the rotating ring is not able to move.
However, do not use excessive strength while tightening. This
may make the removal of the ring difficult, for example in
connection with maintenance.
-
Check finally that the rotating ring stays in its place also when
the lid is opened.
-
Next install the control pads of the top insulation ring
(3 pcs, see figure 4) in their place.
-
The control pads have to be placed evenly on the circumference
of the lower insulation stone.
-
Finally install the upper insulation ring in its place as shown in
the figure.
-
Check also that the insulation rings are undamaged and in
their place.
-
NOTE! If the insulation ring or rings are cracked or are otherwise
damaged, the heater must not be used until the damaged insulation
rings have been replaced!
4
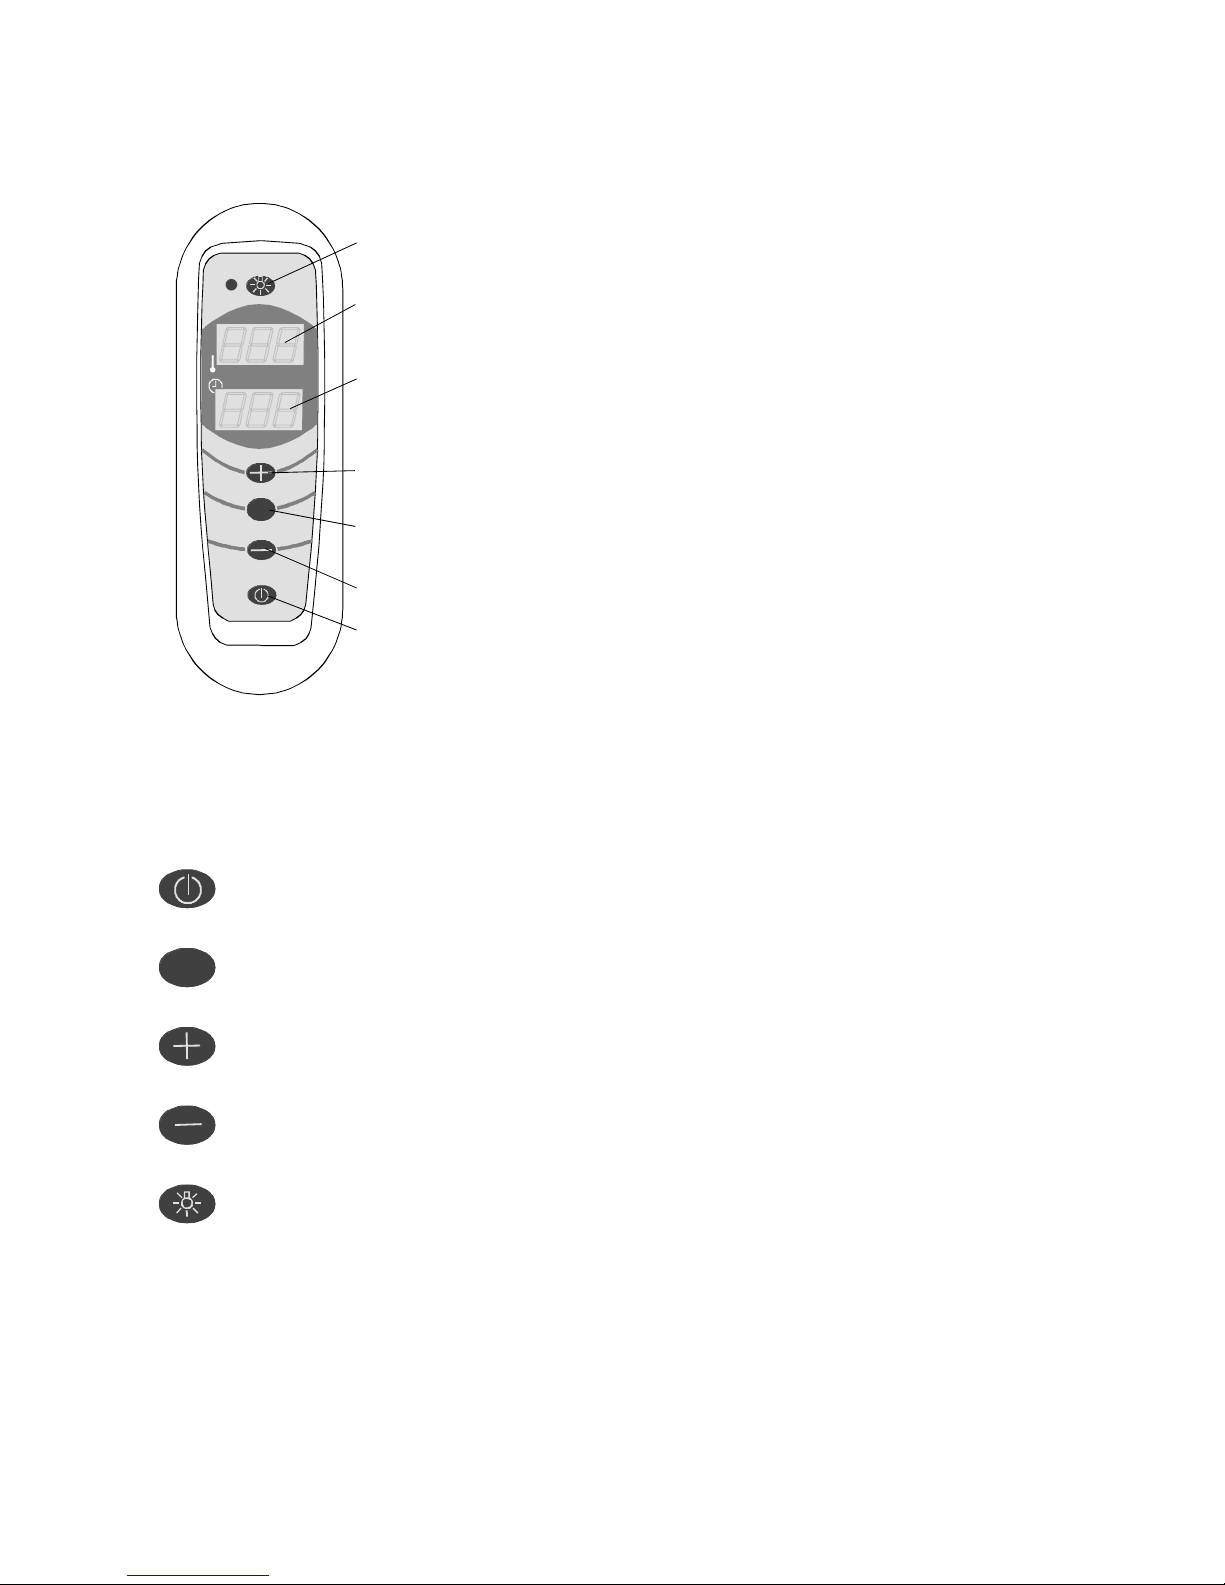
RA 19 – CONTROL
RA 19 Controller Type 1601-19
Button functions:
While the controller is in standby mode (displays not lit) the clicking of the button will
activate the controller. When the controller is active, pressing this button will stop all
functions and the controller / heater is disconnected.
The button is used to accept any changes in the settings and / or to move to the next
setting / operational mode.
Increases the setting rate. Browsing of the rates can be speeded up by holding the button
pressed down.
Reduces the setting rate. Browsing of the rates can be speeded up by holding the button
pressed down.
Activates a relay on the circuit board. The heater has its own connector for the lighting
controller, voltage 230 VAC and the maximum power 100W. A led is activated next to the
light button on the Control panel when the light/s is/are on.
Operational times and
control settings: Operational time (full power) 0 – 2 hours
Stone space temperature (full power) 250 – 300°C
Stone space temperature (simmering mode) 150 – 250°C
OK
OK
Sauna light control on / off
Stone space temperature display
Operational time display (full power)
Sauna room temperature display (requires installation of a sensor as an accessory)
Simmering mode on
Addition of the setting rate
Saving the setting rates
Connection of full power
Selection of the operational mode
Reduction of the setting rate
Activation of the controller
 Loading...