

Helo 1106 – 901, 1106 – 1051,OCTA, 1106 – 1201, 1106 – 1501, 1601 – 12 Installation And User Manual
...
ELECTRIC SAUNA HEATER:
1106 – 901
1106 – 1051
1106 – 1201
1106 – 1501
CONTROL PANEL:
1601 – 12
1601 – 13
CONTACTOR BOX
2005 – 4
314 SKCP 15-3 F
Installation and User Manual OCTA
GENUINE SAUNA & STEAM

Contents
1. Quick instructions for use of the sauna heater 3
1.1. Check before taking a sauna bath 3
1.2. Operation of the sauna heater controls 3
2. Information for users 3
2.1. Sauna room 3
2.2. Rekommenderad ventilation i bastun 3
2.3. Sauna heater stones 4
2.4. Heating the sauna 4
2.5. If the sauna heater will not heat up 4
3. Instructions for the installer 5
3.1. Preparing for sauna heater installation 5
3.2 Heaters installation 5
3.3 Connection of the sauna heater to the mains 5
3.4 Electric heating toggle 6
3.5 Locating the connecting box for the connection cable in the sauna room 6
3.6 Safety distances 7
3.7 Wiring diagram 8
3.8 Principle installation 9
4. ROHS 10
5. Octa Sauna heaters spare part list 10
Bilder och tabeller:
Image. 1 Recommended sauna room ventilation 3
Image. 2 Location for the connection box 6
Image. 3 Safety clearances 7
Image. 4 Wiring diagram Octa heater 8
Image. 5 Wiring diagram Contactor box WE 4 8
Image. 6 Wiring diagram for the Sensor and Control panel (Digi II) 8
Image. 7 Principle installation 9
Image. 8 Sensor installation 9
Table 1 Connection cable and fuses 6
Table 2 Safety clearances 7
Installation and User Manual OCTA
2
1. Quick instructions for use of the sauna heater
1.1. Check before taking a sauna bath
1. The sauna room is suitable for taking a sauna bath.
2. The door and the window are closed.
3. The sauna heater is topped with stones that comply with the manufacturer's recommendations, the heating
elements are covered with stones, and the stones are piled sparsely.
NOTE! Ceramic rocks are not allowed.
1.2. Operation of the sauna heater controls
The control panel is installed outside the sauna room.
For more detailed installation guide, refer to the specific control panel operating instructions.
2. Information for users
Persons with reduced physical and mental capacity, sensory handicap, or little experience and knowledge about
how the device is operated (e.g. children), should only operate the device while supervised or according to
instructions given by the persons in charge of their safety.
Make sure that children aren't playing with the sauna heater.
2.1. Sauna room
The walls and ceiling of a sauna room should be thermally well insulated. All surfaces that store heat, such as tiled
and plastered surfaces must be insulated. It is recommended to use wooden panel cladding inside the sauna room.
If there are heat storage elements in the sauna room, such as decorative stone, glass etc., note that these elements may extend the pre-heating period even though the sauna room is otherwise well insulated (see page 5,
section 3.1 Preparing for sauna heater installation).
2.2. Rekommenderad ventilation i bastun
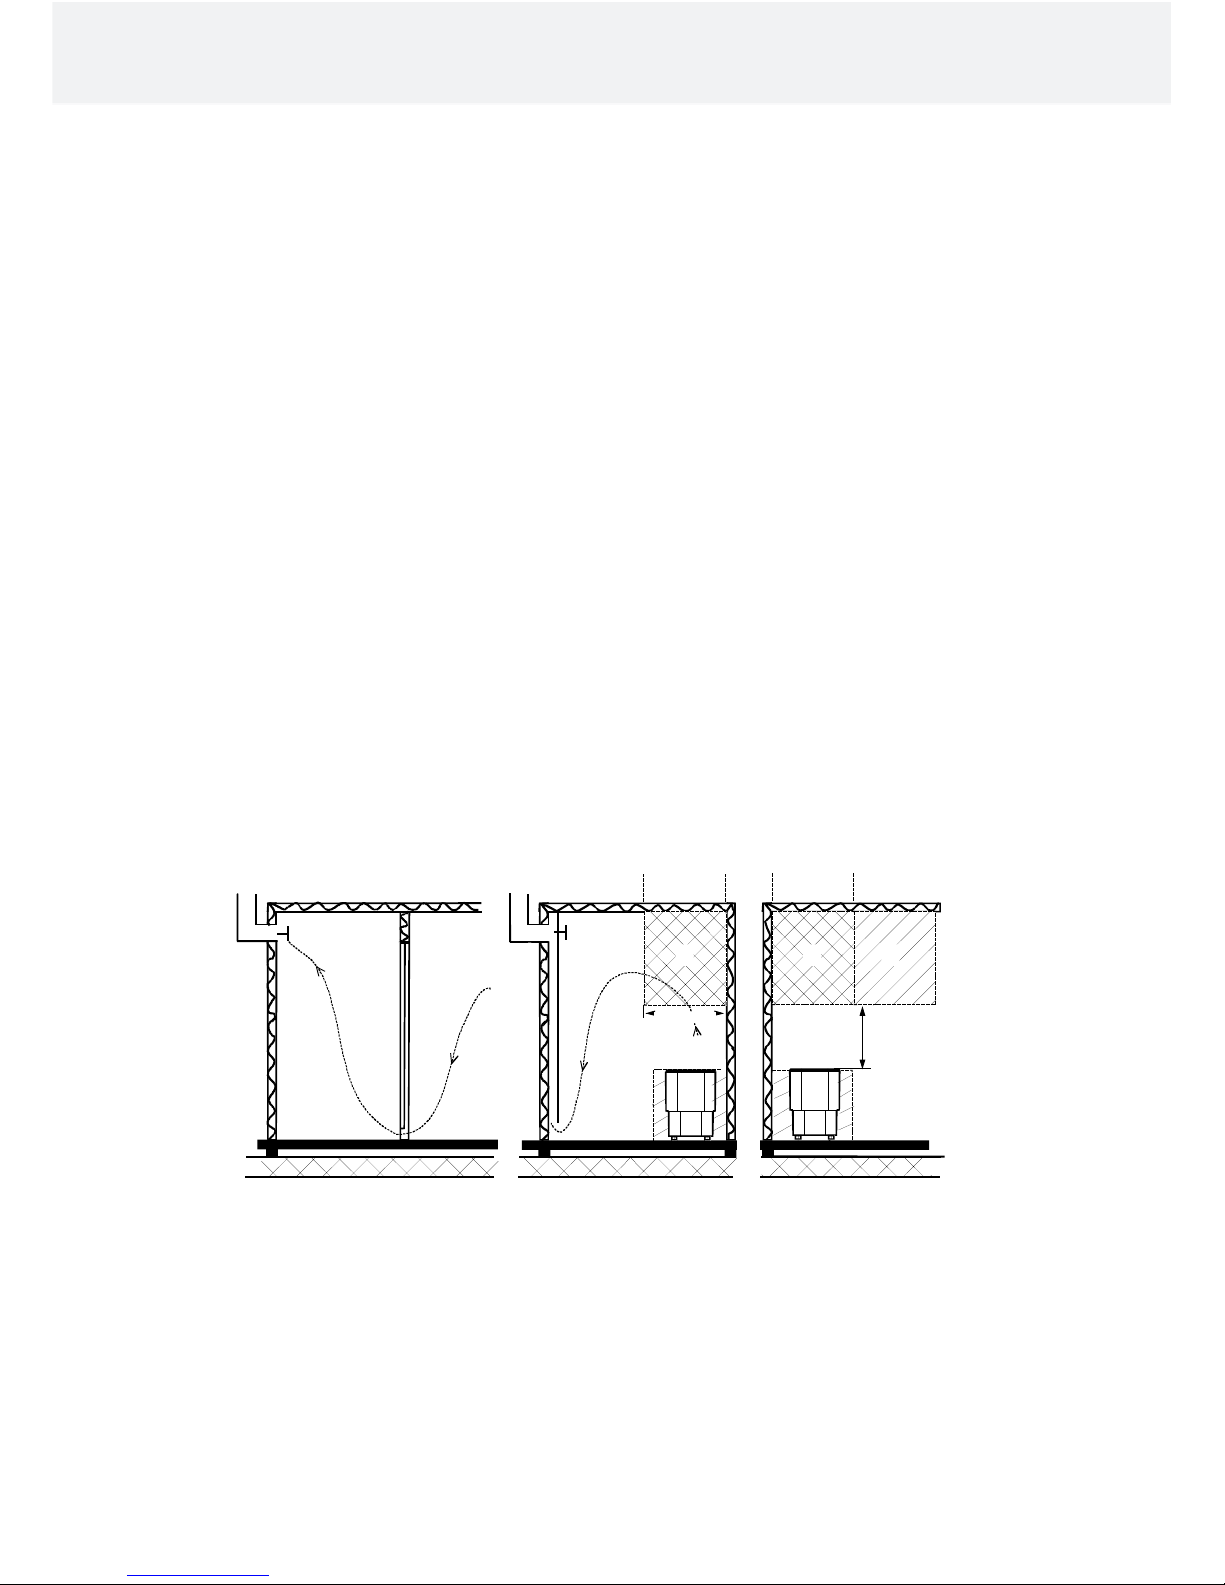
Image. 1 Recommended sauna room ventilation
1. Sauna room 3. Electric sauna heater 5. Exhaust flue or channel
2. Washroom 4. Exhaust valve 6. Door to the sauna room
7. A ventilation valve can be installed here to be kept closed while the sauna is heated and during bathing.
Inlet vent can be positioned in the A zone. Make sure the incoming fresh air will not interfere with (i.e. cool down)
the sauna heater's thermostat near the ceiling.
The B zone serves as the incoming air zone, if the sauna room isn't fitted with forced ventilation. In this case, the
exhaust valve is installed min 1m higher than the inlet valve.
DO NOT ISTALL INLET VALVE WITHIN ZONE C, IF THE SAUNA HEATER'S CONTROL THERMOSTAT IS LO-
CATED IN THE SAME ZONE.
Installation and User Manual OCTA
3
5
5
4
4
2
1
1
1
A
7
A
min
400 mm
6
3
B
3
B
C
C
C
C A
1000 mm
 Loading...