

Page 1
559-734-7451 800-367-5480 FAX 559-734-7460
INSTALLATION INSTRUCTIONS
Jeep Wrangler JK
7876 FRONT SWAY BAR
Thank you for purchasing a quality Hellwig Product.
PLEASE READ THIS INSTRUCTION SHEET COMPLETELY BEFORE STARTING YOUR INSTALLATION
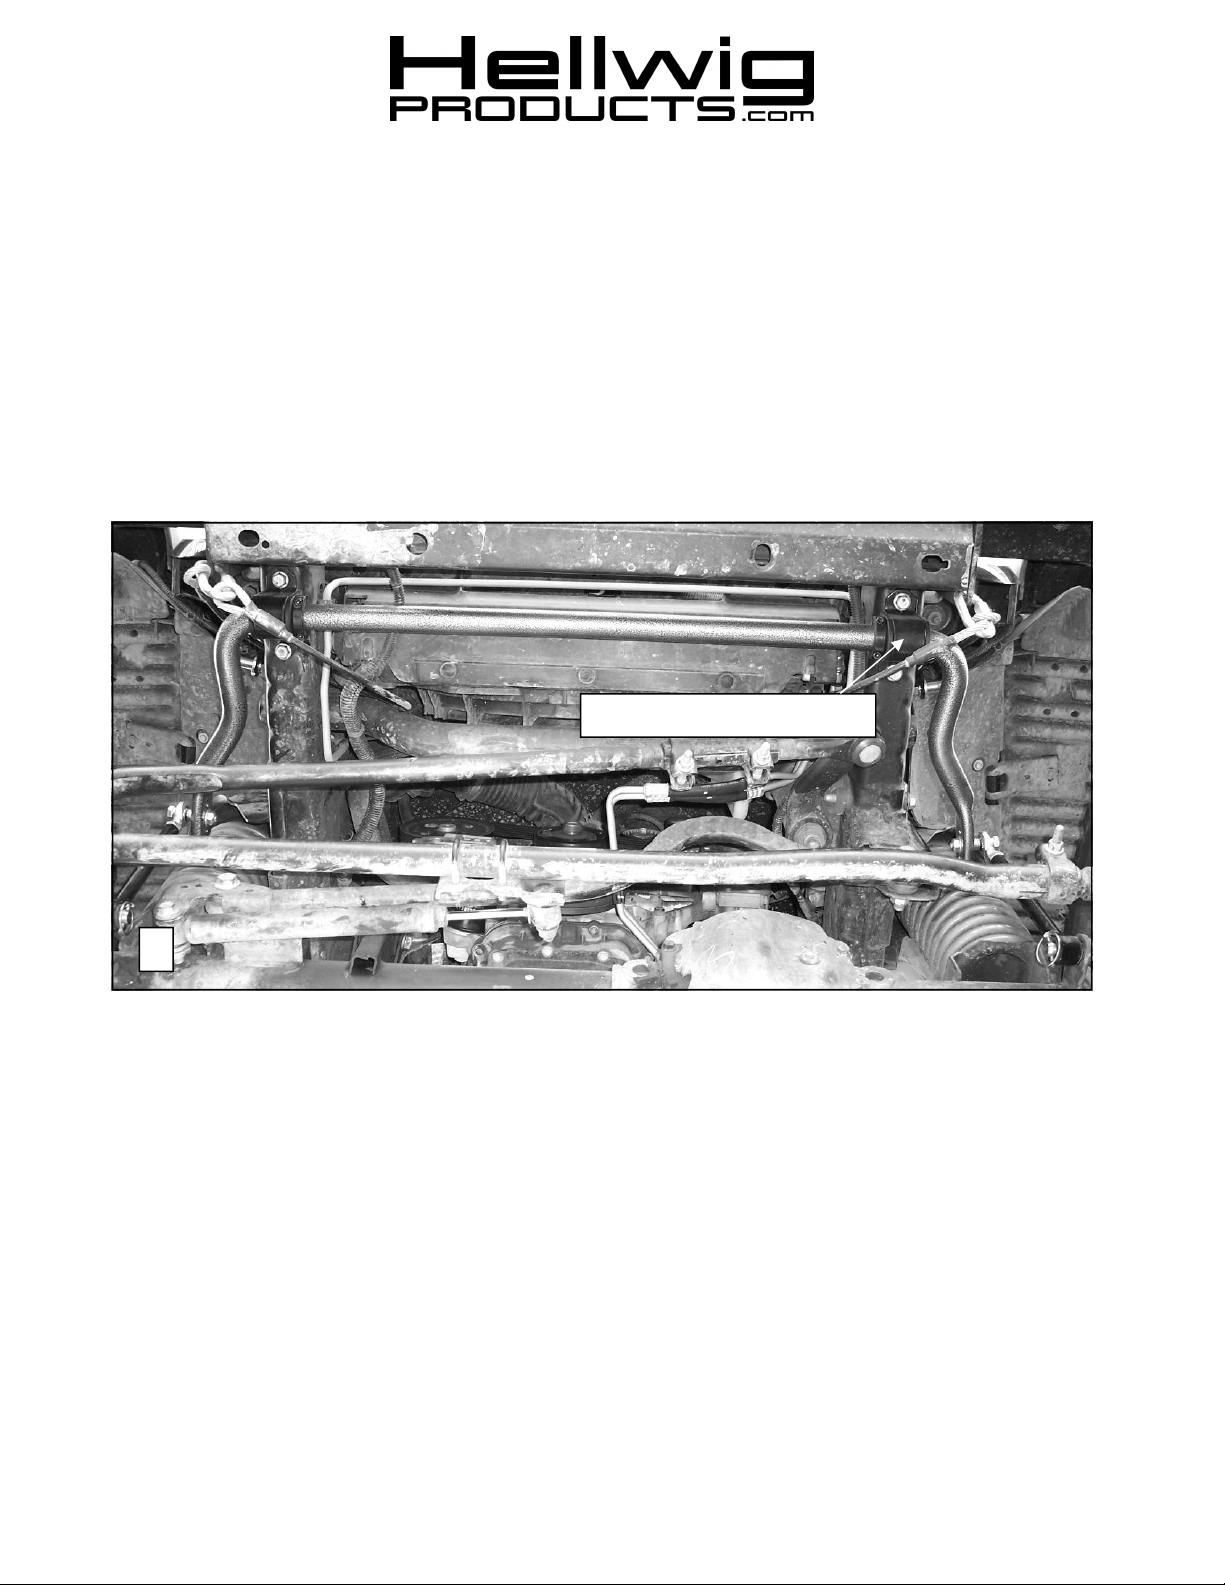
U-Plate and D-bushing
1
SAFETY: BEFORE STARTING YOUR INSTALLATION, BE SURE TO SET PARKING BRAKE AND CHOCK
TIRES.
NOTE: TO EASE INSTALLATION AND TO PROPERLY ADJUST THE BAR, THE WEIGHT OF THE VEHICLE
MUST BE ON THE SUSPENSION, AS IF DRIVING DOWN THE ROAD. DO NOT RAISE VEHICLE BY THE
FRAME.
NOTE: THIS KIT INCLUDES LOCK NUTS WHICH REQUIRES TIGHTENING WITH A WRENCH AFTER
BEING STARTED BY HAND.
TORQUE TABLE
BOLT SIZE: 3/8” = 20-30 ft. lbs. – 7/16” = 35-45 ft. lbs. – 1/2” = 50-70 ft. lbs. – 9/16” = 70-90 ft. lbs.-5/8”=120 ft. lbs.
7876 ( R-7876 ) 03/15/2012
Page 2
559-734-7451 800-367-5480 FAX 559-734-7460
Linch Pin
2
4
3
1. Entirely remove the front factory sway bar and end links. Keep the hardware as some of it will be reused in
the installation.
2. Lubricate the insides of the D-bushings and place them on the bar. Then place the U-plates over the bushings.
3. Using the factory bolts kept in Step 1, attach the sway bar to the underside of the frame in the stock location as shown in Photo 1.
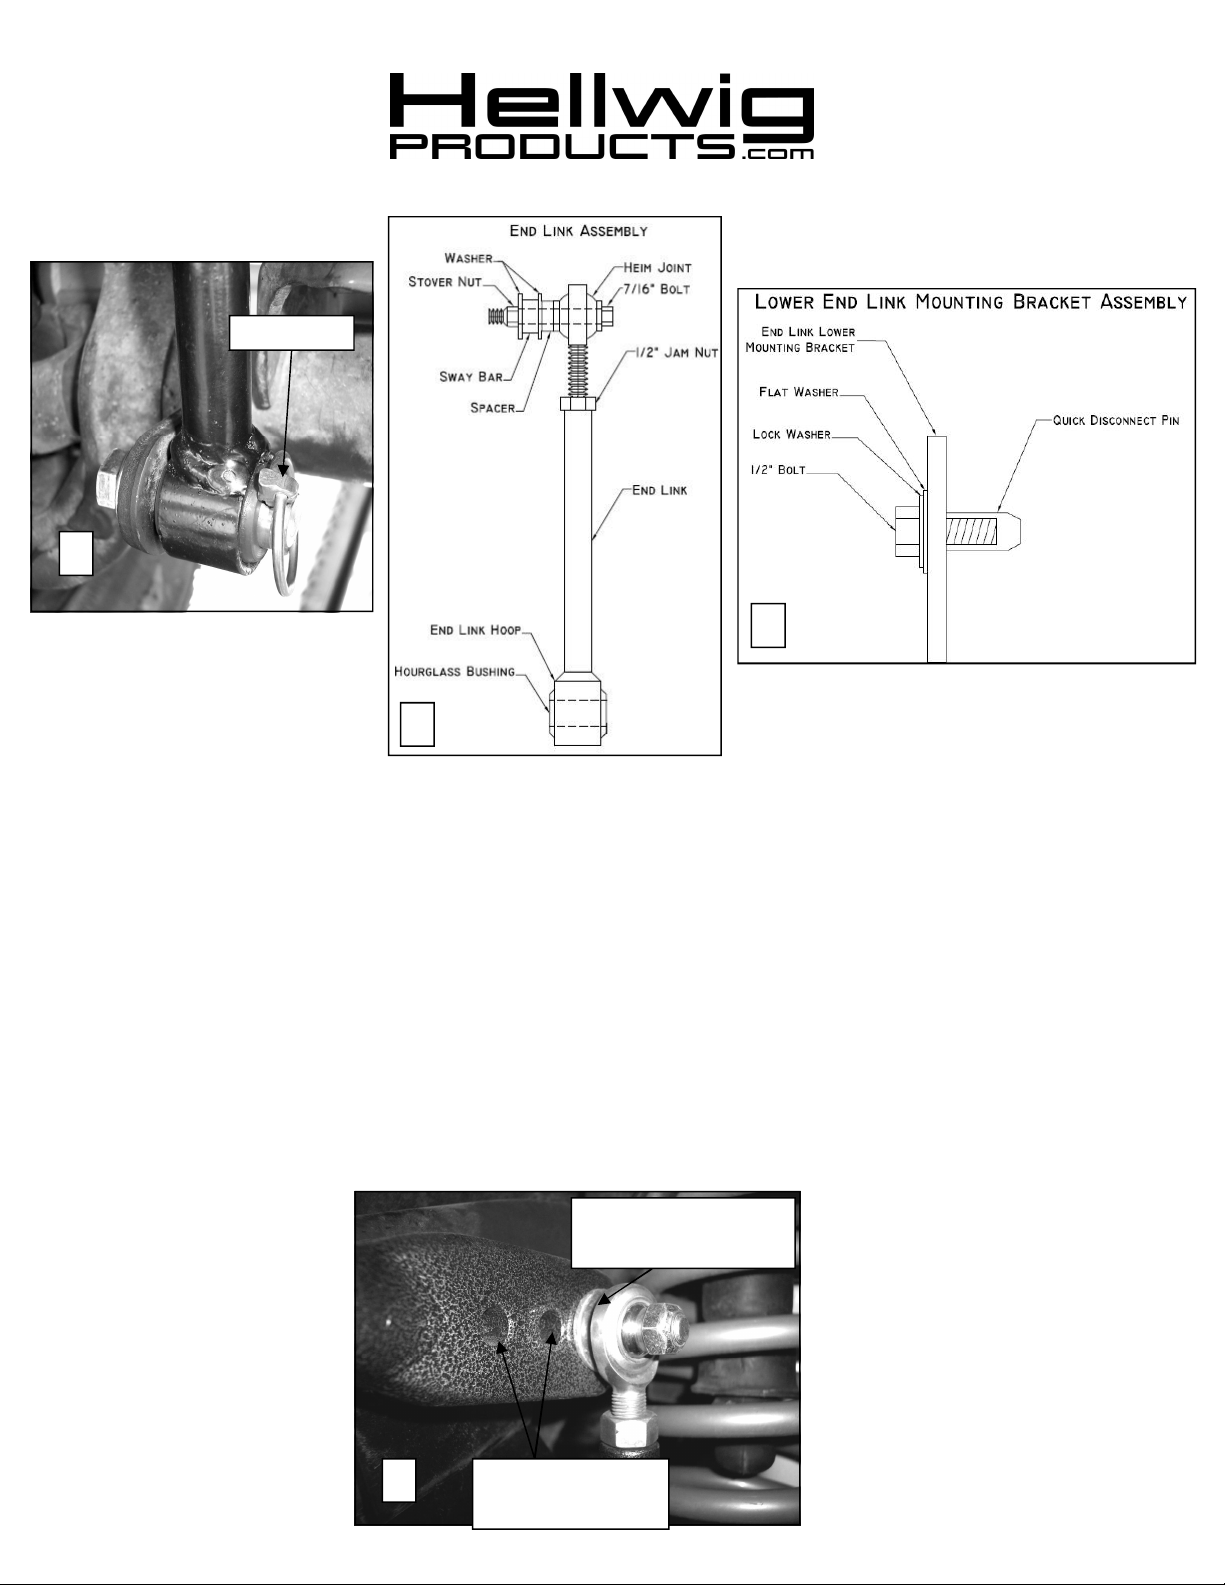
4. Remove end link bolt from axle brackets. Penetrating fluid may be necessary if the bolt is rusty. The new
end link pin will occupy the mounting hole in the axle brackets.
5. Assemble end links together as shown in Diagram 3 above. The heim joint will be threaded into the end
link with a jam nut. Lubricate the outside of the hourglass bushing and tap it into the hoop on the end link.
Leave loose at this time for later adjustment.
6. Loosely attach the rod end to the middle hole on the sway using the 7/16” bolt, washers and stover nut.
The middle hole position is for sizing the end link only, it is recommended to start with the end link attached to the outermost (softest) hole until the driver gets used to the change in ride characteristic and they
can then adjust the hole positioning for their driving style ash shown in Photo 5.
Outermost Hole for
Initial Driving
7876 ( R-7876 ) 03/15/2012
5
Inner Holes for
Stiffer Handling
Page 3
559-734-7451 800-367-5480 FAX 559-734-7460
6 7
7. Attach the quick disconnect pins to the existing lower end link mounting bracket following Diagram 4
and Photo 2 on the previous page. Use the included longer, 1/2x1-1/2” bolts. Torque bolts to 40 ft-lb. A
small Phillips screwdriver can be inserted in to the hole in the end of the pin to keep it from turning while
tightening bolt.
8. Lubricate the inside of the hourglass bushing on the end link and slide it over the quick disconnect pin.
This will be held in place with the included linch pin.
9. Lengthen or shorten the end link so the sway bar arms are parallel to the ground and make sure the bar is
centered on the frame. Once these are correct, tighten the jam nut to hold the end link in place and tighten
all other bolts following the Torque Table on Page 1.
10. Assemble the end link relocation tab following Diagram 4 on the previous page with the quick disconnect pin facing in towards the holes and using the shorter 1/2x1” bolts.
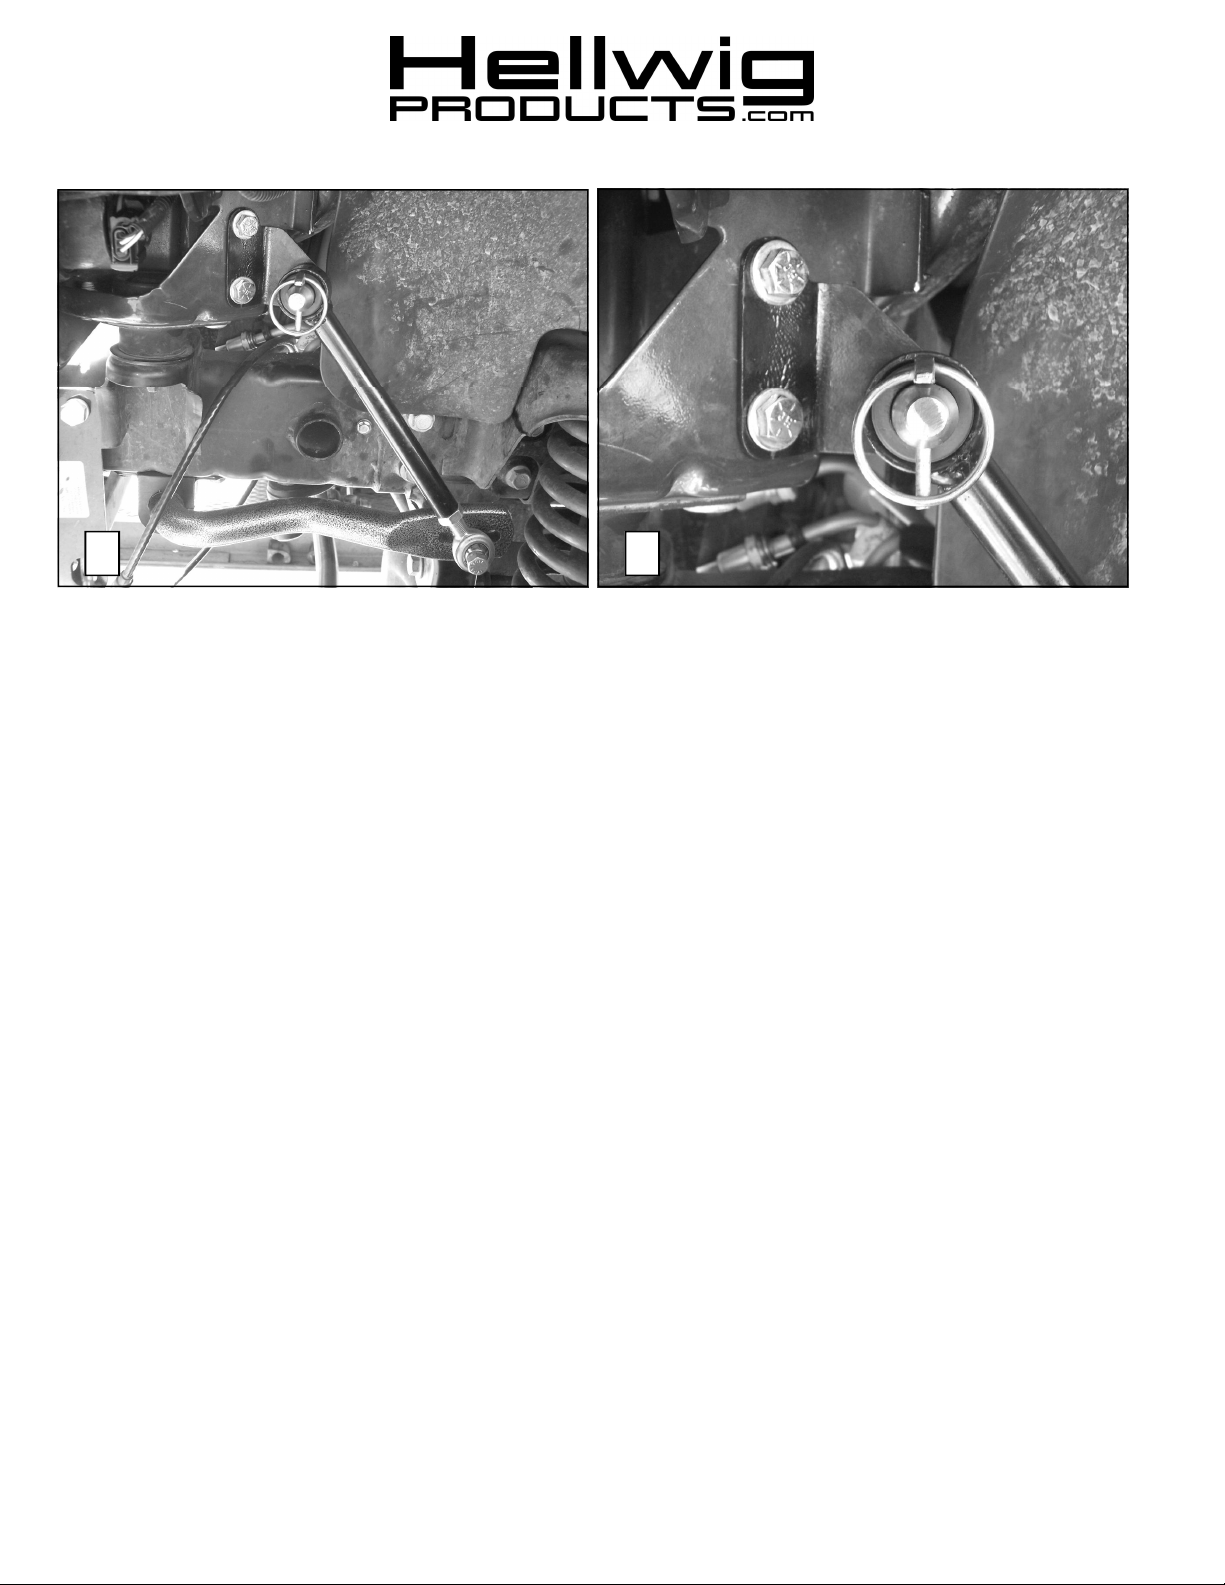
11. Disconnect the end link from the axle and attach it to this mounting tab. Swing the end link forward to
the sheet metal next to the body mount. Use the tab to mark the location for the two holes to attach it in
the same location as shown in Photos 6 and 7.
12. BEFORE DRILLING, DISCONNECTBATTERYANDVERIFY THAT DRILL WILL NOT CONTACT OR DAM-
AGE ANY BRAKE, FUEL, COOLANT LINES, BATTERY, ELECTRICAL COMPONENETS, WIRING, OR ANY
OTHER ENGINE COMPARTMENT COMPONENTS. Drill two 13/32” holes and use the included 3/8” hard-
ware to attach the relocation tab to the body. The end links can be disconnected from the axle and moved
to these locations when the vehicle is being used offroad and needs additional suspension flex. For onroad use, leave the end link attached to the axle bracket.
13. With the end link attached to the relocation tab as well as the axle bracket, bounce the vehicle checking
for clearance on all under carriage components: fuel tank, shocks, differential, brake and fuel lines, etc.
Test drive the vehicle and recheck all clearances and bolt torques. Adjust as needed. Re-check your installation after one week of driving and periodically on a regular basis.
ATTENTION INSTALLER: BE SURE THAT THE CUSTOMER RECEIVES THIS INSTRUCTION
SHEET, ALL IMORTANT NOTE CARDS AND THE WARRANTY FORM
7876 ( R-7876 ) 03/15/2012
 Loading...