

Page 1
559-734-7451 800-367-5480 FAX 559-734-7460
INSTALLATION INSTRUCTIONS
Rear Stabilizer Bar 6806
1964-1970 Ford Mustang, Mercury Cougar
Thank you for purchasing a quality Hellwig Product.
2
6806 (R-6806) 07/14/04
3
4
Page 2

559-734-7451 800-367-5480 FAX 559-734-7460
TORQUE TABLE
Bolt Size 3/8”— 35 ft lbs * Bolt Size 7/16”— 45 ft lbs* Bolt Size 1/2”—75 ft lbs *Bolt Size 9/16”— 90 ft lbs
SAFETY: BEFOREBEGINNING INSTALLATION BE SURE TO SET THE PARKING BRAKE AND CHOCK THE
WHEELS.
NOTE: TO EASE INSTALLATION AND PROPERLY ADJUST THE BAR, THE WEIGHT OF THE VEHICLE
MUST BE ON THE SUSPENSION AS IF DRIVING DOWN THE ROAD. DO NOT RAISE THE VEHICLE BY THE
FRAME.
NOTE: THIS KIT REQUIRES DRILLING THE FRAME RAIL AND POSSIBLE RELOCATION
OF FUEL AND BRAKE LINES. INSTALLER MUST ENSURE THAT THE SWAY BAR KIT
WILL NOT INTERFERE WITH ANY FUEL OR BRAKE LINES OR HOSES.
1. Lubricate the D shaped bushings and place them onto the straight areas of the bar on each side of the center hump as close to
the outside bend as possible.
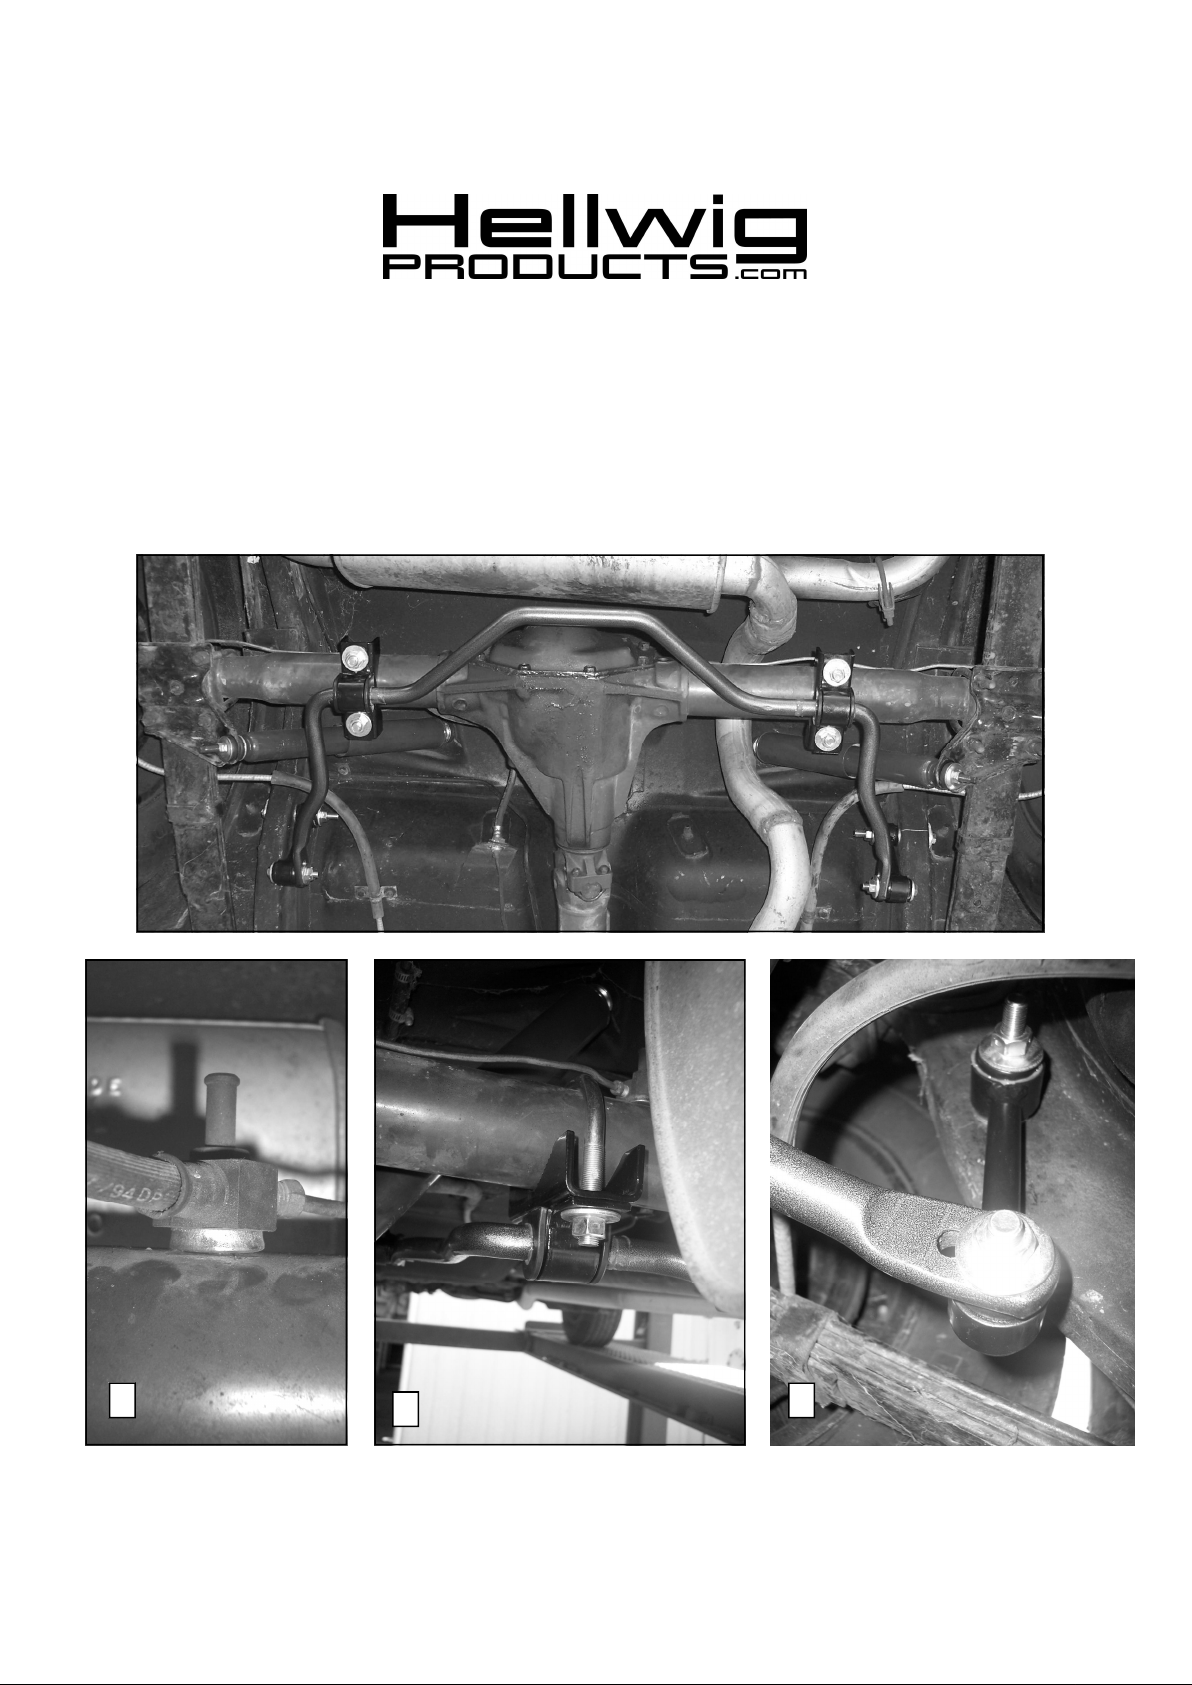
2. Disconnect vent hose from breather vent on axle. Remove the breather vent bolt from axle. Place spacer washer under
brake line tee and re attach vent bolt as shown in PHOTO 2. Reconnect vent hose.
3. Hold bar up to the axle and locate the position on the axle tubes to mount the u-bolts. Be sure to put the U-Bolts Under
Any Brake Lines, Wires or Hoses on the Axle to Avoid Any Possible Damage. The threads of the U-Bolts will point
down.
6806 (R-6806) 07/14/04
Page 3
559-734-7451 800-367-5480 FAX 559-734-7460
5 6 7
4. Place the saddle brackets onto the U-Bolts on the axle tubes. Place the U-Plates over the D shaped bushings on the bar
and attach the bar to the U-Bolts and saddle brackets with the flat washers and nuts provided. LEAVE LOOSE AT
THIS TIME to allow for adjustment later.
6. Position sway bar on axle so that it clears all frame mounted components including fuel tanks, brake lines, fuel lines, etc.
Sway bar can be rotated back and forth on axle to maximize clearance.
7. Assemble end links by inserting bushings and inner sleeve into outer sleeve of end link. Fully lubricate bushings be-
fore installation.
8. Attach end links to the outer hole of the sway bar and align end links for best fit as shown in PHOTO 4.
9. The end links should be located as shown in PHOTO 4 so that the arms of the sway bar are parallel with the ground.
When satisfied with their location, mark location of holes for the end links.
10. Prepare to jack up vehicle by placing wheel chocks on the front wheels. After the rear of the vehicle has been raised,
support frame on jack stands and remove rear wheels.
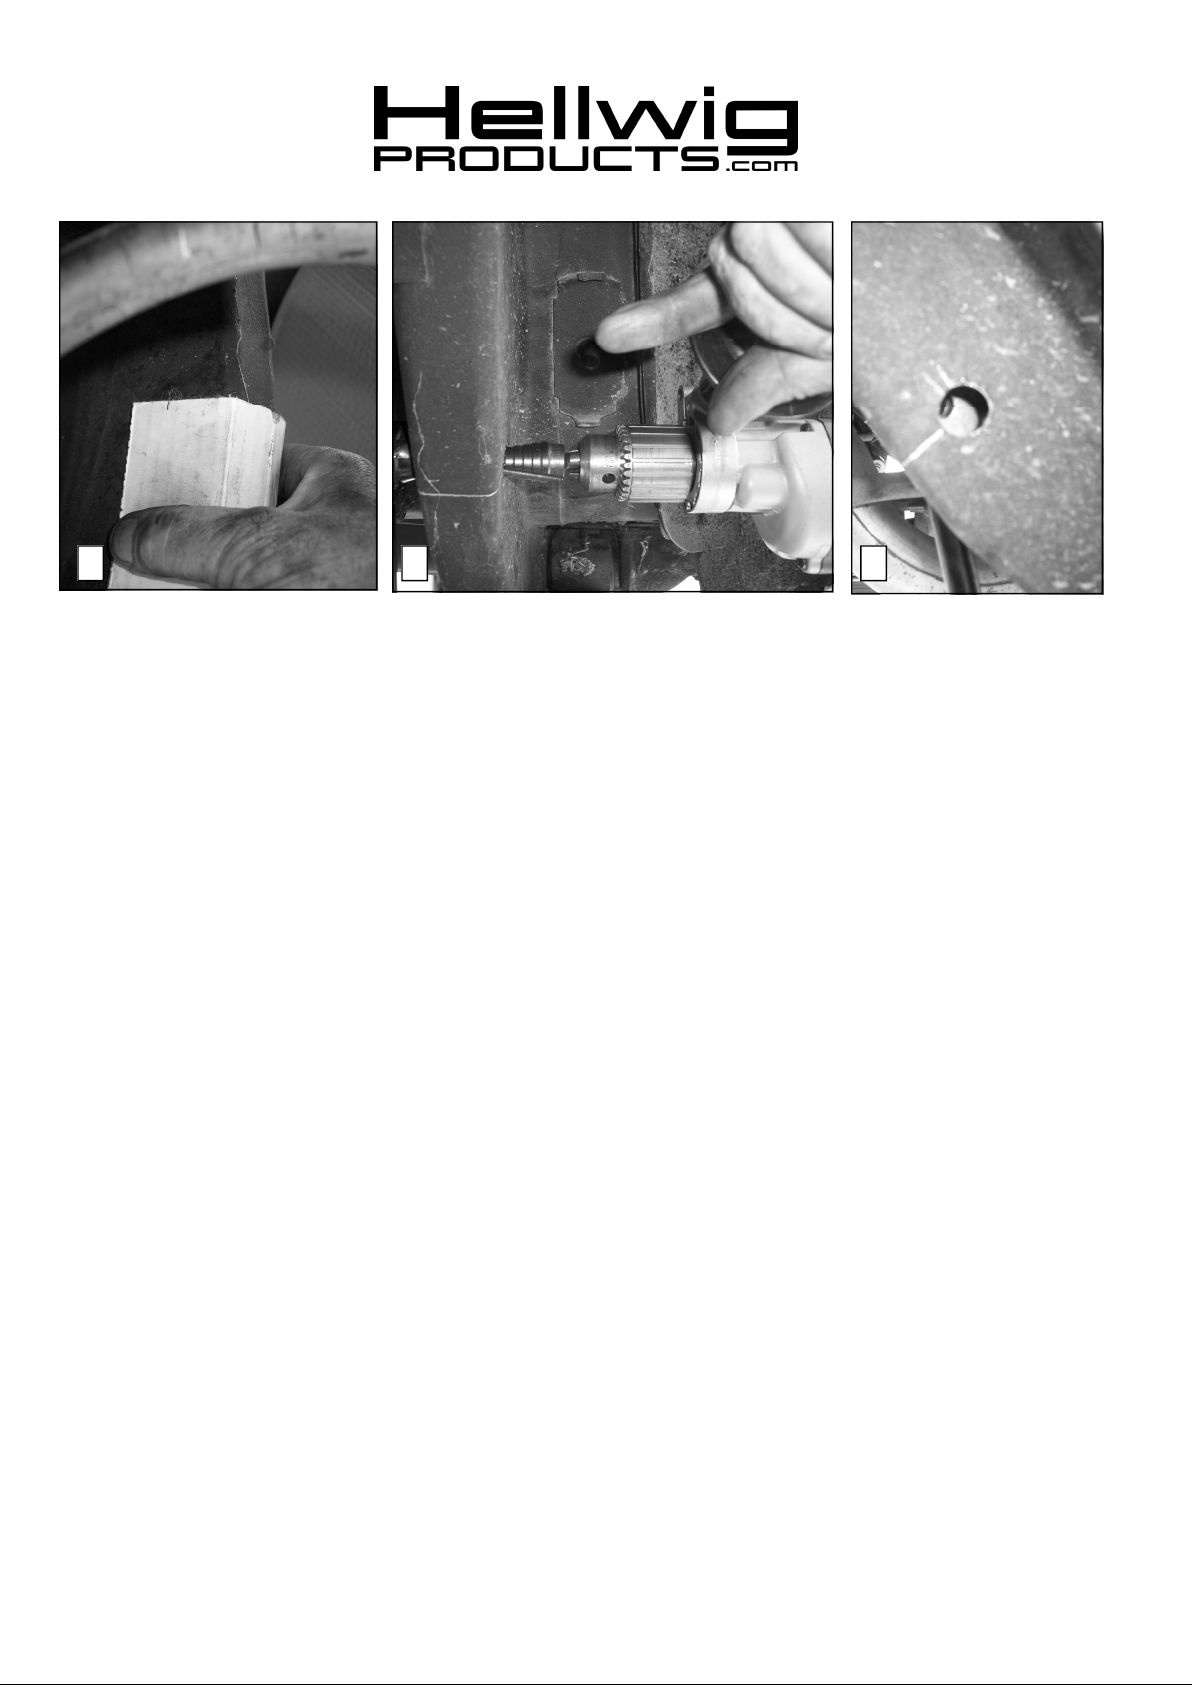
11. Transfer hole location to outer edge of subframe rail. A piece of card board can be used by marking the location of the
hole on the cardboard and transferring the location to the outer rail. Drawing a line on the subframe square to the subframe rails will keep the hole location square. See PHOTO 5,6&7.
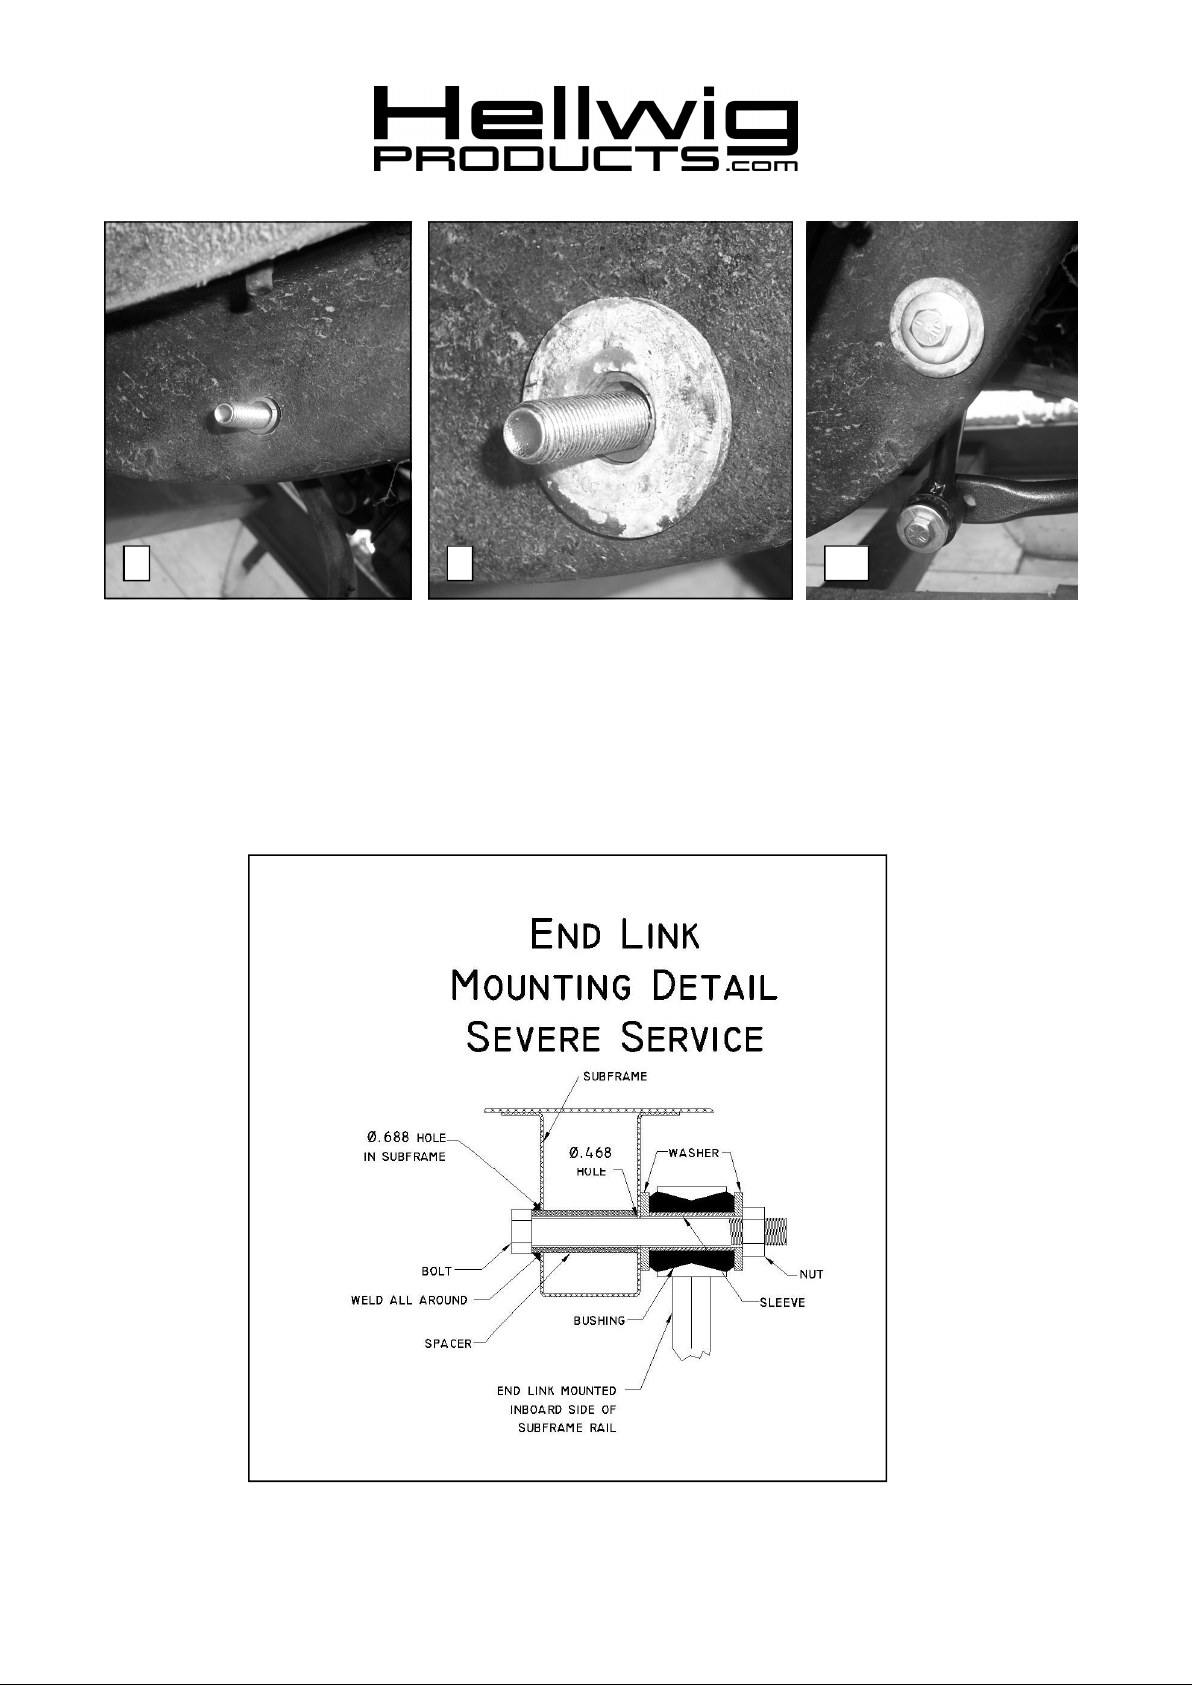
12. Review end link mounting detail before drilling holes. BEFORE DRILLING ANY HOLES IN THE RAIL—
RELOCATE AND PROTECT ANY FUEL OR BRAKE LINES THAT MAY INTERFERE WITH THE DRILL
BIT OR SWAY BAR INSTALLATION.
13. Drill a 15/32 (.468) hole through BOTH walls of the subframe. Make sure holes are square to one another when drilling
holes.
14. Drill an 11/16 (.688) hole through OUTER wall of subframe ONLY.
15. Insert 7/16 X 4-1/2 bolt through rail as shown in PHOTO 8. Insert 1.720” long spacer sleeve into hole so that it is flush
with the inboard wall of subframe. For severe duty it is recommended that the spacer tube be welded to the outer subframe wall. If the spacer is to be welded, review severe service end link detail on page 4 and skip to line 17. Ifany
welding is to be done, the installer must ensure that all hazards (fuel, electrical, etc) are eliminated and that fuel
tanks, fuel lines, brake lines, wiring, etc. are not affected by the welding operation.
16. Install Large washer over spacer tube and check that spacer tube is at least 1/32” below the surface of large washer.
Failure to do this will result in insufficient preload and noise. File or grind end of spacer tube to achieve proper length.
SEE PHOTO 9.
17. Remove bolt and spacer and attach end link to subframe as shown in detail and PHOTO 10. Applications with welded
spacer do not require the washers on the outboard side of subframe. Torque end link bolts to 35-40 ft-lb.
18. Replace rear wheels and torque lug nuts to factory specification. Lower vehicle so that the full weight of the vehicle is
on the suspension.
19. Tighten axle u-bolts to 35 ft-lb.
6806 (R-6806) 07/14/04
Page 4
559-734-7451 800-367-5480 FAX 559-734-7460
8 9 10
19. Bounce the vehicle checking for clearance on all under carriage components: fuel tank, shocks, differential, brake and
fuel lines, etc. Test drive the vehicle and recheck all clearances and the installation alignment. Adjust as needed. Re-check
your installation after one week of driving and periodically on a regular basis.
20. The sway bars arms have two mounting holes. Mounting the sway bar on the outer hole is the nominal position. For a
firmer setting, use the inner hole. We recommend starting with the outer mounting hole as in photo ( 1 ) until you are
accustomed to the vehicles new handling characteristics. Select the mounting point that best fits your driving style.
ATTENTION INSTALLER: BE SURE THAT THE CUSTOMER RECEIVES THIS INSTRUCTION
SHEET, ALL IMORTANT NOTE CARDS AND THE WARRANTY FORM
6806 (R-6806) 07/14/04
 Loading...