

Page 1
ULTRA THIN 3.2 MEGA PIXEL DIGITAL CAMERA
OWNER’S MANUAL
KT7009A
Page 2

2
Introduction
We have taken great care to make sure that this unit was in perfect working order when it left factory. It has
been designed to give you many years of enjoyment and trouble free operation. Rea d this manual before
operating this unit to become familiar with its features and obtain the performance that will bri ng you
continued enjoyment for many years.
You can use your Hello Kitty Di gital Camera to capture not onl y snaps of your family and friends, but also
video clips of them in actio n! Upload the images and vi deo clips to your PC (runn ing Windows® 98SE, ME,
2000 or XP).
Please note that your images and vide os are stored in your Hell o Kitty Digital Camera’s internal memory.
After you have taken your images and video s, the Hello Kitty Digi tal Camera will wait for certain time
(selectable by user) and then automatically switch off. A constant trickle of power from the battery keeps the
images and video stored in memory. Whe n the Battery Indicator on LCD Disp lay blinks, at this ti me all
stored images and videos must be uploaded to your computer and saved, otherwise they will be lost.
For future reference, record the serial number in the space provided.
Model Number: KT7009A
Serial Number:
Page 3

3
SAFETY PRECAUTIONS
- Before using the camera, please ensure that you read and understand the safety p recautions
described below. Always ensure that the camera is operated correctly.
- The safety precautions noted on the following pages are inte nded to instruct you in the safe and
correct operation of the camera and its accessories to prevent injuries or damage to yourself, other
persons and equipment.
WARNINGS
- Do not point the camera directly i nto the sun or at other intense light source that coul d damage
your eyesight.
- Do not trigger the flash i n close proximity to human or animal eyes. Exposure to the i ntense light
produced by the flash may damage eyesight. In parti cular, remain at least 39 inches (1 meter)
away from infants when using the flash.
- Store this camera out of the reach of children and infants. Accidental damage to the camera by a
child could result in serious injury. In addition, placement of the strap around the child’s neck could
result in asphyxiation.
- Do not attempt to disassemble or alter any part of the camera that is not expressly described in
this guide. Disassembly or al teration may result in high -voltage electrical shock. Internal
inspections, alterati ons and repairs should be only be conducted by qualified service personnel
authorized by your camera distri butor.
- To avoid the risk of high-voltage electrical sh ock, do not touch the flash porti on of the camera if it
has been damaged. Similarly, never touch internal portions of the camera that become exposed as
a result of damage. There is a risk of high-voltage electrica l shock. Please consult your camera
distributor for repair.
- Do not allow the equipment to come into contact with, or be come immersed in, water or other
liquids. Do not allow liquids to enter the interior of the camera. The camera is not waterproof. If the
camera exterior comes into contact with liquids or salt air, wipe it dry with a soft, absorbent cloth. In
the event that water or other foreign substances enter the interior, immediately turn the power off
or unplug the power cord from the electr ical outlet. Continu ed use of the equipment may result in
fire or electrical shock. Please consult your camera distributor for repair.
- Do not use substances containing alcohol, benzene, thinners or other flammable substances to
clean or maintain the equipment. The use of these substances may lead to fire or could
permanently damage the camera.
Page 4

4
CAUTIONS
- Avoid using, placing or stor ing the camera in places that ar e subject to strong sunlight or hi gh
temperatures, such as a car dashboard or trunk. Exposure to intense sunlight and heat may cause
the internal batteries to leak, overheat or explode, resulti ng in possible fire, burns or other injuries.
High temperatures may also cause the case to warp and defo rm. Ensure that there is good
ventilation when using the compact power adaptor to charge or power the camera.
- Do not store the camera in humid or dusty areas. Storage in such areas can damage the internal
circuitry and could l ead to fire, electri cal shock or other damage.
- When wearing or hol ding the camera by the strap, be careful not to drop or subject it to str ong
impacts or shocks that could lead to personal injury or possibly damage the camera.
- Be careful not to cover the fla sh with your fingers when shooting. In addition, do not touch the
surface of the flash after taking several pictures in rapi d succession. Either action co uld result in
burns.
- If your camera is used for a prolong ed period of time, the camera body may become warm to the
touch.
Preventing Malfunctions
- Avoid Strong Magnetic Fields
Never place the camera in close proximity to electric motors or other equipment generating strong
electromagnetic fields. Exposure to strong magnetic fields may cause malfunctions or cor rupt
image data.
- Avoid Condensation Related Probl ems
Moving the equipment rapidly between hot and cold temperatures may cause condensation (water
droplets) to form on the cameras external and inter nal surfaces. You can avoid this by placing the
equipment in an airtight, re-sealable plastic bag and letting it adjust to temperature changes slowly
before removing it from the bag.
- If Condensation Forms Inside the Camera
Stop using the camera immediately if you detect condensation. Continued use may damage the
equipment. Remove the SD card from the camera and wait until the moisture evaporates
completely before resuming use.
Page 5
5
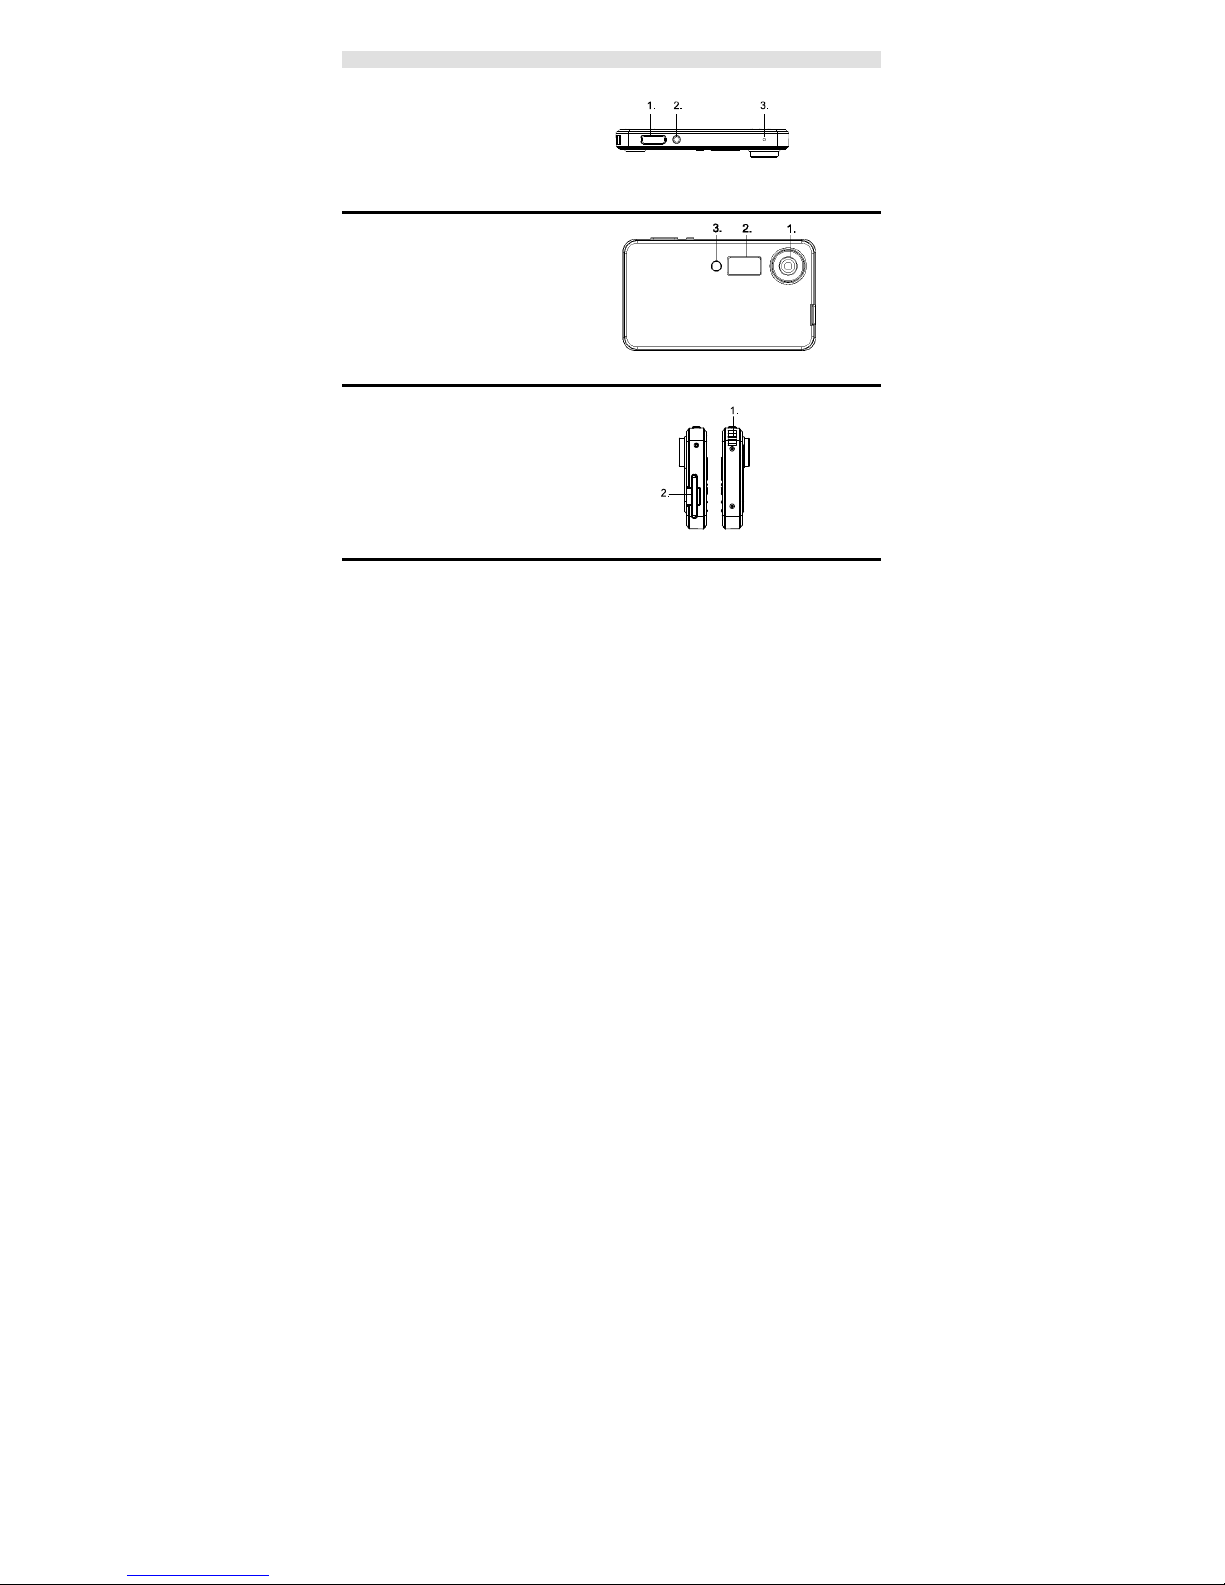
Location of Controls
Top View
1. Shutter (OK) button
2. Power On/Off Button
3. Reset Hole
Front View
1. Lens
2. Flash Strobe Window
3. Self-timer LED
Right Side
1. Strip holder
2. SD Card slot
Page 6
6
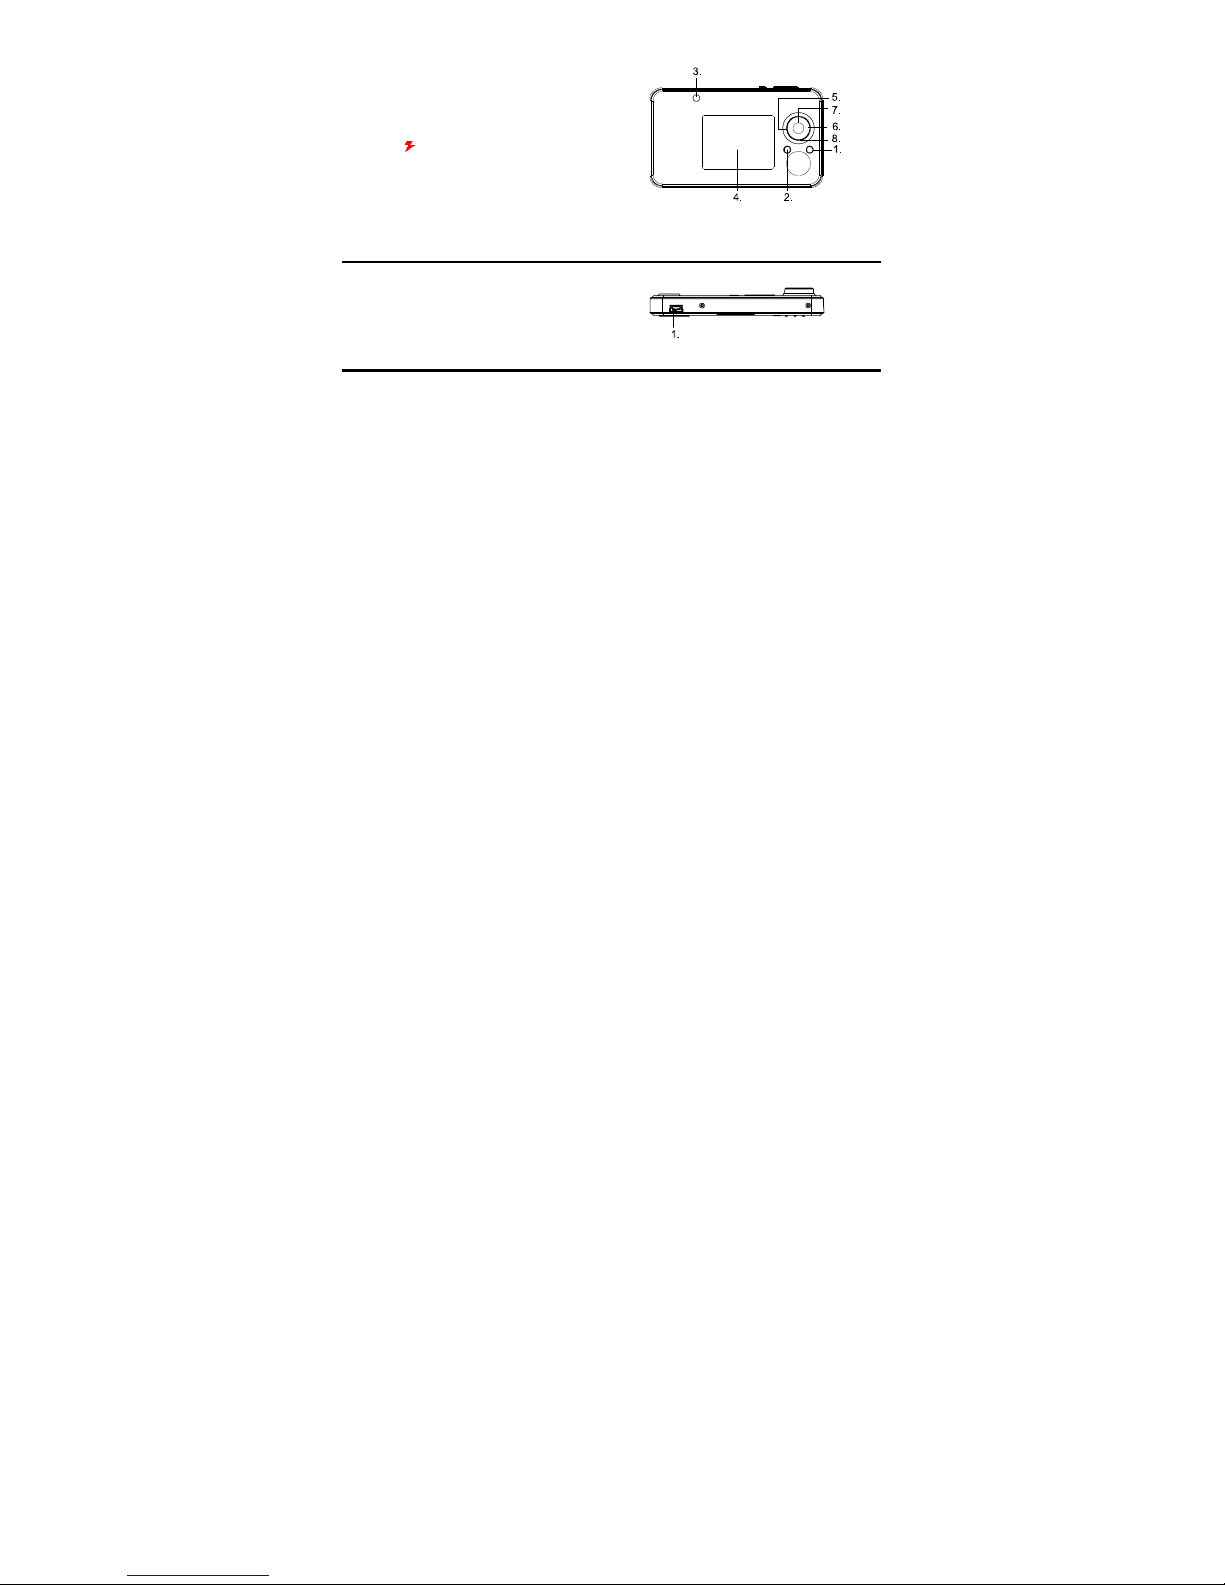
Back view
1. Mode button
2. Menu button
3. Power / Flash / Charging Status LED (Bi-color)
4. LCD Screen
5. Left ( ) key
6. Right (Disp) key
7. Up (Zoom In) key
8. Down (Zoom Out) key
Bottom View
1. USB jack
Page 7

7
Table of Contents
1. Getting Started 10
What Can I do with my Camera? 10
What can I do with my Digital Pi ctures? 10
What can I do with my Video clips? 10
Camera Package Contents 11
Insert and remove SD (Secure Digital) Card 11
Turning the Camera On and Off 12
Checking the Battery Level 12
Charging the internal Lithium Battery 12
Camera Mode Selection 13
2. Camera Settings 14
Checking Camera Status 14
Setting Date & Time 15
Setting Language 15
Format Storage 15
USB Connection 16
Setting Auto Power off 16
Setting Light Frequency 16
Setting Default 17
System Information 17
3. Taking Pictures 18
Taking a Picture 18
Taking Picture under dim light 18
Taking Pictures with Flash Strobe 18
Taking Picture with Digital Zoom 18
LCD Display ON/OFF 19
Setting Picture Quality 19
Setting Exposure Value 20
Setting White Balance 20
Setting Single / Multipl e Snapshot 21
Setting Self-timer 21
Setting Time Stamp 22
4. Recording Video Clips 23
Recording a Video Clip 23
Page 8

8
Recording Video with Digital Zoom 23
LCD Display ON/OFF 23
Setting Video Quality 23
Setting Exposure Value for Video Recording 24
Setting White Balance for Video Recording 24
5. Reviewing Pictures and Video clips 26
Thumbnail Display and Viewing 26
Viewing Pictures with Digital Zoom 26
Viewing Video Clip 26
Slide Show 27
Delete File 27
Delete ALL 28
Protect (Lock) Picture / Video fil e 28
Digital Print ordering on Printer via SD Card 28
6. Computer System Requirement 29
7. Hello Kitty Studio (For Windows® User Only) 30
How to Install Hello Kitty Studio 30
Uninstalling your Hell o Kitty Studio 30
How to Install Hello Kitty Camera Driver 30
Uninstalling Camera Driver (for Windows® Users Only) 31
How to Use Hello Kitty Studio 31
8. Installing the Software to your Computer 34
Installing the Software 34
Software Included with your Camera 36
9. Transferring Pictures and Video Clips to a Computer 37
10. Using the Camera as a Web Cam (for Windows® Users Only) 38
11. Troubleshooting Guide 39
12. Appendix 41
Regulatory Information 41
13. Specifications 42
Page 9

9
14. Care and Maintenance 43
15. Getting Help 43
Page 10

10
1. Getting Started
What can I do with my Camera?
What can I do with my Digital Pictures?
What can I do with my Video clips?
Capture
Enjoy point-and-shoot operation. Store pictures and video clips
to a SD card.
Set Up
Select various camera settings.
View
View the pictures on a computer.
Save
Save the pictures to a computer memory by Mass Storage
interface.
E-mail
Send the pictures over the Intern et to family and friends.
Playback
Application
Play back of video clips on a computer usi ng your system
default video.
Save
Save video clips to the computer memory by Mass Storage
interface.
E-mail
Send the video clips over the Internet to family and friends.
Page 11

11
Camera Package Contents
Warranty Card
USB Cable
User Manual
Carrying Case
CD-ROM
Neck strap
CDROM contains the following software:
a.) Hello Kitty Studio
b.) PC Camera Driver (for W indows ® users)
c.) ArcSoft PhotoStudio Application software. (for W indows ® users)
Inserting the SD (Secure Digital) Card
This camera has 16MB of internal memory, but it’s recommended you use a larger capacity SD card if you
would like to take more pictures and longer videos. If inserting an SD card before taking pictur es or
recording video clips, then the SD card is default storage media. Turn off the camera before inserting or
removing the SD card. Be sure to orient the card correctly when inserting it. Never try to force the SD card
into the slot when you feel resistance. The SD card has a write protect switch, which you can use to
prevent data from accidental deletion; therefore, disable the write protectio n beforehand whenever you
want to record, format or delete files in the SD card.
Page 12

12
1. Power off the camera and turn the camera SD Card slot faces you.
2. Inserting the SD card, ensuring you ori ent it correctly — please see the silkscreen beside the SD
card socket. To remove the SD card, push the SD card inside and the SD card is released from
the slot.
3. Power on the camera again and ready for picture shoot or video recording.
IMPORTANT:
The camera will be turned off automatically for pro tection if SD Card is inserted or removed when
the camera power is on.
Never insert any other object which i s not SD card into the camera’s SD card slot. Doing so will
create the risk of damaging to the camera and th e card.
Make sure that the terminals of the SD card are facing towards the same side of the LCD.
Should water or any foreign object ever get into the card slot, immediately turn off the camera and
then contact your dealer or nearest service provider.
Turning the Camera On and Off
To turn on the camera, fully press and hold the Power button until the power indicator lights up. Press and
hold the Power button again to tur n off the camera.
Checking the Battery Level
Check the battery power level befor e taking pictures.
1. Turn on the camera.
2. Check the battery status level that a ppears on the LCD screen.
Batteries have adequate power.
Batteries have only limited power to support in a short time.
When running out of battery power, the icon will blink for 5 seconds and camera will be turned
off automatically. This indicates the battery need to be r echarged.
Charging the internal Lithium Battery
A rechargeable battery is integrated in the camera. When the camera displays “ “ icon in blinking and
is turned off automatically, it means all the battery energy is used up. Please follow the following steps to
recharge the battery.
IMPORTANT:
Battery charging is active only when the camera power is switched off.
It is normal that the camera feels slightly warm while recharging the internal battery.
Page 13

13
Recharging the Battery with the USB Port of your PC:
1. Switch off the camera.
2. Connect the camera to the USB Port on your PC with the USB cable (included). The charging
indicator will light red.
3. After a period of time, the charging indicator will turn off. That means th e battery has been fully
charged.
4. Disconnect the camera from your PC and then remove the USB cable.
Note:
1. The camera will be switched off a utomatically for battery cha rging if the USB cable from PC i s
inserted when the camera power is on.
2. Please fully recharge the built-in batter y for up to 10 hours before you use the camera for the
first time after purchase. The internal battery should last for the life of the camera, but as is the case
with all rechargeable b atteries the actual charge held may decline with use.
Camera Mode Selection
Turn on the camera, press “Mode” button to the main menu of camera.
User can select the mode of camera for “Photo Snapshot”, “Video Recording”, “Photo & Video Playback”
and “Camera Configuration”.
Page 14
14
2. Camera Settings
Checking Camera Status
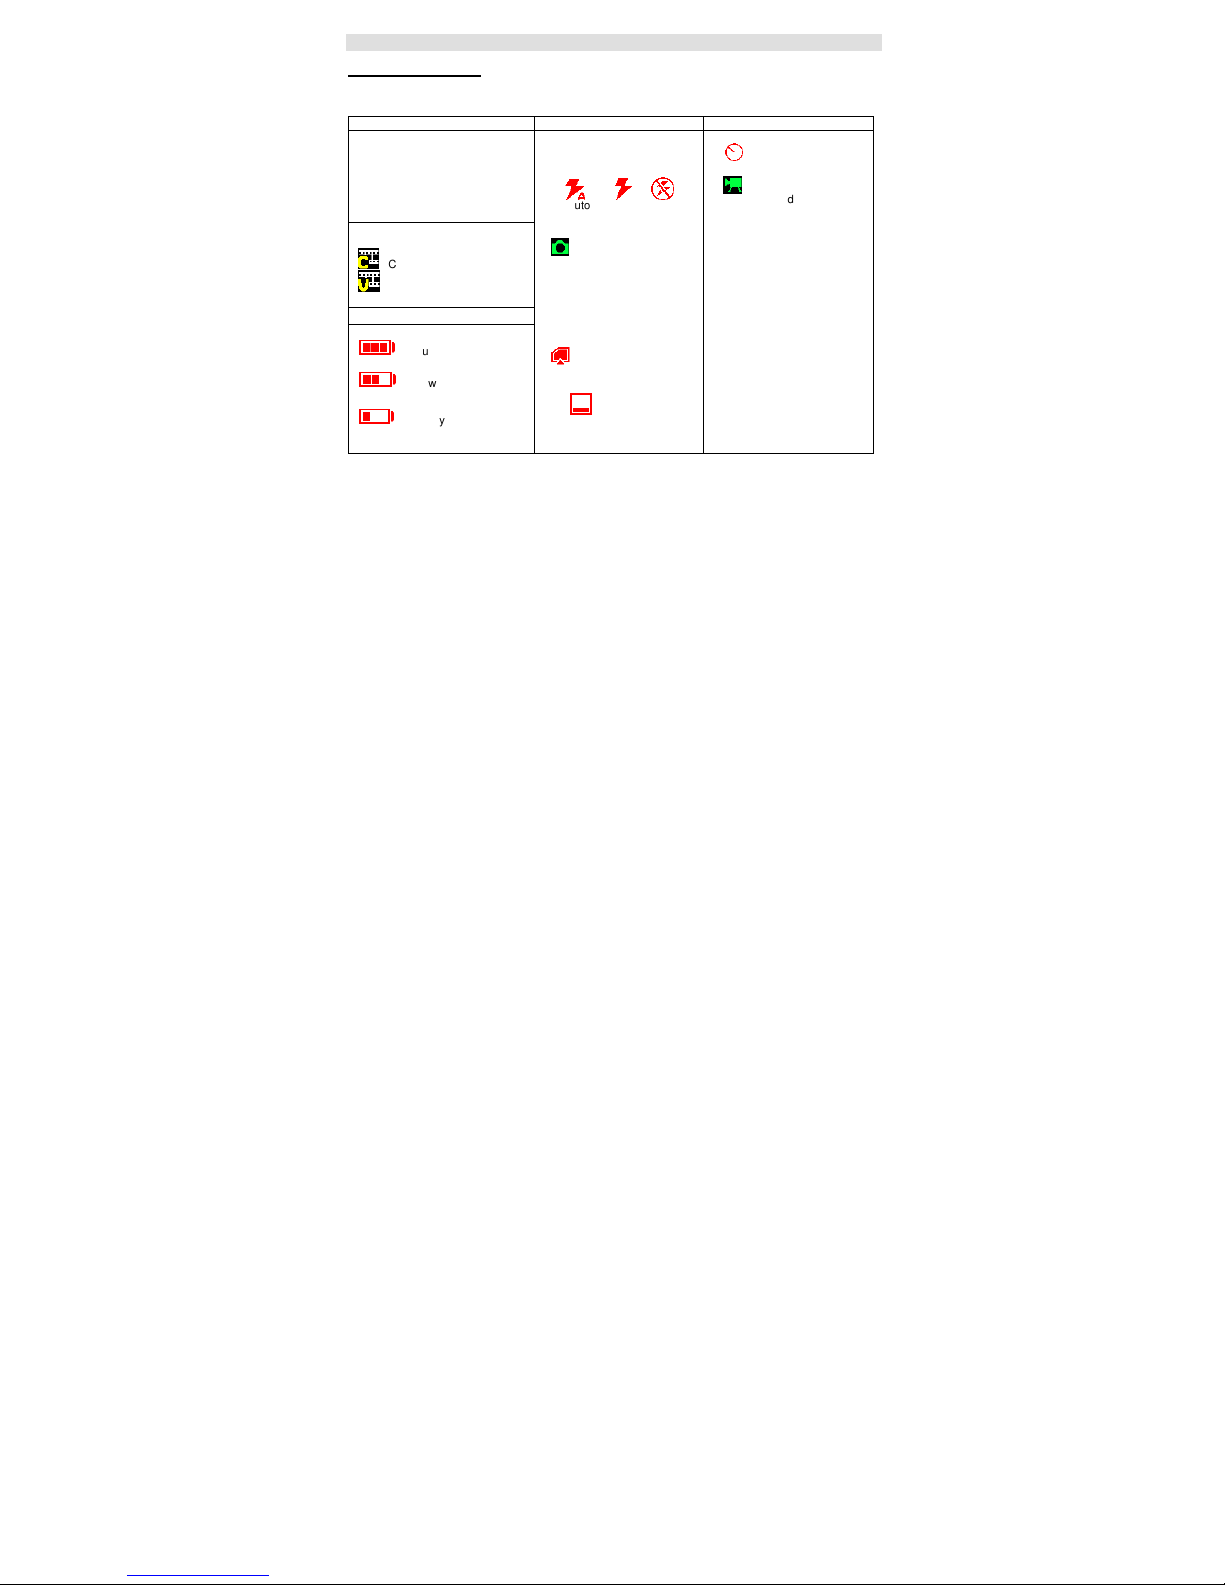
Turn on the camera, and view the camera LCD screen to check which camera settings are active. If the
feature icon is not disp layed, it means that particular fea ture is not activated.
Image Quality Camera Status Other Features
Image Resolutions
H Hi gh: 2048 x 1536
M Medium: 1600 x 1200
L Low: 800 x 600
Video Resolutions
CIF 320 x 240
VGA 640 x 480
Battery Status
Full
Low level
Empty
Flash Tube condition
Auto On Off
Photo Capture mode
1.00 ~ 4.00 Zoom in/out
SD Card inserted
0003 Pictures can be
taken
Self-timer
Video Recording mode
0015 / 0017 Number of
picture displayed
Page 15

15
Setting Date & Time
The current date and time can be recor ded, and stored with the images or video clips.
It is also be used to make Date / Time Stamp on picture.
You can change the Date & Time setting by the following steps:
Turn on the camera, press “Mode” button and select “Co nfiguration” Menu.
Select “Date & Time Setti ng”, then use “Up” and “Down” key to increase an d decrease the setting value.
Use “Left” and “Right” key to choose setting item “mm”, “dd”, “yyyy” and “hour”, “min”, “sec”.
Setting Language
Under this setting, you can sel ect the language you prefe r for the LCD screen.
(Japanese)
(Simplified Chinese)
Turn on the camera, press “Mode” button and select “Co nfiguration” Menu.
Go down to “Language”, then use “Left” and “Right” key to choose the language.
Format Storage
Formatting the SD Card or on board memory will erase all pictures and video clips, remove the SD card
during formatting may damage the card.
You can format the storage media by following steps:
Turn on the camera, press “Mode” button and select “Co nfiguration” Menu.
Go down to “Format Storage”, press “OK” button to select format storage media function. Confirm to format
start, press “OK” button. Otherwise, press “Menu” button to return menu without format.
Page 16

16
During format, the LCD displays “Fo rmatting Please Wait”.
After format, the menu is back again. In the Playback mode, LCD will show “NO IMAGE” on screen.
USB Connection
To check the available USB connection, it can be performed by fol lowing steps:
Turn on the camera, press “Mode” button and select “Co nfiguration” Menu.
Go down to “USB Connection”, the avail able USB connection is indicated on LCD.
Use “Left” and “Right” key to choose between “PC Cam” and “Mass Storage” mode for USB connection.
Setting Auto Power Off
Your camera is designed to switch off automatically after 1 minutes of inactivity. You can change the Auto
power off setting by the following steps:
Turn on the camera, press “Mode” button and select “Co nfiguration” Menu.
Go down to “Auto Power Off”, then use “Left” and “Right” key to choose “30 sec”, “1 Min”, “3 Min” or “5 Min”.
Setting Light Frequency
In order to take a better indoor picture, the camera needs to be set to suit the correct lighting frequency. Set
the frequency to 60Hz for USA and Japan, and 50 Hz for Europe and Asia.
50Hz Frequency
60Hz Frequency
Page 17

17
Turn on the camera, press “Mode” button and select “Co nfiguration” Menu.
Go down to “Light Freq.”, sele ct between “50Hz” and “60Hz” light frequency.
Setting Default
The camera settings can restore to factor y default by following steps:
Turn on the camera, press “Mode” button and select “Co nfiguration” Menu.
Go down to “Default Setting”, press “ OK” button to allow camera setting restore to factory default.
System Information
The camera firmware version can be obtained by fol lowing steps:
Turn on the camera, press “Mode” button and select “Co nfiguration” Menu.
Go down to “System Info.”, press “OK” button and the camera firmware version will be displayed.
Page 18

18
3. Taking Pictures
Taking a Picture
1. Turn on the camera and make sure it is in Capture mode. Now is ready to take pictures.
2. Frame your subject using the LCD screen.
3. Press the Shutter button to take a picture, holding the camera steadily. One beep will sound when
the picture has been taken.
Taking Picture under dim light
When the picture for shoot is not bright e nough, the picture may be captured with blur image if the camera
is held by hand. Hand shaking icon is blinking on LCD as an alert to user. Fixed the camera firmly in place,
turn camera viewing to brighter di rection or turn on flash strobe can prevent capturing with blur image.
Taking Pictures with Flash Strobe
Normally the outdoor and indoor pi ctures are taken under the “Off” flash mode as it is the default settin g.
If the background is too dark, th e user nee ds to turn the flash strobe on and off manually for background
requirement.
Turn on the camera and make sure it is in Capture mode.
Press “Left ( )” key and select between “Auto”, “On” and “Off” flash mode.
Flash mode setting will be di splayed on LCD.
Auto On Off
During flash is charging and not ready, the charging LED is blinking and LCD screen is turned off in order
for full energy chargi ng.
Taking Pictures with Digital Zoom
The camera is designed with 4x digital zoom in both still image mode and video mode. This feature lets you
zoom in on the center area of a photo an d photograph only the enl arged portion of the pi cture.
Page 19

19
Digital zoom applies to all still pictures until you manually turn it back, and can be co ntinuously in video
mode.
Zoom +
Z oom -
Turn on the camera and make sure it is in Capture mode.
Press the “Up (Zoom In)” or “Down (Zoom Out)” key to zoom in and out.
LCD Display ON/OFF
The LCD can be turned on or off manually according to the desire from user. It can save battery energy
when the LCD is turned off.
Turn on the camera and make sure it is in Capture mode.
Press the “Right (Disp)” key to turn “Disp ON with OSD”, “Disp ON without OSD” o r “Disp OFF”.
Setting Picture Quality
L M H
Picture quality depends on both its resolution and the JPEG file compression that the camera applies when
the pictu re is taken. Higher resolution make better quality which occupies more memory space. Smaller
size pictures in lower resolution are easier to email, while larger size pictures in higher resolution are better
for printing.
Turn on the camera and make sure it is in Capture mode.
Press “Menu” button and use “up”/ “down” button till the cursor on “Picture Quality” in the menu on the LCD
Screen, then use “Left” and “Right” to choose the size you prefer (800x600, 1600x1200, 2048x1536).
Here is the approximate number of pictures you can expect the camera to hold based on the 16MB NAND
FLASH Memory:
L 800x600: Low resolution approximately 116 pictures.
M 1600x1200: Medium resolution ap proximately 28 pictures.
H 2048x1536: High resolution approximately 17 pictures
Page 20

20
Note: The numbers are also be infl uenced by the complexity of the picture.
Scene complexity affects a p icture’s file size. For example, the file size of a picture with trees in
autumn is larger than that of the blue sky at the same resolution setting. Therefore, the number of pictures
you can store in the memory may vary.
Setting Exposure Value
Similar to white balance, sometimes to obtain better image qu ality, the user can use manually select the
exposure accompanied with the white balance.
Current in thi s camera, there are 9 exposure value offset levels: from -2 till +2, 0.5EV each step. To
manually select the exposure level , please do as following.
Turn on the camera and make sure it is in Capture mode.
Press “Menu” button and use “up”/ “down” button till the cursor on “Exposure Value” in the menu on the
LCD Screen, then use “Left” and “Right” to choose the EV setting you prefer. In normal condition, the EV is
set to “0”.
Setting White Balance
The sensor of the camera has different light sensitivity in different circumstances. The camera has
designed to have auto white balance function. However, it also has the feature to let the user to select the
white balance mode in daylight, cloudy, tungsten and fluorescent to get the best image quality performance.
To change the white balance mode, the user need:
Turn on the camera and make sure it is in Capture mode.
Press “Menu” button and use “up”/ “down” button till the cursor on “White Balance” in the menu on the LCD
Screen, then use “Left” and “Right” to choose “AWB”, “Sunny”, “ Cloudy”, “Tungsten”, “Fluorescent 1” and
“Fluorescent 2”.
Page 21

21
Apply “Fluorescent 1” under traditional fl uorescent lamp.
Apply “Fluorescent 2” under high intensity fl uorescent lamp.
Apply “AWB” for auto white balan ce setting or when you are not sure what i s the best option to set.
Setting Single / Multiple Snapshot
The shutter button can act as a normal shutter for single picture shooting. This camera also supports
multiple shooting by a sin gle shutter key press.
Single Snapshot
Burst Snapshot
Turn on the camera and make sure it is in Capture mode.
Press “Menu” button and use “up”/ “down” button till the cursor on “Burst Snapshot” in the menu on the
LCD Screen, then use “Left” and “Right” to choose between “Single” or “Burst” snapshot.
The multiple snapshot operates with 3 picture capturing sequentially. It supports only with 800x600
resolution picture.
Setting Self-timer
Your camera is designed with a self-timer function, which allows you to take pi ctures with built-in ti mer.
Turn on the camera and make sure it is in Capture mode.
Press “Menu” button and use “up”/ “down” button till the cursor on “Self timer” in the menu on the LCD
Screen, then use “Left” and “Right” to choose self-timer interval setting of “OFF”, “10 sec”, “15 sec” or “20
sec”.
Press “Menu” button again to e xit menu setting. Next time while taking a picture, the camera will count
Page 22

22
down the time interval after the shutter key pushed for photo taking. The Self-timer function is only applied
to next picture. When the self-timer is a ctivated, the camera beeps and the self-timer LED tur ns red and
blinks for each second during count down before the picture is taken. Please place the camera on a flat
surface or use a tripod.
Setting Time Stamp
Time Stamp can be imprinted on the picture. “Date Only” or “Date & Time” can be selected.
Turn on the camera and make sure it is in Capture mode.
Press “Menu” button and use “up”/ “down” button till the cursor on “Time Stamp” in the menu on the LCD
Screen, then use “Left” and “Right” to choose “OFF”, “Date Only” or “Date & Time”.
Time Stamp: OFF
Time Stamp: Date Only
Time Stamp: Date & Time
.
Page 23

23
4. Recording Video Clips
Recording a Video Clip
1. Turn on the camera and make sure it is in Video Recording mode. Now is ready to record video.
2. Frame your subject using the LCD screen.
3. Press the Shutter button to start video recording.
4. The recorded time appears on the LCD for recorded video.
5. Press the Shutter button again to stop the video recording if you complete, or memory full.
Before recording a video cl ip, make sure the memory has adequate free space.
Note: Audio is not included on video recording so the recorded AVI file has not audio.
Recording Video with Digital Zoom
The camera is designed with 4x digital zoom in both still image mode and video mode. This features lets
you zoom i n on the center area of video and photograph only the enlarged potion of the picture. Digital
zoom applies to all stil l pictures until you manually turn it back, and can b e continuously in video mode.
Zoom +
Z oom -
Turn on the camera and make sure it is in Video Recordi ng mode.
Press the “Up (Zoom In)” or “Down (Zoom Out)” key anytime to zoom in and o ut.
LCD Display ON / OFF
The LCD can be turned on or off manually according to the desire from user. It can save battery energy
when the LCD is turned off.
Turn on the camera and make sure it is in Video Recordi ng mode.
Press the “Right (Disp)” key to turn “Disp ON with OSD”, “Disp ON without OSD” o r “Disp OFF”.
Setting Video Quality
Higher resolution make better quality which occupies more memory space. Smaller size videos in lower
Page 24

24
resolution are easier to email, while larger si ze videos in higher r esolution are better for viewing quality.
CIF: 320x240
VGA: 640x480
Turn on the camera and make sure it is in Video Recordi ng mode.
Press “Menu” button and use “up”/ “down” button till the cursor on “Video Resolution” in the menu on the
LCD Screen, then use “ Left” and “Right” to choose between the resolution of CIF (320x240) or VGA
(640x480).
Setting Exposure Value for Video Recording
Similar to white balance, sometimes to obtain better image qu ality, the user can use manually select the
exposure accompanied with the white balance.
Current in thi s camera, there are 9 exposure value offset levels: from -2 till +2, 0.5EV each step. To
manually select the exposure level , please do as following.
Turn on the camera and make sure it is in Video Recordi ng mode.
Press “Menu” button and use “up”/ “down” button till the cursor on “Exposure Value” in the menu on the
LCD Screen, then use “Left” and “Right” to choose the EV setting you prefer. In normal condition, the EV is
set to “0”.
Setting White Balance for Video Recording
You may also set the White Balance during the Video Mode. The operation is identical to that in Capture
mode. Once the White Balance is set, it influen ces both capture mode and Video mode.
The sensor of the camera has different light sensitivity in different circumstances. The camera has
designed to have auto white balance function. However, it also has the feature to let the user to select the
white balance mode in daylight, cloudy, tungsten and fluorescent to get the best image quality performance.
To change the white balance mode, the user need:
Page 25

25
Turn on the camera and make sure it is in Video Recordi ng mode.
Press “Menu” button and use “up”/ “down” button till the cursor on “White Balance” in the menu on the LCD
Screen, then use “Left” and “Right” to choose “AWB”, “Sunny”, “ Cloudy”, “Tungsten”, “Fluorescent 1” and
“Fluorescent 2”.
Apply “Fluorescent 1” under traditional fl uorescent lamp.
Apply “Fluorescent 2” under high intensity fl uorescent lamp.
Select “AWB” for auto white balance setting or when you are not sure what i s the best option to set.
Page 26

26
5. Reviewing Pictures and Video Clips
Thumbnail Display and Viewing
Turn on the camera and make sure it is in Playback mode.
Press “OK” button to display 6 pictures of thumbnail for picture or video. Use “Up”, “Down”, “Left” and
“Right” keys to select thumbnail for playback or go to next / previous thumbnail page. The cursor on
selected thumbnail indicates icon to represent picture file or video file on the bo ttom. Press “OK” button for
picture or video viewing.
Thumbnail of Picture fil e (JPG)
Thumbnail of Video file (AVI)
Viewing Pictures with Digital Zoom
The camera i s designed with 4x digital zoom on cap tured pictures for viewing on LCD. This feature lets
you zoom in on the center area of photo a nd photograph only the enl arged portion of the pi cture.
Zoom +
Z oom -
Turn on the camera and make sure it is in Playback mode.
Select picture file vi a thumbnail as procedure stated on thumbnail display.
Press the “Up (Zoom In)” or “Down (Zoom Out)” key to zoom in and out.
Viewing Video Clip
Turn on the camera and make sure it is in Playback mode.
Select video file vi a thumbnail as procedure stated on thumbnail display.
Use “Up” and “Down” keys to select foll owing function for video p layback.
Use “Left” and “Down” keys to select previous or next picture/video fil e.
Page 27

27
Previous file (“Left” key)
Rewind
Pause
Normal playback
Fast forward
Next file (“Down” key)
Slide Show
A series of pictures can be viewed as slide sho w during playback.
Turn on the camera and make sure it is in Playback mode.
Press “Menu” button and use “up”/ “down” button till the cursor on “Slide Show” in the menu on the LCD
Screen, press “OK” button to start the picture slide show. Press any key to stop the slide show.
Note: This function cannot use on video clips. To playback the video clips, please refer
“Viewing Video Clip”.
Delete File
Picture or Video file can be deleted as following steps.
Turn on the camera and make sure it is in Playback mode.
Press “Menu” button and use “up”/ “down” button till the cursor on “Delete” in the menu on the LCD Screen,
press “OK” button to select delete file function. Confirm to delete, press “OK” button. Otherwise, press
“Menu” button to return menu without delete file.
Page 28

28
Delete All
All Picture and Video fil es can be deleted with a singl e step as described below.
Turn on the camera and make sure it is in Playback mode.
Press “Menu” button and use “up”/ “down” button till the cursor on “Dele te ALL” in the menu on the LCD
Screen, press “OK” button to select delete file function. Confirm to delete all, press “OK” button. Otherwise,
press “Menu” button to return menu without del ete any file.
Protect (Lock) Picture / Video file
File can be marked protect so as to prevent erase the file by “Delete” or “Delete All” function.
Turn on the camera and make sure it is in Playback mode.
Press “Menu” button and use “up”/ “down” button till the cursor on “Protect” in the menu on the LCD Screen,
then use “Left” and “Right” to choose protect file “ON” or “O FF”.
Digital Print ordering on Printer via SD Card
The camera supports DPOF function. User can mark the picture that is wanted for digital printing on printer
function. After marked with digital print, the SD Card can be inserted into the printer that supports DPOF
function for digital pr int only on those fil e marked with digital print “ON”.
Turn on the camera and make sure it is in Playback mode.
Press “Menu” button and use “up”/ “down” button till the cursor on “Print” i n the menu on the LCD Screen,
then use “Left” and “Right” to choose file for digital print order “ON” or “OFF”.
Page 29

29
6. Computer System Requirement
For acceptable picture transfe r and editing, foll owing minimum requirement is recommended:
For Windows Users (PC)
• Compatible with Microsoft® Windows® 98SE, ME, 2000 or XP
• Pentium IV 1.2GHz or equivalen t processor
• USB port
• 128MB RAM (256M recommended)
• 600MB free disk space
• 24 bit true colo ur graphic capability o r above
• CD-ROM drive
• Standard mouse and keyboard
Page 30

30
7. Hello Kitty Studio (For Windows® User Only)
IMPORTANT:
Please backup all the necessa ry data before any driver/software install ation.
Our CD-ROM is tested and recommended to use under Engli sh Windows OS.
MAKE SURE YOU INSTALL ALL THE SOFTWARE FROM THE CD SUPPLIED BEFORE YOU
CONNECT YOUR CAMERA TO A COMPUTER.
If the computer requests you to i nsert the windows set up CD during the software installation, place
the Windows CD into the computer CD-ROM drive. The computer will install the necessary files from
the CD automatically. After the installation is completed, remove th e Windows setup CD and stored
safely.
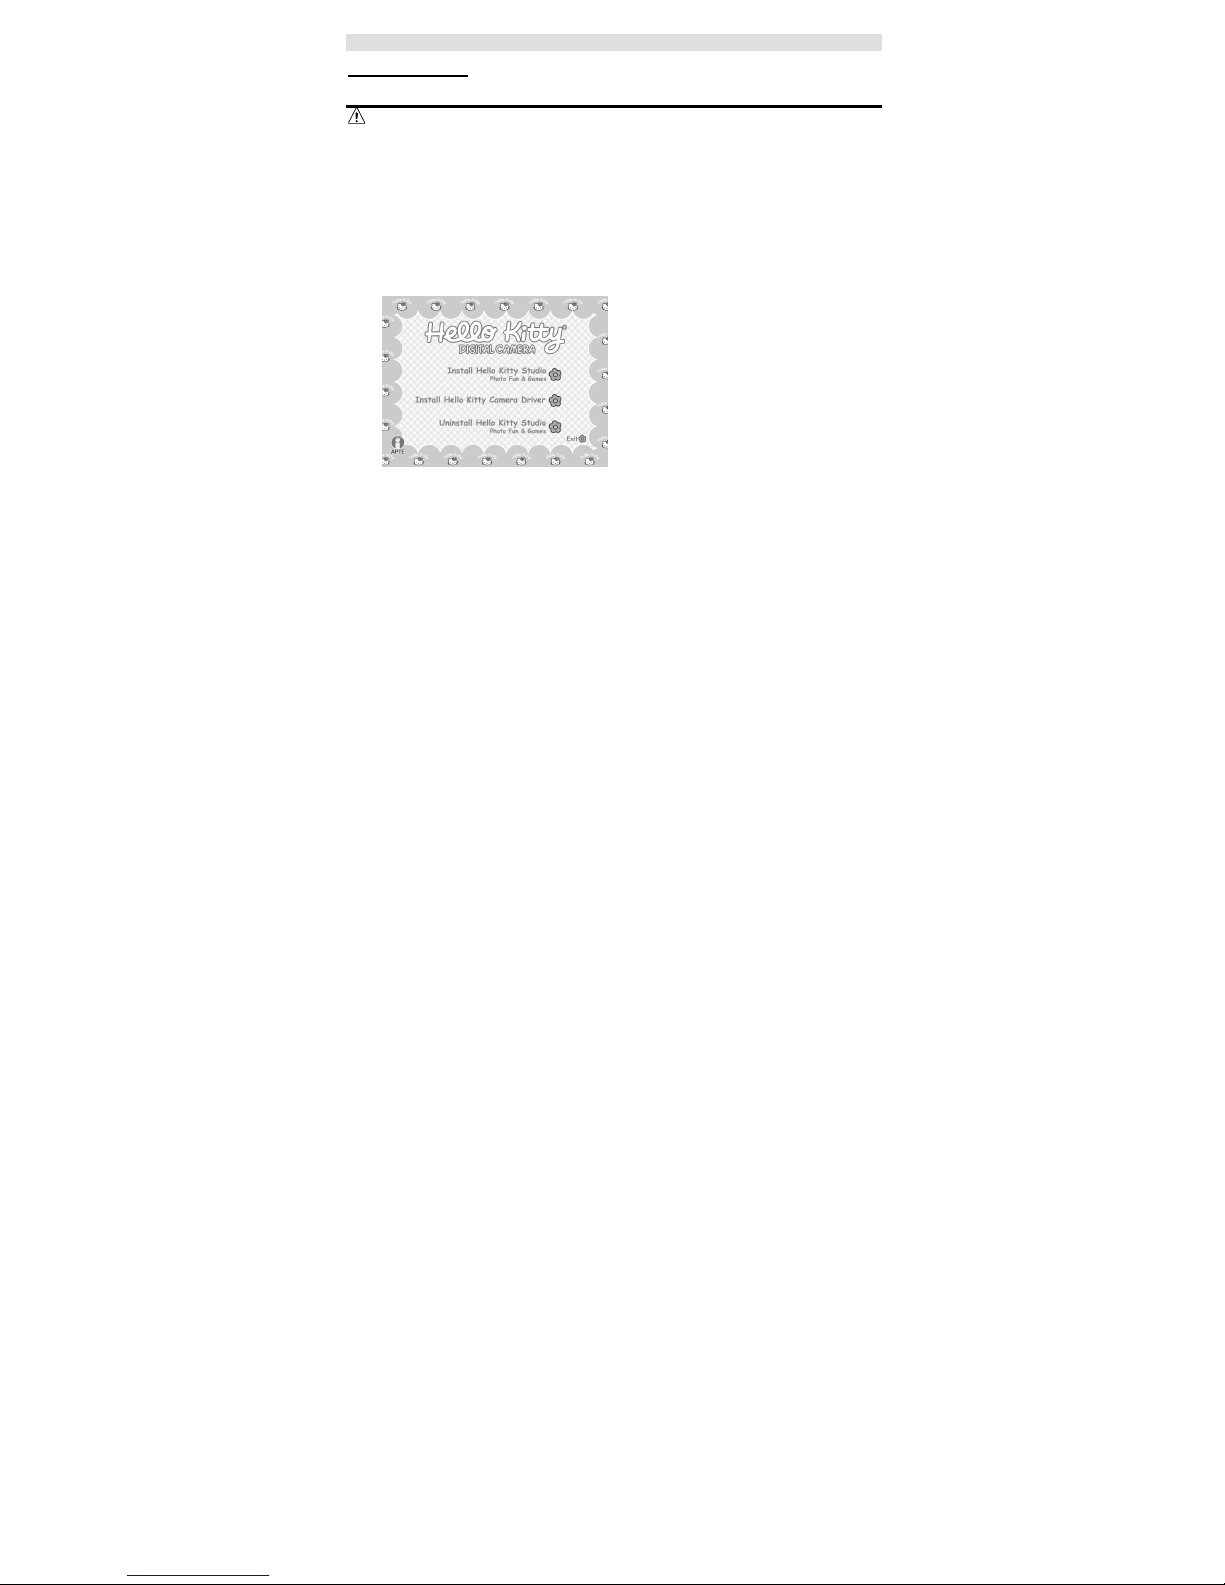
How to Install Hello Kitty Studio
1. Insert the CD-ROM disc into the CD-ROM drive and close
the CD-ROM drawer.
2. Installation wizard will automatically launch.
3. Click the “Install Hello Kitty Studio Photo Fun & Games”
icon.
4. Follow the instructions presented on the screen to
complete the installation.
5. Click “OK” to complete the installati on wizard.
Uninstalling your Hello Kitty Studio
1. Re-insert the CD-ROM disc into the CD-ROM drive an d close the CD-ROM drawer.
2. Installation wizard will automatically launch.
3. Click the “Uninstall Hello Kitty Studio Photo Fun & Games” icon.
4. Follow the instructions presented on the screen to uninstall the Hello Kitty Studio.
5. Click “OK” to complete the uninstalli ng wizard.
How to Install Hello Kitty Camera Driver
1. Insert the CD-ROM disc into the CD-ROM drive and close the CD-ROM drawer.
2. Installation wizard will automatically launch.
3. Click the “Install Hello Kitty Camera Driver” icon.
4. Follow the instructions presented on the screen to complete the install ation.
5. Click “OK” to complete the installati on wizard.
6. Restart the computer.
Page 31
31
Uninstall Camera Driver (for Windows® Users Only)
1. Unplug the camera from your PC
2. Go to Windows® Control Panel
3. Double click Add/Remove programs
4. In Add/Remove programs, select “STK014_V2.01” and click the r emove button.
5. Restart the computer.
How to Use Hello Kitty Studio
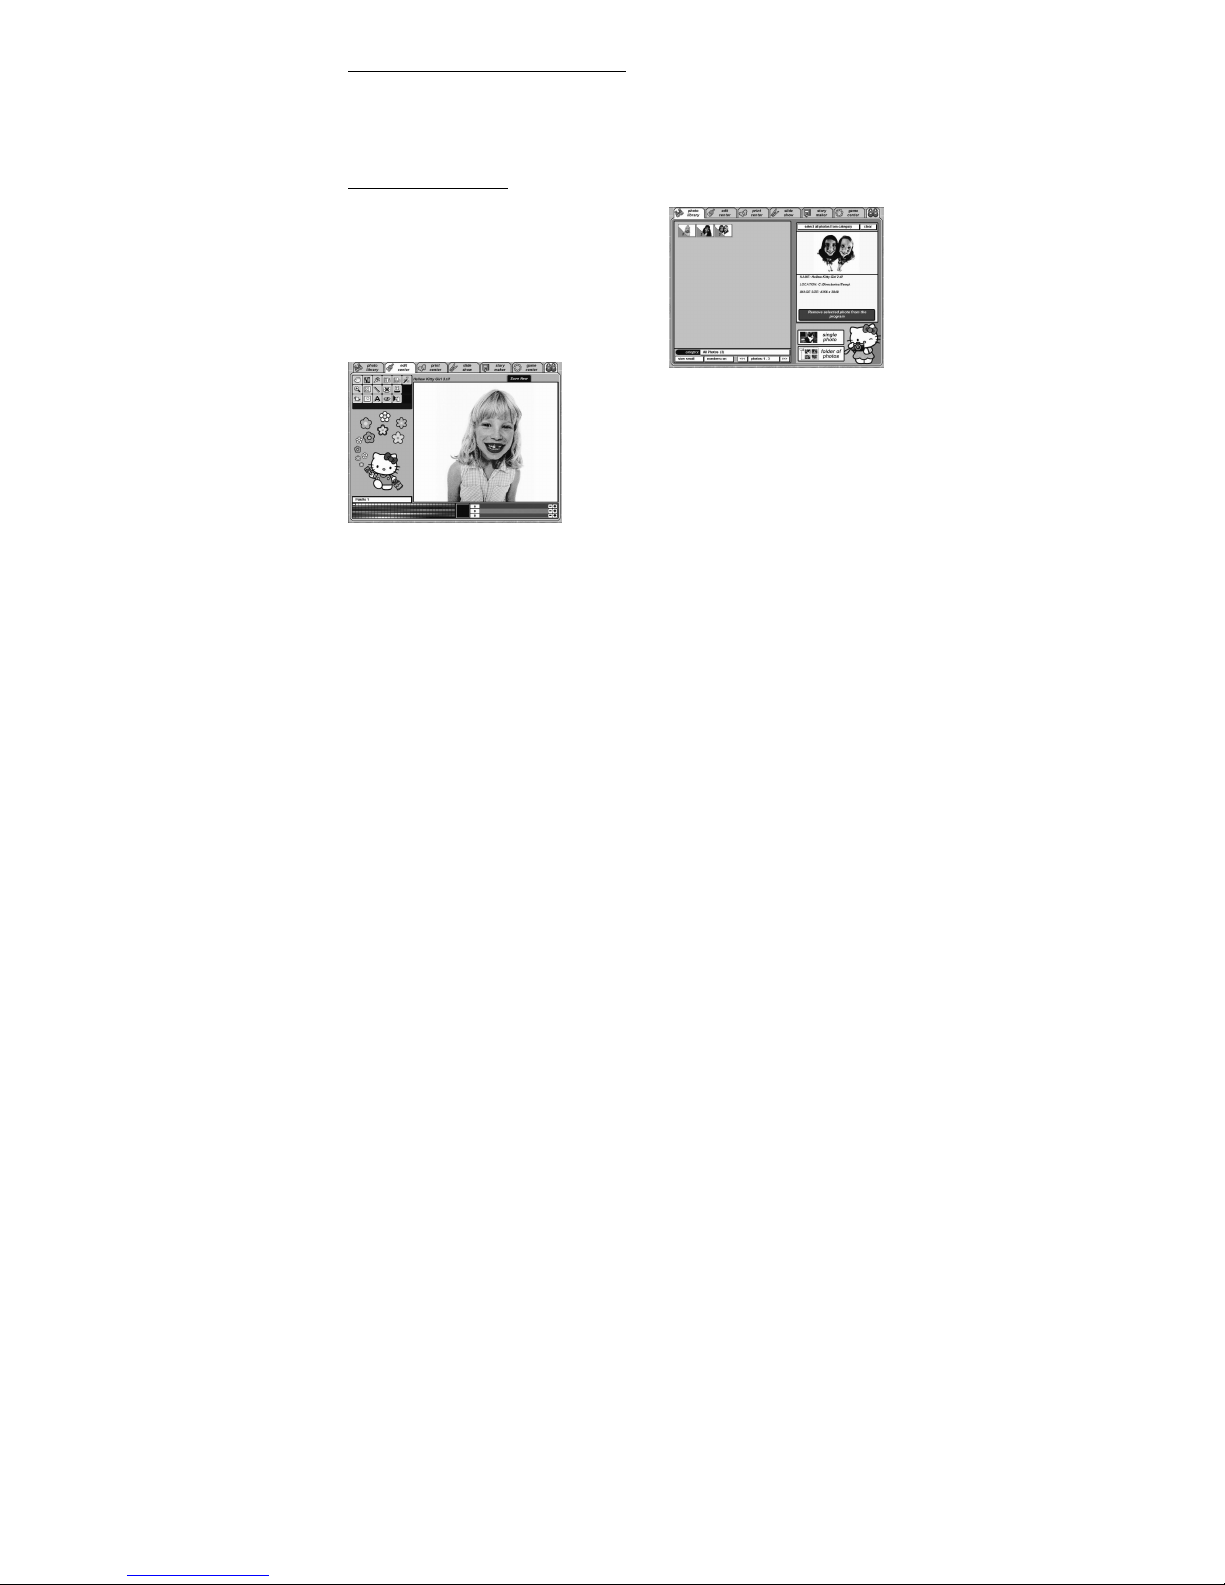
Photo Library
Use the photo library to manage your photos. Use the import
buttons to select and import photos into the Hello Kitty Studio
program.
When photos are i mported, they are organized by catego ry.
The categories correspond to the name of the folder where
the original photo r esides.
Once photos are imported, you can sele ct one or more
photos for editing or pr inting.
Edit Center
Use any of the 18 editing tools to modi fy your photo. Then
save your edited photo for future use in the Hello Kitty
Studio.
Note:
Your original photo will not be altered when you use the edit
center.
Page 32
32
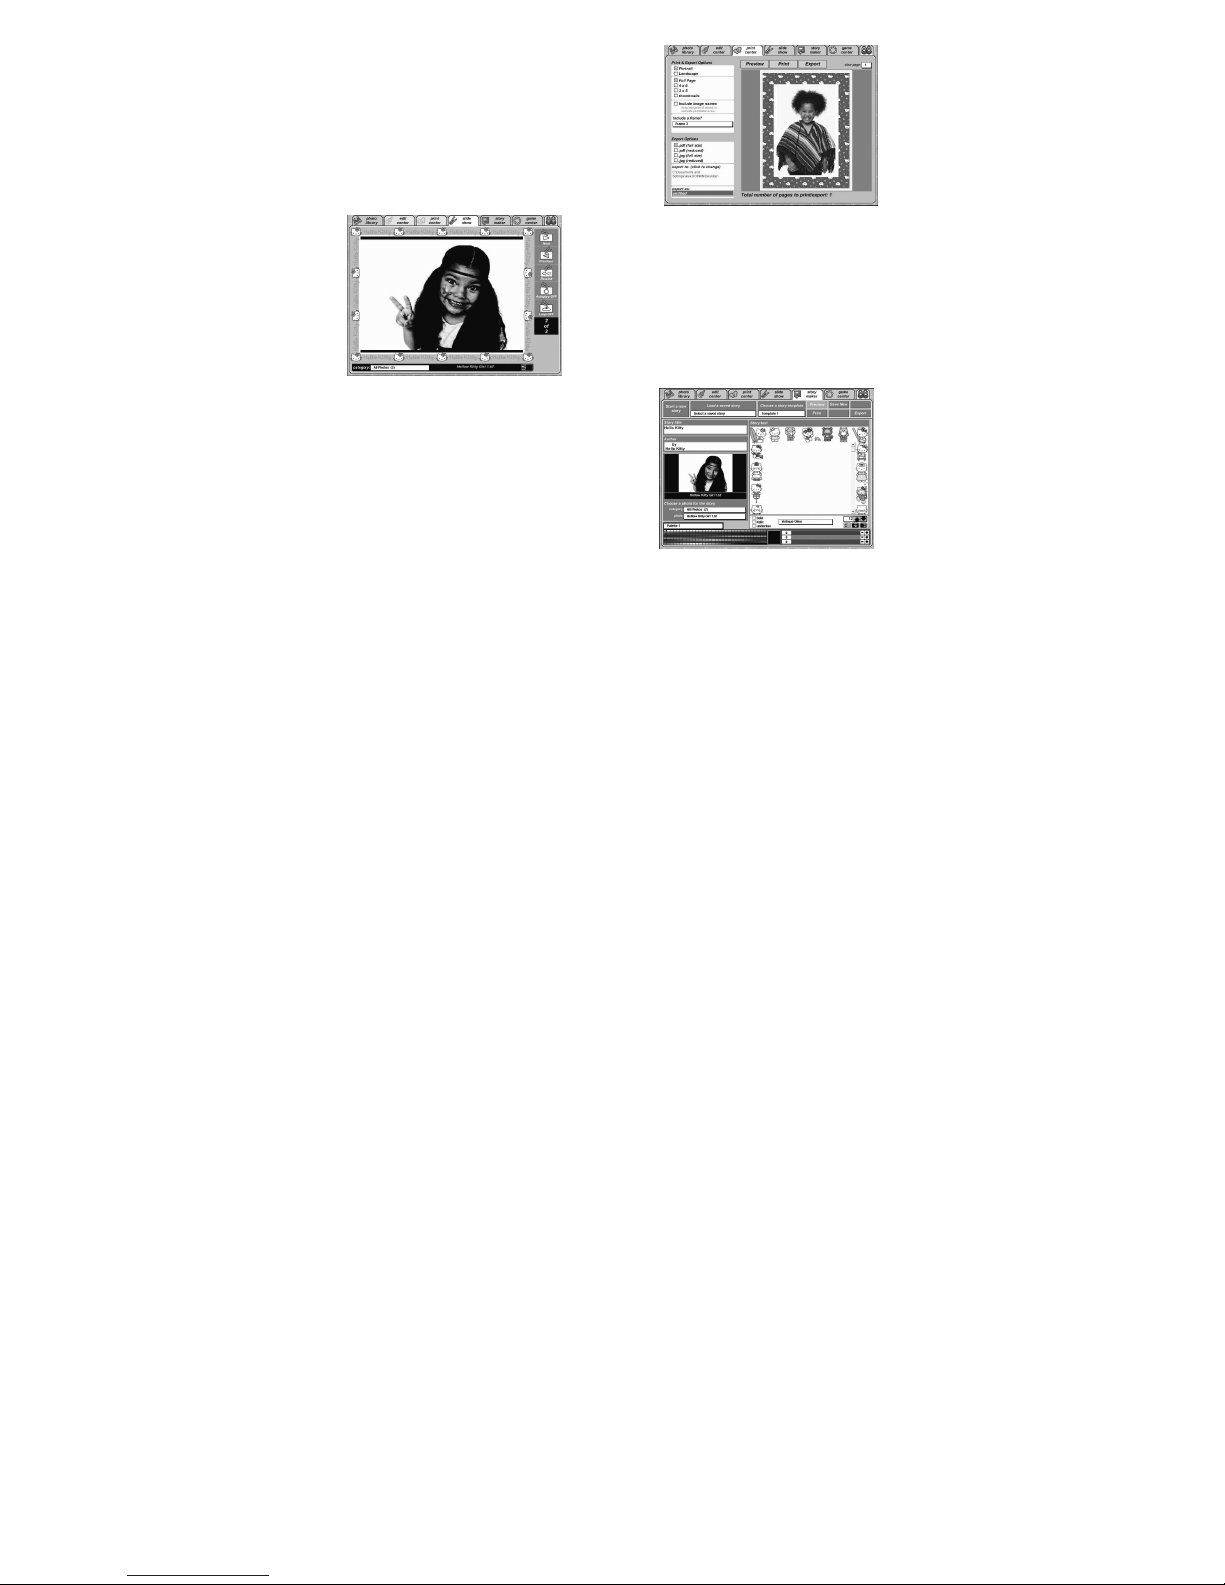
Print Center
Select one or more photos from the Photo Library, then go
to the print center to pri nt or export them.
Hello Kitty Studio offers several printing formats and print
options including layouts, image names and photo frames.
Use the export option in the print center to save a copy of
the photo to your computer in .jpg or .pdf format. Choose the
reduced option to create a smaller file that works better with
e-mail.
Slide Show
Select a category of Hello Ki tty Studio photos for a sli de
show. Page through the photos one by one, or select the
auto-play option to di splay the photos automatically.
Story Maker
Create a story using your Hello Kitty Studio photos. Then
save your story or export it to your computer as a .jpg
or .pdf file. Choose from 5 colorful Hello Kitty templates.
Page 33

33
Game Center
Play 5 great games that use your photos in the game!
Choose from Pixel Paddle, Photo Jigsaw, Click Flip,
Shutter Bug or Photo Tiles.
Page 34
34
8. Installing the Software to your Computer
Installing the Software
For Windows® Users:
IMPORTANT:
Please backup all the necessa ry data before any driver/software install ation.
Our CD-ROM is tested and recommended to use under Engli sh Windows OS.
MAKE SURE YOU INSTALL ALL THE SOFTWARE FROM THE CD SUPPLIED BEFORE YOU
CONNECT YOUR CAMERA TO A COMPUTER.
If the computer requests you to i nsert the windows set up CD during the software installation, place
the Windows CD into the computer CD-ROM drive. The computer will install the necessary files from
the CD automatically. After the installation is completed, remove th e Windows setup CD and stored
safely.
1. Before you begin, close al l other software applications o pen on your computer.
2. Insert the CD supplied int o the CD-ROM drive.
3. Click “Exit” to quit the auto run “Hello Kitty Studio”.
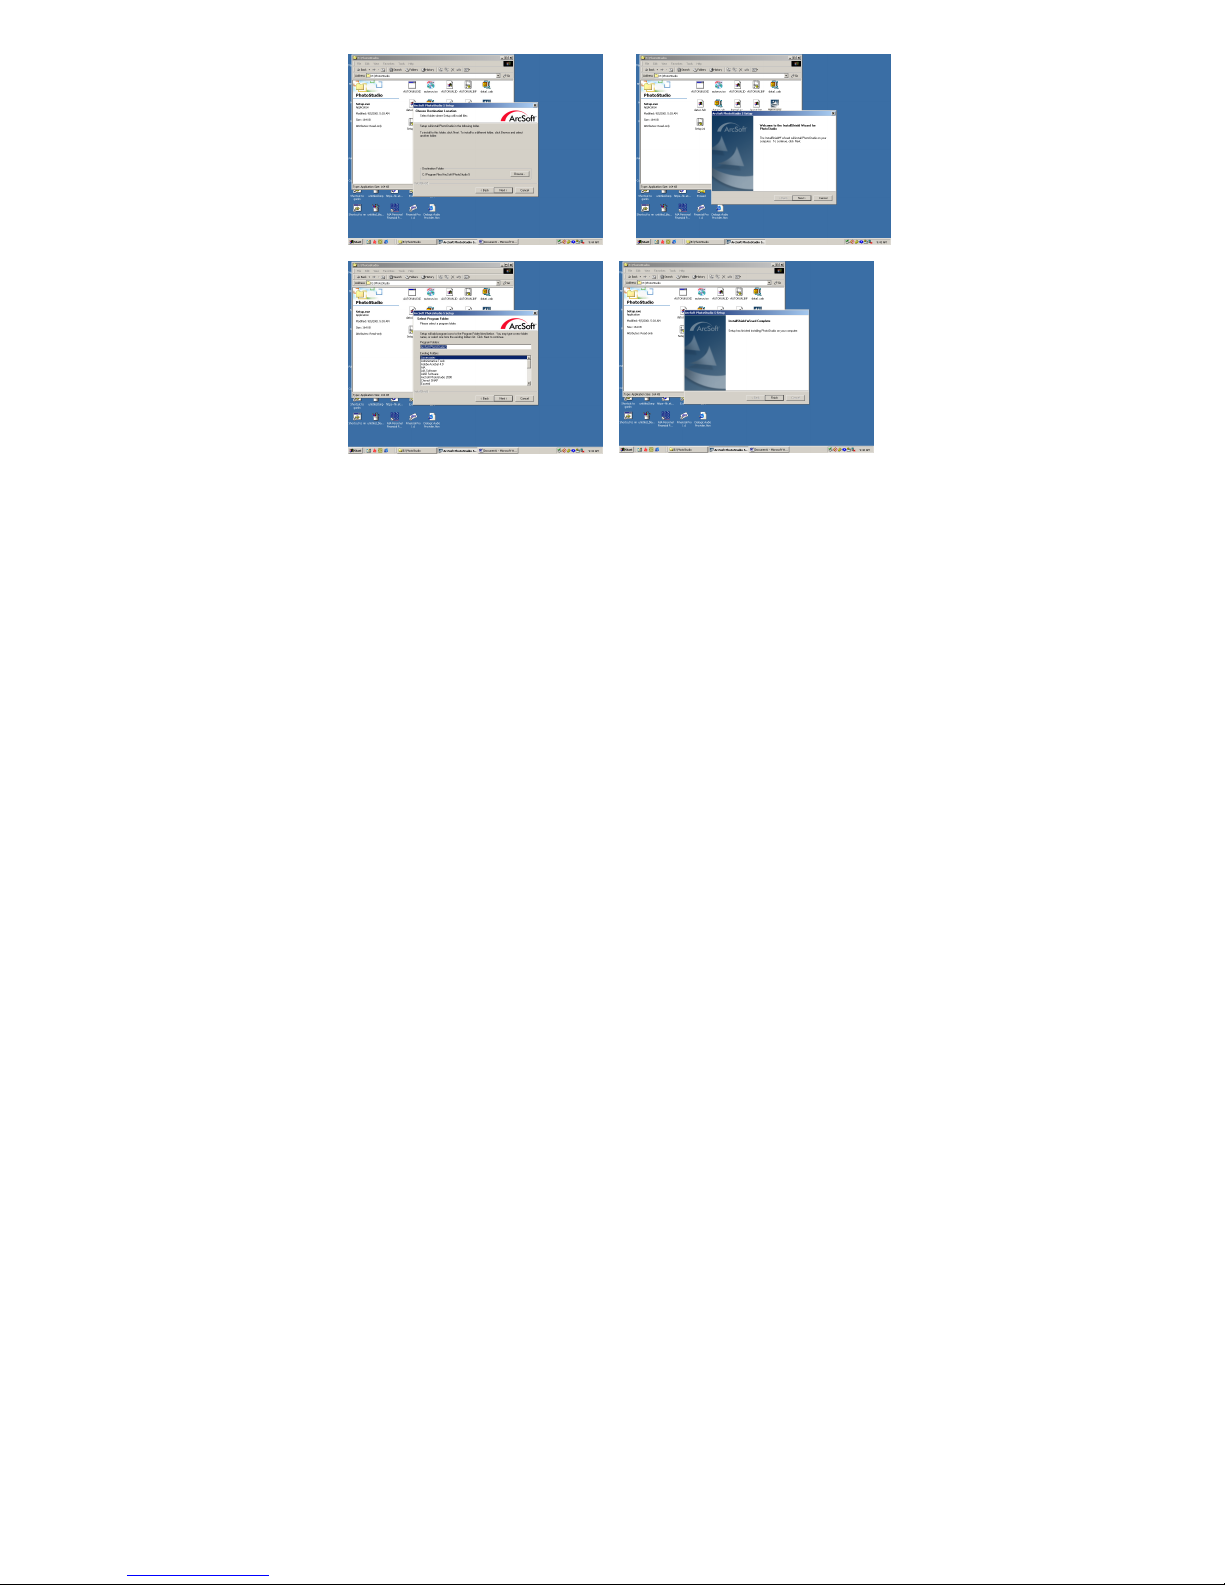
4. Double-click the “Setup.exe” under “Photostudio” folder to start setup progress of the software
and follow the on screen instructions till “Finish” choice on the screen. Please see the following
graphs.
Page 35
35
5. Click “Finish” to co mplete the installation of the software.
Page 36

36
Software Included with your Camera
The software CD contains the following software:
1. PC Camera Driver (For Windows® Use rs Only)
This is a MS Windows dri ver for the camera. After installing this driver and restarting W indows, the digital
camera can be used as a PC webcam function. It can link with common video capturi ng software.
2. Arcsoft PhotoStudio® 5
Arcsoft PhotoStudio® 5 is a full-featured, easy to use digital-editing program that provide s a complete set
of photo editing and retouching tools, pl us a wide selection of special effects and enhancements, its
powerful include a wide variety of input and output options, layers, mul tiple undo and redo functions, image
management tools, editable text, multiple file format support and a lot more.
3. Hello Kitty Studio (For Windows® Users Only)
Hello Kitty Studio is designed for your complete Hello Kitty experience; you can print, email and share your
Hello Kitty digital cr eations!
Page 37

37
9. Transferring Pictures and Video Clips to a Computer
1. Make sure the USB Connection under the “Configurati on” Menu has been set to “Mass Storage”
mode. Otherwise, change it to “Mass Storage” according to the procedure described i n “Camera
Settings” chapter. Turn OFF the power of camera.
2. Connect USB cable to your computer USB port.
3. Connect other end of USB cable to the camera while the camera is power OFF.
For Windows Users (PC)
1. Turn on the camera and LCD displays a mass storage drive icon:
2. System will automatically recognize a MASS STORAGE drive.
3. Double click on “My computer” icon on your desktop and then you can see a “Removable Disk” drive
4. Double click on “Removable Disk” ->Double click on “DCIM”-> Doubl e click on “100CRESI”
5. Double click on the images or vi deos to view.
All the pictures and video clips are in the 100CRESI folder. Highlight the pictures and video clips that you
choose and drag them into a folder of your choice. You can also create sub-folder to group them or use the
image processing software to edit and manage pictures.
Page 38
38
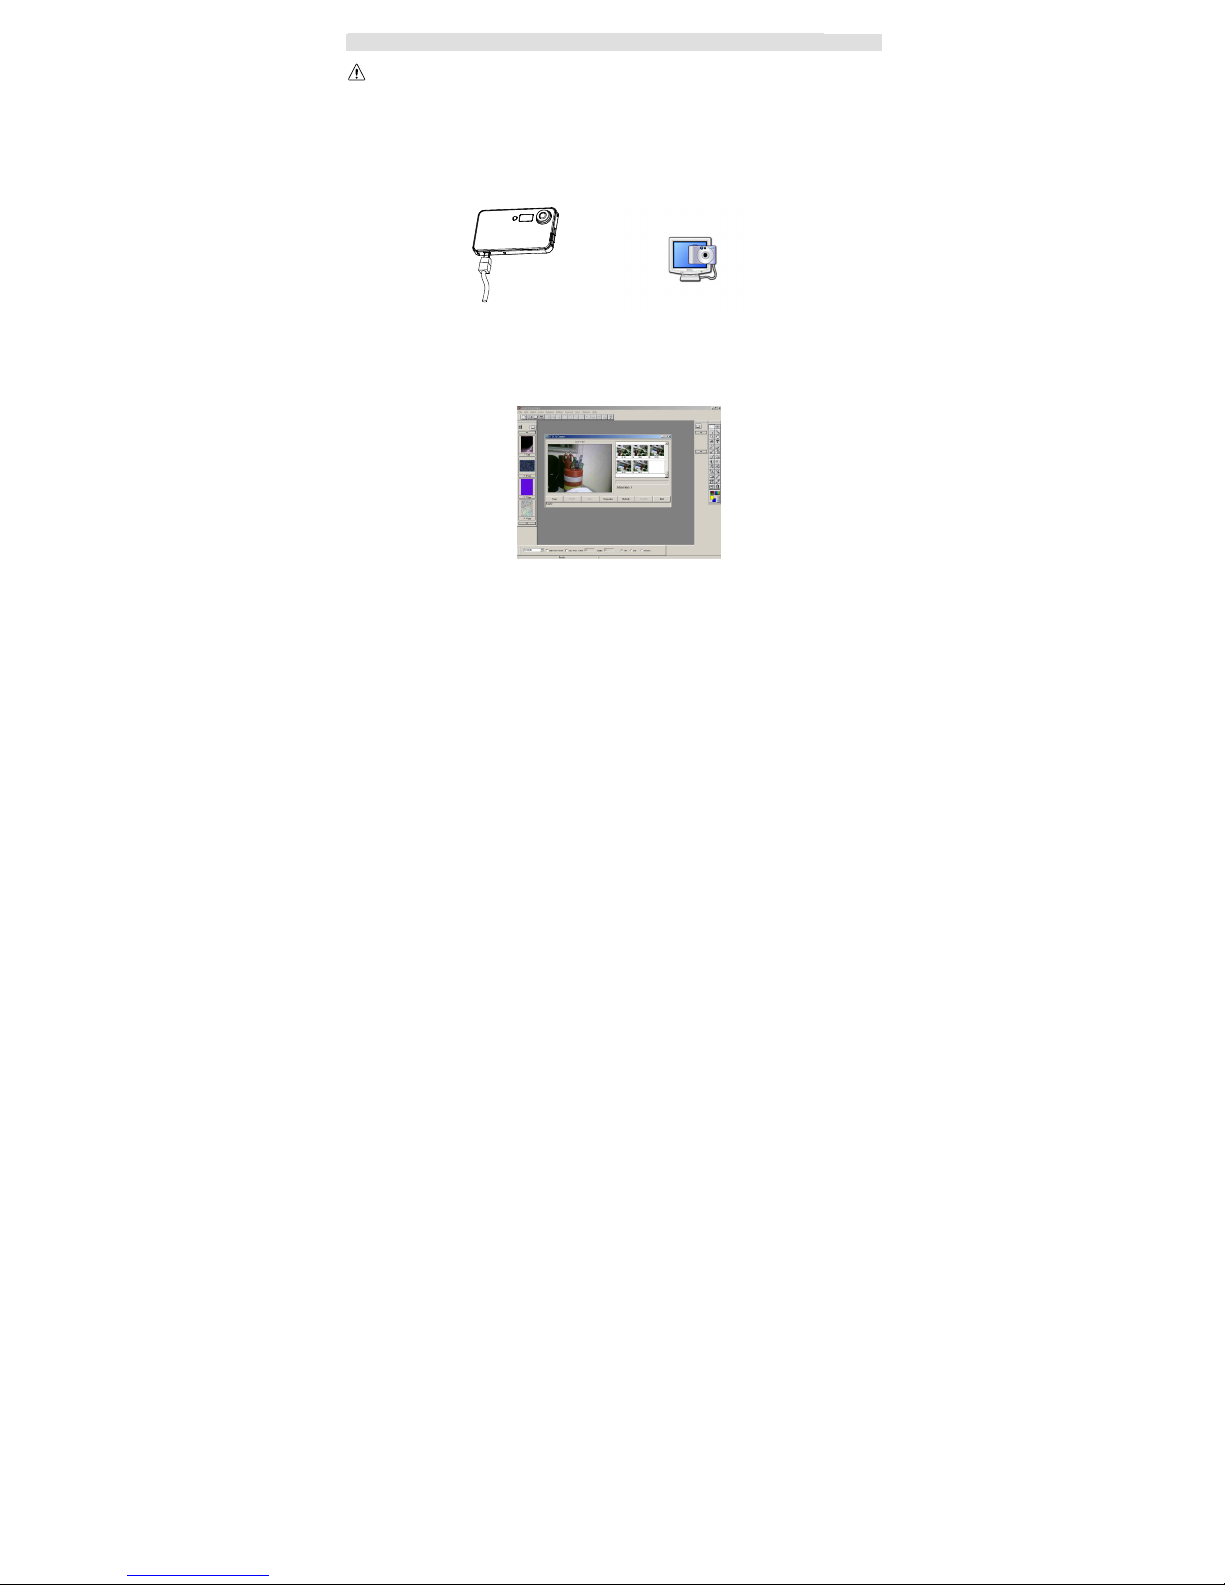
10. Using the Camera as a Web Cam (For Windows® Users Only)
IMPORTANT: For Windows® Users
Before you connect your digital camera to the computer, make sure that you have installed the software
from the enclosed CD. Please refer to previous chapter: “Install the software to your computer”.
1. Make sure the USB Connection under the “Configuration” Menu has been set to “PC Cam”
mode. Otherwise, change it to “PC Cam” according to the procedure described in “Camera
Settings” chapter. Turn OFF the power of camera.
2. Connect USB cable to your computer USB port.
3. Connect other end of USB cable to the camera while the camera is power OFF.
4. Turn on the camera and LCD displays a PC Cam icon.
5. System will automatically recognize the PC Cam.
6. From Windows Startup Menu, click “Program”, then -> “ArcSoft PhotoStudio 5” ->
“PhotoStudio 5”.
7. Click “File” and make sure the “Select Source” has selected “STK014 Camera”. Cli ck
“Acquire” -> “Acquire normall y”. The window containing live vide o from PC Cam is
appeared on screen.
Page 39

39
11. Troubleshooting Guide
Problem Symptom Likely Cause Solution
No power Camera will not
turn on
Battery is flat Recharge the
battery via USB
No sufficient power The battery indicator
icon on the LCD will go
“Blank”
Battery voltage is low to
the automatically shut
down level
Charge the battery
The camera or subject
was moving when the shot
was taken
Hold the camera
firmly
The subject is too close Move away from
the subject
Image appears blurred
or dark
The lens is dirty Clean the lens with
a soft cloth
Flash has not finished
charging
Wait until the Flash
Icon is steady
Flash does not go off
as expected
The flash has been turned
off
Make sure the flash
is set to Automatic
or ON
Camera will not focus Subject is not in the center
of the LCD (preview)
Move the subject to
the center of the
LCD (preview)
Camera is not turned on Turn on the camera
No space on the SD card /
internal memory
Delete unwanted
files or insert a new
SD card
Picture-taking
Cannot take pictures
when the shutter
button is pressed
The camera has timed out Turn the camera on
Camera hang up
during operation
Preview function can
work, but no other key
functions
Preview function occupy
too large internal space of
camera
Use a sharp end
spurn to press
reset hole.
PC Connection PC does not recognize
the camera
Check the USB cable
connection
Make sure both
ends of the USB
cable are
connected
Page 40

40
Interference from other
USB devices
Disconnected other
USB devices
Check computer Connect the
camera to the PC
with the USB cable
and select [My
Computer] –
[Control Panel] –
[System] – [Device
Manager]. In the
[Device Manager]
window delete
[Compose USB
device] or
[Unknown device]
in [Other devices].
Then disconnect
the camera and
install the software
again.
Camera
malfunctions during
use
Electrostatic discharge
interfered with the
camera
Check if the camera is
connected to the PC
Turn off the camera
and then turn it
back on. If
connected to the
PC disconnect the
camera from the
USB cord, and turn
it off then on again.
The removable disk
crashes with the
network drive
The camera is
detected by the
Windows and works
properly. But a driver
letter of the removable
disk is not created
Driver is not installed
properly, or network driver
connection is crash
Reinstall the driver ,
or disconnect the
crashed network
driver and reserve
this drive letter for
the camera
No response from
any of the function
keys
The LCD on camera
has frozen when insert
a SD card into the
camera
SD card is first use and
not formatted
Ensure you only
use a new or
Formatted SD card
Page 41

41
12. Appendix
Regulatory Information
Under the environment with electrostatic discharge , the product may malfunction and re quire user to reset
the product.
Under the environment with radio frequency interference, the product may malfunction and r esume
to normal operation without the interference.
Page 42

42
13. Specifications
Resolution (pixels) : High – 2048 X 1536
Medium – 1600 X 1200
Low – 800 X 600
Shutter Speed : 1 second to 1/1000 second
Image File Format : Still Images – JPEG (Exif 2.2)
Movies – AVI without audio (for W indows® Users Only)
Internal Memory : 16 MB Flash Memories
External Memory : SD Memory Card (maximum 256MB) (not included)
Lens : Fi xed Lens – 8.4mm Effective Focal Length
Digital Zoom : 4X
Exposure : Automatic
White Balance : Auto, Sunny, Cloudy, Flu orescent, Tungsten
Sensitivity : ISO 100
LCD : 2.0” TFT
Interface : USB v1.1
Self Timer : OFF / 10 / 15 / 20sec Selectable
Flash Function : Auto / On / Off
Operation System : Windows® 98SE / ME / 2000 / XP
Auto Power Off : 30sec / 1 / 3 / 5min Selectable
Power Source : Built-in Rechargeable Battery or 5V DC from USB Port
Operating Temperature : 10℃ - 40℃
Operating Humidity : 20% - 85% Non-condensing
*NOTE: Scene complexity affects an image’s file size. T he number of images you can store on the
camera or memory card may vary.
Page 43

43
Producer / Produzent / Producteur /
Produttore / Productor:
EAGLETRON TECHNOLOGY LTD
14. Care and Maintenance
Camera Body:
Wipe the body cl ean with a soft cloth or eyegl ass lens wiper.
Lens:
First use a lens blower brush to remove dust and dirt, then remove any remaining dir t by wiping the len s
lightly with a soft cloth .
Never use synthetic cleansers on the camera body or lens.
LCD Monitor:
Use a lens blower brush to remove the dust and dirt. If necessary, gently wipe the LCD monitor with a soft
cloth or an eyeglass len s wiper to remove stubborn dirt.
Never rub or press forcefully on the LCD monitor. T hese a ctions may damage it or lead to other
problems.
CAUTION: NEVER USE THINNERS, BENZENE, SYNTHETIC CLEANERS OR WATER TO CLEAN THE
CAMERA. THESE SUBSTANCES MAY DIST ORT OR DAMAGE THE EQUIPMENT.
15. Getting Help
Please refer to the instructi ons on the enclosed warranty card for returning your uni t for service.
Distribuito in Ital ia da:
CAMOMILLA SPA
Via Bodoni 8/12
20090 Buccinasco (Mi)
Tel: +39-02-48840405
Fax: +39-02-48841725
E-mail: [email protected]
Stampato in Cina
AF10-16670-000L
 Loading...