

Page 1
PROJECTION ALARM CLOCK WITH FM SCAN RADIO
USER MANUAL
KT3004
PLEASE READ THIS MANUAL COMPLETELY BEFORE OPERATING
THIS UNIT AND RETAIN THIS MANUAL FOR FUTURE REFERENCE
NOTES ON FCC COMPLIANCE
This equipment has been tested and found to comply with the limits for a radio receiver, pursuant to Part
15 of the FCC Rules. These limits are designed to provide reasonable protection against harmful
interference in a residential installation. This equipment generates, uses and can radiate radio frequency
energy and, if not installed and used in accordance with the instructions, may cause harmful interference
to radio communications. However, there is no guarantee that interference will not occur in a particular
installation. If this equipment does cause harmful interference to radio or television reception, which can
be determined by turning the equipment off and on, the user is encouraged to try to correct the
interference by one or more of
the following measures:
- Reorient or relocate the receiving antenna.
- Increase the separation between the equipment and receiver.
- Connect the equipment into an outlet on a circuit different from that to which the receiver is connected.
- Consult the dealer or an experienced radio/TV technician for help.
WARNING
Changes or modifications to this unit not expressly approved by the party responsible for compliance
could void the user's authority to operate the equipment.
1
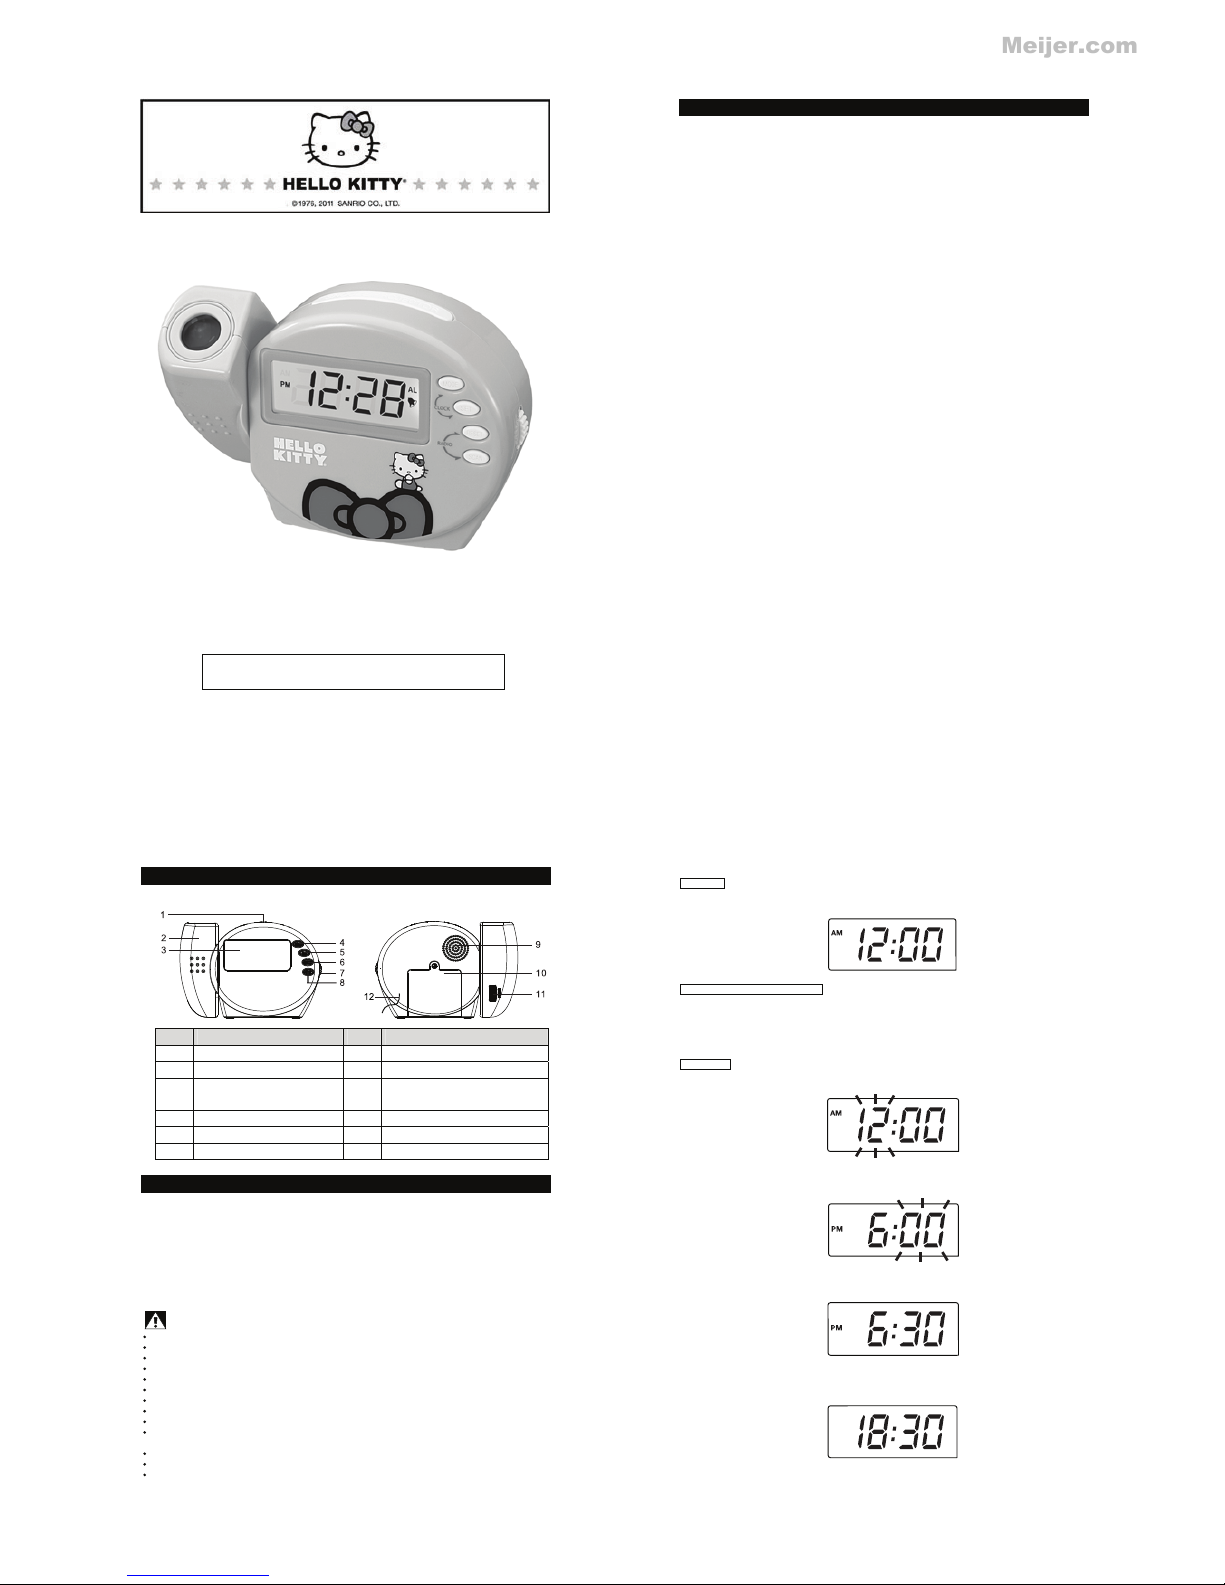
FEATURES AND CONTROL
Item Description Item Description
1 Snooze/ Projector Button 7 ON/OFF Volume Control
nottuB nacS8 tinU rotcejorP2
3 LCD display on demand
backlighting
9 Speaker
tnemtrapmoC yrettaB01 nottuB edoM4
lortnoC sucoF 11 nottuB teS5
annetnA eriW MF21 nottuB teseR6
GETTING STARTED
INSTALLING/REPLACING BATTERIES
This unit operates on three ‘AAA' (UM-4) size batteries (not included), bottom two for the FM radio and
the top one for the LCD alarm clock. All three are required for the Hello Kitty image projector and LCD
backlighting to work properly.
1. Loosen the screw of the battery compartment located at the back of the projector clock.
2. Remove old batteries (if any).
3. Following the polarity diagram shown inside the battery compartment, insert three fresh ‘AAA'
(UM-4) size alkaline batteries or Ni-MH rechargeable batteries (not included).
4. Close the battery compartment cover and secure the cover in place with screw.
IMPORTANT: Be sure that the batteries are
installed correctly. Wrong polarity may damage the
unit.
WARNINGS!
Batteries must be placed by an adult.
The use of good quality alkaline batteries is recommended.
Place batteries based on the polarity shown on the battery compartment.
Only use the recommended type of batteries.
Non rechargeable batteries are not to be recharged
Rechargeable batteries are only to be charged under adult supervision
Rechargeable batteries are to be removed before being charged.
DO NOT mix different types of batteries together.
DO NOT mix new and old batteries together.
If you do not use the product for an extended period of time, we recommend that you take out the
batteries. Remove exhausted batteries from the product. Battery leak may cause damage.
DO NOT short circuit the terminals of the battery.
DO NOT throw batteries into an open flame. They may explode.
Keep the packaging for future reference as it contain important information
2
ALARM CLOCK
Setting up
The LCD will display all icons and digits after batteries are placed into battery compartment. Then ‘AM
12:00’ as default time will be displayed on LCD display.
Switching among different modes
You can press ‘MODE’ to switch among four different modes:
1. Time mode – this is the default mode and it shows hour and minutes.
2. Alarm mode - set alarm wake up time.
3. Date mode - set the date, month and year.
4. Second mode - set the second of the clock.
Set the time
1. In time mode the default time is 12:00 AM. Press ‘SET’ and the ‘hour’ will be blinking and you can
set the hour.
2. Press ‘MODE’ button to reach the desired hour.
3. If ‘MODE’ is held down, it will advance the clock four hours per second.
4. Press ‘SET’ again and the ‘minute’ will be blinking and you can set the minute.
5. Press ‘MODE’ button to reach the desired minute.
6. If ‘MODE’ is held down, it will advance the clock four minutes per second. Press ‘SET’ again, and
the correct time should be displayed.
7. If the clock is idle for 6 seconds, it will assume setting is finished and go back to normal time display.
8. To switch from 12-hour display to 24-hour display, press SET when normal time appears. Press it
again to switch back.
3
AGES 8+
Front view
Back view
Meijer.com
Page 2
Set the alarm
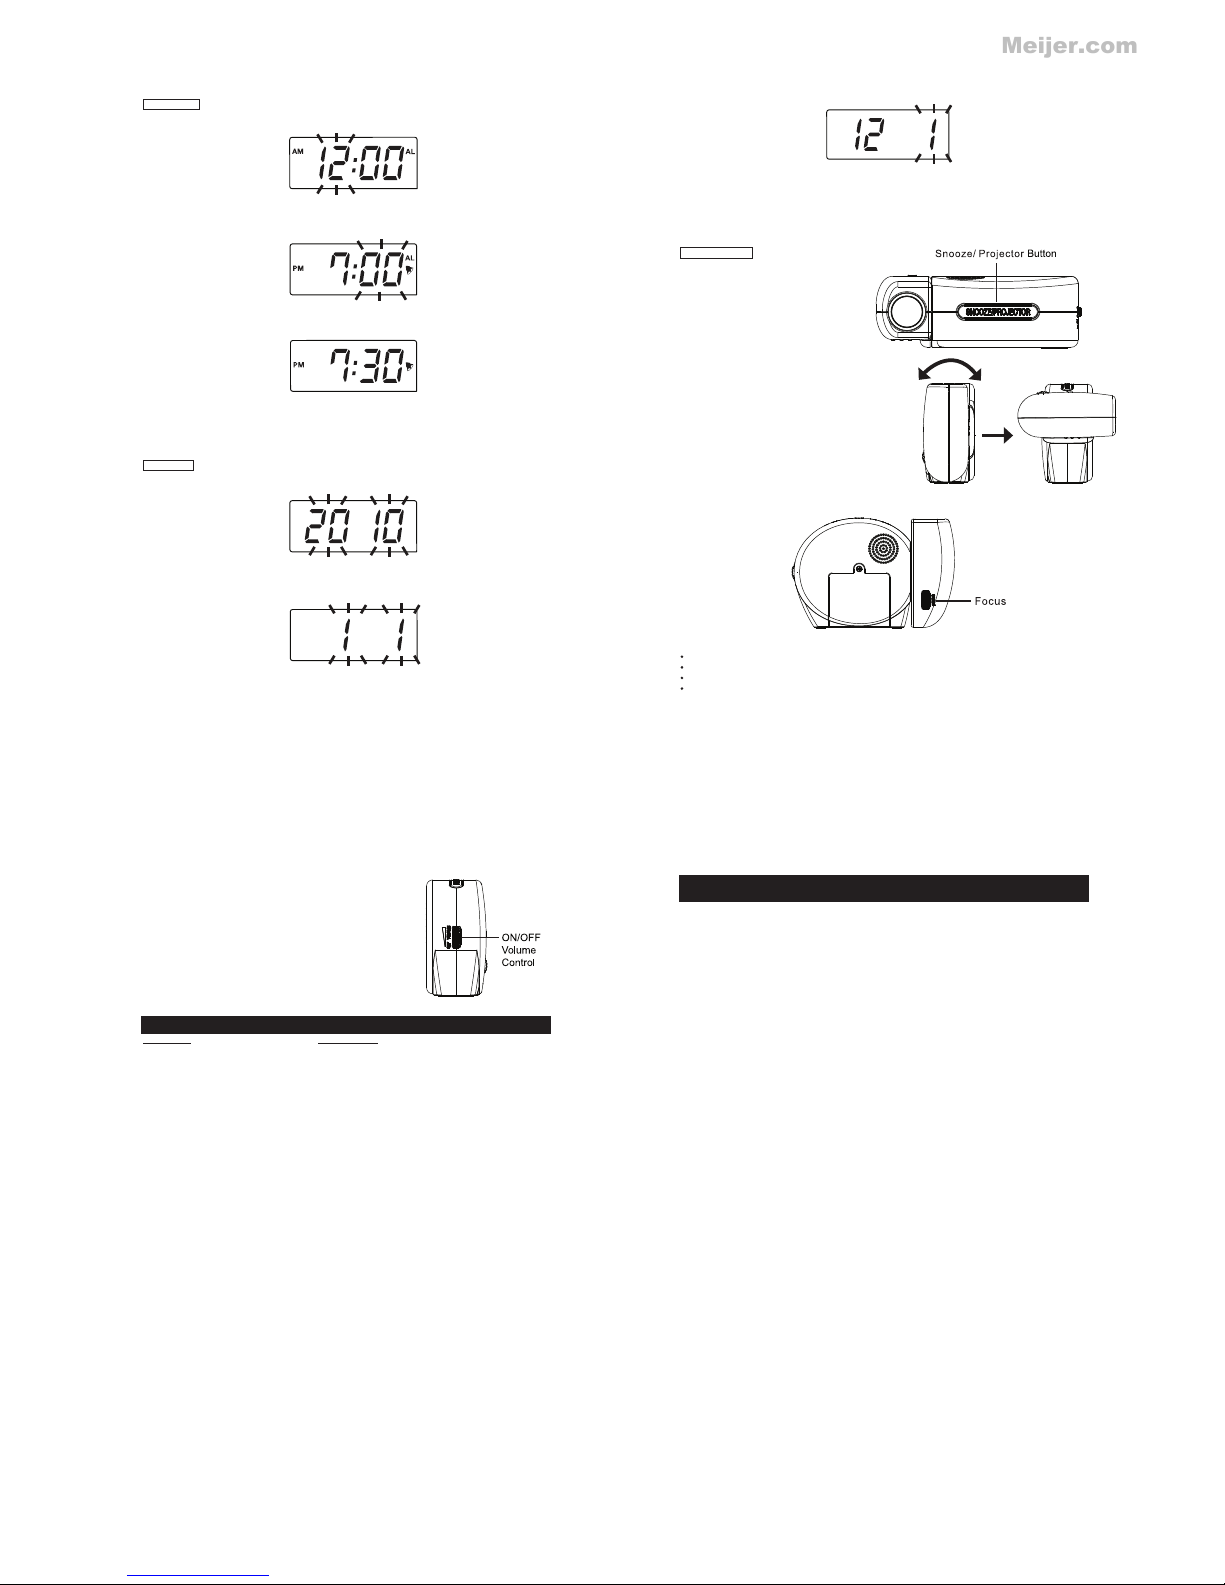
1. Press ‘MODE’ to switch to alarm mode. The ‘AL’ icon will be turned on.
2. In alarm mode press ‘SET’ and the ‘hour ’ will be blinking .
3. Press ‘MODE’ to desired hour. The bell shaped alarm icon will turn on.
4. If ‘MODE’ is held down, it will advance four hours per second.
5. Press ‘SET’ again and the ‘minute’ will be blinking and you can set the correct minute.
6. Press ‘MODE’ to desired minute.
7. If ‘MODE’ is held down, it will advance four minutes per second. Press ‘SET’ again and it will return
to the alarm time display.
8. If the clock is left idle for 6 seconds, it will assume setting is finished and go back to alarm time
display automatically.
9. If the alarm time display is left idle for 30 seconds, it will go back to normal time display
automatically.
Set the date
1. Press ‘MODE’ to switch to date mode.
2. In date mode, a four digit year will be blinking. The default year is 2010.
3. Press ‘MODE’ button to reach desired year.
4. If ‘MODE’ is held down, it will advance four years per second.
5. Press ‘SET’ again and the ‘month’ will be blinking. The default date is 1st of January. The display
format is MM-DD.
6. Press ‘MODE’ button to reach the desired month.
7. If ‘MODE’ is held down, it will advance four months per second.
8. Press ‘SET’ again and the ‘date’ will be blinking.
4
9. Press ‘MODE’ button to reach desired date.
10. If ‘MODE’ is held down, it will advance four days per second. Press ‘SET’ again and the date
should be displayed.
11. If the clock is left idle for 6 seconds, it will assume setting is finished and display the date as entered.
12. If the date display is left idle for 30 seconds, the clock will go back to normal
time display.
13. In date mode only month and date will be shown. Year will only be shown while setting the date.
Snooze Function
1. The clock will ring at the preset alarm time
for 30 seconds.
2. When it is ringing press ‘SNOOZE/
PROJECTOR’, the alarm will stop and
snooze function will be enabled. The
clock will ring again in 5 minutes.
3. To shut off the alarm and disable the
snooze function, press ‘MODE’ or ‘SET’
while the alarm is ringing.
PROJECTOR AND BACKLIGHT
1. Press ‘SNOOZE/ PROJECTOR’ and the Hello Kitty
image will project for 30 seconds before
automatically shutting off. At the same time the
image projects, the LCD backlight will turn on for 30
seconds automatically allowing you to read the time
display easier under low light conditions.
2. You can rotate the projector portion to allow it to
project on the wall or ceiling.
3. To improve the clarity of the image, adjust the ‘FOCUS’ located on the back of the projector unit.
Tips for best projected Hello Kitty image:
Keep the room as dark as possible.
Try and project the image on a flat, dull, light colored surface.
Best projection distance is about 6 – 7 feet (1.8 – 2.1m)
When projected image, time display or backlighting dim considerably, replace all three batteries and
set up the time and alarm settings again.
5
FM RADIO
1. To switch on the radio, turn ‘VOLUME ON/ OFF’ knob located on
the side and adjust volume to a comfortable level.
2. Press ‘SCAN’ to search radio stations. It will search from
88MHz to 108MHz. Once a radio station is found, the searching
will stop automatically.
3. To find the next station, press ‘SCAN’ again.
4. Press ‘RESET’ if you want to go back to the original starting
point.
5. For best reception result, always fully extend the FM Wire
Antenna at the rear cabinet.
SPECIFICATIONS
Description
Specifications
DCL tigid-4 ”6.0 yalpsiD
zHM 801 - 88 dnaB oidaR MF
)dedulcni toN( seirettab enilakla )4-MU( ’AAA‘ V5.1CD x 3 ecruoS rewoP
Battery life may vary depending on usage.
Specification may change without notice in order to make product improvement.
6 7
90 DAY LIMITED WARRANTY AND SERVICE
VALID IN THE U.S.A ONLY
SPECTRA MERCHANDISING INTERNATIONAL, INC. warrants this unit to be free from defective
materials or factory workmanship for a period of 90 days from the date of original customer purchase and
provided the product is utilized within the U.S.A. This warranty is not assignable or transferable. Our
obligation under this warranty is the repair or replacement of the defective unit or any part thereof except
batteries, when it is returned to the SPECTRA Service Department, accompanied by proof of the date of
original consumer purchase, such as a duplicate copy of a sales receipt.
You must pay all shipping charges required to ship the product to SPECTRA for warranty service. If the
product is repaired or replaced under warranty, the return charges will be at SPECTRA’s expense. There
are no other express warranties other than those stated herein.
This warranty is valid only in accordance
with the conditions set forth below:
1. The warranty applies to the SPECTRA product only while:
a. It remains in the possession of the original purchaser and proof of purchase is demonstrated.
b. It has not been subjected to accident, misuse, abuse, improper service, usage outside the
descriptions and warnings covered within the user manual or non-SPECTRA approved
modifications.
c. Claims are made within the warranty period.
2. This warranty does not cover damage or equipment failure caused by electrical wiring not in
compliance with electrical codes or SPECTRA user manual specifications, or failure to provide
reasonable care and necessary maintenance as outlined in the user manual.
3. Warranty of all SPECTRA products applies to residential use only and is void when products are used
in a nonresidential environment or installed outside the United Sta
tes.
This warranty gives you specific legal rights, and you may also have other rights which vary from state to
state. TO OBTAIN SERVICE please remove all batteries (if any) and pack the unit carefully and send it
freight prepaid to SPECTRA at the address shown below. IF THE UNIT IS RETURNED WITHIN THE
WARRANTY PERIOD shown above, please include a proof of purchase (dated cash register receipt) so
that we may establish your eligibility for warranty service and repair of the unit without cost. Also include
a note with a description explaining how the unit is defective. A customer service representative may
need to contact you regarding the status of your repair, so please include your name, address, phone
number and email address to expedite the process.
IF THE UNIT IS OUTSIDE THE WARRANTY PERIOD, please include a
check for $5.00 to cover the
cost of repair, handling and return postage. All out of warranty returns must be sent prepaid.
It is recommended that you contact SPECTRA first at 1-800-777-5331 or by email at
[email protected] for updated information on the unit requiring service. In some cases the
model you have may be discontinued, and SPECTRA reserves the right to offer alternative options for
repair or replacement.
SPECTRA MERCHANDISING INTERNATIONAL, INC.
4230 North Normandy Avenue,
Chicago, IL 60634, USA.
1-800-777-5331
To register your product, visit the link below to enter your information.
http://www.spectraintl.com/wform.htm
Printed in China
Meijer.com
 Loading...