

Page 1
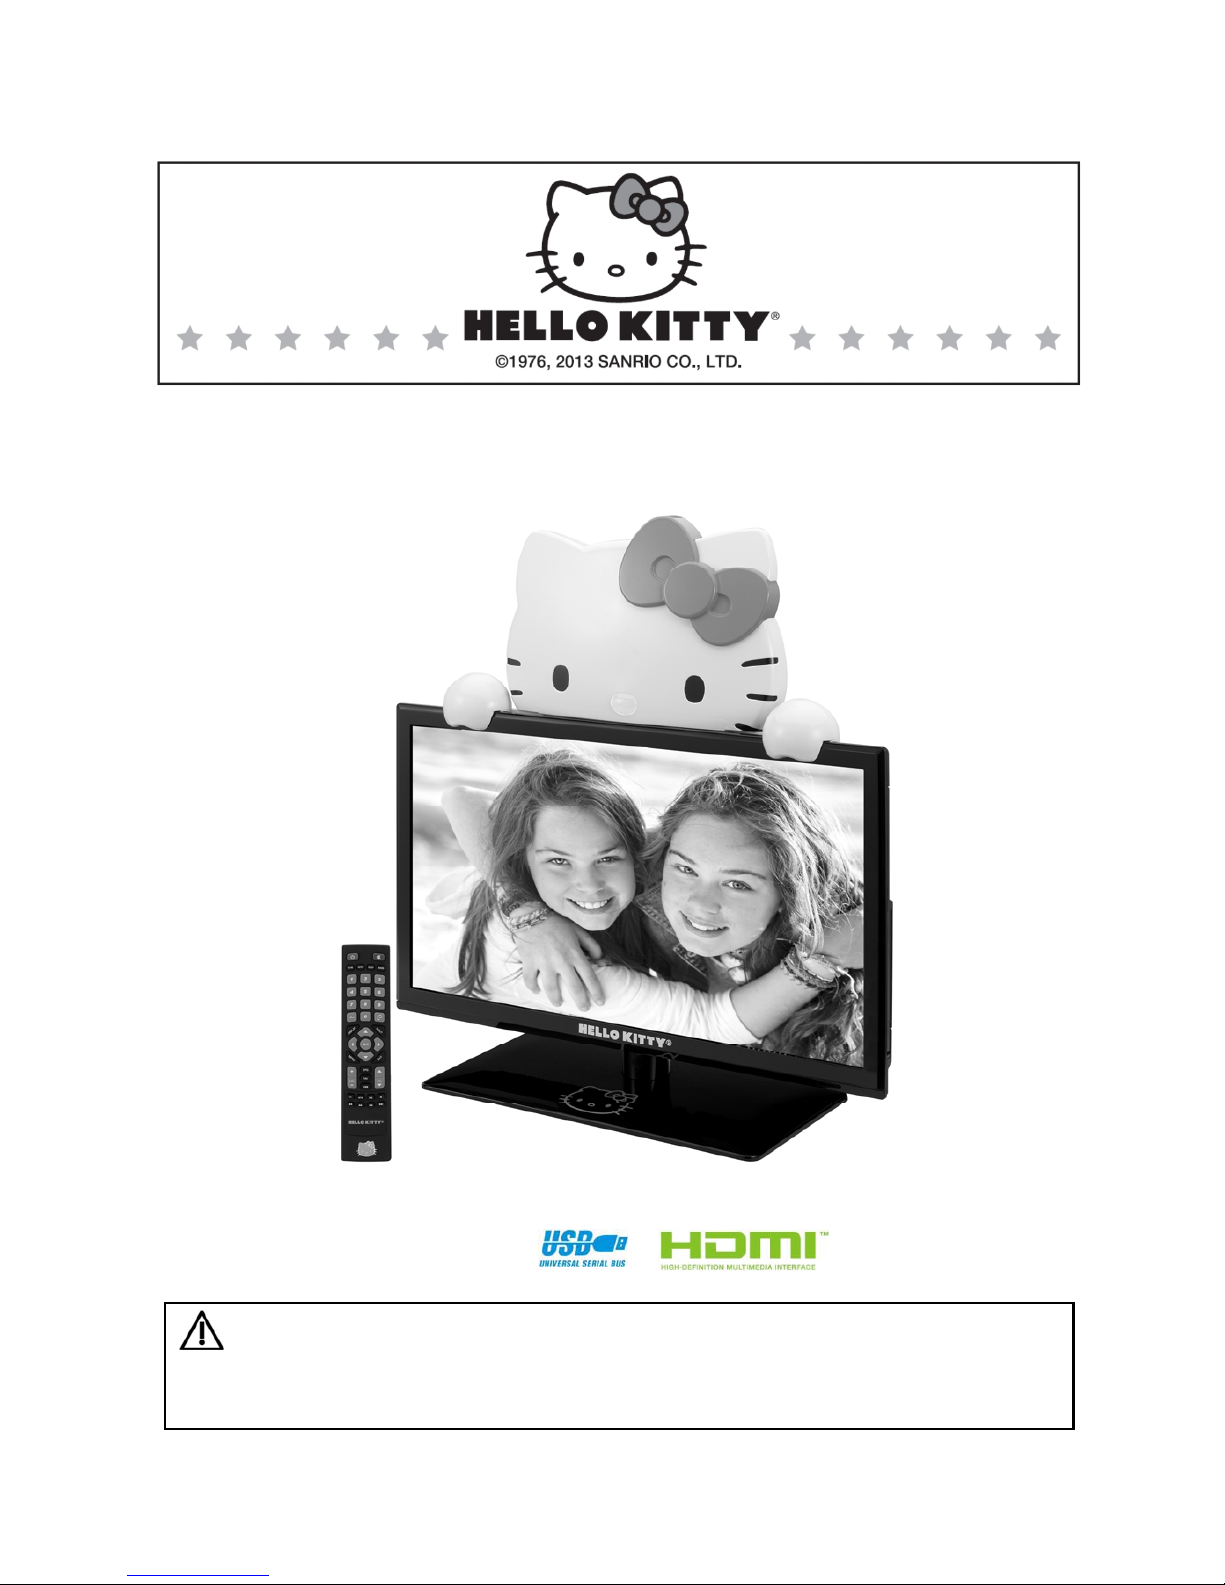
19” LED TELEVISION
USER MANUAL
KT2219MBY
CAUTION: THIS IS NOT A TOY!
Electrically Operated Product - Please use care when plugging into
A
C outlet.
STANDBY
Page 2
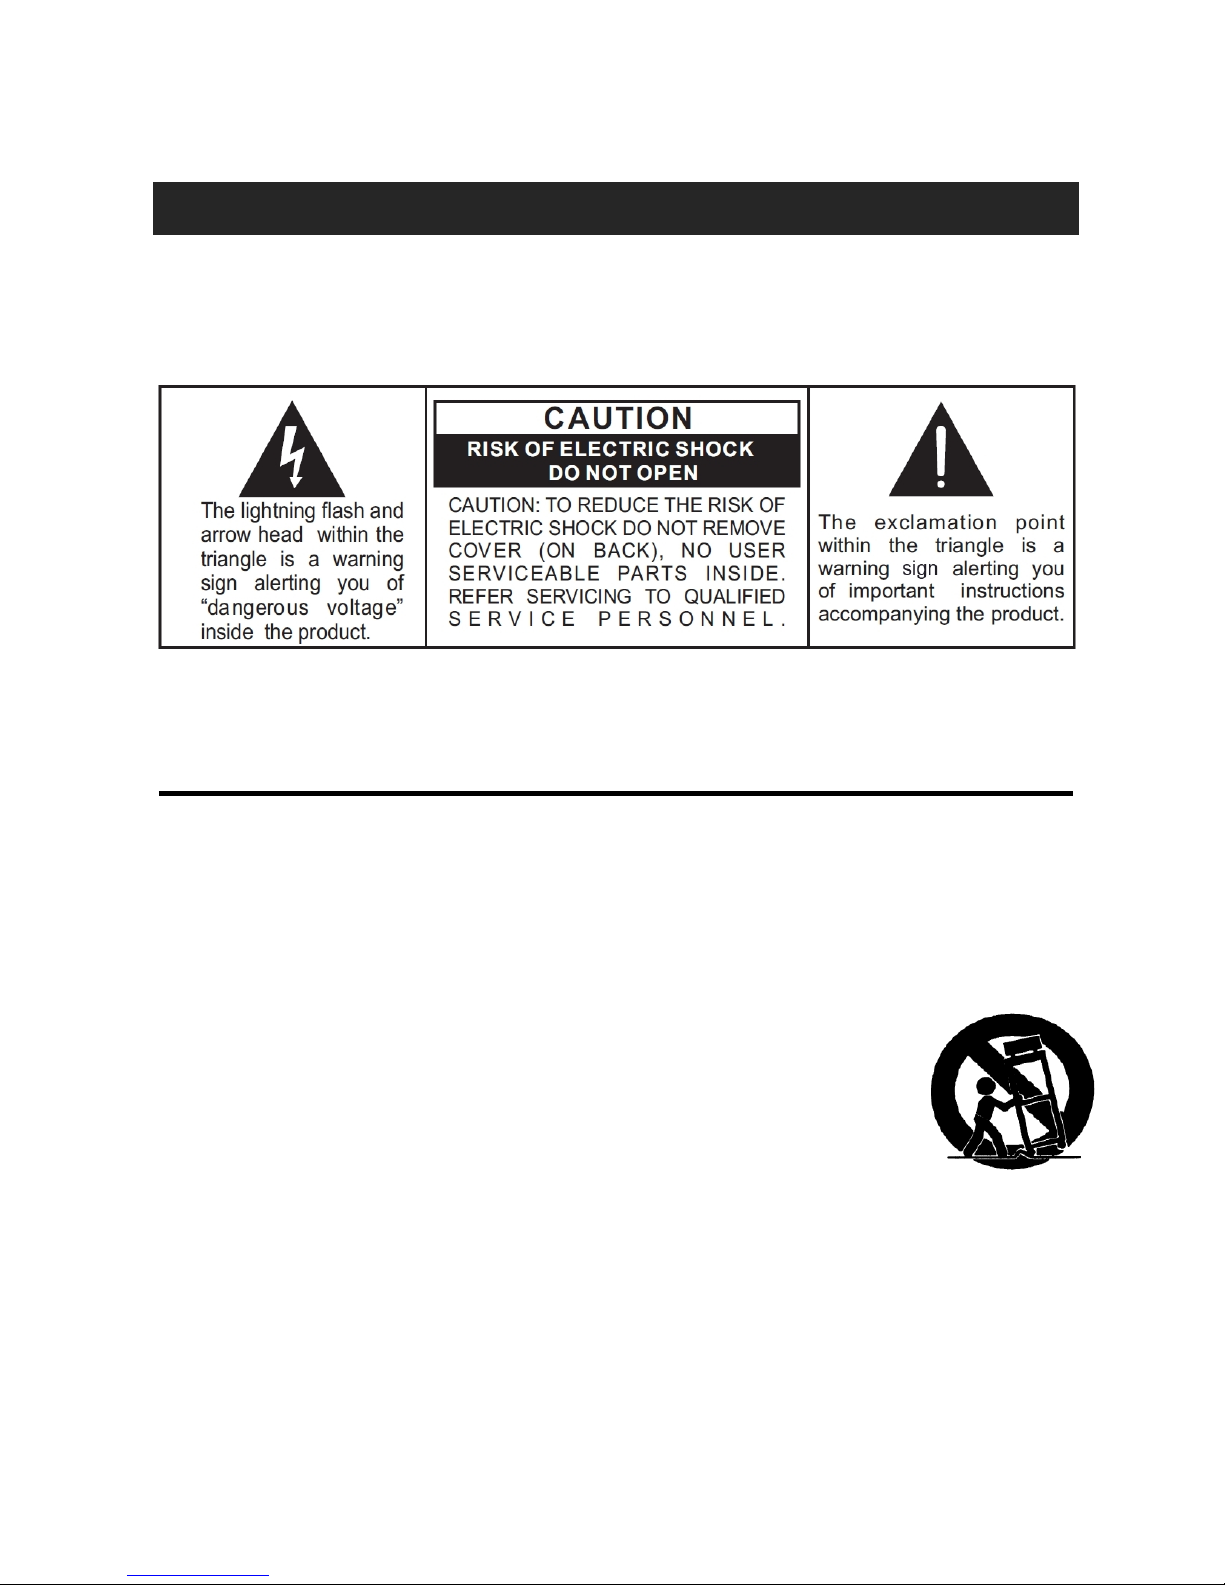
SAFETY INSTRUCTIONS AND WARNINGS
TO PREVENT FIRE OR SHOCK HAZARD, DO NOT USE THE AC ADAPTER WITH AN
EXTENSION CORD, RECEPTACLE OR OTHER OUTLET UNLESS THE BLADES CAN BE
FULLY INSERTED TO PREVENT BLADE EXPOSURE. TO PREVENT FIRE OR SHOCK
HAZARD, DO NOT EXPOSE THIS APPLIANCE TO RAIN OR MOISTURE.
Caution Markings are located at rear enclosure of the apparatus
IMPORTANT SAFETY INSTRUCTIONS
1. Read these instructions.
2. Keep these instructions.
3. Heed all warnings.
4. Follow all instructions.
5. Do not use this apparatus near water.
6. Cleaning - Unplug this product from the wall outlet before cleaning. Do not use liquid cleaners or
aerosol cleaners. Clean only with dry cloth.
7. Do not block any ventilation openings. Install in accordance with the manufacturer’s instructions.
8. Do not place this product on an unstable cart, stand, tripod, bracket, or table.
The product may fall, causing serious injury to a child or adult, and serious
damage to the product. Use only with a stand, or bracket, recommended by the
manufacturer, or sold with the product. Any mounting of the product should
follow the manufacturer’s instructions, and should use a mounting accessory
recommended by the manufacturer. A product and cart combination should be
moved with care. Quick stops, excessive force and uneven surfaces may
cause the product and cart combination to overturn.
9. Do not install near any heat sources such as radiators, heat registers, stoves, or other apparatus
(including amplifiers) that produce heat.
10. Only use attachments/accessories specified by the manufacturer.
11. Unplug this apparatus during lightning storms or when unused for a long periods of time.
12. Refer all servicing to qualified service personnel. Servicing is required when the apparatus has
been damaged in any way, such as ac adapter is damaged, liquid has been spilled or objects
have fallen into the apparatus, the apparatus has been exposed to rain or moisture, does not
operate normally, or has been dropped.
1
Page 3

13. This appliance shall not be exposed to dripping or splashing water and that no object filled with
liquids such as vases shall be placed on the apparatus.
14. AC adapter is used as disconnect device and it should remain readily operable during intended
use. In order to disconnect the apparatus from the mains completely, the AC adapter should be
disconnected from the mains socket outlet completely.
15. Batteries of the remote shall not be exposed to excessive heat such as sunshine, fire or the like.
Do not mix old and new or different types of batteries. Remove batteries when the unit is not used
for long time.
16. Do not overload wall outlet. Use only power source as indicated.
17. Use replacement parts as specified by the manu
facturer.
18. The product may be mounted to a wall by following instructions from the manufacturer.
19. Upon completion of any service or repairs to this product, ask the service technician to perform
safety checks.
20. Power Sources - This product should be operated only from the type of power source indicated
on the marking label. If you are not sure of the type of power supply to your home, consult your
product dealer or local power company. For products intended to operate from battery power, or
other sources, refer to the operating instructions.
21. Object and Liquid Entry - Never push objects of any kind into this product through openings as
they may touch dangerous voltage points or short-out parts that could result in a fire or electric
shock. Never spill liquid of any kind on the product.
22. Damage Requiring Service - Unplug this product from the wall outlet and refer servicing to
qualified service personnel under the following conditions:
a) When the AC adapter is damaged,
b) If liquid has been spilled, or objects have fallen into the product,
c) If the product has been exposed to rain or water,
d) If the product does not operate normally by following the operating instructions. Adjust only
those controls that are covered by the operating instructions as an improper adjustment of
other controls may result in damage and will often require extensive work by a qualified
technician to restore the product to its normal operation.
e) If the product has been dropped or damaged in any way, and
f) When the product exhibits a distinct change in performance - this indicates a need for service.
23. Wall or Ceiling Mounting – The appliance should be mounted to a wall or ceiling only as
recommended by the manufacturer.
24. Power Lines – An outdoor antenna should be located away from the power lines.
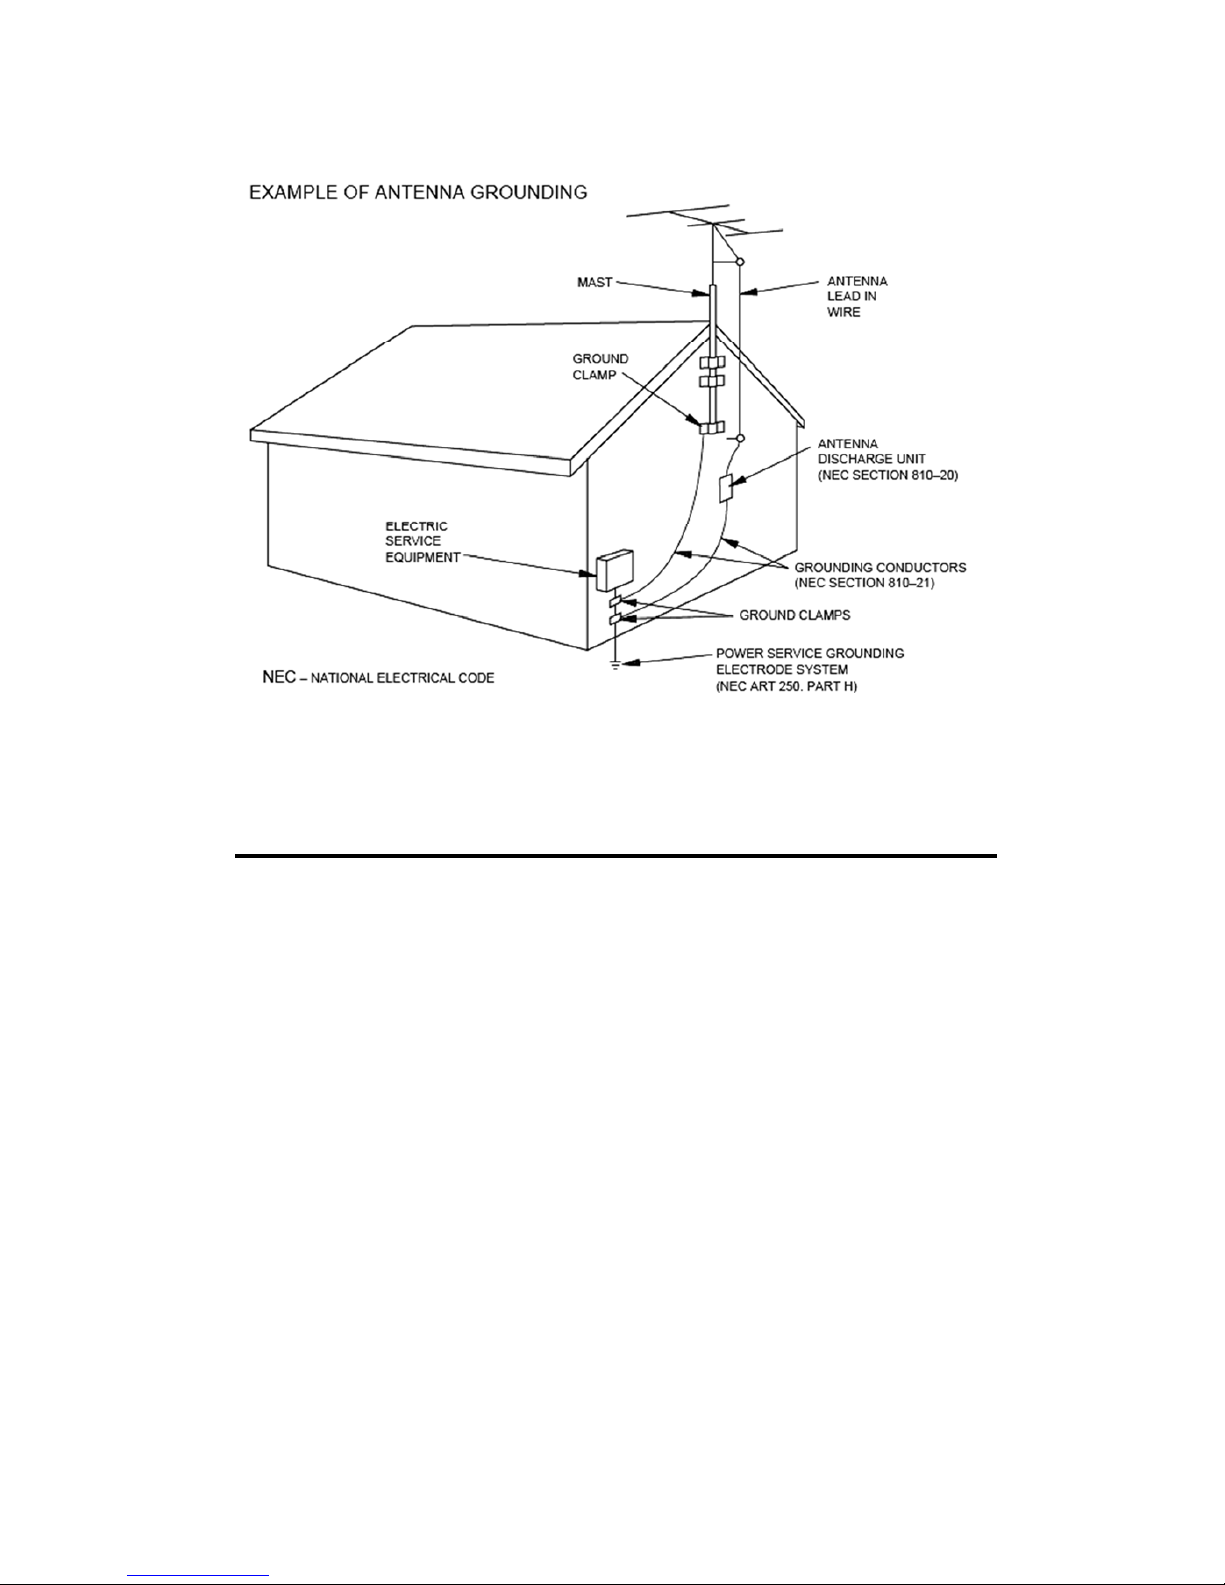
25. Outdoor Antenna Grounding – If an outside antenna is connected to the TV receiver, be sure the
antenna system is grounded so as to provide some protection against voltage surges and built up
static charges.
Section 810 of the National Electric Code, ANSI/NFPA No. 70-1984, provides information with
respect to proper grounding of the mast and supporting structure, grounding of the lead-in wire to
an antenna discharge unit, size of grounding connectors, location of antenna discharge unit,
connection to grounding electrodes and requirements for the grounding electrodes. See figure
below:
2
Page 4
SAVE THESE INSTRUCTIONS
3
Page 5

COMPLIANCE WITH FCC REGULATIONS
FCC Declaration of Conformity
Trade Name: Hello Kitty
Responsible Party: Spectra Merchandising International, Inc
4230 North Normandy Avenue
Chicago IL 60634, USA
Hotline: 1-800-777-5331
Declaration of Conformity for Products Marked with FCC Logo, United States Only
This device complies with Part 15 of the FCC Rules. Operation is subject to the following two conditions:
(1) This device may not cause harmful interference, and
(2) This device must accept any interference received, including interference that may cause undesired
operation.
This equipment has been tested and found to comply with the limits for a Class B digital device,
pursuant to Part 15 of the FCC Rules. These limits are designed to provide reasonable protection
against harmful interference in a residential installation. This equipment generates, uses and can
radiate radio frequency energy and, if not installed and used in accordance wit
h the instructions, may
cause harmful interference to radio communications. However, there is no guarantee that interference
will not occur in a particular installation. If this equipment does cause harmful interference to radio or
television reception, which can be determined by turning the equipment off and on, the user is
encouraged to try to correct the interference by one or more of the following measures:
- Reorient or relocate the receiving antenna
- Increase the separation between the equipment and receiver.
- Connect the equipment into an outlet on a circuit different from that to which the receiver is
connected.
- Consult the dealer or an experienced radio technician for help.
WARNING:
Changes or modifications to this u
nit not expressly approved by the party responsible for compliance
could void the user's authority to operate the equipment.
Cables Connections to this device must be made with shielded cables with metallic RFI/EMI connector hoods
to maintain compliance with FCC Rules and Regulations.
Canadian notice This Class B digital apparatus meets all requirements of the Canadian Interference-Causing Equipment
Regulations.
Avis Canadien Cet appareil numérique de la classe B respecte toutes les exigences du Règlement sur le matériel
brouilleur du Canada.
4
Page 6
PROTECT YOUR FURNITURE!!
This system is equipped with non-skid rubber ‘feet’ to prevent the product from moving when you operate the
controls. These ‘feet’ are made from non-migrating rubber material specially formulated to avoid leaving any
marks or stains on your furniture. However certain types of oil based furniture polishes, wood preservatives, or
cleaning sprays may cause the rubber ‘feet’ to soften, and leave marks or a rubber residue on the furniture.
To prevent any damage to your furniture we strongly recommend that you purchase small self-adhesive felt pads,
available at hardware stores and home improvement centers everywhere, and apply these pads to the bottom of
the rubber ‘feet’ before you place the product on fine wooden furniture.
WELCOME TO THE WORLD OF HELLO KITTY
We have taken great care to make sure that your Digital Television was in perfect working order when it left our
factory. It has been designed to give you many years of enjoyment and trouble free operation. Read this manual
before operating this unit to become familiar with its features and obtain the performance that will bring you
continued enjoyment for many years.
Customer's Record:
The serial number of this product is found on its back. You should note the serial number of this unit in the space
provided as a permanent record of your purchase to aid in identification in the event of theft of loss.
Model Number: KT2219MBY Serial Number: _______________________
Selecting fine audio equipment such as the item you’ve just purchased is only the start of your musical enjoyment. Now it’s
time to consider how you can maximize the fun and excitement your equipment offers. This manufacturer, the Consumer
Electronics Association (CEA)R and the American Speech-Language-Hearing Association (ASHA) want you to get the most
out of your equipment by playing it at a safe level – a level that lets the sound come through clearly without annoying blaring
or distortion and, most importantly, without damaging your sensitive hearing.
Sound can be deceiving. Over time, your hearing “comfort level” adapts to higher volumes of sound, so what sounds “normal”
can actually be loud and harmful to your hearing. Guard against
this by setting your equipment at a safe level BEFORE your
hearing adapts.
TO ESTABLISH A SAFE LEVEL:
Set your volume control to the lowest level where you can hear the music
comfortably and clearly. Once the volume is set, leave it there. Prolonged
exposure to anything over 85 decibels can cause gradual hearing loss.
See if your music player has a volume limiter that allows you to set a safe
listening level by establishing a maximum volume level on your player. This is a
great solution for parents to ensure their children listen at a safe level.
Limit listening time to give your hearing “quiet breaks.”
BE SURE TO OBSERVE THE FOLLOWING GUIDELINES WHEN WEARING
YOUR HEADPHONES OR EARBUDS:
Do not turn up the volume so high that you can’t hear sounds around you.
Do not use headphones or earbuds while operating a motorized vehicle; it may create a traffic hazard and is illegal in many
areas.
5
Page 7

CONTENTS
SAFETY INSTRUCTIONS AND WARNINGS 1
COMPLIANCE WITH FCC REGULATIONS 4
PROTECT YOUR FURNITURE 5
WELCOME TO THE WORLD OF HELLO KITTY 5
TABLE OF CONTENTS 6
CONTENTS OF YOUR BOX 7
SPECIAL NOTES 7
PREPARATIONS 8
CONTROL FUNCTIONS AND TERMINALS 11
GETTING STARTED 14
USING THE REMOTE CONTROL 14
CONNECTING THE TV TO AC POWER 15
ANTENNA CONNECTION 15
CONNECTING TO A DEVICE USING THE COMPOSITE VIDEO AND STEREO AUDIO INPUT TERMINALS 16
CONNECTING TO A DEVICE USING THE COMPONENT VIDEO AND STEREO AUDIO INPUT TERMINALS 17
CONNECTING TO A DEVICE USING THE HDMI INPUT TERMINAL 17
CONNECTING TO A PC USING THE PC VIDEO (VGA) AND PC AUDIO INPUT TERMINALS 18
CONN
ECTION TO A HOME THEATER AUDIO SYSTEM
19
PUTTING THE UNIT ON A PROPER SURFACE 20
TURNING THE TV ON FOR THE FIRST TIME 20
SOURCE SELECT 20
CHANNEL MENU 21
PICTURE MENU 22
SOUND MENU 23
TIME MENU 24
SETUP MENU 25
LOCK MENU
26
PLAYING MEDIA VIA USB 27
DISPLAY MODE 28
PC VIDEO FORMATS 28
CLEANING 29
TROUBLESHOOTIING 30
SPECIFICATIONS 30
V-CHIP TV RATING EXPLANATIONS 32
MPAA US MOVIE RATING EXPLANATIONS 33
GLOSSARY 34
WARRANTY INFORMATION 36
6
Page 8

CONTENTS OF YOUR BOX
LED TV x 1 set
TV Stand x 1 set
Remote Control x 1 set
AAA Batteries x 2 pcs
AC Adapter x 1 pc
Hello Kitty Figure x 1 pc
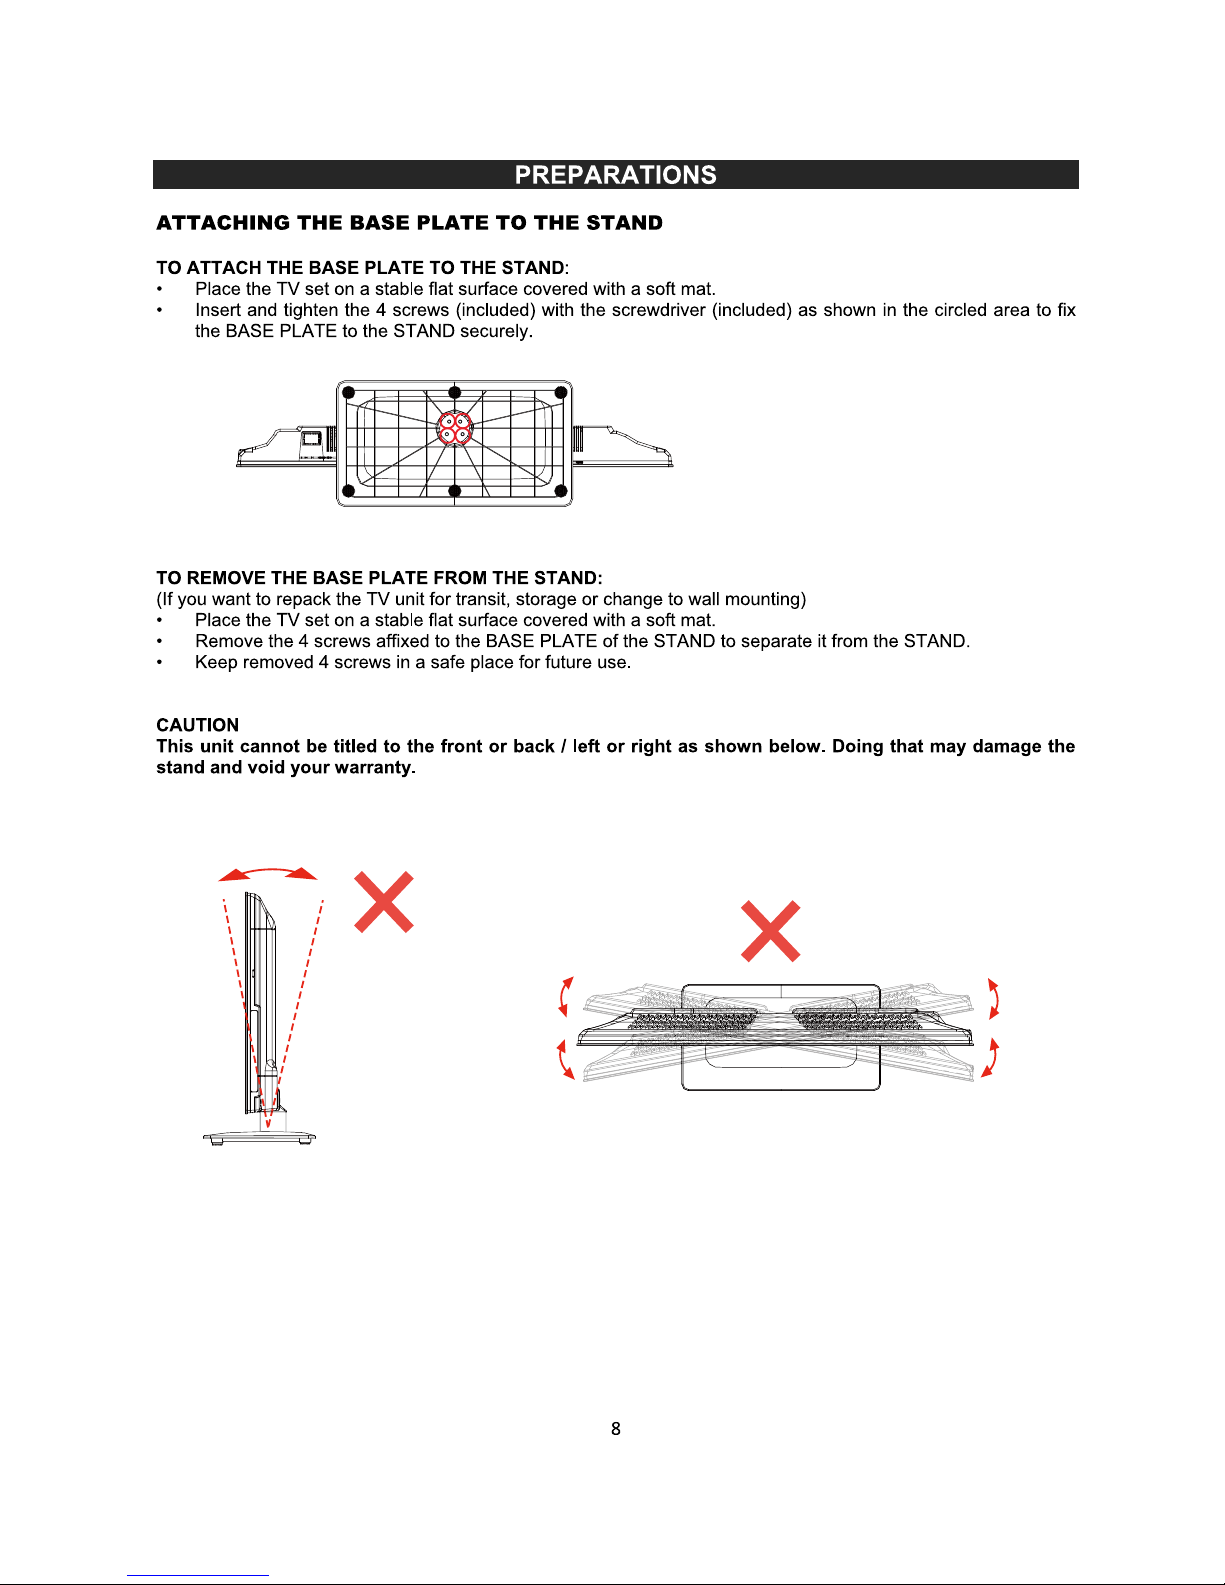
Mounting Screws for the Base Plate of the TV Stand x 4 pcs
Mounting Screws for Hello Kitty Figure x 1pc
Screwdriver x 1 pc
Instruction Manual x 1 set
TV Stand & Hello Kitty Figure installation sheet x 1 pc
SPECIAL NOTES
CARE AND MAINTENANCE
Do not use in hot and cold rooms and/or locations.
x When the unit is used in rooms and/or locations with low temperature, the picture may leave trails or appear
slightly delayed. This is not a malfunction, and the unit will recover when the temperature returns to normal.
x Do not leave the unit in a hot or cold location. Also, do not leave the unit in a location exposed to direct
sunlight or near a heater, as this may cause the cabinet to deform and the TV to malfunction.
x Recommended storage temperature range : 32°Fto122°F.
x Recommended working temperature range : 41°Fto104°F
PANEL PROTECTION
The LED display panel used in this TV is made of glass.
Therefore, it can break when the product
is harshly dropped or impacted upon by other hard objects.
Be careful not to be injured by broken glass pieces in case the display panel breaks.
ABOUT AFTER-IMAGE
The extended use of fixed image program material can cause a permanent after-image on the screen.
This background image is viewable on normal programs in the form of a stationary fixed image. This type of
irreversible screen deterioration can be limited by observing the following steps:
x Reduce the brightness/contrast setting to a minimum viewing level.
x Do not display fixed images for extended periods of time.
x Turn the power off when not in actual use.
IMPORTANT INFORMATION REGARDING DISPLAY OF VIDEO GAMES, COMPUTERS, CAPTIONS OR
OTHER FIXED IMAGES.
x Do not allow a still picture to be displayed for an extended period, as this can cause a permanent after-image
to remain on the screen.
Examples of still pictures include station logos, video games, computer images, text and images displayed in
4:3 mode.
x The permanent after-image on the screen resulting from abovementioned fixed images is not an operating
defect and as such is not covered by the warranty.
x This TV is not designed to display fixed images for extended periods of time. Do not let images display in 4:3
mode for extended periods of time.
PIXEL DEFECT
The LED display panel is a high tech part capable of reproducing high definition images. In ra
re cases, a few
non-active pixels may appear on the screen as a fixed point of blue, green or red. Please note that this does not
affect the performance of your product.
7
Page 9
Page 10
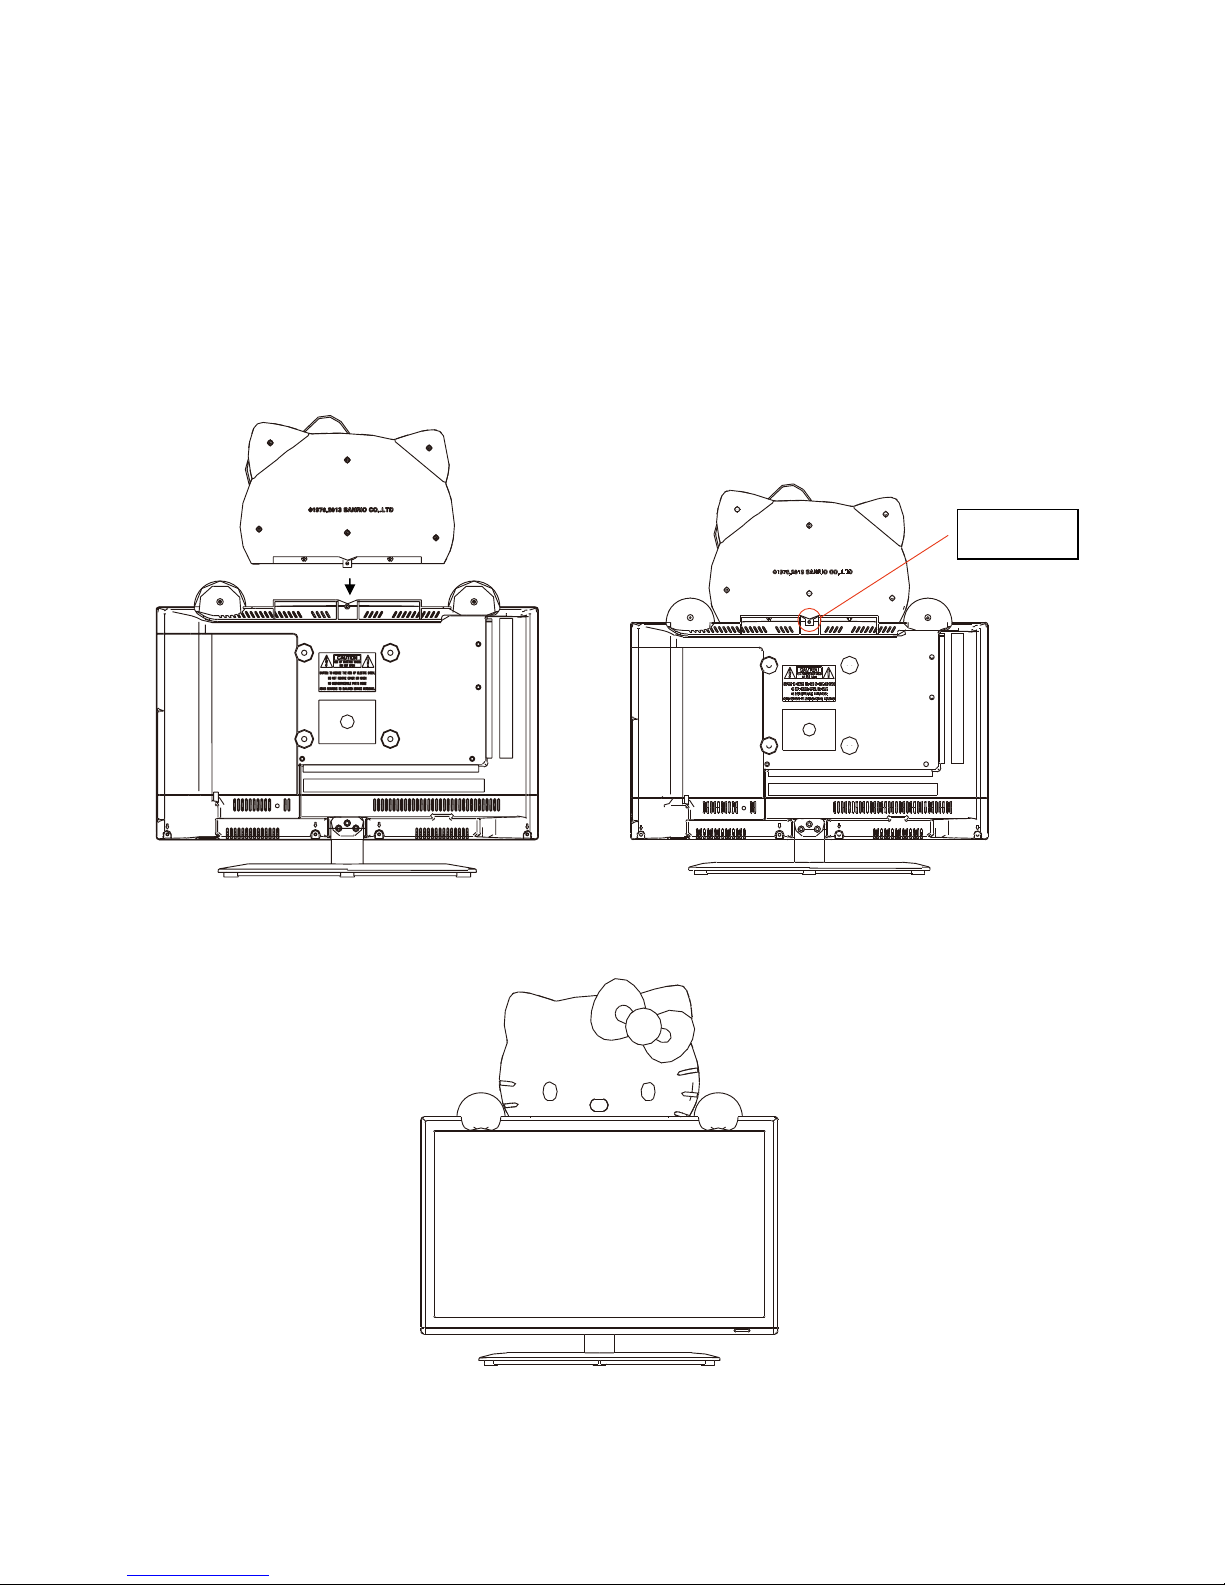
INSTALLING THE HELLO KITTY FIGURE TO THE TV FRAME
.
Step 1
Align the hole in the center of
the back base of the Hello
Kitty figure
to align with the
hole in the center of the top of
the TV f
rame.
Step 2
Secure the Hello Kitty figure to
the top of the TV
as shown
below by using screw and
screwdriver provided.
Screw hole
Step 3
Installation completed.
Enjoy.
9
Page 11
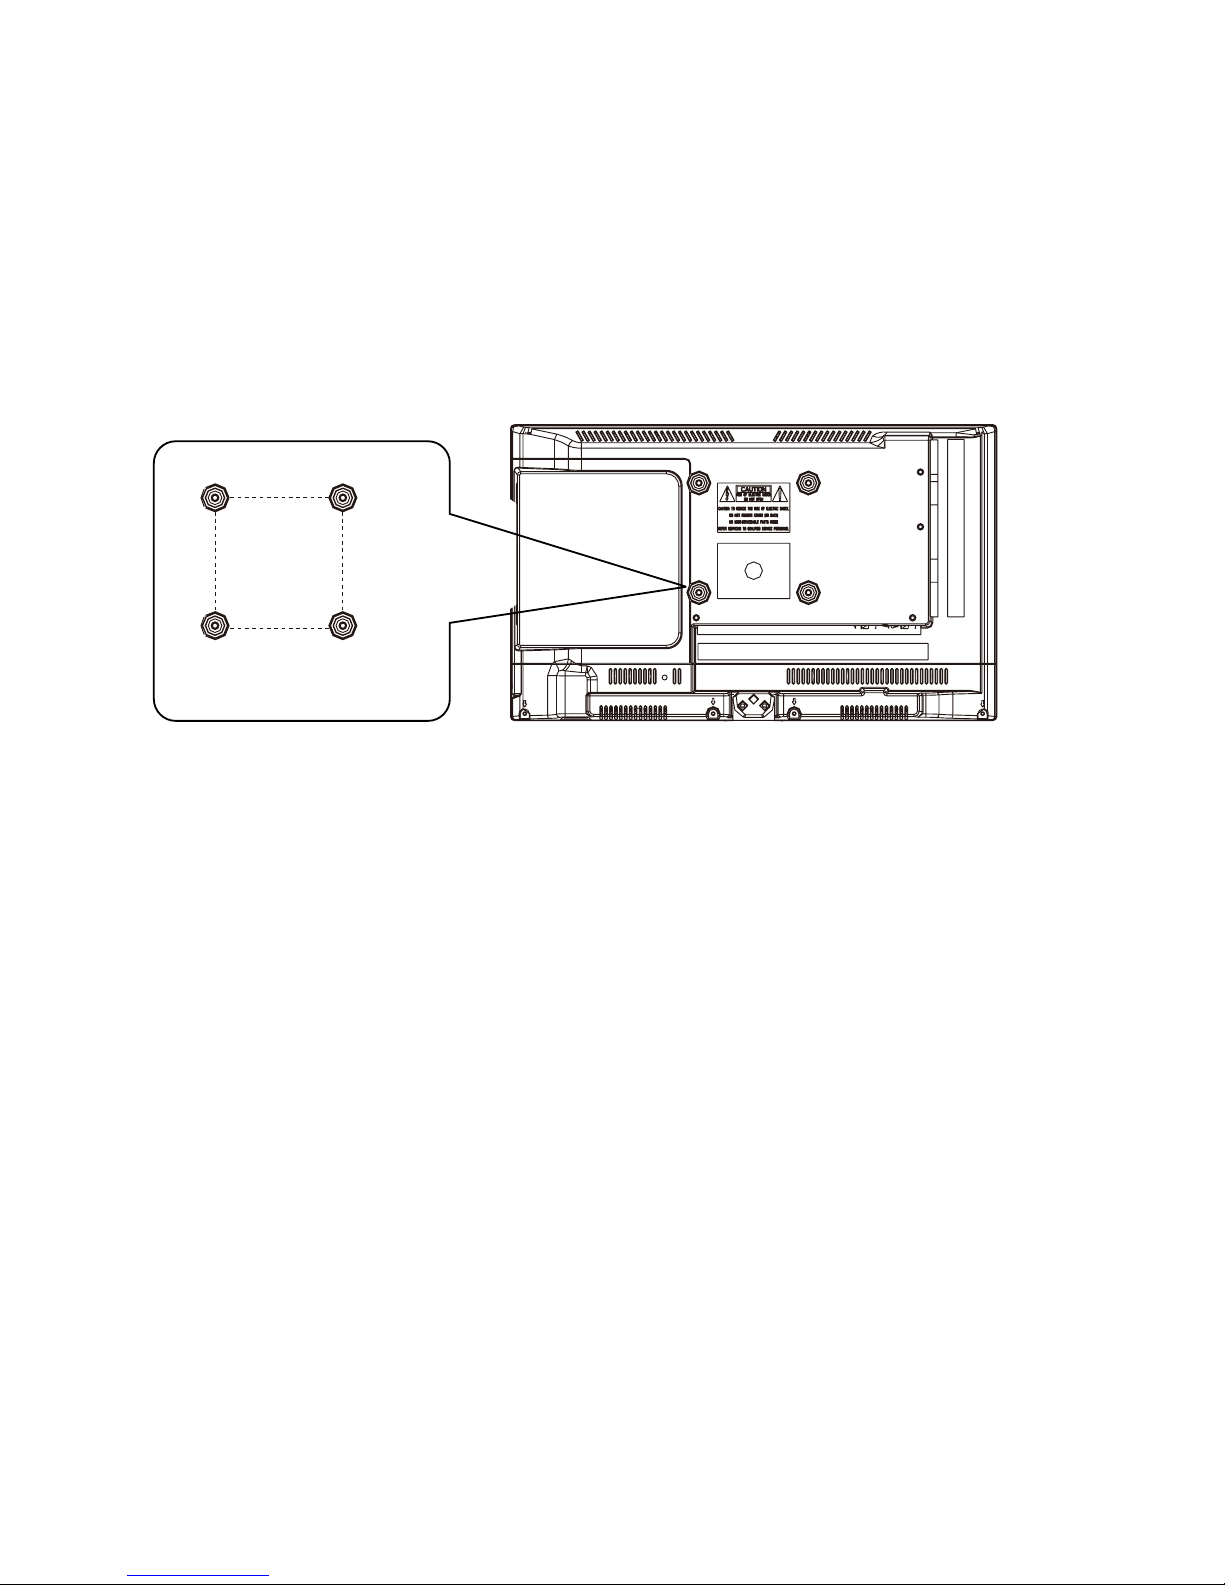
WALL MOUNTING
This unit is VESA-compliant, and is designed to be wall-mounted with a VESA-compliant (100 mm x 100 mm or 315/16” x 3-15/16”) mounting kit designed for flat-panel TVs (not included). Mount the TV unit according to the
instructions included in the mounting kit.
Length of wall mounting screws affixing the TV set should not exceed 8 mm (0.3”).
NOTE
Remove the base stand before mounting the unit on the wall.
CAUTION:
- Do NOT fasten the screws too tight for this may damage the TV or cause the TV to fall,
resulting in personal injury.
- Do not use screws longer than 8mm (0.3”) as it will cause damage to the internal parts.
- Fit the wall bracket securely following the manufacturer’s instructions.
- Do NOT mount your TV at more than a 15 degree angle.
- ALWAYS use two people to mount the
TV to a wall.
- Do NOT install your Wall Mount Kit while your TV is turned on. It may result in personal
injury due to electric shock.
10
100mm
(3-15/16”)
(3-15/16”)
100mm
Four mounting holes
(size M4 screw)
Page 12
CONTROL FUNCTIONS AND TERMINALS
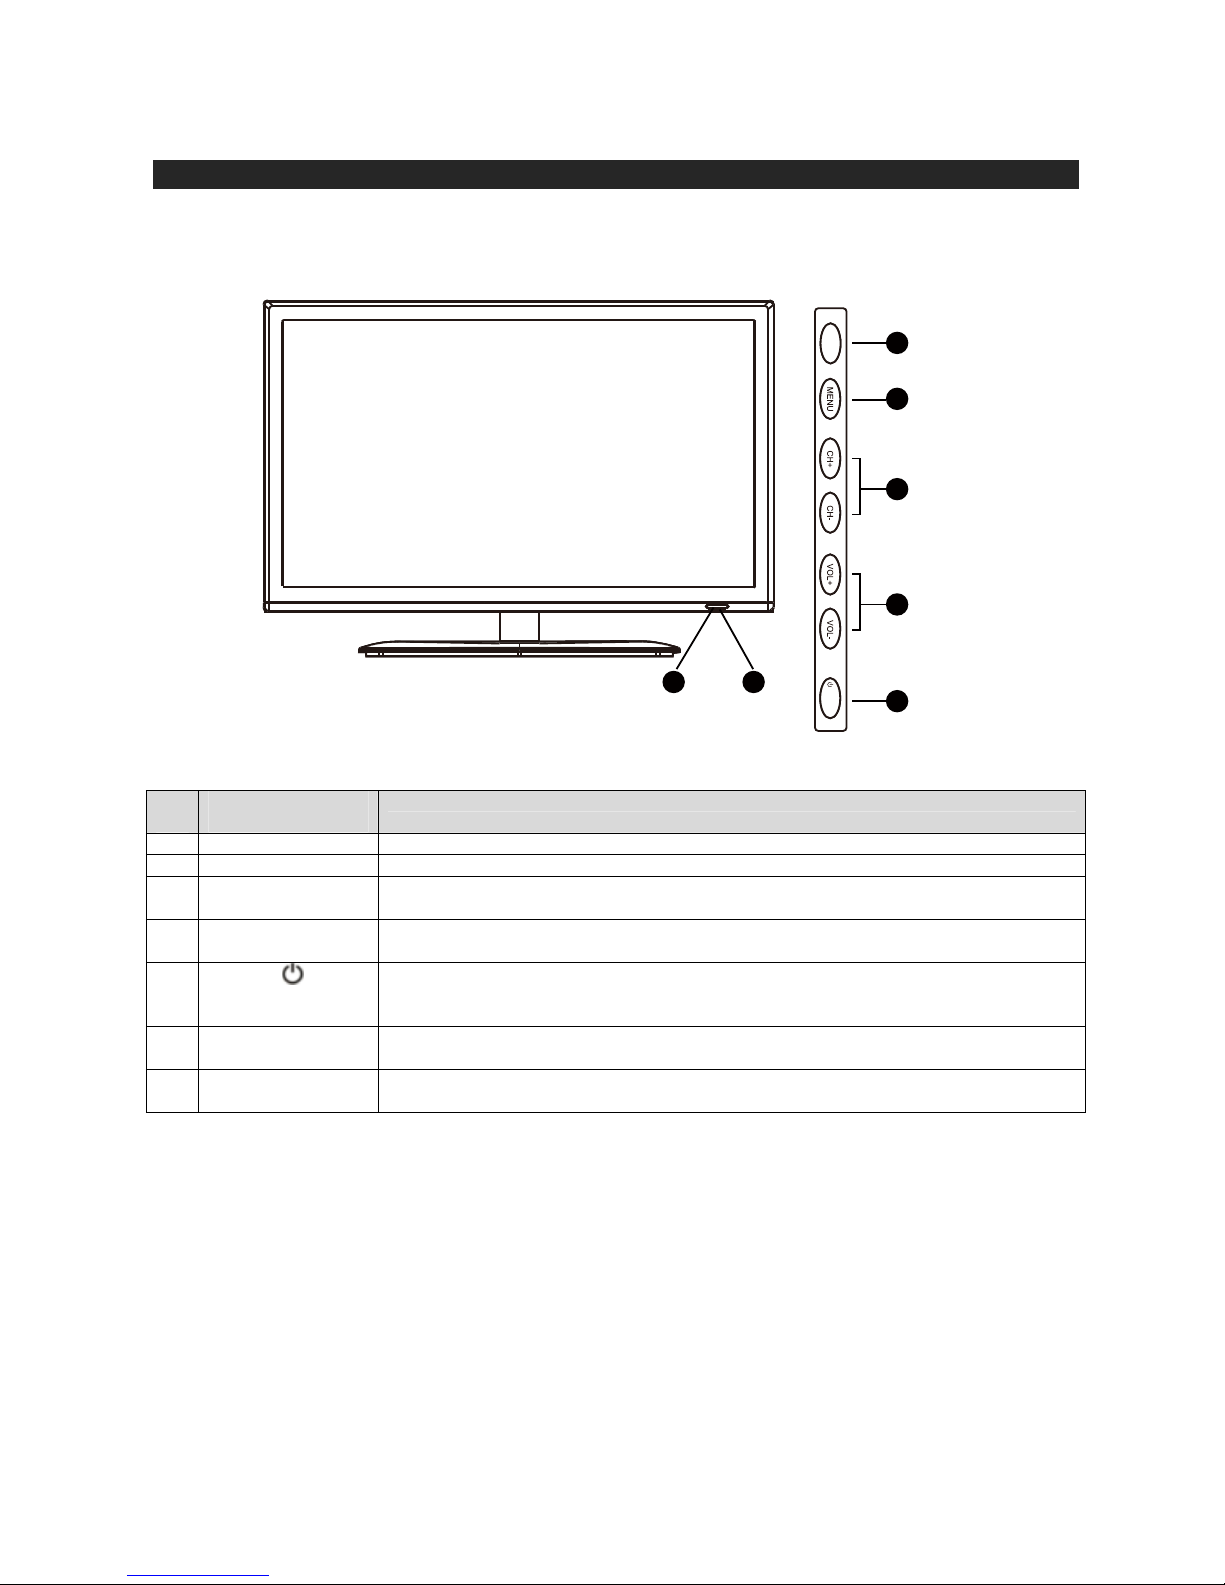
TV UNIT
FRONT PANEL CONTROL
NO.
CONTROL
BUTTON
FUNCTION DESCRIPTION
1 SOURCE To access the INPUT SOURCE menu.
2 MENU Press this button to access the main menu page.
3 CH+/- Press these two buttons to directly change the TV channel.
In menu operations, these buttons also serve as up/down buttons.
4 VOL+/- Press the VOL+ or VOL - button to directly increase or decrease the sound volume
level. In menu operations, these buttons also serve as right/left buttons.
5
POWER
/
STANDBY
Press this button to turn the unit ON from STANDBY mode. Press it again to turn the
set back to STANDBY.
6 POWER
INDICATOR
Indicates Power ON/Standby mode
7 INFRARED
SENSOR
Receives IR signal from remote control
NOTE:
Functions of CH+/-, VOL+/-, MENU, SOURCE and STANDBY are also provided on the remote control. This user
manual provides a description of remote control operating functions.
11
source
STANDBY
1
2
3
4
5
6 7
Ź
Page 13
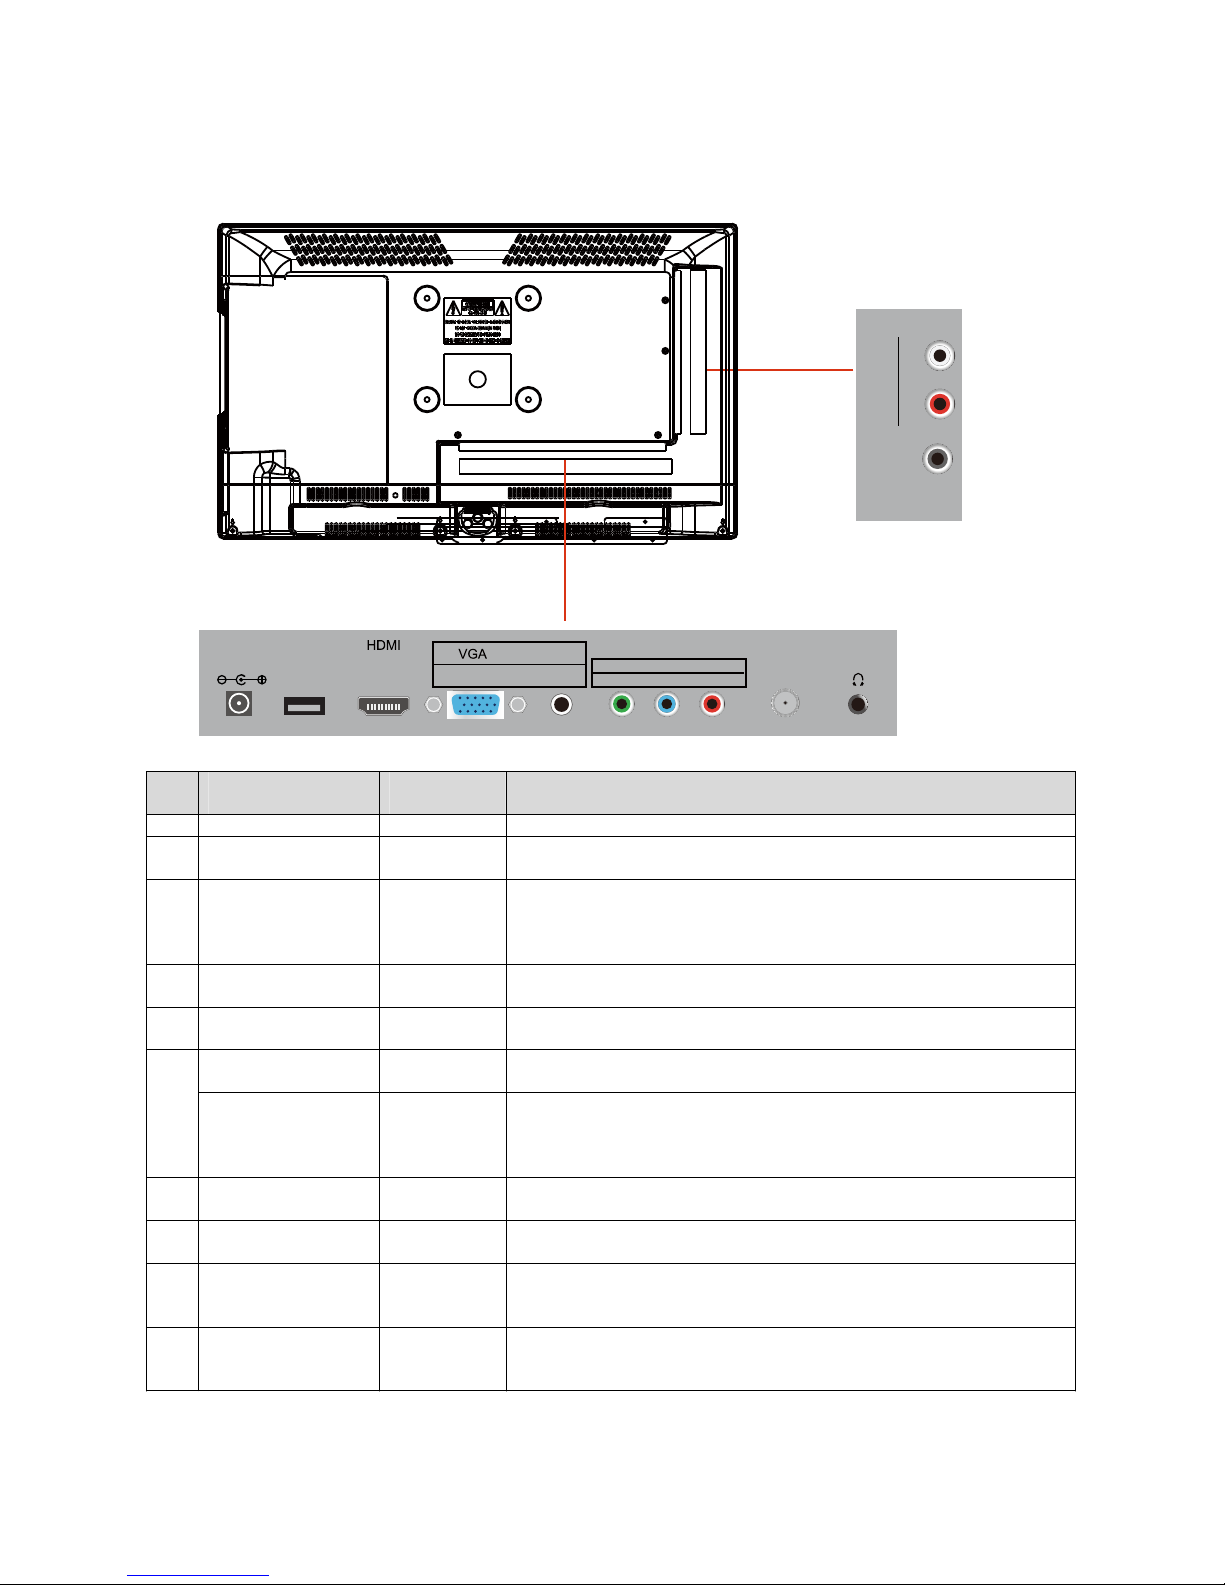
BACK & SIDE PANEL CONNECTORS
NO. NAME OF
INPUT/OUTPUT
TYPE OF
CONNECTOR
FUNCTI ON DESCRI PTION
1.
DC IN DC jack Connect to DC plug of AC adaptor.
2.
USB PORT Type –A USB
connector
Connect to a USB flash drive for playing music and viewing picture files up to 4GB.
Only FAT16 or FAT32 formatted flash drives are supported.
3.
HDMI INPUT HDMI female
connector
Connect to a device that uses HDMI cable, such as Blu-ray, HD cable / satellite box
or video cam. This connection port receives pure digital audio and high definition
video signals through one single cable. This port also can accept a HDCP video
device for video.
4.
PC VIDEO INPUT
(VGA)
D-sub (15-pin) Connect to the VGA output from a PC or notebook using a VGA cable. Be sure to
connect your audio cable as well if you want to hear sound from the VGA source.
5.
PC AUDIO INPUT 3.5mm stereo
jack
Connect to the audio output from a PC or a DVI video device.
COMPONENT VIDEO RCA jacks x 3 Connect to a device with the YPb Pr output jack, such as a DVD or VCR.
Color codes: green for Y, blue for Pb & red for Pr .
6.
VIDEO INPUT
(COMPOSITE)
Share Y RCA
jack of
component
video
Connect to a device with the composite video output jack, such as a DVD or VCR.
Color code: yellow of your external device.
Green of your KT2219MBY
7.
ANTENNA/CABLE 75-ohm F
connector
Connect to a 75-ohm coaxial cable to receive signal from an outdoor antenna, cable
or cable box.
8.
HEADPHONE 3.5mm stereo
jack
Connect to a pair of stereo headphones with a 3.5mm stereo plug for private
listening.
9.
DIGITAL AUDIO OUT
(COAXIAL)
RCA jack Connect to the coaxial digital audio input of an external AV amplifier with Dolby
Digital (AC3) decoding capacity.
Color code: orange
10.
AUDIO INPUT FOR
COMPONENT &
COMPOSITE VIDEO
RCA jacks x 2 Audio input: Connect to the Video Audio output jack of DVD.
Color codes: white for LEFT and red for RIGHT
12
PC INPUT
AUDIO
Y
ANTENNA/
PHONES
CABLE
(75 OHMS)
COMPOSITE
VIDEO IN
COMPONENT VIDEO IN
Pb Pr
USB
INPUT
POWER IN
(DC 12V 3A)
DIGITAL
R
AUDIO IN
L
(COAXIAL)
AUDIO OUT
Page 14
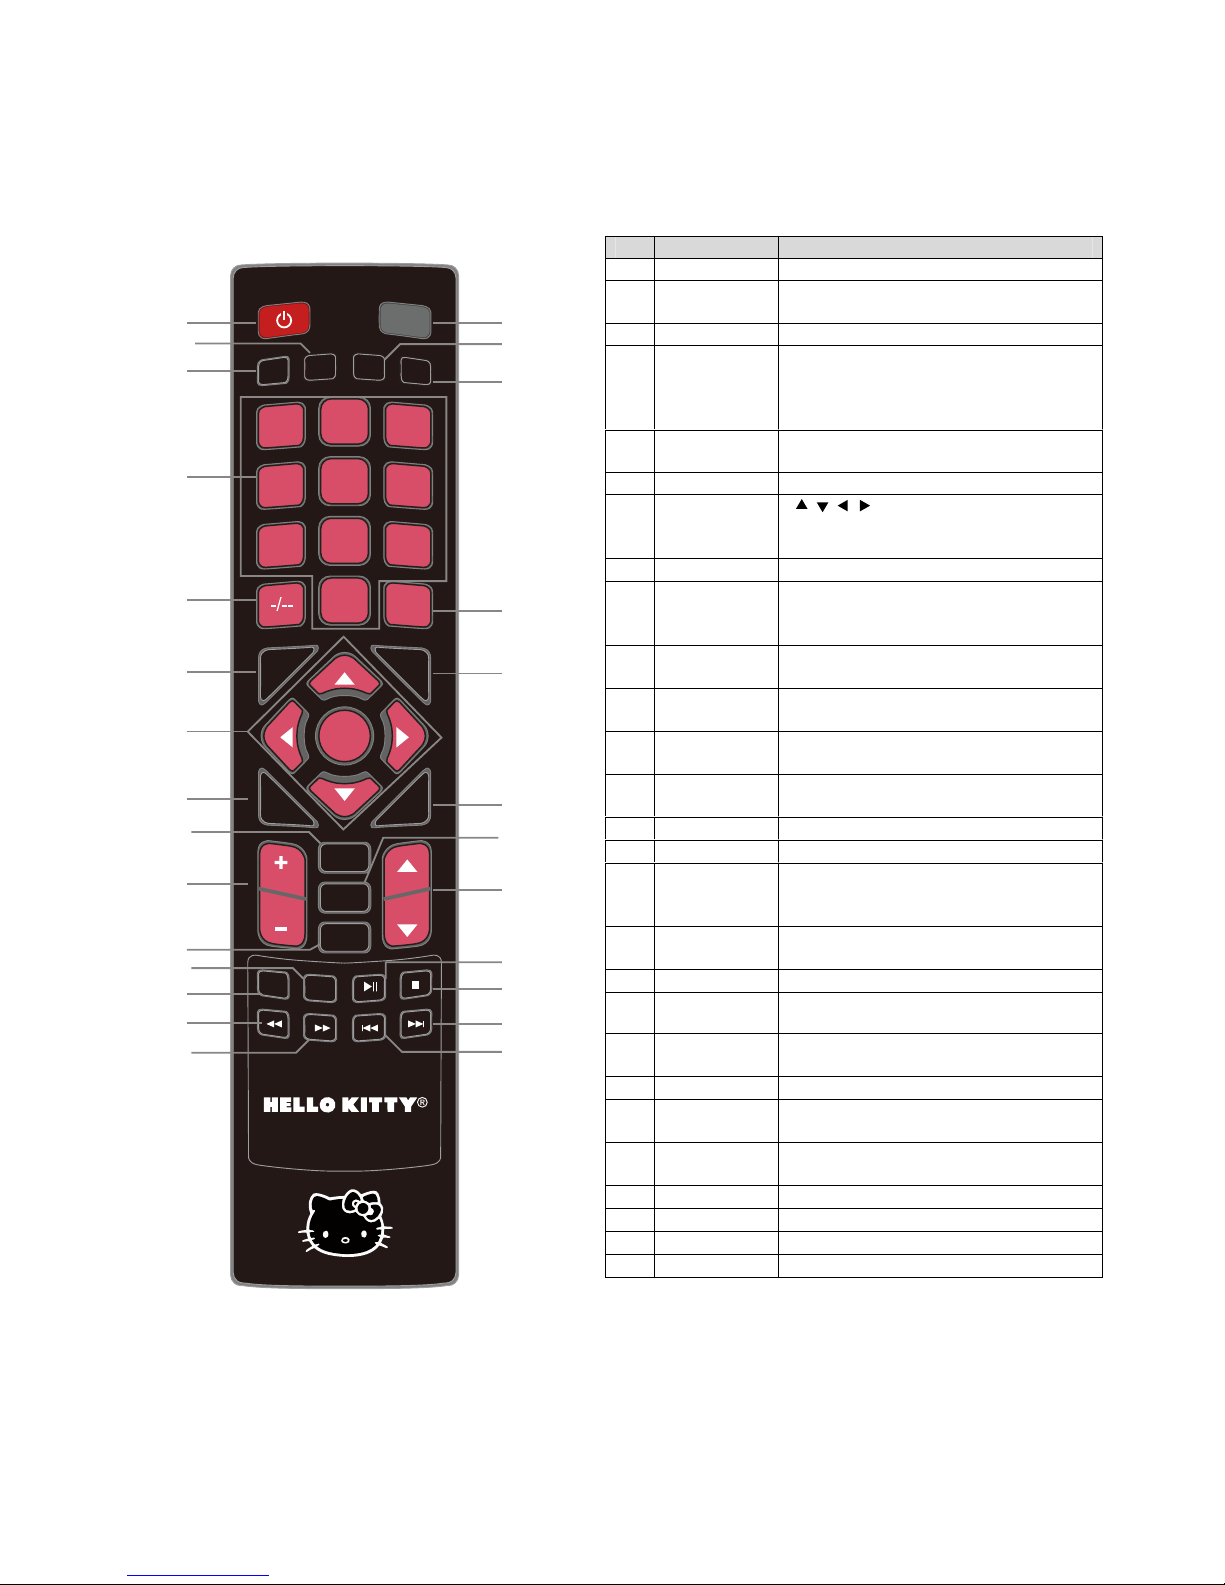
REMOTE CONTROL
No. FUNCTION DESCRI PTION
1 POWER/Standby
Turn the TV on or put it on Standby
2 ASPECT
Select different viewing modes of the TV
and external video inputs.
3 PICTURE
Select various preset picture settings.
4 NUMBERS
Press 0-9 to select a TV channel directly
when you are watching TV. The channel
will change after 2 seconds.
5 -/--
Insert the dash for selecting digital
channels directly.
6 DISPLAY
Show the display information
7 THUMB STICK
( / / / / ENTER): Allows you to
navigate the on-screen menus and system
settings to your preference.
8 MENU
Bring up the main TV menu on the screen.
9 EPG
In TV mode, press to enter the EPG
(Electronic Programming Guide)
menu directly
10 VOL +/-
Press the VOL buttons to increase or
decrease the sound level.
11 TV/USB
Toggle select TV mode or Launch the USB
reader function for pictures
and music.
12
MTS
Select stereo/mono or second audio
programming.
13 CC
Cycle between different closed captioning
modes.
14 Fast Backward Fast forward MP3 playback in USB mode.
15 Fast Forward Fast backward MP3 playback in USB mode.
16 MUTE
Turn the sound off from the TV. To unmute
either
press VOL(+) or press the MUTE
button again.
17 SLEEP
Select amount of time to let your TV turn off
automatically.
18 SOUND
Select
various preset sound settings.
19 LAST
Go between current and last channel
selected.
20 SOURCE
Press this button to cycle through the
INPUT sources.
21 EXIT
Exit the main TV menu on the screen.
22 FAVORITE
(FAV)
Press to add or remove your favorite
channel.
23 CH +/-
Press the CH buttons to go through the
channel list.
24 Play/Pause Play/Pause media playback in USB mode
25 Stop Stop media playback in USB mode
26 Skip Next
Skip to next track/picture
27 Skip Previous
Skip to previous track/picture
13
PICTURE
ASPECT
SOUND
SLEEP
1
2
3
4
5
6
7
8
9
0
VOL CH
SOURCE
DISPLA
Y
EPG
STANDBY
MUTE
LAST
ENTER
TV/USB
FAV
MENU
CC
MTS
EXIT
116
18
19
20
21
22
23
25
26
27
24
17
2
3
4
5
6
7
8
10
13
14
15
11
12
9
Page 15
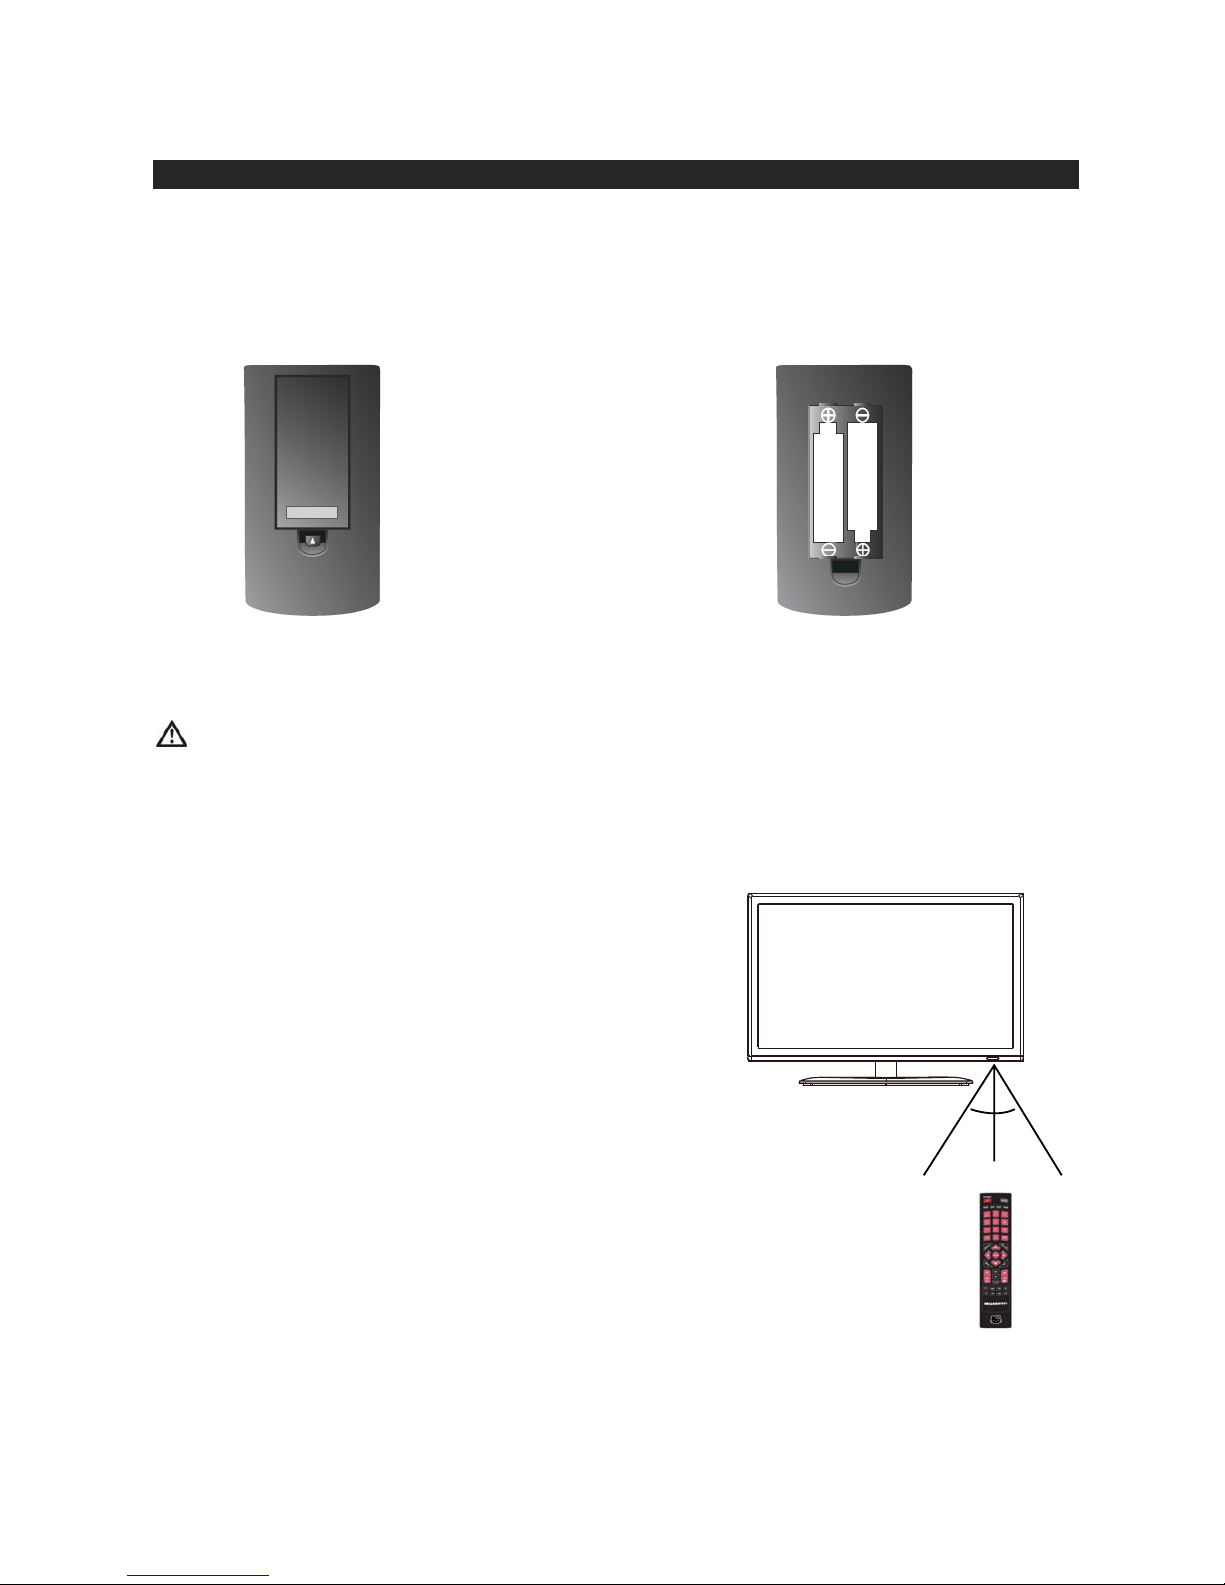
GETTING STARTED
USING THE REMOTE CONTROL
TO INSTALL BATTERIES
1. Open the battery door.
.2
Insert 2 "AAA" batteries.
BATTERY REPLACEMENT
When the batteries become weak, the operating distance of the remote control is greatly reduced and you will
need to replace the batteries.
BATTERY CARE
x Be sure that the batteries are installed correctly. Wrong polarity may damage the unit.
x (a) Do not mix old and new batteries.
(b) Do not mix alkaline, standard (carbon-zinc) or rechargeable (nickel-cadmium) batteries.
x If the unit is not to be used for an extended period of time, remove the batteries. Old or leaking batteries can
cause damage to the unit and may void the warranty.
x Never attempt to recharge “Non-rechargeable” batteries.
x Do not dispose of batteries in fire, batteries may explode or leak.
x Batteries should be changed by adults.
Use the rem
ote control by pointing it towards the remote sensor
window of the set. Objects between the remote control and sensor
window may prevent proper operation.
CARE OF REMOTE CONTROL
x Do not expose the remote control to shock. In addition, do not
expose the remote control to liquids, and do not place in an area
with high humidity.
x Do not place the remote control under direct sunlight. The heat
may cause deformation of the unit.
x The remote control may not work properly if the remote sensor
window of the main unit is under direct sunlight or strong lighting.
In such a case, change the angle of the lighting or
the TV set, or
operate the remote control closer to the remote sensor window.
14
5m
30° 30°
Page 16
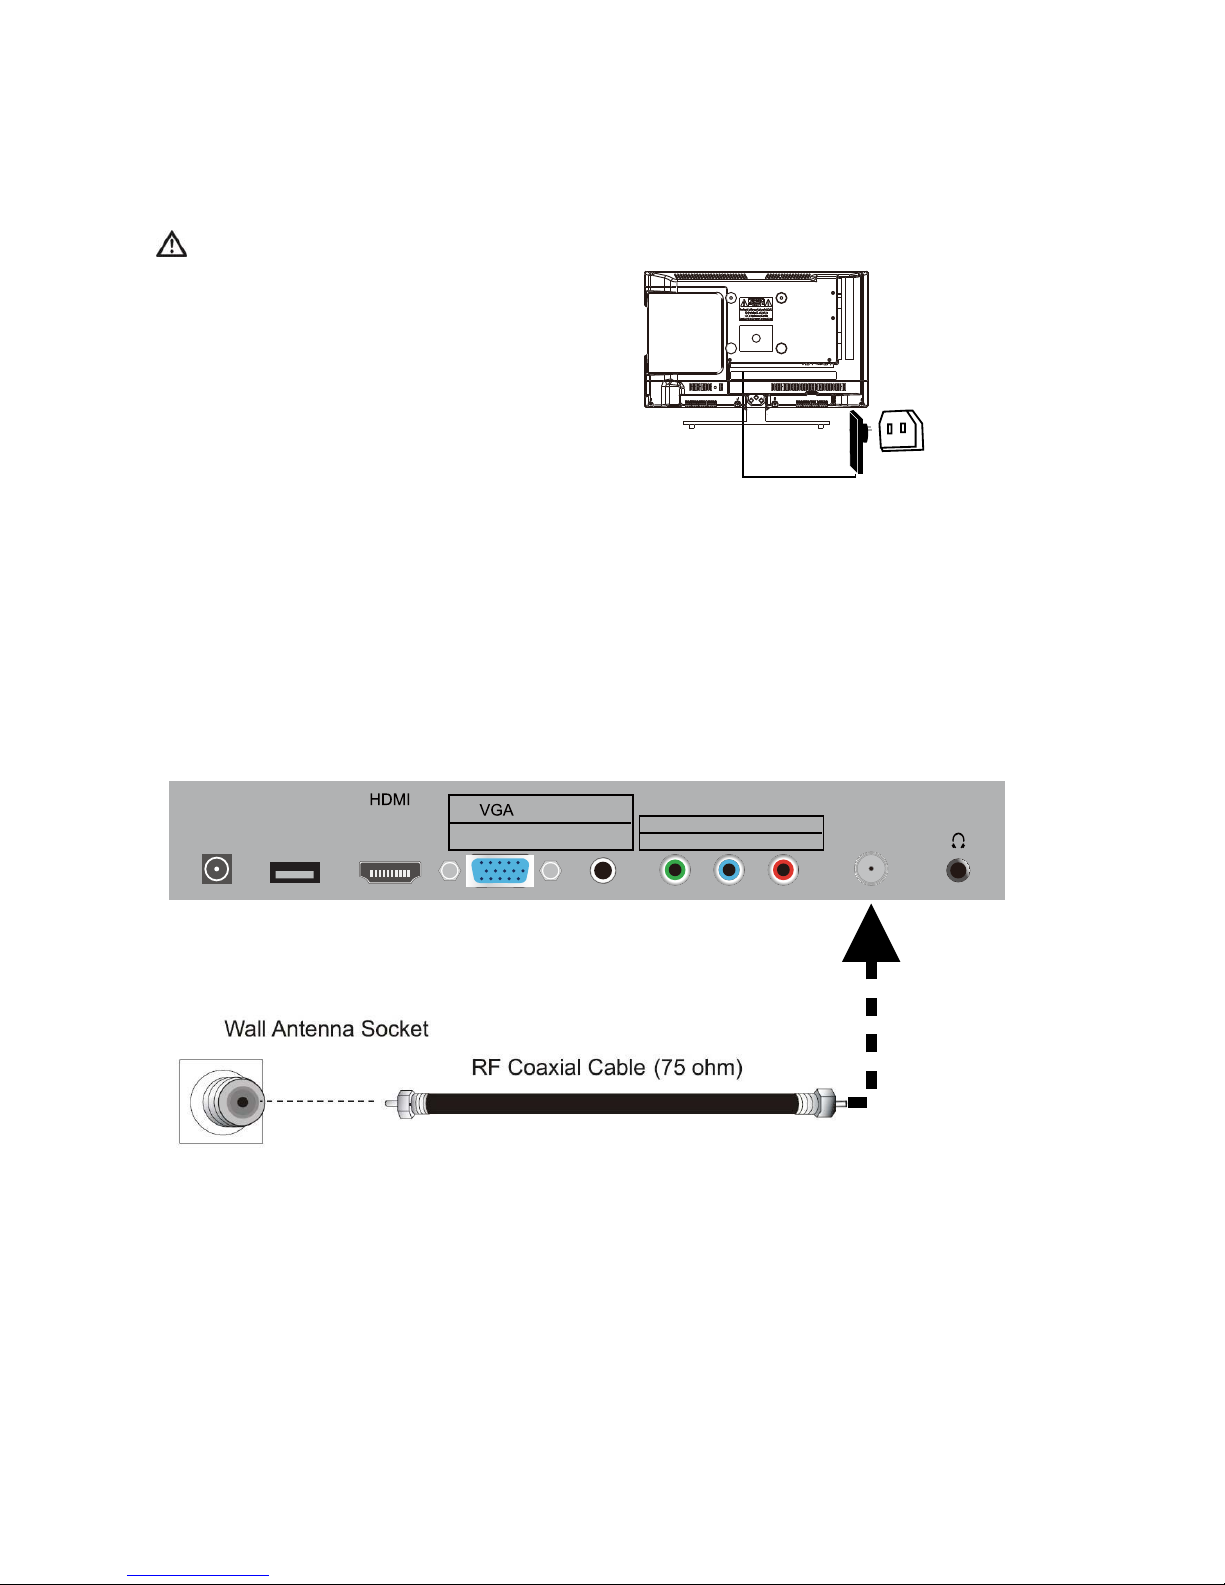
CONNECTING THE TV TO AC ADAPTER
Insert the AC ADAPTER (included) into a household 120V~ 60Hz AC socket outlet.
WARNINGS
Ensure that the AC ADAPTER is easily accessible.
Ensure the AC ADAPTER is securely connected to
prevent electric shock.
Do not touch the AC ADAPTER with a wet hand to
prevent an electric shock.
Do not change the AC ADAPTER other than that
provided with this TV to prevent fire or electric shock.
Do not damage the AC ADAPTER. A damaged AC
ADAPTER may cause fire or electric shock.
Do not move the TV with the AC ADAPTER plugged
in the power outlet.
Do not place the AC ADAPTER near a high
temperature object.
Do not twist, bend excessively or stretch the DC cord of the AC ADAPTER.
Do not pull on the DC cord. Always grip the AC ADAPTER body when disconnecting it from the power outlet.
Do not use
a damaged AC
ADAPTER or AC power outlet.
ANTENNA CONNECTION
INSTALL the unit in a room where direct light will not fall upon the screen. Total darkness or a reflection on the
picture screen may cause eyestrain. Soft and indirect lighting is recommended for comfortable viewing.
Optimum reception of color requires a good signal and will generally mean that an outdoor antenna must be used.
The exact type and position of the antenna will depend upon your particular area.
NOTE:
x It is recommended that the 75-ohm coaxial cable be used to eliminate interference and noise which may
occur due to radio wave conditions.
x The antenna cable should not be bundled with the power cord and the like.
x If the antenna is not installed properly, contact your dealer for assistance.
15
AC ADAPTOR
120V~AC POWER OUTLET
PC INPUT
AUDIO
Y
ANTENNA/
PHONES
CABLE
(75 OHMS)
COMPOSITE
VIDEO IN
COMPONENT VIDEO IN
Pb Pr
USB
INPUT
POWER IN
(DC 12V 3A)
Page 17
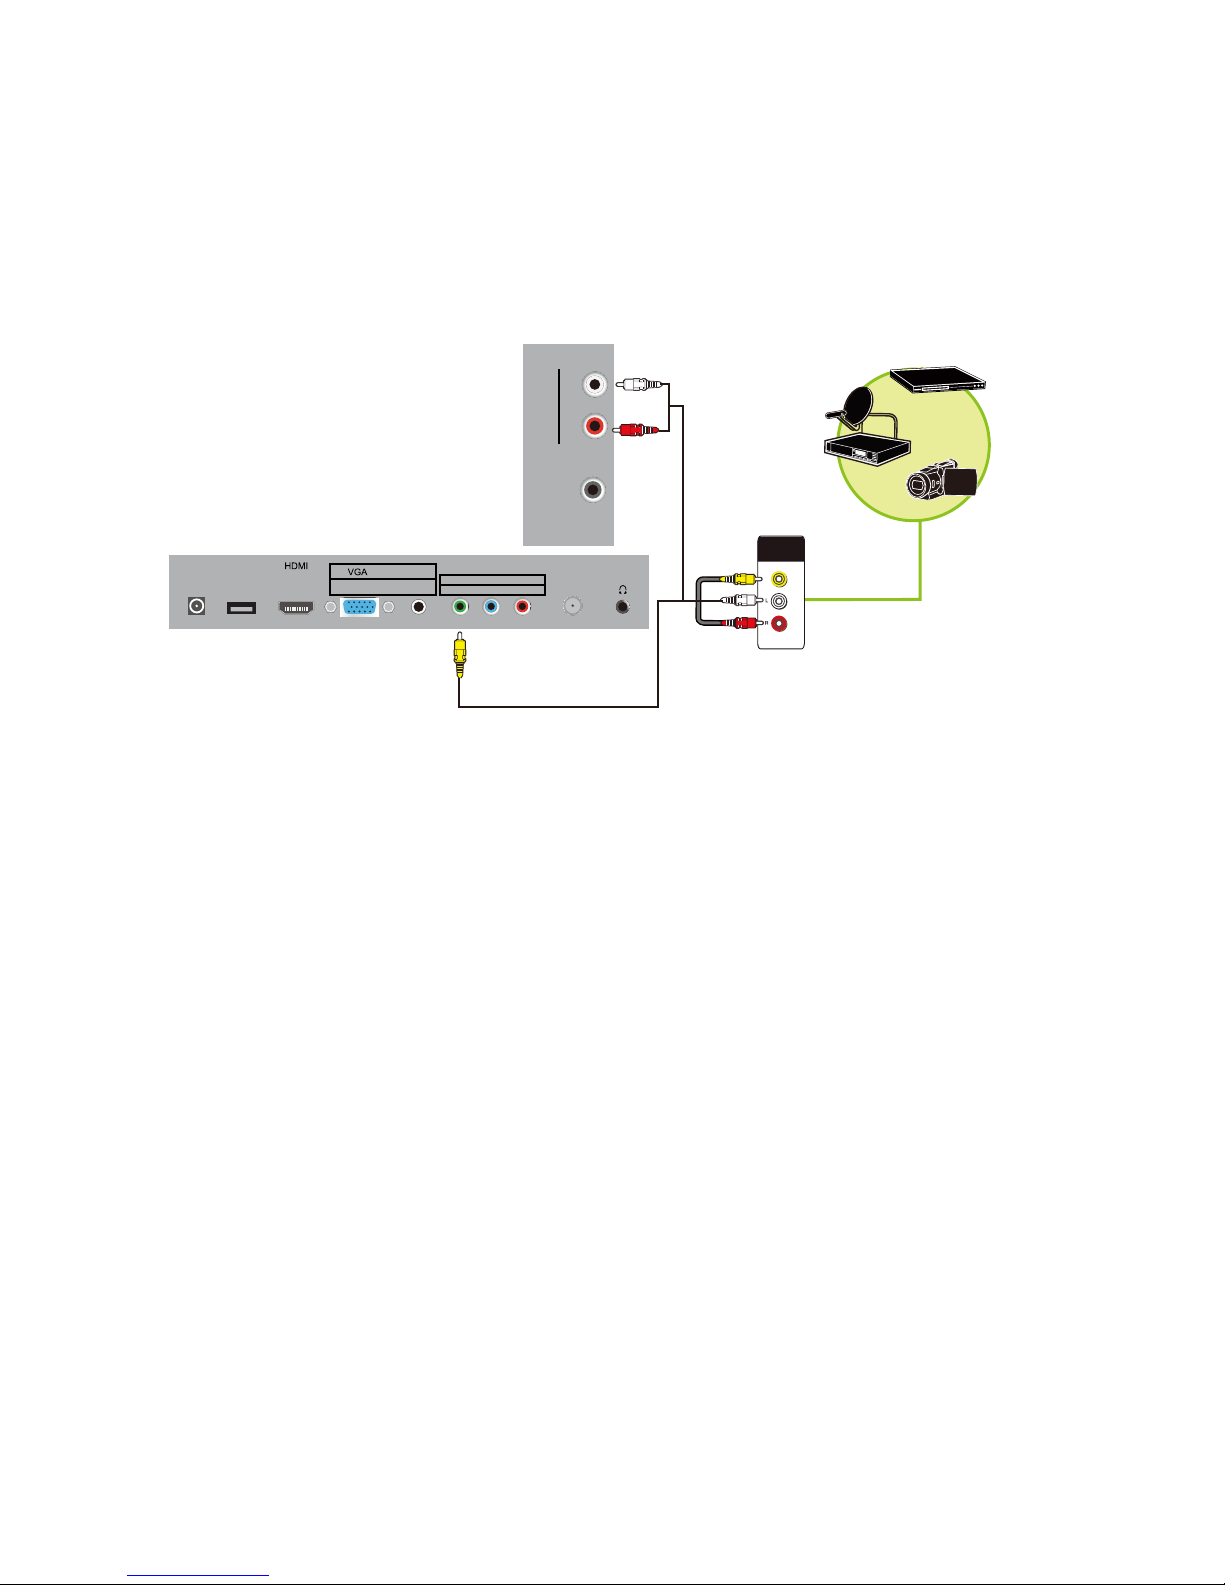
CONNECTING TO A DEVICE USING THE COMPOSITE VIDEO AND STEREO AUDIO
INPUT TERMINALS
How to connect:
Connect the AUDIO (L/R) jacks on TV to the corresponding color-coded output jacks on the device.
Connect Composite Video IN jack on TV (color coded green, share with Y RCA jack of component video ) to video
output jack of device, such as a VCR, using a good quality Audio/Video cable (not included) as shown below:
To play a videotape from a VCR:
1. Turn on your TV, then press SOURCE button. The INPUT SOURCE menu opens.
2. Press ϧ or ϰ to select AV, then press ENTER to confirm.
3. Turn on your VCR , insert a videotape and press the Play button.
Note: The component video and AV jacks are shared. This means you can connect only one component video or
AV device at a time. We suggest us
ing HDMI if your device supports it.
16
PC INPUT
AUDIO
Y
ANTENNA/
PHONES
CABLE
(75 OHMS)
COMPOSITE
VIDEO IN
COMPONENT VIDEO IN
Pb Pr
USB
INPUT
POWER IN
(DC 12V 3A)
DIGITAL
R
AUDIO IN
L
(COAXIAL)
AUDIO OUT
Connect the yellow video cable
connector to the green
VIDEO IN(Y) jack
onthebackofyourTV.
AV cable option
AUDIO/VI DO
OUT
Page 18
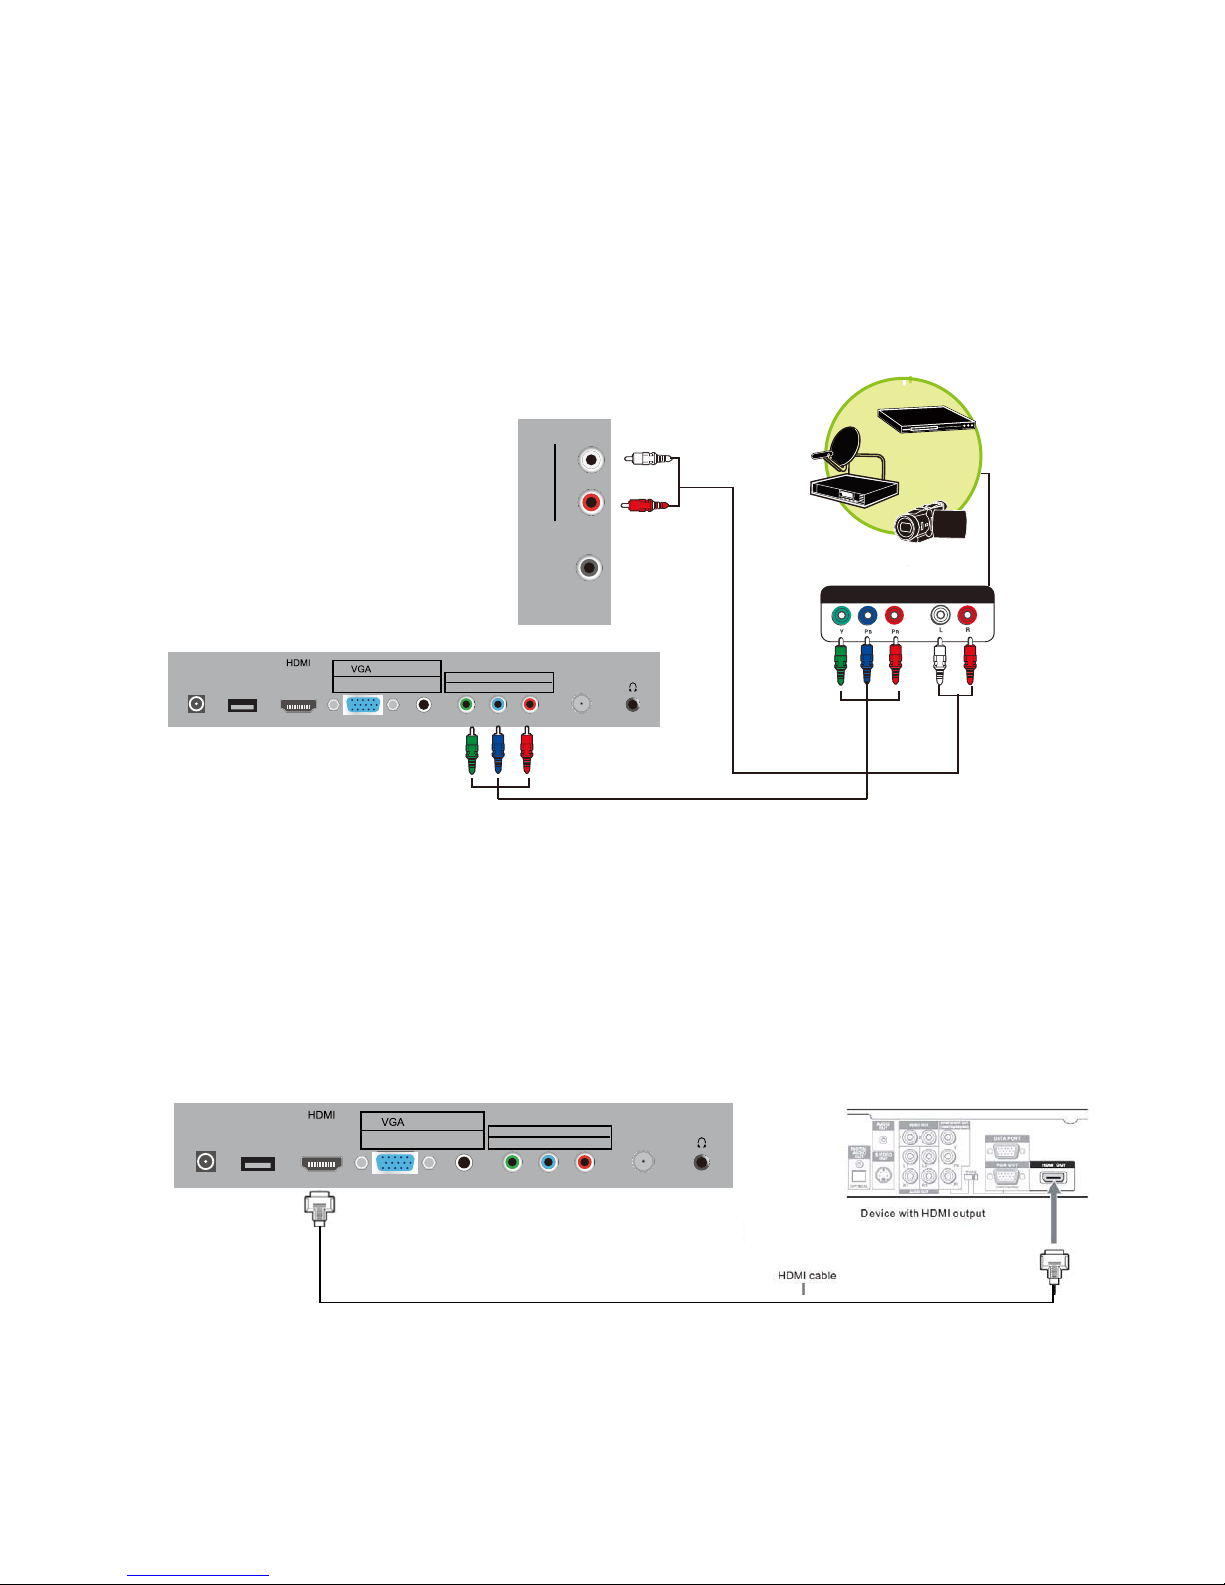
CONNECTING TO A DEVICE USING THE COMPONENT VIDEO AND STEREO AUDIO
INPUT TERMINALS
How to connect:
1. Connect the Y, Pb, Pr input jacks on the TV to the corresponding color coded output jacks on the device,
such as a DVD player, using a good quality Component Video cable (not included) as shown below.
2. Connect the AUDIO (L/R) input jacks on the TV to the corresponding color coded output jacks on the device
using a good quality audio cable (not included).
To play component video from a DVD player:
1. Turn on your TV, then press SOURCE button. The INPUT SOURCE menu opens.
2. Press ϧ or ϰ to select Component, then press ENTER to confirm.
3. Turn on your DVD player and set it to the correct video output mode. See the device's user guide for more
information.
CONNECTING TO A DEVICE USING THE HDMI INPUT TERMINAL
How to connect:
Connect the HDMI connector on the TV to the HDMI connector on the device, such as a Blu-
ray disc player,
using a good quality HDMI cable (not included) as shown below:
To play a Blu-ray disc:
1. Turn on your TV, then press SOURCE button. The INPUT SOURCE menu opens.
17
PC INPUT
AUDIO
Y
ANTENNA/
PHONES
CABLE
(75 OHMS)
COMPOSITE
VIDEO IN
COMPONENT VIDEO IN
Pb Pr
USB
INPUT
POWER IN
(DC 12V 3A)
AUDIO/VIDEO OUT
DIGITAL
R
AUDIO IN
L
(COAXIAL)
AUDIO OUT
PC INPUT
AUDIO
Y
ANTENNA/
PHONES
CABLE
(75 OHMS)
COMPOSITE
VIDEO IN
COMPONENT VIDEO IN
Pb Pr
USB
INPUT
POWER IN
(DC 12V 3A)
Page 19
2. Press ϧ or ϰ to select HDMI, then press ENTER to confirm.
3. Turn on your Blu-ray disc player and set it to the correct video output mode. See the device's user guide for
more information.
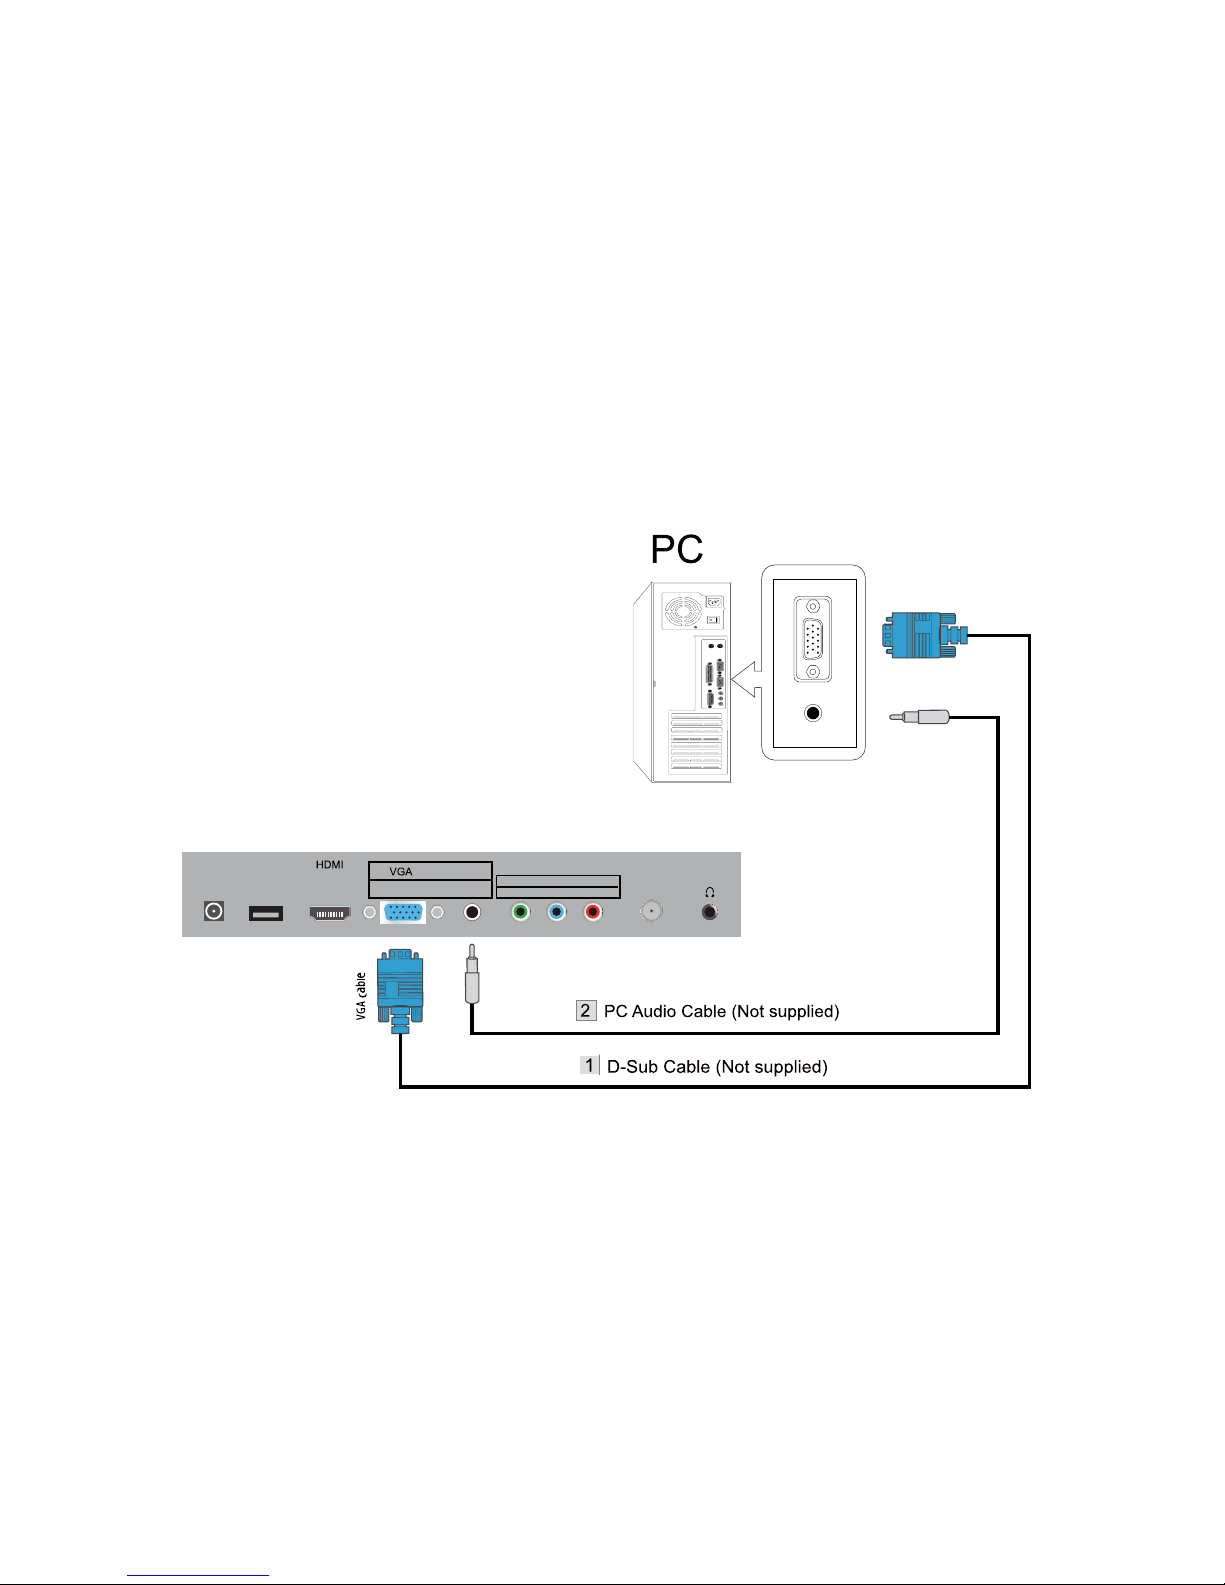
CONNECTING TO A PC USING THE PC VIDEO (VGA) AND PC AUDIO INPUT
TERMINALS
How to connect:
1. In TV & your PC power off mode, connect the PC VIDEO (VGA) connector on the TV to the corresponding
VGA connector on the PC using a good quality VGA cable (not included) as shown below.
2. Connect the PC AUDIO input jack on the TV to the corresponding output jack on the PC using a good quality
audio cable with 3.5mm stereo plugs (not included).
To play video from a PC:
1. Turn on your TV, then press SOURCE button
. The INPUT SOURCE menu opens.
2. Press ϧ or ϰ to select PC, then press ENTER to confirm.
3. Turn on your PC and adjust the display properties as required. Please also see the PC Video Format Table
under the DISPLAY MODE section for more information.
18
PC INPUT
AUDIO
Y
ANTENNA/
PHONES
CABLE
(75 OHMS)
COMPOSITE
VIDEO IN
COMPONENT VIDEO IN
Pb Pr
USB
INPUT
POWER IN
(DC 12V 3A)
Page 20
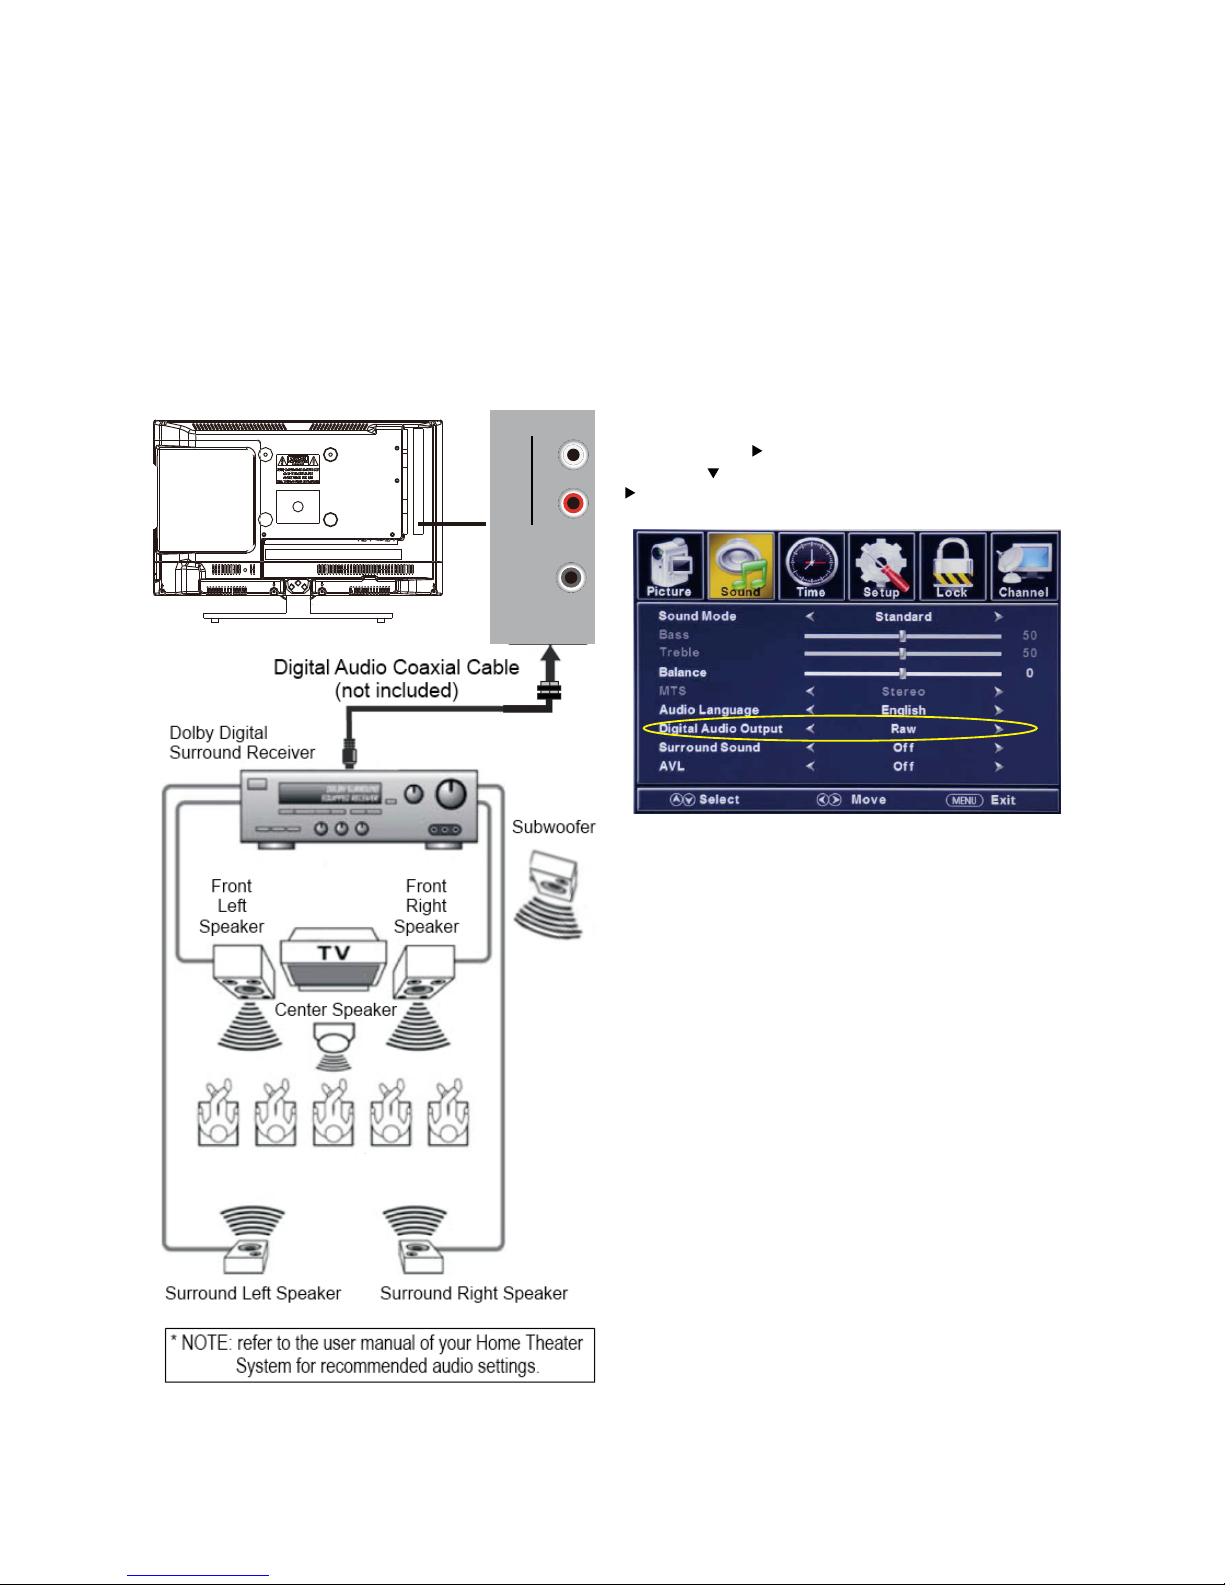
CONNECTION TO A HOME THEATER AUDIO SYSTEM
For BEST Audio Performance
Connecting to a Home Theater System:
Dolby Digital can deliver optimal 2 channel stereo or surround sound with five discrete full range channels plus a
sixth channel for a subwoofer.
Enjoy optimal sound reproduction from your system with a Dolby Digital amplifier that incorporates a digital
coaxial input. Connect an optional digital cable directly to the television’s coax audio output to listen through all
inputs except VGA.
NOTE: The VGA does not support digital audio.
How to Setup Digital Output
Press the MENU button on the remote control.
Press the right
arrow button to select SOUND Press
the down
arrow button to highlight SPDIF type right
RaworPCM.
19
DIGITAL
R
AUDIO IN
L
(COAXIAL)
AUDIO OUT
Page 21
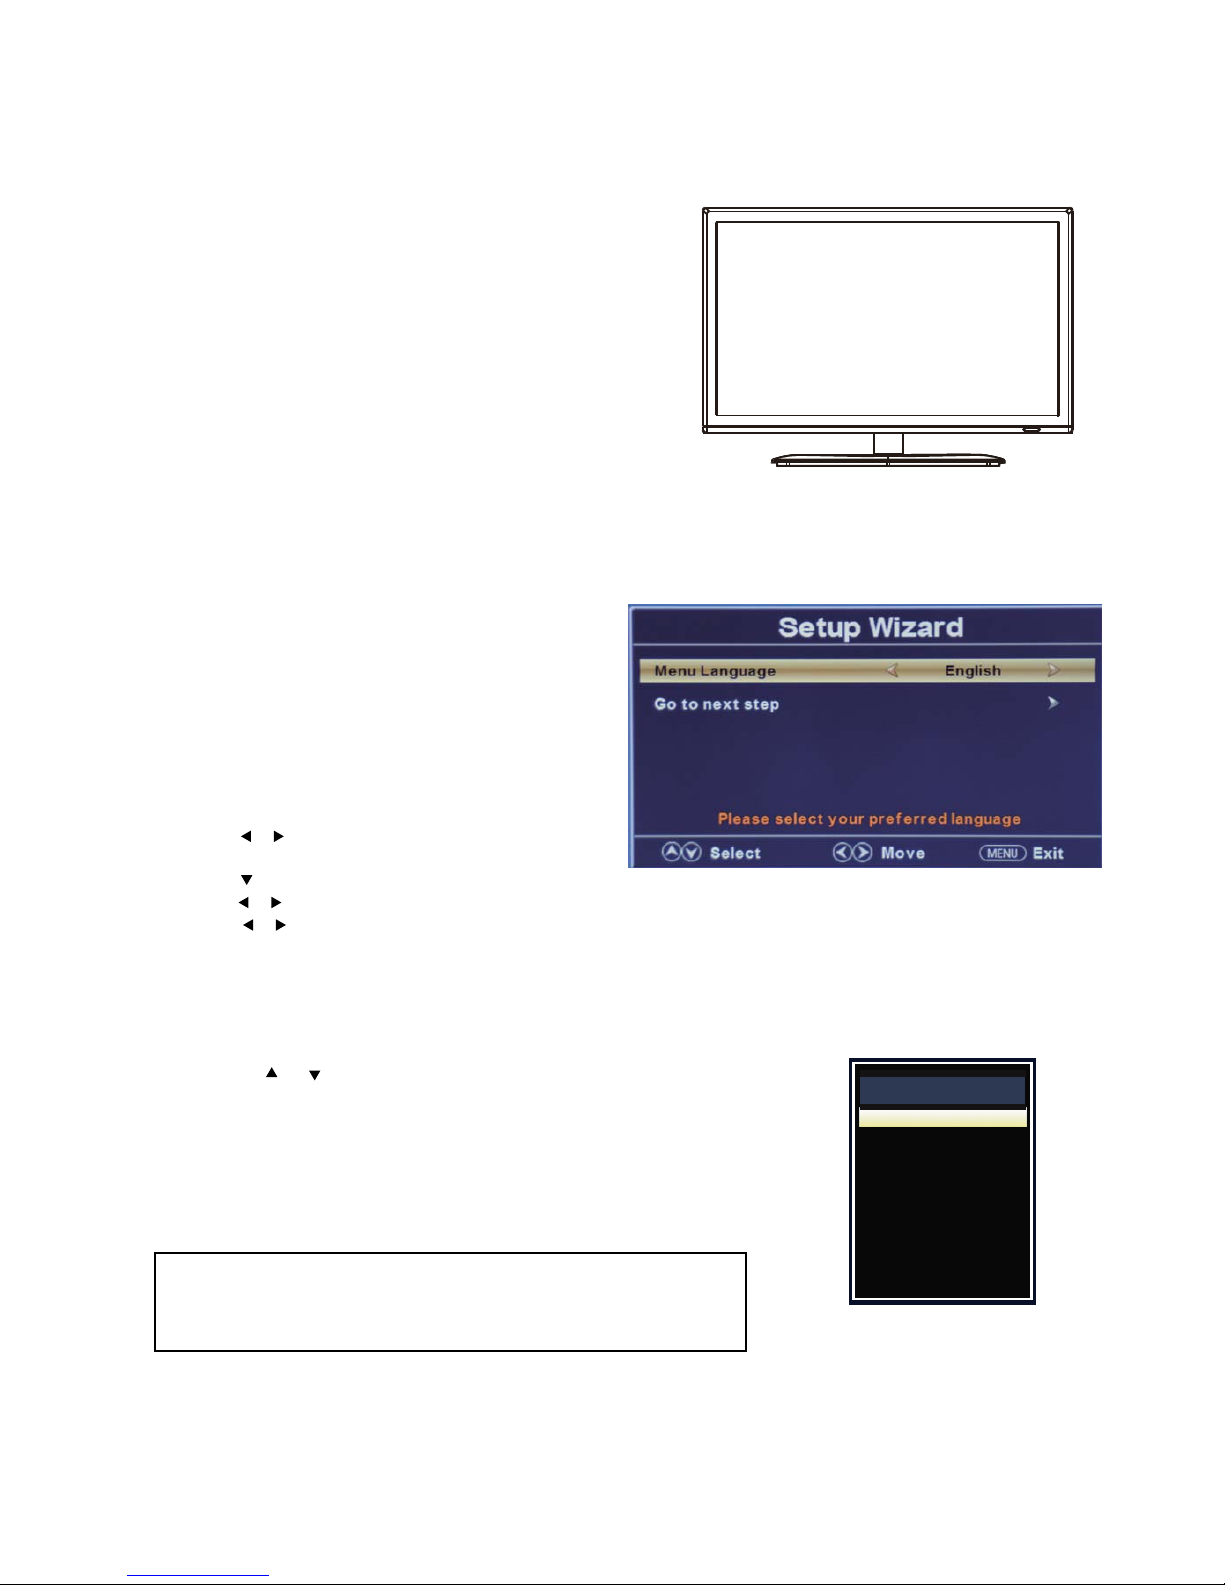
PUTTING THE UNIT ON A PROPER SURFACE
r and be sure to
URNING THE TV ON FOR THE FIRST TIME
ss POWER button to turn the television ON.
Scan.
.
t channel
OURCE SELECT
on the remote control.
hen you turn on your television set for the first time, be sureW
to place it on a solid stable, surface.
To avoid danger, do not expose the TV to water, or a heat
source
(i.e. lamp, candle, radiator).
o not obstruct the ventilation grid at the reaD
leave sufficient gaps around the unit.
T
fter you have initially connected your TV antenna or cable, preA
A screen will display asking you to run a Channel Auto
can to search and receive available local digital
S
channels.
It is here where you will select antenna options and run
hannel Auto
C
Channels will then be stored in the TV tuner.
Press the MENU button on the remote control
sing the
/
/
/
buttons, scroll to highlighU
mode.
Press
Using the buttons, select “air” or “cable”.
Using the buttons, answer “yes” to the question do you want to run Channel Auto Scan.
the
button to highlight AIR/CABLE.
S
1. ress the SOURCE buttonP
2. Use the
or button to select the options: TV, AV, Component, HDMI, PC
and Media.
3. Select any of them using the ENTER button and the screen will change to
your desired source.
E:
NOT
ttempting to watch TV, please make sure all necessary cables andBefore a
devices are connected.
If the unit cannot detect a valid video signal on the
selected input source in 15 minutes, it will return to
standby mode automatically for energy saving.
20
TV
AV
Component
HDMI
Media
PC
Source Select
Page 22
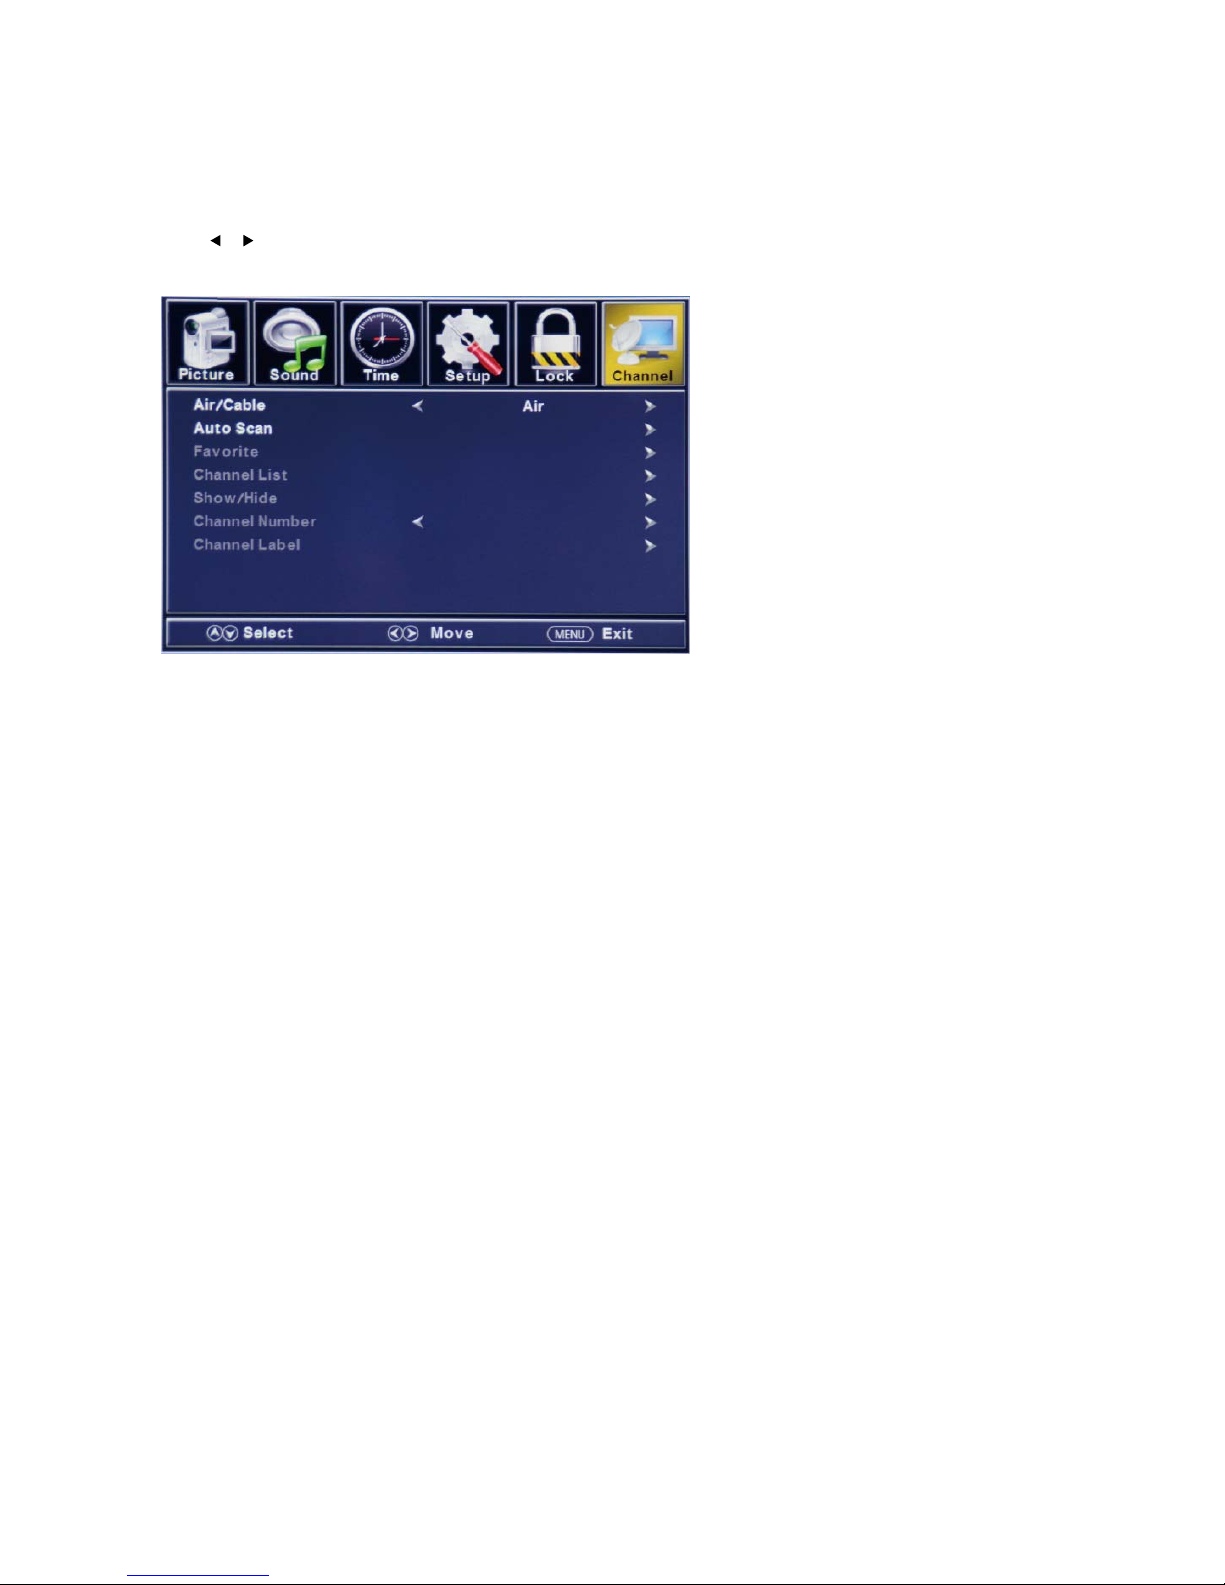
CHANNEL MENU
ress MENU button to display the main menu.
ain menu. It will highlight the first option.
IR/CABLE
ows you to switch between air (such as using antenna) and cable.
UTO SCAN
arches channels automatically for you.
AVORITES
ves the favorite list of channels added by you.
HANNEL LIST
s the list of stored channels.
HOW / HIDE
P
Press
/ button to select CHANNEL in the m
A
This feature all
A
This feature se
F
This feature gi
C
This feature show
S
This feature tells you if you have chosen for channels to be skipped.
HANNEL NUMBER
hat channel you are currently on.
HANNEL LABEL
the name of the channel.
OTE:
nnel options are only available when you select TV as your SOURCE. When you open the OSD menu on
C
This feature tells you w
C
This feature changes
N
The cha
other sources (HDMI, AV, Component, PC, USB), these options will be grayed out.
21
Page 23
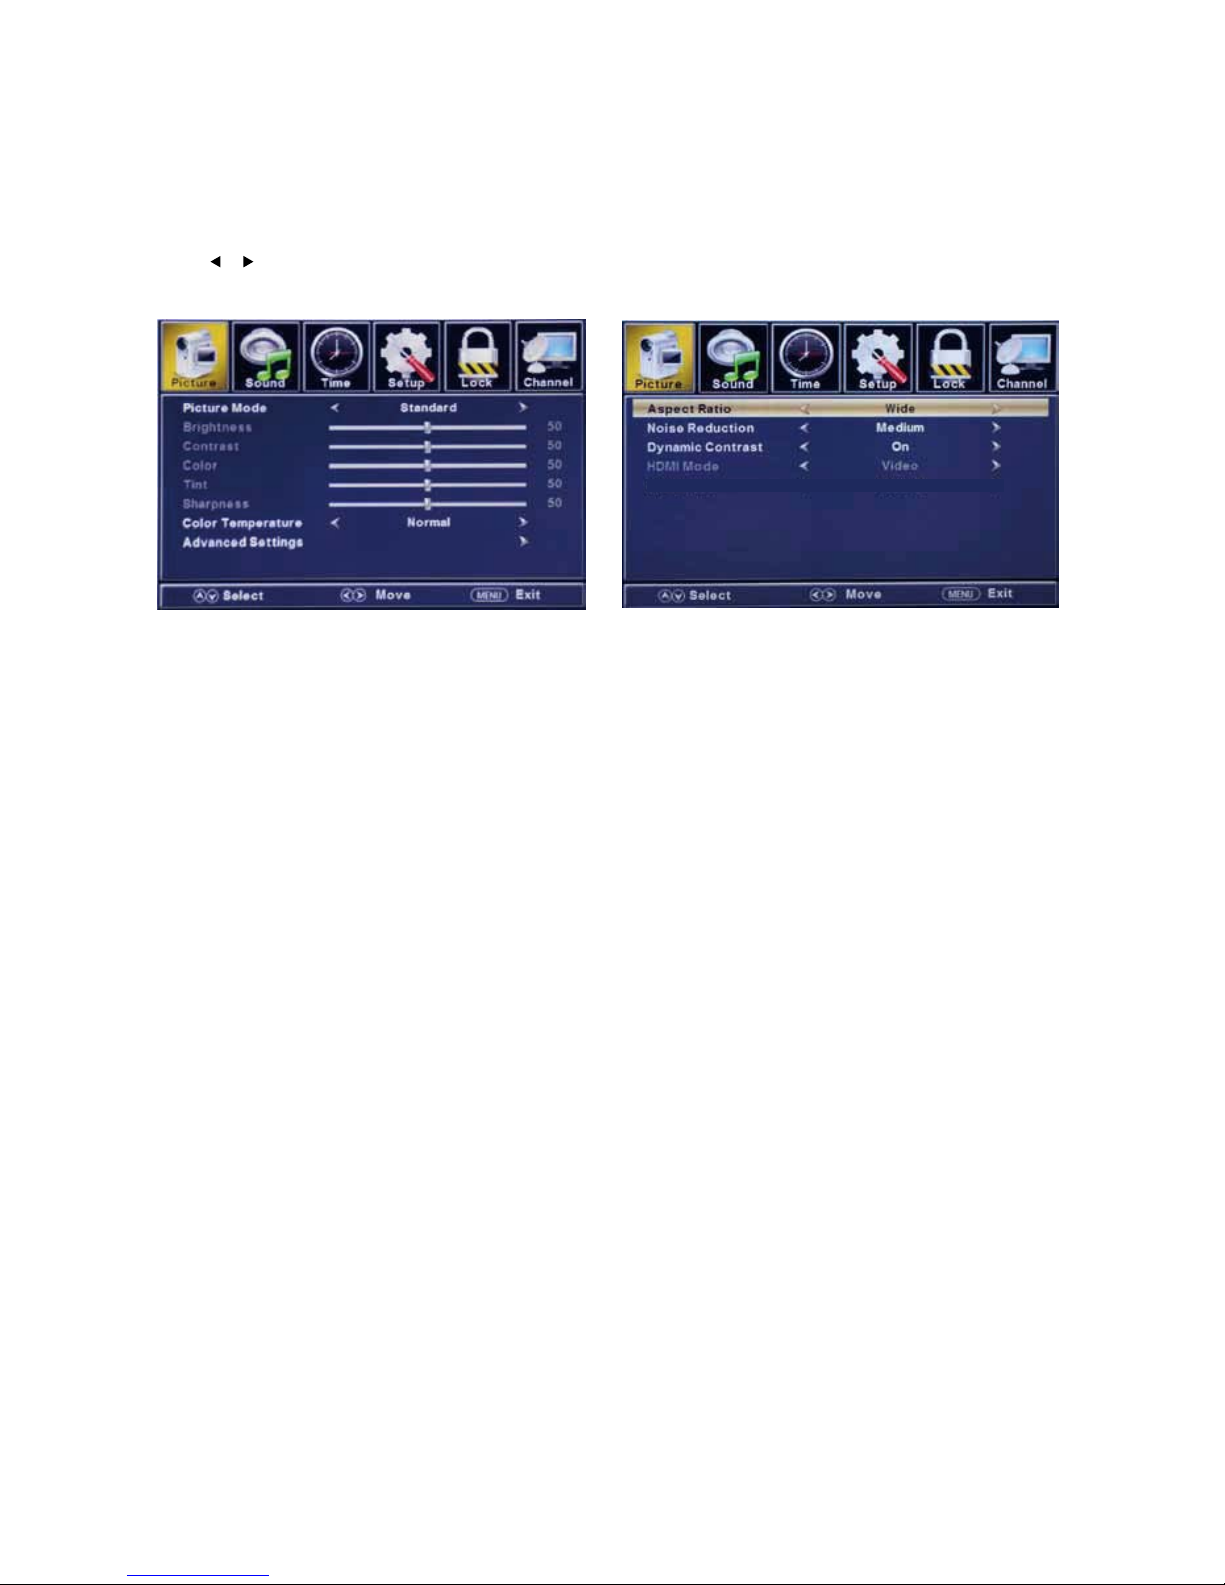
PICTURE MENU
ress MENU button to display the main menu.
ain menu. It will highlight the first option.
P
Press
/ button to select PICTURE in the m
ICTURE MODE
es various color modes for the TV.
or use the presets (Standard, Dynamic, Soft, User and
RIGHTNESS
nges the picture's detail in dark colors.
ONTRAST
hanges the difference between dark and bright objects.
OLOR
re changes the amount of color in the picture.
INT
ature changes the white balance of the color.
P
This feature chang
You can adjust the settings individually in User mode
Power Saving).
B
This feature cha
C
This feature c
C
This featu
T
This fe
NOTE: TINT is only available in AV and TV modes.
HARPNESS
nges the picture quality.
OLOR TEMPERATURE
S
This feature cha
C
This feature adjusts the color temperature of the TV, giving options of Warm, Normal, and Cool.
DVANCED SETTINGS
arious aspects of the TV's video, giving Wide, Zoom, Cinema and Normal options.
E REDUCTION
neral pixilation by blurring them, giving Low,
Medium, High, Auto and Off options.
) DYNAMIC CONTRAST
to automatically adjust the contrast of the TV depending on the picture you are
(d) DE: Select Video or Graphic (only available in HDMI mode).
A
(a) ASPECT RATIO
This feature changes the v
(b) NOIS
This feature reduces ge
(c
This feature allows the TV
viewing.
HDMI MO
22
Page 24
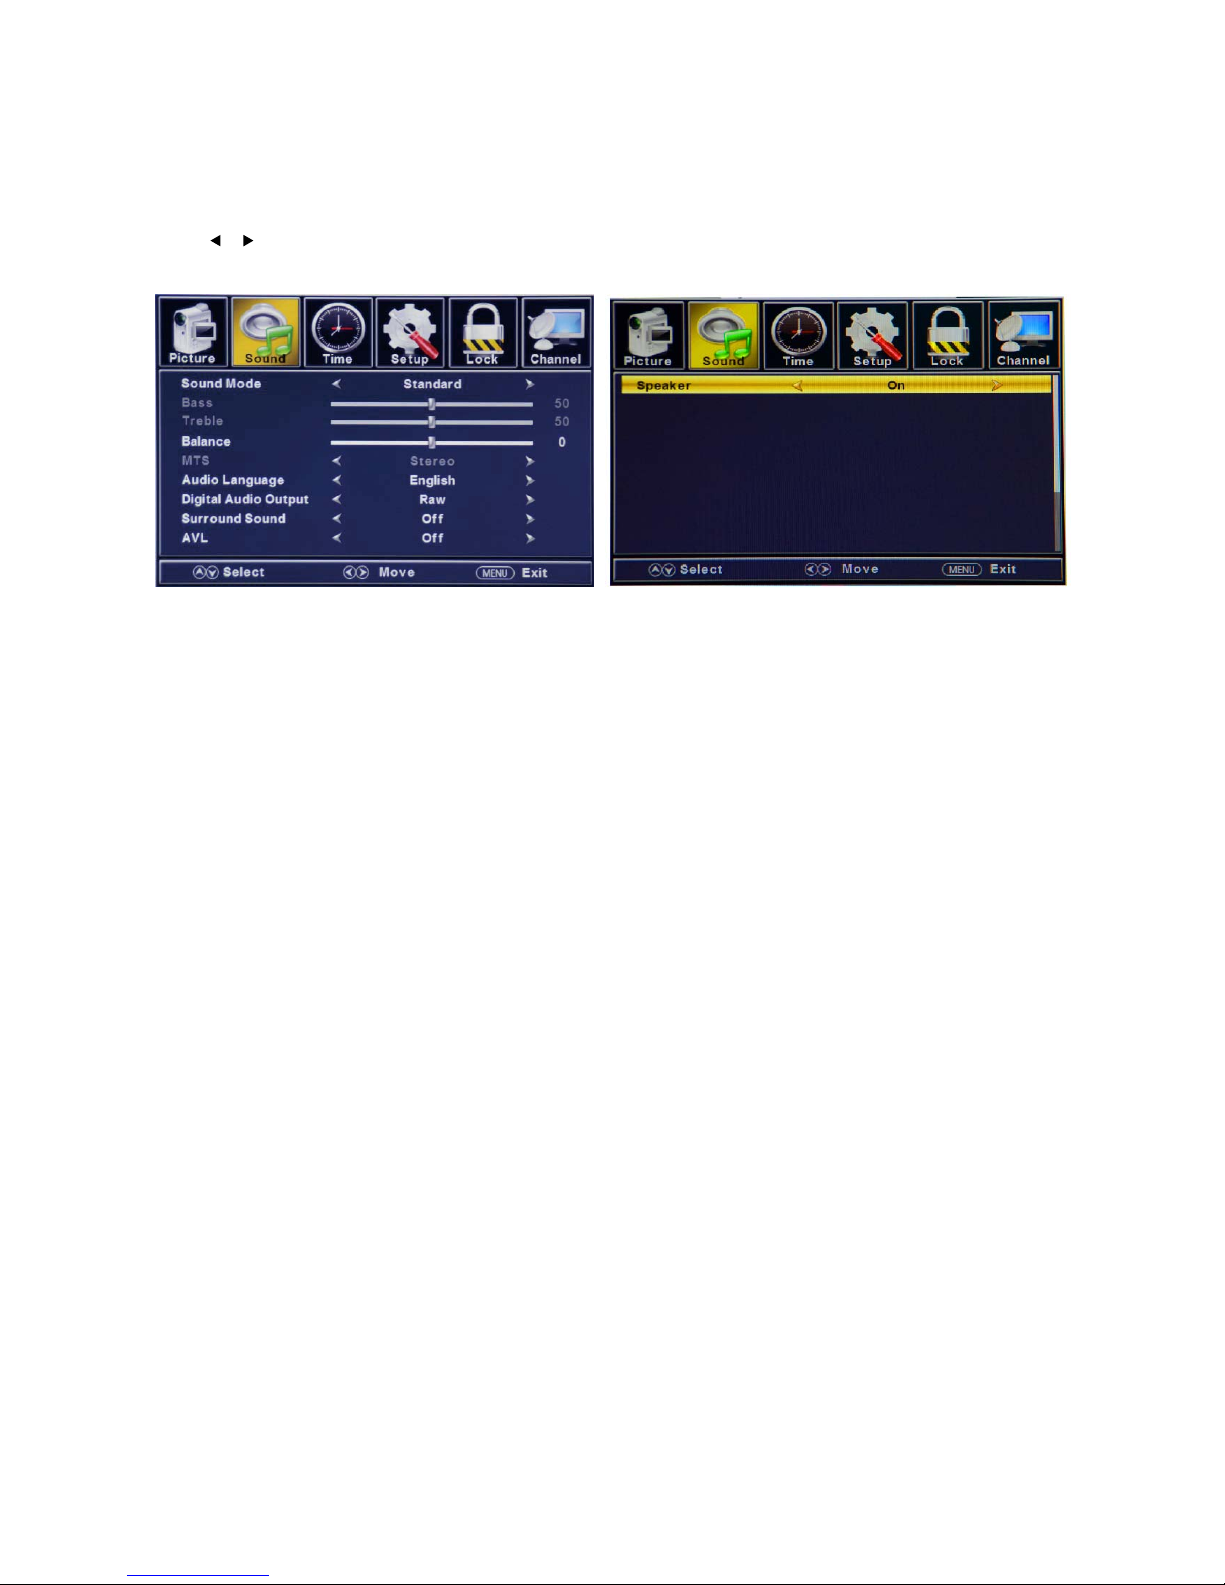
SOUND MENU
Press MENU button to display the main menu.
Press
/ button to select SOUND in the main menu. It will highlight the first option.
EQUALIZER SETTINGS
This feature enables the internal equalizer of the speakers.
You can adjust the settings individually in User mode or use the presets (Standard, Music, Movie and Sports).
Bass: Adjust low frequency intensity.
Treble: Adjust high frequency intensity.
Balance: Adjust left and right stereo audio channel balance.
MTS
This feature adjusts the audio programming in analog channels, giving Mono, Stereo and SAP options.
AUDIO LANGUAGE
This feature adjusts the audio programming in digital channels.
DIGITAL AUDIO OUTPUT
This feature adjusts the digital audio output, giving PCM, Raw and Off options.
SURROUND SOUND
This feature adjusts the dimensional surround effect On or Off (for built-in speakers only).
AVL
SPEAKER
This
Turn on/off the speakers on the TV.
feature adjusts the auto volume leveler, enabling volume protection from excessively loud commercials.
NOTE:
AUDIO LANGUAGE and MTS are dependent on the broadcasting station's support and are only available under
the “TV” source.
23
50
50
50
Page 25
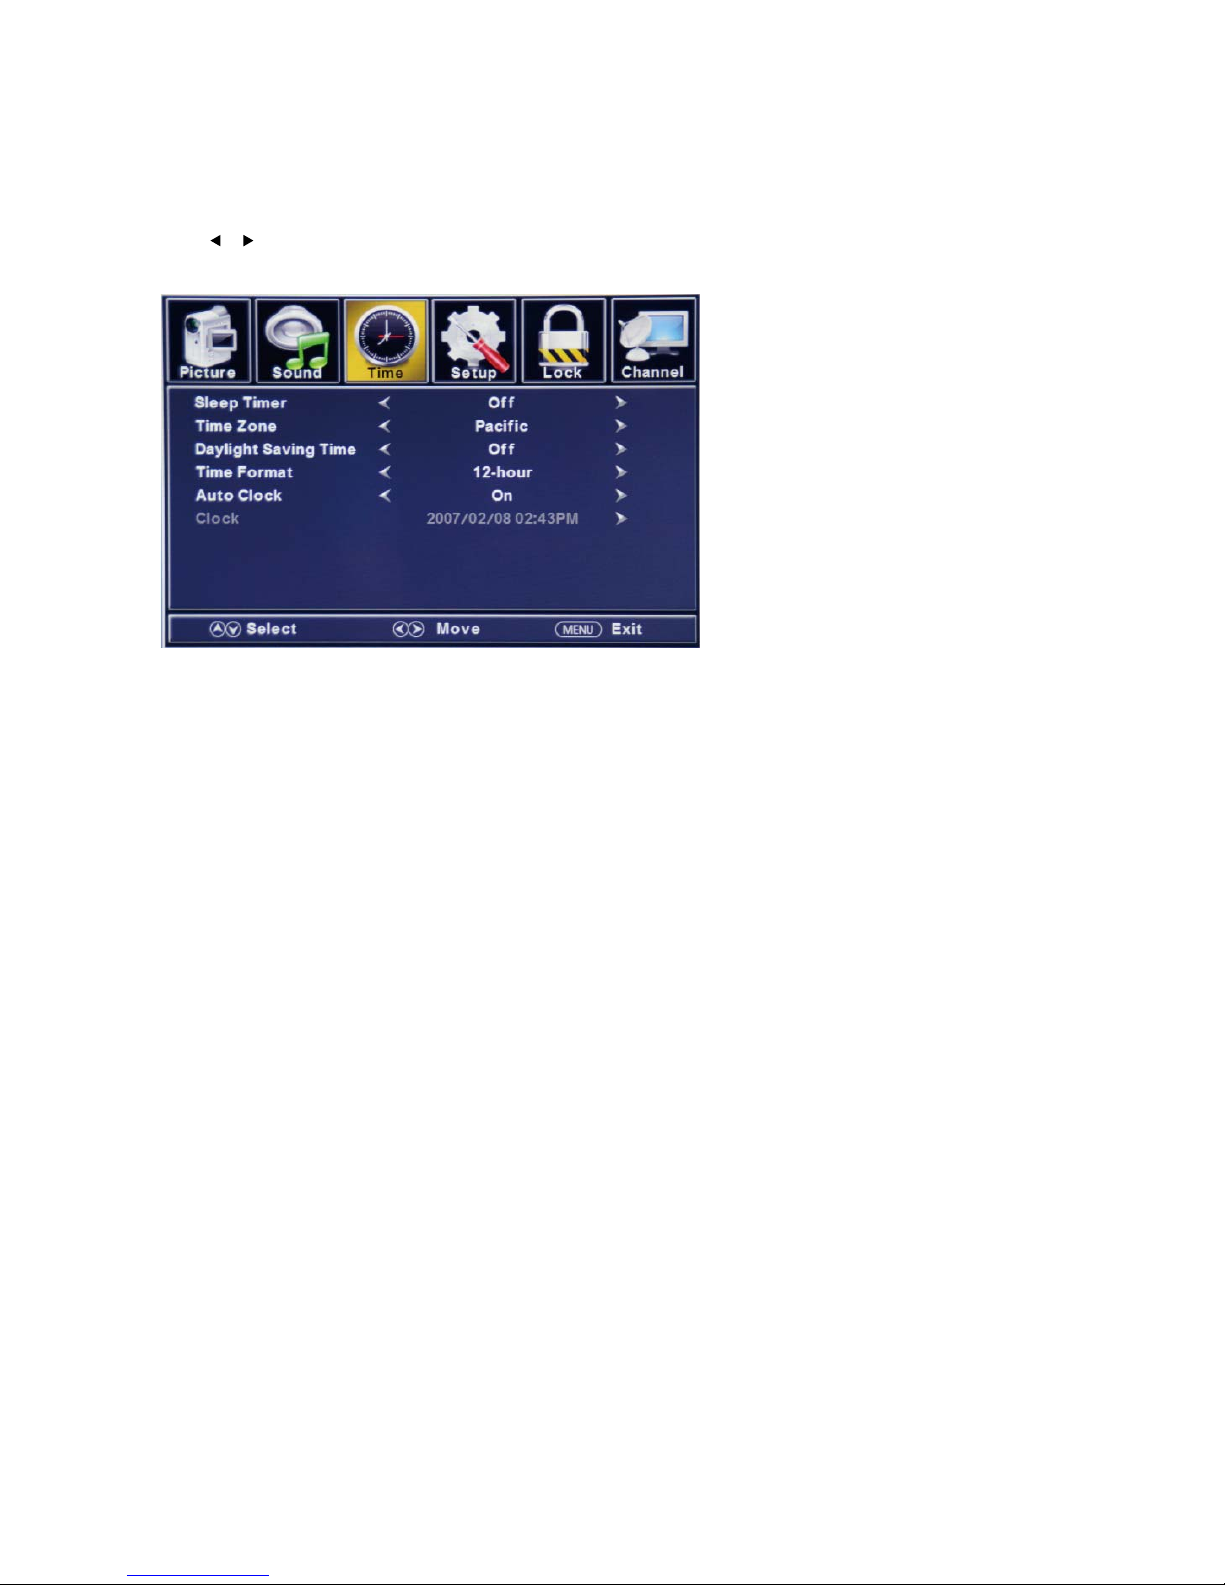
TIME MENU
Press MENU button to display the main menu.
Press
/ button to select TIME in the main menu. It will highlight the first option.
SLEEP TIMER
This timer automatically turns off the TV at the designated time. Options are Off, 5, 10, 15, 30, 60, 90, 120, 180
and 240 minutes.
TIME ZONE
This option adjusts the global time zone for the TV, giving Pacific, Alaska, Hawaii, Samoa, Newfoundland, Atlantic,
Eastern, Central and Mountain options.
DAYLIGHT SAVING TIME
This option toggles the daylight saving time feature On or Off.
TIME FORMAT (12/24 HOUR)
This option adjusts the display format for the time. (i.e. Under 24 hour format, 1:00PM would display as 13:00).
AUTO CLOCK
This option enables the TV to sync time with the antenna.
(Put it on AUTO if you have an antenna attached to the TV. If you have CABLE, SATELLITE, or anything else,
please make sure AUTO CLOCK is turned off)
CLOCK
This option allows you to
adjust the date and time of the TV manually. You need to disable AUTO CLOCK in
order to use this function.
NOTE:
The TIME function will keep accurate time only if the TV remains plugged into a live AC power source. If the TV
is unplugged or the power strip is turned off, the TV's time may not be accurate. Please set up the correct date
and time manually if necessary.
24
Page 26
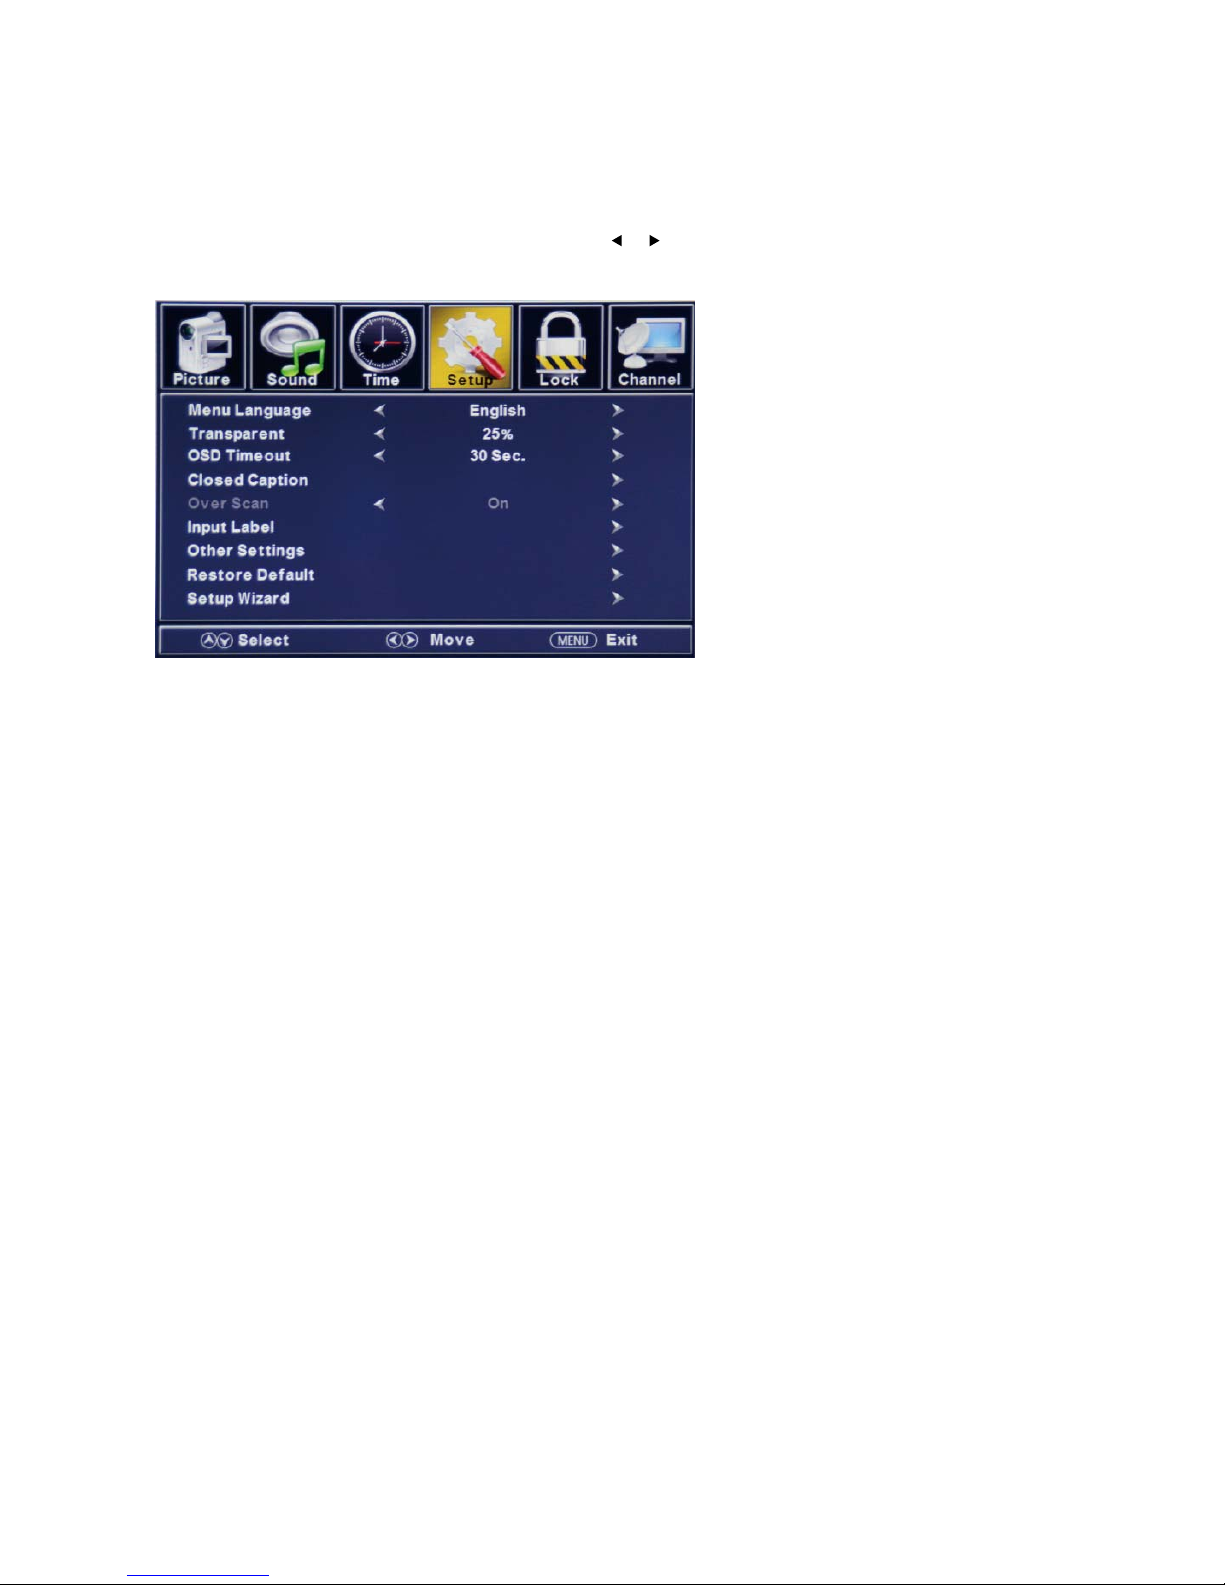
SETUP MENU
Press MENU button to display the main menu. Press / button to select SETUP in the main menu, it will
highlight the first option.
MENU LANGUAGE
This feature changes the language of the TV's OSD menu, giving English, French and Spanish options.
TRANSPARENT
This features changes the transparency of the menu allowing background TV images to show through, giving 0,
25%, 50%, 75% and 100% options.
OSD TIMEOUT
This feature changes the time which the TV's OSD menu automatically goes off, giving 5, 15, 30, 45 and 60
second options.
CLOSED CAPTION
This option displays words on the TV, giving optional settings for Analog CC and Digital CC.
(a) Analog CC : Allows you to select basic selections: CC1, CC2, CC3, CC4, Text 1, Text 2, Text 3 and Text 4.
(b) Digital CC: Allows you to select the advanced se lections: Service1, Service 2, Service 3 Service 4,
Service 5 and Service 6, OFF.
(c) Option: Use thumb stick buttons to operate in option menu as your desire
Over Scan: Over Scan is extra image area around the four edges of a video image that may not to be
seen reliably by the TV. Select from On or Off.
INPUT LABEL
This option changes the source names to your personal preference.
OTHER SETTINGS
It provides Blue Screen ON/OFF when there is no signal input and the AUDIO ONLY option which turns off the
video portion of the screen and allows audio to still play.
25
Page 27
RESTORE DEFAULT
This option restores all the personal settings in the OSD menu back to the default factory settings except
manually set clock and password.
SETUP WIZARD
This option enables the TV to show you the setup wizard of the TV again.
NOTE:
Closed captioning is only available in AV and TV sources.
Closed captioning depends on your TV program's support. Sometimes due to the TV channel or the signal,
closed captioning will not be available.
In the United States, closed captioning under analog signals is CC1 and digital signal is Service1.
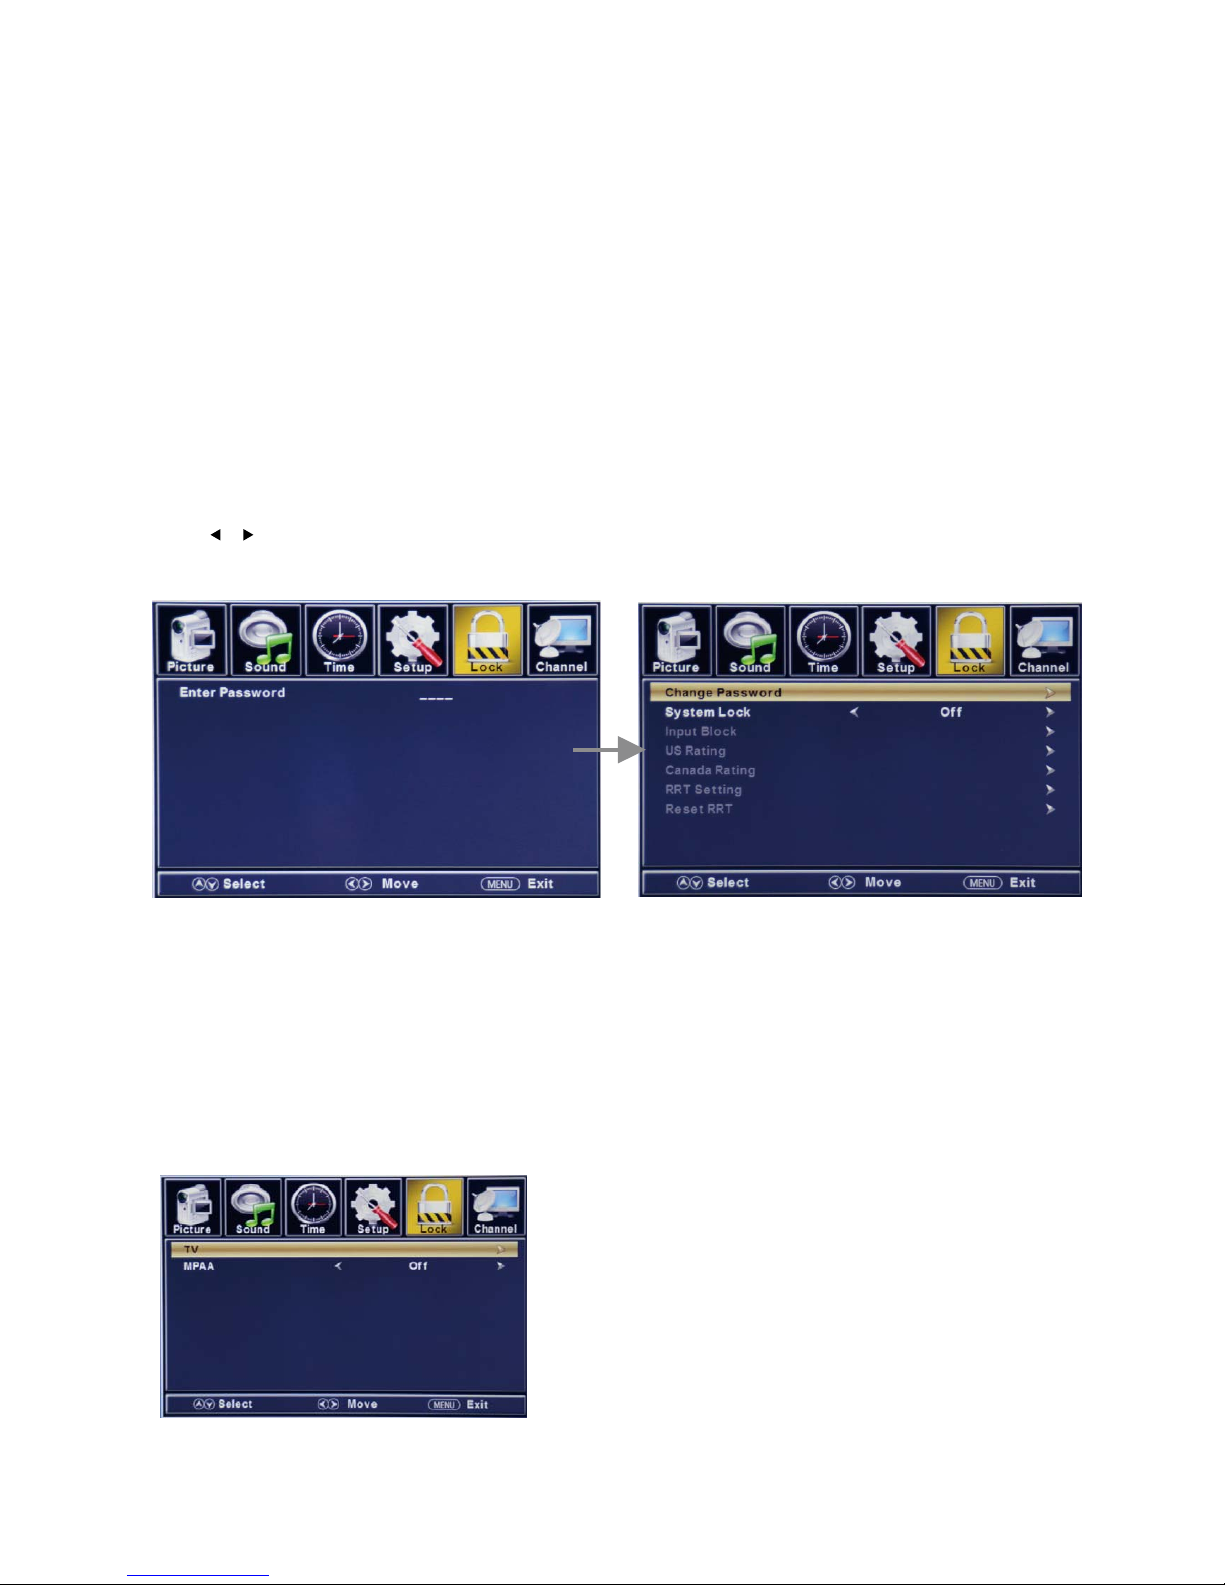
LOCK MENU
Press MENU button to display the main menu.
Press
/ button to select LOCK in the main menu. It will highlight the first option.
Press “0000” for the default and to unlock password.
The “Input Block” down to “Reset RRT” options will appear only after the System Lock option is set to On.
CHANGE PASSWORD
This option allows you to change the LOCK menu password.
SYSTEM LOCK
This option enables parental locking and filtering for the TV.
INPUT BLOCK
This option disables the connection ports of your choice, i.e. If the DVD player is connected to HDMI and you use
INPUT BLOCK to block HDMI, you will not be able to see anything from HDMI.
US RATING
This option filters US TV programming and movies.
TV: Use thumb stick buttons to select the desired rating and to block
or unblock rating.
MPAA: The Movie rating (MPAA) is used for original movies rated by
the Motion Picture Association of America (MPAA) as broadcasted
on cable TV and not edited for television. Use thumb stick button to
select N/A(not applicable), G, PG, PG-13, R, NC-17 or X.
26
Page 28
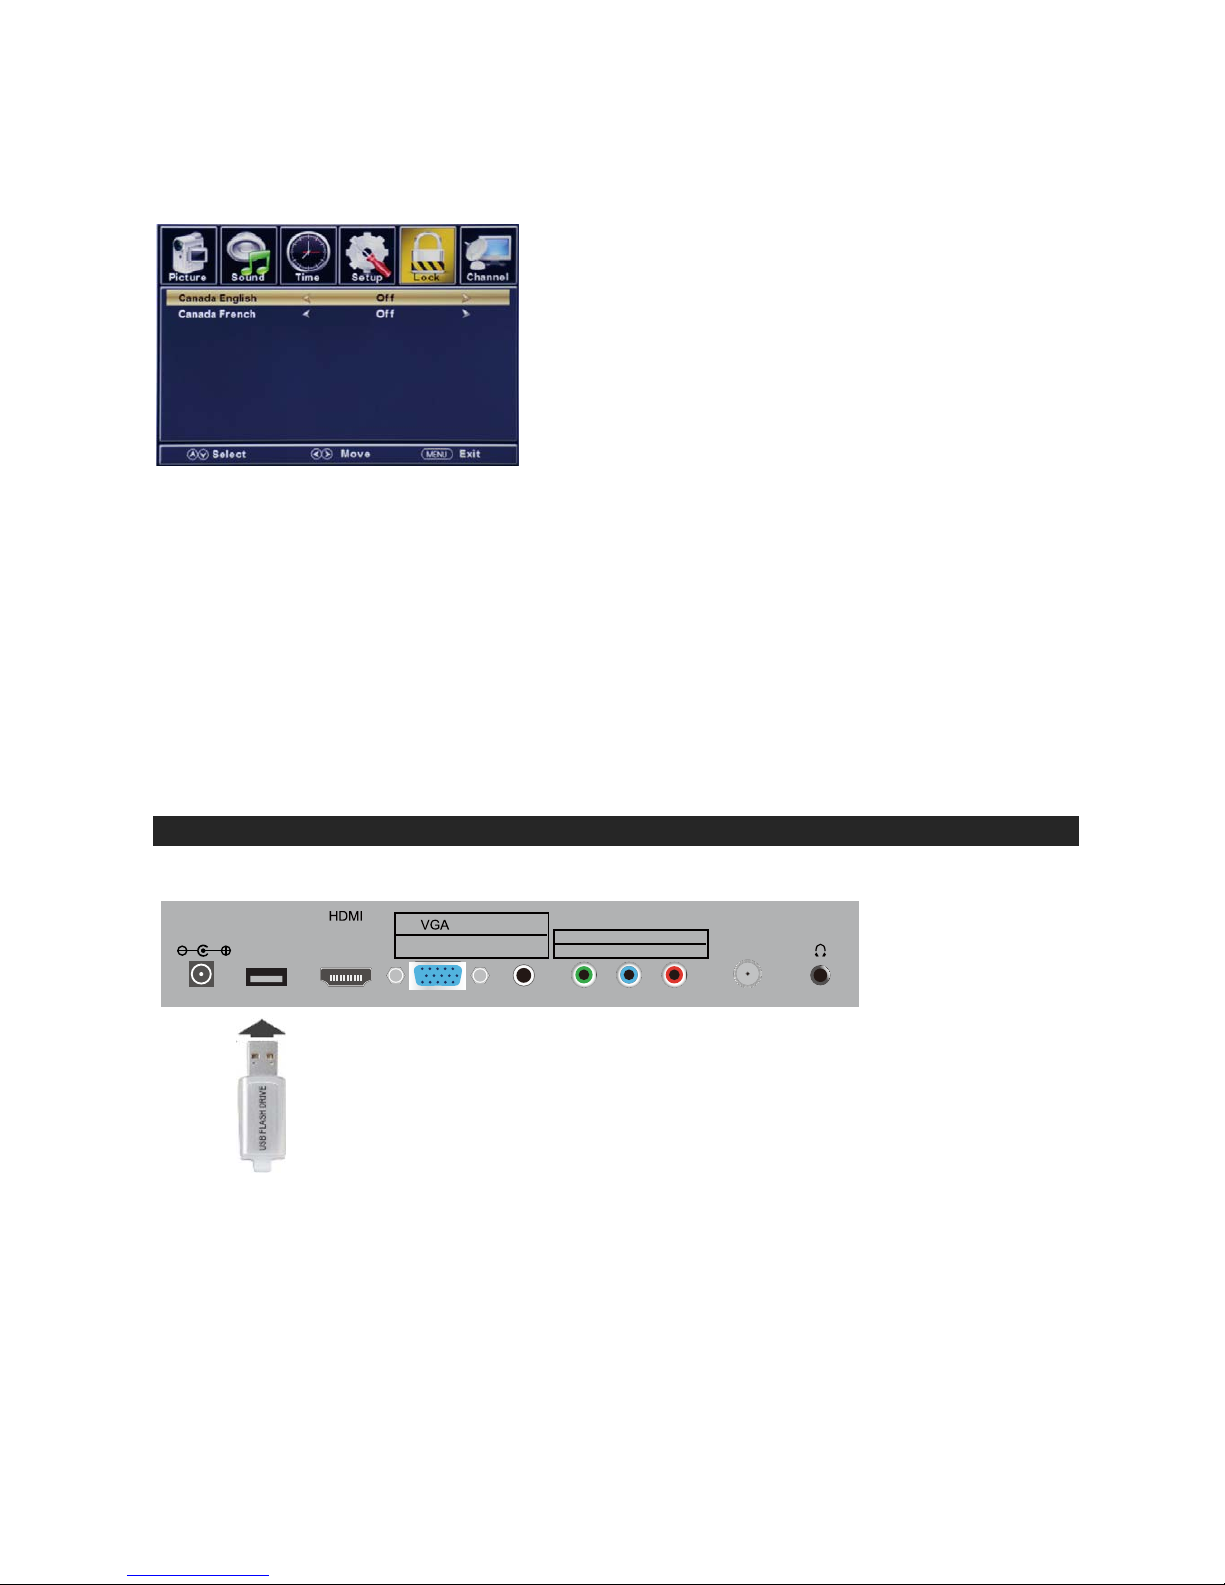
CANADA RATING
This option filters CANADA TV ratings.
Canada English: Select among: E, C, C8+, G, PG, 14+
and 18+.
Canada French: Select among: E, G, 8ans+, 13ans+, 16ans+
and 18ans+
RRT SETTING
This feature is a downloadable rating filter based on TV broadcasts. With the transition of TV broadcasts to digital,
future changes, and enhancements in how TV shows are rated for content are possible.
RESET RRT
This option resets the RRT5 settings.
NOTE:
Please refer to V-CHIP TV RATING EXPLANATIONS and MPAA US MOVIE RATINGS EXPLANATIONS
sections for more information on ratings definitions.
Downloadable rating and clear downloadable data might be grayed out depending on the TV station’s support.
RRT5 options are based on TV broadcasts. If it is grayed out, then it is not available in your
region.
PLAYING MEDIA VIA USB
The TV has a USB port on its side panel as shown below.
It can access USB flash drive and display pictures or playback MP3 songs contained in it. Simply connect a USB
flash drive to the USB port and press the TV/USB button to start browsing for music and pictures.
27
PC INPUT
AUDIO
Y
ANTENNA/
PHONES
CABLE
(75 OHMS)
COMPOSITE
VIDEO IN
COMPONENT VIDEO IN
Pb Pr
USB
INPUT
POWER IN
(DC 12V 3A)
Page 29
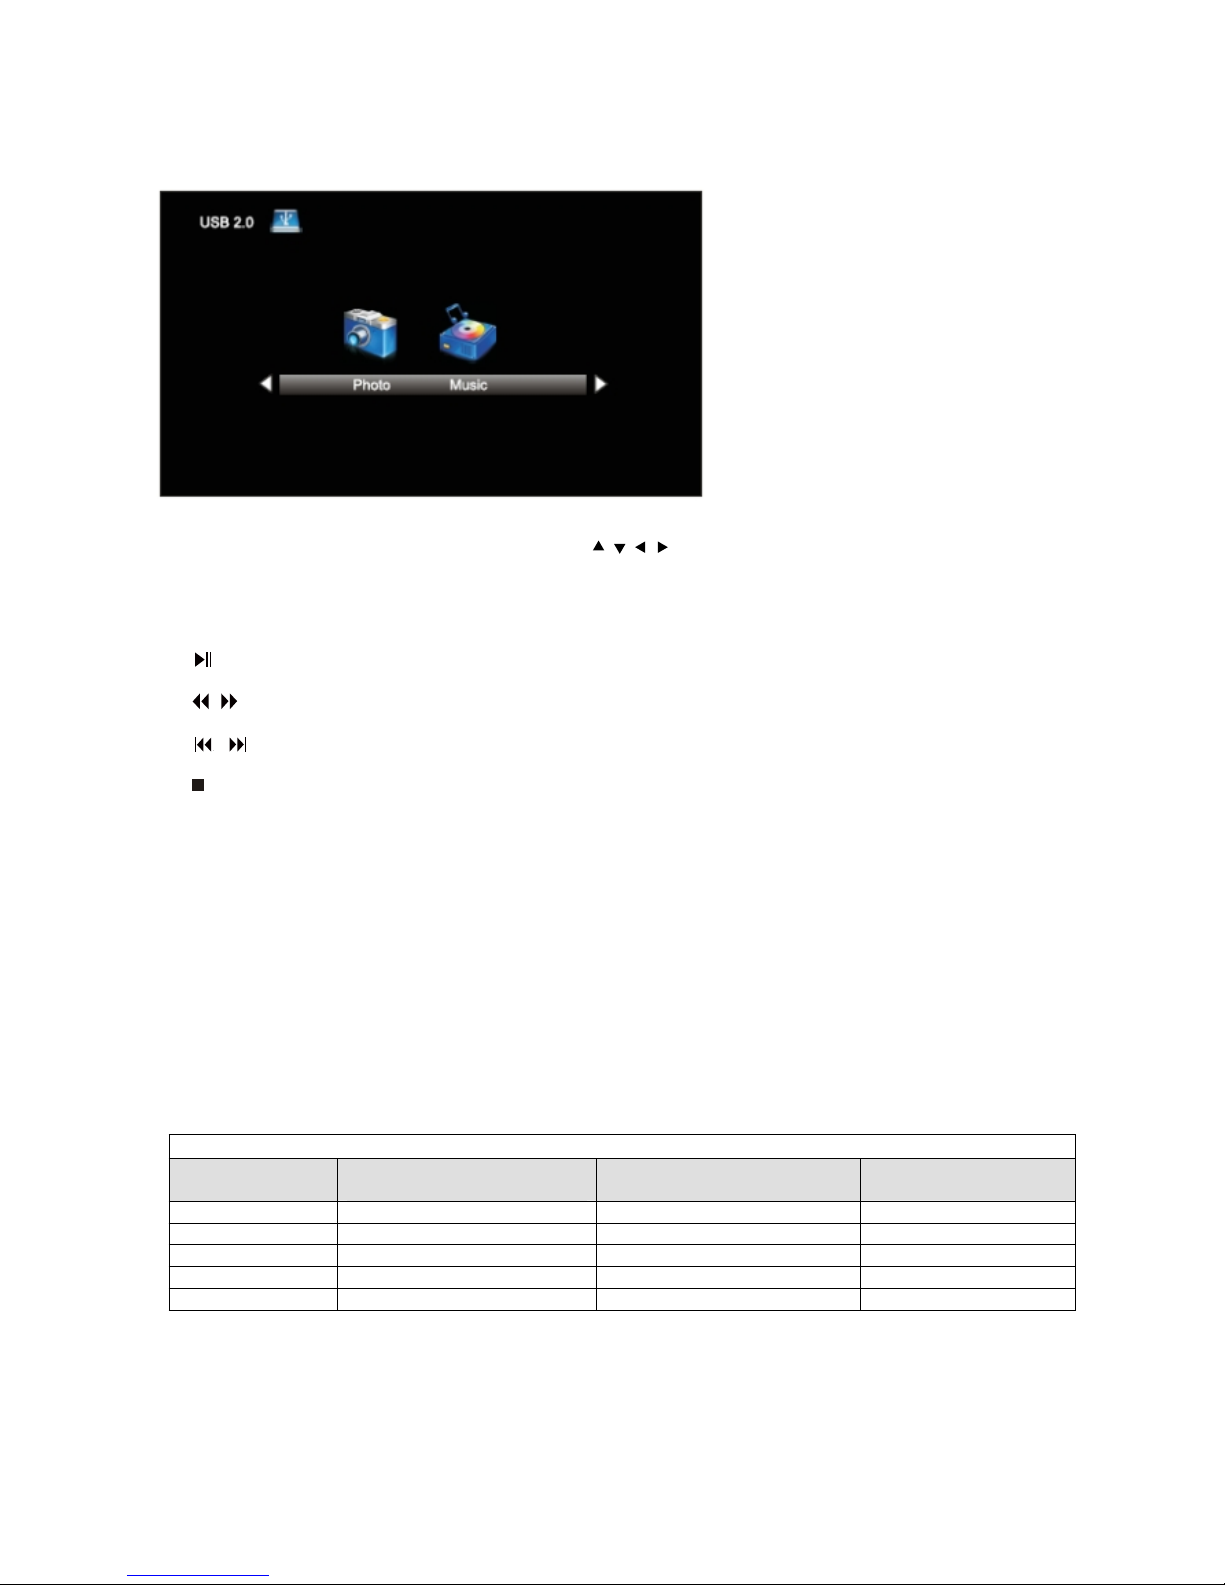
Browsing Music and Photo:
In the USB function, select Music or Photo. Use the
/ / / thumb stick button to select the folder or file you
want and press the ENTER button to play the file. Use the EXIT button to exit a folder and return to the previous
menu.
Playback Controls on Remote Control:
(a) : Play/Pause the music/slideshow.
(b)
/ : Fast back/fast forward.
(c)
/ : Skip to previous/next track/photo.
(d)
: Stop music or slideshow playback.
Technical Limitations:
x The USB port also supports a USB 2.0 SD card reader but does not support a USB hub.
x The USB flash drive supports FAT32 and FAT16 file systems only.
x The biggest file size is 4 GB in FAT32 file system.
x The Photo function only supports JPEG files (baseline only, progressive is not supported).
x The Music function only supports MP3 files having a sampling rate of 32 - 48kHz and data rate of 32 - 320
kbps.
x All USB functions are operated by the remote control. None of the buttons physically located on the TV will
respond to USB functions.
PC VIDEO FORMATS
SUPPORTED PC INPUT MODES
Resolution
Horizontal Scanning
Frequency (kHz)
Vertical Scanning
Frequency (Hz)
Format
640 x 480 31.50 60.00 DOS
800 x 600 37.90 60.00 VESA
800 x 600 48.10 72.20 VESA
1024 x 768 48.40 60.00 VESA
1360 x 768 47.70 60.00 VESA
28
Page 30
NOTE:
This product does not support the display mode if it is not listed above. For best display effect, select from the
display mode input signals listed.
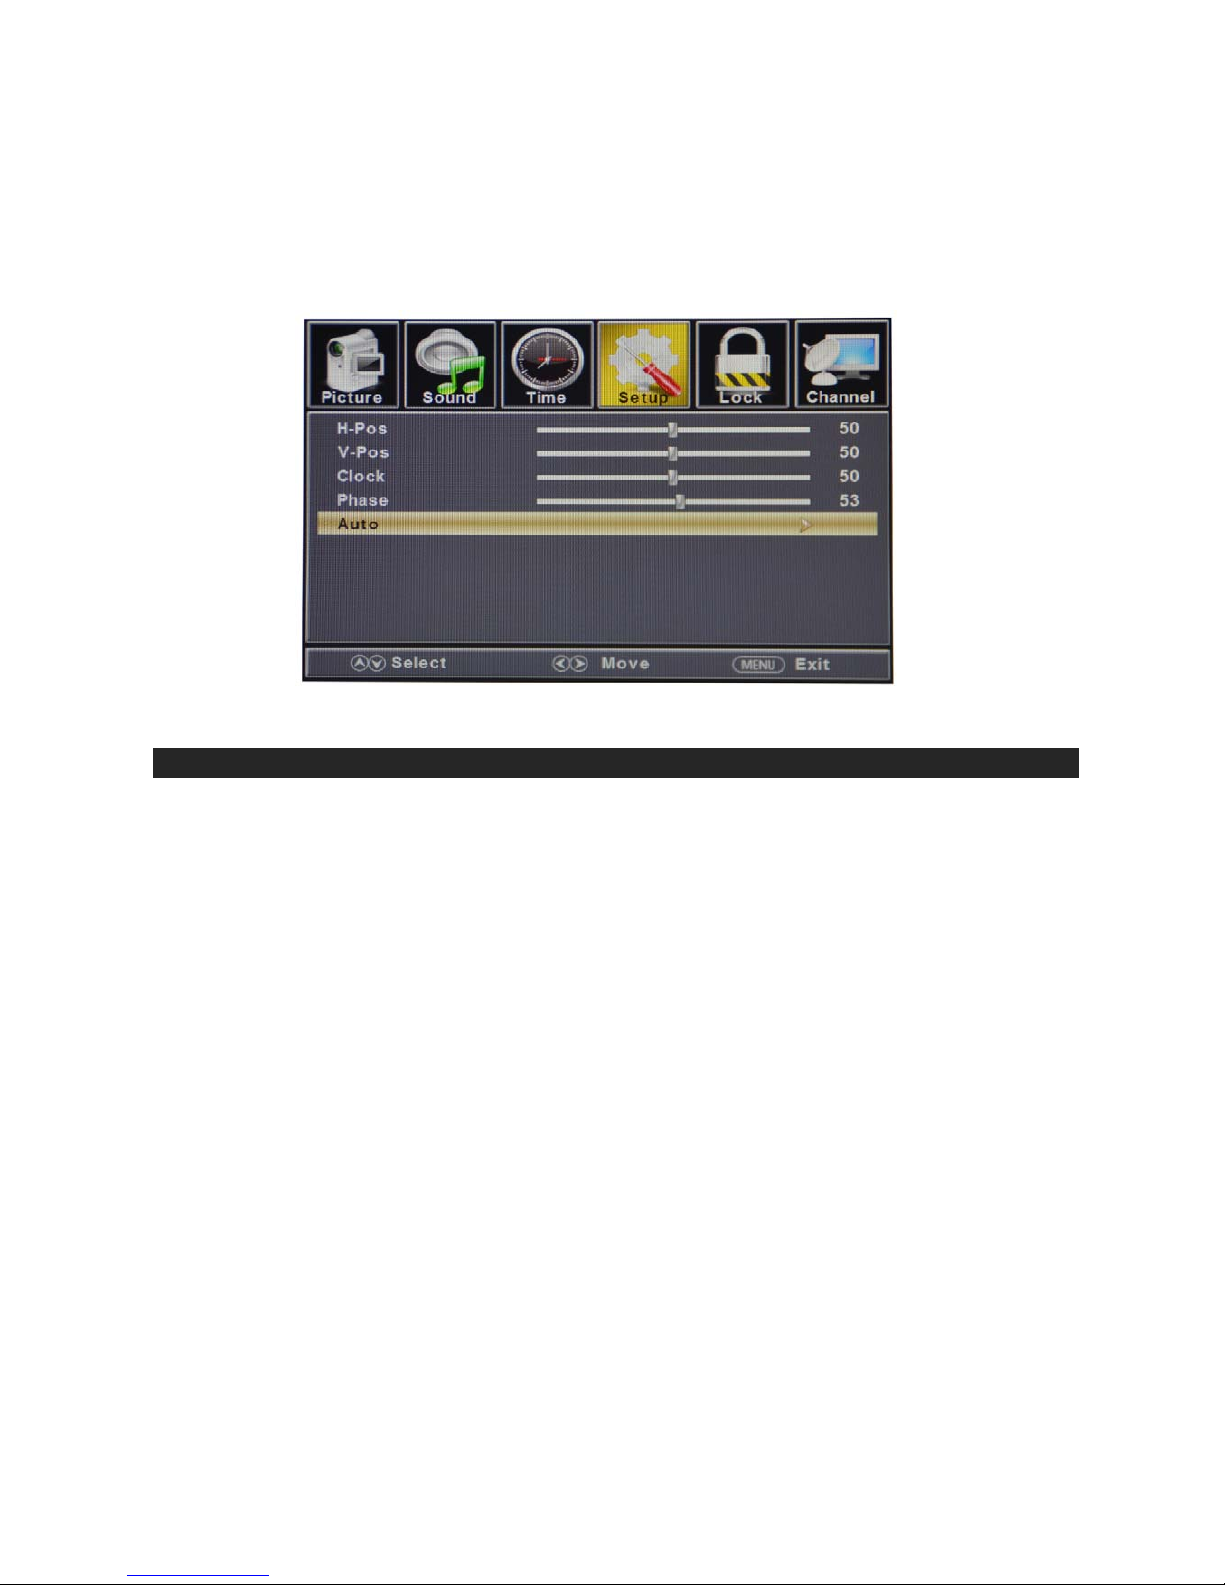
The output signal varies depending on the display driver and may cause interference, which can be adjusted with
the “AUTO” button on the PC menu screen under the Setup\PC Settings submenu.
CLEANING
x To clean this unit, wipe with a soft, dry and lint-free cloth.
x If the surfaces are extremely dirty, wipe gently with a soft cloth moistened (never wet) in a soap and water
solution or a weak detergent solution.
x Use only good quality cleaner specifically formulated to clean the LED panel to remove stubborn dirt from the
TV screen surface.
x Never use alcohol, paint thinner or other organic solvents to clean this unit. They can cause permanent
damage to your TV parts and finishing.
x Before using a chemically treated cloth, read the instructions that came with the cloth carefully.
29
Page 31
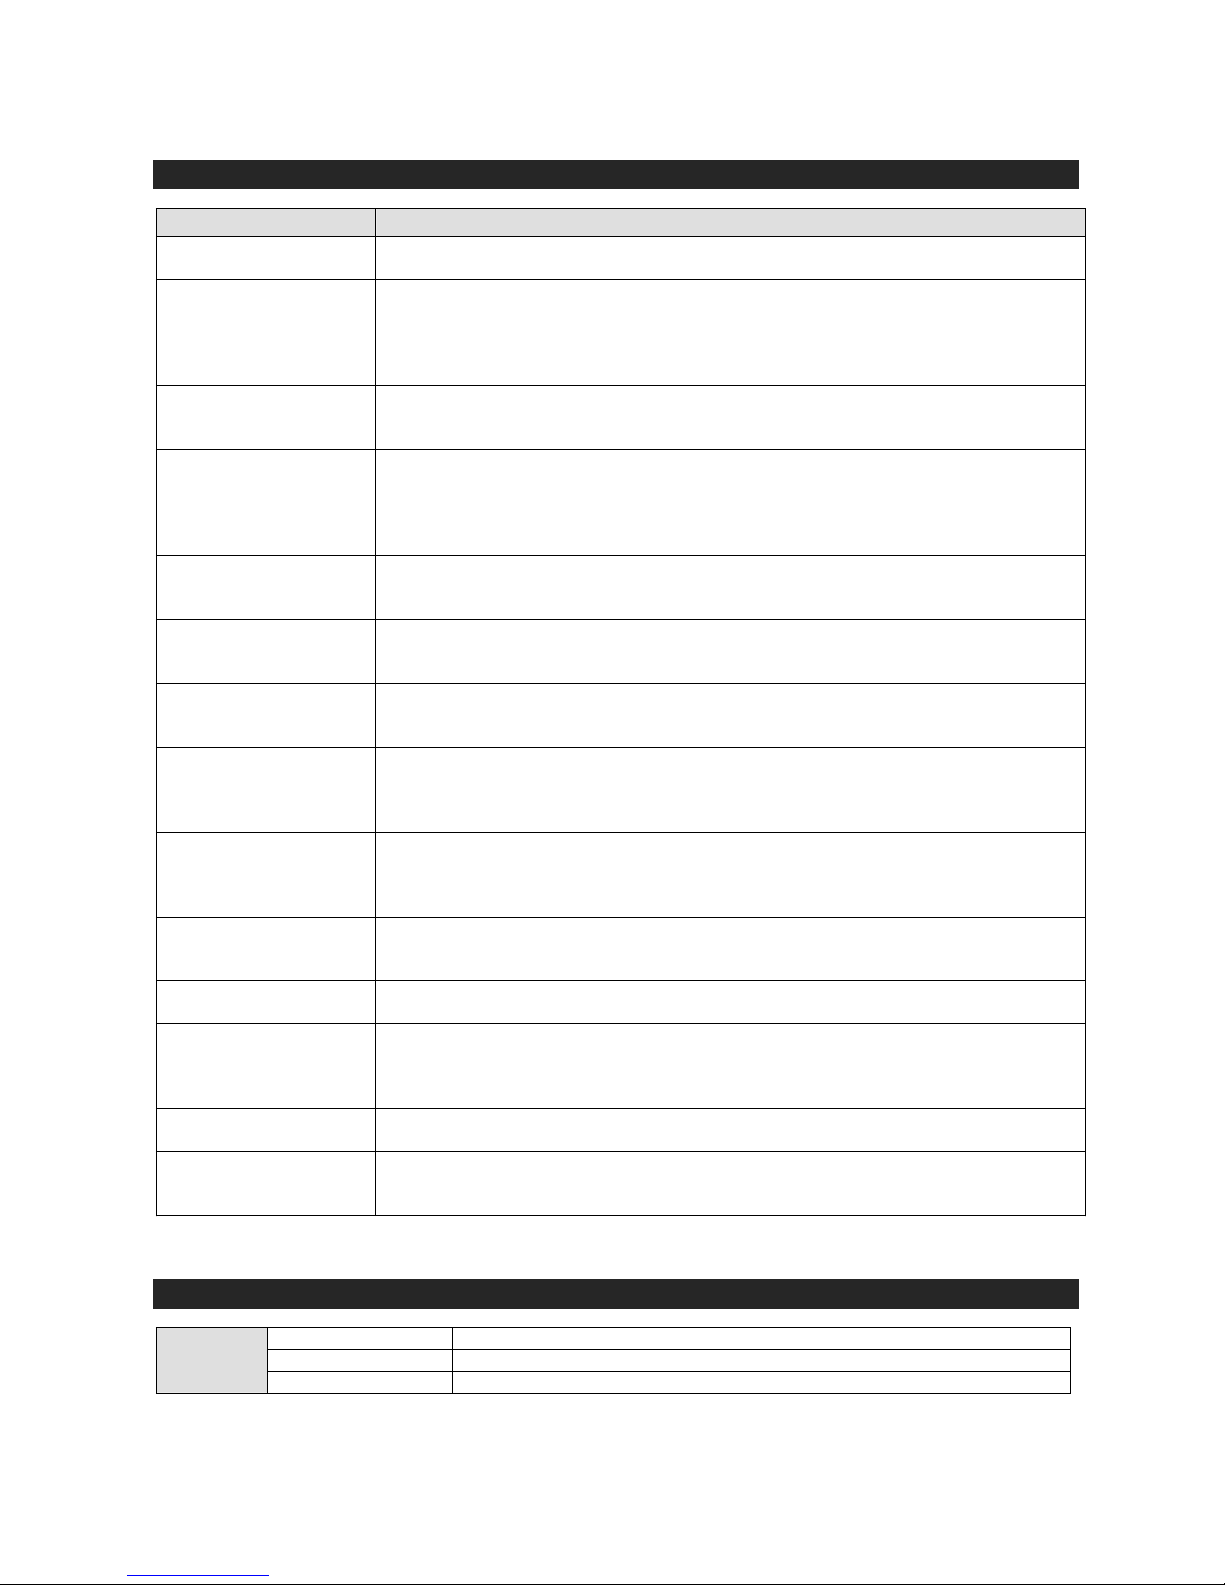
TROUBLESHOOTING
SYMPTOM CAUSE / REMEDY
TV does not power ON - Make sure the AC adapter is securely connected.
- Unplug the AC adapter from the outlet. Wait one minute and reconnect.
TV is ON but no picture
or sound
- Make sure the TV mode is selected.
- Try a new channel to check for possible station trouble.
- Make sure the antenna or audio/video source is connected and working properly.
- Make sure all cables are firmly connected.
- Check for sources of local interference.
Distorted picture when
first turning on the
power
- May be caused by very short interval of time between the TV being powered OFF.
and then ON again. Unplug the AC adapter to the TV and then plug in again.
Bad TV Picture (snow,
multiple images,
distortion, blurry)
(For analog TV
reception only)
- Check the location of the antenna and adjust if necessary.
- Make sure the antenna cable is firmly connected.
- Make sure all input cables from all devices are firmly connected.
Only getting black and
white picture on the
screen
- Check the PICTURE setting within the PICTURE menu.
- Make sure the program you are watching is indeed being broadcast in color.
TV is ON and has
picture but no sound
- Check to see the volume is not set to “0” and increase the volume to desired level.
- Check whether the mute function has been activated.
- Check to see that all cables are properly connected.
TV is ON and has
picture but sound quality
is poor
- Check that all sounds settings are done correctly.
- If sound is coming from just one speaker, adjust sound balance control to the
center.
Top and/or Screen of
TV are warm to the
touch after several
hours of continuous use
- This is due to normal power dissipation of the working electrical parts inside the TV
and is not a defect in the product. To prevent potential overheating, make sure the
ventilation slots are not blocked.
Remote control is not
working properly
- Make sure batteries are installed properly.
- Replace batteries if they are weak.
- Clean the remote control and TV sensor lens.
- Make sure there is no object between remote control and TV.
Unable to select a
certain channel
- The channel may have been skipped during auto tuning setup. Choose the desired
channel by directly selecting the channel using the number keys on the remote
control.
Panel function key does
not respond correctly
- Reset the TV by unplugging the AC adapter for 5 minutes or more and then
reconnecting.
Problem with HDMI
devices
- If the TV does not recognize a certain HDMI device and no picture is displayed, try
switching from one device to another and then back again.
- If there are audio issues, check that output settings of the HDMI device are set
properly.
Problem with computer
image on the TV
- Check that your PC uses the supported resolution and format available with this TV
- Try other picture formats by pressing the ASPECT button repeatedly.
Unusual dots appear on
the screen
- In rare case, black dots and bright spots may appear on the LED screen. This is a
structural property of the LED panel and not considered as a defect unless those
dots appear in a cluster of two or three together.
SPECIFICATIONS
Panel Type LED Panel
Diagonal Size 18.5 inches
PANEL
Screen Format 16:9
30
Page 32
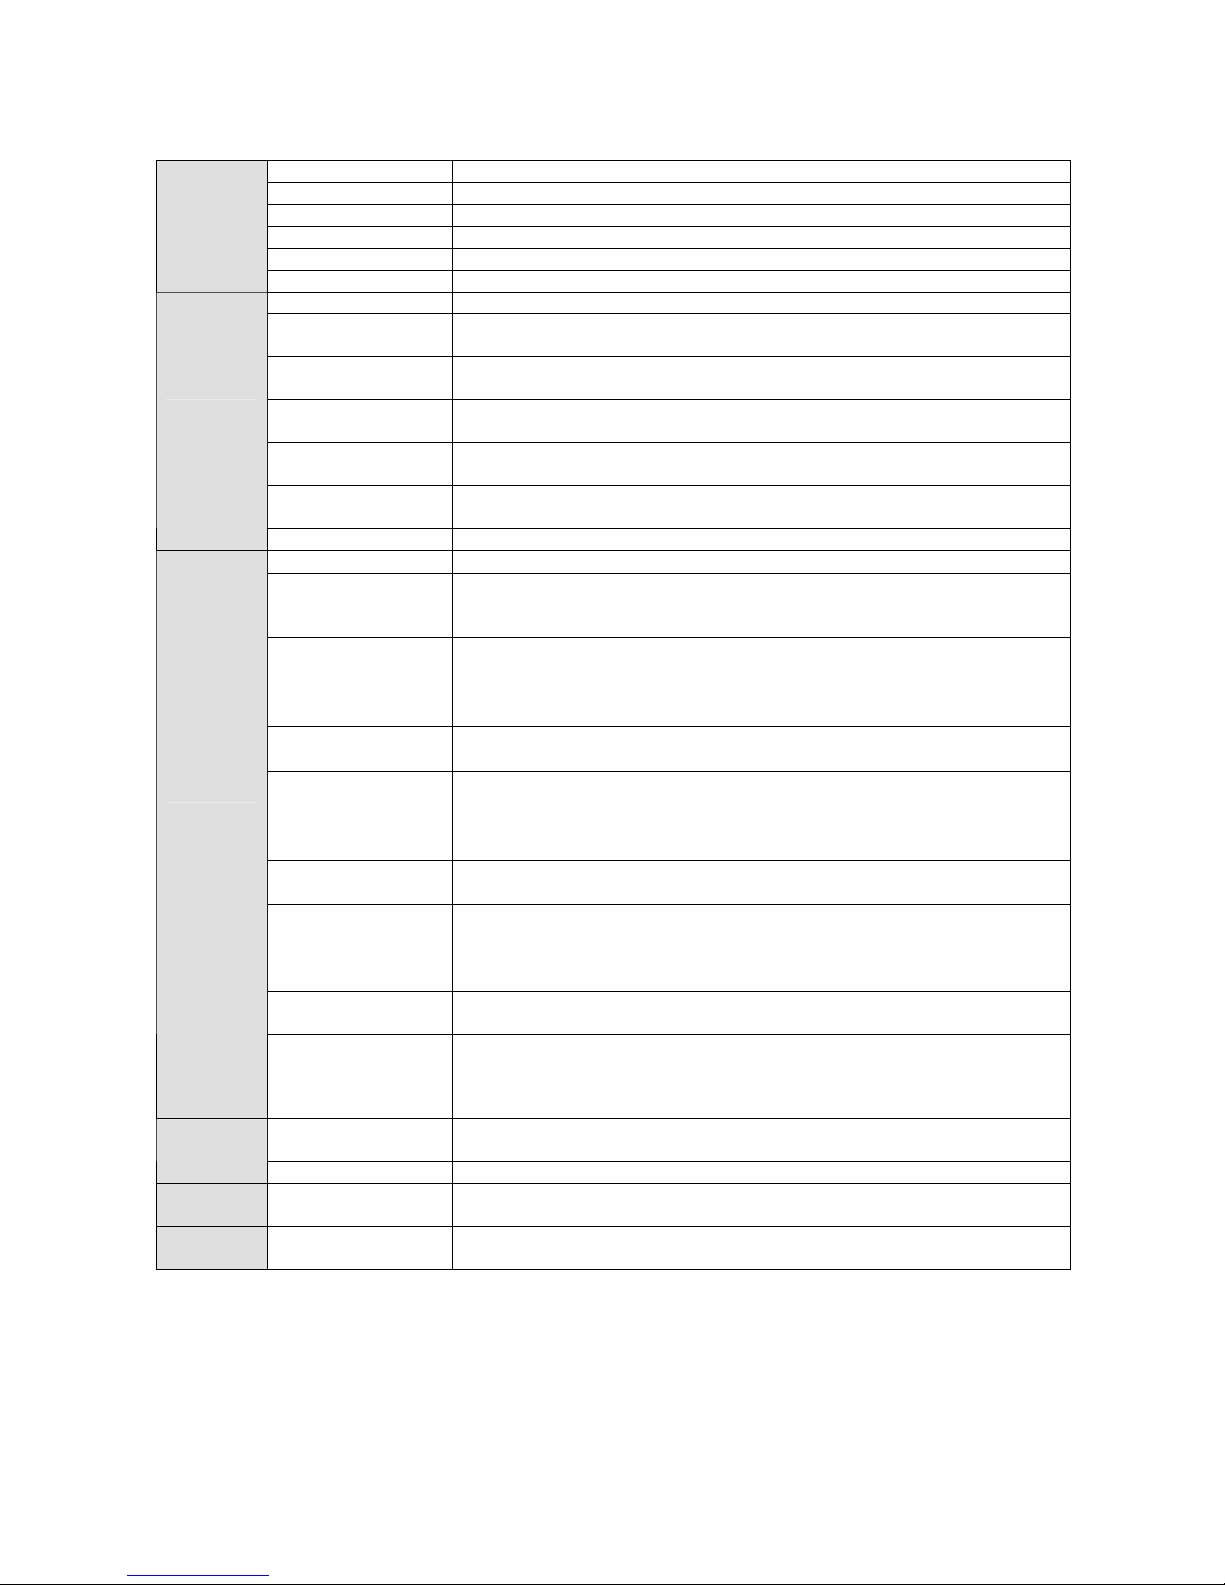
Resolution 1366 (H) x 768 (V)
Brightness 250 nits
Contrast 1000:1
View Angle 170° (H) / 160° (V)
Response Time 5 ms
Color Depth 16.7 million colors
Digital TV Tuner ATSC
Digital TV Video
System
MPEG-2 MP@HL
Digital TV Sound
System
AC-3
Analog TV Video
System
NTSC
Analog TV Sound
System
M / MTS
Number of
Channels
AIR : 69
CABLE : 135
SYSTEMS
Audio Output Power 2 x 3W
Antenna Input
75: F type female connector
HDMI Input HDMI connector
Video formats supported: 480i, 480p, 720p, 1080i & 1080p
Audio: 2-channel LPCM 32 - 44.1 & 48kHz, 16, 20 and 24 bits
Component Video
Input
RCA jacks (Green / Blue / Red)
Y: 1.0 Vp-p (75:), 0.3 V negative sync
Pb: 0.7 Vp-p (75:)
Pr: 0.7 Vp-p (75:)
Composite Video
Input
RCA jack (Green)
1.0 Vp-p (75:)
PC - RGB Input D-sub 15pin socket
R: 0.7 Vp-p (75:)
G: 0.7 Vp-p (75:)
B: 0.7 Vp-p (75:)
Digital Audio Output RCA jack (Orange)
500 mVp-p (75:)
Stereo Audio Input RCA jacks (White / Red) for;
- L/R Audio (CVBS/Component inputs)
- PC Audio
500 mVrms (20k:)
Headphone Output 3.5 mm
100-150 mV
INPUTS &
OUTPUTS
USB Input A-type female connector
Max. file size: 4 GB
File systems supported: FAT16 or FAT32
File types supported: JPEG image and MP3 audio
Power
Requirements
AC Adapter
input :100 – 240 V~ 50/60 Hz ; output : DC12V 3A
POWER
Power Consumption 36 W (max)
OTHERS
Operating
Temperature
41°F (5°C) to 104°F (40°C)
Storage
Temperature
32°F (0°C) to 122°F (50°C)
NOTE: Specifications are subject to update without prior notice.
31
Page 33

V-CHIP TV RATING EXPLANATIONS
US V-Chip TV Rating System:
TV-MA (Mature Audience Only) - Specifically designed to be viewed by adults and may be unsuitable for
children under 17. It contains one or more of the following content themes: crude indecent language (L), explicit
sexual activity (S), or graphic violence (V).
TV-14 (Parents Strongly Cautioned) - Contains some material that many parents would find unsuitable for
children under 14. Parents are strongly urged to exercise greater care in monitoring this program and are
cautioned against letting children under the age of 14 watch unattended. This program contains one or more of
the following content themes: intensely suggestive dialogue (D), strong coarse language (L), intense sexual
situations (S), or intense violence (V).
TV-PG (Parental Guidance Suggested) - Contains material that parents may find unsuitable for younger
children. Many parents may want to watch it with their younger children. The program contains one or more of the
following content themes: some suggestive dialogue (D), infrequent coarse language (L), some sexual situations
(S), or moderate violence (V).
TV-G (General Audience) - Most parents would find this program suitable for all ages. It contains little or no
sexual dialogue (D) or situations (S), no strong language (L), and little or no violence (V).
TV-Y7 (Directed to Children 7 years and older) - Designed for children ages 7 and above. It may be more
appropriate for children who have acquired the developmental skills needed to distinguish between make believe
and reality. Themes and elements in this program may include mild fantasy violence (FV) or comedic violence, or
may frighten children under the age of 7.
TV-Y (All Children) - Themes and elements in this program are designed for a young audience, including
children ages 2-6. It is not expected to frighten younger children.
Canadian English V-Chip TV Rating System:
18+ (Adult) - Programming intended for adults 18 and older. It may contain elements of violence, language, and
sexual content which could make it unsuitable for viewers under 18. Violence Guidelines: May contain violence
integral to the development of the plot, character or theme, intended for adult audiences. Other Content
Guidelines: May contain graphic language and explicit portrayals of nudity and/or sex.
14+ (Viewer 14 and over) - Programming contains themes or content which may not be suitable for viewers
under the age of 14. Parents are strongly cautioned to exercise discretion in permitting viewing by pre-teens and
early teens. Violence Guidelines: May contain intense scenes of violence. Could deal with mature themes and
societal issues in a realistic fashion. Other Content Guidelines: May contain scenes of nudity and/or sexual
activity. There could be frequent use of profanity.
PG (Parental Guidance) - Programming intended for a general audience but which may not be suitable for
younger children (under the age of 8). Parents may consider some content inappropriate for unsupervised
viewing by children aged 8-13. Violence Guidelines: Depictions of conflict and/or aggression will be limited and
moderate; may include physical, fantasy, or supernatural violence. Other Content Guidelines: May contain
infrequent mild profanity, or mildly suggestive language Could also contain brief scenes of nudity.
G (General Audience) - Programming considered acceptable for all ages groups. While not designed specifically
for children, it is understood younger viewers may be part of the audience. Violence Guidelines: Will contain very
little violence, either physical or verbal or emotional. Will be sensitive to themes which could frighten a younger
child, will not depict realistic scenes of violence which minimize or gloss over the effects of violent
acts. Other Content Guidelines: There may be some inoffensive slang, no profanity and no nudity.
C8+ (Children 8 and older) - Programming generally considered acceptable for children 8 years and over to
watch on their own. Violence Guidelines: Violence will not be portrayed as the preferred, acceptable, or only way
to resolve conflict or encourage children to imitate dangerous acts which they may see on television. Any realistic
depictions of violence will be infrequent, discreet, of low intensity and will show the consequences of the acts.
Other Content Guidelines: There will be no profanity, nudity or sexual content.
C (Children) - Programming intended for children under age 8. Violence Guidelines: Careful attention is paid to
themes which could threaten children’s sense of security and well being. There will be no realistic scenes of
violence. Depictions of aggressive behavior will be infrequent and limited to portrayals that are clearly imaginary,
comedic or unrealistic in nature. Other Content Guidelines: There will be no offensive language, nudity or sexual
content.
Canadian French V-Chip TV Rating System:
18+ (Adult) - Programming is for adults only. This program contains sustained violence or extremely violent
scenes.
32
Page 34
16+ (Viewer 16 and over) - Programming is not suitable for those under age 16. This program contains frequent
scenes of violence or intensely violent scenes.
13+ (Viewer 13 and over) - Programming may not be suitable for children under the age of 13. This program
either contains several violent scenes or one or more scenes that are violent enough to affect them. Viewing in
the company of an adult is therefore strongly recommended for children under the age of 13.
8+ (Viewer 8 and over) - Not recommended for young children. This program is suitable for most audiences, but
it contains mild or occasional violence that could upset young children. Viewing in the company of an
adult is therefore recommended for young children (under the age of 8) who do not distinguish between reality
and imagination.
G (General Audience) - This program is suitable for audiences of all ages. It contains no violence, or any
violence that it does contain is either minimal or is presented in a humorous manner, as a caricature, or in an
unrealistic way.
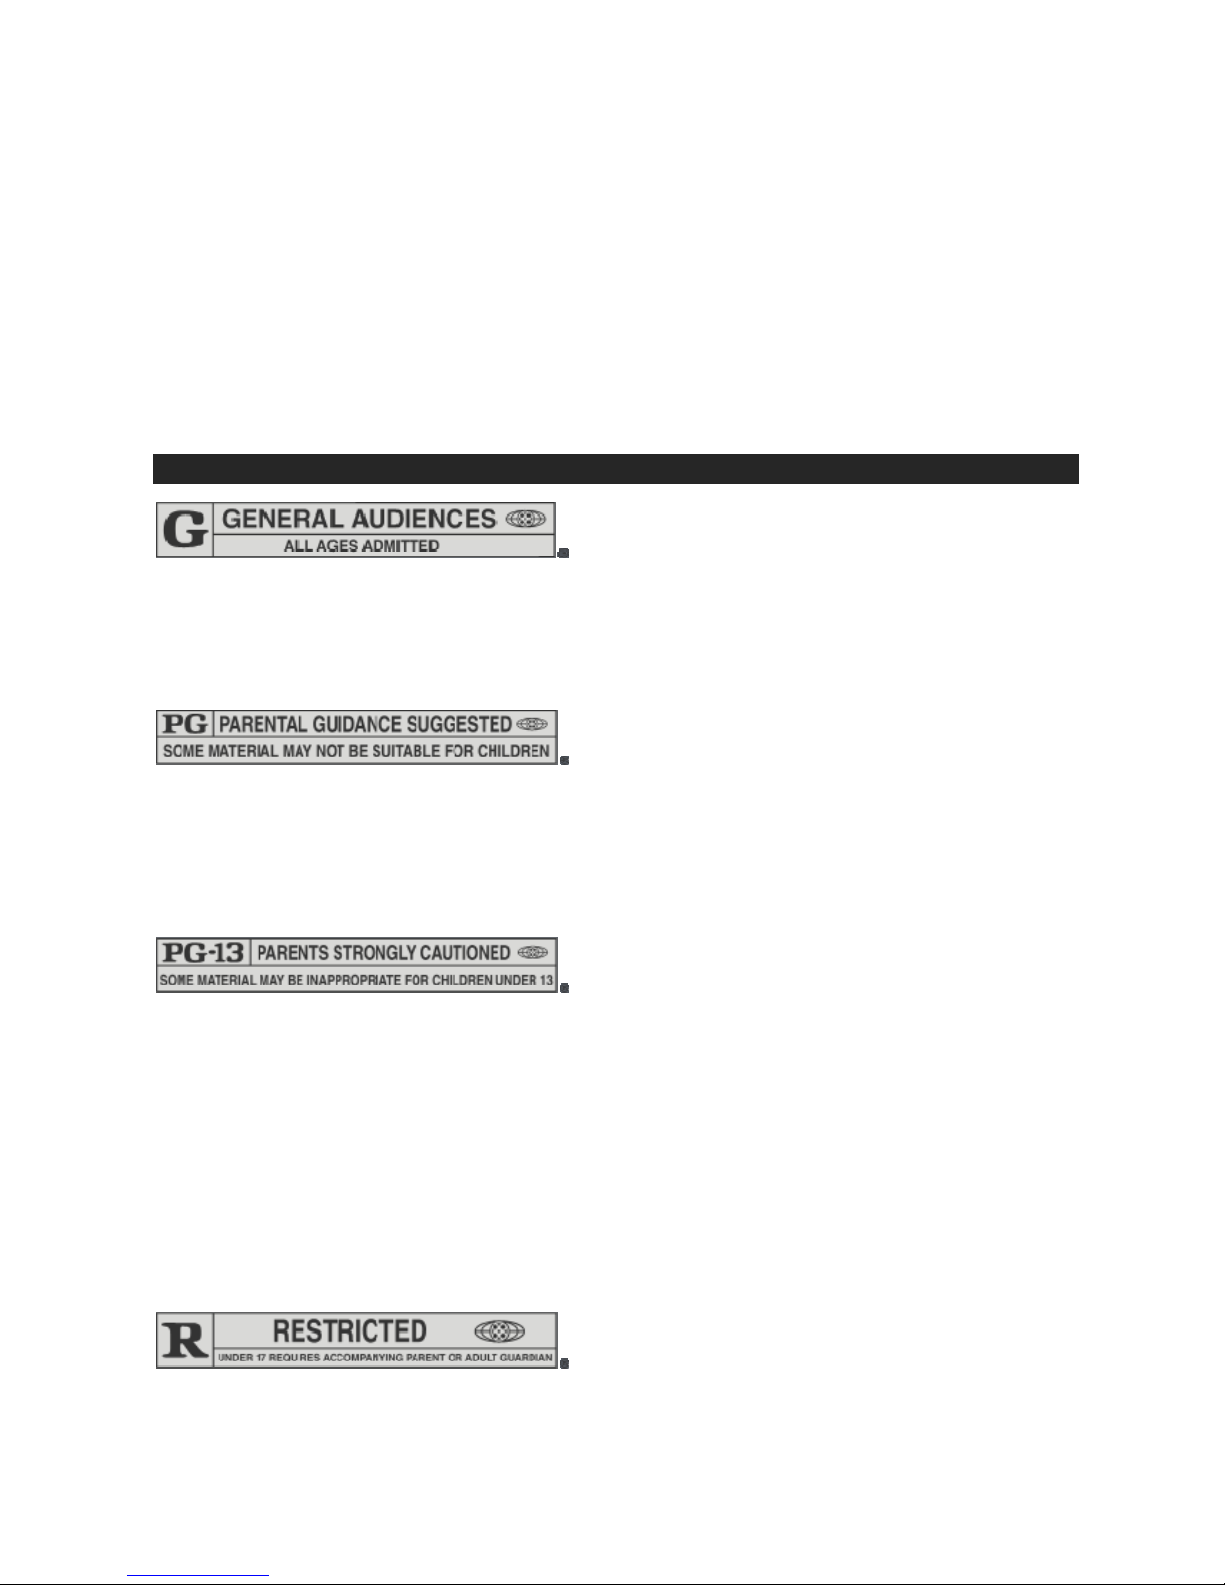
MPAA US MOVIE RATING EXPLANATIONS
G — General Audiences. All Ages Admitted. A G-rated
motion picture contains nothing in theme, language, nudity, sex, violence or other matters that, in the view of the
Rating Board, would offend parents whose younger children view the motion picture. The G rating is not a
"certificate of approval," nor does it signify a "children’s" motion picture. Some snippets of language may go
beyond polite conversation but they are common everyday expressions. No stronger words are present in G-rated
motion pictures. Depictions of violence are minimal. No nudity, sex scenes or drug use are present in the motion
picture.
PG — Parental Guidance Suggested. Some Material May
Not Be Suitable For Children. A PG-rated motion picture should be investigated by parents before they let their
younger children attend. The PG rating indicates, in the view of the Rating Board, that parents may consider
some material unsuitable for their children, and parents should make that decision. The more mature themes in
some PG-rated motion pictures may call for parental guidance. There may be some profanity and some
depictions of violence or brief nudity. But these elements are not deemed so intense as to require that parents be
strongly cautioned beyond the suggestion of parental guidance. There is no drug use content in a PG-rated
motion picture.
PG-13 — Parents Strongly Cautioned. Some Material May
Be Inappropriate For Children Under 13. A PG-13 rating is a sterner warning by the Rating Board to parents to
determine whether their children under age 13 should view the motion picture, as some material might not be
suited for them. A PG-13 motion picture may go beyond the PG rating in theme, violence, nudity, sensuality,
language, adult activities or other elements, but does not reach the restricted R category. The theme of the
motion picture by itself will not result in a rating greater than PG-13, although depictions of activities related to a
mature theme may result in a restricted rating for the motion picture. Any drug use will initially require at least a
PG-13 rating. More than brief nudity will require at least a PG-13 rating, but such nudity in a PG-13 rated motion
picture generally will not be sexually oriented. There may be depictions of violence in a PG-13 movie, but
generally not both realistic and extreme or persistent violence. A motion picture’s single use of one of the harsher
sexually-derived words, though only as an expletive, initially requires at least a PG-13 rating. More than one such
expletive requires an R rating, as must even one of those words used in a sexual context. The Rating Board
nevertheless may rate such a motion picture PG-13 if, based on a special vote by a two-thirds majority, the
Raters feel that most American parents would believe that a PG-13 rating is appropriate because of the context or
manner in which the words are used or because the use of those words in the motion picture is inconspicuous.
R — Restricted. Children Under 17 Require
Accompanying Parent or Adult Guardian. An R-rated motion picture, in the view of the Rating Board, contains
33
Page 35

some adult material. An R-rated motion picture may include adult themes, adult activity, hard language, intense or
persistent violence, sexually-oriented nudity, drug abuse or other elements, so that parents are counseled to take
this rating very seriously. Children under 17 are not allowed to attend R-rated motion pictures unaccompanied by
a parent or adult guardian. Parents are strongly urged to find out more about R-rated motion pictures in
determining their suitability for their children. Generally, it is not appropriate for parents to bring their young
children with them to R-rated motion pictures.
NC-17 — No One 17 and Under Admitted. An NC-17 rated
motion picture is one that, in the view of the Rating Board, most parents would consider patently too adult for their
children 17 and under. No children will be admitted. NC-17 does not mean "obscene" or "pornographic" in the
common or legal meaning of those words, and should not be construed as a negative judgment in any sense. The
rating simply signals that the content is appropriate only for an adult audience. An NC-17 rating can be based on
violence, sex, aberrational behavior, drug abuse or any other element that most parents would consider too
strong and therefore off-limits for viewing by their children
X – Matured Audience Only. (non MPAA rating) Only adults are allowed to watch these motion pictures.
GLOSSARY
Aspect Ratio
The ratio between the width and height of the TV picture on the screen. In a normal TV set, the aspect ratio is 4 to
3 (4:3). The new aspect ratio in HDTV is 16:9 which resembles the aspect ratio in a movie theatre (Widescreen).
New TV systems support both 4:3 and 16:9 aspect ratio and can automatically switch between them.
ATSC (Advanced Television Systems Committee)
Formed to establish technical standards for advanced television systems, including digital high definition
television (HDTV).
Audio/Video (A/V)
A term often used when discussing a channel on a TV receiver or on video equipment, which has been especially
designed to accept audio-video signals. This channel automatically activates special circuitry within the TV set to
prevent picture distortion and skewing. It is also used for audio-video processors, which handle both types of
signals.
Component Video Input (Y Pb Pr)
Component Video Input is a type of connection that uses a cinch-type connector to allow set top boxes or analog
DVD players to connect a signal to the TV. By offering the cinch-type input (Y Pb Pr) the primary colors, red,
green and blue are connected from a cable box directly into the TV allowing for the signal to display on the screen.
CVBS (Composite Video Baseband Signal)
In broadcast television this refers to the video signal, including the color information and syncs.
Digital Tuner
A digital tuner serves as the decoder required to receive and display digital broadcasts. It can be included inside
TV sets or via a cable box.
DOLBY Digital
The system developed by Dolby Laboratories to compress digital sound. It offers stereo sound (2 channel) or
multi-channel audio (the six-channel digital audio standard that is part of the U.S. digital television standard; also
called AC-3 or Digital 5.1). The channels consist of front left, front right, front center, surround or rear left,
surround or rear right, and a separate subwoofer.
DTV (Digital television)
Generic term that refers to all digital television formats, including high-definition television (HDTV) and standarddefinition television (SDTV).
34
Page 36

HDMI (High-Definition Multimedia Interface)
Interface that supports all uncompressed, digital audio / video formats including a cable box, Blu-ray / DVD
recorder or digital television, over a single cable.
HDTV
The generally agreed upon definition of HDTV is approximately twice the vertical and horizontal picture resolution
of today’s NTSC TV, which essentially makes the picture twice as sharp. HDTV also has a screen ratio of 16:9 as
compared with most of today’s TV screens, which have a screen ratio of 4:3. HDTV offers reduced motion
artifacts (i.e. ghosting, dot crawl), and offers 5.1 independent channels of CD-quality stereo surround sound, (also
referred to as AC-3).
NTSC (National Television System Committee)
The organization that developed the analog television standard currently in use in the U.S., Canada, and Japan.
Now generally used to refer to that standard. The NTSC standard combines blue, red, and green signals
modulated as an AM signal with an FM signal for audio.
Progressive Scan
In Progressive Scanning all the horizontal scan lines are scanned on to the screen at one time. The Digital TV
and HDTV Standards accept both Interlaced Scan and Progressive Scan broadcast and display methods.
Resolution
A measurement of the finest (smallest) detail that is visible in a video image. TV resolution may be expressed as
number of pixels in an image, or more commonly, as total number of horizontally scanned lines used to create the
image.
Standard Digital TV Resolutions:
SDTV - 480i - The picture is 704x480 pixels, 480p - The picture is 704x480 pixels.
HDTV - 720p - The picture is 1280x720 pixels
1080i - The picture is 1920x1080 pixels with interlaced scanning.
1080p - The picture is 1920x1080 pixels with progressive scanning.
SAP (Secondary Audio Program)
Second-audio channel delivered separately from main-audio channel.
This audio channel is used as an alternate in bilingual broadcasting.
SPDIF (Digital Audio format)
SPDIF (Sony and Philips Digital Interconnect Format) is highly recommended for high quality digital sound output.
35
Page 37

90 DAY LIMITED WARRANTY AND SERVICE
VALID IN THE U.S.A. ONLY
SPECTRA MERCHANDISING INTERNATIONAL, INC. warrants this unit to be free from defective materials or
factory workmanship for a period of 90 days from the date of original customer purchase and provided the product
is utilized within the U.S.A. This warranty is not assignable or transferable. Our obligation under this warranty is
the repair or replacement of the defective unit or any part thereof, except batteries, when it is returned to the
SPECTRA Service Department, accompanied by proof of the date of original consumer purchase, such as a
duplicate copy of a sales receipt.
You must pay all shipping charges required to ship the product to SPECTRA for warranty service. If the product is
repaired or replaced under warranty, the return charges will be at SPECTRA’s expense. There are no other
express warranties other than those sta
ted herein.
This warranty is valid only in accordance with the conditions set forth below:
1. The warranty applies to the SPECTRA product only while:
a. It remains in the possession of the original purchaser and proof of purchase is demonstrated.
b. It has not been subjected to accident, misuse, abuse, improper service, usage outside the descriptions
and warnings covered within the user manual or non-SPECTRA approved modifications.
c. Claims are made within the warranty period.
2. This warranty does not cover damage or equipment failure caused by electrical wiring not in compliance with
electrical codes or SPECTRA user manual specifications, or failure to provide reasonable care and
necessary maintenance as outlined in the user manual.
3. Warranty of all SPECTRA products applies to residential use only and is void when products are used in a
nonresidential environm
ent or installed outside the United States.
This warranty gives you specific legal rights, and you may also have other rights which vary from state to state.
TO OBTAIN SERVICE please remove all batteries (if any) and pack the unit carefully and send it freight prepaid
to SPECTRA at the address shown below. IF THE UNIT IS RETURNED WITHIN THE WARRANTY PERIOD
shown above, please include a proof of purchase (dated cash register receipt) so that we may establish your
eligibility for warranty service and repair of the unit without cost. Also include a note with a description explaining
how the unit is defective. A customer service representative may need to contact you regarding the status of your
repair, so please include your name, address, phone number and email address to expedite the process.
IF THE UNIT IS OUTSIDE THE WARRANTY PERIOD, please include a check for $100.00 to cover the cost of
repair, handling and return postage. All out of warranty returns must be sent prepaid.
It is recommended that you contact SPECTRA first at 1-800-777-5331 or by email at [email protected]
for updated information on the unit requiring service. In some cases the model you have may be discontinued,
and SPECTRA reserves the right to offer alternative options for repair or replacement.
SPECTRA MERCHANDISING INTERNATIONAL, INC.
4230 North Normandy Avenue,
Chicago, IL60634, USA.
1-800-777-5331
To register your product, visit the link on the website below to enter your information.
http://www.spectraintl.com/wform.htm
0713 Printed in China
36
 Loading...