

Page 1
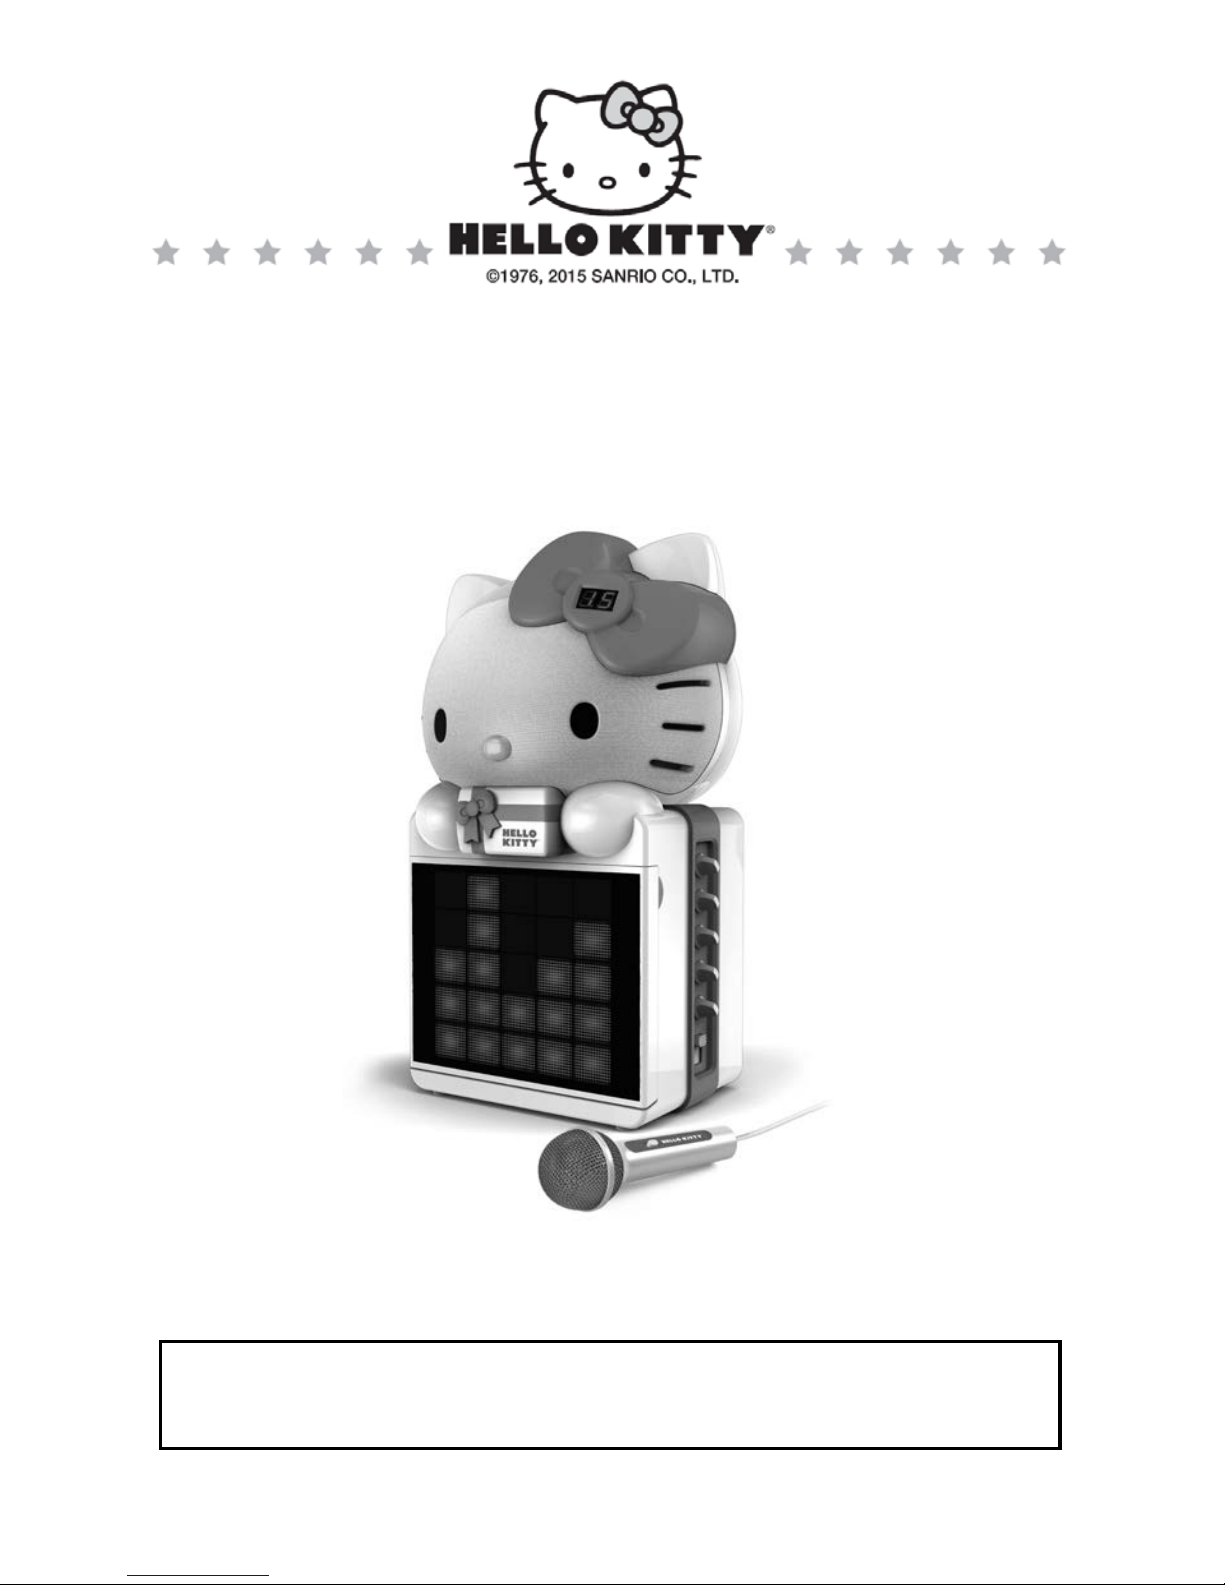
CD+G KARAOKE SYSTEM WITH LED LIGHT S HOW
AND MP3 /MP 3+G P LA YB A CK
KT2008B
USER MANUAL
CAUTION: Electrically Operated Product - Please use
care when plugging AC Adapter into AC outlet.
Page 2
1
COMPLIANCE WITH FCC REGULATIONS
This device complies with Part 15 of the FCC Rules. Operation is subject to the following
two conditions:
(1) This device may not cause harmful interference, and
(2) This device m ust acce pt an y int erfe rence recei ved , i nclud ing inte rferenc e tha t m ay
cause undesired operation.
This equipmen t has been teste d and found to com ply with the limits for a class B dig ital
device, pursuant to Part 15 of the FCC Rules. These limits are designed to provide
reasonable protection against harmful interference in a residential installation. This
equipment generates uses and can radiate radio freque ncy energy and, if not installed
and used in accordance wit h the instructions, may cause harmfu l interference to radio
communications. However, there is no guarantee that interference will not occur in a
particular installation. If this equipment does cause harmful interference to radio or
television recep tion, which can be determine d by turning the e quipment off and on, the
user is encouraged to try to correct the interference by one or more of the following
measures:
- Reorient or relocate the receiving antenna.
- Increase the separation between the equipment and receiver.
- Connect the equipment into an outlet o n a circuit different from that to which the
receiver is connected.
- Consult the dealer or an experienced radio/TV technician for help.
CAUTION: Changes or modifications not expressly appr oved by the party responsible for
compliance could void the user’s authority to operate the equipment.
CAUTION
Follow the advice below for safe operations.
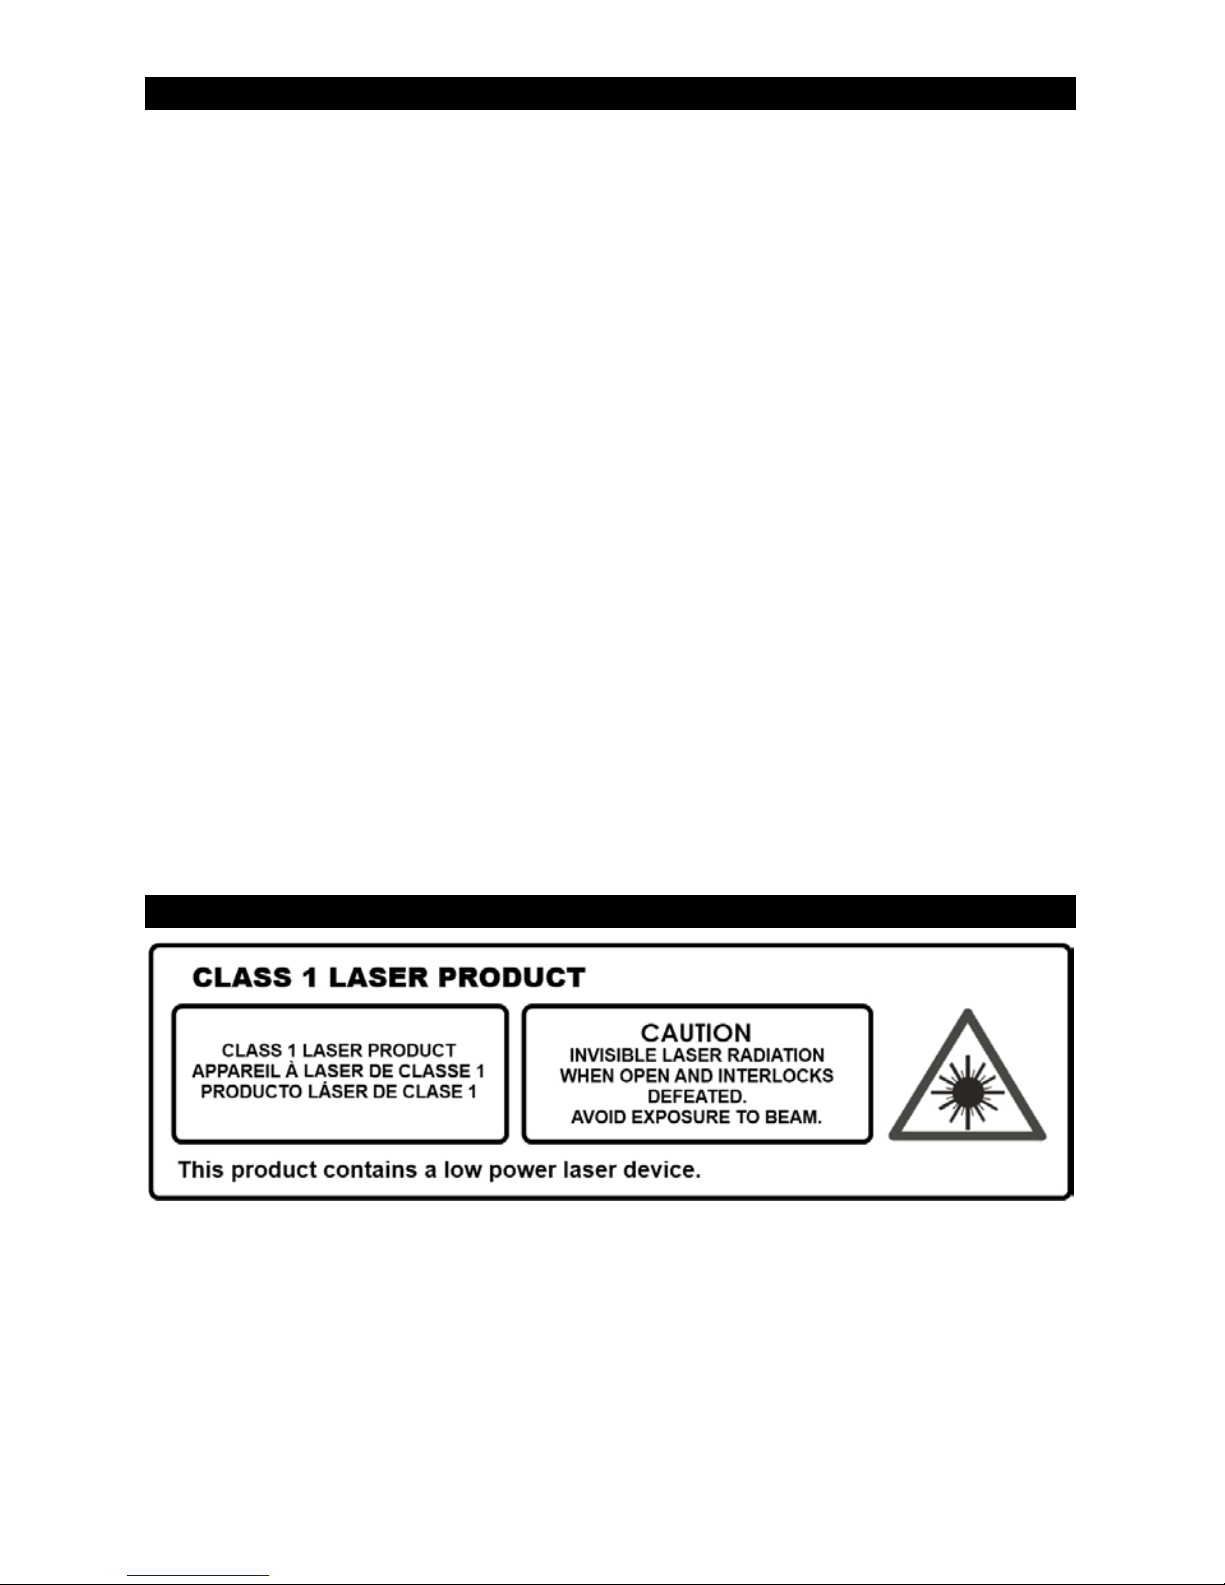
ON PROTECTION AGAINST LASER ENERGY EXPOSURE
♦ As the laser beam used in this compact disc player is harmful to the eyes, do not
attempt to disassemble the casing.
♦ Stop operation immediately if any liquid or solid object should fall into the cabinet.
♦ Do not touch the lens or poke at it. If you do, you may damage the lens and the
player may not operate properly.
Page 3

2
♦ Do not put anything in the safety slot. If you do, the laser diode will be “ON” when
the CD door is still open.
♦
If the unit is not to be used for a long period of time, make sure that the power
source is
disconnected from the unit. Unplug the
AC cord from the wall outlet.
Make it a pr ac tic e to remove the AC cord by grasping the mai n
body and not by
pulling the cord.
♦ This unit employs a laser. The use of controls or adjustment or performance of
procedures othe r than those specified here may result in e xposure to hazardous
radiation.
ON PLACEMENT
♦ Do not use the unit in places which are extremely hot
,
cold, dusty or humid.
♦ Place the unit on a flat and even surface.
♦ Do not restrict the air flow of the unit by placing it i n a place with poor ventilat ion, by
covering it with a cloth or by placing it on a carpet.
ON CONDENSATION
♦
When left in a heated room where it is warm and damp, water droplets or
condensation may
form inside the unit.
♦ When there is condensation inside the unit, the unit may not function normally.
♦ Let it stand for 1 to 2 hours before t urning the power on, or gradually heat the
room up and dry the unit before use.
Should any trouble occur, remove the power source and refer servicing to qualified
personnel.
PROTECT YOUR FURNITURE!!
This system is equipped with non-skid rubbe r ‘feet’ to pre vent the p roduct from mo ving
when you operate the controls. These ‘feet’ are made from non-migrating rubber material
specially formulated to avoid leaving any marks or stains on your furniture. However
certain types of oil based furnitu re polishes, wood pres ervatives, or cleaning sprays may
cause the rubber ‘feet’ to soften, and leave marks or a rubber residue on the furniture.
To prevent any damage to your furniture we strongly recommend that you purchase small
self-adhesive felt pads, available at hardware stores and home improvement centers
everywhere, and apply these pads to the bottom of the rubber ‘feet’ before you plac e the
product on fine wooden furniture.
GLOSSARY OF KARAOKE
In addition to all of the terminology associated with consumer electronics products, a few
additional terms are used almost exclusively in karaoke. These terms are meant to
familiarize you wit h the world of karaoke . The features list ed below ma y not necessaril y
apply to the particular model that you have. Following are some brief explanations:
Echo:
Echo adds de pth and resonance to a singer's voice, withou t affecting the music. This
echo is produced by creating minor controlled f eedbac k in the singer's voice.
Page 4

3
CDGMs (Compact Disc Plus Graphics Multiplex):
They are CD’s that contain songs that include the lead singer's voice, which can be
removed with a karaoke system that has a balance or multipl ex contr ol. The idea is to si ng
along with the lead singer or replace the lead singer’s voice w ith yours. B ackground vocals
and backup singers are provide d.
Automatic Voice Control (AVC):
When the AVC function is activated, the vocals on a multiplex recording are eliminated as
soon as the singer begins singing into the microphone. When the singer stops singing, the
vocals on the multiple x recording are automatically re-activated. This us eful function is
used primarily during practice sessions while a singer is learning a song. Please note that
the AVC function only works with multiplex recordings and not with standard audio
recordings.
CD+G:
This is an acronym for Comp act Disc plus Graphics . You will als o see variat ions CD+G,
and CD+Graphics. This is a regular CD with information stored on a data track
simultaneous to music. CDG has a video output for simple graphics (not full motion video).
In the case of karaoke, the graphics function is used to store song lyrics, and display the
lyrics in sync with music . In mos t cases, CDG soft ware displa yed lyrics change c olor as
they are to be sung. A regular television with a Video-In RCA Jack is all that is required to
display CD+G lyrics.
INTRODUCTION
Your CD+Graphics Karaoke System will provide you with many years of fun and
entertainment . It makes you a "star" as you sing along with your favorite karaok e discs
and hear your voice with the music through the system's speakers.
This Karaoke System has a com pact desig n and is full of featu res yet it is eas y to us e.
Just a few simple instructions a nd y ou will become an expert.
Before using your unit, please read this manual to familiarize yourself with all the features
available and th e sections of the manual that describe their o perations. Next go to the
section for the specific operatio n y ou w ish to perfor m.
For your easy reference, listed here are some of the main features of this Karaoke
System.
Lyrics on TV screen - displays the lyrics in rh ythm with the mus ic when pla ying CD+G
discs.
Balance Control - lets you adjust the balance between the pre-recorded original singer's
voice and the music if you use a multiplex karaoke disc.
Automatic Voice Contr ol (AVC) - l ets you replace the original singer's voice with your
own voi ce whe n any p re-recorded multiplex karaoke disc is played. To activate, just rotate
the Mic Volume to a comfortable listening level and Auto Voice Control for the best
balance between playback and microphone levels.
Echo Control - lets you add echo to enrich your voice for a concert hall effect.
Page 5

4
Built-in Speakers - lets you share the music with your family or friends.
Audio Out Jacks - lets you connect to ano ther audio output compone nt, such as an
equalizer/booster or a PA system.
Video Out Jacks - lets you connect to your TV/monitor for displaying the lyrics from
CD+G discs.
Digital Key Control (DKC) - lets you adjust music ke y from C D+G tracks and MP3+G
files up or down 7 levels in either direction.
Page 6
5
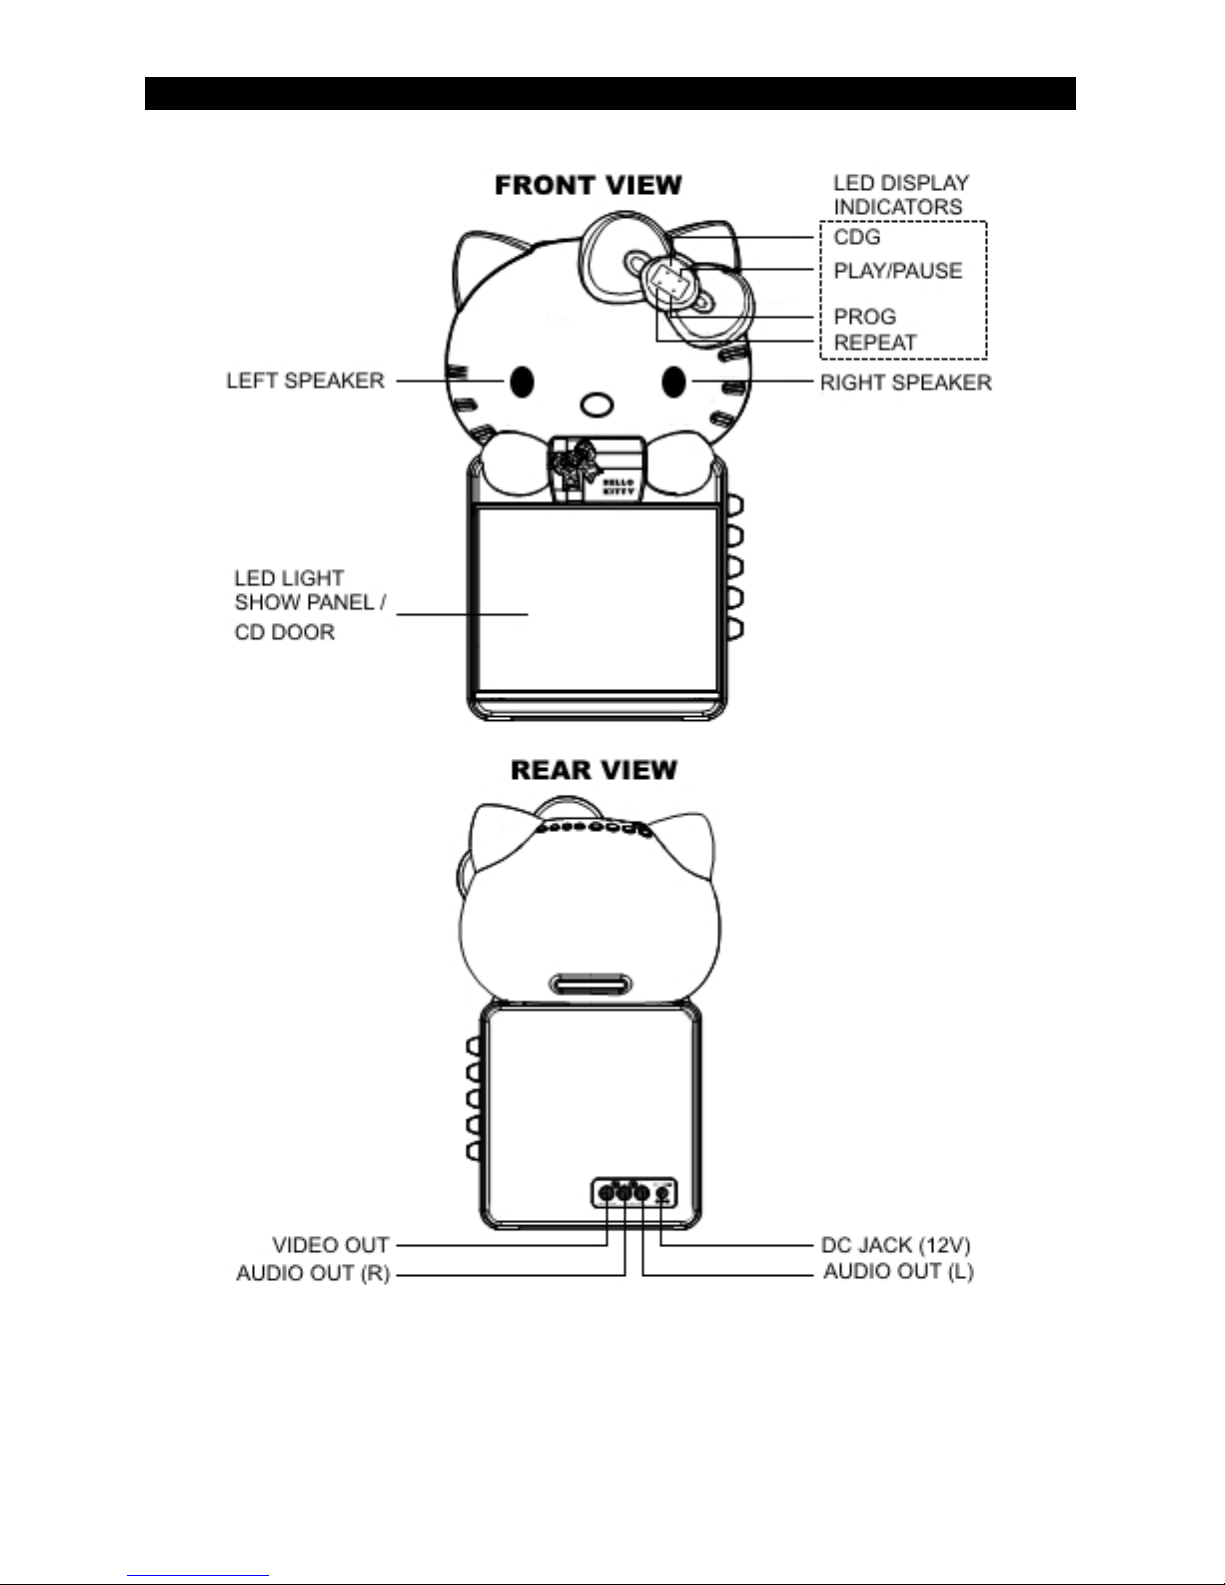
CONTROL L OCATIONS
Page 7
6
SETTING UP FOR OPERATION
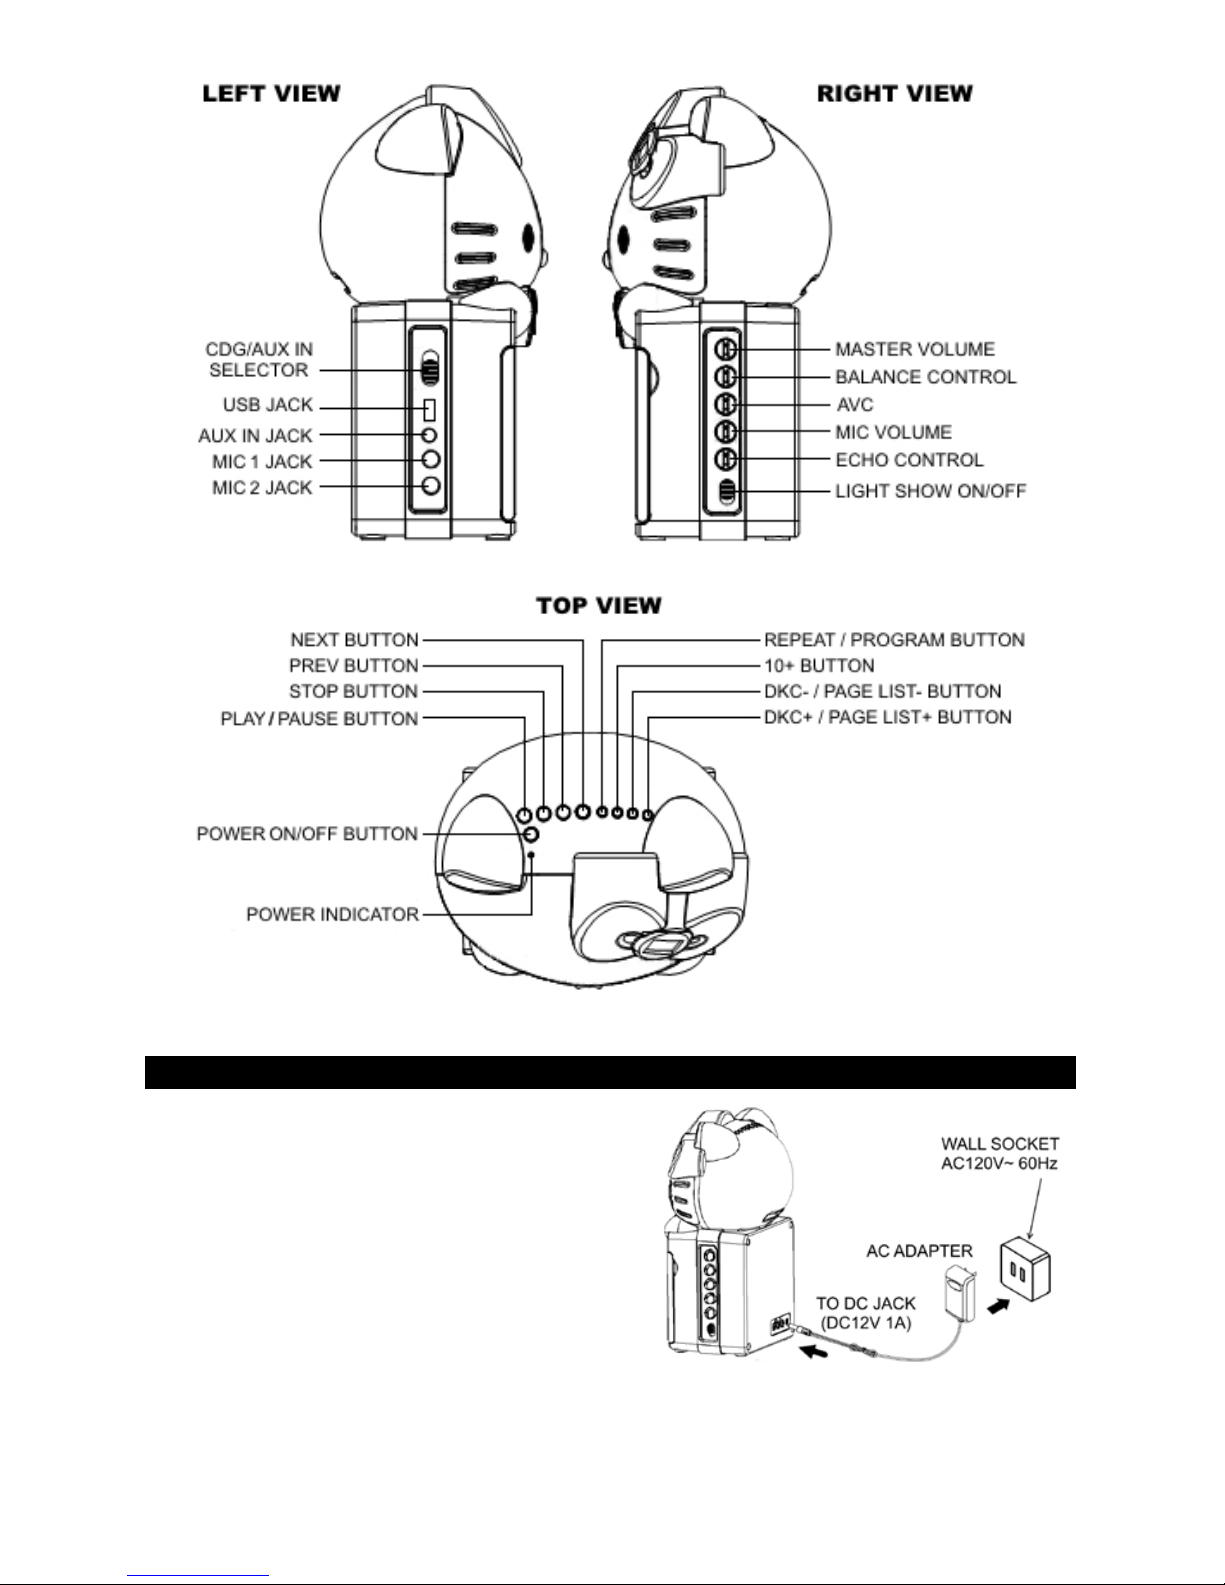
CONNECTING POWER
Plug the supplied AC adapter into the DC jack
on the rear side of the unit and connect to a
standard AC wall socket with 120V~ 60Hz
continuous power supply.
Note: When the unit is not operated for long
periods of time, unplug the AC adapter from the
unit and wall outlet.
CONNECTING TO YOUR TV
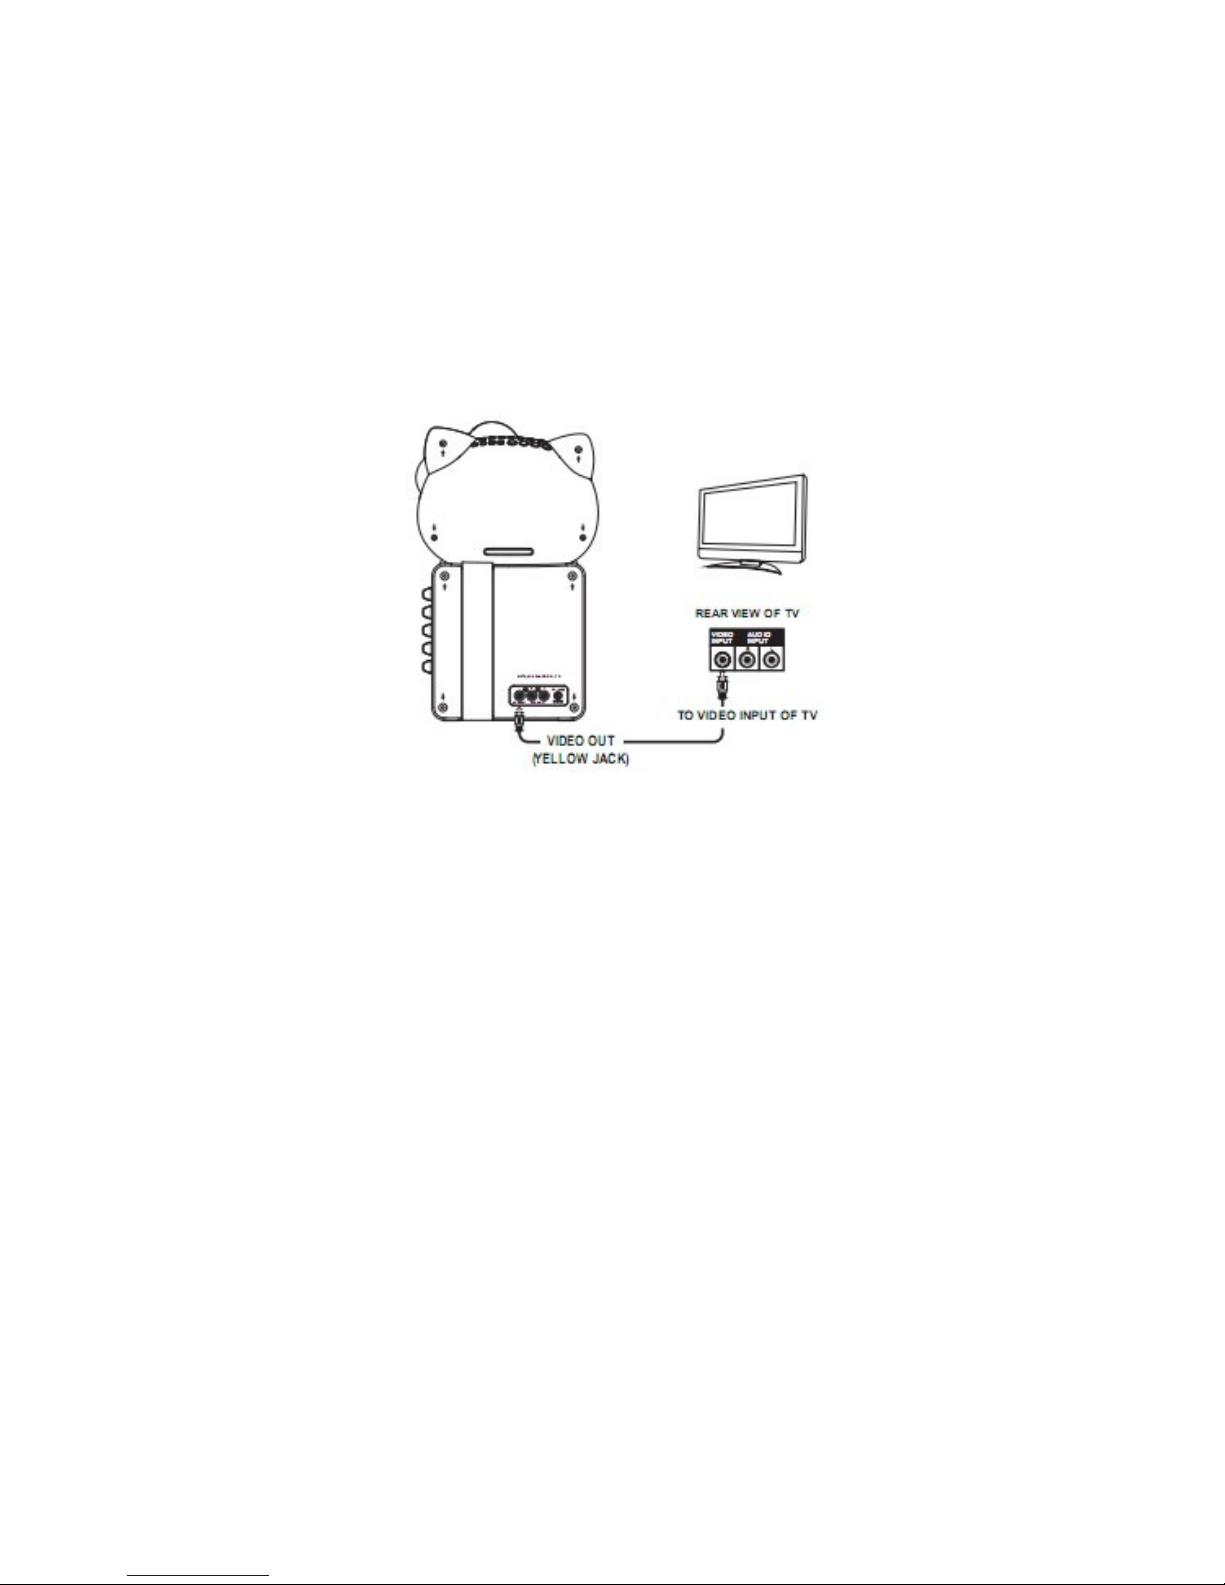
The karaoke system provides a patch cord to give you the option of connecting you r unit
to an external audio/video device. The patch cord has three R CA jacks at each end. White
Page 8
7
and Red are for left and right audio connections and the Yellow is for video. Modern flat
panel digital TV sets and home music systems are usually equipped with corresponding
color-coded RCA jacks to assist correct connections. Make sure that you have a CD+G
disc in the karaoke system playing when you are making this connection. You will know
you have the proper settings o n y our TV as soon as you see t he ly r ics on the s creen.
Video connection
Please follow the steps below to display CD+G lyrics on the TV screen:
1. Locate the color-coded patch cords.
2. Connect video cable (Yellow) to the VIDEO OUT on the back of the karaoke system.
3. Connect the other end of the video cable (Yellow) to the VIDEO/AV INPUT on your
TV.
If your television does not have the required Video Inpu t, you will need a RF modulator
(Radio Frequency Modulator), which connects through your TV Antenna or cable line and
serves as your Video Input.
The RF Modulator can be purchased at almost an y consumer electronics re tailer. If you
are connecting th e video from the karaok e system to a television video i nput jack, you
must specify the source the TV is to display. Your TV user guide can tell you how to
display the video signal from the 'Video In' jack.
If you do not have the manual for your TV, we suggest calling the TV manufacturer's
customer service depar tment. Only the manufacturer will be able to tell you accurately
how to con f igure your TV to dis play t he v ideo signal coming from the 'Video Input' jack.
Note: Some projection TV sets do not properly display the s tandard blue background
used on most CD+Gs. If the background color is inconsistent or flashing, please try
connecting your karaoke system to a standard CRT/LCD television instead.
Common ways to configure your TV
1. You karaoke system is designed to connect to your TV. The karaoke system is
constantly sending the video and audio signals to the 'VIDEO OUT' and 'AUDIO
OUT' jacks whenever you play a CD+G disc. So, load a CD+G into your ka raoke
system before you start making these conn ections. You will see lyrics on the TV
screen as soon as you have completed the setup correctly.
Page 9
8
2. The setup of your TV is the most difficult part of making the connection for displaying
your lyrics. In most homes, the TV has eith er a cable connec ted or antenna in use.
Once you connect your karaoke system to the TV, you must 'tell' your TV to display
the input from the karaoke system instead of the usual input from the cable or
antenna.
3. Check your TV user manual for the easiest way to setup your particular
entertainment system. If you do not have your manual, you can always call your TV
manufacturer for that information or try their website for online assistance. We have
listed below the most common ways of setting up a TV:
♦ In the setup menu for configuring the TV there may be an 'Input Selection'
option w here you may choos e betw een 'Cable/A nt.', 'V ideo 1', or 'Video 2' etc.
as the input source.
♦ Try looking for a 'Video' channel between the highest channel and the lowest
channel on your TV (i.e. between 2 and 99 may be 'VIDEO' or 'INPU T').
♦ Look for a button on the remote control for the TV you are connecting to that
says 'VIDEO', 'VIDEO 1', 'AUX', 'EXT', 'LINE 1. The 'LINE-IN' button will
display the Video input source.
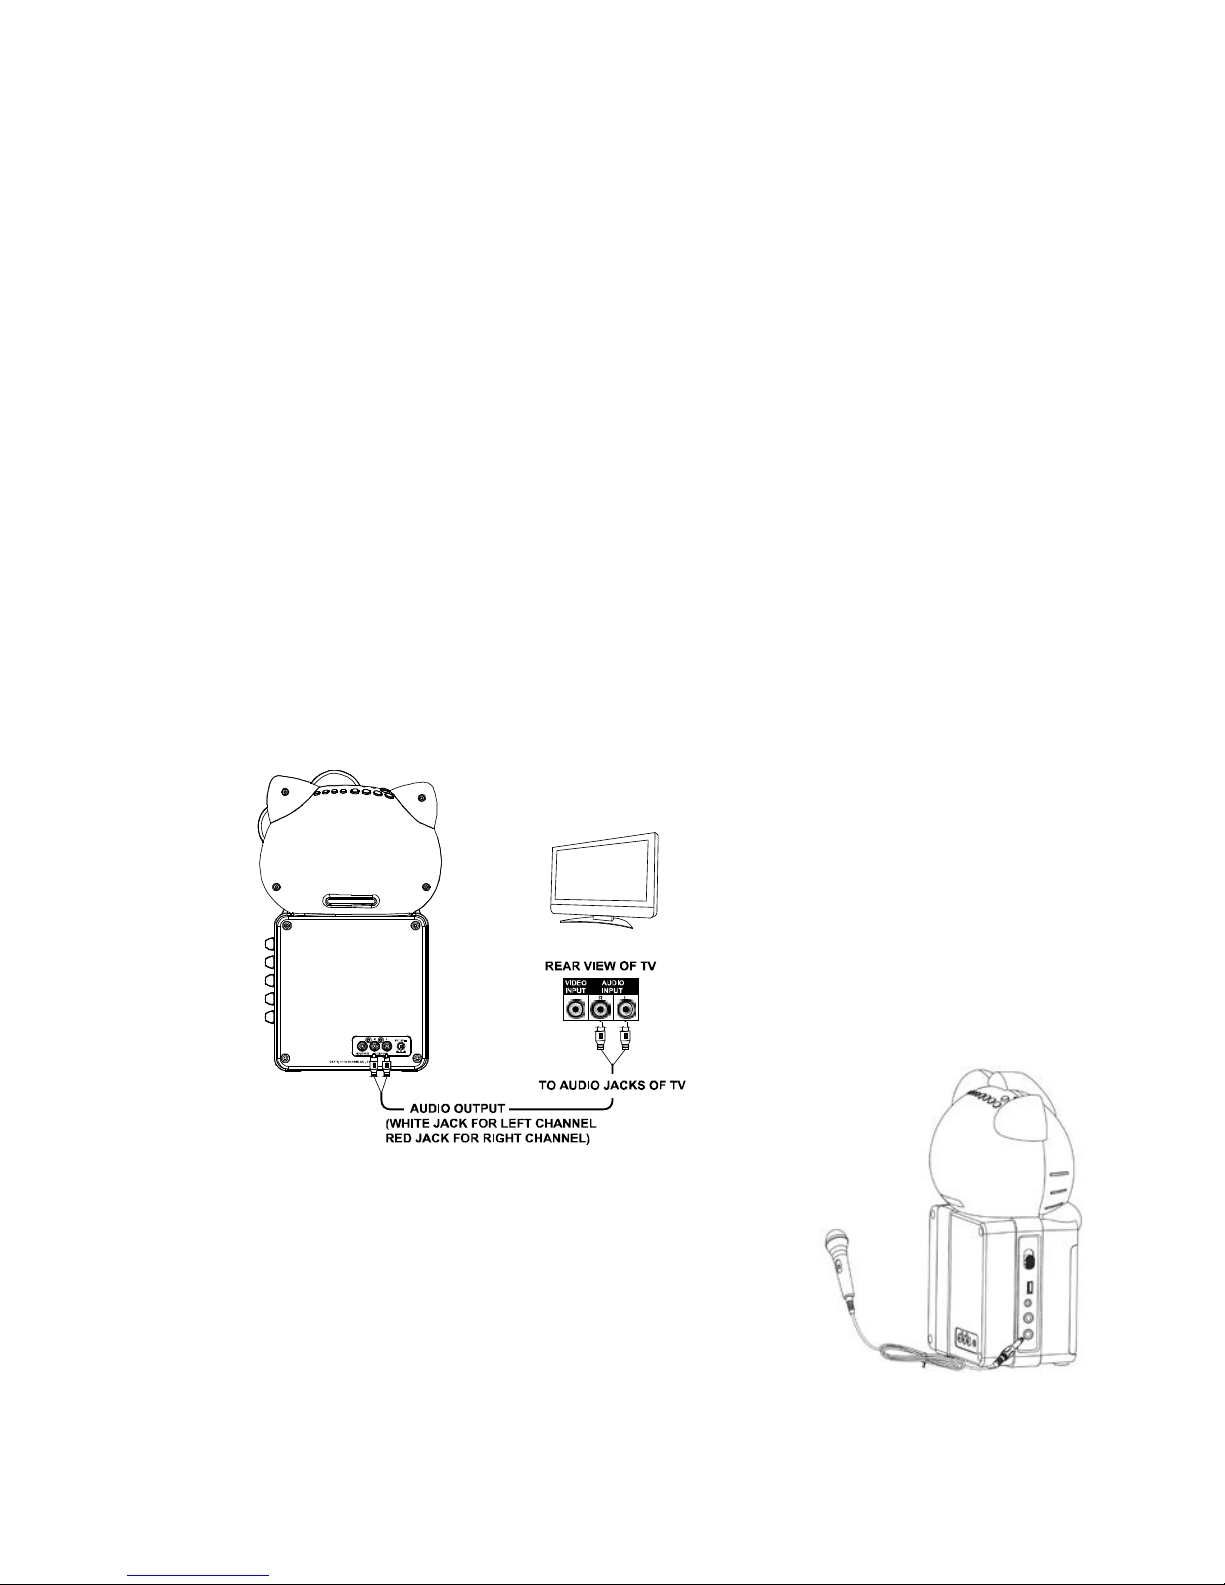
Audio connection
Connect the unit to your TV or home stereo system using the White and Red
connections on the supplied patch cord. Plug the white end of the patch cord into the
white AUDIO OUT jack on the unit. Plug the re d end of the patch cord i nto the red AUDI O
OUT jack on unit. Now conne c t the ot her e nd of the cable's white (left channel) and red
(right channel) plugs to your TV or home stereo system's 'AUDIO IN' or 'AUX IN' jacks.
CONNECTING A MICROPHONE
1. Plug a microphone (one microphone is included) into the
MIC 1 or MIC 2 JACK on the lower left side of your unit.
The mic output will be mixed with an audio source from
CD/CD+G/USB flash drive.
2. Slide ON/OFF switch on microphone to “ON” before
singing and always slide to “ OF F” aft er use.
CAUTION - Tapping or dropping the microphone while it is on can cause permanent
damage to it. Never grip and sw ing the microphone around by the connecting cord.
Page 10

9
UNDERSTANDING THE CONTROL FUN CTIONS
POWER AND PLAYBACK FUNCTIONS
1. FUNCTION SELECTOR (CD G/AUX IN )
Set it to “CDG” to playback a CD, CD+G, CD-R/CD-RW disc o r USB flash drive
with MP3/MP3+G files.
Set it to “AUX IN” to playback audio output from an externa l audio dev ice that is
connected to the AUX IN JACK.
2. LIGHT SHOW ON/OFF
Set it to “ON” to turn ON the Light Show on the front panel.
Set it to “OFF” to turn Light Show OFF.
3. POWER ON/OFF BUTTON
Press and lock th is button t o turn unit ON. The POW ER INDICATOR will lig ht in
red.
Press and releas e this bu tton to tu rn unit OFF. The POW ER INDIC ATOR will go
off.
4. PLAY/PAUSE
BUTTON
Tap once to play a selected song when playing a CD/CD+G/CD-R/CD-RW disc or
MP3/MP3+G files on a USB flash dr ive. The PLAY/PAUSE INDICATOR will light.
While playing, tap again to pause. The PLAY/PAUSE INDICATOR will flash.
5. STOP BUTTON
While a selected song is playing, tap this to stop.
6. NEXT BUTTON
Tap once to skip forward to the following song during playback or stop mode.
7. PREV BUTTON
Tap once to s kip ba ck to the s tart of the cu rrent song d uring playb ack or s kip ba ck
to the previous song during stop mode.
8. REPEAT/PROGRAM BUTTON
REPEAT function
During CD/CD+G playback:
tap once for Repeat 1 (REPEAT INDICATOR in LED DISPLAY will flash) to
playback current song only;
tap again for Repeat All (REPEAT INDICATOR will light steadily) to repeat
all available tracks on the disc;
tap again to cancel Repeat mode (REPEAT INDICATOR will be OFF) .
During MP3/MP3+G playback on CD-R/CD-RW or USB flash drive:
tap once for Repeat 1 (REPEAT INDICATOR in LED DISPLAY will flash) to
playback current song only;
tap again f or Rep eat Directory (REPEAT INDICATOR will flash slowly) to
repeat all available tracks in the selected directory (or folder/album) on the
disc or USB drive;
tap again for Repeat All (REPEAT INDICATOR will light steadily) to repeat
all available tracks on the disc or USB drive;
Page 11
10
tap again to cancel Repeat mode (REPEAT INDICATOR will be OFF) .
PROGRAM function
In stop mode, tap once to enter PR OGRAM mode:
For CD/CD+G tracks:
tap NEXT or PREV BUTTON to select the desired song;
tap the 10+ BUTTON to ski p f o rward by 10 so ng s at one time.
For MP3/MP3+G tracks:
you may additionally tap PAGE LIST + or PAGE LIST – to skip forward or
backward by one screen page at a time.
Tap PROGRAM BUTTON to confirm selection and proceed to next track.
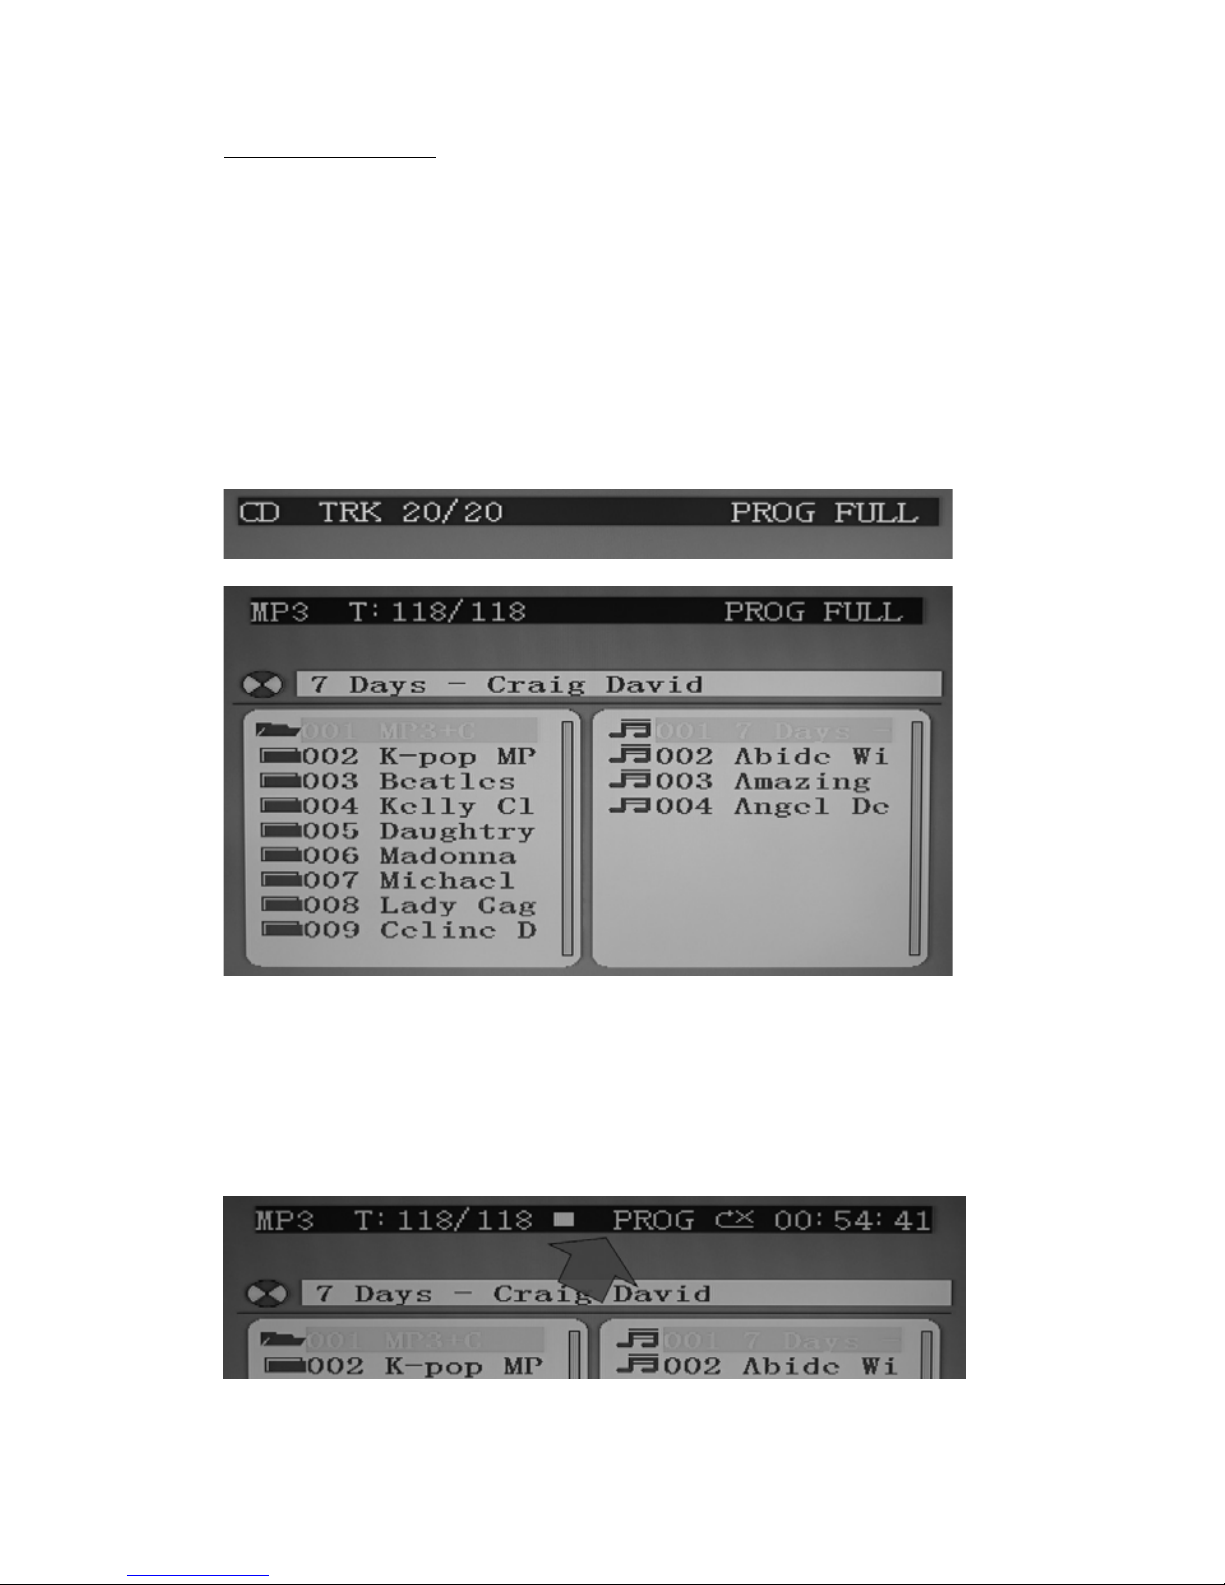
Up to 20 tracks can be programmed. If you attempt to program more than 20
tracks, “FU” will appear in the LED DISPLAY and “PROG FULL” will appear on
the TV screen as show n below (if connected).
Program Play mode:
When finished programming, tap PLAY BUTTON to confirm and start program
play. The PROG INDICATOR in the LED DISPLAY will light. W hile playing, you
may tap the NEXT or PREV BUTTON to skip to a desired song in the program list.
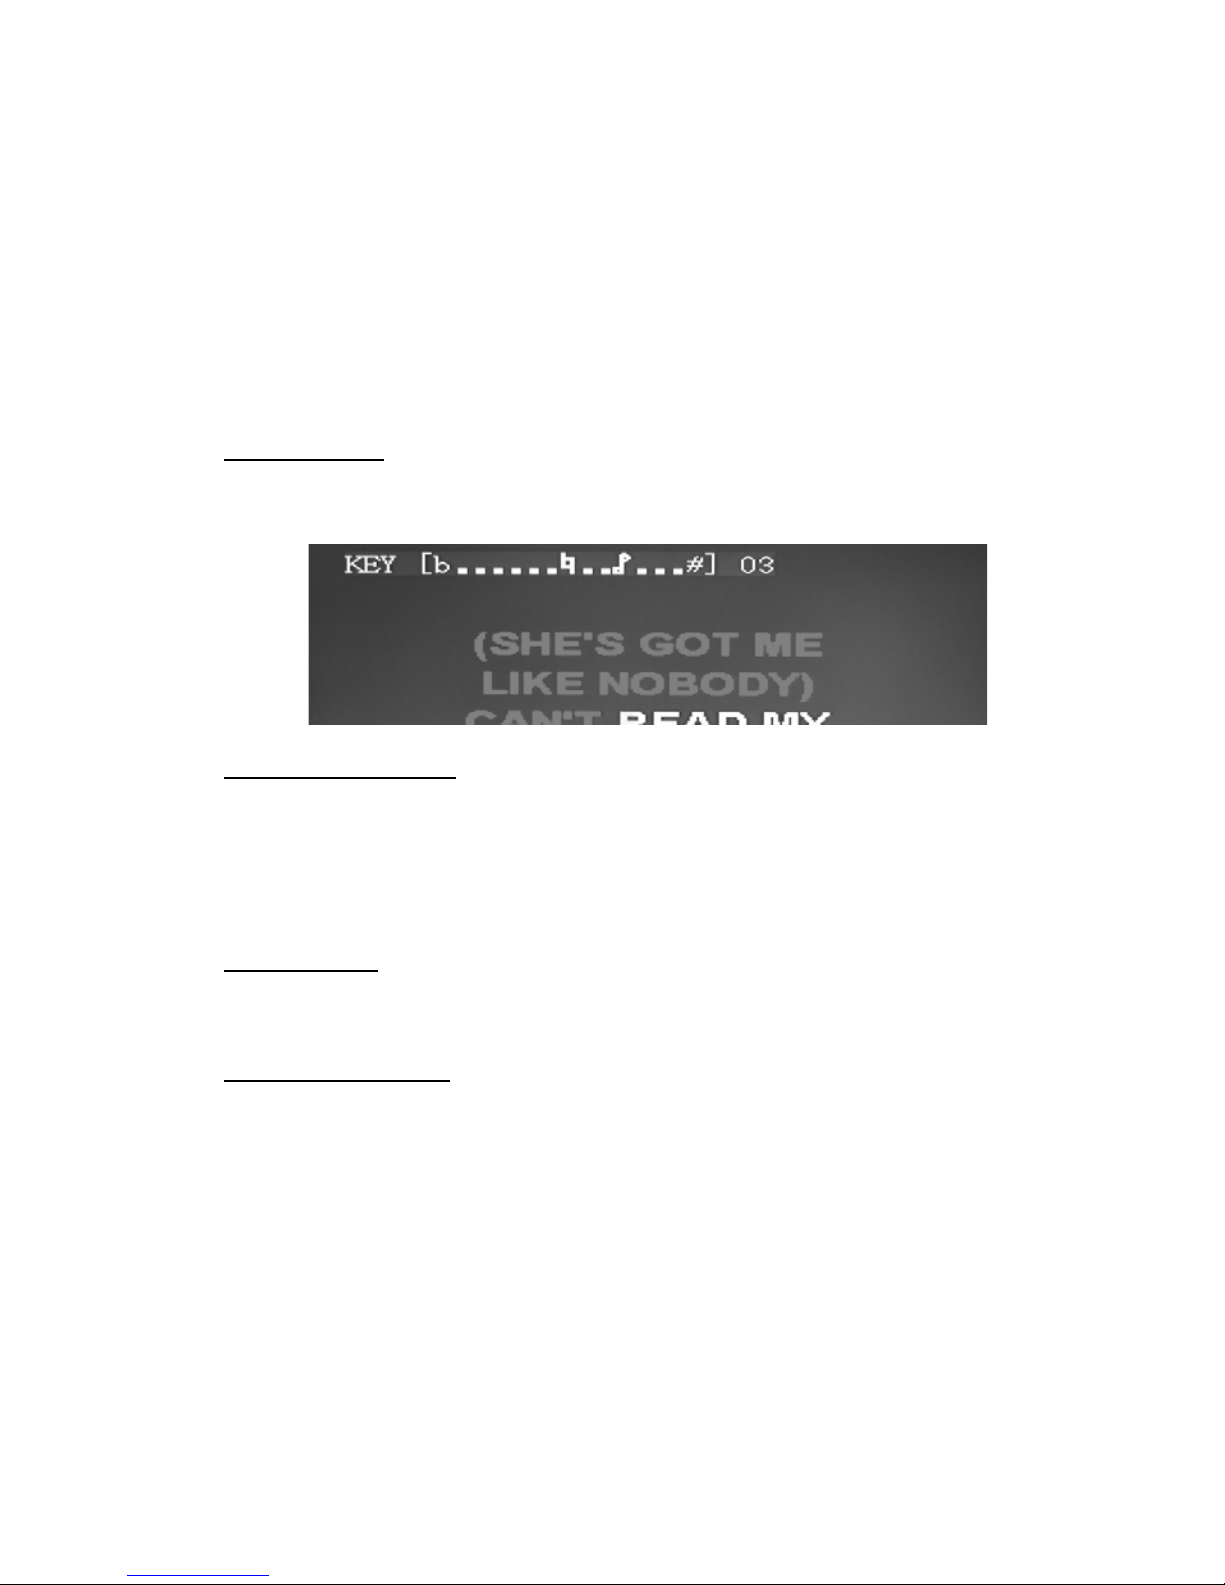
To stop program play temporarily, tap the STOP BUTTON once. The PROG
INDICATOR in the LED DISPLAY and TV screen (as shown below) will remain
ON.
Page 12
11
Tap PLAY BUTTON to resume program play.
Note: if you ta p the STOP BUTTON twice consecutively , you w ill cance l progr am
play and erase the program list permanent ly. The PROG INDICAT OR in the LED
DISPLAY and TV screen will go OFF.
Program Review:
In stop mode, you can review the program list by pressing the NEXT or PREV
BUTTON.
9. 10+ BUTTON
During MP3/MP3+G playback, tap once to skip forward by10 songs each time.
10. DKC+/PAGE LIST+ BUTTON
DKC+ function
During playback of songs from CD/CD+G disc or USB flash d rive, tap once to
increase the digital key by 1 step up to a maximum of 7 steps.
PAGE LIST+ function
During stop mode of MP3/MP3+G playback, tap once to navigate to the next
directory (or folder/album) on the left hand column of the following menu. The right
hand column will sho w the firs t 9 songs in the current folder/album. Tap again to
display more songs until all songs in all folders/albums are displayed.
11. DKC-/PAGE LIST- BUTTON
DKC- function
During playback of songs from CD/CD+G disc or USB flash dri ve, tap once to
decrease the digital key by 1 step up to a maximum of 7 steps.
PAGE LIST- function
During stop m ode of MP3/MP3+G playback, tap once to navigate to the p revious
directory (o r folder/album) on the le ft hand column of th e menu. The right ha nd
column will show 9 songs of the current folder/album. Tap again to go back to the
previous folders/albums and display more songs.
INPUT FUNCTIONS
12. DC JACK
Connect the DC plug of the DC12V output AC Adapter (included) to this jack.
13. USB JACK
Connect a USB flash drive (FA T32 formatted) up to 32GB (not include d) which
contains MP3/MP3+G files to this jack for playback.
Page 13

12
14. AUX IN JACK
Connect the 3.5mm stereo plug of a stereo audio cable (not inc luded) to this jack
and the other end to an external audio player for audio playback.
15. MIC 1 / MIC 2 JACKS
Connect the microphone (one included) to either one of the jacks to sing.
OUTPUT FUNCTIONS
16. VIDEO OUT JACK
Connect the yellow coded RCA plug of the A/V cable (included) to this jack and the
other en d t o the composite video input of your TV set.
17. AUDIO OUT JACKS (L/R)
Connect the white coded RCA plug (L) and red coded plug (R) of the A/V cable
(included) to these jacks and the other end to the audio inputs of your TV set.
18. SPEAKERS (L/R)
There are 2 built -in speakers on this unit , a left (L) channel t o reproduce music
only and the right (R) channel for vocal+music multiplex tracks on CD+G disc .
KARAOKE CONTROL FUNCTIONS
19. MASTER VOLUME
Adjust this to obtain the desired volume level from the built-in SPEAKERS.
20. BALANCE CONTROL
Adjust this to obtain the optimum music and vocal levels while playing a CD+G or
MP3+G file or as left (L) and right (R) channel balance while playing ordinary
stereo sound tracks of CD or MP3.
21. AVC (AUTOMATIC VOICE CONTROL)
Adjust this to obtain the desired AVC s en s itivity.
When you r otate clockwise to increase t he sensitivity, the vocals on a multiplex
recording are eliminated as soon as the singer begins singing into the microphone.
When the singer stops singing, the vocals on the multiplex recording are
automatically re-activated. This function is used primarily during practice sessions.
22. MIC VOLUME
Adjust this control to obtain the desired mic volume output during singing.
Volume level of both Mic 1 and Mic 2 will be adjusted at the same time.
23. ECHO CONTROL
Turn this cont rol clock wise for a mo re signi ficant ec ho effec t to en rich your voice
for a concert hall effect.
HOW TO SING WITH CD+G, USB OR AUX-IN MUSIC SO UR CE
GET PREPARED FOR YOUR SINGING SESSION
You will need to do the following things:
♦ Connect your unit to a compatible T V using the includ ed A /V cable.
Page 14
13
♦ Plug in the included MICROP HONE into either the M IC 1 or MIC 2 JACK.
Note: Always set the mic to OFF before you are ready to sing to avoid possible
sharp feedback noises.
FROM CD+G, CD, CD-R/CD-RW OR U SB FLASH DRIVE WIT H MP3/MP3+G
FILES
1. Set the FUNCTION SELECTOR to “CDG”.
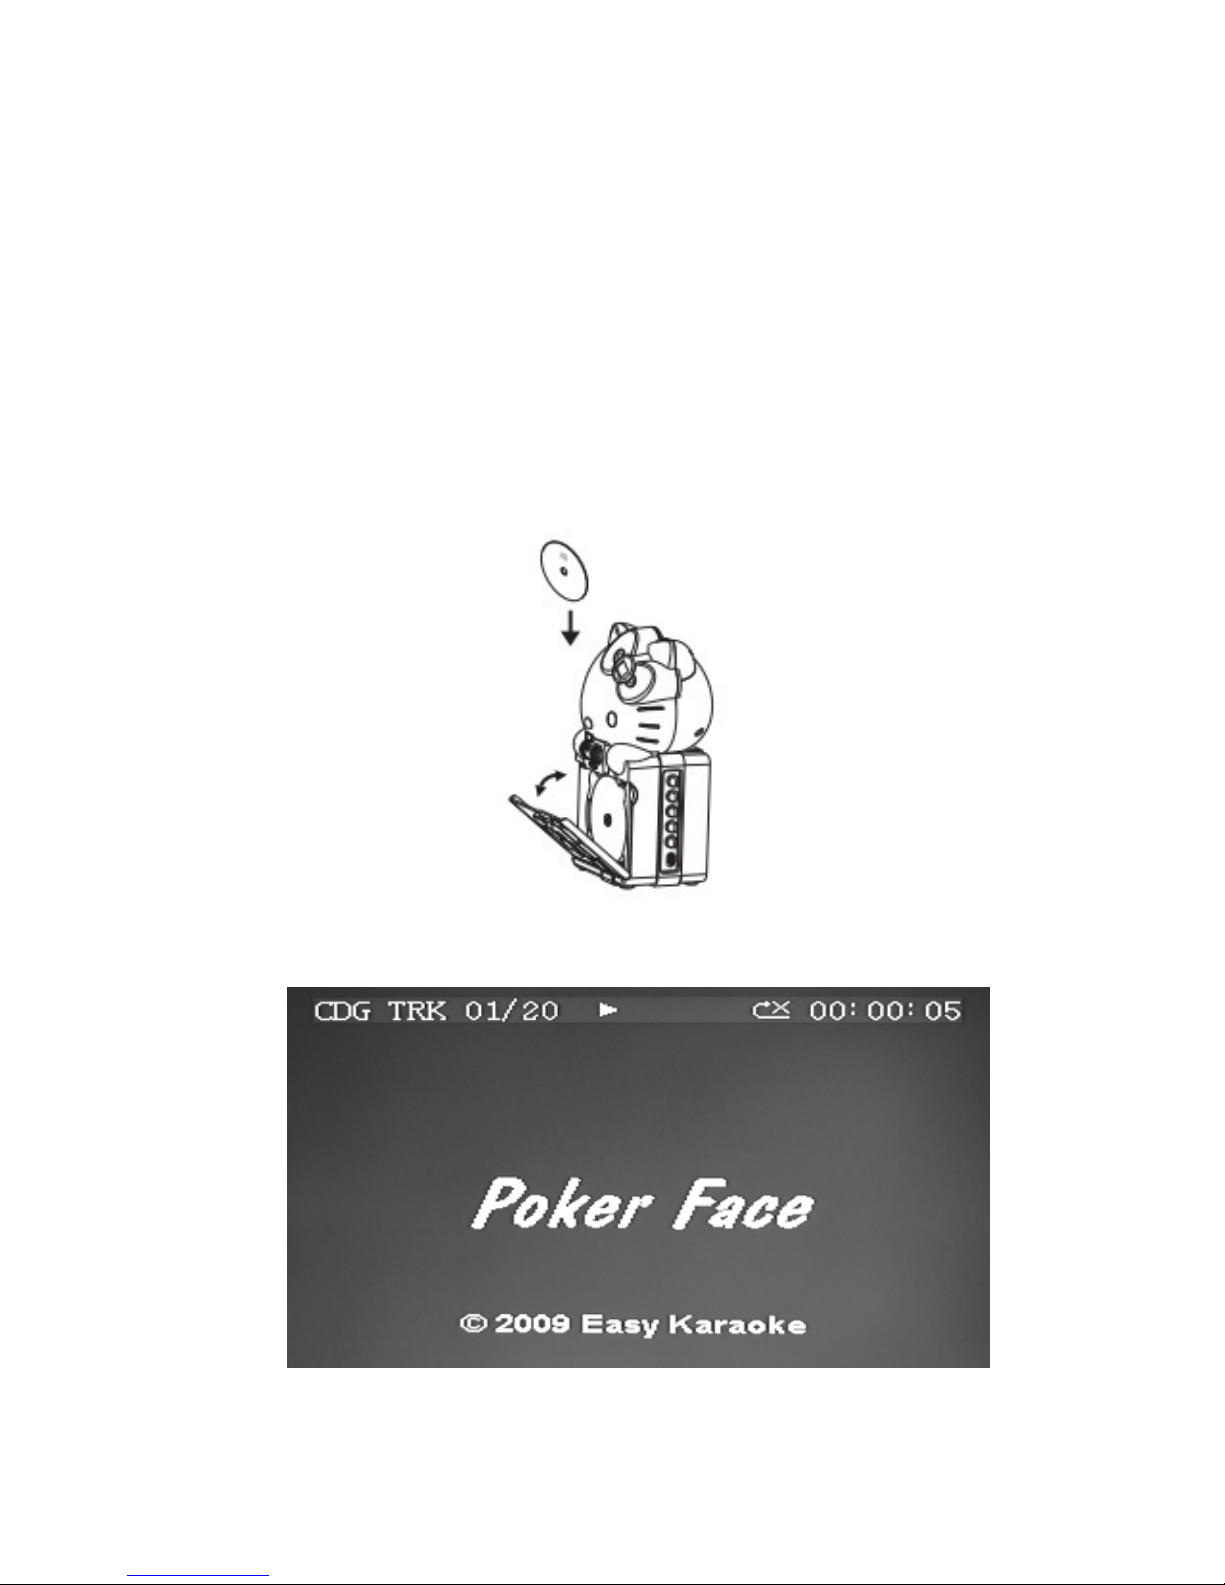
2. Load a CD/CD+G disc as follows:
a) Grip the top right edge on the CD DOOR where indicated and pull gently to open
it. The LED DISPLAY will display “O P”.
b) Load a disc vertically into the compartment w ith the print ed si d e facing y ou.
c) Gently close the CD DOOR. The unit begin s to read the disc. The LED DIS PLAY
will display the total number of tracks. (If no disc is loaded or the disc cannot be
recognized, “No” will be display ed in the LED DISPLAY).
d) When a CD+G disc is detected and being played, the CDG INDICATOR in the
LED DISPLAY will light.
3. Press PLAY/PAUSE BUTTON to play the disc. If a CD+G track is being played, the
following TV screen will appear.
Page 15
14
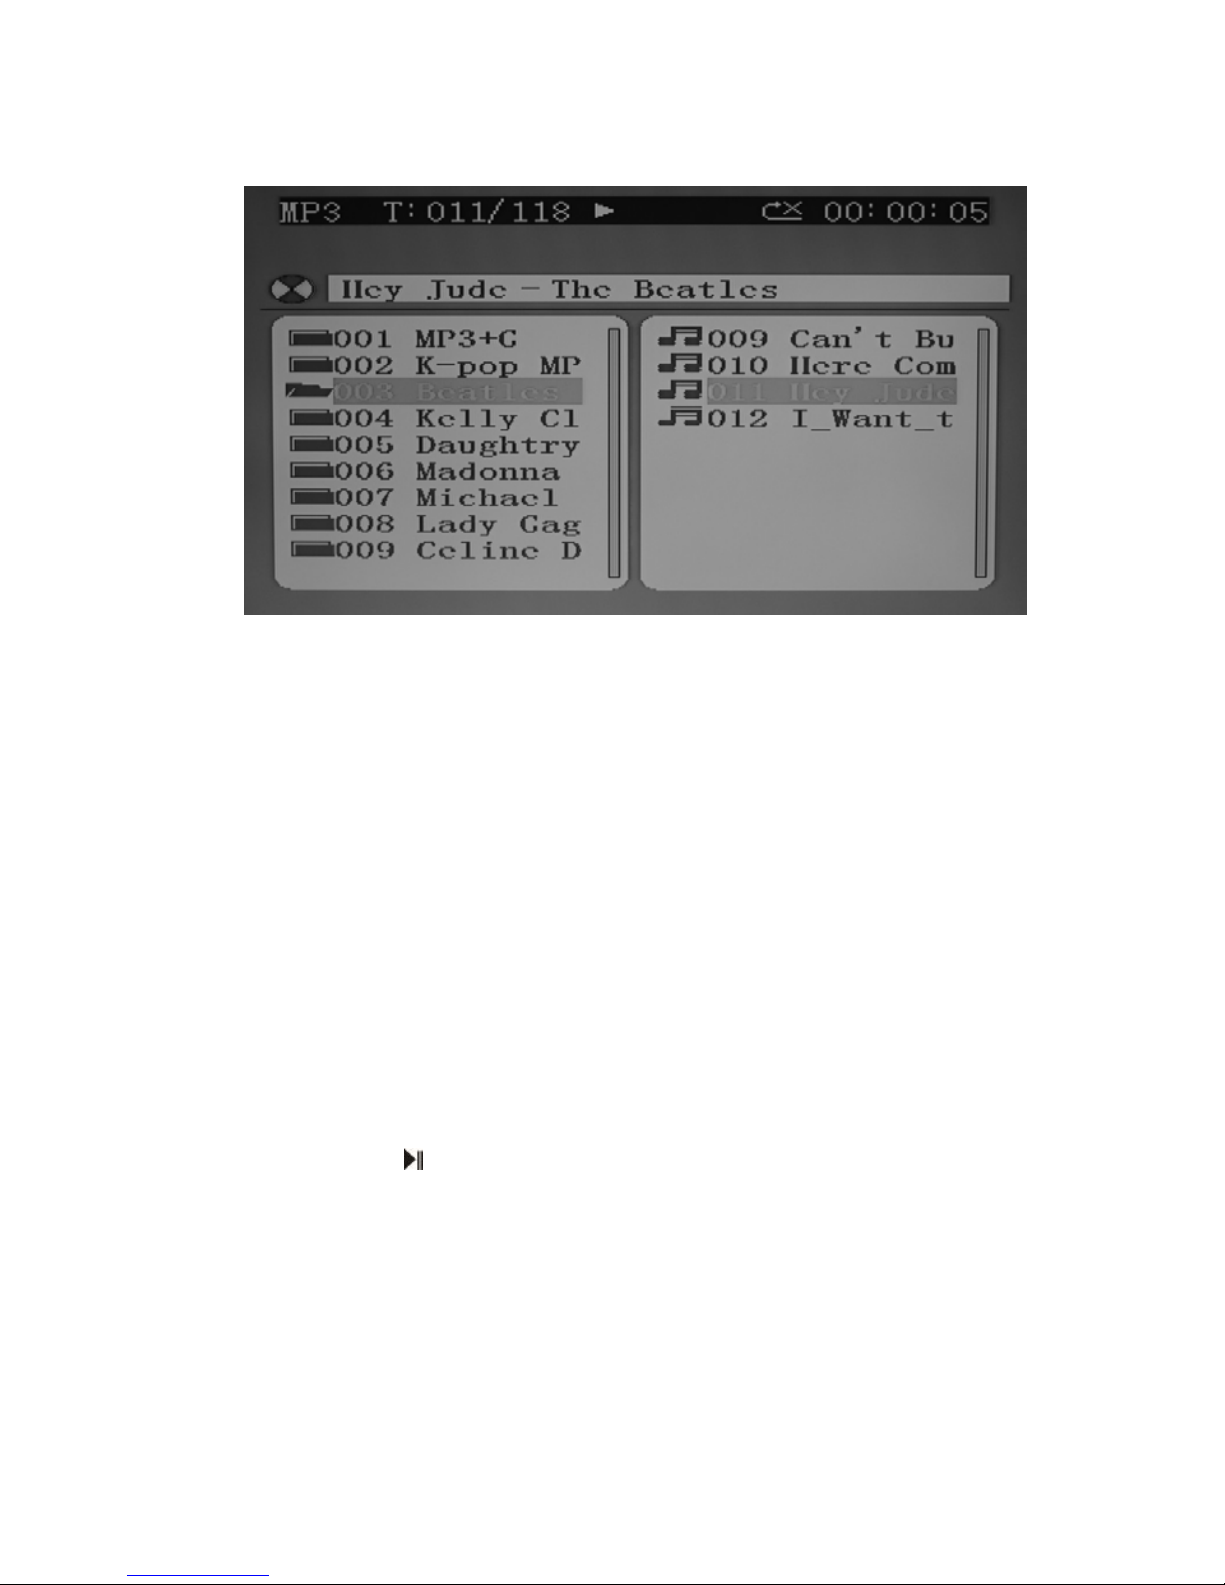
Notes on playing self-compiled CD-R/RW or USB flash drive with MP3/MP3+G
songs: If you try to play a self-compiled CD-R/RW disc or USB flash drive with
MP3/MP3+G songs (both are not included), you will see the following menu instead.
On the top line of the menu, “T: 011/118 mean s track #11 out of total 118 tracks is
now playing. The elapsed time of current track i s show n on the right.
♦ The USB flash drive will always be played at a higher priority than the compact
disc. So, once the USB flash drive is remov ed, the unit will read the compact disc
inside the CD compartment again automatically.
♦ If the number of songs on the di sc/USB drive is more than 99, the LED DISPLAY
will only display the last two digits. For example, if it contains “118” songs, “18”
will flash on the LED DISPLAY. How ever, if you hav e connected to a TV , full disc
content information will be shown as above.
♦ When a MP3+G file is detected and being played, the CDG INDICATOR in the
LED DISPLAY will flash and the TV screen will display “MP3G” in its top left
corner.
♦ All basic play/pause, stop and skip co ntr ols are id entica l to C D G mode.
♦ Tap the +10 BUTTON if you want to skip forward by 10 songs each time.
♦ When in stop mode, tap PAGE LIST+ or PAGE LIST- BUTTON to swiftly navigate
between the folders on the left column of the menu. Songs in the selected folder
will be displayed on the right column.
4. Select your favorite song using the N EX T / PREV BUTTON.
5. Tap PLAY/PAUSE
BUTTON to start playing.
6. Turn ON your microphone and starting singing. Adjust the MASTER VOLUME, MIC
VOLUME and TV VOLUME if necessary.
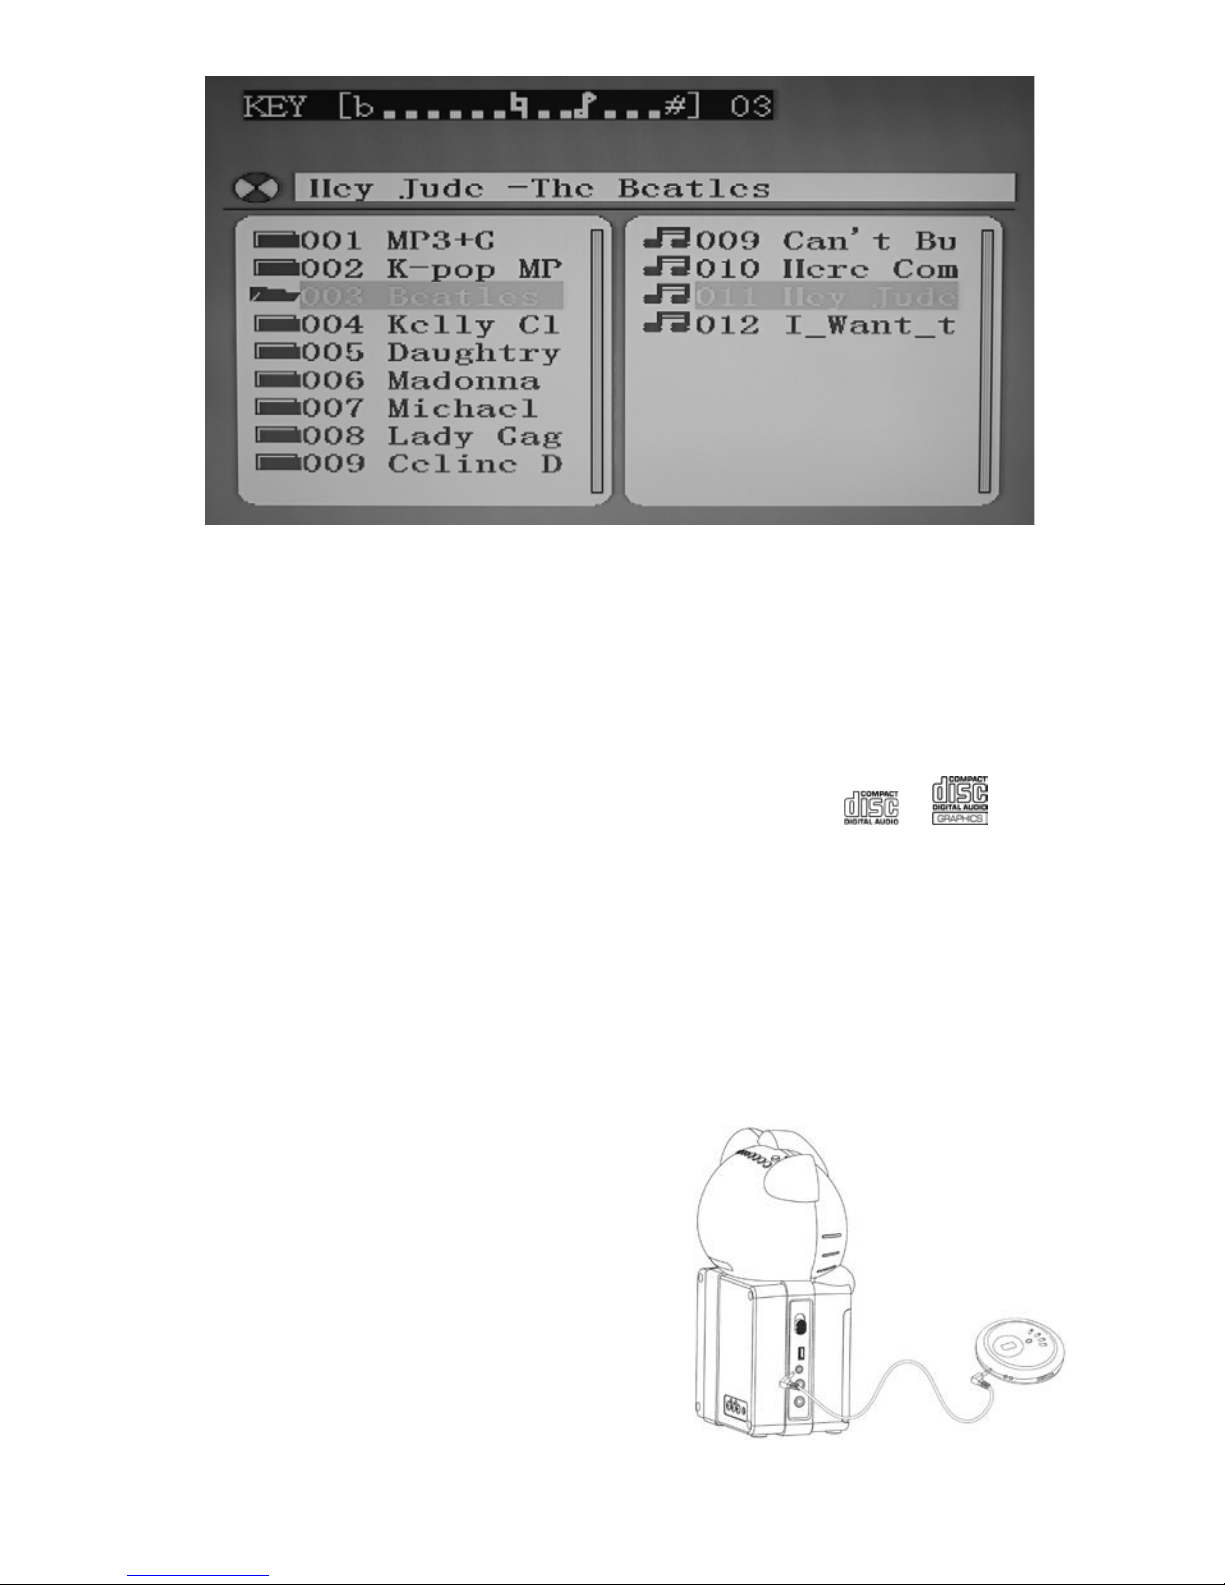
7. You may change the key of the song using the Digital Key Control DKC+/DKC–
BUTTON each by 7 lev els up or down to suit your own voice. You may also use the
BALANCE, AVC and ECHO controls to enhance your singing experience.
Page 16
15
PLEASE READ THIS IMPORTANT INFORMATION
CD mechanisms used in devices like thi s are designed to fully read all co mmercial CDs.
They will also read self-compiled CD-R/CD-R W discs but it m ay take up to 10 se conds
for playback to start. If playback does not start, it is likely due to the quality of the
CD-R/CD-RW disc and/or the compatibility of the CD compilation software.
Manufacturer is not responsible for the play back qual ity of CD -R/CD-RW discs.
Do not attach a label or seal to either side of the CD-R/CD-RW disc. It may cause a
malfunction.
This unit is designed to play CDs bearing the identification logo
or . If CDs
do not conform to the CD standard, they may not play properly.
NOTES ON CD, CD+G, CD-R/RW OPERATION
♦ Do not apply excessive force or press the CD DOOR while it is playing.
♦ Never place anything except a compact disc in the disc compartment. Foreign
objects can damage the unit.
♦ Only load one disc into the disc compartment at a time.
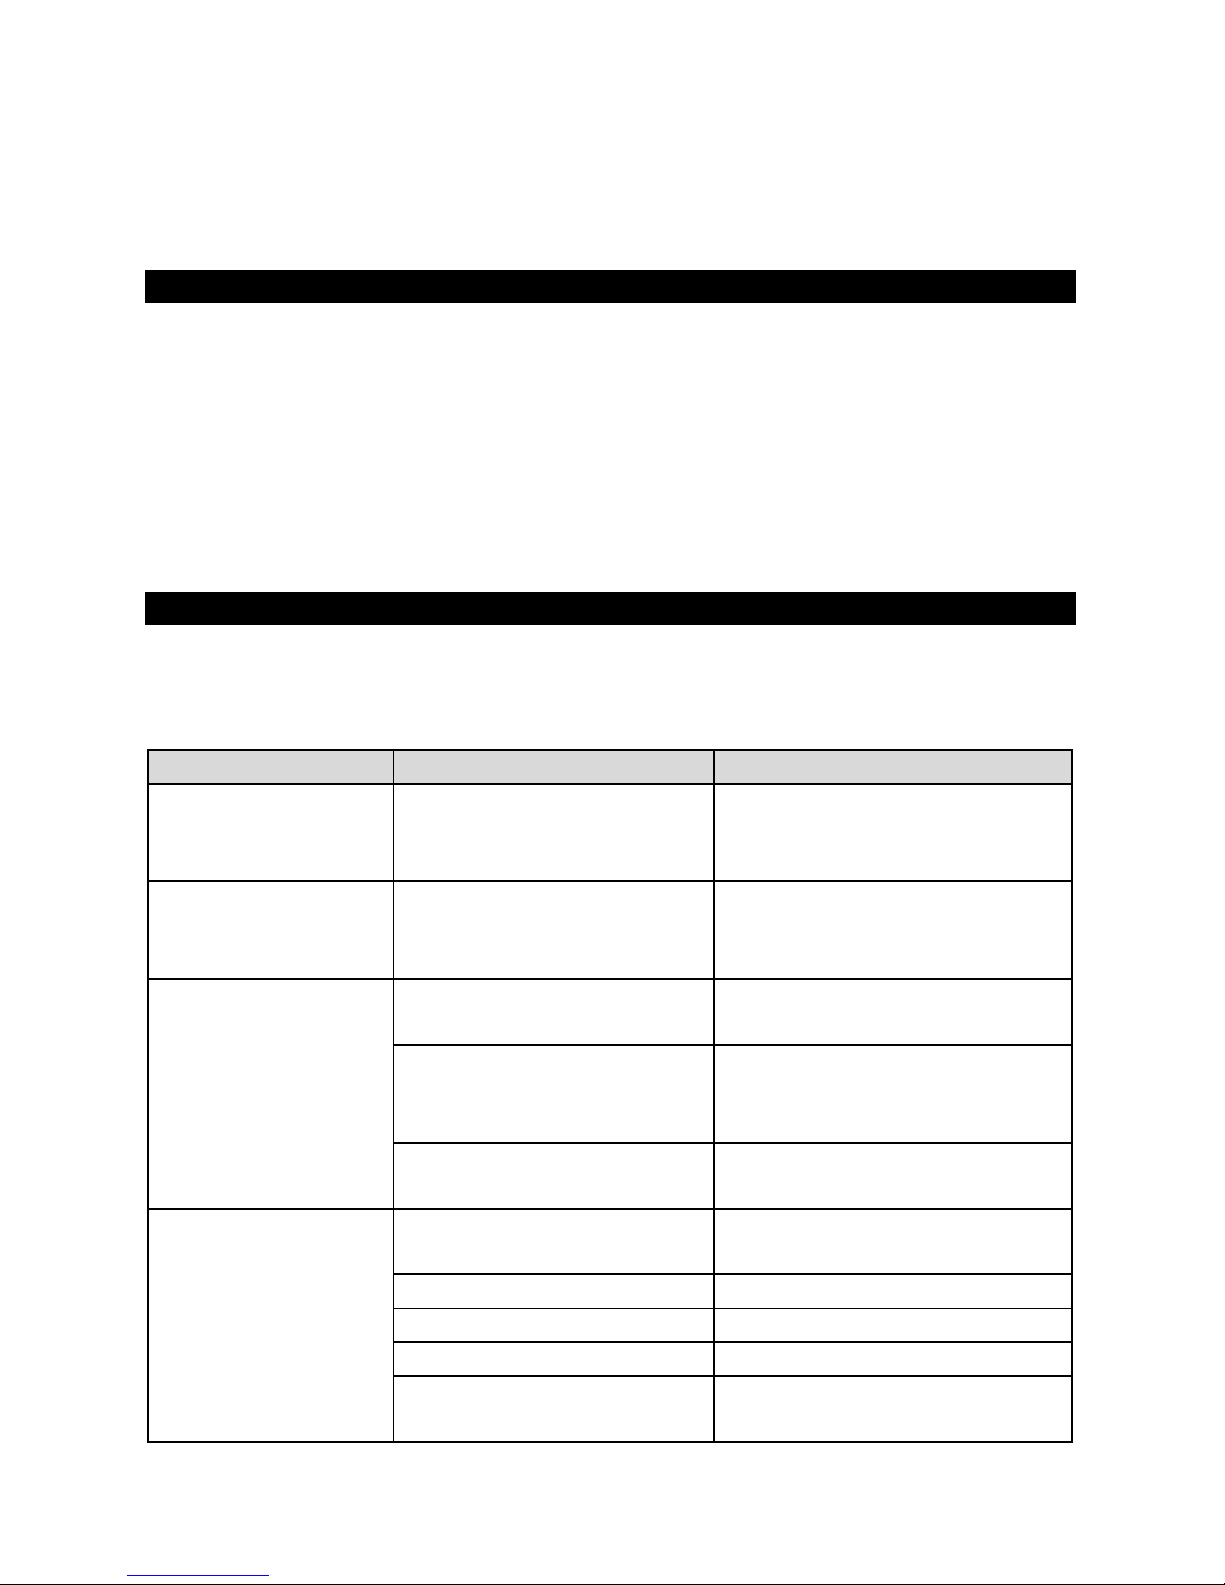
FROM AUX INPUT
1. Set the FUNCTION SELECTOR to “AUX IN”.
2. Connect the line out or headphone jack of
your external audio device (e.g. a CD player,
MP3 player, iPhone, iPod, etc…) to the unit
with a suitable audio cable (not included) .
3. Select your favorite song on your external
audio device to play. You may need to adjust
the output volume of your external audio
device if the headphone jack is used for
making the connection.
Page 17
16
4. Turn on your microphone and start singing. Adjust the MASTER VOLUME and/or
MIC VOLUME if necessary.
5. You may also use the BALANCE and ECHO CONTROLS to enhance your singing
experience.
6. Turn off both devices after use.
USING THE UNIT AS A PUBLIC ADDRESS SYSTEM
This unit can also be used a s a PA (P ublic Address System).
Note: To prevent feedback or whistling from occurring, please be sure that the
microphone is not held too close to unit’s s peakers.
1. Set the FUNCTION SELECTOR to “AUX IN” and unplug any 3.5mm audio cable (not
included) that may have been connected to the AUX IN JACK previously.
2. Turn on your MICROPHONE (one included) and start your performance. Adjust the
MASTER VOLUME, MIC VOLUME and ECHO control if necessary.
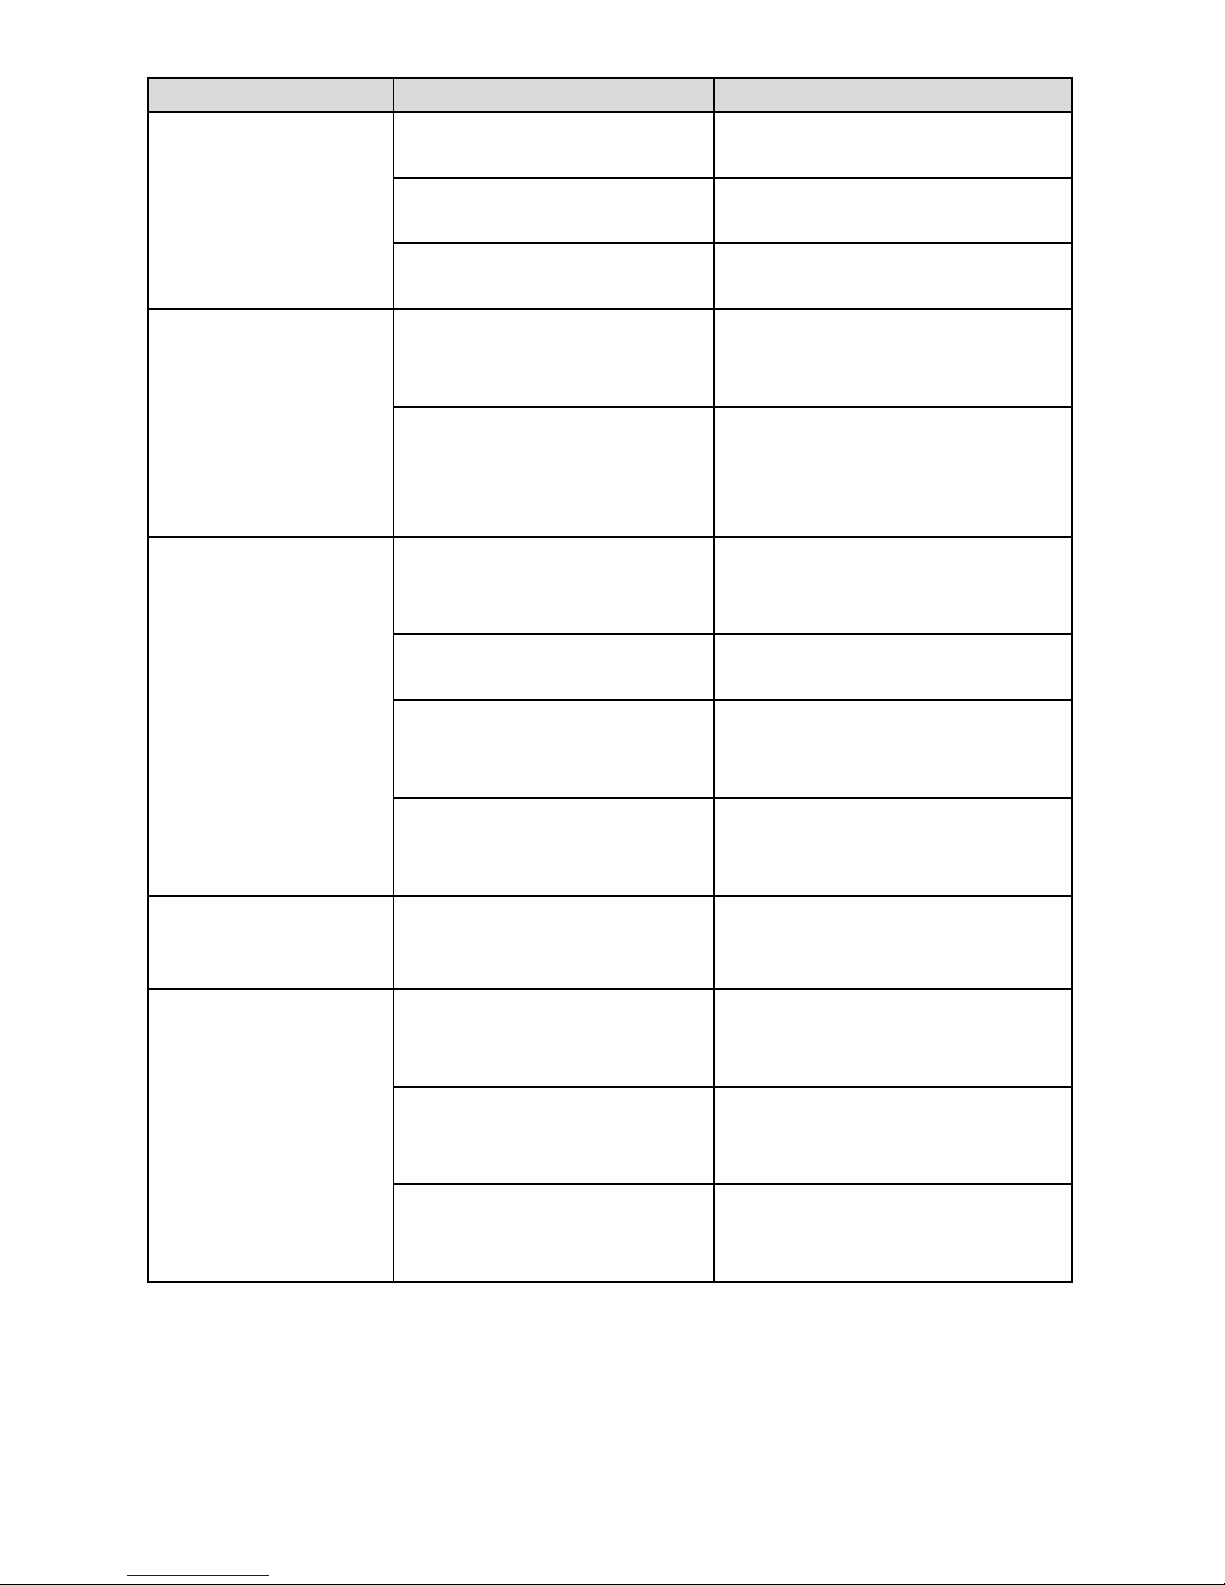
TROUBLESHOOTING GUIDE
If you have followed the instructions and are having difficulty operating the unit, locate
the P ROBLEM in the le ft column below. Check the correspondin g POSSIBLE CAUSE
and SOLUTI ON columns to locate and fix the problem.
PROBLEM
POSSIBLE CAUSE
SOLUTION
No power when
POWER ON/OFF
BUTTON is pressed
DC plug of the AC adapter is
not plugged into the DC
JACK properly.
Re-insert the DC plug of the AC
adapter properly.
No power when
plugged in
The AC outlet may not have
power.
Check the outlet with a working
lamp or other electrical
appliance.
No sound
MAST ER V OLUME of this
unit is set to minimum.
Turn up the MASTER
VOLUME.
Volume control on TV
set/PA system is set to
minimum.
Turn up the volume of the
TV/PA system.
TV set/PA system power is
OFF.
Turn ON the power of TV/PA
system.
CD player of
Karaoke System
does not work
normally or the “No”
appears on the LED
DISPLAY.
Disc is inserted upside
down.
Insert disc correctly.
Disc is dirty.
Wipe it clean wit h soft cloth.
Disc is scratched.
Use a new disc.
Disc is warped.
Use a new disc.
A non-standard disc is
inserted.
Only use compatible discs
mentioned in this manual.
Page 18
17
PROBLEM
POSSIBLE CAUSE
SOLUTION
Lens is dirty.
Clean the optical pickup with a
CD lens cleaner.
Moisture has condensed
inside the CD deck.
Wait about 20 to 30 minutes to
let it dry out.
Karaoke system needs to be
reset.
Disconnect the machine from
power source for 30 seconds.
No sound - If audio is
going through TV
home stereo
Source Selection on your
TV home stereo is not set
properly.
Select AV INPUT as the source
for your TV home stereo.
Improper connection to
stereo system or PA.
Follow directions on ‘Audio
Connection’ section for
connecting to a home stereo
system.
No song lyrics
appear on the TV
screen
Video cable is not
connected properly to the
TV.
Connect the video cable to the
VIDEO OUT of the unit and to
the TV’s Video In jack.
Source selector on TV is not
set to VIDEO or A/V IN.
Use your TV Remote to select
VIDEO or A/V input.
TV does not have video line
input.
Connect from VIDEO OUT of
the unit to a RF modulator and
then to the TV cable input.
A CD+G disc is loaded but
the CDG indicator is not lit.
Check the disc to be sure it is a
CD+G.
Check disc to ensure it is clean .
No image on TV
screen
TV input is not properly set.
Set TV input to correct A/V input
that is connected to the unit.
Cannot sing through
the mic
Improper mic volume
setting.
Adjust MIC and MASTER
VOLUME CONTROLS to
appropriate levels.
Mic is off.
Turn on mic with the ON/OFF
switch located on the
microphone.
Mic is not properly plugged
in.
Insert the mic plug fully into
either MIC 1 or MIC 2 JACK of
the unit properly.
Page 19
18
CARE AND MAINTENANCE
1. Clean your unit with a damp (never wet) cloth. Solvent or detergent should never be
used.
2. Avoid leaving your unit in hot, humid or dusty places.
3. Keep your unit away from heat ing applianc es and sourc es of electrical n oise such
as fluorescent lamps or motors.
HANDLING CD DISCS
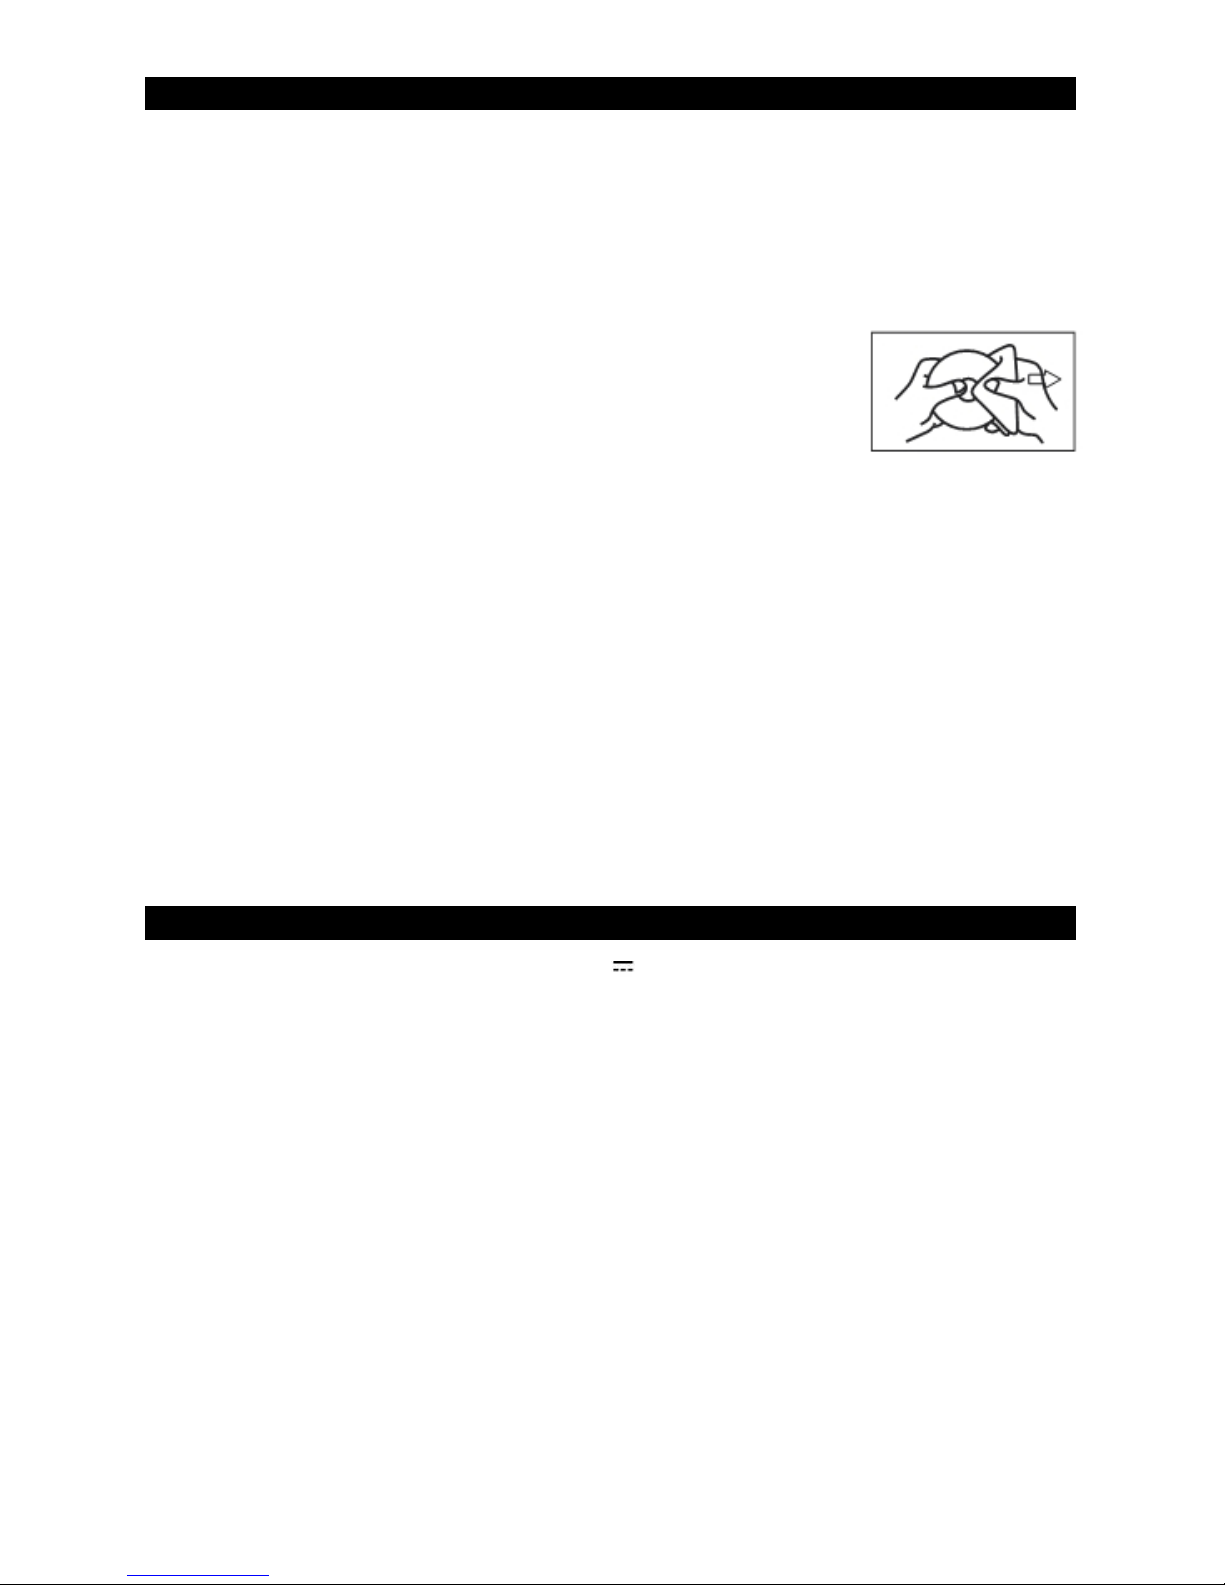
♦ If drop-outs or interruptions occur in the music during CD
play, or if the CD fails to play a t all, its b ottom surfac e may
require cleaning. Before playing, fingerprints and dust should
be carefully wiped off with a soft cloth. Wipe in a straight
motion from the center of the disc to the outside edge with a
good soft cleaning cloth.
♦ Never use chemicals , such as record cleaning spra ys, antistatic sprays or fluids,
benzene or thinner to clean compact discs. These chemicals will permanently
damage the plastic surface of the disc.
♦ Always install the com pact disc securely on the disc clampers with the label side
facing up. Compact discs can be played on only one side.
♦ To remove a disc from its storage case, press down on the center of the case and lift
the disc out, holding it carefully by the edges.
♦ Discs should be returned to their cases after use to protect them from dust and
scratches.
♦ To prev ent w arping the disc, do not expose it to direct sunlight, high humidity or high
temperature for extended periods of time.
♦ Do not appl y adhesive lab els o r write an ything on either si de of the disc. The inks
used in some felt-tips pens may damage the surfaces of the disc.
SPECIFICATIONS
DC input 12V 1A
AC Adapter input 100-240V~ 50/60Hz
Speaker Output 2 x 1.5W (rms)
Video Output NTSC composite (RCA)
USB Flash Drive Sup port Max 32 GB (FAT32 formatted)
Microphone Jacks (x2) Each 6.3 mm (mono)
AUX IN Jack (x1) 3.5 mm (ster eo)
Compact Disc Support CD/CD+G/CD-R/CD-RW
USB file typ es MP3/MP3+G
Page 20

19
90 DAY LIMITED WARRANTY AND SERVICE
VALID IN THE U.S.A. ONLY
SPECTRA MERCHANDISING INTERNAT ION AL, INC . warrant s this unit to be free from
defective materials or factory workmanship for a period of 90 days from the date of
original custom er purchase and pro vided the product is util ized within the U.S.A . This
warranty is not assignable or transferable. Our obligation under this warranty is the repair
or replacement of the defective unit or any part thereof, except batteries, when it is
returned to the SPECTRA Service Department, accompanied by proof of the date of
original consumer purchase, such as a duplicate copy of a sales receipt.
You must pay all shipping charges requ ir ed t o s hip t he pr od u ct t o S PECT R A for w arr anty
service. If the product is repaired or replaced under warranty, the return charges will be at
SPECTRA’s expense. There are no other express warranties other than those stated
herein.
This warranty is valid only in accordance with the conditions set forth below:
1. The warranty applies to the SPECTRA product only while:
a. It remains in the possession o f the o riginal purchas er and p roof of pu rchase is
demonstrated.
b. It has not been sub jected to accident, m isuse, abuse , improper ser vice, usage
outside the descriptions and warnings covered within the user manual or
non-SPECTRA approved modifications.
c. Claims are made within the warranty period.
2. This warranty does not cover damage or equipment failure caused by electrical
wiring not in compliance with electrical codes or SPECTRA user manual
specifications , or failure to provide reasonable care and necess ary maintenance as
outlined in the user manual.
3. Warranty of all SPECTRA products applies to residential use only and is void when
products are used in a nonresi dential environment or installed outside the United
States.
This warranty gi ves you specific legal rights, and you may also ha ve other rights which
vary from sta te to state. TO OBTAI N SERVICE pleas e remove al l batteries (if an y) and
pack the unit ca refully and send it freight pr epaid to SPECTRA at the address s hown
below. IF TH E UNI T IS RETUR NE D WI THIN THE W ARRA NTY PE RI OD s hown abo ve,
please include a proof of purchase (dated cash register receipt) so that we may establish
your eligibility for warranty service and repair of the unit without cost. Also include a note
with a description explaining how the unit is defective. A customer service representative
may need to contact you regarding the status of your repair, so please include your name,
address, phone number and email address to expedite the process.
IF THE UNIT IS OUTSIDE THE WARRANTY PERIOD, please include a check for $45.00
to cover the c ost of r epa ir, h and ling an d retur n p osta ge. A ll out of warran ty returns must
be sent prepaid.
It is recomme nded that you contact SPECTRA first at 1-800-777-5331 or by em ail at
[email protected] for up dated information on the unit requiring service. In some
cases the model you have may be discontinued, and SPECTRA reserves the right to offer
alternative options for repair or replacement.
Page 21

20
SPECTRA MERCHANDISING INTERNATIONAL, INC.
4230 North Normandy Avenue,
Chicago, IL 60634, USA.
1-800-777-5331
To register your product, visit the link below to enter your information.
http://www.spectraintl.com/wform.htm
Licensed by:
Marino Andriani, LLC
Distributed by:
Spectra Merchandising International, Inc.
4230 North Normandy Avenue
Chicago, IL 60634, USA
www.spectraintl.com
0515 Printed in China
 Loading...