

Page 1
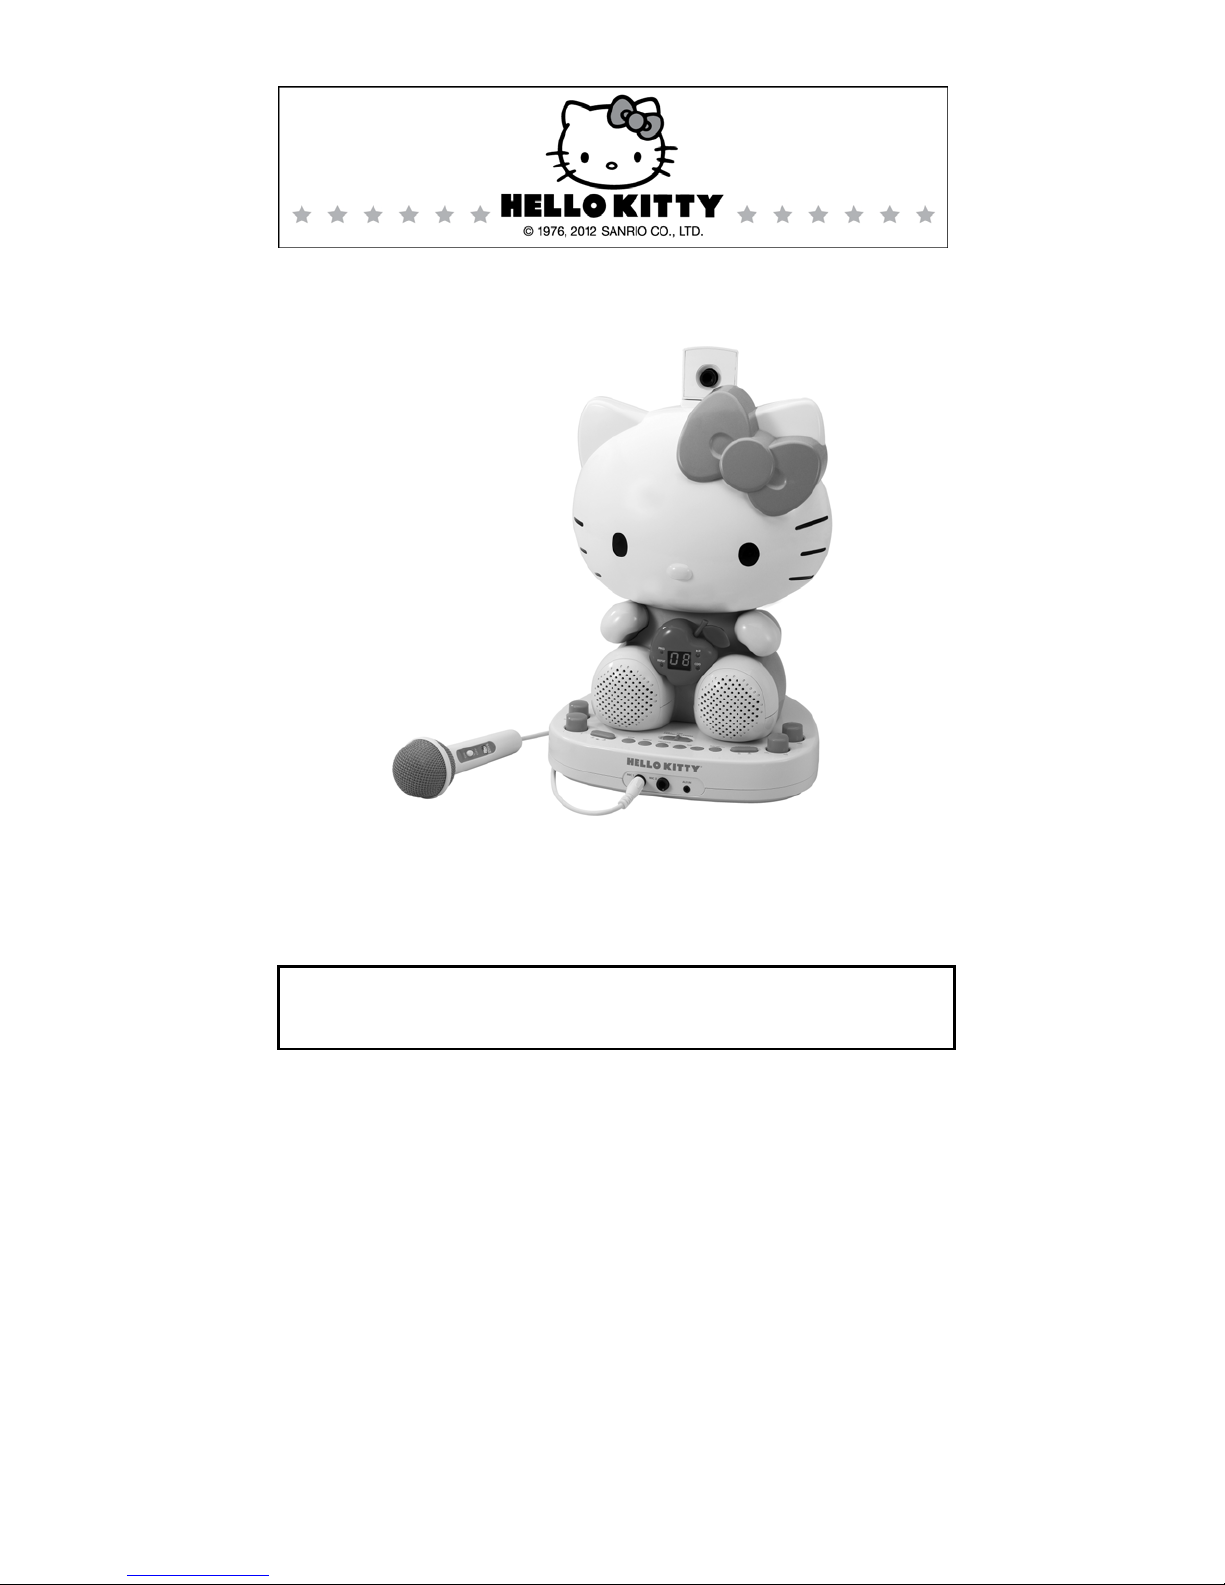
COMPACT DISC + GRAPHICS KARAOKE SYSTEM
USER MANUAL
KT2007
CAUTION: Electrically Operated Product - Please use
care when plugging AC Adaptor in to A C ou tle t .
Page 2

CAUTION
Follow the advice below for safe operations.
ON PROTECTION AGAINST LASER ENERGY EXPO SURE
As the laser beam used in this compact disc player is harmful to the eyes, do not
attempt to disassemble the casing.
Stop operation immediately if any liquid or solid object sho uld fall into the cabinet.
Do not touch the lens or poke at it. If you do, you may damage the lens and the player
may not operate prop erly.
Do not put anything in the safety slot. If you do, the laser diode will be “ON” when the
CD door is still open.
If the unit is not to be used for a long period of time, make sure that all power
sources are
compartment, and unplug the
remove the AC cord by grasping the main
This unit employs a laser. The use of controls or adjustment or performance of
procedures other than those specified here may result in exposure to hazardous
radiation.
ON PLACEMENT
Do not use the unit in places which are extremely hot
Place the unit on a flat and even surface.
Do not restrict the air-flow of the unit by placing it in a place with poor ventilation, by
covering it with a cloth or by placing it on a carpet.
ON CONDENSATION
When left in a heated room where it is warm and damp, water droplets or
condensation may
When there is condensation inside the unit, the unit may not function normally.
Let it stand for 1 to 2 hours before turning the po wer on , or gradu a lly heat the room
up and dry the unit before use.
Should any trouble occur, remove the power source and refer servicing to qualified
personnel.
disconnected from the unit. Remove all batteries from the battery
form inside the unit.
AC cord from the wall outlet. Make it a practice to
body and not by pulling the cord.
cold, dusty or humid.
,
1
Page 3

PROTECT YOUR FURNITURE!!
This system is equipped with non-skid rubber ‘feet’ to prevent the product from moving
when you operate the controls. These ‘feet’ are made from non-migrating rubber material
specially formulated to avoid leaving any marks or stains on your furniture. However
certain types of oil based furniture polishes, wood preserv ativ es, or cleanin g spra ys may
cause the rubber ‘feet’ to soften, and leave marks or a rubber residue on the furniture.
To prevent any damage to your furniture we strongly recommend that you purchase small
self-adhesive felt pads, available at hardware stores and home improvement centers
everywhere, and apply these pads to the bottom of the rubber ‘feet’ b efore you place the
product on fine wooden furniture.
GLOSSARY OF KARAOKE
In additional to all of the terminology associated with consu mer electronics products, a
few additional terms are used almost exclusivel y in karaoke. These terms are meant to
familiarize you with the world of karaoke. The features listed below may not necessari ly
apply to the particular model that you have. Following are some brief explanations:
Echo:
Echo adds depth and resonance to a singer's voice, without affecting the music. This
echo is produced by creating minor controlled feedback in the singer's voice.
CDGMs (Compact Disc Plus Graphics Multiplex):
They are CD’s that contain songs that include the lead singer's voice, which can be
removed with a karaoke system that has a balan ce or multiplex co ntrol. The idea is to sing
along with the lead singer o r replace the lead sin ger’s voice with yours. Backg round vocals
and backup singers are provided.
Automatic Voice Cancel (AVC):
When the AVC function is activated, the vocals on a multiplex recording are eliminated as
soon as the singer begins singing into the microphone. When the singer stops singing, the
vocals on the multiplex recording are automatical ly re-activated. This useful function is
used primarily during practice sessions while a singer is learning a song. Please note that
the AVC function only works with multiplex recordings and not with standard audio
recordings.
CD+G:
This is an acronym for Compact Disc plus Graphics. You will also see variations CD+G,
and CD+ Graphics. This is a regular CD with information stored on a data track
simultaneous to music. CDG has a video output for simple graphics (not full motion video).
In the case of karaoke, the graphics function i s used to store song lyrics, and display the
lyrics in synch with music. In most cases, CDG software displayed lyrics change color as
they are to be sung. A regular television with a Video In RCA Jack is all that re quired to
2
Page 4

display CDG lyrics.
INTRODUCTION
Your Compact Disc + Graphics Karaoke Syst em will pr ovide you with man y year s of fun
and entertainment. It can let you be the "star" as you sing along with your favorite karaoke
discs and hear your voice with the music through the system's speakers.
This Karaoke System has a compact design and is full of features yet it is easy to use.
Just a few simple instructions and you will become an expert.
Before you use your unit, please glance through this manual to familiarize yourself with all
the features available and the sections of the manual that describe their operation. Next
go to the section for the specific operation y ou wish to perform.
For your easy reference, listed here are some of the main features of this Karaoke
System.
Lyrics on TV screen - displays the lyrics with the tempo of music when playing CD+G
discs.
Automatic Voice Control - lets you replac e the original singer's voice with your own
voice when any prerecorded multiplex karaoke disc is played. To activate, just rotate the
Mic Volume to a comfortable listening lev el and Aut o Voice Contro l for the best balance
between playback and microphone levels.
Balance Control - lets you adjust the balance between the pre-recorded original singer's
voice and the music if you use a multiplex karaoke disc.
Echo Control - lets you add an echo to enrich your voice for a concert hall effect. Built-in
Speaker - lets you share the music with your family or friends.
Built-in Speaker - lets you share the music with your family or friends.
Audio Out Jacks - lets you connect another audio output component, such as an
equalizer/booster or a PA system.
Video Out Jacks - lets you connect to your TV for displaying the lyrics.
3
Page 5
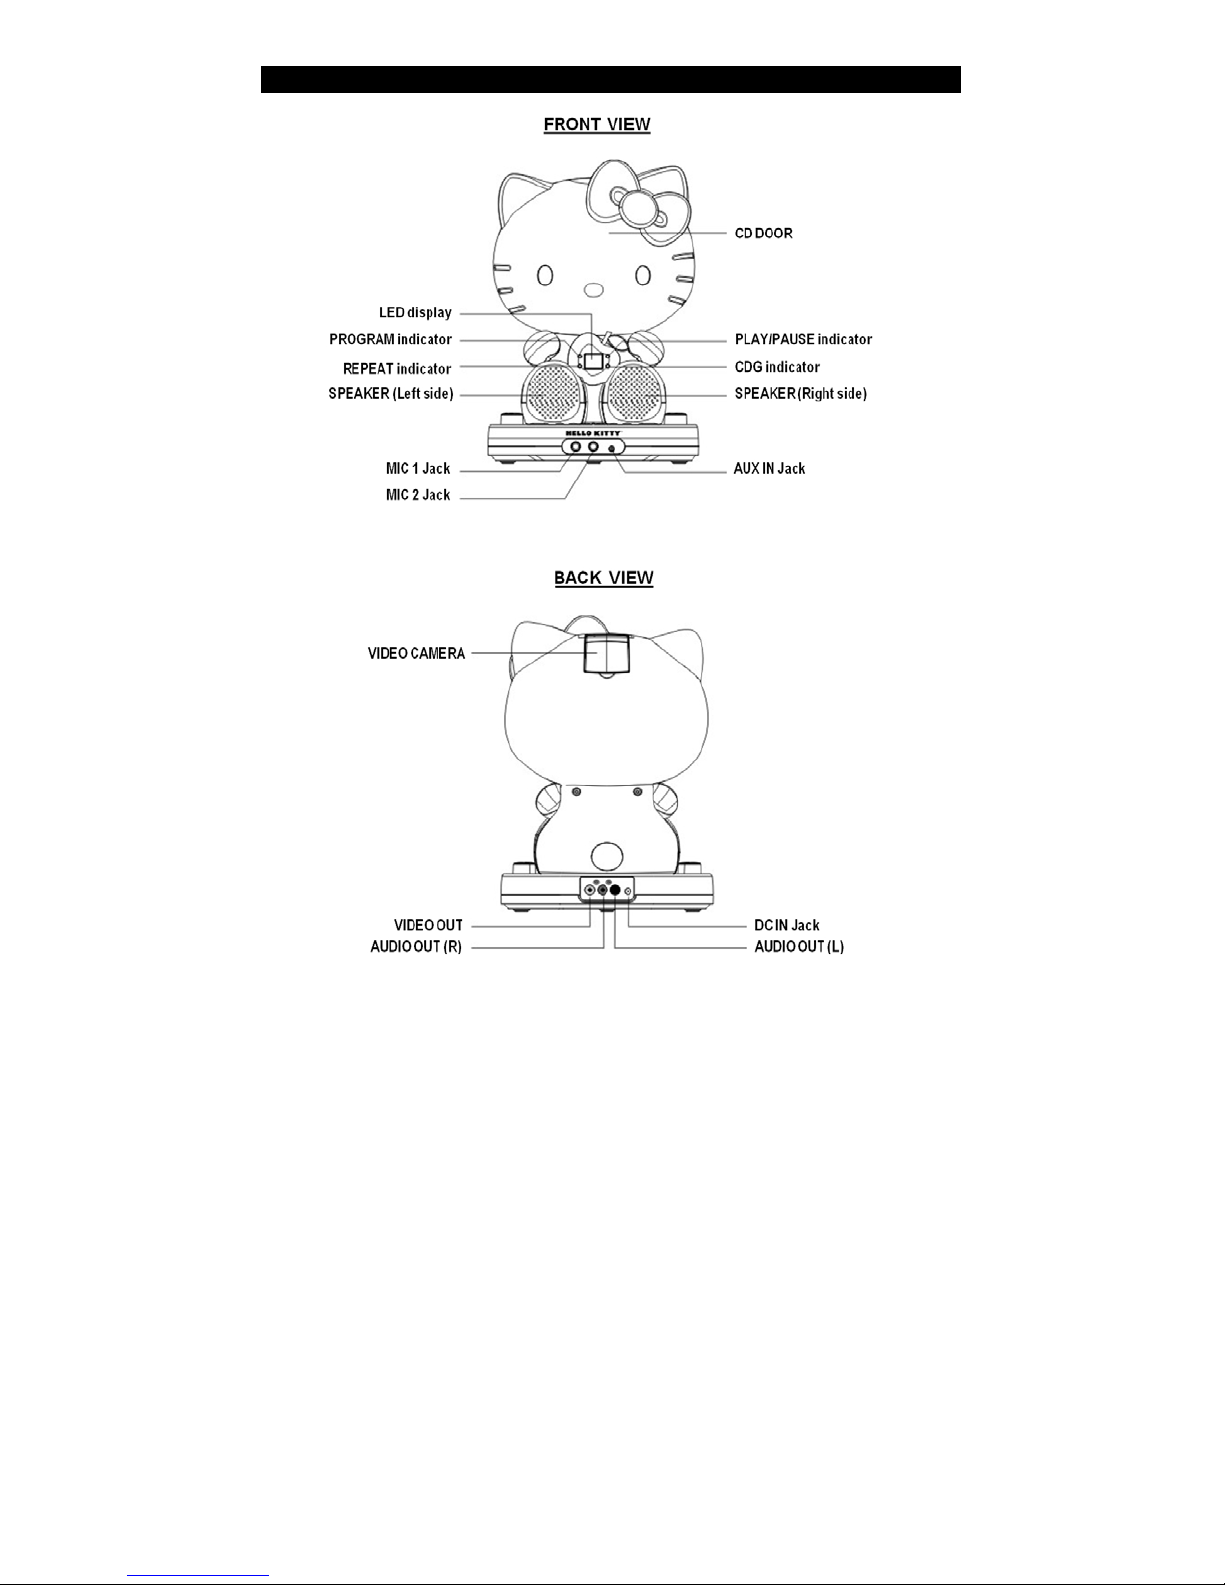
CONTROL LOCATIONS
4
Page 6
MAIN OPERATION
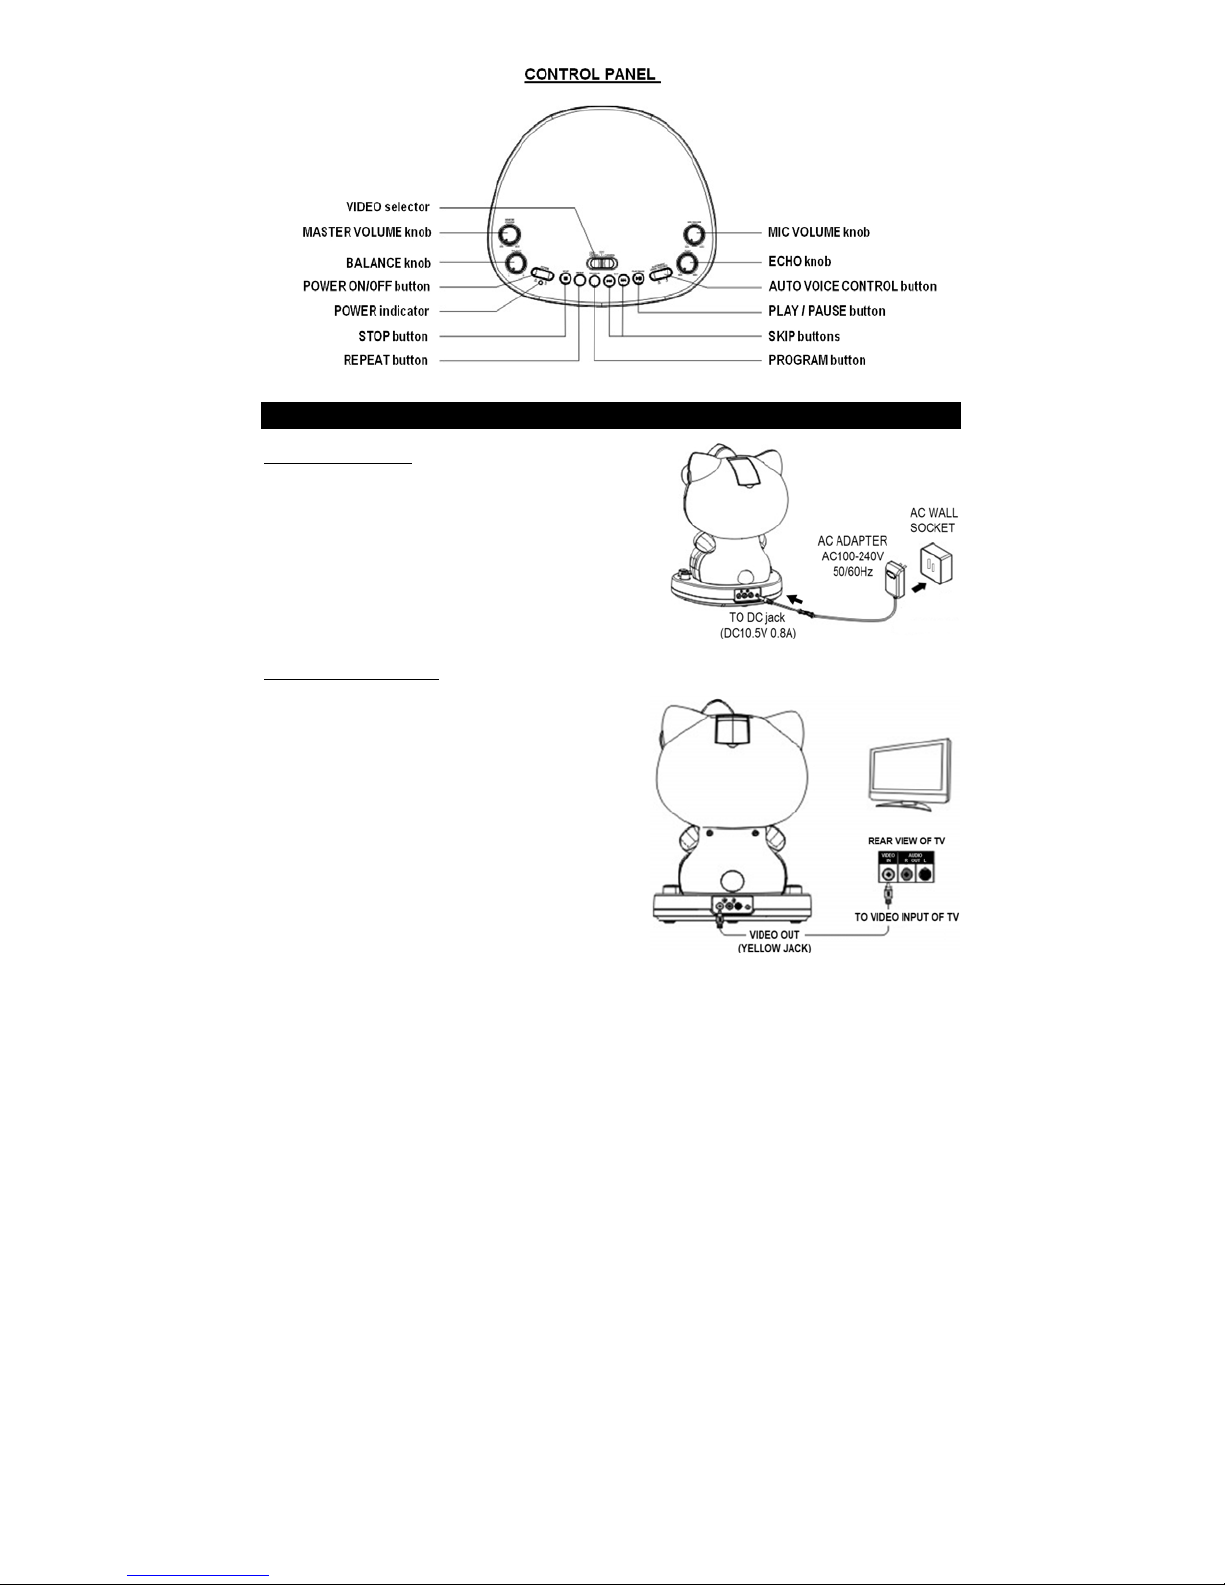
Connecting Power
Plug the supplied AC adapter into the DC jack on
the side of the unit and connect to a sta ndard AC
wall socket.
Note: When the unit is not operated for long
periods of time, unplug the AC adapter from the
unit and wall outlet.
Connecting to your TV
The karaoke system provides a patch cord to
give you the option of connecting your unit to an
external audio/video device . The patch cord has
three RCA jacks at each end. White and Red
are for left and right audio connections and the
Yellow is for video. Modern flat panel digital TV
sets and home music systems are usually
equipped with corresponding color-coded RCA
jacks to assist correct connections. Make sur e
that you have a CD+G disc in the karaoke
system playing when you are making this
connection. You will know you have the proper
settings on your TV as soon as you see the lyrics on the screen.
5
Page 7

Video connection
Please follow the steps below to display CD+G lyrics on the TV screen:
(1) Locate the color-coded patch cords.
(2) Connect video cable (Yellow) to the VIDEO OUT on the back of the karaoke
system.
(3) Connect the other end of the video cable (Yellow) to the VIDEO/AV INPUT on your
TV.
If your television does not have the required Video Input, you will need a RF modulator
(Radio Frequency Modulator), which connects through your TV Antenna or cable line and
serves as Video Input.
The RF Modulator can be purchased at almost any consum er electronics retailer. If you
are connecting the video from the karaoke s ystem to a television video input jack, you
must specify the source the TV is to display. Your TV user guide can tell you how to
display the video signal from the 'Video In' jack.
If you don't have the manual for your TV we suggest calling the TV manufacturer's
customer service department. Only the manufacturer will be able to tell you accurately
how to configure your TV to display the video signal coming from the 'Video Inpu t' jack.
Note: Some projection TV sets do not display the standard blue background use d on
most CDGs properly. If the background color is inconsistent or flashing, please try
connecting your karaoke system to a standard C R T/LC D t elevision.
Common ways to configure your TV
You karaoke system is designed to con nect to your TV. The karaoke system is
constantly sending the video an d audio signals to the 'VIDEO OUT' and 'AUDIO
OUT' jacks whenever you play a CD+G disc. So, load a CD+G into your karaoke
system before you start making these conn ections. You will see lyrics on the TV
screen as soon as you have completed the setup correctly.
The setup of your TV is the most difficult part of making the connection for
displaying your lyrics. In most homes, the TV has either a cable connected or
antenna in use. Once you connect yo ur karaoke system to the TV, you must 'tell'
your TV to display the input from the karaoke system instead of the usual input from
the cable or antenna.
Check your TV user manual for the easiest way to setup your particular
entertainment system. If you don't have your manual you can al ways call your TV
manufacturer for that information or try their website for online assistance. We've
listed below the most common ways of setting up a TV:
(1) In the setup menu for configuring the TV there may be an option on 'Input
Selection' where you may choose between 'Cable/Ant.', 'Video 1', or 'Video 2'
etc. as the input source.
(2) Try looking for a 'Video' channel between the highest channel and the lowest
channel on your TV (i.e. Between 99 and 2 may be 'VIDEO' or 'INPUT')
6
Page 8
(3) Look for a button on the remote control for the TV you are connecting to that
says 'VIDEO', 'VIDEO 1', 'AUX', 'EXT', 'LINE 1. The 'LINE-IN' button will
display the Video input source.
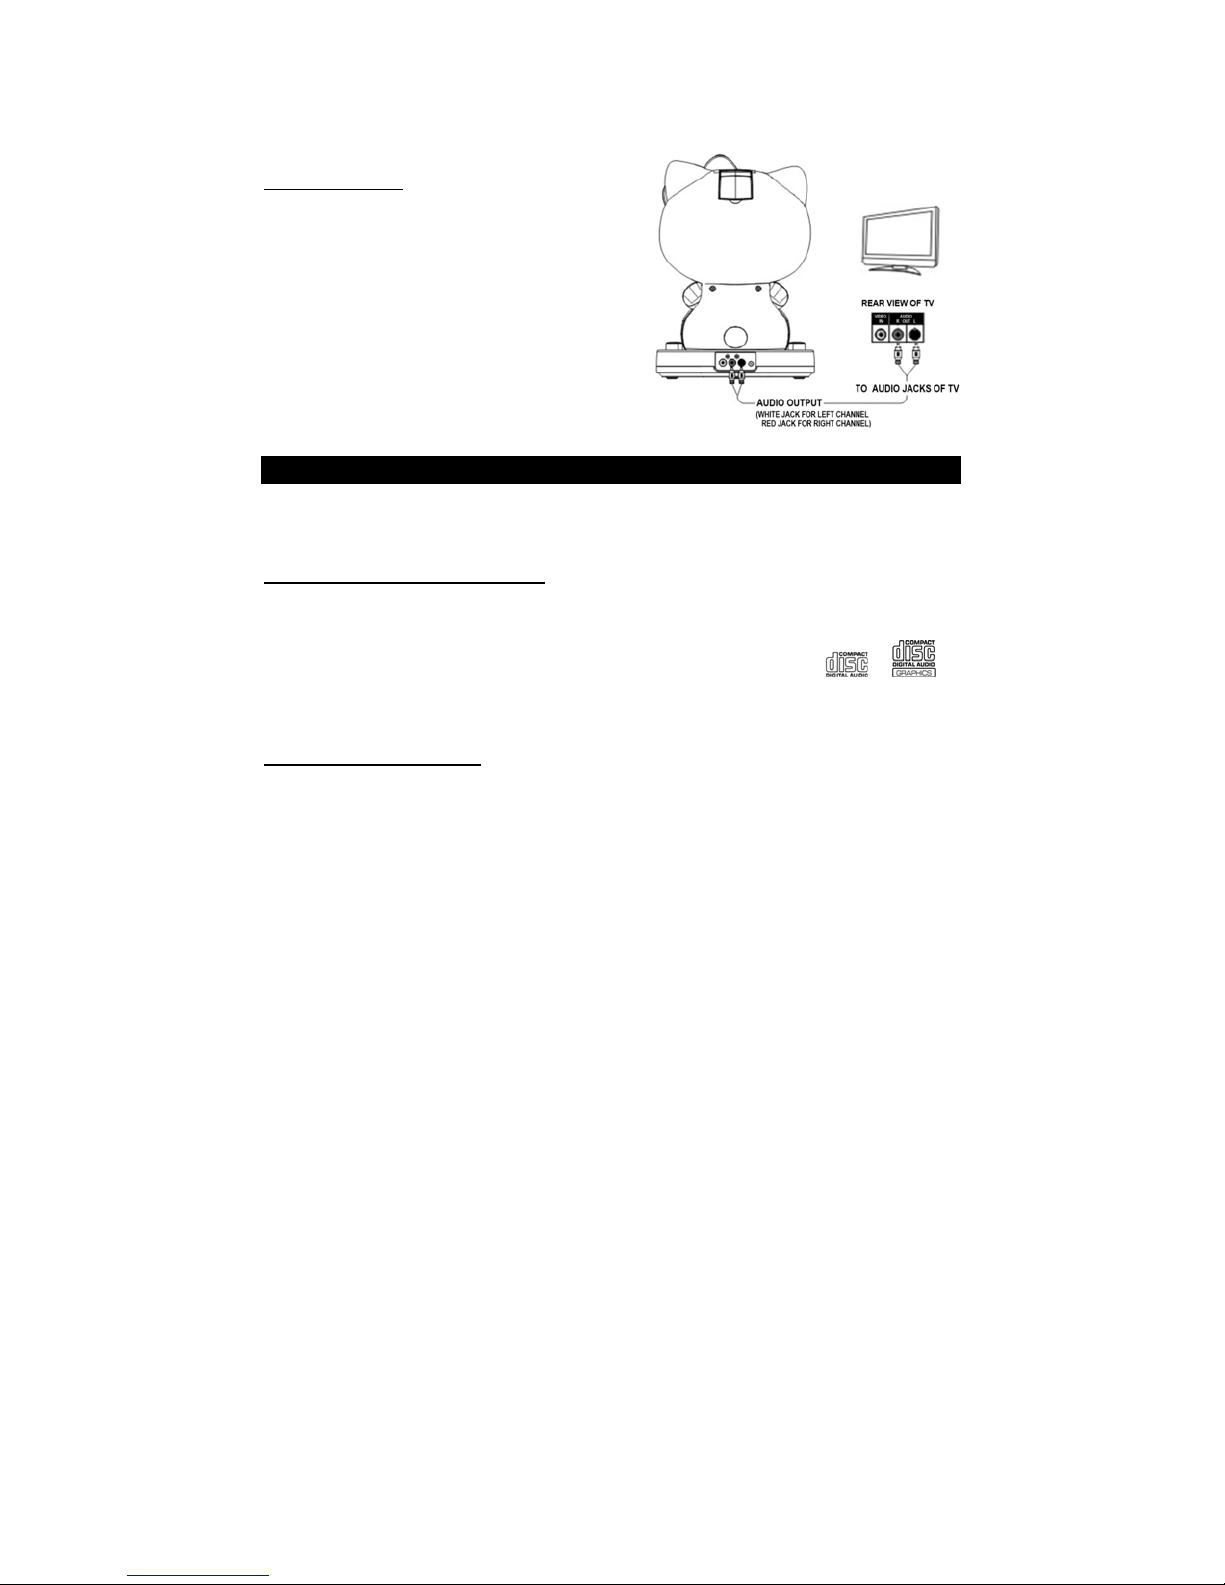
Audio connection
Connect the unit to your TV or home stereo
system using the White and Red connections
on the supplied patch cord. Plug the white end
of the patch cord into the white AUDIO OUT
jack on the unit. Plug the red end of the patch
cord into the red AUDIO OUT jack on unit. Now
connect the other end of the cable's white (left
channel) and red (right channel) plugs to your
TV or home stereo system's 'AUDIO IN' or
'AUX IN' jacks.
CD OR CD+G OPERATION
WARNING - Tapping or dropping the microphone while it is on can permanently damage
your microphone. Do not swing the microphone around by the co rd.
ABOUT THE CD-R/CD-RW DISCS
This unit is CD-R/CD-RW compatib le bu t p layb ack capability may vary depending on the
quality of the disc, the recording device and application software.
NOTE: This unit is designed to play CDs bearing the identification logo
CDs do not conform to the CD standard, they may not play prope rly.
CD or CD+G OPERATION
Do not press the door of the CD compartment while it is playing.
Never place anything except a compact disc in the d isc tray. Foreign objects can
damage the unit.
Do not apply excessive force to disc cover.
Only place one disc in the tray at a time.
TURNING POWER ON/OFF
(1) Press the POWER button switch on the Karaoke system, the POWER indicator will
light up.
(2) Press the POWER button ag ain to switch off the system, the POWER indicator will
be off.
or . If
7
Page 9

VIDEO SELECT
Set the VIDEO select to CDG.
LOADING A DISC
(1) Grip the specific points on the CD Door where indicated by a
removable label and pull gently to open it.
(2) Load a disc into the compartment with the printed side facing you.
(3) Gently close the CD DOOR. The karaok e system begins to rea d
the disc. The LED display will display the total number of tracks.
(4) Press PLAY/PAUSE button to play CD. (If no disc is loaded, "- -"
will be displayed).
PLAY/PAUSE MODE
(1) To start playing, press the PLAY/PAUSE button once, the first track [1] will be
displayed and the PLAY/PAUSE indicator will light. (If a CD+G disc is detected, the
CDG indicator will also turn on).
(2) To temporarily stop playing, press the PLAY/PAUSE
indicator will flash.
(3) To resume play, press PLAY/PAUSE
STOP MODE
If the STOP
total number of tracks will be shown on the LED display.
SKIP PLAY (For both CD and CD+G discs)
(1) In stop mode, you can skip up or down to a specific track number by pres sing the
forward or back SKIP / button.
(2) While the selected song track is flashing, press the PLAY/PAUSE
(3) During the PLAY mode, you can skip up or do wn to a specific track number by
pressing the forward or back SKIP / button.
button is pressed in the course of playing, the disc will cease to pl ay. The
button again.
button, the PLAY/PAUSE
button.
REPEAT PLAY (For CD and CD+G discs)
(1) To repeat the current track, press the REPEAT button once. The REPEAT indicator
will flash. The track will continue to play until the repeat function is turned off.
(2) To repeat all the tracks, press the REPEAT button twice, the REPEAT indicator will
light up steadily. All the tracks on the disc will be played repeatedly.
(3) To clear the repeat function, press the REPEAT button again, the REPEAT indicator
will turn off.
PROGRAM
Use this button to program and play back songs in a preselec ted order.
(1) Programming can be done in the stop mode only. Press the PROGRAM button, the
PROGRAM indicator will light up.
8
Page 10
(2) Press the forward or back SKIP / button to select a desired track number.
(3) Press PROGR AM button to confirm entry. You can repeat the same step up to a
maximum of 20 tracks.
(4) Press PLAY
you are ready to start singing along.
(5) Press STOP
MICROPHONES/ECHO/BALANCE/AVC
(1) When either one or two Microphones are pl ugged int o the MIC 1 jack / MIC 2 jack,
their output is mixed with the playback from CD/CDG discs.
(2) Adjust MIC VOLUME knob for best balance between playback and microphone
(singing) levels.
(3) Adjust ECHO to add depth and richness to vocals.
(4) Adjust BALANCE for balance between the pre-recorded singer's voice and the
music if you use a multiplex karaoke disc.
(5) Press the AVC (Automatic Voice Control) button to on if you want the original singer’s
voice to stop while you are singing. Th e original singer voi ce will resume immed iately
when you pause.
CAMERA OPERATIONS
button when you have completed programming to start playing and
button to clear all the programmed entries.
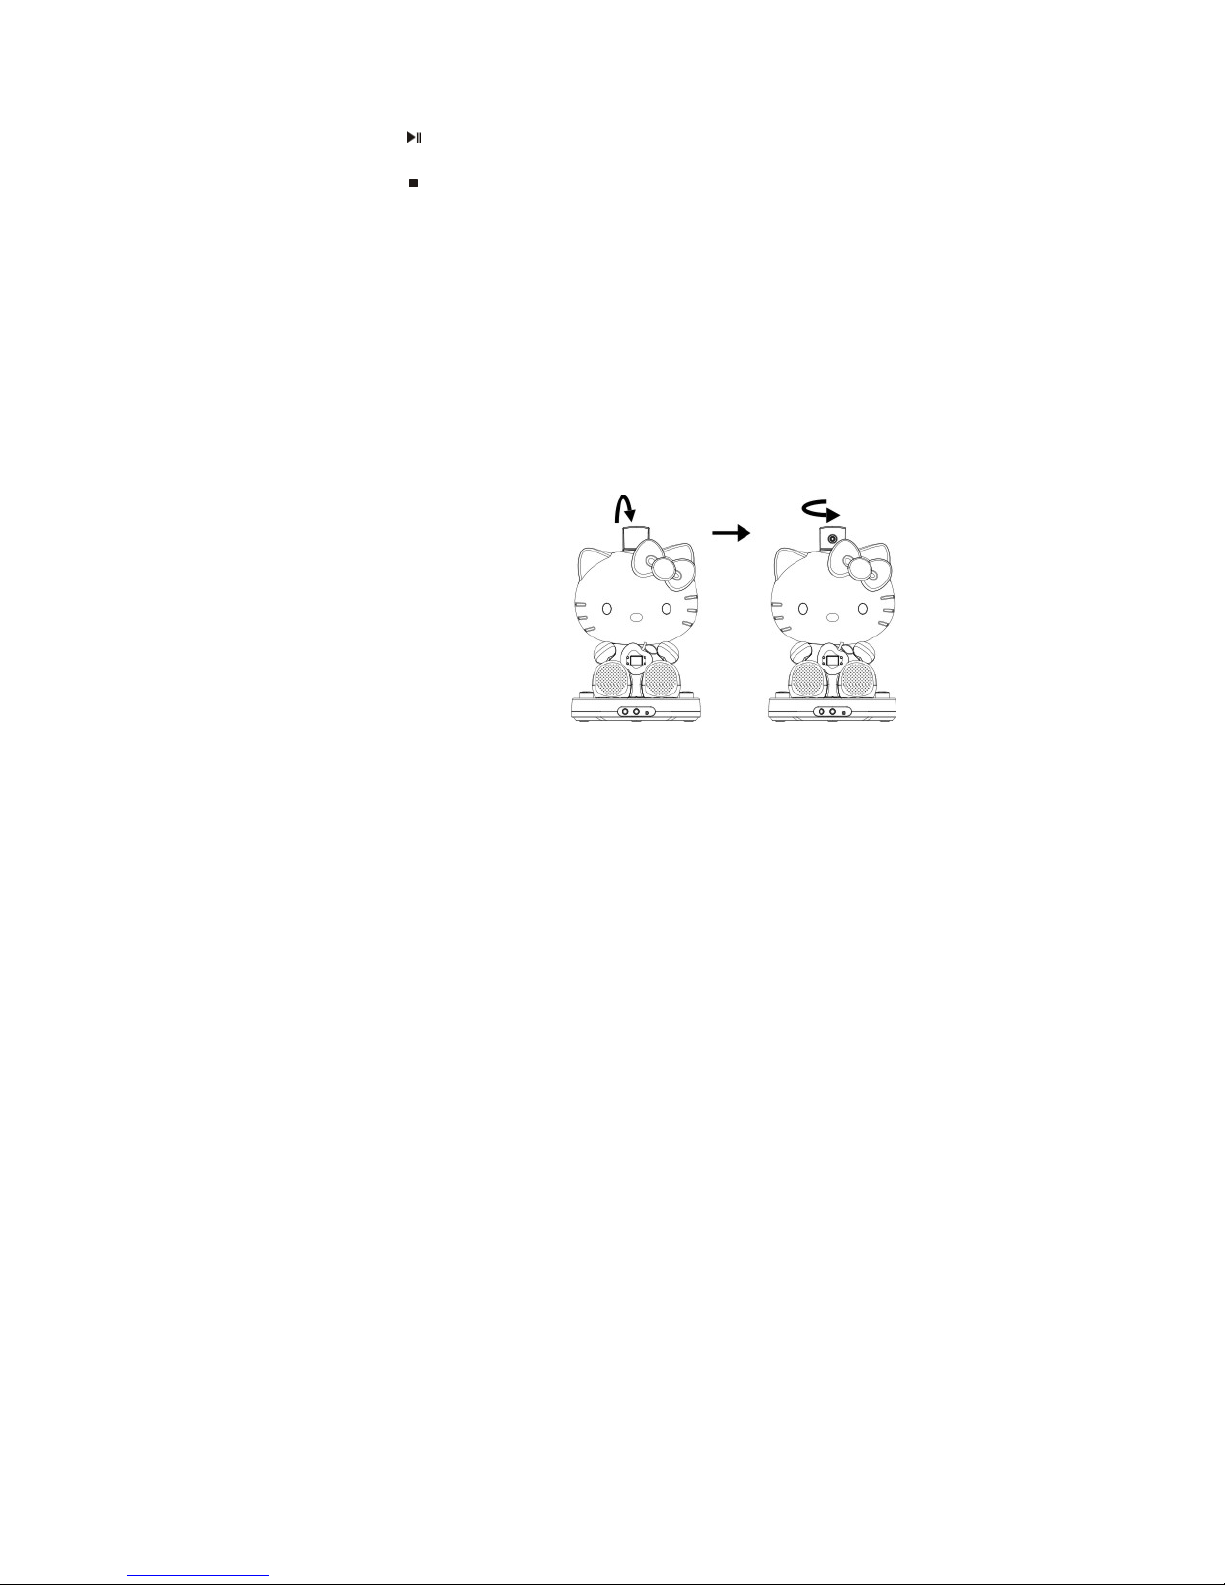
(1) Lift camera to an upright position.
(2) Adjust the camera position by moving it sli ghtly up and down until the camera is
pointing at a desired angle.
(3) Make sure that the VIDEO selector is in CDG+CAMERA position so that you can
see song lyrics and camera image on your TV at the same time.
(4) If you only want to see song lyrics on your TV, you can switch VIDEO selector to
CDG position.
(5) If you switch VIDEO selector to CAMERA position, you will see only the camera
image on your TV.
9
Page 11
PUBLIC ADDRESS
This unit can be used as a PA (Public Address system).
NOTE: To prevent feedback or whistling from occurring, please be sure that the
microphone is not too close to unit’s speakers.
(1) Connect the supplied Microphone to either one of the MIC input jacks.
(2) Press the POWER button switch on the Karaoke system, the POWER indicator will
light.
(3) Set the VIDEO select to CDG or CDG+CAMERA. Set the MIC VOLUME knob to
about midway position.
(4) Slide the ON/OFF switch located on the Microphone to the ON position and speak or
sing into the Microphone. The Microphone sensitivity and loudness can be adjusted
as required by turning the MIC VOLUME control and/or MASTER VOLUME control.
(5) To turn the unit off, press the POWER button again, the POWER indicator goes off.
USING THE AUX IN JACK
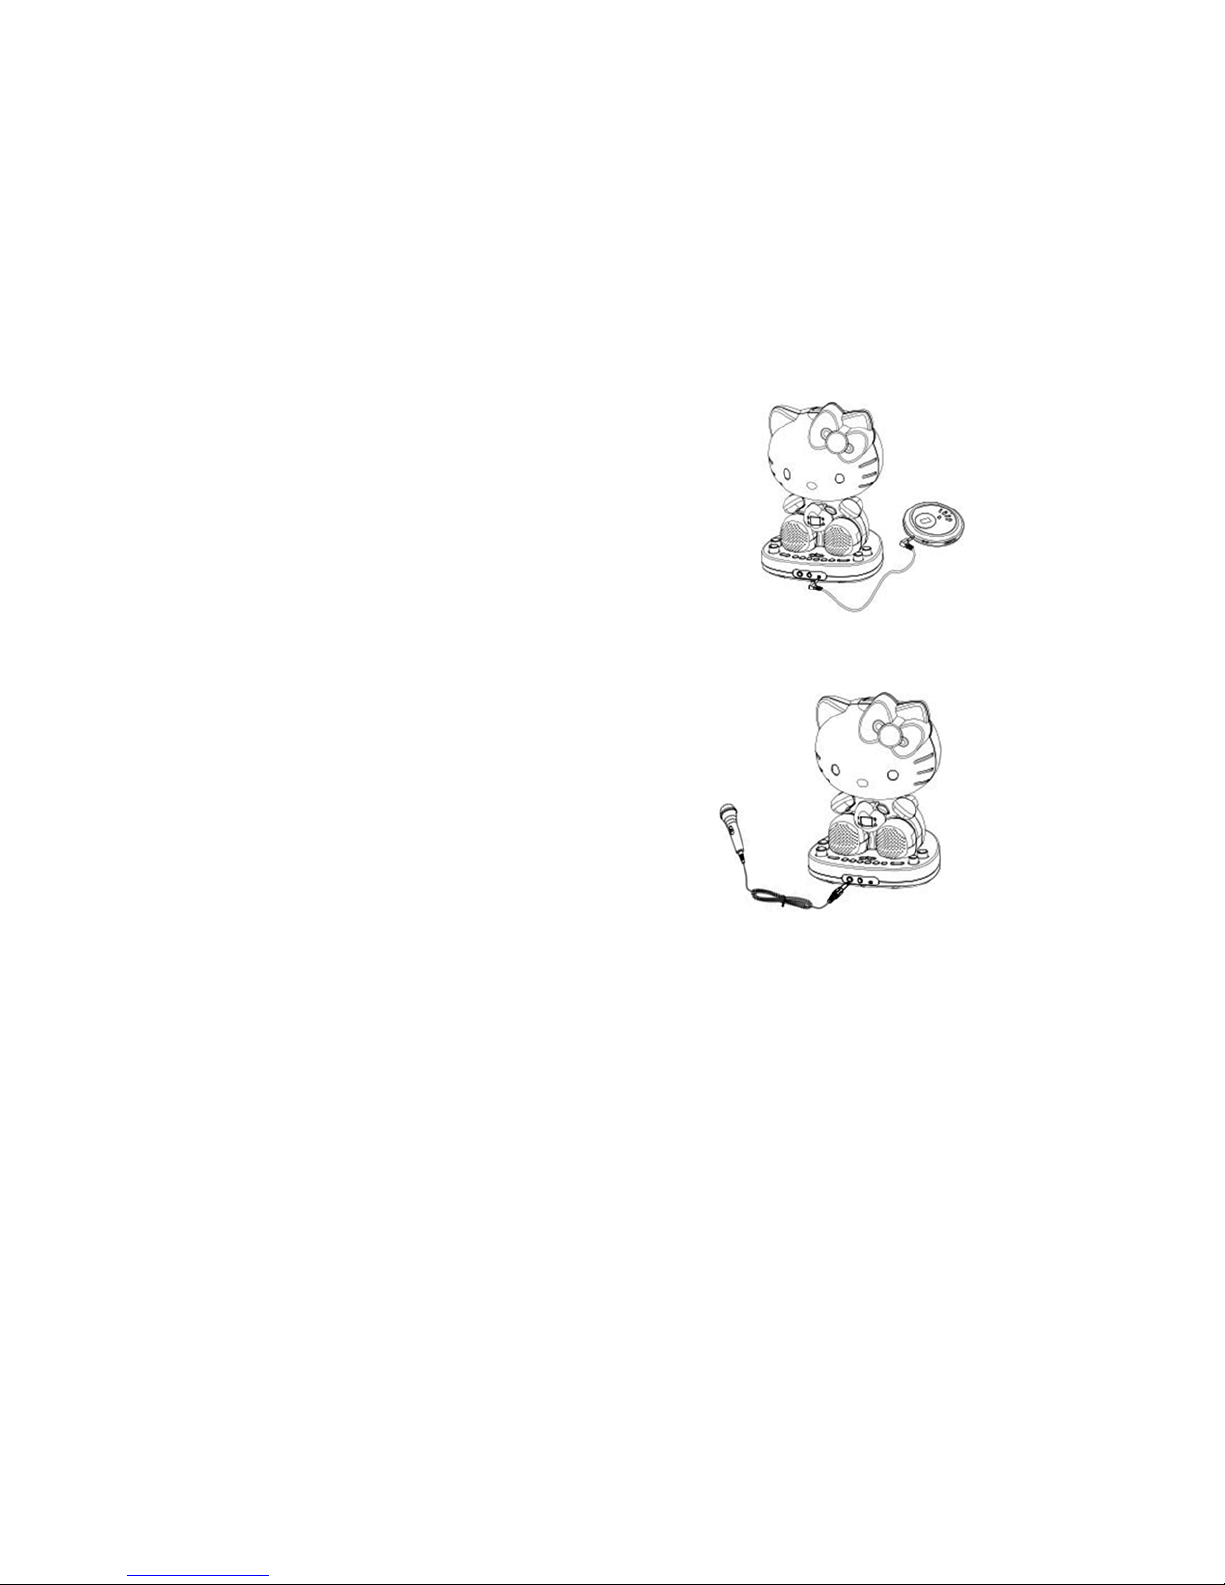
This feature allows yo u to listen to an exter nal audio source
through the speakers of this unit.
1. Plug a 3.5mm audio cable (not included) into the
headphone jack your MP3 or MP4 playe r and connect
the other end (3.5mm plug) into the AUX IN jack at the
front side of this unit.
2. Make sure both units are turned on.
3. Play a song on your MP3 or MP4 play er.
4. Turn off both the external audio source and this unit after
use.
CONNECTING A MICROPHONE
1. Plug a microphone into the MIC 1 or MIC 2. jack at
the front side of your unit. Their output is mixed
with playback from the CD.
2. Slide ON/OFF switch on microphone to ON
position.
10
Page 12
TROUBLESHOOTING GUIDE
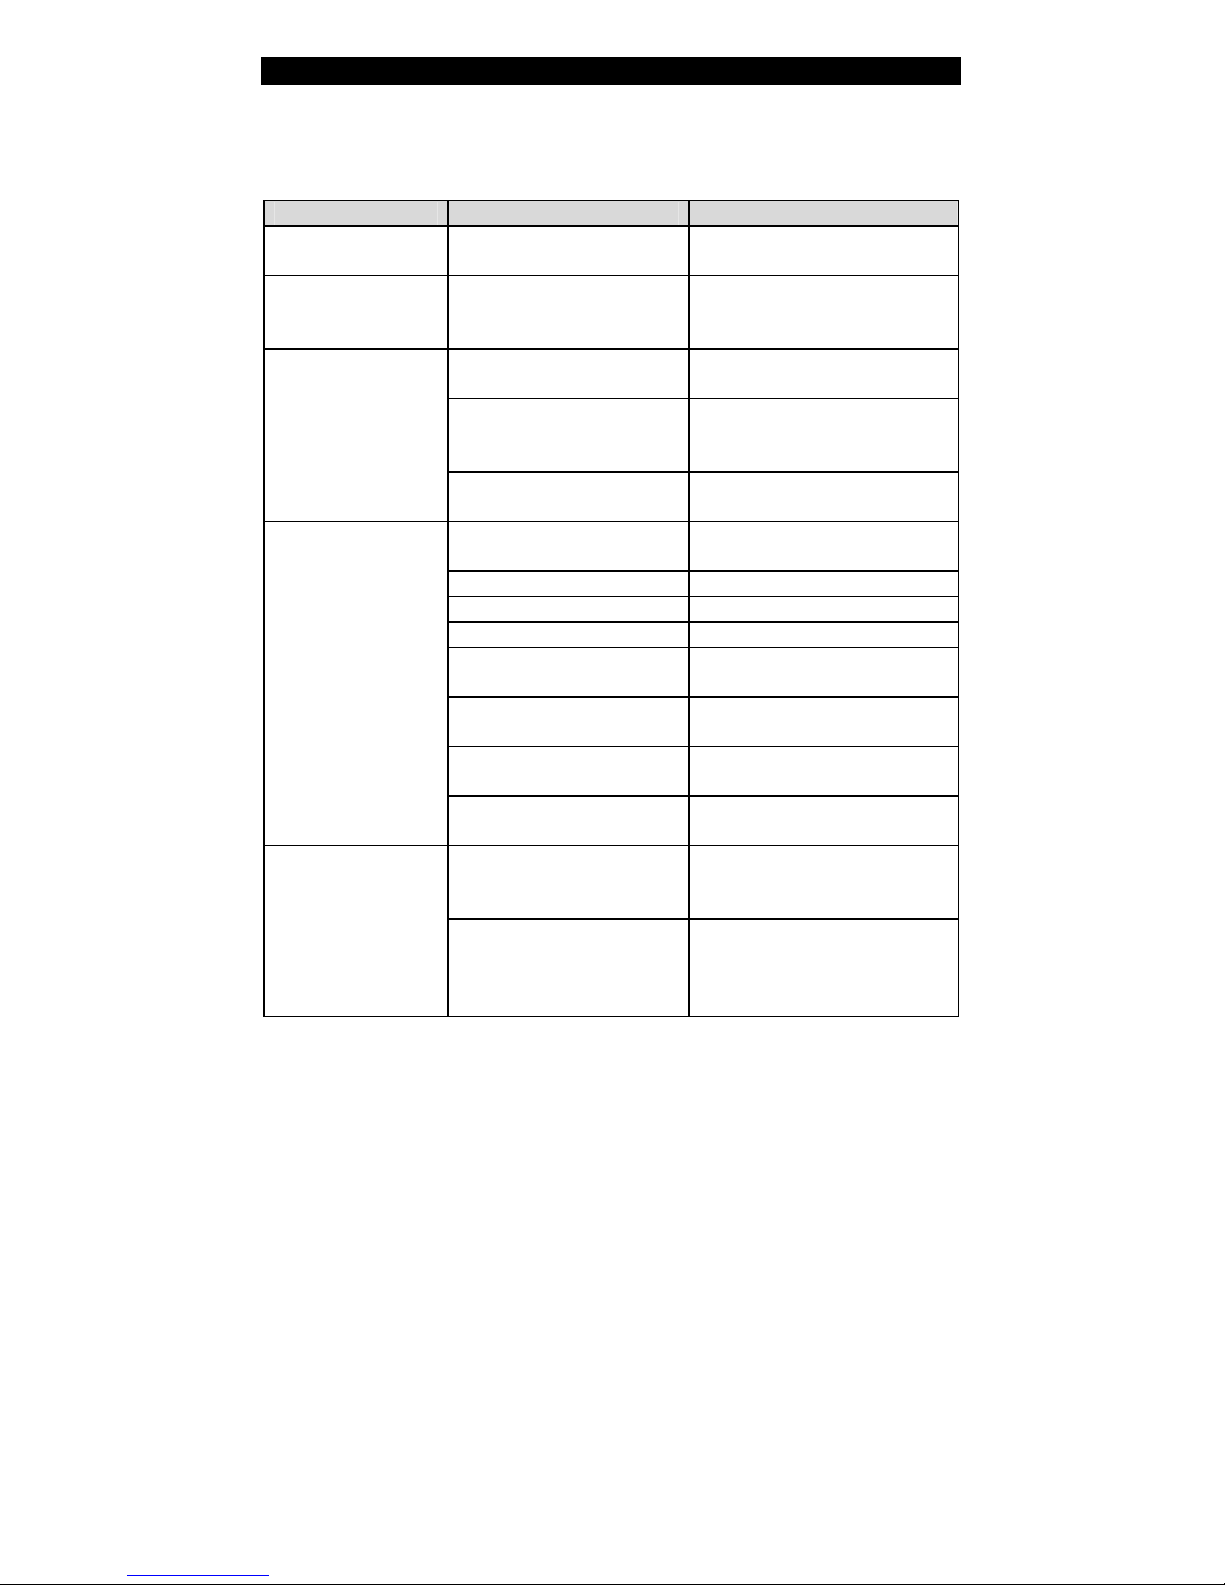
If you have followed the instruction s an d are havi ng dif ficu lty oper a ting t he unit , locat e
the
PROBLEM in the left column below. Check the corres ponding POSSIBLE CAUSE
column to locate and fix the problem .
PROBLEM POSSIBLE CAUSE SOLUTION
No power when
ON/OFF button is on
No power when
plugged in
No sound
CD PLAYER does
not work normally or
the LED displays
“ - - ” , “
No sound - If audio is
going through TV
home stereo
E
” or “ no ”
AC adapter is not plugged
into the AC outlet.
The AC outlet may not have
power.
Master volume control is set
to minimum.
Volume control on TV
set/PA system is set to
minimum.
TV set/PA system power is
OFF.
Disc is inserted upside
down.
Disc is dirty. Wipe it clean with soft cloth.
Disc is scratched. Use a new disc.
Disc is warped. Use a new disc.
A non-standard disc is
inserted.
Lens is dirty. Clean the optical pickup with a
Moisture has formed inside
the CD deck.
Karaoke system needs to
be reset.
Source Selection on your
TV home stereo is not set
properly.
Improper connection to
stereo system or PA.
Insert the AC adapter into the
AC outlet.
Check the outlet with a working
lamp or other electrical
appliance.
Turn up the master volume.
Turn up the volume of the
TV/PA system.
Turn on the power at TV/PA
system.
Insert disc correctly.
Only use discs bearing standard
logo.
CD lens cleaner.
Wait about 20 to 30 minutes to
let it dry out.
Disconnect the machine from
power source for 30 se cond s .
Select AUX IN as the source for
your TV home stereo.
Follow directions on ‘Audio
Connection’ page for
connecting to a home stereo
system.
11
Page 13
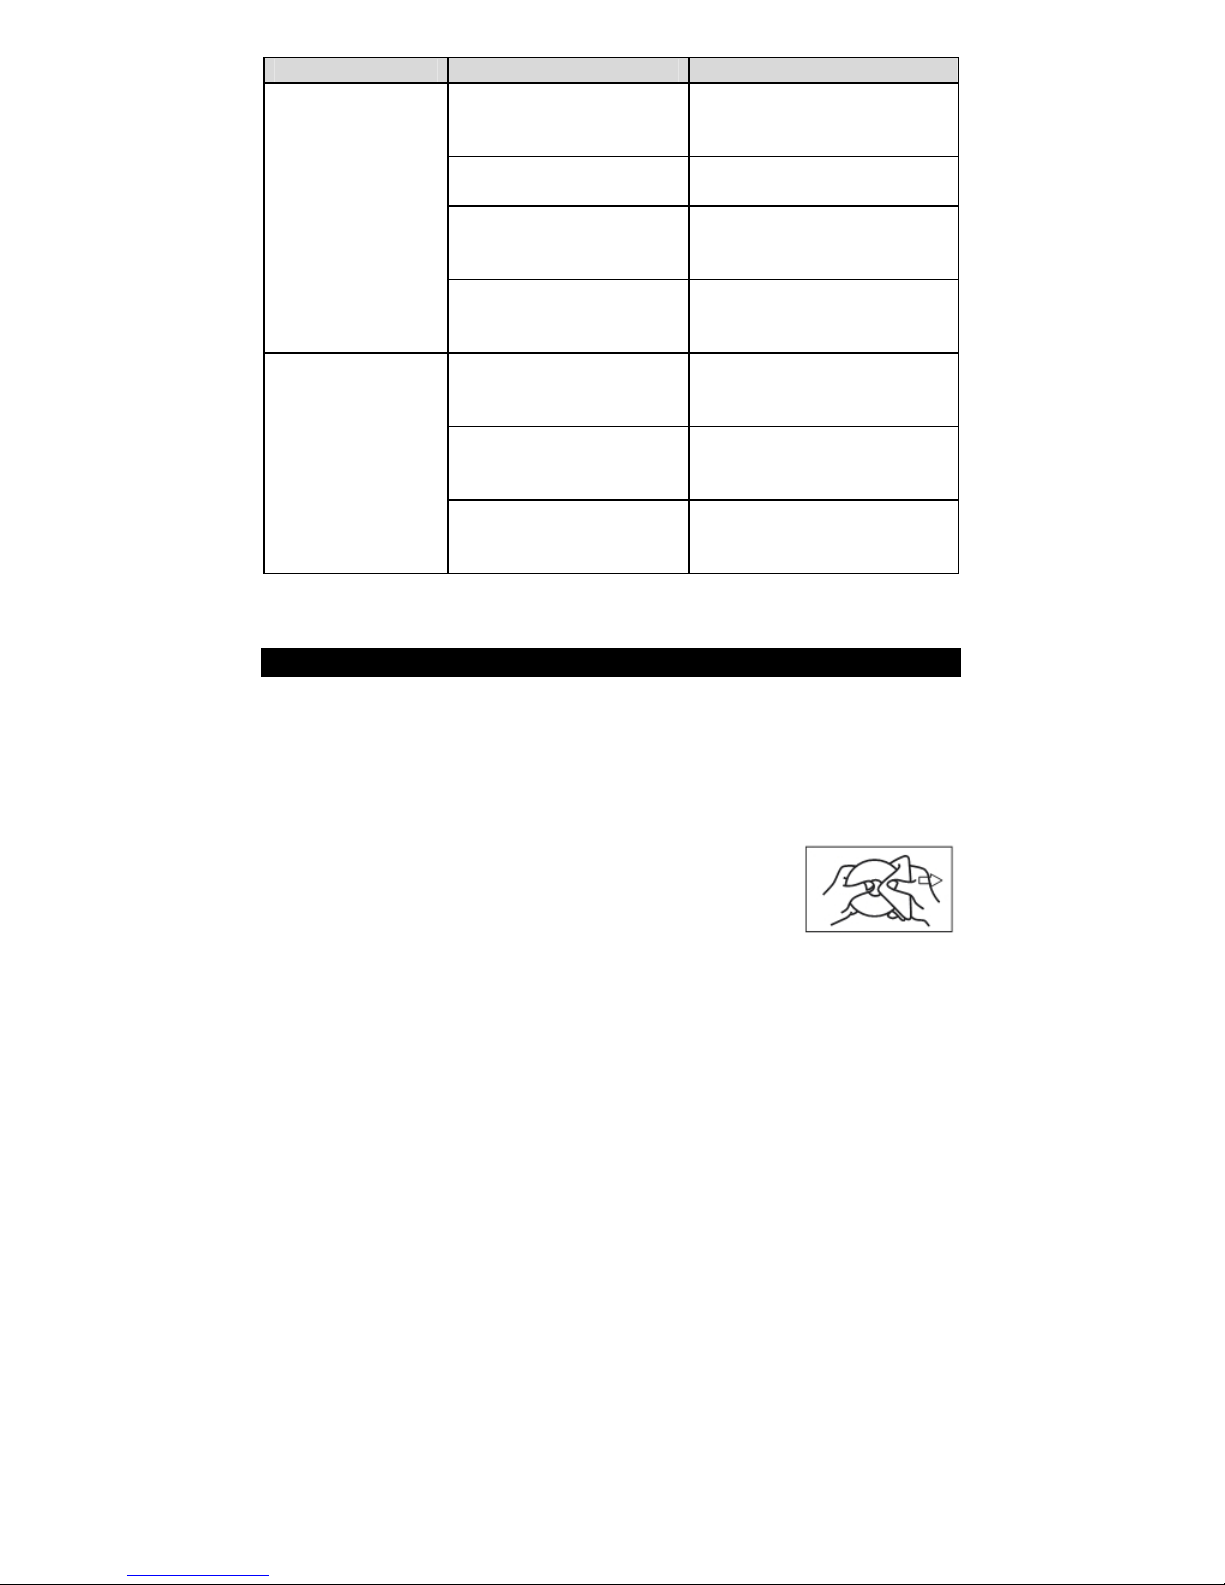
PROBLEM POSSIBLE CAUSE SOLUTION
Connect the video cable to the
VIDEO OUT of the unit and to
the TV VIDEO IN jacks.
Use your TV Remote to select
VIDEO or AV input.
Connect from VIDEO OUT of
the unit to a RF modulator and
then to the TV cable input.
Check the disc to be sure it is a
CDG.
Check disc to ensure it is clean.
volume level controls to
appropriate levels.
switch located on the
microphone.
Insert the mic pl ug into either
MIC 1 or MIC 2 jack of the unit
properly.
No song lyrics
appear on the TV
screen
Cannot sing through
the mic.
Video cable is not
connected properly to the
TV.
Source selector on TV is not
set to VIDEO or AV IN.
TV does not have video line
input.
A CD+G disc is loaded but
the CDG indicator is not lit.
Mic volume control. Adjust MIC and MASTER
Mic is off. Turn on mic with the ON/ OFF
Mic is not properly plugged
in.
CARE AND MAINTENANCE
(1) Clean your unit with a damp (never wet) cloth. Solvent or detergent should never be
used.
(2) Avoid leaving your unit in hot, humid or dusty places.
(3) Keep your unit away from heating appliances and sources of electrical noise such
as fluorescent lamps or motors.
HANDLING CD DISCS
Fingerprints and dust should be carefully wiped off with a soft
cloth. Wipe in a straight motion from the center of the disc to
the outside edge.
Never use chemicals, such as record cleaning sprays,
antistatic sprays or fluids, benzene or thinner to clean compact discs. These
chemicals will permanently damage the plastic surface of the disc.
Always place the compact disc on the disc tray with the label facing upward.
12
Page 14
Compact discs can be played on only one side.
To remove a disc from its storage case, press down on the center of the case and lift
the disc out, holding it carefully by the edge s.
Discs should be returned to their cases after use to protect them from dust and
scratches.
To prevent warping the disc, do not expose it to direct sunlight, high humidity or high
temperature for extended periods of time.
Do not apply adhesive labels or write anything on either side of the disc. The inks
used in some felt-tips pens may da mage the surfaces of the disc.
If drop-outs or interruptions occur in t he music during CD p lay, or if the CD fails to
play at all, its bottom surface may require cleaning. Before pla ying, wipe the disc
from the center outwards with a good soft cleaning cloth.
SPECIFICATIONS
Powe r Output........................................................... 1.5 W + 1.5W (RMS) @10% T H D
Speakers.................................................................. 2 x 8 Ohms 57mm diameter
DC input................................................................... 10.5V
AC Ad a p t e r i n p u t...................................................... 100-240V~ 50/60H z
0.8A 8.4W
0712 Printed in China
13
 Loading...