

Page 1
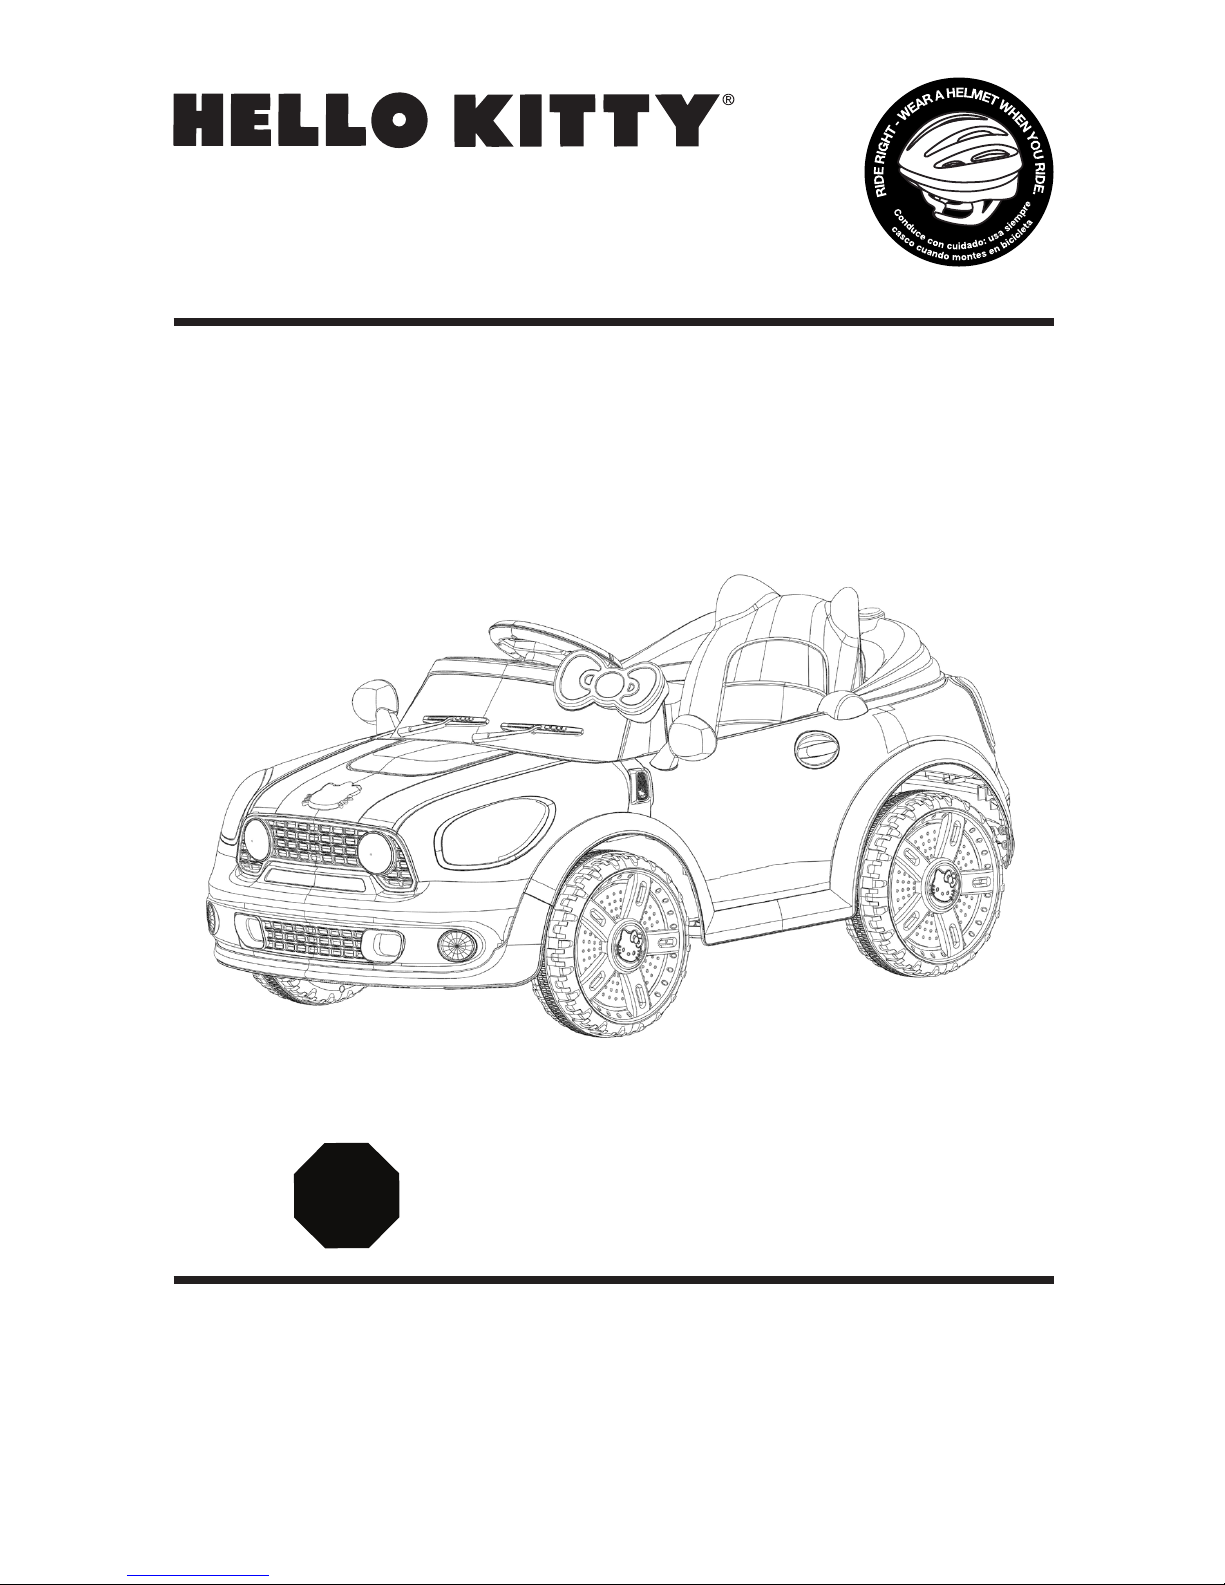
HELLO KITTY COUPE
this manual contains important safety, performance and
maintenance information. read the manual before taking your
first ride or allowing your child to ride your new electric
ride-on toy. keep the manual handy for future reference.
FOR AGES 3-8 YEARS
MAXIMUM WEIGHT: 65 lbs. (29.5 kgs)
OWNER’S MANUAL
NOTE: Illustrations in this Manual are for reference purposes only and may not reflect the exact
appearance of the actual product. Specifications are subject to change without notice.
©1976, 2012 Sanrio Co., LTD. Used Under License.
DO NOT RETURN TO STORE!
QUESTIONS OR COMMENTS?
1-800-288-1560
STOP
Page 2

1
TABLE OF CONTENTS
A Introduction, Safety and Warnings
B Before You Begin Assembly
C List of Assembled Parts
D Assembly
E How to Use Your Vehicle
F Detailed Maintenance and Repair
G Troubleshooting Guide
H Warranty
ELECTRIC CAR SPECIFICATIONS
2
6
7
9
14
17
22
25
SUITABLE AGE
CAPACITY
SPEED
CHARGER / INPUT
OUTPUT
CHARGING
BATTERY
SIZE OF CAR
AVERAGE BATTERY LIFE
3-8 Years
under 65lbs (29.5kgs)
2.5 mph
AC120V / 60HZ
DC6V, 1A
12-18 Hours
6V7AH, 1 x Battery
118 x 81 x 67cm
300 Charges
Page 3
2
INTRODUCTION, SAFETY, AND
WARNINGS
ABOUT THIS MANUAL: This Manual was written to help you and your child get the
most performance, comfort, enjoyment and safety when riding your new electric rideon toy. It is important for you to understand your new electric ride-on toy. By reading
this manual before you let your child go out on his/her first ride, you will know how
to get the most from your new electric ride-on toy. It is also important that your or
your child’s first ride be in a controlled environment, away from cars, obstacles, and
other riders.
GENERAL WARNING Riding an electric ride-on toy can be a
dangerous activity, even under the best of circumstances. Proper maintenance of
your new ride-on toy is your responsibility and helps reduce the risk of injury. Certain
conditions may cause components to fail without fault of the manufacturer. The rideon toy can and is intended to move and it is therefore possible to lose control, fall off
and/or get into dangerous situations that no amount of care, instruction or expertise
can eliminate. If such a thing does occur your child can become seriously injured or
die, even when using safety equipment and other safety precautions.
WARNING To reduce risk of injury, adult supervision is required. Never use
in roadways, near motor vehicles, on or near steep inclines or steps, swimming pools
or other bodies of water; always wear shoes, and never allow more than one (1) rider.
WARNING CHOKING HAZARD-Small parts not suitable for children under 3
years old.
RIDE AT YOUR OWN RISK AND ALWAYS USE COMMON SENSE.
This manual contains many warnings and cautions concerning the consequences of
failing to inspect, maintain or properly use your electric ride-on toy. Because any fall
can result in serious injury or even death, we do not repeat the warning of possible
serious injury or death each time such a possibility is mentioned in this manual or the
risk of falling leads to a warning.
ALWAYS USE PROPER SAFETY EQUIPMENT AND RIDING ATTIRE.
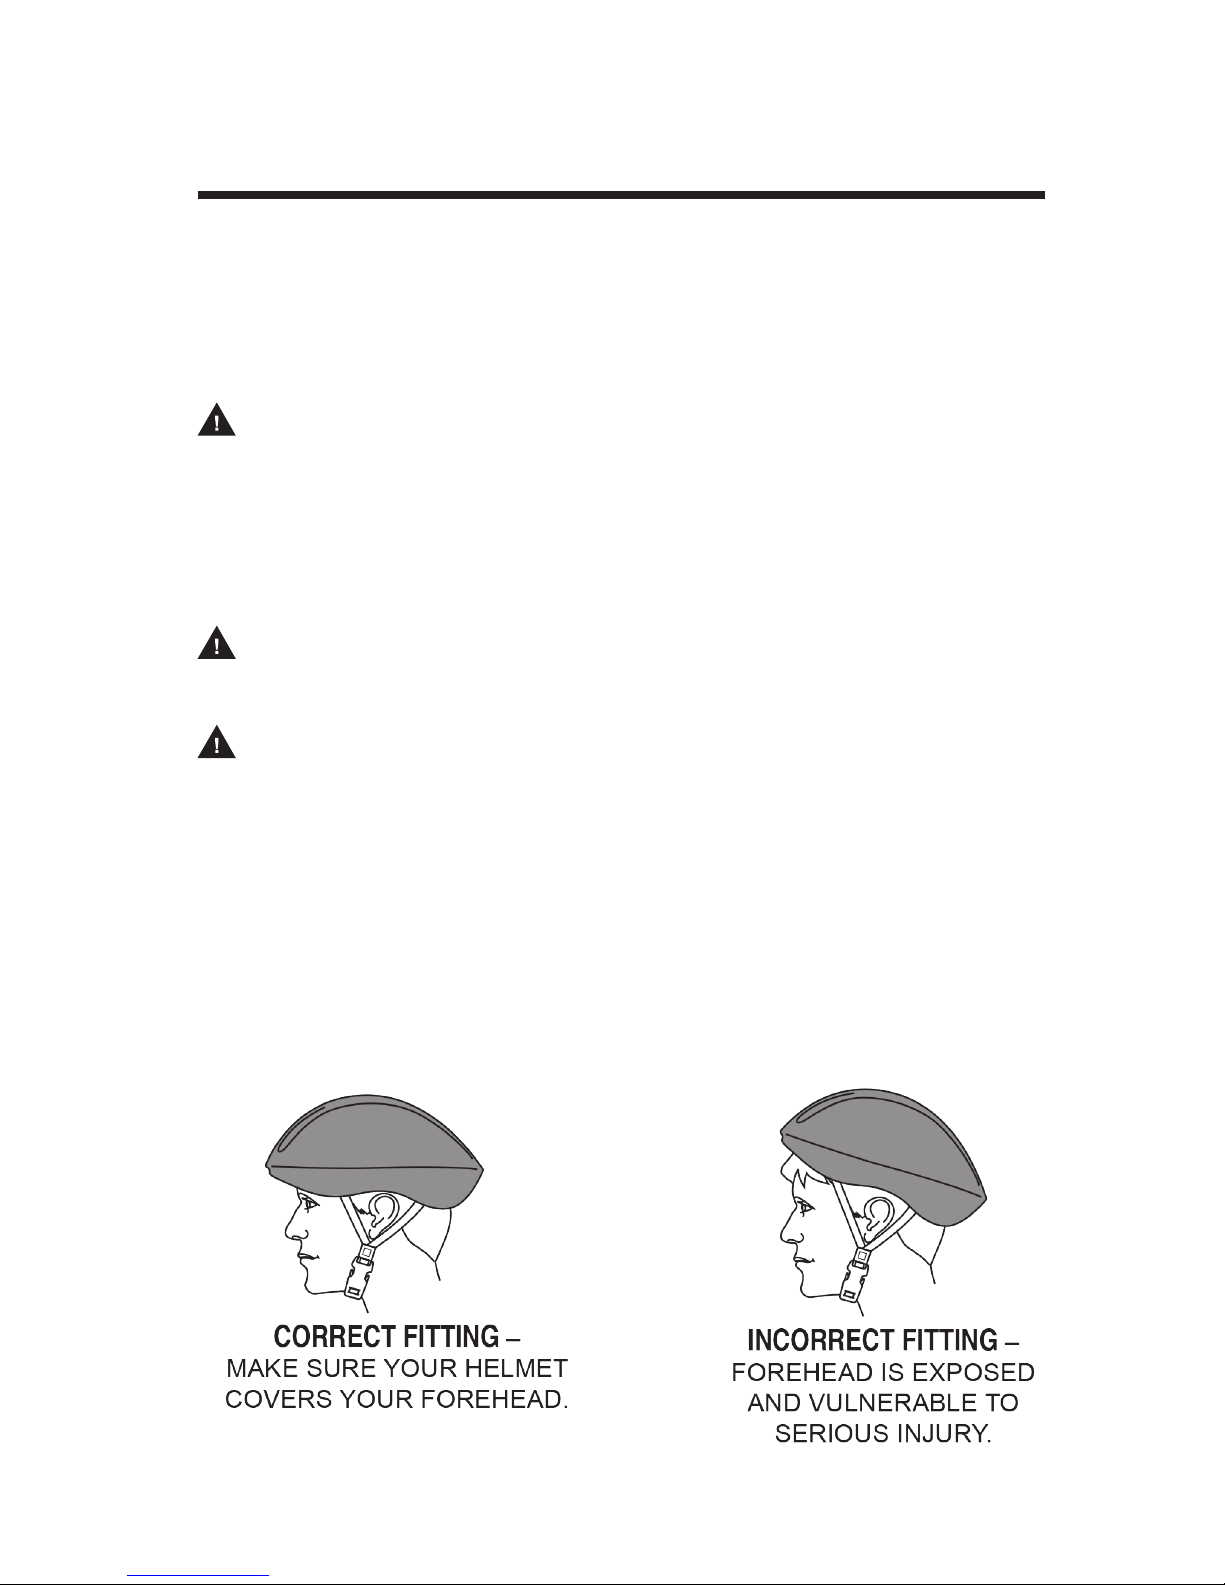
Always use appropriate safety equipment, including a helmet. A helmet is not only a
good idea but may be legally required in your community. To protect yourself or your
child, the helmet must meet CPSC, 16 CFR 1203, requirements and be worn correctly.
Page 4

3
Always wear appropriate clothing and shoes, including long sleeved shirts and long
pants and lace-up or similar shoes with rubber soles. Never ride barefoot or in
sandals and make sure that shoelaces or other fasteners are tied and kept away from
the wheels and drive system of the ride-on toy.
RIDER USE AND REQUIRED PARENTAL SUPERVISION
RIDERS MUST NOT EXCEED THE WEIGHT LIMIT OF 65 pounds (29.5kg) and MUST
BE OVER 3 years old.
The age grade for the electric ride-on toy is for ages 3-8 years. Just because your
child is within the age and weight limitations specified for the electric ride-on toy,
does not mean that his/her size is appropriate to fit or maintain control of the electric
ride-on toy or that he/she is capable of safely operating the electric ride-on toy. You
are the best judge of whether you or your child can safely operate the electric ride-on
toy; this includes determining whether your child is at the appropriate developmental
stage for safe use of the electric ride-on toy. Any rider that is unable to fit comfortably
on the electric ride-on toy should never attempt to ride it. A parent’s decision to allow
their child to use the electric ride-on toy should be based on the child’s maturity, skill
and their ability to follow rules. Remember that the electric ride-on toy is intended for
use only by children who are, at a minimum, able to comfortably and safely operate it.
Children operating the electric ride-on toy should be supervised by an adult at all
times. Parents should ensure that children only use the electric ride-on toy safely and
within their age and physical limits.
This manual contains very important safety information. It is your responsibility to
completely review this information and make sure that all riders understand all of
the warnings, cautions, instructions and safety topics addressed in this manual and
to assure that all riders are able to safely and responsibly use the electric rideon toy. You should periodically review and reinforce all information in this manual
with all riders, especially children. You should also regularly inspect and maintain
your electric ride-on toy to insure the safety of all riders. Make sure that your new
electric ride-on toy is properly fitted to any child riding it; that it is in good repair and
safe operating condition; that you and your child have gone over the use, operation
and safety information in this manual; that you and your child have learned and
understand what to do and what not to do with your new electric ride-on toy, including
observing all applicable laws, rules and common sense.
Children should be made aware of all possible riding hazards and correct riding
behavior before they ride the electric ride-on toy and should be supervised by an adult
at all times. Please explain the following to them as often as necessary.
Page 5

4
SAFE RIDING PRACTICES AND WARNINGS
• Check and obey all local laws or regulations which may be in effect in the locations
where the electric ride-on toy may be used.
• Always wear a helmet and other safety equipment and appropriate clothing and
shoes. Always keep the chin strap on the helmet securely buckled.
• Observe the age and weight limitations on the cover of this manual.
• Always stay seated while riding the electric ride-on toy. To stop you must take your
foot off of the foot pedal.
• Children must be supervised by an adult at all times to be safe.
• Always be alert and ride your electric ride-on toy defensively. Watch out for
obstacles that could catch one of the scooter’s wheels or force you to turn suddenly
and/or lose control. Be careful to avoid pedestrians, persons using other wheeled
products (including roller or in-line skates, skateboards, scooters, bikes, etc.),
children or animals who may enter your path. Always respect the rights and
property of others.
• Do not activate the foot pedal unless you are seated in the vehicle and in a safe,
outdoor environment that is suitable for riding your electric ride-on toy.
• Do not attempt or perform any stunts or tricks on the electric ride-on toy. It is not
made to withstand such misuse and abuse.
• Keep both hands on the handlebars at all times.
• Do not touch the motor on the electric ride-on toy when in use or directly after use
as these parts can become extremely hot.
• Never allow more than one person to ride the electric ride-on toy at one time and
never try to tow anything.
• Do not use near steps, water, or swimming pools.
• Do not ride in wet weather.
• Never immerse the electric ride-on toy in water; electrical and drive components
could be damaged by water or create other potentially unsafe conditions.
• Keep your fingers and other body parts away from the motor, steering system,
wheels and all other moving components.
• Never hitch onto another vehicle or let yourself be pulled or pull anyone or anything
while riding the electric ride-on toy.
• Ride only on smooth, flat, dry surfaces such as pavement or level ground without
loose debris, such as sand, leaves, rocks or gravel. Water, mud, ice, bumpy, uneven, slick, or rough surfaces could impair traction and contribute to possible loss
of control.
• Do not ride on or near hills or steep inclines. Ride only on level ground to avoid tip over.
• Avoid sharp turns, bumps, drainage grates, and other obstacles.
• Do not ride at night or where there is limited visibility.
• Do not ride indoors or on surfaces that could become damaged such as carpet or
flooring.
• Do not ride on streets, around cars, or in foot or vehicle traffic.
• Regularly check the electric ride-on toy and its components. If any parts are broken
or worn, do not ride the electric ride-on toy until you have fixed or replaced the
broken or worn parts.
Page 6

5
• Do not to allow hands, feet, hair, body parts, clothing, or similar articles to come in
contact with wheels or other moving parts.
• Before each cycle of operation, you must perform the preoperation checks specified
in this manual or by the manufacturer, including:
• That all guards and pads originally supplied by the manufacturer are in proper place
and in serviceable condition;
• That the area that the unit is to be operated in is safe and suitable for safe
operation;
• That all safety labels are in place and understood by everyone, including the rider;
• That any and all axle guards, chain guards, or other covers or guards supplied by
the manufacturer are in place and in serviceable condition; and
• That tires/wheels are in good condition and have sufficient tread remaining.
• Avoid sharp bumps, drainage grates, and sudden surface changes.
PRE-RIDE SAFETY CHECKLIST
• Check to make sure that all components are properly secured and are functioning
according to the manufacturer’s specifications.
• Components must be maintained and repaired and only with the manufacturer’s
authorized replacement parts. Installation should be performed only by adult,
qualified personnel.
USING THE CHARGER
The charger should be examined regularly for damage to the cord, plug, enclosure and
other parts. In the event such damage has occurred, the electric ride-on toy should
not be charged until the charger has been repaired by qualified personnel or replaced.
Use only the supplied, recommended charger.
• Always use caution when charging.
• The charger is not a toy and should be operated by an adult.
• Never operate the charger near flammable materials or liquids, and operate the
charger in well-ventilated areas.
• Disconnect the charger and unplug it from the electric ride-on toy when not in use.
• Do not exceed the recommended charging time.
• Always disconnect the charger from the electric ride-on toy prior to wiping down or
cleaning the electric ride-on toy with any liquid.
WARNING
Never modify or alter the electrical system. Alterations could cause a fire or explosion
resulting in serious injury or death and could also ruin the electrical system.
FAILURE TO HEED THE WARNINGS LISTED ABOVE INCREASES RISK OF
POTENTIALLY SERIOUS INJURY. USE THE APPROPRIATE CAUTION WHEN RIDING
AND ALWAYS WEAR PROTECTIVE GEAR.
Page 7

6
BEFORE YOU BEGIN ASSEMBLY
WARNING
Remove all packing and items from the display box. Make sure that the power switch
is turned “OFF” before assembling the electric ride-on toy.
ESTIMATED ASSEMBLY TIME
You should allow approximately 25 minutes for assembly, not including initial
charging time. Initial charging can take approximately 18 hours. (see page 12-13 for
charging information).
WARNING: DO NOT USE NON-ORIGINAL OR
NON-RECOMMENDED PRODUCTS WITH YOUR
ELECTRIC RIDE-ON TOY.
Altering of the original components or use of non-recommended
replacement parts may or may not be compatible with the design and will
void the warranty and may cause an unsafe condition resulting in serious
injury or death.
Page 8
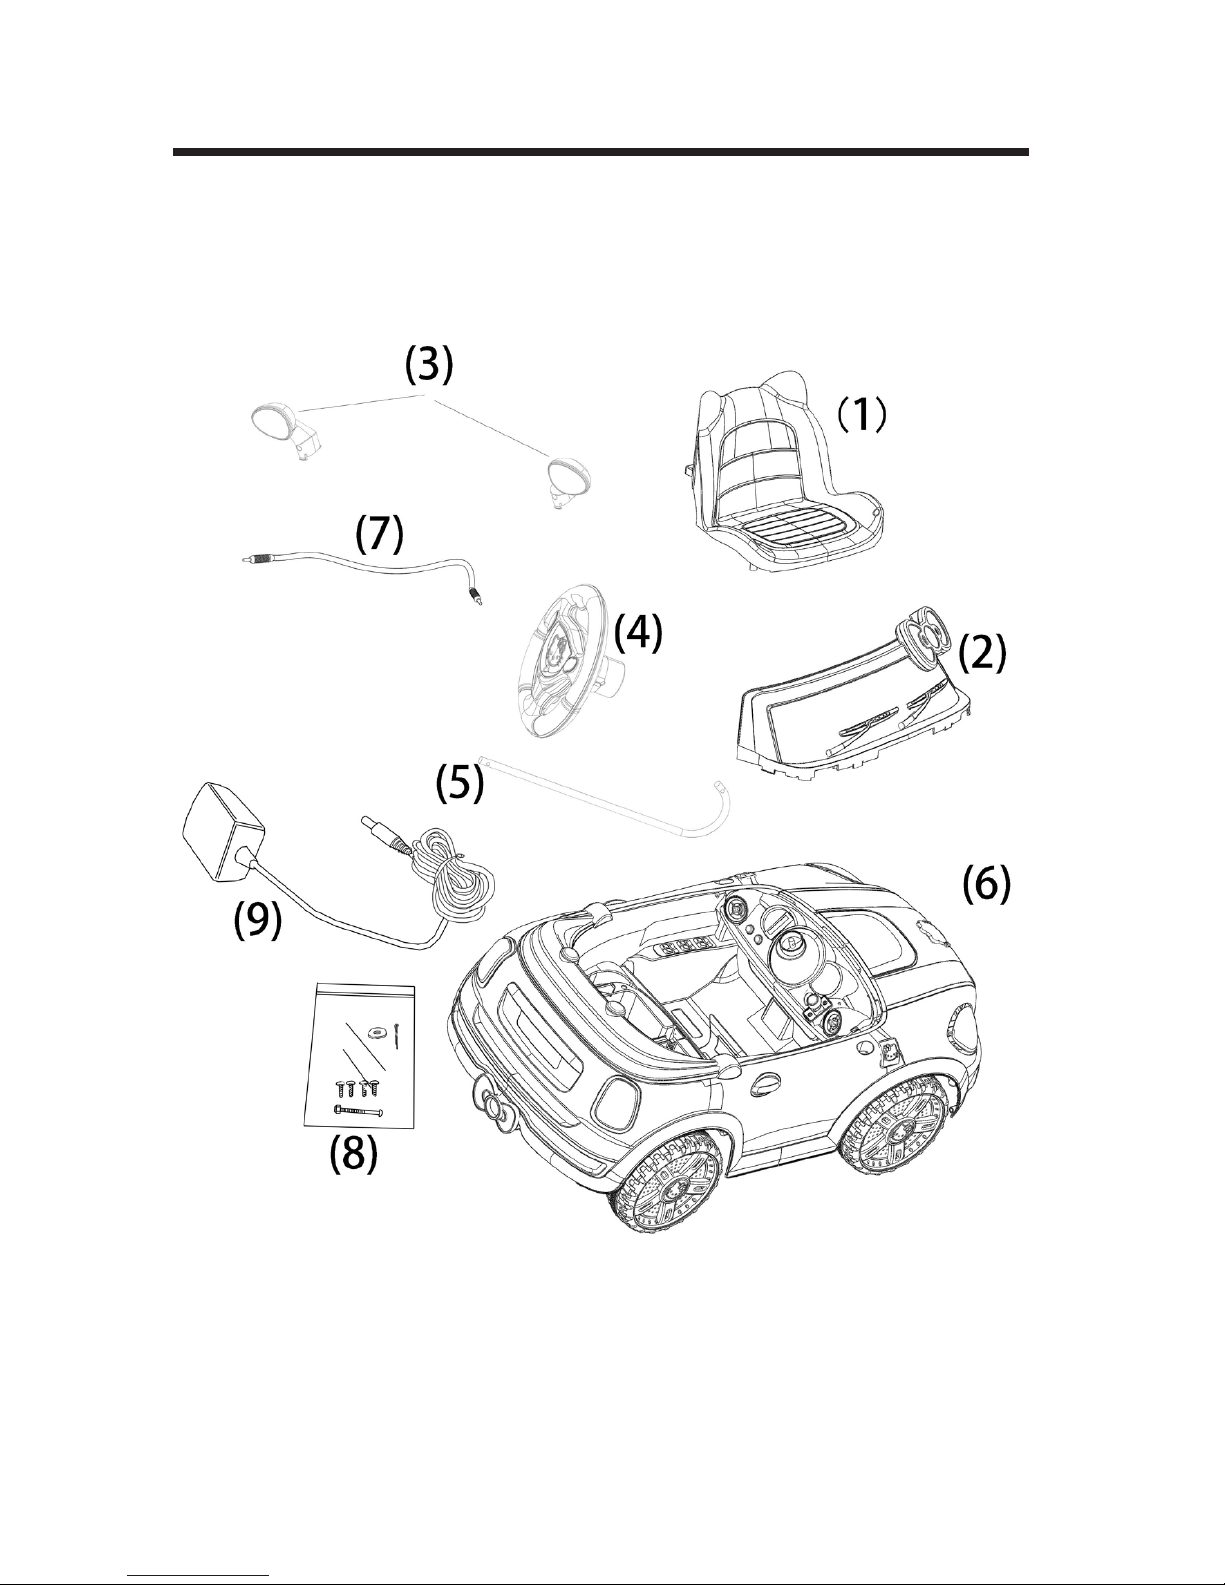
LIST OF ASSEMBLED PARTS
1. Seat
2. Windshield
3. View mirrors
4. Steering wheel set
5. Steering Column
6. Main body Assembly
7. Audio Input Cable
8. Hardware in poly bag
9. Charger
If you experience a problem with this product, or are missing a part, please call us at
1-800-288-1560, rather than return this product to the store. Please identity all parts
before assembly and save all packaging material until assembly is complete to ensure
that no parts are discarded.
Page 9
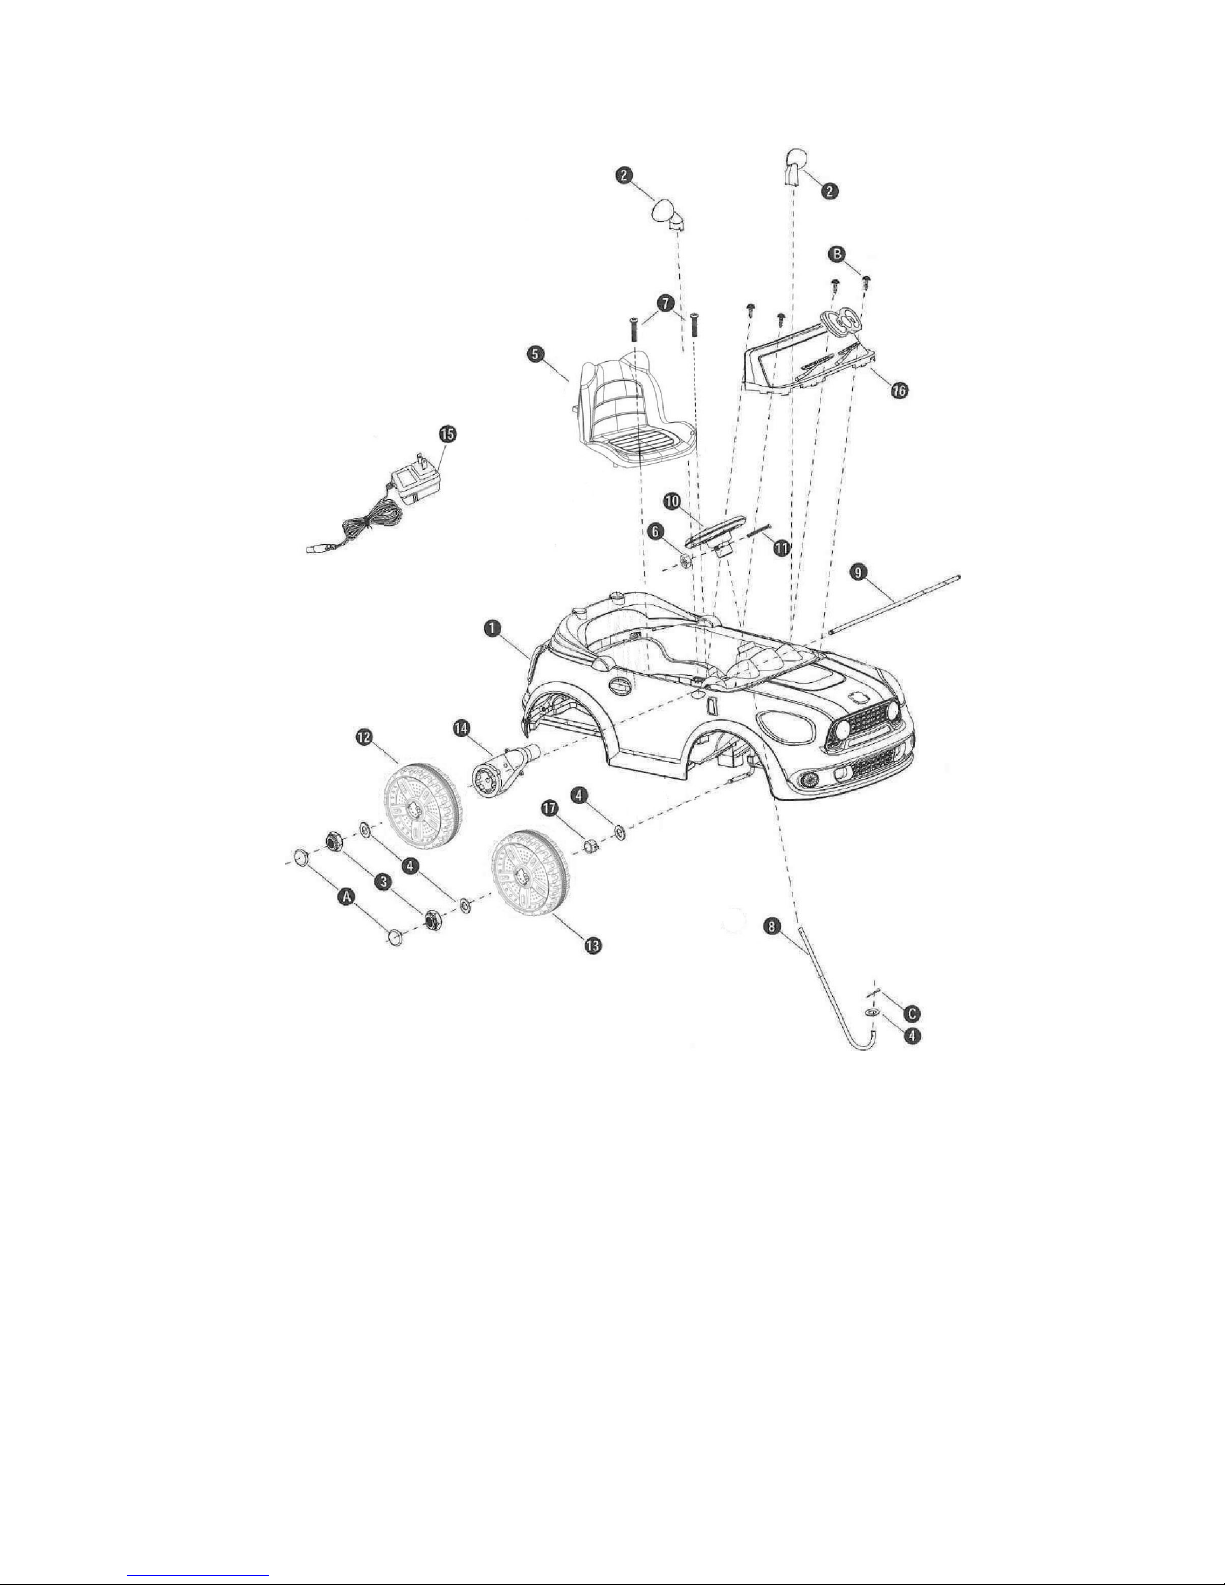
PARTS DIAGRAM
1. Plastic Body Assembly
2. View Mirrors
3. M10 Lock Nuts
4. Ø10 Washer
5. Seat
6. Ø5 nut
7. M5x16 Machine Screws
8. Steering Column
9. Rear Wheel Axle
10. Steering Wheel
11. M5x35 Machine Screw
12. Rear Wheel
13. Front Wheel
14. Gear Box
15. Charger
16. Windshield
17. Bushing
A. Axle Cap
B. 4x12 Round Head Screws
C. Split Pin
Page 10
9
ASSEMBLY
Your new vehicle requires adult assembly. Please set aside around 25 minutes for
assembly. Please identify all parts before assembly and save all packaging material
until assembly is complete to ensure that no parts are discarded.
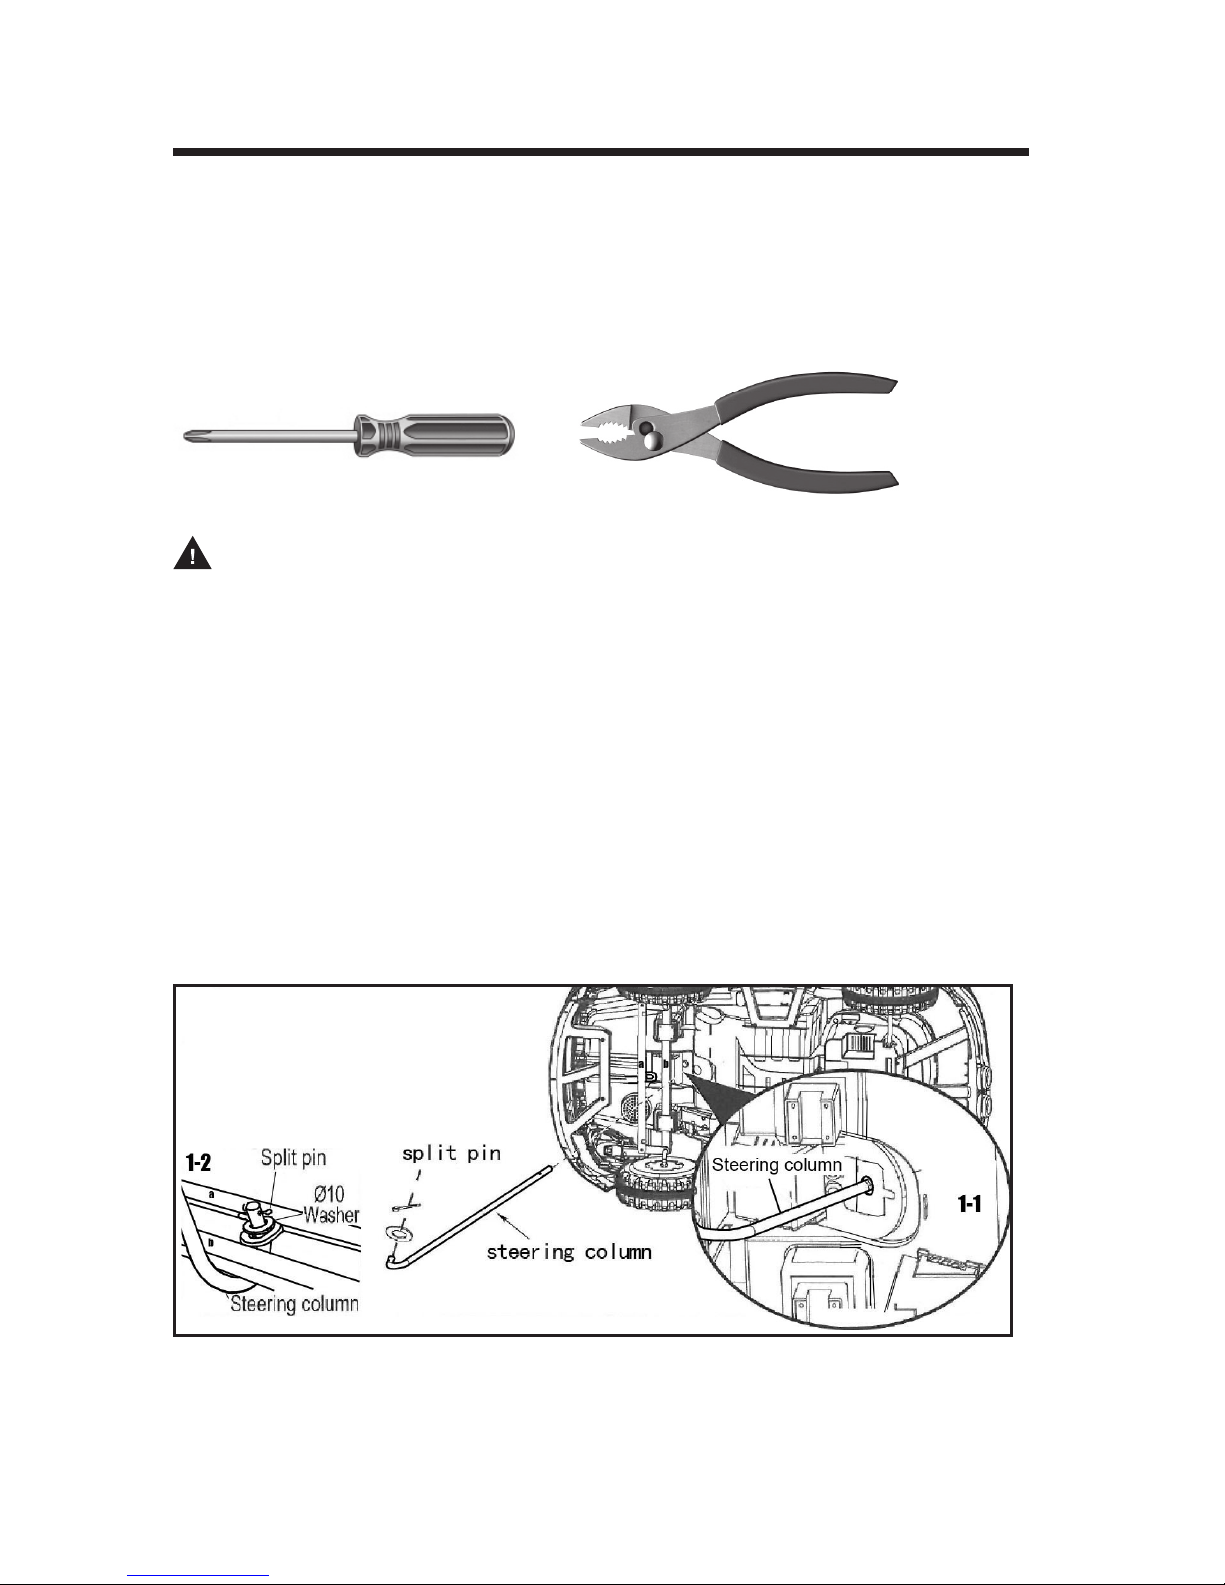
Tools Required:
Phillips Screwdriver (not included) Standard slip joint pliers (not included)
WARNING: Children can be harmed by small parts, sharp edges and sharp
points in the vehicle’s unassembled state, or by electrical items. In the unassembled
state, this package contains small parts. Adult assembly is required; children should
not handle parts, or help in assembly of the vehicle.
1. Steering Column Assembly
• Turn the vehicle body on its side.
• Insert the straight end of steering column through the hole under vehicle body
until it sticks out of the hole on the top of the car body. <see diagram 1-1>
• Insert the bent end of steering column through the hole on the steering bracket
(which connects with the front wheel axle).
• Fit a Ø10 washer onto the bent end of the steering column and insert a split pin
into the hole in the steering column, use standard slip joint pliers to open and
split the pin ends (to assure the Ø10 washer will not fall out). <see diagram 1-2>
Page 11
10
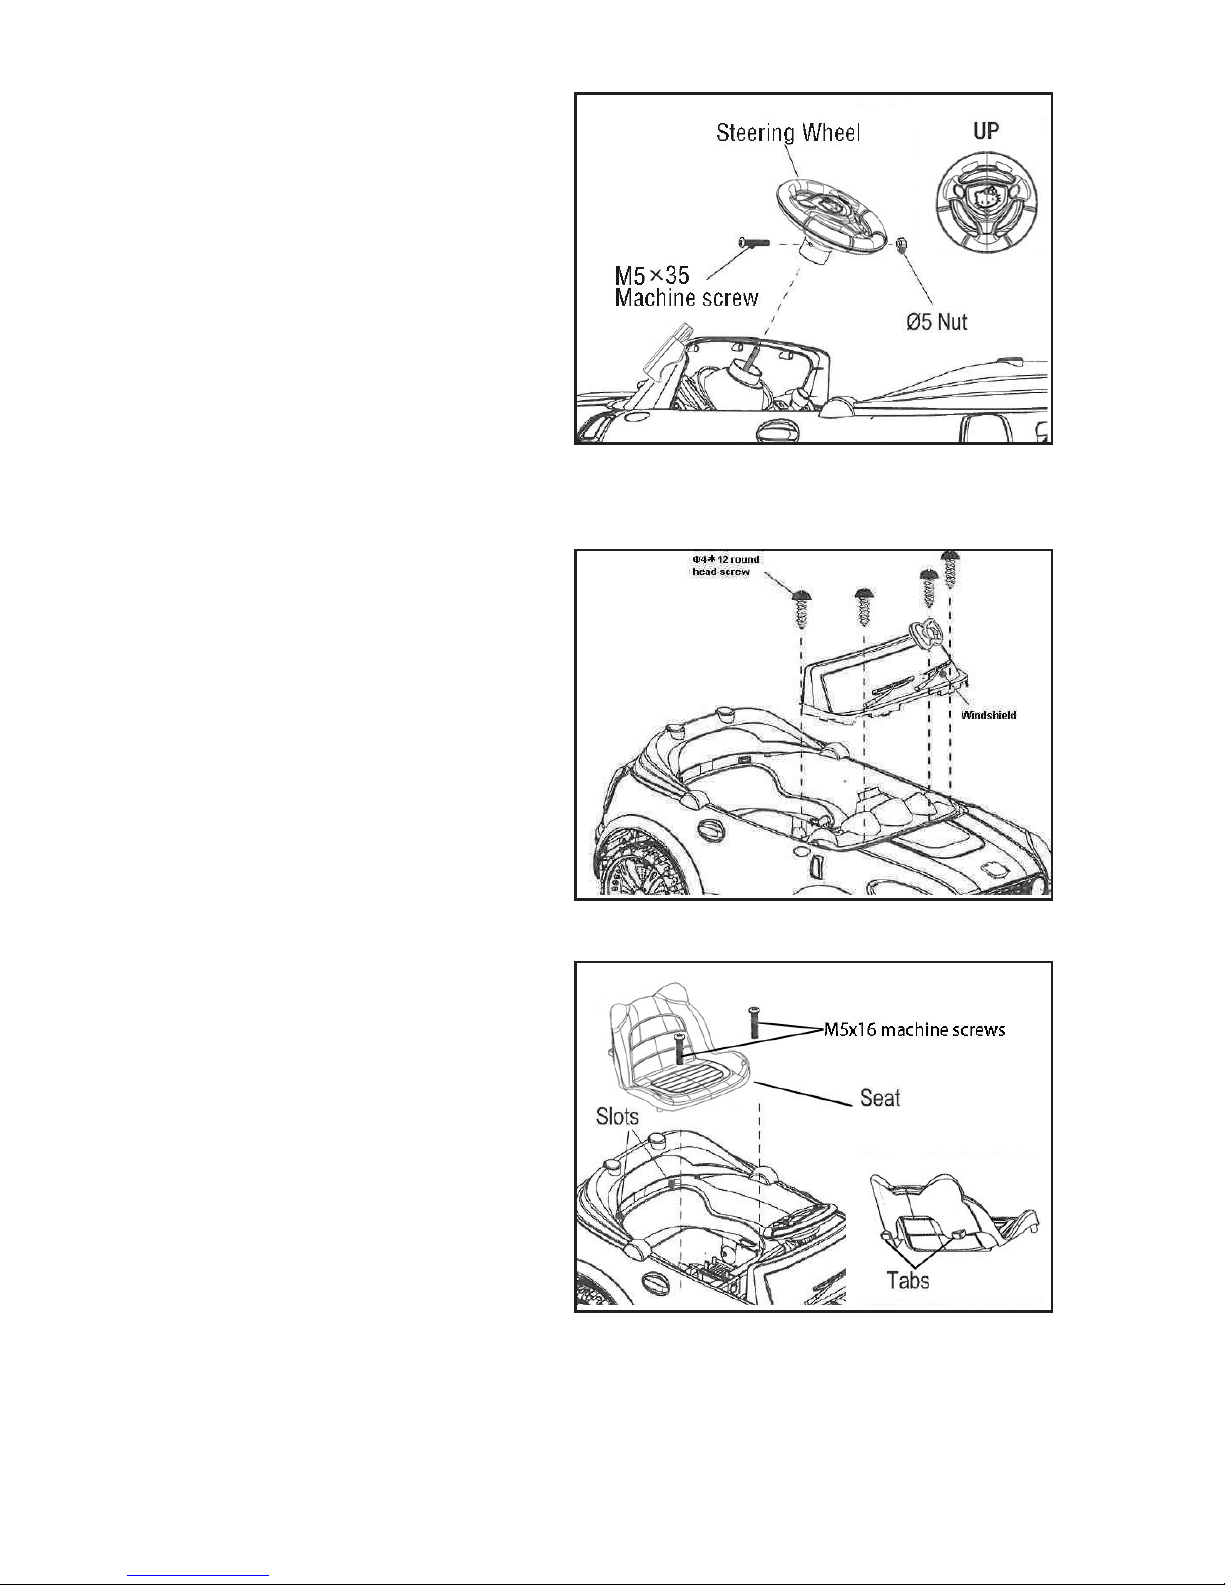
2. Steering Wheel
Assembly
• Put the vehicle body upright.
• Remove the M5x35 machine
screw and Ø5 nut from the
steering wheel.
• Insert the steering wheel to the
end of the steering column.
• Insert the M5x35 machine
screw through the steering
wheel and steering column
(make sure to align their holes),
then tighten securely.
3. Windshield Assembly
• Fit the tabs on the windshield
into the slots in the vehicle
as shown.
• Insert four Ø4x12 round head
screws and tighten with a
screwdriver.
4. Seat Assembly
• Insert the tabs on the back of
the seat into the slots in the
vehicle body.
• Insert two M5x16 machine
screws, and tighten securely
with a screwdriver.
Page 12
11
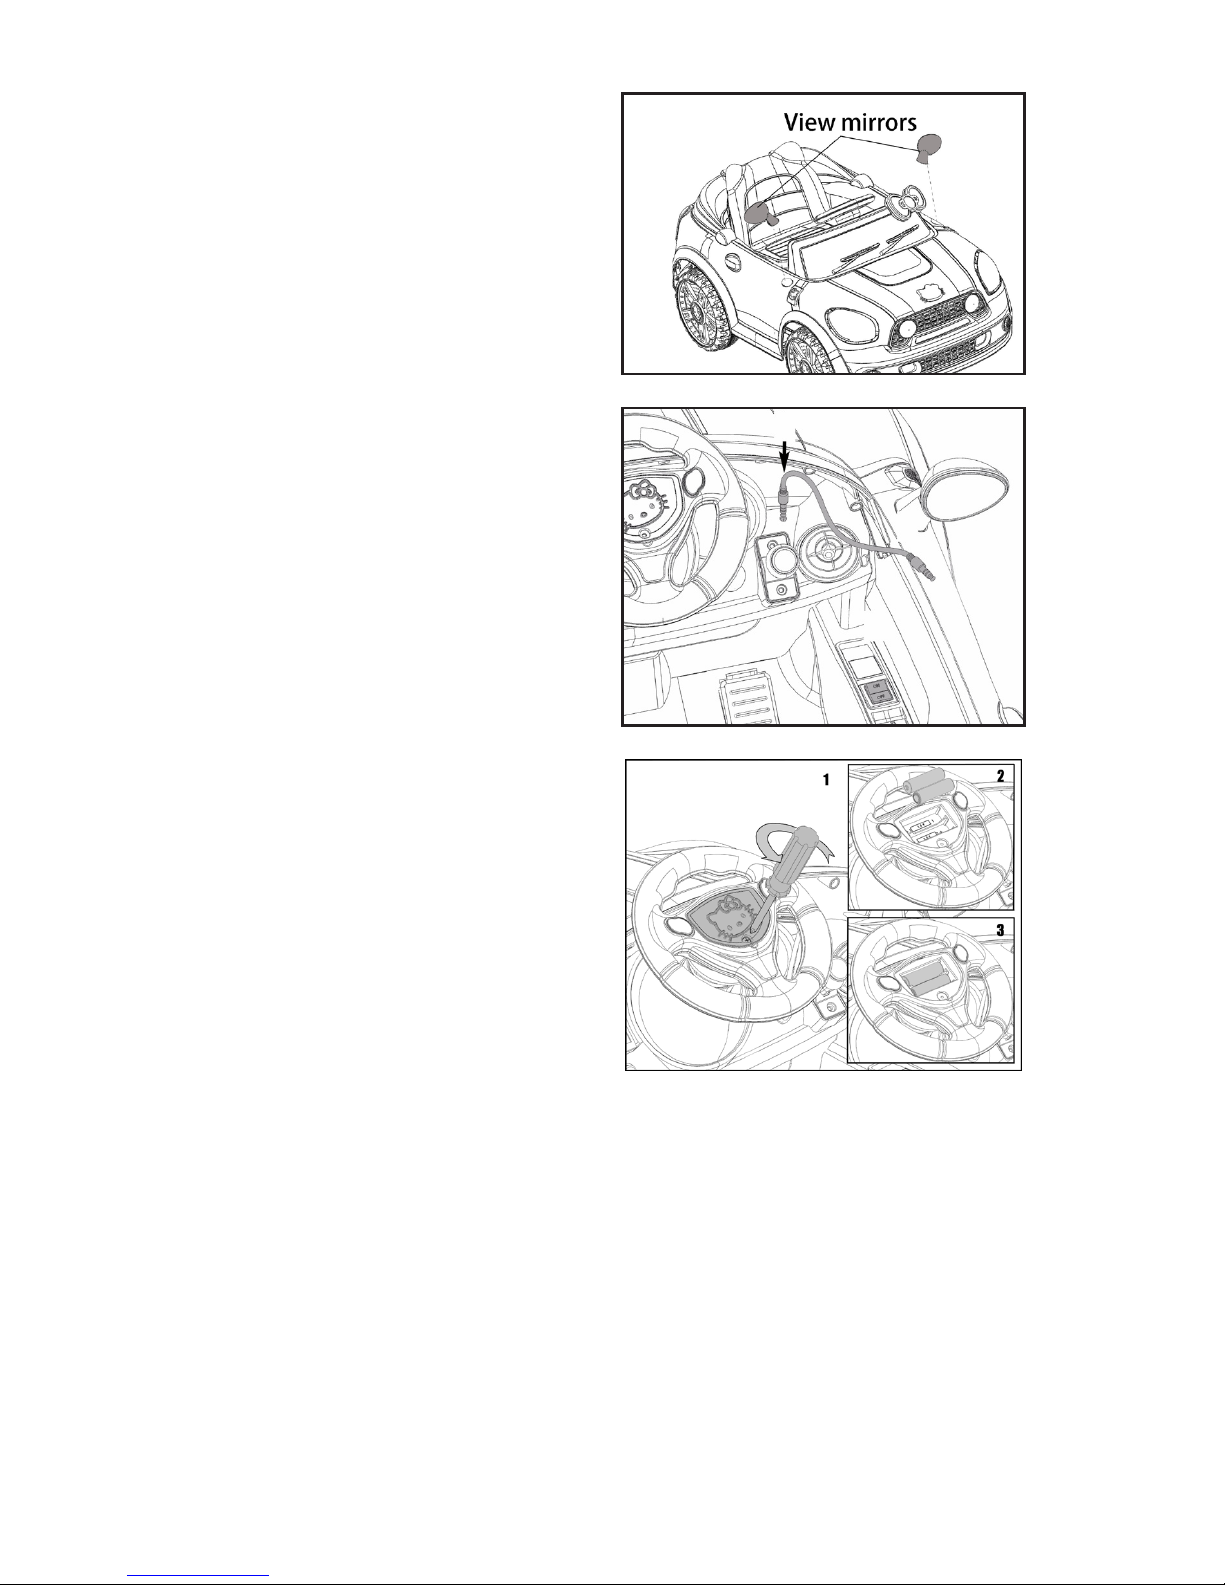
5. View Mirrors Assembly
• Insert the view mirror into the hole in
the vehicle body and push until you
hear this click into place.
• Repeat for the other side.
6. Connect Audio Input Cable
• Plug the audio input cable on AUX
line-in jack on the vehicle. (You can
connect the cable with an audio
device or MP3 player whenever you
want to play.)
• Note: For your long term usage,
please remember to store the audio
input cable in a safe place when
not in use.
7. Install Steering
Wheel Batteries
(Note: Batteries not included)
1. Loosen the screw in the steering
wheel and remove the cover.
2. Insert 2 x 1.5V size AA AM-3 or LR6
batteries as shown.
3. Replace the cover and tighten the
screw to secure it in place.
Battery Notice:
• Install batteries correctly, observing the
polarity (+,-) signs to avoid leakage.
• Do not mix old and new batteries.
• Do not mix batteries of different types:
alkaline, standard (carbon-zinc) or
rechargeable (Ni-MH).
• Remove the batteries from the
battery compartment when the unit
will not be used for an extended
period of time.
• Always remove exhausted batteries
from the batteries compartment.
• Do not dispose of batteries in fire.
• Do not short circuit the supply
terminals
• Replace the batteries when the horn
sounds distorted.
Page 13

12
BATTERY CHARGING
IMPORTANT! Before first time use, charge the battery for at least 18 hours. Charge the
battery for at least 12 hours after each use of the vehicle. Never charge the battery
longer than 30 hours. Over charging or undercharging the battery may shorten battery
life and decrease vehicle running time.
WARNING: Battery can fall out and injure a child if vehicle tips over.
Always use battery retainer.
PREVENT FIRE
• Never modify the electrical system.
• Alterations could cause a fire resulting in serious injury and could also ruin the
electrical system.
• Use of the wrong type battery or charger could cause a fire or explosion resulting
in serious injury.
• Use of non-original components on this vehicle could cause overheating,
fire or explosion.
• The battery must be handled by adults only.
• The battery is heavy and contains sulfuric acid (electrolyte).
• Dropping the battery could result in serious injury.
• Never allow children to charge the battery.
• Battery charging must be done by adults only. A child could be injured by the
electricity involved in charging the battery.
• Never lift or carry the battery by the wires or connector. This can damage the
battery and possibly cause a fire resulting in serious injury. Lift and carry the
battery by the case only.
• Read the safety instructions on the battery.
• Examine the battery, charger and their connectors for excessive wear or damage
each time you charge the battery.
• If damage or excessive wear is detected, do not use the charger or the battery
until you have replaced the worn or damaged part.
CAUTION: Use the charger in dry locations only.
IMPORTANT NOTE
• We recommend that you start charging your battery before beginning assembly
of your new vehicle.
• The battery must be upright while charging.
• The charger is not a toy.
• Do not short-circuit the battery.
• You do not need to remove the battery from your vehicle to recharge it.
• Before charging the battery, examine the battery case for cracks and other
damage which may cause sulfuric acid (electrolyte) to leak during the charging
process. If damage is detected, do not charge the battery or use it in your vehicle.
Battery acid is very corrosive and can cause severe damage to surfaces
it contacts.
Page 14
13
• Do not charge the battery on a surface (such as a kitchen counter top) which
could be damaged by the acid contained inside the battery. Take precautions to
protect the surface on which you charge your battery.
• Use only an original charger (120VAC 60Hz) with an output of 6 VDC (1A) to
charge your vehicle battery.
• Note to Adults: Regularly examine the charger for damage to the cord, plug,
housing or other parts that may result in the risk of fire, electric shock or injury.
• If your battery is old and will not accept a charge, do not leave it in the vehicle.
Always remove a dead battery from the vehicle.
• After the first charge, recharge the battery for at least 12 hours after each use.
Never charge the battery longer than 30 hours. Charge the battery after each use,
regardless of how long the vehicle was used.
• Do not allow the battery to run down completely before charging.
• Charge the battery before storing the vehicle.
• Charge the battery at least once per month, even if the vehicle has not been used.
NOTE:
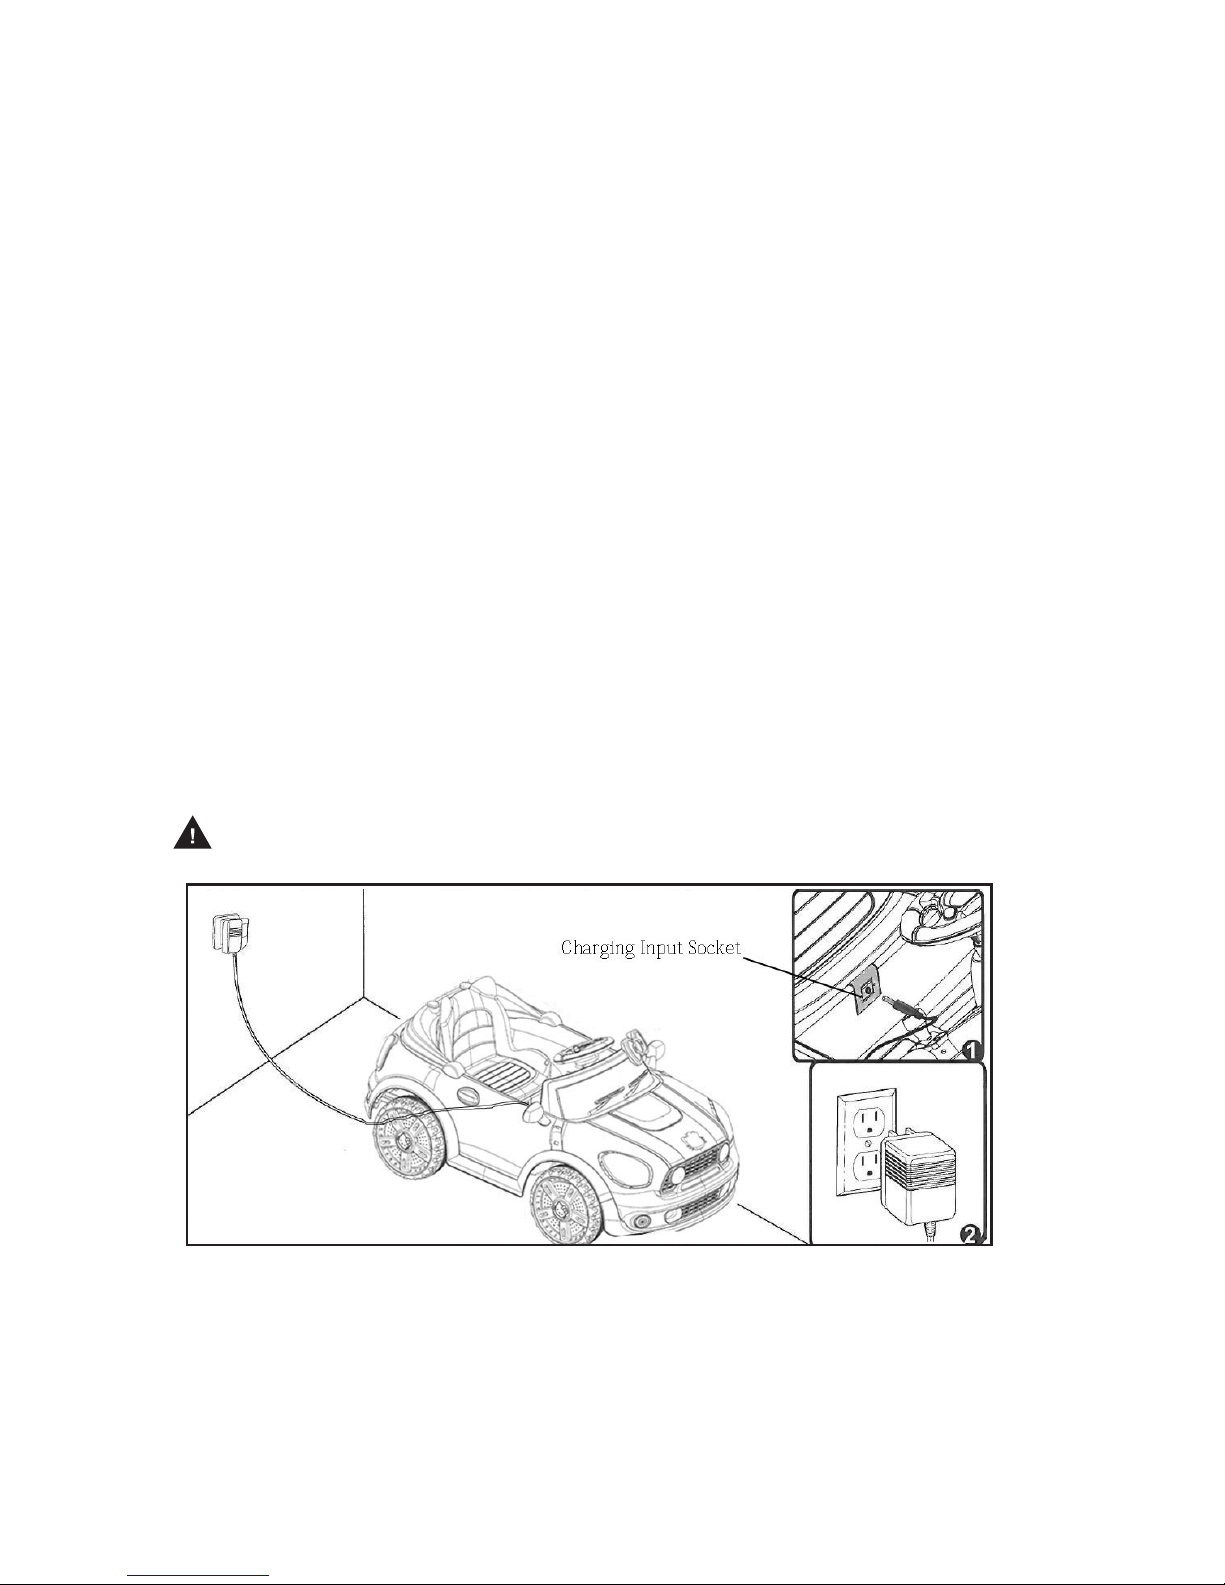
• The charging input socket is UNDER THE SEAT.
• The POWER SWITCH must be switched to the OFF position when charging.
• Recharges after initial charge - Up to 12 hours, and never charge the battery
longer than 30 hours.
• When the vehicle begins to run slowly, recharge the battery.
• After each use or once a month minimum recharge time 12 hours, less than 20
hours at most.
WARNING: Use the charger in dry locations only.
1. Plug the charger port into the input socket (the socket is under the seat).
2. Plug the charger plug into a wall outlet. The battery will begin charging.
Note: Red LED light indicates battery is charging and a green LED light indicates
battery is fully charged. (If the lights on the charger do not light up, check the power
to the outlets.)
Page 15
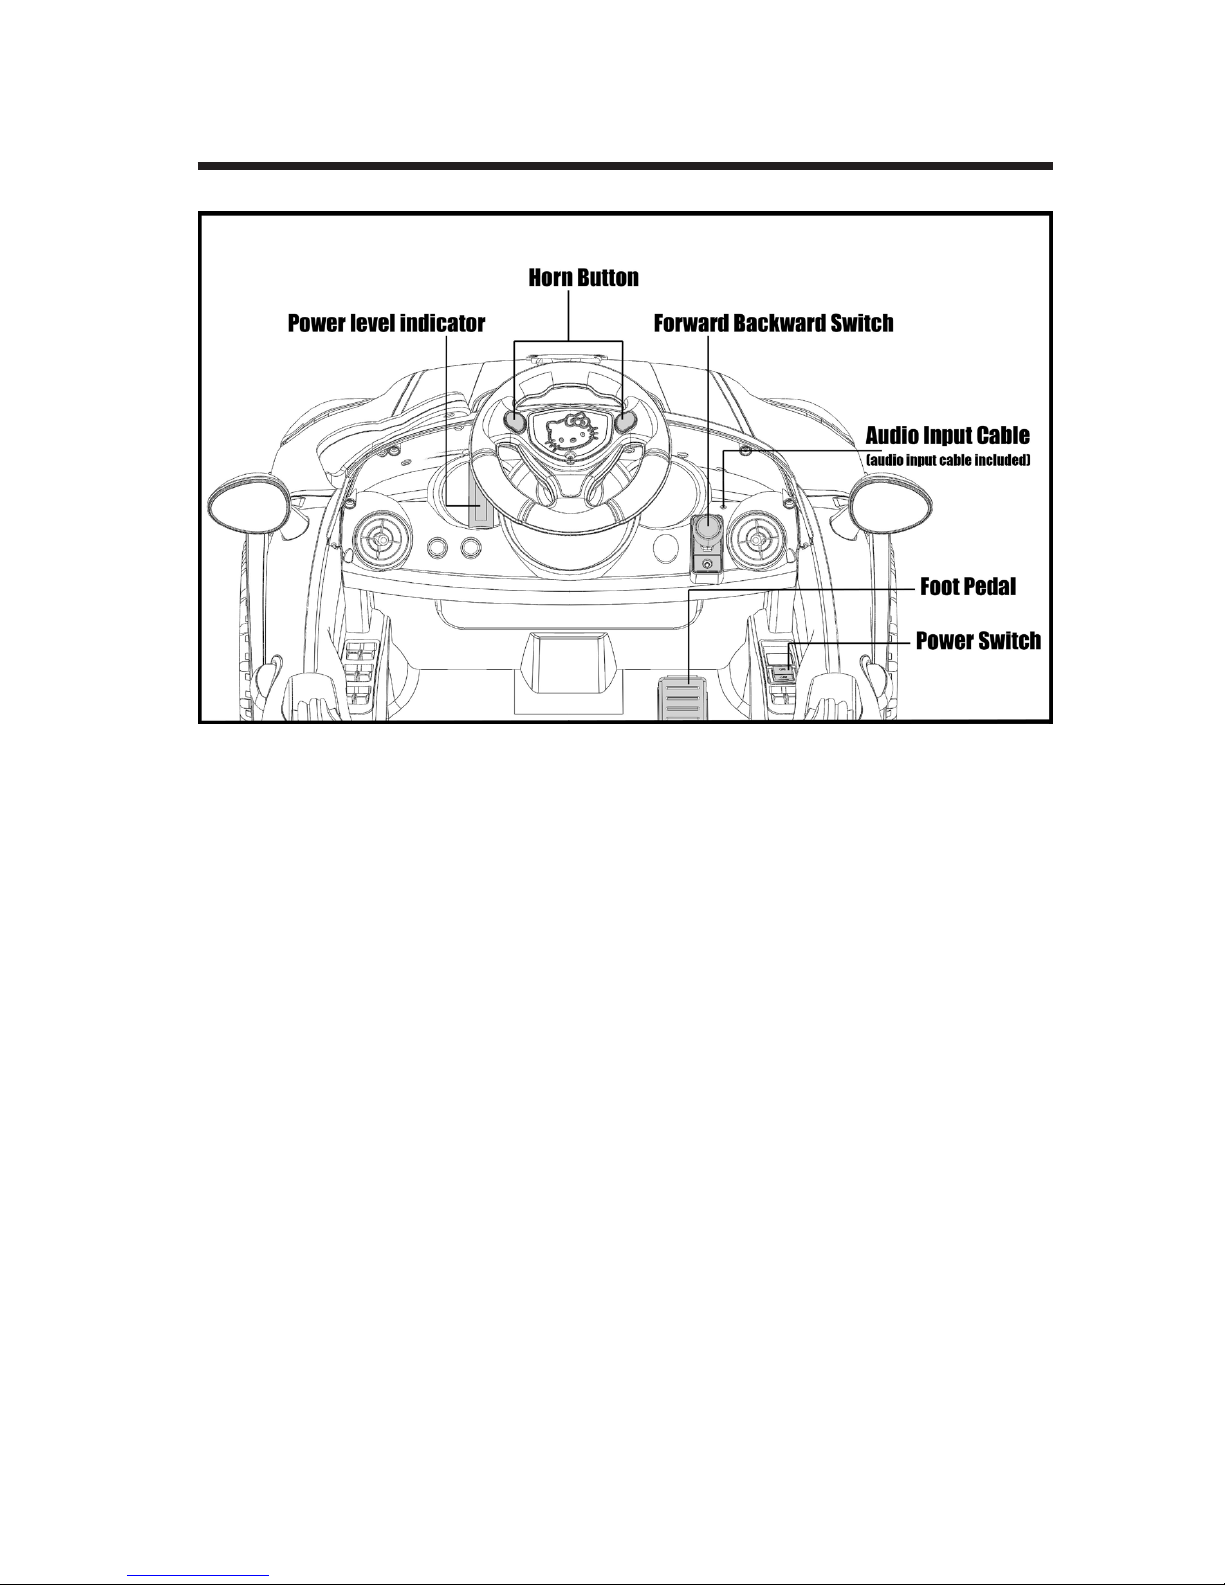
14
HOW TO USE YOUR VEHICLE
FORWARD
1. Move the “Forward-Backward switch” into the “Forward” position.
2. Press the “Foot pedal”, and the vehicle will move forward.
STOP
The vehicle will stop automatically, when your child’s foot is removed from the “Foot
pedal”.
BACKWARD
1. Press the “Forward-Backward Switch” on the “Backward” position.
2. Press the “Foot pedal”, the vehicle drives backward.
POWER LEVEL INDICATOR
The indicator will go from top to bottom to indicate how much power is remaining in
the battery; when just one red Indicator remains, you must recharge the battery.
AUDIO INPUT JACK
Use the audio input cable (included) to connect your MP3 player or other compatible
audio device with this vehicle to listen to and enjoy music and have fun playing.
Page 16
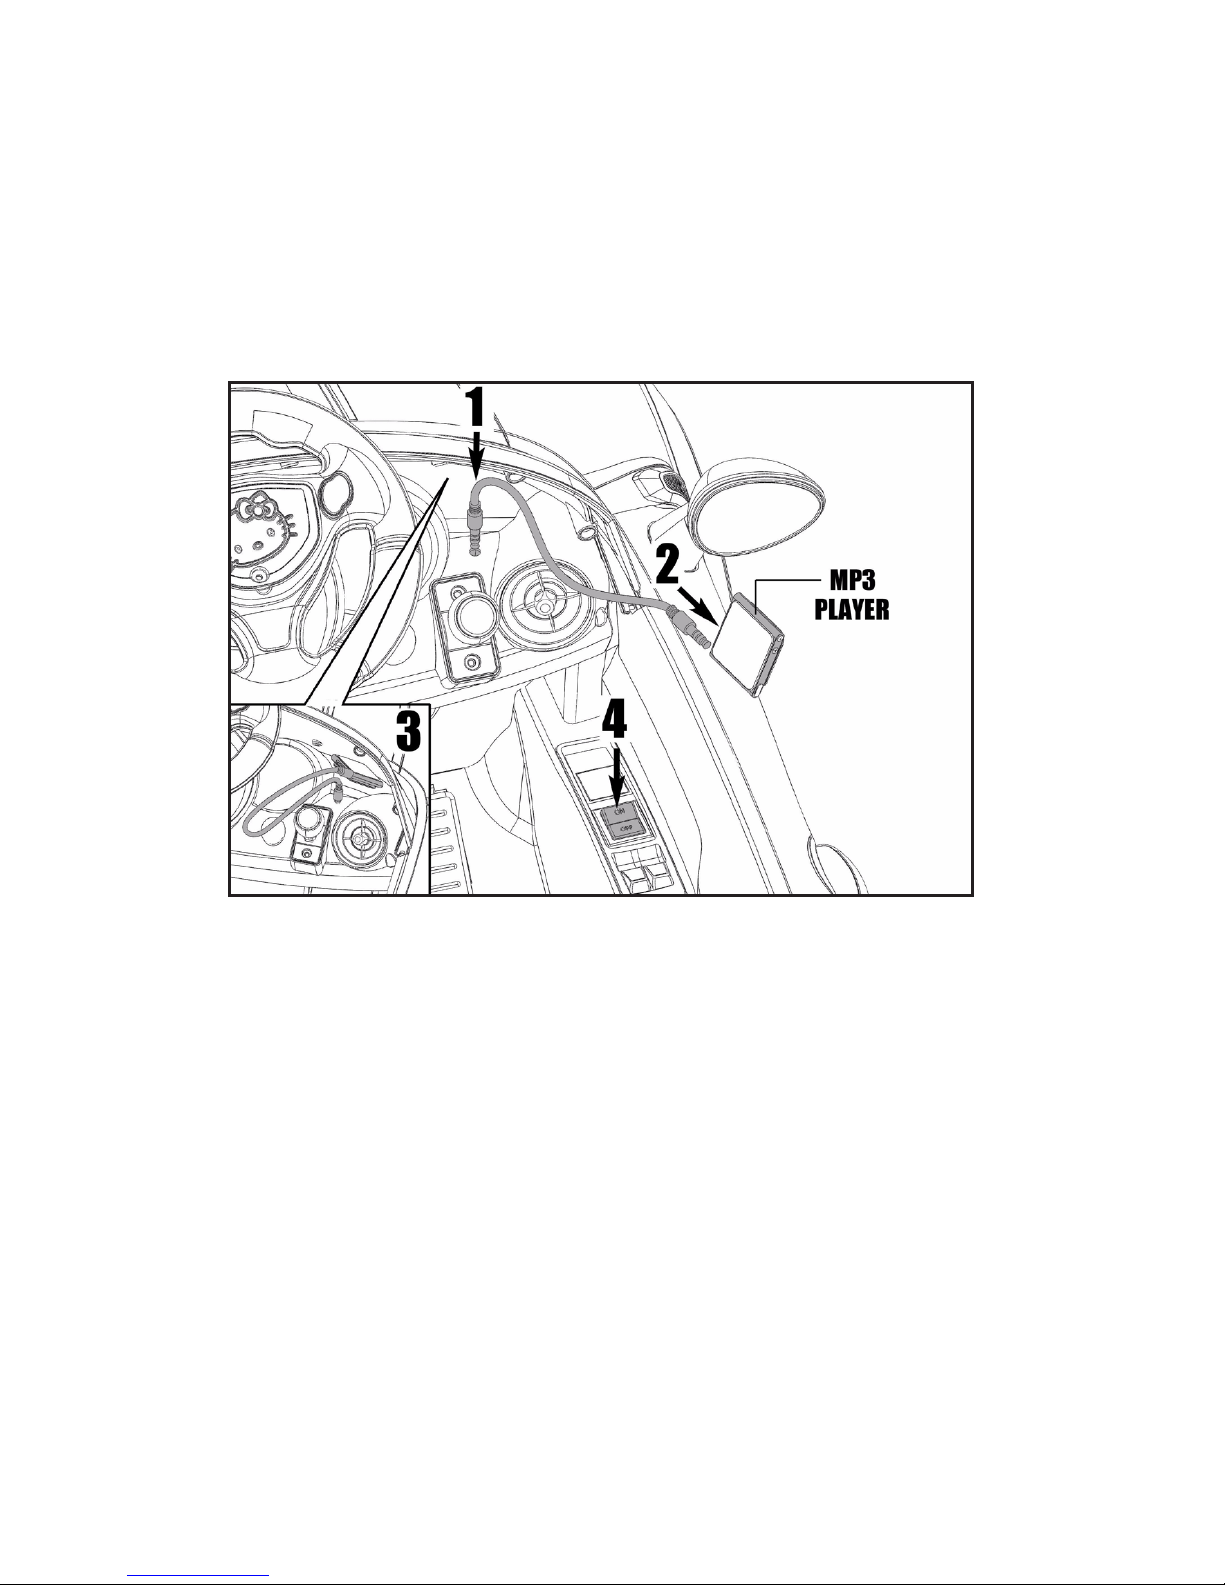
15
1. Plug one end of the audio input cable (included) into the audio input jack on the
vehicle as shown.
2. Plug the other end of the audio input cable into the headphone jack on your audio
device or MP3 player.
Note: You may be able to place your audio device or MP3 player inside the vehicle
windshield as shown. If you do, make sure it is secure before riding.
3. Adjust your audio device or MP3 player volume to low level and turn the power
switch on your vehicle to the “ON” position.
4. Then adjust the volume to increase or decrease its sound level as desired.
Note: MP3 player or Audio device not included.
IMPORTANT
Always stop vehicle when changing the direction to avoid damage to the gears and motor.
• This vehicle has an adjustable play seat belt; please instruct children on how to
fasten the seat belt before using.
• Do not let any child touch the wheels or be near them when the car is moving.
• Make sure you come to a complete stop before changing directions from forward
to reverse.
• To avoid accidents, please inspect the vehicle before riding to ensure that it is in
proper working order and safe to ride.
• Protective equipment should always be worn.
• This toy has no brake; to stop, remove foot from foot pedal.
• Check all the screws, cap nuts and protective coverings regularly and tighten as
required. Check plastic parts on a regular basis for cracks or broken pieces.
Page 17

16
SAFETY PRECAUTIONS
• Your new battery must be charged for at least 18 hours before you use it in your
vehicle for the first time.
• The child must have adult supervision at all times.
• Do not ride on the road, footpaths, near pools, or bodies of water.
• Do not allow children under the recommended age to ride the vehicle; please
refer to the age grading.
• Do not allow riders over the recommended weight rating or aged grading to use
the vehicle.
• To “stop” you must take your foot off the pedal.
• Charging should only be done by an adult.
• An adult must teach the child how to operate the vehicle.
• Do not ride on hills or slopes, or in sand, or on other soft, wet, or slippery surfaces.
• Do not use a different size battery. Use only original or recommended
replacement batteries.
• The vehicle is designed to carry only one rider at a time. Never allow more than
one rider or over-load the vehicle.
• This product should be assembled and checked by adults before use.
• Don’t wash the vehicle with water. Just clean it with a cloth.
Page 18
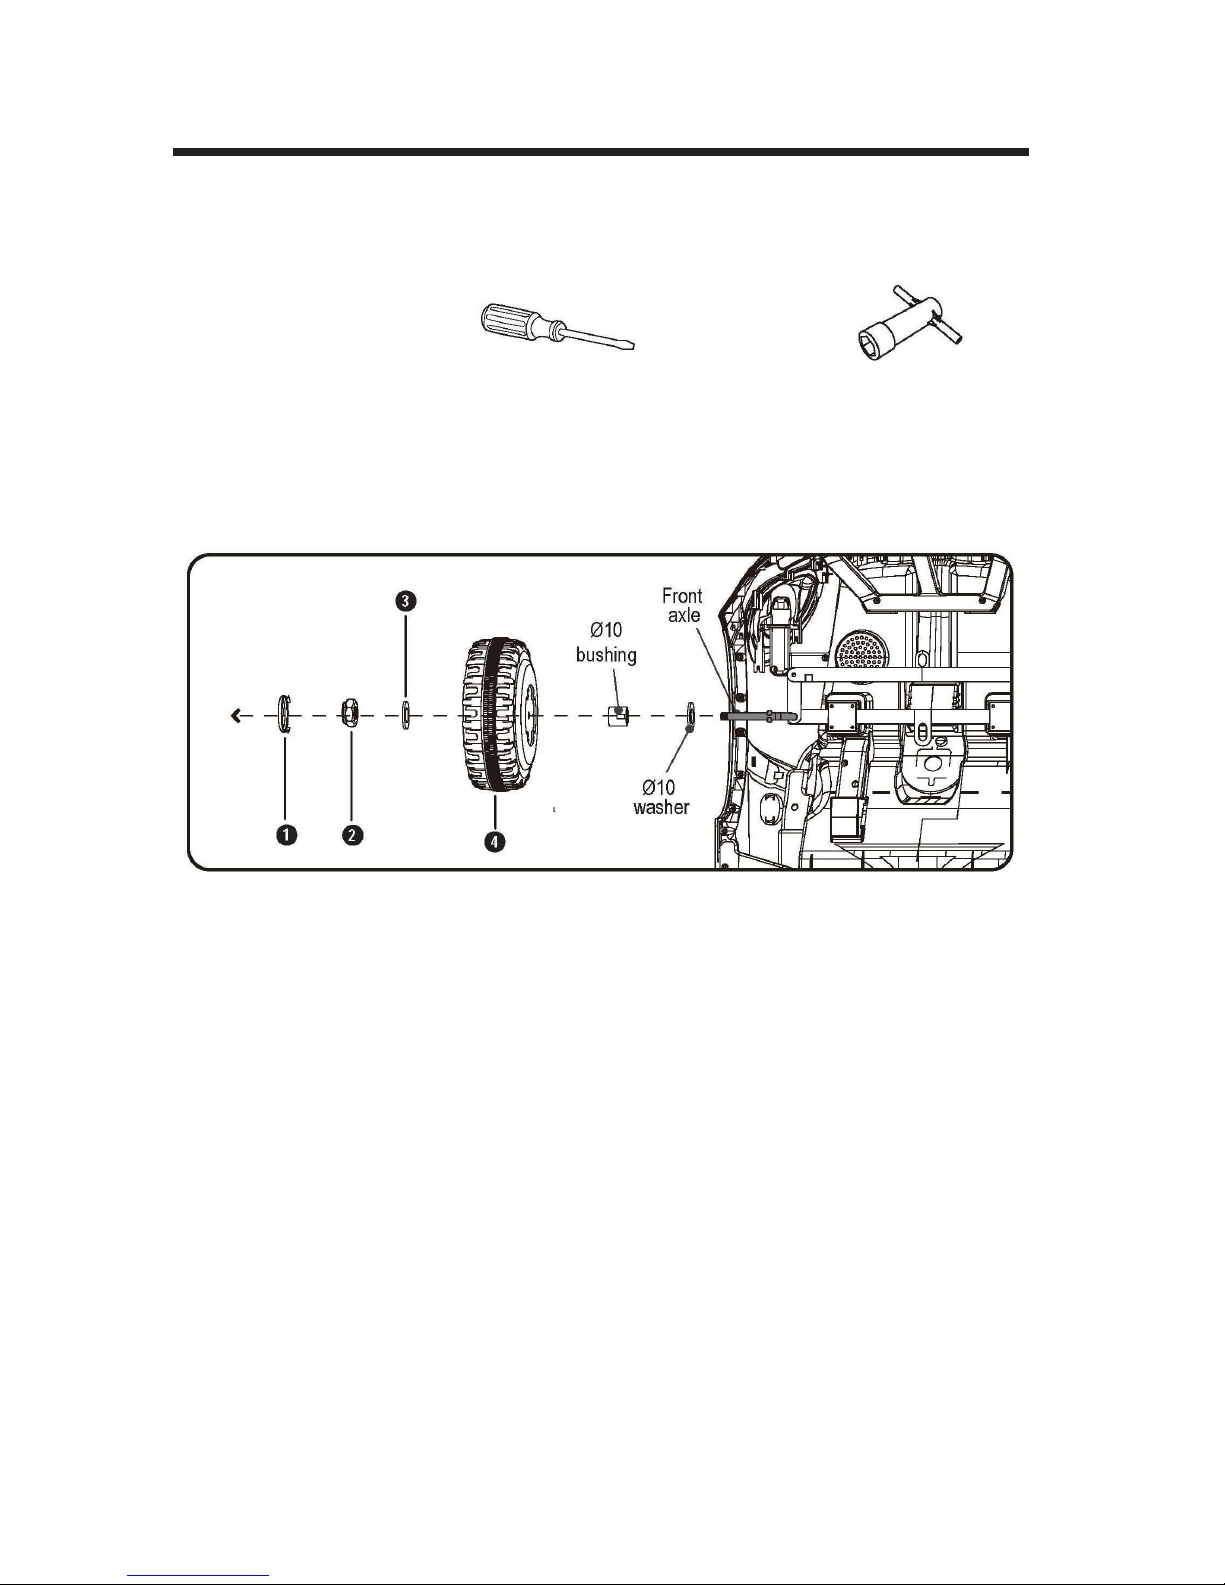
17
DETAILED MAINTENANCE AND REPAIR
Turn power “OFF” before conducting any maintenance procedures.
HOW TO REPLACE FRONT WHEELS
1. Remove the Axle Cap with a flat head screwdriver.
2. Remove the M10 locknut with a 17mm socket wrench.
3. Remove the Ø10 washer.
4. Remove the wheel, then replace with a new one and make sure the Ø10 bushing
sits inside the wheel.
5. Remount the Ø10 washer, M10 locknut and securely tighten the wheel; then
re-insert the axle cap.
Tools Required: Flat head Screwdriver
(not included)
17mm Socket Wrench
(not included)
Page 19
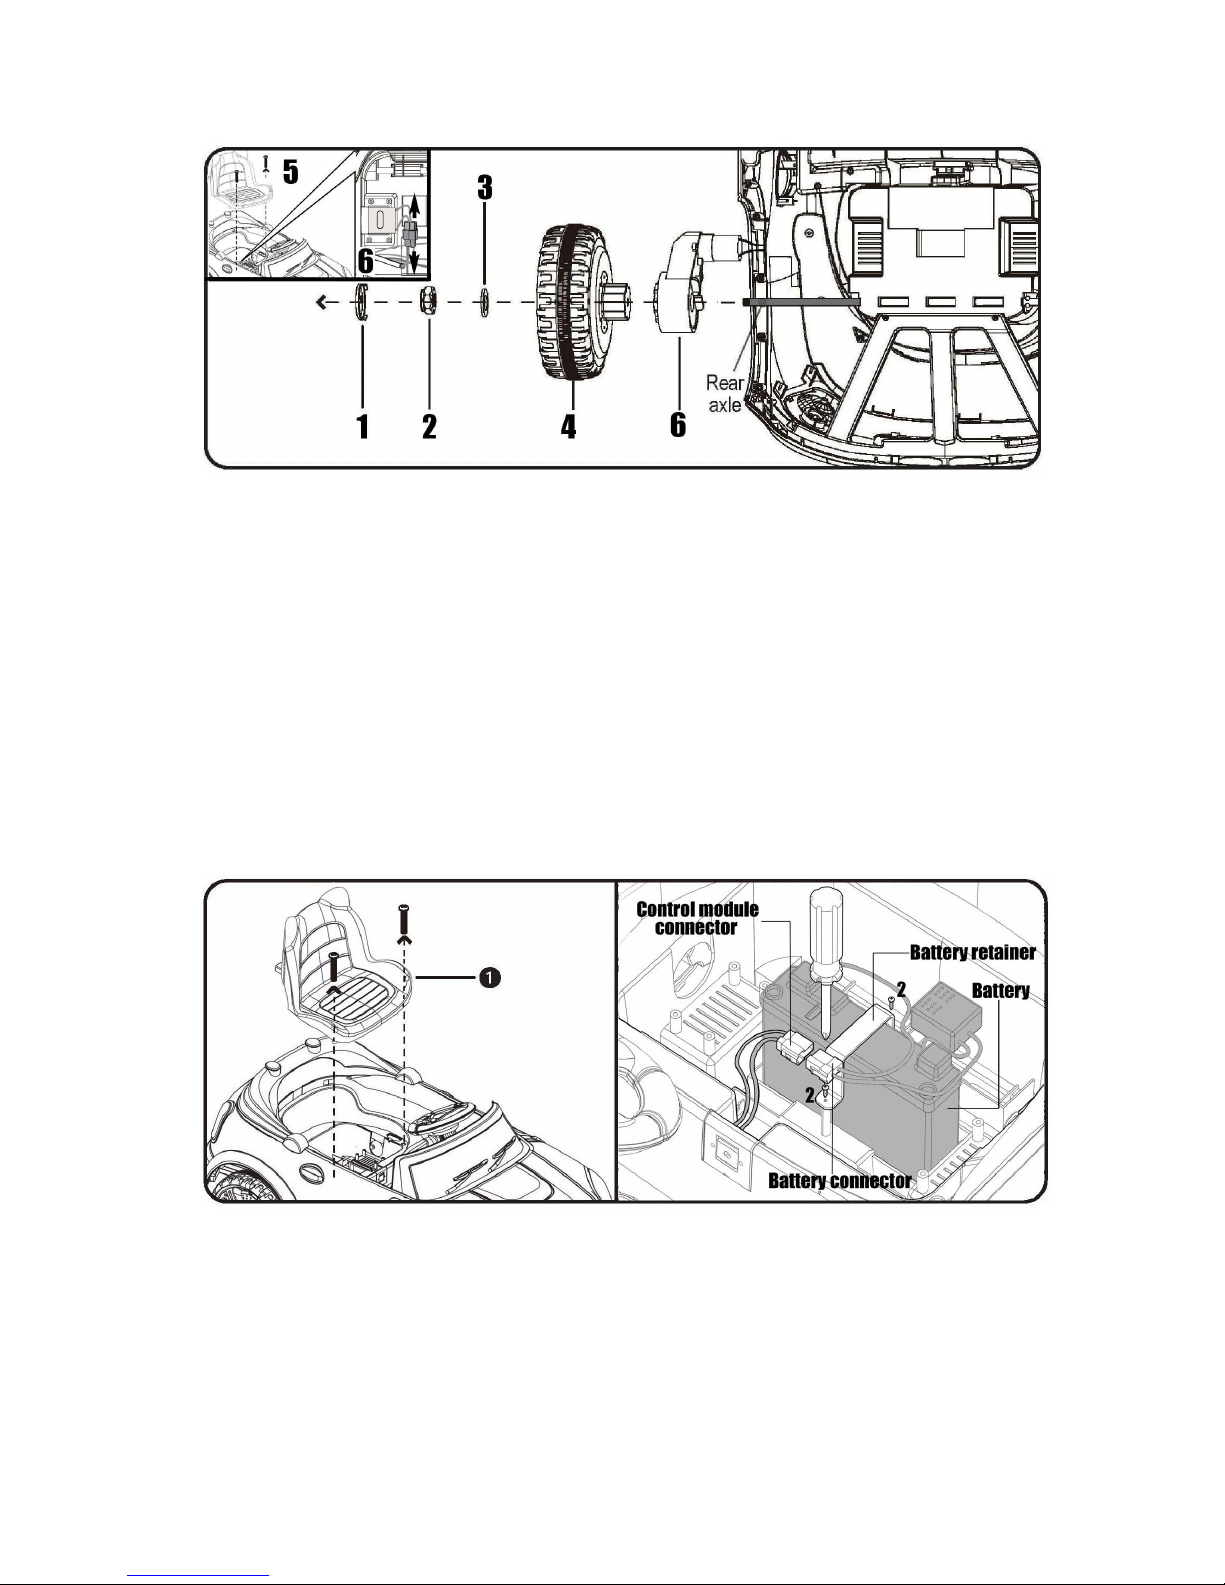
18
HOW TO REPLACE REAR WHEEL AND GEAR BOX
1. Remove the Axle Cap with a flat head screwdriver.
2. Remove the M10 locknut with a 17mm socket wrench.
3. Remove the Ø10 washer.
4. Remove the driving wheel, and replace with new wheel.
If you need to replace the gear box, please proceed to the next step.
5. Unscrew the screws on the seat with a screwdriver and remove the seat.
6. Unplug the power connector that is connected to the gear box.
7. Remove the gear box and replace with a new one.
8. Plug the power connector back into the gear box.
9. Replace the driving wheel, Ø10 washer, and M10 locknut, and tighten securely.
10. Re-insert the axle cap and secure the seat back onto the vehicle with the screws.
HOW TO REPLACE THE BATTERY
1. Unscrew the screws on the seat with a screwdriver and remove the seat.
2. Use a screwdriver to remove the two screws from the battery retainer.
3. Remove the battery.
4. Unplug the power connector (which is connected to the battery).
5. Carefully lift the dead battery and replace it with a new one.
6. Replace the battery retainer and secure it with the screws. Plug the power
connector into the terminal on the battery and replace the seat.
Page 20
19
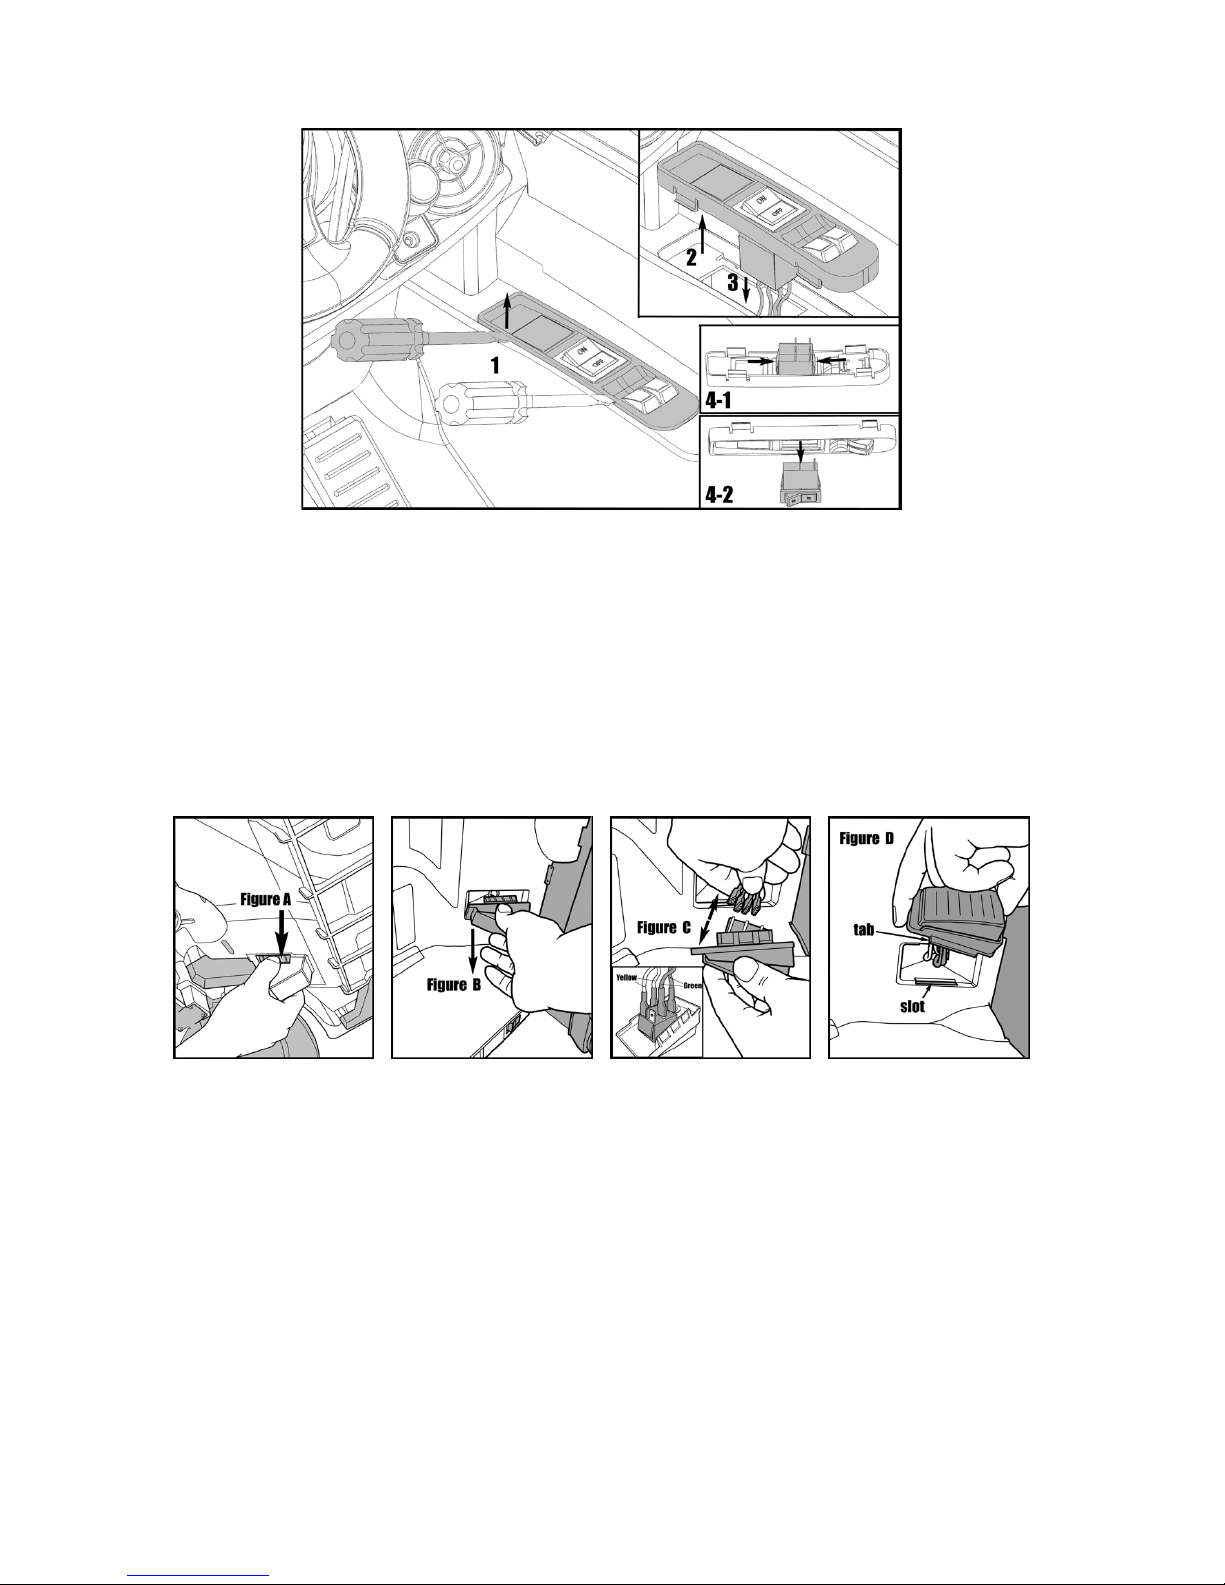
HOW TO REPLACE THE POWER SWITCH
1. Remove the power switch holder with a flat head screwdriver (not included).
2. Take out the holder as shown.
3. Unplug the main connector from the power switch as shown.
4. Push down the clips on both sides of the switch (see 4-1), take out the switch
from the holder (see 4-2), and then replace with a new switch.
5. Repeat the steps in reverse (to re-set the new switch into the holder; re-plug the
switch with the connector (making sure its direction is correct); and then replace
the holder back into the vehicle).
HOW TO REPLACE THE FOOT PEDAL
1. Turn the vehicle body on its side.
2. On the bottom of the vehicle, you will find a compartment which contains the foot
pedal. Push the button on side of the compartment as shown, so as to release
the foot pedal. <see Figure A>
3. Pull the foot pedal off from the other side of the vehicle (the foot pedal side in the cab).
<see Figure B>
4. Disconnect the cables from the foot pedal and replace the old foot pedal with a
new one. <see Figure C>
5. Re-connect the new foot pedal to the cables (make sure that the color of the cables follows the indication in “Figure C” to ensure that the cables are connected
in the right position). Re-insert the foot pedal into the foot pedal compartment on
the deck of the vehicle (first make sure the tab on the foot pedal is being inserted
into the slot as shown in the diagram), then push the foot pedal all the way in.
<see Figure D>
Page 21

20
BATTERY CARE AND DISPOSAL
Do not store the battery in temperatures above 75° F (23.5° C) or below 32° F (0°C).
THIS SCOOTER CONTAINS SEALED LEAD ACID BATTERIES
WHICH MUST BE RECYCLED IN ACCORDANCE TO
YOUR LOCAL AND STATE LAWS. PLEASE CAREFULLY
READ AND UNDERSTAND THE FOLLOWING DISPOSAL
INSTRUCTIONS:
Disposal: This product contains sealed lead acid batteries which must be disposed of
or recycled in an environmentally safe manner. Do not dispose of the batteries in your
household trash. Do not dispose of the batteries in a fire, as the battery may explode
or leak. The incineration, disposal in landfill and/or placing sealed lead acid batteries
with household trash is prohibited by law in most areas. Return exhausted batteries to
a state or federal approved lead acid battery recycler or check with your local retailer
of vehicle batteries. If you live in Florida or Minnesota, it is prohibited by law to throw
away lead-acid batteries in the municipal waste stream.
WARNING
• Do not mix old and new batteries. Do not mix alkaline, standard (carbon-zinc), or
rechargeable (nickel-cadmium) batteries.
• Do not store the battery in temperatures above 75° F (23.5° C) or below 32° F (0°C).
• If a battery leak develops, avoid contact with the leaking acid and place the battery
in a plastic bag. See instructions above for proper disposal. If acid comes into
contact with skin or eyes, flush with cool water for at least 15 minutes and contact
a physician.
CARE
• If a battery leak develops, avoid contact with the leaking acid and place the
damaged battery in a plastic bag. See information above for proper disposal.
• If acid comes in contact with skin or eyes, flush with cool water for at least 15
minutes and call a physician.
• If acid is internally ingested, give water, milk of magnesia or egg whites
immediately. Never give emetics or induce vomiting. Call a physician.
• Leaving the battery in a discharged condition will ruin it.
• Always remove an exhausted battery from the vehicle. Battery leakage and
corrosion can damage the vehicle.
• Do not store the battery on a surface (such as a kitchen counter top) which could be
damaged by the acid contained inside the battery. Take precautions to protect the
surface on which you store the battery.
• Do not store the battery in temperatures above 75° F (23.5° C) or below 32° F (0°C).
• Use only a 6 volt (7.0Amp/Hr.) battery. Remember to charge the new battery for at
least 18 hours before first use.
• Prevent the battery from moving freely inside the battery compartment. Always use
the battery retainer to secure the battery in the battery compartment.
• Examine the battery, charger and their connectors for excessive wear or damage
each time you charge the battery. If damage is detected, do not use the charger or
the battery until you have replaced the worn or damaged part.
Page 22

21
MAINTAINING YOUR VEHICLE
Occasionally use a lightweight oil to lubricate moving parts such as wheels and
the steering linkages.
Park the vehicle indoors or cover it with a tarp to protect it from wet weather.
Keep the vehicle away from sources of heat, such as stoves and heaters. Plastic parts
may melt.
ADULTS ONLY: Recharge the battery after each use. Recharge the battery at least once
a month when the vehicle is not being used.
DO NOT wash the vehicle with a hose. DO NOT wash the vehicle with soap and water.
DO NOT drive the vehicle in rainy or snowy weather. Water will damage the motor,
electrical system, and battery.
Clean the vehicle with a soft, dry cloth. To restore shine to plastic parts, use a non wax
furniture polish. DO NOT use car wax. DO NOT use abrasive cleaners.
DO NOT drive the vehicle in loose dirt, sand or fine gravel, which could damage
moving parts, motors or the electric system.
CAUTION Charge the battery before storing your vehicle, otherwise the
battery will be damaged.
ABOUT THERMAL FUSES
Your vehicle’s 6 Volt battery is equipped with a built-in thermal fuse. The thermal fuse
is a self-resetting safety device which automatically “trips” and shuts down operation
of the vehicle if the vehicle is overloaded or the driving conditions are too severe.
Once a fuse has “tripped,” DO NOT CONTINUOUSLY PUSH ON THE POWER BUTTON. It
will automatically reset itself after approximately 2 minutes and allow the vehicle to
resume normal operations. To avoid repeated automatic shut-downs, do not overload
the vehicle by exceeding the 65 Ibs (29.5 kgs) maximum weight capacity or by towing
anything behind the vehicle. Avoid severe driving conditions, such as driving up slopes
or running into fixed objects, which can cause the wheels to stop spinning while
power is still being supplied to the motor.
Page 23

22
TROUBLESHOOTING GUIDE
Problem
Vehicle does not run
Vehicle was running
but suddenly stopped
Possible Cause
Undercharged battery
Tripped thermal fuse
Electrical switch damage
Dead battery
Motor damage
Loose wires or connectors
Solution
Charge the battery. A new battery should
have been charged for at least 18 hours
before using the vehicle for the first time.
After first-time use, recharge the battery
for at least 12 hours after each use. Never
charge the battery longer than 30 hours.
Check all connectors. Make sure the battery
connector is tightly plugged into the charger
connector, and that the charger is plugged
into the wall outlet.
Make sure that there is power flow to the
wall outlet.
The built-in thermal fuse may “trip” and shut
down operation of the vehicle if the vehicle
is overloaded or the driving conditions too
severe. Once a fuse has “tripped”, release
the button on the handlebar and wait 25
seconds before operating the vehicle again.
To avoid repeated automatic shutdowns,
do not overload the vehicle by exceeding
the 65 Ib maximum weight capacity or by
towing anything behind the vehicle. Do not
drive up hills or run into fixed objects, which
can cause the wheels to stop spinning while
power is still being supplied to the motors.
The electrical switches can become corroded
due to exposure to water or moisture, or can
jam due to loose dirt, sand or gravel.
Check all wires and connectors. Make sure
the battery connector is tightly plugged into
the control module connector and that there
are no loose wires around the motor.
If your battery is old or if you have not
followed Battery Care instructions, your
battery may be dead. add: “Replace only
with an original 6 Volt (7.0 Amp/Hr.) battery
with built-in thermal fuse. Do not use nonoriginal substitute parts.
Visit the Dynacraft website and replace with
a new motor.
Check all wires and connectors. Make sure
the battery connector is tightly plugged into
the control module connector, and that there
are no loose wires around the motors.
Page 24

23
Problem
Short run time
(Less than 15 minutes
per charge)
Possible Cause
Tripped thermal fuse
Undercharged battery
Overcharged battery
Battery is old and will not
accept full charge
Tripped thermal fuse
Solution
The built-in thermal fuse may “trip” and shut
down operation of the vehicle if the vehicle
is overloaded or the driving conditions too
severe. Once a fuse has “tripped”, release
the button on the handle and wait 25
seconds before operating the vehicle again.
To avoid repeated automatic shutdowns, do
not overload the vehicle by exceeding the 65
Ibs maximum weight capacity or by towing
anything behind the vehicle. Do not drive
up hills or run into fixed objects, which can
cause the wheels to stop spinning while
power is still being supplied to the motors.
Charge the battery. A new battery should
have been charged for at least 18 hours
before using the vehicle for the first time.
After first-time use, recharge the battery
for at least 12 hours after each use. Never
charge the battery longer than 30 hours.
Check all wires and connectors. Make sure
the battery connector is tightly plugged into
the control module connector, and that the
charger is plugged into the wall.
Make sure that there is power flow to the
wall outlet.
Do not charge the battery longer than 30
hours. If you suspect that your battery
is damaged as a result of overcharging,
change with new new original 6 Volt (7.0
Amp/Hr.) battery with built-in thermal fuse.
Do not use non-original substitute parts.
Even with proper care, a rechargeable
battery does not last forever. Average battery
life is 1 to 3 years depending on vehicle use
and use conditions. Replace only with an
original 6 Volt (7.0 Amp/Hr.) battery with
built-in thermal fuse. Do not use non-original
substitute parts.
The built-in thermal fuse may “trip” and shut
down operation of the vehicle if the vehicle is
overloaded or the driving conditions are too
severe. Once a fuse has “tripped”, release
the button on the handle and wait 25
seconds before operating the vehicle again.
To avoid repeated automatic shutdowns, do
not overload the vehicle by exceeding the
65 Ibs maximum weight capacity or by
towing anything behind the vehicle. Do not
drive up hills or run into fixed objects, which
can cause the wheels to stop spinning while
power is still being supplied to the motors.
Page 25

24
Problem
Vehicle runs sluggishly
Sometimes the vehicle
doesn’t run, but other
times it does
When the button is
pressed, the vehicle
won’t run without a push
The battery’s thermal
fuse constantly “trips”,
but the vehicle is not
overloaded and the
driving conditions are
not severe
Charger gets warm
during use
Battery makes a
sizzling or gurgling
noise when charging
Possible Cause
Undercharged battery
Battery needs charging
Battery is old and will not
accept a full charge
Vehicle is overloaded
Driving conditions too
stressful
Loose wire or connector
Damaged battery
It is normal for some
chargers to get warm during
use and is not reason for
concern. Some chargers do
not get warm during use
It is normal for some
batteries to make noise and
swell slightly while charging
and is not reason for concern
Solution
Charge the battery. A new battery should have
been charged for at least 18 hours before
using the vehicle for the first time. After firsttime use, recharge the battery for at least 12
hours after each use. Never charge the battery
longer than 30 hours. Check all connectors.
Make sure the battery connector is tightly
plugged into the charger connector, and that
the charger is plugged into the wall outlet.
Make sure that there is power flow to the
wall outlet.
Be sure to charge the battery after each use.
Even with proper care, a rechargeable battery
does not last forever. Average battery life is 1
to 3 years depending on vehicle use and use
conditions. Replace only with an original 6
Volt (7.0 Amp/Hr.) battery with built-in thermal
fuse. Do not use non-original substitute parts.
Make sure you do not overload the vehicle
by allowing more than one rider at one time,
exceeding the 65 Ibs. maximum weight
capacity, or by towing objects behind the
vehicle. If the vehicle is overloaded, the
built-in thermal fuse in the battery may “trip”,
and automatically shut down operation of
the vehicle for approximately 25 seconds.
Correct the condition that lead to the overload
and adjust the driving conditions to prevent
repeated automatic shutdowns.
Use only on generally level ground.
Check all wires around the motors and all
connectors to make sure they are tight.
Check all wires around the motors and all
connectors to make sure they are tight.
Replace with new battery. Replace only with
an original 6 Volt (7.0 Amp/Hr.) battery with
built-in thermal fuse. Do not use non-original
substitute parts.
No action required.
If your charger does not get warm during
use, it does not mean that it is not working
properly.
No action required.
If your battery does not make noise or swell
slightly while charging, it does not mean that
it is not working properly.
Page 26

25
WARRANTY
Limited Warranty
Subject to the following limitations, all electric ride-on toys manufactured for
Dynacraft are warranted to the original purchaser to be free of defects in materials
and workmanship for a period of 90 days from the date of purchase.
No other express or implied warranty is given. Dynacraft will replace without charge
those component parts that are determined by Dynacraft to be defective in materials
or manufacture under normal use and service during the warranty period. The original
purchaser will be responsible for any and all labor charges connected with the repair
or replacement of component parts.
This Limited Warranty does not apply to normal wear and tear, such as to wheels/tires,
cables, or other components that wear with use, nor to claimed defects, malfunctions,
or failures that result from abuse, neglect, improper assembly, improper maintenance,
lack of maintenance, improper storage alteration, modification, collision, crash, or
misuse of the Dynacraft electric ride-on toys.
Dynacraft does not encourage stunting, trick riding, ramp riding, jumping, aggressive
riding, riding on severe terrain, riding in severe climates, riding with heavy loads,
commercial activities, or other similar activities; such use is inherently dangerous,
can cause serious injury to the rider, and if done, it is with the rider and/or the rider’s
parent’s express and implied assumption of the risk of such use, and Dynacraft shall
not have any responsibility for any resulting break down of the ride-on toy or its
components, or for any rider injuries that occur during such use.
Riding an electric ride-on toy can be inherently dangerous such that bodily injury or
even death can occur, especially if the rider and/or the rider’s parent does not perform
the safety and maintenance checks recommended in this manual, if the rider does
not wear a helmet, if the rider does not follow all applicable laws and rules, if the
rider goes into traffic, rides double, or engages in aggressive, stunt or extreme terrain
riding. Parents that allow their children to ride taking such actions will assume their
own risk and the risk of injury to their children, and Dynacraft will not be responsible.
THE PURCHASE OF THIS ELECTRIC RIDE-ON TOY WILL CONFIRM THE BUYER’S
AGREEMENT THAT DYNACRAFT’S LIABILITY UNDER THIS WARRANTY SHALL BE NO
GREATER THAN THE AMOUNT OF THE ORIGINAL PURCHASE PRICE AND IN NO EVENT
SHALL DYNACRAFT BE LIABLE FOR INCIDENTAL OR CONSEQUENTIAL DAMAGES.
This Limited Warranty will be void if the product is ever:
• used in a manner other than for recreation or transportation
• modified in anyway
• used as a rental
Dynacraft does not offer an extended warranty; if you have purchased an extended
warranty, it must be honored by the store from which you purchased the ride-on toy or
the appropriate party. For your records, keep your original sales receipt with this manual.
Page 27
26
Dynacraft
Customer Service
1.800.288-1560
7AM TO 4PM PACIFIC TIME
Please have the following information available when you call:
Model Number: (sample: 8595-95)
Production Date: (sample: 2003.10.10)
Serial Number: (sample: 03TD5899988)
Having this information is required and helps us handle your call more effectively.
DO NOT return this item to the store.
Please call Dynacraft for assistance.
STOP
Dynacraft BSC, Inc.
89 S. Kelly Rd., American Canyon, CA 94503
Call Toll Free 1.800.288-1560
Monday - Friday 7AM TO 4PM PACIFIC TIME
www.dynacraftbike.com
©2012 All Rights Reserved
2012 Printed in China
 Loading...