

Page 1
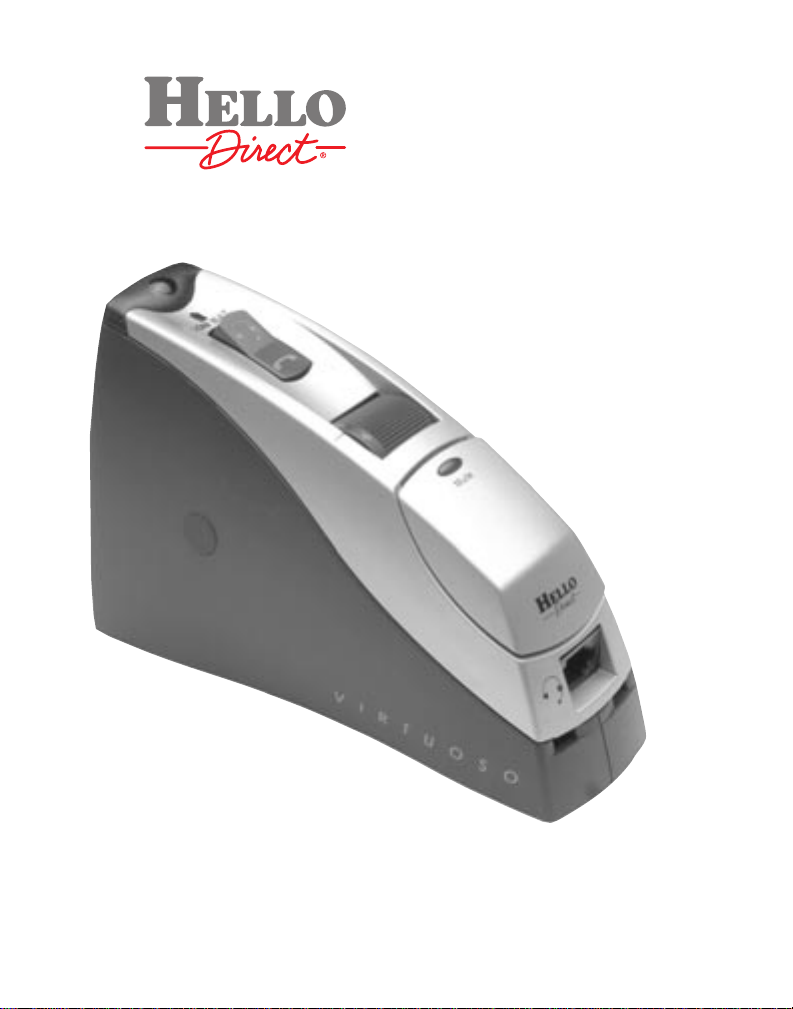
VIRTUOSO
™
MULTIMEDIA
AMPLIFIER
#7475
USER
GUIDE
Page 2
Thank you for purchasing the Hello Direct Virtuoso Multimedia Amplifier. The Virtuoso
is the only amplifier that lets you simultaneously use your headset to talk on the phone
while recording or playing back from virtually any source.To use the multimedia
capabilities of the Virtuoso, you need the Multiplier module.The Multiplier module lets
you use your headset with your phone and computer or other audio device at the flick of
a switch.If you didn’t purchase it as part of the Virtuoso multimedia headset system, it is
available separately (Item # 7476).
VIRTUOSO FEATURES
•LearnIt™ setup: automatically sets itselfto be compatible with most phones at the
press of a button.
•Locking,flashing mute button lets you hear callers while preventing them from
hearing you.
•Receive volume roller adjustment.
•Transmit volume digital switch.
•Quick disconnect headset cord.
•In-use light.
•Uses batteries or AC adapter. (Both are included.)
•Low battery indicator.
•Handset/headset switch.
•Headset hanger.
•AUX jack for use with the optional BUSY Indicator (sold separately,Item # 1608).
•Works with Touch-N-Talk handset lifter (sold separately, Item # 1275).
2
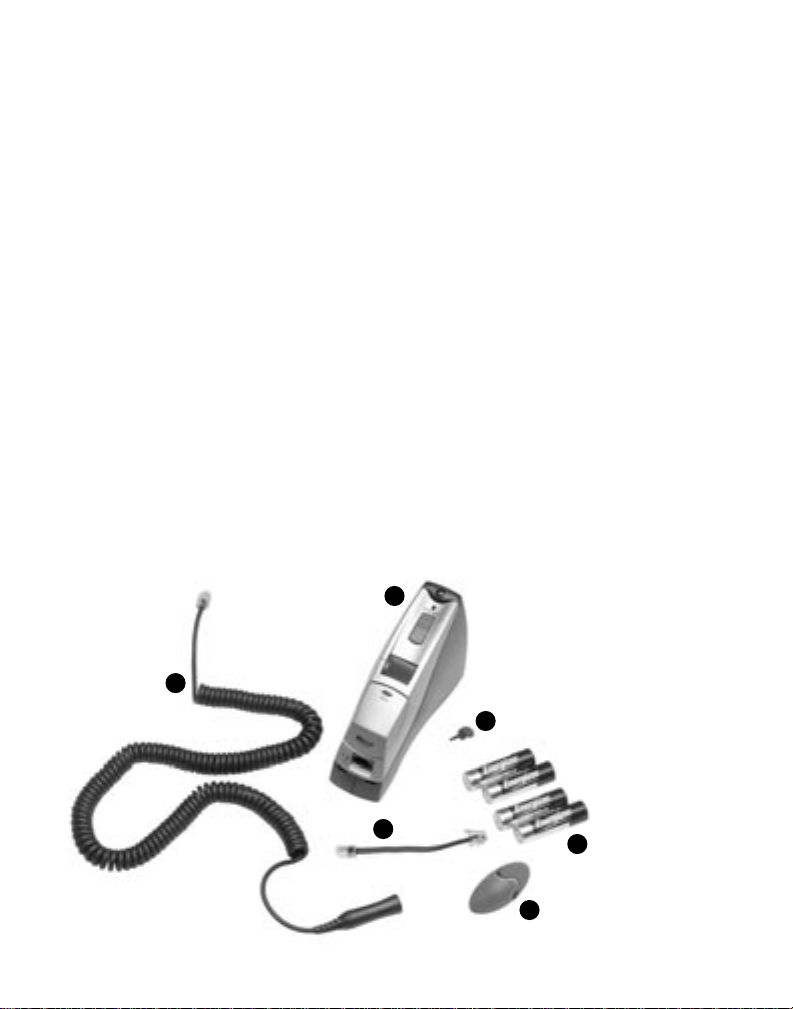
Your Virtuoso includes:
1. Virtuoso amplifier
2. Quick disconnect cord
3. Short 18" cord
4. 4 AA batteries
5. Power saver plug
6. Headset hanger
Not shown:
AC adapter
User guide
1
2
3
4
5
6
18" straight Cord
Page 3
SETTING UP YOUR VIRTUOSO AMPLIFIER
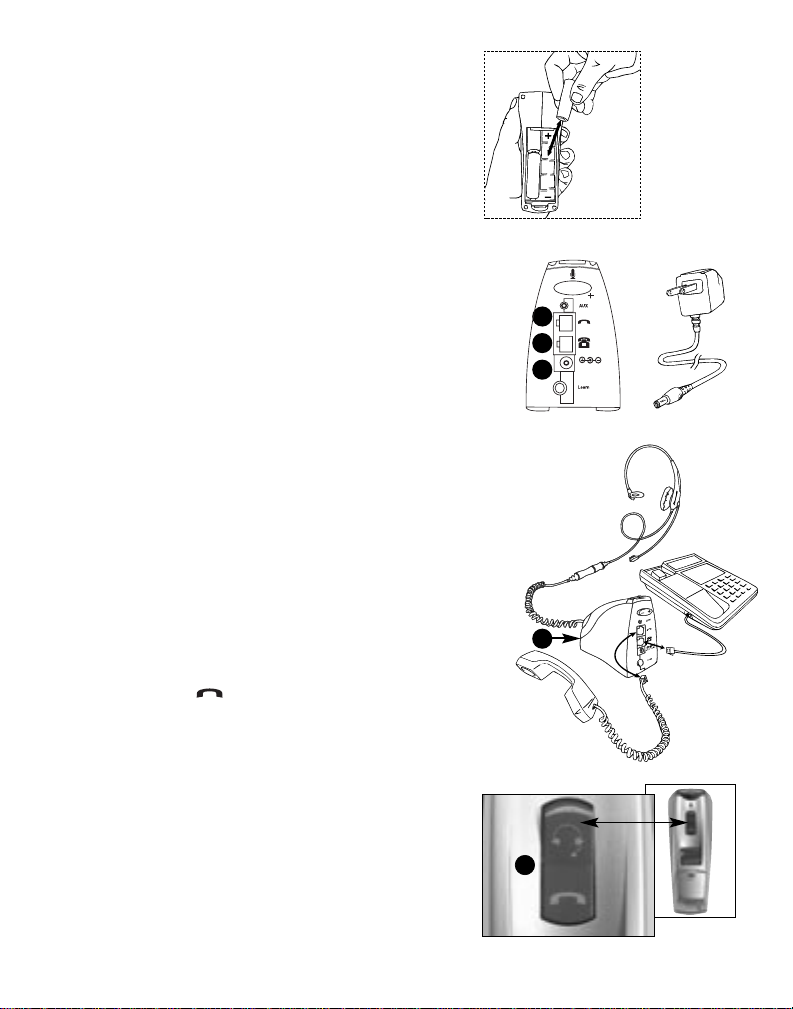
Step 1. Install the batteries in your Virtuoso or plug
in the power cord.
•Turn the Virtuoso unit over and open the battery
door to install the batteries.Insert the supplied
4 AA batteries in the battery well as shown in
Figure 1.Be sure to align the “+”end of the
battery with the “+”sign on the label.
•You do not need to install batteries to use the
AC adapter.Plug the AC adapter into a standard
electrical outlet. Insert the AC adapter plug into
the Virtuoso power jack (A,Figure 2) on the back
of the Virtuoso. If you use a power strip,Hello
Direct recommends you choose a high quality
model.
Step 2.Connect the Virtuoso to your telephone.
•Do not unplug the telephone from the wall jack.
•Disconnect the handset (receiver) cord from the
phone’s base and plug it into jack (C), Figure 2,
on the back of the Virtuoso.
•Plug the Virtuoso’s short 18" cord into phone
jack (B) on the back of Virtuoso and into the
handset cord’s jack on the phone.
•Plug the long coiled quick disconnect cord into
the jack (D,Figure 3) on the front of the Virtuoso.
•Plug your headset into the 3.5 mm female jack
on the long cord.
•Hang up the handset.
Step 3.Test the connections.
•Move the handset/headset switch (E,Figure 4)to
the handset position.
• Lift the handset and listen for dial tone.If you
hear a dial tone,the connections are fine. Hang
up the handset.
•Ifyou hear no dial tone,recheck all connections
from Step 1.If, after rechecking all connections,
you still don ’ t heara dial tone, call 1-800-444-3556
toll free for Hello Direct Technical Support.
3
Figure 1
Figure 3
Figure 4
C
B
A
E
D
Figure 2
6VDC
100mA
Page 4
Step 4. Virtuoso learns your phone’s characteristics.
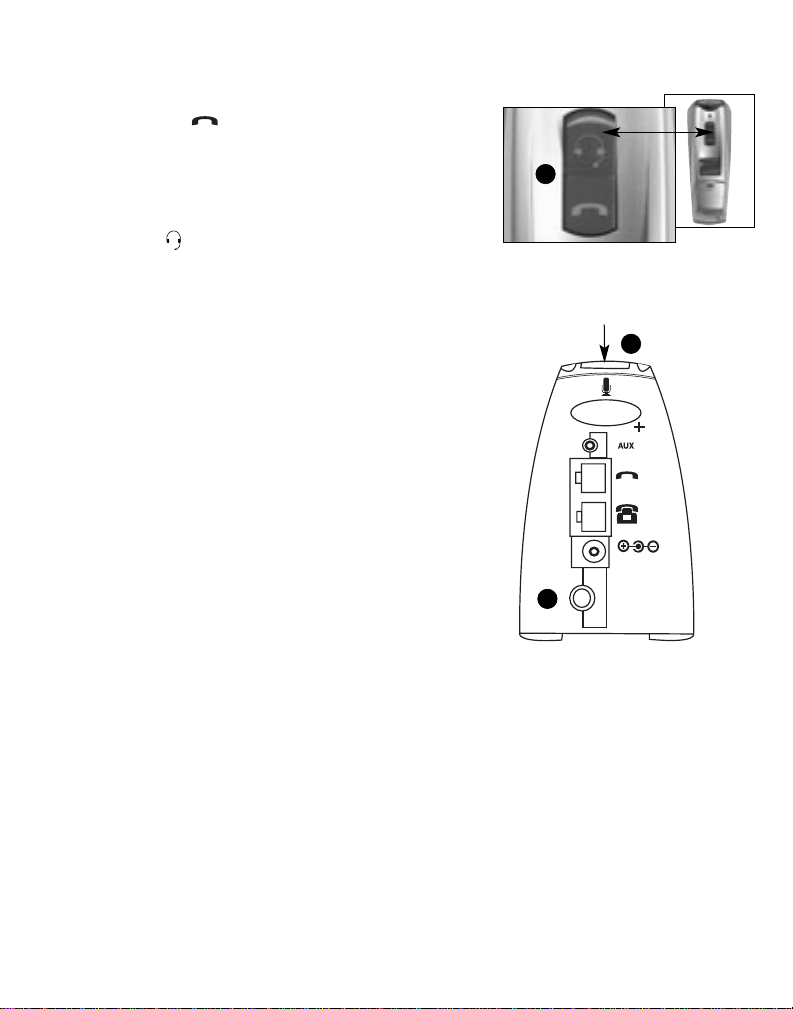
•Move the headset/handset switch (E,Figure 4) to
the handset position.
• Lift the handset from the phone and obtain an
outside line dial tone as you normally would.
(For example,dial 9, or press a function key.)
• Listen for the dial tone, then move the
headset/handset switch (E,Figure 4) to the
headset position.
•Press and immediately release the Learn button
(F, Figure 5) on the back of the Virtuoso unit.
The in-use light (G,Figure 5) will begin to flash,
and the Virtuoso will learn your phone.
•Put on your headset.
When learning is complete,the in-use light will stop
blinking and turn solid red.You should now hear a
dial tone through your headset.Hang up the handset.
Ignore Step 5 and proceed to Step 6.
•Ifthe in-use light does not stop flashing, or both
the in-use and mute lights flash,the Virtuoso was
unable to learn your phone using a dial tone.
Step 5.If learning fails.
•Repeat Step 4,and make sure that the outside line
dial tone doesn’t time out before you press the
Learn button.
•Turn up the receive volume on your telephone
set,and repeat Step 4.
•Ifneither of the bullet points above solves the
problem,use the Automatic Setup Line described
below:
4
Figure 4
Figure 5
F
E
In-use light
.
G
Learn
Automatic Setup Line
•Move the headset/handset switch (E,Figure 4) to the handset position.
•Call the automatic setup line at 1-800-895-3553.Follow the prompts until you are
connected to the programmer.When instructed to,hold down the Learn button (F,
Figure 5) until the in-use light begins to flash (approximately 10 seconds).Move the
headset/handset switch to the headset position.
•Wait approximately 2 minutes while listening on the headset.The in-use light should
turn solid red,and the programmer should notify you that programming is complete.
•Ifyou hear a screeching sound, or both the in-use and mute lights flash together,
programming has failed. Contact Hello Dir ect Technical Support at 1-800-444-3556
toll free using the phone handset.The technician will connect to your Virtuoso
through its internal modem to diagnose and fix the problem.
6VDC
100mA
Page 5
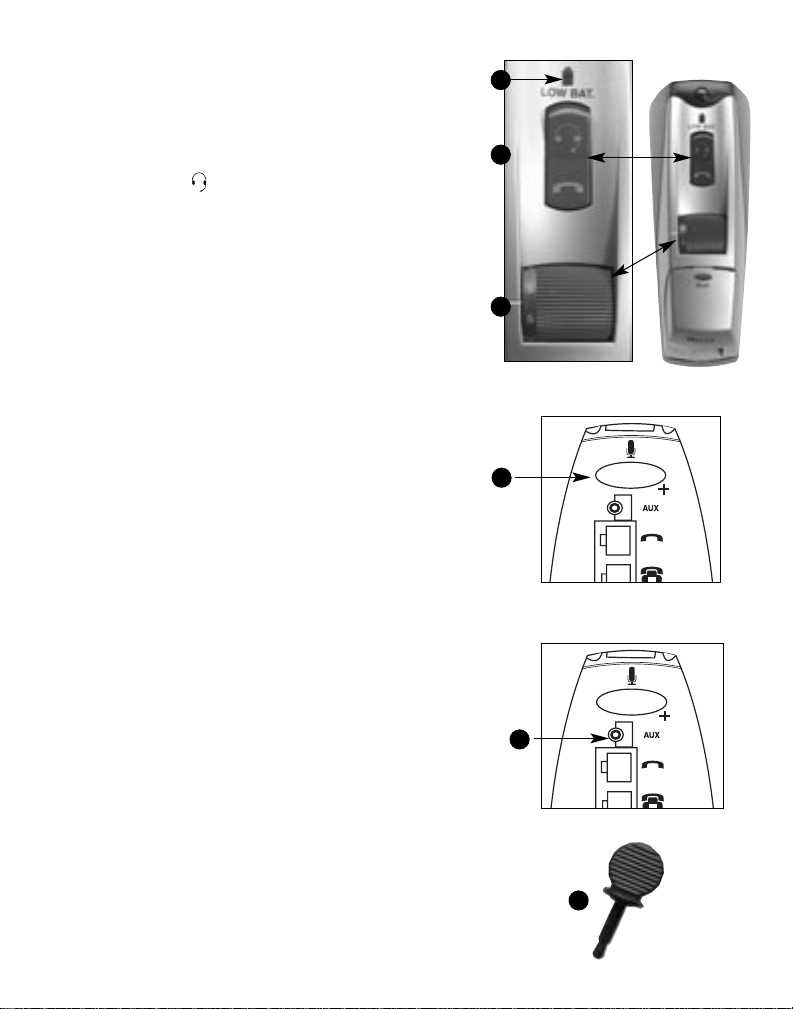
Step 6.Adjust the receive and transmit sound.
• Once the Virtuoso has successfully learned your
phone,make a test call to a friend to adjust the
sound volumes.
•Move the handset/headset switch (E, Figure 6) to
the headset position.
•Put on your headset. Make sure the microphone is
pointing toward your mouth,and is 1 to 2 fingers
from your mouth,just below your lower lip.Lift
the handset and make a call.
•Adjust the receive volume with the roller
(H,Figure 6) on top of your Virtuoso.
Important: Ask your caller how you sound. If you
need to sound louder or softer,adjust the volume of
your voice up or down using the transmit volume
digital switch (J,Figure 7).
USING THE VIRTUOSO AMPLIFIER
The Virtuoso works with your phone rather than
replacing it.When you answer or place calls,put your
headset on with the microphone positioned as
directed in the headset user guide.Put the phone
handset next to the phone,and make sure the Virtuoso
headset/handset switch is set to headset.Hang up the
handset when the call is completed.(Touch-N-Talk,
Item #1275,allows you to raise and lower your phone
handset instead of placing it next to the phone.)
Batteries or AC power
We recommend you use AC power if possible.This
eliminates the need to change batteries.If you use
batteries,you can expect a battery life of 4–6 months
depending on usage.The low battery indicator
(I,Figure 6) will flash when it is time to change
the batteries.
•You can increase battery life by disabling the inuse light. Insert the Power Saver Plug (K,Figure 8)
into the AUX jack (L). Remove the Power Saver
Plug to reactivate the in-use light.
•You can further increase battery life by
disconnecting your headset from the quick
disconnect cord when it’s not in use.
• Please remove the batteries if you are using the
AC adapter.
5
Figure 6
Figure 7
Figure 8
H
J
K
.
.
E
L
I
Page 6
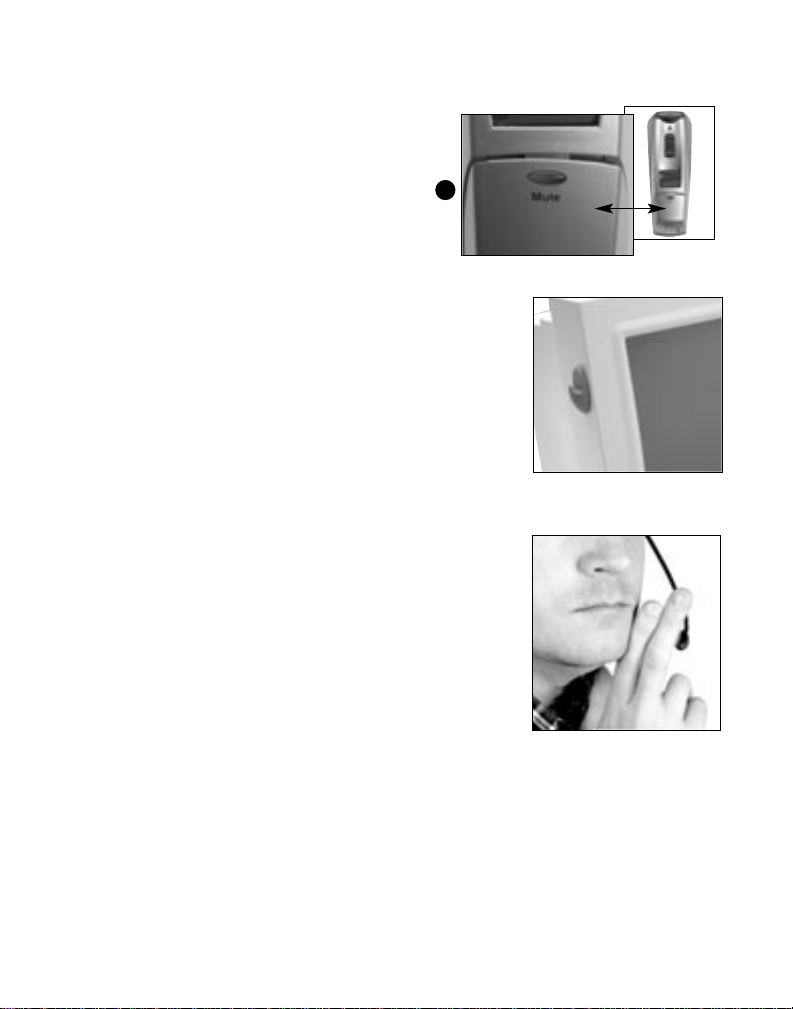
Muting your voice
•Press the mute button (M, Figure 9) once
to turn off your microphone.The mute
light will flash and your caller won’t hear
you.Press the mute button a second time
to turn your microphone back on.
Headset/handset switch
•To use your handset for a call, move the
headset/handset switch to handset.
•To return to using your headset, move the
headset/handset switch to headset.
Volume adjustment
Note: the volume controls on your telephone
will affect the volumes of your Virtuoso
amplifier.
•To adjust the sound you hear,use the
roller volume control.The higher the
number,the louder the volume will be.
•To adjust the sound your caller hears, use
the digital volume control on the back of
the Virtuoso.Pressing the side with the
small raised bump will increase volume
and pressing the flat side will decrease
volume.You will hear a click each time
you change the volume.When you have
reached the maximum or minimum
adjustment,you will hear a tone instead
of a click.
Using the headset hanger
Your Virtuoso includes a headset hanger
that can be attached to any flat surface
(Figure 10).To use the headset hanger:
•Make sure the surface is clean and dry.
•Remove protective covering from adhesive
and attach to surface.
•Hang headset to store it safely.
Switching phones
•To switch to a new phone,repeat the
setup instructions,and the Virtuoso will
learn your new phone’s characteristics.
6
Figure 10
Figure 11
Figure 9
M
Page 7

#50-0041-02 10/01
www.HelloDirect.com
e-mail: [email protected] (general support)
[email protected] (technical support)
Hello Direct 30 day unconditional money back
guarantee
If,for any reason, you’re not 100% satisfied with any product you’ve received from us, simply contact Hello Direct within 30 days of your invoice date. If our Technical Support
Specialists are unable to resolve the problem,we’ll gladly arrange for an exchange, company
credit,or refund.
HELLO DIRECT BRAND 2 YEAR UNCONDITIONAL PRODUCT WARRANTY
All new Hello Direct brand corded headset products are warranted to you, the original
owner,for two years from date of purchase,and subject to all terms, conditions,and
limitations set forth in this standard Hello Direct Product Warranty,which is included with
each product shipped.
If a Hello Direct brand product fails,as diagnosed by an authorized Hello Direct Customer
Service Representative,we will repair the product without charge or replace it without
charge with an identical product,if available, or a product of equal or greater function and
value,at our option.
The Hello Direct Warranty does not apply to any product that has been altered or modified,
or used in any manner contrary to written instructions provided by Hello Direct.
Consumable parts such as cords,ear cushions, clothing clips,microphone screens, and
batteries are not covered by this warranty. In no event shall Hello Direct be responsible for
any incidental,special or consequential damages, even if it has been notified ofthe
possibility of such damages.
Hello Direct, Inc.
Phone: 1-800-435-5634
Fax: 1-800-456-2566
Page 8
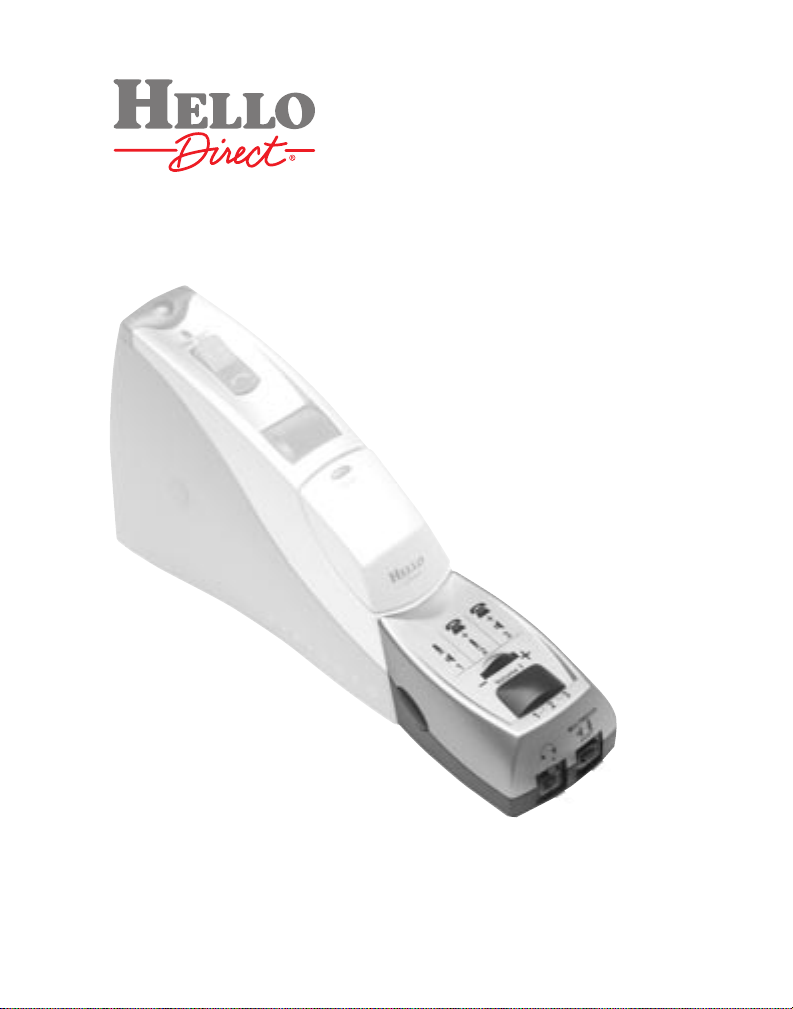
VIRTUOSO
™
MULTIPLIER
#7476
USER
GUIDE
Page 9
ADDING THE
MUL TIPLIER TO YOUR VIRTUOSO
1.Make sure you have set up your Virtuoso
according to the directions in the user guide.
2.Remove the headset cord from the headset
jack on the front of the Virtuoso.
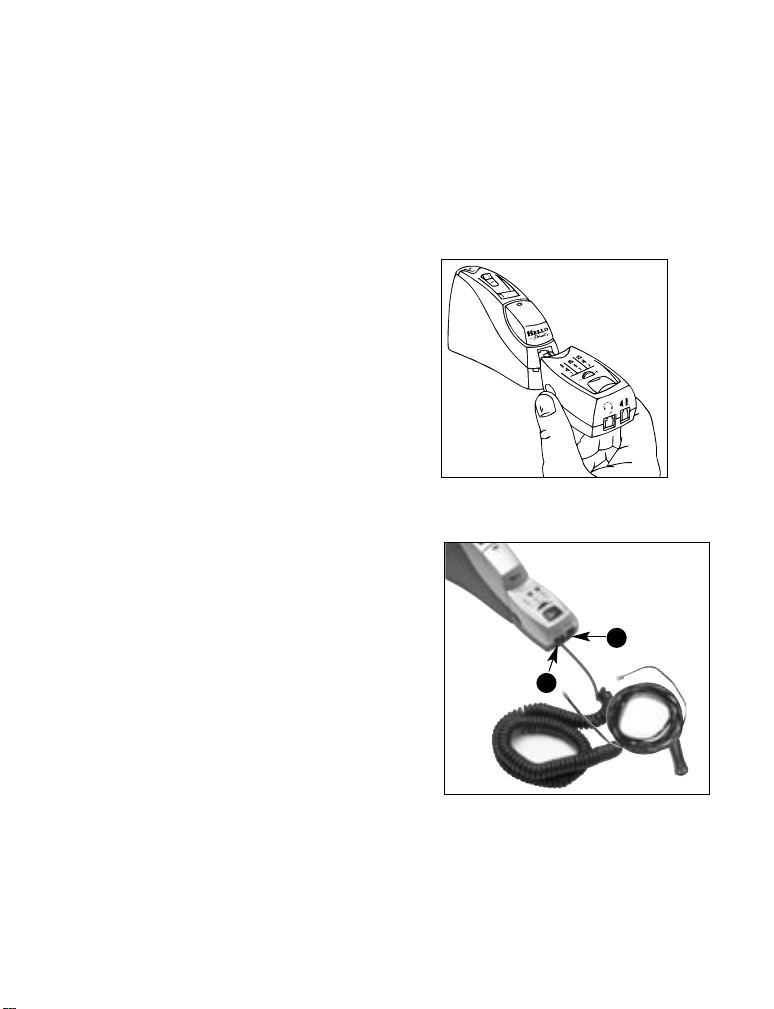
3.Insert the Multiplier’s plug into the Virtuoso’s
headset jack.Make sure the connection is solid
and the side clamps are locked in place (Figure 1).
4.Plug the headset cord into the headset jack (A) on
the front of the Multiplier (Figure 2).
5.Make sure the switch on top of the Multiplier is in
position 2 for normal use.
Your headset can now be used normally for phone calls.
CONNECTING MULTIMEDIA DEVICES
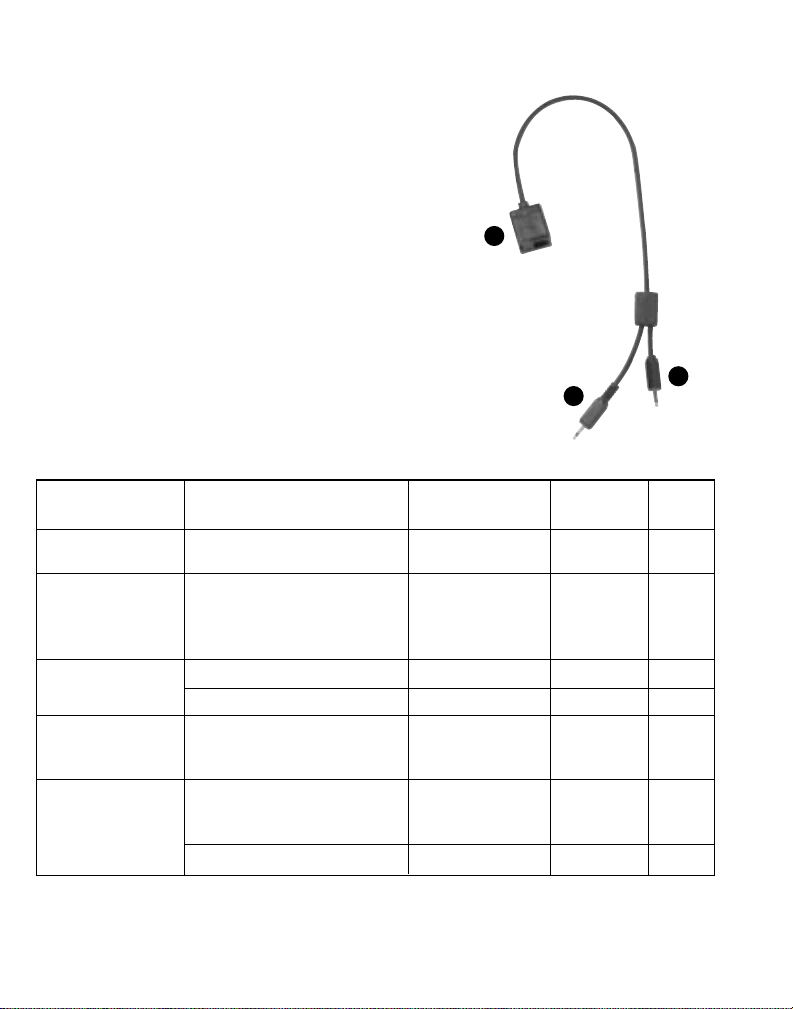
The Multiplier includes 3 cords:a 10 foot extension
cord,a 3.5 mm plug adapter cord,and a 2.5 mm plug
adapter cord.Depending on the device you are
connecting, you will use either the 3.5 mm or 2.5 mm
adapter cord (Please refer to Table 1).
•Connect the speaker plug (C,Figure 3) to the
output (monitor,headset,earphone,or speaker)
jack of your device.Connect the microphone
plug (D,Figure 3) to the input (microphone,line
in) jack.You may not need to connect both cords
depending on your application.
•Plug the 10 foot extension cor d into the m ultimedia
jack (B,Figure 2) on the Multiplier unit.Connect
the RJ-9 (rectangular) jack (E,
Figure 3)
on the
adapter cord to the extension cord.
Thank you for purchasing the Virtuoso Multiplier for use with your Virtuoso amplifier. The
Multiplier connects to your Virtuoso amplifier and lets you use your Hello Direct headset for
more than just talking on the phone.With the flick of a switch,you can:
•Use the headset for speech recognition, dictation,voice recording,internet telephony
(VoIP), etc.,on your computer.
•Record phone calls.
•Use your headset to listen to music from CD, tape player, radio,computer,etc.
• Play sound files and recordings for your callers.
Figure 1
Figure 2
A
B
2
Page 10
•Set the switch on the Multiplier unit to the
appropriate setting for your application.
Please refer to Table 1.
MUL TIMEDIA APPLICATIONS
Use switch setting 1 to:
• Listen to sound files and other recordings from
your computer, CD player, radio,or tape player.
•Record your voice onto your computer or tape
recorder for notes, dictation,and speech
recognition applications.
•Use voice activated gaming and other
applications that recognize voice commands.
•Use the internet for phone calls.
Use switch setting 2 to:
•Talk on the phone.
•Record both sides of phone calls.
Use switch setting 3 to:
• Play recordings and sound files for your callers.
Application Connect to
Adapter cord Plugs Switch
to use to use set to
Normal phone use
None None 2
Speech recognition, Sound Blaster
®
Speaker and
dictation, voice compatible sound card 3.5 mm plug
microphone
1
recording, VoIP, etc.
Record phone call
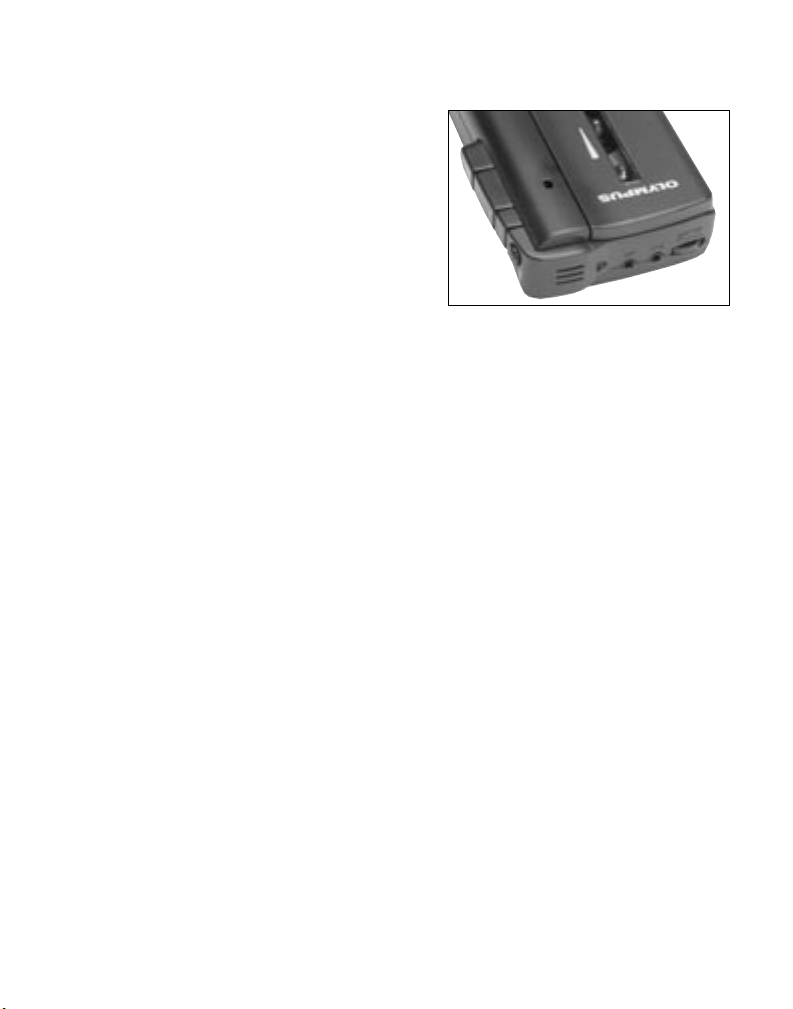
Olympus® mini tape recorder 2.5 mm plug Microphone 2
Full sized tape recorders 3.5 mm plug Microphone 2
Listen to music Walkman®, Sound Blaster
from CD, tape, radio, compatible sound card or 3.5 mm plug Speaker 1
computer, etc. any standard earphone jack
Play recording to
Walkman, Sound Blaster
telephone caller
compatible sound card or 3.5 mm plug Speaker 3
any standard earphone jack
Olympus mini tape recorder 2.5 mm plug Speaker 3
Table 1
D
C
E
Figure 3
3
Page 11
ADJUSTING THE VOLUME FROM YOUR
MULTIMEDIA DEVICE IN SWITCH SETTING
#3
When playing back from a multimedia device, the
volume from the device may be significantly different
from the volume of your voice or your caller’s voice.
The volume 3 control on the Multiplier helps you
adjust this volume to acceptable levels.Note:the
volume 3 control functions only in switch setting #3.
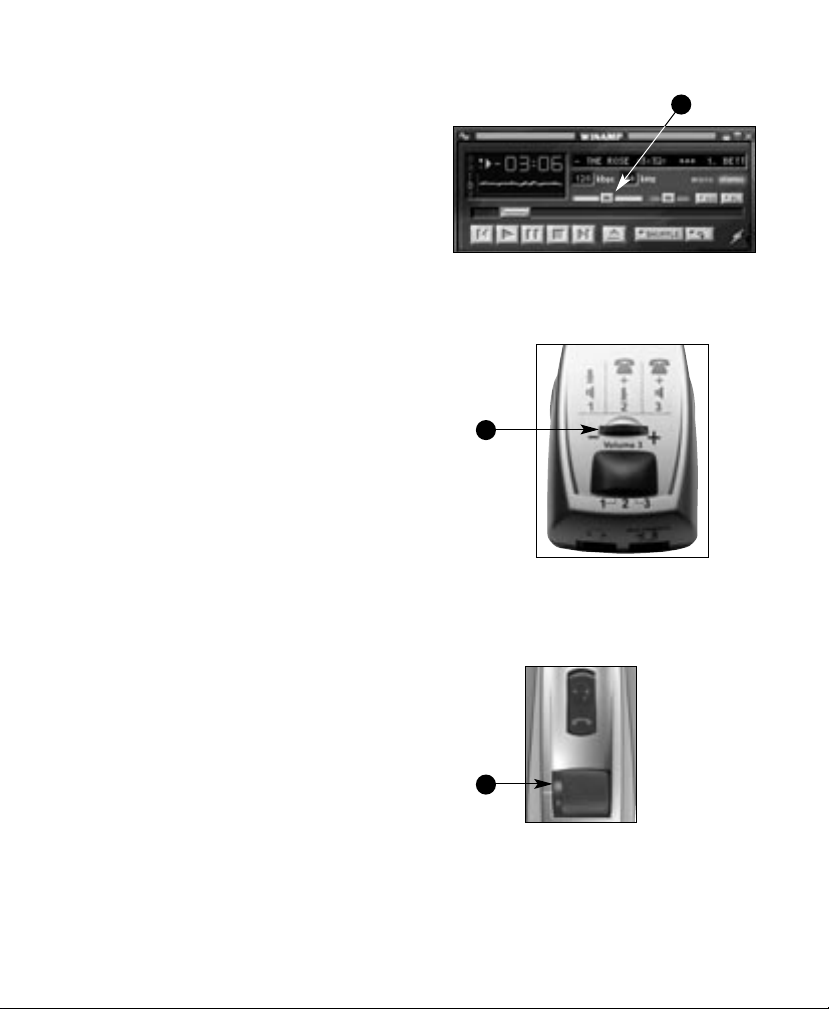
• Step 1:Test the multimedia device volume.
Before using the multimedia device with the
phone,play back from it in switch setting #1, and
adjust the volume (F, Figure 4) until it is
comfortable for you.
• Step 2:Adjust the volume your caller hears.
Make a test call in switch setting #3 without any
playback.Set the Multiplier volume 3 control all
the way to the left (“–”) side.This will not affect
the voice volumes (G,Figure 5).
Begin playback from the multimedia device.
Slowly turn the volume toward the plus (“+”)
until the multimedia volume is comfortable for
your caller.This volume may be too low for you.
• Step 3:Adjust the volume you hear.
You can adjust the volume you hear by turning
up the roller volume on the Virtuoso amplifier
(H,Figure 6). This will also increase the loudness
of your caller’s voice.
Note:if either you or your caller hear distortion,
turn down (“–”) the Multiplier’s volume 3
control slightly.
REMOVING THE MULTIPLIER FROM YOUR VIRTUOSO
1.Remove the headset cord and 10 foot extension
cord from the Multiplier jacks.
2.Press in both of the side clips simultaneously,
then pull the Multiplier straight out of the
Virtuoso headset jack.
3.Plug your headset cord into the headset jack on
the Virtuoso amplifier.
Figure 5
H
Figure 6
4
F
Figure 4
G
Page 12
COMPATIBILITY
•Sound Blaster compatible sound cards.
•Multimedia devices with 3.5 mm or 2.5 mm jacks.
•Additional software and hardware required for
multimedia applications are not included.
TROUBLESHOOTING
• No sound is coming from the multimedia device.Verify that the device works properly
without the Multiplier connected.Make sure the cords are correctly connected. Refer to
Table 1 and verify you are using the correct switch setting.Increase the volume on the
multimedia device.Ifyou are using switch setting #3, please review “Adjusting the
volume from your multimedia device”on page 4.
• The multimedia device is not receiving sound.Verify that the device works properly
without the Multiplier connected.Make sure the cords are correctly connected. Refer to
Table 1 and verify you are using the correct switch setting.Make sure the device is set to
receive input.
• My recording is unclear or sounds far away. Check microphone position.Make sure it
is 1 to 2 fingers from your mouth,just below your lower lip,and the microphone foam
screen is pointed toward your mouth.Verify that the device works properly without the
Multiplier connected.Make sure the cords are correctly connected. Refer to Table 1 and
verify you are using the correct switch setting.
• Sound quality has deteriorated.Check the low battery indicator on the Virtuoso amplifier
and replace batteries if necessary.
• The volume of the multimedia device in switch setting #3 won’t adjust to the same
level as my voice.Move the Multiplier switch to setting #1 and adjust the multimedia
device’s volume control until the volume is comfortable for you.Follow the instructions
for “Adjusting the volume from your multimedia device” on page 4.
• If you need additional troubleshooting help, call 1-800-435-5634 toll free for H ello Dir ect
Technical Support.
Please note:It’s the user’s responsibility to install the multimedia device according to the
manufacturer’s instructions,and to ensure it is functioning properly before being connected
to the Multiplier. Hello Direct,Inc., cannot assist you with the installation of sound cards,
recorders, or other multimedia devices not purchased from us.Please refer to the distributor
or manufacturer of such products for assistance.
5
Page 13

Hello Direct 30 day unconditional money
back guarantee
If,for any reason, you’re not 100% satisfied with any product you’ve received from us,
simply contact Hello Direct within 30 days of your invoice date. If our Technical Support
Specialists are unable to resolve the problem,we’ll gladly arrange for an exchange,
company credit,or refund.
HELLO DIRECT BRAND 2 YEAR UNCONDITIONAL PRODUCT WARRANTY
All new Hello Direct brand corded headset products are warranted to you, the original
owner,for two years from date of purchase,and subject to all terms, conditions,and
limitations set forth in this standard Hello Direct Product Warranty,which is included
with each product shipped.
If a Hello Direct brand product fails,as diagnosed by an authorized Hello Direct
Customer Service Representative,we will repair the product without charge or replace
it without charge with an identical product, if available,or a product of equal or
greater function and value,at our option.
The Hello Direct Warranty does not apply to any product that has been altered or
modified,or used in any manner contrary to written instructions provided by Hello
Direct.Consumable parts such as cords, ear cushions,clothing clips, microphone
screens,and batteries are not covered by this warranty.In no event shall Hello Direct
be responsible for any incidental,special or consequential damages, even ifit has been
notified of the possibility of such damages.
Hello Direct, Inc.
75 Northeastern Blvd.
Nashua, New Hampshire 03062
Tel: 1 (800) 435-5634
Fax: 1 (800) 456-2566
e-mail: [email protected] (general support)
www.HelloDirect.com
[email protected] (technical support)
#50-0049-02 10/01
 Loading...