

Page 1
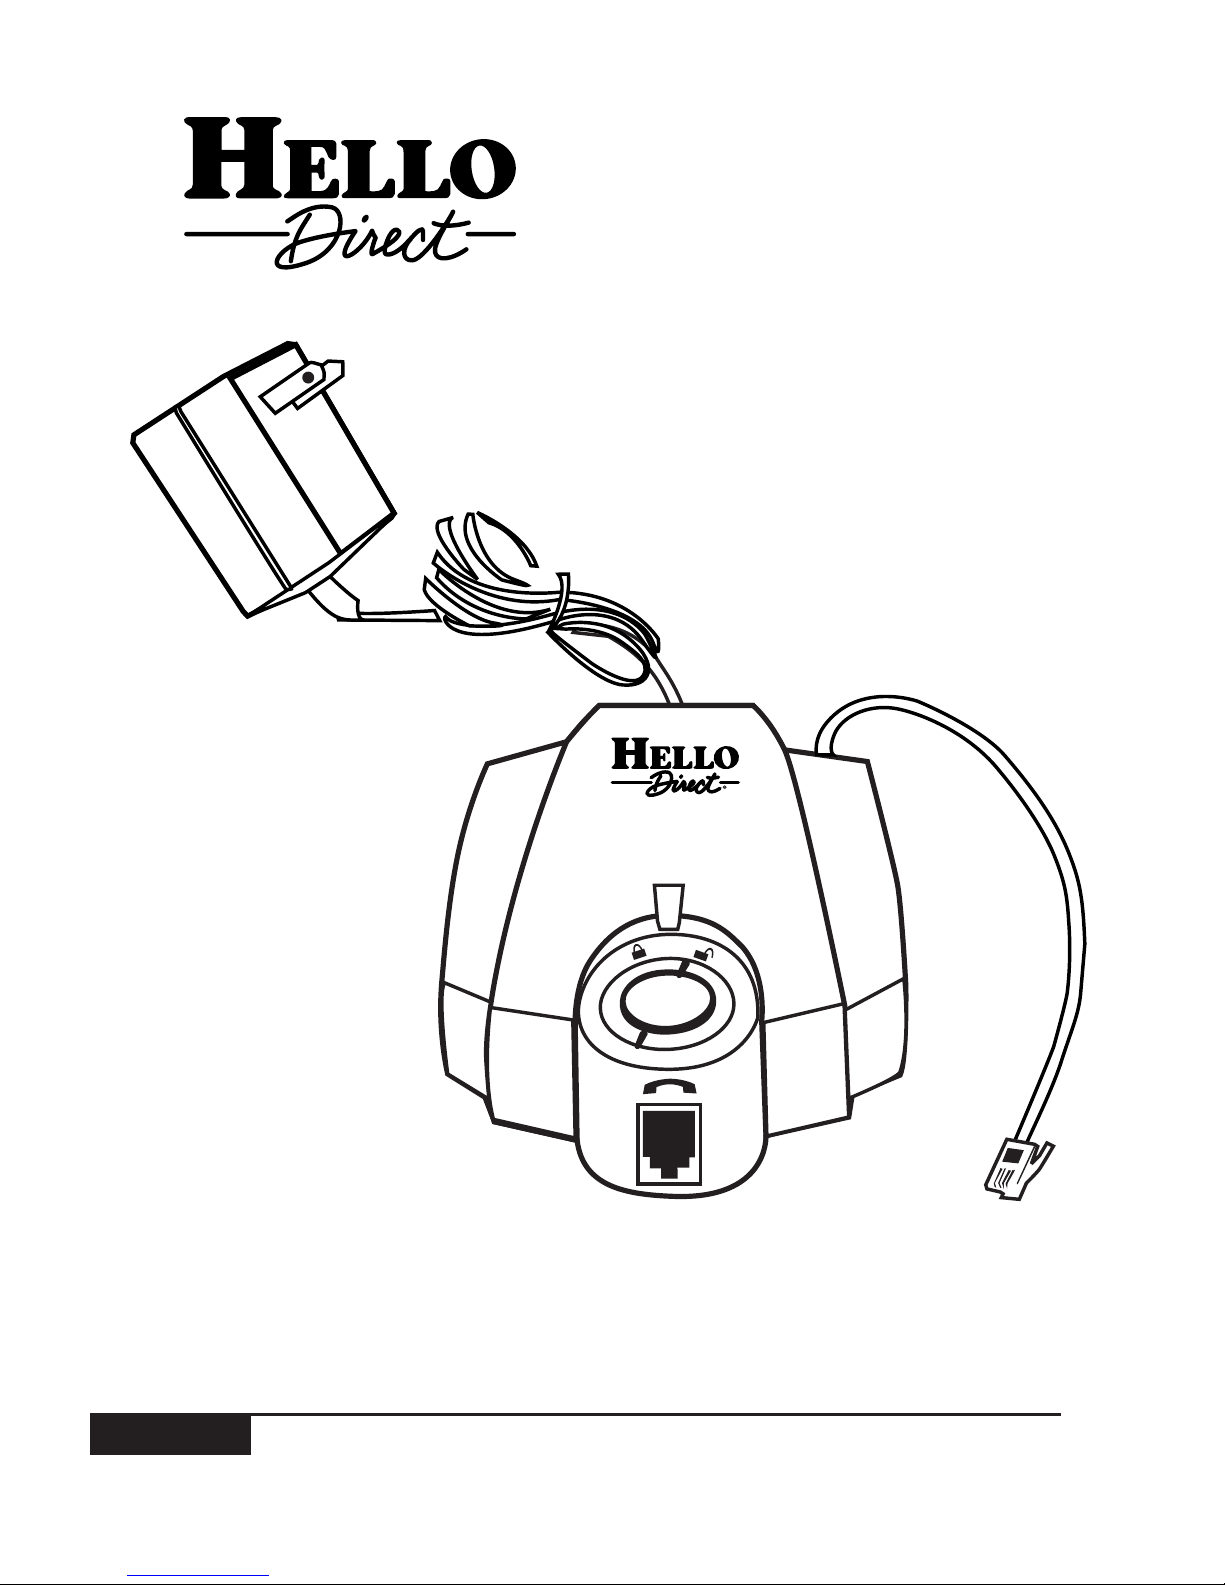
IMPORTANT! FOLLOW THE SETUP PROCEDURE IN THIS USER GUIDE WHENEVER
YOU MOV E
LINESTEIN TO A DIFFERENT TELEPHONE.
USER
GUIDE
®
LEARN
LINESTEIN
™
DIGITAL
ADAPTER
Page 2
Congratulations on purchasing LineStein,
a universally compatible communication
device for executives, mobile professionals and office workgroups.
LineStein lets you connect your teleconferencing unit or modem to virtually any
digital phone set, multi-line key system
or hotel telephone in seconds. LineStein
is fully compatible with all modems and
can support connections up to 56K.
About Your New LineStein
If you will be using LineStein with a…
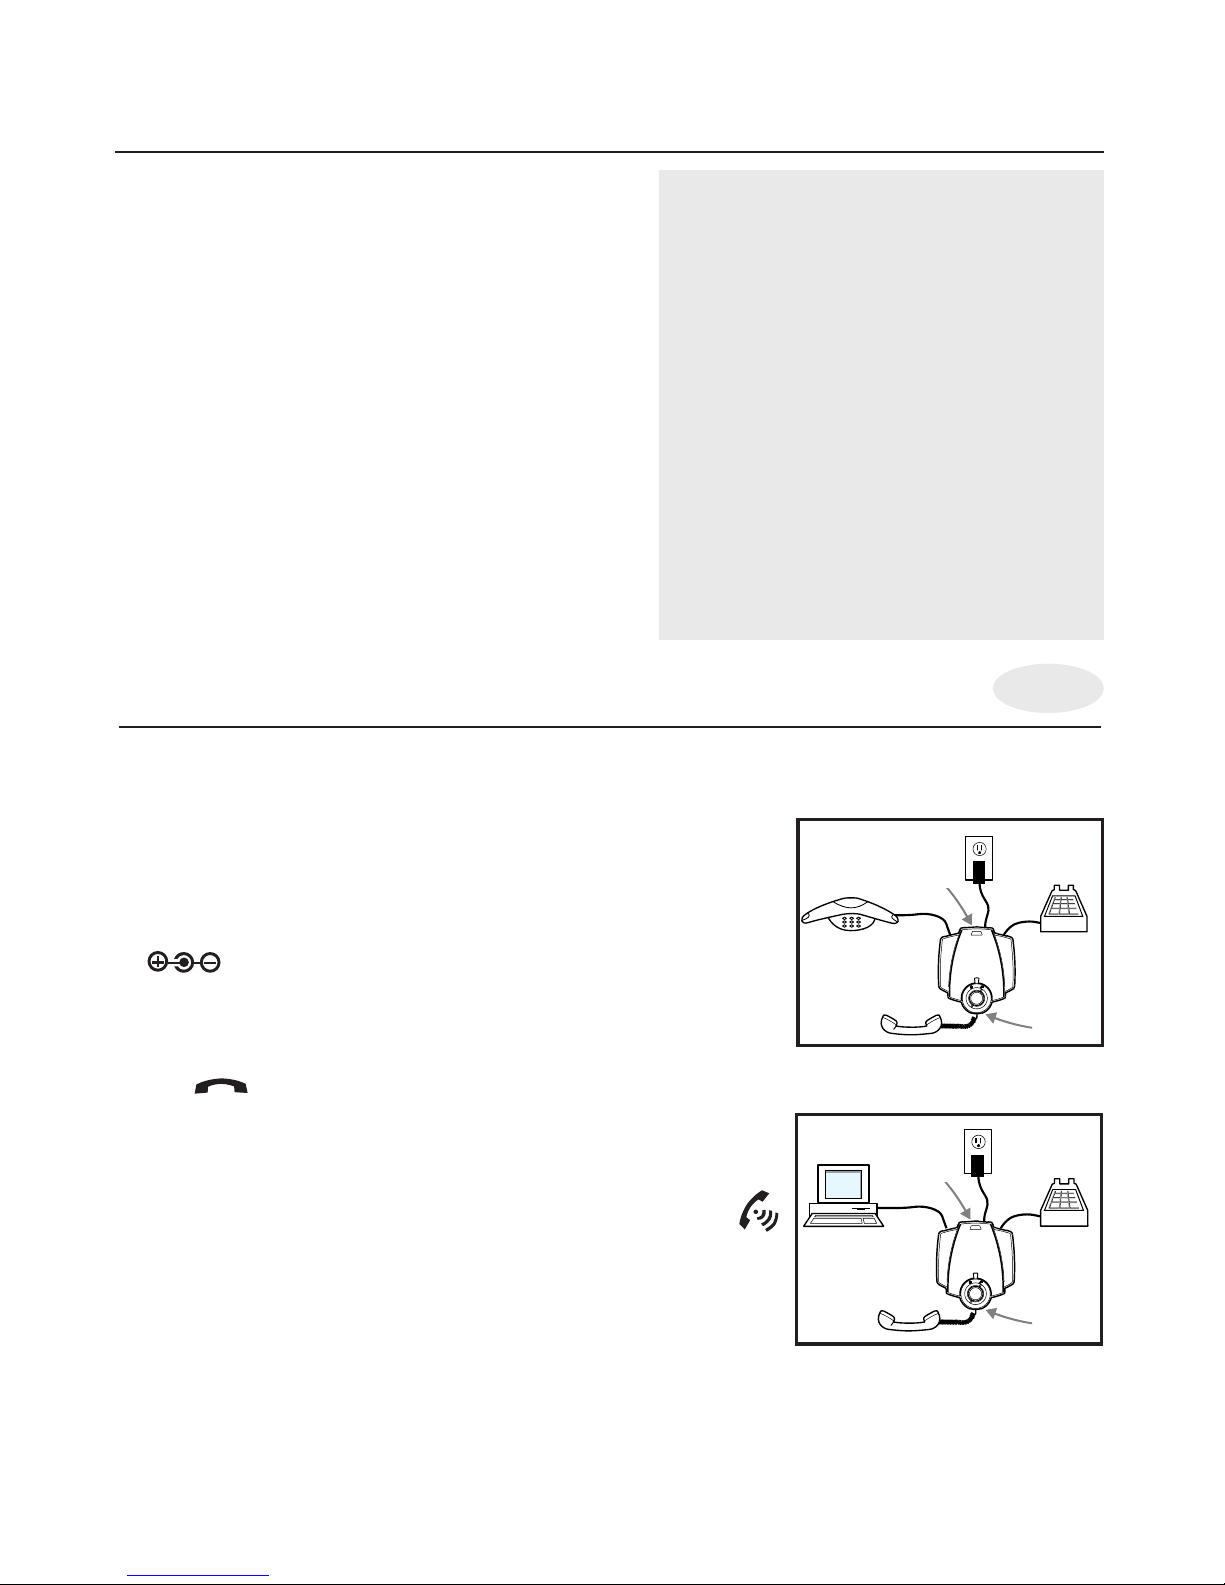
Teleconferencing device . . . . . . . . . . . . .see Figure 1.
PC modem . . . . . . . . . . . . . . . . . . . . . . .see Figure 2.
1. Plug the AC power cord into LineStein’s power jack,
and a standard wall outlet, see Figures 1 & 2.
2. Unplug the curly telephone handset cord from the
telephone base. Plug this cord into the HANDSET
jack in front of LineStein’s LEARN button, under
the icon.
3. Plug LineStein’s straight modular cord into the handset
jack on your telephone’s base.
4. Plug the cord from your teleconferencing device or
modem into LineStein’s VOICE/DATA jack, labeled:
Please Note: The teleconferencer or modem (analog
device) will need to be disconnected to complete the
learning process.
5. Check Figures 1 & 2 to make sure the connections are
correct for your device.
IMPORTANT: Follow the setup procedure in this
User Guide whenever you move LineStein to a
different telephone.
Connect LineStein to Your Telephone
Step 1
Figure 2
Figure 1
In-Use
Light
PC
Modem
Conferencer
LEARN
Button
In-Use
Light
LEARN
Button
WARNING:
Do not plug LineStein directly into phone line—you may damage equipment!
LineStein provides these
additional features:
•Compact, durable, and lightweight design
allows LineStein to go anywhere.
•Small footprint.
•Smart Interface Technology (LearnIt™)
ensures universal compatibility with
virtually any North American business
telephone.
•Easy installation and user setup.
•Transmit switch adjusts speaking volumes.
•Online light indicates when VOICE/DATA
port is in use.
Page 3
LEARN
LEARN
Set LineStein to Learn Your Telephone
Figure 3
LEARN
LEARN
LEARN
LEARN
Figure 4
LEARN
LEARN
Figure 6
HELLOHINT:
If you have trouble setting
LineStein to work with
your phone:
•Re-check connections.
•Repeat LEARN procedure (above).
•Still having difficulty?
Call 24 hours: 1-800-895-3553.
Please Note:
•If it does not learn successfully,
the Learn light will begin flashing
orange. See Troubleshooting
section for help.
•Handset must be “off hook”
(out of the handset cradle) to use
your teleconferencing unit or
modem with LineStein.
Step 2
Figure 5
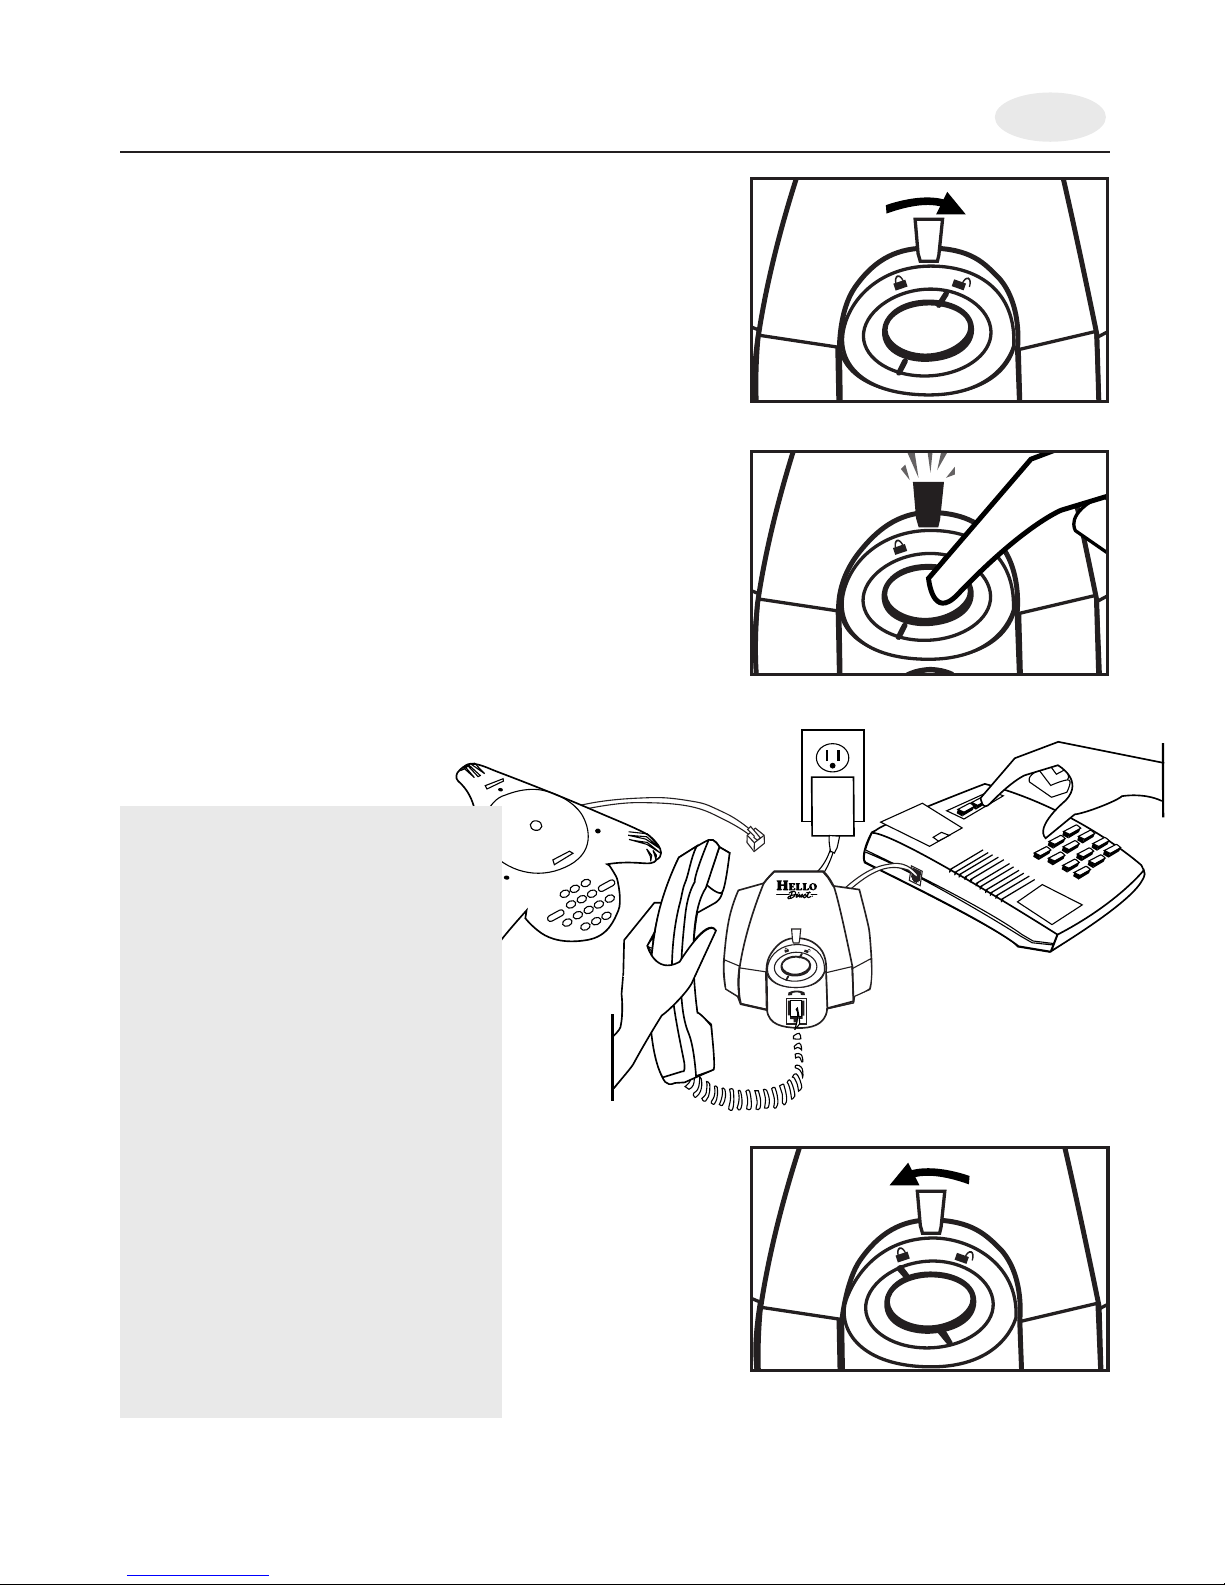
1. Find the LEARN button on the top of LineStein.
2. Turn the LEARN button collar from the “locked”
position to the “unlocked” position (Figure 3).
3. Make sure no devices are connected to LineStein’s
VOICE/DATA port. If a device is connected, disconnect it for the duration of the learning process.
4. Lift the telephone handset and place it on your
desk. Get an OUTSIDE line and dial tone.
Note: You may have to dial “9” or press a
special key (Figure 5).
5. Push and release the LEARN button. The Green
Learn light will start flashing (Figure 4).
6. Wait 2–3 seconds. The Green Learn light will go
out, telling you that LineStein has successfully
learned your phone.
7. Turn the LEARN button collar back to the
“locked” position. LineStein is now ready
to use (Figure 6).
Page 4

How to Use LineStein with a PC Modem
LineStein lets you use your PC modem even if you don’t have an analog line where you
need one. Just connect LineStein between your modem and any digital (or analog)
phone with a modular handset cord. If you are using a modem, your computer’s software may have to be reset for manual transmission. Refer to your modem user guide
for manual setup instructions.
SENDING DATA AND FAXES WITH LINESTEIN
You can send data and faxes with LineStein by manually dialing the numbers on your
telephone keypad. Note: Many modems are set to wait for a dial tone before beginning
data transmission. This feature must be turned off, or the modem cannot go “off
hook” and start transmitting. On most modems, this feature can be turned off by
resetting the DIAL command as shown below:
Change ATDT command line to: ATX3DT
DIALING
1. Click SIGN ON, connect or press ENTER on your computer to begin modem/fax
transmission.
2. Remove the telephone handset from its cradle, listen for a dial tone, and place the
handset on your desk. Using your telephone keypad, place a call to the destination
modem/fax.
If you experience problems where the communications software times out before
the other modem/fax answers, try reversing numbers 1 and 2 above.
4. When your data has been sent successfully, end the call by clicking SIGN OFF or
DISCONNECT, or by selecting the Stop or End function on your computer.
5. Hang up the phone.
RECEIVING DATA AND FAX FILES
To receive data or fax transmissions, you must be present to answer incoming calls. Most
modems can operate in two Receive modes. The first is typically known as Manual
Answer or Receive mode. The second is generally called Direct Connect or Local
Terminal mode. Choose your preferred mode of operation and follow the steps below:
1. When the phone rings, lift the handset and listen for incoming data tones.
2. Begin the data or fax transmission.
Manual Answer or Receive mode: Select the Manual Answer or Receive command
using your PC’s communications software.
Direct Connect or Local Terminal mode: Type ATA and ENTER to establish modem
connection.
3. Place your handset on the desk and wait for confirmation that the data has been
received.
4. When finished, end the call.
Manual Answer or Receive mode: Use your Call Termination software feature.
Direct Connect or Local Terminal mode: Type ATH Ø and ENTER.
5. Hang up the phone.
Page 5
How to Use LineStein with a Teleconferencer
LineStein lets you use your teleconferencer even if you don’t have an analog
line close by. Just connect LineStein between your teleconferencer and any
digital (or analog) telephone with a modular handset cord.
ADJUSTING SPEAKING VOLUME
(HOW LOUD YOU SOUND TO YOUR CALLER)
During setup in Step 2, LineStein adapted itself to work with your telephone.
After this step, further adjustments to LineStein aren’t normally needed.
However, if teleconference callers say your voice is faint, “echoey” or sounds
like you’re in a tunnel, fine-tune your phone’s speaking volume as follows:
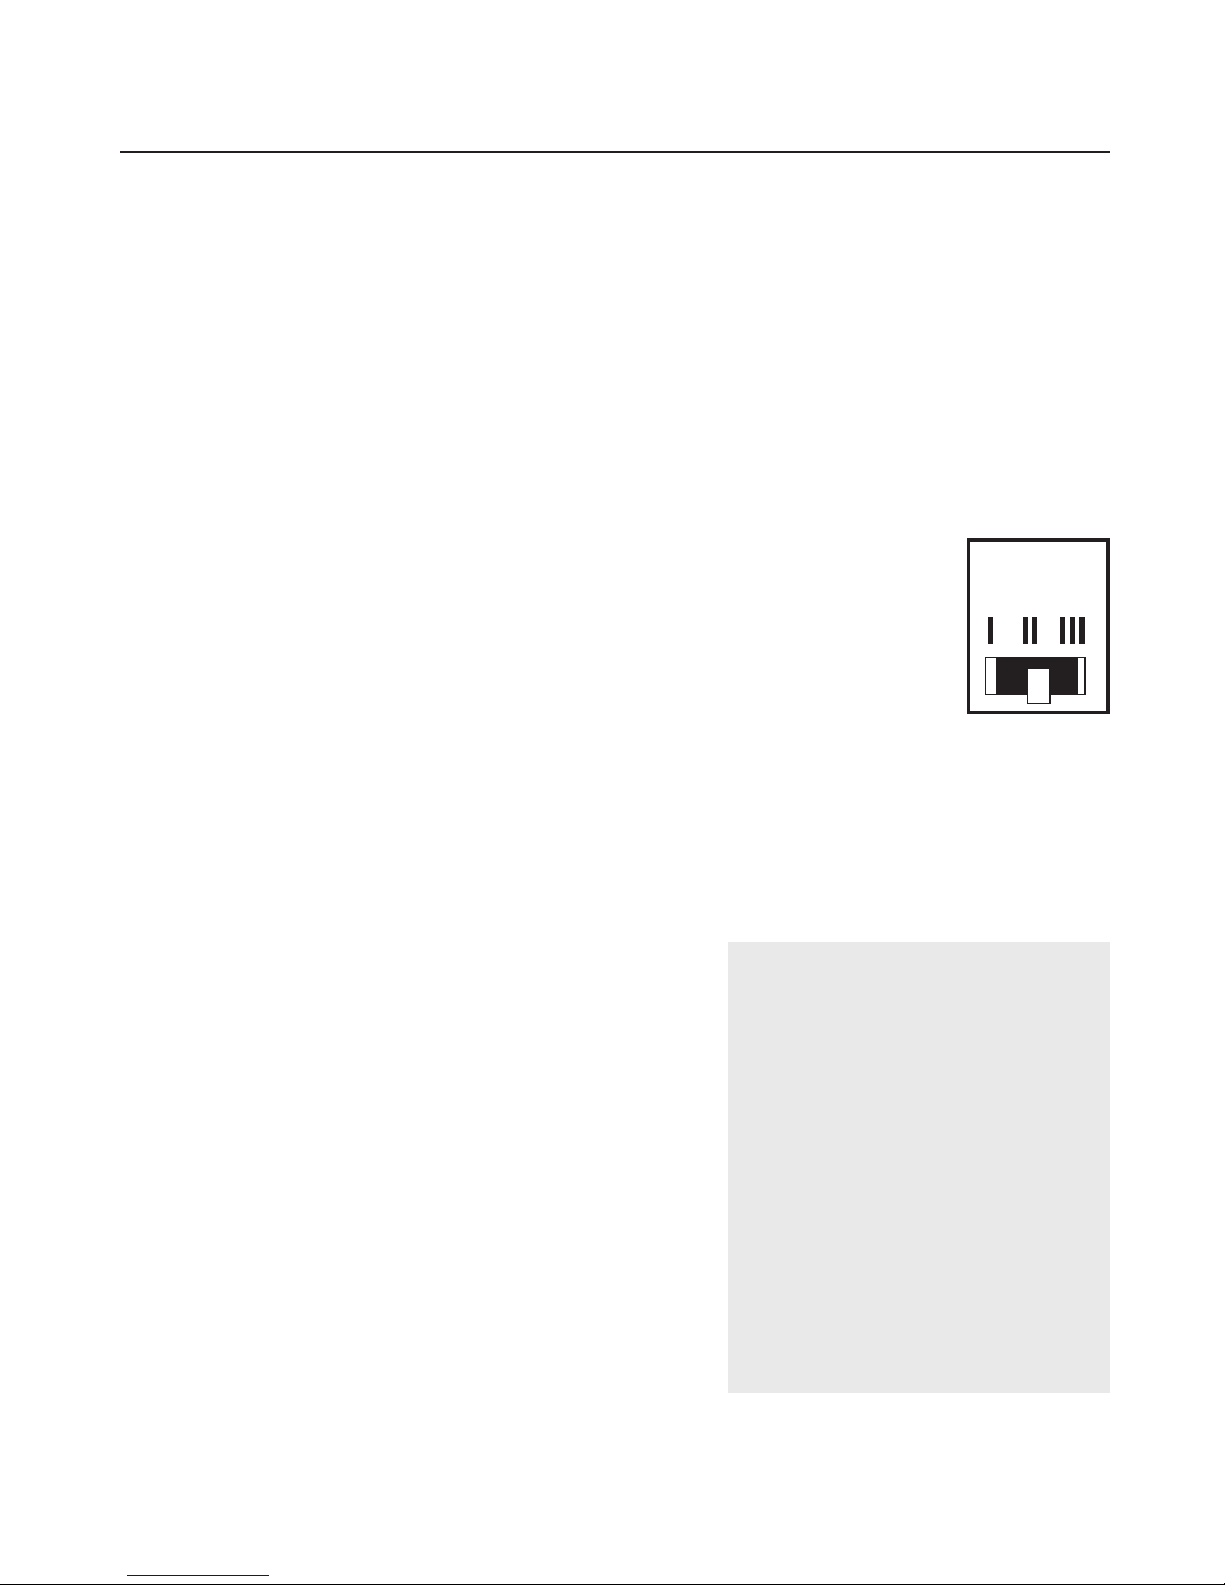
• Find LineStein’s 3-position switch marked TRANSMIT LEVEL.
This switch controls your speaking volume (Figure 8).
• The transmit volume control has 3 positions:
(I) = lowest transmit volume (set here if your voice has an echo
or tunnel sound)
(II) = standard setting for most conversations
(III) = highest transmit volume
(set here if your voice sounds faint)
If you are unable to optimize the performance of your teleconferencer using
this switch, you may need to reset the teleconferencer. Please refer to the setup
section of your teleconferencer user guide.
OPERATING YOUR TELECONFERENCER
USING
LINESTEIN
1. Check Figure 1 to be sure that LineStein has
been properly connected to your phone and
teleconferencer.
2. Press your teleconferencer’s ON button.
LineStein’s In-Use light should come on.
3. Lift your phone’s handset and set it on the desk.
You should hear dial tone through your
teleconferencer.
4. Place a call as usual, using your teleconferencer’s
keypad. (With some phones it may be necessary
to use the telephone keypad to dial.)
TRANSMIT
LEVEL
Figure 8
HELLOHINT:
•To answer or place calls through
the teleconferencer, it must be
turned on, and you must lift your
phone’s handset.
•If the teleconferencer is off, your
phone will operate in the usual
manner.
•If you change phones, you must
reset LineStein to work with the
new telephone. Repeat the LEARN
procedure in “Step 2 – Set
LineStein to Learn Your Telephone”.
Page 6

SETUP FOR USE WITH WINDOWS
WINDOWS 95, WINDOWS 98
1. Open the My Computer icon (usually located in upper left corner of desktop).
2. Within the My Computer screen, double-click the Dial-Up Networking icon.
3. Then click MAKE NEW CONNECTION. Name the new connection, “LineStein.”
4. Make sure your modem type is displayed, and then click CONFIGURE.
5. Within modem properties, set Maximum Speed to 38400 or 57600 (setting it at
115200 may cause problems).
6. Click on the CONNECTION tab.
7. Uncheck the “Wait for dial tone before dialing” box.
8. Click on the ADVANCED button.
9. In extra settings, type in X3.
10. Click OK twice and you will return to Make New Connection screen.
11. Click NEXT. Enter the number of the computer you are dialing or ,,, (three commas)
if you are dialing manually.
12. Click NEXT, then FINISH. This will return you to Dial-Up Networking screen.
13. You are ready to connect. Please see dialing instructions.
AUTO-DIALING
If your phone allows auto-dialing, follow these
steps:
1. Prepare your modem to send a transmission.
2. Lift the phone’s handset and listen for dial tone.
Place the handset on the desk (returning the
handset to its cradle will end the call).
3. Begin transmission by selecting SEND or
ENTER on your PC.
4. After successful completion of the data/fax
transmission, end the call by selecting the END
or ENTER command on your PC, then hang up
the phone.
HELLOHINT:
•You must lift handset to use modem.
•To restore your phone to normal
use, your modem must “hang up”
(disconnect) after your transmission
is complete.
•If you change phones, you must
reset LineStein to work with the new
phone. Repeat the LEARN procedure.
•Some PC software takes a few
moments to prepare a document for
transmission before dialing. On some
phones, this may cause a dial tone
“timeout.” To avoid this timeout,
convert the document to a fax format
before lifting the handset, or wait
until the software indicates it’s ready
to dial before lifting the handset.
Page 7

WINDOWS NT 4.0
1. Open the My Computer icon (usually located in upper left corner of desktop).
2. Within My Computer screen, click on the CONTROL PANEL icon.
3. Then click MODEM.
4. Highlight the modem you wish to use, then click PROPERTIES.
5. Within modem properties, set Maximum Speed to 38400 or 57600 (setting it at
115200 may cause problems).
6. Click on the CONNECTION tab.
7. Uncheck the “Wait for dial tone before dialing” box.
8. Click on the ADVANCED button.
9. In extra settings type X3.
10. Continue clicking OK to return to the Dial-Up Networking screen.
11. You are ready to connect. Please see dialing instructions.
SETUP FOR USE WITH AOL
AOL 3.0
1. Open the AOL Dial-Up window and click SETUP.
2. Within Network and Modem Setup, click CREATE LOCATION.
3. Please enter the following information:
• Location = LineStein
• Phone Number = ,,, (three commas)
• Modem Speed = 38400bps
• Network = AOL Net
4. Click SAVE.
5. Within Network and Modem Setup, click SETUP MODEM.
6. Then click on EDIT COMMANDS, you may be prompted: “Do you wish to delete it
and copy the current profile to the custom profile area?” Click OK.
7. Change Custom Modem Profile Dial Prefix line to ATX3DT.
8. Continue clicking OK until you return to the AOL Dial-Up window.
9. You are ready to connect. Please see dialing instructions.
Page 8

AOL 4.0
1. Open the AOL Dial-Up window and click SETUP.
2. Within AOL Setup screen, click EXPERT SETUP.
3. Click EXPERT ADD.
4. Please enter the following information:
• Name = LineStein
• Edit Number Here = ,,, (three commas)
• Speed = 57600bps
• Network = AOL Net
5. Click OK.
6. Click DEVICES (modems, etc.) tab.
7. Highlight modem type, then click EDIT.
8. Within the Edit screen, click EDIT COMMANDS.
9. Change Custom Modem Profile Dial Prefix line to ATX3DT.
10. Click OK twice, then click CLOSE and you will return to the AOL Dial-Up window.
11. You are ready to connect. Please see dialing instructions.
TRANSMIT
LEVEL
Page 9

Poor transmit or receive quality
1. Did LineStein learn the characteristics of your phone?
2. Did you get an outside line during setup? (Review Step 2 of the installation instructions.)
3. Did you try all of the Transmit Level switch settings (I, II, III)?
4. Did you try adjusting the volume on your phone or teleconferencing device.
Learn Light flashing green
LineStein is trying to learn your phone. Check Step 2 of the installation instructions to be sure:
1. You have an outside line.
2. You’ve taken the handset off the phone cradle.
If so:
3. Disconnect, then reconnect LineStein’s power cord.
4. Repeat Step 2 of the installation instructions.
Learn Light flashing orange
LineStein did not learn your phone successfully.
1. Check your phone and handset connections.
2. Disconnect, then reconnect LineStein’s power cord.
3. Repeat Step 2 of the installation instructions.
Unit dead, no transmit or receive
1. Has the unit been installed correctly? (For teleconferencing, make sure setup looks
like Figure 1. For PC modem, make sure setup looks like Figure 2.)
2. Did you remove the handset from the cradle and set it on the desk?
3. Did you get an outside line?
4. Is LineStein’s In-Use light lit?
5. For teleconferencing: Did you turn your teleconferencer on?
For PC modem: Did you set your PC modem for manual transmission?
If you are still
having trouble,
call 24 hours:
1-800-895-3553.
Troubleshooting
Page 10

LEARN
LEARN
LEARN
LEARN
LEARN
LEARN
LEARN
LEARN
LIMITED 2-YEAR WARRANTY
1. Hello Direct warrants this product to be free from defects in materials or workmanship,
under normal use and service, for two years from the date of purchase, subject to the limitations set forth below. This warranty extends only to the original owner. This warranty
is void if service is performed by anyone other than Hello Direct.
2. This warranty gives you specific legal rights and you may also have other rights which
vary from state to state. Hello Direct’s obligations under this warranty are limited to repair
or replacement, at Hello Direct’s sole option, of the product or parts found to be defective, as diagnosed by an authorized Hello Direct customer service representative. Hello
Direct reserves the right to make such inspections as may be necessary in order to determine the cause of the defect. Hello Direct will not charge for labor or parts in connection
with any repairs or replacements covered in this warranty.
3. This warranty does not apply to: (a) product failure resulting from accidents, improper
care or operation, or negligence (where Hello Direct is not at fault), or from normal wear
and tear. In these cases, repairs or replacement will be made at a reasonable charge; (b)
consumable parts such as cords, ear cushions, clothing clips, microphone screens or batteries; (c) any product which has been subject to alteration or modification, or which has
been installed or used in any manner contrary to this user guide.
4. To obtain warranty repair/replacement service under this warranty, the owner must call
Hello Direct at 1-800-444-3556 for an RMA number and full return/replacement
instructions.
5. This written limited warranty is the only warranty made by Hello Direct. Repair or
replacement as provided under this warranty shall be the exclusive remedy available to
the purchaser. Hello Direct shall not be responsible for loss of use of the product or for
any other incidental, special or consequential damages or expenses incurred by the
purchaser or by any other party, even if Hello Direct has been notified of the possibility of such damages or expenses. Except to the extent prohibited by applicable law, any
implied warranties, including those of merchantability or fitness for a particular purpose, are hereby expressly excluded, and, to the extent not excludable, are expressly
limited to the duration of this warranty. Some states do not allow exclusion of implied
warranties, limitations on the duration of implied warranties, or the exclusion or limitation of incidental or consequential damages, so the above limitation and exclusion
may not apply to you.
Page 11

FCC INFORMATION: Your new LineStein Digital Adapter complies with Part 68 of
the FCC Rules. Your local telephone company may need to know the compliance information, which may include the Registration Number, Ringer
Equivalence Number (REN), USOC phone jack type, and other information.
You’ll find this info on the underside of LineStein.
TELEPHONE PROBLEMS: If you experience problems with LineStein, disconnect it
from the phone jack. If the trouble disappears, your unit may need repair or
adjustment. In this case, the FCC requires that the product not be used, and
remain unplugged from the telephone line until the problem has been corrected.
If after disconnecting the unit from the phone jack, the trouble still exists,
contact your phone company’s repair department.
LineStein
Model #5850
Tested to Comply with
FCC Part 15 Class B
Page 12

Hello Direct, Inc.
75 Northeastern Blvd.
Nashua, NH 03062 www.HelloDirect.com
Tel: 1-800-435-5634 e-mail: [email protected] (general support)
Fax: 1-800-456-2566 [email protected] (technical support)
© Hello Direct, Inc. 1999 Printed on recycled and recyclable paper. #263.1
LEARN
 Loading...