

Page 1
USER MANUAL
Page 2

TABLE OF CONTENTS
SOFTWARE SETUP
Pronterface............................................................................................................................................2
Cura 15.04..............................................................................................................................................3
BED CALIBRATION
Using Pronterface................................................................................................................................11
Using LCD ...........................................................................................................................................13
LOAD/UNLOAD FILAMENT
Using LCD (extruder 0 only).................................................................................................................14
Using PRONTERFACE..........................................................................................................................15
FIRST PRINT
Cura and SDCard..................................................................................................................................16
Pronterface and USB Cable..................................................................................................................16
GETTING STARTED WITH DUAL EXTRUSION
How to setup the offset of the extruders............................................................................................17
Set up the two extruders with the same height..................................................................................19
Steps to print with two extruders........................................................................................................21
The information on this manual was written with software running on Microsoft Windows 8.1
but the same software can be found for MAC and Linux and the same instructions may work
on other operating systems.
V7_20160126
Page 3
SOFTWARE SETUP
In order to be able to control helloBEEprusa and print through the computer, you need to use
an OpenSource software that is developed by the 3D printing community.
PRONTERFACE
This software can be used to help you calibrate the print bed, load/unload filament
and do other operations.
You can download it from this link - version "Printrun-Win-Slic3r-03Feb2015":
http://koti.kapsi.fi/~kliment/printrun/
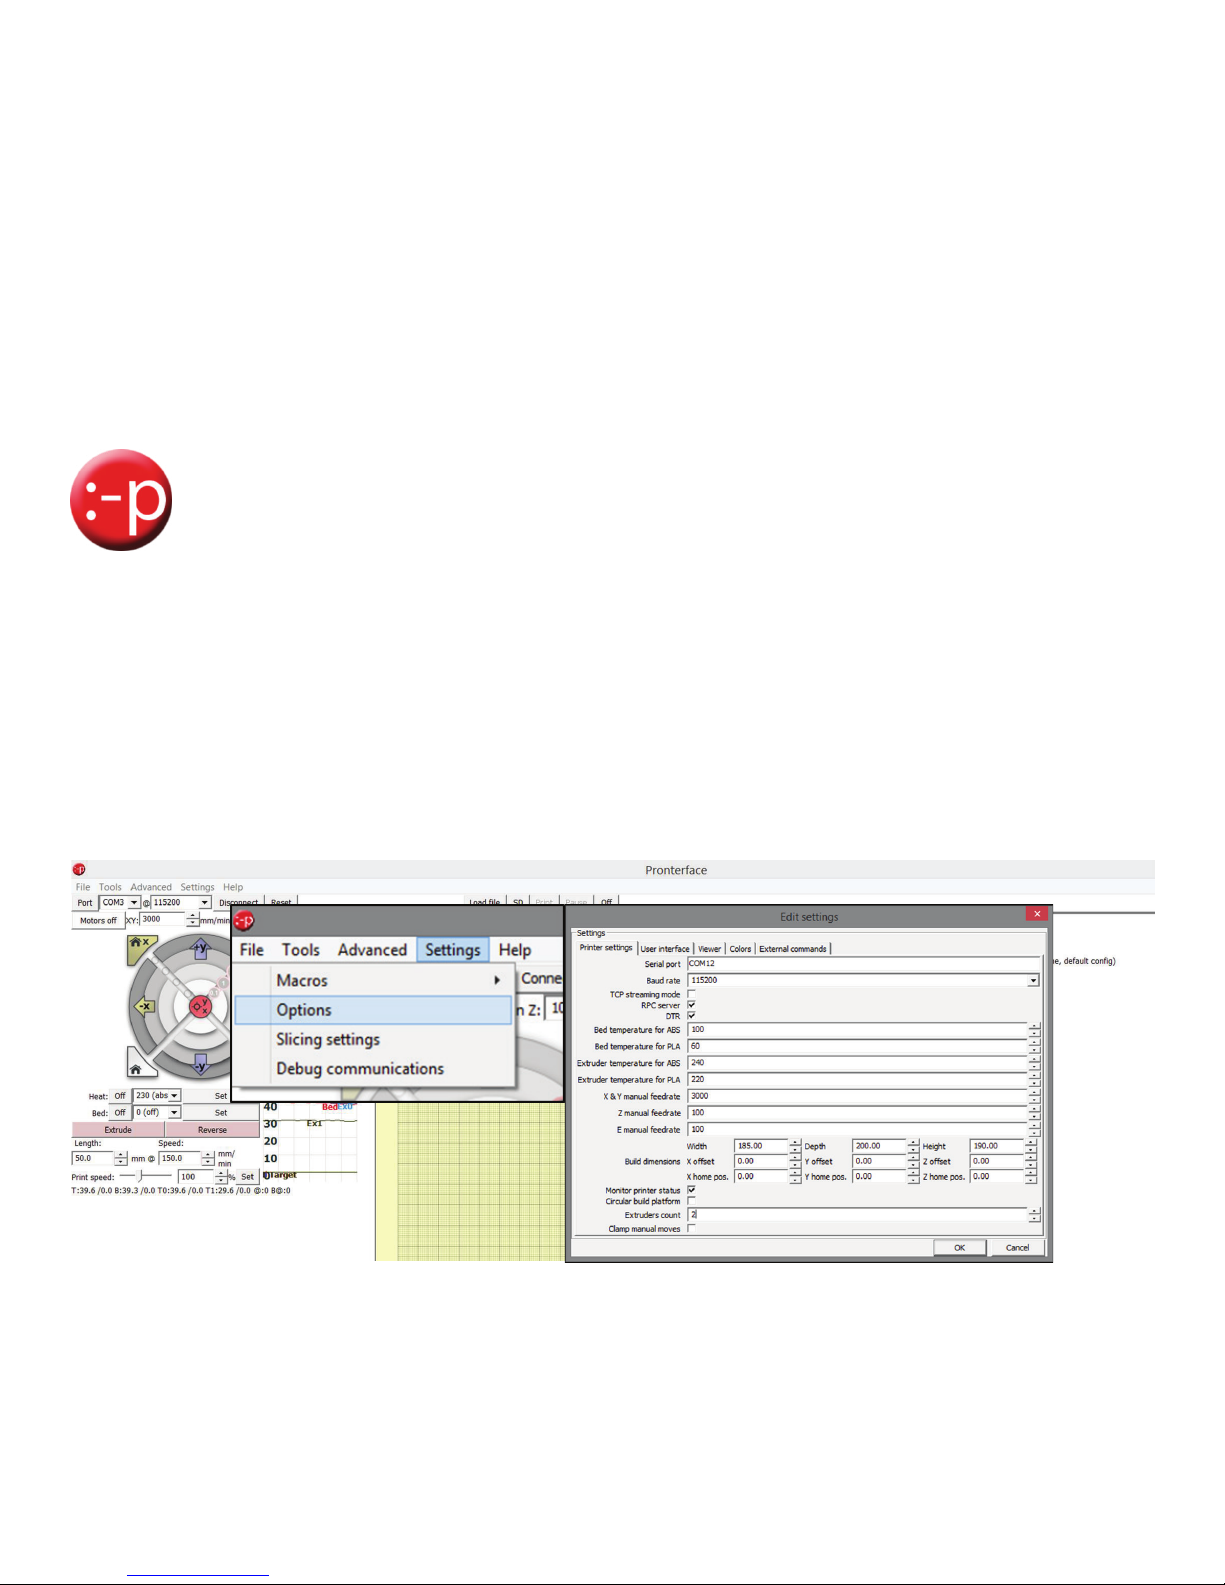
To make sure that the Pronterface is correctly configured, follow the next steps:
Go to “Settings” and select “Options”, and make sure to put these settings in “Edit settings”.
2
Page 4
CURA 15.04
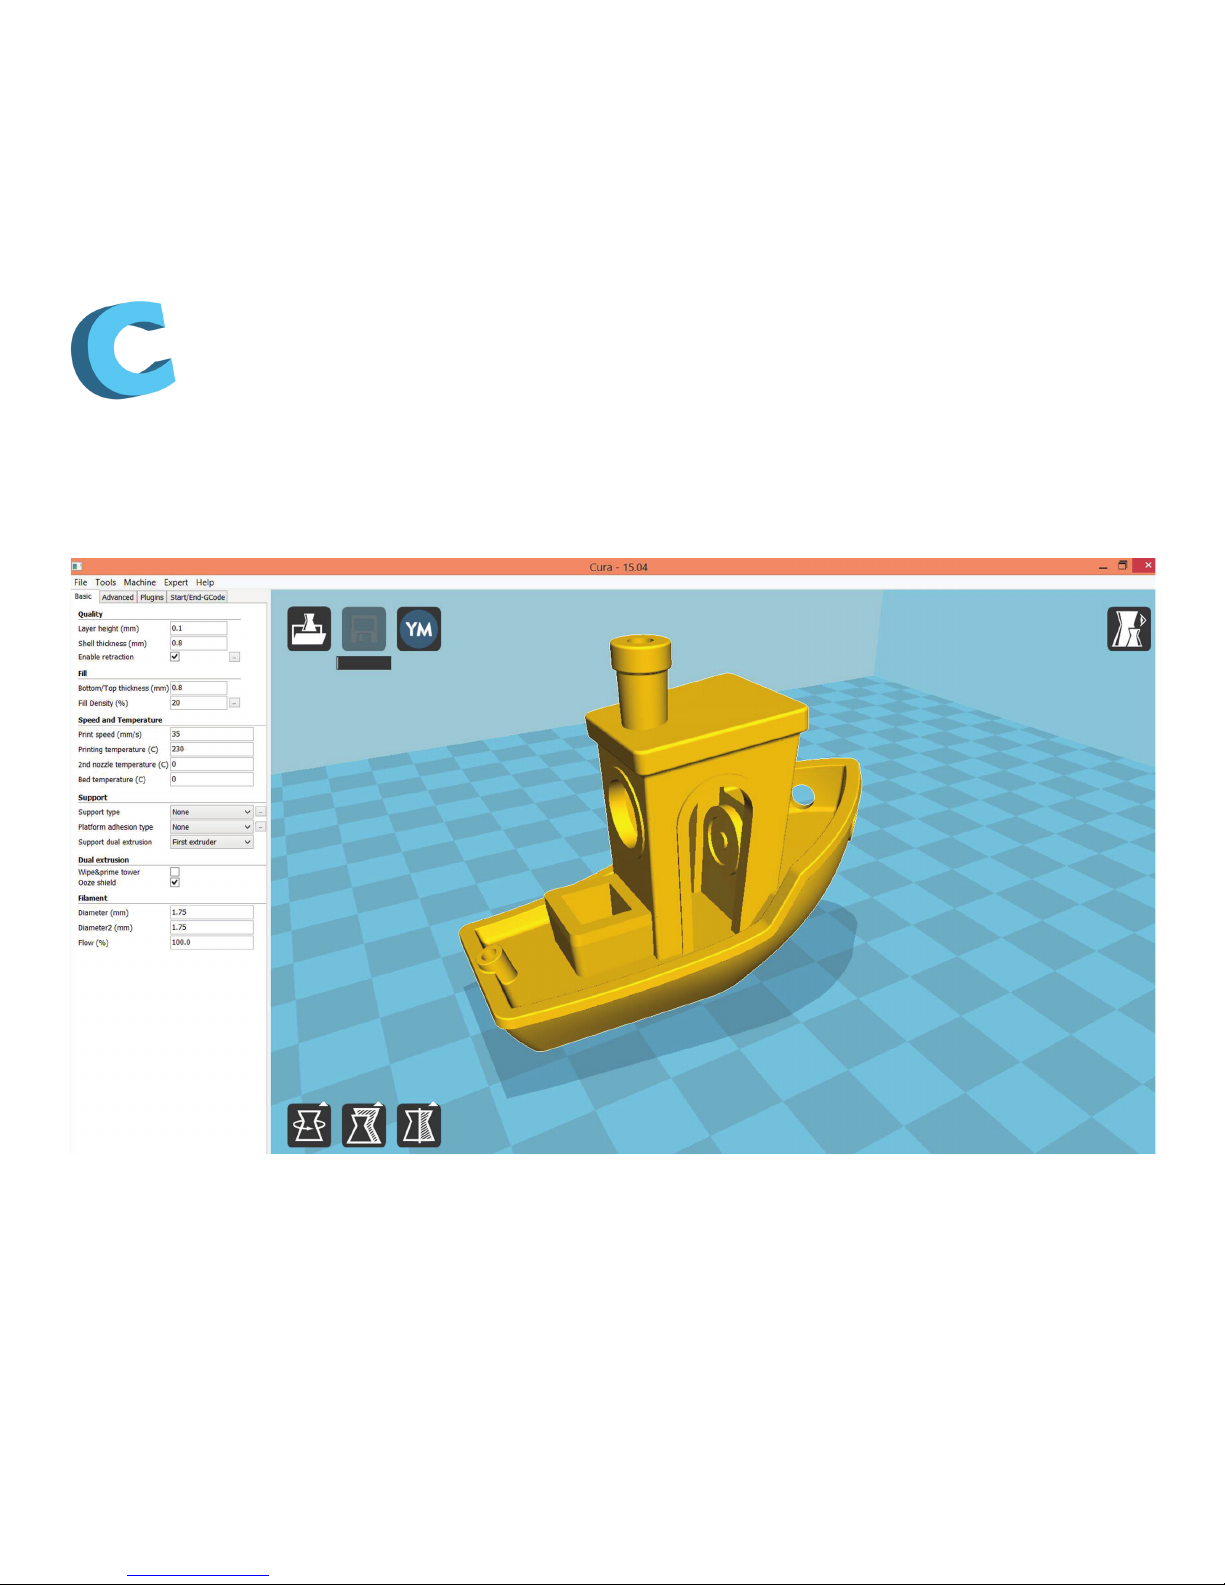
In order to generate G-code for printing, you can use Cura 15.04.
Please download only related versions from this link:
https://ultimaker.com/en/products/cura-software/list
Cura 15.04 screenshot
3
Page 5
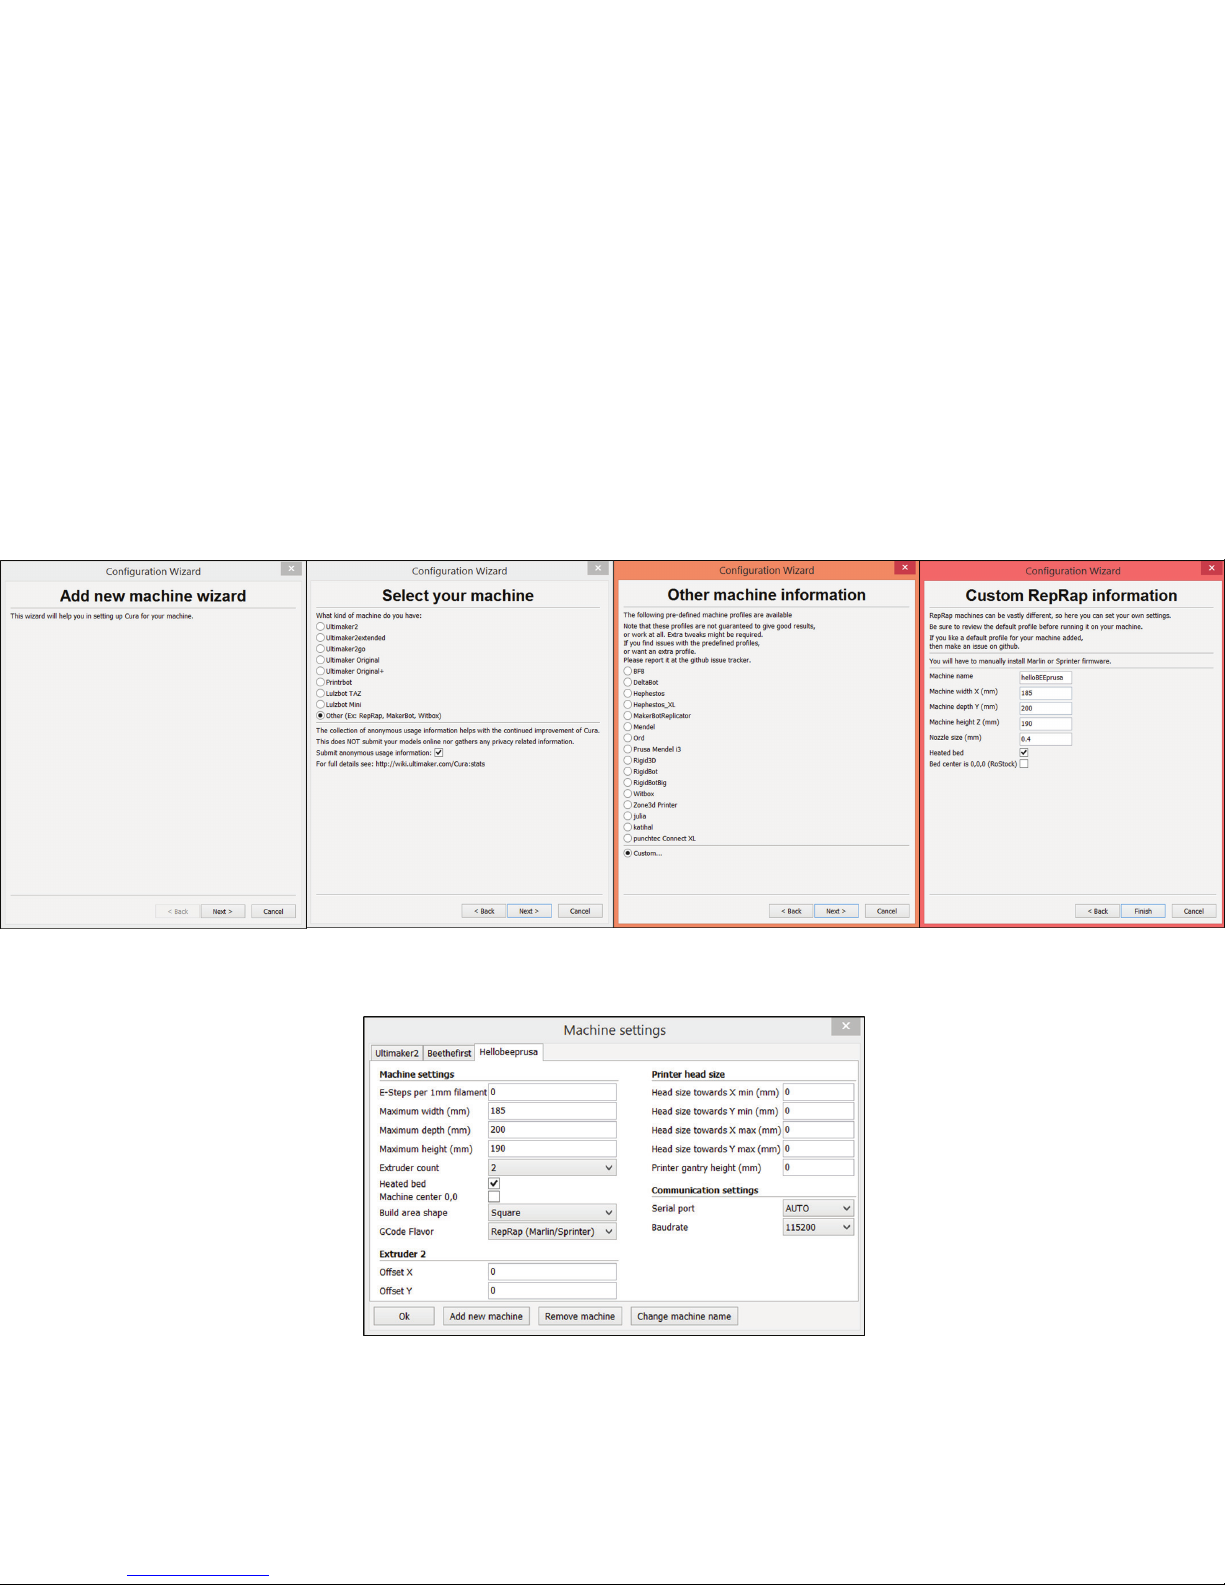
Before you start using this software you need to create a correct profile.
Add helloBEEprusa as a new machine on Cura 15.04
Go to "File > Machine settings" and click on "Add new machine".
Follow the next screenshots and use the same options.
Access to "Machine > Machine settings…" and compare with the following screenshot:
4
Page 6
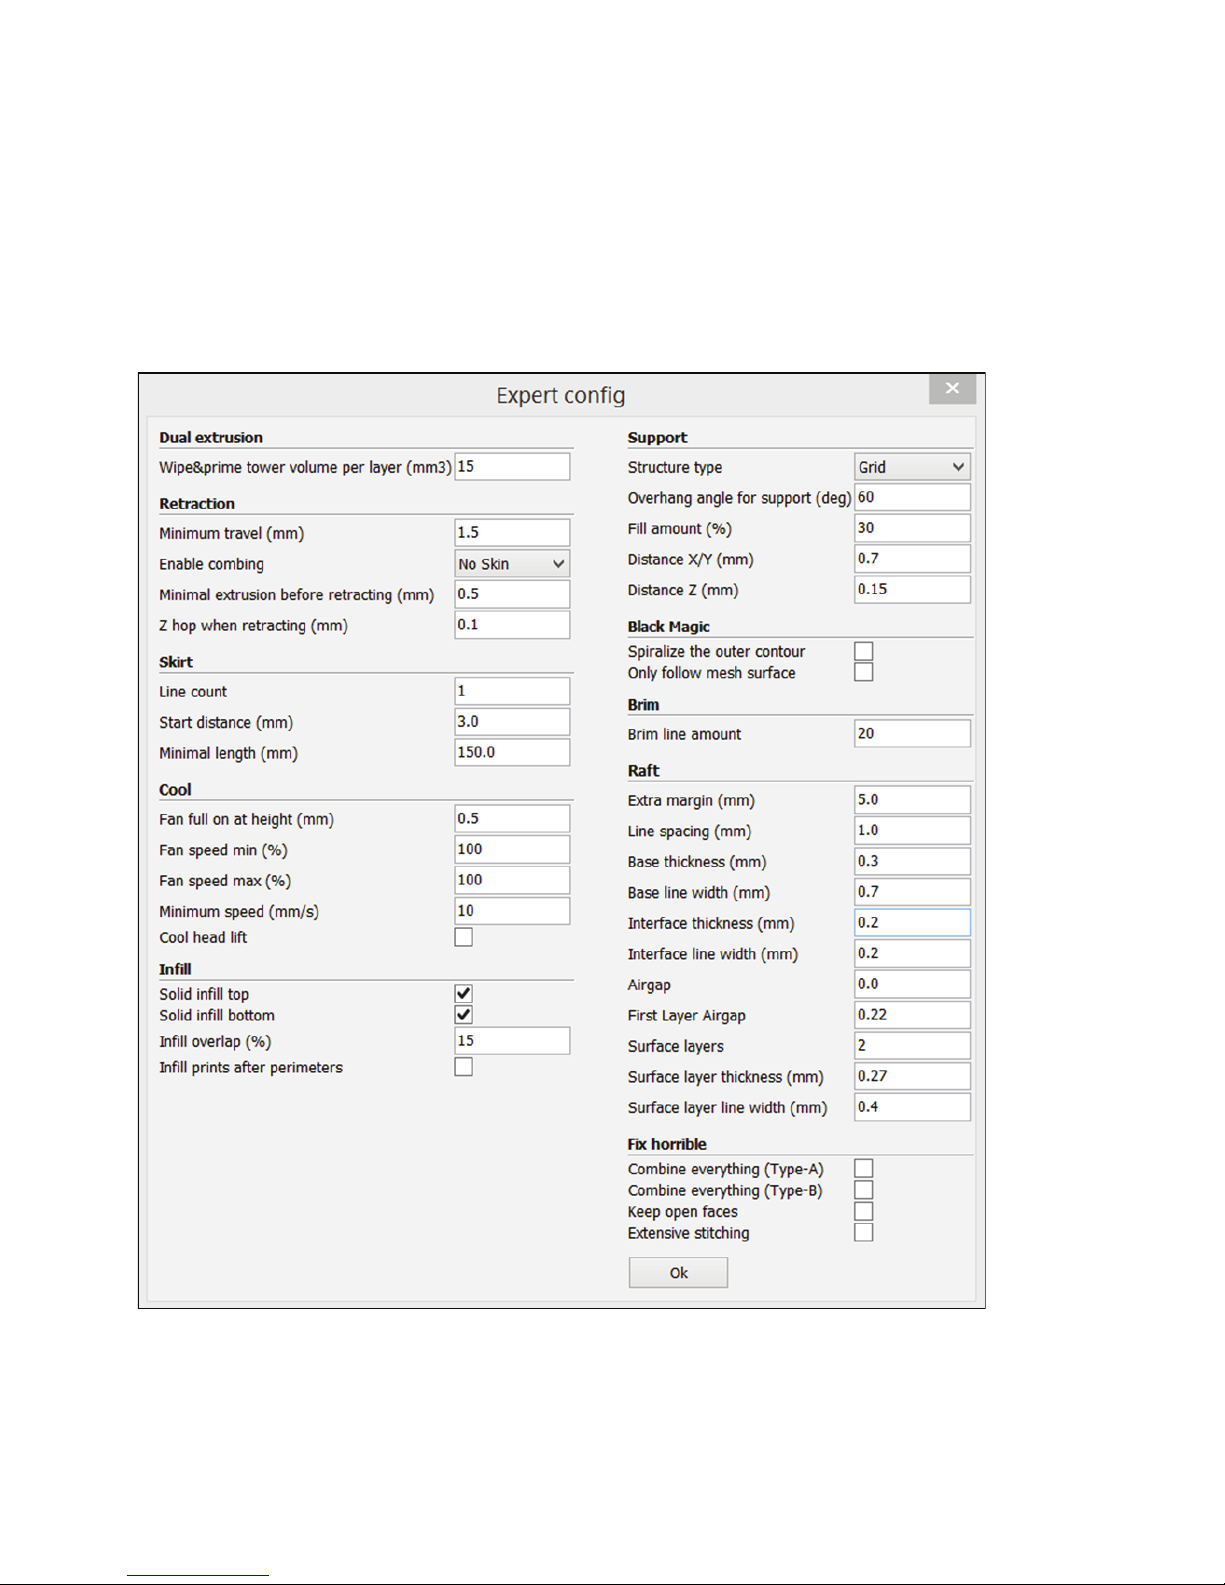
Access to "Expert > Open expert settings…" and compare with the following screenshot:
5
Page 7
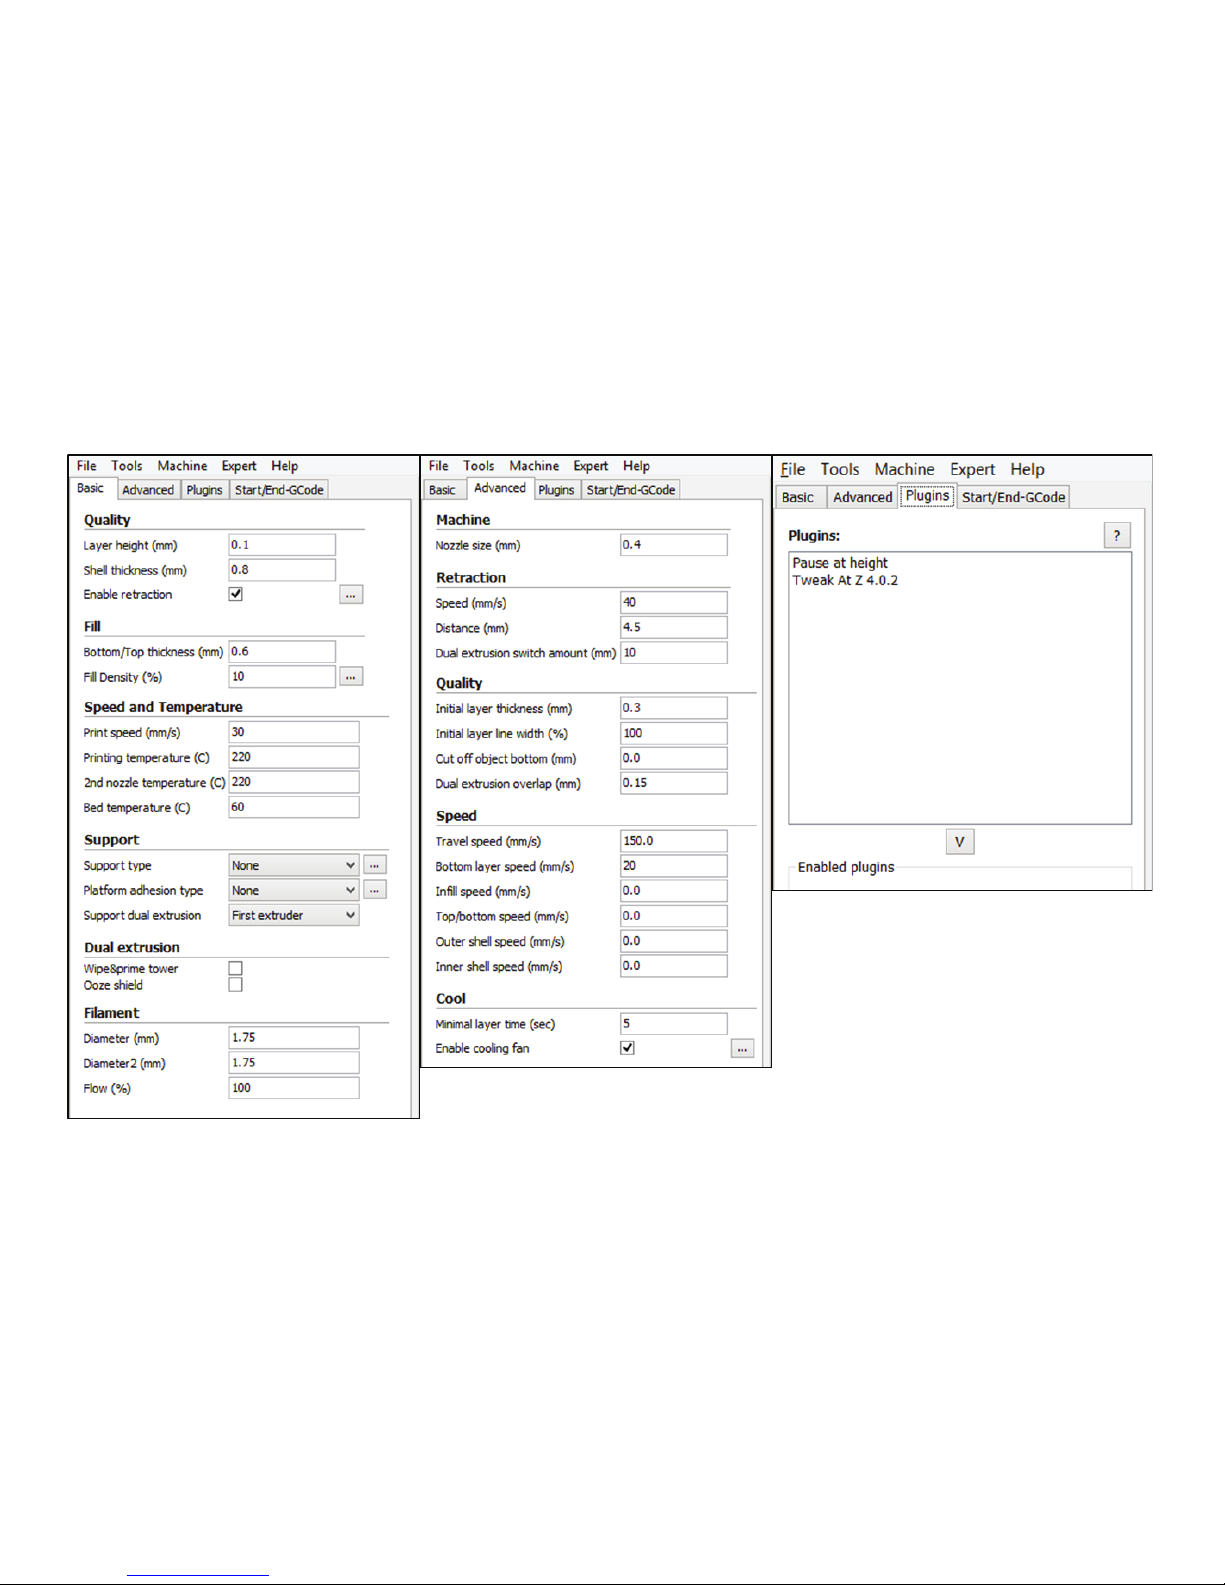
CONFIGURE SETTINGS
Follow these screenshots and use the same options.
6
NOTE: for ABS filament, choose Printing temperature of about 240ºC
and Bed temperature of 100ºC or more.
For PLA filament, choose printing temperature of about 220ºC
and Bed temperature of about 60ºC.
Page 8
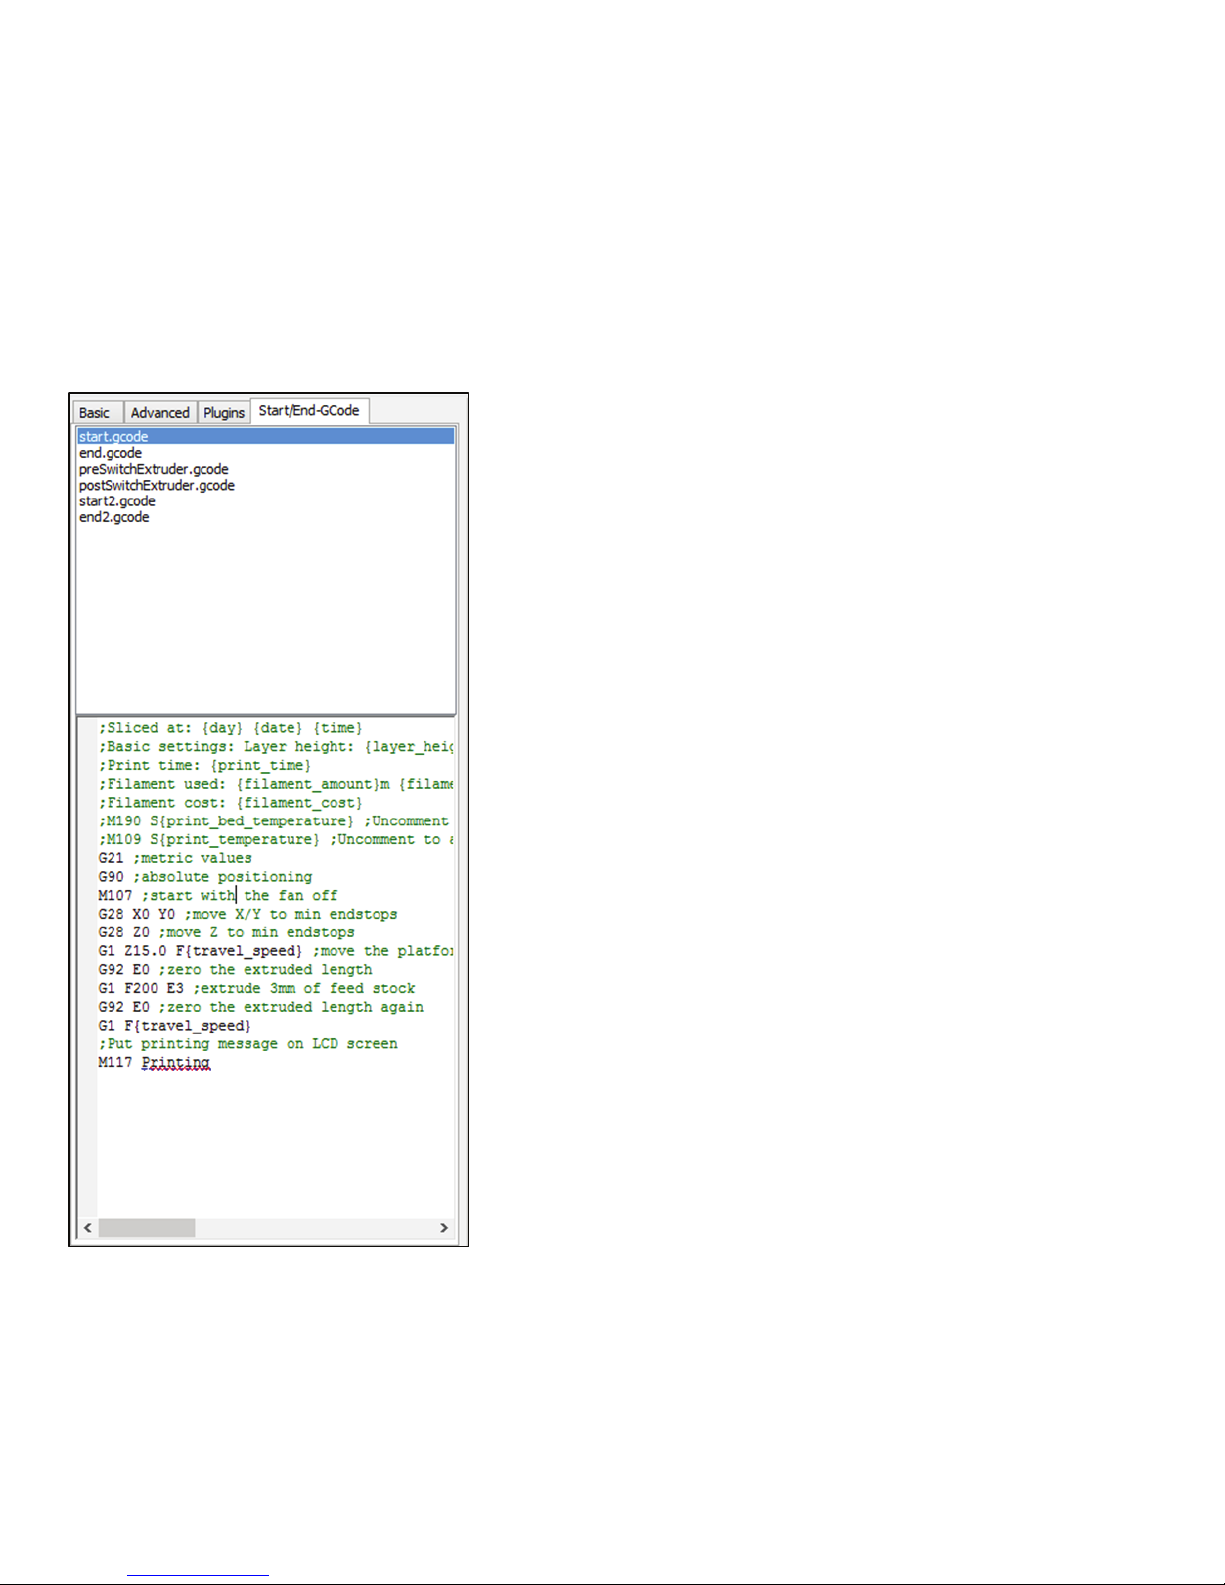
Follow these screenshots and copy the following commands.
7
USE THE FOLLOWING COMMANDS FOR START.GCODE:
;Sliced at: {day} {date} {time}
;Basic settings: Layer height: {layer_height} Walls: {wall_thickness} Fill: {fill_density}
;Print time: {print_time}
;Filament used: {filament_amount}m {filament_weight}g
;Filament cost: {filament_cost}
;M190 S{print_bed_temperature} ;Uncomment to add your own bed temperature line
;M109 S{print_temperature} ;Uncomment to add your own temperature line
G21 ;metric values
G90 ;absolute positioning
M107 ;start with the fan off
G28 X0 Y0 ;move X/Y to min endstops
G28 Z0 ;move Z to min endstops
G1 Z15.0 F{travel_speed} ;move the platform down 15mm
G92 E0 ;zero the extruded length
G1 F200 E3 ;extrude 3mm of feed stock
G92 E0 ;zero the extruded length again
G1 F{travel_speed}
;Put printing message on LCD screen
M117 Printing
Page 9

8
USE THE FOLLOWING COMMANDS FOR END.GCODE:
;End GCode
M104 S0 ;extruder heater off
M140 S0 ;heated bed heater off (if you have it)
G91 ;relative positioning
G1 E-1 F300 ;retract the filament a bit before lifting the nozzle, to release some of the pressure
G1 Z+0.5 E-5 X-20 Y-20 F{travel_speed} ;move Z up a bit and retract filament even more
G28 X0 Y0 ;move X/Y to min endstops, so the head is out of the way
M84 ;steppers off
G90 ;absolute positioning
USE THE FOLLOWING COMMANDS FOR PRESWITCHEXTRUDER.GCODE:
;Switch between the current extruder and the next extruder, when printing with multiple extruders.
;This code is added before the T(n)
USE THE FOLLOWING COMMANDS FOR POSTSWITCHEXTRUDER.GCODE:
;Switch between the current extruder and the next extruder, when printing with multiple extruders.
;This code is added after the T(n)
Page 10

9
USE THE FOLLOWING COMMANDS FOR START2.GCODE:
;Sliced at: {day} {date} {time}
;Basic settings: Layer height: {layer_height} Walls: {wall_thickness} Fill: {fill_density}
;Print time: {print_time}
;Filament used: {filament_amount}m {filament_weight}g
;Filament cost: {filament_cost}
;M190 S{print_bed_temperature} ;Uncomment to add your own bed temperature line
;M104 S{print_temperature} ;Uncomment to add your own temperature line
;M109 T1 S{print_temperature2} ;Uncomment to add your own temperature line
;M109 T0 S{print_temperature} ;Uncomment to add your own temperature line
G21 ;metric values
G90 ;absolute positioning
M107 ;start with the fan off
G28 X0 Y0 ;move X/Y to min endstops
G28 Z0 ;move Z to min endstops
G1 Z15.0 F{travel_speed} ;move the platform down 15mm
T1 ;Switch to the 2nd extruder
G92 E0 ;zero the extruded length
G1 F200 E10 ;extrude 10mm of feed stock
G92 E0 ;zero the extruded length again
G1 F200 E-{retraction_dual_amount}
T0 ;Switch to the first extruder
G92 E0 ;zero the extruded length
G1 F200 E10 ;extrude 10mm of feed stock
G92 E0 ;zero the extruded length again
G1 F{travel_speed}
;Put printing message on LCD screen
M117 Printing
Page 11

USE THE FOLLOWING COMMANDS FOR END2.GCODE:
;End GCode
M104 T0 S0 ;extruder heater off
M104 T1 S0 ;extruder heater off
M140 S0 ;heated bed heater off (if you have it)
G91 ;relative positioning
G1 E-1 F300 ;retract the filament a bit before lifting the nozzle, to release some of the pressure
G1 Z+0.5 E-5 X-20 Y-20 F{travel_speed} ;move Z up a bit and retract filament even more
G28 X0 Y0 ;move X/Y to min endstops, so the head is out of the way
M84 ;steppers off
G90 ;absolute positioning
10
Page 12
11
BED CALIBRATION
In order to be able to print, you first need to calibrate the bed.
You need to evenly level the bed so the first layer of the print can adhere well to the bed,
otherwise it may ruin your print.
For this you can use the Pronterface or the LCD.
USING PRONTERFACE
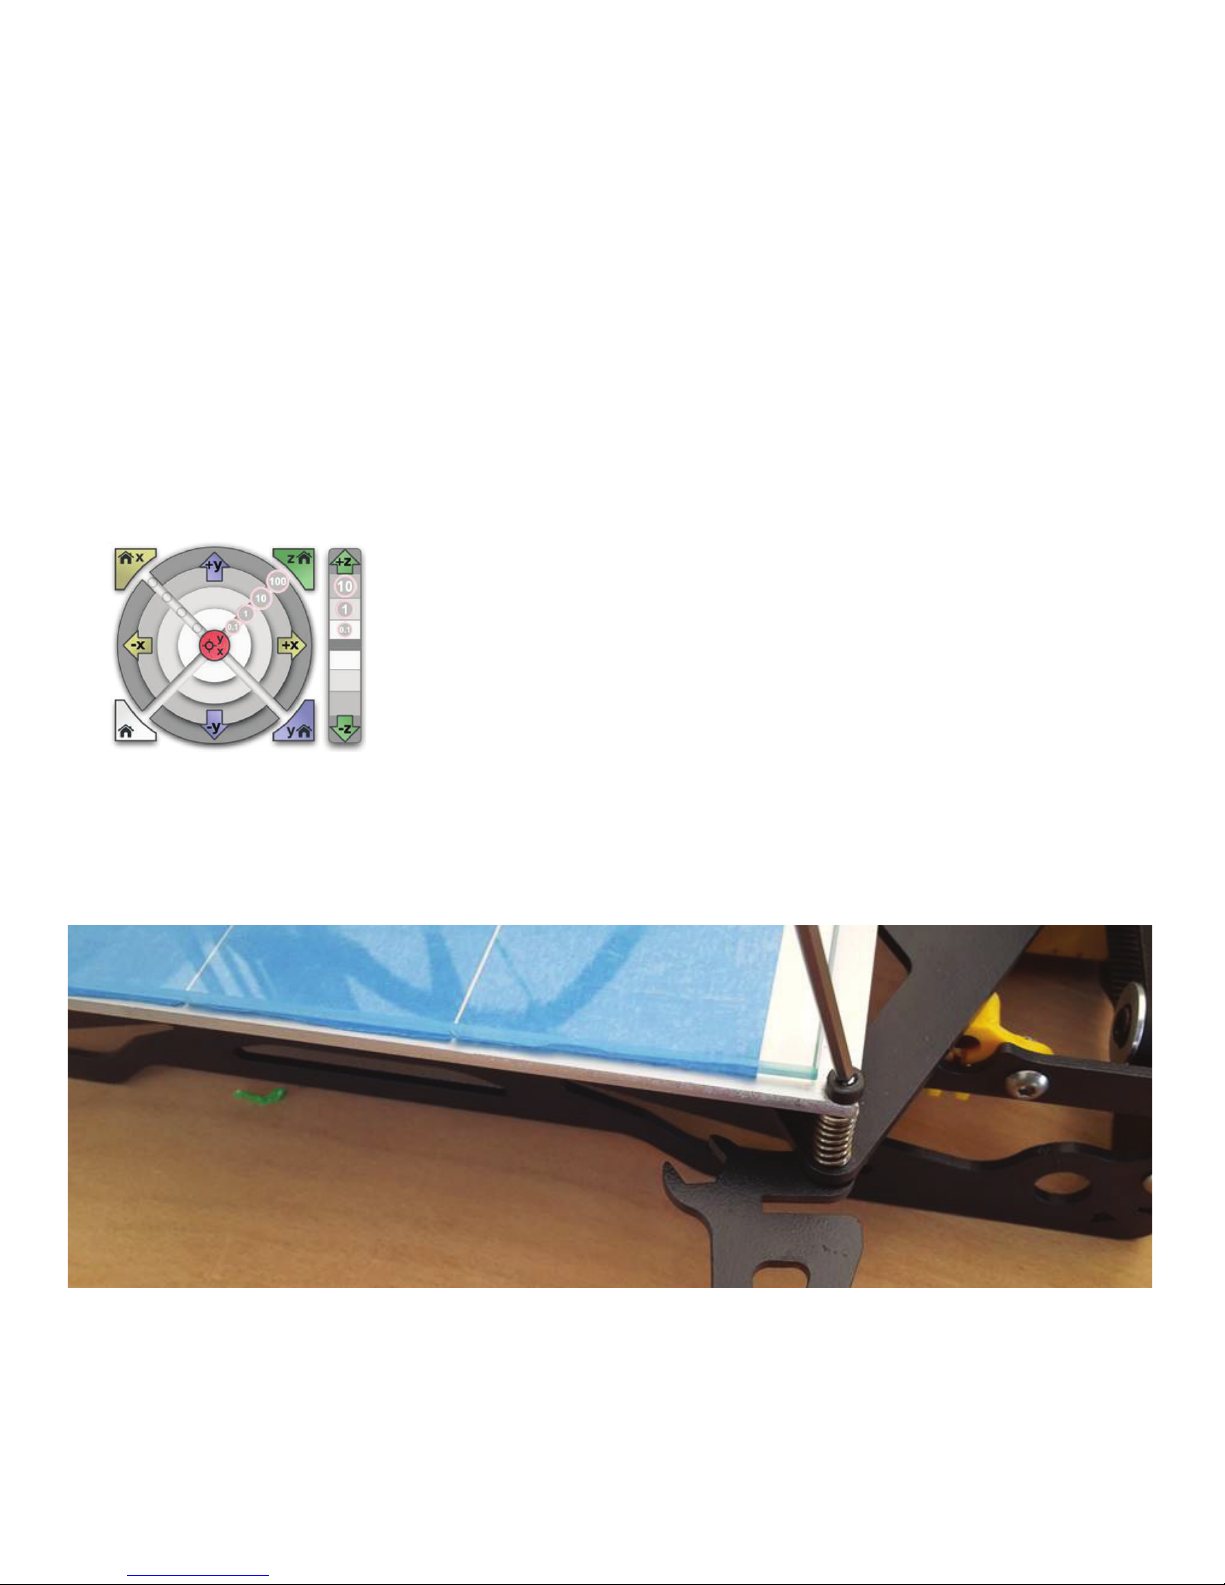
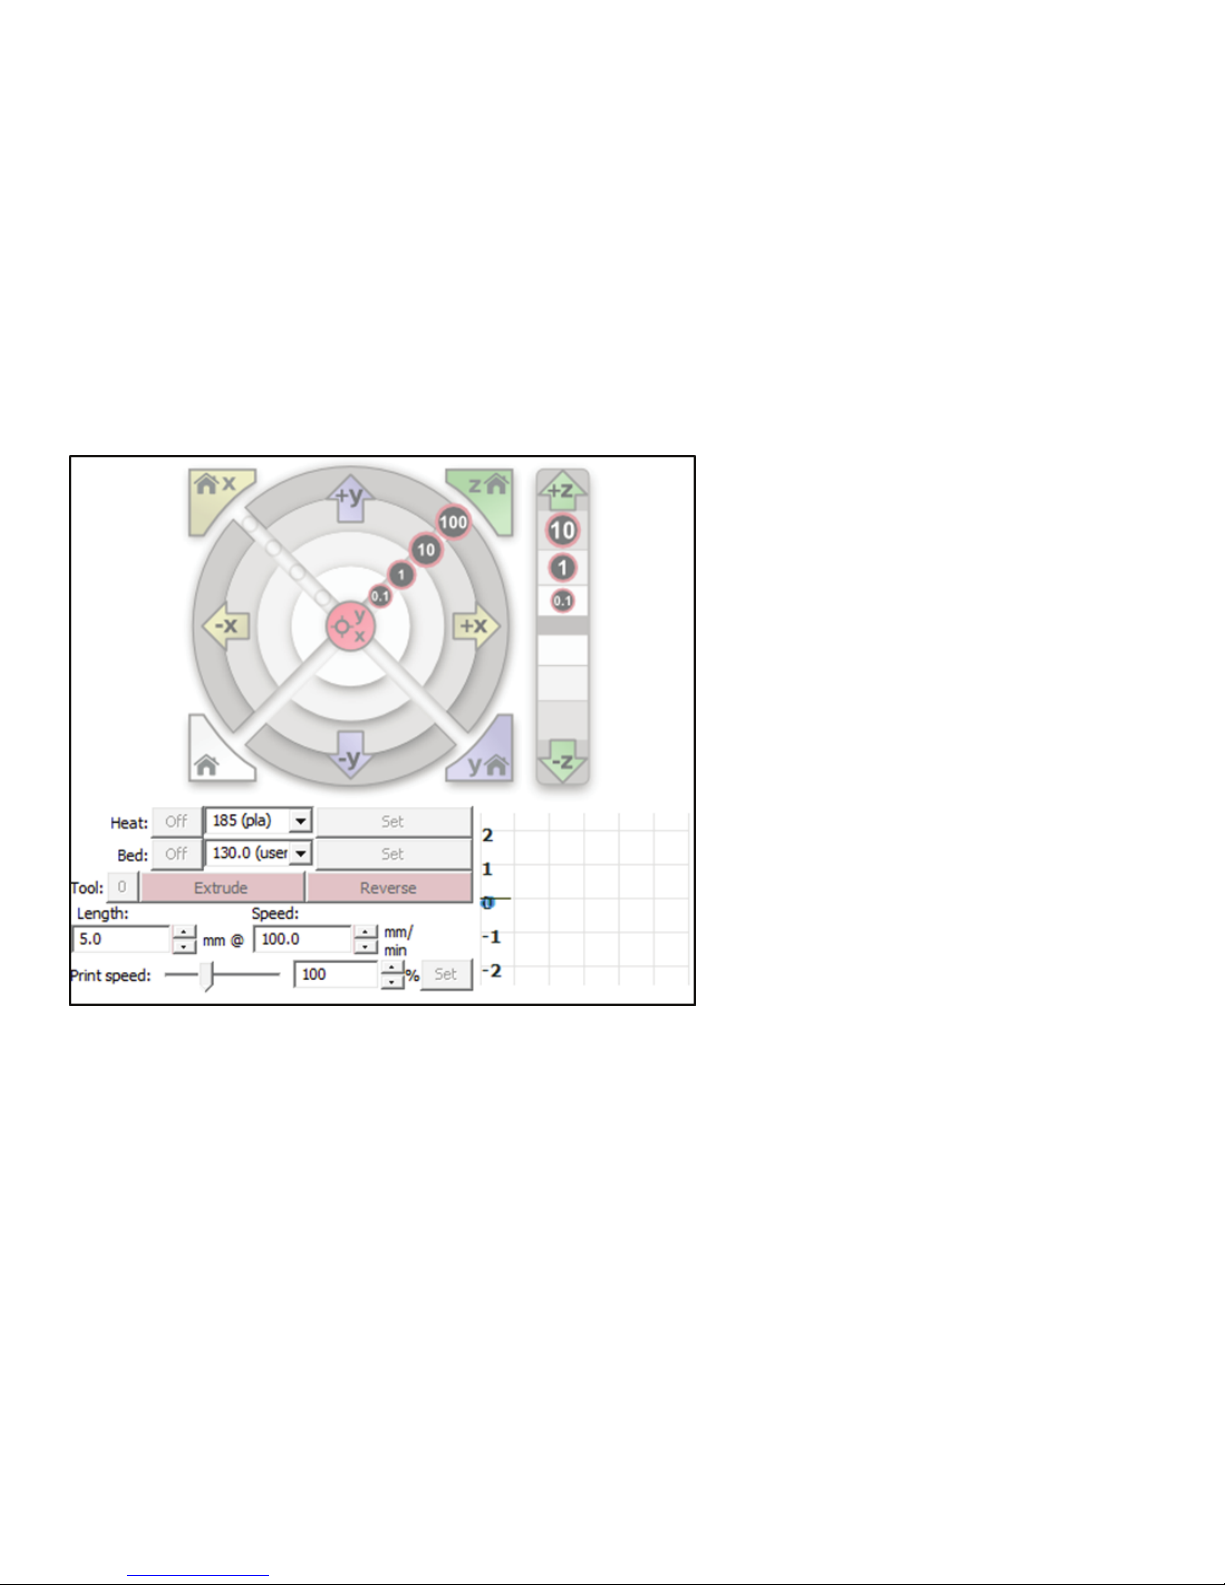
Before starting to level the bed, you can jog the extruder
and the bed using the jog buttons (picture below) on Pronterface.
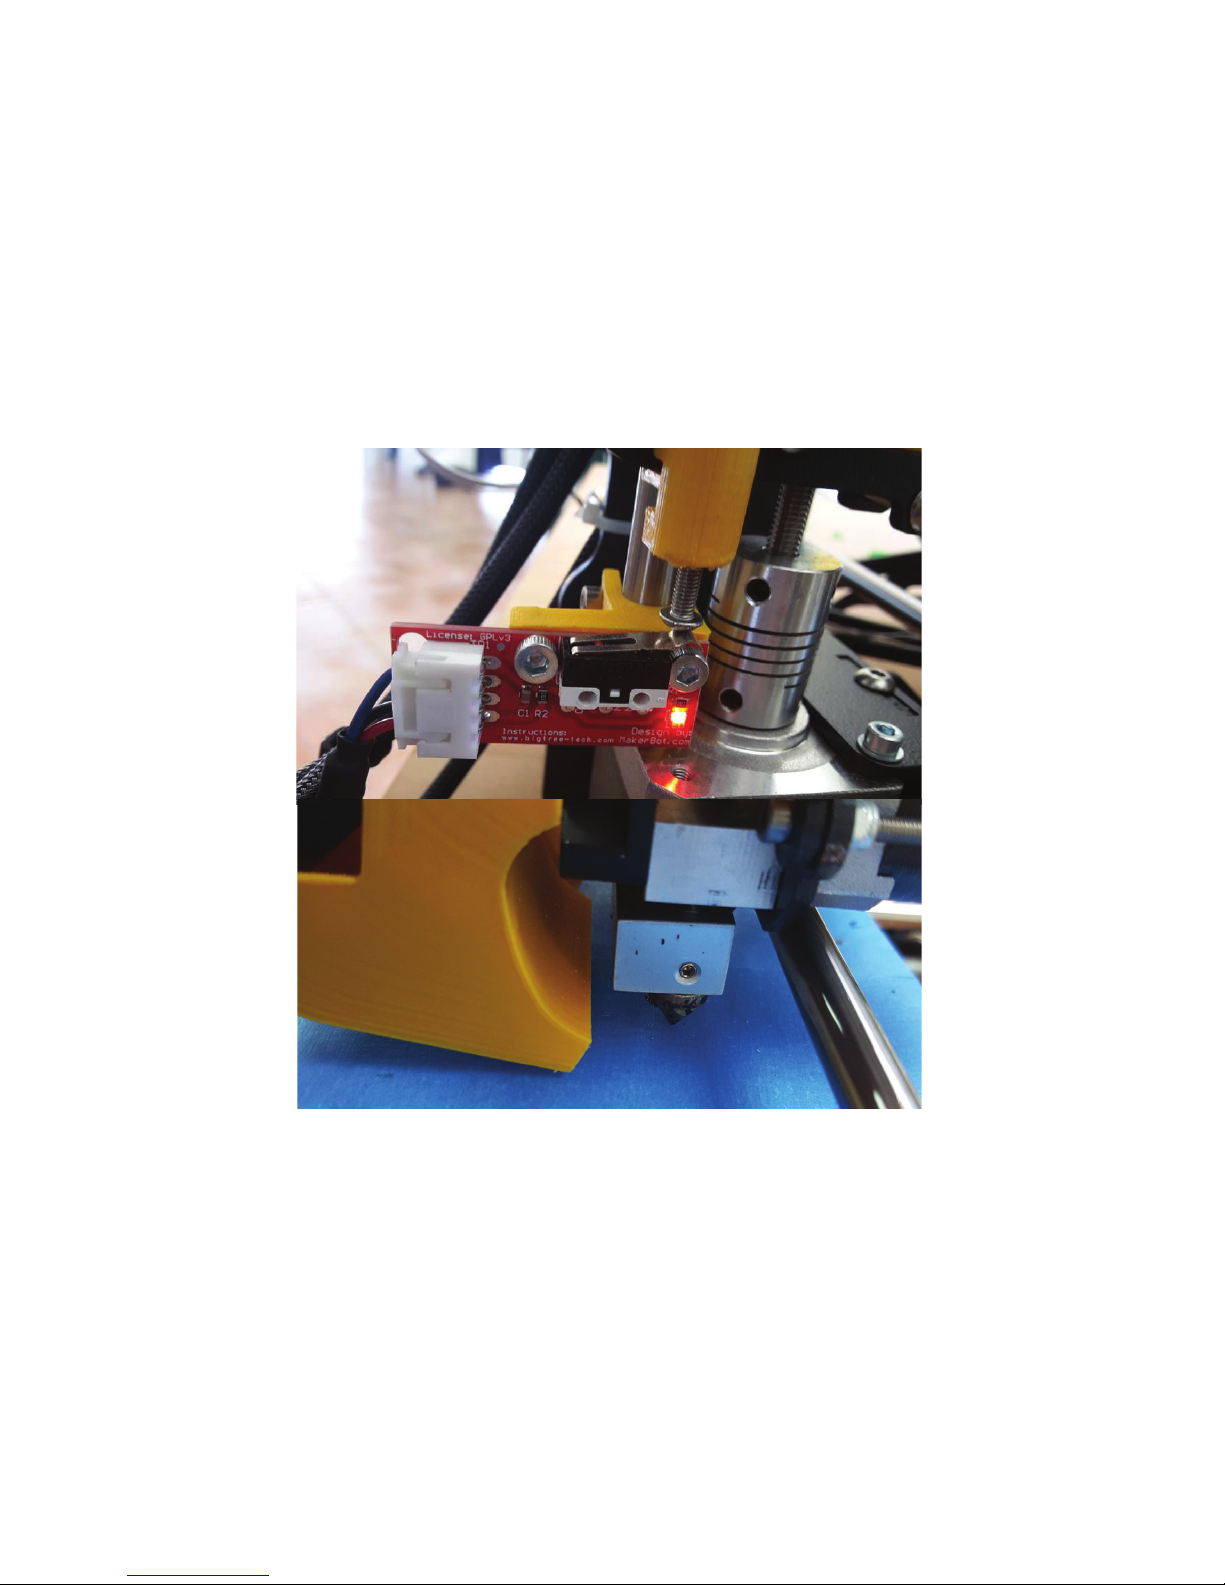
You can move the Z axis in a way that the nozzle stays a bit closer
to the bed and is essential for the following steps.
Use the 3 screws to level the bed. This is done to give the same clearance from the nozzle on all
points of the bed.
Page 13
12
Next step is to adjust the home Z axis so the nozzle is at a distance of about 0.2mm from the bed.
You can use a paper sheet as reference for the needed distance. Use the Pronterface jog panel for this.
Example of the nozzle staying at about 0.2mm from the bed
Page 14
13
USING THE LCD
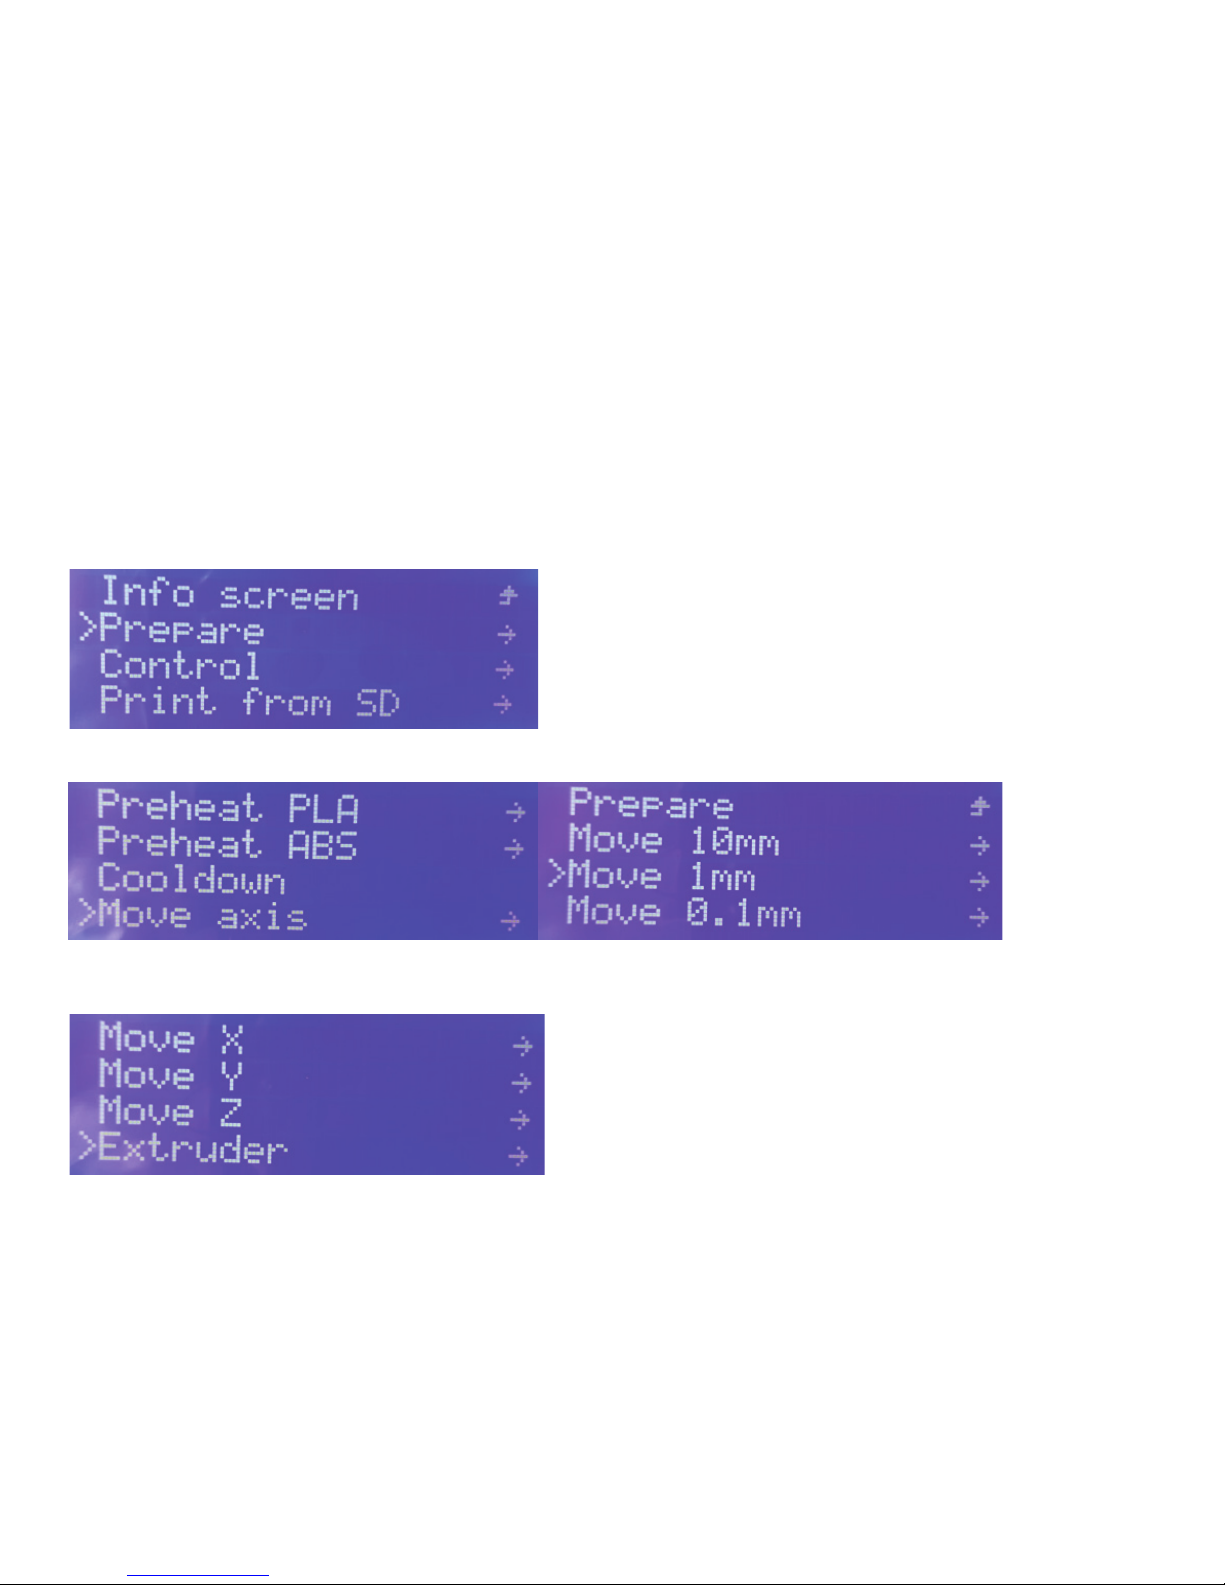
You can use the LCD to level the bed also, follow the next steps:
In the LCD push the button to have access to the "info screen";
In "info screen" select "Prepare";
In "Prepare" go to "Move axis"and select "Move 1mm";
In "Move 1mm" select the axis you want to move;
Rotate the button to the right or to the left to make the axis move, (note that the extruder motor
only move if the extruder is heat but in this case you don’t need to move it);
Page 15
14
LOAD/UNLOAD THE FILAMENT
USING THE LCD (EXTRUDER 0 ONLY)
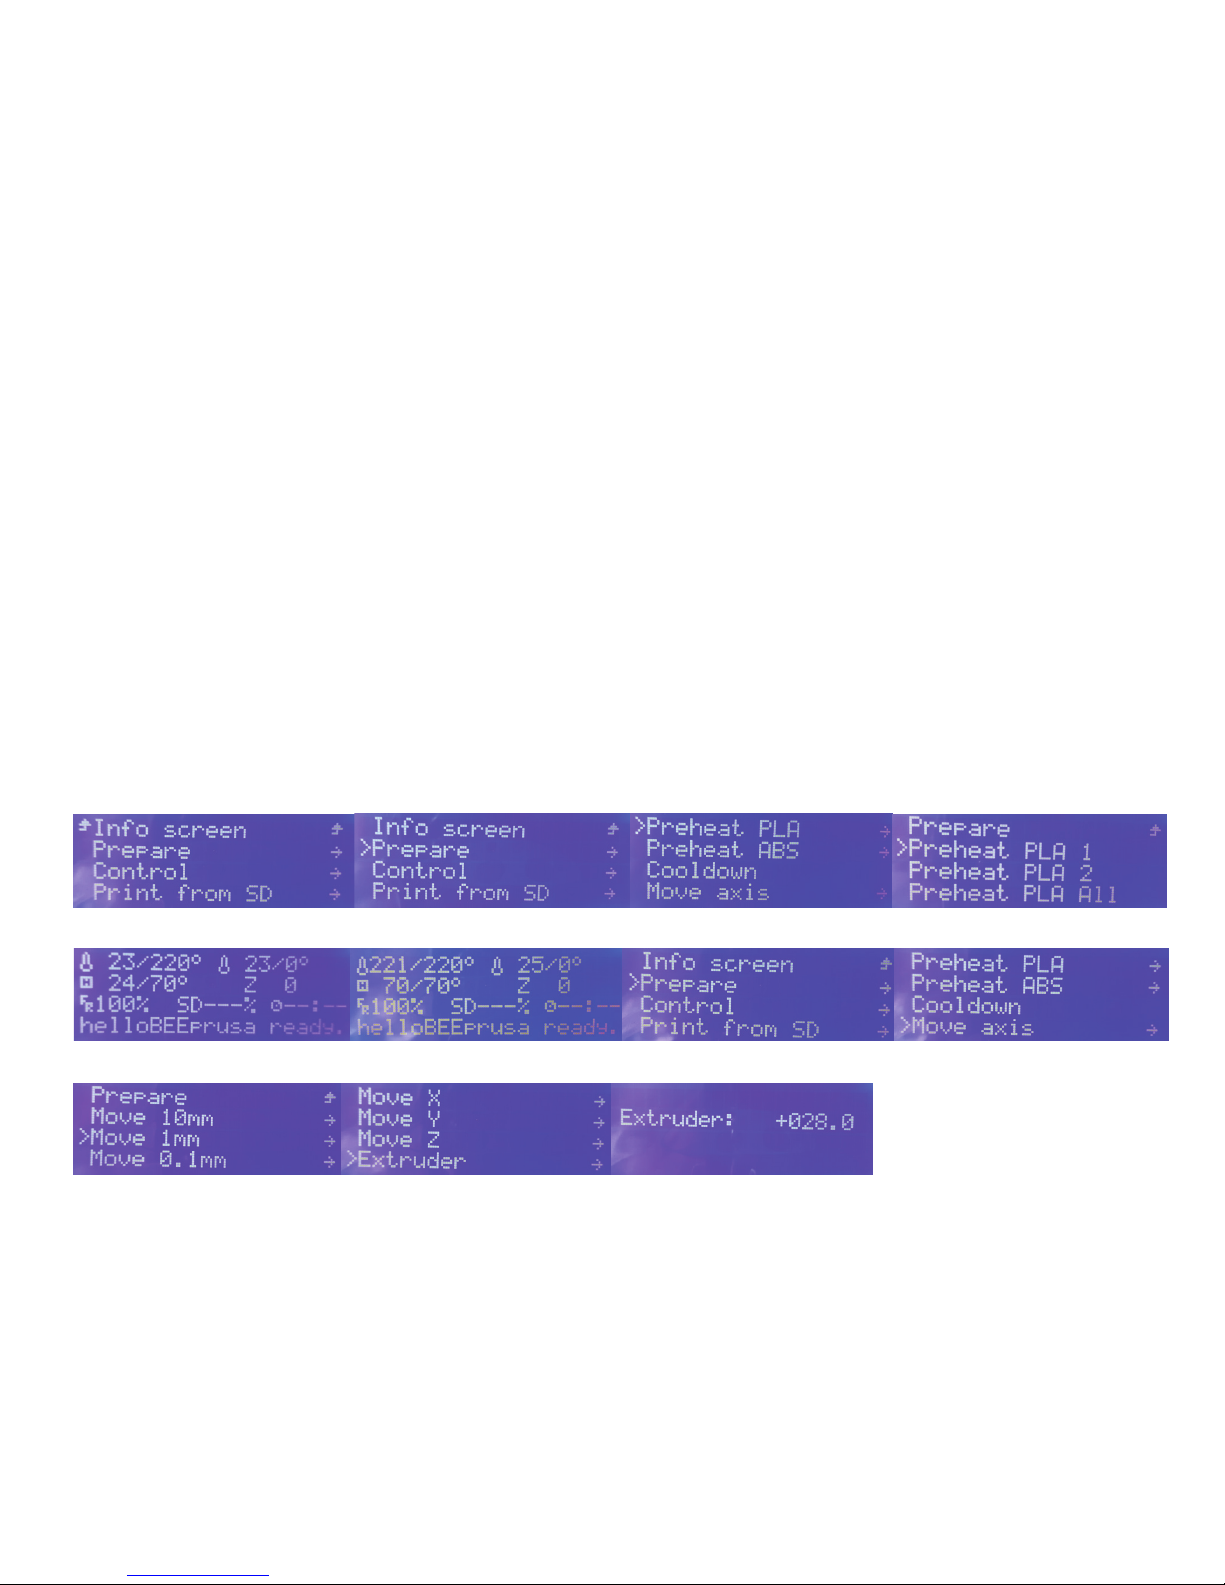
You can follow these steps to load/unload through the LCD, but this only works for the extruder 0:
1. In the LCD push the button to have access to the "info screen";
2. In "info screen" select "Prepare";
3. In "Prepare" go to "Preheat PLA" or "Preheat ABS";
4. In "Preheat PLA" select "Preheat PLA 1", the printing table and the extruder 0 will start heating;
5. After finishing heating, push the button to go to the "info screen" and select "Prepare";
6. In "Prepare" go to "Move axis" and select "Move 1mm";
7. In "Move 1mm" select "extruder";
8. In this screen you rotate the button to the right if you want to load and to the left if you want to unload.
Page 16
15
USING PRONTERFACE
You can change the extruder by clicking on the button next to “Tool”, Tool 0 is for the first extruder
and Tool 1 is for the second extruder.
You can load/unload filament using the Pronterface control panel.
To load, first you need to set
the extruder heating temperature
and wait for the temperature to reach
that value.
You can check progress on the graph.
When the extruder reaches
the temperature, then you can click on
the Extrude button and
insert the filament into the extruder.
To unload, you also need to set
the same extruder heating temperature.
Afterwards, just click the Reverse button
and gently pull the filament from
the extruder.
Page 17
16
FIRST PRINT
For our first print we will be using the free 3DBenchy 3D model - you can download it here:
http://www.3dbenchy.com/
There are two ways to print:
CURA AND SDCARD
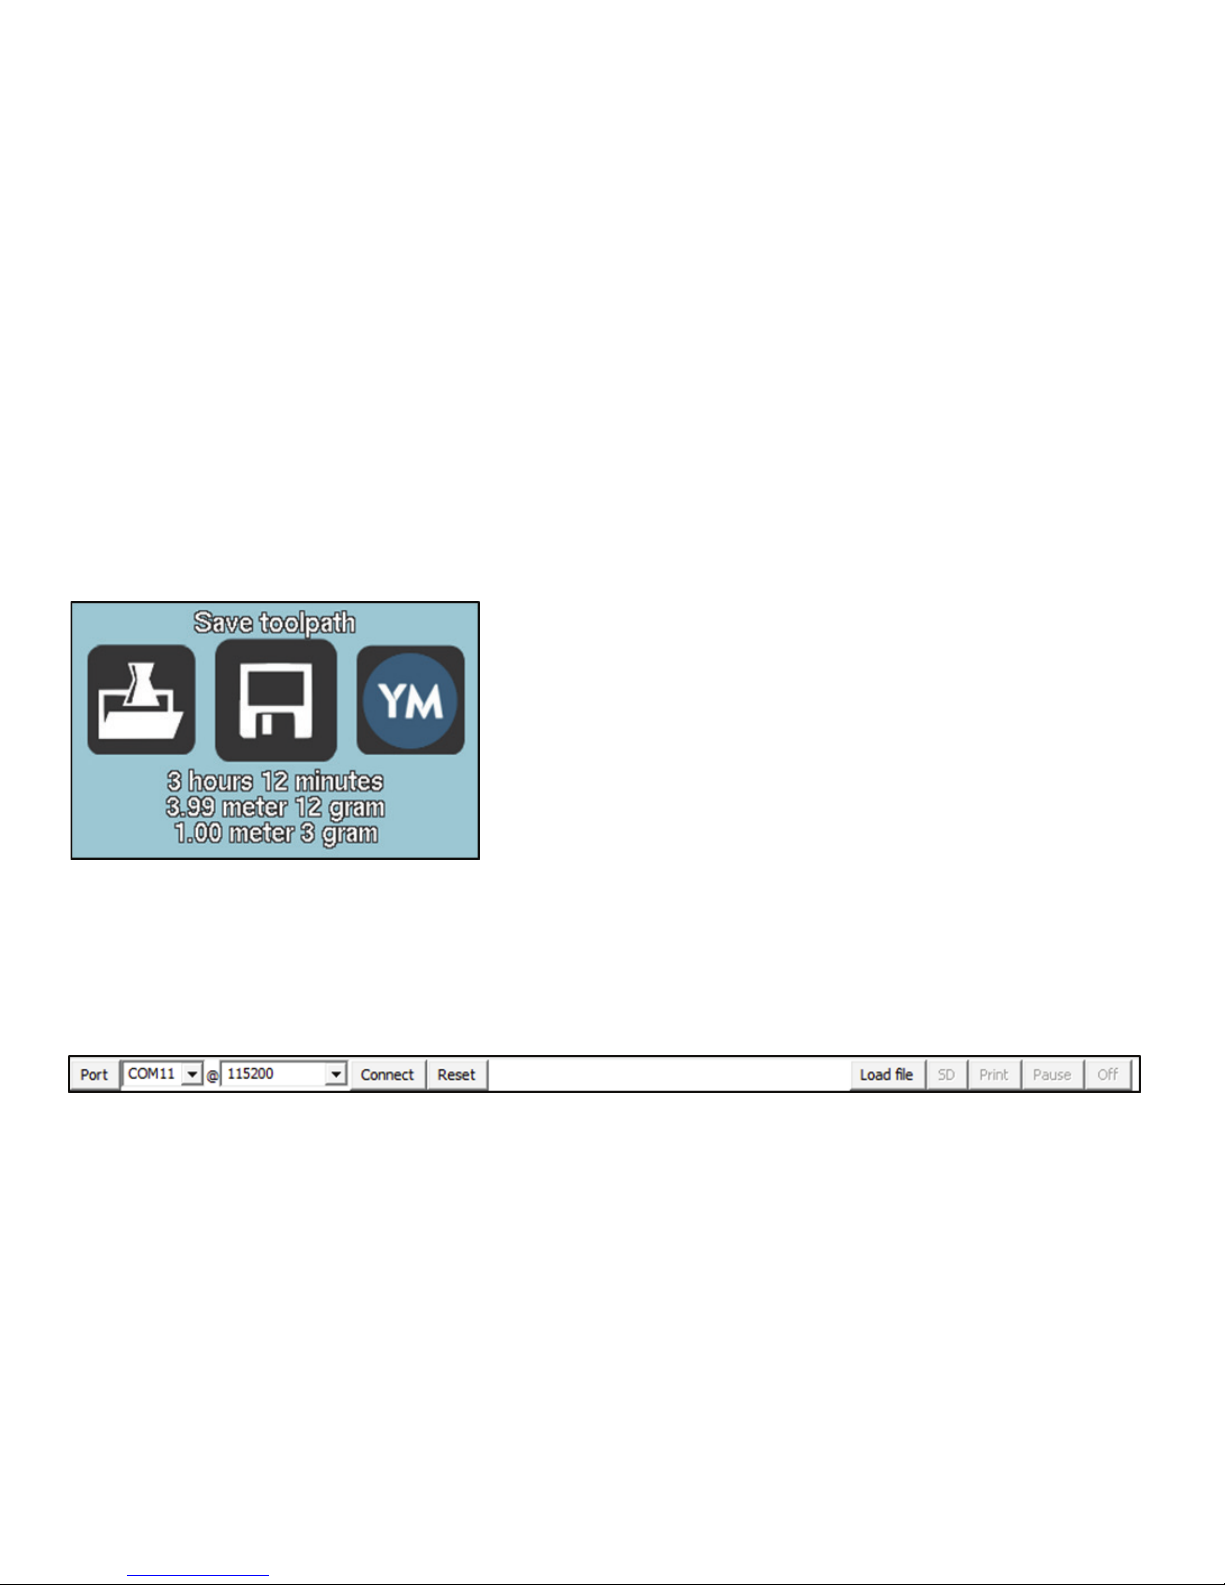
After we correctly configure Cura 15.04, we just need to import the STL file and export the Gcode.
We export the Gcode by doing "Save toolpath"
and choose to save it in your SDCard.
Now insert the SDCard on the printer and with the LCD button,
navigate to "Print from SD" and choose the file.
Your printer will start heating and will then print the object.
PRONTERFACE AND USB CABLE
First configure Pronterface and Cura, after that, use Cura to generate the GCode of the object
you want to print.
Connect the printer trough the USB.
Click on the “Connect” button and the printer will be connect to Pronterface, after that click
on the “Load file” button and select the Gcode file that was generated by Cura before.
Now click on “Print”, the printer will start to heat up and will print after that
Remember to never disconnect the USB cable or close the Pronterface, the printer will stop
if you do that.
Page 18
GETTING STARTED
WITH DUAL EXTRUSION
Before you start printing with dual extruders, you need to setup the offset of the extruders.
HOW TO SET THE OFFSET OF THE EXTRUDERS
Download and drag it onto the printbed in Cura this file:
https://github.com/beeverycreative/helloBEEprusa-software/raw/master/dual_extruder_offset.amf
17
Page 19
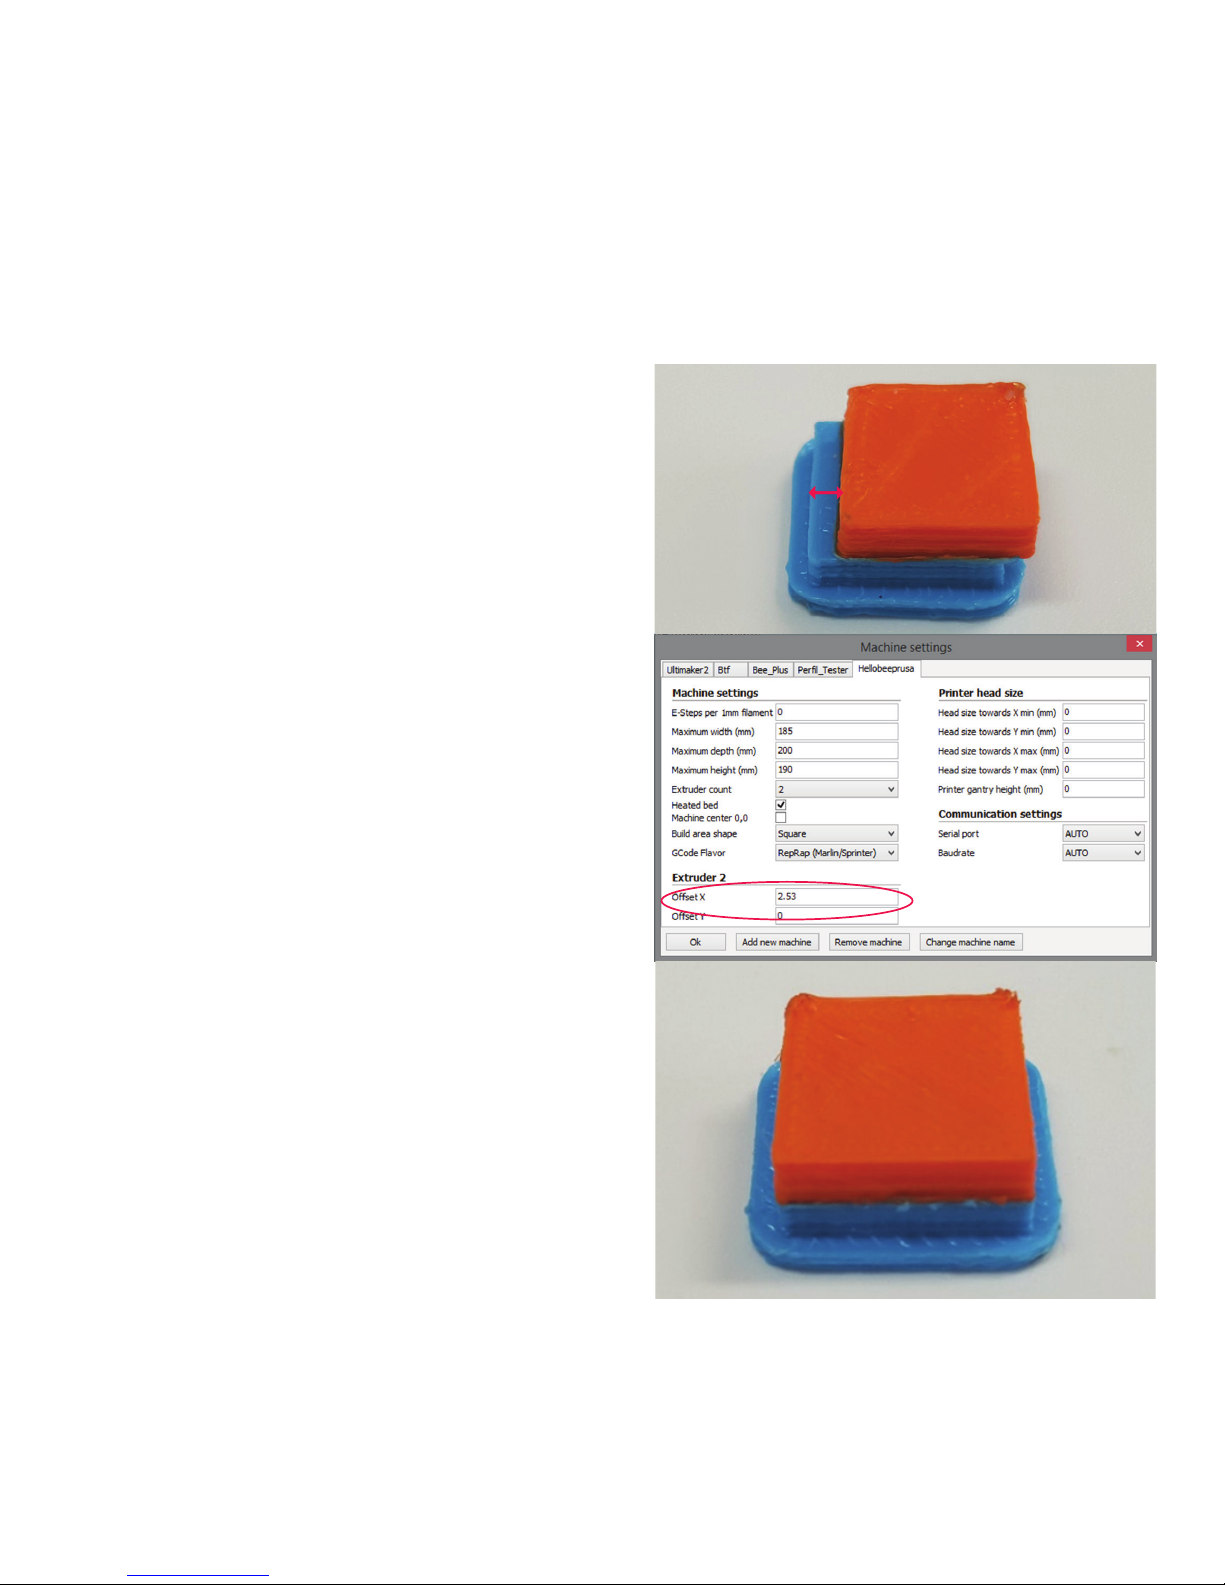
Export the G-Code and print. Grab a metric ruler
and measure the distance of any axis offset
that exists on the 3D-printed object.
The Red rectangle and the Yellow rectangle should
coincide. If they’re not, measure the offset
between them.
Now you need to setup in Cura the offset.
Go to Machine >Machine Settings:
under Extruder 2 change the Offset X and the Offset Y
to the number that was measure before
(in this example, offset of 2.53mm for X and 0 for Y).
Test the offset and repeat the process if the print
does not looks good.
Example of printed part with a good offset setup:
2,53mm
18
Page 20
SET UP THE TWO EXTRUDERS WITH THE SAME HEIGHT
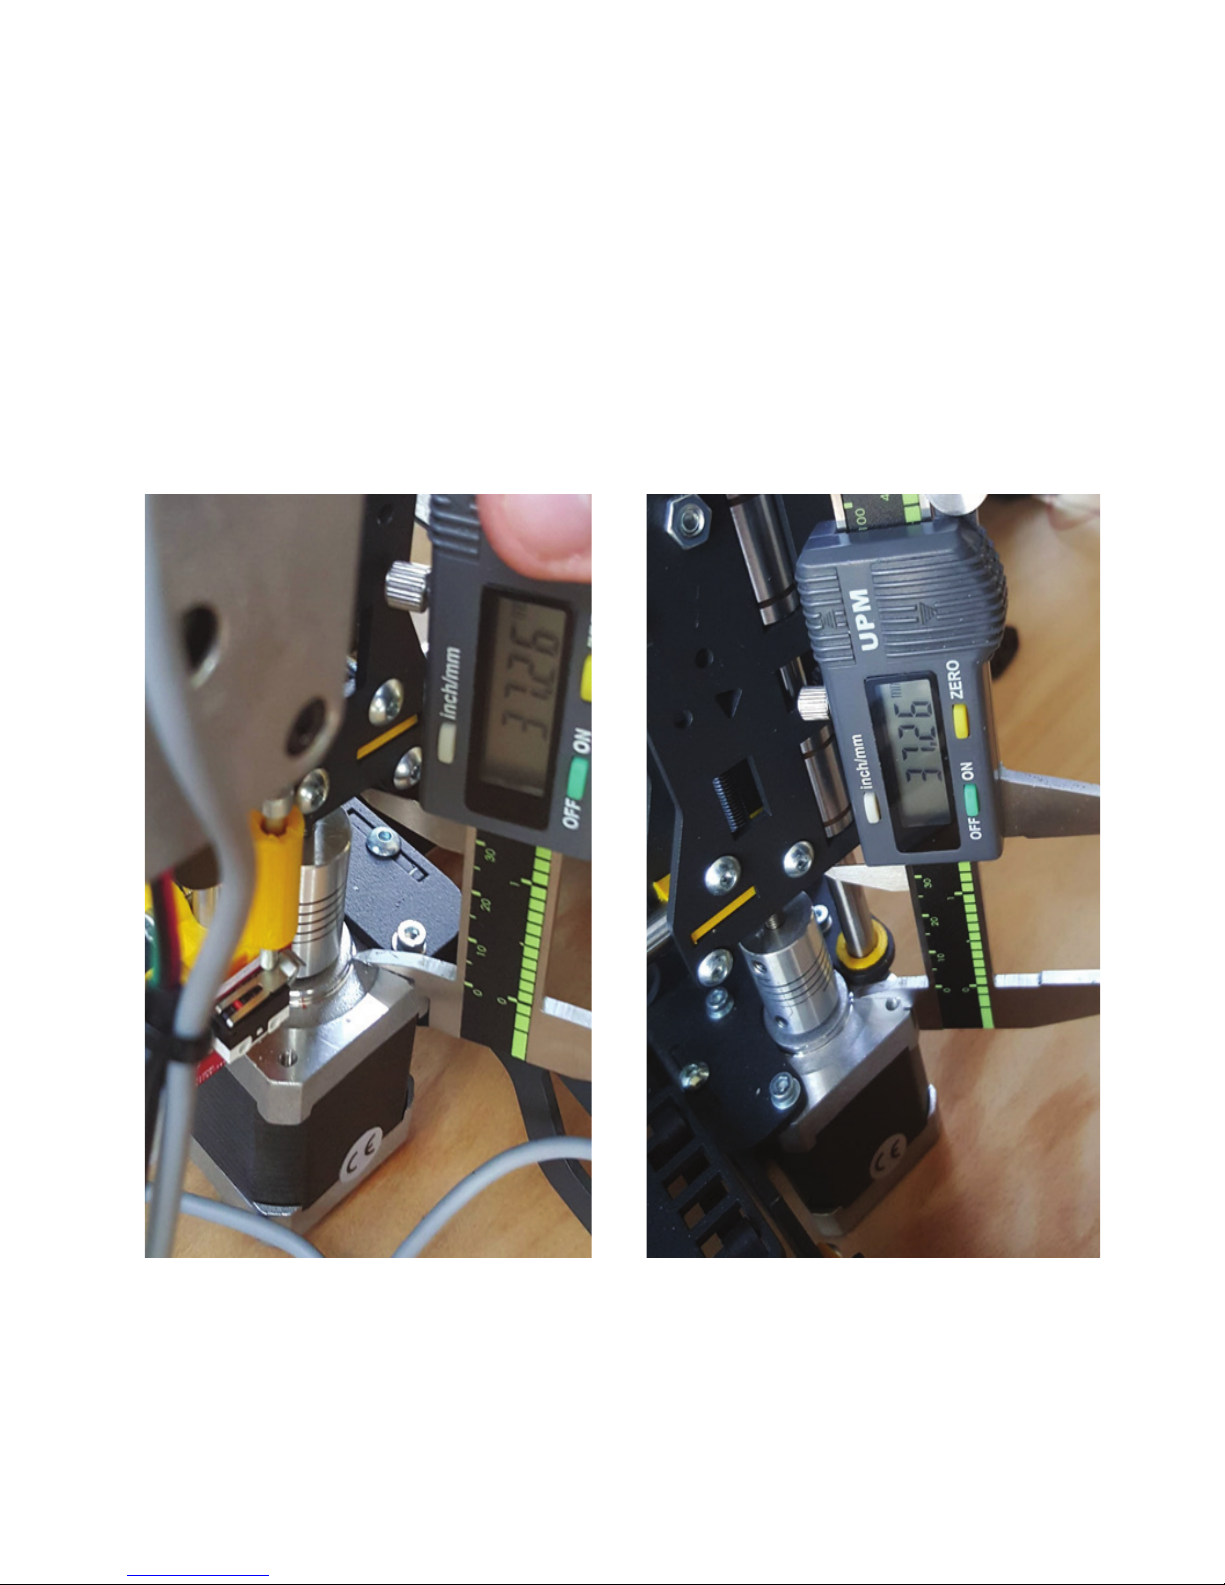
Ensure that the X carriage has the exact same height, using its Z motor as a reference, and ensure
that the bed is calibrated with the lowest nozzle as reference.
19
Page 21
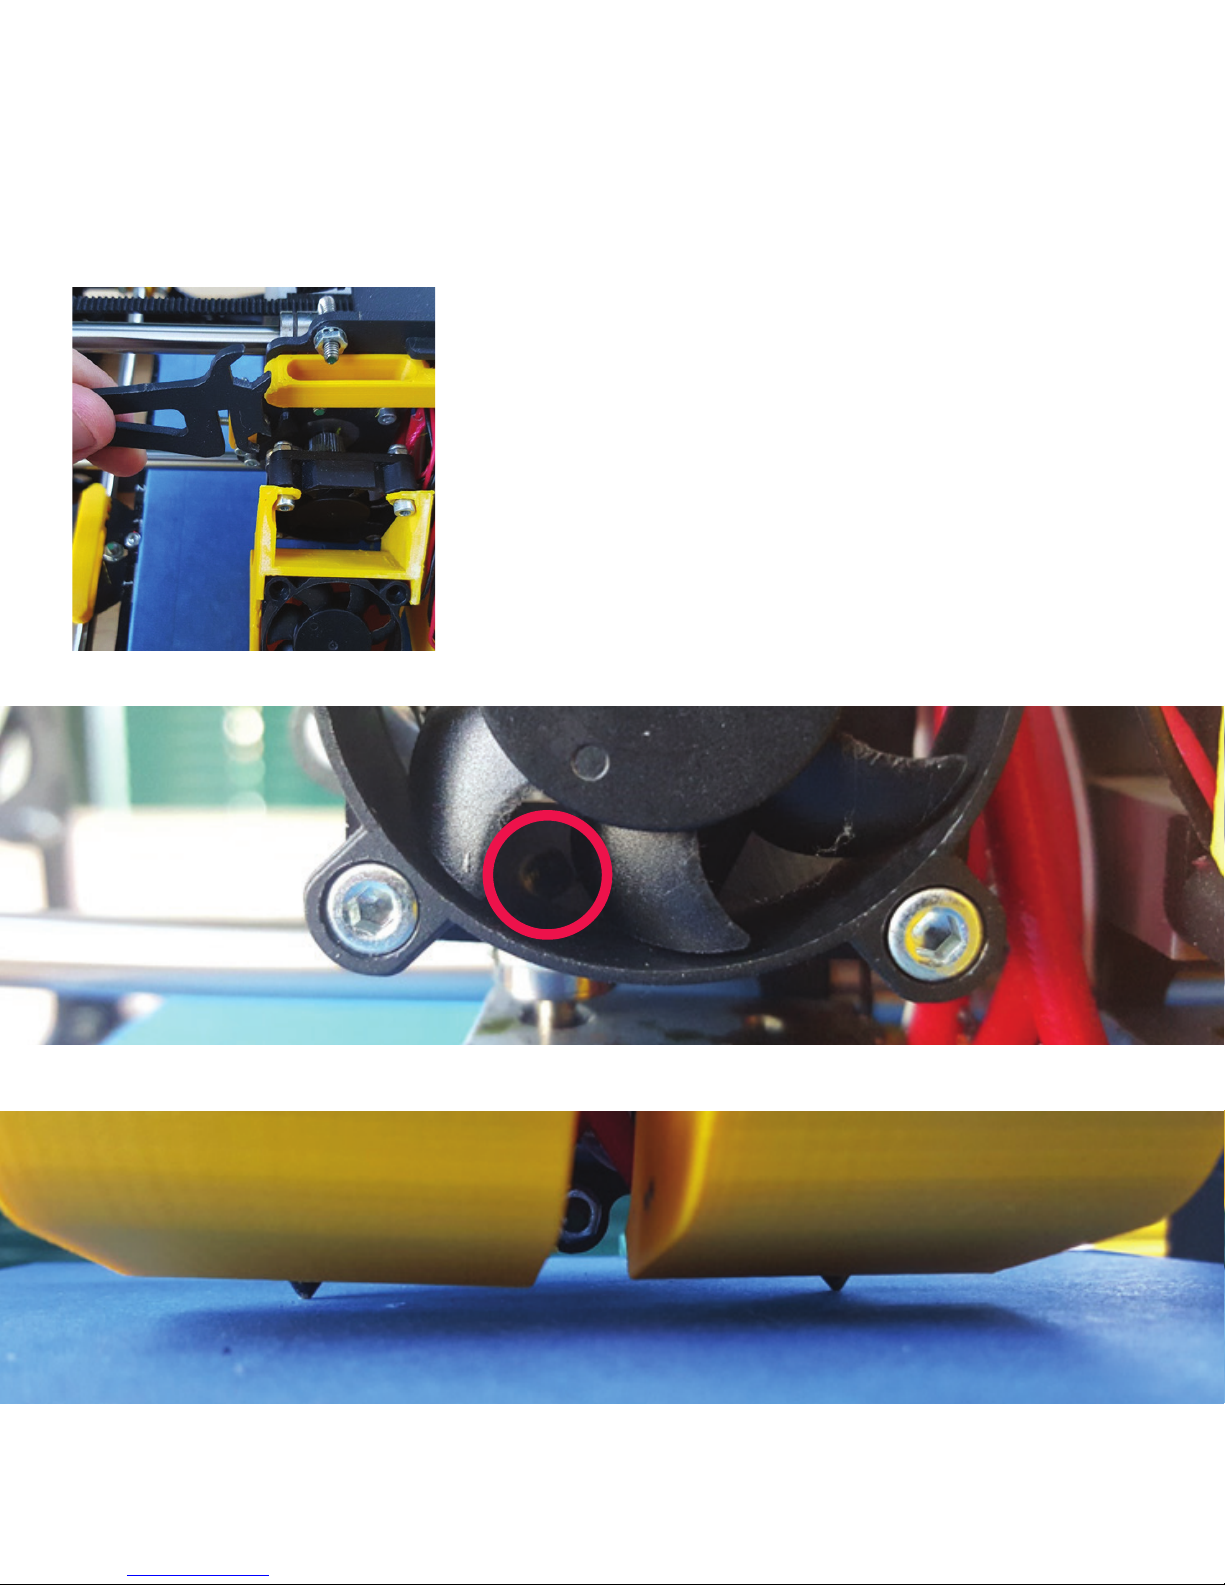
With the extruders on the center of the heatbed and
with the lowest nozzle touching the table,
take off the blower off the extruder
that isn't touching the table;
Unscrew the little screw and we can now lower the nozzle until it is touching the table too;
Screw it again and assemble the blower, now we have the nozzles at the same height.
20
Page 22
STEPS TO PRINT WITH TWO EXTRUDERS
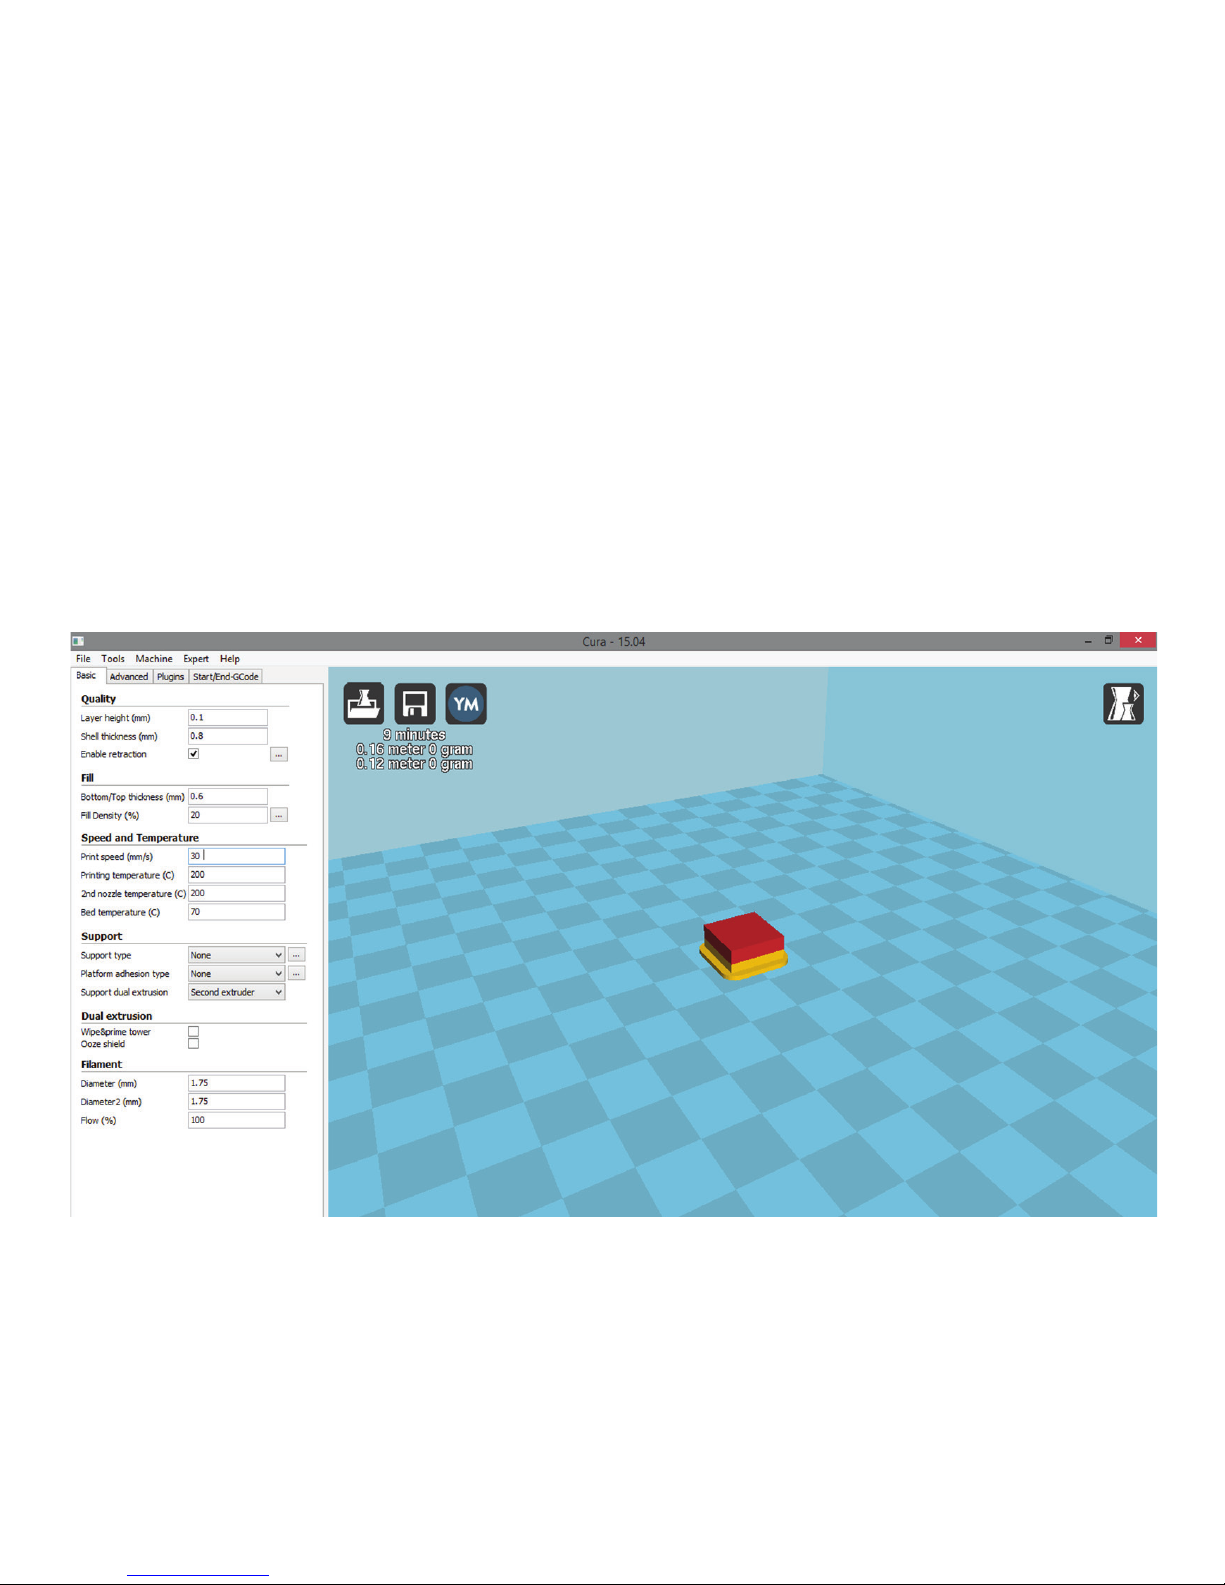
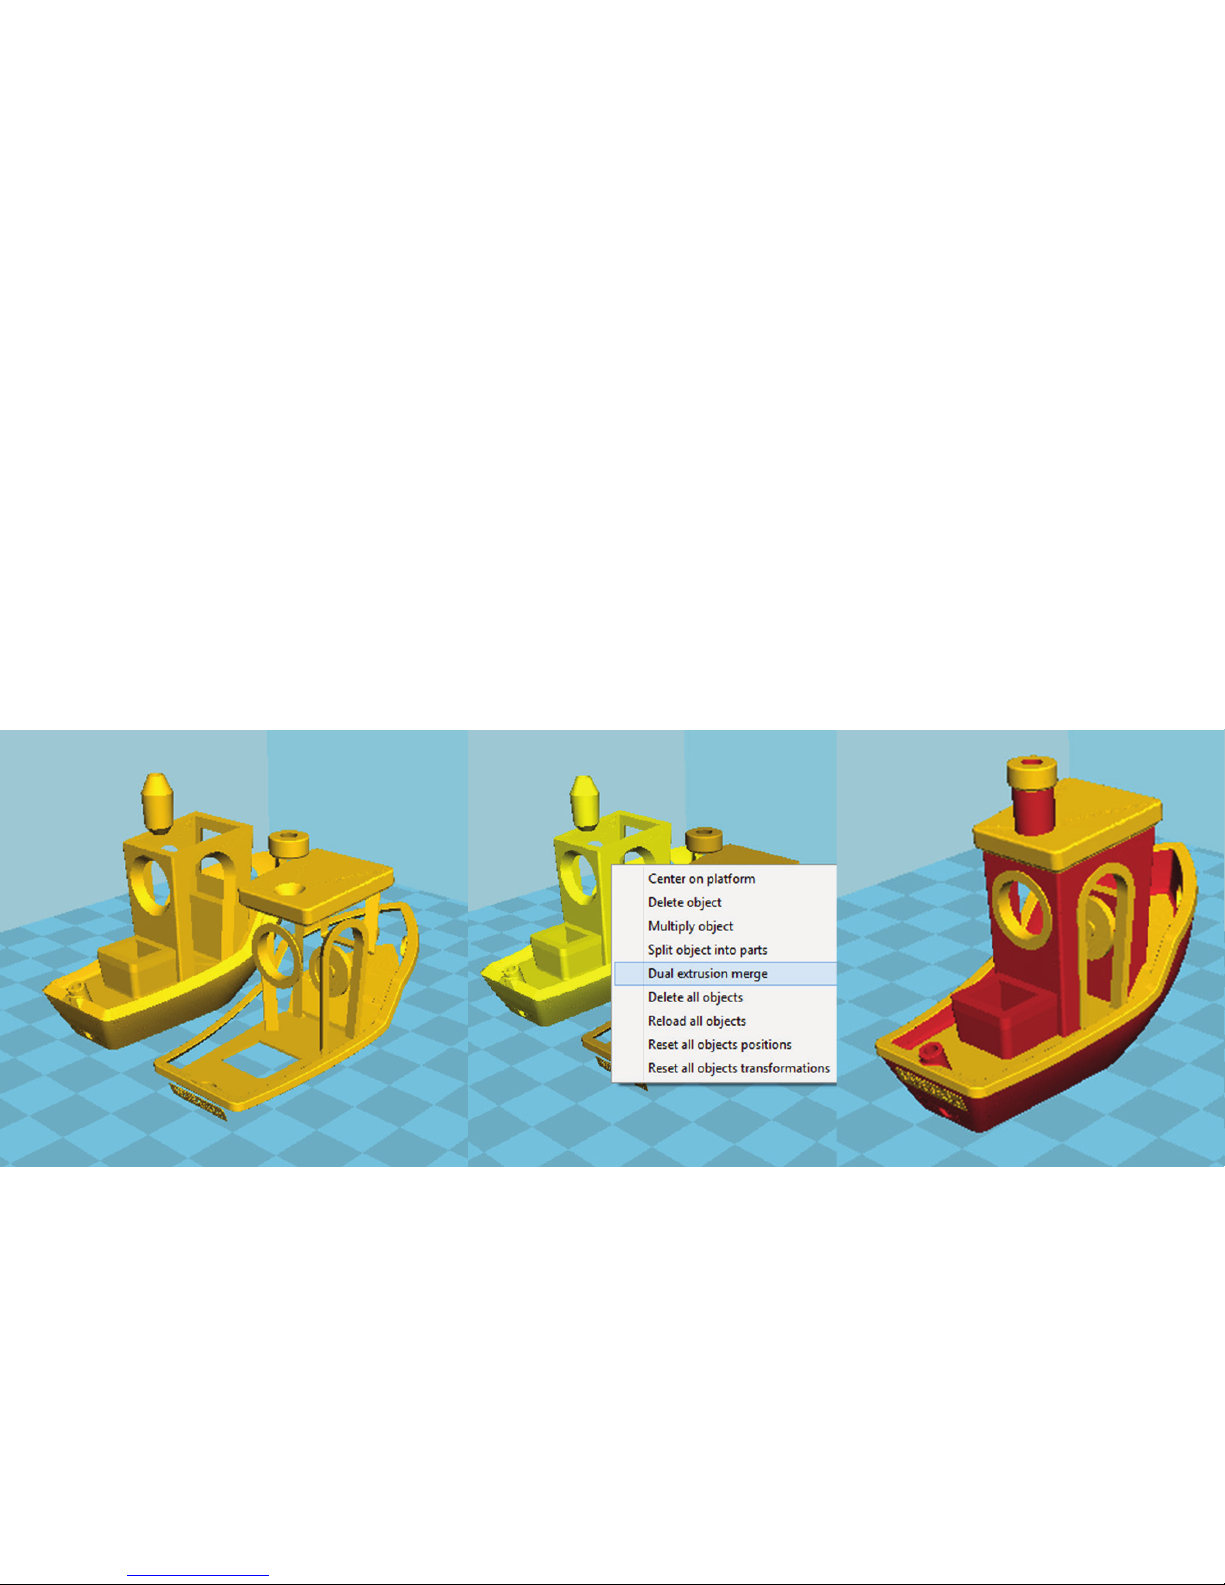
1. Load the two STL files into Cura, for instance these 3DBenchy files.
The first loaded STL file will be printed on extruder 0 and the second one on the extruder 1.
2. Select any object and with mouse right click and select "Dual extrusion merge":
3. After the merge, the model will have 2 different colours.
The yellow part will be printed by with extruder 0 and the red part by extruder 1:
4. Now export the ready-to-print G-Code.
16
21
Page 23

© 2016 BEEVERYCREATIVE
www.beeverycreative.com
All rights reserved.
www.facebook.com/beeverycreative
www.linkedin.com/company/beeverycreative
www.instagram.com/beeverycreative
www.pinterest.com/beeverycreative
www.google.com/+beeverycreative
www.twitter.com/beeverycreative
 Loading...